1
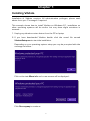
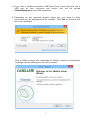
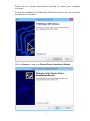
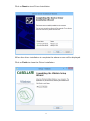
Vibdata Professional Vibration Analysis Software User Manual Version 1.32 For Use with the Following Casella Vibration Meter HAVex Vibration Meter www.casellasolutions.com Thank you for purchasing the Casella Vibdata software. We hope that you will be pleased with the software and the service that you receive from us. If you do have any queries, concerns or problems, please don’t hesitate to contact us: UK Office Casella Regent House Wolseley Road Kempston Bedford MK42 7JY Tel: +44 (0)1234 844100 [email protected] Or specifically for technical support, please contact our dedicated product support line on: Tel: +44 (0) 1234 847799 Or visit: http://helpdesk.casellameasurement.com Casella prides itself on providing precision instrumentation since 1799, supplying eminent figures including Darwin and Livingstone. A lot has changed in our long history but what does remain is our commitment to reliable, trustworthy and credible solutions. Casella’s aim is to enhance the long term health and quality of life for workers in high risk occupational sectors and to monitor the impact on the environment through innovative technology, easy to use products and expertise that can be trusted. For more information or to find out more about Casella, please visit our website at: http://www.casellasolutions.com Copyright This manual is copyrighted with all rights reserved. The manual may not be copied in part or in whole without the prior written consent of Casella. Minimum System Requirements • • • • • Pentium 4 1.5 GHz or Athlon XP 1500+ processor or higher 200MB Free hard disk space 256MB Ram One free USB Port Operating Systems (minimum operating system requirements also apply): • Windows XP SP3 • Windows Vista SP2 • Windows 7 – 32 or 64 bit • Windows 8 – 32 or 64 bit • Windows 8.1 – 32 or 64 bit Windows 8.1 RT is not compatible with Vibdata. Contacting Casella This manual contains complete operating instructions for the Casella software Vibdata, read it carefully and you will quickly become familiar with its features and operation. If you do encounter problems with the operation of your software please feel free to contact customer support with your enquiry on: Telephone: +44 (0)1234 847799 Website: http://www.casellasolutions.com Helpdesk: http://helpdesk.casellameasurement.com Email: [email protected] Contents Chapter 1 ................................................................................................... 1 Installing Vibdata ............................................................................................................. 1 Chapter 2 ................................................................................................... 6 Vibdata LITE ....................................................................................................................... 6 Functionality ..................................................................................................................................... 6 Registering....................................................................................................................................... 7 Step 1........................................................................................................................................... 7 Step 2........................................................................................................................................... 7 Step 3........................................................................................................................................... 8 Chapter 3 ................................................................................................... 9 Connectivity ........................................................................................................................ 9 Chapter 4 ................................................................................................ 10 Getting Started.............................................................................................................. 10 Opening Home Screen ............................................................................................................ 10 Toolbar Options........................................................................................................................... 11 File Menu ................................................................................................................................. 11 View Menu .............................................................................................................................. 11 Help Menu ............................................................................................................................... 11 Edit Menu ................................................................................................................................ 12 Toolbar Buttons .......................................................................................................................... 13 User Preferences and Vibdata Settings ......................................................................... 14 General Tab ............................................................................................................................ 14 Company Options ............................................................................................................ 15 Working Directories ...................................................................................................... 15 Fields Tab................................................................................................................................. 16 Display Tab .............................................................................................................................. 18 Display Options................................................................................................................. 18 Criteria Tab ............................................................................................................................. 19 Chapter 5 ................................................................................................ 20 Downloading, Opening and Saving Data ............................................................ 20 Downloading Data...................................................................................................................... 20 Error Messages ................................................................................................................... 24 Opening Data ............................................................................................................................... 25 Saving Data................................................................................................................................... 26 File Browser ................................................................................................................................. 27 Chapter 6 ................................................................................................ 29 Using Vibdata ................................................................................................................. 29 Data Viewing Screen ................................................................................................................ 29 Calculator ................................................................................................................................ 30 Exposure Points ............................................................................................................... 31 Drag & Combine Data .................................................................................................. 32 Cumulative Data ................................................................................................................... 33 Trend Analysis ....................................................................................................................... 34 Chapter 7 ................................................................................................ 35 Customer Support....................................................................................................... 35 Warranty and After Sales Service ..................................................................................... 35 Disclaimer ..................................................................................................................................... 36 Software Details ......................................................................................................................... 36 Chapter 1 Installing Vibdata Installation of Vibdata requires full administrative privileges, please seek advice from your IT manager if required. This example shows how to install Vibdata on Windows 8.1, installation on other operating systems will be similar but may show slight variations in screens: 1. Unplug any vibration meter device from the PC or laptop. 2. If you have downloaded Vibdata double click the saved file named VibdataSetup.exe to start the installation. Depending on your operating system setup you may be prompted with the message as below: - Click on the text More info and a new screen will be displayed: - Click Run anyway to continue. 1 3. If you have a Vibdata installation USB Flash Drive, insert the drive into a USB port on your computer and double click the file named VibdataSetup.exe to start the installation. 4. Depending on the operating system setup you may need to allow permission for the application to be installed. Click Yes to continue and start the installation. Click on Yes to begin the installation of Vibdata, select the installation language and the following screen will be shown:- 2 Follow the on screen instructions carefully to install your software correctly. During the installation of Vibdata the USB device drivers for your vibration will need to be installed: - Click on Extract to open the Device Driver Installation Wizard. 3 Click on Next to start Driver Installation. When the driver installation is complete the above screen will be displayed. Click on Finish to close the Driver Installation. 4 Click on Finish to complete the Vibdata installation. 5. Your vibration meter may now be attached to a spare USB port on your laptop or desktop PC. Note that the HAVex instrument must be turned ON The first time the meter is attached, windows will automatically configure the device for use: - When complete your computer will be ready to download data from your vibration meter. 5 Chapter 2 Vibdata LITE HAVex instruments are supplied with a free version of Vibdata which has limited functionality. Every time the software is opened, it will operate with limited functionality in LITE mode until the software has been unlocked. See Registering for further details. This manual describes the functions that are available in the registered version of the software. Functionality In Vibdata LITE the following viewing screens are either unavailable or will display Not available in LITE mode: Exposure Calculator Merge / Combine Adding Images Trend Analysis Add New Record 6 Registering Vibdata LITE can easily be unlocked by entering a valid Unlock Key Code which can be purchased at any time. If or when you have purchased Vibdata you can unlock the software using the 3 Step Procedure below. Please note that the Encryption Code provided in Step 1 is randomly generated, therefore if the software is removed and installed either on the same PC or another PC you will need to repeat all the steps outlined below. Step 1 Copy the Encryption Code from the ‘Enter KeyCode’ screen. This displays each time Vibdata LITE starts, or alternatively it can be opened by selecting ‘Help’, ‘Licensing…’ from the toolbar menu. Step 2 Click on Get Key Code and enter the required fields to obtain your Key Code immediately. Please note an internet connection is required. Alternatively please contact Casella on +44 (0) 1234 847799 7 Step 3 Entered details will be validated and a valid Key Code will be issued. Enter the issued Key Code in the blank Key Code cell and press ‘Activate’. All Unlock Key Codes must be entered in UPPER CASE. If the entry is not valid then the following will be displayed: - If a valid Unlock Key Code is entered the following will be displayed. Please click ‘OK’ and then restart Vibdata for the Unlock Key Code to take effect. Your software is now registered and each time you start the software it will open as Vibdata Pro with no restrictions. 8 Chapter 3 Connectivity Downloading recorded data from your vibration meter into Vibdata is only possible if you are using the correct cable and the required device drivers are correctly installed during installation of the software. To download recorded data from your HAVex instrument into Vibdata requires a spare USB port on your desktop or laptop and the installation of the supplied USB device driver which is installed during the installation of Vibdata please see Installing Vibdata , Chapter 1 for more information. Regardless of your operating system the USB device driver MUST be installed to allow communication between your HAVex instrument and your PC. If the incorrect device driver or no device driver is installed then your instrument will not download. Ensure your instrument is powered ON and then connect the supplied USB cable as shown below: HAVex Vibration Meter USB Micro B PC USB Port The instrument is now ready for downloading data into Vibdata. Please be aware of the Auto Shutdown feature on the HAVex instrument if no keys have been pressed for 10 minutes. Download will not occur if this feature has been activated. 9 Chapter 4 Getting Started Vibdata can be run using either of the two options below: 1. Double click on the desktop icon or single click on the quick launch icon, both of which are named Vibdata. Note these shortcuts are only available if selected during the installation process. Quick launch on Windows 7 or above will need to be turned on, alternatively simply pin the desktop icon to the taskbar. 2. On Windows 7 or below click the ‘START’ button and select ‘All Programs’, choose the folder ‘Vibdata’ and finally select the application ‘Vibdata’. On Windows 8 or above, press and hold the Windows key on the keypad then press S. Type vibdata in the search bar and then select the application Vibdata. Opening Home Screen The display area is split into two sections. Toolbar Data Viewing Screen File Browser Quick Access Buttons Column Divider The left hand column named the ‘File Browser’ will display details of any file opened within Vibdata. 10 The right hand area named the ‘Data Viewing Screen’ displays downloaded data and instrument information relevant to the recording. The Home Screen also contains quick access buttons to useful features of Vibdata. The File Browser or Viewing Screen can be resized horizontally by grabbing and moving the column divider. At the top left of the screen is the Toolbar which gives quick access to the commonly used functions within Vibdata. Toolbar Options The following toolbar options are available (some options listed below require an active file to be open): - File Menu Download New Open Save Save As Close Close All Print Exit Download data from an instrument Create a new blank folder Open a saved file Save the current data to a file Save the current data to a new file specifying a new name Close the active data file Close all the open data files Print current view Close the application View Menu Toolbar Settings Toggle toolbar on / off Open the Options window for Vibdata settings and user preferences Help Menu Vibdata Help Casella Homepage About Vibdata Update Instrument View the help file Opens Casella's Website in a browser window Display the current software version Update HAVex instrument firmware 11 Edit Menu Click on the folder name and then click on Edit or right click on the folder name to show the options above and described below: Rename Folder Group Folder By Date Location Tool Record Employee Regroup and sort the measurement folder by Date, Location, Tool, Record or Employee Click on HAV within the group and then click on Edit or right click on HAV type to show the options above and described below: New … Create new :• Employee, Tool, Record, Location or Date Depending on Grouped By selection 12 Click on a recording and then click on Edit or right click on the recording to show the options above and described below: New … Create new :• Employee, Tool, Record, Location or Date Depending on Grouped By selection Add Picture Add a picture to file Copy To Clipboard Copy selected file data to clipboard Rename … Rename either: • Employee, Tool, Record or Location Depending on Grouped By selection Delete … Print Current View Delete Measurement Copy Measurement Paste Measurement Exclude Measurement Include Measurement Edit Exposure Time Log Information Edit Copy To Clipboard Edit Note It is not possible to rename by Date Delete Individual selection of either: • Employee, Tool, Record, Location or Date Depending on Grouped By selection Print current view Delete selected indivdual measurement Copy selected measurement Paste selected measurement into group Exclude / Include selected measurement from calculations. Enter a new Exposure Time Edit Log Information such as Tool, Employee Copy all Log Information to the clipboard Add a Note description to the measurement Toolbar Buttons From left to right, the buttons perform faster access to the following common actions: Download data from an instrument Create a new blank folder Open a saved file Save selected data to a file Copy current view data to clipboard Print current view Home Screen 13 User Preferences and Vibdata Settings To change user preferences and settings within Vibdata, select ‘Settings’ from the ‘View’ menu. Some settings may require a restart of Vibdata to take effect. General Tab Program Options Group Downloaded Data By: Select how downloaded data will be grouped. methods are by: - The available grouping • Employee, Tool (Default), Record, Location, Date Data can be regrouped at any time if required after it has been downloaded. 14 Company Options Company Name: Enter your company name here. Logo File: Browse to the location of your company logo image file which is used when printing documents. The image size is 170(W) * 57(H) pixels and must be in the .bmp or .wmf format. Working Directories Files: Point to the folder where you wish to open and save your data. Images: Point to the folder where you wish to open image files from. Note that image files are 100(W) * 100(H) pixels and must be in either of the following formats: • • • • .jpg .bmp .gif .png 15 Fields Tab Use the Fields tab to select which information is: • Displayed on screen • Copied to the Clipboard • Printed Use the drop down box labelled Data Format to select any of the following options: Screen Clipboard Print Select for parameters displayed on screen Select for parameters copied to clipboard Select for parameters to be printed Parameters in the Current Fields list will be displayed, copied or printed. 16 Highlight items under Available Fields and click on parameter to Current Fields. to add the To remove parameters, highlight the item and click on To change the order in which the parameters are displayed, copied or printed, highlight a parameter in the Current Fields list and then use the Move Up or Move Down buttons to move the selected item up or down the list. Exposure Points which are not moveable or removable from the Current Fields and are always the last parameter in the item list. Attempts to move Exposure Points will display the following message: - Attempts to remove Exposure Points will display the following message: - 17 Display Tab Display Options Chart Line Width: Move the slider to determine the line width used for graphing. 18 Criteria Tab Use the Criteria tab to change the Action and Limit values as required. In the UK, The Control of Vibration at Work Regulations 2005 stipulates the following Action and Limit Values: Vibration Type Action Value (m/s ) Limit Value (m/s ) Hand Arm 2.5 5.0 2 19 2 Chapter 5 Downloading, Opening and Saving Data Downloading Data Please ensure the required drivers have been installed during installation, see ‘Chapter 1, Installing Vibdata’ for more information. Downloading data from your instrument is achieved by connecting your instrument to your PC or laptop via the supplied USB cable, see ‘Chapter 3, Connectivity’ for more information. To download the data from your Casella vibration meter, follow the procedure below: 1. Ensure that the vibration meter is ON. Connect the USB lead to the instrument and to the PC. 2. Select ‘Download’ from the File menu or click on the Download icon Vibdata will attempt communication with your Vibration Meter. and Once the instrument is identified the acquisition of available logs will begin. 20 3. With acquisition complete a list of all available measurements is displayed. Available measurements can be sorted by clicking on the field name. Sorted fields are identified by having the symbol ‘>’ at the left of the field name. Reverse the order by clicking on the field name again. The image below shows reverse sorting by File Name. Field Names 21 4. Select which measurements are required by clicking in individual tick boxes or by selecting ‘Select All’ and then choosing Measurements or Hand-Arm Vibration. 22 5. Select or Deselect Merge Folder and / or Combine Logs using the tick boxes. Selecting Merge Folders will place the data to be downloaded into the active folder that is open in Vibdata. If no folder exists or if this option is not selected then the data will be downloaded into a new folder. Selecting Combine Logs will combine each measurement of the same name and of the same type into one measurement. 6. Once all preferences have been selected, press the OK button to start the data download from the instrument to Vibdata. 23 Error Messages If Vibdata does not receive a response from your instrument then you will be shown the following error messages: - If this occurs please see ‘Chapter 3, Connectivity’ for instructions on connecting your instrument. If an instrument is detected but no files have been recorded then the following message is displayed: - If this occurs please create some recordings on the instrument. 24 Opening Data To open a saved data file choose ‘File’, ‘Open’ or click the Open File icon. The initial default location for file storage is found under Working Directories from the General tab of Settings, this location can be changed if required, however Vibdata remembers the last folder location used enabling fast folder access. To open the selected file double click on it or highlight it by a single click of the mouse button and then click on the ‘Open’ button. 25 Saving Data To save data to a log file choose ‘File’, ‘Save As’ or click the Save icon. The initial default location for file storage is found under Working Directories from the General tab of Settings, this location can be changed if required, however Vibdata remembers the last folder location used enabling fast folder access. Enter a file name and then click on the ‘Save’ button. Once a file name has been specified quick saves are possible using the Save icon or ‘File’, ‘Save’. To specify a new name, where required, use ‘File’, ‘Save As’ again. 26 File Browser The File Browser is located at the left hand side of the screen. It is used to select which information is displayed in the Data Viewing screen. The example below describes how to use File Browser: i. Open or download a file. ii. Click on the ‘+’ to the left of the vibration type icon to display the downloaded or saved file information. Group by method Click on the file you wish to view which will then appear in the Data Viewing Screen. By default all files are grouped by Tools, this can be changed under Settings. To regroup an open file, right click on the folder name and choose ‘Group Folder By’: - 27 Group By Date:- Group By Location:- Group By Record:- Group By Employee:- It is also possible to rename folder names by right clicking on the folder name and selecting ‘Rename Folder’. Enter the new name and press Ok. The renamed folder will be now be displayed: - 28 Chapter 6 Using Vibdata Data Viewing Screen The Data Viewing Screen is the main area at the right hand side of the screen which shows the recorded data for the chosen file in the tree view. Tree View Data Viewing Screen Tab Buttons File Information File Image Instrument Details The following selectable tab buttons are at the bottom of the viewing screen: • Calculator • Cumulative Data • Trend Analysis (if more than one recording is grouped) Click these to change the display in the data viewing screen. 29 Calculator The Calculator tab displays the calculated variables selected under ‘Options’, ‘Fields’ for the recording selected and is always available for any recording. Where multiple entries exist, click on the entry to highlight it. The instrument details, file image and file information will be shown. The data for the selected file will also be shown when viewing different screens in the data viewing area. 30 Exposure Points The vibration exposure point system is based on the UK’s Health & Safety Executive’s system where vibration magnitude and exposure time are given in exposure points rather than ms-2. Partial exposure points of merged recordings are added together to produce a total points exposure for a working day. Partial points are displayed by default, Points(1hr) and Points(15m) will need selecting in order to be displayed, copied or printed. See User Preferences and Vibdata Settings under Chapter 4 for more information. Partial Exposure Points Total Exposure Points Each recording and the total exposure points are colour coded using the following criteria: Hand Arm >0 & <100 >=100 & <400 >= 400 GREEN ORANGE RED 31 Drag & Combine Data Whilst on the Calculator screen it is possible to use the extremely powerful drag and combine feature of Vibdata. Click and hold the left mouse button on the data you wish to drag, the mouse will switch from an Arrow to a Pointed Hand. Keep the mouse button down and move the Hand over the area on the Tree View where you wish the data to be placed then release the mouse button. Data items such as Units, Type or Date must match to perform the requested operation. If the drag is not possible then Vibdata will automatically place the data in the correct location, creating folders as and where required. The overall combined A(8) and Exposure Points are then calculated on each recording that is in the calculator screen. 32 Cumulative Data To view cumulative data use the Cumulative Data tab. The cumulative data is a single overall figure calculated or measured over the measurement period for each available axis. Individual data for recordings that have been combined can be viewed but are selected at the calculator screen. The information from the Calculator screen for the selected log is displayed at the top of the Cumulative Data screen to easily identify which recording is selected. 33 Trend Analysis Combined recordings allow a Trend Analysis tab to become available. Use this tab to plot graphically the cumulative average for each individual recording within the combined set. The plot is graphed in the order the list is displayed in the Calculator screen (Time and Date) and is extremely useful for machine monitoring. 34 Chapter 7 Customer Support Warranty and After Sales Service In the event of a fault or problem occurring with your software during the warranty period, the software should be returned to Casella. Please enclose a clear description of the fault or symptom. Details of the warranty cover are available from Casella or an authorized agent. Should you have any queries regarding the use of the software or wish to suggest future improvements or additions then please feel free to contact us. Tel: +44 (0)1234 844100 [email protected] Or specifically for technical support, please contact our dedicated product support line on: Tel: +44 (0) 1234 847799 Or visit: http://helpdesk.casellameasurement.com For warranty or service please return your software to: The Service Department Casella Regent House Wolseley Road Kempston Bedford MK42 7JY During the one year warranty period of your software, upgrades or bug fixes will be issued free of charge whenever they become available. 35 Disclaimer Whilst every effort is made to ensure the accuracy and reliability of both the software described and the associated documentation, Casella makes no representation or warranties as to the completeness or accuracy of this information. Casella assumes no responsibility or liability for any injury, loss or damage incurred as a result of misinterpreted or inaccurate information. Any documentation supplied with your product is subject to change without notice. Software Details For your records and for future correspondence with Casella regarding your instrument, please complete the following details: - Software Version Serial Number Purchase Date 36