1
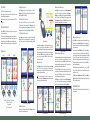
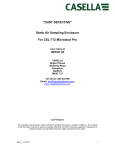
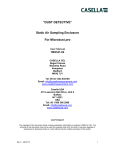
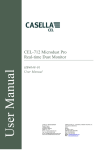
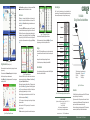
Note: A Record Notes screen will appear prior to starting a measurement if Audio
Notes have been activated. Refer to User Manual for more details.
The Play symbol 4
is displayed at the top left-hand corner of the screen, and the
Pause symbol ;
is displayed at the bottom left-hand corner of the screen. The lefthand soft key (A) is the Pause/Run control and toggles between these two modes
when operated.
3
4
The screen displays PAUSED! when measurements are paused. The incremental
run number and its duration are displayed at the top right-hand corner of the screen. If
the Run Duration Timer is set, an icon that shows a stopwatch is displayed next to the
countdown timer. To enable or disabled the Run Duration Timer, use the Settings
screens (refer to Figure 6). If the Run Duration Timer is not set, the digital timer clock
counts up until you stop the measurement run manually (by pressing the Run/Stop
key D).
Application
Figure 12. 1/3 Octave graph and list views
from a road vehicle, with a specific identity using one of four markers.
When the measurement run has finished, press the Run/Stop key (D). A screen is
displayed asking you to confirm the action - press Yes to end the run.
Period Results
Switch the CEL-63x instrument off when you are not using it to record measurements,
and remove the batteries if the instrument will not be used for extended periods of
time.
Profile Results
More information
Figure 11. Graph and Main screens
For instruments that include this option, the broadband values can be viewed as a
bargraph or as a graphical time history on the Graph screen. Press the View key (B)
to toggle between the Graph and the Main screens.
Certain instrument types provide two additional Octave (or 1/3 Octave) screens (refer
to Figure 12). Use the View key (B) to toggle the screens. Use the left/right navigation
keys (C) to move across the frequency bands in the Graph view. Use the up/down
navigation keys to toggle between showing Lmax and Leq functions
Each bar in the graph represents an octave band measured in Hz or kHz. To view a
table of the octave values, press the View key (B).
In 1/3 Octave mode, use the up/down navigation keys to change the displayed
frequencies on the table.
Some instruments in the CEL-63x range can display all the screens shown in
Figure 11 and Figure 12.
The Marker screen allows you to tag noise data and record audio, for example noise
Figure 10. Example Stop and Run screens
1
2
3
4
B
Statistical Parameters (Ln%)
5
A
Audio Notes
Marker Events
The measurement options and screen details will vary, depending on the instrument
type you are using.
Press the Run/Stop key (D) to start making measurements. The screen shows green
bars at the top and bottom.
Field Guide
CEL-63x Series Sound Level Meters
7
To protect the microphone, you should always keep the windshield fitted.
Taking Measurements (Refer to Figure 10)
The instrument must be in the Measurement Stop mode (with red bars at the top and
bottom of the screen) before you can start a measurement.
Cumulative Results
Storage
Always protect the instrument from physical damage and from water.
Figure 9. Memory screens
Model number
Environmental
CEL-633 (with logging)
Run Screens
Occupational
CEL-632 (with logging)
Table 1 below lists the instrument types and shows the capabilities of each
instrument in the range. Please remember that the features that are available to you
and the screens that you can see depend on the type of instrument you are using.
CEL-631 Environmental
2
CEL-630 Occupational
1
Instrument types
For more information about any of the topics summarised in this Quick Start guide and
additional functions, refer to the User Manual.
6
Level Events
External Events
SLM Mode
1. Windshield (covering the removable microphone)
2. Removable amplifier 5. Soft keys A and B
6. Navigation keys
3. On/Off key
7. Run/Stop key
4. Display
ONLINE Mode
NNR Mode
Figure 1. The CEL-63x series
Timers
Introduction
Table 1. CEL-63x instrument types, applications and capabilities
CASELLA MEASUREMENT
Regent House, Wolseley Road, Kempston, Bedford, MK42 7JY, U.K.
Phone: +44 (0) 1234 844 100
Fax: +44 (0) 1234 841 490
E-mail for technical support: [email protected]
For online Technical Support: http://supportdesk.casellacel.com
Document number FG40-04
This Quick Start guide helps you to familiarise yourself with the CEL-63x instrument
quickly, so that you can begin to use it without delay.
The guide assumes this is the first time you have used the instrument. It therefore
includes instructions to install the batteries, switch ON and set up the instrument to be
ready for use, calibrate it, take measurements, and store it safely.
We want you to get the best possible performance from the CEL-63x instrument, and
we recommend you refer to the Operator’s Manual for detailed information.
© 2011 Casella Measurement
www.casellameasurement.com
Think Environment. Think Casella.
Fit the batteries
Set language (Refer to Figure 2)
Measurement control(Refer to Figure 6)
The CEL-63x instrument requires three AA batteries.
Select 1 Settings and press B to continue. Use navigation keys C to select the
Language symbol 4. Press B to continue. Use navigation keys C to select the correct
language. Press Select (B). Press Exit (A).
Select Settings and use the navigation keys to select the Measurement control
symbol 1. Press B to continue. Use the navigation keys to select the Measure Start/Stop symbol 2. Press Edit (B). Use the navigation keys to select the Mode (Key
Press / Fixed Duration / Timers). Press Save (B). Use the navigation keys to select
additional Fixed duration or Timers options. Press Edit (B), and use the navigation
keys to set the run duration. Press Save (B) to continue (if required).
Remove the battery compartment cover and fit the batteries using the correct
polarities. Refit the battery compartment cover.
Note: The batteries can be zinc carbon, alkaline or rechargeable. DO NOT mix
battery types.
Switch the instrument ON
Press the On/Off key. Confirm the battery condition symbol shows there is a good
level of charge in the batteries.
The initialisation screen is displayed for approximately 10 seconds, and then the
measurement screen is displayed in the STOP mode (with red bars at the top and
the bottom of the screen). Press the Menu key to access the settings, memory
and instrument status. The screens displayed depend on the model of instrument
in use.
Set frequency modes (Refer to Figure 2)
Some instruments in the CEL-63x range allow you to select either Octave or
1/3 Octave with which to take measurements. Select 1 Settings and press B to
continue. Use navigation keys C to select the Octave symbol 5. Press B to continue.
Use navigation keys C to select Octave mode. Press Select (B). Press Exit (A).
Select 1 Settings and press B to continue. Use navigation keys C to select the Set
Clock symbol 2. Press B to continue. Use navigation keys C to select the time or date.
Press B to edit. Use navigation keys C to adjust time/date. Press Save (B). Press Exit
(A).
LANGUAGE
SETTINGS
2
1
2
B
A
C
A
Select the Measurement Stop screen. Fit the acoustic calibrator fully over the
removable microphone. Press the calibrator’s On/Off key 1. The CEL-63x
instrument detects the signal and activates the calibration screen (with yellow bars at
the top and bottom). Press B to start the calibration. The instrument calibrates and
displays the word PASSED when finished. Press Exit (A) to return to the Stop
screen. Press and hold the calibrator’s On/Off key to switch the calibrator off.
Remove the acoustic calibrator.
A
C
1
Figure 8. Memory results
Memory results (Refer to Figure 8)
1
Note: This instrument simultaneously records all noise functions for every
measurement it completes. The Measurement View screens simply define which
functions are displayed on the measurement screens.
B
2
Press the Menu key to access the settings, memory and instrument status. Use the
navigation keys to select the Memory Results symbol 1 and press Select (B) to
continue. Use the navigation keys to select a result in the list, and press Select (B) to
select the measurement.
Figure 4. Calibration
Select 1 Settings and press B to continue. Use navigation keys C to select the Setup
symbol 2. Press B to continue. Use navigation keys C to select the required
measurement view for your local legislation. Refer to the User Manual for detailed
information about the measurement views.
3
5
A
B
Setup (Refer to Figure 5)
4
1
A
Set the time and date (Refer to Figure 3)
Settings screen
MENU
1
Figure 6. Run duration
Measurement data sets (Refer to Figure 7)
Cumulative measurements made by the instrument apply for the entire measurement
duration. They do not show how the sound level changed during the period of
measurement. The instrument can also make Periodic measurements, which store
measurements acquired during a repeating interval of time. When one interval ends,
the next one begins until the periodic measurements stop.
The instrument’s Profile recording function provides an additional time-history
recording channel, which may operate in parallel with either Cumulative or Periodic
data recording. The Profile time history channel can provide faster recording
resolution but for a reduced set of noise parameters.
Select Settings and use the navigation keys to select the Measurement control
symbol 1. Press B to continue. Use the navigation keys to select the Data Sets
symbol 2. Set the Periodic and Profile measurement intervals and press Exit.
B
Use the navigation keys to select View Results 1 (see Figure 9) and press Select (B)
to display the selected memory results. For additional data press View (B). The
screen displays detailed, read-only data for the selected measurement. Press View
(B) to see the data in a graphical format, using the Octave format saved in the
Memory Results. Use the navigation keys to move the vertical line across the graph.
Each graph bar represents an octave level measured in Hz or kHz. Press View (B)
again to view tabular octave results.
Use the navigation keys to toggle between functions such as Lmax and LAeq. Press View
(B) to view the results in tabular form. The results stored for the octave band graph
display functions Lmax and Leq.
Press Exit (A) to leave the Memory Results, or press View (B) to cycle the Memory
Results screens again. Note that the display screens will vary according to the model
of CEL-63x instrument you are using.
Delete Memory Results
Refer to the User Manual for details and instructions to delete the results stored in the
instrument’s memory.
C
1. Settings
C
2. Memory results 3. Instrument status
A. Exit / Back B. Select / Edit
C. Navigation keys
Figure 2. Settings screen
1
C
2
2
1
Figure 3. Setting the time and date
Calibration (refer to Figure 4)
Calibration is auto-set to the reference level as set within the Settings menu. Refer to
the manual to set the calibration reference level.
Figure 5. Settings options
Figure 7. Measurement data sets