1
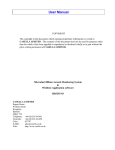
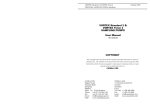
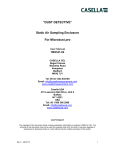
HB3121
USER MANUAL
COPYRIGHT
The copyright in this document which contains information is vested in
CASELLA LIMITED. The contents of this document must not be used for
purposes other than that for which it has been supplied or reproduced or disclosed
wholly or in part without the prior written permission of CASELLA LIMITED.
CASELLA LIMITED
Regent House
Wolseley Road
Kempston
Bedford
MK42 7JY
Telephone:
Facsimile:
Telex:
e-mail:
Webpage:
+44 (0)1234 841441
+44 (0)1234 841490
827707
[email protected]
http://www.casella.co.uk
FORTIN
BAROMETER
HB3121-02
1
HB3121
CONTENTS
Page
INTRODUCTION.................................................................................................. 3
PRINCIPLE OF OPERATION ............................................................................ 3
PACKING............................................................................................................... 3
INITIAL SET UP ................................................................................................... 4
CHOOSING A SUITABLE LOCATION............................................................ 4
UNPACKING ...................................................................................................... 4
CHECKING FOR AIR IN THE COLUMN......................................................... 4
MOUNTING THE INSTRUMENT..................................................................... 5
ADJUSTING THE LEVEL IN THE CISTERN .................................................. 5
READING THE BAROMETER........................................................................... 7
CORRECTION OF READINGS TO STANDARD CONDITIONS ................. 9
MAINTENANCE ................................................................................................. 10
NOTES .................................................................................................................. 10
SPECIFICATION ................................................................................................ 11
ACCESSORIES.................................................................................................... 11
ALTERATION WITHOUT NOTICE ............................................................... 11
2
HB3121
INTRODUCTION
The Fortin barometer is the most widely used type and can be found in many
industrial laboratories, workshops, classrooms and meteorological offices.
The measurement of atmospheric pressure finds its greatest use in meteorology,
where knowledge of the pressure distribution over a very wide area at the same
moment is of vital importance in the forecasting of weather.
PRINCIPLE OF OPERATION
As atmospheric pressure changes the mercury level in the cistern changes
accordingly, for example, an increase in pressure will cause the mercury level to
drop. The Fortin barometer allows the mercury level in the cistern to be set to a
fixed datum or zero every time a reading is taken. The mercury is contained within
a flexible pouch and a screw jack causes the level to either rise or fall. Having
made this setting the top of the column is then measured by bringing the lower
edge of the vernier so that it apparently just touches the top of the column. The
reading is then taken on one or other of the scales provided.
PACKING
Since all mercury barometers are delicately constructed it is important that proper
care is taken to prevent damage during all stages of handling. To help in this, a
barometer is packed with its cistern uppermost in a specially designed case, which
must be kept as near vertical as possible.
WARNING
Mercury is Toxic and corrosive. It should be treated with caution avoiding contact
with skin.
3
HB3121
INITIAL SET UP
CHOOSING A SUITABLE LOCATION
The room in which the barometer is due to hang should: • Not be unduly warm.
• Not be subject to variations of temperature.
• Not be exposed to sunlight.
• Not contain corrosive chemicals.
• Not be used as a passage way to other rooms.
• Have solid walls free from vibration.
• Be well lit using artificial light if necessary.
UNPACKING
Unscrew the barometer board from the back of the packing case, lift the complete
instrument on its board out of the case and lay it on the bench, with a block 8 –
10cm high, under the cistern end.
Then remove the barometer from its board by unscrewing the top and bottom
holding screws, and place it by itself on the bench with its cistern resting on the
block.
CHECKING FOR AIR IN THE COLUMN
Before hanging the barometer on its backboard, it should be tested to ensure that
no air has entered the vacuum space at the top of the mercury column.
To do this the barometer should be slowly raised to a vertical position with the
scale uppermost. This is to be the position in which it will finally be used.
It should now be possible to see that there is a space between the top of the
mercury column and the top of the glass tube. If there is no space visible, unscrew
the milled-headed screw at the base of the cistern several turns. This will lower the
mercury column and create the required space.
Next slowly incline the instrument away from the vertical until the mercury
touches the end of the tube. When this happens a sharp metallic click should be
heard, if only a dull thud or no sound at all is heard it is indicative that air has
entered the column. If this is so, please refer to NOTES section.
4
HB3121
MOUNTING THE INSTRUMENT
Having chosen the best possible position for the barometer the glass windowed
case should be securely fixed to the wall. The height of the case should be chosen
so that the barometer scale is 1.5 meters above floor level making reading it easier.
To ensure that the readings taken from the barometer are accurate, it should be set
as vertical as possible and freely hung from its top suspension. The board should
be fixed inside the case in such a way that it can be moved from side to side to set
it vertical. The two bottom screws can then be tightened to keep the board vertical.
When the barometer is hanging vertically, screw in the three adjusting screws so
they just touch the barometer but do not displace it. This will hold it vertical while
the adjustments are being made.
ADJUSTING THE LEVEL IN THE CISTERN
When adjusting the mercury level to point zero, the adjusting screw should not be
turned too quickly and if the mercury has been moved through a large amount, the
instrument should be left to settle before making the final settings. Care must
always be taken when moving the screw upwards, since the air, not being able to
escape quickly, may be driven up the tube through its open end. In particular,
movements should not be too quick when making the barometer completely
portable and when nearing the end of the screw travel.
In all setting movements, the mercury surface must be moved upwards to the point,
gradually closing the gap between the point and its image. It is impossible to
separate the point with accuracy while the level is being lowered, since the
mercury sticks round the point so that when it finally parts, the surface will be
found to be too low. When the setting is correct, no gap can be seen and no
shadow observed round the point. The best illumination conditions can be found
with a little practice, but a general guide is to have the reflector on the board
strongly lit with no light directly entering the observer’s eye.
5
HB3121
If the readings are to be corrected to mean sea level, the height of the cistern
should be accurately found and recorded as the station height. That this is
important will be realised from the fact that a difference of 30cm equals a change
in barometric height of 0.025mm (0.3mb).
POINT ZERO
TUBE
MERCURY
ADJUSTING
SCREW
Cut away diagram of the Cistern
6
HB3121
READING THE BAROMETER
The thermometer should always be read first since the presence of the observer
will cause the thermometer to alter more quickly than the mercury in the tube. The
temperature should be read to the nearest ½ degree.
Adjust the mercury level to point zero as described earlier.
The milled head on the right hand side below the scale shade should now be turned
so that the vernier edge and the corresponding edge at the back are in line, and just
set tangentially to the meniscus. The scale is then read by means of the vernier. It
is most important to avoid any error when setting the vernier edges to the
meniscus.
The following diagram shows diagrammatically how the vernier should be set
relative to the sight line of the observer’s eye.
• In the top view the eye is too high so that even though the sight line (1) the
front vernier edge (2) and the top of the meniscus are in line, the back vernier
edge is not on the sight line. The reading will be too high.
• In the middle view the eye is too low so that the line of sight (1) the front
vernier edge (2) and the meniscus are in line but the back vernier edge (3)
prevents a clear view of the meniscus and is also not on the sight line. The
reading will be too low.
• In the bottom view the sight line is horizontal, the front vernier edge (2) the
top of the meniscus and the back vernier edge (3) are all in line.
7
HB3121
Where to view the vernier from
8
HB3121
The height of the mercury column can now be read on the scale using the vernier.
The diagram below gives an example.
For mmHg the reading is 1000mm, the units reading is made by lining up exactly a
number on the inner scale with a division on the outer, in the example the units are
3. Therefore the reading for the example is 1003 mmHg.
Example vernier reading
CORRECTION OF READINGS TO STANDARD CONDITIONS
The barometer scale is correct at: • 0°C
• Standard gravity 980.665cm/s2
Barometer readings have to be corrected to the value that would have been
obtained if the mercury and the scale had been at their standard temperatures.
9
HB3121
MAINTENANCE
No attention should be necessary to a barometer except to dust it and to keep the
adjusting screw clean and lightly oiled. The three bottom adjusting screws should
be occasionally slackened off and re-adjusted to make sure the barometer has not
been disturbed. No attempt should be made to clean the scale, since the silver is
protected by a lacquer which will be damaged by rubbing and allow air to penetrate
to the silver which will quickly tarnish.
Casella’s in house service department offers a comprehensive range of repair and
calibration services designed to effect a fast and efficient back up for all our
products. The service department is operated under the scope of our BSI
registration for products manufactured by us. We will however, undertake the
repair of other manufactures equipment.
For further information please contact our service department at our Bedford
headquarters. We will be happy to provide quotations for individual repairs or
provide annual maintenance under contract.
NOTES
If by any mischance the barometer tube arrives broken and the barometer is to be
sent back for repair, we would appreciate if the following points could be attended
to before returning the case to us.
Remove the barometer from the case and take off the tip. All the mercury should
then be emptied out together with any pieces of broken tube. Particular care
should be exercised to remove all the mercury from the scale and from any pieces
of exposed brass. These precautions will preserve the frame from corrosion by the
mercury and enable a repair to be effected. If this is not done the brass tube can be
badly corroded as not to be possible to repair.
If it is found at any time that air has entered the vacuum space it can quite often be
removed by first making the barometer portable slowly inclining the barometer and
then inverting it. Gentle tapping when inverted will often cause the air bubble to
travel up the tube so that escapes into the cistern. When the bubble is small it may
not travel freely and continued tapping may be necessary to remove it.
A barometer once installed requires practically no attention and will last in good
condition for many years.
10
HB3121
SPECIFICATION
Effective range:
Altitude up to:
Vernier reads to:
Thermometer range:
Mercury:
Dimensions:
Weight:
ACCESSORIES
M101004
Ordinary Range model
900 to 1060mb
670 to 800mmHg
26.4 to 31.2inHg
450m
0.1mb, 0.05mmHg, 0.002inHg
-10°C to +50°C
Triple distilled and filtered
Barometer on backboard 1090 x 90 x 90mm
Barometer in case 1250 x 165 x 165mm
Barometer on backboard 3.62kg
Barometer in case 9.50kg
Carry case of polished wood with glass front and sides,
Reflectors, lock and key.
ALTERATION WITHOUT NOTICE
The contents of this manual are subject to change without notice.
11