1
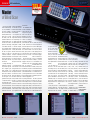
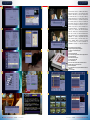
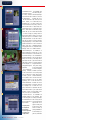
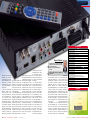
TEST REPORT
该独家报道由技术专家所作
HDTV Satellite Receiver
Icecrypt
S3000HDCCI
•Extremely fast blind scan that can find low SR
channels
•Supports a wide variety of CA systems
•Built-in multi satellite controls (USALS) let the
box find every channel on your multi satellite
system automatically
•Full PVR features via USB
GUARANTEE
direct contact
TELE-satellite Magazine
Business Voucher
www.TELE-satellite.info/11/09/icecrypt
Direct Contact to Sales Manager
16 TELE-satellite — Global Digital TV Magazine — 08-09/2011 — www.TELE-satellite.com
www.TELE-satellite.com — 08-09/2011 —
TELE-satellite — Global Digital TV Magazine
17
TEST REPORT
HDTV Satellite Receiver
Master
08-09/2011
Icecrypt S3000HDCCI
Super fast blindscan finds
all channels
of Blind Scan
The term “well rounded”
comes to mind when studying the specifications of
this receiver. Although it
has only one tuner and not
that many interfaces as you
might find in top-of-theline models, all the main
functions and features of a
PVR-type satellite receiver
are there. But how does it
perform? Is it fast enough?
Is its software stable and
are its submenus logically
organized and easy to follow? Will it be good for
family use or is this more
a model for a satellite enthusiast? Our TELE-satellite
test gives clear answers to
these questions and other
ones like that.
Its elegant black design
pleases the eye. We especially liked the eight-character 14-segment green
display mounted on the
left hand side of the front
panel. Also the labels for
the eight front panel buttons look great. On the
right side of the front panel
is a flap behind which we
can find the USB 2.0 port,
a smart card slot and a CI
slot. The smart card reader
is described in the specifications as compatible with
Conax but it is in fact a uni-
1
versal one. We confirmed in
our tests that it can work
with smart cards of at least
two other CA systems: Viaccess and SECA.
The rear panel has everything you expect from a
single tuner box: LNB input
and looped-through output, digital outputs: HDMI
and optical S/PDIF audio,
analog outputs: 2 x SCART,
6 x RCA with composite,
component video and stereo audio, data interfaces:
Ethernet and RS-232 and
a main power switch. The
USB port is not duplicated
on the rear panel – so when
you connect a memory device you have to keep the
flap open on the front panel.
In our opinion the remote
control unit does not look
as elegant as the box. It’s
a puzzling thing: why does
the design of a remote control often have no resemblance to the design of the
box? That’s a fact for quite
a few A/V devices. It would
be great if you could look
at several remote controls
spread out on a table and
be able to instantly match
the remote control with the
receiver simply by comparing its appearance to that
of the receiver.
The S3000HDCCCI does
not have an installation assistant. Right after powering up the unit, you are
taken to the main menu.
Navigation in the menu is
simple and fast. The menu
consists of six submenus:
Edit Channel, Installation,
System Setup, Tools, Game
and REC. It would help to
have some experience with
satellite TV receivers in order to install the S3000HDCCI properly. We’ll describe this process a little
to assist our less experienced readers.
The first and most obvious step is to set the OSD
language so that you can
understand all the menu
items. By pressing the
down arrow button twice in
the Main Menu, the System
Setup submenu is shown. A
push of the OK button takes
you to the right hand side of
the menu and the Language
submenu is highlighted. After pressing the OK button
again, the content of this
menu is displayed. You can
choose from the following
language options: English,
French, German, Italian,
Spanish, Portuguese, Russian, Turkish, Polish, Ara-
2
18 TELE-satellite — Global Digital TV Magazine — 08-09/2011 — www.TELE-satellite.com
bic, Dutch, Czech, Slovak,
Greek and Hungarian. Not
only can the OSD language
be set here but you can
also select the preferred
audio language (first and
second) as well as the preferred teletext language.
When a new channel is selected, the S3000HDCCI
will always try to connect
to the soundtrack in the
language that was selected
as the first audio. If it’s not
available, it will try to find
the second audio and only if
the second preferred audio
is not available will it connect to the first available
soundtrack of a given channel.
Now that a proper OSD
language has been chosen, the next step would be
setting up the TV system,
which can be found in another submenu in Systems
Setup. If you are using an
HDMI connection and your
TV supports 1080i resolution, we suggest setting
this value as the Video
Resolution in the receiver’s
submenu. We also suggest
leaving the other menu
items in their default settings (Aspect Mode = Auto,
Video Output = YUV, etc.).
You can adjust them later if
necessary.
The next submenu you
should visit is the Local
Time Settings where you
tell the receiver what your
local time is with respect
to Greenwich Mean Time
(UTC). You can also configure the S3000HDCCI to
automatically adjust the
receiver’s time to daylight
savings time if this is in use
in your country.
At this point you’ll want
to match the antenna system connected to the LNB
IN jack to the receiver. This
3
0.4
7
can be taken care of in the
Installation Menu. From the
Antenna Connection menu
you have two options: Fixed
Antenna and Motor Antenna. If it’s a simple installation, you would choose the
Fixed Antenna option. In
the next submenu you can
identify which satellites you
want to receive with your
dish. Depending on the settings in these two menus,
the third menu item – Antenna Setup – gives you an
opportunity to set up your
reception system in more
detail.
The LOF frequencies have
to be chosen from the list
– they cannot be entered
manually.
Fortunately,
there’s no need to worry,
the list is quite extensive.
It contains the following
frequencies: 5150, 5750,
5950, 9750, 10000, 10050,
10450,
10600,
10700,
11250, 11300, 5150-5750,
5750-5150,
Universal
(9750-10550),
Universal
(9750-10600),
Universal
(9750-10700) and Universal
(9750-10750). By default
the most popular choice in
Europe for the Ku-Band is
Universal
(9750-10600).
These settings must match
your LNB LOFs.
Depending on the type
of antenna you have, there
are different DiSEqC op-
tions available. For a fixed
antenna, you can select between DiSEqC 1.0, 1.1 or
no DiSEqC (= direct). If you
have just one LNB and do
not use any DiSEqC switches between your receiver
and the LNB, then ‘no DiSEqC’ is the proper choice.
For a motorized antenna,
you can select either DiSEqC 1.2 or USALS depending on the type of motor
you have. If USALS is se1. Edit Channel
2. Installation submenu
3. System Setup submenu
4. Tools submenu
4
www.TELE-satellite.com — 08-09/2011 —
TELE-satellite — Global Digital TV Magazine
19
5
6
7
8
9
lected, you must enter the
geographical
coordinates
of the antenna’s position.
All of this is fairly logical.
Once the antenna setup
is completed, you can move
on to channel searching. We
can search either one satellite or a number of satellites
in a single pass. Of course,
the latter is possible if motorized or multi feed antenna systems are in use. The
factory
preprogrammed
satellite list is not very long
and has only 41 positions.
Some important satellites
for the European market
are missing – for example,
HELLAS SAT at 39° east is
not in the list. However, as
you will see, this is not a big
problem at all.
We started with an automatic scan of the HOTBIRD satellite at 13° east.
The S3000HDCCI required
almost 7 minutes to scan
92 factory preprogrammed
transponders; this is fairly
good. 1239 TV channels
and 357 radio channels
were found. After resetting
the box and turning on the
Network Search option, the
scan was repeated. This
time it took 8 minutes and
45 seconds but the number
of channels grew significantly: 1510 TV channels
and 418 radio channels.
But here’s the best part:
as the proud owner of an
S3000HDCCI, you can opt
for yet another option – a
blind scan. We couldn’t wait
to test it. There are no options to be set for this kind
of a scan (like frequency
range or polarization) so
you just select blind scan
and let the box take care
of the rest. We expected
5. Three video games are
available
6. REC submenu to configure a
USB memory device
7. Satellite List
8. Setting up a USALS
compatible motorized antenna
9. Ready for scanning one
satellite - HOTBIRD 13 E
20 TELE-satellite — Global Digital TV Magazine — 08-09/2011 — www.TELE-satellite.com
the blind scan to take much
longer then the automatic
scans based on the preprogrammed transponder lists.
But we were shocked when
the box reported the end
of the process after only 5
minutes and 15 seconds.
It found 98 transponders,
1485 TV channels and 417
radio channels. That’s an
outstanding result and far
better than we expected!
As mentioned before,
the HELLAS SAT was missing from the satellite list.
Keeping in mind the results
from the HOTBIRD scans,
we decided to add the HELLAS SAT channels using the
blind scan feature and not
the automatic scan because
this would have required us
to manually enter in a number of transponders. Within
just a couple of minutes the
blind scan was finished; it
found 27 transponders and
231 TV channels. For this
test we were looking only
for TV channels and noticed
that not only high symbol
rate transponders were detected and processed but
SCPC transponders as well
– for example 11139 MHz V
with a symbolrate of 2.891
Ms/sec.
Considering
that
the
blind scan was so successful, we decided to perform
the installation as if we
were doing it for our own
home receiver. We deleted
all of the factory preprogrammed satellites and
entered only the satellites
that can be received at our
location with a 90 cm motorized dish. That turned
out to be 25 satellites –
from HISPASAT at 30° west
to INTELSAT 12 at 45° east.
The blind scan’s job was to
find all the FTA TV and radio channels on these satellites and we started it in
the Multi Satellite Search
submenu. After leaving the
box unattended for about
two and half hours, we dis-
10
11
15
16
20
21
covered that the scan had
finished and the receiver’s
channel list was filled up.
We counted 2437 FTA TV
channels and 1854 FTA radio channels. Since the box
has a memory capacity of
5000 channels, there were
still over 700 unoccupied
channels. They could be
used for PayTV channels.
Among
the
channels
found we noticed there
were quite a number of
SCPC transmissions, like:
SOLIDARIA
on
HISPASAT (SR=2.222 Ms/sec),
RIT on ATLANTIC BIRD
1 (SR=2.139 Ms/sec) or
ISHTARFEED A on ATLAN-
TIC BIRD 2 (SR=2.098 Ms/
sec). Generally all symbol
rates were present from
the very high (30 Ms/sec),
through medium (4-6 Ms/
sec) to the very low (around
2 Ms/sec). This means that
the blind scan function of
this receiver is very scrupulous in detecting all active transponders. The receiver tuner also detected
and correctly processed the
weaker transponders which
would occasionally produce
some glitches when viewed
with other receivers. All in
all, we were very pleased
with the performance of
the blind scan function in
10, 11. Automatic channel scan in progress
12. Signal strength and quality of a transponder
13. Othello is a simple but addictive game
14. Info bar
15. Electronic Program Guide
16. The Find function helps you find a channel in a long channel list
17. Switching soundtracks
18. Extended channel description
19. Teletext displayed as OSD
20, 21. Timeshift function
22. SD channel video zoomed 12 times; maximum zoom is 16x
23. Media player ready to show JPG pictures
24. Mosaic of JPG pictures
25. The S3000HDCCI is ready to play back an MPG movie stored on
a USB device
26. List of recordings
12
17
22
13
18
23
25
14
19
24
26
22 TELE-satellite — Global Digital TV Magazine — 08-09/2011 — www.TELE-satellite.com
www.TELE-satellite.com — 08-09/2011 —
TELE-satellite — Global Digital TV Magazine
23
27
28
29
30
31
the S3000HDCCI as well as
the sensitivity of its tuner.
We heartily recommend
using the blind scan option
for channel searching.
With the channel search
portion
complete,
the
S3000HDCCI took us to
the very last channel it had
found. We could now start
enjoying watching TV. The
time to switch between
channels was very short
– one second or slightly
above one second. Channel
surfing was a real joy. The
info bar appeared momentarily after each channel
change and displayed typical data: channel name and
number, current and upcoming program and icons
identifying channel features like scrambling or the
presence of EPG data. The
info bar can be displayed at
any time when watching TV
by pressing the Info button.
Pressing the Info button
again displays more information about the channel
and the transponder – including signal strength and
signal quality.
To see extended programming
descriptions,
you have to visit the EPG
screen. The EPG has only
one format - grid form but it’s probably the most
desired one. It shows the
programming
guide
for
channels transmitted within the current transponder.
If you highlight the program you are interested in
and press OK, its extended
description is shown. Of
course, this is only true if
the provider makes this
information available. You
can mark the programs to
be recorded directly in the
EPG. Up to eight timer settings are allowed.
27. Organizing channels
28. Transponder editor
29. Channel info bar
30. Electronic Program Guide
31. Programming a new
recording in the EPG
24 TELE-satellite — Global Digital TV Magazine — 08-09/2011 — www.TELE-satellite.com
The S3000HDCCI comes
with channel editing functions that are quite straightforward to use. You can do
everything that you normally would expect from
a channel editor, such as,
locking a channel with a
PIN, setting a channel to
be skipped during channel surfing with the PR+
and PR- buttons, moving a
channel within the channel
list, deleting a channel or
renaming it. You can also
sort channels in a number
of ways. When in the editor screen, the video of the
currently selected channel
is visible in an insert and
information about the satellite, transponder and channel PIDs are also shown.
The availability of 32
Favorites lists is a number that will satisfy every
user. The S3000HDCCI allows you to name them as
you wish. Simply enter the
proper menu item and use
the on-screen keyboard to
change the name of the list.
During normal viewing,
the color function buttons
can be used to change the
soundtracks (if more than
one are present), display
teletext, change the video
resolution of the HDMI signal or start the Find function. The Find function
filters the channel list in
accordance with the first
several letters entered by
the viewer. This is a very
helpful feature when looking for a specific channel
among hundreds or even
thousands of others.
The S3000HDCCI has
PVR functionality. After
connecting a USB storage
device to its port, the box
turns into a fully functional
digital recorder. You can
program a recording from
the EPG, from the timer
submenu or manually by
pressing the RECORD button when watching a program. Every mode worked
TECHNICAL
DATA
Manufacturer
Icecrypt, Sittingbourne, United Kingdom
Websitewww.icecrypt.com
[email protected]
Fax
+44-1795 427 666
ModelS3000HDCCI
Description
Expert Opinion
+
perfectly in our tests. While
recording, you can watch
another channel from the
same transponder but you
cannot play a previously
recorded program. This is
only a minor limitation of
this receiver.
Even when recording and
watching another channel at same time, you still
can use the Timeshift function. The Timeshift function is started by pressing the PAUSE button. The
picture freezes and everything from that moment on
is recorded on a USB storage device. You can restart
the video a little bit later by
pressing the PLAY button.
Similarly to normal playback of regular recordings,
you can also rewind or fast
forward a program when
watching it in time shifted
mode. This is an especially
useful feature when viewing channels with lots of
commercial breaks.
The S3000HDCCI’s media
player is not just limited to
playing the receiver’s recordings; it will happily work
with MP3 music or JPG/BMP
images located on your USB
storage device. When in
slideshow mode, the media
player can switch between
4 MB JPG files every 5 to 7
seconds. It’s not as fast as
a regular PC but it’s much
faster than older receivers.
Video recordings in AVI and
MPG formats stored on USB
storage devices can also be
played with the S3000HDCCI media player. However,
be aware that some of the
video file formats are not
supported by this receiver.
Fortunately, there are many
free video converters available so you can convert the
most important files to a
format recognized by the
S3000HDCCI. So the next
time your aunt comes to
visit, you can turn on your
media player and show her
all the videos and photos
you took from your last vacation. If you do that in a
clever way, chances are she
won’t visit you again anytime soon.
26 TELE-satellite — Global Digital TV Magazine — 08-09/2011 — www.TELE-satellite.com
If watching live channels,
recordings, MP3’s or JPG’s
are not enough, you can
go to the Game submenu
where you’ll find three video games: Tetris, Othello
and Sudoku.
The receiver’s software
can be updated from the
Internet either via the RS232 port or the USB port.
The default settings for
an Internet update didn’t
work for us so we visited
the manufacturer’s webpage and downloaded the
latest
firmware
version
for the S3000HDCCI. After uncompressing the file,
we transferred it to a USB
stick and connected it to
the receiver’s USB port.
The update process went
smoothly - the receiver
had programmed its internal memory, rebooted and
–
SCR CompatibleNo
Excellent blind scan – very fast and accurate
Supports smart cards of different CA systems
Very fast channel surfing
Extremely low energy consumption in
stand-by
Firmware update erases all user satellite and
channel data
the new firmware (version
2.10B4) was installed. Unfortunately, all our satellite
and channel information
disappeared. That was a
surprise! Hopefully Icecrypt will address this issue
as soon as possible; user
data should not vanish like
that. We suggest that you
should start with updating the receiver’s software
first before proceeding to
receiver configuration and
channel search.
Throughout the entire
test the S3000HDCCI performed very well and did
not give us any hardware
or software problems. We
were able to figure out
most of the receiver’s fea-
Digital Satellite Receiver/ PVR ready
C/Ku Band CompatibleYes
DiSEqC Compatible
1.0 – 1.3 (USALS)
PVR readyyes
Jacek Pawlowski
TELE-satellite
Test Center
Poland
tures and functions without any reference to the
user manual. The manual
explains all of its major
functions, comes with numerous screenshots and
will confidently guide you
through the receiver’s installation even if you happen to be new at this sort of
thing. This receiver is suitable for family use as well as
for both single and multisatellite reception systems.
It is obviously limited by its
single tuner unit but if you
can live without the ability
to record one channel while
watching another from a
different transponder, you
should be very happy with
the S3000HDCCI.
Input
1 x L-Band (950-2150 MHz),
LNB power
13/18VDC, max.400mA
,
SCPC Compatible
Yes (from 2 Ms/sec)
Transport Stream
MPEG-II ISO/IEC 13818-2 MP@ML, H.264 MPEG4 part 10
Audio Decoding
MPEG-1 Layer I & II, PCM Downmix,
IEC958 SPDIF, Dolby 5.1 channel,
Dolby Downmix 2 Channel, Dolby Prologic 2
Main Processor
ALI 3602
Memory
Flash-ROM : 4 MBytes
SDRAM
64 Mbytes
Power Supply
AC 175 ~ 250, 50/60Hz
Size (W x H x D)
260mm x 45mm x 213mm
ENERGY
DIAGRAM
Apparent Power
Active Power
Mode
Active
StandBy
www.TELE-satellite.com — 08-09/2011 —
Apparent Active Factor
36 W
17 W 0.47
4W
0.5 W 0.12
TELE-satellite — Global Digital TV Magazine
27