1
Contents
TO ENSURE SAFE AND CORRECT USE ...............................2
Introducing Craft ROBO ...........................................................4
Try cutting! ................................................................................5
Cutting out letters and shapes (CC300-20/CC330-20) .....6
Making stickers from vinyls
(Only CC330-20) .............................................................12
Contour cut printed graphics or letters
(Only CC330-20) .............................................................15
Cut detailed
graphics using
paper and labels
with ease.
Using the SD Card..................................................................20
Troubleshooting ......................................................................22
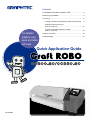
Quick Application Guide
621459630
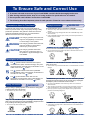
To Ensure Safe and Correct Use
P To ensure safe and correct use of your Craft ROBO, read this Guide thoroughly before use.
P After having read this Guide, keep it in a handy location for quick reference as needed.
P Do not permit small children to touch the Craft ROBO.
P The following describes important points for safe operation. Please be sure to observe them strictly.
Conventions Used in This Guide
To promote safe and accurate use of the Craft ROBO as
well as to prevent human injury and property damage, safety
precautions provided in this guide are ranked into the three
categories described below. Be sure you understand the
difference between each of the categories.
This category provides information that,
Safety Precautions
WARNING
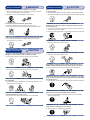
Do not disassemble, repair, or remodel the Craft ROBO.
P Such action may cause electrical shock or a fre hazard due to current
leakage.
P Contact with the high-voltage parts within the Craft ROBO may cause
electrical shock.
P If the Craft ROBO requires repair, contact your sales representative or
nearest Graphtec vendor.
DANGER if ignored, is highly likely to cause fatal
or serious injury to the operator.
This category provides information that,
WARNING if ignored, is likely to cause fatal or
serious injury to the operator.
CAUTION
This category provides information
that, if ignored, could cause injury to
the operator or physical damage to the
Craft ROBO.
Do not connect the Craft ROBO to a non-rated power supply.
P Use of a different supply voltage may result in electrical shock or a fre
hazard due to current leakage.
Description of Safety Symbols
The
symbol indicates information that requires
careful attention (which includes warnings). The point
requiring attention is described by an illustration or text
within or next to the
symbol.
Do not use the Craft ROBO in a location where it will be exposed to
water, rain or snow.
P Such location may cause electrical shock or a fre hazard due to current
leakage.
The
symbol indicates action that is prohibited.
Such prohibited action is described by an illustration or
text within or next to the
symbol.
The
symbol indicates action that must be
performed. Such imperative action is described by an
illustration or text within or next to the
symbol.
If the Craft ROBO generates smoke, is too hot, emits a strange odor, or
otherwise functions abnormally, do not continue using it. Unplug the
AC adapter’s power cord from the electrical socket.
P Such action may cause human injury.
P Use of the Craft ROBO in such status may result in a fre hazard or
electrical shock.
P After confrming that smoke is no longer being generated, contact your
sales representative or nearest Graphtec vendor to request repair.
P Never try to perform repair yourself. Repair work by inexperienced
personnel is extremely dangerous.
Keep your hands, hair, etc. away from the writing panel and moving
parts such as the carriage even if the Craft ROBO is stopped, because
it may suddenly start moving when data is received.
Do not allow dust or metallic matter to adhere to the power plug.
Safety Precautions
WARNING
During a cutting or plotting operation, do not touch the writing panel
or moving parts such as the carriage.
P Such action may cause human injury.
P A dirty power plug may result in electrical shock or a fre hazard due to
current leakage.
Safety Precautions
WARNING
Safety Precautions
Do not use the power cord or AC adapter if it is damaged.
CAUTION
When disconnecting the power cord or an interface cable, do not pull
on the cord/cable.
P Use of a damaged power cord or AC adapter may result in electrical
shock or a fre hazard due to current leakage.
P Replace the power cord or AC adapter with a new one.
P Such action will damage the cord/cable, resulting in a fre hazard or electrical
shock. Be sure to hold the power cord’s plug or the interface cable’s connector.
Be careful when handling the blade, blade holder.
If water or foreign matter enters inside the Craft ROBO, do not
continue using it. Turn off its power and unplug its power cord from
the electrical socket.
P Touching the blade with your bare hand may cause injury.
P During a cutting operation, keep away from the blade, blade holder.
P Use of the Craft ROBO in such status may result in electrical shock or a
fre hazard due to current leakage.
P Contact your sales representative or nearest Graphtec vendor to request repair.
Only use the AC adapter that was supplied as a standard accessory.
P Use of any other AC adapter may cause malfunctions or result in
electrical shock or a fre hazard.
Do not attempt to lubricate the Craft ROBO’s mechanisms.
P Such action may cause it to break down.
Safety Precautions
CAUTION
Do not clean the Craft ROBO using a volatile solvent such as thinner or benzine.
Do not use or store the Craft ROBO in a location exposed to direct
sunlight or the direct draft of an air conditioner or heater.
P Such action may impair its performance.
P Such location may impair the performance of the Craft ROBO.
During cutting or plotting, provide enough space around the Craft
ROBO so that the loaded sheet will not hit any objects in its vicinity.
P Such contact may cause cutting or plotting to go out of alignment.
Do not use the Craft ROBO in an excessively dusty or humid location.
P Such location may impair the performance of the Craft ROBO.
When using indoor lighting such as a fuorescent lamp or an electrical
lamp, provide a distance of at least one meter between the Craft ROBO
and the light source.
Do not place any receptacle containing water or other fuid on top of
the Craft ROBO.
P Closer proximity of such a light source may cause the sensors to malfunction.
P Fluid falling inside the Craft ROBO may cause electrical shock or a fre
hazard due to current leakage.
When using the blade, blade holder, make sure that the correct blade
adjustment cap for the selected Media Type is installed.
Do not use the Craft ROBO in a location subject to excessive
mechanical vibration or electrical noise.
P An overly extended blade will damage the cutting mat and adversely
affect the cutting quality.
P Such location may impair the performance of the Craft ROBO.
Move the Tool carriage slowly when moving it manually in order to
load the sheet for cutting or for other reasons.
P Moving it quickly may damage the Craft ROBO.
3
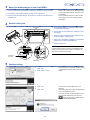
Try cutting!
A quick guide to a basic usage of Craft ROBO.
Is the preparation OK?
Verify it before starting operation.
• Is the software installed in the PC?
"Setup Instruction Sheet"
Snip
Sn i p
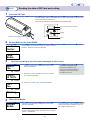
• Is the Craft ROBO connected to a PC by the USB cable?
"Setup Instruction Sheet"
• Prepare the Media (paper or flm) to be cut.
Cutting out letters and shapes (CC300-20/CC330-20)
P.6
x Design and cut out letters and shapes of your choice. This manual
explains how to cut out letters using a craft paper.
To learn the basic operation
This section explains the basic operations common to the CC300-20 and
CC330-20. It is recommended that you frst operate your Craft ROBO
following the procedures described in this section and learn the basic
operations.
Making stickers from vinyl (only CC330-20)
P.12
x Vinyl can be cut and made into stickers. This manual explains how to
make stickers with the letters cut out from vinyl.
Transferring vinyl
A vinyl is a color flm with adhesive backing.
Letters are cut and transferred with transfer tape
without losing its place.
Cutting to match the printed graphics or letters (only CC330-20)
P.15
x Pop-up Cards, scrapbooking and paper crafting are made easy using
the print & cut function. This manual explains how to make a pop-up
card using sample template provided in the attached CD-ROM. Include
graphics can be modifed- or new graphics can be created.
To match a cut-line to printed graphics or letters
Registration Marks (Marks for defning position
on a graphic) are scanned automatically,
allowing precise cutting according to the
graphic.
5
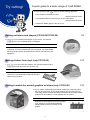
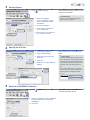
Cutting out letters and shapes (CC300-20/CC330-20)
p Create cutout letters from craft paper!
Cutting with Craft
ROBO
* This guide uses the screen and illustration displayed when the Craft ROBO
CC330-20 is connected with the Windows Vista.
Design
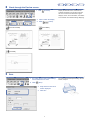
1
Designing graphics and letters
Designing graphics
and letters
ROBO
t
f
a
r
C
Start the ROBO Master.
Start "ROBO Master" (software for design) in
PC.
Double-click the ROBO
Master Icon.
R When the ROBO Master Icon is not
available
Select [Start], [(All) Programs], [Craft ROBO]
and [ROBO Master] in this order from the
Start Menu of Windows.
2
Create a new data.
1 Click
First, create a new fle to specify your cutting
(New)
data. Click "OK" of "Document Settings" Window
1
to display the plotting screen of "Untitled1*".
2
2 Select "ISO A4".
3 Click "Landscape".
R Print setting for Registration Mark (only
CC330-20)
4 Remove tick from the check box
For cut only, remove tick from the check box
of "Use Registration Marks", and
put a tick in the check box of
"Use Carrier Sheet".
of "Use Registration Marks". To cut the prints
after printing by use of Printer, put a tick in the
check box of "Use Registration Marks".
5 Click "OK".
3
Enter the letters.
1 Click
(Text).
Set the design of the letters to be cutout, and
enter the letters.
2 Select a font.
3 Put a tick in the
check box of
"Outline".
4 Enter the
letters.
5 Click "OK".
6 Move the letters by using the
mouse, and click to defne.
R To design the letters
To change the design of letters, set "Font",
"Width", "Height" and "Angle" in the "Text Set tings" Window.
Larger fonts are easier for handling after cutting. For beginners, we recommend Gothic
fonts of 20mm or larger.
R To move the allocated letters
Click on "Select" and move the mouse. Click
once on an item to be moved. When a hand
appears, drag the item while pressing on the
left button of the mouse.
6
Design
4
Cut
Plot a Figure.
Plot a Figure using the Tool.
A rectangle is plotted here for example,
1 Click
(Rectangle).
2 Click the point on upper
left of Figure to be located,
and move the Mouse
cursor to lower right , and
click to defne.
however, various shapes such as circle and
polygon can be plotted. For details, see User's
Manual of ROBO Master (CD-ROM).
R To plot a circle
Click
(Circle), and click the
center point of Circle that is created to specify.
Then move the Mouse, and the Circle can be
plotted with the clicked point being centrally
located.
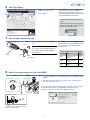
Cut
1
Cutting with Craft ROBO
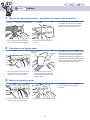
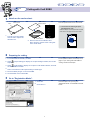
Attach the Media on the carrier sheet.
Carrier sheet
Separator
Card without
Carrier Sheet
Place the media on the carrier sheet.
R Tips for affxing media on the carrier sheet.
• Prevent air bubble or wrinkle from being
produced while affxing.
Adhesive face
• Your media should be affxed on all areas
and evenly.
1 Peel off covers from inside
and out side to expose the
adhesive face.
• Your media should be placed straight along
Carrier sheet
Exterior frame
the grids.
2 Attach a sheet on the adhesive face.
Place along the exterior frame of the grids
of the carrier sheet.
For a landscape image,
place the corner of media on
(black triangular mark) at
upper left of carrier sheet.
2
For a portrait image, place
the corner of media on
h (white triangular mark)
at upper right of carrier
sheet.
Prepare Craft ROBO.
Press the Standby switch of Craft ROBO
main unit, and verify that LED lamp (green
color) is on.
Put Craft ROBO in Standby condition ready for
cutting. If Craft ROBO is not connected to a PC,
use a USB cable to connect.
R Cautions before use
• Do not attempt to cut media without a
backing or cutting without a media. It may
damage the cutting mat.
• Be sure to use the carrier sheet when
CC300-20 is used.
Design
3
Cut
Set the Output.
1 Click
(Output Settings).
Display the "Output Settings" Window, and set
the Output of Craft ROBO.
R Output Settings
2 Verify that "Graphtec
CC330" ("Graphtec CC300"
when CC300-20 is used) is
established.
There is no need to adjust the settings on
"Printer" when it is a direct cut.
3 Click "Print Settings".
4 Verify that the Orientation is
set to "Landscape".
5 Remove a tick from the check
box of "Print Cut Lines".
4
Specify the Cut-line.
1 Click "Cutting Settings".
2 Click "Cutline Settings".
3 Verify that a tick is put in the
check box.
4 Click "OK".
5 Click "OK" of "Output Settings"
Window.
Set the line (Cut-line) for cutting with Craft
ROBO.
R Cutline Settings
The colors used for cutlines are listed in the
"Color" column in the Cutline Settings window.
The check box for the cutlines that should be
cut are checked. Remove the check from the
check box of the cutline that should not be
cut.
You can select "Solid Cut Line" or "Dashed
Line" for each cutline. Select "Dashed Line" to
create a guideline for folding thick media.
5
Start the Craft ROBO Controller.
1 Click
(Craft ROBO).
2 Verify that "Graphtec CC330" ("Graphtec
CC300" when CC300-20 is used) is
established.
3 Click "OK".
Start the Craft ROBO Controller from the
"Output to Craft ROBO" Window.
Design
6
Cut
Select the Paper.
1 Select the media type.
2 Click "Next>>".
Select the media type. Once the media is
selected through "Media Type", the color of
recommended Blade adjustment cap will appear
on the Craft ROBO Controller screen.
R When the Operation guide does not appear
When the Operation guide does not appear
at bottom of Craft ROBO Controller screen,
click "Show the operation guide".
7
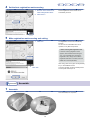
Set the blade adjustment cap.
Set the yellow-colored blade adjustment
cap.
Verify that the yellow-colored blade adjustment
cap is displayed on the Craft ROBO Controller
screen, and set the yellow-colored blade
CAUTION!
adjustment cap.
Loosen
If you need to replace the blade adjustment
cap or set the Cutter on the Craft ROBO,
handle with care.
Plunger
Color of cap Paper
Fasten
Blade
adjustment cap
8
R Blade adjustment cap color and paper
Bladelength
Blue
Thin material, Thin
paper/flm
0.1mm
Yellow
Medium thick paper
such as Kent paper,
Thick flm
0.2mm
Red
Thick paper for
scraping
0.3mm
Mount the blade plunger on the Craft ROBO.
Plunger
Plunger holder
1 Turn the Lock lever in the direction of "OPEN" to loosen the Plunger
holder.
2 Securely insert the blade plunger, and turn the Lock lever in the
Loosen
direction of "CLOSE" to fx.
Fasten
Once the blade plunger is completely mounted, click twice the "Next>>"
in Operation Guide screen of Craft ROBO Controller to go into
"Document Settings". "Media loading" Window appears.
Lock lever
Side face of Cutter
Front
face
Securely insert until bottom face of fange
touches the Plunger holder.
9
Design
9
Cut
Set the attached Media on the carrier sheet.
1 Set the edge of carrier sheet to the guide line at
Push rollers
left side (outside) inscribed on the front guide.
2 Push the edges of carrier sheet into Push rollers
at both ends, and set it in a straight line.
3 Verify that "Load w/ Carrier" is displayed on
Operation panel screen, and press [ENTER] key.
(If CC330-20 is used, press either F or E on
Operation panel of main unit to select "Load w/
Carrier", and press [ENTER] key.)
4 Close the Top cover.
CAUTION!
If media other than those exclusive to Craft ROBO is used,
cutting may not performed as well. Please note that this will
also not be covered by the warranty.
Guideline of
left side
ENTER key
R Direction for setting the carrier sheet
Set the arrow of carrier sheet with faced
toward Craft ROBO main unit.
10
Proceed to "Start cutting".
1 Click "OK".
2 Click "Next>>" twice.
10
Once the Paper is set, proceed to "Start
cutting". in Craft ROBO Controller screen. You
can skip the "Registration Marks" settings.
Design
11
Cut
Cut.
1 Click "Cut".
Do not touch the Craft ROBO when it is in
operation.
After cutting, take out the paper. Press [ENTER]
key on "Unload Media" screen. The paper is
discharged.
To terminate the operation, press the Standby
switch and verify that LED lamp is off. Also
click
(Close) at upper right of ROBO
Master screen to terminate the ROBO Master.
R To save the cutting data
Click
in ROBO Master to display the
"Save as" Window. Specify the Saving
Place, and put the File name, and then
click "Save". The data will be saved in the
GSD-type.
2 Click "OK".
Test plotting
(Ballpoint pen plunger is sold seperately)
Plot using a ballpoint pen allows you to check the created
cut data beforehand. To make good use of valued media,
we recommend you to do a test plotting.
Proceed as follows for test plotting:
/
Ballpoint pen
Select "Pen" in "Media Type" of Craft ROBO Controller.
b Set the Ballpoint pen on the Craft ROBO.
Use the slender Ballpoint pen. Verify that the edge of Pen is protruded
by 3 to 3.5mm from Ballpoint pen plunger when set. For details about
Ballpoint pen that can be used, see User's manual.
c Set the Media for test plotting (if normal A4 copy paper is used, process
as shown on the right fgure to prevent from being caught up during
setting.). (For details, see the Setup Manual.)
Loosen
Fasten
Ballpoint pen plunger
(sold separately)
Set to the
notch
d Click "Cut" of Craft ROBO Controller to start plotting of Cut data line.
10mm
3mm
Copy paper
Portion to be cut off
11
The size of portion to be cut
off is only for your reference.
Try actual cutting.
Making stickers from vinyl
Designing graphics
and letters
(Only CC330-20)
Cutting with Craft
ROBO
p Creating a cut-out letter sticker from vinyl!
* Only CC330-20 has this function.
* This guide uses the screen and illustration that are displayed when the Craft
ROBO CC330-20 is connected with the Windows Vista.
Design
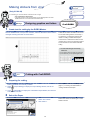
1
Designing graphics and letters
Paste
Craft ROBO
Create text for cutting by the ROBO Master.
Start the ROBO Master, and open the new data, and then allocate the letters and the
rectangle enclosing the letters as shown below.
Create the cut data for the letters to be cut-out.
For the data creating method, see the step 1
to 4 (page 6 to ) of "Designing graphics and
letters" in "Cutting out letters and shapes".
Put the frame on outside of the letters so that
it makes easy to remove unnecessary portions
and to transcribe on the Transfer sheet after
cutting.
R To make letter designs enclosed by
frame lines
For the design where the letters are enclosed
by the frame line, plot the quadrangles thrice.
ROBO
Cut
1
Cutting with Craft ROBO
Preparing for cutting.
1 Make Craft ROBO into Standby condition.
2 Click
(Output Settings) to display the Output Setting Window, and set the
Output.
For the operation method, see the step 2 to 5
(page to ) of "Cutting with Craft ROBO" in
"Cutting out letters and shapes".
3 Click
(Craft ROBO) to display the Craft ROBO Output Window, and start the
Craft ROBO Controller.
2
Select the Paper.
1 Select "Film Labels".
2 Click "Next>>".
12
Select "Film Labels" for "Media Type" in Craft
ROBO Controller.
Design
3
Cut
Adhere
Mount the blade plunger on the Craft ROBO.
1 Turn the Lock lever in the direction of "OPEN" to loosen the Plunger holder.
Replace with the blue-colored blade adjustment
2 Set the blue-colored blade adjustment cap on the edge of Pen.
cap for cutting the Cutting flm, and set it on the
Craft ROBO.
For the installation method of Cutter, see step
3 Securely insert the blade plunger, and turn the Lock lever in the direction of
"CLOSE" to fx.
4
and (page 9) of "Cut" of "Cutting out letters
and shapes".
Set the Cutting flm.
1 Go to "Media loading" in Operation Guide screen
Push rollers
of Craft ROBO Controller.
2 Set the edge of the media to the guide line on the
front guide.
3 Push the edges of Media into push rollers at both
ends, and set it in a straight line.
4 Verify that "Load Media" is displayed on Operation
panel screen, and press [ENTER] key.
5 Close the Top cover.
CAUTION!
If media other than those exclusive to Craft ROBO is used,
cutting may not perform as well. Please note that this will
also not be covered by the warranty.
Guideline of
right side
ENTER key
5
Perform cutting.
1 Click "OK".
2 Click "Next>>" twice.
Once the Paper is set, proceed to "Start cutting"
in Craft ROBO Controller screen and make
cutting.
3 Click "Cut".
Do not touch the Craft ROBO when it is in
4 Click "OK".
operation.
After cutting, take out the paper. Press [ENTER]
key on "Unload Media" screen.
To end the operation, press the Standby switch
and verify that LED lamp is lit off. Also click
[Close] at upper right of ROBO Master
screen to end the ROBO Master.
13
Design
Adhere
1
Adhere
Adhere
Take out the unnecessary portions, and adhere the Transfer sheet from above.
Cutting flm
Also take out the unnecessary
portions left on inside the letters.
1 Use a tool such as the tweezers to
take out the unnecessary portions.
2
Cut
Start working to adhere the letters to the place
Transfer sheet
you prefer. At frst, take out the unnecessary
portions from the Cutting sheet. Thereafter,
adhere the Transfer sheet from the top.
2 Paste the Transfer sheet from
above.
Transcribe on the Transfer sheet.
Backing sheet of
Cutting flm
Transcribe the cut letters on the pasted Transfer
Transfer sheet
sheet. Thin/ fne areas should be pressed frmly
so that the letters can be securely adhered.
Slowly peel off the Backing sheet little by little.
If part of the letter is left on the Backing sheet of
Cutting flm during peeling, restore the Backing
sheet to original point and rub it again.
1 Securely rub with a cloth from above
the Transfer sheet to transcribe the
cut letters on the Transfer sheet.
3
2 Carefully peel off the Backing
sheet of Cutting flm so that the
cut letters can be pasted on the
Transfer sheet.
Paste on the point you prefer.
Firmly rub with a cloth to assure pasting.
Once the Transfer sheet is peeled, it is
completed.
1 Paste the letters transcribed on the
2 Carefully peel off the Transfer sheet.
transfer sheet, where you prefer.
14
Cutting to match the printed graphics or
letters (Contour cutting - Only CC330-20)
Design the Pop-up
card.
Print the Graphic or
letters by the Printer.
p Create the Pop-up Card by use of the creating example stored in CD-ROM!
Cutting with Craft
ROBO
* Only CC330-20 has this function.
* This guide uses the screen and illustration that are displayed when the Craft
ROBO CC330-20 is connected with the Windows Vista.
Assemble
Design
1
Designing graphics and letters
Start the ROBO Master, and open the Data (FILE).
1 Start the ROBO Master, and click
[Open].
Use the sample data (New Baby pop-up
greeting card (for practice)).
R Sample data for design
2 Click "New Baby pop-up
greeting card (for practice)".
Sample data can be modifed or edited to cre ate a totally new design.
3 Click "Open".
2
Enter the letters and make the layout.
1 Click
Enter the letters and make layout on the
(Text).
optional point.
2 Select a font.
3 Set each letter
width and
height to "5.0",
respectively.
R To edit the shape of letters
The shapes of letters such as Font (Typeface) and Size can be edited in "Text Set tings" screen.
4 Remove tick
from the check
box of "Outline".
5 Enter the
letters.
6 Click "OK".
7 Move it with Mouse, and click to defne.
15
R To change the color of the letters
Click
while the letter is being selected to
set the color in "Line Settings" screen.
Design
3
Print
Cut
Assembling
Insert the Image.
1 Click
(Load File).
2 Click the Image fle you need to
Select a Photo or Illustration, and set them
anywhere you prefer.
R Location of Material data fle
To use the sample image of ROBO Master,
open the following folders:
insert.
3 Click "Open".
Program Files/ROBO Master/Illustrations
Select your favorite image from the three
folders in "Illustrations" folder.
R To delete the inserted image
To delete the inserted image, select the
4 Move it with Mouse, and
click to defne.
5 Put the Mouse pointer on
the mark M at corner of
Image, and drag it to adjust
the size.
Print
1
image and click
. If you cannot select the
image well,click the white portion once where
nothing is displayed and then click the image
again.
Print a Graphic or letters using a Printer.
Set the Output destination.
1 Click
(Output Settings).
Select the Printer that is used, and set the
printing items.
Checking items
2 Confrm the Printer name.
3 Verify that "Graphtec CC330"
is displayed.
4 Click "Print Settings".
Item name
Setting
Printer
Check the name of Printer
connected.
Craft ROBO
Verify that "Graphtech CC330" is
displayed.
Checking items ([Print Settings]Tab)
5 Click "Landscape".
6 Verify that a tick is removed
from the check box of "Print
Cut Lines" .
Item name
Setting
Orientation
Verify that [Landscape] is selected.
Print Cut Lines
Take out the tick.
7 Click "OK".
R When multiple Printers are being connected
When multiple Printers are being connected,
select the Printer that is used from the Pull
down menu of Printer selection column.
16
Design
2
Print
Cut
Assembling
Check through the Preview screen.
1 Click
(Preview).
Display the Preview screen, and check the
graphics and letters to be printed and the Cutline. The Preview screen allows three types
displays, that is, "Print & Cut Data", "Print Data"
and "Cut Data" to be switched during displaying.
2 Click to switch the display.
3 Click
(Print & Cut Data)
(Close).
(Print Data)
(Cut Data)
3
Print.
1 Set "Card without Craft Paper Backing"
into the Printer that is used.
2 Click
(Print).
3 Verify that the Printer to be
used is displayed.
4 Click "OK".
1
Set "Card without Craft Paper Backing" into the
Printer, and print.
Design
Cut
1
Print
Cut
Assembling
Cutting with Craft ROBO
Attach on the carrier sheet.
Card without
Carrier Sheet
Carrier sheet
Cover
Place the printed media on the carrier sheet.
R The direction for attaching the prints
with Registration mark
Attach the Paper in such way that the encircled
mark come to the upper left of carrier sheet.
Adhesive face
1 Peel off covers from inside
and out side to expose the
adhesive face.
Carrier sheet
Exterior frame
2 Attach a sheet on the adhesive face.
Place along the exterior frame of the grids
of the carrier sheet.
2
Preparing for cutting.
1 Put Craft ROBO into Standby condition.
2 Click
(Output Settings) to display the "Output Settings" Window, and set the
Output.
For the operation method, see the step 2 to 9
(page to 9) of "Cutting with Craft ROBO" in
"Cutting out letters and shapes".
3 Click
(Craft ROBO) to display the "Output to Craft ROBO" Window, and start
the Craft ROBO Controller.
4 Select "Card without Craft Paper Backing" in Media Type.
5 Mount the blade plunger on the Craft ROBO.
6 Set the Media on the Craft ROBO.
3
Go to "Registration Marks".
1 Click "OK".
Once the Paper is set, you can go to
2 Click "Next>>".
"Registration Marks" in Craft ROBO Controller
screen.
1
Design
4
Print
Cut
Assembling
Set the Auto registration mark scanning.
1 Put a tick in the check box of
"Search Registration Mark".
Set the Registration mark so that it can be
automatically scanned.
2 Click "Next>>".
5
Make registration mark scanning and cutting.
1 Click "Cut".
The Registration mark can be automatically
scanned.
Do not touch the Craft ROBO when it is in
operation, it may affect the precision.
R When scanning fails Registration mark
If "Failed in scanning Registration mark"
appears, reset the Media before clicking the
"Cut". If you repeatedly fail in scanning the
Registration mark, change into the Manual
Registration Mark Scan. For details, see Craft
ROBO User’s manual (CD-ROM).
After cutting, take out the paper. Press [ENTER]
key on "Unload Media" screen.
To end the operation, press the Standby switch
and verify that LED lamp is off.
2 Click "OK".
Assembling
1
Assemble.
Assemble.
Once assembled, it is completed.
19
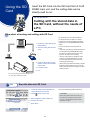
Using the SD
Card
Insert the SD Card into the SD Card Slot of Craft
ROBO main unit, and the cutting data can be
directly read to cut.
You can use this to...
Cutting with the stored data in
the SD Card, without the needs of
a PC.
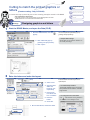
Flow chart of reading and cutting with SD Card
You can either set a new cutting condition or
use the previous tool condition. For details,
1 Create the cutting data by the
ROBO Master.
2 Save the cutting data into SD
Card.
x
see User's manual of Craft ROBO (CD-ROM)
"CHAPTER 4. CUTTING DATA SAVED ON SD
CARD".
To cut by the SD Card, verify the points as
below.
• Only GSP type (data type where data is stored
into SD Card through ROBO Master) allows
the data to be read through SD Card. Other
types can be viewed, but not cutting.
Graphtec
• Save the cutting data into “Graphtec” folder
of SD Card by the ROBO Master. The data
saved in other folders cannot be read even
3 Insert the SD Card into Craft
ROBO, and the SD Card data
can be read.
4 Load the media.
according to the GSP type.
• While cutting is performed according to the SD
Card data, another data sent from PC will be
invalid. Send the data from PC again only after
cutting is fnished.
5 Cut
x For contour cutting, insert printed media for the
fle. (Only when CC330-20 is used)
Save
Save the data into SD Card.
1 Create the folder named "Graphtec" in
Save the created cutting data into SD Card.
the frst hierarchy of SD Card.
2 Click
(Save to SD Card).
R Filenames
When saving data into SD Card, make sure
3 Select "Graphtec" folder in SD Card.
4 Enter the File name.
the flename are in English one byte charac ters. Error message appears when two byte
characters are input.
5 Click "Save".
20
Save
Read
1
Read
Reading the data of SD Card and cutting
Insert the SD Card.
Press the Standby switch of Craft ROBO main unit, and verify that LED lamp (green color)
is lit on before inserting the SD Card.
Then, follow the instructions of Menu displayed on Operation panel.
Instruction Menu will be displayed.
OP
ENTER
Insert the SD Card into SD Card Slot.
2
SHIFT
Set the Media on the Craft ROBO.
Load w/
Carrier
Set the Media, and verify that "Load w/ Carrier" or "Load
Media" is displayed, and press [ENTER].
or
Load
Media
3
Operate according to the instruction displayed on the screen.
Select
File
Q ENTER
File001
25 100%
Q ENTER
Cut?
Yes
Q ENTER
Working . .
4
1 Verify that "Select File" is displayed on the screen,
and press [ENTER].
R Screen for selecting fle name
The fle name is displayed on top.
Cutting force and Enlarging/Shrinking
size (Scale) set for previous cutting,
2 Press OP to select the data fle name you need to
are displayed on bottom.
cut, and press [ENTER].
3 Press OP to select "Yes", and press [ENTER].
Take out the Media.
Unload
Media
Verify that "Unload Media" is displayed on the screen,
and press [ENTER].
CAUTION!
To insert or take out the SD Card, use either screen of "Load w/
Carrier" or "Load Media".
21
To end the operation, take out the SD Card from
Card slot, and press the Standby switch, and
then verify that LED lamp is off.
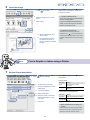
Troubleshooting
Troubleshooting explanations are given below. Check the conditions of Craft ROBO before to
clarify the problem.
For the symptoms not stated in the following, see the User's manual (CD-ROM).
If the trouble cannot be resolved through "Troubleshooting ", please visit our home page and see
Craft ROBO information, or contact the nearest retailer. (If it is diffcult to make a phone call, use
FAX or e-mail.)
Craft ROBO does not run
Symptoms
Even if the Standby
switch is pressed, the
LED lamp does not light
up.
Cannot set paper.
Causes
Countermeasures
P The Power cord is not correctly
inserted into AC Adapter or Power
receptacle. Or, it is disconnected.
Correctly insert the Power cord.
P The AC adapter is not connected
with the AC Adapter jack. Or, it is
disconnected.
Correctly insert it into the AC Adapter jack.
P A paper smaller than 210mm width
is set.
To use the paper not more than 210mm width, paste it on the carrier sheet
before use.
4FF
4FF
See User's manual of Craft ROBO (CD-ROM) "Connecting and
Turning on the Power".
See User's manual of Craft ROBO (CD-ROM) "Connecting and
Turning on the Power".
See "Loading Media Using the Carrier Sheet" of Craft ROBO
User's manual (CD-ROM).
Caution: When carrier sheet is used, it is impossible to cut the paper more
than sheet length.
4FF
P A paper larger than 20mm width is
set.
It is impossible to set the size more than 270mm. Cut the width to make it
into smaller one before setting or replace it with smaller one.
(Even if the paper of 2 0mm width is set, the cutting range is 190mm (200mm
when enlarged) as standard and same as the paper of 210mm width.)
P The Push roller is dirty.
Clean the Push roller with a dry cloth.
Error appears on PC.
Symptoms
"Writing error/Output
error into USB xxx "
appears on PC.
Causes
Countermeasures
P Preparation for Craft ROBO is not
yet arranged.
Press the Standby switch to light up (green) the LED lamp.
When LED lamp is not lit on, cutting cannot start even if paper is set.
P The USB cable is disconnected.
Correctly insert the USB cable.
See User's manual of Craft ROBO (CD-ROM) "Connecting to a
Computer".
x When the relay or USB hub is used, remove them and directly connect the
Craft ROBO with a PC.If it cuts normally, then contact the relay or USB hub
maker.
x It is also possible that cable gets a malfunction. Replace it with other cable
and check.
4FF
The USB error appears
on PC during outputting.
P The USB is not selected for Printing
port.
Verify that "USB xxxx " is selected for Printing port. If it is not yet selected,
change it. If there is no Printing port, install the driver again.
1. (For Windows 2000) Click "Start", and then click "Setting" and "Printer" in
this order.
(For Windows XP) Click "Start", and then click "Control panel" , "Printer
and other hardware" and "Printer and FAX" in this order.
(For Windows Vista) Click "Start", and then click "Control panel" ,
"Hardware and sound" and "Printer" inside group in this order.
2. Once displayed, right-click the Graphtec CC330 or Graphtec CC300 and
select "Properties".
3. Select the tab of "Port", and verify that "USBxxx " is selected.
4FF
See User's manual of Craft ROBO (CD-ROM) "Installing the
Craft ROBO Controller".
P The cutting data is too large.
Craft ROBO holds a memory for saving the data.
When data volume exceeds the memory size, an error may appear on a PC.
However, cutting will be performed normally.
22
The error message appears on the screen of Operation panel.
Symptoms
Causes
Countermeasures
"SD Error" appears.
P The SD Card is not set.
Correctly insert the SD Card into the SD Card slot.
"No File" appears.
P There is no fle in "Graphtec" folder
of SD Card.
Correctly save the cutting data into SD Card before inserting into the SD
Card slot.
"Unknown File" appears.
P The selected fle is a fle other than
GSP type.
Insert the SD Card where the GSP type fle is saved into the SD Card slot.
"RMS Error" appears.
(Only CC330-20)
P The Registration mark cannot be
scanned precisely.
Press [ENTER], and verify that "Unload Media" is displayed.
Press [ENTER] again, and take out the media.
Then correctly set the media again.
Cutting does not run well.
Symptoms
It is impossible to cut
fnely.
Causes
Countermeasures
P The Cutter and Ballpoint pen are not
correctly set in the Plunger holder.
Corectly set them into the Plunger holder.
P The Ballpoint pen is not correctly set
in the Ballpoint pen plunger.
Verify that the edge of Ballpoint pen is protruded by 3 to 3.5mm from
Ballpoint pen plunger.
4FF
4FF
Replace the bladeset.
P Inside of blade plunger is clogged.
Remove the blade adjustment cap, and clean it. If it cannot be improved,
replace it.
See User's manual of Craft ROBO (CD-ROM) "Adjusting and
Mounting the Blade Plunger".
P The Blade-length of blade plunger is
not matched.
Select the blade adjustment cap that is suited to the paper. Adjust the Bladelength of Cutter by the blade adjustment cap.
("Blue" 0.1mm, "Yellow " 0.2mm, "Red" 0.3mm)
Adjust in such a way that a bit of trace can be left on Backing sheet and
carrier sheet.
P Tool condition adjustment is not
precise.
Set the specifed paper in "Media Type" of Craft ROBO Controller. Also check
"Adjust Settings", and adjust the tool conditions.
4FF
P The Cutting mat is damaged.
The carrier sheet, backing P The Blade tip of blade plunger is
sheet is mistakenly cut.
extended too far.
P Tool condition adjustment is not
precise.
See User's manual of Craft ROBO (CD-ROM) "Craft ROBO
Controller Settings".
Damaged cutting mat will make the paper diffcult to cut. If this happens in
the same place, replace with new cutting mat.
Replace the blade adjustment cap with less blade-length.
4FF
When having trouble, see (this manual) "It is impossible to cut
fnely."
Set the specifed paper in "Media Type" of Craft ROBO Controller. Also check
"Adjust Settings", and set the tool conditions to "Thin Media".
4FF
See User's manual of Craft ROBO (CD-ROM) "Craft ROBO
Controller Settings".
P The Blade tip of blade plunger is not
extended.
Replace the blade adjustment cap with larger blade-length.
P Tool condition adjustment is not
precise.
Set the specifed paper in "Media Type" of Craft ROBO Controller. Also check
"Adjust Settings", and set the tool conditions to "Thick Media".
4FF
4FF
Letters and lines are
deformed during pen
writing.
See User's manual of Craft ROBO (CD-ROM) "Adjusting and
Mounting the Blade Plunger".
P The blade of blade plunger is worn
out. It gets chipped.
4FF
Thick paper cannot be
cut thoroughly.
See User's manual of Craft ROBO (CD-ROM) "Adjusting and
Mounting the Blade Plunger".
P "Pen" is not selected in "Media
Type".
When having trouble, see (this manual) "It is impossible to cut
fnely."
See User's manual of Craft ROBO (CD-ROM) "Craft ROBO
Controller Settings".
Select "Pen writing" in "Media Type" of Craft ROBO Controller.
4FF
23
See User's manual of Craft ROBO (CD-ROM) "Craft ROBO
Controller Settings".
Cutting does not run well (continued)
Symptoms
• Some areas cannot be
Causes
Countermeasures
P The data paper size is larger than
the actual paper set in Craft ROBO.
Match the data paper size and the actual paper size set in Craft ROBO.
• Paper gets jammed.
P The paper (thin paper) is curled
lifting above the work table.
Feed the Media to the inside by either Craft ROBO Controller or "Start Point"
of Operation panel.
x Note that plotting range will be decreased by the amount of Media feeding.
Some areas are not
yet completely cut after
cutting. (Some portions
are left)
P Even if Tool conditions adjustment
and blade adjustment cap are
correctly selected, some areas can
be left uncut depending on the type
of paper (thickness, frmness, fber
type). This is not a malfunction.
(For details about Tool conditions adjustment, see "It is impossible to cut
fnely.")
cut.
• Paper drops.
When the Registration mark (Positioning mark) is used (only CC330-20)
Symptoms
Causes
The cutting is off the mark P Laser or photocopy machine was
when the Registration
used to print the media.
mark (Positioning mark)
is used.
P The scanning position of Registration
mark sensor is not matched.
Countermeasures
A printed matter using a Laser printer tends to be deformed by heat at
output. This may cause the Registration mark to be incorrectly adjusted.
We recommend you to use an Ink jet printer.
The Craft ROBO uses the Optical sensor to scan the Registration mark and
to specify the cutting position.
If the cutting position gets out of order, correct the Registration mark sensor
for its position.
Correct the Registration mark sensor for its position.
4FF
When the Registration
mark (Positioning mark)
is used, the error of
"Scanning of Registration
mark failed" appears.
The Craft ROBO uses the Optical
sensor to scan the Registration mark
and to specify the cutting position. Error
can appear due to the causes stated
below.
P Glossy paper or laminated paper is
used.
P Strong glare or lighting exists near
the Craft ROBO.
P The set paper is curled.
P Color paper is used.
P The Registration mark is printed with
the colors other than black.
See User's manual of Craft ROBO (CD-ROM) "Craft ROBO
Controller Settings".
When light-refecting printed matters are set, Registration marks may not be
scanned. Replace the Paper.
If the light source such as illumination exists near the Craft ROBO, it is
possible that the Registration mark cannot be scanned. When an error
appears, change the installation place.
When curled paper which lifts above the work table is set, Registration marks
may not be scanned. Modify the curled paper and set it again. If it cannot be
solved, replace the paper.
When colored papers are set, Registration marks may not be scanned. Use
the paper of white or lighter color.
When the Registration mark is not printed with the black, it is possible that
the Registration mark cannot be scanned. Print the Registration mark with
the black color.
Others
Questions
Is it possible to use applications other
than the attached ones?
Answers
The operation of the application recommended by GRAPHTEC is covered by the warranty. There is no
guarantee of proper operation for other applications. For the recommended applications, please contact
the nearest retailer.
The Windows is the registered trademark of U.S. Microsoft Corporation in the United States
and other countries.
621459630
Other products' names are the trademark or the registered trademarks of each company.
24