1
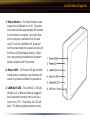
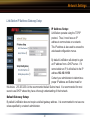
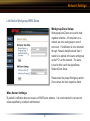
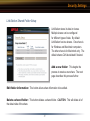
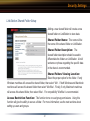
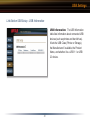
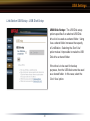
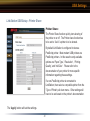
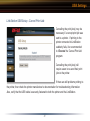
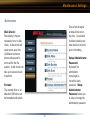
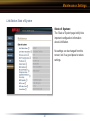
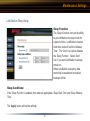
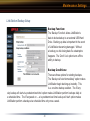
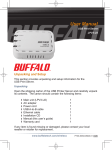
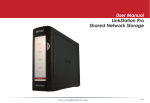
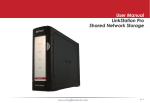
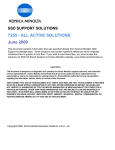
User Manual
LinkStation
HD-H120/160/250LAN
PY00-30014-DM20-01
Table of Contents
Table of Contents
LinkStation Diagram ......................................... 3
LinkStation Quick Setup ................................... 4
LinkNavigator Setup ....................................... 11
Accessing LinkStation Data from PC ............. 20
LinkStation Expansion .................................... 23
Basic Settings ................................................. 24
Network Settings ............................................ 27
Security Settings ............................................ 30
USB Settings ................................................... 37
Maintenance Settings ..................................... 42
Technical Specifications................................. 51
Technical Support ........................................... 52
2
LinkStation Diagram
1. Power Button – The Power Button is used
to power the LinkStation on or off. The power
on process will take approximately 30 seconds
to a full minute to complete. During this time,
do not unplug the LinkStation from the wall
outlet. To turn the LinkStation off, press and
hold the power button for several seconds until
the Power LED light begins blinking. At that
time, stop pressing the button and shutdown
should complete within 30 seconds.
2. Power LED – The Power LED light will blink
during startup or shutdown, but otherwise will
remain lit up while LinkStation is powered on.
3. LINK/ACT LED – The LINK/ACT LED light
will light up if an Ethernet Cable is plugged in
that is attached to another device such as a
router, hub, or PC. Periodically, the LED will
blink. This blinking signifies network activity.
3
LinkStation Diagram
4. Disk Full LED – When LinkStation’s internal
drive approaches 98% of its capacity, the Disk
Full LED will light up in red. For options to
increase storage capacity, see ‘LinkStation
Expansion’ section on Page 23.
5. Diagnostic LED – The Diagnostic LED
may begin flashing when the LinkStation
encounters an error.
6. USB Port (Front & Rear) – LinkStation
offers two USB ports for adding external drives
or USB printers. Please see the ‘LinkStation
Expansion’ section on Page 23 to learn more
about how to take advantage of the USB ports
on LinkStation.
4
LinkStation Quick Setup
The setup of the LinkStation is performed using the following steps:
◗ Plug the LinkStation’s power cord into a power outlet.
5
LinkStation Quick Setup
◗ Press the power button of the LinkStation to turn LinkStation on. Press the power button until the green
Power LED turns on.
6
LinkStation Quick Setup
◗ Connect the included Ethernet Cable into the Ethernet port on the rear of LinkStation. Connect the
other end of the cable into a hub, switch, or router on the network, or connect it directly to a nearby
running PC.
7
LinkStation Quick Setup
◗ Check the LINK/ACT light on the front of the LinkStation. If it is lit, then your LinkStation is connected
properly; please turn to Page 11 to continue setup. If it is not lit, continue to the next page.
8
LinkStation Quick Setup
◗ On the rear of the LinkStation, flip the black ‘Cable Selection’ switch. This switch tells LinkStation
whether to communicate over a Crossover or Patch cable.
◗ Verify that the LINK/ACT LED on the front of LinkStation is lit (see Page 8’s picture). If it is lit, continue
to Page 11 to continue setting up LinkStation. If the LINK/ACT LED is still not lit, please verify the
following:
9
LinkStation Quick Setup
✓ Both LinkStation and the switch or PC are powered on.
✓ The Ethernet Cable is securely fastened to both devices.
✓ The Ethernet Cable is not damaged, to verify this try using another Ethernet Cable.
✓ When verifying new cables, remember to switch the ‘Cable Selection’ switch to both positions (see
Page 9).
10
Link Navigator Setup
The setup of the LinkNavigator is performed using the following steps:
◗ Insert the LinkNavigator CD into a PC’s CD-ROM drive. Depending on the PC’s configuration, the
EasySetup program may launch. If it does not automatically launch, manually launch it by pressing
the ‘Start’ menu, selecting the ‘Run...’ option. When the ‘Run’ dialog opens, type x: easysetup.exe
(where x is the drive letter of the CD-ROM drive). Press ‘OK’ to continue.
11
Link Navigator Setup
◗ LinkNavigator is now running. Please press the ‘Install IP Setup Utility’ icon, then press the
‘Start’ button. The LinkStation IP Configuration Utility will launch and scan for networks.
12
Link Navigator Setup
◗ The IP Configuration Utility allows you to easily configure LinkStation’s network settings. The ‘Search’
button will re-scan the network for any and all LinkStations available. The drop down menu lists
all available LinkStations. If there are multiple LinkStations on the network, then select the proper
LinkStation from the pull down menu. Once the proper LinkStation has been selected, press the
‘Change IP Address’ button to continue.
13
Link Navigator Setup
◗ This part of the program changes LinkStation’s IP address. Check the check box that states
‘Acquire IP Address Automatically’. This will give LinkStation an IP address from
the network’s router/DHCP server. A set (static) IP address and gateway can also be set if
preferred. The ‘Administrator Password’ field sets an administrator password for the
web-based configuration. If desired, type a password in the field. When finished, press the
‘OK’ button. LinkStation will set the IP address and password settings.
14
Link Navigator Setup
◗ LinkStation is now ready to be configured. The login prompt will appear. The user name is
root. There is no password by default. If a password was specified on the previous step,
then type that password in, otherwise leave the password field blank. Press the ‘OK’ button
when finished.
User name: root
Password: There is no
default password.
Only enter a password if
one was set on Page 14.
◗ In the future LinkStation can be accessed by typing http://LINKSTATION_NAME into a Web
browser (where LINKSTATION_NAME is the name of LinkStation set on Page 17).
15
Link Navigator Setup
◗ Congratulations, you have logged into LinkStation. These are the main configuration menus.
Please bookmark this page so it can be accessed for future configuration changes. For
detailed explanations of each menu and setting, please refer to the ‘Settings’ section
(starting on Page 24) of this manual. To continue setup, click on the ‘Basic’ button. This
will allow you to setup some important settings. Then click on ‘LinkStation Name
Setup’ link to continue.
16
Link Navigator Setup
◗ This section allows you to change the name of your LinkStation. This name will be required
to access LinkStation data. A friendly, easy name is recommended. Please enter an
appropriate name in the ‘LinkStation Name’ field. Feel free to use your first or last name,
a description of the content to be installed on LinkStation, or simply name it LinkStation.
A short description of the LinkStation can be created in the ‘LinkStation Description’
field. Once the fields have been completed, press the ‘Apply’ button.
17
Link Navigator Setup
◗ By default there are two shares on LinkStation. Shares are best described as folders. One is for
Windows and Mac machines, while the other is for Macs only. Windows machines will only see one
share. If you would like to create additional shares for specific users or specific types of data, then
click on the ‘Security’ tab on the left. Then click on the ‘Setup Shared Folder’ link to continue.
From this screen you can add new shares/folders or edit existing shares/folders. Press the ‘Add New
Folder’ button to begin creating a new share/folder.
18
Link Navigator Setup
◗ To begin setting up a new share, enter an appropriate share/folder name in the ‘Shared
Folder Name’ field. Set the remaining settings to the desired function. ‘Access
restriction’ will turn on security features. Please refer to the ‘Settings’ section (starting
on Page 24) of this manual before using the ‘Access Restriction’ function. Press the
‘Apply’ button when finished. A new shared folder has been setup. Please repeat this step
to setup more shared folders.
19
Accessing LinkStation Data from a PC
Accessing LinkStation data is performed using the following steps:
◗ Press the ‘Start’ menu, select the ‘Run...’ option. When the ‘Run’ dialog opens, type
\\LinkStation_Name (where LinkStation_Name is name of the LinkStation set on Page 17). Press
the ‘OK’ button to continue.
20
Accessing LinkStation Data from a PC
◗ LinkStation’s root directory will appear. You will see all of the configured shares. All
users can read and write to all folders unless otherwise configured. To setup security and
password protection, please refer to the ‘Settings’ section (starting on Page 24) of this
manual. To setup a printer see the ‘LinkStation Expansion’ section found on Page 23.
LinkStation can be accessed by multiple PC’s simultaneously by following this step. A drive
letter can also be mapped for LinkStation, see the next page for more information.
21
Accessing LinkStation Data from a PC
◗ From the previous step’s screen, use the pull down menu and click ‘Tools’ and then select
‘Map Network Drive’. The ‘Map Network Drive’ program will run. Select the drive
letter you would like LinkStation to assume from the ‘Drive:’ pull down menu. Type
\\LinkStation_Name (where LinkStation_Name is the name of LinkStation set on Page 6) in
the ‘Folder:’ field. You can also press the ‘Browse’ button to browse for LinkStation through
the network. Once complete, press the ‘Finish’ button. LinkStation is now mapped to a
drive letter.
22
LinkStation Expansion
LinkStation Expansion Information
LinkStation has two USB 2.0 ports on it. These ports can be used for adding an external USB Hard
Drive or a USB Printer. LinkStation will then share the USB device to everyone on the network. There
is one port on the front of LinkStation and one port on the back of LinkStation. One printer and one
external USB Hard Drive can be added to either of the ports. However, two USB Printers or two USB
Hard Drives cannot be added, only one of each device.
To connect a USB device to LinkStation, simply plug it into one of the USB ports and set it up in the
LinkStation configuration.
USB Hard Drive Information:
See Page 39 to show you how to enable a USB Hard Drive to be used for shared folders. Page
49 will show you how format the USB Hard Drive. Page 46 & Page 47 will show you how to setup
LinkStation to backup to a USB Hard Drive. Page 31 & Page 32 will show you how to add more
shared folders with a USB Hard Drive.
USB Printer Information:
See Page 40 to setup a USB Printer on LinkStation.
23
Basic Settings
This section explains the functions of LinkStation’s settings:
Basic Setup
LinkStation
Name Setup:
LinkStation should
be configured with
a unique name to
identify it over the
network. A general
description can be
given for the device
as well.
Time Setup:
To properly catalogue
shares and files by
date, and to properly
schedule tasks (such
as backups), the
current date and time
must be set.
24
Basic Settings
LinkStation Name Setup
LinkStation Name:
The LinkStation name is a very
critical piece of information. This
name is used to access LinkStation
and is a key element in differentiating
LinkStation from other computers and
devices on the network.
The LinkStation name should be
something easy to remember. It can
be named after its owner, it’s location,
or the type of data that will be installed
on it. If there is only one LinkStation on the network, then naming it ‘LinkStation’ would be fine.
LinkStation Description:
The LinkStation Description is a handy way of differentiating multiple LinkStations. A suitable
description would be a short sentence or phrase describing LinkStation’s purpose.
The ‘Apply’ button will set the settings.
25
Basic Settings
LinkStation Time Setup
Time Setup:
The LinkStation time must be set to
maintain proper logs and to schedule
proper backups.
Input the proper time and date in or
press the ‘Current time is acquired’
button to set LinkStation’s time to the
same time as the PC that is being
used to configure it.
The time may need to be changed
at a later time to accommodate any changes of time (e.g. daylight savings).
The ‘Apply’ button will set the settings.
26
Network Settings
IP Address
Setup:
By default,
LinkStation will
attempt to obtain
an IP Address from
a DHCP Server. If
a DHCP Server
is not available,
it will assign itself
an IP Address of
192.168.11.150.
Setup Workgroup:
If a Microsoft
Workgroup or
AppleShare Zone
needs to be setup
for the LinkStation,
it can be performed
in the ‘Setup
Workgroup’
section. WINS server
information can be
added as well, but is
not necessary in most
environments.
A designated static
IP Address can be
given to LinkStation
within ‘IP Address
Setup’. The
gateway and subnet
can also be set here.
27
Network Settings
LinkStation IP Address/Gateway Setup
IP Address Setup:
LinkStation operates using the TCP/IP
protocol. Thus, it must have an IP
address to communicate on a network.
This IP address is also used to access the
web-based configuration menus.
By default LinkStation will attempt to gain
an IP address from a DHCP server. If it
cannot obtain an IP, it will default to the IP
address 192.168.11.150
Contact your administrator to determine a
proper IP address and Subnet mask for
this device. 255.255.255.0 is the recommended default Subnet mask. It is recommended for most
users to use DHCP unless they have a thorough understanding of their network.
Default Gateway Setup:
By default LinkStation does not require a default gateway address. It is recommended to not use one
unless specified by a network administrator.
28
Network Settings
LinkStation Workgroup/WINS Setup
Workgroup/Zone Setup:
Workgroups and Zones are used to help
organize networks. All computers on a
network are on a workgroup or zone of
some sort. If LinkStation is to be browsed
through ‘Network Neighborhood’ then it
needs to be placed in the same workgroup
as the PC’s on the network. The same
is true for Mac’s with the AppleShare
Network Zone Setup.
Please enter the proper Workgroup and/or
Zone names into their respective fields.
Wins Server Settings:
By default LinkStation does not require a WINS Server address. It is recommended to not use one
unless specified by a network administrator.
29
Security Settings
Setup Shared Folder
Setup Shared
Folder:
Shared folders
should be created to
store data. Access
to shared folders
can be controlled
via Group and User
permissions. By
default a shared
folder will allow
access to all Groups
and Users. Folders
can be created in
file formats for use
by Windows, Mac,
or both operating
systems.
can be added to the
Groups.
Setup User Group:
To ease security administration, Groups should be created
for users to control shared folder access. Once a group has
been created, settings on Shared Folders can be modified
to limit access to a Group or Groups. Also, individual users
30
User Setup:
Individual users and
passwords should be
created for each user
that needs to access
restricted Shared
Folders. Once
created, a user can
specifically be given
access to a shared
folder or included in
a group to received
permissions to a
shared folder.
Security Settings
LinkStation Shared Folder Setup
LinkStation stores its data in shares.
Multiple shares can be configured
for different types of data. By default
LinkStation has two shares. One share is
for Windows and Macintosh computers.
The other share is for Macintosh only. The
default shares CAN be deleted if desired.
Add a new folder: This begins the
process to create a new share. The next
page describes this process further.
Edit folder information: This button allows share information to be edited.
Delete a shared folder: This button deletes a shared folder. CAUTION: This will delete all of
the data inside of the share.
31
Security Settings
LinkStation Shared Folder Setup
Adding a new shared folder will create a new
shared folder on LinkStation to store data.
Shared Folder Name: This name will be
the name of the shared folder on LinkStation.
Shared Folder Description: The
shared folder description should be used to
differentiate the folders on LinkStation. A brief
sentence or phrase regarding the specific data
in the share is recommended.
Shared Folders Viewing Location:
Select the proper option for the folder. If only
Windows machines will access this shared folder, then select ‘Win’. If both Windows and Macintosh
machines will access this shared folder then select ‘Win/Mac’. Finally, if only Macintosh machines
will access this shared folder, then select ‘Mac’. For compatibility ‘Win/Mac’ is recommended.
Access Restriction Function: This function turns on user/group permissions. Using this
function will give the ability to secure a folder. For more information, see the next sections about
setting up users and groups.
32
Security Settings
LinkStation User Group Setup
User groups allow for quicker security
administration. A user group is a group of
users with specific writes to specific shared
folders. A business may want to make a
‘Manager’ user group and add all of its
managers to the group. This group could
have access to a shared folder that the
regular employees do not have access too.
By default there is a share called ‘hdusers’.
This share cannot be deleted.
Add a new group:
This begins the process to create a new
user group.
Edit group information:
This allows group settings to be changed. Users can be added or removed from the group here.
Delete a group:
This button deletes a user group. The users inside the user group will still exist.
33
Security Settings
LinkStation User Group Setup - Add New Group
Group Name: This will be the name of
the group. The name should somehow
reflect the types of users added. For
instance, the manger’s group could be
named, ‘Managers’.
Group Description: The group
description should be used to differentiate
the different groups on LinkStation. A brief
sentence or phrase regarding the users
inside of the group is recommended.
Select Affiliated Users:
Select the users that are to be added to this new group. The check box next to the user’s name
should be checked if they are to be added to the group. Users can be added or removed to the group
at a later time by editing the user group.
The ‘Apply’ button will set the settings.
34
Security Settings
LinkStation User Setup
User accounts allow LinkStation to limit
access to certain or all shared folders. A
user account is assigned a password. This
password is used to obtain the data inside
the shared folder. If a user does not have
the proper user account credentials then
access to the data will be denied.
NOTE: User accounts will only be used on
shares with the ‘Access Restriction’ function
turned on.
Add a new user:
This begins the process to create a new
user.
Edit user information:
This allows user settings to be changed. The user password can also be changed here.
Delete a user:
This button deletes a user.
35
Security Settings
LinkStation User Setup - Add New User
User Name: This will be the name of the
user. The name should somehow reflect the
user added. For instance, the user’s name.
Password: The user password is the
password associated with the user. The
password can be up to 8 characters and can
contain spaces, hyphens, and underscores.
The password will need to be confirmed on
the ‘Password(Confirm)’ line as well. The
password can be changed at a later time by
editing the user’s settings.
User Description:
The user description will help to differentiate different users on LinkStation.
The ‘Apply’ button will set the settings.
36
USB Settings
USB Setup
USB Information:
All devices currently
connected to the
LinkStation will be
displayed under ‘USB
Information’. It may be
necessary to restart the
LinkStation when new USB
devices are attached to the
LinkStation.
USB Disk Setup:
An attached USB disk can be configured as an additional Shared Folder for Group
and User access. If the USB disk is setup as a backup target, it cannot be set up for
Shared access. The attached USB disk must be formatted by the LinkStation.
Delete USB Print Job:
If the printer queue on the LinkStation becomes corrupt, the print queue should be
cleared. All submitted print jobs will need to be re-sent to the printer.
37
USB Printer Setup:
Postscript Printers can
easily be shared from the
LinkStation via USB. If
a non-Postscript Printer
is attached, additional
information from your
printer’s documentation is
required in the LinkStation
printer setup to ensure
proper operation. Once
installed, the printer will
be available to users by
browsing to LinkStation’s
printer folder.
USB Settings
LinkStation USB Setup - USB Information
USB Information: The USB Information
table lists information about connected USB
devices (such as printers and hard drives).
It lists the USB Class (Printer or Storage),
the Manufacturer if available, the Product
Name, and whether it is a USB 1.1 or USB
2.0 device.
38
USB Settings
LinkStation USB Setup - USB Disk Setup
USB Disk Setup: The USB Disk setup
options specifies if an attached USB Disk
drive is to be used as a shared folder. Using
it as a shared folder increases the capacity
of LinkStation. Selecting the ‘Don’t Use’
option makes it impossible to make the USB
Disk drive a shared folder.
If the drive is to be used for backup
purposes, then the USB disk cannot be used
as a shared folder. In this case, select the
‘Don’t Use’ option.
39
USB Settings
LinkStation USB Setup - Printer Share
Printer Share:
The Printer Share function quickly turns sharing of
the printer on or off. The Printer share function has
to be set to ‘Use’ if a printer is to be shared.
By default LinkStation is configured to share a
PostScript printer. Most modern USB printers are
PostScript printers. In this case the only available
options are ‘Paper Type’, ‘Resolution’, ‘Printing
Quality’, and ‘Ink/Color’. Please refer to the
documentation of your printer for more specific
information regarding these settings.
If a non-PostScript printer is connected to
LinkStation, then select a compatible printer from the
‘Type of Printer’ pull down menu. Other settings will
have to be set based on the printer’s documentation.
The ‘Apply’ button will set the settings.
40
USB Settings
LinkStation USB Setup - Cancel Print Job
Cancelling the print job(s) may be
necessary if a corrupt print job was
sent to a printer. If printing to the
printer connected to LinkStation
suddenly fails, it is recommended
to ‘Execute’ the ‘Cancel Print Job’
program.
Cancelling the print job(s) will
require users to re-send their print
jobs to the printer.
If there are still problems printing to
the printer, then check the printer manufacturer’s documentation for troubleshooting information.
Also, verify that the USB cable is securely fastened to both the printer and the LinkStation.
41
Maintenance Settings
Maintenance
Setup Backup:
Individual Shares
can be scheduled for
backup to an attached
USB device. The
scheduled backup
time should not conflict
with a scheduled sleep
time. If the backup
should overwrite the
previous backup, be
sure to check the
corresponding box;
otherwise, backups will
be incremental.
State of System:
The System State
page displays current
information about
LinkStation.
Setup Sleep:
The LinkStation can be
scheduled to enter a
sleep mode to preserve
energy at a scheduled
time. The sleep time
cannot coincide with
the time of a scheduled
backup or the backup
will fail.
42
Maintenance Settings
Maintenance
Once a format begins
all data will be lost on
the drive. Care should
be taken to backup any
data stored on the drive
prior to formatting.
Disk Check:
Periodically it may be
necessary to run a disk
check. A disk check will
repair errors upon the
LinkStation’s internal
drive surfaces and fix
errors within the file
system. A disk check can
take up to several hours
to perform.
Setup Administrator
Password:
By default, the
administrator
name (login) is
root with a blank
password. ‘Setup
Administrator
Password’ allows you
to setup or change the
administrator password.
Format:
The internal drive or an
attached USB drive can
be formatted and rebuilt.
43
Maintenance Settings
LinkStation State of System
State of System:
The ‘State of System’ page briefly lists
important configuration information
about LinkStation.
No settings can be changed from this
screen, but it’s a good place to review
settings.
44
Maintenance Settings
LinkStation Sleep Setup
Sleep Function:
The ‘Sleep Function’ turns on the ability
to put LinkStation into sleep mode for
a period of time. LinkStation’s internal
hard drive shuts off until the ‘Wakeup
Time’. The ‘Don’t Use’ option disables
the ‘Sleep Function’. Select ‘Don’t
Use’ if you want LinkStation to always
remain on.
When LinkStation is sleeping, data
cannot be accessed and scheduled
backups will fail.
Sleep Conditions:
If the ‘Sleep Function’ is enabled, then enter an appropriate ‘Sleep Start Time’ and ‘Sleep Wakeup
Time’
The ‘Apply’ button will set the settings.
45
Maintenance Settings
LinkStation Backup Setup
Backup Function:
The ‘Backup Function’ allows LinkStation’s
data to be backed up to an external USB Hard
Drive. Backing up data is important in the event
of LinkStation becoming damaged. Without
a backup you risk losing data if a catastrophe
happens. The ‘Don’t Use’ option turns off the
ability to backup.
Backup Conditions:
There are three options for starting backups.
The ‘Backup will start immediately’ option makes
LinkStation begin backing up instantly. This
is a one-time backup solution. The ‘Every
day backup will start at a predetermined time’ option makes LinkStation perform backups daily at
a scheduled time. The ‘Everyweek on ... at a predetermined time backup will start’ option makes
LinkStation perform a backup at a scheduled time only once a week.
46
Maintenance Settings
LinkStation Backup Setup
Predetermined Time:
The ‘Predetermined Time’ is the time that
LinkStation will perform it’s backup if scheduled.
Backup Source: The ‘Backup Source’ is the
list of available shares that can be backed up.
All shared folders or just specific shared folders
can be backed up.
Backup Destination:
The backup source allows you to select the USB
Disk to backup too. The ‘Overwrite Backup’
check box will delete the old backup before
starting. If unchecked, it will create a new incrimental backup.
The ‘Apply’ button will set the settings.
47
Maintenance Settings
LinkStation Disk Check Setup
Select Check Object Disk:
The ‘Object Disk’ is the disk that is to be
checked. The ‘Internal HDD’ option is for
LinkStation’s internal hard drive. If a USB Hard
Drive is connected to LinkStation, then it will
be available from the pull-down menu. Please
select the disk that should be checked. If both
disks are to be checked, then the ‘Disk Check’
must be run twice; once for each disk.
Select Check Contents:
The ‘Check Contents’ pull-down menu allows you to select whether the ‘Disk Check’ is to be a
‘Normal’ or a ‘Detailed Check’. A normal check will perform a fast disk check. The ‘Detailed Check’
will check every sector individually. The ‘Detailed Check’ can take up to several hours to complete. It
is recommended to not access LinkStation or turn LinkStation off during a ‘Detailed Check’.
48
Maintenance Settings
LinkStation Disk Format Setup
Select a Disk to Format:
The pull-down menu lists the drives that can be
formatted. If a USB Hard Drive is connected to
LinkStation then it will be available for format.
The ‘Internal HDD’ can also be formatted from
this page.
All external USB Hard Drives MUST be
formatted by LinkStation before they are used.
NOTE:
Formatting a drive will erase all data. Do not format a drive unless you are absolutely sure you want
to delete ALL of the data on the drive. Brand new USB Hard Drives will need to be formatted, but the
internal LinkStation hard drive comes pre-formatted.
49
Maintenance Settings
LinkStation Administrator Password Setup
Administrator Name:
The ‘Administrator Name’ is used to log into
the Web-Based configuration. The default
‘Administrator Name’ is root. It cannot be
changed.
Old Administrator Password:
Please type the current administrator password
into this field. By default there is no LinkStation
password. If a password has already been set on LinkStation, then enter the current password.
New Administrator Password:
Please enter the new desired administrator password. This password can be up to 8 characters and
CAN use spaces, hyphens, and underscores.
Re-input (Confirm):
Please re-type the ‘New Administrator Password’ into this field. This will ensure that the proper
password typed in correctly.
50
Technical Specifications
LAN Standards:
IEEE 802.3u 100BASE-TX; IEEE 802.3 10BASE-T
Transmission Types:
100Mbps/10Mbps; 100BASE-TX 4B/5B,
MLT-3;10BASE-T Manchester Coding
Access Media:
CSMA/CD
Media Interface:
RJ-45
USB Standard:
USB 2.0
Hi-Speed (HS)
Full-Speed (FS)
Low-Speed (LS)
USB Connector:
USB A Connector (2)
Data Transmission Speed:
Max: 480 Mbps (HS Mode)
Max: 12 Mbps (FS Mode)
Electric Current:
5.0V
Power Consumption:
17W Maximum
Dimensions:
2.4 x 6.94 x 7.4 in. (60 x 173.5 x 185 mm.)
Weight:
3.8 LB. (1.3 kg.)
Operating Temperature:
5-35 C; 20-80% non-condensing
51
Technical Support
FCC Warning
This device complies with part 15 of the FCC Rules. Operation is subject to the following two conditions:
(1) This device may not cause harmful interference, and (2) this device must accept any interference
received, including interference that may cause undesired operation.
CE Mark Warning
This is a Class B product. In a domestic enviroment, this product may cause radio interference, in which
case the user may be required to take adequate measures.
GPL Statement
This product uses GPL/LGPL software. Please see the GNU LICENSE document on the LinkNavigator
CD-ROM for more information concerning the terms of the license. To obtain a copy of our open source
software, please send a message to [email protected] to inquire about obtaining a package.
52