1
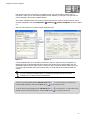
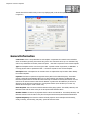
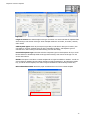
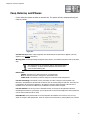
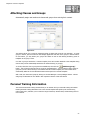
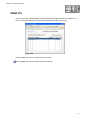
 Chapter 6 Contract Template FrontDesk v4.1.25 76 – 77 Contract Template Manager General Information 77 – 78 Fees, Returns, and Phases 79 Renewal Information 80 Attendance and Commissions 80 – 81 Attaching Classes and Groups 82 Personal Training Information 82 – 85 Packages 85 – 86 Client #’s
Contract
Revised on: 03/13/2009
87 Templates
Chapter 6: Contract Template Each member entered into the software has a Member Type. This is the member’s contract name, or
Contract ID. Before you can start entering members into the software you will need to set up at least one
contract template in the Contract Template Manager.
The Contract Templates section can be found in both the AAC Check-In and Point of Sale drop down menus.
Open either application and click Configuration
Members
Contract Templates, as shown in Figure
6-1.
Add, view, edit, and print out contract template information here.
Figure 6-1.
Figure 6-2.
Contract templates allow you to minimize your data entry. After you setup each of your templates, the
default values will be automatically filled when entering new contracts in the Contract Wizard. This will
dramatically reduce the time it takes to enter a contract, as well as reduce the chance of data entry errors.
You can override most fields during actual contract entry, so not all fields in the Contract Template are
required.
If you are utilizing the Package feature you should enter packages through the inventory
manager prior to creating contracts with Packages.
To add a new contract template click the “Add new record” button
contract template information, then click the “Save” button
or use your [Insert] key. Then enter the
or use your [F3] key to save.
To edit an existing contract template click the “Edit Record” button
all fields except for the Contract Id and Type. Click the “Save” button
or use the [F11] key. You will be able to edit
or use your [F3] key to save.
76
Chapter 6: Contract Template The title bar will show which mode you are in by displaying add, or edit at the top of the screen, as shown
in Figure 6-3.
Figure 6-3.
General Information
Contract ID: This is a unique identifier for each template. It represents the contract’s name and will be
shown as member type during the contract entry process. The contract id can be up to 10 characters long
and use any combination of numbers, letters and spaces. * This field is required for each contract template.
Type: Each template must be one of two types: TERM - a specific number of payments, or OPEN END - a
recurring payment with no specified end date. * This field is required for each contract template.
Description: Enter a description for the contract. This is not required but may be used to better identify
the contract templates.
Payment: This amount represents the payment amount paid over the desired frequency. The Default
amount is what will be automatically filled in for you when entering new contracts. The Minimum and
Maximum Payment amounts will limit the amount that may be entered into the Payment amount of a new
contract. If the amount entered is less than the Minimum or greater than the Maximum you will not be
allowed to use the amount in contract entry. Leaving these fields to $0.00 will allow you to enter any
desired amount during the actual contract entry.
Down Payment: This is the amount that the member will be paying upfront. The Default, Minimum, and
Maximum totals work the same as they do in the Payment fields described above.
Number of Pmts: The amount of payments that this contract is scheduled for. The Default, Minimum, and
Maximum amounts work the same as they do in the Payment and Down Payment fields described above.
Payment Frequency: How often the member will make payments. Some examples include monthly,
weekly, bi-weekly, semi-annually, and yearly. A partial list is shown below.
77
Chapter 6: Contract Template Figure 6-4.
Figure 6-5.
Length of Contract: The default length for this type of contract. It is used to calculate the expiration date
when entering a new contract of this type. Some examples include one 24 months, 12 months, 6 months,
and 3 months.
Valid Payment Types: Check only the Payment Types that you will allow for this type of contract. (This
only applies to ‘In House’ contracts where the club is responsible for billing. Valid Payment Types for
contracts sent to AAC for billing will be determined by your AAC client setup.)
Use Default Payment Type: Check this and select a Payment Type from the drop-down list if you would
like the software to automatically default to this type when entering a new contract of this type. You can
see the choices above.
Disable: This option is used when a contract template will no longer be available to members. You will not
want to delete the template because existing members may still be attached to it. By checking the disable
box, you will still see the template, but it will no longer be available for selection during contract entry.
Microsoft Word Document: Attach the proper word document to use for the contract template.
Figure 6-6.
78
Chapter 6: Contract Template Fees, Returns, and Phases
Control when the system considers an account late. The system will warn employees during the
check-in process.
Figure 6-7.
Account Late By: Number of days a payment must be late before any late fees are applied. (This only
applies to your ‘In House’ members.)
Warning After: A warning message will appear during check-in if a member’s payment is late by this many
days.
The following areas are controlled by AAC for AAC-billed members.
For consistency, In-House accounts should be set with the same
values as those billed by AAC.
Return Fees:
Checks: The amount you wish to charge for a returned check.
EFT: The amount you wish to charge for a returned EFT Draft.
Credit Cards: The amount you wish to charge for a returned credit card payment.
Late Fee Percentage: The Default % is the percentage you want to charge on late payments. The
Minimum $ and Maximum $ amounts limit the amount you can actually charge for late fees. If the Late Fee
is calculated to be less than the Minimum $, the Minimum $ amount will be charged. If the Late Fee is
calculated to be more than the Maximum $, the Maximum $ amount will be charged.
Late Fee Amount: Use this if you have a flat dollar amount you charge for late payments instead of
calculating them based on a percentage. (If you specify both a Late Fee percentage and a Late Fee Amount,
only the Late Fee Amount will be used.)
Phase Breaks: These phase breaks are used to determine the timelines of an account. They are very
similar in concept to A/R aging breaks. These are used in various functions to group together your accounts.
79
Chapter 6: Contract Template Renewal Information
Define the default renewal method and payment amount for this contract.
Figure 6-8.
Figure 6-9.
Renewal Type: You may choose to renew into a monthly agreement, or you have many term choices to
choose from. The way you do business will determine how your renewals are set up. You may select “N/A”
if you do not want contracts of this type to automatically renew.
Renewal Payment: This amount will become the new Payment amount when the contract goes into
renewal.
Renewal Total: If the contract will renew into another term agreement, you will enter the full sale of the
renewal in this section. This will be the balance owed when the contract goes into renewal.
Attendance and Commission
Usage restrictions may be set for entrance to the facility as well as for entering employee commission
information per contract template.
Figure 6-10.
Figure 6-11.
80
Chapter 6: Contract Template Valid Attendance Days: Check all of the days that members with this contract type are allowed to check
in.
Restricted Usage: Enter any usage limits for this type of contract.
Frequency: Set this to the frequency in which you want to restrict check-ins.
Allowed Visits: Enter the number of allowed check-ins for the selected frequency. If the
Frequency is set to anything except ‘N/A’ and the Allowed Visits are set to ‘0’, member’s with this
type of contract will not be able to automatically check in.
For Example: Billy signs a contract where he can only enter the facility 10 times per month. You
would set the frequency to monthly and the allowed visits to 10. Once Billy checks in for the 10th
time, he will not be allowed to check in anymore until the next month.
Allow Alternates: Check this if you would like to be able to add Alternate members for contracts of this
type. Alternate members will only have one identification number and you will have to choose them from a
list at time of check in. It is our suggestion that you use non-responsible members when having multiple
members on one contract. This way each member will have their own identification number for checking in.
Attendance reports will be more accurate. You may assign cards or pin numbers to each member if they are
entered as non-responsible members. To add a member as non-responsible, use the contract wizard.
Prompt for Class List: Check this if you would like members with this type of contract to get a pop-up list
of all available classes when they check in. This will be an entire list. If this is not checked and members are
attached to classes, only the classes they are attached to will show up in list format at time of check-in.
Employee Commissions
Commission Percentage: The Default % is the commission percentage you want to give an
employee for selling this type of contract. The Minimum $ and Maximum $ amounts limit the
commission amount that the employee can receive. If the commission is calculated to be less than
the Minimum $, the Minimum $ amount will be given to the employee. If the commission is
calculated to be more than the Maximum $, the Maximum $ amount will be given to the employee.
Commission Amount: Use this if you have a flat dollar commission amount you give your
employees for selling this type of contract instead of calculating it based on a percentage. (If you
specify both a Commission Percentage and a Commission Amount, only the Commission Amount
will be used.)
81
Chapter 6: Contract Template Attaching Classes and Groups
Automatically assign new members to classes and groups when entering their contract.
Figure 6-12.
The software allows you to create an unlimited number of classes and groups for your members. To create
groups or classes, open the Reference File Manager Application and click on the groups or classes buttons.
In this location, you may define your groups and classes as well as add existing members, guests or
templates to the group or class.
If a class or group is attached to a contract template, then each member attached to that template during
contract entry will be automatically attached to the selected class(s) or group(s).
(Add class/group)”
To do this, select the class or group from the Available list, then click the “
button. This will put the selected class or group into the Attached list. You may attach as many classes or
groups as you like. When entering a new member with this contract template, the new member will be
automatically added to all of the Attached Classes and Groups for this contract template.
Add or edit your classes and groups by clicking on the Class Manager or Group Manager buttons. Classes
and groups are discussed in more detail in their respective sections of this User Manual.
Personal Training Information
The Front Desk Personal Training module allows you to maintain all of your Personal Training information.
Entering Personal Training information here in the contract template will speed up new contract entry,
reduce input errors, and allow you to control the range of Sessions, Session Rates, and Processing Fees for
new contracts.
82
Chapter 6: Contract Template Figure 6-13.
Sessions Contracted: The total number of sessions contracted for this type of contract. If this is a ‘TERM’
type of contract, this is the number of sessions for the entire term. If this is an ‘OPEN END’ type of contract,
this is the number of sessions for each payment period. The Default amount is what will be automatically
filled in for you when entering new contracts. The Minimum and Maximum amounts will limit the number of
sessions that may be entered into the Total Sessions field of a new contract. Any amount entered that is
less than the Minimum or greater than the Maximum amount will not be allowed in the actual contract
entry. Leaving these fields to ‘0’ will allow you to enter any amount in the actual contract entry.
Session Rate: This is the amount of each personal training session for this type of contract. The Default,
Minimum, and Maximum amounts are used just as in the Sessions Contracted fields described above.
Processing Fee: The amount you will charge as a Processing Fee for this type of contract. The Default,
Minimum, and Maximum amounts are used just as in the Sessions Contracted and Session Rate fields
described above. The Processing Fee is only available for personal training type contracts.
Personal Trainer Credit hours: The number of hours that a trainer will receive credit for each time he
trains a member with this type of contract. This allows you to track the number of hours that your trainers
are giving personal training sessions.
Must Use Personal Training Sessions: If this option is checked, this contract will only be used for
personal training and will not be able to be used for any other type of agreement.
Use Personal Training Schedule: Check this box to schedule the number of sessions a member can use
in a month. This will allow them to use sessions before they have been paid for. Each member will only be
able to use the amount of sessions set up per month in the personal training schedule on each contract
template.
A program option must be set in the Front Desk Configuration to allow
personal training check-ins over the paid amount of sessions. The allowed
number of sessions can be set per contract template as well as globally for all
personal training members.
83
Chapter 6: Contract Template A. Setting up the Personal Training Schedule per Contract Template:
1.
Check the box labeled Use “Personal Training Schedule”.
2.
Click on the PT Schedule Button. The monthly training schedule will open.
3.
Click on each individual month so it is highlighted in blue and type the number of sessions
they will be able to use for each month. As each month’s sessions are entered, the total
sessions will be shown on the right hand side of the window.
4.
If the no rollover box is unchecked, the member will have the ability to use available sessions
from previous months. If checked, then sessions will have to be used by the member in the
specified months.
5.
After all information has been entered, click “Okay” to return to the Contract Template
Manager screen.
Figure 6-14.
Figure 6-15.
84
Chapter 6: Contract Template B. Turning on Program Options for the Personal Training Schedule:
1.
Open the AAC Front Desk Configuration by clicking on the “Configuration” drop down menu
in AAC Check In or Point of Sale.
Figure 6-16.
2.
Figure 6-17.
Click on the “Program Options” Tab. Expand the Personal Training Section so that all
Personal Training program options are shown.
Figure 6-18.
3.
Choose this option: “Allow Sessions That Have Not Been Paid For”. The option will
allow the Personal Training Scheduler to be used for contract templates as well as for Change
the value to “Yes”.
85
Chapter 6: Contract Template Packages
The packages tab is used to attach packages that the new member will automatically be using at the time of
entry. For example, a member is signed up for a year contract with unlimited tanning for the standard
tanning bed. You may create a package to log their tanning sessions and attach it to the contract template
so the member automatically has the package to check into.
Figure 6-19.
All Packages: View all packages available in the screen below.
Packages Selected: Shows only selected packages in the screen below.
Packages Not Selected: Shows only packages that are not selected in the screen below.
Select All Items: All packages listed below will be attached to the contract template.
Clear All Items: All packages listed below will be deselected and none will be attached to the contract
template.
Package Id: This is the system identifier for each individual package.
Package Description: The description is entered when the package is created through the Inventory
Manager and it gives more information to identify the package.
Quantity: This is the number of default packages a person assigned to the contract template will be given.
Normally, you want the quantity to be 1.
Selection: If the selection box is chosen for a package, then it is attached to the contract template you are
viewing. Any customer entered through Contract Wizard with the contract template will be attached to the
selected packages.
You can attach packages to in-house, AAC billed, and non-responsible members. If
the member is buying a package for a single month, you will be better off added
them as a customer through the point of sale application and selling the package
to them through point of sale. Adding customers through point of sale will be
explained in greater detail further on in the manual.
86
Chapter 6: Contract Template Client #’s
When entering a new contract template, it must be attached to the appropriate AAC Client Number or inhouse account and/or department. Use the Client numbers tab to assign contract types.
Figure 6-20.
Check the “Use” Box next to the appropriate client numbers.
Click the “Save” button when finished entering all information.
87