1
New Features
Version 5 Release 3
DN4500579.0904
EDA, EDA/SQL, FIDEL, FOCCALC, FOCUS, FOCUS Fusion, FOCUS Vision, Hospital-Trac, Information Builders, the Information Builders logo,
Parlay, PC/FOCUS, SmartMart, SmartMode, SNAPpack, TableTalk, WALDO, Web390, WebFOCUS and WorldMART are registered trademarks,
and iWay and iWay Software are trademarks of Information Builders, Inc.
Due to the nature of this material, this document refers to numerous hardware and software products by their trademarks. In most, if not
all cases, these designations are claimed as trademarks or registered trademarks by their respective companies. It is not this publisher’s
intent to use any of these names generically. The reader is therefore cautioned to investigate all claimed trademark rights before using any
of these names other than to refer to the product described.
Copyright © 2004, by Information Builders, Inc and iWay Software. All rights reserved. Patent Pending. This manual, or parts thereof, may
not be reproduced in any form without the written permission of Information Builders, Inc.
Preface
This manual describes the new features available in WebFOCUS Version 5 Release 3. It is
intended for all levels of users, including application developers, administrators, and end
users.
How This Manual Is Organized
This manual includes the following chapters:
Chapter/Appendix
Contents
1
WebFOCUS
Reporting Language
Enhancements
Describes new features and enhancements to the
WebFOCUS Reporting Language.
2
Developer Studio
Enhancements
Describes new features and enhancements to Developer
Studio.
3
Managed Reporting
Enhancements
Describes new features that enhance Managed
Reporting, including User Administration Services,
Dashboard, the applet environment, and migration and
extract utilities.
4
Ad Hoc Reporting
Enhancements
Describes new features that enhance ad hoc reporting
capabilities. These enhancements include OLAP, Report
Assistant, and Graph Assistant features.
5
ReportCaster
Enhancements
Describes new features and enhancements to
ReportCaster.
6
WebFOCUS Client
Enhancements
Describes new features that enhance the WebFOCUS
Client and National Language Support (NLS).
7
WebFOCUS Graphics
Provides an overview of WebFOCUS Graphics and the
different types of graphs you can create.
8
WebFOCUS Maintain
Enhancements
Describes the enhancements that have been made to the
Maintain Language, Server, and Development
environments.
9
WebFOCUS Web
Services
Describes how you can interact with a variety of
WebFOCUS features using Web services.
WebFOCUS New Features
iii
Preface
iv
Chapter/Appendix
Contents
10
Security
Enhancements
Describes the security enhancements for WebFOCUS.
11
Server
Enhancements
Describes new features that enhance the WebFOCUS
Reporting Server.
12
Adapter
Enhancements
Describes support for new DBMSs, new versions of
existing DBMSs, and features within DBMSs.
13
DataMigrator
Enhancements
Describes enhancements to DataMigrator (previously
known as ETL Manager).
14
Resource Analyzer
and Resource
Governor
Enhancements
Describes enhancements to Resource Analyzer and
Resource Governor.
Information Builders
Preface
Documentation Conventions
The following conventions apply throughout this manual:
Convention
Description
THIS TYPEFACE or
this typeface
Denotes syntax that you must enter exactly as shown.
this typeface
Represents a placeholder (or variable) in syntax for a value that
you or the system must supply.
underscore
Indicates a default setting.
this typeface
Represents a placeholder (or variable), a cross-reference, or an
important term. It may also indicate a button, menu item, or
dialog box option you can click or select.
this typeface
Highlights a file name or command.
Key + Key
Indicates keys that you must press simultaneously.
{
}
Indicates two or three choices; type one of them, not the
braces.
[
]
Indicates a group of optional parameters. None are required,
but you may select one of them. Type only the parameter in
the brackets, not the brackets.
|
Separates mutually exclusive choices in syntax. Type one of
them, not the symbol.
...
Indicates that you can enter a parameter multiple times. Type
only the parameter, not the ellipsis points (…).
.
.
.
Indicates that there are (or could be) intervening or additional
commands.
Related Publications
To view a current listing of our publications and to place an order, visit our World Wide Web
site, http://www.informationbuilders.com. You can also contact the Publications Order
Department at (800) 969-4636.
WebFOCUS New Features
v
Preface
Customer Support
Do you have questions about WebFOCUS?
Call Information Builders Customer Support Services (CSS) at (800) 736-6130 or
(212) 736-6130. Customer Support Consultants are available Monday through Friday
between 8:00 A.M. and 8:00 P.M. EST to address all your WebFOCUS questions. Information
Builders consultants can also give you general guidance regarding product capabilities and
documentation. Please be ready to provide your six-digit site code (xxxx.xx) when you call.
You can also access support services electronically, 24 hours a day, with InfoResponse
Online. InfoResponse Online is accessible through our World Wide Web site, http://
www.informationbuilders.com. It connects you to the tracking system and known-problem
database at the Information Builders support center. Registered users can open, update,
and view the status of cases in the tracking system and read descriptions of reported
software issues. New users can register immediately for this service. The technical support
section of www.informationbuilders.com also provides usage techniques, diagnostic tips,
and answers to frequently asked questions.
To learn about the full range of available support services, ask your Information Builders
representative about InfoResponse Online, or call (800) 969-INFO.
Information You Should Have
To help our consultants answer your questions most effectively, please provide the
following information when you call:
vi
•
Your six-digit site code (xxxx.xx).
•
Your WebFOCUS configuration:
•
The front-end you are using, including vendor and release.
•
The communications protocol (for example, TCP/IP or HLLAPI), including vendor
and release.
•
The software release.
•
Your server version and release. You can find this information using the Version
option in the Web Console.
•
The stored procedure (preferably with line numbers) or FOCUS commands being used
in server access.
•
The name of the Master File and Access File.
Information Builders
Preface
•
The exact nature of the problem:
•
Are the results or the format incorrect? Are the text or calculations missing or
misplaced?
•
The error message and return code, if applicable.
•
Is this related to any other problem?
•
Has the procedure or query ever worked in its present form? Has it been changed
recently? How often does the problem occur?
•
What release of the operating system are you using? Has it, WebFOCUS, your security
system, communications protocol, or front-end software changed?
•
Is this problem reproducible? If so, how?
•
Have you tried to reproduce your problem in the simplest form possible? For example,
if you are having problems joining two data sources, have you tried executing a query
containing the code to access a single data source?
•
Do you have a trace file?
•
How is the problem affecting your business? Is it halting development or production?
Do you just have questions about functionality or documentation?
User Feedback
In an effort to produce effective documentation, the Documentation Services staff
welcomes your opinions regarding this manual. Please use the Reader Comments form at
the end of this manual to relay suggestions for improving the publication or to alert us to
corrections. You can also use the Documentation Feedback form on our Web site, http://
www.informationbuilders.com.
Thank you, in advance, for your comments.
Information Builders Consulting and Training
Interested in training? Information Builders Education Department offers a wide variety of
training courses for this and other Information Builders products.
For information on course descriptions, locations, and dates, or to register for classes, visit
our World Wide Web site (http://www.informationbuilders.com) or call (800) 969-INFO to
speak to an Education Representative.
WebFOCUS New Features
vii
Preface
viii
Information Builders
Contents
1.
WebFOCUS Reporting Language Enhancements . . . . . . . . . . . . . . . . . . . . . . . . . . . .1-1
Combinations of Summary Commands . . . . . . . . . . . . . . . . . . . . . . . . . . . . . . . . . . . . . . . . . . . . . . . . . . . . . . . .1-2
Non-Overridable User Passwords (SET PERMPASS) . . . . . . . . . . . . . . . . . . . . . . . . . . . . . . . . . . . . . . . . . . . 1-12
Fully Qualified File Names in -INCLUDE Commands . . . . . . . . . . . . . . . . . . . . . . . . . . . . . . . . . . . . . . . . . . 1-14
Assigning Column Numbers Only to Report Output Columns . . . . . . . . . . . . . . . . . . . . . . . . . . . . . . . . 1-17
Using Column Notation in a Report Request . . . . . . . . . . . . . . . . . . . . . . . . . . . . . . . . . . . . . . . . . . . . 1-18
Creating a Standard Quote-Delimited Character String . . . . . . . . . . . . . . . . . . . . . . . . . . . . . . . . . . . . . . . 1-26
Producing ANSI-compliant Empty Reports . . . . . . . . . . . . . . . . . . . . . . . . . . . . . . . . . . . . . . . . . . . . . . . . . . . 1-30
Using Date System Amper Variables in Master File DEFINEs . . . . . . . . . . . . . . . . . . . . . . . . . . . . . . . . . . . 1-32
Creating a Drill Through PDF Compound Report . . . . . . . . . . . . . . . . . . . . . . . . . . . . . . . . . . . . . . . . . . . . . 1-35
Use With Other Features . . . . . . . . . . . . . . . . . . . . . . . . . . . . . . . . . . . . . . . . . . . . . . . . . . . . . . . . . . . . . . . 1-36
Drill Through and Drill Down Compared . . . . . . . . . . . . . . . . . . . . . . . . . . . . . . . . . . . . . . . . . . . . . . . 1-37
Creating a Drill Through PDF Compound Report . . . . . . . . . . . . . . . . . . . . . . . . . . . . . . . . . . . . . . . 1-39
Excel Table of Contents Feature . . . . . . . . . . . . . . . . . . . . . . . . . . . . . . . . . . . . . . . . . . . . . . . . . . . . . . . . . . . . . 1-49
Excel Compound Reports . . . . . . . . . . . . . . . . . . . . . . . . . . . . . . . . . . . . . . . . . . . . . . . . . . . . . . . . . . . . . . . . . . . 1-52
Displaying Multiple Excel Reports Simultaneously . . . . . . . . . . . . . . . . . . . . . . . . . . . . . . . . . . . . . . . . . . . 1-64
JPEG Format Support . . . . . . . . . . . . . . . . . . . . . . . . . . . . . . . . . . . . . . . . . . . . . . . . . . . . . . . . . . . . . . . . . . . . . . . 1-65
Preventing Messages With CREATE FILE . . . . . . . . . . . . . . . . . . . . . . . . . . . . . . . . . . . . . . . . . . . . . . . . . . . . . 1-67
Preserving Filters With Joins . . . . . . . . . . . . . . . . . . . . . . . . . . . . . . . . . . . . . . . . . . . . . . . . . . . . . . . . . . . . . . . . . 1-71
Preventing Propagation of SUBTOTAL and RECOMPUTE to the Grand Total . . . . . . . . . . . . . . . . . . . 1-74
Increased Number of Joins . . . . . . . . . . . . . . . . . . . . . . . . . . . . . . . . . . . . . . . . . . . . . . . . . . . . . . . . . . . . . . . . . . 1-80
Raised FML Rows Limit . . . . . . . . . . . . . . . . . . . . . . . . . . . . . . . . . . . . . . . . . . . . . . . . . . . . . . . . . . . . . . . . . . . . . . 1-80
Error Messages . . . . . . . . . . . . . . . . . . . . . . . . . . . . . . . . . . . . . . . . . . . . . . . . . . . . . . . . . . . . . . . . . . . . . . . . 1-80
FMLLIST Function: Retrieving an FML Tag List . . . . . . . . . . . . . . . . . . . . . . . . . . . . . . . . . . . . . . . . . . . . . . . . 1-81
FMLFOR Function: Retrieving FML Tag Values . . . . . . . . . . . . . . . . . . . . . . . . . . . . . . . . . . . . . . . . . . . . . . . . 1-82
FMLCAP Function: Retrieving FML Hierarchy Captions . . . . . . . . . . . . . . . . . . . . . . . . . . . . . . . . . . . . . . . 1-83
Increased Limit for MATCH FILE . . . . . . . . . . . . . . . . . . . . . . . . . . . . . . . . . . . . . . . . . . . . . . . . . . . . . . . . . . . . . 1-85
Creating Visual Discovery Output Files . . . . . . . . . . . . . . . . . . . . . . . . . . . . . . . . . . . . . . . . . . . . . . . . . . . . . . . 1-86
WebFOCUS New Features
ix
Contents
2.
Developer Studio Enhancements . . . . . . . . . . . . . . . . . . . . . . . . . . . . . . . . . . . . . . . . . . .2-1
Extended Currency Symbol Support . . . . . . . . . . . . . . . . . . . . . . . . . . . . . . . . . . . . . . . . . . . . . . . . . . . . . . . . . . .2-2
SET Commands . . . . . . . . . . . . . . . . . . . . . . . . . . . . . . . . . . . . . . . . . . . . . . . . . . . . . . . . . . . . . . . . . . . . . . . . . . . . . . .2-6
Tab-delimited Output Format . . . . . . . . . . . . . . . . . . . . . . . . . . . . . . . . . . . . . . . . . . . . . . . . . . . . . . . . . . . . . . . . .2-7
Minus Edit Display Option . . . . . . . . . . . . . . . . . . . . . . . . . . . . . . . . . . . . . . . . . . . . . . . . . . . . . . . . . . . . . . . . . . . . .2-8
Multivariate Regression . . . . . . . . . . . . . . . . . . . . . . . . . . . . . . . . . . . . . . . . . . . . . . . . . . . . . . . . . . . . . . . . . . . . . 2-10
NORMSDST and NORMSINV Subroutines . . . . . . . . . . . . . . . . . . . . . . . . . . . . . . . . . . . . . . . . . . . . . . . . . . . . 2-13
Execute Wizard . . . . . . . . . . . . . . . . . . . . . . . . . . . . . . . . . . . . . . . . . . . . . . . . . . . . . . . . . . . . . . . . . . . . . . . . . . . . . 2-14
Graph Enhancements . . . . . . . . . . . . . . . . . . . . . . . . . . . . . . . . . . . . . . . . . . . . . . . . . . . . . . . . . . . . . . . . . . . . . . . 2-22
Redesigned Graph Assistant . . . . . . . . . . . . . . . . . . . . . . . . . . . . . . . . . . . . . . . . . . . . . . . . . . . . . . . . . . . 2-22
Graph Assistant: Save Options . . . . . . . . . . . . . . . . . . . . . . . . . . . . . . . . . . . . . . . . . . . . . . . . . . . . . . . . . 2-22
Graph Assistant: Selection Criteria Features . . . . . . . . . . . . . . . . . . . . . . . . . . . . . . . . . . . . . . . . . . . . 2-23
Graph Assistant: Styling Specified Fields . . . . . . . . . . . . . . . . . . . . . . . . . . . . . . . . . . . . . . . . . . . . . . . . 2-23
Graph Assistant: Auto Arrange Feature . . . . . . . . . . . . . . . . . . . . . . . . . . . . . . . . . . . . . . . . . . . . . . . . . 2-25
Graph Assistant: Text Rotation . . . . . . . . . . . . . . . . . . . . . . . . . . . . . . . . . . . . . . . . . . . . . . . . . . . . . . . . . 2-27
Graph Types and Graph Styles . . . . . . . . . . . . . . . . . . . . . . . . . . . . . . . . . . . . . . . . . . . . . . . . . . . . . . . . . 2-28
Graph Display Formats . . . . . . . . . . . . . . . . . . . . . . . . . . . . . . . . . . . . . . . . . . . . . . . . . . . . . . . . . . . . . . . . 2-29
Adding Multiple Values With the Variable Editor . . . . . . . . . . . . . . . . . . . . . . . . . . . . . . . . . . . . . . . . . . . . . 2-32
Security Enhancements in Developer Studio . . . . . . . . . . . . . . . . . . . . . . . . . . . . . . . . . . . . . . . . . . . . . . . . . 2-34
Logging Off Areas in WebFOCUS Environments . . . . . . . . . . . . . . . . . . . . . . . . . . . . . . . . . . . . . . . . . . . . . . 2-35
Enhanced User Interface . . . . . . . . . . . . . . . . . . . . . . . . . . . . . . . . . . . . . . . . . . . . . . . . . . . . . . . . . . . . . . . . . . . . 2-36
Performance Enhancements . . . . . . . . . . . . . . . . . . . . . . . . . . . . . . . . . . . . . . . . . . . . . . . . . . . . . . . . . . . . . . . . 2-36
Local Machine Properties . . . . . . . . . . . . . . . . . . . . . . . . . . . . . . . . . . . . . . . . . . . . . . . . . . . . . . . . . . . . . . 2-38
Preserved Table Positioning in Graphical Tools . . . . . . . . . . . . . . . . . . . . . . . . . . . . . . . . . . . . . . . . . . . . . . . 2-39
Access to Any Text Editor . . . . . . . . . . . . . . . . . . . . . . . . . . . . . . . . . . . . . . . . . . . . . . . . . . . . . . . . . . . . . . . . . . . 2-39
Accessing Text Editors . . . . . . . . . . . . . . . . . . . . . . . . . . . . . . . . . . . . . . . . . . . . . . . . . . . . . . . . . . . . . . . . . 2-40
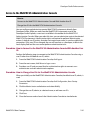
Access to the WebFOCUS Administration Console . . . . . . . . . . . . . . . . . . . . . . . . . . . . . . . . . . . . . . . . . . . 2-41
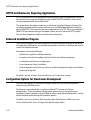
HTTPS Certification for Reporting Applications . . . . . . . . . . . . . . . . . . . . . . . . . . . . . . . . . . . . . . . . . . . . . . . 2-42
Enhanced Installation Program . . . . . . . . . . . . . . . . . . . . . . . . . . . . . . . . . . . . . . . . . . . . . . . . . . . . . . . . . . . . . . 2-42
Configuration Options for Stand-alone Development . . . . . . . . . . . . . . . . . . . . . . . . . . . . . . . . . . . . . . . . 2-42
Developer Studio Command Console . . . . . . . . . . . . . . . . . . . . . . . . . . . . . . . . . . . . . . . . . . . . . . . . . . . . . . . 2-43
New Formatting and Styling Capabilities in the Resource Layout Painter . . . . . . . . . . . . . . . . . . . . . 2-44
Changes in the Default Control Type . . . . . . . . . . . . . . . . . . . . . . . . . . . . . . . . . . . . . . . . . . . . . . . . . . . 2-44
Accessing Standard Reports in Managed Reporting . . . . . . . . . . . . . . . . . . . . . . . . . . . . . . . . . . . . 2-44
Changes to Properties Window . . . . . . . . . . . . . . . . . . . . . . . . . . . . . . . . . . . . . . . . . . . . . . . . . . . . . . . . 2-44
Browser Defaults Displayed in Design Window . . . . . . . . . . . . . . . . . . . . . . . . . . . . . . . . . . . . . . . . . . . . . . . 2-45
Using a Soft Alias With Resource Layout Painter Reports . . . . . . . . . . . . . . . . . . . . . . . . . . . . . . . . 2-47
Automatic Population of Fields with Parameter Values . . . . . . . . . . . . . . . . . . . . . . . . . . . . . . . . . . . . . . . 2-47
All Option Enhancements . . . . . . . . . . . . . . . . . . . . . . . . . . . . . . . . . . . . . . . . . . . . . . . . . . . . . . . . . . . . . . 2-49
Sizing a Graph in Resource Layout Painter . . . . . . . . . . . . . . . . . . . . . . . . . . . . . . . . . . . . . . . . . . . . . . . . . . . 2-50
Attaching a Dynamic Calendar in the Resource Layout Painter . . . . . . . . . . . . . . . . . . . . . . . . . . . . . . . 2-50
x
Information Builders
Contents
Customizing Dynamic Parameters . . . . . . . . . . . . . . . . . . . . . . . . . . . . . . . . . . . . . . . . . . . . . . . . . . . . . . . . . . .
Hidden Parameters . . . . . . . . . . . . . . . . . . . . . . . . . . . . . . . . . . . . . . . . . . . . . . . . . . . . . . . . . . . . . . . . . . . .
Dynamic Parameters . . . . . . . . . . . . . . . . . . . . . . . . . . . . . . . . . . . . . . . . . . . . . . . . . . . . . . . . . . . . . . . . . .
French and Japanese Localized Versions . . . . . . . . . . . . . . . . . . . . . . . . . . . . . . . . . . . . . . . . . . . . . . . . . . . . .
3.
2-54
2-58
2-58
2-59
Managed Reporting Enhancements . . . . . . . . . . . . . . . . . . . . . . . . . . . . . . . . . . . . . . . .3-1
Working With Procedures in Application Files in the Data Servers Component . . . . . . . . . . . . . . . . . .3-2
Increased Number of Domains . . . . . . . . . . . . . . . . . . . . . . . . . . . . . . . . . . . . . . . . . . . . . . . . . . . . . . . . . . . . . . . .3-2
Importing and Managing End User Custom Reports . . . . . . . . . . . . . . . . . . . . . . . . . . . . . . . . . . . . . . . . . . . .3-2
Data Security . . . . . . . . . . . . . . . . . . . . . . . . . . . . . . . . . . . . . . . . . . . . . . . . . . . . . . . . . . . . . . . . . . . . . . . . . . . . . . . . .3-5
Section 508 Compliance . . . . . . . . . . . . . . . . . . . . . . . . . . . . . . . . . . . . . . . . . . . . . . . . . . . . . . . . . . . . . . . . . . . . . .3-5
Managing Users . . . . . . . . . . . . . . . . . . . . . . . . . . . . . . . . . . . . . . . . . . . . . . . . . . . . . . . . . . . . . . . . . . . . . . . . . . . . . .3-6
Customizing the Look of the HTML Report and Graph Assistant . . . . . . . . . . . . . . . . . . . . . . . . . . . . . . . .3-8
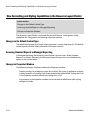
Dashboard Template Enhancements . . . . . . . . . . . . . . . . . . . . . . . . . . . . . . . . . . . . . . . . . . . . . . . . . . . . . . . . . .3-8
Creating a Locked Content Block . . . . . . . . . . . . . . . . . . . . . . . . . . . . . . . . . . . . . . . . . . . . . . . . . . . . . . . . . . . . 3-11
Toolbox Option . . . . . . . . . . . . . . . . . . . . . . . . . . . . . . . . . . . . . . . . . . . . . . . . . . . . . . . . . . . . . . . . . . . . . . . . . . . . . 3-11
New Buttons in the View Builder . . . . . . . . . . . . . . . . . . . . . . . . . . . . . . . . . . . . . . . . . . . . . . . . . . . . . . . . . . . . 3-11
Handling Messages in Dashboard . . . . . . . . . . . . . . . . . . . . . . . . . . . . . . . . . . . . . . . . . . . . . . . . . . . . . . . . . . . 3-12
Creating a Deferred Status Content Page . . . . . . . . . . . . . . . . . . . . . . . . . . . . . . . . . . . . . . . . . . . . . . . . . . . . 3-13
Positioning Items in a List Block . . . . . . . . . . . . . . . . . . . . . . . . . . . . . . . . . . . . . . . . . . . . . . . . . . . . . . . . . . . . . 3-13
Text Editor Enhancements . . . . . . . . . . . . . . . . . . . . . . . . . . . . . . . . . . . . . . . . . . . . . . . . . . . . . . . . . . . . . . . . . . 3-14
Domain/Role Tree Usability . . . . . . . . . . . . . . . . . . . . . . . . . . . . . . . . . . . . . . . . . . . . . . . . . . . . . . . . . . . . . . . . . 3-16
4.
Ad Hoc Reporting Enhancements . . . . . . . . . . . . . . . . . . . . . . . . . . . . . . . . . . . . . . . . . . .4-1
Redesigned HTML Report Assistant and Graph Assistant . . . . . . . . . . . . . . . . . . . . . . . . . . . . . . . . . . . . . . .4-2
HTML Report Assistant and Graph Assistant: Customizing Default Colors . . . . . . . . . . . . . . . . . . . . . . .4-2
HTML Report Assistant and Graph Assistant: Save Options . . . . . . . . . . . . . . . . . . . . . . . . . . . . . . . . . . . . .4-4
HTML Report Assistant and Graph Assistant: Working With Joins . . . . . . . . . . . . . . . . . . . . . . . . . . . . . . .4-4
HTML Report Assistant and Graph Assistant: Selection Criteria Features . . . . . . . . . . . . . . . . . . . . . . . 4-13
Creating a WHERE or WHERE TOTAL Statement . . . . . . . . . . . . . . . . . . . . . . . . . . . . . . . . . . . . . . . . . 4-13
Combining Expressions . . . . . . . . . . . . . . . . . . . . . . . . . . . . . . . . . . . . . . . . . . . . . . . . . . . . . . . . . . . . . . . . 4-22
Grouping Expressions Together With Parentheses . . . . . . . . . . . . . . . . . . . . . . . . . . . . . . . . . . . . . . 4-22
HTML Report Assistant and Graph Assistant: Styling Specified Fields . . . . . . . . . . . . . . . . . . . . . . . . . . 4-23
HTML Report Assistant: Subtotal, Sub-total, and Recalculate . . . . . . . . . . . . . . . . . . . . . . . . . . . . . . . . . . 4-25
HTML Report Assistant: Warning Message in Heading . . . . . . . . . . . . . . . . . . . . . . . . . . . . . . . . . . . . . . . . 4-26
HTML Report Assistant: New Display Formats . . . . . . . . . . . . . . . . . . . . . . . . . . . . . . . . . . . . . . . . . . . . . . . . 4-26
HTML Report Assistant: Fully Qualified Field Names . . . . . . . . . . . . . . . . . . . . . . . . . . . . . . . . . . . . . . . . . . 4-26
HTML Graph Assistant: Auto Arrange Feature . . . . . . . . . . . . . . . . . . . . . . . . . . . . . . . . . . . . . . . . . . . . . . . . 4-27
HTML Graph Assistant: Text Rotation . . . . . . . . . . . . . . . . . . . . . . . . . . . . . . . . . . . . . . . . . . . . . . . . . . . . . . . . 4-29
HTML Graph Assistant: Graph Types and Graph Styles . . . . . . . . . . . . . . . . . . . . . . . . . . . . . . . . . . . . . . . . 4-31
HTML Graph Assistant: Graph Display Formats . . . . . . . . . . . . . . . . . . . . . . . . . . . . . . . . . . . . . . . . . . . . . . . 4-33
WebFOCUS New Features
xi
Contents
OLAP Features . . . . . . . . . . . . . . . . . . . . . . . . . . . . . . . . . . . . . . . . . . . . . . . . . . . . . . . . . . . . . . . . . . . . . . . . . . . . . . 4-37
Saving Options . . . . . . . . . . . . . . . . . . . . . . . . . . . . . . . . . . . . . . . . . . . . . . . . . . . . . . . . . . . . . . . . . . . . . . . . 4-37
Uniform Field Name Referencing in OLAP . . . . . . . . . . . . . . . . . . . . . . . . . . . . . . . . . . . . . . . . . . . . . . 4-42
5.
ReportCaster Enhancements . . . . . . . . . . . . . . . . . . . . . . . . . . . . . . . . . . . . . . . . . . . . . . .5-1
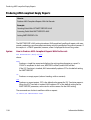
Migrating the ReportCaster Configuration File . . . . . . . . . . . . . . . . . . . . . . . . . . . . . . . . . . . . . . . . . . . . . . . . .5-2
Migration of Daily Jobs . . . . . . . . . . . . . . . . . . . . . . . . . . . . . . . . . . . . . . . . . . . . . . . . . . . . . . . . . . . . . . . . . . . . . . . .5-2
Informix and Sybase Support . . . . . . . . . . . . . . . . . . . . . . . . . . . . . . . . . . . . . . . . . . . . . . . . . . . . . . . . . . . . . . . . . .5-2
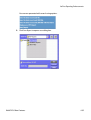
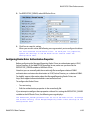
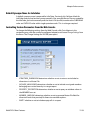
Configuring Access to the User Interfaces Using the WebFOCUS Administration Console . . . . . . . .5-3
Configuration Tool Settings . . . . . . . . . . . . . . . . . . . . . . . . . . . . . . . . . . . . . . . . . . . . . . . . . . . . . . . . . . . . . . . . . . .5-4
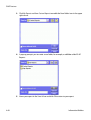
Development and Administration Interface . . . . . . . . . . . . . . . . . . . . . . . . . . . . . . . . . . . . . . . . . . . . . . . . . . . .5-6
HTML User Interface . . . . . . . . . . . . . . . . . . . . . . . . . . . . . . . . . . . . . . . . . . . . . . . . . . . . . . . . . . . . . . . . . . . . . . . . . .5-9
Checking the Status of a Scheduled Job . . . . . . . . . . . . . . . . . . . . . . . . . . . . . . . . . . . . . . . . . . . . . . . . . .5-9
Creating, Updating, and Deleting an Execution ID . . . . . . . . . . . . . . . . . . . . . . . . . . . . . . . . . . . . . . 5-10
Customizing the Dynamic Language Switch in ReportCaster . . . . . . . . . . . . . . . . . . . . . . . . . . . . . . . . . 5-14
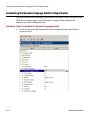
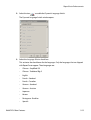
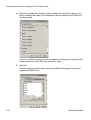
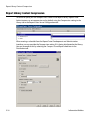
Report Library Content Compression . . . . . . . . . . . . . . . . . . . . . . . . . . . . . . . . . . . . . . . . . . . . . . . . . . . . . . . . 5-18
Including Parameters and Burst Values in an E-mail Subject Line . . . . . . . . . . . . . . . . . . . . . . . . . . . . . 5-19
Automatically Deleting Distribution Files . . . . . . . . . . . . . . . . . . . . . . . . . . . . . . . . . . . . . . . . . . . . . . . . . . . . 5-20
Report Formats . . . . . . . . . . . . . . . . . . . . . . . . . . . . . . . . . . . . . . . . . . . . . . . . . . . . . . . . . . . . . . . . . . . . . . . . . . . . . 5-21
&ECHO and -TYPE Support in Log Reports . . . . . . . . . . . . . . . . . . . . . . . . . . . . . . . . . . . . . . . . . . . . . . . . . . . 5-23
PDF Drill Through Support . . . . . . . . . . . . . . . . . . . . . . . . . . . . . . . . . . . . . . . . . . . . . . . . . . . . . . . . . . . . . . . . . . 5-24
ReportCaster Bean and Web Services API . . . . . . . . . . . . . . . . . . . . . . . . . . . . . . . . . . . . . . . . . . . . . . . . . . . . 5-24
Address Book Options . . . . . . . . . . . . . . . . . . . . . . . . . . . . . . . . . . . . . . . . . . . . . . . . . . . . . . . . . . . . . . . . . 5-25
Scheduling Options . . . . . . . . . . . . . . . . . . . . . . . . . . . . . . . . . . . . . . . . . . . . . . . . . . . . . . . . . . . . . . . . . . . 5-25
Report Library Options . . . . . . . . . . . . . . . . . . . . . . . . . . . . . . . . . . . . . . . . . . . . . . . . . . . . . . . . . . . . . . . . 5-26
ReportCaster Console Options . . . . . . . . . . . . . . . . . . . . . . . . . . . . . . . . . . . . . . . . . . . . . . . . . . . . . . . . . 5-26
Log File Options . . . . . . . . . . . . . . . . . . . . . . . . . . . . . . . . . . . . . . . . . . . . . . . . . . . . . . . . . . . . . . . . . . . . . . . 5-26
6.
WebFOCUS Client Enhancements . . . . . . . . . . . . . . . . . . . . . . . . . . . . . . . . . . . . . . . . . .6-1
Name Change for WebFOCUS Client Console . . . . . . . . . . . . . . . . . . . . . . . . . . . . . . . . . . . . . . . . . . . . . . . . . .6-2
Setting a Default WebFOCUS Reporting Server . . . . . . . . . . . . . . . . . . . . . . . . . . . . . . . . . . . . . . . . . . . . . . . . .6-2
New Grouping of Variables in cgivars.wfs . . . . . . . . . . . . . . . . . . . . . . . . . . . . . . . . . . . . . . . . . . . . . . . . . . . . . .6-3
Restoring Default Client Settings . . . . . . . . . . . . . . . . . . . . . . . . . . . . . . . . . . . . . . . . . . . . . . . . . . . . . . . . . . . . . .6-5
New Settings in cgivars.wfs . . . . . . . . . . . . . . . . . . . . . . . . . . . . . . . . . . . . . . . . . . . . . . . . . . . . . . . . . . . . . . . . . . .6-6
New Format Types in mime.wfs . . . . . . . . . . . . . . . . . . . . . . . . . . . . . . . . . . . . . . . . . . . . . . . . . . . . . . . . . . . . . 6-15
Opening Multiple Excel Spreadsheets . . . . . . . . . . . . . . . . . . . . . . . . . . . . . . . . . . . . . . . . . . . . . . . . . . 6-16
Customizing the Dynamic Language Switch . . . . . . . . . . . . . . . . . . . . . . . . . . . . . . . . . . . . . . . . . . . . . . . . . 6-17
Configuring the Client for the Baltic Language . . . . . . . . . . . . . . . . . . . . . . . . . . . . . . . . . . . . . . . . . . . . . . . 6-19
Configuring Managed Reporting Tool Types . . . . . . . . . . . . . . . . . . . . . . . . . . . . . . . . . . . . . . . . . . . . . . . . . 6-19
Configuring Default Values for the WebFOCUS Client . . . . . . . . . . . . . . . . . . . . . . . . . . . . . . . . . . . . . . . . 6-21
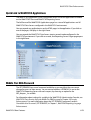
Quick Link to WebFOCUS Applications . . . . . . . . . . . . . . . . . . . . . . . . . . . . . . . . . . . . . . . . . . . . . . . . . . . . . . 6-23
Middle Tier DBA Password . . . . . . . . . . . . . . . . . . . . . . . . . . . . . . . . . . . . . . . . . . . . . . . . . . . . . . . . . . . . . . . . . . 6-23
xii
Information Builders
Contents
Diagnostics . . . . . . . . . . . . . . . . . . . . . . . . . . . . . . . . . . . . . . . . . . . . . . . . . . . . . . . . . . . . . . . . . . . . . . . . . . . . . . . . .
WebFOCUS Client Traces . . . . . . . . . . . . . . . . . . . . . . . . . . . . . . . . . . . . . . . . . . . . . . . . . . . . . . . . . . . . . .
Verification Tool . . . . . . . . . . . . . . . . . . . . . . . . . . . . . . . . . . . . . . . . . . . . . . . . . . . . . . . . . . . . . . . . . . . . . . .
Configuring Managed Reporting Realm Driver Authentication . . . . . . . . . . . . . . . . . . . . . . . . . . . . . . .
Setting the REPOSITORY_DRIVER Variable . . . . . . . . . . . . . . . . . . . . . . . . . . . . . . . . . . . . . . . . . . . . . .
Configuring Realm Driver Authentication Properties . . . . . . . . . . . . . . . . . . . . . . . . . . . . . . . . . . . .
Portuguese Localized Version . . . . . . . . . . . . . . . . . . . . . . . . . . . . . . . . . . . . . . . . . . . . . . . . . . . . . . . . . . . . . . .
Netscape Support . . . . . . . . . . . . . . . . . . . . . . . . . . . . . . . . . . . . . . . . . . . . . . . . . . . . . . . . . . . . . . . . . . . . . . . . . .
Self-Service Features . . . . . . . . . . . . . . . . . . . . . . . . . . . . . . . . . . . . . . . . . . . . . . . . . . . . . . . . . . . . . . . . . .
Managed Reporting Features . . . . . . . . . . . . . . . . . . . . . . . . . . . . . . . . . . . . . . . . . . . . . . . . . . . . . . . . . .
Dashboard Features . . . . . . . . . . . . . . . . . . . . . . . . . . . . . . . . . . . . . . . . . . . . . . . . . . . . . . . . . . . . . . . . . . .
7.
6-24
6-24
6-26
6-34
6-34
6-35
6-40
6-41
6-41
6-43
6-43
WebFOCUS Graphics . . . . . . . . . . . . . . . . . . . . . . . . . . . . . . . . . . . . . . . . . . . . . . . . . . . . . .7-1
What Is Scalable Vector Graphics? . . . . . . . . . . . . . . . . . . . . . . . . . . . . . . . . . . . . . . . . . . . . . . . . . . . . . . . . . . . . .7-2
Viewing Scalable Vector Graphics . . . . . . . . . . . . . . . . . . . . . . . . . . . . . . . . . . . . . . . . . . . . . . . . . . . . . . . . . . . . .7-3
Portable Network Graphics . . . . . . . . . . . . . . . . . . . . . . . . . . . . . . . . . . . . . . . . . . . . . . . . . . . . . . . . . . . . . . . . . . . .7-3
Virtual Coordinate System . . . . . . . . . . . . . . . . . . . . . . . . . . . . . . . . . . . . . . . . . . . . . . . . . . . . . . . . . . . . . . . . . . . .7-4
A Look at Coordinate Systems: Cartesian and Virtual . . . . . . . . . . . . . . . . . . . . . . . . . . . . . . . . . . . . . .7-4
How Does WebFOCUS Graphics Use the Virtual Coordinate System? . . . . . . . . . . . . . . . . . . . . . .7-9
Implementing API Calls . . . . . . . . . . . . . . . . . . . . . . . . . . . . . . . . . . . . . . . . . . . . . . . . . . . . . . . . . . . . . . . . . . . . . 7-18
8.
WebFOCUS Maintain Enhancements . . . . . . . . . . . . . . . . . . . . . . . . . . . . . . . . . . . . . . . .8-1
WebFOCUS Maintain Application Debugger . . . . . . . . . . . . . . . . . . . . . . . . . . . . . . . . . . . . . . . . . . . . . . . . . . .8-2
Debugger Screen . . . . . . . . . . . . . . . . . . . . . . . . . . . . . . . . . . . . . . . . . . . . . . . . . . . . . . . . . . . . . . . . . . . . . . . .8-4
Debugging Your Application . . . . . . . . . . . . . . . . . . . . . . . . . . . . . . . . . . . . . . . . . . . . . . . . . . . . . . . . . . . .8-5
Tracking Variables . . . . . . . . . . . . . . . . . . . . . . . . . . . . . . . . . . . . . . . . . . . . . . . . . . . . . . . . . . . . . . . . . . . . . . .8-6
Navigation Control . . . . . . . . . . . . . . . . . . . . . . . . . . . . . . . . . . . . . . . . . . . . . . . . . . . . . . . . . . . . . . . . . . . . . .8-6
Maintain Form Enhancements . . . . . . . . . . . . . . . . . . . . . . . . . . . . . . . . . . . . . . . . . . . . . . . . . . . . . . . . . . . . . . . . .8-7
9.
WebFOCUS Web Services . . . . . . . . . . . . . . . . . . . . . . . . . . . . . . . . . . . . . . . . . . . . . . . . . .9-1
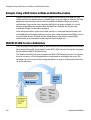
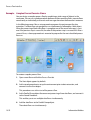
What Is a Web Service? . . . . . . . . . . . . . . . . . . . . . . . . . . . . . . . . . . . . . . . . . . . . . . . . . . . . . . . . . . . . . . . . . . . . . . . .9-2
Components of a Web Service . . . . . . . . . . . . . . . . . . . . . . . . . . . . . . . . . . . . . . . . . . . . . . . . . . . . . . . . . . . . . . . . .9-3
Using WebFOCUS Web Services . . . . . . . . . . . . . . . . . . . . . . . . . . . . . . . . . . . . . . . . . . . . . . . . . . . . . . . . . . . . . . .9-4
What Can You Do Through a WebFOCUS Web Service? . . . . . . . . . . . . . . . . . . . . . . . . . . . . . . . . . . .9-5
The WebFOCUS WSDL Creation Utility . . . . . . . . . . . . . . . . . . . . . . . . . . . . . . . . . . . . . . . . . . . . . . . . . . .9-5
The WebFOCUS Web Services Adapter . . . . . . . . . . . . . . . . . . . . . . . . . . . . . . . . . . . . . . . . . . . . . . . . . . .9-5
Example: Using a Web Service to Make an Online Reservation . . . . . . . . . . . . . . . . . . . . . . . . . . . . . . . . . .9-6
WebFOCUS Web Services Architecture . . . . . . . . . . . . . . . . . . . . . . . . . . . . . . . . . . . . . . . . . . . . . . . . . . . . . . . .9-6
WebFOCUS New Features
xiii
Contents
10. Security Enhancements . . . . . . . . . . . . . . . . . . . . . . . . . . . . . . . . . . . . . . . . . . . . . . . . . . 10-1
Managed Reporting Realm Driver . . . . . . . . . . . . . . . . . . . . . . . . . . . . . . . . . . . . . . . . . . . . . . . . . . . . . . . . . . . 10-2
WebFOCUS Data Security Using the Middle Tier DBA Password . . . . . . . . . . . . . . . . . . . . . . . . . . . . . . . 10-2
Developer Studio Security Enhancements . . . . . . . . . . . . . . . . . . . . . . . . . . . . . . . . . . . . . . . . . . . . . . . . . . . 10-4
Custom Logon Template Support . . . . . . . . . . . . . . . . . . . . . . . . . . . . . . . . . . . . . . . . . . . . . . . . . . . . . . 10-4
Enhanced Support for Netegrity SiteMinder . . . . . . . . . . . . . . . . . . . . . . . . . . . . . . . . . . . . . . . . . . . . 10-5
Support for RSA ClearTrust . . . . . . . . . . . . . . . . . . . . . . . . . . . . . . . . . . . . . . . . . . . . . . . . . . . . . . . . . . . . 10-5
ReportCaster Integration With SiteMinder . . . . . . . . . . . . . . . . . . . . . . . . . . . . . . . . . . . . . . . . . . . . . . . . . . . 10-5
Optional Encryption Providers for ReportCaster . . . . . . . . . . . . . . . . . . . . . . . . . . . . . . . . . . . . . . . . . . . . . . 10-6
Sun JCE Provider Support . . . . . . . . . . . . . . . . . . . . . . . . . . . . . . . . . . . . . . . . . . . . . . . . . . . . . . . . . . . . . . 10-9
Enhanced Single Signon Support for Open Portal Services . . . . . . . . . . . . . . . . . . . . . . . . . . . . . . . . . . 10-10
Configuring the Trusted MR Sign-On Setting for ReportCaster . . . . . . . . . . . . . . . . . . . . . . . . . . . . . . . 10-10
11. Server Enhancements . . . . . . . . . . . . . . . . . . . . . . . . . . . . . . . . . . . . . . . . . . . . . . . . . . . 11-1
Large-Scale Application Deployment Across Multiple Servers . . . . . . . . . . . . . . . . . . . . . . . . . . . . . . . . 11-2
Installing and Configuring the Cluster Manager Server . . . . . . . . . . . . . . . . . . . . . . . . . . . . . . . . . . 11-3
Configuring Subservers for Cluster Manager Server . . . . . . . . . . . . . . . . . . . . . . . . . . . . . . . . . . . . . 11-4
Configuring the Client for Cluster Manager Server . . . . . . . . . . . . . . . . . . . . . . . . . . . . . . . . . . . . . . 11-4
Using the Stress Test Tool to Fine-Tune and Test the Server . . . . . . . . . . . . . . . . . . . . . . . . . . . . . . . . . . 11-5
Enhanced Stress Test Tool Options . . . . . . . . . . . . . . . . . . . . . . . . . . . . . . . . . . . . . . . . . . . . . . . . . . . . . . . . . . 11-5
Server Check Up Daemon . . . . . . . . . . . . . . . . . . . . . . . . . . . . . . . . . . . . . . . . . . . . . . . . . . . . . . . . . . . . . . . . . . . 11-6
Enhanced Management of Shared Memory . . . . . . . . . . . . . . . . . . . . . . . . . . . . . . . . . . . . . . . . . . . . . . . . . . 11-6
Restricting Host Names . . . . . . . . . . . . . . . . . . . . . . . . . . . . . . . . . . . . . . . . . . . . . . . . . . . . . . . . . . . . . . . . . . . . . 11-6
Securing the Web Console . . . . . . . . . . . . . . . . . . . . . . . . . . . . . . . . . . . . . . . . . . . . . . . . . . . . . . . . . . . . . . . . . . 11-8
Authenticating Users at the Database Level . . . . . . . . . . . . . . . . . . . . . . . . . . . . . . . . . . . . . . . . . . . . . . . . . . 11-8
Running a Server in LDAP Security Mode . . . . . . . . . . . . . . . . . . . . . . . . . . . . . . . . . . . . . . . . . . . . . . . . . . . 11-10
LDAP Support . . . . . . . . . . . . . . . . . . . . . . . . . . . . . . . . . . . . . . . . . . . . . . . . . . . . . . . . . . . . . . . . . . . . . . . . . . . . . 11-10
Specifying the Security Scope . . . . . . . . . . . . . . . . . . . . . . . . . . . . . . . . . . . . . . . . . . . . . . . . . . . . . . . . . . . . . . 11-11
E-mail Notification for Crashed or Aborted Agents . . . . . . . . . . . . . . . . . . . . . . . . . . . . . . . . . . . . . . . . . . 11-13
Special Character Support in Names . . . . . . . . . . . . . . . . . . . . . . . . . . . . . . . . . . . . . . . . . . . . . . . . . . . . . . . . 11-13
Support for User-Level Profiles . . . . . . . . . . . . . . . . . . . . . . . . . . . . . . . . . . . . . . . . . . . . . . . . . . . . . . . . . . . . . 11-14
Limiting the Time Allowed for a Connection to the Server . . . . . . . . . . . . . . . . . . . . . . . . . . . . . . . . . . . 11-14
Controlling a Web Session Expiration Time . . . . . . . . . . . . . . . . . . . . . . . . . . . . . . . . . . . . . . . . . . . . . . . . . 11-15
Unlimited Number of Administration IDs . . . . . . . . . . . . . . . . . . . . . . . . . . . . . . . . . . . . . . . . . . . . . . . . . . . 11-16
Granting Application Administrator Privileges to All Users . . . . . . . . . . . . . . . . . . . . . . . . . . . . . . . . . . . 11-16
National Language Support Default Code Page . . . . . . . . . . . . . . . . . . . . . . . . . . . . . . . . . . . . . . . . . . . . . 11-17
Baltic Language Support on Server . . . . . . . . . . . . . . . . . . . . . . . . . . . . . . . . . . . . . . . . . . . . . . . . . . . . . . . . . 11-17
Specifying the Life Span for the Server Activity Log . . . . . . . . . . . . . . . . . . . . . . . . . . . . . . . . . . . . . . . . . 11-18
Displaying IP Names in the Server Activity Log . . . . . . . . . . . . . . . . . . . . . . . . . . . . . . . . . . . . . . . . . . . . . . 11-18
Specifying the Location of Recording/Playback Files . . . . . . . . . . . . . . . . . . . . . . . . . . . . . . . . . . . . . . . . 11-18
Reading From and Writing to Large Files . . . . . . . . . . . . . . . . . . . . . . . . . . . . . . . . . . . . . . . . . . . . . . . . . . . . 11-19
Platform Support . . . . . . . . . . . . . . . . . . . . . . . . . . . . . . . . . . . . . . . . . . . . . . . . . . . . . . . . . . . . . . . . . . . . . . . . . . 11-19
Connector for CICS . . . . . . . . . . . . . . . . . . . . . . . . . . . . . . . . . . . . . . . . . . . . . . . . . . . . . . . . . . . . . . . . . . . . . . . . . 11-19
Baltic Language Support on Client . . . . . . . . . . . . . . . . . . . . . . . . . . . . . . . . . . . . . . . . . . . . . . . . . . . . . . . . . 11-19
xiv
Information Builders
Contents
12. Adapter Enhancements . . . . . . . . . . . . . . . . . . . . . . . . . . . . . . . . . . . . . . . . . . . . . . . . . . 12-1
Adapter for Adabas . . . . . . . . . . . . . . . . . . . . . . . . . . . . . . . . . . . . . . . . . . . . . . . . . . . . . . . . . . . . . . . . . . . . . . . . . 12-2
Controlling Adabas Multifetch for Join Operations . . . . . . . . . . . . . . . . . . . . . . . . . . . . . . . . . . . . . . 12-3
Controlling Data Retrieval Types . . . . . . . . . . . . . . . . . . . . . . . . . . . . . . . . . . . . . . . . . . . . . . . . . . . . . . . 12-3
Handling Unreadable Sub or Superdescriptor Fields . . . . . . . . . . . . . . . . . . . . . . . . . . . . . . . . . . . . 12-5
Adapter for Adabas Stored Procedures . . . . . . . . . . . . . . . . . . . . . . . . . . . . . . . . . . . . . . . . . . . . . . . . . . . . . . 12-5
Adapter for CICS Transactions . . . . . . . . . . . . . . . . . . . . . . . . . . . . . . . . . . . . . . . . . . . . . . . . . . . . . . . . . . . . . . . 12-6
Adapter for Micro-Focus C-ISAM and FairCom c-tree ISAM . . . . . . . . . . . . . . . . . . . . . . . . . . . . . . . . . . . 12-6
Adapter for DATACOM . . . . . . . . . . . . . . . . . . . . . . . . . . . . . . . . . . . . . . . . . . . . . . . . . . . . . . . . . . . . . . . . . . . . . . 12-8
Adapter for DB2 . . . . . . . . . . . . . . . . . . . . . . . . . . . . . . . . . . . . . . . . . . . . . . . . . . . . . . . . . . . . . . . . . . . . . . . . . . . . 12-8
Using DB2 Cube Views . . . . . . . . . . . . . . . . . . . . . . . . . . . . . . . . . . . . . . . . . . . . . . . . . . . . . . . . . . . . . . . . . 12-9
Mapping Metadata for DB2 Cubes Views . . . . . . . . . . . . . . . . . . . . . . . . . . . . . . . . . . . . . . . . . . . . . . . 12-9
Adapter for Enterprise Java Beans . . . . . . . . . . . . . . . . . . . . . . . . . . . . . . . . . . . . . . . . . . . . . . . . . . . . . . . . . . 12-11
Adapter for Essbase . . . . . . . . . . . . . . . . . . . . . . . . . . . . . . . . . . . . . . . . . . . . . . . . . . . . . . . . . . . . . . . . . . . . . . . . 12-11
Adding Measures and Scenarios to Synonyms . . . . . . . . . . . . . . . . . . . . . . . . . . . . . . . . . . . . . . . . . 12-11
Specifying ALIAS and Member Names in One Request . . . . . . . . . . . . . . . . . . . . . . . . . . . . . . . . . 12-15
Adapter for IMS . . . . . . . . . . . . . . . . . . . . . . . . . . . . . . . . . . . . . . . . . . . . . . . . . . . . . . . . . . . . . . . . . . . . . . . . . . . . 12-17
Using an IMS Secondary Index . . . . . . . . . . . . . . . . . . . . . . . . . . . . . . . . . . . . . . . . . . . . . . . . . . . . . . . . 12-19
Using an IMS Secondary Index on a Child Segment . . . . . . . . . . . . . . . . . . . . . . . . . . . . . . . . . . . . 12-23
Adapter for IMS Transactions . . . . . . . . . . . . . . . . . . . . . . . . . . . . . . . . . . . . . . . . . . . . . . . . . . . . . . . . . . . . . . . 12-25
Adapter for Informix . . . . . . . . . . . . . . . . . . . . . . . . . . . . . . . . . . . . . . . . . . . . . . . . . . . . . . . . . . . . . . . . . . . . . . . 12-25
Adapter for Ingres . . . . . . . . . . . . . . . . . . . . . . . . . . . . . . . . . . . . . . . . . . . . . . . . . . . . . . . . . . . . . . . . . . . . . . . . . 12-26
Adapter for JDBC (Generic) . . . . . . . . . . . . . . . . . . . . . . . . . . . . . . . . . . . . . . . . . . . . . . . . . . . . . . . . . . . . . . . . . 12-26
Adapters for J.D. Edwards World and One World . . . . . . . . . . . . . . . . . . . . . . . . . . . . . . . . . . . . . . . . . . . . 12-26
Adapter for Microsoft SQL Server . . . . . . . . . . . . . . . . . . . . . . . . . . . . . . . . . . . . . . . . . . . . . . . . . . . . . . . . . . . 12-26
Adapter for Oracle . . . . . . . . . . . . . . . . . . . . . . . . . . . . . . . . . . . . . . . . . . . . . . . . . . . . . . . . . . . . . . . . . . . . . . . . . 12-26
Adapter for Oracle E-Business Suite . . . . . . . . . . . . . . . . . . . . . . . . . . . . . . . . . . . . . . . . . . . . . . . . . . . . . . . . . 12-27
Adapter for PeopleSoft . . . . . . . . . . . . . . . . . . . . . . . . . . . . . . . . . . . . . . . . . . . . . . . . . . . . . . . . . . . . . . . . . . . . . 12-27
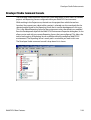
Updating the Workspace Service Profile . . . . . . . . . . . . . . . . . . . . . . . . . . . . . . . . . . . . . . . . . . . . . . . 12-28
Adapter for Progress . . . . . . . . . . . . . . . . . . . . . . . . . . . . . . . . . . . . . . . . . . . . . . . . . . . . . . . . . . . . . . . . . . . . . . . 12-28
Adapter for RMS . . . . . . . . . . . . . . . . . . . . . . . . . . . . . . . . . . . . . . . . . . . . . . . . . . . . . . . . . . . . . . . . . . . . . . . . . . . 12-28
Adapter for SAP BW . . . . . . . . . . . . . . . . . . . . . . . . . . . . . . . . . . . . . . . . . . . . . . . . . . . . . . . . . . . . . . . . . . . . . . . . 12-29
Support for BEx Structures . . . . . . . . . . . . . . . . . . . . . . . . . . . . . . . . . . . . . . . . . . . . . . . . . . . . . . . . . . . . 12-29
Cancelling BW Requests for Results That Exceed 1 Million Tuples . . . . . . . . . . . . . . . . . . . . . . . 12-32
Default Synonym Name for InfoCubes . . . . . . . . . . . . . . . . . . . . . . . . . . . . . . . . . . . . . . . . . . . . . . . . 12-33
Controlling Session Parameters From the Web Console . . . . . . . . . . . . . . . . . . . . . . . . . . . . . . . . 12-33
Adapter for SAP R/3 . . . . . . . . . . . . . . . . . . . . . . . . . . . . . . . . . . . . . . . . . . . . . . . . . . . . . . . . . . . . . . . . . . . . . . . . 12-34
Controlling Execution and Report Processing Settings From the Web Console . . . . . . . . . . 12-34
Adapter for Sybase ASE . . . . . . . . . . . . . . . . . . . . . . . . . . . . . . . . . . . . . . . . . . . . . . . . . . . . . . . . . . . . . . . . . . . . 12-34
Adapter for Sybase IQ . . . . . . . . . . . . . . . . . . . . . . . . . . . . . . . . . . . . . . . . . . . . . . . . . . . . . . . . . . . . . . . . . . . . . . 12-35
Adapter for System 2000 . . . . . . . . . . . . . . . . . . . . . . . . . . . . . . . . . . . . . . . . . . . . . . . . . . . . . . . . . . . . . . . . . . . 12-35
Adapter for Tamino . . . . . . . . . . . . . . . . . . . . . . . . . . . . . . . . . . . . . . . . . . . . . . . . . . . . . . . . . . . . . . . . . . . . . . . . 12-35
WebFOCUS New Features
xv
Contents
Adapter for Teradata . . . . . . . . . . . . . . . . . . . . . . . . . . . . . . . . . . . . . . . . . . . . . . . . . . . . . . . . . . . . . . . . . . . . . . . 12-35
Adapter for TOTAL . . . . . . . . . . . . . . . . . . . . . . . . . . . . . . . . . . . . . . . . . . . . . . . . . . . . . . . . . . . . . . . . . . . . . . . . . 12-35
Adapter for VSAM . . . . . . . . . . . . . . . . . . . . . . . . . . . . . . . . . . . . . . . . . . . . . . . . . . . . . . . . . . . . . . . . . . . . . . . . . . 12-35
Preparing the Environment for VSAM CICS . . . . . . . . . . . . . . . . . . . . . . . . . . . . . . . . . . . . . . . . . . . . 12-36
Configuring the Adapter for VSAM CICS . . . . . . . . . . . . . . . . . . . . . . . . . . . . . . . . . . . . . . . . . . . . . . . 12-38
Declaring Connection Attributes for VSAM CICS Manually . . . . . . . . . . . . . . . . . . . . . . . . . . . . . 12-39
Logging VSAM CICS Processing . . . . . . . . . . . . . . . . . . . . . . . . . . . . . . . . . . . . . . . . . . . . . . . . . . . . . . . 12-39
Adapter for Web Services . . . . . . . . . . . . . . . . . . . . . . . . . . . . . . . . . . . . . . . . . . . . . . . . . . . . . . . . . . . . . . . . . . 12-41
Adapter for XML . . . . . . . . . . . . . . . . . . . . . . . . . . . . . . . . . . . . . . . . . . . . . . . . . . . . . . . . . . . . . . . . . . . . . . . . . . . 12-41
XA Support . . . . . . . . . . . . . . . . . . . . . . . . . . . . . . . . . . . . . . . . . . . . . . . . . . . . . . . . . . . . . . . . . . . . . . . . . . . . . . . . 12-41
Supported Adapters . . . . . . . . . . . . . . . . . . . . . . . . . . . . . . . . . . . . . . . . . . . . . . . . . . . . . . . . . . . . . . . . . . 12-41
Aggregate Awareness Support . . . . . . . . . . . . . . . . . . . . . . . . . . . . . . . . . . . . . . . . . . . . . . . . . . . . . . . . . . . . . 12-42
Relational Adapters and Aggregated SQL Queries . . . . . . . . . . . . . . . . . . . . . . . . . . . . . . . . . . . . . 12-42
Aggregate Awareness in RDBMSs . . . . . . . . . . . . . . . . . . . . . . . . . . . . . . . . . . . . . . . . . . . . . . . . . . . . . 12-43
Cluster Joins . . . . . . . . . . . . . . . . . . . . . . . . . . . . . . . . . . . . . . . . . . . . . . . . . . . . . . . . . . . . . . . . . . . . . . . . . . . . . . . 12-44
Embedded Joins . . . . . . . . . . . . . . . . . . . . . . . . . . . . . . . . . . . . . . . . . . . . . . . . . . . . . . . . . . . . . . . . . . . . . 12-45
Embedded Join Master Files . . . . . . . . . . . . . . . . . . . . . . . . . . . . . . . . . . . . . . . . . . . . . . . . . . . . . . . . . . 12-46
Web Console Enhancements for Adapters . . . . . . . . . . . . . . . . . . . . . . . . . . . . . . . . . . . . . . . . . . . . . . . . . . 12-48
Relational Adapters . . . . . . . . . . . . . . . . . . . . . . . . . . . . . . . . . . . . . . . . . . . . . . . . . . . . . . . . . . . . . . . . . . 12-48
Non-Relational Adapters . . . . . . . . . . . . . . . . . . . . . . . . . . . . . . . . . . . . . . . . . . . . . . . . . . . . . . . . . . . . . . 12-51
General Adapter Features . . . . . . . . . . . . . . . . . . . . . . . . . . . . . . . . . . . . . . . . . . . . . . . . . . . . . . . . . . . . . . . . . . 12-54
Stored Procedures in Relational Adapters . . . . . . . . . . . . . . . . . . . . . . . . . . . . . . . . . . . . . . . . . . . . . 12-54
13. DataMigrator Enhancements . . . . . . . . . . . . . . . . . . . . . . . . . . . . . . . . . . . . . . . . . . . . 13-1
New Feature Highlights . . . . . . . . . . . . . . . . . . . . . . . . . . . . . . . . . . . . . . . . . . . . . . . . . . . . . . . . . . . . . . . . . . . . . 13-2
Installation and Configuration . . . . . . . . . . . . . . . . . . . . . . . . . . . . . . . . . . . . . . . . . . . . . . . . . . . . . . . . . 13-2
Data Management Console . . . . . . . . . . . . . . . . . . . . . . . . . . . . . . . . . . . . . . . . . . . . . . . . . . . . . . . . . . . . 13-3
Data Flow Designer . . . . . . . . . . . . . . . . . . . . . . . . . . . . . . . . . . . . . . . . . . . . . . . . . . . . . . . . . . . . . . . . . . . 13-4
Process Flow Designer . . . . . . . . . . . . . . . . . . . . . . . . . . . . . . . . . . . . . . . . . . . . . . . . . . . . . . . . . . . . . . . . . 13-6
Running Flows . . . . . . . . . . . . . . . . . . . . . . . . . . . . . . . . . . . . . . . . . . . . . . . . . . . . . . . . . . . . . . . . . . . . . . . . 13-6
Metadata . . . . . . . . . . . . . . . . . . . . . . . . . . . . . . . . . . . . . . . . . . . . . . . . . . . . . . . . . . . . . . . . . . . . . . . . . . . . . 13-7
Reports . . . . . . . . . . . . . . . . . . . . . . . . . . . . . . . . . . . . . . . . . . . . . . . . . . . . . . . . . . . . . . . . . . . . . . . . . . . . . . . 13-7
Revised Functionality . . . . . . . . . . . . . . . . . . . . . . . . . . . . . . . . . . . . . . . . . . . . . . . . . . . . . . . . . . . . . . . . . . . . . . . 13-8
FTP . . . . . . . . . . . . . . . . . . . . . . . . . . . . . . . . . . . . . . . . . . . . . . . . . . . . . . . . . . . . . . . . . . . . . . . . . . . . . . . . . . . 13-8
Server Transfer Files . . . . . . . . . . . . . . . . . . . . . . . . . . . . . . . . . . . . . . . . . . . . . . . . . . . . . . . . . . . . . . . . . . . 13-9
Stored Procedures . . . . . . . . . . . . . . . . . . . . . . . . . . . . . . . . . . . . . . . . . . . . . . . . . . . . . . . . . . . . . . . . . . . . . 13-9
Remote Transformations . . . . . . . . . . . . . . . . . . . . . . . . . . . . . . . . . . . . . . . . . . . . . . . . . . . . . . . . . . . . . . 13-9
Setting Default Values for Global Variables . . . . . . . . . . . . . . . . . . . . . . . . . . . . . . . . . . . . . . . . . . . . . 13-9
Fusion Targets . . . . . . . . . . . . . . . . . . . . . . . . . . . . . . . . . . . . . . . . . . . . . . . . . . . . . . . . . . . . . . . . . . . . . . . . 13-9
Load Options . . . . . . . . . . . . . . . . . . . . . . . . . . . . . . . . . . . . . . . . . . . . . . . . . . . . . . . . . . . . . . . . . . . . . . . . . . 13-9
Metadata Manager . . . . . . . . . . . . . . . . . . . . . . . . . . . . . . . . . . . . . . . . . . . . . . . . . . . . . . . . . . . . . . . . . . . 13-10
Catalog Administrator . . . . . . . . . . . . . . . . . . . . . . . . . . . . . . . . . . . . . . . . . . . . . . . . . . . . . . . . . . . . . . . . 13-10
iWay Test Tool . . . . . . . . . . . . . . . . . . . . . . . . . . . . . . . . . . . . . . . . . . . . . . . . . . . . . . . . . . . . . . . . . . . . . . . . 13-10
xvi
Information Builders
Contents
Data Management Console . . . . . . . . . . . . . . . . . . . . . . . . . . . . . . . . . . . . . . . . . . . . . . . . . . . . . . . . . . . . . . . . 13-10
Data Flow/Process Flow Design Paradigm . . . . . . . . . . . . . . . . . . . . . . . . . . . . . . . . . . . . . . . . . . . . . . . . . . 13-13
Data Flow Interface . . . . . . . . . . . . . . . . . . . . . . . . . . . . . . . . . . . . . . . . . . . . . . . . . . . . . . . . . . . . . . . . . . . . . . . . 13-14
Process Flow Methodology . . . . . . . . . . . . . . . . . . . . . . . . . . . . . . . . . . . . . . . . . . . . . . . . . . . . . . . . . . . . . . . . . 13-19
Creating a Process Flow With a Data Flow . . . . . . . . . . . . . . . . . . . . . . . . . . . . . . . . . . . . . . . . . . . . . 13-19
Creating a Process Flow Without a Data Flow . . . . . . . . . . . . . . . . . . . . . . . . . . . . . . . . . . . . . . . . . . 13-19
Process Flow Interface . . . . . . . . . . . . . . . . . . . . . . . . . . . . . . . . . . . . . . . . . . . . . . . . . . . . . . . . . . . . . . . . . . . . . 13-20
Integrating DataMigrator Components . . . . . . . . . . . . . . . . . . . . . . . . . . . . . . . . . . . . . . . . . . . . . . . . . . . . . 13-23
Source Management With Visual SourceSafe . . . . . . . . . . . . . . . . . . . . . . . . . . . . . . . . . . . . . . . . . . . . . . . 13-26
14. Resource Analyzer and Resource Governor Enhancements . . . . . . . . . . . . . . . . . 14-1
Rebuild SMCTRL From Resource Analyzer and Resource Governor . . . . . . . . . . . . . . . . . . . . . . . . . . . .
Location Information Collection . . . . . . . . . . . . . . . . . . . . . . . . . . . . . . . . . . . . . . . . . . . . . . . . . . . . . . . . . . . . .
Collecting CPU and Elapsed Time in Reports in Milliseconds . . . . . . . . . . . . . . . . . . . . . . . . . . . . . . . . . .
Monitoring of MODIFY . . . . . . . . . . . . . . . . . . . . . . . . . . . . . . . . . . . . . . . . . . . . . . . . . . . . . . . . . . . . . . . . . . . . . .
Delete by Date Range in Repository . . . . . . . . . . . . . . . . . . . . . . . . . . . . . . . . . . . . . . . . . . . . . . . . . . . . . . . . .
Global Rules . . . . . . . . . . . . . . . . . . . . . . . . . . . . . . . . . . . . . . . . . . . . . . . . . . . . . . . . . . . . . . . . . . . . . . . . . . . . . . . .
Capture Information for Cancelled Queries . . . . . . . . . . . . . . . . . . . . . . . . . . . . . . . . . . . . . . . . . . . . . . . . . .
Managed Reporting Information Capture . . . . . . . . . . . . . . . . . . . . . . . . . . . . . . . . . . . . . . . . . . . . . . . . . . . .
WebFOCUS New Features
14-2
14-2
14-2
14-2
14-2
14-2
14-2
14-3
xvii
Contents
xviii
Information Builders
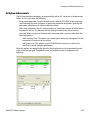
CHAPTER 1
WebFOCUS Reporting Language Enhancements
This chapter describes WebFOCUS reporting language new features in Version 5 Release 3.
Topics:
•
Combinations of Summary Commands
•
Excel Compound Reports
•
Non-Overridable User Passwords (SET
PERMPASS)
•
Displaying Multiple Excel Reports
Simultaneously
•
Fully Qualified File Names in -INCLUDE
Commands
•
JPEG Format Support
•
Preventing Messages With CREATE FILE
•
Assigning Column Numbers Only to Report
Output Columns
•
Preserving Filters With Joins
•
Creating a Standard Quote-Delimited
Character String
•
Preventing Propagation of SUBTOTAL and
RECOMPUTE to the Grand Total
•
Producing ANSI-compliant Empty Reports
•
Increased Number of Joins
•
Using Date System Amper Variables in Master
File DEFINEs
•
Raised FML Rows Limit
•
FMLLIST Function: Retrieving an FML Tag List
•
FMLFOR Function: Retrieving FML Tag Values
•
FMLCAP Function: Retrieving FML Hierarchy
Captions
•
Increased Limit for MATCH FILE
•
Creating Visual Discovery Output Files
•
Creating a Drill Through PDF Compound
Report
•
Excel Table of Contents Feature
WebFOCUS New Features
1-1
Combinations of Summary Commands
Combinations of Summary Commands
How to:
Use Summary Commands
Example:
Using SUBTOTAL and RECOMPUTE in a Request
Using SUB-TOTAL With Multiple Summary Commands
Using Multiple Summary Commands With Prefix Operators
Propagation of Summary Commands With Field Lists
Reference:
Usage Notes for Combinations of Summary Commands
You can specify a different summary operation for each sort break (BY field).
If you have multiple summary commands for the same sort field, the following message
displays and the last summary command specified in the request is used:
(FOC36359) MORE THAN 1 SUBTOTAL/SUB-TOTAL/RECOMPUTE/SUMMARIZE
There is more than one SUBTOTAL/SUB-TOTAL/RECOMPUTE/SUMMARIZE on the same key
field which is not allowed. The last one specified will override the rest.
SUMMARIZE and SUB-TOTAL, which propagate their summary operations to higher level
sort breaks, skip those fields at higher level sort breaks that have their own summary
commands. The propagation of summary operations depends on whether prefix operator
processing is used for summary lines. If prefix operators are:
•
1-2
Not used on summary lines or if you issue the SET SUMMARYLINES=OLD command,
prefix operator processing is not used for the request. In this case, if any summary
command specifies a field list, only the fields specified on the summary line field lists
are populated on the report.
Information Builders
WebFOCUS Reporting Language Enhancements
•
Used on summary lines or if you issue the SET SUMMARYLINES=NEW command, prefix
operator processing is used for the request. In this case, SUB-TOTAL and SUMMARIZE
propagate to:
•
All fields at higher level sort breaks that do not have their own summary command.
•
Fields not specified in the field list at higher level sort breaks that do have their own
summary commands (columns that would have been empty). Note that this is the
only technique that allows different fields at the same sort break to have different
summary options.
Prefix operators on summary lines result in the same values whether the command is
RECOMPUTE/SUMMARIZE or SUBTOTAL/SUB-TOTAL. For a computed field, the prefix
operator is not applied, the value is recalculated using the expression in the COMPUTE
command and the values from the summary line.
When you use different summary commands for different sort fields, the default grand total
row inherits the summary command associated with the first sort field in the request. You
can change the operation performed at the grand total level by using the ON TABLE phrase
to specify a specific summary command.
Note: The grand total is considered the highest sort level. Therefore, although you can use
the SUMMARIZE or SUB-TOTAL command at the grand total level, these commands apply
only to the grand total and are not propagated to any other line on the report. On the
grand total level SUMMARIZE operates as a RECOMPUTE command, and SUB-TOTAL
operates as a SUBTOTAL command.
Syntax:
How to Use Summary Commands
At a sort break, use the following syntax:
{BY|ON} breakfield [AS 'text1'] sumoption [MULTILINES]
[pref.] [*|[field1 [[pref2.]field2 ...]]]
[AS 'text2'] [WHEN expression;]
To replace the default grand total, use the following syntax
ON TABLE sumoption [pref.][field1 [[pref2.]field2 ...]] [AS 'text2']
where:
breakfield
Is the sort field whose change in value triggers the summary operation.
sumoption
Can be one of the following: SUBTOTAL, SUB-TOTAL, RECOMPUTE, or SUMMARIZE.
'text1'
Is the column heading to use for the break field on the report output.
WebFOCUS New Features
1-3
Combinations of Summary Commands
MULTILINES
Suppresses the printing of a summary line for every sort break that has only one detail
line. Note that MULTILINES suppresses the summary line even if a prefix operator is
used to specify a different operation for the summary line. MULTI-LINES is a synonym
for MULTILINES.
pref.
Is a prefix operator. When specified without a field list, the prefix operator is applied to
every numeric column in the report output and every numeric column is populated
with values on the summary row.
*
Includes all display fields on the summary line. If a prefix operator is specified, it is
applied to all fields. If the prefix operator is not supported with alphanumeric fields,
alphanumeric fields are not included on the summary line.
[field1 [field2 ... fieldn]]
Produces the type of summary specified by sumoption for the listed fields. If no field
names are listed, the summary is produced for every numeric column in the report
output.
pref. field1 [field2 ... fieldn] [pref2. fieldm ...]
The first prefix operator is applied to field1 through fieldn. The second prefix operator is
applied to fieldm. Only the fields specified are populated with values on the summary
row. Each prefix operator must be separated by a blank space from the following field
name.
'text2'
Is the text that prints on the left of the summary row.
expression
Is an expression that determines whether the summary operation is performed at each
break.
1-4
Information Builders
WebFOCUS Reporting Language Enhancements
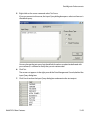
Example:
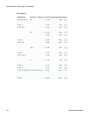
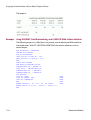
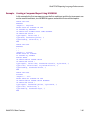
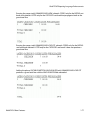
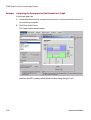
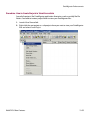
Using SUBTOTAL and RECOMPUTE in a Request
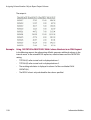
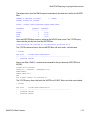
In the following request, the first sort field specified is COPIES, which is associated with the
RECOMPUTE command. Therefore, on the grand total line, the value of RATIO is correctly
recomputed and the values of LISTPR and WHOLESALEPR are summed (because this is the
default operation when the field is not calculated by a COMPUTE command).
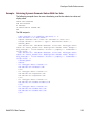
TABLE FILE MOVIES
PRINT DIRECTOR LISTPR WHOLESALEPR
COMPUTE RATIO = LISTPR/WHOLESALEPR;
BY COPIES
BY RATING
WHERE COPIES LT 3
WHERE DIRECTOR EQ 'DISNEY W.' OR 'HITCHCOCK A.'
ON COPIES RECOMPUTE AS '*REC: '
ON RATING SUBTOTAL AS '*SUB: '
END
WebFOCUS New Features
1-5
Combinations of Summary Commands
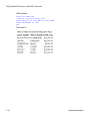
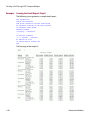
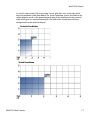
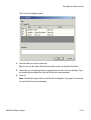
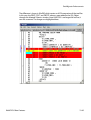
The output is:
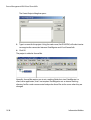
If you reverse the BY fields, the grand total line sums the RATIO values as well as the LISTPR
and WHOLESALEPR values because the SUBTOTAL command controls the grand total line:
TOTAL
129.85
60.99
12.97
You can change the operation performed at the grand total level by adding the following
command to the request:
ON TABLE RECOMPUTE
The grand total line then displays the recomputed values:
TOTAL
1-6
129.85
60.99
2.13
Information Builders
WebFOCUS Reporting Language Enhancements
Example:
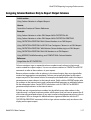
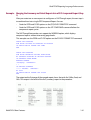
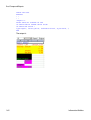
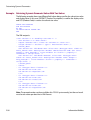
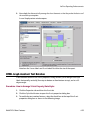
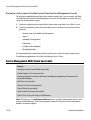
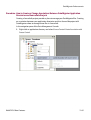
Using SUB-TOTAL With Multiple Summary Commands
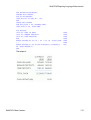
In the following request, the SUB-TOTAL command propagates its operation to the
DIRECTOR sort field (see the total line for HITCHCOCK, on which the RATIO values are
subtotaled, not recomputed).
SUB-TOTAL is not propagated to the RATING sort field which has its own RECOMPUTE
command, and for this sort field the RATIO value is recomputed.
The grand total line is recomputed because RECOMPUTE is performed on a higher level sort
field than SUB-TOTAL.
TABLE FILE MOVIES
PRINT LISTPR WHOLESALEPR
COMPUTE RATIO = LISTPR/WHOLESALEPR;
BY DIRECTOR
BY RATING
BY COPIES
WHERE COPIES LT 3
WHERE DIRECTOR EQ 'HITCHCOCK A.'
ON COPIES SUB-TOTAL AS '*SUB: '
ON RATING RECOMPUTE AS '*REC: '
END
WebFOCUS New Features
1-7
Combinations of Summary Commands
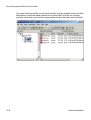
The output is:
1-8
Information Builders
WebFOCUS Reporting Language Enhancements
Example:
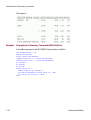
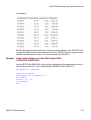
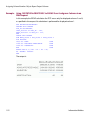
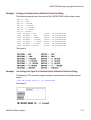
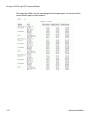
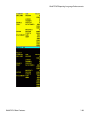
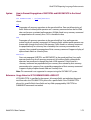
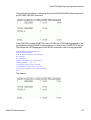
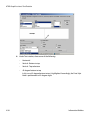
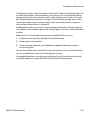
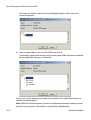
Using Multiple Summary Commands With Prefix Operators
The following request prints the average value of LISTPR and the recomputed value of
RATIO on the lines associated with sort field RATING. The SUB-TOTAL command associated
with sort field COPIES is propagated to all fields on the DIRECTOR sort field lines and to the
WHOLESALEPR and RATIO1 columns associated with the RATING sort field. The grand total
line is suppressed for this request.
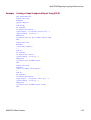
TABLE FILE MOVIES
PRINT LISTPR WHOLESALEPR
COMPUTE RATIO/D6.2 = LISTPR/WHOLESALEPR;
COMPUTE RATIO1/D6.2 = LISTPR/WHOLESALEPR;
BY DIRECTOR
BY RATING
BY COPIES
WHERE COPIES LT 3
WHERE DIRECTOR EQ 'KAZAN E.'
ON RATING RECOMPUTE AVE. LISTPR RATIO AS '*REC:
ON COPIES SUB-TOTAL
AS '*SUB:
ON TABLE NOTOTAL
END
'
'
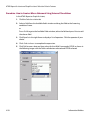
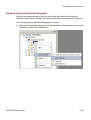
On the output:
•
The values of WHOLESALEPR and RATIO1 on the row labeled *REC are subtotals
because of propagation of the SUB-TOTAL command to the fields not specified in the
RECOMPUTE command.
•
The LISTPR value is an average and the value of RATIO (which has the same definition as
RATIO1) is recomputed because these two fields are specified in the RECOMPUTE
command.
•
The SUB-TOTAL command is propagated to the DIRECTOR row.
WebFOCUS New Features
1-9
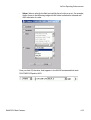
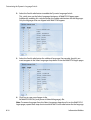
Combinations of Summary Commands
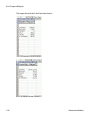
The output is:
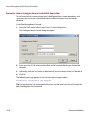
Example:
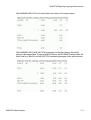
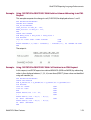
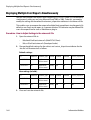
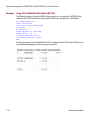
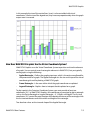
Propagation of Summary Commands With Field Lists
In the following request, the RECOMPUTE command has a field list.
SET SUMMARYLINES = OLD
TABLE FILE MOVIES
PRINT LISTPR WHOLESALEPR
COMPUTE RATIO/D6.2 = LISTPR/WHOLESALEPR;
COMPUTE RATIO1/D6.2 = LISTPR/WHOLESALEPR;
BY DIRECTOR
BY RATING
BY COPIES
WHERE COPIES LT 3
WHERE DIRECTOR EQ 'KAZAN E.'
ON RATING RECOMPUTE LISTPR RATIO AS '*REC:
ON COPIES SUB-TOTAL AS '*SUB: '
END
1-10
'
Information Builders
WebFOCUS Reporting Language Enhancements
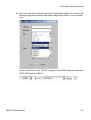
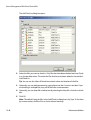
With SUMMARYLINES=OLD, only those fields have values on the report output:
With SUMMARYLINES=NEW, SUB-TOTAL propagates to all of the columns that would
otherwise be unpopulated. The grand total line inherits the RECOMPUTE command for the
fields listed in its field list, and the SUB-TOTAL command propagates to the other columns:
WebFOCUS New Features
1-11
Non-Overridable User Passwords (SET PERMPASS)
Reference: Usage Notes for Combinations of Summary Commands
•
Summary processing differs for summary commands that have prefix operators and
summary lines that do not use prefix operators (see the Creating Reports With
WebFOCUS Language manual for details). If any summary command uses prefix
operators, the entire request uses prefix operator processing. If processing without
prefix operators is initiated, but a subsequent field requires prefix operator processing,
the following message is generated and processing halts:
(FOC36376) CANNOT COMBINE SUBTOTAL/RECOMPUTE STYLES WHEN
SUMMARYLINES=OLD
You can prevent this message by setting SUMMARYLINES=NEW to invoke prefix
operator processing.
•
SET SUMMARYLINES=EXPLICIT affects propagation of summary commands to the
grand total line by making it consistent with the behavior for any sort break. Therefore,
with this setting in effect, SUB-TOTAL and SUMMARIZE propagate to the grand total
line but SUBTOTAL and RECOMPUTE do not.
Non-Overridable User Passwords (SET PERMPASS)
How to:
Set a Non-Overridable User Password
Example:
Setting a Non-Overridable User Password
Reference:
Usage Notes for Non-Overridable User Passwords
The PERMPASS parameter establishes a user password that remains in effect throughout a
session or connection. You can issue this setting in any supported profile but is most useful
when established for an individual user by setting it in a user profile. It cannot be set in an
ON TABLE phrase. It is recommended that it not be set in EDASPROF because it would then
apply to all users.
1-12
Information Builders
WebFOCUS Reporting Language Enhancements
All security rules established in the DBA sections of existing Master Files are respected
when PERMPASS is in effect. The user cannot issue the SET PASS or SET USER command to
change to a user password with different security rules. Any attempt to do so generates the
following message:
permanent PASS is in effect. Your PASS will not be honored.
VALUE WAS NOT CHANGED
Only one permanent password can be established in a session. Once it is set, it cannot be
changed within the session.
Syntax:
How to Set a Non-Overridable User Password
SET PERMPASS=userpass
where:
userpass
Is the user password used for all access to data sources with DBA security rules
established in their associated Master Files.
Example:
Setting a Non-Overridable User Password
Consider the MOVIES Master File with the following DBA rules in effect:
DBA=USER1,$
USER = USERR,
USER = USERU,
USER = USERW,
USER = USERRW,
ACCESS
ACCESS
ACCESS
ACCESS
=
=
=
=
R ,$
U ,$
W ,$
RW,$
The following FOCEXEC sets a permanent password:
SET PERMPASS = USERU
TABLE FILE MOVIES
PRINT TITLE BY DIRECTOR
END
The user has ACCESS=U and, therefore, is not allowed to issue a table request against the
file:
(FOC047) THE USER DOES NOT HAVE SUFFICIENT ACCESS RIGHTS TO THE FILE:
CAR
BYPASSING TO END OF COMMAND
The permanent password cannot be changed:
SET PERMPASS = USERRW
permanent PASS is in effect. Your PASS will not be honored.
VALUE WAS NOT CHANGED
WebFOCUS New Features
1-13
Fully Qualified File Names in -INCLUDE Commands
The user password cannot be changed:
SET PASS = USERRW
permanent PASS is in effect. Your PASS will not be honored.
VALUE WAS NOT CHANGED
Reference: Usage Notes for Non-Overridable User Passwords
If you use FOCUSID to set passwords externally, these external passwords may be
overridable or non-overridable. If they are non-overridable, they take precedence over the
PERMPASS setting.
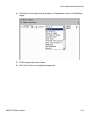
Fully Qualified File Names in -INCLUDE Commands
How to:
Use a Fully Qualified File Name on UNIX
Use a Fully Qualified File Name on Microsoft Windows
Example:
Using a Fully Qualified Name in a -INCLUDE Command
The -INCLUDE Dialogue Manager command can accept fully qualified file names so that
files outside of the standard search path can be inserted into procedures. This technique
reduces the time it takes to search for a specific procedure, providing a performance
benefit.
Relative paths are not supported in the -INCLUDE command; you must use the fully
qualified platform-specific file name. The limit for a fully qualified platform-specific file
name is defined by the operating system (as long as it is within the 32K length maximum
for a FOCEXEC line).
The fully qualified name applies only to the -INCLUDE command in which it is specified; it is
not inherited by other -INCLUDE commands.
1-14
Information Builders
WebFOCUS Reporting Language Enhancements
Syntax:
How to Use a Fully Qualified File Name on UNIX
-INCLUDE /path/filename.ext
where:
path
Is the fully qualified path to the file that contains the FOCEXEC.
filename
Is the name of the file that contains the FOCEXEC.
ext
Is the extension of the file that contains the FOCEXEC.
Syntax:
How to Use a Fully Qualified File Name on Microsoft Windows
-INCLUDE drive:\path\filename.ext
where:
drive
Is the drive that contains the path to the FOCEXEC.
path
Is the fully qualified path to the file that contains the FOCEXEC.
filename
Is the name of the file that contains the FOCEXEC.
ext
Is the extension of the file that contains the FOCEXEC.
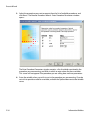
Example:
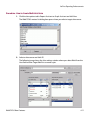
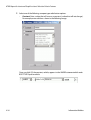
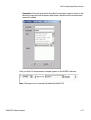
Using a Fully Qualified Name in a -INCLUDE Command
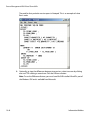
Assume the FOCEXEC named HEADINGS contains the following heading text for the
request:
HEADING
"THIS IS THE INCLUDED HEADING FILE"
" "
Microsoft Windows example:
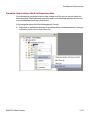
TABLE FILE EMPLOYEE
-INCLUDE c:\ibi\srv55\mydataarea\headings.fex
PRINT CURR_SAL BY LAST_NAME BY FIRST_NAME
WHERE DEPARTMENT EQ 'MIS'
END
WebFOCUS New Features
1-15
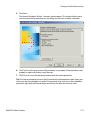
Fully Qualified File Names in -INCLUDE Commands
UNIX example:
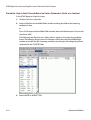
TABLE FILE EMPLOYEE
-INCLUDE /u2/prog/headings.data
PRINT CURR_SAL BY LAST_NAME BY FIRST_NAME
WHERE DEPARTMENT EQ 'MIS'
END
The output is:
1-16
Information Builders
WebFOCUS Reporting Language Enhancements
Assigning Column Numbers Only to Report Output Columns
In this section:
Using Column Notation in a Report Request
How to:
Control the Creation of Column References
Example:
Using Column Notation in a Non-FML Request With CNOTATION=ALL
Using Column Notation in a Non-FML Request With CNOTATION=PRINTONLY
Using CNOTATION=PRINTONLY With Column Numbers in an FML Request
Using CNOTATION=PRINTONLY to RECAP Over Contiguous Columns in an FML Request
Using CNOTATION=PRINTONLY With Relative Column Addressing in an FML Request
Using CNOTATION=PRINTONLY With Cell Notation in an FML Request
Using NOPRINT, Field Reformatting, and COMPUTE With Column Notation
Reference:
Usage Notes for SET CNOTATION
Column notation assigns a sequential column number to each column in the internal
matrix created for a report request. You can use column notation in COMPUTE and RECAP
commands to refer to these columns in your request.
Because column numbers refer to columns in the internal matrix, they are assigned after
retrieval and aggregation are completed. Columns not actually displayed on the report
output may exist in the internal matrix. For example, calculated values used in the request
generate one or more columns in the internal matrix. Fields with the NOPRINT option take
up a column in the internal matrix, and a reformatted field generates an additional column
for the reformatted value. Certain RECAP calculations such as FORECAST or REGRESS
generate multiple columns in the internal matrix.
BY fields are not assigned column numbers but, by default, every other column in the
internal matrix is assigned a column number, which means that you have to account for all
of the internally generated columns if you want to refer to the appropriate column value in
your request. You can change this default column assignment behavior with the SET
CNOTATION=PRINTONLY command, which assigns column numbers only to columns that
display on the report output.
WebFOCUS New Features
1-17
Assigning Column Numbers Only to Report Output Columns
Syntax:
How to Control the Creation of Column References
SET CNOTATION={ALL|PRINTONLY}
where:
ALL
Assigns column reference numbers to every column in the internal matrix. ALL is the
default value.
PRINTONLY
Assigns column reference numbers only to columns that display on the report output.
Note: This setting is not supported in an ON TABLE phrase.
Using Column Notation in a Report Request
To create a column reference in a request, you can:
Example:
•
Preface the column number with a C in a non-FML request.
•
Use the column number as an index in conjunction with a row label in an FML request.
With this type of notation, you can specify a specific column, a relative column number,
or a sequence or series of columns. See the Creating Reports With WebFOCUS Language
manual for a complete description of this notation.
•
Refer to a particular cell in an FML request using the notation E(r,c), where r is a row
number and c is a column number. See the Creating Reports With WebFOCUS Language
manual for a complete description of this notation.
Using Column Notation in a Non-FML Request With CNOTATION=ALL
In the following request with CNOTATION=ALL, the product of C1 and C2 does not calculate
TRANSTOT times QUANTITY because the reformatting generates additional columns.
SET CNOTATION = ALL
TABLE FILE VIDEOTRK
SUM TRANSTOT/D12.2 QUANTITY/D12.2
AND COMPUTE
PRODUCT = C1 * C2;
BY TRANSDATE
END
1-18
Information Builders
WebFOCUS Reporting Language Enhancements
The output is:
BY fields do not get a column reference, so the first column reference is for TRANSTOT with
its original format, then the reformatted version. Next is QUANTITY with its original format
and then the reformatted version. Last is the calculated value, PRODUCT:
Example:
Using Column Notation in a Non-FML Request With
CNOTATION=PRINTONLY
Setting CNOTATION=PRINTONLY assigns column references to the output columns only. In
this case the product of C1 and C2 does calculate TRANSTOT times QUANTITY.
SET CNOTATION = PRINTONLY
TABLE FILE VIDEOTRK
SUM TRANSTOT/D12.2 QUANTITY/D12.2
AND COMPUTE
PRODUCT = C1 * C2;
BY TRANSDATE
END
WebFOCUS New Features
1-19
Assigning Column Numbers Only to Report Output Columns
The output is:
Example:
Using CNOTATION=PRINTONLY With Column Numbers in an FML Request
In the following request, the reformatting of fields generates additional columns in the
internal matrix. In the second RECAP expression, note that because of the CNOTATION
setting:
1-20
•
TOTCASH(1) refers to total cash in displayed column 1.
•
TOTCASH(2) refers to total cash in displayed column 2.
•
The resulting calculation is displayed in column 2 of the row labeled CASH
GROWTH(%).
•
The RECAP value is only calculated for the column specified.
Information Builders
WebFOCUS Reporting Language Enhancements
SET CNOTATION=PRINTONLY
DEFINE FILE LEDGER
CUR_YR/I5C=AMOUNT;
LAST_YR/I5C=.87*CUR_YR - 142;
END
TABLE FILE LEDGER
SUM CUR_YR/F9.2 AS 'CURRENT,YEAR'
LAST_YR/F9.2 AS 'LAST,YEAR'
FOR ACCOUNT
1010 AS 'CASH ON HAND'
1020 AS 'DEMAND DEPOSITS'
1030 AS 'TIME DEPOSITS'
BAR
RECAP TOTCASH/F9.2C= R1 + R2 + R3; AS 'TOTAL CASH'
" "
RECAP GROCASH(2)/F9.2C=100*TOTCASH(1)/TOTCASH(2) AS 'CASH GROWTH(%)'
END
OVER
OVER
OVER
OVER
OVER
OVER
100;
The output is:
WebFOCUS New Features
1-21
Assigning Column Numbers Only to Report Output Columns
Example:
Using CNOTATION=PRINTONLY to RECAP Over Contiguous Columns in an
FML Request
In this example, the RECAP calculation for ATOT occurs only for displayed columns 2 and 3,
as specified in the request. No calculation is performed for displayed column 1.
SET CNOTATION=PRINTONLY
DEFINE FILE LEDGER
CUR_YR/I5C=AMOUNT;
LAST_YR/I5C=.87*CUR_YR - 142;
NEXT_YR/I5C=1.13*CUR_YR + 222;
END
TABLE FILE LEDGER
SUM NEXT_YR/F9.2 CUR_YR/F9.2 LAST_YR/F9.2
FOR ACCOUNT
10$$ AS 'CASH'
OVER
1100 AS 'ACCOUNTS RECEIVABLE'
OVER
1200 AS 'INVENTORY'
OVER
BAR
OVER
RECAP ATOT(2,3)/I5C = R1 + R2 + R3;
AS 'ASSETS ACTUAL'
END
The output is:
1-22
Information Builders
WebFOCUS Reporting Language Enhancements
Example:
Using CNOTATION=PRINTONLY With Relative Column Addressing in an FML
Request
This example computes the change in cash (CHGCASH) for displayed columns 1 and 2.
SET CNOTATION=PRINTONLY
DEFINE FILE LEDGER
CUR_YR/I5C=AMOUNT;
LAST_YR/I5C=.87*CUR_YR - 142;
NEXT_YR/I5C=1.13*CUR_YR + 222;
END
TABLE FILE LEDGER
SUM NEXT_YR/F9.2 CUR_YR/F9.2 LAST_YR/F9.2
FOR ACCOUNT
10$$ AS 'TOTAL CASH' LABEL TOTCASH
OVER
" "
OVER
RECAP CHGCASH(1,2)/I5SC = TOTCASH(*) - TOTCASH(*+1); AS 'CHANGE IN CASH'
END
The output is:
Example:
Using CNOTATION=PRINTONLY With Cell Notation in an FML Request
In this request, two RECAP expressions derive VARIANCEs (EVAR and WVAR) by subtracting
values in four displayed columns (1, 2, 3, 4) in row three (PROFIT); these values are identified
using cell notation (r,c).
SET CNOTATION=PRINTONLY
TABLE FILE REGION
SUM E_ACTUAL/F9.2 E_BUDGET/F9.2 W_ACTUAL/F9.2 W_BUDGET/F9.2
FOR ACCOUNT
3000 AS 'SALES'
OVER
3100 AS 'COST'
OVER
BAR
OVER
RECAP PROFIT/I5C = R1 - R2;
OVER
" "
OVER
RECAP EVAR(1)/I5C = E(3,1) - E(3,2);
AS 'EAST VARIANCE'
OVER
RECAP WVAR(3)/I5C = E(3,3) - E(3,4);
AS 'WEST VARIANCE'
END
WebFOCUS New Features
1-23
Assigning Column Numbers Only to Report Output Columns
The output is:
Example:
Using NOPRINT, Field Reformatting, and COMPUTE With Column Notation
The following request has a field that is not printed, several reformatted fields and three
calculated values. With SET CNOTATION=PRINTONLY, the column references result in
correct output.
SET CNOTATION = PRINTONLY
DEFINE FILE LEDGER
CUR_YR/I5C=AMOUNT;
LAST_YR/I5C=.87*CUR_YR - 142;
NEXT_YR/I5C=1.13*CUR_YR + 222;
END
TABLE FILE LEDGER
SUM NEXT_YR NOPRINT CUR_YR
COMPUTE AMT2/D6 = AMOUNT *2;
LAST_YR/D5
AMOUNT NEXT_YR
COMPUTE AMT3/D6 = AMOUNT*3;
COMPUTE AMT4/D6 = AMOUNT*4;
FOR ACCOUNT
10$$ AS 'CASH'
1100 AS 'ACCTS. REC.'
1200 AS 'INVENTORY'
BAR
RECAP ATOT/I8C = R1 + R2 + R3; AS 'TOTAL'
RECAP DIFF(2,10,2)/D8 = ATOT(*) - ATOT(*-1);
END
1-24
OVER
OVER
OVER
OVER
OVER
Information Builders
WebFOCUS Reporting Language Enhancements
The output is:
Reference: Usage Notes for SET CNOTATION
•
BY fields are not assigned column reference numbers.
•
ACROSS fields do have column reference numbers and they will always show.
WebFOCUS New Features
1-25
Creating a Standard Quote-Delimited Character String
Creating a Standard Quote-Delimited Character String
How to:
Create a Standard Quote-Delimited Character String
Example:
Creating a Standard Quote-Delimited Character String
Converting User Input to a Standard Quote-Delimited Character String
Using Quote-Delimited Strings With Relational Data Adapters
Reference:
Usage Notes for Quote-Delimited Character Strings
Character strings must be enclosed in single quotation marks to be handled by most
database engines. In addition, embedded single quotation marks must be represented by
two contiguous single quotation marks. FOCUS, WebFOCUS, and iWay handle character
strings that do not follow these rules. However, when accessing a non-FOCUS data source, it
is sometimes necessary to impose them.
The QUOTEDSTRING suffix on a Dialogue Manager variable applies the following
conversions to the contents of the variable:
•
Any single quotation mark embedded within the string is converted to two single
quotation marks.
•
If the string is enclosed in single quotation marks, they are left as is.
•
If the string is not enclosed in single quotation marks, they are added around the string.
•
If the string has only an ending quotation mark, as in a plural possessive such as JONES',
the existing single quotation mark is doubled and the entire result is enclosed in single
quotation marks, yielding 'JONES'''.
Dialogue Manager commands differ in their ability to handle character strings that are not
enclosed in single quotation marks but contain embedded blanks. An explicit or implied
-PROMPT command can read such a string. The entire input string is then enclosed in single
quotation marks when operated on by .QUOTEDSTRING. However, in a -SET command, any
string with embedded blanks that is not enclosed in single quotation marks generates an
error.
Syntax:
How to Create a Standard Quote-Delimited Character String
&var.QUOTEDSTRING
where:
&var
Is a Dialogue Manager variable.
1-26
Information Builders
WebFOCUS Reporting Language Enhancements
Example:
Creating a Standard Quote-Delimited Character String
The following example shows the results of the QUOTEDSTRING suffix on input strings.
-SET &A = ABC;
-SET &B = 'ABC';
-SET &C = O'BRIEN;
-SET &D = 'O'BRIEN';
-SET &E = 'O''BRIEN';
-SET &F = O''BRIEN;
-SET &G = OBRIEN';
-TYPE ORIGINAL = ABC
-TYPE ORIGINAL = 'ABC'
-TYPE ORIGINAL = O'BRIEN
-TYPE ORIGINAL = 'O'BRIEN'
-TYPE ORIGINAL = 'O''BRIEN'
-TYPE ORIGINAL = O''BRIEN
-TYPE ORIGINAL = OBRIEN'
QUOTED
QUOTED
QUOTED
QUOTED
QUOTED
QUOTED
QUOTED
=
=
=
=
=
=
=
&A.QUOTEDSTRING
&B.QUOTEDSTRING
&C.QUOTEDSTRING
&D.QUOTEDSTRING
&E.QUOTEDSTRING
&F.QUOTEDSTRING
&G.QUOTEDSTRING
The output is:
Example:
Converting User Input to a Standard Quote-Delimited Character String
The following -TYPE command accepts quoted or unquoted input and displays quoted
output.
-TYPE THE QUOTED VALUE IS: &E.QUOTEDSTRING
The output is:
WebFOCUS New Features
1-27
Creating a Standard Quote-Delimited Character String
Example:
Using Quote-Delimited Strings With Relational Data Adapters
The following procedure creates an Oracle table named SQLVID from the VIDEOTRK data
source.
TABLE FILE VIDEOTRK
SUM CUSTID EXPDATE PHONE STREET CITY STATE ZIP
TRANSDATE PRODCODE TRANSCODE QUANTITY TRANSTOT
BY LASTNAME BY FIRSTNAME
WHERE LASTNAME NE 'NON-MEMBER'
ON TABLE HOLD
END
-RUN
CREATE FILE SQLVID
-RUN
MODIFY FILE SQLVID
FIXFORM FROM HOLD
DATA ON HOLD
END
Consider the following SQL Translator request:
SET TRACEUSER = ON
SET TRACEON = STMTRACE//CLIENT
SQL
SELECT *
FROM SQLVID WHERE LASTNAME = &1.QUOTEDSTRING;
END
When this request is executed, you must enter a last name, in this case O’BRIEN:
PLEASE SUPPLY VALUES REQUESTED
1=
O'BRIEN
In the generated SQL request, the character string used for the comparison is correctly
enclosed in single quotation marks, and the embedded single quote is doubled:
SELECT SQLCOR01.CIN , SQLCOR01.LN , SQLCOR01.FN ,
SQLCOR01.EXDAT , SQLCOR01.TEL , SQLCOR01.STR , SQLCOR01.CITY ,
SQLCOR01.PROV , SQLCOR01.POSTAL_CODE , SQLCOR01.OUTDATE ,
SQLCOR01.PCOD , SQLCOR01.TCOD , SQLCOR01.NO , SQLCOR01.TTOT
FROM SQLVID SQLCOR01 WHERE SQLCOR01.LN = 'O''BRIEN';
The following input variations are translated to the correct form of quoted string
demonstrated in the trace.
'O'BRIEN'
'O''BRIEN'
1-28
Information Builders
WebFOCUS Reporting Language Enhancements
Any other variation results in:
•
A valid string that does not match the database value and does not return any rows. For
example, O''''BRIEN becomes 'O''''''''BRIEN' in the WHERE predicate.
•
An invalid string that produces one of the following messages:
Error - Semi-colon or END expected
Error - Missing or Misplaced quotes
Error - (value entered) is not a valid column
Error - Syntax error on line ... Unbalanced quotes
Strings without embedded single quotation marks can be entered without quotes or
embedded in single quotation marks, either SMITH or 'SMITH'.
If you use &1 without the QUOTEDSTRING suffix in the request, acceptable input strings
that retrieve O’Brien’s record are:
'''O'''BRIEN'''
'''O''''BRIEN'''
Using &1 without the QUITEDSTRING suffix, the acceptable form of a string without
embedded single quotation marks is '''SMITH'''.
To make a string enclosed in single quotation marks acceptable without the
QUOTEDSTRING suffix, use '&1' in the request. In this case, in order to retrieve O'Brien’s
record, you must enter the string that would have resulted from the QUOTEDSTRING suffix:
'O''''BRIEN'
To enter a string without embedded single quotation marks using '&1', you can either omit
the surrounding single quotation marks or include them: SMITH or 'SMITH'.
Note: The form '&1.QUOTEDSTRING' is not supported.
Reference: Usage Notes for Quote-Delimited Character Strings
An unmatched single quotation mark at the beginning of a character string is treated as
invalid input and generates the following message:
(FOC257) MISSING QUOTE MARKS:
WebFOCUS New Features
value;
1-29
Producing ANSI-compliant Empty Reports
Producing ANSI-compliant Empty Reports
How to:
Produce ANSI-Compliant Reports With No Records
Example:
Counting Fields With SET EMPTYREPORT=ANSI
Summing Fields With EMPTYREPORT=ANSI
Setting EMPTYREPORT=ON
The EMPTYREPORT=ANSI setting introduces ANSI-compliant handling of reports with zero
records, producing a one-line report containing only the specified missing data character. If
the request is a COUNT operation, however, a zero is displayed for the missing values.
Syntax:
How to Produce ANSI-Compliant Reports With No Records
SET EMPTYREPORT={ANSI|ON|OFF}
where:
ANSI
Produces a single-line report and displays the missing data character or a zero if a
COUNT is requested. in each case, &RECORDS will be 0, and &LINES will be 1.
If the SQL Translator is invoked, ANSI automatically replaces OFF as the default setting
for EMPTYREPORT.
ON
Produces an empty report (column headings with no content).
OFF
Produces no report output. OFF is the default value except for SQL Translator requests.
When the SQL Translator is invoked, ANSI replaces OFF as the default setting for the
EMPTYREPORT parameter, so the results are the same as for the ANSI setting.
The command can also be issued from within a request:
ON TABLE SET EMPTYREPORT ANSI
1-30
Information Builders
WebFOCUS Reporting Language Enhancements
Example:
Counting Fields With SET EMPTYREPORT=ANSI
SET EMPTYREPORT=ANSI
TABLE FILE EMPLOYEE
COUNT CURR_SAL AND DEPARTMENT
WHERE LAST_NAME EQ 'PATRICK'
END
The output shows no records and one line, with a zero displayed for CURR_SAL and a period
for Department:
Example:
Summing Fields With EMPTYREPORT=ANSI
SET EMPTYREPORT=ANSI
TABLE FILE EMPLOYEE
SUM CURR_SAL
IF LAST_NAME EQ 'PATRICK'
END
Here is the output. Note that with SUM, the default missing data character (.) is displayed
for CURR_SAL.
Example:
Setting EMPTYREPORT=ON
SET EMPTYREPORT=ON
TABLE FILE EMPLOYEE
PRINT CURR_SAL AND DEPARTMENT
IF LAST_NAME EQ 'PATRICK'
END
With EMPTYREPORT=ON, there are no lines in the report.
WebFOCUS New Features
1-31
Using Date System Amper Variables in Master File DEFINEs
Example:
Printing Fields and Setting EMPTYREPORT=ANSI in the Request
With PRINT you get one line, with the default missing data character (.) displayed.
TABLE FILE EMPLOYEE
PRINT CURR_SAL AND DEPARTMENT
IF DEPARTMENT EQ 'PATRICK'
ON TABLE SET EMPTYREPORT ANSI
END
The output is:
Using Date System Amper Variables in Master File DEFINEs
Example:
Using the Date Variable &DATE in a Master File DEFINE
Using the Date Variable &YYMD in a Master File DEFINE
Reference:
Messages for Date System Amper Variables in Master File DEFINEs
Master File DEFINE fields can use Dialogue Manager system date variables to capture the
system date each time the Master File is parsed for use in a request.
The format of the returned value for each date variable is the format indicated in the
variable name. For example, &DATEYYMD returns a date value with format YYYMD. The
exceptions are &DATE and &TOD, which return alphanumeric values and must be assigned
to a field with an alphanumeric format. The variable names &DATE and &TOD must also be
enclosed in single quotation marks in the DEFINE expression.
1-32
Information Builders
WebFOCUS Reporting Language Enhancements
The variables supported for use in Master File DEFINEs are:
•
&DATE
•
&TOD
•
&DATEMDY
•
&DATEDMY
•
&DATEYMD
•
&DATEMDYY
•
&DATEDMYY
•
&DATEYYMD
•
&DMY
•
&YMD
•
&MDY
•
&YYMD
•
&MDYY
•
&DMYY
Note that all other reserved amper variables are not supported in Master Files.
Example:
Using the Date Variable &DATE in a Master File DEFINE
The following version of the EMPLOYEE Master File has the DEFINE field named TDATE
added to it. TDATE has format A12 and retrieves the value of &DATE, which returns an
alphanumeric value and must be enclosed in single quotation marks:
FILENAME=EMPLOYEE, SUFFIX=FOC
SEGNAME=EMPINFO, SEGTYPE=S1
FIELDNAME=EMP_ID,
ALIAS=EID,
FIELDNAME=LAST_NAME,
ALIAS=LN,
FIELDNAME=FIRST_NAME,
ALIAS=FN,
FIELDNAME=HIRE_DATE,
ALIAS=HDT,
FIELDNAME=DEPARTMENT,
ALIAS=DPT,
FIELDNAME=CURR_SAL,
ALIAS=CSAL,
FIELDNAME=CURR_JOBCODE, ALIAS=CJC,
FIELDNAME=ED_HRS,
ALIAS=OJT,
DEFINE TDATE/A12
='&DATE';, $
.
.
.
WebFOCUS New Features
FORMAT=A9,
FORMAT=A15,
FORMAT=A10,
FORMAT=I6YMD,
FORMAT=A10,
FORMAT=D12.2M,
FORMAT=A3,
FORMAT=F6.2,
$
$
$
$
$
$
$
$
1-33
Using Date System Amper Variables in Master File DEFINEs
The following request displays the value of TDATE:
TABLE FILE EMPLOYEE
PRINT LAST_NAME FIRST_NAME HIRE_DATE TDATE AS 'TODAY''S,DATE'
WHERE LAST_NAME EQ 'BANNING'
END
The output is:
Example:
Using the Date Variable &YYMD in a Master File DEFINE
The following version of the EMPLOYEE Master File has the DEFINE field named TDATE
added to it. TDATE has format YYMD and retrieves the value of &YYMD:
FILENAME=EMPLOYEE, SUFFIX=FOC
SEGNAME=EMPINFO, SEGTYPE=S1
FIELDNAME=EMP_ID,
ALIAS=EID,
FIELDNAME=LAST_NAME,
ALIAS=LN,
FIELDNAME=FIRST_NAME,
ALIAS=FN,
FIELDNAME=HIRE_DATE,
ALIAS=HDT,
FIELDNAME=DEPARTMENT,
ALIAS=DPT,
FIELDNAME=CURR_SAL,
ALIAS=CSAL,
FIELDNAME=CURR_JOBCODE, ALIAS=CJC,
FIELDNAME=ED_HRS,
ALIAS=OJT,
DEFINE TDATE/YYMD
= &YYMD ;, $
.
.
.
FORMAT=A9,
FORMAT=A15,
FORMAT=A10,
FORMAT=I6YMD,
FORMAT=A10,
FORMAT=D12.2M,
FORMAT=A3,
FORMAT=F6.2,
$
$
$
$
$
$
$
$
The following request displays the value of TDATE:
TABLE FILE EMPLOYEE
PRINT LAST_NAME FIRST_NAME HIRE_DATE TDATE AS 'TODAY''S,DATE'
WHERE LAST_NAME EQ 'BANNING'
END
The output is:
1-34
Information Builders
WebFOCUS Reporting Language Enhancements
Reference: Messages for Date System Amper Variables in Master File DEFINEs
The following message appears if an attempt is made to use an unsupported amper
variable in a Master File DEFINE:
(FOC104)
DEFINE IN MASTER REFERS TO A FIELD OUTSIDE ITS SCOPE: var
Creating a Drill Through PDF Compound Report
In this section:
Use With Other Features
Drill Through and Drill Down Compared
Creating a Drill Through PDF Compound Report
How to:
Create a Drill Through in a PDF Compound Report
Specify Drill Through Hyperlinks
Examples:
Creating the Summary Report (Step 1)
Creating the Detail Report (Step 2)
Merging the Summary and Detail Reports Into a PDF Compound Report (Step 3)
Connecting the Reports With Hyperlinks (Step 4)
Reference:
Guidelines on Links For FIRST
Rules For Drill Through Hyperlinks
A common technique in business reporting is to create two related reports:
•
Summary Report. Contains condensed information for a category such as a business
account, with summed data such as total balances and total sales.
•
Detail Report. For specified fields in the associated summary report, a detail report
contains all the component values that contributed to each summary field value.
The Drill Through feature provides a way to easily relate the data in these two types of
reports. For example, a user scanning a summary report account may see an unusual figure
in one of the accounts, requiring examination of the specific data behind that figure.
WebFOCUS New Features
1-35
Creating a Drill Through PDF Compound Report
The Drill Through feature automates the process of navigating quickly and easily from
general to specific information in related reports packaged in a single PDF compound
report. Drill Through syntax sets up hyperlinks that take you from an item in a summary
report to a corresponding item in a detail report.
The reports linked using Drill Through must follow certain rules. For example, they must
contain a corresponding set of fields with the same data type, called the link fields. You
must follow certain rules and syntax when constructing Drill Through reports.
Use With Other Features
You can use the Drill Through feature with other WebFOCUS features:
1-36
•
Compound reports that contain linked Drill Through reports may also contain
unrelated reports, before or after the Drill Through reports. For example, you can add to
the compound report package a PDF report that contains embedded graphs.
•
You can add Drill Down and URL hyperlinks to a PDF report that contains Drill Through
hyperlinks.
•
Since Drill Through reports are standard PDF compound reports packaged into a single
PDF file, you can distribute them using ReportCaster.
•
Reports with DRILLTHROUGH syntax can be rendered in all other styled output formats:
HTML, PostScript, EXL2K, and so on. In these other formats, the DRILLTHROUGH syntax
is ignored. It is useful, for example, to generate a PostScript version of a Drill Through
report, which is formatted identically to the PDF version, but which you can send
directly to a PostScript printer using ReportCaster or operating system commands.
Information Builders
WebFOCUS Reporting Language Enhancements
Drill Through and Drill Down Compared
Using Drill Down, you can construct a summary report in which clicking a hyperlink displays
detail data. A Drill Down is implemented dynamically; clicking a hyperlink causes a new
report to run. The detail report typically displays only the detail data for a selected field on
the summary report.
In contrast, Drill Through reports are static. The Drill Through feature creates a PDF
document that contains the summary report plus the detail report, with the detail report
containing all the detail data for designated fields in the summary report. Clicking a Drill
Through hyperlink navigates internally in the PDF file; no additional reports are run. You
can save the PDF file to disk or distribute it via ReportCaster. When opened with Acrobat
Reader, it retains its full Drill Through functionality.
Drill Through provides flexibility in the appearance of reports and location of hyperlinks:
•
Drill Through hyperlinks may appear in headings, subheadings, and so on, as well as in
rows of data.
•
You can format the reports using a WebFOCUS StyleSheet.
•
You can indicate a hyperlink by color, font, underlining, and so forth.
•
You can mix conventional Drill Down hyperlinks freely in the same report with Drill
Through hyperlinks.
•
The PDF file created with the Drill Through feature can consist of more than two
reports.
Procedure: How to Create a Drill Through in a PDF Compound Report
To create a Drill Through in a PDF Compound Report:
1. Create the summary report.
2. Create the detail report.
3. Merge the summary and detail reports into a PDF compound report.
4. Connect the reports with hyperlinks.
WebFOCUS New Features
1-37
Creating a Drill Through PDF Compound Report
Syntax:
How to Specify Drill Through Hyperlinks
TYPE=type, [element,] [styling_attributes,]
DRILLTHROUGH={DOWN|FIRST}(link_fields) , $
where:
type
Is one of the following StyleSheet types:
•
DATA
•
HEADING
•
FOOTING
•
SUBHEAD
•
SUBFOOT
•
SUBTOTAL
•
RECAP
element
Is one or more identifying elements allowed in a WebFOCUS StyleSheet and Drill
Through report. An element can describe a specific column (for example,
COLUMN=PRODUCT) or heading item (for example, LINE=2, OBJECT=field, ITEM=3).
styling_attributes
Optionally specify the appearance of the hyperlink (for example, COLOR=RED,
STYLE=BOLD).
DOWN
Links to the next (the following) report.
FIRST
Links to the first Drill Through report in the sequence.
1-38
Information Builders
WebFOCUS Reporting Language Enhancements
link_fields
Specifies blank-delimited link field pairs with the following format:
T1=S1 T2=S2 T3=S3...
T1, T2, and T3 represent column references in the target (linked) report, and S1, S2,
and S3 represent column references in the source (current) report. There may be
more than three pairs.
A column reference can be the name of a field or any of the other symbols valid in
WebFOCUS StyleSheets syntax (for example, Bn, Cn, Pn, Nn, An, subscripted field
name, and so on).
The order of the T's on the left of the equal sign and the S's on the right of the equal
sign is similar to Drill Down syntax, in which the parameter pairs specify the column
reference in the current (source) report on the right and the name of the Dialogue
Manager variable in the Drill Down (target) procedure on the left.
If the column reference in the target report is identical to the column reference in
the source report, you can use a single column reference, for example, COUNTRY
instead of COUNTRY=COUNTRY.
Creating a Drill Through PDF Compound Report
The following examples illustrate how to use Drill Through syntax to navigate between a
summary and a detail report. In the process, these reports are merged into a single PDF
Compound Report. Their relationship to one another with the use of Drill Through is shown
and the location of the Drill Through hyperlinks are specified.
Example:
Creating the Summary Report (Step 1)
The following syntax generates a sample summary report:
TABLE FILE GGSALES
SUM UNITS DOLLARS BY CATEGORY BY PRODUCT
ON TABLE PCHOLD FORMAT PDF
END
The output is:
WebFOCUS New Features
1-39
Creating a Drill Through PDF Compound Report
Example:
Creating the Detail Report (Step 2)
The following syntax generates a sample detail report:
SET SQUEEZE=ON
TABLE FILE GGSALES
SUM UNITS BUDUNITS DOLLARS BUDDOLLARS
BY CATEGORY NOPRINT BY PRODUCT NOPRINT
ON CATEGORY PAGE-BREAK
HEADING CENTER
"Category: <CATEGORY"
" "
ON PRODUCT SUBHEAD
"**** Product: <PRODUCT"
BY REGION BY CITY
ON TABLE PCHOLD FORMAT PDF
END
The first page of the output is:
1-40
Information Builders
WebFOCUS Reporting Language Enhancements
Example:
Merging the Summary and Detail Reports Into a PDF Compound Report (Step
3)
After you create two or more reports to configure as a Drill Through report, the next step is
to combine them into a single PDF Compound Report. You can:
•
Code the OPEN and CLOSE options on the [PC]HOLD FORMAT PDF command.
•
Code the OPEN and CLOSE options on the SET COMPOUND command before the
component report syntax.
The Drill Through feature does not support the NOBREAK option, which displays
compound reports without intervening page breaks.
This example uses the OPEN and CLOSE options on the PCHOLD FORMAT PDF command:
TABLE FILE GGSALES
SUM UNITS DOLLARS BY CATEGORY BY PRODUCT
ON TABLE PCHOLD FORMAT PDF OPEN
END
TABLE FILE GGSALES
SUM UNITS BUDUNITS DOLLARS BUDDOLLARS
BY CATEGORY NOPRINT BY PRODUCT NOPRINT
ON CATEGORY PAGE-BREAK
HEADING CENTER
"Category: <CATEGORY"
" "
ON PRODUCT SUBHEAD
"**** Product: <PRODUCT"
BY CITY
ON TABLE PCHOLD FORMAT PDF CLOSE
END
The output on the first page of the merged report shows the totals for Coffee, Food, and
Gifts. This output is the result of the first (summary) report in the procedure.
WebFOCUS New Features
1-41
Creating a Drill Through PDF Compound Report
The output for Coffee is on the second page of the merged report. It is the result of the
second (detail) report in the procedure.
1-42
Information Builders
WebFOCUS Reporting Language Enhancements
Similarly, the output for Food and Gifts is on page 3.1 and 3.2, and 4.1 and 4.2, respectively.
Example:
Connecting the Reports With Hyperlinks (Step 4)
The example illustrates the following:
•
When you place a Drill Through hyperlink on a sort-break element, ensure the
sort-break is at least at the level of the last sort field participating in the Drill Through.
For example, in the second report, the Drill Through hyperlink is on the subheading
associated with PRODUCT rather than the heading (with a sort break) associated with
CATEGORY.
Although the code can infer a value of PRODUCT for the CATEGORY heading (you can
verify this by embedding the field <PRODUCT> in the heading), it is always the value of
the first PRODUCT within that CATEGORY. Typically you want a Drill Through hyperlink
for each value of PRODUCT within each CATEGORY.
•
You do not need to place the hyperlink on the embedded field PRODUCT as this
example does. You can just as effectively place it on the text item **** Product. Any
item in this subheading is associated with the same values of CATEGORY and PRODUCT.
Similarly, in the first report, you can place the hyperlink on any field in the DATA line,
and the values of the associated link fields will be identical. Conventional Drill Down
hyperlinks also work this way.
WebFOCUS New Features
1-43
Creating a Drill Through PDF Compound Report
The first report in the merged procedure:
•
Places a hyperlink on the PRODUCT field on each DATA line.
•
Specifies that the fields to link to the next report are CATEGORY and PRODUCT. Since
the target fields in the detail report have identical names in the summary report, you
can use the notation CATEGORY rather than CATEGORY=CATEGORY.
•
Specifies the action DOWN, so that clicking a hyperlink brings you to the location in the
next report that has the corresponding values of the two link fields.
•
Uses the default appearance for the hyperlinks, which is blue, underlined text.
The first report is:
TABLE FILE GGSALES
SUM UNITS DOLLARS BY CATEGORY BY PRODUCT
ON TABLE PCHOLD FORMAT PDF OPEN
ON TABLE SET STYLE *
TYPE=DATA, COLUMN=PRODUCT, DRILLTHROUGH=DOWN(CATEGORY PRODUCT), $
ENDSTYLE
END
The second report in the merged procedure:
1-44
•
Places a hyperlink in the subheading associated with the link field PRODUCT. Since
CATEGORY is a higher level BY field than PRODUCT, each PRODUCT subheading is also
associated with a unique value of CATEGORY.
•
Places a hyperlink on the second item of the first line of the subheading, which is the
embedded field PRODUCT.
•
Specifies action FIRST, so that clicking the hyperlink jumps to the line in the first
(summary) report that contains the same values of the two link fields CATEGORY and
PRODUCT.
•
Uses the COLOR attribute to display the hyperlink as red, underlined text.
Information Builders
WebFOCUS Reporting Language Enhancements
The second report is:
SET SQUEEZE=ON
TABLE FILE GGSALES
SUM UNITS BUDUNITS DOLLARS BUDDOLLARS
BY CATEGORY NOPRINT BY PRODUCT NOPRINT
ON CATEGORY PAGE-BREAK
HEADING CENTER
"Category: <CATEGORY"
" "
ON PRODUCT SUBHEAD
"**** Product: <PRODUCT"
BY REGION BY CITY
ON TABLE PCHOLD FORMAT PDF CLOSE
ON TABLE SET STYLE *
TYPE=SUBHEAD, LINE=1, ITEM=2, DRILLTHROUGH=FIRST(CATEGORY PRODUCT),
COLOR=RED, $
ENDSTYLE
END
WebFOCUS New Features
1-45
Creating a Drill Through PDF Compound Report
Run the report. On the first page (summary report), click the hyperlink Croissant for the
category Food. You jump to that detail information:
Now click the hyperlink Croissant to return to the first page (summary report).
1-46
Information Builders
WebFOCUS Reporting Language Enhancements
Reference: Guidelines on Links For FIRST
The following guidelines apply:
•
The set of link fields used with FIRST must correspond to the set of link fields used with
DOWN on the first report.
•
The action of a FIRST hyperlink in the last report should return to the corresponding
line in the first report. The chosen set of links must uniquely identify that line of the first
report.
•
The DOWN hyperlink on the line of the first report must uniquely identify that line of
the first report to locate the matching line of the detail report. The set of links for the
DOWN in the first report and the FIRST link in the last report are the same, since they
both must uniquely identify a line in the first report.
Reference: Rules For Drill Through Hyperlinks
Reports linked with the Drill Through feature must follow certain rules to ensure that the
hyperlinks between them work correctly. The following are key concepts:
•
Source report. The report from which you are linking. The source report contains
hyperlinks to the target report.
•
Target report. The report to which you are linking.
•
Link field. One of a set of corresponding fields that exist in both the source and target
reports. Link fields locate the position in the target report to which a hyperlink in the
source report jumps.
Source and target terminology refer to each pair of linked reports. For example, if there are
three reports linked with Drill Through, the second report is generally the target report of
the first report, and also the source report of the third report.
WebFOCUS New Features
1-47
Creating a Drill Through PDF Compound Report
To process a report as a Drill Through, you must identify the link fields in the source report
that relate to the target report:
1-48
•
Choose meaningful link fields whose values match in the source and target reports. For
example, if a field in the source report contains a part number and a field in the target
report contains a Social Security number, the field values will not match and you
cannot construct hyperlinks.
•
Specify as many link fields as necessary to uniquely locate the position in the target
report that corresponds to the link fields in the source report. For example, if the source
report is sorted by STATE and CITY, specifying CITY alone as the link field will be
problematic if different states contain a city with the same name.
•
The link fields in the source and target reports must have the same internal (actual)
format: the stopped data type and internal length must be identical. Formatting
options, such as number of displayed digits and comma suppression, may differ. For
example, an A20 field must link to another A20 field. However, an I6C field may link to
an I8 field, since internally both are four-byte fields.
•
The link fields must be sort fields or verb objects in both the source and target reports.
You can include a NOPRINT (non-display) field, which is useful when constructing a
report in which a field is in embedded in heading text.
•
Designing Drill Through reports is very similar to designing Drill Down reports.
Choosing the link fields for a Drill Through report is similar to choosing the parameter
fields in a Drill Down report. Likewise, the syntax of a Drill Through closely parallels the
syntax of a Drill Down.
•
Since Drill Through reports are linked by corresponding values of link fields, the
hyperlinks must appear on report elements associated with a particular value of a link
field. However, hyperlinks do not have to appear on any link itself.
•
Not all line types are appropriate for placement of a Drill Through hyperlink. For
example, if a page break occurs on a BY field that is also a Drill Through link, each page
heading is clearly associated with a value in that field. However, if a page break occurs
because of page overflow, avoid placing a Drill Through link in a heading. Similarly,
subheadings, subfootings, subtotals, and recaps are associated only with the values of
particular BY fields.
Information Builders
WebFOCUS Reporting Language Enhancements
Excel Table of Contents Feature
How to:
Use the Excel Table of Contents Feature
Example:
Creating a Simple TOC Report
Reference:
How to Name Worksheets
Limitations of TOC Reports
Excel Table of Contents (TOC) is a feature that enables you to generate a multiple worksheet
report in which a separate worksheet is generated for each value of the first BY field in the
FOCUS report.
Note: This feature can be used only with EXCEL 2002 or higher releases because it requires
the Web Archive file format, which was not available in Excel 2000 and earlier releases.
Syntax:
How to Use the Excel Table of Contents Feature
The syntax is identical to that of HTML TOC reports, except that only a single BY field is
allowed in EXL2K, while multiple BY fields are allowed in HTML.
ON TABLE HOLD/PCHOLD FORMAT EXL2K BYTOC
Since only one level of TOC is allowed for EXL2K reports, the optional number following the
BYTOC keyword can only be 1.
As with HTML, the SET COMPOUND syntax, which precedes the TABLE command, may also
be used to specify that a TOC be created:
SET COMPOUND=BYTOC
Since a TOC report is burst into worksheets according to the value of the first BY field in the
report, the report must contain at least one BY field. The bursting field may be a NOPRINT
field.
WebFOCUS New Features
1-49
Excel Table of Contents Feature
Reference: How to Name Worksheets
•
The worksheet tab names are the BY field values that correspond to the data on the
current worksheet. If the user specifies the TITLETEXT keyword in the stylesheet, it will
be ignored.
•
Excel limits the length of worksheet titles to 31 characters. The following special
characters cannot be used: ':', '?', '*', and '/'.
•
If you want to use date fields as the bursting BY field, you an include the - character
instead of the / character. The - character is valid in an Excel tab title. However, if you do
use the / character, WebFOCUS will substitute it with the - character.
Reference: Limitations of TOC Reports
•
A TOC report cannot be embedded in a compound report.
•
A TOC report cannot not be a pivot table report.
Note: FORMULA is not supported with bursting.
1-50
Information Builders
WebFOCUS Reporting Language Enhancements
Example:
Creating a Simple TOC Report
SET COMPOUND=BYTOC
TABLE FILE CAR
PRINT SALES BY COUNTRY NOPRINT BY CAR
ON TABLE PCHOLD FORMAT EXL2K
ON TABLE SET STYLE *
type=report, style=bold, color=yellow, backcolor=black, $
type=data, backcolor=red, $
type=data, column=car, color=blue, backcolor=yellow, $
END
The output is:
WebFOCUS New Features
1-51
Excel Compound Reports
Excel Compound Reports
Examples:
Creating a Simple Compound Report Using EXL2K
Creating a Compound Report With Pivot Tables and Formulas
Creating a Compound Report Using NOBREAK
Reference:
Guidelines for Using the OPEN, CLOSE, and NOBREAK Keywords and SET COMPOUND
Guidelines for Producing Excel Compound Reports
Excel Compound Reports is a feature which enables you to generate multiple worksheet
reports using the EXL2K output format.
The syntax of this feature is identical to that of PDF Compound Reports. By default, each of
the component reports from the compound report is placed in a new Excel worksheet
(analogous to a new page in PDF). If the NOBREAK keyword is used, the next report follows
the current report on the same worksheet (analogous to starting the report on the same
page in PDF).
Output, whether sent to the client using PCHOLD or saved in a file using HOLD, is generated
in Microsoft's Web Archive format. This format is labeled Single File Web Page in Excel's
Save As dialog. Excel provides the conventionally given file suffixes: .mht or .mhtml.
WebFOCUS uses the same .xht suffix that is used for EXL2K reports. Since the output is
always a single file, it can be easily distributed using ReportCaster.
The components of an Excel compound report can be FORMULA or PIVOT reports (subject
to the restrictions). They cannot be Table of Contents (TOC) reports.
For more information, see Guidelines for Producing Excel Compound Reports on page 1-54.
Note: Excel 2002 (Office XP) or higher must be installed. This feature will not work with
earlier versions of Excel since they do not support the Web Archive file format.
1-52
Information Builders
WebFOCUS Reporting Language Enhancements
Reference: Guidelines for Using the OPEN, CLOSE, and NOBREAK Keywords and SET
COMPOUND
As with PDF, the keywords OPEN, CLOSE, and NOBREAK are used to control Excel
compound reports. They can be specified with the HOLD or PCHOLD command or with a
separate SET COMPOUND command.
•
OPEN is used on the first report of a sequence of component reports to specify that a
compound report be produced.
•
CLOSE is used to designate the last report in a compound report.
•
NOBREAK specifies that the next report be placed on the same worksheet as the
current report. If it is not present, the default behavior is to place the next report on a
separate worksheet.
NOBREAK may appear with OPEN on the first report, or alone on a report between the
first and last reports. (Using CLOSE is irrelevant, since it refers to the placement of the
next report, and no report follows the final report on which CLOSE appears.)
•
•
When used with the HOLD/PCHOLD syntax, the compound report keywords OPEN,
CLOSE, and NOBREAK must appear immediately after FORMAT EXL2K, and before any
additional keywords, such as FORMULA or PIVOT. For example, you can specify:
•
ON TABLE PCHOLD FORMAT EXL2K OPEN
•
ON TABLE HOLD AS MYHOLD FORMAT EXL2K OPEN NOBREAK
•
ON TABLE PCHOLD FORMAT EXL2K NOBREAK FORMULA
•
ON TABLE HOLD FORMAT EXL2K CLOSE PIVOT PAGEFIELDS COUNTRY
As with PDF compound reports, compound report keywords can be alternatively
specified using SET COMPOUND:
•
SET COMPOUND = OPEN
•
SET COMPOUND = 'OPEN NOBREAK'
•
SET COMPOUND = NOBREAK
•
SET COMPOUND = CLOSE
WebFOCUS New Features
1-53
Excel Compound Reports
Reference: Guidelines for Producing Excel Compound Reports
•
Pivot Tables and NOBREAK. Pivot Table Reports may appear in compound reports,
but they may not be combined with another report on the same worksheet using
NOBREAK.
•
Naming of Worksheets. The default worksheet tab names will be Sheet1, Sheet2, and
so on. You have the option to specify a different worksheet tab name by using the
TITLETEXT keyword in the stylesheet. For example:
TYPE=REPORT, TITLETEXT='Summary Report', $
Excel limits the length of worksheet titles to 31 characters. The following special
characters cannot be used: ':', '?', '*', and '/'.
•
File Names and Formats. The output file name (AS name, or HOLD by default) is
obtained from the first report of the compound report (the report with the OPEN
keyword). Output file names on subsequent reports are ignored.
The HOLD FORMAT syntax used in the first component report in a compound report
applies to all subsequent reports in the compound report, regardless of their format.
•
1-54
NOBREAK Behavior. When NOBREAK is specified, the following report appears on the
row immediately after the last row of the report with the NOBREAK. If additional
spacing is required between the reports, a FOOTING or an ON TABLE SUBFOOT can be
placed on the report with the NOBREAK, or a HEADING or an ON TABLE SUBHEAD can
be placed on the following report. This allows the most flexibility, since if blank rows
were added by default there would be no way to remove them.
Information Builders
WebFOCUS Reporting Language Enhancements
Example:
Creating a Simple Compound Report Using EXL2K
SET PAGE-NUM=OFF
TABLE FILE CAR
HEADING
"Sales Report"
" "
SUM SALES
BY COUNTRY
ON TABLE SET STYLE *
type=report, titletext='Sales Rpt', $
type=heading, size=18, $
ENDSTYLE
ON TABLE HOLD AS EX1 FORMAT EXL2K OPEN
END
TABLE FILE CAR
HEADING
"Inventory Report"
" "
SUM RC
BY COUNTRY
ON TABLE SET STYLE *
type=heading, size=18, $
ENDSTYLE
ON TABLE HOLD FORMAT EXL2K
END
TABLE FILE CAR
HEADING
"Cost of Goods Sold Report"
" "
SUM DC
BY COUNTRY
ON TABLE SET STYLE *
type=report, titletext='Cost Rpt', $
type=heading, size=18, $
ENDSTYLE
ON TABLE HOLD FORMAT EXL2K CLOSE
END
WebFOCUS New Features
1-55
Excel Compound Reports
The output for each tab in the Excel worksheet is:
1-56
Information Builders
WebFOCUS Reporting Language Enhancements
WebFOCUS New Features
1-57
Excel Compound Reports
Example:
Creating a Compound Report With Pivot Tables and Formulas
SET PAGE-NUM=OFF
TABLE FILE CAR
HEADING
"Sales Report"
" "
PRINT RCOST
BY COUNTRY
ON TABLE SET STYLE *
type=report, titletext='Sales Rpt', $
type=heading, size=18, $
ENDSTYLE
ON TABLE HOLD AS PIV1 FORMAT EXL2K OPEN
END
TABLE FILE CAR
HEADING
"Inventory Report"
" "
PRINT SALES
BY COUNTRY
ON TABLE SET STYLE *
type=heading, size=18, $
ENDSTYLE
ON TABLE HOLD AS PPPP FORMAT EXL2K PIVOT
PAGEFIELDS TYPE SEATS
CACHEFIELDS MODEL MPG RPM
END
TABLE FILE CAR
SUM RCOST
BY COUNTRY BY CAR BY MODEL BY TYPE BY SEATS SUMMARIZE
ON MODEL SUB-TOTAL
ON TABLE HOLD AS XFOCB FORMAT EXL2K FORMULA
END
TABLE FILE CAR
HEADING
"Cost of Goods Sold Report"
" "
PRINT DCOST
BY COUNTRY
ON TABLE SET STYLE *
type=report, titletext='Cost Rpt', $
type=heading, size=18, $
E
NDSTYLE
ON TABLE HOLD AS ONE FORMAT EXL2K CLOSE PIVOT
PAGEFIELDS RCOST
CACHEFIELDS MODEL TYPE SALES ACCEL SEATS
END
1-58
Information Builders
WebFOCUS Reporting Language Enhancements
The output for each tab in the Excel worksheet is:
WebFOCUS New Features
1-59
Excel Compound Reports
1-60
Information Builders
WebFOCUS Reporting Language Enhancements
Example:
Creating a Compound Report Using NOBREAK
In this example, the first two reports are on the first worksheet, and the last two reports are
on the second worksheet, since NOBREAK appears on both the first and third reports.
TABLE FILE CAR
HEADING
"Report 1: England"
PRINT DCOST BY COUNTRY BY CAR
IF COUNTRY EQ ENGLAND
ON TABLE HOLD FORMAT EXL2K OPEN NOBREAK
ON TABLE SET STYLE *
type=report, color=red, $
type=data, backcolor=yellow, $
type=heading, color=blue, $
END
TABLE FILE CAR
HEADING
" "
" "
"Report 2: France"
PRINT RCOST BY COUNTRY
IF COUNTRY EQ FRANCE
ACROSS SEATS
ON TABLE PCHOLD FORMAT EXL2K
ON TABLE SET STYLE *
type=report, color=lime, backcolor=fuschia, style=bold, $
type=title, color=black, style=bold+italic, $
type=heading, backcolor=black, $
END
TABLE FILE CAR
FOOTING
"Report 3 - All"
PRINT SALES BY COUNTRY BY CAR
ON TABLE PCHOLD FORMAT EXL2K NOBREAK
ON TABLE SET STYLE *
type=report, backcolor=yellow, style=bold, $
type=title, color=blue, $
type=footing, backcolor=aqua, $
END
WebFOCUS New Features
1-61
Excel Compound Reports
TABLE FILE CAR
HEADING
" "
" "
"Report 4"
PRINT SALES BY COUNTRY BY CAR
ON TABLE PCHOLD FORMAT EXL2K CLOSE
ON TABLE SET STYLE *
type=report, color=yellow, backcolor=black, style=bold, $
END
The output is:
1-62
Information Builders
WebFOCUS Reporting Language Enhancements
WebFOCUS New Features
1-63
Displaying Multiple Excel Reports Simultaneously
Displaying Multiple Excel Reports Simultaneously
You can view multiple Excel reports (each containing a PCHOLD FORMAT EXL2K command)
simultaneously when you are using Microsoft Excel 2002 or 2003. To do this, you need to
modify the settings for the redirect and content_disposition attributes in the mime.wfs file.
This enables users to compare the output of multiple Excel spreadsheets simultaneously. By
default, a new Excel session opens in a separate window. This behavior may be different for
users who expect Excel to start as Web browser plug-in.
Procedure: How to Adjust Settings in the mime.wfs File
1. Open the mime.wfs file in:
•
\ibi\client53\wfc\etc\mime.wfs (WebFOCUS Client)
•
\ibi\srv53\wfs\etc\mime.wfs (Developer Studio)
2. Change the default settings for the redirect and content_disposition attributes for the
.xht and .xls file extensions as follows:
Default settings:
<!
extension
content_type
format
redirect
translate
content_disposition
<ADDTYPE>
.xht
application/
vnd.ms-excel
ascii
yes
&astran
no
<ADDTYPE>
.xls
application/
vnd.ms-excel
binary
yes
no
no
New settings (in bold):
<!
extension
content_type
format
redirect
translate
content_disposition
<ADDTYPE>
.xht
application/
vnd.ms-excel
ascii
no
&astran
yes
<ADDTYPE>
.xls
application/
vnd.ms-excel
binary
no
no
yes
3. Close and save the mime.wfs file.
1-64
Information Builders
WebFOCUS Reporting Language Enhancements
JPEG Format Support
How to:
Embed a JPEG Image in a Report Heading
Example:
Creating a Report Heading With an Embedded JPEG Image
In WebFOCUS, JPEG images are supported in PDF, PS, and HTML formats. JPEG images have
the same behavior as GIF images. JPEG files can be embedded in the heading or footing or
body of a PDF, PS, or HTML report. This is useful when you want to create a single PDF, PS, or
HTML report that contains multiple outputs, such as output from a TABLE request and a
GRAPH request. You can distribute this type of report using ReportCaster.
Syntax:
How to Embed a JPEG Image in a Report Heading
TYPE={REPORT|heading}, IMAGE=filename, $
where
heading
Has the valid values:
•
TABHEADING
•
TABFOOTING
•
HEADING
•
FOOTING
•
SUBHEAD
•
SUBFOOT
filename
Is the name of the file.
Note:
•
httpd:// is not supported in PS, PDF, or HTML.
•
IMAGEALIGN, IMAGEBREAK, and ALT are not supported in PS, PDF, or HTML.
WebFOCUS New Features
1-65
JPEG Format Support
Example:
Creating a Report Heading With an Embedded JPEG Image
TABLE FILE EMPLOYEE
ON TABLE SUBHEAD
"Employee Salary Information and Courses"
" "
" "
" "
" "
" "
" "
" "
" "
" "
PRINT CURR_SAL BY COURSE_NAME
ON TABLE SET PAGE-NUM OFF
ON TABLE SET STYLE *
TYPE=REPORT, GRID=OFF, $
TYPE=TABHEADING, IMAGE=C:\IBI\APPS\IMAGES\Pencils.jpg,
POSITION=(.5 .5), SIZE=(.5 .5), $
ENDSTYLE
END
The output is:
1-66
Information Builders
WebFOCUS Reporting Language Enhancements
Preventing Messages With CREATE FILE
How to:
Issue the CREATE FILE Command With the DROP Option
Example:
Creating a FOCUS Data Source That Already Exists
Creating an Oracle Table That Already Exists
Reference:
Usage Notes for CREATE FILE DROP
The CREATE FILE command creates a data source that conforms to an existing Master File.
You can use this command to create a FOCUS, Fusion, XFOCUS, or relational data source.
If you issue the CREATE FILE command when the data source already exists, the following
message appears for a FOCUS, Fusion or XFOCUS data source:
(FOC441) WARNING. THE FILE EXISTS ALREADY. CREATE WILL WRITE OVER IT
For a relational data source, the following messages appear, followed by messages from the
Relational engine indicating that the table cannot be created and then by a FOC1414
message:
(FOC1400) SQLCODE IS 955 (HEX: 000003BB)
(FOC1421) TABLE EXISTS ALREADY. DROP IT OR USE ANOTHER TABLENAME
The DROP option on the CREATE FILE command prevents the display of the messages and
creates the data source, dropping the existing table first if necessary and re-parsing the
Master File if it changed.
Syntax:
How to Issue the CREATE FILE Command With the DROP Option
CREATE FILE filename DROP
where:
filename
Is the Master File name for a FOCUS, Fusion, XFOCUS, or relational data source.
WebFOCUS New Features
1-67
Preventing Messages With CREATE FILE
Example:
Creating a FOCUS Data Source That Already Exists
The following CREATE FILE command creates the EMPLOYEE data source, which already
exists:
create file employee
(FOC441) WARNING. THE FILE EXISTS ALREADY. CREATE WILL WRITE OVER IT
REPLY :
If you reply NO, the file is not created. If you reply anything else, the file is created.
The following CREATE FILE command creates the EMPLOYEE data source, which already
exists without generating the FOC441 warning or requesting a reply.
create file employee drop
NEW FILE EMPLOYEE FOCUS
Example:
A1 ON 05/12/2004 AT 16.09.14
Creating an Oracle Table That Already Exists
The Oracle table name EMPINFO exists therefore, the following CREATE FILE command
generates an error and the new version of the table is not created:
create file empinfo
(FOC1400) SQLCODE IS 955 (HEX: 000003BB)
(FOC1421) TABLE EXISTS ALREADY. DROP IT OR USE ANOTHER TABLENAME
: ORA-00955: name is already used by an existing object
: Erroneous token: EMPINFO
(FOC1414) EXECUTE IMMEDIATE ERROR.
The following CREATE FILE command drops the existing table and creates a new version:
create file empinfo drop
>
1-68
Information Builders
WebFOCUS Reporting Language Enhancements
The SQLDI trace shows that the original version of the table is dropped and then the new
version is created:
SET TRACEUSER = ON
SET TRACEOFF = ALL
SET TRACEON = SQLDI//CLIENT
create file empinfo drop
****
****
****
****
****
****
****
****
SQL:
****
****
****
****
****
****
****
****
****
****
SQL:
SQL:
SQL:
SQL:
****
****
****
****
****
orafoc: gfun: 3, fun: 2, cnum: 0
orafoc: gfun: 1, fun: 6, cnum: 0
Local server assigned for operation
OOPEN call
OOPEN return
acda=008DC0C8,ocnum=1,retcode=0
OPARSE call
l of sql cmd 20
DROP TABLE EMPINFO
lngflg value 1
OPARSE return
acda=008DC0C8,ocnum=1,retcode=0
OEXEC call:
OEXEC return
acda=008DC0C8,ocnum=1,retcode=0
orafoc: gfun: 1, fun: 6, cnum: 0
Local server assigned for operation
OPARSE call
l of sql cmd 259
CREATE TABLE EMPINFO( "EID" VARCHAR2 (9) NOT NULL ,"LN" VARCHAR2
(15) NOT NULL ,"FN" VARCHAR2 (10) NOT NULL ,"HDT" DATE NOT NULL ,"
DPT" VARCHAR2 (10),"CSAL" DECIMAL(7, 2) NOT NULL ,"CJC" VARCHAR2 (3
) NOT NULL ,"OJT" FLOAT ,"BONUS_PLAN" INTEGER NOT NULL )
lngflg value 1
OPARSE return
acda=008DC0C8,ocnum=1,retcode=0
OEXEC call:
OEXEC return
WebFOCUS New Features
1-69
Preventing Messages With CREATE FILE
****
****
****
****
****
SQL:
****
****
****
****
****
****
****
****
acda=008DC0C8,ocnum=1,retcode=0
orafoc: gfun: 1, fun: 6, cnum: 0
Local server assigned for operation
OPARSE call
l of sql cmd 57
CREATE UNIQUE INDEX EMPINFOIX ON EMPINFO ("EID"
lngflg value 1
OPARSE return
acda=008DC0C8,ocnum=1,retcode=0
OEXEC call:
OEXEC return
acda=008DC0C8,ocnum=1,retcode=0
orafoc: gfun: 1, fun: 5, cnum: 0
OCLOSE call
****
****
****
****
****
OCLOSE return
acda=008DC0C8,ocnum=0,retcode=0
OCOM call
OCOM return
orafoc: gfun: 3, fun: 3, cnum: 0
ASC)
Reference: Usage Notes for CREATE FILE DROP
If you issue the CREATE FILE filename DROP command for a FOCUS, Fusion, or XFOCUS data
source that has an external index or MDI, you must REBUILD the index after creating the
data source.
1-70
Information Builders
WebFOCUS Reporting Language Enhancements
Preserving Filters With Joins
How to:
Preserve Filter Definitions With KEEPFILTERS
Example:
Preserving Filters With KEEPFILTERS
By default, filters defined on the host data source are cleared by a JOIN command. However,
filters can be maintained when a JOIN command is issued, by issuing the SET
KEEPFILTERS=ON command.
Setting KEEPFILTERS to ON reinstates filter definitions and their individual declared status
after a JOIN command. The set of filters and virtual fields defined prior to each join is called
a context (see your documentation on SET KEEPDEFINES and on DEFINE FILE SAVE for
information about contexts as they relate to virtual fields). Each new JOIN or DEFINE FILE
command creates a new context.
If a new filter is defined after a JOIN command, it cannot have the same name as any
previously defined filter unless you issue the FILTER FILE command with the CLEAR option.
The CLEAR option clears all filter definitions for that data source in all contexts.
When a JOIN is cleared, each filter definition that was in effect prior to the JOIN command
and that was not cleared, is reinstated with its original status. Clearing a join by issuing the
JOIN CLEAR join_name command removes all of the contexts and filter definitions that
were created after the JOIN join_name command was issued.
Syntax:
How to Preserve Filter Definitions With KEEPFILTERS
SET KEEPFILTERS = {OFF|ON}
where:
OFF
Does not preserve filters issued prior to a join. This is the default value.
ON
Preserves filters across joins.
WebFOCUS New Features
1-71
Preserving Filters With Joins
Example:
Preserving Filters With KEEPFILTERS
The first filter, UNITPR, is defined prior to issuing any joins, but after setting KEEPFILTERS to
ON:
SET KEEPFILTERS = ON
FILTER FILE VIDEOTRK
PERUNIT/F5 = TRANSTOT/QUANTITY;
NAME=UNITPR
WHERE PERUNIT GT 2
WHERE LASTNAME LE 'CRUZ'
END
The ? FILTER command shows that the filter named UNITPR was created but not activated
(activation is indicated by an asterisk in the SET column of the display:
? FILTER
SET FILE
FILTER NAME DESCRIPTION
--- -------- ----------- --------------------------------VIDEOTRK UNITPR
Next the filter is activated:
SET FILTER= UNITPR IN VIDEOTRK ON
The ? FILTER query shows that the filter is now activated:
? FILTER
SET FILE
FILTER NAME DESCRIPTION
--- -------- ----------- --------------------------------*
VIDEOTRK UNITPR
The following TABLE request is issued against the filtered data source:
TABLE FILE VIDEOTRK
SUM QUANTITY TRANSTOT BY LASTNAME
END
1-72
Information Builders
WebFOCUS Reporting Language Enhancements
The output shows that the TABLE request retrieved only the data that satisfies the UNITPR
filter:
NUMBER OF RECORDS IN TABLE=
ACCESS LIMITED BY FILTERS
6
LINES=
3
PAUSE.. PLEASE ISSUE CARRIAGE RETURN WHEN READY
LASTNAME
-------CHANG
COLE
CRUZ
QUANTITY
-------3
2
2
TRANSTOT
-------31.00
18.98
16.00
Now, the VIDEOTRK data source is joined to the MOVIES data source. The ? FILTER query
shows that the join did not clear the UNITPR filter:
JOIN MOVIECODE IN VIDEOTRK TO ALL MOVIECODE IN MOVIES AS J1
The ? FILTER command shows that the UNITPR filter still exists and is still activated:
? FILTER
SET FILE
FILTER NAME DESCRIPTION
--- -------- ----------- --------------------------------*
VIDEOTRK UNITPR
Next a new filter, YEARS1, is created and activated for the join between VIDEOTRK and
MOVIES:
FILTER FILE VIDEOTRK
YEARS/I5 = (EXPDATE - TRANSDATE)/365;
NAME=YEARS1
WHERE YEARS GT 1
END
SET FILTER= YEARS1 IN VIDEOTRK ON
The ? FILTER query shows that both the UNITPR and YEARS1 filters exist and are activated:
? FILTER
SET
--*
*
FILE
-------VIDEOTRK
VIDEOTRK
WebFOCUS New Features
FILTER NAME DESCRIPTION
----------- --------------------------------UNITPR
YEARS1
1-73
Preventing Propagation of SUBTOTAL and RECOMPUTE to the Grand Total
Now, J1 is cleared. The output of the ? FILTER command shows that the YEARS1 filter that
was created after the JOIN command was issued no longer exists. The UNITPR filter created
prior to the JOIN command still exists with its original status:
JOIN CLEAR J1
? FILTER
SET FILE
FILTER NAME DESCRIPTION
--- -------- ----------- --------------------------------*
VIDEOTRK UNITPR
Preventing Propagation of SUBTOTAL and RECOMPUTE to the Grand Total
How to:
Prevent Propagation of SUBTOTAL and RECOMPUTE to the Grand Total
Example:
Using SET SUMMARYLINES With SUBTOTAL
Using COLUMN-TOTAL With SET SUMMARYLINES=EXPLICIT
Reference:
Usage Notes for SET SUMMARYLINES=EXPLICIT
The SET SUMMARYLINES=EXPLICIT command makes the processing of SUBTOTAL,
SUB-TOTAL, SUMMARIZE, and RECOMPUTE on the grand total line consistent with how they
work for sort field breaks.
When SUBTOTAL and RECOMPUTE are used at a sort break level, they do not propagate to
other sort breaks. SUB-TOTAL and SUMMARIZE propagate to all higher level sort breaks.
The grand total can be considered the highest level sort field in a request. However, by
default, all of the summary options, not just SUB-TOTAL and SUMMARIZE, propagate to the
grand total level.
The SET SUMMARYLINES=EXPLICIT prevents the propagation of SUBTOTAL and
RECOMPUTE to the grand total. In addition, if all summary commands in the request specify
field lists, only the specified fields are aggregated and displayed on the grand total line.
When SUBTOTAL and RECOMPUTE are the only summary commands used in the request, a
grand total line is produced only if it is explicitly specified in the request using the ON
TABLE SUBTOTAL/SUB-TOTAL/RECOMPUTE/SUMMARIZE phrase. If the ON TABLE phrase
specifies a field list, only those fields are aggregated and displayed.
Note that you can always suppress the grand total line using the ON TABLE NOTOTAL
command in the request.
1-74
Information Builders
WebFOCUS Reporting Language Enhancements
Syntax:
How to Prevent Propagation of SUBTOTAL and RECOMPUTE to the Grand
Total
SET SUMMARYLINES = {OLD|NEW|EXPLICIT}
where:
OLD
Propagates all summary operations to the grand total line. Does not allow mixing of
fields with and without prefix operators on a summary command when the first field
does not have an associated prefix operator. All fields listed in any summary command
are populated on all summary lines. OLD is the default value.
NEW
Propagates all summary operations to the grand total line. Uses prefix operator
processing for all summary commands (all summary fields without prefix operators are
processed as though they had a SUM. operator). Fields listed in a summary command
are populated only on summary lines created by that summary command and on
summary lines created by propagation of that summary command. Supports display of
alphanumeric fields on summary lines.
EXPLICIT
Does not propagate SUBTOTAL and RECOMPUTE to the grand total line. Uses prefix
operator processing for all summary commands (all summary fields without prefix
operators are processed as though they had a SUM. operator). Fields listed in a
summary command are populated only on summary lines created by that summary
command and on summary lines created by propagation of that summary command.
Supports display of alphanumeric fields on summary lines.
Note: This command is not supported in a request using the ON TABLE SET syntax.
Reference: Usage Notes for SET SUMMARYLINES=EXPLICIT
If COLUMN-TOTAL is specified in the request, all numeric fields are totaled on the grand
total line unless the COLUMN-TOTAL phrase lists specific fields. If the COLUMN-TOTAL
phrase lists specific fields, those fields and any fields propagated by SUB-TOTAL or
SUMMARIZE commands are totaled.
WebFOCUS New Features
1-75
Preventing Propagation of SUBTOTAL and RECOMPUTE to the Grand Total
Example:
Using SET SUMMARYLINES With SUBTOTAL
The following request using the MOVIES data source has a sort break for CATEGORY that
subtotals the COPIES field and a sort break for RATING that subtotals the LISTPR field:
SET SUMMARYLINES=OLD
TABLE FILE MOVIES
SUM COPIES LISTPR WHOLESALEPR
BY RATING
BY CATEGORY
WHERE CATEGORY EQ 'CHILDREN'
WHERE RATING
EQ 'G'
ON RATING SUBTOTAL COPIES
ON CATEGORY SUBTOTAL LISTPR
END
Running the request with SUMMARYLINES=OLD subtotals both COPIES and LISTPR at every
sort break and propagates them to the grand total line:
1-76
Information Builders
WebFOCUS Reporting Language Enhancements
Running the request with SUMMARYLINES=NEW subtotals COPIES only for the RATING sort
break and subtotals LISTPR only for the CATEGORY sort break but propagates both to the
grand total line:
Running the request with SUMMARYLINES=EXPLICIT subtotals COPIES only for the RATING
sort break and subtotals LISTPR only for the CATEGORY sort break. It does not produce a
grand total line:
Adding the phrase ON TABLE SUBTOTAL WHOLESALEPR with SUMMARYLINES=EXPLICIT
produces a grand total line with the WHOLESALEPR field subtotaled:
WebFOCUS New Features
1-77
Preventing Propagation of SUBTOTAL and RECOMPUTE to the Grand Total
Example:
Using COLUMN-TOTAL With SET SUMMARYLINES=EXPLICIT
The following request using the MOVIES data source has a sort break for CATEGORY for
which subtotals the COPIES field and a sort break for RATING that subtotals the LISTPR field.
It also has an ON TABLE COLUMN-TOTAL phrase:
SET SUMMARYLINES=EXPLICIT
TABLE FILE MOVIES
SUM COPIES LISTPR WHOLESALEPR
BY RATING
BY CATEGORY
WHERE CATEGORY EQ 'CHILDREN'
WHERE RATING
EQ 'G'
ON RATING SUBTOTAL COPIES
ON CATEGORY SUBTOTAL LISTPR
ON TABLE COLUMN-TOTAL
END
The grand total line displays a column total for all numeric columns because of the ON
TABLE COLUMN-TOTAL phrase:
The following request has an ON TABLE SUBTOTAL WHOLESALEPR command. It also has an
ON TABLE COLUMN-TOTAL phrase:
SET SUMMARYLINES=EXPLICIT
TABLE FILE MOVIES
SUM COPIES LISTPR WHOLESALEPR
BY RATING
BY CATEGORY
WHERE CATEGORY EQ 'CHILDREN'
WHERE RATING
EQ 'G'
ON RATING SUBTOTAL COPIES
ON CATEGORY SUBTOTAL LISTPR
ON TABLE COLUMN-TOTAL
END
1-78
Information Builders
WebFOCUS Reporting Language Enhancements
The grand total line displays a column total only for the WHOLESALEPR column because of
the ON TABLE SUBTOTAL command:
Using SUB-TOTAL instead of SUBTOTAL causes COPIES and LISTPR to be aggregated on the
grand total line. WHOLESALEPR is totaled because it is listed in the COLUMN-TOTAL phrase.
The subtotal for LISTPR propagates to the RATING sort break as well as to the grand total:
SET SUMMARYLINES=EXPLICIT
TABLE FILE MOVIES
SUM COPIES LISTPR WHOLESALEPR
BY RATING
BY CATEGORY
WHERE CATEGORY EQ 'CHILDREN'
WHERE RATING
EQ 'G'
ON RATING SUB-TOTAL COPIES
ON CATEGORY SUB-TOTAL LISTPR
ON TABLE COLUMN-TOTAL WHOLESALEPR
END
The output is:
WebFOCUS New Features
1-79
Increased Number of Joins
Increased Number of Joins
The number of joins that can be in effect at one time for one data source has been raised to
63. The joined structure can have a total of up to 64 segments. The total length of all fields
can be up to 32K and the number of fields in a data source can be up to 3072.
For example, you can have 63 joins between 64 one-segment data sources or three joins
between four 16-segment data sources, or any combination that does not exceed 64
segments.
If you are using a relational data adapter, the Relational Database Management System
(RDBMS) may have its own limit for the number of joins allowed in an SQL statement. If you
create a joined structure that exceeds the number of JOINs allowed by the RDBMS but is
within the number of JOINs allowed by WebFOCUS, the join is processed by WebFOCUS,
but not optimized (passed to the RDBMS for processing).
Raised FML Rows Limit
The limit on FML tag values is now based on available memory rather than on a hardcoded
value to service larger FML requests. There is no new syntax and users interact with FML by
entering FML requests using an editor or the FML Painter as before.
Error Messages
If it is determined there is no more available memory, an internal routine displays one of the
following messages before exiting the product:
Reqfor: out of memory
This indicates either too many labels or too much memory required.
Rectok: out of memory
Generated request cannot be parsed because not enough memory.
(This is not an FML-specific message.).
WebFOCUS New Features
1-80
Information Builders
WebFOCUS Reporting Language Enhancements
FMLLIST Function: Retrieving an FML Tag List
How to:
Retrieve an FML Tag List
Example:
Retrieving an FML Tag List With FMLLIST
FMLLIST returns a string containing the complete tag list for each row in an FML request. If a
row has a single tag value, that value is returned.
The FMLLIST function is supported for COMPUTE but not for DEFINE. Attempts to use it in a
DEFINE results in blank values.
Syntax:
How to Retrieve an FML Tag List
FMLLIST('A4096V')
where:
'A4096V'
Is the required argument.
Example:
Retrieving an FML Tag List With FMLLIST
SET FORMULTIPLE=ON
TABLE FILE LEDGER
HEADING
"TEST OF FMLLIST"
" "
SUM AMOUNT
COMPUTE LIST1/A36 = FMLLIST('A4096V');
FOR ACCOUNT
'1010'
OVER
'1020'
OVER
'1030'
OVER
BAR
OVER
'1030' OR '1020' OR '1010'
END
WebFOCUS New Features
1-81
FMLFOR Function: Retrieving FML Tag Values
The output is:
FMLFOR Function: Retrieving FML Tag Values
How to:
Retrieve FML Tag Values
Example:
Retrieving FML Tag Values With FMLFOR
FMLFOR retrieves the tag value associated with each row in an FML request. If the FML row
was generated as a sum of data records using the OR phrase, FMLFOR returns the first value
specified in the list. If the OR phrase was generated by an FML Hierarchy ADD command,
FMLFOR returns the tag value associated with the parent specified in the ADD command.
The FMLFOR function is supported for COMPUTE but not for DEFINE. Attempts to use it in
DEFINEs will result in blank values.
Syntax:
How to Retrieve FML Tag Values
FMLFOR(outfield)
where:
outfield
Is name of the field that will contain the result, or the format of the output value
enclosed in single quotation marks.
1-82
Information Builders
WebFOCUS Reporting Language Enhancements
Example:
Retrieving FML Tag Values With FMLFOR
SET FORMULTIPLE = ON
TABLE FILE LEDGER
SUM AMOUNT
COMPUTE RETURNEDFOR/A8 = FMLFOR('A8');
FOR ACCOUNT
1010
OVER
1020
OVER
1030
OVER
BAR
OVER
1030 OR 1020 OR 1010
END
The output is:
FMLCAP Function: Retrieving FML Hierarchy Captions
The FMLCAP function returns the caption value for each row in an FML hierarchy request. In
order to retrieve caption values, the Master File must define an FML hierarchy and the
request must use the GET CHILDREN, ADD, or WITH CHILDREN option to retrieve hierarchy
data. If the FOR field in the request does not have a caption field defined, FMLCAP returns a
blank string.
FMLCAP is supported for COMPUTE but is not recommended for use with DEFINE.
Syntax:
How to Retrieve Captions in an FML Request Using the FMLCAP Function
FMLCAP(fieldname|'format')
where:
fieldname
Is the name of the caption field.
'format'
Is the format of the caption field enclosed in single quotation marks.
WebFOCUS New Features
1-83
FMLCAP Function: Retrieving FML Hierarchy Captions
Example:
Retrieving FML Hierarchy Captions Using FMLCAP
The following request retrieves and aggregates the FML hierarchy that starts with the
parent value 2000. FMLCAP retrieves the captions, while the actual account numbers
display as the FOR values.
SET FORMULTIPLE = ON
TABLE FILE CENTSTMT
SUM ACTUAL_AMT
COMPUTE CAP1/A30= FMLCAP(GL_ACCOUNT_CAPTION);
FOR GL_ACCOUNT
2000 WITH CHILDREN 2 ADD
END
The output is:
1-84
Information Builders
WebFOCUS Reporting Language Enhancements
Increased Limit for MATCH FILE
You could previously merge up to six different data sources or merge data from the same
data source up to six times per request. That limit has been raised to 16, allowing you to
merge up to 16 data sources in a single MATCH request.
The manner in which MATCH merges the data depends on the request context, or more
specifically, the order in which the data sources, BY fields, and display commands are
mentioned, as well as on the number of verb objects and BY phrases employed. As before,
the following general MATCH conditions apply:
•
You can use a total of 32 BY phrases and the maximum normal number of display fields
in each MATCH request. You must specify at least one BY field for each file named in the
MATCH request.
•
DEFINE commands can be used.
•
Up to 32 sort sets are supported, including the normal number of common sort fields.
•
If used with MATCH, SET HOLDLIST behaves as if HOLDLIST were set to ALL.
•
The ACROSS and WHERE TOTAL phrases are not permitted and you cannot use
COMPUTE or BY HIGHEST in a MATCH request.
There is no new syntax for this feature.
Reference: Usage Notes for MATCH FILE Limit
The limit of 16 files represents the number of files supported in the most complex MATCH
FILE requests. Simpler requests may be able to merge a higher number of files.
WebFOCUS New Features
1-85
Creating Visual Discovery Output Files
Creating Visual Discovery Output Files
How to:
Create a Visual Discovery Output File
Example:
Creating a Visual Discovery Output File
Reference:
Format Conversions for HOLD FORMAT VISDIS
Visual Discovery creates graphs using a tab-delimited data file as input. The first record of
the data file contains the column titles for the data values. The next record can contain the
Visual Discovery field formats. If this record is not present, Visual Discovery attempts to
determine the formats of the data fields by reading the first 50 records from the data file, a
process that is not guaranteed to create accurate representations of the WebFOCUS
formats.
HOLD FORMAT VISDIS creates a tab-delimited output file with the extension .txt in which
the first record has the column titles and the second record contains Visual Discovery
formats based on the FOCUS field formats of the data.
Reference: Format Conversions for HOLD FORMAT VISDIS
1-86
FOCUS Format
Visual Discovery Format
Integer
I
Decimal/Packed
R
Alphanumeric
S
Date format (smart date)
D%format%format%format (for example, D%Y%M%D). If
the year is not a four-digit year, the format returned is S.
Other
S
Information Builders
WebFOCUS Reporting Language Enhancements
Syntax:
How to Create a Visual Discovery Output File
[ON TABLE] HOLD [AS filename ] FORMAT VISDIS
[ON TABLE] PCHOLD [AS filename ] FORMAT VISDIS
[ON TABLE] SAVE [AS filename ] FORMAT VISDIS
where:
filename
Is the name of the output file. The file is created with the extension .txt on UNIX and
Windows platforms. On VM, the file is created with filetype TXT.
Note: No Master File is created for format VISDIS.
Example:
Creating a Visual Discovery Output File
The following request creates a Visual Discovery output file using the MOVIES and
VIDEOTRK data sources joined on the MOVIECODE field. The TRANSDATE field does not
have four-digit years, so to get a date format in the Visual Discovery output file, a new field
named TRANS1 is created from TRANSDATE:
JOIN MOVIECODE IN MOVIES TO ALL MOVIECODE IN VIDEOTRK AS J1
DEFINE FILE MOVIES
TRANS1/YYMD = TRANSDATE;
END
TABLE FILE MOVIES
PRINT COPIES TITLE WHOLESALEPR AS 'WHOLESALE,PRICE'
TRANSDATE
BY CATEGORY
WHERE CATEGORY EQ 'ACTION' OR 'CHILDREN'
ON TABLE HOLD FORMAT VISDIS
END
WebFOCUS New Features
1-87
Creating Visual Discovery Output Files
The following file is created. For clarity, the tab characters in the file are displayed as a caret
(>) surrounded by blanks. Note that the first record has the column titles and the second
has the Visual Discovery formats:
CATEGORY > COPIES > TITLE > WHOLESALE,PRICE > TRANS1
S > I > S > R > D%Y%M%D
ACTION > 2 > JAWS > 10.99 > 19910627
ACTION > 4 > TOTAL RECALL > 11.99 > 19910619
ACTION > 2 > TOP GUN > 9.99 > 19910626
ACTION > 2 > TOP GUN > 9.99 > 19910627
ACTION > 3 > RAMBO III > 10.99 > 19910621
ACTION > 3 > RAMBO III > 10.99 > 19910626
CHILDREN > 1 > SMURFS, THE > 10.00 > 19910622
CHILDREN > 2 > SHAGGY DOG, THE > 29.99 > 19910625
CHILDREN > 2 > ALICE IN WONDERLAND > 12.50 > 19910617
CHILDREN > 2 > ALICE IN WONDERLAND > 12.50 > 19910622
CHILDREN > 1 > SESAME STREET-BEDTIME STORIES AND SONGS > 7.65 > 19910622
CHILDREN > 1 > SLEEPING BEAUTY > 15.99 > 19910624
CHILDREN > 3 > BAMBI > 12.00 > 19910617
CHILDREN > 3 > BAMBI > 12.00 > 19910622
1-88
Information Builders
CHAPTER 2
Developer Studio Enhancements
2.
This chapter describes all of the features for Developer Studio in Version 5 Release 3.
Topics:
Creating Reports
•
Access to Any Text Editor
•
Extended Currency Symbol Support
•
•
SET Commands
Access to the WebFOCUS Administration
Console
•
Tab-delimited Output Format
•
HTTPS Certification for Reporting Applications
•
Minus Edit Display Option
•
Enhanced Installation Program
•
Multivariate Regression
•
Configuration Options for Stand-alone
Development
•
NORMSDST and NORMSINV Subroutines
•
Developer Studio Command Console
•
Execute Wizard
•
Graph Enhancements
•
Adding Multiple Values With the Variable
Editor
•
New Formatting and Styling Capabilities in the
Resource Layout Painter
Interface and Performance Enhancements
•
Browser Defaults Displayed in Design Window
•
Security Enhancements in Developer Studio
•
•
Logging Off Areas in WebFOCUS
Environments
Automatic Population of Fields with Parameter
Values
•
Sizing a Graph in Resource Layout Painter
•
Enhanced User Interface
•
•
Performance Enhancements
Attaching a Dynamic Calendar in the Resource
Layout Painter
•
Preserved Table Positioning in Graphical
Tools
•
Customizing Dynamic Parameters
Styling Reports With the Resource Layout
Painter
Localized Versions
•
WebFOCUS New Features
French and Japanese Localized Versions
2-1
Extended Currency Symbol Support
Extended Currency Symbol Support
How to:
Display an Extended Currency Symbol
Example:
Displaying an Extended Currency Symbol
Reference:
Extended Currency Symbol Formats
Information BuildersIn Developer Studio Version 5 Release 3, you can select a currency
symbol for display in report output regardless of the default currency symbol configured
for National Language Support (NLS). Use the extended currency symbol format in place of
the floating dollar (M) or non-floating dollar (N) display option. When you use the floating
dollar (M) or non-floating dollar (N) display option, the currency symbol associated with the
default code page is displayed. For example, when you use an American English code page,
the dollar sign is displayed.
The extended currency symbol format allows you to display a symbol other than the dollar
sign. For example, you can display the symbol for a United States dollar, a British pound, a
Japanese yen, or the euro. Extended currency symbol support is available for numeric
formats (I, D, F, and P). In Developer Studio, you select these formats in the Formats dialog
box.
Use the following character combinations as the final two characters in any numeric display
format:
2-2
Display Option
Description
Example
!d
Fixed dollar sign.
D12.2!d
!D
Floating dollar sign.
D12.2!D
!e
Fixed euro symbol.
F9.2!e
!E
Floating euro symbol.
F9.2!E
!l
Fixed British pound sign.
D12.1!l
!L
Floating British pound sign.
D12.1!L
!y
Fixed Japanese yen symbol.
I9!y
!Y
Floating Japanese yen symbol.
I9!Y
Information Builders
Developer Studio Enhancements
Reference: Extended Currency Symbol Formats
The following guidelines apply:
•
A format specification cannot be longer than eight characters.
•
The extended currency option must be the last option in the format.
•
The extended currency symbol format cannot include the floating (M) or non-floating
(N) display option.
•
A non-floating currency symbol is displayed only on the first row of a report page. If
you use field-based reformatting (as in the example that follows) to display multiple
currency symbols in a report column, only the symbol associated with the first row is
displayed. In this case, do not use non-floating currency symbols.
•
Lower case letters are transmitted as upper case letters by the terminal I/O procedures.
Therefore, the fixed extended currency symbols can only be specified in a procedure.
•
Extended currency symbol formats can be used with fields in floating point, decimal,
packed, and integer formats. Alphanumeric, dynamic, and variable character formats
cannot be used.
Procedure: How to Display an Extended Currency Symbol
1. Do one of the following to open the Format dialog box:
•
Click the Format button in the Compute, Define, or Recap dialog box.
or
•
Right-click a selected field in the Report Painter window and select Format from the
menu.
The Format dialog box opens.
2. Highlight an extended currency option in the Edit Options list and click OK. The
currency option will display when you run the report.
WebFOCUS New Features
2-3
Extended Currency Symbol Support
Example:
Displaying an Extended Currency Symbol
The following example adds a floating euro symbol to a field.
1. Create a new procedure, using CENTORD as the data source.
2. In the Report Painter’s main window, add the following fields to your report:
•
DATE
•
PRODNAME
•
QUANTITY
•
PRICE
3. Select the DATE field, and click By.
4. Click Where/If. The Report Options window opens.
5. Enter QUANTITY GT 700, and click OK.
6. Right-click the PRICE field, and select Format... from the pop-up menu. The Format
dialog box opens.
7. Select Floating Euro symbol - !E from the Edit Options scroll list.
8. Click OK.
2-4
Information Builders
Developer Studio Enhancements
When the report is run, a euro symbol will appear directly to the left of the values in the
PRICE field:
WebFOCUS New Features
2-5
SET Commands
SET Commands
You can issue a SET command by using the SET tool to generate the command in a stored
procedure, or by coding it in a stored procedure. If you use the SET tool, a SET command is
generated for the report you are developing. SET commands are fully documented in the
Customizing Your Environment chapter in the Developing Reporting Applications manual. The
following SET commands are supported in Developer Studio Version 5, Release 3.
2-6
Command
Description
ERROROUT
Terminates a request and returns an error message when an error is
encountered.
HNODATA
Controls missing values propagated to a HOLD file.
HOLDMISS
Distinguishes between missing data and default data in a HOLD file.
NULL
Enables creation of a variable-length comma or tab-delimited HOLD
file that differentiates between a missing value and a blank string or
zero value.
SAVEDMASTERS
Saves a Master File in memory after it is used in a request.
Information Builders
Developer Studio Enhancements
Tab-delimited Output Format
How to:
Select the TABT Format in the Report Painter
The TABT output format creates an output file in tab-delimited format that includes column
headings in the first row. This is useful for importing data to Windows-based applications
such as MS Access and Excel.
The TABT format includes a built-in safety feature that allows embedded quotation marks
within text fields. It inserts a second double quotation mark (") adjacent to the existing one.
For example, if you input Joe "Smitty" Smith, the output will be Joe ""Smitty"" Smith. The
TABT format also includes the following features:
•
The first row contains field names.
•
All trailing blanks are stripped from alpha [An] fields.
•
All leading blanks are stripped from numeric [Dx.y, Fx.y, Px.y, and In] fields.
•
There is a 32K record length limit in the output file.
•
A Master File is created when the command used to create the output file is HOLD. The
Master File behaves exactly as in FORMAT ALPHA, except for the inclusion of double
quotation marks.
•
The default file type is .TAB.
Supported output formats are fully documented in Output File Formats in the Saving and
Reusing Report Output chapter in the Creating Reports With Graphical Tools manual.
Procedure: How to Select the TABT Format in the Report Painter
1. Choose Output from the Report menu. The Report Options dialog box opens at the
Output tab.
2. Click the Hold Data... button in the Hold/Save section. The Hold dialog box opens.
3. Expand a folder in the Hold Format box to view a list of formats in that category.
Categories are: General, Database, Binary Data, Comma Delimited Data, Microsoft
Excel, Host To PC transfer, Text Data, Web Document, and XML Output.
In the Report Painter, the default is No Hold file.
4. In the Host to PC transfer folder, highlight the TABT format.
WebFOCUS New Features
2-7
Minus Edit Display Option
5. In the Name box, type a new name for the HOLD file.
Tip: This is advisable to avoid having your file overwritten the next time you create a
Hold file.
6. Click OK. When you run the report, output is saved in a HOLD file. If the selected HOLD
format requires an accompanying Master File that file is also created.
Minus Edit Display Option
How to:
Display a Minus Sign After Negative Data
Example:
Displaying a Minus Sign After Negative Data
This option displays a minus sign to the right of negative numeric data. You can define this
option in a Master File, in a COMPUTE or DEFINE command, or from the Report Painter.
Minus Edit functions only as a format option.
This edit option is not supported with format options B, E, R, T, DMY, MDY, and YMD. Minus
Edit does not perform calculations intended to derive a negative number in the data.
Procedure: How to Display a Minus Sign After Negative Data
1. Do one of the following to open the Format dialog box:
•
Click the Format button in the Compute, Define, and Recap dialog box.
or
•
Right-click a field in the Report Painter window and select Format from the menu.
The Format dialog box opens.
2. Check the box next to the option Add minus sign if value is negative and click OK. The
minus sign displays to the right of negative numeric data when the report is executed.
2-8
Information Builders
Developer Studio Enhancements
Example:
Displaying a Minus Sign After Negative Data
1. Right-click the Procedures folder, click New and then Procedure. The Task Viewer opens.
2. Click the diamond-shaped component connector and select Define. Create a virtual
field using the MOVIES Master File. The Define box opens.
3. In the Field input box, enter MDISC. In the Format input box, enter 7.2. Then, in the
expressions window, enter 7.5. Click Close.
4. Click Yes at the prompt to save your changes.
5. Click and hold a component connector, and select Report. The Report Painter opens.
6. From the Report menu, select Computes.... The Report Options dialog box opens with
the Computes tab showing.
7. In the Field input box, enter GROSS_PROFIT.
8. In the expressions box, enter LISTPR - WHOLESALPR, then click New.
9. In the Field input box, enter NET_PROFIT.
10. In the expressions box, enter GROSS_PROFIT - MDISC, then click the Format button. The
Format dialog box opens.
11. Select the Add minus sign if value is negative check box, and click OK.
12. In the Report Options window, click OK. You return to Report Painter.
13. Add the following fields to the report:
•
MDISC
•
WHOLESALEPR
•
LISTPR
•
CATEGORY
14. Select the CATEGORY field, and click By.
15. Click Where/If. The Report Options window opens with the Where/If tab open.
16. Click the If tab, and enter the following in the expressions box:
IF CATEGORY EQ ‘ACTION’ OR ‘MUSICALS’ OR ‘DRAMA’ OR ‘SCI/FI’
17. Click New.
18. Click OK.
WebFOCUS New Features
2-9
Multivariate Regression
When the request is run, the NET_PROFIT field will display a minus sign after any negative
values:
Multivariate Regression
How to:
Create a Multivariate Linear Regression Column
Example:
Creating a Multivariate Linear Regression Column
Reference:
Usage Notes for REGRESS
You can calculate trends and predict values with multivariate regression. This method
derives a linear equation that best fits a set of numeric data points, and uses this equation
to create a new column in the report output. The equation can be based on one to three
independent variables.
2-10
Information Builders
Developer Studio Enhancements
This method estimates values by assuming that the dependent variable (y, the new
calculated values) and the independent variables (x1, x2, x3) are related by the following
linear equation:
y = a1*x1 [+ a2*x2 [+ a3*x3]] + b
When there is one independent variable, the equation represents a straight line. This
produces the same values as FORECAST using the REGRESS method. When there are two
independent variables, the equation represents a plane, and with three independent
variables, it represents a hyperplane. You should use this technique when you have reason
to believe that the dependent variable can be approximated by a linear combination of the
independent variables.
REGRESS uses a technique called Ordinary Least Squares to calculate values for the
coefficients (a1, a2, a3, and b) that minimize the sum of the squared differences between
the data and the resulting line, plane, or hyperplane.
Procedure: How to Create a Multivariate Linear Regression Column
1. In the Report Painter’s main window, select a numeric BY field. The Forecast button is
activated.
2. Click the Forecast button.
3. From the Step 1: Choose a Method drop-down list, select the Multivariate Regression
option.
4. From the Step 2: Choose the First Independent Variable drop-down list, select a
variable. You have the option to choose another independent variable in Step 3 and
Step 4.
5. From Step 5: Choose the Dependent Variable drop-down list, select a dependent
variable.
6. Click OK.
Reference: Usage Notes for REGRESS
•
The sort field used for REGRESS must be a numeric or smart date field. REGRESS cannot
operate on an ACROSS field. If any of the independent variables are also sort fields, they
cannot be referenced in the request prior to the REGRESS sort field.
•
FORECAST and REGRESS cannot be used in the same request, and only one REGRESS is
supported in a request. Non-REGRESS RECAP commands are supported.
•
The RECAP command used with REGRESS can contain only the REGRESS syntax.
REGRESS does not recognize any syntax after the closing semicolon (;).
•
Although you pass parameters to REGRESS using an argument list in parentheses,
REGRESS is not a function. It can coexist with a user-written subroutine of the same
name, as long as the user-written subroutine is not specified in a RECAP command.
WebFOCUS New Features
2-11
Multivariate Regression
Example:
•
BY TOTAL is not supported.
•
MORE, MATCH, FOR, and OVER are not supported.
•
The process of generating the REGRESS values creates extra columns that are not
printed in the report output. The number and placement of these additional columns
varies depending on the specific request. Therefore, use of column notation is not
supported in a request that includes REGRESS.
•
SUMMARIZE and RECOMPUTE are not supported for the same sort field used for
REGRESS.
•
REGRESS is not supported for the FOCUS GRAPH facility.
•
The left side of a RECAP command used for REGRESS supports the CURR attribute for
creating a currency-denominated field.
•
Fields with missing values cannot be used in the regression.
Creating a Multivariate Linear Regression Column
1. Create a new procedure, using GGSALES as the data source.
2. In the Report Painter’s main window, add the following fields to your report:
•
DATE
•
BUDUNITS
•
UNITS
•
BUDDOLLARS
•
DOLLARS
3. Select the DATE field, and click the BY button. The Forecast button is activated.
4. Click the Forecast button. The Forecast window opens.
5. In the Field Name input box, enter ESTDOLLARS.
6. From the Step 1: Choose a Method drop-down list, select Multivariate Regression.
7. From the Step 2: Choose the First Independent Variable drop-down list, select
BUDUNITS.
8. From the Step 3: Choose Another Independent Variable drop-down list, select UNITS.
9. From the Step 4: Choose Another Independent Variable drop-down list, select
BUDDOLLARS.
10. From Step 5: Choose the Dependent Variable drop-down list, select DOLLARS.
11. Click OK.
12. In the Report Painter, click Where/If. The Report Options window opens.
13. Enter CATEGORY EQ ‘Coffee’ in the calculator window, and click New.
2-12
Information Builders
Developer Studio Enhancements
14. Enter REGION EQ ‘West’ in the calculator window, and click New.
15. Enter UNITS GT 1600 AND UNITS LT 1700 in the calculator window, and click New.
16. Click OK.
When the report is run, the forecasted values will display in the ESTDOLLARS column.
NORMSDST and NORMSINV Subroutines
How to:
Use a Function in an Expression With the Define Tool
Use a Function in an Expression With the Where/If or Computes Tab
The NORMSDST and NORMSINV functions perform calculations on a standard normal
distribution curve:
•
The NORMSDST function calculates the percentage of data values that are less than or
equal to a normalized value. A normalized value is a point on the X-axis of a standard
normal distribution curve in standard deviations from the mean. This is useful for
determining percentiles in normally distributed data.
•
The NORMSINV function finds the normalized value that forms the upper boundary of a
percentile in a standard normal distribution curve. This function is the inverse of
NORMSDST.
The results of NORMSDST and NORMSINV are returned as double-precision and are
accurate to six significant digits.
Procedure: How to Use a Function in an Expression With the Define Tool
In the Define tool window:
1. Click the Functions button.
2. The Function Arguments dialog box opens. For a list of functions, see the Using
Functions manual.
3. Select a category from the drop-down list. Categories are: All, Character, Data Source
and Decoding, Date and Time, Format Conversion, Numeric, and System.
4. Select a function.
5. Enter any other criteria for the function, such as the value, length, format, etc.
6. Click OK. The function and placeholders for its arguments are added to the expression.
7. Repeat steps 3 through 6 for each argument.
WebFOCUS New Features
2-13
Execute Wizard
Procedure: How to Use a Function in an Expression With the Where/If or Computes Tab
1. In the Report Options Where/If or Computes tab click the Functions... button.
2. The Function Arguments dialog box opens. For a list of functions, see the Using
Functions manual.
3. Select a category from the drop-down list. Categories are: All, Character, Data Source
and Decoding, Date and Time, Format Conversion, Numeric, and System.
4. Select a function.
5. Enter any other criteria for the function, such as the value, length, format, etc.
6. Click OK. The function and placeholders for its arguments are added to the expression.
7. Repeat steps 3 through 6 for each argument.
Execute Wizard
How to:
Execute a Procedure With the Execute Wizard
Example:
Calling a Procedure From Another Procedure
The Execute component allows one procedure to execute or call another procedure. The
redesigned Execute Wizard allows you to view and select available procedures and supply
values for parameters in the called procedure and also test that called procedure. The called
procedure behaves as a completely separate procedure, with its own context.
Execute Wizard allows you to select the procedure that you are supplying parameter values
for. Once this procedure is specified, Execute Wizard displays these parameters and
prompts you to provide values for them. You can provide values for all parameters in the
procedure, or can choose to provide values for only some of the parameters. If you provide
values for only some of the parameters, you must provide values for the other parameters
using another method. (For example, values are passed from another part of the
application, etc.) After providing parameter values, you can test the called procedure.
The Execute Wizard is available throughout all development areas of the product: Projects,
Data Servers, and Managed Reporting. When working against a Managed Reporting
environment, the tool allows developers to use Standard Reports available in the Domain
or use procedures that reside on the WebFOCUS Reporting Server.
Execute Wizard uses the WFDESCRIBE auto-prompting feature to locate and pass
parameters. To activate the WFDESCRIBE feature, change the default value in the
IBIF_wfdescribe setting in the cgivars.wfs file.
2-14
Information Builders
Developer Studio Enhancements
Procedure: How to Execute a Procedure With the Execute Wizard
1. Click the component connector at the point at which you wish to include the existing
procedure.
The Component Connector toolbox opens.
2. Click the Execute button.
The Execute Procedure Wizard opens.
WebFOCUS New Features
2-15
Execute Wizard
3. Select the procedure you want to execute from the list of available procedures, and
click Next>. The Execute Procedure Wizard - Enter Procedure Parameters window
opens:
The Enter Procedure Parameters window contains a list of variables contained in the
procedure you are executing, and fields in which to enter values for those variables.
This screen will not appear if the procedure you are calling does not have parameters.
4. Enter the variable values you wish to use in the procedure you are executing. If you do
not wish to provide a value for a variable, uncheck the Optional box next to the variable
name.
2-16
Information Builders
Developer Studio Enhancements
5. Click Next>.
The Execute Procedure Wizard - Summary window opens. This window allows you to
view the name of the procedure you are calling and view the variables-value pairs.
6. Click Test Procedure to ensure that the procedure runs properly. If the procedure works
properly, a report will display in your browser.
7. Click Finish to insert the selected procedure into the current procedure.
Tip: The Execute component inserts the EX command in the procedure’s code. Hover your
cursor over the Execute object to see the EX command. If you wish to run the embedded
procedure, right-click the Execute object and choose Run from the shortcut menu.
WebFOCUS New Features
2-17
Execute Wizard
Example:
Calling a Procedure From Another Procedure
In the following example, you will create two procedures. One procedure, named SALESREP,
will contain a sales report with variables. The second procedure, names SVALUES, will
contain the values for the variables in SALESREP, and will execute SALESREP. The result will
be a sales report with variable values filled in.
Create the SALESREP procedure:
1. Create a new procedure named SALESREP using the SALES data source.
2. In the Component Connector toolbox, click a component connector, and select Report.
The Report Painter opens.
3. In the Page Heading section, type Monthly Report for and then select Variable Field from
the Insert menu. The Variable Editor opens.
4. Create the &CITY variable by doing the following:
a. Enter CITY in the Name input field.
b. Select Single Select from the Variable Type drop-down list.
c.
Select Values from field from the Data Context drop-down list.
d. Select CITY from the Fields from database drop-down list.
e. Select ALL the from Values from field CITY box.
f.
Click OK.
5. Add the UNIT_SOLD and RETURNS fields to your report, then select both fields in the
layout and click the Sum button in the toolbar.
6. Create the RATIO field by doing the following:
a. Select Computes... from the Report menu. The Report Options window opens.
b. Enter RATIO in the Field input box.
c.
Enter D5.2 in the Format input box.
d. Enter 100 * (RETURNS/UNIT_SOLD) in the Expressions window.
e. Click OK.
2-18
Information Builders
Developer Studio Enhancements
7. Add the PROD_CODE field to your report, and click By.
8. Filter the PROD_CODE field by doing the following:
a. Select Where/If... from the Report menu. The Report Options window opens.
b. Select the IF tab.
c.
Enter the following in the Expressions window: IF PROD_CODE IS-FROM &CODE1 TO
&CODE2
d. Click OK.
9. Add the CITY field to your report, and click By.
10. Filter by the CITY field by doing the following:
a. Select Where/If... from the Report menu. The Report Options window opens.
b. Select the IF tab.
c.
Enter the following in the Expressions window: IF CITY EQ &CITY
d. Click OK.
11. Save and close the procedure.
Create the SVALUES procedure:
12. Create a new procedure named SVALUES and from the Create with drop-down list,
select Procedure Viewer. The Procedure Viewer opens.
13. Click a component connector, and select Execute. The Execute Wizard opens.
WebFOCUS New Features
2-19
Execute Wizard
14. Select SALESREP from the list of procedures, and click Next>. The Enter Procedure
Parameters window opens.
15. Enter STAMFORD in the Value field for CITY.
16. Enter B10 in the Value field for CODE1.
17. Enter B20 in the Value field for CODE2.
2-20
Information Builders
Developer Studio Enhancements
18. Click Next>. The Summary window opens.
19. Click Finish. You return to the Component Connector toolbox.
20. Close and save the procedure.
When the SVALUES procedure is run, the following report displays.
WebFOCUS New Features
2-21
Graph Enhancements
Graph Enhancements
In this section:
Redesigned Graph Assistant
Graph Assistant: Save Options
Graph Assistant: Selection Criteria Features
Graph Assistant: Styling Specified Fields
Graph Assistant: Auto Arrange Feature
Graph Assistant: Text Rotation
Graph Types and Graph Styles
Graph Display Formats
The following are Developer Studio graph enhancements for Version 5 Release 3.
Redesigned Graph Assistant
The Graph Assistant looks different, but its functionality has not changed, except as
described in the specific features outlined in this topic.
Graph Assistant: Save Options
When you click the Save or Save As buttons you save your report (procedure). If you make
changes in your report without subsequently saving them and then click Quit, you are
prompted with the following options:
•
Yes. Click to save your changes and exit the report.
•
No. Click to discard your changes and exit the report.
•
Cancel. Click to return to your report to continue working or use Save or Save As to
save your changes and then click Quit to exit your report.
The following image shows Save dialog box.
2-22
Information Builders
Developer Studio Enhancements
Graph Assistant: Selection Criteria Features
After selecting field values for the X and Y axes, you may wish to limit the data that appears
in your graph. You can do this by creating WHERE statements. A WHERE statement limits
data by creating parameters the data must satisfy before it is included in the data set. For
details on creating WHERE statements, see Using the Expression Builder in Appendix B,
Writing Expressions.
Graph Assistant: Styling Specified Fields
Use the Conditional Styling dialog box to style records based on specified field values.
Conditional styling, also referred to as stoplighting, allows you to define conditions that
determine when to apply particular fonts, point size, text style, foreground and background
color, and drill down procedures to your report’s data when the report is run.
You can style specified values for one or several column and sort fields. However, you
cannot style values for sort across fields.
Procedure: How to Style Records Based on Specified Field Values
1. In the HTML Graph Assistant, if hidden, Click Show report field options.
2. Click the Display tab in the report field options section.
3. Click the Conditional styling button. The Conditional Styling dialog box opens.
WebFOCUS New Features
2-23
Graph Enhancements
4. Click the Add icon that is on the All box. The edit condition dialog box opens where you
begin to set the conditional styling.
5. Provide a meaningful and unique file name in the Condition input box.
6. Select a field name from the Field list box and a relation from the Relations list box.
7. To specify a value that completes the relation, first select one of the following in the
Compare Type radio button group:
•
Value, to compare the selected report field to a data source value or literal value.
•
Another Field, to compare the selected report field to the value of another field.
8. If you select Value under Compare Type, perform one of the following to complete the
relation:
•
Click Values to display existing data source values in the Value list box, and select a
value.
•
Type a literal value in the Value input box.
9. Click OK. You return to the Conditional Styling dialog box.
10. Select the newly created condition in the list box. The condition statement appears in
the When box.
11. Click the Add icon on the Attached box.
12. Click Font. The Styles dialog box opens.
13. Select the desired font characteristics.
2-24
Information Builders
Developer Studio Enhancements
14. Click OK. You return to the Conditional Styling dialog box. The specified styling options
are reflected in the Text appears as box.
15. Click OK to return to the Field selection tab.
Graph Assistant: Auto Arrange Feature
How to:
Arrange the Elements of a Graph Efficiently
Example:
Comparing the Arrangement of the Elements of a Graph
The auto arrange feature enables the Graph Preview to arrange all the elements in a graph
report efficiently. The auto arrange feature is checked by default.
Procedure: How to Arrange the Elements of a Graph Efficiently
Check the Automatic Positioning option.
Note: This option is checked by default. If you uncheck this feature, WebFOCUS will arrange
the elements.
WebFOCUS New Features
2-25
Graph Enhancements
Example:
Comparing the Arrangement of the Elements of a Graph
In the Graph types tab:
1. Uncheck the Automatic Positioning option.
2. Click Show Graph Preview.
The Graph preview window opens.
Note how the MPG symbol partially blocks the data along the right Y-axis.
2-26
Information Builders
Developer Studio Enhancements
3. Now check the Automatic Positioning option.
A new Graph preview window opens.
Note how the Y-axes labels and X-axis labels fit within the size of the report.
Graph Assistant: Text Rotation
A text rotation feature in the X-axis properties dialog enables you to design Data Style
labels horizontally, vertically (from top to bottom or from bottom to top), and at a
45-degree angle.
Procedure: How to Arrange X Axis Property Data Styles
1. Click the Properties tab and then the X axis tab.
2. Click the Style labels button to open the X-axis properties dialog box.
3. To enable the text rotation features, select the check box at the top of the X axis
properties dialog box as shown in the following image:
WebFOCUS New Features
2-27
Graph Enhancements
4. Under Text rotation, choose one of the following:
•
Horizontal
•
Vertical - Bottom to top
•
Vertical - Top to bottom
•
45-degree bottom to top
In this case, 45-degree bottom to top is highlighted. Accordingly, the Data Style
label is positioned at a 45-degree angle.
Graph Types and Graph Styles
2-28
•
Multi-y. A Multi-y is a vertical, triple/quadruple/quintuple-Y-axis clustered bar chart.
Any series can be assigned to any of the triple/quadruple/quintuple axes.
•
Waterfall. A Waterfall chart is a cumulative stacked chart. The waterfall chart will
automatically perform the cumulative sum when using Subtotal or Total. Waterfall
charts essentially require one data value for each series or group marker to be drawn in
a chart.
•
Miscellaneous. The Miscellaneous Graph Type includes a variety of Graph Styles:
Information Builders
Developer Studio Enhancements
•
Default (Spectral). This is a Spectral Map Chart. This is a chart with row or column
matrix of markers that are colored according to data values.
•
Funnel. A Funnel Chart is basically a pie chart displaying only one group of data at
a time from the first series to the last series at the bottom of the funnel.
•
Gauge1. A Gauge Chart usually indicates the current position of a value within a
given spectrum.
•
Pareto. The X-axis scale is for the group members. The Y-axis scale is the percent of
the total accumulation for each selected series.
•
Resource Report. Resource charts plot X- and Y-axis data cumulatively. They are
useful for plotting two independent variables against each other, particularly in
cases where one or both of the axes specify percentages and the user wants to
examine issues such as capacity utilization.
•
Product Position. A Product Position chart provides a visual representation of
market share and growth versus revenue and measurement (past, present, and
future). Product Position charts require a set of three display fields.
The following Miscellaneous Graph Type uses a Funnel Graph Style:
Graph Display Formats
•
PNG (Portable Network Graphics). PNG graphs are bit mapped and can support 16
million colors. In addition, PNG graphs have lossless compression (data is
decompressed 100% back to the original). Therefore, saving, altering, and resaving a
PNG does not degrade its overall quality. The PNG graph displays in the browser.
•
GIF (Graphics Interchange Format). GIF compresses well but only supports 256 colors.
The GIF graph displays in the browser.
WebFOCUS New Features
2-29
Graph Enhancements
•
JPEG (Joint Photographic Experts Group). A compressed file format.
•
SVG (Scalable Vector Graphics). SVG is a text-based graph file format that enables Web
application developers to design powerful, interactive graphs. SVG is compact and
generates high quality images on any media regardless of resolution. The SVG is
viewable with an Adobe plug-in.
Reference: Choosing Formats for Output to the Screen, a File, or Printer
When you create or edit a graph in Graph Assistant, you can choose among these formats in
the Output section in the Options tab. If you are designating Output To the Screen, all
options listed above are available, as shown in the Format drop-down list.
The following image shows the Options subtab.
If you are designating Output to File, the PNG, JPEG, GIF, and SVG options are available, as
shown in the Format drop-down list.
2-30
Information Builders
Developer Studio Enhancements
The following image shows the Output section of the Options subtab with the Output to File
option selected.
If you are designating Output to a Printer, the PNG, GIF, and SVG options also are available,
as shown in the Format drop-down list.
The following image shows the Output section of the Options tab with the Output to Printer
option selected.
WebFOCUS New Features
2-31
Adding Multiple Values With the Variable Editor
Adding Multiple Values With the Variable Editor
How to:
Add Multiple Values With the Variable Editor
Example:
Adding Multiple Values With the Variable Editor
The Variable Editor has been redesigned so that you can enter multiple values without
having to open more than one dialog box. It has also been enhanced so you can customize
the way you display values.
Procedure: How to Add Multiple Values With the Variable Editor
1. Click inside the Fields tab on the Object Inspector.
2. Right-click a field and select New Amper Variable Field.
The Variable Editor opens.
3. In the Name input box, type a name for the variable. This name will appear as the
Column title if the field is added to the report.
4. Optionally, provide text for the message that prompts a user to supply a value for the
variable in the Prompt input box.
5. From the Variable Type drop-down list, select Multiselect AND or Multiselect OR.
6. In the Data Context area, select either Fields from database or Values for field. The Data
Context list displays available values.
7. In the Data Context list, double-click values you want to add to the Accept List table.
2-32
Information Builders
Developer Studio Enhancements
8. Click OK. The names of multiple values are automatically added to the display prompt
box.
If you want to customize the display of values, simply double-click a value in the Return
Value column and type the name as you want it to appear in the output.
Example:
Adding Multiple Values With the Variable Editor
1. Create a new procedure, using CENTORD as the data source.
2. In the Report Painter’s main window, add the following fields to your report:
•
DATE
•
PROD_NUM
•
PRODNAME
•
PRICE
•
QUANTITY
3. Select the DATE field, and click By.
4. Click Where/If. The Report Options window opens.
5. Click Assist in the Where tab to open the Expression Builder.
6. Double-click PROD_NUM the list on the left side of the window to add it to the Column
to filter column.
WebFOCUS New Features
2-33
Security Enhancements in Developer Studio
7. Click the down arrow in the Logical Relations column, and select equals from the
drop-down list.
8. Click the down arrow in the Compare Type column and select Parameter from the
drop-down list.
9. Double-click the Compare Value column. The Variable Editor opens.
10. In the Name input box, enter ProductNumber. This name will appear as the Column title
if the field is added to the report.
11. Enter Product Number in the Prompt input box.
12. From the Variable Type drop-down list, select Multiselect AND to add values for fields
you want to include in your list of valid values.
13. In the Data Context area, click Values for field. The list box displays available values.
14. Double-click 1020 in the list box to add it to the Accept List table. Do the same for the
values 1022 and 1024.
15. Click OK.
Security Enhancements in Developer Studio
For details about Developer Studio security enhancements for Version 5 Release 3, see the
following topics:
2-34
•
Custom Logon Template Support on page 10-4.
•
Enhanced Support for Netegrity SiteMinder on page 10-5.
•
Support for RSA ClearTrust on page 10-5.
Information Builders
Developer Studio Enhancements
Logging Off Areas in WebFOCUS Environments
How to:
Logoff Areas in WebFOCUS Environments
You can logoff and then reconnect using different credentials for the following areas in
WebFOCUS Environments (without having to restart Developer Studio):
•
The environment name.
•
All available Data Server nodes.
•
Managed Reporting.
The logoff option functions regardless of whether credentials are stored in the WebFOCUS
Environments Properties dialog box or not. It is most useful if credentials are not stored to
allow the developer to use different credentials after performing a logoff action. If
credentials are stored, required cookies are deleted during the logoff process and stored
credentials are reused to establish a new connection.
Procedure: How to Logoff Areas in WebFOCUS Environments
1. Select the WebFOCUS Environments object area.
2. Either right-click the object and select Logoff or select Logoff from the File menu.
When you select the Logoff option, the following occurs:
•
Any open tools are closed and you are prompted to save changes. If you choose not to
save changes and click Cancel, the Logoff action is also canceled.
•
When tools are closed, any open trees collapse and the following cookies are deleted:
•
At the environment name (client and Web connection):
WFC_cookie
•
For available Data Server nodes:
WF_cookie
•
For Managed Reporting:
MR_cookie
Note:
•
For Managed Reporting, a connection to a WebFOCUS Reporting Server is usually
required and most likely established. Clearing the MR_cookie will not clear the
WebFOCUS Reporting Server cookie since a new connection may need to use the same
WebFOCUS New Features
2-35
Enhanced User Interface
WebFOCUS Reporting Server.
•
If caching is enabled, cache of remote directory and file information (metadata level
caching) is automatically refreshed when you logon, create, delete, or rename
applications or files across all areas of the product.
•
You do not have to clear file I/O (content) caching. File content caching is performed for
individual environments and metadata is refreshed when you log on. If a file is cached
and user has access to this file, the cached file will be opened.
•
The logoff option is visible only after a connection is established for the selected area.
Enhanced User Interface
Developer Studio’s redesigned toolbar buttons provide the product with a more
contemporary look. You can also use more standard Windows options, such as dragging
and dropping, copying and pasting, and renaming files in place. Object options are more
standardized, and common dialog boxes are available throughout the product (for
example, File Open, Create New Metadata, and Create New Procedures, etc.) Tools have
been reorganized to provide consistency across the features. Icons have a consistent look
and common themes that are used throughout all development areas.
Performance Enhancements
In this section:
Local Machine Properties
Various improvements have been implemented in the new release of Developer Studio to
improve performance by enabling cache. Improvements apply throughout the product,
from all available development areas.
This feature is similar to the way Web pages are stored in a browser’s cache directory on the
hard disk or memory and speeds up access times, as the requested information is read from
the cache memory and is not downloaded from the source.
The number of connections to the WebFOCUS Reporting Server has been minimized.
Communication between Developer Studio and the WebFOCUS Client enhances
performance because the product does not need to create separate connections for every
request to the WebFOCUS Server. In addition, connection to the WebFOCUS Client is not
terminated during the Developer Studio session.
Caching has been implemented on the following levels:
2-36
Information Builders
Developer Studio Enhancements
Cache Remote Directory and File Information (Metadata Level Caching)
Caching has been implemented in the Developer Studio communication layer in order to
keep requests and responses in cache when requests are issued to retrieve information
from the Reporting Server, such as:
•
Available Reporting Servers, the platform (for instance, Windows, UNIX, and MVS),
version and mode of operation (through WebFOCUS Reporting Servers that are APP
ENABLEd or while using EDAPATH, also known as Cataloged Path).
•
List of applications.
•
List of files.
•
Components of files (for example, for Master Files: file type, segments, fields, and
DEFINE statements).
This feature greatly improves performance, as connections to the Reporting Server are
minimized since information returned from the Reporting Server is cached in memory.
A request for the same information does not send a new request to the Reporting Server
but instead results in a check for the required information in memory and use of the
information if it is available. If information is not available in cache, the request is submitted
to the Reporting Server.
This enhancement limits the number of connections to the server, further improves
performance while displaying files and launching tools, and uses cached information in all
areas (Projects, Data Servers, Managed Reporting, and Web Applications areas) and from all
tools of Developer Studio.
Caching is not enabled by default. If you enable caching, it is in effect for the duration of the
Developer Studio session.
Cache is cleared for a given request if a task such as logon, create, rename, or delete is
performed. A developer can clear/refresh cache on demand if needed.
File Content Caching
This is an additional performance enhancement accomplished by caching file context.
This level of caching stores the contents of FOCUS files (for example, procedures and Master
Files) on a developer’s PC in a local temporary file.
When you need to access the file again, the product checks to see if the file is available
locally, and open its from the local disk if available. If not available, the file is retrieved from
the Reporting Server.
Caching is not enabled by default and is in effect for the duration of the Developer Studio
session.
Cache is cleared for a given request if a task such as create, rename, or delete is performed.
A developer can clear/refresh cache on demand if needed.
WebFOCUS New Features
2-37
Performance Enhancements
Enhancements on both levels limit the number of connections to the server and further
improve performance while displaying files and launching tools.
Local Machine Properties
You can select the Local Machine button to indicate whether to cache files when accessing
the WebFOCUS environment. These properties are always optional.
In caching, copies of files or information stored on a remote machine are temporarily stored
on your local Developer Studio machine. Developer Studio then works with the locally
stored files. Caching speeds Developer Studio performance because remote machines are
not accessed and queried every time you request information. This is especially useful
when accessing mainframes or when a network connection is slow. However, caching
should not be used when multiple developers are working with the same files because the
possibility exists that you may overwrite each others changes. By default, caching is not
enabled.
Two properties are available:
•
Cache remote directory and file information. This option caches information about
files stored on the WebFOCUS environment. This does not actually cache files, only
information about them. If selected, Developer Studio does not re-query the
WebFOCUS Reporting Server every time it needs a list of files stored on the server.
Caching for this level is implemented for all development areas (Projects area, Data
Servers area, or Managed Reporting area).
•
Enable file content caching. This option caches files normally stored on the server.
Developer Studio only retrieves files once and then when you wish to read or edit
them, it uses a cached copy. Be aware that when you edit a cached file, the edited
cached file is returned to the server and replaces the actual file on the server.
Developer Studio retrieves information and files the first time you request them and then
caches them locally. Developer Studio then uses the cached copies until Developer Studio
is restarted or you click the Clear buttons for each level. Or you can perform a manual
refresh and clear all cache files by clicking View, then Refresh, or by pressing F5. Refresh is
performed for the area that is selected in the Explorer when you perform this action.
2-38
Information Builders
Developer Studio Enhancements
Note:
•
If you create a new synonym, you must manually perform a refresh to view the new files
in the Developer Studio Explorer whether or not caching is enabled.
•
You cannot cache information in the local development environment if the source
control feature is enabled.
Preserved Table Positioning in Graphical Tools
Table positions are preserved when you work in the Join tool, Dimension Builder, and
Cluster Join tool. The product will not reposition tables if you restart it.
In addition, usability enhancements are performed, such as allowing selection of multiple
tables and delete confirmations.
Access to Any Text Editor
In this section:
Accessing Text Editors
How to:
Set Up the Default Action for the Open Option
You can access any text editor that is registered with your operating system based on the
program that is set up to be the default program that opens the selected file type. For
example, in Windows Explorer, select a .fex file, then right-click and select Properties from
the context menu. Click Change and select Notepad as the default program to open this file
type if it is not already associated with an application. The option to open procedures (.fex
files) with Notepad will now be available through Developer Studio.
This option is valuable for developers who want to take advantage of the WebFOCUS
language and use the editor of their choice.
WebFOCUS New Features
2-39
Access to Any Text Editor
Accessing Text Editors
You can access any text editor by right-clicking a file within the Developer Studio Explorer.
A context menu for the file appears with the following default options:
•
Open in (Task Viewer/Text Editor/Registered Program) to edit the procedure’s
components. Depending on this setting, the following options order will change.
•
Open in (Task Viewer). Depending on the product settings, this option may show
Open in (Text Editor) or Open in (Registered Program), for example, Notepad.
•
Open in Text Editor to edit the procedure’s code using the Developer Studio text
editor.
•
Open in (Registered Program) to edit the procedure’s code using an external editor,
such as Notepad.
•
Open in auto detected tool to open the procedure in the tool used to create it (for
example, the Report Painter, Resource Layout Painter, etc.). You must use this
option if you need to open the file in the Resource Layout Painter or Compound
Report Constructor because it is the only way to open procedures created in the
tool used to create them. You cannot open procedures created with those tools
from the Task Viewer.
Procedure: How to Set Up the Default Action for the Open Option
1. In the Explorer window, select Options from the Window menu. The Developer Studio
Options dialog box opens at the General tab.
2. From the Default file editor drop-down list, select one of the following:
2-40
•
Edit in DevStudio tool to edit a procedure in the Developer Studio Task Viewer.
•
Edit in Text Editor to edit a procedure in Developer Studio’ s text editor.
•
Edit in Windows registered tool to edit a procedure in Notepad, Wordpad, or other
program as registered with the operating system.
Information Builders
Developer Studio Enhancements
Access to the WebFOCUS Administration Console
How to:
Connect to the WebFOCUS Administration Console With Another User ID
Change User IDs for the WebFOCUS Administration Console
You can configure and administer remote WebFOCUS Environments directly from
Developer Studio. While you work from the WebFOCUS Environments area of the
Developer Studio Explorer, a new icon is available in the toolbar for the WebFOCUS
Administration Console. When you select this icon, you can administer against the selected
WebFOCUS Environment. Administrative rights are required to perform administrative
actions. A default user ID, admin, that does not require a password, is used to establish this
connection. If this user ID has changed, the user will connect as a developer, visible in the
level: display field and the user cannot perform administrative tasks.
Procedure: How to Connect to the WebFOCUS Administration Console With Another User
ID
Perform the following steps to connect to the WebFOCUS Administration Console using a
user ID other than the default user ID, admin.
1. From the WebFOCUS Administration Console, click logout.
2. From the next screen, click Return to logon screen.
3. Provide a user ID and password that has administrative rights to connect as an
administrator and view administrative options.
Procedure: How to Change User IDs for the WebFOCUS Administration Console
When you initially use the WebFOCUS Administration Console, the default user ID, admin, is
used.
1. From the WebFOCUS Administration Console, click Configuration, then Startup
Parameters.
2. Click the Administrators radio button and select Modify.
3. Change the user ID, admin, to a desired name, or add new user IDs.
4. Click Save.
5. Close the browser and re-launch the Administration Console to view behavior.
WebFOCUS New Features
2-41
HTTPS Certification for Reporting Applications
HTTPS Certification for Reporting Applications
HTTPS certification has been completely implemented for reporting applications and can
be used while accessing and developing against WebFOCUS Environments that use this
security implementation on the Web server.
This option allows Developer Studio to use the Secure HyperText Transport Protocol, the
standard encrypted communication mechanism on the World Wide Web while working
against WebFOCUS environments that are configured to use HTTPS. When you configure a
WebFOCUS environment through Developer Studio, you must select the HTTPS option
from the Web Component object and choose the correct port.
Enhanced Installation Program
The installation program has been enhanced to make the product work out of the box for
all supported configurations and available development scenarios. In addition, the wizard’s
screens have been enhanced.
New options include the following:
•
Selection of a specific installation directory.
•
An option to install and configure the New Atlanta ServletExec component.
•
A verification tool that tests configuration.
•
A non-interactive (silent) installation.
•
Auto-configuration of IIS and user accounts to allow development right out of the box.
•
Generation of log files.
For details, see the Developer Studio Installation and Configuration manual.
Configuration Options for Stand-alone Development
You have more options to configure Developer Studio for stand-alone development
without using a full Web server.
This feature is accomplished by using the available HTTP Listener and Tomcat
configurations. These are optional configuration options that you can perform post
Developer Studio installation. Using the Web server for stand-alone development is still the
default required option during the installation process.
For details, see Technical Memo 4546: Using Developer Studio Without a Web Server and
Technical Memo 4548: Tomcat Configuration With Developer Studio.
2-42
Information Builders
Developer Studio Enhancements
Developer Studio Command Console
The Developer Studio command console has a new drop-down list that shows all available
projects and Reporting Servers configured within your WebFOCUS environments.
While working in the Projects area, the tool uses the project from which the tool was
launched. Any request you submit while a project is selected uses the search path for the
selected project based on the Reporting Server that is used for development in this area.
(This is the default Reporting Server for the environment unless the default was modified
from the Development object of the WebFOCUS Environment Properties dialog box.) It also
allows you to work with any remote Reporting Servers that you configured. This allows the
tool to work against all Reporting Servers available within the configured WebFOCUS
environments. The Reporting Server’s search path is used while you work in this area.
The Developer Studio command console’s drop-down list is shown:
WebFOCUS New Features
2-43
New Formatting and Styling Capabilities in the Resource Layout Painter
New Formatting and Styling Capabilities in the Resource Layout Painter
In this section:
Changes in the Default Control Type
Accessing Standard Reports in Managed Reporting
Changes to Properties Window
The Resource Layout Painter is enhanced for Version 5 Release 3 with greater styling
capabilities for sizing graphs and creating a dynamic calendar.
Changes in the Default Control Type
The default control type for all single select parameters is now a drop down list. The default
control type for all multi-select parameters will remain a list box.
Accessing Standard Reports in Managed Reporting
In Managed Reporting, the Resource Layout Painter can now access all the Standard
Reports in a domain. Previously, the Resource Layout Painter access was limited to only
reports in the current folder.
Changes to Properties Window
The following changes have been made to the Properties window:
2-44
•
Property settings for an object are now set to default. No styling is applied to an object
in order to permit a Cascading Style Sheet to control the look and feel. Styling that is set
in the Properties window will override styling set in a CSS.
•
Any property in the Properties window can be set back to default even after styling
changes are made.
Information Builders
Developer Studio Enhancements
Browser Defaults Displayed in Design Window
In this section:
Using a Soft Alias With Resource Layout Painter Reports
Browser defaults such as font type and colors are displayed in design view to give the
developer a consistent look and feel between design and preview modes. The browser
options can be set in the dialog boxes described in this topic.
Note: The text size set in Design View should be representative of its appearance in a
browser. However, the text may not match exactly due the relative font size used by the
browser (large, larger, etc.).
Settings for font, color, language, and accessibility for the browser can be accessed from the
General tab of the Internet Options window. You can control these settings in the following
ways:
•
Color preferences can be accessed by clicking Colors…. The default colors used by the
browser can be changed in the Colors dialog box:
The color preferences set in Resource Layout Painter should match the preferences set
in the Colors dialog box.
WebFOCUS New Features
2-45
Browser Defaults Displayed in Design Window
•
Fonts can be set by clicking Fonts.... This opens the Fonts dialog box, where you can set
the default browser font:
The Resource Layout Painter will use the font specified in the Fonts dialog box.
•
The language to be used in the browser can be set by clicking Languages.... This opens
the Language Preference dialog box, where the language can be set:
The Resource Layout Painter will use the language specified in the Language
Preference dialog box.
2-46
Information Builders
Developer Studio Enhancements
•
Accessibility can be set by clicking Accessibility.... This opens the Accessibility dialog
box, where you can set accessibility options:
The Resource Layout Painter will use the preference specified in an external Cascading
Style Sheet.
Using a Soft Alias With Resource Layout Painter Reports
If a soft alias changes after Resource Layout Painter reports are generated, the developer
will have to reopen and save the reports in the Resource Layout Painter to correct the hard
coded alias setting. This must be done each time the alias is changed. However, this is not a
common occurrence.
Automatic Population of Fields with Parameter Values
In this section:
All Option Enhancements
Example:
Automatically Populating Fields With Parameter Values
When the name of a dynamic parameter matches a corresponding field name in a data
source, the Layout Painter automatically populates the field name for the parameter.
The data source is populated by a default based on the first data source specified by a
TABLE FILE or GRAPH FILE command. The data source field is populated for the Value and
Display field controls in the Parameters window. This generates a “run ready” Layout report
as long as the parameter names match the field names.
WebFOCUS New Features
2-47
Automatic Population of Fields with Parameter Values
Example:
Automatically Populating Fields With Parameter Values
When the following report request is called from the Resource Layout Painter with a push
button control, the parameters window is automatically populated, and the dynamic
parameter is ready to run.
TABLE FILE GGSALES
SUM UNITS
BY PRODUCT
WHERE ( PRODUCT EQ '&PRODUCT.Product:.' );
END
The following is the Properties window for this procedure:
2-48
Information Builders
Developer Studio Enhancements
All Option Enhancements
The ALL feature allows developers to automatically add an ALL value to a list of parameter
values. An ALL value does the following:
•
For dynamic parameters, the ALL feature sends a value of FOCNONE to the reporting
server alerting the server to bypass or ignore the parameter altogether. (Ignoring the
parameter would return all values in the data source.)
•
With static parameters, the ALL value typically uses JavaScript to return all of the values
displayed in the list. This prevents the user having to select every value in the list
manually. When using the ALL feature with static parameters, you can select from the
following options:
•
Add everything value. This option uses JavaScript to send every value present in the
parameter list to the server at run time.
•
Add ignore value. This options sends FOCNONE to the server at run time and is
mainly for use with complex applications.
When the options are added to the Value list, the display text can be customized, but the
value cannot be changed. The default values and display text are as displayed in the
following:
WebFOCUS New Features
2-49
Sizing a Graph in Resource Layout Painter
Note: Sending FOCNONE to a compound WHERE criteria will result in the entire criteria
being ignored. Therefore, when working with multiple parameters that may be chained
together, each parameter should be created in an individual WHERE statement as follows:
WHERE ( REGION EQ ®ION.(OR(Midwest,Northeast)).Region:. );
WHERE ( ST EQ &STATE.(OR(CA,CT)).State:. );
WHERE ( CITY EQ &CITY.(OR(Atlanta,Boston)).City:. );
Sizing a Graph in Resource Layout Painter
Previously, the size of a graph was set in the Graph Assistant, and you could not alter this
size in the Resource Layout Painter. In Version, 5.3 a Size to fit option has been added to the
Properties window.
In the Overflow property for a graph, you can now select Size to fit. This will adjust the graph
size to fit within the area designated for a graph object in the Layout.
Attaching a Dynamic Calendar in the Resource Layout Painter
How to:
Set Calendar Properties
Example:
Returning a Range of Dates From a Procedure
Date parameters now have the option of utilizing a new built-in calendar control that
allows users to select the desired date or range of dates in a pop-up dynamic calendar. A
procedure that is added to or referenced in the Resource Layout Painter and contains date
parameters will have a new Calendar control type available in the Properties window.
When the Calendar control type is selected, a text box with a calendar icon will display in
the Design view of the Layout. The text box is the only control available for the calendar,
and the icon will always display to the right of the text box. The icon cannot be positioned
independently from the text box.
Note that when programmatically returning a date to the calendar, the date must be in a
FOCUS date format that specifies the complete date, including a two digit month, two digit
day, and a four digit year.
2-50
Information Builders
Developer Studio Enhancements
Procedure: How to Set Calendar Properties
1. Right-click the calendar icon and select Calendar Properties:
When selected, the following menu appears:
This menu allows the developer to set the range of dates available to the user at run
time. Available dates will be represented as an active hyperlink (blue and underlined)
and unavailable dates will be static (black without underlines).
WebFOCUS New Features
2-51
Attaching a Dynamic Calendar in the Resource Layout Painter
2. Select an option for setting the range of dates:
•
Static. This option will set a static date range in which the developer will select a
start date and an end date using a pop up calendar or by clicking the month, day,
or year from the controls. This setting is the default.
By default, the current date is selected and circled in red. As you scroll through the
calendar with the left/right arrows, the currently selected day will remain
highlighted for each month. Clicking a date will add that date to the control. Dates
can be selected by scrolling left to right, entering the month, day, and year as text,
or by selecting the month, day, and year from the drop-down list and spin boxes.
Example:
•
Relative. This option allows the developer to set a specific number of days,
months, and years relative to the current date. The current date (at run time) will
always be the reference or starting point and the calendar will show a number of
days, months, and years relative to the current date. The range could be all in the
past (for example, five years prior to the current date) or all in the future (for
example, five years in the future).
•
Dynamic. This option allows the developer to point to a procedure that returns a
range of dates. Clicking the Browse... button allows the developer to choose a
preexisting procedure located in the current APP (local projects/data server) or
Domain (MRE). The procedure must return two date values on the same data line in
XML format. The date values must be returned in a format that returns two digits
for the month and day, and four digits for the year, for example MM/DD/YY.
Returning a Range of Dates From a Procedure
The following returns the complete range of date values for HIREDATE.
-* File getdates.fex
TABLE FILE EMPDATA
SUM MIN.HIREDATE MAX.HIREDATE
ON TABLE PCHOLD FORMAT XML
END
2-52
Information Builders
Developer Studio Enhancements
The XML output is:
<?xml version="1.0" encoding="ISO-8859-1" ?>
- <fxf version="1.0" data="hold">
- <report records="41" lines="1" columns="2" rows="1">
<target format="" version="" type="" destination="HOLD" />
- <column_desc>
<col colnum="c0" fieldname="HIREDATE" alias="HDAT" datatype="date"
width="8" focus_format="YMD" description="" accept="" help_message=""
title="" within="" property="" reference="" valign="right" />
<col colnum="c1" fieldname="HIREDATE" alias="HDAT" datatype="date"
width="8" focus_format="YMD" description="" accept="" help_message=""
title="" within="" property="" reference="" valign="right" />
</column_desc>
- <table>
- <tr linetype="data" linenum="1">
<td colnum="c0" rawvalue="890301">890301</td>
<td colnum="c1" rawvalue="910513">910513</td>
</tr>
</table>
</report>
</fxf>
WebFOCUS New Features
2-53
Customizing Dynamic Parameters
Customizing Dynamic Parameters
In this section:
Hidden Parameters
Dynamic Parameters
Example:
Retrieving Dynamic Parameter Values With One Value
Retrieving Dynamic Parameter Values With Two Values
Retrieving Values for Chained Variables With Caching Disabled
Retrieving Chained Variable Values With Caching Enabled
A new option has been added to allow a customized retrieval of dynamic parameter values.
Previously, the only retrieval option was to point to a field in a data source. Now, by using a
custom procedure, the developer can use the FOCUS language to utilize temporary HOLD
files, filtering, etc. This allows the Layout Painter to better integrate with a multitude of large
and/or proprietary data sources that may require unique retrieval methods. The procedure
must meet the following criteria:
•
The procedure must return a name and value pair for each parameter value that will
populate the list. The first value is the submission value which is passed to the form
when the user clicks the Submit button. The second value is the display value which is
what the user will see in the control. These two values can be the same or different.
•
The procedure must return the two data values on a single data line in XML format
(PCHOLD FORMAT XML).
Note: Different parameters in the same procedure can use both this option and the data
source method.
For chained parameters, there are two options based on whether caching is enabled.
•
By default, caching of parameter values in not enabled. Each parameter control must
be mapped to its own procedure and the developer is responsible for writing filters or
WHERE criteria to properly filter the hierarchy of controls.
•
If caching is enabled for the chained parameters, a single procedure can be used to
populate the controls of the chained variables. In this case, the Resource Layout Painter
writes the WHERE criteria.
To enable caching, click the Chain Order icon and right-click one of the chained
parameters.
2-54
Information Builders
Developer Studio Enhancements
Example:
Retrieving Dynamic Parameter Values With One Value
The following example shows the same value being used for the submission value and
display value.
TABLE FILE GGSALES
SUM FST.PRODUCT
BY PRODUCT
ON TABLE PCHOLD FORMAT XML
END
The XML output is:
<?xml version="1.0" encoding="ISO-8859-1" ?>
- <fxf version="1.0" data="hold">
- <report records="4317" lines="10" columns="2" rows="10">
<target format="" version="" type="" destination="HOLD" />
- <column_desc>
<col colnum="c0" fieldname="PRODUCT" alias="E01" datatype="char"
width="16" focus_format="A16" description="Product name" accept=""
help_message="" title="Product" within="" property="" reference=""
valign="left" />
<col colnum="c1" fieldname="PRODUCT" alias="E02" datatype="char"
width="16" focus_format="A16" description="Product name" accept=""
help_message="" title="Product" within="" property="" reference=""
valign="left" />
</column_desc>
- <table>
- <tr linetype="data" linenum="1">
<td colnum="c0">Biscotti</td>
<td colnum="c1">Biscotti</td>
</tr>
- <tr linetype="data" linenum="2">
<td colnum="c0">Capuccino</td>
<td colnum="c1">Capuccino</td>
</tr>
- <tr linetype="data" linenum="3">
<td colnum="c0">Coffee Grinder</td>
<td colnum="c1">Coffee Grinder</td>
</tr>
- <tr linetype="data" linenum="4">
<td colnum="c0">Coffee Pot</td>
<td colnum="c1">Coffee Pot</td>
</tr>
WebFOCUS New Features
2-55
Customizing Dynamic Parameters
Example:
Retrieving Dynamic Parameter Values With Two Values
The following example shows two different field values being used for the submission value
and display value. In this case, PRODUCT (Product Description) is used for the display value
and PCD (Product Code) is used as the submission value.
TABLE FILE GGSALES
SUM FST.PRODUCT
BY PCD
ON TABLE PCHOLD FORMAT XML
END
The XML output is:
<?xml version="1.0" encoding="ISO-8859-1" ?>
- <fxf version="1.0" data="hold">
- <report records="4317" lines="10" columns="2" rows="10">
<target format="" version="" type="" destination="HOLD" />
- <column_desc>
<col colnum="c0" fieldname="PCD" alias="E01" datatype="char" width="4"
focus_format="A04" description="Product Identification code (for sale)"
accept="" help_message="" title="Product ID" within="" property=""
reference="" valign="left" />
<col colnum="c1" fieldname="PRODUCT" alias="E02" datatype="char"
width="16" focus_format="A16" description="Product name" accept=""
help_message="" title="Product" within="" property="" reference=""
valign="left" />
</column_desc>
- <table>
- <tr linetype="data" linenum="1">
<td colnum="c0">C141</td>
<td colnum="c1">Espresso</td>
</tr>
- <tr linetype="data" linenum="2">
<td colnum="c0">C142</td>
<td colnum="c1">Latte</td>
</tr>
- <tr linetype="data" linenum="3">
<td colnum="c0">C144</td>
<td colnum="c1">Capuccino</td>
</tr>
Note: The procedure does not have to follow this FOCUS syntax exactly, but the end result
must be two values per data line in XML format.
2-56
Information Builders
Developer Studio Enhancements
Example:
Retrieving Values for Chained Variables With Caching Disabled
In the following procedures, there are three parameters (REGION, ST, CITY). Caching is
disabled, so each parameter control must be mapped to its own procedures.
Procedure 1 1 (REGION)
TABLE FILE GGSALES
SUM FST.REGION
BY REGION
ON TABLE PCHOLD FORMAT XML
END
Fex 2 (ST)
TABLE FILE GGSALES
SUM FST.ST
BY ST
WHERE REGION EQ ®ION;
ON TABLE PCHOLD FORMAT XML
END
Fex 3 (CITY)
TABLE FILE GGSALES
SUM FST.CITY
BY CITY
WHERE REGION EQ ®ION;
WHERE ST EQ &STATE;
ON TABLE PCHOLD FORMAT XML
END
WebFOCUS New Features
2-57
Customizing Dynamic Parameters
Example:
Retrieving Chained Variable Values With Caching Enabled
In the following example, caching is enabled, so a single procedure is used to populate the
controls.
TABLE FILE GGSALES
SUM FST.REGION
FST.ST
FST.CITY
BY REGION
BY ST
BY CITY
ON TABLE PCHOLD FORMAT XML
END
The XML output is:
- <table>
- <tr linetype="data" linenum="1">
<td colnum="c0">Midwest</td>
<td colnum="c1">IL</td>
<td colnum="c2">Chicago</td>
<td colnum="c3">Midwest</td>
<td colnum="c4">IL</td>
<td colnum="c5">Chicago</td>
</tr>
Hidden Parameters
You can now select a HIDDEN control type in the Resource Layout Painter. This allows
parameter name value pairs to be passed in the form without the user seeing them. This
option can be chosen in the Parameters window in the Control Type column. When this
control type is selected, the current control assigned to the parameter will be removed. The
value of the parameter can be entered in the Value column of the Parameter window.
Dynamic Parameters
All parameters are now dynamic by default.
If a developer wishes to change a parameter from dynamic to static, and that parameter has
static values specified in the WHERE criteria, the developer can click the static button in the
Parameters window to change the setting.
2-58
Information Builders
Developer Studio Enhancements
French and Japanese Localized Versions
Developer Studio is available in French and Japanese localized versions. A localized version
is a software product in which the entire user interface (for example, menus, wizards, and
online Help) is displayed in a particular language.
To obtain a localized version of Developer Studio, see your Information Builders
representative.
WebFOCUS New Features
2-59
French and Japanese Localized Versions
2-60
Information Builders
CHAPTER 3
Managed Reporting Enhancements
3.
Topics:
•
Working With Procedures in Application Files
in the Data Servers Component
•
Increased Number of Domains
•
Importing and Managing End User Custom
Reports
•
Data Security
•
Section 508 Compliance
This chapter describes all of the features for
Managed Reporting and Dashboard in Version 5
Release 3.
Dashboard Administrative Enhancements
•
Managing Users
•
Customizing the Look of the HTML Report
and Graph Assistant
•
Dashboard Template Enhancements
•
Creating a Locked Content Block
•
Toolbox Option
•
New Buttons in the View Builder
•
Handling Messages in Dashboard
Dashboard Content Enhancements
•
Creating a Deferred Status Content Page
•
Positioning Items in a List Block
•
Text Editor Enhancements
•
Domain/Role Tree Usability
WebFOCUS New Features
3-1
Working With Procedures in Application Files in the Data Servers Component
Working With Procedures in Application Files in the Data Servers
Component
In the Managed Reporting Applet, you can run a procedure from an application file located
in the Data Servers component. This capability also exists in Developer Studio. Both
Developer Studio and the Managed Reporting Applet use self-service amper autoprompting.
Increased Number of Domains
In the User Administrator User Properties Domain option, the maximum number of
domains an Administrator can assign to a Developer for content development has been
increased from 16 to 30.
Importing and Managing End User Custom Reports
Using Developer Studio, Administrators can bring a procedure (FEX) into the Managed
Reporting Repository from their local machine to the user’s Custom Reports folder accessed
from the User Management component. This is accomplished through a drag and drop
action or a cut or copy and paste action. This feature applies only to Developer Studio.
In addition, the ability to create folders and cut or copy and paste procedures within or
across folders within the Custom Reports folder has been added to the User Management
component from Developer Studio and Domain Builder Applet and from the Domains
Applet.
When a folder within a Custom Reports component or a specific Custom Report is selected,
these options are enabled on the right-click menu and on the toolbar.
Procedure: How to Import Custom Reports
1. Open Developer Studio.
2. Select Options from the Window menu.
The Developer Studio Options dialog box opens.
3-2
Information Builders
Managed Reporting Enhancements
3. Ensure the Show Desktop on explorer tree check box in the Other Settings field is
selected and click OK.
WebFOCUS New Features
3-3
Importing and Managing End User Custom Reports
4. Navigate to the procedure you want to copy, then right-click the procedure and select
Copy from the menu.
5. In the User Management component of the selected WebFOCUS Environment,
navigate to the Custom Reports folder where you want to paste the procedure.
6. Right-click the folder and select Paste from the menu.
3-4
Information Builders
Managed Reporting Enhancements
7. Paste the procedure into the appropriate folder.
Note: Alternatively, you can drag and drop the procedure from its original location to the
Custom Reports folder. Note that when you do this, or when you cut the procedure instead
of copy, the procedure is not removed from its original location.
Data Security
WebFOCUS allows administrators to bind FOCUS DBA security with the user's Managed
Reporting ID, Managed Reporting domain HREF, or a named WebFOCUS script variable
such as might be returned from a custom developed WebFOCUS callable exit. The feature
takes advantage of the SET PERMPASS command to avoid the security exposure where a
knowledgeable individual could reissue the SET USER command within their request.
For details on SET PERMPASS, see Non-Overridable User Passwords (SET PERMPASS) in
Chapter 1, WebFOCUS Reporting Language Enhancements.
Section 508 Compliance
Section 508 is an option in the Managed Reporting User Administration - User Properties
dialog that, when checked, allows a user to utilize Section 508 compliant components in
WebFOCUS. These include online help and the HTML Report Assistant and HTML Graph
Assistant as accessed through the Business Intelligence Dashboard. The following users
types are enabled for Section 508: Developers, Analytical Users, Users, and HTML Users.
WebFOCUS New Features
3-5
Managing Users
Managing Users
How to:
Edit User Content
Reassign a User’s View
Remove Users From Dashboard
You can manage user's views (public, group, and personal) from the View Builder. The
Manage Users option allows you to view and update the content of the user's personal
pages and the look of their Dashboard view.
Changing, or reassigning, a user’s view and content is useful when you want to update the
look or the content of a view without having to start over from scratch. It’s also useful if a
user changes groups and you need to update their view and/or content, for example, from
the Human Resources group page to the Accounting group page.
The Manage Users window provides the following information:
•
Status of the user. If a user is logged into Dashboard, a red button appears next to the
User Name (as with the CEO user above). Edits cannot be made to a user’s view when
they are logged in. Green indicates that the user is not logged into Dashboard and edits
can be made to the user’s view.
Note: Before managing users content, refresh the list of users to get the latest user
status since a user may log into or out of Dashboard after the page has been created.
3-6
•
User name. Only those users who have logged into Dashboard appear in the Manage
Users window.
•
The View Folder, View Type, and View Description of the look the user currently has
assigned to them.
Information Builders
Managed Reporting Enhancements
Procedure: How to Edit User Content
Note: You can only edit content for one view at a time.
1. From the View Builder, click Manage Users.
2. Select the user you want to edit content for and click Edit Content.
The Content Window opens.
3. Edit content as necessary.
4. Click Manage Users to save changes and return to the Manage Users window.
Procedure: How to Reassign a User’s View
1. From the View Builder, click Manage Users.
2. Select the user or users you want to reassign.
3. Click Reassign.
4. Select the new view look from the drop-down list.
5. If you want to replace the user’s content with the content from the new view, click the
Replace User Content with View Content check box.
When you replace content, the user still has access to all of the domains (and the items
in those domains) they are assigned to. Only Dashboard specific items are replaced,
such as content pages and content blocks. The user’s Favorites and Recent lists are
cleared when you select the Replace User Content with View Content check box.
6. Click Submit.
Procedure: How to Remove Users From Dashboard
Note: This only removes the user from Dashboard, not Managed Reporting. If the user logs
in to Dashboard again, they will be added to the Manage Users list again.
1. From the View Builder, click Manage Users.
2. Select the user or users you want to remove.
3. Click Remove.
4. Click OK to the confirmation popup dialog box.
WebFOCUS New Features
3-7
Customizing the Look of the HTML Report and Graph Assistant
Customizing the Look of the HTML Report and Graph Assistant
When you select the colors and/or wallpaper for your Dashboard banner, you can also
select that these customizations be inherited by the HTML Report Assistant and Graph
Assistant (when used from the Dashboard view).
Procedure: How to Customize the Look of the HTML Report and Graph Assistant in
Dashboard
1. From the View Builder click Colors.
2. Select the colors and/or wallpaper.
Background color 1 is the top area, background color 2 is the main body area of the
tool.
3. Click the Report Assistant and Graph Assistant inherit banner colors check box.
4. Click Preview.
5. Click Save.
Note: For changes in this window to be effective, you must click Preview and Save before
you exit this window.
Dashboard Template Enhancements
How to:
Create a Custom Template
Reference:
Dashboard Templates
There are two templates available from the Look window in the View Builder that you can
use to create a Dashboard view that does not have a separate area for the logo embedded
in the banner.
Additionally, you can create a custom template for your Dashboard view and access it
through the View Builder.
3-8
Information Builders
Managed Reporting Enhancements
Procedure: How to Create a Custom Template
1. Navigate to the worp_html folder in the worp directory structure.
In this directory there are folders for each of the Dashboard looks, or templates (worp0
through worp7).
2. Copy and rename one of these directories (the one that most closely resembles the
look you want to create) to a new directory under worp_html.
The new directory name should begin with "custom_", for example "custom_new".
3. In the directory for your new look, edit the file profile.prf.
This file contains two references to the directory name for the template. Change both
of these references to reflect the new directory name. If you do not make these
changes, your template will still work correctly. However, these references need to be
updated for the Dashboard Migration Utility to correctly migrate the views that use the
custom templates.
4. Edit the HTML and CSS files as necessary to make your customizations.
The tags bg1, bg2, etc. should be maintained in these files so that the color selections
appear in the View Builder Colors page.
a. The banner.html and banner.css files control the banner display.
b. Domain.css controls the appearance of the left sidebar containing the Domain Tree
and Role Tree.
c.
Ctrl.css controls the appearance of the control bar that displays over the content
blocks.
d. Content.css controls the appearance of the content blocks.
e. Ibitools.css controls the appearance of toolbar 1, and customtools.css controls the
appearance of toolbar 2.
5. Open the View Builder and select the new look, which will show up under the
distributed looks.
Note: When you make changes to the view outside of the View Builder, you will need to
go back into the View Builder and select your customized view again in order to see
your changes reflected in the template.
WebFOCUS New Features
3-9
Dashboard Template Enhancements
Reference: Dashboard Templates
Template 7 (WORP6)
The colors for this template are completely customizable. You may also use an image for a
wallpaper effect in the banner background area. This template does not require a logo.
Template 8 (WORP7)
The colors for this template are completely customizable. You may also use an image for a
wallpaper effect in the banner background area. This template does not require a logo and
the banner is shorter than the other templates.
3-10
Information Builders
Managed Reporting Enhancements
Creating a Locked Content Block
You can create a content block for a Public View that cannot be edited or deleted by a user
after they create their personal view from the Public View.
In a user's personal view, the Edit option is not available for locked content blocks. In
addition, the option to delete or edit locked blocks from the Content window is not
available. A Dashboard user cannot remove a page containing a locked block.
The locked block is designated with a lock icon in the View Builder, Personalize content, and
Manage Users sections of Dashboard. Users receive an error message if they attempt to
remove a content page that contains a locked block.
The Lock Block check box is also available in the Manage Users area of the View Builder.
Procedure: How to Create a Locked Content Block
1. From the Public Views or the Manage Users window, select the Public View you want to
add content to and click Edit Content.
2. From the Content window, select the content page in which to add content.
3. Click Add Block. The Add Block window opens.
4. Select the block type and contents.
5. Click the Check to Lock Block check box.
6. Click Save.
Toolbox Option
The Toolbox option menu item has been moved to the main View Builder page. Once you
create a toolbox you can use it to create a tool bar for a public or group view.
New Buttons in the View Builder
Select All and Clear All buttons have been added to the Public and Group Views windows.
WebFOCUS New Features
3-11
Handling Messages in Dashboard
Handling Messages in Dashboard
A standard message appears for all http 500 series errors, which reads something like the
following:
“An HTTP 500 error has been returned when attempting to communicate with the
WebFOCUS web components. The application server log contains information on why this
error has occurred. Contact your WebFOCUS Administrator or Information Builders
Customer Support Services for further assistance.”
All other http errors are handled by the Web server.
By default, all Dashboard specific error messages are generated by WORP_Error.jsp. You can
implement your own error page by editing the "ERROR" entity in the
worp/conf/bid-config.dtd file:
<!ENTITY ERROR "&JSP;/WORP_Error.jsp">
All messages that display on the user’s screen are written to the Web Application server log
file. The location of the Web Application server log file is different for different Web
Application servers. Check your Web Application server documentation for the location of
the log file.
3-12
Information Builders
Managed Reporting Enhancements
Creating a Deferred Status Content Page
You can create a content page that contains the Deferred Status Report interface. This
means that you can view the status of deferred reports without opening a new window to
view the Deferred Status Report interface.
The Deferred Status content page is not available for Public Views, since the Public user
cannot run deferred reports.
There can only be one Deferred Status page per view.
Procedure: How to Create a Deferred Status Content Page
1. From the Content window, click Add Deferred Status Page.
If you are creating a Public view, the Add Deferred Status button will not appear since
the Public user does not have access to this feature.
2. Enter the tab name in the Page Description text box.
3. Click Update.
When a page is added, it is added as the last page. You can rearrange the order of the
content pages using the Move Left, Move Right, or Set Default buttons. The Set Default
button promotes the current page to the first page.
Positioning Items in a List Block
Administrators and authenticated users can position items in a list block using the up and
down arrows in the Add or Edit Content windows. Only one item can be moved at a time.
The items in a list block appear in the Dashboard in the order they were last saved.
The up and down arrows will always display in the Content window, although they will only
be functional for a list block.
WebFOCUS New Features
3-13
Text Editor Enhancements
Text Editor Enhancements
You can use the text editor to create, view, edit, and run the source code for Custom Reports
in Dashboard. The text editor enables you to use familiar editing techniques, such as cut,
copy, and paste. You can also find and replace text and specify case.
The following table describes all of the functions available in the Dashboard text editor.
Button
Action…
- Save button
- Save As button
- Run button
- Quit button
- Help button
Saves the report. Acts as "Save As" the first time you
save the report.
Saves the report in the Custom Reports folder with a
name you specify.
Runs the current report.
Exits the Editor window. If you made changes to the
original report, a window prompts you to save or
cancel the changes.
Opens the online help.
Cut, copy, or paste, respectively, the highlighted text.
- Cut, Copy and
Paste buttons
3-14
Information Builders
Managed Reporting Enhancements
Button
Action…
Delete, select all, undo, and redo, respectively.
- Delete, Select
All, Undo, and Redo buttons
Find and replace text.
- Find and Replace button
- Go to line button
Enables you to go to a particular line number in the
report.
Converts highlighted text to upper case.
- Uppercase button
Converts highlighted text to lower case.
- Lowercase button
Sets the text color in the editor.
- Text color button
Sets the background color of the editor.
- Background color
button
Note: The text color and background colors are for
the current session only.
Enables you to change the font of the editor.
- Font
drop-down menu
- Font size drop-down
Enables you to change the font size of the text in the
editor.
menu
Note:
•
If you create a Custom Report using the HTML Report Assistant or HTML Graph
Assistant, and then edit the report with the editor, you can than only open and edit the
report using the editor.
•
If you use a Netscape browser, the editing toolbar, which begins with the cut, copy,
paste features listed in the table, does not appear. Use the standard control keys
(Ctrl+x, Ctrl+c, Ctrl+v) to cut, copy, and paste.
•
When you click the X in the upper right hand corner of the text editor, the procedure is
saved, however the Domain Tree does not refresh. To refresh the Domain Tree click
Refresh under the domain name.
WebFOCUS New Features
3-15
Domain/Role Tree Usability
Domain/Role Tree Usability
Previously, users could open and close a folder by clicking on the plus and minus signs in
the Domain or Role Tree. Now, users can also open and close folders by clicking on the
folder icon itself.
3-16
Information Builders
CHAPTER 4
Ad Hoc Reporting Enhancements
4.
This chapter describes all of the features for ad hoc reporting in Version 5 Release 3.
Topics:
•
Redesigned HTML Report Assistant and
Graph Assistant
•
HTML Report Assistant and Graph Assistant:
Customizing Default Colors
•
HTML Report Assistant and Graph Assistant:
Save Options
•
HTML Report Assistant and Graph Assistant:
Working With Joins
•
HTML Report Assistant and Graph Assistant:
Selection Criteria Features
•
HTML Report Assistant and Graph Assistant:
Styling Specified Fields
•
HTML Report Assistant: Subtotal, Sub-total,
and Recalculate
•
HTML Report Assistant: Warning Message in
Heading
•
HTML Report Assistant: New Display Formats
•
HTML Report Assistant: Fully Qualified Field
Names
•
HTML Graph Assistant: Auto Arrange Feature
WebFOCUS New Features
•
HTML Graph Assistant: Text Rotation
•
HTML Graph Assistant: Graph Types and
Graph Styles
•
HTML Graph Assistant: Graph Display
Formats
•
OLAP Features
4-1
Redesigned HTML Report Assistant and Graph Assistant
Redesigned HTML Report Assistant and Graph Assistant
The HTML Report Assistant and HTML Graph Assistant interfaces have been redesigned to
modernize the look and feel of the tools, as well as improve usability. Image and button
controls have been replaced with new Windows-like toolbars and use icons consistent with
Developer Studio. Basic operations have been organized and logically grouped for
consistency.
Hard-coded image and styling references have been replaced with Cascading Style Sheets
(CSS). Cascading Style Sheets have been used to centralize all of the styling code for the
interfaces, enabling users to change colors to match their own applications. Color settings
made in the WebFOCUS Portal (Business Intelligence Dashboard) can be automatically
propagated to the HTML Assistants.
The Report Assistant and Graph Assistant look different, but their functionality has not
changed, except as described in the specific features outlined in this topic.
HTML Report Assistant and Graph Assistant: Customizing Default Colors
Example:
Customizing the Background and Text Colors
Reference:
Rules for Customizing the CSS
You can customize the background color and text color to set new defaults for reports and
graphs generated by the HTML Report and Graph Assistants. You can accomplish this by
editing the following Custom Style Sheet (CSS) file in a text editor, such as Notepad:
\ibi_html\javaassist\ibi\html\assist\rpasstie.css
4-2
Information Builders
Ad Hoc Reporting Enhancements
Example:
Customizing the Background and Text Colors
1. Open the following file in a text editor:
\ibi_html\javaassist\ibi\html\assist\rpasstie.css
2. Create a backup copy before you make any changes.
3. Apply your changes only to the background color and color variables. For example, you
can replace the color codes as follows:
BODY{
/* background-color: C0C0C0;
background color: Blue;
margin: 0;
}
BODY, A {
/* color: #000000; */
color: white;
}
*/
/* silver */
Tip: Retain the original style with comments /* */ to easily change the colors back to the
default style.
Reference: Rules for Customizing the CSS
The following are some basic rules for customizing the CSS file:
•
Styling changes are made only in the CSS files.
•
It is not necessary to edit JSPs.
•
If you make a change in one CSS file, it applies to both the Report and Graph Assistant.
•
You can only change the background and font colors. Other changes to the CSS are not
supported.
•
Color changes should not affect toolbars, menus, input boxes, icons, and other
operational text.
There is no migration utility for CSS changes.
WebFOCUS New Features
4-3
HTML Report Assistant and Graph Assistant: Save Options
HTML Report Assistant and Graph Assistant: Save Options
When you click the Save or Save As buttons you save your report (procedure). If you make
changes in your report without subsequently saving them and then click Quit, you are
prompted with the following options:
•
Yes. Click to save your changes and exit the report.
•
No. Click to discard your changes and exit the report.
•
Cancel. Click to return to your report to continue working or use Save or Save As to
save your changes and then click Quit to exit your report.
The following image shows Save dialog box.
HTML Report Assistant and Graph Assistant: Working With Joins
How to:
Create a Join
Create a Define-based Join
Create Multi-field Joins
Delete a Join
Edit a Join
A join is a temporary connection between two or more data sources that share at least one
common field. Once you join two data sources, each time WebFOCUS retrieves a record
from the first data source (host file), it also retrieves the matching records from the second
data source (target file).
You use the Join tool to link data sources in both Report Assistant and Graph Assistant. The
Join tool provides a graphical method for creating and manipulating joins. You can also
create define-based joins and multi-field joins.
4-4
Information Builders
Ad Hoc Reporting Enhancements
When you access the Join tool, the window displays a field list for the host data source
(which you specified when you created the Standard Report or Reporting Object), and a
field list for any target data source you add to the window.
Important:
•
Only Managed Reporting Administrators and Developers have access to the Join
Options tab. The Join Options tab is not available in self-service mode or to Analytical
Users.
•
The Join Options tab is not available in the HTML Graph Assistant for Developer Studio.
You can only create joins using the Join tool available in Reporting Objects.
Procedure: How to Create a Join
1. Click the Join options tab in Report Assistant or Graph Assistant and click New.
The WebFOCUS masters list dialog box opens where you select a target data source.
WebFOCUS New Features
4-5
HTML Report Assistant and Graph Assistant: Working With Joins
2. Select a data source and click OK.
The following image shows the Join settings window where you select fields from the
Host field and the Target field lists to create a join.
3. Select the fields you want to join from the Host field list and the Target field list and add
them to their respective Selected Fields boxes.
or
Press Alt+T to go to the Target Fields list. Tab to the field and press Enter to add the
chosen field to the its Selected Fields box.
Note: Fields must have the same format and be indexed fields in order to use them to
create joins.
4-6
Information Builders
Ad Hoc Reporting Enhancements
4. If you want to see the join syntax, click View to open a new window that displays the
join syntax as shown in the following image.
5. Click OK.
6. Give the join a meaningful and unique name in the Description box, for example, Plants
as shown in the following image.
7. Click Save & Create. The new join appears in the Joins list.
WebFOCUS New Features
4-7
HTML Report Assistant and Graph Assistant: Working With Joins
Procedure: How to Create a Define-based Join
1. Click the Join options tab in Report Assistant or Graph Assistant and click New.
The WebFOCUS masters list dialog box opens where you select a target data source.
2. Select a data source and click OK.
The following image shows the Join settings window where you select fields from the
Host field and the Target field lists to create a join.
4-8
Information Builders
Ad Hoc Reporting Enhancements
3. Click the down arrow of the Define icon and then click New define field.
The following image shows the list of Define field options.
The following image shows the Define field creator dialog box where you create the
Define expression.
WebFOCUS New Features
4-9
HTML Report Assistant and Graph Assistant: Working With Joins
4. Create the defined field. The new define field appears in the Available fields list. The
field is prefixed with the define symbol as shown in the following image.
5. Add the defined field and the target field to their respective Selected Fields boxes.
Note: Fields must have the same format and be indexed fields in order to use them to
create joins.
6. If you want to see the syntax, click View to display the define-based join syntax as
shown in the following image.
7. Give the join a meaningful and unique name in the Description box as shown in the
following image.
8. Click Save & Create. The new join appears in the Joins list.
4-10
Information Builders
Ad Hoc Reporting Enhancements
Procedure: How to Create Multi-field Joins
1. Click the Join options tab in Report Assistant or Graph Assistant and click New.
The WebFOCUS masters list dialog box opens where you select a target data source.
2. Select a data source and click OK.
The following image shows the Join settings window where you select fields from the
Host field and the Target field lists to create a join.
WebFOCUS New Features
4-11
HTML Report Assistant and Graph Assistant: Working With Joins
3. Enter multiple fields in the Host field list box and one field in the Target field list box.
4. If you want to see the syntax, click View to display the multi-field join syntax as shown in
the following image.
5. Give the join a meaningful and unique name in the Description box as shown in the
following image.
6. Click Save & Create. The new join appears in the Joins list.
Procedure: How to Delete a Join
1. Select a join from the Select an existing join list box.
2. Click Delete.
Procedure: How to Edit a Join
1. Select a join from the Select an existing join list box.
2. Make your desired changes.
3. Click Save & Create.
4-12
Information Builders
Ad Hoc Reporting Enhancements
HTML Report Assistant and Graph Assistant: Selection Criteria Features
In this section:
Creating a WHERE or WHERE TOTAL Statement
Combining Expressions
Grouping Expressions Together With Parentheses
How to:
Select Records Based on Values, Parameters, Fields, or a Constant
Create a Where Statement Using Date and Time Values
Combine Expressions
Delete an Active Expression
Group WHERE Statements Together Using Parentheses
When generating a report and specifying which fields to display, you may not want to show
every instance of a field. By including selection criteria, you can display only those field
values that meet your needs. In effect, you can select a subset of the data, which you can
easily redefine each time you issue the report request.
When developing a report request, you can define criteria that select records based on:
•
The values of an individual field (using a WHERE statement).
•
The aggregate value of a field, for example, the sum or average of a field’s values (using
a WHERE TOTAL statement).
The Selection criteria tab enables you to create WHERE or WHERE TOTAL statements for
record selection.
Creating a WHERE or WHERE TOTAL Statement
WHERE and WHERE TOTAL statements enable you to display only those records that pass
your selection criteria. These statements select the data source records to be included in a
report. The data is evaluated according to the selection criteria before it is retrieved from
the data source. Use the Selection criteria tab to create a new WHERE or WHERE TOTAL
statement.
WebFOCUS New Features
4-13
HTML Report Assistant and Graph Assistant: Selection Criteria Features
Procedure: How to Select Records Based on Values, Parameters, Fields, or a Constant
In the HTML Report or Graph Assistant,
1. Click the Selection criteria tab.
2. Select a field from the Available fields window and drag the field to the Screening
conditions frame.
or
Press Alt+M to go to the Available Fields window, tab to the field and press Enter to add
the chosen field.
The field name and Equal to and <Select values> appear in the Screening conditions
frame. The following image shows the Selection criteria tab with the Available fields
window on the left and the Screening conditions on the right with a beginning Where
statement for the COUNTRY field.
3. Select WHERE or WHERE TOTAL.
4-14
Information Builders
Ad Hoc Reporting Enhancements
4. Click Equal to in the right frame to display a list of operatorsas shown in the following
image.
5. Click the expression of your choice.
6. Click <Select values> to complete the expression.
WebFOCUS New Features
4-15
HTML Report Assistant and Graph Assistant: Selection Criteria Features
7. Select one of the following compare type radio button options:
•
Constant. Enter a value that will serve as a constant (a value that will not change).
For example, enter vehicle as shown in the following image.
Once you click OK, the constant, vehicle, appears in the WHERE statementwhich reads
BODYTYPE Equal to vehicle.
4-16
Information Builders
Ad Hoc Reporting Enhancements
•
Parameters. Enter the name of the &variable. For example, moped as shown in the
following image with the Parameter radio button selected and the variable name
entered as moped.
Once you click OK, the parameter, &moped, appears in the WHERE statement.
Note: The ampersand is automatically added by WebFOCUS.
WebFOCUS New Features
4-17
HTML Report Assistant and Graph Assistant: Selection Criteria Features
•
Fields. Select a field from the list. For example, BHPas shown in the following
image with the Fields radio button selected and CAR.SPECS.BHP selected.
Once you click OK, the field BHP appears in the WHERE statementwhich reads
CAR.COMP.CAR Equal to CAR.SPECS.BHP.
4-18
Information Builders
Ad Hoc Reporting Enhancements
•
Values. Select a value for the field you initially chose (in this case, car). For example,
Audias shown in the following image with the Values radio button selected and
AUDI selected as its value.
Once you click OK, the value, Audi, appears in the WHERE statementwhich reads
CAR.COMP.CAR Equal to AUDI.
WebFOCUS New Features
4-19
HTML Report Assistant and Graph Assistant: Selection Criteria Features
Procedure: How to Create a Where Statement Using Date and Time Values
In the HTML Report or Graph Assistant,
1. Click the Selection criteria tab.
2. Select a field from the Available fields window and drag the field to the Screening
conditions frame.
or
Press Alt+M to go to the Available Fields window, tab to the field and press Enter to add
the chosen field.
3. Click Equal to in the right frame to display a list of operators. Click the operator of your
choice.
4. Click <Select values> to complete the expression.
5. Click Field to access date and time values for that field. For example, EYEAR as shown in
the following image with the Fields radio button selected and EYEAR selected.
4-20
Information Builders
Ad Hoc Reporting Enhancements
6. Click Values and click the value of your choice. For example, 1989/01/18as shown in the
following image with the Values radio button selected and 1989/01/18 as its selected
value.
Once you click OK, the value, 1989/01/18, appears in the WHERE statement which reads
START_DATE Equal to 19890118.
WebFOCUS New Features
4-21
HTML Report Assistant and Graph Assistant: Selection Criteria Features
Combining Expressions
Use the right frame of the Selection Criteria tab to use or delete existing WHERE statements
and to combine expressions.
Procedure: How to Combine Expressions
1. Create an expression.
2. When you create additional expressions, they are combined with the default operator
AND as shown in the following image with two statement, the first being a WHERE and
the second being an AND statement.
3. Toggle between AND, OR, WHERE, and WHERE TOTAL by clicking the AND to make your
choice.
Procedure: How to Delete an Active Expression
1. Select the check box next to the expression you want to delete. Click the Delete icon
above the box.
2. You are prompted to delete the expression. Click OK to delete.
Grouping Expressions Together With Parentheses
You can use parentheses to group expressions together to optimize the WHERE statement.
Procedure: How to Group WHERE Statements Together Using Parentheses
Click the grayed out parentheses to activate the parentheses and group expressions
together.
4-22
Information Builders
Ad Hoc Reporting Enhancements
HTML Report Assistant and Graph Assistant: Styling Specified Fields
Use the Conditional Styling dialog box to style records based on specified field values.
Conditional styling, also referred to as stoplighting, allows you to define conditions that
determine when to apply particular fonts, point size, text style, foreground and background
color, and drill down procedures to your report’s data when the report is run.
You can style specified values for one or several column and sort fields. However, you
cannot style values for sort across fields.
Procedure: How to Style Records Based on Specified Field Values
1. In the HTML Graph Assistant, if hidden, Click Show report field options.
2. Click the Display tab in the report field options section.
3. Click the Conditional styling button. The Conditional Styling dialog box opens.
4. Click the Add icon that is on the All box. The edit condition dialog box opens where you
begin to set the conditional styling.
5. Provide a meaningful and unique file name in the Condition input box.
6. Select a field name from the Field list box and a relation from the Relations list box.
WebFOCUS New Features
4-23
HTML Report Assistant and Graph Assistant: Styling Specified Fields
7. To specify a value that completes the relation, first select one of the following in the
Compare Type radio button group:
•
Value, to compare the selected report field to a data source value or literal value.
•
Another Field, to compare the selected report field to the value of another field.
8. If you select Value under Compare Type, perform one of the following to complete the
relation:
•
Click Values to display existing data source values in the Value list box, and select a
value.
•
Type a literal value in the Value input box.
9. Click OK. You return to the Conditional Styling dialog box.
10. Select the newly created condition in the list box. The condition statement appears in
the When box.
11. Click the Add icon on the Attached box.
12. Click Font. The Styles dialog box opens.
13. Select the desired font characteristics.
14. Click OK. You return to the Conditional Styling dialog box. The specified styling options
are reflected in the Text appears as box.
15. Click OK to return to the Field selection tab.
4-24
Information Builders
Ad Hoc Reporting Enhancements
HTML Report Assistant: Subtotal, Sub-total, and Recalculate
In the Field selection tab, Sort by fields can be subtotaled, sub-totaled, or recalculated with
subtotaled values by checking the appropriate check box in the Sorting tab, which appears
for the given Sort by field in the Show report field options box.
Note:
•
Subtotal numeric sum/print fields is checked by default. You can also use the sub-total
command by checking And subtotal all higher level sort fields.
•
Subtotal displays a subtotal only when the specified sort field changes value. Sub-total
displays subtotals for numeric values when the Sort by field changes value and for any
higher-level Sort by fields when their values change. You can also recalculate all
computed fields by using the subtotal or sub-total values.
WebFOCUS New Features
4-25
HTML Report Assistant: Warning Message in Heading
HTML Report Assistant: Warning Message in Heading
A warning is issued to indicate to the user that the report they are viewing is only a subset
of the actual data. This occurs when either Record limits or Read limits are checked in the
Properties tab, under “Warning message displayed in Heading.“
The edit box that states “This report is only a subset of the data” is checked by default. You
can deselect the check box for this message or design a new message. Either message will
appear in the heading of the report.
HTML Report Assistant: New Display Formats
The HTML Report Assistant includes the formats Excel with Formula and eXtensible Markup
Language (XML).
HTML Report Assistant: Fully Qualified Field Names
The HTML Report Assistant always saves a procedure with its fully qualified field name. If
you want to view this information, click the Prefix with the segment name and Prefix with
the filename options in the Report Fields section of the Field selection tab.
Example:
Viewing Fully Qualified Field Names
Prefix with the segment name and Prefix with the filename are checked. Note that the fields
under Sort by demonstrate the field, segment, and filenames.
4-26
Information Builders
Ad Hoc Reporting Enhancements
HTML Graph Assistant: Auto Arrange Feature
How to:
Arrange the Elements of a Graph Efficiently
Example:
Comparing the Arrangement of the Elements of a Graph
The auto arrange feature enables the Graph Preview to arrange all the elements in a graph
report efficiently. The auto arrange feature is checked by default.
Procedure: How to Arrange the Elements of a Graph Efficiently
Check the Automatically arrange the chart elements so that they make the best use of the
available space option.
Note: This option is checked by default. If you uncheck this feature, WebFOCUS will arrange
the elements.
WebFOCUS New Features
4-27
HTML Graph Assistant: Auto Arrange Feature
Example:
Comparing the Arrangement of the Elements of a Graph
In the Graph types tab:
1. Uncheck the Automatically arrange the chart elements so that they make the best use of
the available space option.
2. Click Show Graph Preview.
The Graph preview window opens.
Note how the MPG symbol partially blocks the data along the right Y-axis.
4-28
Information Builders
Ad Hoc Reporting Enhancements
3. Now check the Automatically arrange the chart elements so that they make the best use of
the available space option.
A new Graph preview window opens.
Note how the Y-axes labels and X-axis labels fit within the size of the report.
HTML Graph Assistant: Text Rotation
A text rotation feature in the X-axis properties dialog enables you to design Data Style
labels horizontally, vertically (from top to bottom or from bottom to top), and at a 45degree angle.
Procedure: How to Arrange X Axis Property Data Styles
1. Click the Properties tab and then the X axis tab.
2. Click the Style labels button to open the X-axis properties dialog box.
3. To enable the text rotation features, select the check box at the top of the X axis
properties dialog box as shown in the following image:
WebFOCUS New Features
4-29
HTML Graph Assistant: Text Rotation
4. Under Text rotation, choose one of the following:
•
Horizontal
•
Vertical - Bottom to top
•
Vertical - Top to bottom
•
45-degree bottom to top
In this case, 45-degree bottom to top is highlighted. Accordingly, the Data Style
label is positioned at a 45-degree angle.
4-30
Information Builders
Ad Hoc Reporting Enhancements
HTML Graph Assistant: Graph Types and Graph Styles
Some of the Graph Types include: Multi-y, Waterfall, and Miscellaneous. In addition, several
new Graph Styles are available for the Special Graph Type.
All Graph Types and Graph Styles can be selected from their respective drop-down lists in
the Graph Types tab. When you begin the process of creating a graph, the first thing you do
is choose a Graph Type and then a corresponding Graph Style.
The following window shows the Miscellaneous Graph Type and a sample Spectral Map
Graph Style:
•
Multi-y. A Multi-y is a vertical, triple/quadruple/quintuple-Y-axis clustered bar chart.
Any series can be assigned to any of the triple/quadruple/quintuple axes.
•
Waterfall. A Waterfall chart is a cumulative stacked chart. The waterfall chart will
automatically perform the cumulative sum when using Subtotal or Total. Waterfall
charts essentially require one data value for each series or group marker to be drawn in
a chart.
•
Miscellaneous. The Miscellaneous Graph Type includes a variety of Graph Styles:
WebFOCUS New Features
4-31
HTML Graph Assistant: Graph Types and Graph Styles
•
Default (Spectral). This is a Spectral Map Chart. This is a chart with row or column
matrix of markers that are colored according to data values.
•
Funnel. A Funnel Chart is basically a pie chart displaying only one group of data at
a time from the first series to the last series at the bottom of the funnel.
•
Gauge1. A Gauge Chart usually indicates the current position of a value within a
given spectrum.
•
Pareto. The X-axis scale is for the group members. The Y-axis scale is the percent of
the total accumulation for each selected series.
•
Resource Report. Resource charts plot X- and Y-axis data cumulatively. They are
useful for plotting two independent variables against each other, particularly in
cases where one or both of the axes specify percentages and the user wants to
examine issues such as capacity utilization.
•
Product Position. A Product Position chart provides a visual representation of
market share and growth versus revenue and measurement (past, present, and
future). Product Position charts require a set of three display fields.
The following Miscellaneous Graph Type uses a Funnel Graph Style:
4-32
Information Builders
Ad Hoc Reporting Enhancements
HTML Graph Assistant: Graph Display Formats
•
PNG (Portable Network Graphics). PNG graphs are bit mapped and can support 16
million colors. In addition, PNG graphs have lossless compression (data is
decompressed 100% back to the original). Therefore, saving, altering, and resaving a
PNG does not degrade its overall quality. The PNG graph displays in the browser.
•
GIF (Graphics Interchange Format). GIF compresses well but only supports 256 colors.
The GIF graph displays in the browser.
•
JPEG (Joint Photographic Experts Group). A compressed file format.
•
SVG (Scalable Vector Graphics). SVG is a text-based graph file format that enables Web
application developers to design powerful, interactive graphs. SVG is compact and
generates high quality images on any media regardless of resolution. The SVG is
viewable with an Adobe plug-in.
•
PDF/SVG (Portable Document Format/Scalable Vector Graphics). The SVG graph is
automatically embedded into a PDF and shown only on the screen. Drill down is not
available with this format.
•
PDF/GIF (Portable Document Format/Graphics Interchange Format). The GIF graph is
automatically embedded into a PDF and shown only on the screen. Drill down is not
available with this format.
WebFOCUS New Features
4-33
HTML Graph Assistant: Graph Display Formats
Reference: Choosing Formats for Output to the Screen, a File, or Printer
When you create or edit a graph in Graph Assistant, you can choose among these formats in
the Output section in the Options tab. If you are designating Output To the Screen, all
options listed above are available, as shown in the Format drop-down list.
The following image shows the Options subtab.
If you are designating Output to File, the PNG, JPEG, GIF, and SVG options are available, as
shown in the Format drop-down list.
4-34
Information Builders
Ad Hoc Reporting Enhancements
The following image shows the Output section of the Options subtab with the Output to File
option selected.
If you are designating Output to a Printer, the PNG, GIF, and SVG options also are available,
as shown in the Format drop-down list.
WebFOCUS New Features
4-35
HTML Graph Assistant: Graph Display Formats
The following image shows the Output section of the Options tab with the Output to Printer
option selected.
4-36
Information Builders
Ad Hoc Reporting Enhancements
OLAP Features
In this section:
Saving Options
Uniform Field Name Referencing in OLAP
How to:
Save a Custom Report in OLAP
Save Standard Reports and Other Files in OLAP
Save an OLAP-enabled Report as a Plain Report Without OLAP Functionality
WebFOCUS includes several saving features for OLAP reports:
•
The dialog for saving reports allows them to be placed in subfolders of the user’s choice
under My Reports; subfolders can also be created from the OLAP tool.
•
Administrators and Developers can save their reports in the Standard Reports or Other
Files folders by creating subfolders on the fly.
•
Users can save their reports with the OLAP functionality removed, so the OLAP tool can
serve as a simple report writer tool.
•
Field name referencing is uniform throughout the OLAP product. For example, the AS
or TITLE phrases will appear in reports generated using the OLAP Selections pane or
the OLAP Control Panel (OCP).
Saving Options
If you are working in the OLAP Selections pane, you can save your report by using the Save
button on the toolbar. You can also access other saving options in the OCP by selecting the
Options button.
WebFOCUS New Features
4-37
OLAP Features
Procedure: How to Save a Custom Report in OLAP
1. Click the Save button in the OLAP Selections Pane.
or
Click the Options button in the OLAP Control Panel (OCP).
4-38
Information Builders
Ad Hoc Reporting Enhancements
You are now presented with several saving options.
2. Click Save Report to open a new dialog box.
WebFOCUS New Features
4-39
OLAP Features
3. Click My Reports and then Custom Reports to enable the New Folder icon in the upper
right corner.
4. A pop-up prompts you to create a new folder, for example, a subfolder called OLAP
Reports.
5. Name your report in the Save As box and click OK to return to your report.
4-40
Information Builders
Ad Hoc Reporting Enhancements
Procedure: How to Save Standard Reports and Other Files in OLAP
Administrators and Developers can save their reports in the Standard Reports or Other Files
folders by creating subfolders in this dialog.
1. Click the Save button in the OLAP Selections pane or click the Options button in the
OCP.
2. Click Save Report.
3. Click either Standard Reports or Other Files from the drop down list.
4. Click the New Folder icon in the upper right corner of the dialog box.
5. Enter the name, for example, Sales Reports, in the Name field.
6. Click OK to return to the OLAP Selections pane or the OCP.
WebFOCUS New Features
4-41
OLAP Features
Procedure: How to Save an OLAP-enabled Report as a Plain Report Without OLAP
Functionality
Users can save their reports with the OLAP functionality removed, so the OLAP tool can be
used as a simple report writer tool.
1. Create a subfolder by following the procedures: Save a Custom Report in OLAP on
page 4-38 or Save Standard Reports and Other Files in OLAP on page 4-41.
2. Once a subfolder is selected, check the Save without OLAP box.
3. Enter a new name for your report in the Save As box and click OK.
WebFOCUS generates a new report without OLAP functionality.
Uniform Field Name Referencing in OLAP
However the developer designs the report with regard to field referencing will carry
through to both the OCP and the OLAP Selections pane. Field referencing does not differ
between the report and the OCP and OLAP Selections pane. Field references by AS, TITLE,
or Field Name, are uniform in the report output and OLAP controls.
4-42
Information Builders
CHAPTER 5
ReportCaster Enhancements
5.
Topics:
•
Migrating the ReportCaster Configuration
File
•
Migration of Daily Jobs
•
Informix and Sybase Support
•
Configuring Access to the User Interfaces
Using the WebFOCUS Administration
Console
•
Configuration Tool Settings
•
Development and Administration Interface
•
HTML User Interface
•
Customizing the Dynamic Language Switch
in ReportCaster
•
Report Library Content Compression
•
Including Parameters and Burst Values in an
E-mail Subject Line
•
Automatically Deleting Distribution Files
•
Report Formats
•
&ECHO and -TYPE Support in Log Reports
•
PDF Drill Through Support
•
ReportCaster Bean and Web Services API
WebFOCUS New Features
This chapter describes new features for
ReportCaster in Version 5 Release 3.
5-1
Migrating the ReportCaster Configuration File
Migrating the ReportCaster Configuration File
Migration for the ReportCaster configuration file (dserver.xmls) between Version 5 Release
2.x and Version 5 Release 3 is seamless. You can automatically convert the old version to the
new version using the ReportCaster Server Configuration tool.
Procedure: How to Migrate the ReportCaster Configuration File
1. Back up your Version 5 Release 3 dserver.xmls file.
2. Copy your Version 5 Release 2.x dserver.xmls file to the Version 5 Release 3 directory.
3. Access the ReportCaster Server Configuration tool. Change the settings to reflect your
Version 5 Release 3 environment. In particular, be aware of the following settings:
•
Repository URL (located on the Default tab)
•
Console Port (located on the Default tab)
•
Library URL (located on the Library tab)
•
Repository Node (located on the MRE Info tab)
Note: If you plan to use Version 5 Release 2.x and Version 5 Release 3 releases
simultaneously (not recommended), you must change the Repository URL setting to
point to the appropriate ReportCaster environment. The ability to have multiple
ReportCaster releases pointing to the same ReportCaster Repository is not supported.
4. Start the ReportCaster Distribution Server so that all updates are recognized by
ReportCaster.
This completes the migration of the ReportCaster configuration file.
Migration of Daily Jobs
Jobs scheduled as 'Daily' that also specify a day or days of the week will continue to work as
is. During migration, these types of jobs will be changed to read 'Weekly'. However, the
behavior will not change.
Informix and Sybase Support
The ReportCaster Repository has been successfully tested for the following databases:
5-2
•
Sybase Version 12 and Version 12.5 on UNIX.
•
Informix Version 9.3 on Windows and UNIX.
Information Builders
ReportCaster Enhancements
Configuring Access to the User Interfaces Using the WebFOCUS
Administration Console
Previously, Managed Reporting Developers and Administrators could be configured to
access the ReportCaster Scheduling Wizard and HTML User Interface, rather than the Java
Web Start-based ReportCaster Development and Administration Interface, by manually
editing files. In Version 5 Release 3, this configuration may be performed using GUI tools
provided in the WebFOCUS Administration Console.
Procedure: How to Change the ReportCaster User Interface
1. On the left side of the screen, click Utilities. The MR Tool Type Selection options appear:
2. Select Administrator or Developer. The MR Tool Type Selection window appears with
the Java Web Start (JWS)-based ReportCaster Development and Administration
Interface selected by default:
Note: The ReportCaster User Interface cannot be configured for Managed Reporting
Analytical Users, who must use the HTML-based Scheduling Wizard and User Interface.
3. To change the interface to the ReportCaster Scheduling Wizard and HTML User
Interface, select the HTML option button and then click Save to save your changes.
You must reload the WebFOCUS Web application in order for your changes to take effect. In
addition, users must log out and log back in.
WebFOCUS New Features
5-3
Configuration Tool Settings
Configuration Tool Settings
Reference:
Additional Configuration Tool Settings
The following settings are available in the ReportCaster Server Configuration tool:
•
•
5-4
Graph. The following graph settings are located on the Data Server tab, which contains
settings for each WebFOCUS Reporting Server in your WebFOCUS environment:
•
Graph Engine. Controls which graph engine to use for server-side graphics. By
default, this specifies the new GRAPH53 setting. You can also specify the GRAPH32
setting used in Version 5 Release 2 and earlier.
•
Headless. Determines whether a graphics card exists on the WebFOCUS Reporting
Server. When set to NO (the default), a graphics card exists on the server. When set
to YES, no graphics card exists on the server (for example, z/OS).
PASSTHROUGH. An option for the Trusted setting located on the Data Server tab, this
setting specifies that ReportCaster uses the owner ID of the schedule as the Execution
ID, rather than the value that is set in REMOTE_USER at schedule time (which is the
value used when Trusted is set to YES). No password is required to connect to the
WebFOCUS Reporting Server. PASSTHROUGH can only be enabled when Shared is set
to YES. PASSTHROUGH is not supported when the WebFOCUS Reporting Server resides
on a Windows platform.
Information Builders
ReportCaster Enhancements
Graph Agent. Located under the User Info folder on the General tab, this setting
optimizes the processing of graphs. Due to performance considerations, Information
Builders generally recommends configuring this setting to 1 Graph Agent for each
concurrent graph report. However, your own internal testing should determine the
Graph Agent value that best suits the business needs of your organization.
Note: After making changes in the tool, recycle the ReportCaster Distribution Server and
reload the ReportCaster and WebFOCUS (when ReportCaster is configured with Managed
Reporting) Web applications in order for the changes to take effect.
Reference: Additional Configuration Tool Settings
For additional configuration tool settings, see the following topics:
•
Customizing the Dynamic Language Switch in ReportCaster on page 5-14.
•
Report Library Content Compression on page 5-18.
•
ReportCaster Integration With SiteMinder on page 10-5.
•
Optional Encryption Providers for ReportCaster on page 10-6.
•
Configuring the Trusted MR Sign-On Setting for ReportCaster on page 10-10.
WebFOCUS New Features
5-5
Development and Administration Interface
Development and Administration Interface
How to:
Run a Schedule Immediately
View a Log Report for a Specific Schedule Using the Log Icon or Right-Click Option
The ReportCaster Development and Administration Interface contains Run
and Log
icons and accompanying right-click options that enable you to run a schedule
immediately or view a log report for the schedule based on parameters you specify.
Procedure: How to Run a Schedule Immediately
From the ReportCaster Development and Administration Interface, select the schedule and
then click the Run
icon, or right-click the schedule and then select Run.
A message should appear informing you that the schedule was sent to run successfully.
5-6
Information Builders
ReportCaster Enhancements
Procedure: How to View a Log Report for a Specific Schedule Using the Log Icon or
Right-Click Option
1. From the ReportCaster Development and Administration Interface, select the schedule
and then click the Log
icon, or right-click the schedule and then select Log:
The ReportCaster Log Option dialog box opens with the Selected schedules check box
active and checked.
Note: You cannot uncheck the Selected schedules check box.
WebFOCUS New Features
5-7
Development and Administration Interface
2. Select one of the following option buttons:
•
Last Executed. Produces a log report containing the most currently run process for
the selected schedule. This is the default value.
•
All. Produces a log report containing all run processes for the selected schedule.
•
Date. Activates the Start date, Start time, End date, and End time fields.
If you have selected the Date option, proceed to step 3. Otherwise, proceed to step 7.
3. In the Start date field, specify the date on which you want the log report to begin. The
report will display all processes for the selected schedule that were run on or after the
specified Start date. You can either type the Start date directly in the field or select a
Start date from the drop-down calendar. The current date is the default value for the
Start date field.
4. In the Start time field, specify a start time for the Start date by entering it directly into
the text box, or by using the arrows. The current time is the default value for the Start
time field.
5. In the End date field, specify the date on which you want the log report to end. The
report will display all processes for the selected schedule that were run before the
specified End date. You can either type the End date directly in the field or select an End
date from the drop-down calendar. The current date is the default value for the End
date field.
6. In the End time field, specify an end time for the End date by entering it directly into the
text box, or by clicking the arrows. The current time is the default value for the End time
field.
7. Click OK to run the log report.
5-8
Information Builders
ReportCaster Enhancements
HTML User Interface
In this section:
Checking the Status of a Scheduled Job
Creating, Updating, and Deleting an Execution ID
Functionality was added to the ReportCaster HTML User Interface. You can now:
•
Check the status of your scheduled jobs.
•
Create, update, and delete your Execution IDs, which are valid user IDs that are used to
run schedules on a specified server.
Note: Although ReportCaster End Users can view only their own scheduled jobs and
Execution IDs, ReportCaster Administrators can view scheduled jobs and Execution IDs for
all users.
Checking the Status of a Scheduled Job
From the ReportCaster HTML User Interface, click the Status menu option to generate a list
of your scheduled jobs that are in the ReportCaster Distribution Server queue:
The list includes schedule ID, schedule description, priority, start time, owner, and status
information. Sorting is available for each column by clicking on the column title (for
example, Schedule ID). The Status column will contain one of the following values:
•
Run. The scheduled job is currently running.
•
Queue. The scheduled job is waiting for a thread to become available to run the
request.
WebFOCUS New Features
5-9
HTML User Interface
Once you have generated a status list of scheduled jobs, you can:
•
Select a scheduled job with a status of Queue and click the Remove icon. The schedule
will be removed from the queue if it is still in the queue, and the Status list will be
refreshed.
•
Select a scheduled job with a status of Queue to enable the Update Priority button. In
the New Priority field, you can change the priority of the scheduled job using the
drop-down list. Click Update Priority to change the priority of the scheduled job if it is
still in the queue.
•
Click the Refresh icon to refresh the current list of schedules with any new jobs that are
in the ReportCaster Distribution Server queue. You can automate this process by
selecting a value (for example, 10 Seconds) from the Auto Refresh drop-down list.
•
Click the Help icon to open the online Help documentation.
Creating, Updating, and Deleting an Execution ID
How to:
Generate a List of Execution IDs
Create a New Execution ID
Change an Execution ID and Password
Delete an Execution ID
An Execution ID is a valid user ID that is used to run a schedule on a specified server. When
an Execution ID is created, changed, or deleted on a server, it must also be created,
changed, or deleted in the ReportCaster Repository tables using ReportCaster. Similarly,
when the password for an Execution ID is changed on the server, the password for that
Execution ID must also be changed in the ReportCaster Repository tables. Exceptions are
when Execution credentials are Trusted.
Procedure: How to Generate a List of Execution IDs
From the ReportCaster HTML User Interface, click the Execution ID menu option to generate
a list of your Execution IDs defined to ReportCaster.
5-10
Information Builders
ReportCaster Enhancements
Note: Execution IDs display when the Run Id Type setting for that server is set to User. For
Trusted servers, only the Execution ID can be changed.
Once you have generated a list of Execution IDs, you can:
•
Click the New icon to create a new Execution ID.
•
Select an Execution ID and click the Open icon to optionally change the Execution ID
for a specific server, and/or change the password of the Execution ID.
•
Select an Execution ID and click the Delete icon to delete the Execution ID from the
ReportCaster Repository tables.
•
Click the Refresh icon to refresh the current list with any newly created Execution IDs.
•
Click the Help icon to open the online Help documentation.
Note: When you create, change, or delete an Execution ID it updates the ReportCaster
Repository tables so that they are in sync with the specified server. However, the credentials
of the user ID on the server itself remain unchanged.
Procedure: How to Create a New Execution ID
1. Click the Execution ID menu option.
2. Click the New icon. The ReportCaster -- Web Page Dialog dialog box opens:
WebFOCUS New Features
5-11
HTML User Interface
3. Specify the following parameters:
a. Server Name: From the Server Name drop-down list, select the name of a
WebFOCUS Reporting Server that will be used to run schedules.
b. Execution ID: Enter a valid user ID for the server.
c.
Password: Enter the password of the user ID. Note that you are not creating this
password on the specified server, but are entering the existing password into the
ReportCaster Repository.
d. Confirm Password: Reenter the password.
4. Click OK to create the Execution ID in the ReportCaster Repository table, or click Cancel
to cancel the request.
Procedure: How to Change an Execution ID and Password
To change an Execution ID and/or password for a specific server, perform the following
steps:
1. Click the Execution ID menu option to generate a list of your Execution IDs.
2. Select the Execution ID whose properties you want to change (for example, caster). This
activates the Open icon, enabling you to change the Execution ID, the Execution ID’s
password, or both.
3. Click the Open icon. The ReportCaster -- Web Page Dialog dialog box opens:
5-12
Information Builders
ReportCaster Enhancements
4. Optionally, enter the following information:
a. Execution ID: Enter a value for the Execution ID. This should be an already existing
and valid Execution ID. This Execution ID will globally replace the old Execution ID
for all schedules on the specified server.
b. Password: Enter the password for the Execution ID. This password must match the
current password for this user ID on the server that appears in the Server Name
field.
c.
Confirm Password: Reenter the password.
Changing the password using ReportCaster does not change the password on the
specified server.
5. Click OK to change the Execution ID and/or password values in the ReportCaster
Repository tables. A message appears confirming that the values have been changed.
Procedure: How to Delete an Execution ID
1. Click the Execution ID menu option to generate a list of your Execution IDs.
2. Select the Execution ID you want to delete (for example, caster).
3. Click the Delete icon. A message appears asking for confirmation that you want to
delete the selected Execution ID.
4. Click OK.
Once the Execution ID is deleted, a scheduled job that requires this Execution ID on the
specified server will not run unless the schedule is modified to use a valid Execution ID. If
you modify the Execution credentials for a single schedule that specifies the deleted
Execution ID, ReportCaster will make this modification for all schedules that specify the
deleted Execution ID.
WebFOCUS New Features
5-13
Customizing the Dynamic Language Switch in ReportCaster
Customizing the Dynamic Language Switch in ReportCaster
You can customize which languages are available on the Report Library and ReportCaster
HTML End User logon pages using the Dynamic Language Switch setting in the
ReportCaster Server Configuration tool.
Procedure: How to Customize the Dynamic Language Switch
1. On the General tab of the ReportCaster Server Configuration tool, select Dynamic
Language Switch.
5-14
Information Builders
ReportCaster Enhancements
2. Select the icon
to enable the Dynamic Language Switch.
The Dynamic Language Switch window opens:
3. Select the Language Selector check box.
This activates the check boxes for the languages. Only the languages that are shipped
with ReportCaster appear. These languages are:
•
Chinese - Simplified GB
•
Chinese - Traditional Big-5
•
English
•
French - Standard
•
French - Canadian
•
German - Standard
•
German - Austrian
•
Japanese
•
Korean
•
Portuguese - Brazilian
•
Spanish
WebFOCUS New Features
5-15
Customizing the Dynamic Language Switch in ReportCaster
4. Check the languages (for example, English and Japanese) you want to appear in the
Select Languages drop-down list on the Report Library and ReportCaster HTML End
User logon pages.
If you want to add a language that does not appear on the Dynamic Language Switch
window, proceed to step 5. Otherwise, proceed to step 6.
5. Click Add.
The New Languages window opens containing additional languages that were not
shipped with ReportCaster.
5-16
Information Builders
ReportCaster Enhancements
Select a language (for example, Hebrew) or languages and then click OK.
The language you selected (for example, Hebrew) appears as an option on the Dynamic
Language Switch window.
6. Click OK to save the changes and exit the Dynamic Language Switch window. You can
also click Cancel to cancel the changes and exit the window.
Note:
•
To remove languages from the Select Languages drop-down list on the Report Library
and ReportCaster HTML End User logon pages, repeat these steps but instead deselect
the check box for the language.
•
If you selected a language that is not shipped with ReportCaster, you must translate the
language. For more information about how to accomplish this, see the Working with
Localized Versions chapter in the National Language Support Manual.
WebFOCUS New Features
5-17
Report Library Content Compression
Report Library Content Compression
To conserve space, you can compress files stored in the Report Library. ReportCaster
Administrators can set compression on by default using the Compression setting in the
Library tab in the ReportCaster Server Configuration tool.
When creating a schedule from the ReportCaster Development and Administration
Interface, you can override the Compression setting if it is being distributed to the Library.
You can accomplish this by selecting the Compress Stored Report check box in the
Distribution tab:
5-18
Information Builders
ReportCaster Enhancements
Although compression is seamless to users viewing content in the Report Library,
ReportCaster Administrators can see which files are compressed, and their compression
ratios, in Library Management:
Including Parameters and Burst Values in an E-mail Subject Line
Example:
Specifying Parameters and Burst Values in an E-mail Subject Line
When creating a schedule, you can place multiple parameters and burst values from the
scheduled procedure in an e-mail subject line. This allows the subject to be dynamically
created in order to personalize e-mails to recipients.
Parameters must be specified in the format '&parmname' (where parmname is the name of
the parameter). Burst values must be specified using the syntax '%BURST'.
Note:
•
The parameter name cannot also be the name of an existing WebFOCUS procedure.
You may specify an unlimited number of parameters.
•
Burst values are only retrieved from the first Task in a multi-Task schedule. If you have
multiple burst values in a Distribution List, only the first value sent to the ReportCaster
Distribution Server is included in the subject.
WebFOCUS New Features
5-19
Automatically Deleting Distribution Files
Example:
Specifying Parameters and Burst Values in an E-mail Subject Line
This schedule specifies burst values and multiple parameters in the e-mail subject line:
The above schedule might result in an e-mail similar to the following:
Automatically Deleting Distribution Files
You can configure ReportCaster so that Distribution Files are automatically deleted after a
schedule runs.
Procedure: How to Automatically Delete a Distribution File
1. Create a blank file in the cfg directory under the ReportCaster installation directory (for
example, c:\ibi\ReportCaster53\cfg) called fileaddr.txt. This file must be called
fileaddr.txt.
2. Create a directory located on the same machine as the ReportCaster Distribution
Server (for example, c:\ibi\ReportCaster53\addrpath).
5-20
Information Builders
ReportCaster Enhancements
3. Edit fileaddr.txt and type the fully qualified directory path (for example,
c:\ibi\ReportCaster53\addrpath) of the Distribution Files to be deleted. It does not
matter whether there is a slash at the end of the directory path. If an invalid directory
path is specified in fileaddr.txt, no Distribution Files will be deleted.
4. Place the Distribution File(s) you want automatically deleted when a schedule runs in
the c:\ibi\ReportCaster53\addrpath directory.
5. Modify your schedules so that the Distribution File(s) are retrieved from the
c:\ibi\ReportCaster53\addrpath directory.
Report Formats
You can schedule output using the EXL2K PIVOT, Joint Photographic Experts Group (JPG),
Scalable Vector Graphics (SVG), and Portable Network Graphics (PNG) formats. The
following table describes these formats and provides recommendations and
considerations when using them with ReportCaster:
Format
Description
Suggested
Uses
Considerations
EXL2K
PIVOT
Used to analyze complex data
much like the OLAP tool in
WebFOCUS. It allows you to drag
and drop data fields within a
PivotTable, providing different
views of the data, such as sorting
across rows or columns.
E-mail,
Library
Microsoft Excel 2000 or higher must
be installed. The format is ASCII.
All EXL2K output with an .xht
extension is dynamically changed to
.xls for e-mail or FTP distribution. You
must edit your Web server’s MIME
table so that the .xls extension is
ascii/application data instead of
binary.
Bursting is not supported.
Must be using Microsoft Office 2000
at a minimum release level of
9.0.3821 SR-1 in order to open in the
Report Library.
JPG
Scheduled output opens as a
graphic in JPG format.
WebFOCUS New Features
E-mail,
Library
Only files can be distributed using
this format. However, you can embed
a JPG in a PDF report and then
distribute the PDF report using
ReportCaster.
5-21
Report Formats
Format
Description
Suggested
Uses
Considerations
PNG
Scheduled output opens as a
graphical image. These graphs are
bit mapped and can support 16
million colors. In addition, PNG
graphs have loss less compression
(data is decompressed 100% back
to the original). Therefore, saving,
altering, and resaving a PNG does
not degrade its overall quality. For
these reasons, PNG graphs are
superior to GIF graphs.
E-mail,
Library
Only works with procedures that
contain GRAPH FILE syntax.
Scheduled output opens as a
graphical image. This file format,
based on Extensible Markup
Language (XML), presents
powerful, interactive graphical
images.
E-mail,
Library
SVG
5-22
Bursting is supported and is
performed on the second BY field in
the GRAPH FILE request.
Drill downs are not supported, as this
format creates a static image.
Same as PNG.
Additionally, recipients must have an
SVG viewer, such as Adobe SVG
Viewer for Windows. To download
Adobe SVG Viewer for Windows, go
to http://www.adobe.com/support/
downloads/
product.jsp?product=46&platform=
windows.
Information Builders
ReportCaster Enhancements
&ECHO and -TYPE Support in Log Reports
Values from &ECHO variables and –TYPE commands in WebFOCUS procedures appear in
log reports. The &ECHO variable displays command lines as they execute in order to test
and debug procedures. The -TYPE command enables you to comment and evaluate your
code for informational and debugging purposes. For example, this procedure:
-SET &ECHO=ALL;
-TYPE Country Sales and Growth
-TYPE Parameter RATE is passed into report to forecast potential sales growth
TABLE FILE CAR
HEADING
"Sales Growth Forecast using Rate: &RATE "
SUM SALES AS 'Sales'
COMPUTE GROWTH/D12.2 = (SALES * &RATE)+ SALES; AS 'Sales, Forecast'
BY COUNTRY AS 'Country'
END
may produce the following log report when scheduled using ReportCaster:
WebFOCUS New Features
5-23
PDF Drill Through Support
PDF Drill Through Support
The PDF Drill Through feature enables Report Library users to move from a summary report
to a detail report, both of which are packaged together in a single PDF compound report.
Drill Through functionality is similar to Drill Down functionality except Drill Through reports
are static. A PDF document is produced that contains the summary report plus a detail
report, with the detail report containing all the detail data for all the line items in the
summary report. Clicking a Drill Through hyperlink navigates internally within the PDF file;
no additional reports are run. The PDF file can be distributed to the library using
ReportCaster, and when opened with Acrobat Reader, retains its full Drill Through
functionality.
For more information about the PDF Drill Through feature, see Creating a Drill Through PDF
Compound Report in Chapter 1, WebFOCUS Reporting Language Enhancements.
ReportCaster Bean and Web Services API
In this section:
Address Book Options
Scheduling Options
Report Library Options
ReportCaster Console Options
Log File Options
The new ReportCaster Bean and Web Services Application Programming Interface (API)
provides access to full ReportCaster functionality independent of WebFOCUS and
ReportCaster user interfaces. Using the ReportCaster API, developers of self-service
applications can enable users to distribute reports via Web applications.
Using JDBC, the ReportCaster Bean and Web Services API accesses the ReportCaster
Repository to read and write scheduling and distribution information. The ReportCaster
Distribution Server then sends this distribution information, when applicable, to the
WebFOCUS Reporting Server to run. Developers must provide a valid ReportCaster logon to
their ReportCaster API applications for ownership of schedules and Distribution Lists.
The new ReportCaster Bean and Web Services API improves on the previous version of
ReportCaster Bean API by offering the full range of functionality of ReportCaster, instead of
the more limited scheduling and logging options available in the 5.2 release.
The ReportCaster Bean and Web Services API consists of JavaBeans™ components that are
extended by Information Builders as Beans. This enables developers to use JavaServer
Pages™ (JSP™) technology or a Java application to create an independent, customized
application that offers the features of ReportCaster.
5-24
Information Builders
ReportCaster Enhancements
Address Book Options
The ReportCaster Bean and Web Services API provides methods that enable you to:
•
Create a new Address Book.
•
Add a line to an existing Address Book.
•
Retrieve an Address Book from a repository.
•
Retrieve a list of all public Address Books for a specific distribution method.
•
Retrieve a list of all private Address Books belonging to a specific owner for a specific
distribution method.
•
Update an existing Address Book by adding a new destination or burst value.
•
Delete an Address Book.
•
Delete a line from an Address Book.
Scheduling Options
The ReportCaster Bean and Web Services API provides methods that enable you to:
•
Create a report schedule specifying the run time, distribution method (e-mail, FTP,
printer, Managed Reporting, or Report Library), notification parameters, report format,
and whether to burst the report.
•
Schedule alerts.
•
Schedule the distribution of a file or the contents of a URL.
•
Schedule a Managed Reporting procedure.
•
Retrieve a list of scheduled Managed Reporting procedures.
•
List the procedures (FOCEXECs) on the default WebFOCUS Reporting Server available
for scheduling.
•
Specify whether to use a Distribution List, distribution file name, single destination, or
dynamic address list.
•
Specify whether the report output should be sent within the body of the e-mail (inline)
or as an attachment (e-mail distribution only.)
•
Update a schedule.
•
Delete a schedule.
•
Retrieve a list of existing schedules.
•
Retrieve the properties and details of a schedule.
•
Run a job once at a specific time without storing the schedule information in the
ReportCaster Repository.
WebFOCUS New Features
5-25
ReportCaster Bean and Web Services API
Report Library Options
The ReportCaster Bean and Web Services API provides methods that enable you to:
•
Distribute reports to the Report Library.
•
Manage content of the Report Library.
•
Track versioning.
•
View content in the Report Library.
Note that you cannot create Access Lists through the API.
ReportCaster Console Options
The ReportCaster Bean and Web Services API provides methods that enable you to:
•
Query the ReportCaster Distribution Server queue to show a list of pending jobs.
•
Query the ReportCaster Distribution Server queue to show a list of running jobs.
•
Change a job’s priority from the default (3).
•
Delete a pending job from the queue.
Log File Options
The ReportCaster Bean and Web Services API provides methods that enable you to:
5-26
•
Retrieve the list of schedules that have log information stored in the ReportCaster
Repository.
•
Retrieve log information for a specific schedule.
•
Retrieve log information based on log field values and specified conditions.
•
Purge log records for a specified schedule.
•
Purge log records based on log field values and specified conditions.
Information Builders
CHAPTER 6
WebFOCUS Client Enhancements
6.
This chapter describes all of the features for the WebFOCUS Client in Version 5 Release 3.
Topics:
WebFOCUS Administration Console
Localized Versions
•
Name Change for WebFOCUS Client Console
•
•
Setting a Default WebFOCUS Reporting
Server
Browser Support
•
New Grouping of Variables in cgivars.wfs
•
Restoring Default Client Settings
•
New Settings in cgivars.wfs
•
New Format Types in mime.wfs
•
Customizing the Dynamic Language Switch
•
Configuring the Client for the Baltic
Language
•
Configuring Managed Reporting Tool Types
•
Configuring Default Values for the
WebFOCUS Client
•
Quick Link to WebFOCUS Applications
•
Middle Tier DBA Password
•
Diagnostics
•
Configuring Managed Reporting Realm
Driver Authentication
WebFOCUS New Features
•
Portuguese Localized Version
Netscape Support
6-1
Name Change for WebFOCUS Client Console
Name Change for WebFOCUS Client Console
The WebFOCUS console name has changed to WebFOCUS Administration Console.
Setting a Default WebFOCUS Reporting Server
You can specify any node as the default WebFOCUS Reporting Server in a WebFOCUS
environment.
Procedure: How to Set a Default WebFOCUS Reporting Server
1. Click Reporting Servers and then Remote Services.
2. Select the node you want to change.
3. Click Modify.
This displays the settings for the selected node, enabling you to make changes.
4. Select the Set as Default Server Node check box to specify that the node is the default
WebFOCUS Reporting Server.
The node will be written as the IBI_REPORT_SERVER parameter value in the cgivars.wfs
file.
6-2
Information Builders
WebFOCUS Client Enhancements
New Grouping of Variables in cgivars.wfs
The client configuration settings are grouped into categories in the console. Some settings
apply to multiple categories and are in each of these categories in the console. If you
change a setting in one category, the change applies to all categories in which that setting
appears.
The term Initial Value next to a setting means that the value shown initially is the installation
default value and that it can be overridden by setting the variable explicitly in the URL
request.
In the Administration Console click Configuration, then Client Settings. The variables are
separated into categories as follows.
WebFOCUS New Features
6-3
New Grouping of Variables in cgivars.wfs
Clicking any category allows you to view and edit the variables used to configure that
category. For example, to see or edit the Managed Reporting variables, click Managed
Reporting. The following screen appears.
If you want to see documentation about the Client settings, click the Help icon (?) next to
any variable.
Make the necessary changes to the settings and then click Save.
6-4
Information Builders
WebFOCUS Client Enhancements
Restoring Default Client Settings
After you have changed and saved WebFOCUS Client settings using the WebFOCUS
Administration Console, you can return all settings to their installation defaults by clicking
the Restore Default Values button.
The following dialog box opens to make sure you want to restore all settings:
Click OK to restore all defaults, Cancel to leave the settings as they are.
WebFOCUS New Features
6-5
New Settings in cgivars.wfs
New Settings in cgivars.wfs
Reference:
New General Settings in the WebFOCUS Administration Console
New Graph Settings in the WebFOCUS Administration Console
New Managed Reporting Settings in the WebFOCUS Administration Console
New Multiple Reports Settings in the WebFOCUS Administration Console
New OLAP Settings in the WebFOCUS Administration Console
New On Demand Paging Settings in the WebFOCUS Administration Console
New Parameter Prompting Settings in the WebFOCUS Administration Console
New Performance Settings in the WebFOCUS Administration Console
New Startup Parameter in the WebFOCUS Administration Console
The following are new settings in the cgivars.wfs configuration file.
In the Administration Console click Configuration, then Client Settings.
Reference: New General Settings in the WebFOCUS Administration Console
Choose the General category to view or edit the following settings.
Setting
Description
SAVE_FEX
Trace option that enables you to write the output procedure
sent to the WebFOCUS Reporting Server to a location
accessible by the WebFOCUS Client. It contains only the
packaged request and is used only for debugging purposes.
The file is always created in the /web/cgi directory of the
WebFOCUS Client and that the name you provide in the
console is the name of the file placed in that directory.
6-6
_eda_config
Points to where the odin.cfg file resides.
CGI_PROG
Overrides the WFServlet, CGI/ISAPI client path for every
redirected request.
Information Builders
WebFOCUS Client Enhancements
Setting
Description
REDIRECT_COOKIE
Prevents a redirected request that was run on one machine
from being viewed from a browser on another machine. It
uses a unique encrypted identifier to ensure that the person
that sent the original request is the same person retrieving
the output again.
WFTRANSINOUT
Is a fully qualified Java class that does the transin/transout
processing for a plug-in for the Servlet version of the
WebFOCUS Client. This class must implement the
WFTransInOutInterface java class that enables data that is
passed between the WebFOCUS Reporting Server and the
Servlet to be parsed for bi-directionality (left/right vs.
right/left strings).
The WFTRANSINOUT parameter must point to a java class
that implements the WFTransInOutInterface class. The
following methods must be implemented in the java class:
•
wfEnableInOut()
•
wfTransin (java.lang.String strToModify)
•
wfTransout(byte[] byteToModify)
WFEXT
Specifies the Java class that invokes the WebFOCUS Servlet
Plug-in. For more information on the WebFOCUS Servlet
Plug-in, see Copying WebFOCUS Variables Using the
WebFOCUS Servlet Plug-in in Chapter 10, Manipulating
WebFOCUS Variables.
IBI_BACKUP_DIR
Location of the backup directory. By default, points to
webfocus\backup unless a different directory was specified
during the installation of the WebFOCUS Client. The conf
subdirectory under backup contains a copy of cgivars.wfs
with all of the default values. This is where the console
retrieves the default values for cgivars.wfs when the Restore
Default Values option is selected.
The administrator can change the backup directory to
another location. However, the conf directory must be
created under the new location.
WebFOCUS New Features
6-7
New Settings in cgivars.wfs
Reference: New Graph Settings in the WebFOCUS Administration Console
Choose the Graph category to view or edit the following setting.
Setting
Description
IBIF_graphengine
Controls which graph engine to use for server-side graphics.
For WebFOCUS 5.3, you must use Graph53.
IBIF_graphservurl
Configures graph image files on the Server:
&URL_PROTOCOL://machinename/alias/IBIGraphServlet
where:
URL_PROTOCOL
Is either http or ftp.
machinename
Is the name of the Web server where the WebFOCUS
Client is installed.
alias
Is the context root of the WebFOCUS application.
GRAPHSERVURL should not be used in an SSL environment
(https). Instead, use the IBIJAVAPATH or JSCOM3 configuration
options.
IBIJAVAPATH is comprised of the parameters IBIJAVADIR and
IBIJAVACMD and is only used when GraphServUrl and
JSCOM3 are not used.
To use JSCOM3, a JSCOM node must de defined and properly
configured on ODIN.CFG on the WebFOCUS Reporting Server
(configured by default during installation). The value of the
variable IBI_USE_JSCOM3 must be set to Yes, which can be
done using the WebFOCUS Administration Console. Also, the
graph jar files must be located on the WebFOCUS Reporting
Server and the classpath must be set, which can be done
using the Reporting Server Web Console or in a batch job
prior to starting the server.
IBIF_graphHeadLess
6-8
Enables you to render graphics on a UNIX or MVS machine
without a 3rd-party software, such as a X-Windows Server.
This setting requires JDK 1.4 or higher.
Information Builders
WebFOCUS Client Enhancements
Setting
Description
IBIF_graphAgents
Specifies the number of pre-started agents available for graph
processing.
SSG_EXTERNAL
Enables server-side graphics when using the WFServlet. This
setting is recommended for large graph requests since it
spawns new JVM processes for each request.
Reference: New Managed Reporting Settings in the WebFOCUS Administration Console
Choose the Managed Reporting category to view or edit the following settings.
Setting
Description
IBIF_dbapass_src
Controls whether to pass a DBA password to the WebFOCUS
Reporting Server on each WebFOCUS request.
REPOSITORY_DRIVER
Holds the name of the repository driver (which determines the
repository used for authentication and authorization). This
setting was previously located in the \WEB-INF\web.xml file.
Select one of the following settings:
MR Driver is the default driver that uses the Managed
Reporting repository when ReportCaster is not installed. Writes
ibi.webfoc.wfmre.repos.basedir.WFMRBasedirFactory into
cgivars.wfs and updates the MR basedir.
MR/RC Driver is the default driver that uses the Managed
Reporting repository when ReportCaster is installed. This driver
also synchronizes the Managed Reporting repository with the
ReportCaster repository. Writes
ibi.webfoc.wfmre.repos.dst_bd.WFMRDST_BDFactory into
cgivars.wfs.
MR Realm Driver is the optional driver distributed with
WebFOCUS that implements authentication and/or
authorization using any combination of the default drivers and
several third party repositories such as LDAP and Active
Directory.
Other Driver is a custom driver that the customer site wrote
and configured. If you choose this option, a text box displays in
which you must enter the fully qualified name of the class for
the driver.
WebFOCUS New Features
6-9
New Settings in cgivars.wfs
Setting
Description
IBIMR_RC_SVCUSER
Is the user ID that the MR Realm Driver can use to connect to
ReportCaster when creating a new Managed Reporting user.
This setting allows the MR Realm Driver to synchronize the
ReportCaster repository with the repository used by the Realm
Driver for Managed Reporting authentication. By default, the
user ID is admin, but this value can be changed after
installation.
MR_PARSER_VERSION
Specifies which HTML parser Managed Reporting uses against
the basedir directory. This setting was previously located in the
\WEB-INF\web.xml file.
Information Builders recommends using the default value, as
there is a 50% performance improvement.
IBIMR_prompting
Enables parameter prompting for all Managed Reporting
requests.
MR_BASE_HTML_DIR
Location where all Managed Reporting published pages will
reside.
MR_TEMPLATE_DIR
Location where all Managed Reporting templates will reside.
Reference: New Multiple Reports Settings in the WebFOCUS Administration Console
Choose the Multiple Reports category to view or edit the following setting.
6-10
Setting
Description
IBIWF_mframename
Used to name each frame in a multi-frame report. The name of
each frame will be this value followed by an index number. For
example, for two frames with IBIF_mframename set to
MYFRAME, the two frames will be named MYFRAME1 and
MYFRAME2. The default value is MREPORT.
IBIWF_mrcolumns
Specifies the maximum number of columns per page in multiframe reports. The default value is 1.
IBIWF_morder
Specifies whether the report frames in a multi-frame report
should appear in the order that the columns are specified in the
fex or the reverse order. Valid values are FORWARD and
REVERSE. The default value is FORWARD.
Information Builders
WebFOCUS Client Enhancements
Setting
Description
IBIWF_mreports
Specifies whether to create an index report, a multi-frame
report, or a standard report. Valid values are OFF, INDEX, and
FRAME. The default value is OFF.
IBIWF_mprefix
Specifies up to 50 characters of descriptive text that precedes a
sequence number and identifies a report on a TOC. Used to
create hyperlink names in index reports. For example, if the
value is MyReport, the hyperlinks will composed of the name
MyReport followed by an index number starting with 1. Default
value is Report. Do not use this variable if
IBIWF_mreports=FRAME.
IBIWF_mrrows
Is the number of vertically stacked reports when
IBIWF_mreports is set to FRAME.
IBIWF_index
Controls whether a sequence number is appended to the end of
the names on the TOC when IBIWF_mreports=INDEX. ON
appends a sequence number of 1 (for the first report generated)
to n (for the last report generated). This value is the default. OFF
omits a sequence number. Only the text specified by
IBIWF_mprefix applies.
Reference: New OLAP Settings in the WebFOCUS Administration Console
Choose the OLAP category to view or edit the following setting.
Setting
Description
IBIF_olappos
Location of the OLAP Panel (top, bottom).
WebFOCUS New Features
6-11
New Settings in cgivars.wfs
Reference: New On Demand Paging Settings in the WebFOCUS Administration Console
Choose the On-Demand Paging category to view or edit the following settings.
Setting
Description
IBIF_odpenable
Controls display of On-Demand Paging (ODP) reports. The
value of this variable overrides the value of the WEBVIEWER
parameter which can be used in a procedure to produce
ODP output.
YES
Displays the report. Yes is the default value.
NO
Does not display the ODP report. Instead, a page with a
message displays. You can specify the message text in
variable IBIODP_disable_msg. If you do not, a blank line
displays.
IBIODP_disable_msg
This variable contains a message, which will be displayed
instead of the ODP report output when IBIF_odpenable is set
to NO. The default value is a blank line.
ODP_target
Controls the back-button’s action in the Web Viewer.
ON
The browser’s Back button redisplays the first ODP page.
OFF
The browser’s Back button returns the browser to the
calling page of the ODP report.
6-12
_search_begin
Opening HTML tag for highlighting text found as a result of a
search in an ODP report. The default is <u>, to underline the
text.
_search_end
Closing HTML tag for highlighting text found as a result of a
search in an ODP report. The default is </u>, to underline the
text.
Information Builders
WebFOCUS Client Enhancements
Reference: New Parameter Prompting Settings in the WebFOCUS Administration
Console
Choose the Parameter Prompting category to view or edit the following setting.
Setting
Description
IBI_AUTOPROMPT_CGI_PROG
Overrides the client path for CGI, ISAPI, or WFServlet for
WebFOCUS AUTOSIGNON feature.
Reference: New Performance Settings in the WebFOCUS Administration Console
Choose the Performance category to view or edit the following settings.
Setting
Description
WF_OPTIMIZEIO
Enhances request processing for the WebFOCUS Reporting
Server.
WF_BURST_OUTPUT
Enables the WFServlet to send simple HTML reports to the
WebFOCUS Client faster. If the request is being redirected,
this option should be turned off.
WF_DATATRANSFER_SIZE
Sets the amount of data (in MBs) that is sent per request. For
example, if the file is 6 MBs and the
WF_DATATRANSFER_SIZE is 3, two requests are sent, each
with half of the data.
If the variable is not specified or is equal or less than 0, no
restrictions are enforced. This is used by Developer Studio
when sending files to the approot directory
WebFOCUS New Features
6-13
New Settings in cgivars.wfs
Reference: New Startup Parameter in the WebFOCUS Administration Console
MRUSERLOG is a new setting in ibiweb.cfg. You can choose one of three values:
•
Off does not create a log file.
•
Daily basis creates a log file on a daily basis.
•
Hourly basis creates a log file on an hourly basis.
By default the MR User Log files are created in the
install_drive: ibi/client_directory/wfc/web/cgi directory, where client_directory is the name
of the directory in which the iWay Client is installed. A location can be specified by the
TRACE_LOCATION variable.
The names of the log files have the following format:
mr_user_MMDD[_HH].log
where:
user
Is the value of the IBIMR_user variable.
MM
Is a two-digit number to indicate the month. The first month of the year is JANUARY,
which is 01.
DD
Is a two-digit number to indicate the day of the month. The first day of the month has
the value 01.
[_HH]
Is shown when the HOUR value of the MRUSERLOG variable is chosen. HH is a two-digit
number to indicate the hour of the day using the 24-hour clock. For example, at
10:04:15.250 PM HH is 22.
6-14
Information Builders
WebFOCUS Client Enhancements
New Format Types in mime.wfs
In this section:
Opening Multiple Excel Spreadsheets
EXL2K PIVOT, Scalable Vector Graphics (SVG), and Portable Network Graphics (PNG) formats
are available as redirection settings in the mime.wfs configuration file.
To access the redirect setting using the WebFOCUS Administration Console, click
Configuration and then Redirection Settings.
WebFOCUS New Features
6-15
New Format Types in mime.wfs
Opening Multiple Excel Spreadsheets
When using Microsoft Excel 2002 or 2003, two or more reports produced by a PCHOLD
FORMAT EXL2K command cannot display simultaneously and produce the following
message indicating that the spreadsheets cannot be opened at the same time:
The mime.wfs file has a new attribute called content_disposition to enable the display of
multiple Excel spreadsheets. Instead of displaying in the browser with an Excel plug-in,
these reports display in Excel.
Adjust the mime.wfs file located:
•
Under the WebFOCUS Client in \ibi\client53\wfc\etc\mime.wfs
•
Under Developer Studio in \ibi\srv53\wfs\etc\mime.wfs.
The default for the redirect attribute is 'yes' and the default for the content_type attribute is
'no' for all output types. To open multiple Excel reports, change the redirect attribute value
to 'no' and the content_disposition attribute to 'yes' for extensions .xht and .xls:
Default:
<!
extension content_type
format redirect translate content_disposition
...
<ADDTYPE> .xht application/vnd.ms-excel ascii yes
&astran
no
<ADDTYPE> .xls application/vnd.ms-excel binary yes
no
no
Change to:
<!
extension content_type
format redirect translate content_disposition
...
<ADDTYPE> .xht application/vnd.ms-excel ascii
no
&astran
yes
<ADDTYPE> .xls application/vnd.ms-excel binary no
no
yes
These attributes allow users to compare the output of multiple spreadsheets
simultaneously. By default, a new Excel session opens in a separate Excel window. This
behavior may be different for users who expect Excel to start as Web browser plug-in.
6-16
Information Builders
WebFOCUS Client Enhancements
Customizing the Dynamic Language Switch
You can customize which languages are available on the WebFOCUS logon pages.
Procedure: How to Customize the Dynamic Language Switch
1. Click Configuration and then Dynamic Language Switch.
By default, the Dynamic Language Switch window appears with the Dynamic
Language Switch disabled.
WebFOCUS New Features
6-17
Customizing the Dynamic Language Switch
2. Select the Enable radio button to enable the Dynamic Language Switch.
This switch turns on the Select Languages button on all WebFOCUS logon pages.
Additionally, enabling this switch activates the Enable radio buttons for the languages.
Only the languages that are shipped with WebFOCUS appear.
3. Select the Enable radio button for additional languages (for example, Spanish) you
want to appear in the Select Languages drop-down list on the WebFOCUS logon pages.
4. Click Save to save your changes in the
ibi\WebFOCUS53\ibi_html\javaassist\ibimultilanguage.js file.
Note: To remove languages from the Select Languages drop-down list on the WebFOCUS
logon pages, repeat these steps but instead click the Disable radio button for the language.
6-18
Information Builders
WebFOCUS Client Enhancements
Configuring the Client for the Baltic Language
You can configure the client for the Baltic language using the graphical prompts on the
console.
For the WebFOCUS Client, navigate to the applicable window by choosing NLS Settings
under Configuration from the WebFOCUS Administration Console navigation pane.
For the iWay Client, navigate to the NLS Configuration Wizard window by choosing NLS
from the configurator’s navigation pane on the Home page.
The code pages are:
CP00921—ISO-8859-4 (Latin 4, Baltic Multilanguage)
CP01257—Windows, Baltic (Latin 7)
Configuring Managed Reporting Tool Types
You can configure tool types for Managed Reporting Administrators, Developers, and
Analytical Users. Selections include:
•
HTML or Applet version of Report Assistant and Graph Assistant.
•
ReportCaster Scheduling Wizard and HTML User Interface or the Java Web Start-based
ReportCaster Development and Administration Interface. This selection is not
applicable to Analytical Users as they use the ReportCaster HTML user interfaces.
Procedure: How to Configure Managed Reporting Tool Types
1. Click Utilities. The MR Tool Type Selection options appear.
WebFOCUS New Features
6-19
Configuring Managed Reporting Tool Types
2. Select Administrator, Developer, or Analytical User.
If you select Administrator or Developer, the MR Tool Type Selection window appears
with the following defaults.
Note: The ReportCaster User Interface cannot be configured for Managed Reporting
Analytical Users, who must use the HTML-based Scheduling Wizard and User Interface.
3. To configure:
•
Managed Reporting Administrators or Developers to use the HTML-based
Scheduling Wizard and User Interface, select the HTML radio button.
•
The specified Managed Reporting user type to use the Java applet-based Report
Assistant or Graph Assistant, select the Applet radio button for the appropriate tool.
4. Click Save to save your changes.
If you are using the WebFOCUS Servlet, you must reload your WebFOCUS Web application
in order for your changes to take effect. In addition, users must log out of the Managed
Reporting environment and log back in.
6-20
Information Builders
WebFOCUS Client Enhancements
Configuring Default Values for the WebFOCUS Client
You can see whether Managed Reporting and ReportCaster are installed, and configure the
WebFOCUS and ReportCaster context roots, using the new Utilities menu. Additionally, you
can configure the WebFOCUS Client for the CGI, ISAPI, or Servlet options, and specify its
default path.
Procedure: How to Configure Default Values for the WebFOCUS Client
1. Click Utilities and then Client Selection. The Client Selection window appears.
WebFOCUS New Features
6-21
Configuring Default Values for the WebFOCUS Client
2. Optionally change the following settings:
•
WebFOCUS Application alias. The approot on the Web Server. Its initial value is
the value specified during installation.
•
WebFOCUS CGI/ISAPI alias. The path of the CGI or ISAPI configured on the Web
Server. Its initial value is the installation value which was not customizable during
installation.
•
WebFOCUS alias. The path to the WebFOCUS HTML pages.
•
BI Dashboard alias. The path to the Dashboard Web Server resources.
•
WebFOCUS Context root. The default context root of the WebFOCUS Web
application. By default, this is set to /ibi_apps unless a different context root was
specified during installation.
•
ReportCaster Context root. The default context root of the ReportCaster Web
application. By default, this is set to /rcaster unless a different context root was
specified during installation.
•
Managed Reporting. Denotes whether Managed Reporting is installed (Installed)
or not (Not Installed).
•
ReportCaster. Denotes whether ReportCaster is installed (Installed) or not (Not
Installed).
•
Client Path. From the drop-down menu, specify the path to the WebFOCUS CGI,
ISAPI, or Servlet. You can also choose User Defined, in which case a text box opens
where you can enter a path. If you are using ReportCaster, you must select the
Servlet.
Change the default path of the WebFOCUS CGI, ISAPI, or Servlet. Default values are:
WebFOCUS CGI: /cgi-bin/ibi_cgi/ibiweb.exe
WebFOCUS ISAPI: /cgi-bin/ibi_cgi/webapi.dll
WebFOCUS Servlet: /ibi_apps/WFServlet
•
Maintain Path. From the drop-down menu, specify the path to the CGI or ISAPI.
You can also choose User Defined, in which case a text box opens where you can
enter a path. Change the default path of the Maintain CGI or ISAPI. Default values
are:
Maintain CGI: /cgi-bin/ibi_cgi/ibiweb.exe
Maintain ISAPI: /cgi-bin/ibi_cgi/webapi.dll
3. Click Save to save your changes.
All changes are written to the ibi\WebFOCUS53\ibi_html\javaassist\cgipath.js file.
6-22
Information Builders
WebFOCUS Client Enhancements
Quick Link to WebFOCUS Applications
The WebFOCUS Applications Quick Link provides access to current applications available
on the WebFOCUS Client and WebFOCUS Reporting Server.
The left frame of the WebFOCUS Applications page has a tree of all applications and all
WebFOCUS Data Servers configured in the WebFOCUS environment.
You can expand any application to see the HTML pages in the application. If you click on
one of the pages, it displays in the right frame.
You can expand the WebFOCUS Data Servers tree to see each node configured in the
WebFOCUS environment. If you click on a node, that Reporting Server’s logon page opens
in the right frame.
Middle Tier DBA Password
The SET PERMPASS=password command establishes a password that the user cannot
change for access to data sources. You can control whether a PERMPASS is sent to the
WebFOCUS Reporting Server with each request, by choosing an option for the
IBIF_dbapass_src variable.
For information about setting this variable in the WebFOCUS Administration Console, see
WebFOCUS Data Security Using the Middle Tier DBA Password in Chapter 10, Security
Enhancements. For more information about the SET PERMPASS command, see NonOverridable User Passwords (SET PERMPASS) in Chapter 1, WebFOCUS Reporting Language
Enhancements.
WebFOCUS New Features
6-23
Diagnostics
Diagnostics
In this section:
WebFOCUS Client Traces
Verification Tool
The following are new features in the Diagnostics section of the WebFOCUS Administration
Console.
WebFOCUS Client Traces
How to:
View WebFOCUS Client Trace Files
Trace files listed in the Client Tracing section have a timestamp that indicates when the
request ran.
The Diagnostics option in the WebFOCUS Administration Console enables you to view and
delete WebFOCUS Client trace files. Trace files enable you to track requests processed by
the WebFOCUS Client (CGI, ISAPI, or Servlet). In order to view WebFOCUS Client trace files,
you must set the trace parameter ON in the ibiweb.cfg file. You must also specify the
location where you want the trace files to be sent using the trace_location parameter in
ibiweb.cfg, which can be accessed by clicking Configuration and then Startup Parameters.
6-24
Information Builders
WebFOCUS Client Enhancements
Procedure: How to View WebFOCUS Client Trace Files
Click Diagnostics and then Client Traces under the Traces menu. The current WebFOCUS
Client trace files appear:
The Trace File column lists the WebFOCUS generated number identifying each trace. A
WebFOCUS Servlet trace file is denoted by srvnnnn.trc, while a WebFOCUS CGI or ISAPI
trace file is denoted by cg0000nnnn.trc. The Date Modified column provides a timestamp
for when the request ran, and the Query String column lists the actual request that was sent
to the WebFOCUS Client. You can view or delete a trace file by selecting the trace file and
then clicking the appropriate action button (View, Delete, or Delete All). When you click
View, the trace file opens in separate browser window, increasing your search speed
without interrupting the console session.
WebFOCUS New Features
6-25
Diagnostics
Verification Tool
How to:
Use Automatic Verification
Verify WebFOCUS Client Connections and Permissions
Verify ReportCaster Settings
Test the WebFOCUS Reporting Server
Test That You Have Correct Versions of the XML Processing Files
Administrators can test the following components of WebFOCUS using the Verification tool
on the Diagnostics menu:
•
WebFOCUS Client
•
WebFOCUS Reporting Server
•
ReportCaster
The Automatic option verifies all of the currently configured components. The Selective
option enables you to choose components to test.
The verification process includes checking Web server aliases and directory permissions for
each type of client communication mode (CGI, WFServlet, or ISAPI).
To access the verification tool, click Diagnostics.
6-26
Information Builders
WebFOCUS Client Enhancements
Procedure: How to Use Automatic Verification
Click Automatic on the Verification menu. This enables you to see your directory
permissions and test whether you can perform all the common WebFOCUS and WebFOCUS
client operations such as creating and deleting applications, logging on as the
administrator, reading and writing from the standard directories, creating and deleting
domains, and creating and deleting reports.
Clicking on Possibilities tells you what the problem might be and possible solutions.
Note: If you run this test (it is the Installation Verification Procedure) immediately after
performing the installation procedure, there might be a delay. Check if the WWW Service
has fully initialized/started before trying to execute this procedure.
WebFOCUS New Features
6-27
Diagnostics
Procedure: How to Verify WebFOCUS Client Connections and Permissions
Click WebFOCUS Client on the Verification menu to test the connection between the client
and the Web server and permissions for your application directory, configuration files, and
Managed Reporting.
When you click WebFOCUS Client and if Managed Reporting is installed, the Managed
Reporting logon section displays in addition to the Client path you are using, either
CGI/ISAPI or servlet.
At this point you can change the Client path to test alternate communication methods and
verify if they are available or configured properly.
6-28
Information Builders
WebFOCUS Client Enhancements
If the Managed Reporting logon screen displayed, enter your ID and password, then click
Start. The following screen appears showing whether each area exists and is configured
properly.
Procedure: How to Verify ReportCaster Settings
Click ReportCaster on the Verification menu to open the ReportCaster home page. This
verifies that resources in the rcaster Web application are accessible.
WebFOCUS New Features
6-29
Diagnostics
Procedure: How to Test the WebFOCUS Reporting Server
Click WebFOCUS Reporting Server on the Verification menu to test the connection between
the client and the WebFOCUS Reporting Server. It shows your path (CGI/ISAPI or Servlet)
and allows you to select a node.
You can then test the following areas:
•
6-30
Automatic Test. This selection checks connections and checks to see if you can list
applications under the approot directory, if you can create and delete an application,
and if you can run stored procedures and ad-hoc reports. When you are finished, click
Back to return to the previous screen.
Information Builders
WebFOCUS Client Enhancements
•
Test Ad Hoc Procedure. This selection opens a window containing a default ad-hoc
procedure. You will be prompted for credentials if the server is secure. Click Run to
execute the procedure, or you can edit the procedure first. You can also change the
application path (using APP PATH, not EDAPATH). The procedure can consist of
WebFOCUS or SQL commands. When you are finished, click Back to return to the
previous screen.
WebFOCUS New Features
6-31
Diagnostics
6-32
•
Test Existing Procedure. This selection lets you enter a procedure name and any
necessary parameters. The procedure must be stored on the Reporting Server. You can
also change the application path. Click Run to execute the procedure. When you are
finished, click Back to return to the previous screen.
•
Open Server Console. This selection opens the Reporting Server’s console.
Information Builders
WebFOCUS Client Enhancements
Procedure: How to Test That You Have Correct Versions of the XML Processing Files
Specific versions of the xerces.jar and xlan.jar files are required for features such as OLAP
and auto prompting. If you are not using the correct versions of these files, problems can
occur.
To check that you are using the correct versions, select XML Processing from the Verification
menu of the Diagnostics section. A Window opens that lists the versions found:
If the versions are not the required ones, a message displays specifying which versions are
required and where they can be obtained. For example:
Please update your current installation to include the required version
of these files. You can obtain the files from the
D:\ibi\WebFOCUS53\webapps\webfocus53\WEB-INF\lib directory.
WebFOCUS New Features
6-33
Configuring Managed Reporting Realm Driver Authentication
Configuring Managed Reporting Realm Driver Authentication
In this section:
Setting the REPOSITORY_DRIVER Variable
Configuring Realm Driver Authentication Properties
How to:
Turn on Realm Driver Tracing
Configure Authentication Properties in mrrealm.cfg
Reference:
LDAP and Active Directory Properties
WebFOCUS Reporting Server Properties
You can use the WebFOCUS Administration Console to configure the Managed Reporting
Realm Driver to authenticate against LDAP, Active Directory, or the WebFOCUS Reporting
Server.
The configuration process using the WebFOCUS Administration Console consists of two
steps:
1. Setting the value of the REPOSITORY_DRIVER variable.
2. Configuring the authentication properties in the mrrealm.cfg file.
Setting the REPOSITORY_DRIVER Variable
To configure the Managed Reporting Realm Driver, you must first select MR Realm Driver as
the value of the REPOSITORY_DRIVER variable in the WebFOCUS Administration Console:
1. In the WebFOCUS Administration Console, choose the Managed Reporting section on
the Configuration menu.
The Managed Reporting settings display.
6-34
Information Builders
WebFOCUS Client Enhancements
2. For REPOSITORY_DRIVER, select MR Realm Driver:
3. Click Save to save this setting.
When you save this value, the following message reminds you to configure the driver:
You have selected the MR Realm Driver. To configure its properties,
update the settings in the MR Realm Driver section under the
Configuration menu.
Configuring Realm Driver Authentication Properties
Before configuring the Managed Reporting Realm Driver to authenticate against LDAP,
Active Directory, or the WebFOCUS Reporting Server, make sure you have set the
REPOSITORY_DRIVER variable to MR Realm Driver.
Note that you can manually edit the mrrealm.cfg file to configure relational DBMS
authentication and external authorization to LDAP, Active Directory, or a relational DBMS.
For helpful support information about the Managed Reporting Realm Driver, see
http://techsupport.informationbuilders.com/realm/toc.html.
To configure the Realm Driver:
•
Turn on tracing.
•
Edit the authentication properties in the mrrealm.cfg file.
If you attempt to configure these properties without first setting the REPOSITORY_DRIVER
variable to the MR Realm Driver, the following message displays:
The REPOSITORY_DRIVER parameter must be set to MR Realm Driver. To change
the current setting, click Managed Reporting under Client Settings of the
Configuration menu
WebFOCUS New Features
6-35
Configuring Managed Reporting Realm Driver Authentication
Procedure: How to Turn on Realm Driver Tracing
1. Click General under MR Realm Driver. The Realm Driver Settings - General panel
displays.
2. Select the True radio button.
3. Enter the fully-qualified directory path that is to contain the log file(s). Note that the
directory delimiter must be a forward slash (/), even on Windows.
4. Click Save to save these settings to mrrealm.cfg.
Trace files are created in the specified directory with names of the form
mrrealm_yyyy_mm_dd.log. The Realm Driver log service writes useful troubleshooting
messages to the file. It appends new messages to the existing information in the file.
Important: Tracing is only recommended for troubleshooting as it affects performance.
When you are confident that the Realm Driver is configured properly, select False for the
trace option and reload your Web application.
Procedure: How to Configure Authentication Properties in mrrealm.cfg
Click Authentication under MR Realm Driver. The Realm Driver Settings - Authentication
panel displays.
Select one of the following authentication options:
•
Active Directory - The panel is updated and the following properties will be
configured in the mrrealm.cfg file:
WEB.AUTHENTICATION=false
AUTHENTICATION.CLASS=ibix.service.WFMRX_LdapManager
AUTHENTICATION.PREFIX=AD
6-36
Information Builders
WebFOCUS Client Enhancements
•
LDAP - The panel is updated and the following properties will be configured in the
mrrealm.cfg file:
WEB.AUTHENTICATION=false
AUTHENTICATION.CLASS=ibix.service.WFMRX_LdapManager
AUTHENTICATION.PREFIX=LDAP
•
WebFOCUS Reporting Server - The panel is updated and the following properties will
be configured in the mrrealm.cfg file:
WEB.AUTHENTICATION=false
AUTHENTICATION.CLASS=ibix.service.WFMRX_DBManager
AUTHENTICATION.PREFIX=WFRS
•
Web Server - The panel is updated and the following properties will be configured in
the mrrealm.cfg file:
WEB.AUTHENTICATION=true
AUTHENTICATION.CLASS=
AUTHENTICATION.PREFIX=
Except for the Web Server option, you must configure additional properties. All of the
property names associated an each authentication option start with the authentication
prefix value. This enables the Realm Driver to access the appropriate settings for the option
selected.
Reference: LDAP and Active Directory Properties
Edit the following properties to configure LDAP or Active Directory authentication in the
mrrealm.cfg file:
HOST
Is the host name or IP address of your directory server. This value is written to the
LDAP.HOST or AD.HOST property, depending on the AUTHENTICATION.PREFIX setting.
PORT
Is the port on which the directory server listens. By default, it is set to 389, the default
LDAP port. This value is written to the LDAP.PORT or AD.PORT property, depending on
the AUTHENTICATION.PREFIX setting.
SECURECONNECTION
Determines whether the connection is encrypted. A value of false means no
encryption. A value of true means SSL encryption is used. Typically, SSL requires
additional setup on the directory server (for example, a certificate). See your directory
server documentation for more information. This value is written to the
LDAP.SECURECONNECTION or AD.SECURECONNECTION property, depending on the
AUTHENTICATION.PREFIX setting.
WebFOCUS New Features
6-37
Configuring Managed Reporting Realm Driver Authentication
REQUIRECREDENTIALS
Specifies whether to perform an anonymous or credential-based search for the user in
the directory as a preliminary step in authenticating the user. The default value for
LDAP is false, and the default value for Active Directory is true. This value is written to
the LDAP.REQUIRECREDENTIALS or AD.REQUIRECREDENTIALS property, depending on
the AUTHENTICATION.PREFIX setting.
For example, a user John Doe enters the user Id JD123 and his password on the BI
Dashboard logon page.
If REQUIRECREDENTIALS=false the Realm Driver first performs an anonymous search to
locate John Doe’s distinguished name (DN), for example, “cn=Doe\,
John,ou=People,dc=informationbuilders,dc=com”. Next, the Realm Driver performs an
LDAP bind with the user’s DN and password in order to authenticate him.
If REQUIRECREDENTIALS=true, the first connection is made with a service account’s DN
with sufficient rights to search the directory and locate user entries.
Note: Active Directory does not allow an anonymous search.
SECURITY.PRINCIPAL
Contains the DN of a service account with sufficient access rights to locate user entries
in the directory. This value is used only when REQUIRECREDENTIALS=true. This value is
written to the LDAP.SECURITY.PRINCIPAL or AD.SECURITY.PRINCIPAL property,
depending on the AUTHENTICATION.PREFIX setting.
SECURITY.CREDENTIALS
Contains the password of the service account. This value is used only when
REQUIRECREDENTIALS=true. This value is written to the LDAP.SECURITY.CREDENTIALS
or AD.SECURITY.CREDENTIALS property, depending on the AUTHENTICATION.PREFIX
setting.
USER.BASE
Specifies the root DN where the user search starts. For performance reasons you should
set this value as close as possible to your user entries. The default value for LDAP is
ou=People,dc=domain,dc=com, and for Active Directory is
cn=Users,dc=domain,dc=com. You must replace this with an appropriate DN for your
directory. This value is written to the LDAP.USER.BASE or AD.USER.BASE property,
depending on the AUTHENTICATION.PREFIX setting.
6-38
Information Builders
WebFOCUS Client Enhancements
USER.SCOPE
Specifies the scope of the search. Valid values are:
subtree indicates that the scope is a subtree rooted at start node. This is the default
value.
onelevel indicates the immediate children of start node only.
This value is written to the LDAP.USER.SCOPE or AD.USER.SCOPE property, depending
on the AUTHENTICATION.PREFIX setting.
USER.CLASS
Specifies the object class used when searching for user entries. The default value for
LDAP is inetOrgPerson, and for Active Directory is User. This value is written to the
LDAP.USER.CLASS or AD.USER.CLASS property, depending on the
AUTHENTICATION.PREFIX setting.
USER.ATTRIBUTE
Specifies the LDAP attribute used when searching for user entries. The default value for
LDAP is uid, and for Active Directory is sAMAccountName. This value is written to the
LDAP.USER.ATTRIBUTE or AD.USER.ATTRIBUTE property, depending on the
AUTHENTICATION.PREFIX setting.
One possible reason to change the default value would be to allow users to log on to
Managed Reporting with an email address instead of user ID. In this case, you might
change the value to mail (if this corresponds with the name of the appropriate attribute
in your directory).
After editing the properties, click Save to save the values. If you want to reestablish the
default values in mrrealm.cfg, click Restore Default Values.
Important: You must reload the WebFOCUS Web application whenever making changes to
the mrrealm.cfg file.
WebFOCUS New Features
6-39
Portuguese Localized Version
Reference: WebFOCUS Reporting Server Properties
Edit the following properties to configure WebFOCUS Reporting Server authentication in
the mrrealm.cfg file:
CLASS
Is the class used by WFServlet to connect with the WebFOCUS Reporting Server. The
value is set to ibi.jlink.EdaDriver and should not be changed. This value is written to the
WFRS.CLASS property.
URL
Is the connection information used to connect with the WebFOCUS Reporting Server.
The value is set to jdbc:eda://hostname:port;SERVER=
Update hostname:port to the host name and port for your WebFOCUS Reporting
Server. This value is written to the WFRS.URL property.
If your Reporting Server is on MVS, you must supply the service name associated with
your server after the SERVER= keyword. For information about setting the service name
for MVS, see your iWay Server Configuration and Operations for MVS manual.
Note: If your Reporting Server is on any other platform, including OS/390 UNIX, leave
SERVER= unchanged. You must not remove the SERVER= keyword.
After editing the properties, click Save to save the values. If you want to reestablish the
default values in mrrealm.cfg, click Restore Default Values.
Important: You must reload the WebFOCUS Web application whenever making changes to
the mrrealm.cfg file.
Portuguese Localized Version
A localized version is a software product in which the entire user interface (for example,
menus, utilities, and online Help) is displayed in a particular language.
A localized version of WebFOCUS in Portuguese (Brazilian) is available.
6-40
Information Builders
WebFOCUS Client Enhancements
Netscape Support
In this section:
Self-Service Features
Managed Reporting Features
Dashboard Features
Example:
Selecting the DIF Filetype
WebFOCUS 5.3 supports Netscape 7.1 for self-service reporting and Managed Reporting
users using the Dashboard user interface. All types of reports can be run but there are
known issues with OLAP reports, Table of Contents, Knowledge Mapping, on-demand
paging reports, and drill-downs in Excel 2000 reports.
From Dashboard, the HTML Report Assistant, HTML Graph Assistant, end-user Schedule
Wizard, HTML-based ReportCaster and Library tools, the Business Intelligence Dashboard
View Builder, and HTML Text Editor are supported. Developer Studio, all administrative
consoles, and Managed Reporting administration tools are not supported.
The following table lists the support capabilities of WebFOCUS features and tools.
Note that support is for Netscape release 7.1, not 7.0.2.
Self-Service Features
Feature
Uses the following Web
technologies…
Supported in
Netscape 7.1
Basic real-time reporting with plain
HTML output. For example HTML
3.x.
Basic HTML markup
GIF Graphics
Frameset support
Yes
Server-side graphics without drilldowns.
GIF Graphics
Yes
Server-side graphics with drilldowns.
GIF Graphics
Image Maps
No
Java based graphics.
Browser JRE/JVM level 1.1.7
Yes, requires Sun
JVM Plug-in
Acrobat (PDF) output
PDF MIME type support
Yes
Excel 2000 output
Excel MIME type support
Yes
WebFOCUS New Features
6-41
Netscape Support
Feature
Uses the following Web
technologies…
Supported in
Netscape 7.1
CLASS-based formatting for
WebFOCUS reports Style Sheets
Cascading Style Sheets
Yes
Drill-downs in Excel 2000 reports.
Ability to set helper context
No
On-Demand Paging (WebViewer).
JavaScript level
Frameset support
Yes
Table of Contents
JavaScript
Cascading Style Sheets
Document Object Model 1.0
No
Knowledge Mapping
Cascading Style Sheets
JavaScript
No
OLAP Control Panel
Java applets
JavaScript
No
OLAP Pane
Cascading Style Sheets
JavaScript
Document Object Model 1.0
No
Report Caster Console
6-42
No
Report Library
JavaScript
Yes
Report Assistant – HTML version as
standalone.
JavaScript
Yes
Value retrieval in XML format
PNG graphs
Yes
SVG graphs
Yes, requires Adobe
plug-in version 6.0.
WebFOCUS Server Console
No
WebFOCUS Client Console
No
Information Builders
WebFOCUS Client Enhancements
Managed Reporting Features
Feature
Uses the following Web
technologies...
Supported in
Netscape 7.1
Admin applet
(Domain Builder)
Java applet
No
End-user applet
(Domains)
Java applet
No
User Administration applet
Java applet
No
Join applet
Java applet
No
Report Assistant and Graph
Assistant applet
Java applet
No
Text Editor applet
Java applet
No
Dashboard Features
Feature
Uses the following
Web technologies…
Supported in Netscape
7.1
Domain Tree
Yes
Role Tree
Yes
Launch Block, List Block, Folder
Block, Output Block
Yes
Run reports
Yes
Run “Deferred only” reports
Yes
On-Demand Paging (WebViewer)
reports
Yes, except controls are
not visible in a launch or
output block.
OLAP reports
No
View Builder/Personalize
JavaScript
Yes
HTML Report Assistant, HTML
Graph Assistant
JavaScript
Yes
WebFOCUS New Features
6-43
Netscape Support
Feature
Uses the following
Web technologies…
Supported in Netscape
7.1
ReportCaster, Report Library
(HTML End-user user interface)
JavaScript
Yes
Schedule Wizard
Deferred Status
Yes
JavaScript
Yes
Domain Search
Yes, except for previous
days and previous
months.
HTML Text Editor
Yes, with limited toolbar
options.
Note:
6-44
•
For On-Demand Paging reports, the control panel may not be visible in launch or
output blocks, depending on the number of blocks on the Dashboard page. You can
maximize the report (opens a new window) to see the control panel.
•
For OLAP reports, the following known issues occur: the sorting does not work,
sometimes column titles overlap or are truncated, and drill-down does not work. The
OLAP button and the control panel do not display.
•
In the advanced domain search in Dashboard, the "during the previous days and
months” option does not filter the data properly.
•
For some file types, Netscape does not use the associated file type definitions that are
specified for your PC.
Information Builders
WebFOCUS Client Enhancements
Example:
Selecting the DIF Filetype
1. In the Edit menu, select Preferences. The Preferences dialog box opens.
2. In the Category box, select Navigator and then Helper Application.
3. If application/x-diff does not already display in the File Types list, select New Type.
4. Select the following:
•
For MIME Type: application/x-diff
•
For Extension: DIF
•
For “When a file of this type is encountered”: “Open it with”
•
Navigate to select Microsoft Excel. For example,
C:\Program Files\Microsoft Office\Office10\EXCEL.EXE
Note: You must exit out of Netscape and restart it so that it will not pick a helper
application when running a WebFOCUS request for an extension that is listed the
helper application definition. After restarting, you can run the WebFOCUS request
again and there will be no additional prompting. The report results will display within
the Netscape browser.
WebFOCUS New Features
6-45
Netscape Support
6-46
Information Builders
CHAPTER 7
WebFOCUS Graphics
Topics:
•
What Is Scalable Vector Graphics?
•
Viewing Scalable Vector Graphics
•
Portable Network Graphics
•
Virtual Coordinate System
•
Implementing API Calls
WebFOCUS includes significant enhancements for users of
business graphics. New chart types such as Pareto,
Waterfall, Cylinder, Cone, Globe, and Funnel extend the
robust presentation styles already available, and Gauges
provide a powerful way to display Key Performance
Indicators. The ability to place graphs in PDF files by simply
clicking a check box makes creation of compound
documents containing business graphics seamless and
easy.
New Java technology produces graphs with higher
resolution and fewer jagged edges. New output formats
are available as well. You can now create graphs as high
resolution Portable Network Graphics (PNG) images, which
use a palette of 64-million colors. In addition, graphs
output as Scalable Vector Graphics (SVG) files produce
boardroom-quality images for print or display and
eliminate jagged edges altogether.
The WebFOCUS graph engine has been enhanced with
intelligent object placement that ensures that graph
elements are appropriately sized and positioned so that
overprinting is eliminated and graphs automatically look
sharp.
These topics describe all of the features for Scalable Vector
and Portable Network Graphics.
WebFOCUS New Features
7-1
What Is Scalable Vector Graphics?
What Is Scalable Vector Graphics?
Scalable Vector Graphics (SVG) is a file format, based on Extensible Markup Language
(XML), that enables Web application developers to design powerful, interactive graphical
images.
SVG was introduced, and continues to be developed, by the World Wide Web Consortium
(W3C), a non-profit group of corporations that work together to create new, open standard
products for the Web. Open standard products are not proprietary—they do not belong to
any company or individual. Other open standard products created by the W3C are
HyperText Markup Language (HTML) and XML.
The following table compares vector graphs with bitmapped graphs, which have been
used traditionally in Web applications until now.
Vector Graphs
Bitmapped Graphs
SVG
GIF, JPEG, PNG
Describe shapes and paths
Provide information about every pixel
Are compact and generate high quality
images on any media
Are bulky and sometimes generate poor
quality images
Are scalable and produce high quality
images regardless of resolution
Show progressive, jagged edges, known as
the staircase effect, when displayed at lower
resolutions or stretched
SVG has several other advantages over bitmapped graphs:
7-2
•
You can zoom in on any part of an SVG graph, always seeing a clear image.
•
You can perform searches and make edits on any part of an SVG graph because it is
actually composed of text.
•
You can interactively respond to a variety of user actions with highlighting, pop-ups,
special effects, audio, and animation.
•
SVG files are usually much smaller and easier to compress than bitmapped files.
•
SVG supports 16 million colors rather than 256 colors. It also supports industry-wide
initiatives for achieving Web-based color consistency across systems.
Information Builders
WebFOCUS Graphics
An SVG graph is created with underlying XML code, which also has benefits for
development on the Web. SVG:
•
Works well across platforms, output resolutions, and methods of representing colors.
•
Is supported in virtually any language for global implementation in many locales.
•
Is compatible with any scripting language (for example, JavaScript) or procedural
language (for example, WebFOCUS) and uses data from any type of data source, from
ASCII to relational.
Viewing Scalable Vector Graphics
To view SVG graphs in a browser, all you need is a free plug-in that you can download from
Adobe®, called the SVG Viewer. The SVG Viewer is available for Netscape® and Microsoft®
Internet Explorer.
For more information about downloading and using this tool, go to the Adobe Web site
and search for information on the SVG Viewer.
You can also embed SVG graphs in PDF documents. Viewing these documents requires
only the Adobe PDF Viewer—no browser plug-in is necessary.
Portable Network Graphics
In addition to SVG, WebFOCUS gives you the option of using the Portable Network Graphics
(PNG) file format. Since a plug-in viewer is required for browser display of the SVG format,
you may decide to use PNG format.
PNG graphs are bitmapped and can support 16 million colors. In addition, they have
lossless compression (data is decompressed 100% back to the original). Therefore, saving,
altering, and resaving a PNG does not degrade its overall quality.
For these reasons, PNG graphs are superior to GIF and JPEG graphs, and you can display
them in virtually any modern browser. The major difference between PNG and SVG is that
SVG is vector based and uses XML as the file format.
WebFOCUS New Features
7-3
Virtual Coordinate System
Virtual Coordinate System
In this section:
A Look at Coordinate Systems: Cartesian and Virtual
How Does WebFOCUS Graphics Use the Virtual Coordinate System?
Example:
Using Virtual Coordinates to Control Font Size
Plotting a Frame Rectangle in the Default Applet Rectangle
Plotting a Graph With a Three-dimensional Effect
Plotting a Legend Rectangle
Whether you save your graphs in SVG or PNG format, you will plot them on a Cartesian grid
using the Virtual Coordinate System. The Virtual Coordinate System provides a way to
position and size graph elements relative to the area in which the graph is displayed.
Changing the aspect ratio (ratio of width to height) of the area results in the necessary
adjustments to the graph elements, creating a graph that fits properly in the space allotted
for it.
This feature has many benefits, including the ability to set font size with virtual coordinates,
ensuring that text appears proportionate regardless of the size of a graph.
The Virtual Coordinate System provides data visualization in WebFOCUS applications
widely distributed on the Web to users with different display technologies and output
devices.
A Look at Coordinate Systems: Cartesian and Virtual
This topic takes a look at the basics of coordinate systems to help you understand how you
will create WebFOCUS graphs.
The Cartesian Coordinate System consists of two number lines perpendicular to each
other. Called axes, the horizontal number line is the X-axis and the vertical number line is
the Y-axis.
The axes form a plane (typically, a flat surface). With the Cartesian Coordinate System, you
assign a pair of numbers, designated as (X,Y), to identify a point on the plane. The first
number is the X-coordinate and the second number is the Y-coordinate; together, the
numbers are the coordinates of the point.
The coordinate point at which the two axes intersect is the origin (0,0).
7-4
Information Builders
WebFOCUS Graphics
The following diagram plots a point on a plane. The Cartesian coordinates of the point are
(2,3). Starting at the origin (0,0), the first number represents 2 units to the right of the origin
on the X-axis, and the second number represents 3 units up on the Y-axis.
Tip: The two Cartesian axes divide a plane into four quarters, called quadrants. For
simplicity, the diagrams show only one quadrant.
If we double the width of the grid—that is, change its aspect ratio (the ratio of width to
height)—the number of coordinate points on the X-axis increases to 10. The space
between coordinate points remains the same; the space between coordinate point 0 and
coordinate point 1 (or between 1 and 2, 2 and 3, and so on) does not change between grids.
WebFOCUS New Features
7-5
Virtual Coordinate System
As a result, when we plot (2,3) on the wider grid, the 2 units to the right of the origin are the
same width as before, and the shaded area is unchanged. In fact, it will always be rendered
exactly the same regardless of the size and shape of the grid.
The Virtual Coordinate System used by WebFOCUS Graphics is based on a Cartesian grid.
As shown before, the first diagram plots a point with Cartesian coordinates (2,3) on a
Cartesian grid. This time, however, when we double the width of the grid (second diagram),
the number of coordinate points on the X-axis remains 5, and, consequently, the space
between coordinate points increases.
In the Virtual Coordinate System, the number of coordinate points on both axes is constant
regardless of the size of the grid.
7-6
Information Builders
WebFOCUS Graphics
As a result, when we plot (2,3) on the wider “virtual” grid, the 2 units to the right of the
origin are doubled in width from before. The Virtual Coordinate System, illustrated in the
second diagram, results in the proportionate display of the shaded area in the increased
width of the grid; it is stretched horizontally. The width of the shaded area will always
change relative to the width of the grid.
WebFOCUS New Features
7-7
Virtual Coordinate System
Example:
Using Virtual Coordinates to Control Font Size
The following graphs are generated by a WebFOCUS procedure. The specific API calls that
created these graphs are described in later sections of this manual.
This example illustrates the results you can achieve using virtual coordinates to control font
size. The font size changes relative to the designated size of the area in which the graph is
displayed (the graph output area).
In the graph request:
•
Absolute coordinates control the font size for the X-axis and Y-axis labels.
•
Virtual coordinates control the font size for the legend.
•
The width and height of the graph output area are controlled by two WebFOCUS graph
commands.
In the first graph, the font size for the axis labels and the legend is proportionate to the size
of the graph. All the text on the graph is easy to read regardless of the way font size is
specified in the procedure—with absolute coordinates or with virtual coordinates:
Next we modify the procedure to increase the size of the graph output area. The font size
for the axis labels—specified with absolute coordinates— remains the same, and the text is
now proportionately too small and harder to read than before. An absolute size, whether it
is the size of a font or another graph element, always renders exactly the same whether the
graph is large or small.
The font size for the legend—specified with virtual coordinates—increases proportionately
with the size of the graph and the text is still easy to read.
7-8
Information Builders
WebFOCUS Graphics
In this example, the size of the vertical bars (risers) is also controlled with virtual
coordinates. Like the size of the legend text, they increase proportionately when the graph
output area is increased.
How Does WebFOCUS Graphics Use the Virtual Coordinate System?
WebFOCUS Graphics uses the Virtual Coordinate System to position and size the elements
of a graph. You can control several rectangular elements in WebFOCUS, but you typically
create graphs using the following:
•
Applet Rectangle—Defines the graph output area, which is the entire area allowed for
the presentation of a graph. The Applet Rectangle sets the size and shape of the virtual
coordinate grid used for plotting a WebFOCUS graph.
•
Frame Rectangle—Is the area within which the graph coordinates are plotted.
•
Legend Rectangle—Explains how to interpret the data plotted on a graph.
To plot a point in the Cartesian Coordinate System, you must provide at least two
coordinates (X,Y). In WebFOCUS Graphics, four coordinates are required to plot a rectangle
such as the Frame Rectangle or Legend Rectangle—X, Y, Width, and Height. The first two
coordinates (X,Y) control the point location of the bottom left corner of the rectangle, while
the last two coordinates control the width and height of the rectangle.
Two absolute values set the size and shape of the Applet Rectangle.
WebFOCUS New Features
7-9
Virtual Coordinate System
The following is a Cartesian grid showing the total number of X-axis and Y-axis coordinate
points used to plot a WebFOCUS graph. It is represented as a square, with points plotted in
the Cartesian Coordinate System. Coordinate point (0,0) is the center of the grid.
If we superimpose this grid over a WebFOCUS graph (next diagram), its shape changes
from a square to a rectangle (the Applet Rectangle), a shape typically used in the
presentation of a graph. However, the number of points on both the X-axis and Y-axis
remains 32,000. The fact that the number of points is constant regardless of the size or
shape of the grid is the reason why the coordinate system used by WebFOCUS Graphics is
called the Virtual Coordinate System.
7-10
Information Builders
WebFOCUS Graphics
The values passed on a WebFOCUS Graphics API call to position and size graph elements do
not apply to pixels; rather, they are conceptual points on a conceptual grid.
The examples that follow always show the position of coordinate point (0,0) to mark the
center of the grid used in the Virtual Coordinate System. It will help you see the effect of the
changes made to the sample graphs. The position of coordinate point (0,0) on the grid is
constant, and graph elements such as rectangles move relative to it through the arguments
passed on a WebFOCUS API call.
Example:
Plotting a Frame Rectangle in the Default Applet Rectangle
In these examples, WebFOCUS Graphics uses the default values for the Applet Rectangle.
You plot an Applet Rectangle with the WebFOCUS HAXIS setting (width of graph output
area) and VAXIS setting (height of graph output area) in a procedure. In general, the optimal
display format for an Applet Rectangle is 1.618 units in width for every 1 unit in height.
This aspect ratio is essentially a golden rectangle, a form used since ancient Greece in art
and architecture. It is naturally pleasing to the human eye.
The WebFOCUS Graphics default values are:
SET HAXIS=770
SET VAXIS=400
WebFOCUS New Features
7-11
Virtual Coordinate System
In the first example, the Frame Rectangle is plotted with the following WebFOCUS Graphics
API code:
setRect(getFrame(),new Rectangle(-10753,-12619,22378,19359));
7-12
Information Builders
WebFOCUS Graphics
In the next example, the API code repositions the bottom left corner of the Frame
Rectangle within the Applet Rectangle and decreases its size. The position of coordinate
point (0,0) remains constant, and the Frame Rectangle moves relative to it. The API code is:
setRect(getFrame(),new Rectangle(10000,-10000,5000,5000);
WebFOCUS New Features
7-13
Virtual Coordinate System
Example:
Plotting a Graph With a Three-dimensional Effect
The Frame Rectangle does not include the wall or floor of a graph rendered with a
three-dimensional effect for depth, as shown in the following diagram. This is important to
keep in mind when you position and size the Frame Rectangle.
7-14
Information Builders
WebFOCUS Graphics
For example, you cannot set the coordinates to the maximum number allowed, in an
attempt to make the Frame Rectangle fill the entire Applet Rectangle. To do that results in
the loss of data, as illustrated in the following unintentional presentation:
WebFOCUS New Features
7-15
Virtual Coordinate System
Example:
Plotting a Legend Rectangle
The virtual coordinates for a Legend Rectangle work just like those for a Frame Rectangle. In
the first example, the Legend Rectangle is plotted with the following WebFOCUS Graphics
API code:
setRect(getLegendArea(),new Rectangle(7300,2488,3300,3100)):
7-16
Information Builders
WebFOCUS Graphics
You can change the first two coordinates to reposition the legend toward the center of the
graph:
setRect(getLegendArea(),new Rectangle(0,0,3300,3100)):
WebFOCUS New Features
7-17
Implementing API Calls
Or you can change the last two coordinates to enlarge the legend:
setRect(getLegendArea(),new Rectangle(0,0,4300,4100)):
Implementing API Calls
How to:
Implement an API Call
Example:
Customizing a Graph Using API Calls
You can enhance graph output by adding a variety of API calls within the ON GRAPH SET
GRAPHSTYLE * and ENDSTYLE commands in a WebFOCUS procedure.
7-18
Information Builders
WebFOCUS Graphics
Syntax:
How to Implement an API Call
GRAPH FILE filename
graph commands
.
.
.
ON GRAPH SET GRAPHSTYLE *
API call
.
.
.
ENDSTYLE
[ON GRAPH SET STYLE *
WebFOCUS StyleSheet command
ENDSTYLE]
END
where:
filename
Specifies a data source.
graph commands
Are commands allowed in a procedure. For a description of valid commands, with
syntax and examples, see the Creating a Graph chapter in the Creating Reports With
WebFOCUS Language manual.
API call
Is a property setting, method call, or multiple property settings or method calls. For a
description of property settings and method calls, with syntax and examples, see the
Properties, the Methods chapter, and the Methods that Return an Object ID in your
WebFOCUS Graphics documentation.
WebFOCUS StyleSheet command
Is an optional WebFOCUS StyleSheet command or multiple StyleSheet commands. For
a description of StyleSheet commands, with syntax and examples, see the Formatting
Reports: An Overview chapter through the Formatting Report Data chapter in the
Creating Reports With WebFOCUS Language manual.
WebFOCUS New Features
7-19
Implementing API Calls
Example:
Customizing a Graph Using API Calls
The following annotated example illustrates how to customize a graph using four API calls.
The API calls are highlighted in the request.
The calls illustrate the API syntax rules. They:
•
Are case sensitive.
•
End with a semicolon (;).
•
Comply with explicitly defined spacing conventions.
The procedure is
1.
2.
3.
4.
GRAPH FILE SALES
SUM RETURNS
RETAIL_PRICE
ACROSS PROD_CODE AS 'Product Code'
ON GRAPH SET GRAPHSTYLE *
setLegendMarkerPosition(4);
setO1LabelRotate(0);
setTitleString("Sales Report");
setTextJustHoriz(getTitle(),1);
ENDSTYLE
END
where:
1. Displays legend text inside the legend marker.
2. Displays the X-axis labels horizontally.
3. Displays the title Sales Report.
4. Centers the title.
7-20
Information Builders
WebFOCUS Graphics
The output is:
WebFOCUS New Features
7-21
Implementing API Calls
7-22
Information Builders
CHAPTER 8
WebFOCUS Maintain Enhancements
Topics:
•
WebFOCUS Maintain Application
Debugger
•
Maintain Form Enhancements
WebFOCUS New Features
This chapter describes all of the features for WebFOCUS
Maintain in Version 5 Release 3.
8-1
WebFOCUS Maintain Application Debugger
WebFOCUS Maintain Application Debugger
In this section:
Debugger Screen
Debugging Your Application
Tracking Variables
Navigation Control
How to:
Invoke the WebFOCUS Maintain Application Debugger
Select a File and Find a Case
Example:
Loading the Application Into the Debugger
Reference:
Alternate Methods of Invoking the Maintain Application Debugger
Error Messages and Type Statements
Usage Notes: Debugger Limitations
The WebFOCUS Maintain Application Debugger allows you to step through your Maintain
application while running on the Web to assist in identifying and correcting problems
encountered at runtime. It is a useful debugging tool that can be easily enabled during the
development cycle or when troubleshooting a problem in a production environment.
A Help feature is available through the debugging tool to provide specific instruction on its
use.
Syntax:
How to Invoke the WebFOCUS Maintain Application Debugger
The following command can be used to run your WebFOCUS Maintain application using
the Maintain Application Debugger:
MNTCON APPDEBUG EX procedure
where:
procedure
is a Maintain procedure with an MNT or MAINTAIN extension
8-2
Information Builders
WebFOCUS Maintain Enhancements
This command is available from the default WebFOCUS Maintain launch form,
WFMSTART.HTML by choosing the option Execute a procedure with Maintain Application
Debugger from the drop down list for Invocation Type.
You can also add this command to your own launch form or embed it in a URL call.
This is the most flexible way to launch the debugger, as it will immediately launch the
application using the debugger without requiring a separate compile step, and without
leaving a compiled module (FCM or FOCCOMP) behind.
Reference: Alternate Methods of Invoking the Maintain Application Debugger
Other methods used to invoke the Maintain Application Debugger:
•
Add the following line to the server’s edasprof.prf profile file
MNTCON APPDEBUG
and run the application with the syntax
MNTCON EX procedure
•
Compile your procedure(s) using the command
MNTCON APPDEBUG COMPILE procedure
and run the compiled object with the command
MNTCON APPDEBUG RUN procedurename
WebFOCUS New Features
8-3
WebFOCUS Maintain Application Debugger
Debugger Screen
The Maintain Application Debugger screen consists of the following components:
Top Left
Top Right
Left, Under View Data
Right, Under
Command Buttons
Select File: Name of
the Maintain
procedure and
associated Winform
(Combo Box)
Command buttons
for the following
actions:
Variables Frame (VF):
Displays details about
Global Variables and
stacks.
File Frame (FF): Shows
the Maintain
procedure code and
the current position as
the application is run.
Select Case: All of the
Cases in the current
Maintain Procedure
(Combo Box)
View Data: Global
Variables or individual
stack names; controls
what you see in the
Variables Frame
(Combo Box)
8-4
•
Set Break Point
•
Run
•
Step Into
•
Step Over
•
Help
•
Exit
Information Builders
WebFOCUS Maintain Enhancements
Debugging Your Application
The following example shows how to use the debugger.
Example:
Loading the Application Into the Debugger
1. Start the debugger using one of the methods described in the syntax section: How to
Invoke the WebFOCUS Maintain Application Debugger on page 8-2.
The main file appears in the File Frame. The color green indicates that a line is
commented. A blue line is the current line where the debugger is paused; this line is
not yet executed.
2. To run the application up to the end or to the nearest break point, click Run.
3. You can run your application either line by line or by setting and using break points.
a. To execute a line:
•
Execute the current line and click Step Over to advance to the next line.
•
Execute the current line and stop inside another case (if the current line contains a
call to another case). Next, click Step Over.
b. To set break points:
•
Click the line where you want to set the break point. When first clicked, the line is
highlighted in a gray frame.
•
Click Set Break Point or press F9. The line changes to red.
•
To deselect a break point, select the line again and, once more, click Set Break Point
or press F9.
Note: If you try to set a break point to a commented line or to an empty line, you
will see the message “Cannot set break point.”
4. To terminate the debugger, click Exit which accesses the launch form.
WebFOCUS New Features
8-5
WebFOCUS Maintain Application Debugger
Tracking Variables
Global variables and Stacks. When you change the Category in the View Data ComboBox,
the corresponding variable group appears in the Variables Frame. If the variable is not set,
its value displays as #empty. When viewing a stack, you can see FocCount and FocIndex and
the current stack position. To change the stack position use the first, next, prev and last
navigation links.
Changing variable values. Currently it is possible to change values only for Global
Variables. To change the value, click the variable value in the Variable Frame, enter a new
value, and click Enter or just remove focus from the current control. The new value turns red.
Note: First the variable is set, then the current line is executed. At this point, the variable is
changed on the screen only. It is not yet set inside the application (or Maintain server). It is
set only when the debugger "goes" to the server, that is, when you click Step Over or when
you change the current file by using the Select File: ComboBox.
If the value entered cannot be set (is not valid) the alert message "Cannot set value"
displays and the variable value is shown as 0.
Navigation Control
The Select File ComboBox lists the name of the Maintain procedure that is currently
running, and the associated Winform and import modules, if any. The Select Case:
ComboBox contains a list of all cases of the current file.
Procedure: How to Select a File and Find a Case
1. To change the current file, select another file from this ComboBox. The debugger will
go to the Maintain server and load the selected file into the File Frame.
At this time, running the Winform file itself with the debugging functions (setting break
points, and so on) is not supported.
External procedures and remote Call procedures are not listed here. They run as part of
the main application and data is returned to the calling procedure and available to the
debugger. However, the debugging functions are not available for the remote
procedures themselves.
2. To go to a Case, select a name from Select Case: ComboBox. The File Frame scrolls to
the selected case and the beginning of the case is highlighted in blue-green.
8-6
Information Builders
WebFOCUS Maintain Enhancements
Reference: Error Messages and Type Statements
If a non-critical run time error occurs, an alert message pops up when the next debugger
screen displays.
Type statements are seen only at the end of the application execution in the case of nonWinform applications, or after the Winform Show command in the case of applications with
winforms.
Reference: Usage Notes: Debugger Limitations
•
Procedure lines greater than 70 characters are truncated in the File Frame view.
•
Winform files cannot be run with debugging options. The code can be viewed in the
File Frame.
•
Remote Calls and external procedures are not listed in the Select Files ComboBox and
cannot be run with debugging functions. They run as usual when encountered in the
application code, and the variables and errors returned are available to the main calling
procedure in the debugger.
Maintain Form Enhancements
The following are Maintain Form enhancements:
•
Click Event is available for the ListBox and ComboBox controls.
•
The Scroll value for the Overflow property of an HTML Table automatically provides a
horizontal scroll bar when the control is sized less than the width of the data. Data
values will wrap when they are wider than the column setting using any Overflow
setting.
•
Developers have the option of using a pointer to their JavaScript and vbscript files in
their runtime forms, rather than being required to embed the script code in the HTML
of the generated forms themselves. The link information for the forms is resolved
during deployment.
WebFOCUS New Features
8-7
Maintain Form Enhancements
8-8
Information Builders
CHAPTER 9
WebFOCUS Web Services
Topics:
•
What Is a Web Service?
•
Components of a Web Service
•
Using WebFOCUS Web Services
•
Example: Using a Web Service to
Make an Online Reservation
•
WebFOCUS Web Services
Architecture
WebFOCUS New Features
With WebFOCUS Version 5 Release 3, you can interact with
a variety of WebFOCUS features using Web Services.
9-1
What Is a Web Service?
What Is a Web Service?
A Web Service is a self-contained application that performs certain functions that you can
publish on the Web based on open standards. A Web Service facilitates communication
between applications because it is not platform-specific or language-based.
A Web Service functions like a black box, because you can provide input and expect certain
output without knowing exactly how the results are achieved. Since Web Services are
platform-neutral and comply with open standards, more businesses can interact with one
another through integration of applications, even those written in different languages. For
example, Windows applications can talk to UNIX applications, and Java can talk to Perl.
Most companies develop software for their specific business functions. However, due to
increased associations among businesses, and international commercial collaboration,
companies need a way to share information stored in separate computer systems. A Web
Service makes it possible for applications within computer systems to communicate with
each other.
Through a Web Service, business logic, processes, and data can be reused by different
applications. This significantly reduces the amount of time it takes to develop applications
by eliminating the need to replicate business functions.
9-2
Information Builders
WebFOCUS Web Services
Components of a Web Service
The main components of a Web Service are:
•
Extensible Markup Language (XML). XML is a flexible text format that allows the
exchange of data on the Internet, intranets, and elsewhere. It is a standard of the World
Wide Web Consortium (W3C).
•
Simple Object Access Protocol (SOAP). SOAP is a communications protocol designed
for exchanging information in a distributed environment. It provides a messaging
framework that is independent of implementation specifics, and it enables a program
on one kind of operating system (such as Windows 2000) to communicate with a
program on another kind of operating system (such as Linux). SOAP uses the Hypertext
Transfer Protocol (HTTP) and XML to exchange information.
•
Web Services Description Language (WSDL). WSDL, expressed in XML, describes how
to access a Web Service and the operations that it will perform. WSDL, which was codeveloped by Microsoft and IBM, describes the protocols and formats used by the Web
Service.
•
Universal Description, Discovery, and Integration (UDDI). UDDI is the component that
enables businesses to find each other on the Web and make their systems
interoperable for e-commerce. A business can list itself by name, product, location, or
by the Web Service it offers. Information is entered on a registry server and then shared
by servers in other businesses. Services are defined through a UDDI document called a
Type Model or tModel. The tModel often contains a WSDL file that describes a SOAP
interface to an XML Web Service.
You can use XML, SOAP, WSDL, and UDDI together to integrate Web-based applications.
Use XML to tag the data, SOAP to transfer the data, WSDL to describe the available services,
and UDDI to list the available services.
WebFOCUS New Features
9-3
Using WebFOCUS Web Services
Using WebFOCUS Web Services
In this section:
What Can You Do Through a WebFOCUS Web Service?
The WebFOCUS WSDL Creation Utility
The WebFOCUS Web Services Adapter
WebFOCUS Web Services allow you to develop applications in the .NET or Java
environments and perform WebFOCUS functionality from it. A business can pass
parameters from its own application to WebFOCUS and retrieve output in the form of a
formatted report or data. In WebFOCUS reports, input is in the form of parameters and
output is in the form of a formatted report.
Businesses benefit from Web Services because of their accessibility and efficiency. A
WebFOCUS Web Service allows businesses to use their own customized front-end
interfaces to implement a variety of WebFOCUS reporting capabilities.
WebFOCUS provides the following Web Services products:
9-4
•
WebFOCUS Web Services Enablement, also known as the Publish option, can present
WebFOCUS reports as Web Services operations. It allows external applications built
with Web Services supported languages (such as C++, C#, VB.NET, Java, and Flash
Action Script) to integrate the report output. It also includes a set of generic Web
Services operations that allow an application to integrate some basic WebFOCUS
functionality.
•
WebFOCUS Web Services Adapter, also known as the Consume option, consumes Web
Services information and incorporates it as a data source. A Web Service that is created
and deployed with any Web Services authoring tool can be accessed directly by the
WebFOCUS Reporting Server and manipulated as though it were relational data.
Information Builders
WebFOCUS Web Services
What Can You Do Through a WebFOCUS Web Service?
You can do the following through a WebFOCUS Web Service:
•
Explore the file structure of servers and applications.
•
Run WebFOCUS reports.
•
Determine the parameters for a report.
•
Query a server for information and incorporate the results in an application. For
example, you can populate a list box in your application with the results to expose
choices to the user.
•
Implement Managed Reporting security, which is beneficial if your business has
different internal security standards from WebFOCUS. You can updated Managed
Reporting security from your own application.
The WebFOCUS WSDL Creation Utility
WebFOCUS provides a WSDL creation utility, which describes the capabilities available
through a WebFOCUS Web Service. A WSDL file is an XML document that defines the input
parameters for WebFOCUS Web Service functions, the expected output, and the method
for calling each function. The WebFOCUS WSDL utility creates a file needed to call one or
more WebFOCUS Web Services.
.NET or Java programmers can use this to develop their own applications.
The WebFOCUS Web Services Adapter
WebFOCUS accesses a business’ data sources with data adapters for Relational Database
Management Systems such as DB2, SQL Server, Oracle, Teradata, and so on. However, some
businesses can only access certain data using a homegrown Web Service, or can only
access external data using a Web Service. In these cases, WebFOCUS can use its Web
Services adapter to call Web Services. The WebFOCUS Web Services adapter allows you to
pass parameters from WebFOCUS to a Web Service and access data from the applications
defined by the Web Service.
The WebFOCUS Web Services adapter allows ad hoc reporting against data from Web
Service applications. You can join Web Services to other Web Services and other data
sources. For more information about joining data sources, see Creating Reports With
WebFOCUS Language.
This adapter can read a Web Service as a source during the creation of a Data Warehouse or
DataMart using DataMigrator.
WebFOCUS New Features
9-5
Example: Using a Web Service to Make an Online Reservation
Example: Using a Web Service to Make an Online Reservation
Suppose you decide to purchase an airline ticket online through a travel Web site. You
search the Web site’s database for an available flight. Once you select an itinerary, the Web
application communicates with the airline’s database to book the flight and secure a
confirmation. If you receive a message that the flight is no longer available, it is usually
because of the difference between the travel Web site’s database and the real-time
availability of flights in the airline’s database.
If the airline reservation system used a Web Service as a method of communication, the
travel Web site could simply send input (such as your name, the date, time of flights, and so
on) to the Web Service. The Web Service would then pass the airline’s output (flight
confirmation, price, and ticket number) back to the travel Web site.
WebFOCUS Web Services Architecture
In this example the developer creates a Web reference from the development environment
(for example, Microsoft® Visual Studio®) to the WSDL (Web Services Description Language)
file for the basic WebFOCUS Web Service.
This Web Service allows the user to explore the WebFOCUS Reporting Server. For instance,
the user can access a list of the applications and procedures residing on the server. The
developer can also run one of the existing procedures or send an ad hoc procedure to the
server for execution.
9-6
Information Builders
CHAPTER 10
Security Enhancements
10.
Topics:
•
Managed Reporting Realm Driver
•
WebFOCUS Data Security Using the
Middle Tier DBA Password
•
Developer Studio Security
Enhancements
•
ReportCaster Integration With
SiteMinder
•
Optional Encryption Providers for
ReportCaster
•
Enhanced Single Signon Support
for Open Portal Services
•
Configuring the Trusted MR
Sign-On Setting for ReportCaster
WebFOCUS New Features
This chapter describes new security features for Version 5
Release 3.
10-1
Managed Reporting Realm Driver
Managed Reporting Realm Driver
The Managed Reporting Realm Driver gives you flexibility in deciding how you will
authenticate and authorize Managed Reporting users. The Realm Driver can both
authenticate and authorize users to LDAP, Active Directory, relational databases, or a
WebFOCUS Reporting Server. You can also write your own manager class to perform
specialized authentication.
The Realm Driver is only available for the Servlet implementation of the WebFOCUS Client.
WebFOCUS Data Security Using the Middle Tier DBA Password
How to:
Set the Middle Tier DBA Password
The SET PERMPASS=password command establishes a password that the user cannot
change for access to data sources. You can control whether a PERMPASS is sent to the
WebFOCUS Reporting Server with each request by choosing an option for the
IBIF_dbapass_src variable.
The DBA password defines access to data sources on the WebFOCUS Reporting Server. Each
data source description can specify which passwords are acceptable for accessing the data
source. Each password may also be associated with specific access types, conditions and
rules that limit access down to the row level if necessary. Database security is described in
the Describing Data With WebFOCUS Language manual.
By setting the DBA password for each request, you establish a single signon from Managed
Reporting in the front end to the data source on the WebFOCUS Reporting Server.
ReportCaster also supports the DBA password, which is sent in encrypted form to
ReportCaster. The DBA password cannot be assigned a group ID because a single password
can be associated with multiple groups. It can be set to the domain ID, the user’s HREF, or to
a user-specified variable.
10-2
Information Builders
Security Enhancements
Procedure: How to Set the Middle Tier DBA Password
1. Click Configuration and then Client Settings.
2. Select the Managed Reporting category and then the IBI_dbapass_src variable.
3. Select one of the following options:
•
OFF. This option sets IBIF_dbapass_src to blank and does not pass a DBA password
with each request.
•
MR Id. This option sets IBIF_dbapass_src to the value of the CURRENT_USER_FILE
variable. CURRENT_USER_FILE is the WFS variable that holds the current user's href.
The href is normally in the form filename.ext (for example, sally02.htm), where the
file name may be a maximum of eight characters. The file name portion of the href
without the extension will be sent to the WebFOCUS Reporting Server as the DBA
password (SET PERMPASS=dbapass) prefixed to each request.
Note: If a Managed Reporting Repository Driver populates user hrefs from an
outside source with file names greater than eight characters, the SET
PERMASS=dbapass syntax fails, the server returns an error, and WebFOCUS may
function unpredictably.
WebFOCUS New Features
10-3
Developer Studio Security Enhancements
•
MR Domain. This option sets IBIF_dbapass_src to the value of the IBIMR_domain
variable. IBIMR_domain is the WFS variable that holds the domain href of the
current action. The domain href is normally in the form of an eight character
domain directory name, a slash, and an eight character domain file name followed
by an extension (for example, domainon/domainon.htm or untitled/untitled.htm).
Only the file name portion of the href (without preceding directory name or the
extension) is sent to the WebFOCUS Reporting Server as the DBA password. A
domain href of untitled/untitled.htm produces a DBA password of untitled.
•
WebFOCUS Variable. If you choose this option, an edit box opens so that you can
enter the name of a user-specified variable available to the CGI/Servlet WFS script
processor. This value is retrieved and sent to the WebFOCUS Reporting Server as
the DBA password. If the value is greater than eight characters, WebFOCUS may
function unpredictably.
For more information about the SET PERMPASS command, see Non-Overridable User
Passwords (SET PERMPASS) in Chapter 1, WebFOCUS Reporting Language Enhancements.
Developer Studio Security Enhancements
In this section:
Custom Logon Template Support
Enhanced Support for Netegrity SiteMinder
Support for RSA ClearTrust
The following are Developer Studio security enhancements for Version 5 Release 3.
Custom Logon Template Support
If you are protecting WebFOCUS with custom security, you may be able to access it from
Developer Studio by using a custom logon template. Logon templates are developed by an
administrator and describe certain behavior specific to the custom security solution. The
template uses XML tags to describe the path to the logon resource (for example, a servlet,
JSP, ASP, or CGI), the protocol to use (for example, HTTP or HTTPS). The security system must
return a cookie, named in an XML tag, upon successful signon. Developer Studio will then
continuously forward this cookie to the site protecting WebFOCUS for the duration of its
session. These templates are distributed to each developer or referenced from a shared
location on the network. Developers may then select a custom logon template from the
environment properties dialog and use it to access the protected WebFOCUS environment.
10-4
Information Builders
Security Enhancements
Enhanced Support for Netegrity SiteMinder
The Netegrity SiteMinder logon option has been redesigned to use a new XML-based logon
template architecture. This approach allows a site to customize its SiteMinder logon
behavior. For example, your logon resource can now be located on a machine different
from the machine hosting WebFOCUS if you add the SMAGENTNAME variable and assign it
the appropriate value.
Support for RSA ClearTrust
Developer Studio includes an option for RSA ClearTrust logon. This option is implemented
with a new XML-based logon template architecture that allows the site to customize the
logon behavior.
ReportCaster Integration With SiteMinder
ReportCaster integration with Netegrity® SiteMinder® is supported when you specify
settings in the siteminder.txt file, which resides in the ReportCaster Distribution Server’s cfg
directory.
For more information about integrating ReportCaster with Netegrity SiteMinder, contact
Customer Support Services.
WebFOCUS New Features
10-5
Optional Encryption Providers for ReportCaster
Optional Encryption Providers for ReportCaster
In this section:
Sun JCE Provider Support
How to:
Enable DES or Triple DES Encryption
Managed Reporting Trusted Signon
Reference:
Key File Format
ReportCaster supports encryption providers based on the Data Encryption Standard (DES)
and Triple DES algorithms. These providers are activated by the Encryption Type parameter
in the ReportCaster Server Configuration tool. This parameter specifies an override of the
encryption class used to read WebFOCUS cookies and protect the ReportCaster cookie. It is
also used with the trusted Managed Reporting sign-on feature.
These optional providers use Sun's Java Cryptography Extension (JCE) library and are
supported with the Java servlet (WFServlet) implementation of the WebFOCUS Client. The
Triple DES provider uses the stronger Cypher Block Chaining (CBC) mode option. You can
specify an external encryption key for both provider types.
If you enable WebFOCUS encryption using the WebFOCUS WFENCR context parameter,
then you must identically set ReportCaster encryption, including any key file settings.
For more information about WebFOCUS encryption using the WebFOCUS WFENCR context
parameter, see Technical Memo 4564: Optional Encryption Providers for WebFOCUS.
10-6
Information Builders
Security Enhancements
Procedure: How to Enable DES or Triple DES Encryption
1. Access the ReportCaster Server Configuration tool in one of the following ways:
•
If you are on a Windows platform, you can access the configuration tool from the
Start Programs menu by selecting Information Builders, ReportCaster 53, Distribution
Server, Configuration, and then clicking Edit.
•
From Managed Reporting, click the clock icon. Java Web Start is launched and the
ReportCaster Development and Administration Interface opens.
•
You can also access ReportCaster independent of Managed Reporting by typing
the following URL:
http://hostname/rcaster/main/reportcaster.jsp
where:
hostname is the host name of the ReportCaster Distribution Server.
In this case, since your user credentials have not been validated by Managed
Reporting, you must enter a valid ReportCaster user ID and password to log on to
ReportCaster.
2. Select the ReportCaster Server Configuration link.
Note: This step is not necessary if you accessed the configuration tool directly from the
Start Programs menu.
The ReportCaster Server Configuration tool opens displaying the General tab.
3. Expand the Security folder and then expand the Encryption folder:
WebFOCUS New Features
10-7
Optional Encryption Providers for ReportCaster
4. Using the drop-down list, select one of the following options for the Type parameter:
•
WebFOCUS Default - Enables WebFOCUS default encryption.
•
WFWireDES - Enables DES encryption without an external key file.
•
WFWireTripleDES - Enables Triple DES encryption without an external key file.
•
WFWireDESKeyFile - Enables DES encryption with an external key file.
•
WFWireTripleDESKeyFile - Enables Triple DES encryption with an external key file.
5. If you select WFWireDESKeyFile or WFWireTripleDESKeyFile as the Encryption Type,
specify the fully qualified path of the key file (for example, c:\ibi\keyfile.dat) in the
following two parameters:
•
Key File for ReportCaster Web Application - Informs the ReportCaster servlets
where the key file resides on the Application Server. This enables ReportCaster to
encrypt and decrypt cookies.
•
Key File for ReportCaster Server - Used by the ReportCaster Server when
connecting to the Web server to retrieve information from Managed Reporting.
Important: If WebFOCUS cookie encryption is enabled using the WebFOCUS
WFENCR context parameter, then the contents of both key files must match the
content of the key file that was specified in the WFENCR_KEY_INFO context
parameter in /ibi/WebFOCUS53/webapps/webfocus53/WEB-INF/web.xml.
6. Create the key file(s) on disk and input 8 or 24 hexadecimal bytes, depending on the
Encryption Type. The following is an example of 24 hexadecimal bytes:
5468658A6C617A7920646F67206A756D7073206F7665723F
Save the key file(s) as a plain text file.
7. Reload the ReportCaster Web application for the new settings to take effect.
Reference: Key File Format
The encryption key information is stored in a plain text file and is represented by a
sequence of bytes in hexadecimal notation. A hexadecimal byte is represented by 2 digits;
each digit is either a number (0-9) or a letter (A-F). The key file must contain 8 hexadecimal
bytes for a DES key and 24 hexadecimal bytes for a Triple DES key.
It may seem that more data is specified in the key file than is required (8 bits per byte times
24 bytes is 192 bits, which is greater than the 168 bits usually required for Triple DES).
However, 192 bits are required when using a plain text file with these algorithms.
10-8
Information Builders
Security Enhancements
Sun JCE Provider Support
The DES and Triple DES algorithms were developed with Sun’s Java Cryptography Extension
(JCE) framework and currently implement only the Sun JCE provider class. Review the
following scenarios to verify support for your Application server:
•
If you are running WebFOCUS inside a Java Application server (or servlet engine) that
runs on Sun’s J2SDK 1.4.1 or higher, you do not need to take any action; the Sun JCE
provider is included.
•
If you are running another vendor’s J2SDK 1.4.1 or higher, check their documentation
to see if the Sun JCE provider is available in that implementation. For example,
WebSphere 5.1 for HP-UX ships with a version of HP’s J2SDK 1.4.1 that has both the Sun
and IBM JCE providers. However, WebSphere 5.1 for AIX ships with an IBM J2SDK 1.4.1
that has only the IBM JCE provider and is therefore not currently supported by the
optional encryption providers supplied by Information Builders.
•
If your Java Application server is running on J2SDK 1.3.x (from any vendor), you must
download and configure Sun’s JCE 1.2.2. For example, WebSphere 5.0 on AIX ships with
IBM J2SDK 1.3.1, which is only supported when you download and configure the Sun
JCE.
You can obtain the Sun JCE 1.2.2 software and installation documentation by accessing
the JCE Downloads section on Sun’s Java Technology Web site.
Procedure: How to Managed Reporting Trusted Signon
There is support for a trusted signon to Managed Reporting in which knowledge of the
user’s password is not required. This feature is used by WebFOCUS Open Portal Services to
achieve single signon between supported third-party portals and Managed Reporting. It is
also used by ReportCaster to access the Managed Reporting Repository when Managed
Reporting is configured with an external authentication driver (for example, the Managed
Reporting Realm Driver).
The trusted relationship is established through a configurable external key shared by
ReportCaster, Open Portal Services, and WebFOCUS. The strength of this feature can be
increased through optional WebFOCUS encryption providers, which are set using the
WebFOCUS WFENCR context parameter and include two Triple DES algorithms.
For more information about the optional WebFOCUS encryption providers, see Technical
Memo 4564: Optional Encryption Providers for WebFOCUS.
WebFOCUS New Features
10-9
Enhanced Single Signon Support for Open Portal Services
Enhanced Single Signon Support for Open Portal Services
WebFOCUS Open Portal Services supports secure signon integration with supported
third-party portal products. After receiving the user's ID from the portal product via a
secure channel, Open Portal Services initiates a trusted Managed Reporting signon on
behalf of the user to avoid the subsequent Managed Reporting logon prompt. The strength
of this feature can be increased through optional WebFOCUS encryption providers.
For information about configuring Open Portal Services, see the WebFOCUS Open Portal
Services Administrator’s Manual.
Configuring the Trusted MR Sign-On Setting for ReportCaster
When using a repository driver for Managed Reporting that performs external
authentication, such as the Managed Reporting Realm Driver, you must set the
Authentication Plug-in parameter in the ReportCaster Server Configuration tool to 'Trusted
MR Sign-On'. Setting this value causes ReportCaster to make a trusted Managed Reporting
signon on behalf of the user, instead of an explicit Managed Reporting signon with the
user’s ID and password.
Procedure: How to Configure the Trusted MR Sign-On Setting for ReportCaster
1. Access the ReportCaster Server Configuration tool in one of the following ways:
•
If you are on a Windows platform, you can access the configuration tool from the
Start Programs menu by selecting Information Builders, ReportCaster 53, Distribution
Server, Configuration, and then clicking Edit.
•
From Managed Reporting, click the clock icon. Java Web Start is launched and the
ReportCaster Development and Administration Interface opens.
•
You can also access ReportCaster independent of Managed Reporting by typing
the following URL:
http://hostname/rcaster/main/reportcaster.jsp
where:
hostname is the host name of the ReportCaster Distribution Server.
In this case, since your user credentials have not been validated by Managed
Reporting, you must type a valid ReportCaster user ID and password to log on to
ReportCaster.
2. Select the ReportCaster Server Configuration link.
Note: This step is not necessary if you accessed the configuration tool directly from the
Start Programs menu.
10-10
Information Builders
Security Enhancements
The ReportCaster Server Configuration tool opens.
3. In the General tab, select the Security folder and locate the Authentication Plug-in
setting. From the drop-down list, select Trusted MR Sign-On.
4. Click the MRE Info tab.
5. Verify that the "Trusted Key File for ReportCaster Server" and "Trusted Key File for
ReportCaster Web Application" settings specify the location where the
ibimr_trusted_key.txt file resides. The example above points to the same location;
however, if ReportCaster is installed on a different machine than WebFOCUS, these
settings must point to different locations.
When you perform an InstallShield installation on Windows or UNIX, and you install
Managed Reporting and ReportCaster together, these settings are populated
automatically and both settings point to the same file, as shown above.
WebFOCUS New Features
10-11
Configuring the Trusted MR Sign-On Setting for ReportCaster
For a z/OS installation, or when ReportCaster and WebFOCUS are installed at different
times or on different machines, you must manually type the location of the key file(s).
Additionally, you must create the key file(s).
Note: The contents of this file (or files) must match the IBIMR_TRUSTED_KEY setting in
the cgivars.wfs file.
6. Click the Save icon, or select Save from the Action menu. A message appears asking for
confirmation that you want to save the changes to the configuration file. Click Yes.
7. Restart the ReportCaster Distribution Server.
8. Reload the ReportCaster Web application.
10-12
Information Builders
CHAPTER 11
Server Enhancements
This section describes server new features in Version 5 Release 3.
Topics:
Cluster Manager Server
Server Administration
•
•
E-mail Notification for Crashed •
or Aborted Agents
Specifying the Life Span for
the Server Activity Log
•
•
Performance
Special Character Support in
Names
Displaying IP Names in the
Server Activity Log
•
Support for User-Level Profiles •
Specifying the Location of
Recording/Playback Files
•
•
•
Large-Scale Application
Deployment Across Multiple
Servers
Diagnostics
Using the Stress Test Tool to
•
Fine-Tune and Test the Server
•
Enhanced Stress Test Tool
Options
•
Server Check Up Daemon
Controlling a Web Session
Expiration Time
•
Enhanced Management of
Shared Memory
Unlimited Number of
Administration IDs
Platform Support
•
National Language Support
Default Code Page
•
•
Baltic Language Support on
Server
Security
•
Restricting Host Names
•
Securing the Web Console
•
Authenticating Users at the
Database Level
•
Running a Server in LDAP
Security Mode
•
LDAP Support
•
Specifying the Security Scope
WebFOCUS New Features
•
•
Limiting the Time Allowed for
a Connection to the Server
Data Resources
Reading From and Writing to
Large Files
• Platform Support
Granting Application
Connectors
Administrator Privileges to All
• Connector for CICS
Users
Baltic Language Support on
Client
11-1
Large-Scale Application Deployment Across Multiple Servers
Large-Scale Application Deployment Across Multiple Servers
In this section:
Installing and Configuring the Cluster Manager Server
Configuring Subservers for Cluster Manager Server
Configuring the Client for Cluster Manager Server
The Cluster Manager Server supports large-scale deployment of applications across
multiple servers, with intelligent fail-over, load balancing, and performance monitoring
capabilities.
Prior server releases provided a configuration option within the client to support clustered
servers. When opening a new connection, the client selected a server at random from its list
of clustered servers and attempted to make the connection. If the connection failed, the
client selected another server, and continued through the list until it found a server that
was available. This dispatch capability provided the essentials for load balancing and
fail-over.
The Cluster Manager Server improves load balancing and reliability by adding a lightweight
layer of management and control over multiple servers. The Cluster Manager Server
provides:
•
Greater intelligence and flexibility in selection of an available server, for optimal load
balancing.
•
A monitoring tool that an administrator can use to track the system load in real time.
•
A system log that you can use to audit and account for usage and performance of each
server.
•
The ability to start a new server automatically as the load requires.
When the Cluster Manager Server is started, it establishes a monitoring thread for each of
its defined servers, and polls these at regular intervals using TCP to determine basic
performance statistics, including:
11-2
•
Mean response time for default service
•
Maximum agents used per service
•
Current agents used per service
•
Queue size
•
Deferred queue size
•
Available disk space
Information Builders
Large-Scale Application Deployment Across Multiple Servers
When an application needs to open a new connection to one of these servers, it submits a
request to the Cluster Manager Server using HTTP. The Cluster Manager Server selects a
server based on information about availability and current load, and directs the application
to use that server. It excludes non-functioning and overloaded servers, and balances the
load between all available servers.
Installing and Configuring the Cluster Manager Server
You can install the Cluster Manager Server on any mid-range platform (including Windows
and Linux) using the standard server installation procedure. The Cluster Manager Server
has its own license key.
The Cluster Manager Server is a specialized server, with standard configuration and startup
files (for example, edaserve.cfg, odin.cfg, edastart.bat). It operates with no agents.
The communication configuration file (odin.cfg) contains the following nodes:
11-3
•
One HTTP listener node (CLASS = AGENT) to support the real-time monitor.
•
One TCP listener node (CLASS = AGENT) to communicate with the clustered servers.
The clustered servers must also be configured with a TCP protocol. Other
communication protocols are not supported.
•
One cluster management node (CLASS = CLM), which defines:
•
A port through which applications submit requests for server assignments, using
the PORT setting. The default is the HTTP listener port, but you may specify an
alternate port, for security or other reasons.
•
Polling rules for how the Cluster Manager Server gathers and stores statistics about
the performance of clustered servers, using the POLLING_INTERVAL and
POLLING_HISTORY settings.
•
An option to permit the Cluster Manager Server to adjust the configuration of its
servers or start reserved servers to minimize response time, using the
AUTO_CONFIG setting.
•
An option for the Cluster Manager Server to configure, start, or stop a clustered
server if its response time is continuously above or below the value specified using
the MAX_RSP_TIME setting, for the last number of polls specified using the
AUTO_CONFIG_THRESHOLD setting.
•
An option to log cluster statistics, using the LOGGING setting.
•
A dispatch method that gives the administrator the choice of four different
algorithms, using the DISPATCH_METHOD, MAX_RSP_TIME, and
RUNNING_AVG_PERIOD settings.
Information Builders
Large-Scale Application Deployment Across Multiple Servers
•
One cluster node (CLASS = CLUSTER), which defines the list of available clustered
servers, using the ALTERNATE setting.
•
Multiple outbound nodes (CLASS = CLIENT), which define the individual servers. If the
Cluster Manager Server is authorized to start and stop its servers, you must specify
additional settings in these nodes:
•
TYPE = RESERVED
•
REMOTE_EDASTART and REMOTE_USER_PROFILE
Configuring Subservers for Cluster Manager Server
Configure remote servers managed by the Cluster Manager Server as standard servers.
Each subserver requires a TCP listener.
Configuring the Client for Cluster Manager Server
The configuration requirements for a client used with a Cluster Manager Server depend on
whether the client is installed on the same physical machine as the Cluster Manager Server,
or if it is installed on a separate machine:
11-4
•
If the client is installed on the same machine, it can share the same configuration file.
•
If the client is installed on a remote machine, its configuration file requires a TCP
listener node and a cluster node. It does not require a node for each of the clustered
servers, but instead it obtains the list from the Cluster Manager Server. In this
configuration, the cluster node (CLASS = CLUSTER) uses the REMOTE_CLM_HOST and
REMOTE_CLM_PORT settings to identify the Cluster Manager Server, and it obtains the
list of alternate servers from that location.
Information Builders
Using the Stress Test Tool to Fine-Tune and Test the Server
Using the Stress Test Tool to Fine-Tune and Test the Server
The Stress Test tool enables you to fine-tune and test the server by running one internal
stored procedure many times in a given interval of time. This process is referred to as Stress
mode.
Procedure: How to Run a Stress Test
1. Start the server and open the Web Console.
2. In the navigation pane on the left, click Procedures.
The Editing and Running Procedures page opens.
3. In an application folder under the Procedures folder, click a procedure and then choose
Run Stress.
The Playback of HTI Script Files page opens in the right pane.
4. In the Number of Threads field, enter the number of times you want the procedure to
execute.
5. In the Test Description field, enter a name for your stress test.
6. Click Start.
7. To view stress test results, in the navigation pane on the left, expand the Stress Test
Statistics folder, then click either the Basic Report or Extended Report.
Enhanced Stress Test Tool Options
The Advanced Options feature on the Playback of HTI Script Files page allows you to specify
additional playback options when conducting a stress test.
Reference: Enhanced Stress Test Tool Options
11-5
Option
Description
Result
By default, stores all data received by a thread in a single file (One
file per thread option). Alternatively, you can store all data
received by a request in a single file (One file per request option),
or discard all results (Discard all option).
Submit as deferred
Sends a request as deferred.
Keep alive for
Causes every thread to repeat a request for a specified time.
Information Builders
Server Check Up Daemon
Option
Description
Redirect to ODIN
node
Sends a request to the node defined in the server
communications configuration file, odin.cfg.
Redirect to HTTP
Sends a request to the Web server (HTTP listener), for example,
www.myhost.com:8101.
Server Check Up Daemon
To improve the throughput of Workspace Manager, the server check up process, which was
part of the main Workspace process, now runs independently as a separate daemon. The
server check up process initializes and checks various states and takes action. For example,
the it stops agents that are inactive past the idle limit.
Enhanced Management of Shared Memory
When the server starts, it checks for leftover shared memory, and automatically clears it or
reuses it.
Restricting Host Names
How to:
Restrict Host Names in the Server Communications Configuration File
Restrict Host Names From the Web Console
You can restrict the host names that the listener will accept. Specify IP addresses in base
256 standard dot notation.
To allow a specific IP address, specify the full number. To allow a range of IP addresses, use
an asterisk (*) to represent the range. For example, the following entries
123.*
123.456.*
123.456.789.*
restrict to all IP addresses beginning with those numbers.
You can specify up to six values. The internal default is *.*.*.*, which allows all IP addresses.
Syntax:
How to Restrict Host Names in the Server Communications Configuration File
Include the following setting in the server communications configuration file, odin.cgf
11-6
Information Builders
Restricting Host Names
RESTRICT_TO_IP = host_name, IP_address, ...
where:
host_name
Is a host name that the listener will accept.
IP_address
Is an IP Version 4 address in base 256 standard dot notation.
Procedure: How to Restrict Host Names From the Web Console
1. Start the server and open the Web Console.
2. In the navigation pane on the left, click Listeners.
The Listeners and Special Services page opens.
3. In the navigation pane on the left, in the Configured folder under the Listeners folder,
click a protocol and then choose Properties.
The Listener Configuration page for the selected listener opens in the right pane.
4. In the Restrict_to_IP field, enter the host name or IP address the listener will accept.
5. Click Save and Restart.
11-7
Information Builders
Securing the Web Console
Securing the Web Console
Security mode PTH, which replaces WCPROTECT, controls access to the Web Console by
authenticating users against the list defined with server_admin_id in the server
configuration file, edaserve.cfg. In this mode, the server does not authenticate user
credentials at the operating system level. All server processes run as a single user ID from
the operating system point of view. There is no operating system impersonation of data
agents.
Since it relies on the user credential and administration privileges specified in the server
configuration file, security mode PTH requires:
•
Server Administrator passwords be configured before starting the server.
•
Individual IDs and passwords in the server configuration file. You cannot use a wildcard
in the server_admin_id to grant application administrator privileges to all
authenticated users.
Security mode PTH supports security scope WC. Designed to protect the Web Console, but
not restrict access to other server resources, it does not support security scope ALL.
Therefore, control of data resources is not possible in this mode.
Authenticating Users at the Database Level
Security mode DBMS controls access to server resources by authenticating user credentials
supplied by client connections at the Database Management System (DBMS) level. In this
mode, the server does not authenticate user credentials at the operating system level. All
server processes run as a single user ID from the operating system point of view. There is no
operating system impersonation of data agents.
Security mode DBMS requires that you:
•
Identify the database engine to use for authentication.
•
Specify the connection the server will use to pass user credentials from client requests
to the database engine for authentication.
Note that the server may have other DBMS connections in addition to the one used for
the security passthru.
11-8
Information Builders
Authenticating Users at the Database Level
Procedure: How to Configure User Authentication at the Database Level
1. Start the server with no security (security mode OFF).
2. Open the Web Console.
3. If you have not already done so, from the Adapters page, configure the adapter and
connection that the server will use to pass user credentials for client applications to the
DBMS.
4. Test the connection.
5. In the navigation pane on the left, click Workspace, and then choose Configure.
The Workspace Configuration page opens.
6. Click the Access Control tab.
7. From the security_dbms drop-down list, select the database engine to use for
authentication.
8. From the security_connection drop-down list, select the connection the server will use
to pass user credentials from client requests to the database engine for authentication.
9. In the administration level field, make sure that SERVER is selected.
10. From the server_admin_id drop-down list, select New ID, type your DBMS user ID, and
click Add. You do not need to provide the password.
11. Click Save.
12. Stop the server.
13. Start the server with security mode DBMS.
14. Log on to the Web Console using the DBMS user ID you entered in Step 10.
15. Test the adapter connection.
Reference: Troubleshooting Security Mode DBMS
The following conditions will prevent access to the Web Console.
•
An error in the security_dbms definition.
•
The DBMS is down.
•
The DBMS user ID is invalid.
To regain access to the console:
1. Stop the server using the text console.
2. Correct the problem.
3. Restart the server.
11-9
Information Builders
Running a Server in LDAP Security Mode
Running a Server in LDAP Security Mode
LDAP (Lightweight Directory Access Protocol) security mode currently applies only to a
server running under Windows.
In LDAP mode, the user credentials from the client connection are authenticated through
the established directory.
To run the server in this mode, export the environment variable EDAEXTSEC=LDAP before
startup.
There is no impersonation at the level of the operating system. All the server processes run
as a single user ID from the operating system point of view. There is no impersonation of
data agents.
You must configure the Server Administrator password before starting a server in this
security mode, either by providing it during installation or by running the following
command from the EDACONF/bin directory:
edastart -change server_admin_id
LDAP Support
How to:
Specify a Secure Sockets Layer Session With LDAP in edaserve.cfg
Specify the LDAP Port Number in edaserve.cfg
Specify the LDAP Domain Name in edaserve.cfg
You can include settings in the server configuration file. edaserve.cfg, that apply to LDAP
(Lightweight Directory Access Protocol) security
The server must be running in LDAP security mode (currently Windows only) for these
settings to apply.
Syntax:
How to Specify a Secure Sockets Layer Session With LDAP in edaserve.cfg
ldap_encryption = {y|n}
where:
y
Enables an encrypted Secure Sockets Layer (SSL) session with the LDAP server.
n
Disables an encrypted SSL session with the LDAP server. N is the default value.
11-10
Information Builders
Specifying the Security Scope
Syntax:
How to Specify the LDAP Port Number in edaserve.cfg
ldap_port = {number}
where:
number
Is the TCP port number of the LDAP server to which to connect. It is a positive integer.
389 is the default value. 636 is the default value for an SSL connection.
Syntax:
How to Specify the LDAP Domain Name in edaserve.cfg
ldap_server = name
where:
name
Is the domain name running the LDAP server. If you do not supply a value, Information
Builders assumes the default LDAP server.
Specifying the Security Scope
How to:
Define the Security Scope in the Server Configuration File
Define the Security Scope From the Web Console
The security scope dimension gives you added flexibility in securing your server resources.
Use this dimension to apply the security mode in effect to:
•
All server resources
•
Web Console only
The following table lists valid combinations of security scope and security mode.
Security Scope
11-11
Security Mode
All Server Resources
Web Console Only
ON
Yes
No
PTH
No
Yes
DBMS
Yes
Yes
LDAP (currently Windows only)
Yes
Yes
OFF
No
No
Information Builders
Specifying the Security Scope
Syntax:
How to Define the Security Scope in the Server Configuration File
Include the following setting in the server configuration file, edaserve.cfg
security_scope = {ALL|WC}
where:
ALL
Applies the security mode in effect to all server resources. This value applies to security
mode ON, DBMS, and LDAP.
WC
Applies the security mode in effect to the Web Console only. This value applies to
security mode PTH, DBMS, and LDAP.
Procedure: How to Define the Security Scope From the Web Console
Note: You must have Server Administrator privileges to perform this procedure.
1. Start the server and open the Web Console.
2. In the navigation pane on the left, click Workspace, and then choose Configure.
The Workspace Configuration page opens.
3. Click the Access Control tab.
4. In the security_scope field, click the appropriate radio button.
5. Click Save.
11-12
Information Builders
E-mail Notification for Crashed or Aborted Agents
E-mail Notification for Crashed or Aborted Agents
When configuring the server, you can enter an e-mail address in the Web Console to
indicate whom to notify via e-mail if an agent crashes or is aborted.
Procedure: How to Specify E-Mail Notification
1. Start the server and open the Web Console,
2. From the navigation pane on the left, click Workspace, then Configure.
The server configuration page opens in the right pane.
3. Click the E-Mail Notification tab at the top of the page.
4. Complete the fields as follows:
smtp_host
Enter the IP Version 4 address of the SMTP mail server.
sender_email
Enter the address that will appear in the From field of the
email message.
server_admin_email
Enter the email address of the recipient.
wsm_email
Select the event or events that will trigger email
notification.
Crashed indicates an error detected by the operating
system.
Aborted indicates an error detected by the program.
5. Click Save.
Special Character Support in Names
Special characters are supported in administrator and user profile names. For example, a
server administrator name can include a space, as in ‘John Doe.’
11-13
Information Builders
Support for User-Level Profiles
Support for User-Level Profiles
The Web Console supports the specification of a user-level profile in which the
CONNECTION_ATTRIBUTES command is stored. This feature gives the server or application
administrator control over the level at which connections to data sources are made.
Procedure: How to Specify a User-Level Profile
1. Start the server and open the Web Console.
2. From the navigation pane on the left, click Data Adapters.
The Configuring Data Adapters page opens.
3. From the navigation pane on the left, click an adapter.
The corresponding configuration page opens in the right pane.
4. Complete the configuration parameters.
5. From the Select profile drop-down list, choose New Profile.
The Profile Name field is added to the page.
6. In the Profile Name field, type the name of the user profile.
7. Click Configure.
Limiting the Time Allowed for a Connection to the Server
You can limit the time allowed for a connection to the server. You set this value in the scope
of an agent service. If queuing is enabled, when the limit is reached, the session is removed
from the queue and the active agent is stopped.
Syntax:
How to Limit the Time Allowed for a Connection to the Server
Include the following setting in the server configuration file, edaserve.cfg:
connection_limit = seconds
where:
seconds
Is the maximum number of seconds for a connection. The default is an unlimited
number of seconds.
11-14
Information Builders
Controlling a Web Session Expiration Time
Controlling a Web Session Expiration Time
How to:
Control a Web Session Expiration Time in odin.cfg
Control a Web Session Expiration Time From the Web Console
Each browser instance is assigned a Web session with a default expiration of 600 seconds.
The session is maintained via a cookie.
You can control the time for which the current Web Console user credentials remain in
effect, using a setting in the server communications configuration file, odin.cfg. The setting
in odin.cfg replaces the setting wc_cookie_expiration in the server configuration file,
edaserve.cfg, in earlier releases.
This feature applies to an HTTP listener.
Syntax:
How to Control a Web Session Expiration Time in odin.cfg
SESSION_EXPIRATION = {seconds|600}
where:
seconds
Is the number of seconds for which the current Web Console user credentials remain in
effect. A valid value is from 1 to 2147483646. 600 is the default value.
Procedure: How to Control a Web Session Expiration Time From the Web Console
1. Start the server and open the Web Console.
2. In the navigation pane on the left, click Listeners.
The Special Services page opens.
3. In the navigation pane on the left, in the Configured folder under the Listeners folder,
click HTTP and then choose Properties.
The Listener Configuration page for HTTP opens in the right pane.
4. In the SESSION_EXPIRATION field, enter the number of seconds for which the current
Web Console user credentials remain in effect.
5. Click Save and Restart.
11-15
Information Builders
Unlimited Number of Administration IDs
Unlimited Number of Administration IDs
There is no limit to the number of authorized users assigned to the SERVER, APPLICATION,
and OPERATOR server administration roles.
Granting Application Administrator Privileges to All Users
To facilitate application management, you can grant application administrator privileges to
all authenticated users. You can implement this easily using the wildcard character, an
asterisk (*), in the server_admin_id setting in the server configuration file, edaserve.cfg.
You cannot use this feature in conjunction with security mode PTH, where user
authentication relies on individual IDs and passwords in the server configuration file.
Syntax:
How to Grant Application Administrator Privileges to All Users
Include the following setting in the server configuration file, edaserve.cfg:
server_admin_id=*::APP
11-16
Information Builders
National Language Support Default Code Page
National Language Support Default Code Page
The National Language Support (NLS) configuration procedure for the server uses 137 as
the default code page on Windows and UNIX.
A large number of applications have replaced the OEM IBM PC-compatible family of
MS-DOS code pages with their ANSI counterpart. Windows and UNIX systems use ANSI
code pages to display data in Graphical User Interface (GUI) tools and also to read from, and
write to, file types such as Excel, PDF, SQL databases, and other popular forms of storage.
In previous releases, OEM was the default configuration for Developer Studio and servers
running on Windows and UNIX.
With code page 137, the default setting of SET OEMTOANSI is OFF. If you access ANSI data,
you do not need to set this parameter in a profile or procedure. Code page 137 allows the
server to treat incoming data as ANSI by turning off OEM to ANSI conversion.
Code page 137 affects your enterprise only if it uses default OEM FOCUS data sources or flat
files. If you store data in ANSI code page 137 or 1252, you do not have to configure for NLS.
If you are using Developer Studio and your data sources are stored in ANSI format, you do
not need to configure Developer Studio so that procedures and Master Files are also stored
in ANSI format.
OEM code page support is available in Information Builders products. To convert OEM data
sources (for example, OEM FOCUS data sources or flat files) to an ANSI encoding scheme,
ask your Information Builders representative for the NLS conversion tool.
Baltic Language Support on Server
You can configure the server for the Baltic language using the NLS Configuration Wizard
scroll-down list on the server console. Navigate to the NLS Configuration Wizard window by
choosing NLS from the console’s navigation pane.
The code pages are:
CP01112—IBM MF Baltic Multilanguage
CP00921—ISO-8859-4 (Latin 4, Baltic Multilanguage)
CP01257—Windows, Baltic (Latin 7)
11-17
Information Builders
Specifying the Life Span for the Server Activity Log
Specifying the Life Span for the Server Activity Log
You can specify the maximum number of days that the server activity log, edaprint, remains
active. When the specified number is reached, the server archives the current log and
creates a new log.
Syntax:
How to Specify the Life Span for the Server Activity Log
Include the following setting in the server configuration file, edaserve.cfg
edaprint_max_days = number_of_days
where:
number_of_days
Is the maximum number of days that the server activity log, edaprint, remains active.
When the specified number is reached, the server archives the current log and creates a
new log. The default value is 0, which represents an unlimited number of days.
Displaying IP Names in the Server Activity Log
You can request that the server activity log, edaprint, display Internet Protocol (IP) names
instead of IP addresses. The server replaces the addresses with names via DNS lookup.
Syntax:
How to Display IP Names in the Server Activity Log
Include the following setting in the server configuration file, edaserve.cfg:
edaprint_ipname = y
Specifying the Location of Recording/Playback Files
You can specify the directory in which recording and playback files are stored.
Syntax:
How to Specify the Location of Recording/Playback Files in edaserve.cfg
httptst_dir = path
where:
path
Is the directory in which recording and playback files are stored. It is a platform-specific
path name. The catalog directory under the configuration directory is the default value,
for example, on Windows, \ibi\srv53\wfs\catalog.
11-18
Information Builders
Server Enhancements
Reading From and Writing to Large Files
The server can read from and write to flat files and fixed-format sequential files over 4
gigabytes in size under the Hierarchical File System (HFS) and zFS file system.
You do not need to customize any settings or perform any configuration steps to enable
this capability.
Platform Support
Version 5 Release 3 adds support for the following platforms:
•
AIX 52
•
HP UX 11.11
•
SUN 9
Connector for CICS
The Connector for CICS is supported by the CICS Transaction Server for z/OS Version 1.3 or
higher.
Baltic Language Support on Client
You can configure the client for the Baltic language using the graphical prompts on the
console.
For the WebFOCUS Client, navigate to the applicable window by choosing NLS Settings
under Configuration from the WebFOCUS Administration Console navigation pane.
For the iWay Client, navigate to the NLS Configuration Wizard window by choosing NLS
from the configurator’s navigation pane on the Home page.
The code pages are:
CP00921—ISO-8859-4 (Latin 4, Baltic Multilanguage)
CP01257—Windows, Baltic (Latin 7)
WebFOCUS New Features
11-19
Baltic Language Support on Client
11-20
Information Builders
CHAPTER 12
Adapter Enhancements
This section describes Adapter new features in Version 5 Release 3.
For more information about adapters, see the iWay Adapter Administration for UNIX, Windows, OpenVMS,
OS/400, OS/390 and z/OS manual.
Note: All adapters can be used for WebFOCUS Reporting and SQL requests, and as sources for
DataMigrator flows.
Topics:
Enhancements for Individual
Adapters
•
Adabas
•
Adabas Stored Procedures
•
CICS Transactions
•
C-ISAM
•
DATACOM
•
DB2
•
Enterprise Java Beans
•
Essbase
•
IMS
•
IMS Transactions
•
Informix
WebFOCUS New Features
•
Ingres
•
System 2000
•
JDBC (Generic)
•
Tamino
•
J.D. Edwards
•
Teradata
•
Microsoft SQL Server
•
TOTAL
•
Oracle
•
VSAM
•
Oracle E-Business Suite
•
Web Services
•
PeopleSoft
•
XML
•
Progress
•
XA Support
•
RMS
•
•
SAP BW
Aggregate Awareness
Support
•
SAP R/3
•
Cluster Joins
•
Sybase ASE
•
Sybase IQ
Generic Adapter and Data
Access Enhancements
•
Web Console
Enhancements
•
General Adapter Features
12-1
Adapter for Adabas
Adapter for Adabas
In this section:
Controlling Adabas Multifetch for Join Operations
Controlling Data Retrieval Types
Handling Unreadable Sub or Superdescriptor Fields
How to:
Set Adabas FETCHJOIN
Set Adabas Dynamic CALLTYPE
Handle Unreadable Sub or Superdescriptor Fields
Example:
Using Dynamic CALLTYPE
The Adapter for Adabas enables you to:
•
Control Adabas multifetch join operations on the session level.
•
Set the data retrieval type per session, file, or segment by switching dynamically
between physical and logical reads.
•
Handle unreadable sub or superdescriptor fields.
These features are available on the OS/390 and z/OS operating systems.
12-2
Information Builders
Adapter Enhancements
Controlling Adabas Multifetch for Join Operations
You can use the FETCHJOIN command to take advantage of Multifetch efficiencies in Join
operations for a session. This feature is particularly useful when you are joining to a base file
in which sorting is based on the key field that is used for the join.
Syntax:
How to Set Adabas FETCHJOIN
ENGINE ADBSINX SET FETCHJOIN {ON|OFF}
where:
ADBSINX
Indicates the Adapter for Adabas.
ON
Sets the FETCHJOIN feature on for the user session. ON is the default value.
OFF
Sets the FETCHJOIN feature off for the user session. This value is recommended when
joining with a base file that is unsorted by the key field used for joining. This option
avoids buffering and reduces processing time.
Controlling Data Retrieval Types
The SET CALLTYPE command enables you to set the data retrieval type per session, file, or
segment by switching dynamically between physical and logical reads.
Syntax:
How to Set Adabas Dynamic CALLTYPE
ENGINE
ENGINE
ENGINE
ENGINE
ENGINE
ADBSINX
ADBSINX
ADBSINX
ADBSINX
ADBSINX
SET
SET
SET
SET
SET
CALLTYPE
CALLTYPE
CALLTYPE
?
CALLTYPE
ctype
ctype AFD afd
ctype AFD afd SEGNAME segname
DEFAULT
where:
ADBSINX
Indicates the Adapter for Adabas.
ctype
Is any CALLTYPE value: FIND/RL/MIXED.
afd
Is any valid Access File name.
segname
Is any valid ADBS segname in the Access File.
WebFOCUS New Features
12-3
Adapter for Adabas
?
Queries the current settings.
DEFAULT
Returns to the default settings for all previous settings. The CALLTYPE is read from the
Access File.
Example:
Using Dynamic CALLTYPE
The following examples illustrate the use of variations of dynamic CALLTYPE syntax:
ENGINE ADBSINX SET CALLTYPE FIND
Uses FIND as the type of data retrieval call for all files.
ENGINE ADBSINX SET CALLTYPE RL AFD EMPFILE
Retrieves data for the EMPFILE using RL as the type of data retrieval call.
Note that you can issue several commands for different files. Each command must be
issued separately. Changes are cumulative. For example, the following commands
ENGINE ADBSINX SET CALLTYPE RL AFD EMPFILE
ENGINE ADBSINX SET CALLTYPE FIND AFD EMP2
ENGINE ADBSINX SET CALLTYPE MIXED AFD VEHICLES
ENGINE ADBSINX SET CALLTYPE FIND AFD EMPFILE SEGNAME S02
retrieve data for the EMPFILE using FIND as the type of data retrieval call for a particular
ADBS segment (segment S02).
ENGINE ADBSINX SET ?
Displays your settings.
ENGINE ADBSINX SET CALLTYPE DEFAULT
Returns to the default settings. This command resets all SET CALLTYPE commands for
all Access Files.
12-4
Information Builders
Adapter Enhancements
Handling Unreadable Sub or Superdescriptor Fields
The Adapter for Adabas cannot read sub/superdescriptors that are derived from PE/MU
access types and defined in a root segment. These types of fields may be used only in an
Adabas FIND command that produces a "trusted" answer set. However, you can add the
description parameter USE=FIND in the Access File for sub and superdescriptor fields that
cannot be read by the adapter.
Syntax:
How to Handle Unreadable Sub or Superdescriptor Fields
Add the following segment attribute to the Adabas Access File:
[,USE={FIND|ANY}]
where:
USE
Indicates a method for handling unreadable sub or superdescriptor fields that are
derived from PE or MU access types and defined in the root segment. Possible values
are:
FIND indicates that the S1 command will be issued against such a field even if
CALLTYPE is RL.
ANY indicates that fields are not of the sub/superdescriptor types. ANY, or the absence
of a USE= entry, are the default values.
Adapter for Adabas Stored Procedures
The Adapter for Adabas Stored Procedures enables you to invoke an Adabas stored
procedure, which is a Natural subprogram that has been created and tested using Natural
facilities.
Note: This adapter is only available on the z/OS and OS/390 operating systems.
You invoke a stored procedure by:
•
Issuing a data retrieval command in an SQL request.
•
Issuing a Data Manipulation Language (DML) request. (DML is iWay's internal retrieval
language, also known as TABLE.)
•
Executing a remote procedure call (RPC).
This enables you to invoke an Adabas stored procedure from a variety of environments,
including WebFOCUS and DataMigrator.
You can pass input parameter values to a stored procedure by specifying filtering criteria in
the request or to an RPC by passing a parameter list. You retrieve output as an answer set.
You use the Web Console to generate a synonym for a stored procedure using information
from Natural data areas; the synonym maps the procedure's input and output parameters.
WebFOCUS New Features
12-5
Adapter for CICS Transactions
Adapter for CICS Transactions
An intermediate program (proxy) allows existing customers using CICS Stored Procedures
Gateway and TP-CICS products, to reuse their existing applications using the Adapter for
CICS Transactions with a Full-Function Server.
The Adapter for CICS Transactions processes input parameters, creates and sends requests
to the CICS Transaction Server, and creates an answer set based on the received response.
This adapter has three different transport layers:
•
EXCI for OS/390 and z/OS platforms.
•
TCP/IP via AnyNet for UNIX and Microsoft Windows platforms.
•
LU6.2 for UNIX and Microsoft Windows platforms.
The adapter can be used for WebFOCUS reporting and SQL access to CICS programs, and as
a source for DataMigrator flow processing. It supports:
•
Two-phase commit, which enables the adapter to participate in an XA-compliant
global transaction. For information about XA compliance, see XA Support on
page 12-41.
•
Web Console synonym creation based on a COBOL File Definition (FD).
•
Transactional access as a FOCUS procedure.
Adapter for Micro-Focus C-ISAM and FairCom c-tree ISAM
How to:
Identify the FairCom c-tree ISAM Load Library Files
Specify the Location of a FairCom c-tree ISAM File
Specify the Location of a FairCom c-tree Parameter File
The Adapter for Micro Focus C-ISAM is available on the Windows and SUN operating
systems.
The Adapter for FairCom c-tree ISAM has been added to the C-ISAM family of adapters. To
prepare the environment, you must add the location of the c-tree ISAM load libraries to the
library path. When configuring the adapter, you must specify the locations of FairCom
c-tree ISAM files and a FairCom c-tree parameter file.
12-6
Information Builders
Adapter Enhancements
Syntax:
How to Identify the FairCom c-tree ISAM Load Library Files
LD_LIBRARY_PATH=path
export LD_LIBRARY_PATH
where:
path
Is the location of the FairCom c-tree ISAM load library files.
Note: If the server is running with security on, the IBIPATH variable needs to be used in
place of LD_LIBRARY_PATH.
Syntax:
How to Specify the Location of a FairCom c-tree ISAM File
FILEDEF file_name DISK file_location
where:
file_name
Is the data file name.
file_location
Is the full path and file name of the data file, without the file extension.
Note:
•
For each data file, there must be a corresponding index file and a corresponding
parameter file.
•
Read/write permissions must be given for all the above mentioned files.
•
By default, the parameter file name is assumed to be the file_location followed by the
“.p” extension.
•
You can override the default parameter file name by specifying it in the environment
variable EDACTPARMF.
•
For the Adapter for FairCom c-tree ISAM, read-only access is supported.
WebFOCUS New Features
12-7
Adapter for DATACOM
Syntax:
How to Specify the Location of a FairCom c-tree Parameter File
EDACTPARMF=path
export EDACTPARMF
where:
path
Is the location of the FairCom c-tree parameter file.
Note:
•
By default, the parameter file name is assumed to be the file_location (as specified in a
FILEDEF command or the DATASET attribute of a Master File), followed by the “.p”
extension.
•
You can override the default parameter file name by specifying it in the environment
variable EDACTPARMF. This is required when selecting data from multiple ISAM files in a
single query through a join. For such queries, a parameter file that describes all the
tables involved must exist, and its name must be specified in EDACTPARMF.
Adapter for DATACOM
The Adapter for DATACOM is supported on UNIX System Services.
The adapter supports synonym creation from the Web Console.
Adapter for DB2
In this section:
Using DB2 Cube Views
Mapping Metadata for DB2 Cubes Views
The Adapter for DB2 supports the following features:
12-8
•
Bulk Load capability on the OS/390 and z/OS operating systems.
•
Two-phase commit with the CLI interface, using Resource Recovery System (RRS), on
the OS/390 and z/OS operating systems.
•
DB2 CLI for OS/400.
•
DB2 Cubes Views. See Using DB2 Cube Views on page 12-9.
•
Stored procedures with input, output, and inout parameters. For details, see Stored
Procedures in Relational Adapters on page 12-54.
•
Aggregate awareness. For details about this optimization feature, see Aggregate
Awareness in RDBMSs on page 12-43.
Information Builders
Adapter Enhancements
Using DB2 Cube Views
The Adapter for DB2 supports Cube Views as an object type. You can specify Cubes as the
object type for which you want to create synonyms.
Before you can use the Adapter for DB2 with Cube Views, you must define DB2 connections
for the database(s) containing the DB2 cube views.
Mapping Metadata for DB2 Cubes Views
Example:
Sample DB2 Cube View Master File
Synonyms are generated for Cubes (not Cube Models). These synonyms reflect the
structure of the cube and its attributes and measures, rather than the structure of the
underlying DB2 tables and their columns.
The Master File synonym component has several segments:
•
The root segment corresponds to the Cube Facts.
•
The children segments correspond to the Cube Hierarchies.
The fields in the root segment reflect the Cube Measures. Field names and titles are
generated based on measure business names, while aliases are generated based on
measure names.
Example:
•
The PROPERTY attribute for these fields contains the word Measure (or Calculated
Measure for calculated measures).
•
The REFERENCE attribute contains the aggregated expression for measures that are
based on simple columns (not expressions) and have aggregations that match those
available in the DML.
Sample DB2 Cube View Master File
FILENAME=BASEAPP/COMPLEX_MEASURES__C_, SUFFIX=DB2CV
, $
SEGMENT=SALESCF, SEGTYPE=S0, $
FIELDNAME=4ADDS, ALIAS=4adds, USAGE=I11, ACTUAL=I4, MISSING=ON,
TITLE='4adds',
REFERENCE=CNT.4ADDS, PROPERTY=MEASURE, $
FIELDNAME=POWEROFADDS, ALIAS=powerofadds, USAGE=D21.2, ACTUAL=D8,
MISSING=ON,
TITLE='powerofadds',
PROPERTY=MEASURE, $
FIELDNAME=PROFIT_CONST, ALIAS=profit*const, USAGE=D21.2, ACTUAL=D8,
MISSING=ON,
TITLE='profit*const',
WebFOCUS New Features
12-9
Adapter for DB2
PROPERTY=MEASURE, $
FIELDNAME=RANDOM, ALIAS=random, USAGE=I11, ACTUAL=I4, MISSING=ON,
TITLE='random',
REFERENCE=CNT.RANDOM, PROPERTY=MEASURE, $
FIELDNAME=3_COLS_WITH_MIXTUREOF_FUNC, ALIAS='3 cols with mixtureof
FUNC', USAGE=D21.2, ACTUAL=D8, MISSING=ON,
TITLE='3 cols with mixtureof FUNC',
PROPERTY=MEASURE, $
FIELDNAME=ROUND_OF_ANOTHER_MEAS, ALIAS='round of another meas',
USAGE=D21.2, ACTUAL=D8, MISSING=ON,
TITLE='round of another meas',
PROPERTY=MEASURE, $
SEGMENT=PRODUCT__CH_, SEGTYPE=U, PARENT=SALESCF, $
FIELDNAME=PRODUCT_GROUP_ID, ALIAS=product_group_ID, USAGE=I11,
ACTUAL=I4, MISSING=ON,
TITLE='product_group_ID',
WITHIN='*product (CH)', $
FIELDNAME=PRODUCT_LINE_ID, ALIAS=product_line_ID, USAGE=I11,
ACTUAL=I4, MISSING=ON,
TITLE='product_line_ID',
WITHIN=PRODUCT_GROUP_ID, $
FIELDNAME=PRODUCT_LINE_NAME, ALIAS='12 product_line_ID
product_line_name', USAGE=A25V, ACTUAL=A25V, MISSING=ON,
TITLE='product_line_name',
REFERENCE=PRODUCT_LINE_ID, PROPERTY=CAPTION, $
SEGMENT=STORE__CH_, SEGTYPE=U, PARENT=SALESCF, $
FIELDNAME=STORE_LOCATION_ID, ALIAS='**** store_location_ID_1',
USAGE=I11, ACTUAL=I4, MISSING=ON
TITLE='store_location_ID',
WITHIN='*store (CH)', $
FIELDNAME=STORE_ADDRESS, ALIAS='store_location_ID_1
_store_address', USAGE=A25V, ACTUAL=A25V, MISSING=ON,
TITLE='store address',
REFERENCE=STORE_LOCATION_ID, PROPERTY=UDA, $
FIELDNAME=STORE_CITY, ALIAS='store_location_ID_1
_store_city',
USAGE=A45, ACTUAL=A45, MISSING=ON,
TITLE='store_city',
REFERENCE=STORE_LOCATION_ID, PROPERTY=UDA, $
FIELDNAME=STORE_ID, ALIAS=store_ID, USAGE=I11, ACTUAL=I4, MISSING=ON,
TITLE='store_ID',
WITHIN=STORE_LOCATION_ID, $
12-10
Information Builders
Adapter Enhancements
Adapter for Enterprise Java Beans
The Adapter for Enterprise Java Beans™ supports Session Beans.
Adapter for Essbase
In this section:
Adding Measures and Scenarios to Synonyms
Specifying ALIAS and Member Names in One Request
The Adapter for Essbase supports setting measures and scenarios from the Web Console
during the synonym creation process.
Essbase also supports the specification of ALIAS and member names in one request.
The Adapter for Essbase support Essbase 7 on UNIX platforms (AIX,SUN, and HP).
Adding Measures and Scenarios to Synonyms
You can choose measure and scenario options from Web Console Create Synonym panes.
Procedure: How to Choose Measure and Scenario Options From the Web Console
1. Start the Web Console and, in the navigation pane, click Metadata. The Managing
Metadata page opens.
To create a synonym, you must have configured the adapter.
2. Click New Synonym in the navigation pane to open the Select Adapter and Connection
to Create Synonym pane.
3. Click a connection for the configured adapter. The Select Database from the
Application for ESSBASE pane (Step 1 of 3) opens.
4. Select a database(s) from the list below the Select Dimension button.
WebFOCUS New Features
12-11
Adapter for Essbase
5. If you wish to filter your selection(s), choose any of the following options:
Option
Description
Filter Dimensions
This check box enables you to retrieve a filtered list of Essbase
Dimensions from which to choose a Scenario Dimension
and/or a Measure Dimension.
A Name input box is added to the selection pane. Type a
string for filtering the dimension names, inserting the
wildcard character (%) as needed at the beginning and/or
end of the string. For example, type ABC% to select
dimensions whose names begin with the letters ABC; %ABC
to select dimensions whose names end with the letters ABC;
%ABC% to select dimensions whose names contain the
letters ABC at the beginning, middle, or end.
Measure
This option enables you to limit the number of fields in the
Master File.
•
Choose Yes (the default) to change the Accounts tagged
dimension without having to change the outline in the
Adabas Database Server. With this setting, an actual field
name is generated for every member of the chosen
dimension in the Master File rather than producing the
dimension in terms of generations.
Note: If you select Yes, when you click Select Dimension in
step 6, two drop-down lists will be added to the
pane—Select Measures and Select Scenarios.
12-12
•
Choose No to limit the number of fields in the Master File.
With this setting, all of the dimensions are interpreted as
non-Accounts dimensions in the Master File and
represented as generations.
•
Note: If you select No, when you click Select Dimension in
step 6, only the Select Scenarios drop-down list appears in
the pane. You cannot apply additional selection criteria
for Measures.
Information Builders
Adapter Enhancements
Option
Description
Aggregate
This option enables you to control summing on
non-aggregated fields in an Essbase request.
•
Choose On to enable summing on non-aggregated fields.
•
Choose Off to disable summing on non-aggregated
fields.
6. Click Select Dimension. The Choose Measures and Scenarios (Step 2 of 3) pane opens.
Any selection criteria you specified in the previous pane are reflected at the top of this
pane. In addition, the dimensions that meet the specified criteria are listed in the Select
Scenarios, and, if shown, the Select Measures, drop-down lists, which appear at the
bottom of the pane.
7. If you wish to create a synonym based on a normal dimension (that is, one in which field
descriptions are generated for the accounts dimension segment), simply click Create
Synonym.
Tip: If you wish to exercise control over several synonym field name processing
options, go to step 10 in this procedure before you click Create Synonym.
8. If you wish to create a synonym based on a pseudo accounts dimension (that is, one in
which a scenario dimension is generated in place of the accounts dimension segment),
click the Choose Scenario check box, and then:
a. Optionally, from the Select Scenario drop down list, specify a dimension from
which you can later choose a member. (If you choose None (the default), no pseudo
accounts dimension is generated.)
If you do not want to use all members of the chosen dimension, click the Filter
check box and, in the Name input box, type a string for filtering the scenario names,
inserting the wildcard character (%) as needed at the beginning and/or end of the
string.
b. Click Get Scenario. The Select Scenario (Step 3 of 3) pane opens.
c.
From the list of Scenario Names at the bottom of the pane, choose the member(s)
you would like to use to build the scenario dimension in the Master File.
To select all members in the list, click the check box to the left of the Scenario Name
column heading. (A message indicates that the selection of all members in the list
may take some time. Click OK if you wish to proceed.)
To select specific members, click the check boxes to the left of those names.
d. Click Create Synonym.
Tip: If you wish to exercise control over several synonym field name processing
options, go to step 10 in this procedure before you click Create Synonym.
WebFOCUS New Features
12-13
Adapter for Essbase
9. If you selected Measures/Yes (the default) in step 5, and you wish to generate a field
name in the Master File for every member of a chosen Measures dimension:
a. Select a measure from the Select Measures drop-down list.
Note that None (the default) generates the field name for every member in the
default Accounts tagged dimension in the Essbase outline.
b. Click Create Synonym.
Tip: If you wish to exercise control over several synonym field name processing
options, go to step 10 in this procedure before you click Create Synonym.
10. Click the Validate check box if you wish to convert all special characters to underscores
and perform a name check to prevent the use of reserved names. (This is accomplished
by adding numbers to the names.) This parameter ensures that names adhere to iWay
specifications.
When the Validate option is unchecked, only the following characters are converted to
underscores: '-' ; ' ' ; ' \' ; '/' ; ',' ; '$'. No checking is performed for names.
11. Click the Make unique check box if you wish to set the scope for field and group names
to the entire synonym; this ensures that no duplicate names are used, even in different
segments of the synonym. When this option is unchecked, the scope is the segment.
12. If appropriate, enter the following synonym processing parameters:
Parameter
Description
Select Application
Select an application directory. baseapp is the
default value.
Prefix/Suffix
If you have tables with identical table names,
assign a prefix or a suffix to distinguish them.
For example, if you have identically named
human resources and payroll tables, assign the
prefix HR to distinguish the synonyms for the
human resources tables. Note that the resulting
synonym name cannot exceed 64 characters.
If all tables and views have unique names, leave
prefix and suffix fields blank.
Overwrite Existing Synonyms
12-14
To specify that this synonym should overwrite
any earlier synonym with the same fully
qualified name, select the Overwrite existing
synonyms check box.
Information Builders
Adapter Enhancements
13. At whichever point you click Create Synonym, synonyms are created and added under
the specified application directory.
A status window displays the message:
All Synonyms Created Successfully
14. From the message window, you can click Go to Metadata page to view, edit, test, or
manage the new synonym.
Specifying ALIAS and Member Names in One Request
How to:
Specify ALIAS and Member Names in a Request
Example:
Generated Master File sample.mas
Using ALIAS and Member Names in an Essbase Request
To specify the member (or shared member) and the ALIAS name in a report, you must
create a synonym using the PARMS 'ALIASFIELD' option. The Master File generated using
this option will contain an ALIAS field for each field in the generation view.
Syntax:
How to Specify ALIAS and Member Names in a Request
CREATE SYNONYM app/synonym FOR application.database DBMS ESSBASE AT
connection_name PARMS 'ALIASFIELD'
END
where:
connection_name
Is the server name used as a connect descriptor to the Essbase Server across the
network.
ALIASFIELD
Is the parameter at the end of the CREATE SYNONYM statement that creates an
additional ALIAS_FIELDNAME for each field of the generation view in the Master File.
WebFOCUS New Features
12-15
Adapter for Essbase
Example:
Generated Master File sample.mas
FILENAME=SAMPLE, SUFFIX=ESSBASE, $
SEGMENT=BASIC, SEGTYPE=S0, $
.
.
.
$ DIMENSION: Product
FIELDNAME=PRODUCT, ALIAS='Lev2,Product', USAGE=A7, ACTUAL=A7,
WITHIN='*Product', $
FIELDNAME=FAMILY, ALIAS=Family, USAGE=A4, ACTUAL=A4,
WITHIN=PRODUCT, $
FIELDNAME=FAMILY_ALIAS, ALIAS=Family_ALIAS, USAGE=A11, ACTUAL=A11,
REFERENCE=FAMILY, PROPERTY=CAPTION, $
FIELDNAME=SKU, ALIAS=SKU, USAGE=A6, ACTUAL=A6,
WITHIN=FAMILY, $
FIELDNAME=SKU_ALIAS, ALIAS=SKU_ALIAS, USAGE=A18, ACTUAL=A18,
REFERENCE=SKU, PROPERTY=CAPTION, $
Note: The SET USEALIASNAME ON/OFF command is ignored when the Master File is
created using this option.
Example:
Using ALIAS and Member Names in an Essbase Request
TABLE FILE SAMPLE
PRINT SALES PROFIT
BY SKU
BY SKU_ALIAS
WHERE SKU_ALIAS EQ 'Cola'
END
The output is:
SKU
--100-10
12-16
SKU_ALIAS
--------Cola
Sales
------62,824.00
Profit
-------22,777.00
Information Builders
Adapter Enhancements
Adapter for IMS
In this section:
Using an IMS Secondary Index
Using an IMS Secondary Index on a Child Segment
How to:
Select a PSB
Use an IMS Secondary Index
Example:
Sample Access File for DI21PART
Using an IMS Secondary Index on a Child Segment
The Adapter for IMS supports:
Syntax:
•
Partitioned databases, including HDAM.
•
Concatenation information in an Access File instead of in a FOCPSB.
•
Secondary indexes.
How to Select a PSB
You have two options for selecting a PSB within the session:
•
You can issue the IMS SET PSB command in your server profile, or in a stored procedure.
•
You can use an Access File to identify the PSB. Each Access File corresponds to one
Master File; it identifies the PSB associated with its corresponding Master File.
If you use an Access File, the adapter identifies the appropriate PSB when you reference a
Master File in a request. The selection is automatic and transparent to you. Each Access File
will contain six or more attributes.
PSB=psbname,PCBNUMBER= pcb_number,PL1=(NO | YES),WRITE=(YES | NO),$
SEGNAME=segment_name, KEYTYPE=segtype (S0|(S or S1)|S2|(SH or SH1)|SH2),$
ALTPCBNAME=index name , ALTPCBNUMBER=index PCB number,$
where:
psbname
Is the actual name of the Access File member to use. The Access File will contain the
name of the actual PSB that IMS will access. If the member does not exist, the following
message is (generated) displayed:
(EDA4261) PSB MEMBER NOT FOUND: psbname
WebFOCUS New Features
12-17
Adapter for IMS
pcb_number
The position within the PSB that points to the database to be processed.
PL1
Indicates whether the PSB was generated with LANG=(PL/I, COBOL or Assembler). YES
indicates PL/I. NO indicates COBOL or Assembler.
WRITE
YES - allows SQL update for this database.
NO - does not allow SQL update for this database and is the default.
segname_name
Is / Are the segment name(s) defined in the database definition.
segtype
Identifies the characteristics of the segment's key field. See SEGTYPE in IMS on
page 12-24.
index name (Optional)
Identifies a secondary index database defined by the 'Procseq=' option within the PSB.
index PCB number (Optional)
Identifies the PCB number of the indexed database.
The member name of an Access File must be the same as the member name of the
corresponding Master File.
Note:
All participating files in a join must use the same PSB. Any attempt to join files that require
different PSBs generates the following message:
(EDA4295) ACCESS POINTS TO DIFFERENT PSBS IN JOIN
Example:
Sample Access File for DI21PART
The following is a sample Access File corresponding to the DI21PART Master File.
PSB=DI21PSB, WRITE=NO PCBNUMBER=2, PL1=NO,,$
SEGNAME=PARTROOT, KEYTYPE=S2,$
SEGNAME=STANINFO, KEYTYPE=S2,$
SEGNAME=STOKCOUNT, KEYTYPE=S2,$
SEGNAME=CYCCOUNT, KEYTYPE=S2,$
SEGNAME=BAKORDR,
KEYTYPE=S2,$
12-18
Information Builders
Adapter Enhancements
Using an IMS Secondary Index
If you want to access a segment through a field in the root segment that is not its sequence
field (primary key), IMS provides the option of creating a secondary index on the field. In
some situations, using a secondary index improves performance. The secondary index is
itself a separate data source. Each of its records contains a value of the field to be indexed
and a pointer to the target segment of the data source record containing that value.
When using a secondary index, IMS locates a record by first reading the index data source to
retrieve the appropriate pointer and then using the pointer to read the data data source.
If a PCB includes the parameter
PROCSEQ=indexDBDname
the named index is used as the main entry point into the data source.
One Master File and Access File can describe all primary and secondary indexes for a data
source. Then, given a request, the adapter can examine all record selection tests to
determine the best access path into the data source. The adapter can take advantage of this
Auto Index Selection feature if:
•
The PSB includes a PCB for each index you may need to access. Each such index PCB
must contain a
PROCSEQ=indexDBDname
parameter that identifies the index DBD.
•
The index targets the root segment in the Master File.
In the Master File, prior to the secondary index definitions, you must describe the entire
root segment of the data source. Every field listed in the DBD is an IMS sequence field or
search field, and each secondary index is based on one or more of these fields. You must
assign each secondary index field its appropriate alias.
Note: IMS allows for system-defined sub-sequence fields to make an index unique. The
Master File can completely ignore the presence and length of such fields.
WebFOCUS New Features
12-19
Adapter for IMS
Syntax:
How to Use an IMS Secondary Index
For each secondary index, in the Master File you must:
1. Describe the secondary index as a group field at the end of the root segment. In the
group definition, use the index name (provided by the XDFLD NAME parameter in the
DBD) as the alias name, and append the suffix SKY to it.
GROUP=anyname, ALIAS=XDFLDname.SKY
where:
anyname
Is the field name for the group, unique within the Master File.
XDFLDname
Is the name assigned to the index by the XDFLD record in the DBD.
For example, consider the following portion of the DBD for the PATDB01 data source:
.
.
.
FIELD NAME=LNAME,BYTES=12,START=56,TYPE=C
FIELD NAME=FNAME,BYTES=12,START=68,TYPE=C
.
.
.
LCHILD NAME=(SEGIX1,PATDBIX1),PTR=INDX
XDFLD NAME=IXNAME,SRCH=(LNAME,FNAME),X
SUBSEQ=/SX1,NULLVAL=BLANK
In the example, the fields that comprise the secondary index are LNAME, FNAME, and
an additional sub-sequence system field that makes the index unique and that the
Master File can ignore. The GROUP definition for the index in the Master File follows:
GROUP=NAMEIX,
ALIAS=IXNAME.SKY,
USAGE=A24,
ACTUAL=A24,$
The ALIAS is the index name from the DBD (XDFLD NAME=IXNAME) with the suffix SKY
appended. Note that the index definition completely ignores the sub-sequence field.
12-20
Information Builders
Adapter Enhancements
2. Describe the indexed fields as subordinate fields of the group. The XDFLD SRCH
parameter in the DBD lists the names of the fields that participate in the index. You
already described these fields once in the Master File as sequence or search fields.
Assign each subordinate field a new field name not previously used in the Master File.
Give each subordinate field an alias value identical to the field name you assigned it
when you previously described it as a sequence or search field.
FIELDNAME=fieldname, ALIAS=alias
.
.
.
GROUP= ...
FIELD[NAME]=newname, ALIAS=fieldname
where:
fieldname
Is the field name previously assigned to this field.
alias
Is the IMS field name from the DBD if the group field is a sequence or search field.
newname
Is any name not previously used in the Master File.
The following portion of the PATINFO Master File illustrates the secondary index
definition for the example in Step 1.
.
FIELD=LAST_NAME,
FIELD=FIRST_NAME,
.
.
.
GROUP=NAMEIX,
FIELD=NAMEL,
FIELD=NAMEF,
ALIAS=LNAME.IMS
ALIAS=FNAME.IMS
,USAGE=A12,
,USAGE=A12,
ACTUAL=A12,$
ACTUAL=A12,$
ALIAS=IXNAME.SKY
ALIAS=
ALIAS=
,USAGE=A24,
,USAGE=A12,
,USAGE=A12,
ACTUAL=A24,$
ACTUAL=A12,$
ACTUAL=A12,$
The Access File must also reflect the secondary indexes. The IMS PSB includes a PCB for
the normal entry point into the data source and an additional PCB for entry through
each secondary index. Each PCB for a secondary index includes the parameter
PROCSEQ=indexDBDname
where:
indexDBDname
Is the LCHILD NAME parameter in the data source DBD.
The Access File must have a one-to-one correspondence with the PSB.
WebFOCUS New Features
12-21
Adapter for IMS
Any Access File entry that corresponds to a secondary index PCB must identify the name of
the index. This index name is the ALIAS of the GROUP record for the index in the Master File.
It is also the value of the XDFLDNAME parameter in the DBD.
The next example illustrates a secondary index PCB and its corresponding Access File entry
for the PATDB01 data source.
PCB:
PCB TYPE=TP,MODIFY=YES,EXPRESS=YES
PCB TYPE=TP,EXPRESS=NO,MODIFY=YES,SAMETRM=YES
PCB TYPE=DB,DBDNAME=PATDB01,PROCOPT=A,KEYLEN=9
SENSEG NAME=PATINFO,PARENT=0
PCB TYPE=DB,DBDNAME=PATDB01,PROCOPT=GO,KEYLEN=24,PROCSEQ= ATDBIX1
SENSEG NAME=PATINFO,PARENT=0
PCB TYPE=DB,DBDNAME=PATDB01,PROCOPT=GO,KEYLEN=33,PROCSEQ=
PATDBIX2
SENSEG NAME=PATINFO,PARENT=0
PCB TYPE=DB,DBDNAME=PATDB01,PROCOPT=GO,KEYLEN=8,PROCSEQ=
PATDBIX3
SENSEG NAME=PATINFO,PARENT=0
PSBGEN LANG=COBOL,PSBNAME=PATDBPSB,CMPAT=YES
END
Access File:
PSB=PATDBPSB,PCBNUMBER= 4,PL1=NO,WRITE=NO,$
SEGNAME=PATINFO, KEYTYPE=S2 ,$
ALTPCBNAME=IXNAME , ALTPCBNUMBER=5,$
ALTPCBNAME=IXCOMP , ALTPCBNUMBER=6,$
ALTPCBNAME=IXADMD , ALTPCBNUMBER=7,$
When the adapter generates DL/I calls for retrieval, it examines the record selection tests in
the request to determine which PCB offers the most efficient access path to the required
data.
Note: Since the PSB most likely includes only one PCB for each secondary index, each
Master File that accesses the same index PCB must contain the same GROUP ALIAS value for
the index.
12-22
Information Builders
Adapter Enhancements
Using an IMS Secondary Index on a Child Segment
The CREATE SYNONYM command places secondary index information in the Access File. No
auxiliary virtual fields are created in the Master File.
Two segments belonging to the same root path might be connected by the secondary
indexes:
•
The target segment has an associated virtual search field (described in the Access File),
which is used in the SSA.
•
The source segment has the real base fields that are used to find the target segment
instances. One target segment might have many secondary indexes associated with
different source segments. The Secondary index is based on one or more (up to 5) base
fields.
Each PCB might be associated with only one secondary index (PROCSEQ parameter in the
PCB definition). Primary PCB number in the PSB statement is chosen at create synonym
time. Sequential numbers of all other PCBs associated with the same DBD are stored in the
XDFLD access file statement (parameter ALTPCBNUMBER).
Note: The .sky field suffix definitions are supported to ensure upward compatibility.
Example:
Using an IMS Secondary Index on a Child Segment
Master File
FILENAME=DIX_DIX1DBD, SUFFIX=IMS
, $
SEGMENT=PARTROOT, SEGTYPE=S0, $
FIELDNAME=PARTKEY, ALIAS=PARTKEY.KEY, USAGE=A17, ACTUAL=A17, $
FIELDNAME=PARTFIL1, ALIAS=PARTFIL1.IMS, USAGE=A8, ACTUAL=A8, $
FIELDNAME=FILL1, USAGE=A1, ACTUAL=A1, $
FIELDNAME=PARTNAME, ALIAS=PARTNAME.IMS, USAGE=A23, ACTUAL=A23, $
FIELDNAME=FILL2, USAGE=A1, ACTUAL=A1, $
SEGMENT=STOKSTAT, SEGTYPE=S0, PARENT=PARTROOT, $
FIELDNAME=STOCKEY, ALIAS=STOCKEY.KEY, USAGE=A16, ACTUAL=A16, $
FIELDNAME=STOKFIL1, ALIAS=STOKFIL1.IMS, USAGE=A4, ACTUAL=A4, $
FIELDNAME=STOKNUMS, ALIAS=STOKNUMS.IMS, USAGE=A9, ACTUAL=A9, $
FIELDNAME=STOKFIL2, ALIAS=STOKFIL2.IMS, USAGE=A20, ACTUAL=A20, $
FIELDNAME=STOKFREQ, ALIAS=STOKFREQ.IMS, USAGE=A6, ACTUAL=A6, $
FIELDNAME=FILL1, USAGE=A105, ACTUAL=A105, $
SEGMENT=CYCCOUNT, SEGTYPE=S0, PARENT=STOKSTAT, $
FIELDNAME=CYCLKEY, ALIAS=CYCLKEY.KEY, USAGE=A2, ACTUAL=A2, $
GROUP=CYCLNUMB, ALIAS=CYCLNUMB.IMS, USAGE=A8, ACTUAL=A8, $
FIELDNAME=CNMB1, USAGE=A3, ACTUAL=A3, $
FIELDNAME=CNMB2, USAGE=A3, ACTUAL=A3, $
FIELDNAME=CNMB3, USAGE=A2, ACTUAL=A2, $
FIELDNAME=CYCLFIL1, ALIAS=CYCLFIL1.IMS, USAGE=A4, ACTUAL=A4, $
FIELDNAME=CYCLVALU, ALIAS=CYCLVALU.IMS, USAGE=A7, ACTUAL=A7, $
FIELDNAME=FILL1, USAGE=A4, ACTUAL=A4, $
WebFOCUS New Features
12-23
Adapter for IMS
Access File
PSB=DIX1PSB, WRITE=NO, PCBNUMBER=2, PL1=NO, $
SEGNAME=PARTROOT, KEYTYPE=S2, $
XDFLD=PARTNAMX, SRCH=PARTNAME, ALTPCBNUMBER=3, $
XDFLD=PARTFILX, SRCH=PARTFIL1, ALTPCBNUMBER=4, $
SEGNAME=STOKSTAT, KEYTYPE=S2, $
XDFLD=CYCLNUMX, SRCH=CNMB1/CNMB3/CNMB2, BASESEG=CYCCOUNT, ALTPCBNUMBER=5, $
SEGNAME=CYCCOUNT, KEYTYPE=S2, $
Inverted Master File
FILENAME=DIX_DIX1DBD, SUFFIX=IMS
, $
SEGMENT=STOKSTAT, SEGTYPE=S0, $
FIELDNAME=STOCKEY, ALIAS=STOCKEY.KEY, USAGE=A16, ACTUAL=A16, $
FIELDNAME=STOKFIL1, ALIAS=STOKFIL1.IMS, USAGE=A4, ACTUAL=A4, $
FIELDNAME=STOKNUMS, ALIAS=STOKNUMS.IMS, USAGE=A9, ACTUAL=A9, $
FIELDNAME=STOKFIL2, ALIAS=STOKFIL2.IMS, USAGE=A20, ACTUAL=A20,
FIELDNAME=STOKFREQ, ALIAS=STOKFREQ.IMS, USAGE=A6, ACTUAL=A6, $
FIELDNAME=FILL1, USAGE=A105, ACTUAL=A105, $
SEGMENT=CYCCOUNT, SEGTYPE=S0, PARENT=STOKSTAT, $
FIELDNAME=CYCLKEY, ALIAS=CYCLKEY.KEY, USAGE=A2, ACTUAL=A2, $
GROUP=CYCLNUMB, ALIAS=CYCLNUMB.IMS, USAGE=A8, ACTUAL=A8, $
FIELDNAME=CNMB1, USAGE=A3, ACTUAL=A3, $
FIELDNAME=CNMB2, USAGE=A3, ACTUAL=A3, $
FIELDNAME=CNMB3, USAGE=A2, ACTUAL=A2, $
FIELDNAME=CYCLFIL1, ALIAS=CYCLFIL1.IMS, USAGE=A4, ACTUAL=A4, $
FIELDNAME=CYCLVALU, ALIAS=CYCLVALU.IMS, USAGE=A7, ACTUAL=A7, $
FIELDNAME=FILL1, USAGE=A4, ACTUAL=A4, $
SEGMENT=PARTROOT, SEGTYPE=U, PARENT=STOKSTAT, $
FIELDNAME=PARTKEY, ALIAS=PARTKEY.KEY, USAGE=A17, ACTUAL=A17, $
FIELDNAME=PARTFIL1, ALIAS=PARTFIL1.IMS, USAGE=A8, ACTUAL=A8, $
FIELDNAME=FILL1, USAGE=A1, ACTUAL=A1,
FIELDNAME=PARTNAME, ALIAS=PARTNAME.IMS, USAGE=A23, ACTUAL=A23, $
FIELDNAME=FILL2, USAGE=A1, ACTUAL=A1, $
Access File
PSB=DIX1PSB, WRITE=NO, PCBNUMBER=5, PL1=NO, $
SEGNAME=STOKSTAT, KEYTYPE=S2, $
XDFLD=CYCLNUMX, SRCH=CNMB1/CNMB3/CNMB2, BASESEG=CYCCOUNT, ALTPCBNUMBER=5, $
SEGNAME=CYCCOUNT, KEYTYPE=S2, $
SEGNAME=PARTROOT, KEYTYPE=S2, $
XDFLD=PARTNAMX, SRCH=PARTNAME, ALTPCBNUMBER=3, $
XDFLD=PARTFILX, SRCH=PARTFIL1, ALTPCBNUMBER=4, $
12-24
Information Builders
Adapter Enhancements
This example contains three secondary indexes:
•
PARTNAMX is the secondary index used to find segment PARTROOT using the value of
the PARTNAME field. Target and source segments are the same: PARTROOT.
•
PARTFILX is the secondary index used to find segment PARTROOT using the value of
the PARTFIL1 field. Target and source segments are the same: PARTROOT.
•
CYCLNUMX is the secondary index used to find segment STOKSTAT using the values of
the CNMB1,CNMB3 and CNMB2 fields. The target segment is STOKSTAT; the source
segment is CYCCOUNT.
Definition description:
1. Secondary index description associated with the target segment.
2. XDFLD parameter defines the secondary index name used to build SSA.
3. BASESEG parameter defines the source segment name (if it is not the target segment).
4. SRCH parameter defines the names of one or more (up to 5) base fields and their order
in the secondary index.
Note: A qualified SSA is built for the target segment if at least one eligible screening
condition is provided for the associated primary key, search field, or secondary key base
source field.
Adapter for IMS Transactions
The Adapter for IMS Transactions processes input parameters, creates and sends requests
to the IMS Transaction Server, and creates an answer set based on the received response.
The adapter can be used for WebFOCUS reporting and SQL access to CICS programs, and as
a source for DataMitgrator flow processing. It supports:
•
Two-phase commit, which enables the adapter to participate in an XA-compliant
global transaction. For information about XA compliance, see XA Support on
page 12-41.
•
Web Console synonym creation based on a COBOL File Definition (FD).
•
Transactional access as a FOCUS procedure.
Adapter for Informix
The Adapter for Informix supports the selection of multiple databases when creating
synonyms from the Web Console. For details about creating synonyms from the Web
Console, see Web Console Enhancements for Adapters on page 12-48.
WebFOCUS New Features
12-25
Adapter for Ingres
Adapter for Ingres
The Adapter for Ingres supports Ingres Release 2.6.
Adapter for JDBC (Generic)
The Adapter for JDBC supports:
•
Read/Write capabilities.
•
Web Console synonym creation.
Note: The Adapter for JDBC is tested to work with the Transoft JDBC Driver for C-ISAM,
Unidata, and Cloudscape, but should also work with any JDBC-compliant driver.
Adapters for J.D. Edwards World and One World
The Adapters for J.D. Edwards World and One World are available through the Web Console,
where you can create synonyms and convert metadata.
Note: You do not need to run AUTOSQL and JDECONV from an OS/400 emulation screen
because the adapter functions are available through the same console environment.
Adapter for Microsoft SQL Server
The Adapter for Microsoft SQL Server accesses data on all UNIX platforms, with the
Microsoft JDBC Driver. This adapter supports:
•
Read/Write capabilities.
•
Server variable &MSSMSGTXT, which indicates any application error that is issued by a
stored procedure.
•
Web Console synonym creation, including the ability to select from multiple databases
when creating synonyms from the Web Console. For details about creating synonyms
from the Web Console, see Web Console Enhancements for Adapters on page 12-48.
•
Stored procedures with input, output, and inout parameters. For details, see Stored
Procedures in Relational Adapters on page 12-54.
Adapter for Oracle
The Adapter for Oracle supports the Oracle 10g release.
The adapter supports aggregate awareness. For details about this optimization feature, see
Aggregate Awareness in RDBMSs on page 12-43.
12-26
Information Builders
Adapter Enhancements
Adapter for Oracle E-Business Suite
The Adapter for Oracle E-Business Suite is a read-only adapter providing security
integration for reporting against Oracle E-Business Suite databases. This adapter supports
user authentication and data access rules that are defined at the metadata and data access
layer. Specific integrated data security is available for:
•
Table and View Restrictions by Responsibility ID
•
View Security by Set of Books ID
•
View Security by Operating Unit
Using this adapter, you can access data with the following security models:
•
Oracle Applications Security
•
Union of Responsibilities Security
•
Total Access Security
Adapter for PeopleSoft
In this section:
Updating the Workspace Service Profile
How to:
Add PSLOGIN to the Workspace Service Profile
The Adapter for PeopleSoft is enhanced for performance and manageability:
•
Service profiles support the call to the adapter using PSLOGIN upon agent connection,
in addition to the edasprof.prf file.
•
Multiple connections to PeopleSoft data sources behave fully independently.
WebFOCUS New Features
12-27
Adapter for Progress
Updating the Workspace Service Profile
In order to support the PeopleSoft integrated security, the adapter must be called during
each connection to the server. The easiest way to ensure that the adapter is always called is
to add the PSLOGIN procedure as a Service Profile.
Procedure: How to Add PSLOGIN to the Workspace Service Profile
1. Open the Web Console.
2. Select Workspace >> Configure.
The Workspace Configuration options window opens.
3. Locate and select the Service link at the top of the page. The Service configuration
options appear.
4. Locate the Service profile input option and add PSLOGIN.
5. Click Save.
You will be prompted to restart the Workspace.
6. Click OK.
Adapter for Progress
The Adapter for Progress supports Progress Release 10.a.
Adapter for RMS
The Adapter for RMS supports metadata creation for RMS files based on CDD Repositories,
using the Web Console synonym creation facility or the CREATE SYNONYM command.
12-28
Information Builders
Adapter Enhancements
Adapter for SAP BW
In this section:
Support for BEx Structures
Cancelling BW Requests for Results That Exceed 1 Million Tuples
Default Synonym Name for InfoCubes
Controlling Session Parameters From the Web Console
How to:
Include Structures as Dimensions in a Master File
Example:
Representing Structures as Dimensions
Support for BEx Structures
Structures consist of a group of characteristics and/or key figures. They can be saved and
reused in other queries. For example, if plan/actual comparisons are being used extensively,
it is possible to save a key figure group that consists of 10 key figures arranged for
plan/actual comparison. To be able to use the same set of key figures in a different query,
instead of selecting 10 key figures individually, adding the structure to the BEx query
automatically brings those key figures into the query.
Note that SAP supports a maximum of two structures in a BEx query and only one of the
structures can be of type Key Figure.
Syntax:
How to Include Structures as Dimensions in a Master File
ENGINE BWBAPI SET STRUCTURE_DIMENSIONS {ON|OFF}
where:
ON
Includes structures as dimensions in a Master File.
OFF
Does not include structures as dimensions in a Master File. OFF is the default value.
Tip: This setting is supported from the Web Console. Click Data Adapters in the navigation
pane, click the name of a configured adapter, and choose Change Settings from the menu to
open the Change Settings pane, where you can turn STRUCTURE_DIMENSIONS on and off.
WebFOCUS New Features
12-29
Adapter for SAP BW
Example:
Representing Structures as Dimensions
You can represent structures as dimensions or create a cartesian product of the fields in the
structures. Consider a BEx query that uses 2 structures:
•
One structure is called “Curr. Year vs. Prev. year Cumulated” and it includes two time
dimensions: Current Year and Prev.Year.
•
The second structure is called “Orders-Sales-Returns” and it includes four key figures:
Incoming Orders, Open Orders, Sales Volume, and Returns.
If the STRUCTURE_DIMENSIONS is set to OFF, the created Master File includes 8 fields
representing the cartesian product of the two structures. All of these fields are be placed
under the MEASURES section of the Master File and treated as separate key figures. The
Master File looks something like this:
FILENAME=BW31C/Z2STRUCTURES_1KF_ROW_1COL, SUFFIX=BWBAPI , $
SEGMENT=Z2STRUCT, SEGTYPE=S0, $
$ -MEASURESFIELDNAME=CURRENT_YEAR_CUMULATED_INCOMING_ORDERS,
ALIAS=3466HXATG6RG1BG9GSTCN65IR3RV6E, USAGE=D18.2, ACTUAL=D8,
TITLE='Current year cumulated Incoming Orders', $
FIELDNAME=CURRENT_YEAR_CUMULATED_OPEN_ORDERS,
ALIAS=3466HXATG6RG1BG9GSTCN65IR3RV6E, USAGE=D18.2, ACTUAL=D8,
TITLE='Current year cumulated Open orders', $
FIELDNAME=CURRENT_YEAR_CUMULATED_SALES_VOLUME,
ALIAS=3466HXATG6RG1BG9GSTCN65IR3RV6E, USAGE=D18.2, ACTUAL=D8,
TITLE='Current year cumulated Sales Volume', $
FIELDNAME=CURRENT_YEAR_CUMULATED_RETURNS,
ALIAS=3466HXATG6RG1BG9GSTCN65IR3RV6E, USAGE=D18.2, ACTUAL=D8,
TITLE='Current year cumulated Returns', $
FIELDNAME=PREV__YEAR_CUMULATED_INCOMING_ORDERS,
ALIAS=36AWN99ETKI46HMTOGIVHHSOJ3RV6E, USAGE=D18.2, ACTUAL=D8,
TITLE='Prev. year cumulated Incoming Orders', $
FIELDNAME=PREV__YEAR_CUMULATED_OPEN_ORDERS,
ALIAS=36AWN99ETKI46HMTOGIVHHSOJ3RV6E, USAGE=D18.2, ACTUAL=D8,
TITLE='Prev. year cumulated Open orders', $
FIELDNAME=PREV__YEAR_CUMULATED_SALES_VOLUME,
ALIAS=36AWN99ETKI46HMTOGIVHHSOJ3RV6E, USAGE=D18.2, ACTUAL=D8,
TITLE='Prev. year cumulated Sales Volume', $
FIELDNAME=PREV__YEAR_CUMULATED_RETURNS,
ALIAS=36AWN99ETKI46HMTOGIVHHSOJ3RV6E, USAGE=D18.2, ACTUAL=D8,
TITLE='Prev. year cumulated Returns', $
$ DIMENSION 0DISTR_CHAN (Distribution Channel):
$ HIERARCHY (Distribution Channel):
...
...
12-30
MISSING=ON,
MISSING=ON,
MISSING=ON,
MISSING=ON,
MISSING=ON,
MISSING=ON,
MISSING=ON,
MISSING=ON,
Information Builders
Adapter Enhancements
The following is a sample WebFOCUS request against this Master File:
TABLE FILE Z2STRUCTURES_1KF_ROW_1COL
SUM CURRENT_YEAR_CUMULATED_INCOMING_ORDERS
CURRENT_YEAR_CUMULATED_OPEN_ORDERS
CURRENT_YEAR_CUMULATED_SALES_VOLUME
CURRENT_YEAR_CUMULATED_RETURNS
PREV__YEAR_CUMULATED_INCOMING_ORDERS
PREV__YEAR_CUMULATED_OPEN_ORDERS
PREV__YEAR_CUMULATED_SALES_VOLUME
PREV__YEAR_CUMULATED_RETURNS
BY 0DISTR_CHAN_KEY
END
If the STRUCTURE_DIMENSIONS is set to ON, the created Master File includes four key
figures placed under the MEASURES section of the Master File and the “Curr. Year vs. prev.
year Cumulated” structure are treated as a dimension. The Master File looks something like
this:
FILENAME=BW31C/Z2STRUCTURES_1KF_ROW_1COL_STON, SUFFIX=BWBAPI , $
SEGMENT=Z2STRUCT, SEGTYPE=S0, $
$ -MEASURESFIELDNAME=INCOMING_ORDERS, ALIAS=[3RV6ENA572BRXFKFCO2M2ZUWS],
USAGE=D18.2, ACTUAL=D8, MISSING=ON,
TITLE='Incoming Orders', $
FIELDNAME=OPEN_ORDERS, ALIAS=[3RV6ENHTQ0XHG23VII4YD1TMK],
USAGE=D18.2, ACTUAL=D8, MISSING=ON,
TITLE='Open orders', $
FIELDNAME=SALES_VOLUME, ALIAS=[3RV6ENPI8ZJ6YONBOC7AN3SCC],
USAGE=D18.2, ACTUAL=D8, MISSING=ON,
TITLE='Sales Volume', $
FIELDNAME=RETURNS, ALIAS=[3RV6ENX6RY4WHB6RU69MX5R24], USAGE=D18.2,
ACTUAL=D8, MISSING=ON,
TITLE='Returns', $
$ DIMENSION 0DISTR_CHAN (Distribution Channel):
$ HIERARCHY (Distribution Channel):
...
...
$ DIMENSION EAZ5PAJIWG37DI674JZI2C3UB (Curr. year vs. prev. year
(cumulated to last period)):
$ HIERARCHY (Curr. year vs. prev. year (cumulated to last period)):
FIELDNAME=CURR__YEAR_VS__PREV__YEAR__CUMULATED_TO_LAST_PERIOD_,
USAGE=A22, ACTUAL=A22, MISSING=ON,
TITLE='Curr. year vs. prev. year (cumulated to last period)',
WITHIN='*[EAZ5PAJIWG37DI674JZI2C3UB]', $
$ Cardinality: 2
$ DIMENSION EAZ5PAJIWG37DI674JZI2C3UB, PROPERTIES:
FIELDNAME=EAZ5PAJIWG37DI674JZI2C3UB_KEY, ALIAS=MEMBER_NAME,
USAGE=A64, ACTUAL=A64, MISSING=ON,
TITLE='Curr. year vs. prev. year (cumulated to last period) Key', $
WebFOCUS New Features
12-31
Adapter for SAP BW
The following is sample WebFOCUS request against this Master File:
TABLE FILE Z2STRUCTURES_1KF_ROW_1COL_STON
PRINT INCOMING_ORDERS
OPEN_ORDERS
SALES_VOLUME
RETURNS
BY CURR__YEAR_VS__PREV__YEAR__CUMULATED_TO_LAST_PERIOD_
END
Note: When the STRUCTURE_DIMENSIONS is set to ON, you must use the key figures with
the verb PRINT rather than SUM.
Important: If the BEx query includes only two structures and no dimensions as free
characteristics or no dimensions in rows and columns, you should set
STRUCTURE_DIMENSIONS to ON. If STRUCTURE_DIMENSIONS is set to OFF, the created
synonym will have only measures and no dimensions. Any WebFOCUS requests created
against such a synonym would produce the following messages:
(FOC11205) ERROR IN MASTER FILE DESCRIPTION:
(FOC11229) MDX SEGMENT DESCRIPTION CONTAINS NO HIERARCHIES
Cancelling BW Requests for Results That Exceed 1 Million Tuples
For performance reasons, SAP has placed an internal limit on BW requests. In the past, this
limit may have caused problems with some WebFOCUS requests. To prevent these
problems in WebFOCUS Release 5.3, the request will not be forwarded to SAP BW if it is too
large for the SAP BW system to handle. The user is notified with the following message:
(FOC11201) VIOLATION OF BW LIMIT. MAXIMUM 1 MILLION TUPLES.
(FOC11201) CELL_DATA TUPLES COUNT: #########
(FOC11201) FS_DATA
TUPLES COUNT: #########
where:
#
Represents a number.
As SQL returns a subset of two-dimensional data from tables, MDX returns a subset of
multi-dimensional data from cubes. Tuples list dimensions and members to identify
individual cells, as well as larger sections of cells in the cube. Because each cell is an
intersection of all the dimensions of the cube, tuples can uniquely identify every cell in the
cube.
The cell data tuples count is calculated by looking at the number of measures (key figures).
A Flattened Set (FS) data tuples count is calculated by using the cardinality of the
dimensions included in the request. If the Master File is created with MEMBER_SAMPLING
ON, the cardinality information can be found in the Master File.
12-32
Information Builders
Adapter Enhancements
Default Synonym Name for InfoCubes
A default synonym name is proposed for InfoCubes. Previously, this field was blank for
InfoCubes and you had to enter a name manually. Also, once the Master File was created for
the InfoCube, you had to manually edit the Access File (acx file) to enclose the CUBENAME
value and CATALOG value within single quotation marks. This is no longer required.
Controlling Session Parameters From the Web Console
To change the following settings from the Web Console, click Data Adapters in the
navigation pane, click the name of a configured adapter, and choose Change Settings from
the menu. The Change Settings for SAP BW pane opens.
•
STRUCTURE_DIMENSIONS determines whether or not structures are included as
dimensions in a Master File.
•
INCLUDE_UNASSIGNED determines whether or not to include unassigned members
belonging to an active hierarchy in a target report.
•
PROPERTY_DESCRIPTION determines whether or not to query on attribute values in
the MEMBERS row set.
•
MEMBER_SAMPLING determines whether or not to generate Master File fields for
dimension levels that precisely fit dimension member captions.
•
EMPTY whether or not to include empty cells in a report.
WebFOCUS New Features
12-33
Adapter for SAP R/3
Adapter for SAP R/3
In this section:
Controlling Execution and Report Processing Settings From the Web Console
The Adapter for SAP R/3 supports:
•
Long logical database names (up to 20 characters).
•
Aggregation for Open/SQL.
•
Increase in the character length of the development class used for the installation, from
4 to 14 characters. This extends the usability of the installation.
•
Foreign Keys (visible using odbcpkey/odbcfkey), which are implemented for the use of
all adapters, but only used by R/3.
•
Integrated Help for BAPIs.
•
Integration between SAP R/3 and DataMigrator using the following features:
•
SAP Direct Input
•
Inbound IDOCs
•
Control of execution and report processing settings from the Web Console.
•
SAP queries created under the Global area (cross-client), as well as those created under
the Standard query area (client-specific).
Controlling Execution and Report Processing Settings From the Web Console
To change the following settings from the Web Console, click Data Adapters in the
navigation pane, click the name of a configured adapter, and choose Change Settings from
the menu. The Change Settings for SAP R3 pane opens. You can set:
•
Online and Batch execution modes for report processing.
•
Dynamic mode (on or off ) to support either standard report processing via
subroutine-pools or reporting from a Logical Database (LDB) in Native Mode. With the
latter setting you can catalog the report and set attributes to the desired LDB before
the report is executed.
Adapter for Sybase ASE
The Adapter for Sybase ASE supports the selection of multiple databases when creating
synonyms from the Web Console. For details about creating synonyms from the Web
Console, see Web Console Enhancements for Adapters on page 12-48.
12-34
Information Builders
Adapter Enhancements
Adapter for Sybase IQ
The Adapter for Sybase IQ supports Sybase IQ Release 12.5 on Solaris 9 (64 bit) and on AIX
5.2.
Adapter for System 2000
The Adapter for System 2000 is supported on UNIX System Services.
Adapter for Tamino
The Adapter for Tamino allows Tamino client applications to access Tamino providers. The
adapter converts:
•
Internal data manipulation language (DML) requests or SQL requests into Tamino
requests.
•
Tamino responses into answer sets.
Adapter for Teradata
The Adapter for Teradata supports Teradata macros, only with an ODBC interface.
This adapter supports aggregate awareness. For details about this optimization feature, see
Aggregate Awareness in RDBMSs on page 12-43.
Adapter for TOTAL
The Adapter for TOTAL is supported on UNIX System Services.
Adapter for VSAM
In this section:
Preparing the Environment for VSAM CICS
Configuring the Adapter for VSAM CICS
Declaring Connection Attributes for VSAM CICS Manually
Logging VSAM CICS Processing
The Adapter for VSAM supports:
•
Read/Write access to CICS-controlled VSAM.
•
Two-phase commit. For information about XA compliance, see XA Support on
page 12-41.
WebFOCUS New Features
12-35
Adapter for VSAM
The Adapter for VSAM can access and change CICS-owned VSAM files if the Full-Function
Server (FFS) is running on OS/390 or z/OS in the same LPAR as the target CICS region. The
adapter, running outside CICS, employs EXCI to communicate with the remote component,
the long running CICS transaction.
Separate steps are required to prepare the VSAM CICS environment and configure the
Adapter for VSAM CICS.
Preparing the Environment for VSAM CICS
Example:
Sample CICS Installation
Reference:
VSAM CICS Components
The server starts a special process, CSCOM3, to control communications with all target CICS
regions. This process can be stopped and started from the adapter’s Web Console page.
One CSCOM3 process handles all configured EXCI communications to CICS regions.
CSCOM3 sends the command to XMITRUE to initialize global storage for the server.
Note:
•
CSCOM3 must be running prior to the execution of any request against VSAM CICS.
CSCOM3 maintains open EXCI pipes to CICS regions until it is stopped. Having an open
pipe may prevent CICS from being recycled.
•
When CICS is being recycled, the CSCOM3 service must be stopped. In the event that
CICS is forced to shutdown, CSCOM3 must also be stopped, and restarted when CICS is
available for use. When CSCOM3 is stopped, it sends a request to XMITRUE to release all
global storage. This may have an adverse affect on in-flight requests.
Reference: VSAM CICS Components
One transaction and three programs must be defined in CICS:
12-36
•
XMIV. Is a transaction pointing to the program XMI.
•
XMI. Is the main program. It is responsible for all physical data I/O.
•
XMITRUE. Is a dual purpose program. When called by CSCOM3, it sets up global
storage areas in CICS for each server odin node combination.
•
XMIABEND. Is an error handling program. It gets control when XMI or XMITRUE
abends. It is responsible for capturing trace and log information, as well as global
storage cleanup.
Information Builders
Adapter Enhancements
Example:
Sample CICS Installation
//jobname JOB (accid),'CICS 3.3.0 INSTALL'
//
MSGCLASS=X,MSGLEVEL=(1,1),NOTIFY=userid,
// PERFORM=3
//*
//DBCRDO
EXEC PGM=DFHCSDUP,REGION=256M
//STEPLIB DD DSN=CICSTS.V1R3M0.SDFHLOAD,DISP=SHR
//DFHCSD2 DD DSN=userid.CICS410.DFHCSD,DISP=SHR
//DFHCSD
DD DSN=userid.CICSTS13.DFHCSD,DISP=SHR
//SYSPRINT DD SYSOUT=*
//SYSUDUMP DD SYSOUT=*
//SYSIN
DD *
DEFINE PROGRAM(XMI) GROUP(XMI)
DESCRIPTION(XMI MAIN MODULE)
LANGUAGE(C) RELOAD(NO) RESIDENT(NO) USAGE(NORMAL) USELPACOPY(NO)
STATUS(ENABLED) CEDF(YES) DATALOCATION(ANY) EXECKEY(CICS)
EXECUTIONSET(FULLAPI)
DEFINE PROGRAM(XMIABEND) GROUP(XMI)
DESCRIPTION(XMI ABEND MODULE)
LANGUAGE(C) RELOAD(NO) RESIDENT(NO) USAGE(NORMAL) USELPACOPY(NO)
STATUS(ENABLED) CEDF(YES) DATALOCATION(ANY) EXECKEY(USER)
EXECUTIONSET(FULLAPI)
DEFINE PROGRAM(XMITRUE) GROUP(XMI)
DESCRIPTION(XMITRUE GLOBAL STORAGE ANCHOR)
LANGUAGE(C) RELOAD(NO) RESIDENT(NO) USAGE(NORMAL) USELPACOPY(NO)
STATUS(ENABLED) CEDF(YES) DATALOCATION(ANY) EXECKEY(CICS)
EXECUTIONSET(FULLAPI)
DEFINE TRANSACTION(XMIV) GROUP(XMI)
DESCRIPTION(XMI MAIN TRANSACTION)
PROGRAM(XMI) TWASIZE(0) PROFILE(DFHCICST) STATUS(ENABLED
TASKDATALOC(ANY) TASKDATAKEY(USER) STORAGECLEAR(NO)
RUNAWAY(SYSTEM) SHUTDOWN(DISABLED) ISOLATE(YES) DYNAMIC(NO)
PRIORITY(1) TRANCLASS(DFHTCL00) DTIMOUT(NO) INDOUBT(BACKOUT
RESTART(NO) SPURGE(NO) TPURGE(NO) DUMP(NO) TRACE(YES)
CONFDATA(NO) RESSEC(NO) CMDSEC(NO)
/*
//
WebFOCUS New Features
12-37
Adapter for VSAM
Configuring the Adapter for VSAM CICS
Configuring the adapter consists of specifying connection and authentication information
for each of the connections you want to establish. You can configure the Adapter for
Adabas manually or from the Web Console.
Procedure: How to Declare Connection Attributes for VSAM CICS From the Web Console
To configure the adapter for VSAM CICS from the Web Console,
1. Start the Web Console and select Data Adapters from the left pane.
2. Expand the Add folder, expand the Other DBMS group folder, then expand the VSAM
CICS folder and click a connection. The Add VSAM CICS to Configuration pane opens.
3. Enter the following parameters:
Connection name
Logical name used to identify a specific set of connection
attributes.
Proxy
Name of the supplied proxy (or user written) program that
converts the Full Function Server calling syntax to the syntax
that is valid for the CICS program to be executed.
Note: This parameter is optional and should only be used at
the direction of local support personnel. Leave the field
blank for normal operation.
Mirror
IBM-supplied mirror transaction CPMI that the adapter calls
by default. If this transaction cannot be used, another
transaction name can be created to point to the
IBM-supplied mirror program DFHMIRS.
This alternate mirror transaction name can be supplied in
this field.
Partner LU Name
(Application ID)
Application ID of the CICS region.
Local LU Name
LU name to be used. This value is taken from an LU entry in
the major node. This value is also specified in the CICS
connection/sessions definition.
Trace DSN
Trace data set name.
Log DSN
Log data set name.
4. Click Configure.
For details about VSAM CICS logs, see Logging VSAM CICS Processing on page 12-39.
12-38
Information Builders
Adapter Enhancements
Declaring Connection Attributes for VSAM CICS Manually
To establish communication between a Full-Function Server and CICS, you can define
communication parameters in the ODIN configuration file. The ODIN node is created when
you add a new connection for the Adapter the VSAM CICS.
Example:
ODIN Configuration File With CICS VSAM Node
NODE = VSMCICS
BEGIN
PROTOCOL = EXCI
PROXY = XMITRUE
MIRROR = EXCI
CLASS = CICSCLIENT
PARTNER_LU_NAME = EDBGM006
LOCAL_LU_NAME = T29DPB50
TRACEDSN = userid.CICSVSAM.TRACE
LOGDSN = userid.CICSVSAM.LOG
END
Logging VSAM CICS Processing
Logging is always on. All log information is sent to the CICS log CSSL. In most cases, this
shows up under JES as MSGUSR.
Log information is written to the specified log dataset in addition to the standard CICS log.
However, the two logs may not be completely synchronized. Some errors may not permit
writing to the specified Log file.
When CSCOM3 receives a STOP request, it transfers all relevant CICS log records to the local
HFS cscom3.log file. The CICS Log file is cleared as part of CSCOM3 START request
processing.
The client component of the Adapter for VSAM CICS is executed as an agent process under
TSCOM3. The server component of the Adapter for VSAM CICS is executed in the CICS
region as part of the XMI program associated with the XMIV with transaction. The client
component is responsible for the logical processing of the client's request.
The server component executes physical I/O operations with the CICS controlled VSAM
data sets. The server component also dynamically defines in the CICS region (if not
pre-defined by the user), the dataset whose name is passed to the client.
Client component trace records are stored in the TSCOM3-owned HFS trace file. Server
component trace records are forwarded to the transaction-owned Temporary Storage
Queue. All records from the queue are sent to the server and appended to the HFS trace file
upon completion of the request.
WebFOCUS New Features
12-39
Adapter for VSAM
During abend processing, the information stored in the TS-Queue is copied to the specified
trace file. The file is then transferred to the server as part of CSCOM3 STOP request
processing. Tracing can be turned on and off from the server Web Console.
Communication between the server and CICS is handled by the standard communication
layer on the server-side and by the mirror transaction (EXCI) on the CICS side. All
information is passed in the COMAREA buffer in packed format.
Example:
Defining Trace and Log Files
Both trace and log files must be defined and available to all users prior to server startup.
Define these files as follows:
//jobname JOB (accid),'CICS 3.3.0 INSTALL'
//
MSGCLASS=X,MSGLEVEL=(1,1),NOTIFY=userid,
//
REGION=256M
//*
//SYSPRINT DD SYSOUT=*
//SYSIN
DD *
DEL userid.CICSVSAM.TRACE
DEL userid.CICSVSAM.LOG
DEF CL ( NAME( userid.CICSVSAM.TRACE ) VOLUMES(volume) CYLINDERS(1 1) RECSZ(200 200) CISZ(4096) INDEXED UNIQUE SHR(2 3))
DEF CL ( NAME( userid.CICSVSAM.LOG ) VOLUMES(volume)
RECSZ(200 200) CISZ(4096)
UNIQUE KEYS(8 0) SHR(2 3))
/*
//
12-40
Information Builders
Adapter Enhancements
Adapter for Web Services
The Adapter for Web Services allows client applications to access Web Services providers.
The adapter converts:
•
Internal data manipulation language (DML) requests or SQL requests into Web Services
requests.
•
Web Services responses into answer sets.
The adapter supports:
•
Web Console synonym creation based on WSDL documents.
•
HTTP and HTTPS protocols.
Adapter for XML
The Adapter for XML supports the HTTPS protocol.
XA Support
Two-phase commit is supported for additional adapters.
Supported Adapters
Those added in the current release are marked with an asterisk (*).
XA-compliant adapters are:
•
DB2 (using CLI interface) on UNIX/Windows/Linux
•
DB2 (using CLI Interface with RRS) on OS/390 and z/OS*
•
Oracle
•
MS SQL Server (using OLE DB interface)
•
Informix
•
Sybase ASE
•
Ingres II*
Non-XA-compliant adapters are:
•
Adabas Stored Procedures*
•
CICS Transactions*
•
IMS Transactions*
•
VSAM CICS*
WebFOCUS New Features
12-41
Aggregate Awareness Support
Aggregate Awareness Support
In this section:
Relational Adapters and Aggregated SQL Queries
Aggregate Awareness in RDBMSs
How to:
Set Aggregate Awareness
Reference:
Usage Notes for Aggregate Awareness
Aggregate Awareness substantially improves the efficiency of queries. In order to use this
feature successfully, you need an understanding of the principles of relational adapter
operation and knowledge of the RDBMS optimizer.
Relational Adapters and Aggregated SQL Queries
Relational adapters construct optimized SQL queries based on a WebFOCUS request and
the hierarchical structure of a file. A relational adapter always attempts to construct an SQL
query that delegates most of the work (such as record screening, joins and aggregation) to
the underlying relational engine. The interface's ability to pass the join and all tests to the
RDBMS is a prerequisite to constructing an aggregated SQL query.
If aggregation cannot be passed to the RDBMS, the trace file contains an explanation.
Usually, the request or the file hierarchy can be corrected in such a way that aggregation
can be passed to the RDBMS.
12-42
Information Builders
Adapter Enhancements
Aggregate Awareness in RDBMSs
When aggregation is delegated to the RDBMS, the RDBMS can perform additional
optimization of the query by using a mechanism commonly called Aggregate Awareness.
Aggregate Awareness is implemented in DB2, Teradata, Oracle, and some other RDBMSs.
The implementation is similar in most RDBMSs. Based on most common types of reports
performed on a database, the database administrator creates one or more objects (named
SUMMARY TABLES in DB2, JOIN INDEXES in Teradata, and MATERIALIZED VIEWS or
SNAPSHOTS in Oracle) that are populated with pre-aggregated data. The size of the
pre-aggregated object (summary table, join index, or snapshot) is usually much smaller
than the combined size of the involved tables. The RDBMS optimizer evaluates the
incoming queries and, if possible, reconstructs the incoming query so that the
pre-aggregated data is used for forming the answer set. This significantly reduces both CPU
time and I/O operations.
The aggregated SQL generated by the relational adapter is fully suitable for an RDBMS
optimizer to use pre-aggregated data. However, DB2, Teradata, and Oracle optimizers have
specific rules for when to use pre-aggregated data.
Syntax:
How to Set Aggregate Awareness
SET AGGREGATE_AWARENESS {FRESHONLY|OLD_OK|OFF}
where:
FRESHONLY
Sets different values for the parameters associated with each RDBMS.
OLD_OK
Sets different values for the parameters associated with each RDBMS.
OFF
If no option is selected, the behavior of the target RDBMS is determined by the
database configuration options.There is no default for this setting.
For details about adapter-specific settings, see Usage Notes for Aggregate Awareness on
page 12-44.
WebFOCUS New Features
12-43
Cluster Joins
Reference: Usage Notes for Aggregate Awareness
Adapter-specific parameters for which values are set by the FRESHONLY and OLD_OK
settings:
•
For DB2, CURRENT REFRESH AGE and CURRENT QUERY OPTIMIZATION.
•
For Oracle, QUERY_REWRITE_INTEGRITY and QUERY_REWRITE_ENABLED.
These values can be set in the Server profile or as a part of an RPC using Direct Passthru.
•
Teradata handles aggregate awareness internally.
RDBMS manuals should be reviewed for recommendations, but the most common
checklist items are:
•
Updating statistics on the pre-aggregated object and the master tables: (RUNSTATS in
DB2, COLLECT STATISTICS in Teradata, ANALYZE TABLE in Oracle).
•
Confirming compatibility of the generated SQL query and the query used for creating
the pre-aggregated object. The most common items are compatibility of:
•
Aggregators (columns functions) and aggregation objects (column function
arguments)
•
GROUP BY clauses
•
Joins
Cluster Joins
In this section:
Embedded Joins
Embedded Join Master Files
How to:
Define an Equijoin in the Master File
The Cluster Join feature enables you to describe heterogeneous static Joins in Master and
Access Files. Different adapter suffixes may be combined in one Master File using the
SEGSUF parameter in the SEGMENT statement. Information for all adapters participating in
the CLUSTER JOIN is combined in the Access File. A unified set of APIs is used by all CLUSTER
JOIN-enabled adapters to gain access to the relevant portion of the Access File.
12-44
Information Builders
Adapter Enhancements
Embedded Joins
An embedded join is an equijoin that you define in a Master File. The name comes from the
fact that the join definition is “embedded” in the Master File. (This is also known as a cluster
join.)
You can define an embedded join between data sources:
•
Data sources of the same type. For example, you can define an embedded join
between two DB2 tables. This is known as a homogeneous embedded join.
•
Data sources of different types. For example, you can define an embedded join
between three DB2 tables, three CA-IDMS/DB records, and one IMS segment. This is
known as a heterogeneous embedded join.
In the following heterogeneous embedded join, A = a DB2 table, B = a CA-IDMS/DB
record, and C = an IMS segment.
In a Master File, each segment declaration describes one RDBMS table or view, or one
record. You can include up to 64 segments in an embedded join.
The entire join structure described by the Master File is referred to as a tree.
A subtree is a segment and any directly related descendant segments of the same data
source type. A root subtree is the subtree at the top of the tree.
There are four subtrees here:
•
A-A-A
•
B¹-B¹
•
B²
•
C
Note that B¹-B¹ and B² are separate subtrees because, even though they are of the same
data source type, they are not directly related.
The root subtree is A-A-A.
WebFOCUS New Features
12-45
Cluster Joins
Embedded Join Master Files
Each embedded join segment declaration describes one RDBMS table or view, or one
non-RDBMS record. You can include up to 64 segments.
If several Master Files (used only with TABLE requests) include the same table, you can avoid
repeating the same description multiple times. Describe the table in one of the Master Files,
and use the CRFILE attribute in the other Master Files to access the existing description.
Syntax:
How to Define an Equijoin in the Master File
An embedded equijoin uses the PARENT segment attribute to identify the relationship
between tables and/or records.
FILENAME=mtname, SUFFIX=rootsuffix
[,$]
SEGNAME=table1, SEGTYPE= {S0|KL} [,CRFILE=crfile1] [,$]
FIELD=name,...,$
.
.
.
SEGNAME=table2, [SEGSUF=branchsuffix,] SEGTYPE=relationship,
PARENT=table1 [,CRFILE=crfile2][,$]
FIELD=name,...,$
.
.
.
where:
mtname
Is the one- to eight-character name of the embedded join Master File.
rootsuffix
When the Master File describes:
•
A homogeneous embedded join, rootsuffix specifies which adapter to use to access
the data source.
•
A heterogeneous embedded join, rootsuffix specifies which adapter to use to
access the join's highest-level subtree. That is, it specifies which adapter to use to
access the tables or records represented by the root segment and all
directly-related descendant segments that are of the same DBMS type.
table1
Is the SEGNAME value for the root table or record in the embedded join. If this segment
references a remote segment description, table1 must be identical to the SEGNAME
from the Master File that contains the full definition of the remote data source.
12-46
Information Builders
Adapter Enhancements
name
Is any field name.
table2
Is the SEGNAME value for the related table or record. If this segment references a
remote segment description, table2 must be identical to the SEGNAME from the Master
File that contains the full definition of the remote data source.
SEGSUF
Is used in a heterogeneous embedded join to identify the beginning of a new subtree
(other than the root subtree), and to specify which adapter to use to access that
subtree. A subtree is a segment (representing a table or record) and all directly related
descendant segments of the same data source type. You specify SEGSUF in the
subtree's highest-level segment.
branchsuffix
Specifies the value of SEGSUF.
relationship
Indicates the type of relationship between the table or record and its parent. Possible
values are:
S0 indicates that the related table is in a one-to-many or many-to-many (non-unique)
relationship with the table or record named as its parent.
U indicates that the related table or record is in a one-to-one or a many-to-one (unique)
relationship with the table or record named as its parent.
KL references a remote segment description. Indicates that the related table or record is
in a one-to-many or many-to-many (non-unique) relationship with the table or record
named as its parent.
KLU references a remote segment description. Indicates that the related table or record
is in a one-to-one or a many-to-one (unique) relationship with the table or record
named as its parent.
crfile1
References a remote segment description. Indicates the name of the Master File that
contains the full definition of table1.
crfile2
References a remote segment description. Indicates the name of the Master File that
contains the full definition of table2.
WebFOCUS New Features
12-47
Web Console Enhancements for Adapters
Web Console Enhancements for Adapters
In this section:
Relational Adapters
Non-Relational Adapters
How to:
Create a Synonym From the Web Console (Relational Adapters)
Change Data Mapping Conversion, Optimization, Session, and Other Settings From the
Web Console (Relational Adapters)
Create a Synonym From the Web Console (Non-Relational Adapters)
Set CHECKNAMES and UNIQUENAMES Manually
This topic describes Web Console enhancements for relational and non-relational adapters.
Relational Adapters
For relational adapters, the Web Console supports:
•
Overwriting of existing synonyms using the CREATE SYNONYM command. This
option generates DROP parameter syntax.
•
Dynamic Column option for the CREATE SYNONYM command. This option generates
NOCOL syntax.
•
Cardinality option in the CREATE SYNONYM command for use with equi-joins. This
option enables you to reflect the current cardinality (number of rows or tuples) in the
table during metadata creation.
•
Synonym creation for the SYNONYM table type (if supported in the RDBMS).
•
Ability to change settings for data mapping conversions, as well as optimization,
session, and other settings from a single location in the Web Console. Click Data
Adapters in the navigation pane, click the name of a configured adapter, and choose
Change Settings from the menu. The Change Settings pane opens. For details, see How
to Change Data Mapping Conversion, Optimization, Session, and Other Settings From the
Web Console (Relational Adapters) on page 12-51.
In addition, the Adapters for Informix, Microsoft SQL Server, and Sybase ASE support
selection from multiple databases when creating synonyms from the Web Console.
12-48
Information Builders
Adapter Enhancements
Procedure: How to Create a Synonym From the Web Console (Relational Adapters)
1. Start the Web Console and, in the navigation pane, click Metadata. The Managing
Metadata page opens.
To create a synonym, you must have configured the adapter.
2. Click New Synonym in the navigation pane. The Select Adapter and Connection to
Create Synonym pane opens.
3. Click a connection for the configured adapter. The right pane displays selection options
that are appropriate for each adapter.
Use Current Database. Select the Use Current Database check box to use the database
defined for the chosen connection. (Appears only for Informix, Microsoft SQL Server,
and Sybase ASE.)
Select Database. If you wish to use a different database, leave the Use Current
Database check box blank and choose a database from the drop-down list. (Appears
only for Informix, Microsoft SQL Server, and Sybase ASE.)
Restrict Object Type to. Restrict candidates for synonym creation based on selected
object type(s). Note that the object types vary depending on RDBMS support.
Filter by Name and Owner. Selecting this option adds the Owner and Table Name
parameters to the screen:
•
Owner. Type a string for filtering the owner IDs, inserting the wildcard character
(%) as needed at the beginning and/or end of the string. For example, enter: ABC%
to select tables or views whose owner IDs begin with the letters ABC; %ABC to
select tables or views whose owner IDs end with the letters ABC; %ABC% to select
tables or views whose owner IDs contain the letters ABC at the beginning, middle,
or end.
•
Table Name. Type a string for filtering the table or view names, inserting the
wildcard character (%) as needed at the beginning and/or end of the string. For
example, enter: ABC% to select all tables or views whose names begin with the
letters ABC; %ABC to select tables or views whose names end with the letters ABC;
%ABC% to select tables or views whose names contain the letters ABC at the
beginning, middle, or end.
4. Click Select Candidates. All tables that meet the specified criteria appear.
5. From the Select Application Directory drop-down list, select a directory. baseapp is the
default value.
WebFOCUS New Features
12-49
Web Console Enhancements for Adapters
6. If you have tables with identical table names, assign a prefix or a suffix to distinguish
them. For example, if you have identically named human resources and payroll tables,
assign the prefix HR to distinguish the synonyms for the human resources tables. Note
that the resulting synonym name cannot exceed 64 characters.
If all tables and views have unique names, leave prefix and suffix fields blank.
7. To specify that this synonym should overwrite any earlier synonym with the same fully
qualified name, select the Overwrite existing synonyms check box.
8. To reflect the current cardinality (number of rows or tuples) in the table during
metadata creation, select the Cardinality check box. The use of cardinality is for
equi-joins. The order of retrieval is based on the size (cardinality) of the table. Smaller
tables are read first.
Note: If the cardinality of the tables to be used in the application are dynamic, it may
not be beneficial to choose this setting.
9. To specify that the Master File created for the synonym should not contain column
information, select the Dynamic columns check box.
If this option is selected, column data is retrieved dynamically from the data source at
the time of the request.
10. From the SET CONVERSION LONGCHAR drop-down list, select: TEXT, ALPHA, or BLOB.
TEXT is the default value.
11. Complete your table or view selection:
To select all tables or views in the list, select the check box to the left of the Default
Synonym Name column heading.
To select specific tables or views, select the corresponding check boxes.
12. The Default Synonym Name column displays the name that will be assigned to the
synonym. To assign a different name, replace the displayed value.
13. Click Create Synonym.
Synonyms are created and added under the specified application directory.
A status window displays the message:
All Synonyms Created Successfully
14. From the message window, you can click Go to Metadata page to view, edit, test, or
manage the new synonym.
12-50
Information Builders
Adapter Enhancements
Procedure: How to Change Data Mapping Conversion, Optimization, Session, and Other
Settings From the Web Console (Relational Adapters)
1. Click Data Adapters in the navigation pane.
2. Click the name of a configured adapter.
3. Choose Change Settings from the menu. The Change Settings pane opens.
Note that the setting for AGGREGATE AWARENESS is new in the software. For the
details, including the underlying syntax, see Aggregate Awareness in RDBMSs on
page 12-43.
Non-Relational Adapters
In non-relational adapters that support synonym creation, the following field name
processing options are available on the Web Console: Validate and Make Unique.
In addition, other features that are common to most non-relational adapters have been
standardized in the Web Console. For an illustration, see How to Create a Synonym From the
Web Console (Non-Relational Adapters) on page 12-52.
WebFOCUS New Features
12-51
Web Console Enhancements for Adapters
Procedure: How to Create a Synonym From the Web Console (Non-Relational Adapters)
Note: The order in which common options appears may vary slightly.
1. Start the Web Console and, in the navigation pane, click Metadata. The Managing
Metadata page opens.
To create a synonym, you must have configured the adapter.
2. Click New Synonym in the navigation pane. The Select Adapter and Connection to
Create Synonym pane opens.
3. Click a connection for the configured adapter. The right pane displays selection options
that are appropriate for each non-relational adapter.
4. Complete all required adapter-specific selections. Details are provided in the
documentation for each non-relational adapter that generates synonyms from the Web
Console.
5. Choose from the common options in steps 6-8, as required, before generating the
synonym in step 9.
6. Click the Validate check box if you wish to convert all special characters to underscores
and perform a name check to prevent the use of reserved names. (This is accomplished
by adding numbers to the names.) This parameter ensures that names adhere to iWay
specifications. For the syntax associated with this option and the next, see How to Set
CHECKNAMES and UNIQUENAMES Manually on page 12-53.
When the Validate option is unchecked, only the following characters are converted to
underscores: '-' ; ' ' ; ' \' ; '/' ; ',' ; '$'. No checking is performed for names.
7. Click the Make unique check box if you wish to set the scope for field and group names
to the entire synonym; this ensures that no duplicate names are used, even in different
segments of the synonym. When this option is unchecked, the scope is the segment.
12-52
Information Builders
Adapter Enhancements
8.
Enter the following parameters:
Parameter
Description
Select Application
Select an application directory. baseapp is the
default value.
Prefix/Suffix
If you have tables with identical table names, assign
a prefix or a suffix to distinguish them. For example,
if you have identically named human resources and
payroll tables, assign the prefix HR to distinguish the
synonyms for the human resources tables. Note that
the resulting synonym name cannot exceed 64
characters.
If all tables and views have unique names, leave
prefix and suffix fields blank.
Overwrite Existing Synonyms
To specify that this synonym should overwrite any
earlier synonym with the same fully qualified name,
select the Overwrite existing synonyms check box.
9. Click Create Synonym. The result of the Create Synonym process is a Master File and an
Access File, which are created and added under the specified application directory.
10. A status window displays the message:
All Synonyms Created Successfully
From the message window, you can click Go to Metadata page to view, edit, test, or
manage the new synonym.
Syntax:
How to Set CHECKNAMES and UNIQUENAMES Manually
You can include the following attributes in the CREATE SYNONYM syntax for all
non-relational adapters:
CHECKNAMES
Converts all special characters to underscores and performs a name check to prevent
the use of reserved names. (This is accomplished by adding numbers to the names.)
The CHECKNAMES parameter ensures that names adhere to iWay specifications.
When this parameter is omitted (the default), only the following characters are
converted to underscore are:'-' ; ' ' ; ' \' ; '/' ; ',' ; '$'. No checking is performed for names.
UNIQUENAMES
Sets the scope for field and group names to the entire synonym; this ensures that no
duplicate names are used, even in different segments of the synonym.
When this option is omitted (the default), the scope is the segment.
WebFOCUS New Features
12-53
General Adapter Features
General Adapter Features
In this section:
Stored Procedures in Relational Adapters
How to:
Invoke a Stored Procedure
Example:
Invoking a Stored Procedure
Sample Stored Procedure
The features described in this section affect multiple adapters.
Stored Procedures in Relational Adapters
The following adapters support stored procedures with input, output, and in-out
parameters:
•
DB2
•
Microsoft SQL Server
Note: The syntax and examples that follow use DB2 as an illustration.
The output parameter values that are returned by stored procedures are available as result
sets. These values form a single-row result set that is transferred to the client after all other
result sets are returned by the invoked stored procedure. The names of the output
parameters (if available) become the column titles of that result set.
Note that only the output parameters (and the returned value) referenced in the invocation
string are returned to the client. As a result, users have full control over which output
parameters have their values displayed.
The server supports invocation of stored procedures written according to rules that are
specific to each adapter.
For details, see the iWay Adapter Administration for UNIX, Windows, OpenVMS, OS/400,
OS/390, and z/OS manual.
The server supports invocation of stored procedures written according to rules that are
specific to each adapter, as described in the iWay Adapter Administration for UNIX, Windows,
OpenVMS, OS/400, OS/390, and z/OS manual.
12-54
Information Builders
Adapter Enhancements
Syntax:
How to Invoke a Stored Procedure
SQL [DB2] EX procname [parameter_specification1]
[,parameter_specification2]...
END
where:
DB2
Is the ENGINE suffix.
procname
Is the name of the stored procedure. It is the fully or partially qualified name of the
stored procedure in the native RDBMS syntax.
parameter_specification
Input, output, and in-out parameters are supported. Use the variation required by the
stored procedure:
input
Is a literal (for example, 125, 3.14, 'abcde'). You can use reserved words as input.
Unlike character literals, reserved words are not enclosed in quotation marks (for
example, NULL). Input is required.
output
Is represented as a question mark (?). You can control whether output is passed to
an application by including or omitting this parameter. If omitted, this entry will be
an empty string (containing 0 characters).
in-out
Consists of a question mark (?) for output and a literal for input, separated by a
slash ( /). (For example: ?/125, ?/3.14, ?/'abcde'.) The out value can be an empty
string (containing 0 characters).
Example:
Invoking a Stored Procedure
In this example, a user invokes a stored procedure, edaqa.test_proc01, supplies input
values for parameters 1, 3, 5, and 7, and requests the returned value of the stored
procedure, as well as output values for parameters 2 and 3.
Note that parameters 4 and 6 are omitted; the stored procedure will use their default
values, as specified at the time of its creation.
SQL DB2 EX edaqa.test_proc01 125,?,?/3.14,,'abc',,'xyz'
END
WebFOCUS New Features
12-55
General Adapter Features
Example:
Sample Stored Procedure
This stored procedure uses out and in-out parameters:
CREATE PROCEDURE EDAQA.PROCP3 (
OUT chSQLSTATE_OUT
CHAR(5),
OUT intSQLCODE_OUT
INT,
INOUT l_name char(20),
INOUT f_name char(20))
RESULT SETS 1
LANGUAGE SQL
------------------------------------------------------------------------- SQL Stored Procedure
-----------------------------------------------------------------------P1: BEGIN
-- Declare variable
DECLARE SQLSTATE CHAR(5) DEFAULT '00000';
DECLARE SQLCODE INT DEFAULT 0;
-- Declare cursor
DECLARE cursor1 CURSOR WITH RETURN FOR
SELECT
EDAQA.NF29005.SSN5 AS SSN5,
EDAQA.NF29005.LAST_NAME5 AS LAST_NAME5,
EDAQA.NF29005.FIRST_NAME5 AS FIRST_NAME5,
EDAQA.NF29005.BIRTHDATE5 AS BIRTHDATE5,
EDAQA.NF29005.SEX5 AS SEX5
FROM
EDAQA.NF29005
WHERE
(
( EDAQA.NF29005.LAST_NAME5 = l_name )
AND
( EDAQA.NF29005.FIRST_NAME5 = f_name )
);
-- Cursor left open for client application
OPEN cursor1;
SET
SET
SET
SET
END P1
12-56
chSQLSTATE_OUT
intSQLCODE_OUT
l_name = 'this
f_name = 'this
= SQLSTATE;
= SQLCODE;
is first name';
is last name';
@
Information Builders
CHAPTER 13
DataMigrator Enhancements
Topics:
•
New Feature Highlights
•
Revised Functionality
•
Data Management Console
•
Data Flow/Process Flow Design Paradigm
•
Data Flow Interface
•
Process Flow Methodology
•
Process Flow Interface
•
Integrating DataMigrator Components
•
Source Management With Visual SourceSafe
WebFOCUS New Features
This section describes DataMigrator (formerly ETL
Manager) new features in Version 5 Release 3.
For more information about DataMigrator, see
the iWay DataMigrator User’s Guide. For more
information about the DataMigrator Server, see
the chapter on configuring the DataMigrator
Server in the iWay Server Administration Guide.
13-1
New Feature Highlights
New Feature Highlights
In this section:
Installation and Configuration
Data Management Console
Data Flow Designer
Process Flow Designer
Running Flows
Metadata
Reports
Installation and Configuration
Operating Systems
In addition to Windows 2000 and XP, this release is also certified for Windows 2003 Server.
Client Installation
The complete Data Management Console (client) is installed from a single CD. Previous
releases required separate installations of the iWay Client and the Data Management
Administration Tools (DMAT).
Database Support
This release adds support for MySQL as both a source and a target.
Data Type Support
This release adds support for TEXT and LONG VARCHAR columns described in a synonym as
TX. However, the Sample Data, Test SQL, and Test Transforms facilities of the Data
Management Console do not display columns that are described as TX correctly.
13-2
Information Builders
DataMigrator Enhancements
Data Management Console
Integration
In addition to the tool for building flows, the new Data Management Console integrates:
•
Client Configuration - iWay client configuration for available servers can be done from
the Data Management Console. Once a server has been configured, it can be used
immediately.
•
Adapter Configuration - The Adapter tab of the navigation pane allows you to add
and configure adapters from the Data Management Console.
•
Synonym Creation - You can create synonyms for any configured adapter by
right-clicking an application directory.
•
Synonym Editor (File Tool) and Metadata Manager - The new graphical Synonym
Editor allows you to change synonyms in the Data Management Console workspace.
•
Access to the Web Console - The Web Console can be accessed directly from the Data
Management Console.
•
API Test Tool - The Test Server function supports execution of stored procedures, SQL,
or FOCUS commands. When an answer set is returned, it is displayed in a resizable grid
in the Data Management Console workspace.
Text View
A new Text View displays the code that is generated for a flow. This view can be printed for
documentation purposes.
Connections
The User ID and password used to connect to a server can be saved so that they do not
have to be entered every time a user connects. For a Windows server, IWA (Integrated
Windows Authentication) can be used so that the current Windows user id is used to
connect to the server.
A single connection suffices for any integrated tool.
Navigation Pane
The navigation pane has two tabs, one for procedures and one for metadata. Application
directories are displayed in the order that they appear in the application path, instead of
alphabetically. The Metadata tab includes synonyms that are available as data sources or
data targets. The Procedures tab includes both DM flows and user-written stored
procedures.
WebFOCUS New Features
13-3
New Feature Highlights
Flow Options
Descriptive comments can be added to a DM flow.
A flow can be halted after a user-specified number of database errors have occurred.
Stored Procedures
Stored procedures, used to customize flows, have been integrated into the Data
Management Console. The Procedures tab shows all stored procedures on the server by
application directory. Stored procedures can be edited and run directly from the Data
Management Console.
Source Management With Visual SourceSafe
Note: This feature is a Candidate for Release.
DataMigrator provides a direct connection to Microsoft Visual SourceSafe that enables you
to source manage flows, procedures, and synonyms. This can provide file backup, change
tracking, and version control. Visual SourceSafe manages access to source code and
documents all code changes.
Data Flow Designer
Data Flow Objects
The new Data Flow designer works from left to right instead of from the top down. Objects
have been combined to simplify the data flow:
•
Source Objects - Source objects can be displayed with the application directory and
the synonym’s full name.
•
Virtual Columns - Virtual columns in a synonym are displayed in the Source
Transformations window and in the Synonym Editor.
•
Joins - Join objects can be automatically added to the flow when a second or
subsequent source object is added.
Join columns can be automatically selected, based on matching name and format,
when a Join object is added.
Join objects in the data flow display the join type: Inner, Left Outer, Right Outer or Cross
Join.
•
SQL Objects - The SQL Object includes Manage Columns, Filter, Sort, and SQL
Statement options.
It’s no longer necessary to drag a separate SQL object into the workspace to see the
generated SELECT statement. The statement is always available from a right-click
menu.
User-entered SQL is automatically drawn in the data flow when possible.
13-4
Information Builders
DataMigrator Enhancements
•
Target Objects - The target object includes target and load options, as well as access to
transformation mapping.
System and DataMigrator variables used in expressions can be tested with the Test
Transforms functionality.
After a flow is run, the Sample Data option allows you to view a portion of the data that
has been loaded.
New target tables can be created in any application directory in the application path, in
addition to the baseapp directory.
Adjusting Expressions
The Transformation window provides a option for automatically adjusting transformations
to reconcile different format sizes.
Functions
The function listed in the Transformation and SQL Calculators can be displayed by category
or alphabetically. Double-clicking a function will add its syntax with sample arguments to
an expression. Online help is available for all functions. User written functions with syntax
and sample arguments can be added to the calculator’s functions tab.
Two-part Name Support
Source and target object labels can include application directories for data flows in the
workspace. Using two-part names, synonyms from a specific application directory can be
run. When two-part names are not in affect, the synonym from the first application
directory in the application path is used, as in previous releases
WebFOCUS New Features
13-5
New Feature Highlights
Process Flow Designer
Process Flow Objects
The new Process Flow designer replaces panels for Dependencies and Procedures. It also
allows scheduling requests independently.
Conditional Execution
Execution of objects in a process flow can truly “depend” on the completion of previous
objects. The default conditions are for successful or failed execution. Other conditions, like
the number of rows process or the number of rows rejected, can also be used.
Grouped Execution
Data flows and procedures can be grouped, causing the process flow to wait for multiple
flows/procedures to be completed successfully before proceeding.
E-mail
E-mail messages can be sent at any point in a process flow. For example, one e-mail
message could be sent if a flow completes successfully, and a different message sent if it
fails.
Two-part Name Support
Stored procedure and flow labels can include application directories for process flows in
the workspace. Using two-part names (the default), procedures and flows from a specific
application directory can be run. When two-part names are not in affect, the procedure or
flow from the first application directory in the application path is used, as in previous
releases.
Running Flows
Execution in Progress
Flows that take longer than a few seconds to run will launch the Execution in Progress
dialog box where you can cancel the flow or access the Web Console's Agents page to
monitor the flow's progress.
User ID
The user id that is used to run flows submitted from the client can be set from the Web
Console to either the server administrator id or the user’s id. By default the server
administrator id is used. When set to use the user id, the user id of the user that initiated the
flow is used. Scheduled flows use the user id that saved the flow.
13-6
Information Builders
DataMigrator Enhancements
Metadata
Metadata tab
The Metadata tab allows you to edit synonyms and their access files as text, generate
sample data, refresh and delete data, recreate underlying DBMS tables, and assess the
impact of changes.
Reports
View Last Log
The log for a flow’s last run can be viewed directly from an open flow or by right-clicking a
flow on the navigation pane’s Procedures tab.
Process Flow Log
The process flow log displays Job IDs for other flows that it runs. This a drill-down report,
that is, the Job IDs provide live links that allow you to access details about the components
of the process flow. In previous releases, the log for a dependent request appeared in the
log for the original request (5.2), or as a separate log (5.1 and earlier).
Statistics Report
•
Failure indication - The statistics report shows failed and incomplete requests in red
for easy identification.
•
Drill Down - The Statistics report is a drill-down report, which allows you to click entries
to display details about the individual flows.
•
New statistics - The statistics report (and underlying ETLSTATS table) contains two
additional columns:
STAT_DBMSERROR
Number of rows rejected by the database for a constraint violation, such as a
Unique Index constraint, a Not Null constraint, or a user-specified constraint.
CPU_TIME
Total CPU time used by the flow in milliseconds.
WebFOCUS New Features
13-7
Revised Functionality
Impact Analysis Reports on Synonyms, Data Flows and Columns
Impact Analysis Reports on data flows, synonyms, and columns provide information on the
flows that are available on a particular server, and the synonyms and columns they use.
They allow you to provide a quick analysis of the usage of synonyms and columns by data
flows, and allow you to get information for data flows without opening individual flows.
There are six types of reports:
•
Synonyms by Data Flow
•
Data Flows by Synonym
•
Columns by Data Flow
•
Data Flows by Column
•
Synonyms by Data Flow - Enterprise
•
Data Flows by Synonym - Enterprise
Revised Functionality
In this section:
FTP
Server Transfer Files
Stored Procedures
Remote Transformations
Setting Default Values for Global Variables
Fusion Targets
Load Options
Metadata Manager
Catalog Administrator
iWay Test Tool
The current release of DataMigrator has a number of functionality changes from previous
releases. In addition, a number of ancillary programs are no longer part of the DataMigrator
environment. Their functionality has been added to the Data Management Console.
FTP
Use of FTP (File Transfer Protocol) to carry data from a sub-server to a hub-server as part of a
data flow has been replaced by use of the iWay Server.
13-8
Information Builders
DataMigrator Enhancements
Server Transfer Files
Server Transfer Files, flat files created on a sub-server in a hub-sub environment, are not
supported. An iWay DataMigrator Server should be used on the platform where a file is
desired.
Stored Procedures
Stored procedures run during a flow to allow manipulation of a file moved with FTP
(previously called Post-extract and Pre-load) are no longer supported. Stored procedures
can be run before or after a data flow (previously called Pre-extract and Post-load).
Remote Transformations
In a hub-sub environment, previous releases of ETL Manager allowed creating extract
transformations and specifying that they should be run on a sub-server. If this functionality
is required, create a transformation (virtual column) in the synonym on the sub-server.
Setting Default Values for Global Variables
A stored procedure must be used to set a global variable in a filter (where condition). In
previous releases, the workbench would prompt for a default value and store it in the
request (flow). For details, see Using Variables in a Data Flow in Chapter 5, Designing a Data
Flow.
Fusion Targets
Fusion files are not supported as targets in this release.
Load Options
The load option Disable automatic pass through (APT) is not available. If this option is
required for testing, include a pre-extract stored procedure in the process flow with the
following lines:
SQL
SET APT=OFF;
END
-RUN
The load option Continue load processing when an error is encountered has been replaced.
This is now the default behavior. To stop processing after the first error occurs, click the
Flow Properties button, go to the Execution page, and select the Stop processing after _
DBMS errors check box. Enter 1 in the DBMS errors field and click OK.
The load option Oracle Blank Column is no longer available or required. ORACLE columns
described as VARCHAR2 are now fully supported.
WebFOCUS New Features
13-9
Data Management Console
Metadata Manager
Table and column impact analysis, features previously available with Metadata Manager,
are incorporated into the Data Management Console. Other features of Metadata Manager
will be added in a future release.
Catalog Administrator
Catalog Administrator is no longer distributed as part of the Data Management Console.
Synonyms should be created and managed from the Web Console.
iWay Test Tool
Functionality provided by the iWay Test tool is now available from the Data Management
Console using the Test Server capability.
Data Management Console
The DataMigrator Data Management Console is a graphical design interface that runs on
Windows 2000, Windows XP, and Windows 2003. You can use the Data Management
Console to:
•
Design and test data flows and process flows.
•
Perform ancillary DataMigrator Server functions, such as scheduling and e-mail
notification for processing, data adapter configuration and testing, and metadata
management.
These functions are performed from the Web Console, which you can launch from the
Data Management Console.
•
13-10
View log and report statistics.
Information Builders
DataMigrator Enhancements
The following is the main window of the Data Management Console in Data Flow mode.
It includes the following components:
•
The Navigation pane, on the left, always displays a list of servers that can be accessed
by DataMigrator and on which you can store flows. The three tabs below the navigation
pane enable you to switch among the Procedures, Metadata, and Adapters tabs.
When the Procedures tab is active, each application directory displays:
•
The files for data flows, process flows, and any supporting stored procedures
created for an application.
•
DM and Scheduler Reports folders that contain the reports and logs you can run.
Note: When you are logged on to an iWay Server, you can view the Application
Directories and reports folders in this pane. Until you log onto a server, only the servers
appear.
WebFOCUS New Features
13-11
Data Management Console
When the Metadata tab is active, each application directory displays the synonyms
that are available for source and target data in an application’s data flows. The
synonyms in the following pane describe data for a variety of database systems.
When the Adapters tab is active, you can add and configure adapters from the Data
Management Console. The Adapters tab is only visible if you select Enable Adapters
management from the General page of the Tools>Options menu.
13-12
•
The Data Flow workspace, at the right, where the flow is designed.
•
Toolbars, which provide icons for the actions most commonly performed from the
Data Management Console. Active tools correspond to the task currently being
performed. The types of toolbars are:
•
A General toolbar for familiar editing tasks.
•
A Data and Process Flow toolbar for key aspects of the design tasks.
•
A Reporting toolbar for tasks associated with report output.
Information Builders
DataMigrator Enhancements
•
The Message window, which appears below the workspace and displays application
and server messages. The two tabs at the bottom of the window enable you to switch
between Application Log messages and Server messages.
Data Flow/Process Flow Design Paradigm
At the core of DataMigrator is the ability to design data flows and process flows. The
DataMigrator Data Management Console facilitates the design task using two tabs—Data
Flow and Process Flow—and provides a Text View tab from which you can see the code
generated by the graphical tools.
•
Data Flow. Normally, you design a data flow from a set of objects that identify your
data source(s), your data target(s), the columns of data to include in the data target(s),
and the business rules that govern how the data is extracted from the source(s),
transformed, and loaded into the target(s).
You can join multiple data sources, filter and sort the extracted source data, and specify
column mappings from the source to the target.
•
•
Process Flow. You structure how the data flow is processed by positioning objects in
your workspace and defining their interactions. You can combine:
•
A schedule object that defines when to run the process.
•
Data flow objects that indicate what data to extract and move from data sources to
data targets.
•
E-mail objects that notify users about the status of the process at specified points.
•
Stored procedure objects that perform a variety of supplementary tasks before or
after the extraction and load steps defined in a data flow.
•
Connector objects, represented as arrows, that specify execution logic for the objects
in the process flow (for example, what to do next when a step succeeds or fails).
•
Group objects that specify parallel, rather than sequential, execution of a subset of
objects within the total flow. Objects that follow are not executed until processing
for the grouped objects is complete.
Text View. This tab enables you to toggle between the graphical interface and the
underlying code at any point in your design process.
Note: This modular design methodology is new in DataMigrator Version 5 Release 3. If you
are migrating requests that you created in a prior release, they are automatically
restructured based on the new Data Flow/Process Flow paradigm.
WebFOCUS New Features
13-13
Data Flow Interface
Data Flow Interface
Example:
Simple Data Flow at a Glance
Complex Data Flow at a Glance
The Data Flow interface consists of:
13-14
•
The Data Flow tab and workspace, where you build your data flows to extract and
move data from data source objects to data target objects. Arrows connect the objects
and support the flow.
•
The Data Flow toolbar, which enables you to set data flow properties, run flows, and
arrange flow objects. The same toolbar is active when you create process flows.
•
The Navigation pane, where you choose and store flow components. It has three tabs:
•
The Metadata tab shows synonyms
that describe data. You can use them as
data sources or data targets in your flow.
•
The Procedures tab shows flows
and stored procedures
. This tab is where
data flows and stored procedures are saved. You can use the stored procedures in a
data flow, although this tab is primarily used when developing process flows. The
Procedures tab also includes reports folders that provides access to log, statistical,
and scheduler reports, as well as data flow and synonym reports.
•
The Adapters tab allows you to add and configure adapters.
Information Builders
DataMigrator Enhancements
When you create a new flow, the Data Flow tab opens by default, with an SQL object in the
workspace to anchor the flow. By default, the Metadata tab in the navigation pane is active
and ready for you to add data source objects. You can change this from the Options menu
by deselecting the Automatically switch trees check box on the General page. The Flow
toolbar is also active.
You add data source objects and data target objects, and use the SQL object to establish
rules for extracting and moving data between them.
Note: As you build the data flow, you can click the Text View tab at any point to see the
underlying code that is generated as you make your additions and selections.
WebFOCUS New Features
13-15
Data Flow Interface
Example:
Simple Data Flow at a Glance
You can use DataMigrator to build data flows ranging from the simple, where data is moved
from one source into one target, to the complex, which employs multiple sources and
targets and a variety of data extraction techniques.
This simple data flow consists of a data source, an SQL object, and a data target.
To create a simple data flow:
1. Open a new flow.
The Data Flow tab opens by default, with an SQL object in the center of the workspace.
2. To add a data source object, drag a data source object from the Metadata tab of the
navigation pane into the workspace to the left of the SQL object.
3. Select the columns that you want to extract from the source and copy into the target.
Note: If Automatically select all columns is checked in the Data Flow Designer branch of
the User Preferences tree from the Tools>Options menu, you do not need to manually
select columns.
4. To add a data target object to the data flow, right-click the workspace to the right of the
SQL object and select Add Target, then New.
5. Save and run the data flow.
6. View the log file for data flow details.
For more information on how to create a data flow of any complexity, see Chapter 5,
Designing a Data Flow, in the iWay DataMigrator User’s Guide.
13-16
Information Builders
DataMigrator Enhancements
Example:
Complex Data Flow at a Glance
You can define a complex data flow that extracts information from multiple data sources
and copies it into multiple data targets, using extract transformations, joins, filters, and
sorts to refine the results.
This data flow consists of two data sources, an extract transformation, a Join, a filter, a sort,
an SQL object, and two data targets.
To create a complex data flow:
1. Open a new flow.
The Data Flow tab opens by default, with an SQL object in the center of the workspace.
2. To add a data source, drag a data source object from the Metadata tab of the
navigation pane into the workspace to the left of the SQL object.
3. Add a second data source to the flow.
The data sources are connected by a join object, which is linked to the SQL object.
Note: The default setting of the Data Management Console automatically adds a join
object to the workspace. If the Data Management Console is not automatically adding
join objects, you can change the setting by checking Add Join Object if needed in the
Data Flow Designer branch of the User Preferences tree from the Tools>Options menu.
4. Build an expression that creates a new column for extraction in the second data source.
WebFOCUS New Features
13-17
Data Flow Interface
5. Specify join properties.
An inner join is the default. If you are using the default setting for the Data
Management Console, an inner join is created automatically for columns that are
identically named and formatted, if one of them is a key column.
Note: An inner join is created if Automatically add join conditions is checked in the Data
Flow Designer branch of the User Preferences tree from the Tools>Options menu.
6. Create an expression that filters the data prior to extraction.
7. Select the columns you want to extract from the source and copy into the target.
Tip: If Automatically select all columns is checked in the Data Flow Designer branch of
the User Preferences tree from the Tools>Options menu, you do not need to manually
select columns.
8. To add two data target objects to the data flow, drag one from the navigation pane and
create the other.
9. Map the columns from the joined data sources to the existing data target.
The columns in the new data target are mapped automatically.
Tip: If Automatically map all columns is checked in the Data Flow Designer branch of the
User Preferences tree from the Tools>Options menu, you do not need to map columns
manually if the source and target column names are the same.
10. Save and run the data flow.
11. View the log file for data flow details.
For more information on creating this data flow, see Chapter 7, Tutorial: Creating Data and
Process Flows With DataMigrator, in the iWay DataMigrator User’s Guide.
13-18
Information Builders
DataMigrator Enhancements
Process Flow Methodology
In this section:
Creating a Process Flow With a Data Flow
Creating a Process Flow Without a Data Flow
You can create a process flow either with or without a data flow.
Creating a Process Flow With a Data Flow
Although you can build a simple process flow as an extension to an existing data flow, it is
recommended that you create and save each flow and stored procedure separately. With
this modular approach, individual flows (both data and process flows) and stored
procedures can be executed from more than one process flow, and a process flow can be
modified as needed and used to incorporate different data flow and stored procedure
objects. A change to a data flow or stored procedure automatically affects all of the process
flows that use it.
Note: If you click the Text View tab in a process flow created with this method, any data
flows or stored procedures used in the process flow appear as EX procedure_name. If you
want to see the underlying code for the individual procedures, you can right-click the
object and select View as Text.
However, if you want to add a few process flow objects, such as a schedule or an e-mail, to a
data flow, and do not require the advantages of a modular design, save the data flow and
click the Process Flow tab, then add the process flow components to the existing data flow.
Note: If you click the Text View tab in a process flow created with this method, the
underlying data flow and process flow code appears fully, since it is part of the same
procedure.
Creating a Process Flow Without a Data Flow
Normally, process flows manage extraction, transformation, and load processing. However,
process flows are not limited to this implementation. Under some circumstances, you may
wish to create process flows that do not contain any data flows.
Using the same set of design tools, you can, for example, create a process flow that
launches a series of reporting procedures on a defined schedule and then sends e-mail
messages to appropriate recipients when the procedures are complete.
WebFOCUS New Features
13-19
Process Flow Interface
Process Flow Interface
Example:
Simple Process Flow At a Glance
Complex Process Flow at a Glance
The Process Flow interface consists of:
•
The Process Flow tab and workspace, where you build your process flows.
•
The Process Flow toolbar, above the workspace, which enables you to add objects to
your process flow.
•
The Procedures tab in the navigation pane, where you save all flows and other
procedures, and select them for use in your process flows. From this tab, you can also
view logs and reports for your flows. (The Metadata tab in the navigation pane is used
to develop data flows; it does not directly affect process flow development.)
When you create a new flow and click the Process Flow tab, a Start object appears in the
workspace to anchor the flow. The Process Flow icons on the toolbar become active, as
does the Procedures tab in the navigation pane.
You can add a variety of other objects from the Procedures tab or from the toolbar. These
may include a schedule, data flows or other process flows, as single components or as a
group, stored procedures, and e-mail messages, in whatever combination and order suits
your needs.
13-20
Information Builders
DataMigrator Enhancements
Note: As you build the process flow, you can click the Text View tab at any point to see the
underlying code that is being generated as you make your selections.
Example:
Simple Process Flow At a Glance
You can use DataMigrator to design process flows ranging from simple, where you use only
a few process flow components, to complex, where you take advantage of a wide range of
components.
In this example, the process flow includes a data flow that is scheduled to run weekly, on
Thursdays, starting at midnight. At the end of each run, an e-mail message is sent to a
designated recipient to indicate the successful completion of the data flow processing.
To create a simple process flow:
1. Open a new flow and click the Process Flow tab.
The Start object appears by default.
2. To add a data flow object, drag the data flow from the Procedures tab in the navigation
pane into the workspace.
3. To add an e-mail object and create a message, ensure that your server is configured for
e-mail notification.
4. To add a Schedule object, specify when and how often to run the process flow.
5. Connect the objects.
6. Save and run the process flow.
7. View the log file for flow processing details.
For more information on creating a process flow, see Chapter 6, Designing a Process Flow, in
the iWay DataMigrator User’s Guide.
WebFOCUS New Features
13-21
Process Flow Interface
Example:
Complex Process Flow at a Glance
You can design a complex process flow by combining a wider range of objects in the
workspace. You can run stored procedures before and after executing flows, execute flows
concurrently or individually, and send e-mail messages based on the execution’s outcome.
In the following process flow, a setup procedure prepares the environment for data
extraction. Two data flows are grouped to run simultaneously, followed by a Wait object.
When the processing of both data flows is complete, one of two e-mail messages is sent:
one if the previous step is successful; the other if the previous step is unsuccessful. After a
successful run, a cleanup procedure is executed to prepare for the next scheduled process
flow run.
To create a complex process flow:
1. Open a new flow and click the Process Flow tab.
The Start object appears by default.
2. Add a stored procedure to set up the environment prior to data extraction, and
connect it to the Start object.
This procedure runs at the start of the process flow.
3. Add a Parallel Group object for concurrent processing of two data flows, and connect it
to the Stored Procedure.
This enables you to run multiple data flows simultaneously.
4. Add the data flows to the Parallel Group object.
These data flows run simultaneously.
13-22
Information Builders
DataMigrator Enhancements
5. Add a Wait object to ensure that the next step does not begin until all of the data flows
in the Parallel group are complete.
6. Connect the Group object to the Wait object.
7. Add another Data Flow object to be executed when the Wait conditions are satisfied.
8. Connect the Data Flow object to the Wait object.
9. Create two e-mail messages and connect both to the Data Flow object, forming two
branches in the process flow.
10. Send the messages to appropriate recipients when the data run succeeds or fails.
11. Add a cleanup procedure that runs after the data flows, and connects to the e-mail
object upon successful completion the flow.
12. Add a Schedule object and specify when and how often to run the flow.
The Schedule object is connected to the Start object by default.
13. Save and run the process flow.
14. View the log file for flow processing.
For more information on how to create a process flow, see Chapter 6, Designing a Data Flow,
in the iWay DataMigrator User’s Guide.
Integrating DataMigrator Components
How to:
Connect to and Test the Server From the Data Management Console
Launch the Web Console From the Data Management Console
The integration of DataMigrator components is critical to processing your flows effectively.
This integration underscores the need to prepare your server environment properly to
handle all aspects of a DataMigrator operation.
After you configure your server(s) for local or remote data access and install the Data
Management Console, you can define additional server nodes in the client software. The
nodes identify the name and port of the DataMigrator Server(s) to which you are
connecting. Your entries automatically update the client’s odin.cfg file.
After you define the server nodes, you start the Data Management Console and connect to
the DataMigrator Server. From the Data Management Console, in addition to designing
your flows, you can access the Server Web Console to perform key server administration
tasks.
For more information about these tasks, see Chapter 2, Setting Up DataMigrator, in the iWay
DataMigrator User’s Guide.
WebFOCUS New Features
13-23
Integrating DataMigrator Components
Procedure: How to Connect to and Test the Server From the Data Management Console
Before you proceed, it is recommended to test the connection between the iWay Client
software and the DataMigrator Server.
To ensure that the server is running and that you are able to retrieve sample data:
1. From the Windows Start menu, select the iWay Software>IWAY 53 DM Client program
group (or a different program group name if you supplied one during installation), and
then, Data Management Console.
The Data Management Console opens, with the available servers appearing under
Procedures in the navigation pane on the left.
2. Right-click on the server you wish to test and select Connect.
The Enter Connection Information dialog box opens:
3. If your server has security enabled, enter your user ID and password in the User Name
and Password fields.
Windows requires that your user name be no longer than 32 characters.
Note: If you select Save Userid and Password, you do not need to reenter these
credentials each time you connect, and the dialog box does not appear. However, you
must reenter this information when you change your password for the server. To do so,
right-click the server name in the navigation tree and select Properties to reopen the
Remote Server Configuration dialog box.
4. Click Connect.
For data retrieval and processing to occur, you must perform this connection step each
time you start the DataMigrator Server and the Data Management Console.
13-24
Information Builders
DataMigrator Enhancements
5. Right-click on the server name and select Test Server.
If you can connect to the server, the Input Query dialog box opens. select car from car is
the default query.
You can change the test query, but the default, based on sample data delivered with
your software, is sufficient to verify that you can retrieve data.
6. Click Test.
The answer set appears in the right pane of the Data Management Console, behind the
Input Query dialog box.
7. Click Cancel to close the Input Query dialog box and examine the test output.
WebFOCUS New Features
13-25
Source Management With Visual SourceSafe
Procedure: How to Launch the Web Console From the Data Management Console
To facilitate the performance of key server administration tasks, you can access the Web
Console directly from the Data Management Console. This procedure assumes that the
server has already been started.
1. From the navigation pane, right-click a server name, and select Access Web Console.
2. From the secondary menu, select the option that is related to the task you wish to
perform:
•
Home (to see all available console options)
•
Agents
•
Scheduler Configuration
•
Procedures
•
Configure Data Adapters
•
Manage Metadata
For more information about these administrative tasks, see the chapter on planning a
DataMigrator application in the iWay DataMigrator User’s Guide.
Source Management With Visual SourceSafe
How to:
Configure Source Control With SourceSafe
Create Projects in Visual SourceSafe
Create or Change Associations Between DataMigrator Application Directories and
SourceSafe Projects
Add Files to SourceSafe
Check Out Files From SourceSafe
Check Files Into SourceSafe
Undo a Check Out From SourceSafe
View a File’s History, Versions, and Differences
Note: This feature is a Candidate for Release and is not fully implemented in the current
version of DataMigrator. If you have comments about this feature, contact Information
Builder’s customer support.
13-26
Information Builders
DataMigrator Enhancements
DataMigrator provides a direct connection to Microsoft Visual SourceSafe that enables you
to source manage flows, stored procedures, and synonyms. This can provide file backup,
change tracking, and version control, as well as allow multiple users to work on the same
files without overwriting each other’s changes. Visual SourceSafe manages access to the
source code and documents all code changes. Visual SourceSafe maintains a separate
version of your file each time it is checked in.
DataMigrator provides access to basic source management functions through right-click
menu options in the navigation pane which will only appear if you have a SourceSafe client
installed.
Before you can use SourceSafe to manage your DataMigrator files, you must:
1. Configure source control by selecting a SourceSafe database.
2. Create a project in SourceSafe.
3. Create associations between your DataMigrator application directories and your
SourceSafe project.
You can then add file to your SourceSafe system, check them in or out, and see file history,
versions and differences from the Data Management Console.
For detailed information on installing and configuring Visual SourceSafe, and setting up
SourceSafe databases, see your Microsoft Visual SourceSafe documentation.
WebFOCUS New Features
13-27
Source Management With Visual SourceSafe
Procedure: How to Configure Source Control With SourceSafe
To use SourceSafe to source manage your DataMigrator flows, stored procedures, and
synonyms, you must have a SourceSafe client installed and access to a SourceSafe
database.
In the Data Management Console:
1. From the Tools menu, select Create Source Control Configuration.
The Configure Source Control dialog box opens.
2. Enter your User ID, Password and the Path to the srcsafe.ini file for your SourceSafe
database.
3. Optionally, click the Test button to determine if you can connect to the VSS database.
4. Click OK.
The following message appears in the Console Log message window:
Successfully connected to VSS database
Tip: For convenience, it is recommended that you use the same User ID and Password for
both DataMigrator and SourceSafe.
13-28
Information Builders
DataMigrator Enhancements
Procedure: How to Create Projects in Visual SourceSafe
SourceSafe projects, like DataMigrator application directories, work essentially like file
folders. You need to create a project folder to store your DataMigrator files.
1. Launch Visual SourceSafe.
2. Right-click the root project or a subproject where you want to store your DataMigrator
files and select Create Project.
WebFOCUS New Features
13-29
Source Management With Visual SourceSafe
The Create Project dialog box opens.
3. Type in a name for the project. Using the node name, like EDASERVE, will make it easier
to recognize the connection between DataMigrator and Visual SourceSafe.
4. Click OK.
The project is added to SourceSafe.
Normally, SourceSafe requires you to set a working folder, but since DataMigrator is a
client/server application, that is not required. DataMigrator sets an internal working
directory for files under source control and pushes those files to the server when they are
changed.
13-30
Information Builders
DataMigrator Enhancements
Procedure: How to Create or Change Associations Between DataMigrator Application
Directories and SourceSafe Projects
Creating a SourceSafe project provides a place to manage your DataMigrator files. Creating
an association between your application directories and that SourceSafe project tells
DataMigrator where to manage those files in SourceSafe.
In the navigation pane of the Data Management Console:
1. Right-click an application directory and select Source Control>Create Association with
Source Control.
WebFOCUS New Features
13-31
Source Management With Visual SourceSafe
The Create Association with Source Control dialog box opens, which shows your
SourceSafe projects.
2. Select a project folder, in this case EDASERVE, and click OK.
Associating an application directory with the root project folder will create a subfolder
for that application directory in SourceSafe.
You can also use this procedure to change the association of an application directory to
another SourceSafe project.
Note: While the Data Management Console lists application directories according to their
position in your App Path, SourceSafe lists project folders alphabetically.
13-32
Information Builders
DataMigrator Enhancements
Procedure: How to Add Files to SourceSafe
Once you have created SourceSafe projects and created associations in the Data
Management Console, the next step is to actually put the files under source control. In
other words, you need to add them to a SourceSafe project. You can add individual files or
select a group of files from an application directory.
Note: Files that are added or checked into SourceSafe become read-only until they are
checked out. In the navigation pane of the Data Management Console:
1. Right-click an application directory or an individual flow, stored procedure or synonym,
and select Source Control>Add/Check In.
WebFOCUS New Features
13-33
Source Management With Visual SourceSafe
The Add/Check In dialog box opens.
2. Select the files you want to add to SourceSafe. Files that are added are automatically
checked in.
Tip: You can use the Select All check box to both select and deselect all the files.
3. Optionally, you can add comments by typing them into the Comments text box. If you
are adding multiple files, they will all have the same comment.
4. Optionally, you can check the files out by selecting the Keep files checked out check box.
5. Click OK.
Note: The default listing for files in the Add/Check In dialog box is by Type. To list them
by name, click the Files column heading.
13-34
Information Builders
DataMigrator Enhancements
If you open Visual SourceSafe, you will see that the files from the DataMigrator application
directory have been added to the corresponding SourceSafe project folder. The synonym
(dminv) has a .mas extension and the stored procedure (dmdefs) has a .fex extension. The
flow (dmdemo) has two files stored in SourceSafe. The source code is stored in the file with
the .fex extension. The file with the .etg extension holds the information required for the
Data Management Console interface.
WebFOCUS New Features
13-35
Source Management With Visual SourceSafe
Procedure: How to Check Out Files From SourceSafe
For files that are being source managed using Visual SourceSafe, you must check them out
before you can make changes.
In the navigation pane of the Data Management Console:
1. Right-click an application directory or an individual flow, stored procedure or synonym,
and select Source Control>Check Out.
13-36
Information Builders
DataMigrator Enhancements
The Check Out dialog box opens.
2. Select the files you want to check out.
Tip: You can use the Select All check box to both select and deselect all the files.
3. Optionally, you can add comments by typing them into the Comments text box. If you
are checking out multiple files, they will all have the same comment.
4. Click OK.
Note: The default listing for files in the Check Out dialog box is by Type. To list them by
name, click the Files column heading.
WebFOCUS New Features
13-37
Source Management With Visual SourceSafe
If you open Visual SourceSafe, you will see that the files that you checked out from the Data
Management Console have been checked out of SourceSafe. These files are no longer
read-only, which allows you to make changes before checking them back into SourceSafe.
13-38
Information Builders
DataMigrator Enhancements
Procedure: How to Check Files Into SourceSafe
After you have made changes to files, you must check them back into SourceSafe to
maintain a record of those changes. Files that are checked in are copied back to the server.
In the navigation pane of the Data Management Console:
1. Right-click an application directory or an individual flow, stored procedure or synonym,
and select Source Control>Add/Check In.
WebFOCUS New Features
13-39
Source Management With Visual SourceSafe
The Add/Check In dialog box opens.
2. Select the files you want to check in. Only files that have been checked out have Check
In as the possible action. The action for files that have not been added to SourceSafe is
Add/Check In.
Tip: You can use the Select All check box to both select and deselect all the files.
3. Optionally, you can add comments by typing them into the Comments text box. If you
are checking in multiple files, they will all have the same comment.
4. Optionally, you can keep files checked out by selecting the Keep files checked out check
box.
5. Click OK.
Note: The default listing for files in the Add/Check In dialog box is by Type. To list them
by name or action, click the Files or Action column headings.
13-40
Information Builders
DataMigrator Enhancements
Procedure: How to Undo a Check Out From SourceSafe
If you decide that you do not want to make changes to a file, you can undo its check out
from SourceSafe. The file becomes read-only again, and SourceSafe maintains the version
as it existed before the file was checked out.
In the navigation pane of the Data Management Console:
1. Right-click an application directory or an individual flow, stored procedure or synonym,
and select Source Control>Undo Check Out.
WebFOCUS New Features
13-41
Source Management With Visual SourceSafe
The Undo Check Out dialog box opens.
2. Select the file(s) whose check out you want to undo.
Tip: You can use the Select All check box to both select and deselect all the files.
3. Click OK.
Note: The default listing for files in the Undo Check Out dialog box is by file name. To
list them by Type, click the Type column heading.
13-42
Information Builders
DataMigrator Enhancements
Procedure: How to View a File’s History, Versions, and Differences
A file’s source management history records each date and time it was checked in, as well as
the user involved.
In the navigation pane of the Data Management Console:
1. Right-click an individual flow, stored procedure or synonym, and select Source
Control>History.
The History dialog box opens, showing the user, date and time for each check in.
2. Optionally, to view a version of the file, select a row and click the View button.
WebFOCUS New Features
13-43
Source Management With Visual SourceSafe
The code for that particular version opens in Notepad. This is an example of a data
flow’s code.
3. Optionally, to view the differences between two versions, select two rows by clicking
one and CTRL-clicking a second row. Click the Difference button.
Note: To use the Difference feature, you must have WinDiff installed. Windiff is part of
the Windows SDK and is available from Microsoft.
13-44
Information Builders
DataMigrator Enhancements
The difference is shown in WinDiff, which creates an ASCII comparison of the two files.
In this case, the PRICE, COST, and PROFIT columns were added to the SQL Object
through the Selected Columns window. Since LINECOGS is no longer the last line, it
now has a comma. The changes are highlighted here.
WebFOCUS New Features
13-45
Source Management With Visual SourceSafe
13-46
Information Builders
CHAPTER 14
Resource Analyzer and Resource Governor Enhancements
Topics:
•
Rebuild SMCTRL From Resource
Analyzer and Resource Governor
•
Location Information Collection
•
Collecting CPU and Elapsed Time in
Reports in Milliseconds
•
Monitoring of MODIFY
•
Delete by Date Range in Repository
•
Global Rules
•
Capture Information for Cancelled
Queries
•
Managed Reporting Information
Capture
WebFOCUS New Features
This section describes Resource Analyzer and Resource
Governor new features in Version 5 Release 3.
For more information about Resource Analyzer, see the
iWay Resource Analyzer Administrator's and User's Manual.
For more information about Resource Governor, see the
iWay Resource Governor Administrator's and User's Manual.
14-1
Rebuild SMCTRL From Resource Analyzer and Resource Governor
Rebuild SMCTRL From Resource Analyzer and Resource Governor
You can reconfigure Resource Analyzer and Resource Governor from the Web Console. This
feature allows the administrator to specify the adapter and database used to store the
Resource Analyzer/Governor internal information from the Web Console. It removes the
requirement that Resource Analyzer/Governor can only create its internal tables in the first
database definition for a adapter that is defined in the profile.
Location Information Collection
This feature provides a report that displays an overview of the data source, including its
location, the number of times it was accessed, and the number of users accessing the data
source.
Collecting CPU and Elapsed Time in Reports in Milliseconds
To provide more accuracy in resource reports, the elapsed time collected for a request is
now in milliseconds (10,000ths of a second). Both CPU and elapsed time use the same
increment. All reports have been changed to display CPU and elapsed time as
hhhh:mm:ss.nnnn for detail reports and hhhh:mm:ss for summary reports.
Monitoring of MODIFY
This feature monitors all tables used by the FOCUS MODIFY command, including
COMBINEs, cross reference files, and lookup files. Resource Analyzer monitors the date,
time, user ID, databases used, CPU usage, and elapsed time.
Delete by Date Range in Repository
This feature allows users to delete monitored data for a given date range.
Global Rules
This feature provides the capability to create rules for the server that can be applied to all
requests regardless of the data source used.
Capture Information for Cancelled Queries
This feature captures information for queries that are cancelled due to high resource
consumption (not for MVS OS/390 server).
14-2
Information Builders
Resource Analyzer and Resource Governor Enhancements
Managed Reporting Information Capture
This feature captures the full description, short name, application directory, base directory,
domain name, and both Managed Reporting and server user ID.
WebFOCUS New Features
14-3
Managed Reporting Information Capture
14-4
Information Builders
Index
Symbols
Adapter for Informix 12-25
&MSSMSGTXT variable 12-26
Adapter for Ingres 12-26
.NET development environment 9-1
Adapter for J.D. Edwards 12-26
_eda_config setting 6-6
Adapter for JDBC 12-26
_search_begin setting 6-12
Adapter for Microsoft SQL Server 12-26
_search_end setting 6-12
Adapter for Oracle 12-26
A
Adapter for PeopleSoft 12-27
Access Files for IMS 12-17
Across field 2-23, 4-23
ad hoc reporting 4-1
Adabas adapter 12-2 to 12-3
data retrieval types 12-3
handling unreadable descriptor fields 12-5
Adabas Stored Procedures adapter 12-5
Adapter for Adabas 12-2
data retrieval types 12-3
handling unreadable descriptor fields 12-5
multifetch for Joins 12-3
Adapter for Adabas Stored Procedures 12-5
Adapter for Progress 12-28
Adapter for RMS 12-28
Adapter for SAP BW 12-29
cancelling request 12-32
InfoCubes 12-33
Adapter for SAP R/3 12-34
Adapter for Sybase ASE 12-34
Adapter for Sybase IQ 12-35
Adapter for System 2000 12-35
Adapter for Tamino 12-35
Adapter for Teradata 12-35
Adapter for TOTAL 12-35
Adapter for CICS Transactions 12-6
transport layers 12-6
two-phase commit 12-6
Adapter for VSAM 12-35
Adapter for C-ISAM 12-6
Adapter for XML 12-41
Adapter for DATACOM 12-8
adding process flow components 13-22
Adapter for DB2 12-8
adding server nodes 13-23
Adapter for Enterprise Java Beans 12-11
adding servers 13-23
Adapter for Essbase 12-11
Adobe SVG Viewer 7-3
Adapter for Web Services 12-41
Adapter for IMS 12-17
Adapter for IMS Transactions 12-25
WebFOCUS New Features
I-1
Index
aggregate awareness 12-42, 12-44
in RDBMSs 12-43
relational adapters and 12-42
C
aggregated SQL queries 12-42
calculating trends 2-10 to 2-11
multivariate regression 2-11
ALIASFIELD parameter in Essbase 12-15 to 12-16
amper variables 1-32
in Master File DEFINEs 1-32
quote-delimited 1-26
caching Developer Studio 2-36
calendar 2-50
calling stored procedures 12-54 to 12-55
cancelling SAP BW requests 12-32
And/Or keyword 4-22
cardinality in synonyms 12-48 to 12-49
ANSI-compliant reports with no records 1-30
Cartesian Coordinate System 7-4
API syntax rules for graphs 7-20
Cascading Style Sheets (CSS) 4-2
Applet Rectangle 7-9
Catalog Administrator 13-10
application components 2-39
CGI_PROG setting 6-6
application files 3-2
cgivars.wfs configuration file 6-3
arranging graphic elements 2-25, 4-27
changing a user’s Dashboard view 3-6
assigning domains 3-2
changing passwords 5-13
automatic field population 2-47
chart elements 2-25, 4-27
automatic verification 6-27
checking the status of your scheduled jobs 5-9
automatically deleting Distribution Files 5-20
CICS Transaction Adapter 12-6
transport layers 12-6
two-phase commit 12-6
B
background color 4-2
Baltic language on client 6-19, 11-19
Baltic language on server 11-17
BEx structures 12-29
defining 12-30
BI Dashboard alias 6-22
bitmapped graphs 7-2
Brazilian localized version 6-40
bursting reports 5-19
CICS Transaction adapter
creating synonyms using the Web Console
12-52
C-ISAM Adapter 12-6
FairCom c-tree load libraries 12-7
specifying FairCom c-tree file locations 12-7
specifying FairCom c-tree parameter file
locations 12-8
client configuration for Baltic language 6-19, 11-19
Client connections 6-28
and permissions 6-28
Client Path 6-22
I-2
Information Builders
Index
Cluster Join tool 2-39
creating objects 13-20
cluster joins 12-44 to 12-45
creating synonyms from Web Console 12-11, 12-48
to 12-49, 12-52
CNOTATION SET parameter 1-17 to 1-18
code 13-21
code page 137 11-17
code page default 11-17
colors 4-2
column notation 1-17
column numbers, using in a request 1-17
combining expressions 4-22
command console 2-43
commands 2-43
comparing graphs 2-26, 4-28
complex data flows 13-17
conditional styling 2-23, 4-23
configuration files
cgivars.wfs 6-3
configuring 6-21
default values 6-21
configuring access to the ReportCaster user
interfaces 5-3
configuring Developer Studio 2-42
content pages 3-13
cookie expiration 11-15
CREATE FILE command 1-67
creating Execution IDs 5-9, 5-11 to 5-12
creating fields 2-32
creating synonyms using the Web Console 12-52
creating variable fields 2-32
creating WHERE statements 4-13 to 4-14
CSS (Cascading Style Sheets) 4-2
CSS files, customizing 4-3
c-tree ISAM file locations 12-7
c-tree ISAM parameter file locations 12-8
Cube views 12-9
currency symbols 2-2
extended currency symbols 2-3
custom logon template support 2-34, 10-4
custom reports 3-2
importing in Managed Reporting 3-2
in OLAP 4-38
custom templates 3-9
customizing background color 4-2
customizing CSS files 4-3
customizing default colors 4-2
customizing error messages in Dashboard 3-12
customizing graphs 7-20
customizing text color 4-2
customizing the Dynamic Language Switch 5-14,
6-17
customizing the HTML Report/Graph Assistant in
Dashboard 3-8
creating files that already exist 1-67
creating folders in Custom Reports 3-2
creating joins 4-5, 4-8, 4-11
WebFOCUS New Features
I-3
Index
D
DBA security 3-5
Dashboard 3-1
custom templates 3-9
Netscape support 6-41
templates 3-8
text editor 3-14
DBMSs (Database Management Systems) 12-1
Data Flow tab 13-13
default code page on server (Windows and UNIX)
11-17
default colors 4-2
deferred status content page 3-13
data flows 13-13 to 13-14
complex 13-17
designing 13-13
interface 13-14
simple 13-16
define-based joins 4-8
Data Management Console 13-10 to 13-12
adding servers 13-23
designing process flows 13-13
functions 13-10
launching Web Console 13-26
Metadata tab 13-12
navigation pane 13-11 to 13-12
Procedures tab 13-11
testing connections 13-24
testing servers 13-24
Text View tab 13-13
toolbars 13-12
deleting Distribution Files automatically 5-20
data security 3-5, 6-9
Data Servers component 3-2
data sources 4-4
Data Style labels 2-27, 4-29
Database Management Systems (DBMSs) 12-1
DATACOM adapter 12-8
DataMigrator components 13-23
DB2 adapter 12-8
DB2 Cube Views 12-9
mapping metadata 12-9
DBA passwords 1-12, 6-9
I-4
defined fields 4-8
defining BEx structures 12-29
deleting Distribution Files 5-20
deleting Execution IDs 5-9
deleting joins 4-12
DES encryption 10-6
designing data flows 13-13
designing process flows 13-13
Developer Studio 2-1
accessing WebFOCUS Administration Console
2-41
application files 3-2
configuring 2-42
enabling cache 2-36
localized versions 2-59
Netscape support 6-41
running procedures 3-2
security enhancements 2-34
Developer Studio command console 2-43
Developer Studio installation program 2-42
Developer Studio localized versions 2-59
developing domains 3-2
development environments 9-1
diagnostics 6-25
Information Builders
Index
Dialogue Manager variables 1-26
in Master File DEFINEs 1-32
quote--delimited 1-26
quote-delimited 1-26
error messages in Dashboard 3-12
Dimension Builder 2-39
Essbase adapter 12-11
displaying multiple Excel reports 1-64
Essbase ALIAS 12-15 to 12-16
displaying values 2-32
Essbase member name 12-15 to 12-16
Distribution Files 5-20
ETL Manager 13-1, 14-1
domain name for LDAP 11-10
Excel reports 1-64
domains 3-2
Execute Wizard 2-14 to 2-15, 2-30, 4-34
Drill Through feature 5-24
dynamic calendar 2-50
Execution IDs 5-9 to 5-10
creating 5-10 to 5-12
deleting 5-10, 5-13
updating 5-10
dynamic columns in synonyms 12-48 to 12-49
EXL2K Pivot format 5-21
Dynamic Language Switch 5-14, 6-17
expiration time of session 11-15
E
expressions 4-14
combining 4-22
deleting 4-22
grouping 4-22
DROP option 1-67
eda_config setting 6-6
editing application components 2-39
ERROROUT command 2-6
Essbase 7 12-11
editor, in Dashboard 3-14
extended currency symbols 2-2 to 2-3
displaying 2-3
formats 2-3
embedded joins 12-46
F
editing joins 4-12
EMPTYREPORT SET parameter 1-30
enabling the WebFOCUS Servlet Plugin 6-7
FairCom adapter for c-tree ISAM
load libraries 12-7
encrypting ReportCaster cookies 10-6
FairCom c-tree ISAM files 12-7
encryption for LDAP 11-10
FairCom c-tree ISAM parameter files 12-8
encryption providers for ReportCaster 10-6
FETCHJOIN 12-3
ENDSTYLE command 7-18
field formats 2-8
Enterprise Java Beans adapter 12-11
field name referencing 4-42
equijoins 12-45
field names in OLAP 4-42
error checking 12-26
WebFOCUS New Features
I-5
Index
field options 4-25
G
field referencing in OLAP 4-42
general settings 6-6
_eda_config 6-6
CGI_PROG 6-6
IBI_BACKUP_DIR 6-7
REDIRECT_COOKIE 6-7
SAVE_FEX 6-6
WFEXT 6-7
WRTRANSINOUT 6-7
fields 2-32
file names in -INCLUDE 1-14 to 1-15
files 1-85
filters, maintaining across joins 1-71
flows 13-13
FML 1-80 to 1-81
increased row limit 1-80
retrieving tag lists 1-81
retrieving tag values 1-82
GIF graphs 7-2 to 7-3
FML hierarchies 1-83
Graph Assistant 4-1
customizing in Dashboard 3-8
Data Style labels 2-27, 4-29
Graph Preview 2-25, 4-27
graph styles 4-31
graph types 4-31
redesigned interface 2-22
redesigned interfaces 4-2
rotating text 2-27, 4-29
FMLCAP function 1-83
FMLFOR function 1-82
FMLLIST function 1-81
FOCUS DBA security 3-5
font sizes in graphs 7-8
FOR lists, retrieving 1-81
formatting currency 2-2
Frame Rectangle 7-9, 7-11
French localized version (Developer Studio) 2-59
FTP 13-8
fully qualified field names 4-26
functions 1-81
FMLCAP 1-83
FMLFOR 1-82
FMLLIST 1-81
Fusion 13-9
graph API calls 7-18
graph API syntax rules 7-20
Graph Preview 2-25, 4-27
graph settings 6-8
IBIF_graphAgents 6-9
IBIF_graphengine 6-8
IBIF_graphHeadLess 6-8
IBIF_graphservurl 6-8
SSG_EXTERNAL 6-9
graphic elements 2-25, 4-27
graphs 2-50, 4-31
formats 2-29, 4-31, 4-33
Graph Assistant 4-31
sizing in the Resource Layout Painter 2-50
styles 4-31
grouping expressions 4-22
grouping WHERE statements 4-22
I-6
Information Builders
Index
H
IBIF_olappos setting 6-11
HDAM databases 12-17
IBIMR_prompting setting 6-10
heterogeneous joins 12-44
IBIMR_RC_SVCUSER setting 6-10
hidden parameters 2-58
ibimultilanguage.js file 6-17
HNODATA command 2-6
IBIODP_disable_msg setting 6-12
Hold dialog box 2-7
IBIWF_index setting 6-11
HOLD files 2-7
IBIWF_mframename setting 6-10
HOLD FORMAT VISDIS 1-86
IBIWF_morder setting 6-10
HOLD formats 2-7
IBIWF_mprefix setting 6-11
HOLDMISS command 2-6
IBIWF_mrcolumns setting 6-10
HTML Graph Assistant 4-1
customizing in Dashboard 3-8
redesigned interfaces 4-2
IBIWF_mreports setting 6-11
HTML Report Assistant 4-1
customizing in Dashboard 3-8
redesigned interfaces 4-2
IBIWF_mrrows setting 6-11
implementing graph API calls 7-18
importing Custom Reports 3-2
HTTP protocol 12-41
IMS Data adapter 12-17
Access Files for 12-17
creating synonyms using the Web Console
12-11
https certification 2-42
IMS Transactions adapter 12-25
HTTPS protocol 12-41
-INCLUDE command 1-14 to 1-15
I
include parameters 5-19
IBI_AUTOPROMPT_CGI_PROG setting 6-13
Informix adapter 12-25
IBI_BACKUP_DIR setting 6-7
Informix support 5-2
IBIF_dbapass_src setting 6-9
Ingres adapter 12-26
IBIF_dbapass_src variable 10-2 to 10-3
integrating DataMigrator components 13-23
IBIF_graphAgents setting 6-9
invoking stored procedures 12-55
IBIF_graphengine setting 6-8
issuing commands 2-43
http errors in Dashboard 3-12
IBIF_graphHeadLess setting 6-8
IBIF_graphservurl setting 6-8
IBIF_odpenable setting 6-12
WebFOCUS New Features
I-7
Index
J
L
J. D. Edwards adapter 12-26
language selection on logon pages 5-14, 6-17
J2EE development environment 9-1
LDAP security 11-10
Japanese localized version (Developer Studio) 2-59
LDAP support 11-10
JDBC adapter 12-26
ldap_encryption setting 11-10
join operations 12-3
ldap_port setting 11-10
join structures 4-4
creating 4-5, 4-8, 4-11
deleting 4-12
editing 4-12
ldap_server setting 11-10
Join tool 2-39, 4-4
positioning tables with 2-39
joining data sources 4-4
joins 1-80
cluster 12-44
embedded in Master Files 12-45 to 12-46
heterogeneous 12-44
increased limit 1-80
maintaining filters during 1-71
Legend Rectangle 7-9, 7-16
limits 1-85
files in MATCH FILE 1-85
FML rows 1-80
number of joins 1-80
links to WebFOCUS applications 6-23
load libraries for FairCom c-tree ISAM 12-7
localized version in Portuguese 6-40
localized versions of Developer Studio 2-59
location of recording/playback files 11-18
JPEG graphs 7-2 to 7-3
locked content block 3-11
JPEG image format 1-65
log messages 13-22
JPG format 5-21
logging off of WebFOCUS Environments 2-35
K
logging on to WebFOCUS Environments 2-35
KEEPFILTERS SET parameter 1-71
key file format 10-8
logon for WebFOCUS 5-24
logon pages language selection 5-14, 6-17
logon template security 10-4
logon templates 10-4
M
Maintain 6-22, 8-1
CGI 6-22
ISAPI 6-22
path 6-22
I-8
Information Builders
Index
maintaining filters across joins 1-71
mime.wfs settings 1-64
Manage Users 3-6
minus edit display option 2-8
Managed Reporting 3-1
application files 3-2
configuring tool types 6-19
Custom Reports 3-2
data security 3-5
default value 6-22
default values 6-21
Netscape support 6-41
running procedures 3-2
tool types 6-19
modifying procedures in Custom Reports 3-2
Managed Reporting Environment (MRE) 5-24
multiple Excel reports 1-64
Managed Reporting settings 6-9
IBIF_dbapass_src 6-9
IBIMR_prompting 6-10
IBIMR_RC_SVCUSER 6-10
MR_BASE_HTML_DIR 6-10
MR_PARSER_VERSION 6-10
MR_TEMPLATE_DIR 6-10
MRUSERLOG 6-14
REPOSITORY_DRIVER 6-9
multiple reports settings 6-10
IBIWF_index 6-11
IBIWF_mframename 6-10
IBIWF_morder 6-10
IBIWF_mprefix 6-11
IBIWF_mrcolumns 6-10
IBIWF_mreports 6-11
IBIWF_mrrows 6-11
MR_BASE_HTML_DIR setting 6-10
MR_PARSER_VERSION setting 6-10
MR_TEMPLATE_DIR setting 6-10
MRUSERLOG setting 6-14
Multifetch in join operations 12-3
multi-field joins 4-11
managing Custom Reports 3-2
multivariate regression 2-10 to 2-11
REGRESS method 2-11
managing projects 13-27
mutlifetch for joins 12-3
managing users in Dashboard 3-6
N
mapping metadata for Db2 Cube views 12-9
Natural subprogram 12-5
MATCH FILE 1-85
navigation pane 13-11, 13-20
Metadata tab 13-12
Procedures tab 13-11
maximum number of domains 3-2
member name for Essbase 12-15 to 12-16
Message window 13-12
messages in Dashboard 3-12
Metadata Manager 13-10
Metadata tab 13-12
Microsoft SQL Server adapter 12-26
WebFOCUS New Features
negative numeric data 2-8
Netegrity SiteMinder 2-34, 10-5
Netscape support 6-41
nodes 6-2
changing 6-2
profiles for specified servers 6-2
I-9
Index
NORMSDST function 2-13 to 2-14
NORMSINV function 2-13 to 2-14
NULL command 2-6
numeric display options 2-8
numeric field formats 2-8
O
objects 13-20
passwords 1-12 to 1-14
changing 5-13
for accessing data 10-2 to 10-3
passwords in DBA 1-12
PDF Drill Through 5-24
PeopleSoft adapter 12-27
performance settings 6-13
ODP_target setting 6-12
performing calculations
NORMSDST function 2-14
NORMSINV function 2-14
OLAP 4-1, 4-37
field name referencing 4-42
saving reports 4-37
PERMPASS SET parameter 1-12 to 1-13
OLAP settings 6-11
playback options 11-5
on demand paging settings 6-12
_search_begin 6-12
_search_end 6-12
IBIF_odpenable 6-12
IBIODP_disable_msg 6-12
ODP_target 6-12
plotting a Frame Rectangle 7-11
ON GRAPH SET GRAPHSTYLE * command 7-18
Oracle adapter 12-26
Oracle E-Business Suite 12-27
Oracle E-Business Suite Adapter 12-27
output file formats 2-7
overwriting synonyms 12-48 to 12-49
PERMPASS setting 10-2 to 10-3
plotting a Legend Rectangle 7-16
plotting a three-dimensional graph 7-14
plug-ins 6-7
PNG (Portable Network Graphics) 7-3
PNG format 5-21
port number for LDAP 11-10
Portable Network Graphics (PNG) 7-3
Portuguese localized version 6-40
positioning tables 2-39
P
predicting values 2-10 to 2-11
multivariate trends 2-11
parameter prompting settings 6-13
IBI_AUTOPROMPT_CGI_PROG 6-13
preserved table positioning in graphical tools 2-39
parameters 2-14, 2-58
hidden 2-58
passing to procedures 2-14 to 2-15, 2-30, 4-34
procedures 2-14, 2-39
calling procedures 2-14 to 2-15, 2-30, 4-34
editing 2-39
passing parameters 2-14 to 2-15, 2-30, 4-34
parenthesis 4-22
Procedures tab 13-11, 13-20
partitioned HDAM databases 12-17
I-10
Information Builders
Index
Process Flow tab 13-13, 13-20
REDIRECT_COOKIE setting 6-7
Process Flow toolbar 13-20
REGRESS method 2-10
process flows 13-13, 13-20
adding components 13-22
complex 13-22
designing 13-13
simple 13-21
removing OLAP functionality 4-42
PROCSEQ parameter 12-19 to 12-20
Program Specification Blocks (PSBs) in IMS 12-17
Progress adapter 12-28
Properties Window 2-44
PSBs (Program Specification Blocks) in IMS 12-17
PSLOGIN command 12-28
Q
Report Assistant 4-1
customizing in Dashboard 3-8
display formats 4-26
fully qualified field names 4-26
Read limits 4-26
Record limits 4-26
redesigned interfaces 4-2
report field options 4-25
Sort by fields 4-25
warning messages 4-26
report field options 4-25
report formats for use in ReportCaster 5-21
query
BEx 12-29 to 12-30
ReportCaster 5-1
context root 6-22
default value 6-22
deleting Distribution Files 5-20
Netscape support 6-41
quote-delimited 1-26
ReportCaster Bean API 5-24
quote-delimited string 1-26
ReportCaster Console options 5-9 to 5-10
Execution ID 5-10
Status 5-9
qualified file names in -INCLUDE 1-14 to 1-15
QUOTEDSTRING 1-26
R
Read limits 4-26
ReportCaster Servlet API 5-24
read-only content block 3-11
ReportCaster settings 6-29
verification of 6-29
recalculating fields 4-25
reporting objects 4-4
RECOMPUTE 1-2
and propagation to grand total 1-74
and SUMMARYLINES 1-2
combined with other summary commands 1-3
reports 4-13
combining expressions 4-22
editing as text 2-39
styling 2-23, 4-23
Record limits 4-26
REPOSITORY_DRIVER setting 6-9
records 4-13
selecting 4-13 to 4-14
styling 2-23, 4-23
Resource Layout Painter 2-44, 2-50
Properties window 2-50
sizing graphs 2-50
WebFOCUS New Features
I-11
Index
retrieving FML hierarchy captions 1-83
Secure Hyper Text Transport Protocol 2-42
retrieving records in IMS 12-19 to 12-20
security 10-4
retrieving segments in IMS 12-19
security enhancements 2-34
revised functionality 13-8
security modes 11-10
RMS adapter 12-28
selecting records 4-13 to 4-14
rotating text 2-27, 4-29
selection criteria 2-23
RSA ClearTrust 10-5
server configuration for Baltic language 11-17
RSA ClearTrust support 2-34
server for UNIX default code page 11-17
running a schedule immediately 5-6
server for Windows default code page 11-17
running procedures 3-2
server nodes 13-23
running process flows 13-22
servers 13-23
S
Session Beans 12-11
SAP BW adapter 12-29
cancelling requests 12-32
InfoCubes 12-33
session expiration time 11-15
SAP BW InfoCubes 12-33
SAP R/3 adapter 12-34
save options 2-22, 4-4
SAVE_FEX setting 6-6
SAVEDMASTERS command 2-6
saving custom reports in OLAP 4-38
saving reports 2-22, 4-4, 4-37
session parameters for SAP BW 12-33
SESSION_EXPIRATION setting 11-15
SET commands 2-6
ERROROUT 2-6
HNODATA 2-6
HOLDMISS 2-6
NULL 2-6
ON GRAPH SET GRAPHSTYLE * 7-18
SAVEDMASTERS 2-6
SET MEASURE 12-11
scheduling process flows 13-22
SET parameters 10-2
CNOTATION 1-17 to 1-18
EMPTYREPORT 1-30
KEEPFILTERS 1-71
PERMPASS 1-12 to 1-13, 10-2 to 10-3
SUMMARYLINES 1-2, 1-74 to 1-75
search_begin setting 6-12
SET PERMPASS command 3-5
search_end setting 6-12
SET SCENARIO 12-11
secondary indexes in IMS 12-19 to 12-20
SET USEALIASENAME 12-16
saving reports without OLAP functionality 4-42
saving standard reports in OLAP 4-41
Scalable Vector Graphics (SVG) 7-2
I-12
Information Builders
Index
setting a permanent DBA password 1-12
styling reports 2-23, 4-23
setting measures from Web Console 12-11
Submit as deferred option 11-5
setting scenarios from Web Console 12-11
subroutines 5-24
simple data flows 13-16
SUB-TOTAL 1-2
and propagation to grand total 1-74
and SUMMARYLINES 1-2
combined with other summary commands 1-3
SiteMinder 10-5
Sort by field options 4-25
source control 13-27
source management 13-26
SUBTOTAL 1-2
and propagation to grand total 1-74
and SUMMARYLINES 1-2
combined with other summary commands 1-3
specifying file locations for c-tree ISAM 12-7
sub-totaling fields 4-25
specifying file locations for FairCom c-tree ISAM
12-7
subtotaling fields 4-25
source file management 13-27
specifying location of recording/playback files
11-18
specifying parameter file locations for c-tree ISAM
12-8
subtotals 1-2
and SUMMARYLINES 1-2
combinations of 1-2
specifying parameter file locations for FairCom
c-tree ISAM 12-8
SUMMARIZE 1-2
and propagation to grand total 1-74
and SUMMARYLINES 1-2
combined with other summary commands 1-3
SSG_EXTERNAL setting 6-9
summary commands 1-2
stand-alone development 2-42
SUMMARYLINES SET parameter 1-74 to 1-75
and combinations of summary commands 1-2
standard reports 2-44
standard reports in OLAP 4-41
Status option in ReportCaster 5-9
Sun JCE provider support for encryption 10-9
SVG (Scalable Vector Graphics) 7-2
SVG format 5-21
stored procedures 12-54 to 12-55
executing 13-22
specifying parameters 12-54 to 12-55
SVG Viewer 7-3
stress test options 11-5
Sybase IQ adapter 12-35
strings 1-26
Sybase support 5-2
WebFOCUS New Features
Sybase ASE adapter 12-34
I-13
Index
SYNONYM table type 12-48 to 12-49
TOTAL adapter 12-35
synonyms 13-12
cardinality in 12-49
CDD Repositories and 12-28
COBOL File Definition and 12-6, 12-25
creating from Web Console 12-49
dynamic columns in 12-49
overwriting 12-49
selecting databases for 12-25 to 12-26, 12-34
SYNONYM table type 12-49
tracing for the WebFOCUS Client 6-24
System 2000 adapter 12-35
updating Execution IDs 5-9
T
updating workspace service profile 12-28
tab-delimited files 2-7
tables 2-39
TABT format 2-7
tag lists 1-81
tag lists, retrieving 1-81
tag values 1-82
Tamino adapter 12-35
templates in Dashboard 3-8
templates, custom 3-9
Teradata adapter 12-35
Teradata macros 12-35
text color 4-2
text editor 2-39
in Dashboard 3-14
text rotation 2-27, 4-29
Text View tab 13-21
three-dimensional graph effect 7-14
tool types 6-19
associating users with tools 6-19
toolbars 13-12
I-14
triple DES encyrption 10-6
two-phase commit 12-6, 12-25, 12-41
U
uniform field name referencing 4-42
updating a user’s Dashboard view 3-6
USER attribute 1-13
user IDs 5-24
user interface 2-36
User Properties Domain option 3-2
utilities 6-19
V
Variable Editor 2-32
displaying values 2-32
variable fields 2-32
variables 1-26, 1-32, 2-10
dependent and independent 2-10
in Master File DEFINEs 1-32
quote-delimited 1-26
variables in Master Files 1-32
vector graphs 7-2
verification 6-27
automatic 6-27
Client connections and permissions 6-28
ReportCaster settings 6-29
WebFOCUS Reporting Server 6-30
XML processing 6-33
verification tool 6-26 to 6-30, 6-33
Information Builders
Index
verifying Client connections 6-28
version control 13-27
View Builder templates 3-8
viewing a log report for a specific schedule, Log
icon 5-7
viewing code 13-21
viewing fully qualified field names 4-26
Virtual Coordinate System 7-4
virtual fields 1-32
VISDIS format 1-86
Visual Discovery format 1-86
VSAM adapter 12-35, 12-38
VSAM CICS 12-35
W
warning message in heading 4-26
wc_cookie_expiration setting 11-15
Web Console 13-26
accessing 13-26
changing SAP BW session parameters 12-33
configuring VSAM 12-38
creating synonyms 12-11, 12-48 to 12-49,
12-52
creating synonyms for CICSTRAN 12-52
creating synonyms for IMS 12-11
launching 13-26
setting measures from 12-11
setting scenarios from 12-11
Web Services 9-1 to 9-2
Web Services adapter 12-41
WebFOCUS New Features
WebFOCUS
alias 6-22
application alias 6-22
CGI 6-22
CGI/ISAPI alias 6-22
context root 6-22
ISAPI 6-22
Servlet 6-22
WebFOCUS Administration Console 6-7
_eda_config setting 6-6
_search_begin setting 6-12
_search_end setting 6-12
CGI_PROG setting 6-6
changing settings for 6-3
Developer Studio 2-41
general settings 6-6
graph settings 6-8
IBI_AUTOPROMPT_CGI_PROG setting 6-13
IBI_BACKUP_DIR setting 6-7
IBIF_dbapass_src setting 6-9
IBIF_graphAgents setting 6-9
IBIF_graphengine setting 6-8
IBIF_graphHeadLess setting 6-8
IBIF_graphservurl setting 6-8
IBIF_odpenable setting 6-12
IBIF_olappos setting 6-11
IBIMR_prompting setting 6-10
IBIMR_RC_SVCUSER setting 6-10
IBIODP_disable_msg setting 6-12
IBIWF_index setting 6-11
IBIWF_mframename setting 6-10
IBIWF_morder setting 6-10
IBIWF_mprefix setting 6-11
IBIWF_mrcolumns setting 6-10
IBIWF_mreports setting 6-11
IBIWF_mrrows setting 6-11
Managed Reporting settings 6-9
MR_BASE_HTML_DIR setting 6-10
MR_PARSER_VERSION setting 6-10
MR_TEMPLATE_DIR setting 6-10
MRUSERLOG setting 6-14
multiple reports settings 6-10
I-15
Index
WebFOCUS Administration Console (continued)
ODP_target setting 6-12
OLAP settings 6-11
on demand paging settings 6-12
parameter prompting settings 6-13
performance settings 6-13
quick links to applications 6-23
REDIRECT_COOKIE setting 6-7
REPOSITORY_DRIVER setting 6-9
SAVE_FEX setting 6-6
SSG_EXTERNAL setting 6-9
verification tool 6-26
WF_BURST_OUTPUT setting 6-13
WF_DATATRANSFER_SIZE setting 6-13
WF_OPTIMIZEIO setting 6-13
WFEXT setting 6-7
WFTRANSINOUT setting 6-7
WFEXT setting 6-7
WebFOCUS Client traces 6-25
XML processing files 6-33
WebFOCUS Client tracing 6-24
XML processing files, verifying versions 6-33
WebFOCUS code 2-39
Z
WebFOCUS cookie (WF_COOKIE) 5-24
zero records in a report 1-30
WFTRANSINOUT setting 6-7
WHERE statements 4-13 to 4-14
combining expressions 4-22
creating 4-13
WHERE TOTAL statements 4-13 to 4-14
workspace service profile 12-28
X
XA support 12-41
XA Transaction Management feature 12-41
X-axis properties 2-27, 4-29
XML adapter 12-41
WebFOCUS Environments 2-35
WebFOCUS environments
logging off 2-35
logging on 2-35
WebFOCUS logon 5-24
WebFOCUS Maintain 8-1
WebFOCUS Reporting Server 6-30
connection 6-30
WebFOCUS Servlet Plug-in 6-7
WebFOCUS Web Services 9-1 to 9-2
WF_BURST_OUTPUT setting 6-13
WF_COOKIE (WebFOCUS cookie) 5-24
WF_DATATRANSFER_SIZE setting 6-13
WF_OPTIMIZEIO setting 6-13
I-16
Information Builders
Reader Comments
In an ongoing effort to produce effective documentation, the Documentation Services staff at
Information Builders welcomes any opinion you can offer regarding this manual.
Please use this form to relay suggestions for improving this publication or to alert us to corrections.
Identify specific pages where applicable. You can contact us through the following methods:
Mail:
Documentation Services - Customer Support
Information Builders, Inc.
Two Penn Plaza
New York, NY 10121-2898
Fax:
(212) 967-0460
E-mail:
[email protected]
Web form:
http://www.informationbuilders.com/bookstore/derf.html
Name:_________________________________________________________________________________
Company:______________________________________________________________________________
Address:_______________________________________________________________________________
Telephone:____________________________________Date:_____________________________________
E-mail:_________________________________________________________________________________
Comments:
Information Builders, Two Penn Plaza, New York, NY 10121-2898
WebFOCUS New Features
Version 5 Release 3
(212) 736-4433
DN4500579.0904
Reader Comments
Information Builders, Two Penn Plaza, New York, NY 10121-2898
WebFOCUS New Features
Version 5 Release 3
(212) 736-4433
DN4500579.0904