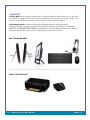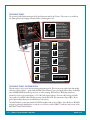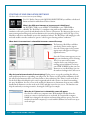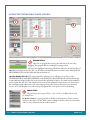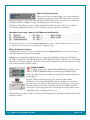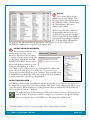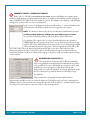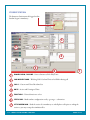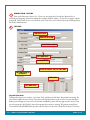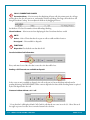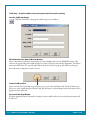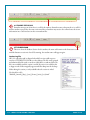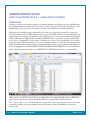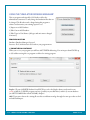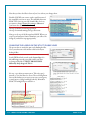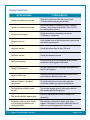
1
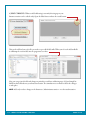
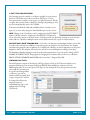
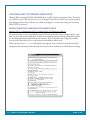
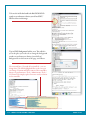
User Manual
9 - 1 - 1 R e a l i t y Tr a i n i n g S tat i o n
Pag e : B - 1
IMPORTANT INFORMATION
WEB RESTRICTED TO INSTRUCTOR/ROLE PLAYER STATIONS
The simulator will not operate as expected if any of the student stations are allowed to access the internet.
Internet access is hidden but not deleted from the student stations. The system can be hard wired with CAT
5 cables if you wish to use the internet on the units.
PROGRAMS ADDED ON
Station programs allow viewing of the DVDs and Power Points. Open Office and Power Point Viewer allow
for tasks you may want your learners to participate in. A flash drive is provided for transfer of documents or
documentation of any errors or problems you may encounter. Use your flash drive to upload documents or
programs to your system.
TROUBLESHOOTING
When encountering an error on the screen hit the prt scr tab on the top of the keyboard. This will take a
snapshot of your screen. Next open Paint from Accessories and hit Paste. This will place your snapshot on
the screen. Save As jpg and store it on your 9-1-1 Reality Flash Drive so that you can send a snapshot of
what you are viewing to our techs from any computer with internet. Send to [email protected].
RETURN POLICY
In the event you wish to return 9-1-1 Reality, each station must be returned within five days of delivery in
the original shipping boxes. You must contact 1.800.830.8228 to obtain a return authorization. All
authorized returns will result in a 15% restock fee.
WARRANTY
Equipment warranty on the stand-alone computer systems is one year parts and service. Warranty on the
software is one year. Supplier warrants, at the time of acceptance of the Products in whole or in part, and for
a period of twelve (12) months from such acceptance, the software will be free from defects in materials or
workmanship and will function in accordance with the system description.
USER CONFIGURABLE FILES
ALI DATABASE can be user defined — Unlimited additions using ACCESS
CALL TYPES can be user defined — Maximum Call Types: 999
AREA BEATS can be user defined — Maximum Beat index: 999
UNIT IDENTIFIERS can be user defined — Maximum Units number: 999
9 - 1 - 1 R e a l i t y Tr a i n i n g S tat i o n
Pag e : B - 2
HARDWARE
An All In One defines a desktop computer that is combined with a monitor all into one case. Recently
these kinds of computers have become extremely popular because they save on desk space and are easy
to move around. Products shown here may not be the actual model/make shipped.
Full package contains: Instructor Station(s) and Student Station(s). All stations will be
All In One Complete Computers, with wired keyboard, wired mouse, wired headset. An additional
INSTRUCTOR MONITOR SCREEN is included for each ordered Instructor Station. Each Reality
system also includes (1) wireless router, (1) wireless printer and connector cords.
One Station Includes:
EACH SYSTEM INCLUDES:
9 - 1 - 1 R e a l i t y Tr a i n i n g S tat i o n
Pag e : B - 3
UPON RECEIVING YOUR 9-1-1 REALITY!
Not Just A Simulator! There are two ways you can train and learn with your 9-1-1 Reality Stations.
You have the option to:
1) Use the Instructor Tools and the 1Student Learning Center.
2) Work with the Call Taking and Radio Simulator software.
1) The Instructor Tools provide a variety of teaching helpers and are contained in the desktop folder
named Instructor Teaching Center. You’ll also find a folder with tutorials. Student Learning Center
provides a variety of ways to learn and practice using the simulation software.
2) 9-1-1 Reality Call Taking and Radio Dispatch simulation software is installed on your stations and can
be selected for simulation lab training by selecting the 911 Instructor or 911 Trainee icons on the
desktop. Selecting this icon will bring up your simulation CAD Card and allow the stations to
communicate for a learning session for call taking and radio dispatch.
Two Types of Stations. There are two types of stations; 1) the Instructor/Administrator station is
dedicated as such and the 2) Trainee station. You will know which unit is which as the screen will indicate
Instructor or Trainee upon start up.
Multiple Station Lab Set Up. In the event your lab has numerous stations, each Trainee will be required to
indicate which other station they will be training with as the trainer/instructor can design the simulation
session in many ways. The instructor can work with one student or all students.
Customizing Your Simulation Software. Prior to designing your lab sessions, you have the ability to load
your own addressing, call types, unit numbers and sound effects into your software. You can also change
these options at any time. See complete instructions in the document under Administration. The program
used to customize your ALI, Units and Call Types is called SIMULATOR DATABASE MANAGER.
1
The terms trainee and student are interchangeable.
9 - 1 - 1 R e a l i t y Tr a i n i n g S tat i o n
Pag e : B - 4
TRAINING TOOLS
The system is loaded with training tools for the Instructor and for the Trainee. The tools are accessible on
the desktop shortcuts leading to another folder containing the tools.
Instructor Tools
Notes from Simulation
Sessions, Recording Logs,
Sound Effects, Reality
Manuals, Quiz Template,
Ring Ring Simulation
Books, Assessments Typing
Test, 9-1-1 Instructor —
Simulator Start Up, 9-1-1
Trainee — Trainee Start Up
Jeopardy Millionaire
(9) Power Point
Exercises; Liability,
Police, Fire EMS etc.
Customer Service
Power Point
Workshop
with eBook
DVDs & Workbooks
(6) 20 minutes DVDs;
Call Taking, Radio,
Crisis, Suicide, More
E Radio Workshop
Emergency Radio
Power Point
Workshop
with eBook
9-1-1 Call Cards
(3) Call Guides
(50) 9-1-1 Actual
Calls Embedded,
Police, Fire, EMD
Call Taking Mastery
Power Point
Workshop
with eBook
9-1-1 Scripted Calls
(3) Intense 9-1-1 Calls
Scripted, Police,
Fire, EMD
Stress Training
Negativity eBook,
Stressful Job eBook,
Chill Out eGame
Domestic Violence
Power Point
Workshop
with eBook
See more information
on each included product
at www.911trainer.com!
Additional product downloads available for purchase
TRAINING TOOLS INFORMATION
Take the time to review your various learning and training tools. The various tools require basic knowledge
of the use of Power Point — particularly the Slide Show feature. Upon opening the Power Point workshops
select SLIDE SHOW from the top menu to view the training. The Instructor Workshop Guides are
narrated so check your sound volume. 9-1-1 Call Cards require patience for some calls are large and take
30 seconds to load. PDF and DVD files open up with double click. This system uses Open Office. If you
prefer Microsoft products you can add them to your system.
The ALI Database is customized with ACCESS from Microsoft or Open Office. Your eBooks are PDF files
and can be printed for distribution or read on screen. Please read the ABOUT cards for each section in the
INSTRUCTOR TOOLS folders.
9 - 1 - 1 R e a l i t y Tr a i n i n g S tat i o n
Pag e : B - 5
STARTING UP YOUR SIMULATION SOFTWARE
You have either one or two icons on your desktop.
For 9-1-1 Reality Owners with ONE ON ONE STATION you will have a dedicated
Instructor Station and dedicated Trainee Station.
What is the difference between an Instructor and a Role Player?
An INSTRUCTOR is your AGENCY TRAINER or your TEACHER or
INSTRUCTOR — officially. The ‘Role Player’ is a student acting with another student so that
simulation calls can be practiced and submitted to the Trainer or Instructor. The Instructor has access to
many training and teaching tools and can administer the system by changing the ALI, Call Types, Unit
Identifiers and other customizable areas in the simulation software. The Role Player will simply give calls
and radio traffic to another student for ‘practice’ which is great learning without evaluation.
When the 911 Instructor icon is selected the Instructor screen will start up.
The Instructor/Role Player will then
wait for the Trainee unit to sign in.
Once the Trainee signs in, the persons
sign-in name will appear in the upper
right hand corner.
Once the Trainee name appears, you can
begin your simulation practice learning.
There is one more task you must
complete before you can begin your
training session and that is to start up
your VIEW SCREEN so that you as an
Instructor or your Role Player can view
the student working in the CAD screen.
Why do I need to know what the Trainee is doing? Unless you are very good at tracking the calls you
make and the units that are responding, you will get lost. The Trainee screen has all the information on all
the calls. For the Instructor this is a necessary feature so that evaluation of the Trainee’s work can be done.
For the Role Player this helps keep the session organized and the other Trainee can learn from watching
the entry. In addition, the view screen can be used by the Instructor to demonstrate how an entry could be
handled as the Instructor can also work on the CAD card that is non the view screen. The Instructor can
help the student by correcting a narrative, locating the Call Type for example.
When the 911 Trainee icon is selected this screen will appear.
One On One will list one computer name. With multiple Lab this allows the
sessions to connect to the Instructor to work with. It is essential the computer
NAME is not changed or the software and networking will not operate. Once the
student selects which computer(s) to work with the Student Screen will come up so
work can begin.
9 - 1 - 1 R e a l i t y Tr a i n i n g S tat i o n
Pag e : B - 6
Instructor Station (Role Player Station)
1
4
6
2
3
5
1
7
RECORD REPLAY
This is an exe program that sits atop the card and can be moved by
dragging. This program allows recording the training session.
Hit Start Record prior to initiating a call (the bar will turn red) and Stop Record
after disconnecting from the call. The *.rec file will be automatically saved in a folder on the desktop labeled
RECORDINGS and each file will be labeled studentname.rec
How Do I Replay The Calls? The only method for replaying your recordings is to use this recorder.
Hit REPLAY, find the folder RECORDINGS on the desktop then find the file labeled with the student sign
in name and time stamp. Double click on the found call to upload then replay it. You must exit the simulation
session to play the calls. The calls will play when you are in the simulation session however we have found
the sound may sound underwater as the competing open lines often (but not always) are overwhelmed.
You access VCS911Replay.exe recorder from your program files or the speaker icon on the desktop.
2
PHONE PANEL
The panel shows three types of lines : (4) 9-1-1 lines, (1) Business Line and
(4) Utility Lines.
T1-(4) 9-1-1 Lines are outgoing only when called from the Instructor. Trainees cannot
call out on these lines. On the Trainee station calling on this line will create an incident
card for ‘every’ call initiated to the student station.
9 - 1 - 1 R e a l i t y Tr a i n i n g S tat i o n
Pag e : B - 7
When The Call Is Connected?
When an ALI is selected and the phone icon is selected that line
will flash and ring for the student. When the call is answered the
hand icon will appear. To place the call on HOLD click this hand icon. The icon will turn red. To take the
call off hold click the red hand icon again. Clicking the phone icon disconnects.
The Instructor/Role Player can initiate calls to multiple lines while currently on a line (i.e. can call in on
Line2 while speaking to the student on Line1). Instructors need not put lines on hold at all.
With Many Lines on Hold – How Can I Tell What Line Has Which Call?
The line the call came in on is listed on Current Incidents box. (Note : Call 10 on Hazetine did not come in on
a 9-1-1 line, the card was created as in incident from a traffic stop TS).
What Is The Business Line For?
Communications on non 9-1-1 lines to and from either party. Business Line does not create an incident
card. The business line label cannot be changed.
Utilities lines are designed as ‘Ring Down Lines’ to frequently called numbers and can be labeled by the
user. When a utility line is called from the Instructor/Role Player the T button will ‘dance’ to let the student
know where the call is coming from. These lines cannot be put on hold by the student, the instructor acting
as the utility can put the student on hold.
3
RADIO CHANNELS
(2) Radio channels are available. A BLUE ARROW icon indicates a live
channel – WHITE ARROW indicates muted. Pressing the BLUE triangle
activates the radio. Radio can be used when on the phone and will be heard in the
headset right ear.
Large PTT blue arrow below the logo is the ‘simulcast’ button. Radio
transmissions are recorded with the Replay button only IF you are on a phone
line. You cannot record radio exclusively, the way around this is to open a phone
line when wishing to train radio only and record. The Record Button must be
pressed prior to opening the phone line, leave the phone line open until you have
completed the radio recording you wish to save.
When both parties activate the radio at the same time, a dinging sound will be heard. Volume is for the radio
and phone volume.
9 - 1 - 1 R e a l i t y Tr a i n i n g S tat i o n
Pag e : B - 8
4
ALI LIST
Your system is delivered with a
default Anytown ALI/ANI list. 2This
list can be customized using Microsoft
ACCESS. Open Office is installed as an
ACCESS substitute. 999 custom
addresses can be added.
The Instructor/Role Player must select
the desired ALI address to fit the type
of call for the scenario before calling the
911 line. Ensure that the desired address is
highlighted before pushing the telephone
line, or the last address will dump into
the Incident Card, and must be deleted. All telephone calls answered on 9-1-1 lines will create an
INCIDENT CARD with no recognition of any duplicate ALI.
5
INSTRUCTOR/ROLE PLAYER NOTES
This notepad is intended for use
during a student training session.
Instructor/Role Players have the ability
to real time view the student’s work with
the INSTRUCTOR/ROLE PLAYER
MONITOR SCREEN. Instructor/Role
Players will also have comments to write
during the calls regarding the student’s
voice, manner, service and questions or dispatching skills. The address will
appear only for the ALI that is selected. Therefore, to create notes on a
certain call, select that call and enter your comments. The notes will be saved
in the INSTRUCTOR NOTES folder on the desktop and can be printed or
stored in student files or another specific grading file.
INSTRUCTOR VIEW SCREEN
Each Instructor Station includes an additional computer monitor that acts as a real time viewing screen for
the student. This viewing can be initiated by pressing the VNC viewer icon and dragging the student screen
over to the monitor. When an Instructor is working with more than one student there will be additional
VNC icons labeled “Student1” “Student2.”
The additional feature for this instructor tool allows the instructor interact on the Trainee screen
with the Trainee. The Instructor could (for example) correct a narrative or change the Call Type
choice by moving the mouse to the VIEW screen and typing on the student screen.
2
ALI can be modified or created new. You can use multiple ALI for training multiple jurisdictions.
9 - 1 - 1 R e a l i t y Tr a i n i n g S tat i o n
Pag e : B - 9
6
CURRENT STUDENTS - CONNECTED STUDENTS
In the event 9-1-1 Reality is one station to one station, this area will display the computer name...
Student 1. Students must enter first and last name and use no numbers. This student real name will appear
under CURRENT STUDENT when the student is selected. On multiples select Student 3 and that name
will appear so you know who it is you are working with.
In the event your configuration involves multiple students — connected students will
tell the Instructor/Role Player which stations are signed in to the session.
NOTE: The Instructor Station can only act as an Instructor/Administrator position.
So when working with many students do I work with only one at a time?
Yes, you will select which student to call on the phone, others will monitor.
One student will recognize they are selected and should answer the call when a
GREEN BAR appears on the bottom of their screen. All non-selected monitoring
students will notice a RED BAR at the bottom of their screen. Monitoring students
will be automatically muted on the phone. Monitoring students will be able to fill
out CAD Cards on the call. Monitoring students will be able to save their CAD entry into logs.
Monitoring students are able to answer the radio on all calls without being selected. Instructors can
switch from student to student at will but must hang up on the phone with each student upon selecting
another student.
7
BACKGROUND SOUND EFFECTS
The system allows an Instructor/Role Player to manually
start or stop playback of a background noise audio file from a palette
of (5) possible choices to be mixed with an active phone call or radio
transmission. Once the Instructor/Role Player has started a
background noise audio file playback, the system will play the audio
file in a continuous loop until the Instructor/Role Player stops
the playback.
These sounds can be changed by the System Administrator.
All potential sound effects can be viewed in the Instructor Tools folder to preview before replacing in the
simulation software. You may load your own wav files into the ini file to upload — and these may be actual
911 calls you want the trainee to enter into CAD or other training reasons.
9 - 1 - 1 R e a l i t y Tr a i n i n g S tat i o n
Pag e : B - 10
Student Station
The Instructor Station must be logged on first.
Student Logon is mandatory.
3
1
2
4
5
6
7
1
PHONES RADIO / VOLUME – Same as Instructor/Role Player unit
2
CAD INCIDENT CARD – Working CAD Card and Units to be filled in during call
3
CALLS – Current and Closed Incidents List
4
UNITS – Active and Unassigned Units
5
FUNCTIONS – Various functions to select
6
STATUS BAR – Multi-student configuration notify – green go – red monitor
7
LITTLE GREEN MAN – Ends the session. It is mandatory to end all phone calls prior to ending the
session or you may corrupt the simulation files.
9 - 1 - 1 R e a l i t y Tr a i n i n g S tat i o n
Pag e : B - 11
1
PHONES RADIO / VOLUME
2
CAD CARD
Same as the Instructor Station. 9-1-1 Lines are incoming only for students. Business line is
incoming and outgoing. Volume bar adjusts the student’s headset volume – be sure the computer volume
is adjusted. Utility lines do not create incident cards. These lines can be labeled as any desired Ring Down
line by the Administrator.
Name Upon Sign In
Populated by System
Populated by ALI Choice
Pull Down Choice
Populated by ALI
Entered by Learner – Must hit time stamp
Time Stamp for Entry
of New Data
End This Call
Pull Down Choice
Dispatch/Clear Units
To dispatch a unit for one incident, select from ‘Unit’ pull down and click the ‘dispatched’ timestamp. The
selected unit will be shown in ‘Active Units List’ and on that Incident on the screen in ‘Current Incidents’.
Primary unit will appear connected to the Incident and Back Up units will only appear in the Active Units
box referencing the call. Click the ‘arrived’ timestamp when units are arriving. The primary unit will not
clear until the call is ENDED. Back up units will clear whenever the unit is clicked in the Active Units box.
9 - 1 - 1 R e a l i t y Tr a i n i n g S tat i o n
Pag e : B - 12
3
CALLS / CURRENT AND CLOSED
Current Incidents – Non interactive box displaying all open calls, the primary unit, the call type
and the phone line the call came in on, and number of units responding. Selecting a call in this box will
bring the Incident Card up. You can adjust the field size by dragging the boxes.
In=Incident # T=Line N=number of units IsPending=Pending
Closed Incidents – Non interactive box displaying the list of incidents that have ended
4
UNITS
Active – A list of Units that have been put on calls or traffic and their location.
Unassigned – Units available to dispatch.
5
FUNCTIONS
Disposition User defined non data drive field.
Save the Incident Card Information
Every card must be saved after the data is entered or the data will be lost.
Pending a Call if no units are available to dispatch
In the event no unit is available to dispatch, the call can be put in Current Incidents and indicated as
pending by hitting CALL PENDING. When a unit is dispatched on that call the Pending Status is replaced
by the unit dispatched to the call.
Create an incident without a 9-1-1 call
“Create Incident” will display a blank CAD Card for calls that do not come in on the 9-1-1 lines. Not used
for traffic stop turned incident, there is another button below for that.
9 - 1 - 1 R e a l i t y Tr a i n i n g S tat i o n
Pag e : B - 13
Traffic Stop – for police traffic or other police patrol work that needs recording.
Start the Traffic Stop Popup
Click blue car button to bring up the traffic stop/on view window.
Fill Information in On View Traffic Stop Window
Select a unit from the pull down menu, input a location and plate and select the TRAFFIC button. This
will close the popup and put the traffic stop into the Active Units box only with the designation TS with the
unit name and location. To reopen double click in the Active Units box pop up, this will return the prior
box so the name or disposition can be entered.
Create a Traffic Incident
In the event the On View Traffic stop results in an arrest or needs an Incident Card, click the leftmost open
file icon to create a traffic Incident Card in CAD. This will open a card and dump current information in the
popup into the CAD Card.
Erase the Traffic Stop Window
Click the rightmost button with trash can image so that no traffic incident is created and no unit status will
be affected.
9 - 1 - 1 R e a l i t y Tr a i n i n g S tat i o n
Pag e : B - 14
6
911 Trainee Status Bar
7
Little Green Man
Status bar turns green when there is a call for the student. Status bar turns red means there is a call for
another student connected to the same session and the red student may monitor the call and enter their own
information into CAD and save in their own student files.
This icon closes the Student Session for the student, the name will remain on the Instructor screen
until the Instructor session is closed. If returning, the student name will appear again.
Student Log File
All 9-1-1 calls taken and/or dispatched and all on view traffic stops are
saved in a STUDENT LOG folder on the desktop. The file can be printed
and submitted for lab work or saved on a flash drive or student folder. The
file is not available until the session is ended. No action is needed for this
to happen as the folder magically appears and files dump into the desktop
folder during the session yet only available after the session is ended.
You should see a file
“NAME_{month}_{day}_{year}_{hours}_{min}_{sec}.html”
9 - 1 - 1 R e a l i t y Tr a i n i n g S tat i o n
Pag e : B - 15
ADMINISTRATOR GUIDE
HOW TO CUSTOMIZE YOUR 9-1-1 SIMULATION SOFTWARE
ADDRESSING
In order to create the most realistic setting for your learning simulation you will want to create ALI addressing
for residential and business that matches your vicinity or your own locale. You also have the ability to create
multiple ALI with easy upload to your software in order to study different areas of the jurisdiction.
ALI Anytown is included in your program and can be used as is or replaced at any time by creating your
own ALI (unlimited) in ACCESS. ALI can only be created in ACCESS and lists in other formats such as txt
must be imported according to the guidelines in ACCESS. Once you create your new ALI in ACCESS this
mdb file will need to be uploaded into your ARTTCOMMS folder to replace the current view. This folder
is located in: C: Program Files / ArtComms / 911Trainer.ini. Copy over the other mdb file. If you wish to
change the ALI for different locations you can create and drop each day as needed. The entry format must be
followed with maximum number of letters or numbers.We have created an easy program for uploading new
ALI or changing current ALI called SIMULATOR DATABASE MANAGER located on your Instruction
Station. Easy directions are located in your DESKTOP TUTORIALS by Camtasia — a narrated show.
When you have the ARTTComms folder open simply replace the existing ALI.mdb with your NEW ALI.
mdb – your new file must be named exactly ALI.mdb to be recognized by 911 Reality Software.
Note – if you wish to create 3 ALI files mdb you can name them whatever you want but when you are ready
to upload new ALI to use in your simulation the new file must be renamed ALI.mdb to overwrite the
Anytown file.
9 - 1 - 1 R e a l i t y Tr a i n i n g S tat i o n
Pag e : B - 16
USING THE ‘SIMULATOR DATABASE MANAGER’
This exe program was designed for 911 Reality to allow the
administrator/instructor to easily change the simulation files that can
be changed. The files that can be changed using this program to
enhance and customize your training experience are:
1) Import new ALI Database
2) Edit Current ALI Database
3) Edit Types & Unit Names (call types and unit names changed
in minutes)
PROGRAM LOCATION
Simulator Database Manager is located:
Instructor Tools / Administrative Tools and on your program menu
1) IMPORT NEW ALI DATABASE
When you receive your program you will have ANYTOWN addressing. You can import from EXCEL up
to 999 addresses using this exe program or add to the existing program.
Replace? To put a full NEW database from EXCEL you select the Replace button as shown then use
search to find the 1) EXCEL program you have (possibly on your flash drive) and the 2) current database
(in ARTTCOMM folder named ALI.mdb). Import!
Add? To put more data to the existing file use this second button and go through the same procedure to find
and add with Import.
9 - 1 - 1 R e a l i t y Tr a i n i n g S tat i o n
Pag e : B - 17
2) EDIT CURRENT? Whatever ALI addressing is currently showing up on your
Instructor station can be edited easily. Open the Edit feature and use the search button.
This search will lead you to the file you need to open called ALI.mdb. When you select the ALI.mdb file
it will dump the current ALI into the program as seen here.
Now you can go into this file and change any mistakes or add new addressing up to 999 and simply hit
SAVE an this will load onto your Instructor Station. The simulaiton screen must be off for the changes
to take place.
NOTE: ALI only needs to change on the Instructor / Administrator station – not the student station.
9 - 1 - 1 R e a l i t y Tr a i n i n g S tat i o n
Pag e : B - 18
3. EDIT TYPES AND UNIT NAMES
Your training experience must be as realistic as possible for your learners,
therefore 911 Reality expects that you will use Call Types / Codes /
Descriptors that are unique to your agency or CAD or jurisiction. We also
recognize that you may want to change the Call Types depending on what
you are training that day; police, fire or EMD.
Unit names should fit the shift and availability that is common to your
agency so you can easily change the Unit Identifiers prior to the session.
NOTE: Changes to the Unit Names can be completed on the STUDENT
station. Call Types must be completed on the INSTRUCTOR station.
Go to each trainee station to the ArtComms / 911trainer.ini file (use find Unit) and type in your own unit
names and save. This allows multiple stations to have different units (fire or pd) on various stations.
MULTIPLE UNITS GREAT TRAINING IDEA — If you have one Instructor and multiple students you are able
to easily set up each station as a different responder type by entering their own Unit Names. For example
One Instructor giving the call to 4 students, one of which is the call taker, one the fire dispatcher, one the police
dispatcher, and one the call taker. All can hear the call, all can enter and dispatch according to their duty.
The Simulation Database Manager is placed on all student stations however is only used to change UNIT
NAMES, NOTHING ELSE. The program for changing the Unit Name daily or whenever is called the
SIMULATION DATABASE MANAGER and is located in C: Program Files X86.
CHANGING CALL TYPES
From the Instructor station use the Import Call Types feature. Click on 911Trainer.ini and this sweet
program will show up. You can import a file from EXCEL Named MyTypes in Instructor Tools /
Administrative files. Or you can type the Call Types in, this example does not show priorities but they
can be added. Unit names can
be typed in and changed daily
or whenever you wish to
simulate a different squad, shift
or type of responder ...and can
be changed for all from the
instructor station or
individually by going to each
student station to change
UNITs only.
9 - 1 - 1 R e a l i t y Tr a i n i n g S tat i o n
Pag e : B - 19
CHANGING AND CUSTOMIZING SIMULATION
Warning! When changing SOUND and PHONE files you will be directly entering the ini files. The ini files
are extremely sensitive. The system arrives to you working perfectly, if the system does not work as intended
after changing the files as directed below, most likely a missing space or some other change was entered not
EXACTLY as it was before.
INSTRUCTIONS FOR CHANGING THE SOUND EFFECTS
Instructor Tools / 1. Administrator Tools / Computer Tools / 911 Trainer ini - Shortcut
The shortcut leads you to the system INI files named 911Trainer.ini. Ini files tell your computer what to name,
what to look at, what to do basically. These ini files run the simulation software for both stations. Most ini files
are not changeable and if changed will destroy the software. There are files that can be changed if you follow
clear directions. If the files are not re created exactly as intended they will not work.
When you click on the Shortcut you will end up at the right place that contains the ini file that is ready for
editing. You will see this list of various files that run the system, most of which you are NOT allowed to change.
9 - 1 - 1 R e a l i t y Tr a i n i n g S tat i o n
Pag e : B - 20
To locate the ini file that handles the BACKGROUND
sounds on your Instructor Station you will use EDIT /
FIND as shown in this image.
Type in FIND background and hit enter. This will take
you to the place you need to be to change the background
sounds on your Instructor Station (sound effects).
Background is on the bottom of the page, scroll down.
You currently have (4) sound effects installed – you can
change these. The blue highlighted files are the ones you
can change. You must match the names of the sound files
that are in your Instructor Tools / Administrator Tools /
911 Sound. You simply replace the name exactly as shown
in the sound file.
9 - 1 - 1 R e a l i t y Tr a i n i n g S tat i o n
Pag e : B - 21
Now that you have the files in front of you, here is how you change them.
Find the SOUND you want to replace and the name of
the sound file you want to enter. You will find this name
EXACTLY as it is in your 911 Sound folder. Let’s say
you want to change Woman Screaming to Shots.wav
(you listened to it and like Shot better).
On top of Woman Screaming type Shots.
On top of womanSreaming.wav type Shots.wav.
Next go to the top of the Notepad and SAVE. When you
reopen your Instructor Station Simulator you will see the
change if you did the steps appropriately.
CHANGING THE LABELS ON THE UTILITY PHONE LINES
The process here is exactly the same as for finding the files.
Go to your shortcut to the ini files as before from your
desktop folder.
Search FIND with the search words Contact Page #2 —
this will bring you to the area of the ini file you want
to change to label the UTILITY PHONE LINES
differently. Only change the Title!!!
It’s easy – type what you want next to Title=(no space)
instead. i.e. over State Patrol or Power. These are Ring Down
Lines so label whatever you use in your area or your agency
or mock agency (colleges and high schools). Remember
EXACT meaning NO space after the =.
9 - 1 - 1 R e a l i t y Tr a i n i n g S tat i o n
Pag e : B - 22
TROUBLESHOOTING
If this happens
It could be this
Sounds are underwater at times
Open the Instructor and let the system cycle
3 minutes before opening the Student.
Sounds are underwater at times
Your other wireless is competing with ‘911Reality’
wireless – hard wire the computers with a Cat5 or
turn off the other wireless.
Student cannot sign on
Check your wireless connections to ensure
‘911Reality’ is connected.
Volume is too low
Go to Speaker icon on the bottom menu, open mixer
and check volume levels.
Volume is too low
Check the volume bars on the CAD card.
Volume is too low
Check your headset volume.
Can’t hear anything
Check the plug in for the computer, often the two
connectors are plugged in backwards.
Wrong ALI Showed up
You must ensure the ALI is properly selected or the
last ALI will reappear
Narrative didn’t save
After every entry on the narrative you must hit the
save button on the lower menu bar.
Selected Student 1, Student 2
rang instead
On the first call you must manually select the
connected student you want or it will default.
The record feature didn’t record
the call.
Turn on the recorder prior to calling out, and turn
the recorder off after hanging up.
The .rec call wouldn’t open or play.
The only way to play an .rec call is to open it in
the Replay.
Simulation software seems frozen
or is doing things different, not
working as before.
Like with any software that seems to be stuck,
reboot. If that doesn’t work call 1.800.830.8228 and
talk to us or email [email protected].
9 - 1 - 1 R e a l i t y Tr a i n i n g S tat i o n
Pag e : B - 23