1
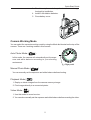
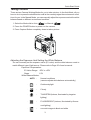
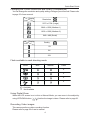
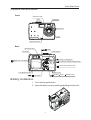
Quick Start Guide
Camera Nomenclature
Front
Self-timer lamp
Viewfinder
Flash
3
x
M
Microphone
DI
G I TA L Z O O
Lens
Exposure sensor
Back
Operation lamp
button
Power button
Viewfinder
/ Zoom In / Up button
/ Self-timer / Left button
/ Continuous shutter / Right button
/ Zoom Out / Down button
Battery cover
LCD Monitor screen
/ / Flash / / Play / / Pause button
/ /Stop button
Battery Installation
1. Turn camera upside-down.
2. Open the battery cover by pushing and sliding into the side.
1
Quick Start Guide
3. Check inscription on battery chamber for correct negative/positive installation.
4. Install 2-AA alkaline batteries.
5. Close battery cover.
Camera Working Mode
You can select the camera’s working mode by using the Mode dial located on the top of the
camera. There are 4 working modes in this camera.
Auto Photo Mode (
)
In this mode, the camera will automatically set the exposure and white balance according to your shooting
environment.
Align point
Manual Photo Mode (
)
You can manually set the exposure and white balance before shooting.
Playback Mode (
)
1. Replay or delete images from the camera memory storage.
2. Print images directly to a connected printer.
Video Mode (
)
1. Use this mode to record movies.
2. You can also manually set the exposure and white balance before recording the video.
2
Quick Start Guide
Taking Pictures
There are two Camera Working Modes for you to take a picture. In the Auto Mode, all you
have to do is to press the shutter button and let the camera judges the environment conditions for you. In the Manual Mode, you can manually adjust the exposure and set the white
balance based on different environment condition.
1. Select the Mode dial to Auto (
) or Manual (
).
2. Press the POWER button to power on the camera.
3. Press Capture Button completely down to take a picture.
Adjusting the Exposure And Setting the White Balance
You can manually set the exposure value (EV value) and the white balance mode to
match different type of light source. Please refer to Page 20 of user’s manual.
Exposure Compensation:
EV Value Range: -2EV to +2EV
Steps:
1/3V
White Balance Modes:
· AUTO Normal conditions
(camera adjusts white balance automatically)
·
-
Outdoor daylight
·
-
Cloudy
·
-
TUNGSTEN (Indoors, illuminated by tungsten
lighting)
·
-
FLUORESCENT (Indoors, illuminated by fluorescent lighting)
·
-
converts images to black and white
3
Quick Start Guide
Changing the Picture Resolution and Quality (Compression)
You can change the resolution and quality setting of images you will record. Please refer
to page 22 of user manual.
Display
Resolution
Icon
2272 x 1704 (Large)
2048 x 1536 (Medium-1)
1600 x 1200 (Medium-2)
640 x 480 (Small)
Display
Quality
Icon
5X
8X
12X
Flash available in each shooting mode
Mode
Auto
Manual
Video
X
X
X
X
: Available
X : Not Available
Using Digital Zoom
When the LCD screen is on in Auto or Manual Mode, you can zoom in the subject by
using UP/DOWN button (
/
) before the image is taken. Please refer to page 26.
Recording Video images
This camera performs video-recording function.
Please refer to page 28 of user’s manual.
4
Quick Start Guide
Reviewing Your Pictures and Videos
Viewing Pictures
Select the Mode dial to Playback (
) to view pictures and images.
1. You can view up to 9 images at a time by using the THUMBNAIL function (
).
Please refer to page 31 of user’s manual.
2. In Playback mode, use RIGHT/LEFT button to scroll the images.
3. When viewing a single image in Playback Mode, you can magnify the image you
selected by using UP/DOWN button. The scale of magnification is x1.0 ~ x4.0.
Please refer to page 32 of user’s manual.
Deleting Pictures
You can delete single or all images in Playback mode. Please refer to page 33 of user’s
manual.
Running a Slide Show
View your pictures on the camera LCD screen by using the Slide Show feature. The
pictures appear for a period of 5 sec. or 10 sec. upon the time you set. Please refer to
page 37 of user’s manual.
Downloading Images to a Computer
There are two ways to download images taken with the camera to a computer.
1. Directly from the SD card. Please refer to page 44 of user’s manual.
2. Connect the camera to a computer via the USB cable. Please refer to page 45 of
user’s manual.
A. If operating system is Windows 98/98SE, make sure that you install the USB
driver that comes on the bundled CD-ROM first. Please refer to Page 45 and 48
of user’s manual.
B. Connect the supplied USB cable to the computer’s USB port.
C. Turn on your camera, and your computer will detect the camera and then automatically complete the camera installation.
D. A “ Removable Disk” will be displayed under “ My Computer”.
E. Double-click the “ Removable Disk” and you will see a “DCIM” folder.
F. All the images stored on your camera memory storage are transferred to the “
DCIM” folder.
5
Quick Start Guide
Quick Start Guide
Digital Still Camera
3.2 Mega Pixel