1
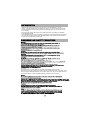
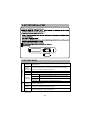
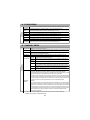
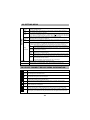
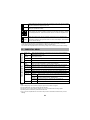
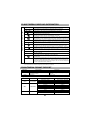
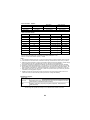
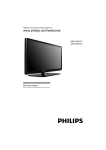
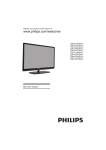
LCD/LED
TELEVISION
1st proof - 15-7-13
SANSUI COMBO - LED (1100098898) 13-7-13
Shri. Ganesh Lasane sir / Shri. Snehal Sir
MESSAGE FROM THE VICE CHAIRMAN & CEO
Dear Customer,
It gives me great pleasure to welcome you to the SANSUI family.
Our sincere endeavour is to provide you with best quality products & service
support, which lay the foundation for a binding relationship with you. One that
stands the test of time to grow stronger with our every interaction.
At SANSUI, we have set ourselves a goal to continuously challenge ourselves
to contribute towards your happiness. That’s how with extensive research and
creativity we present a whole new range of products - designed with superior
technology in both picture and sound - so that nothing (else) sounds better.
Warm regards,
(Vice Chairman & CEO)
1.
INTRODUCTION.......................................................................................... 2
2.
WARNING AND SAFETY PRECAUTIONS................................................. 2
3.
ANTENNA AND EXTERNAL EQUIPMENT CONNECTION........................ 3
4.
NAMES AND FUNCTIONS OF CONTROLS ON SET................................. 4
5.
NAMES AND FUNCTIONS OF CONTROLS ON REMOTE........................ 5
6.
BATTERY INSTALLATION.......................................................................... 8
7.
PICTURE MENU......................................................................................... 8
8.
SOUND MENU............................................................................................ 9
9.
CHANNEL MENU........................................................................................ 9
10.
SETTING MENU.........................................................................................10
10.1. EASY CONNECT & DEVICE MENU INFORMATION..............................10
11.
PARENTAL MENU....................................................................................... 11
12.
MULTIMEDIA GUIDE BAR INFORMATION................................................12
13.
MULTIMEDIA SUPPORT FORMATS..........................................................12
14.
TECHNICAL SPECIFICATION....................................................................14
15.
TROUBLESHOOTING................................................................................15
NOTE : Pictures and OSD shown in this User Guide Book are just for representation.
Actual product may look differ than representation.
Product disposal Guidelines:
For the purpose of recycling to facilitate effective utilization of resources, please
return this product to a nearby authorized collection center, registered dismantler,
recycler, service center when disposing of this product.
In case of further assistance, you may contact nearest authorized service center.
Or Please see the Company website for further information on collection centers etc.
Visit-http://www.sansui-india.com
(
)
Thank you for choosing our product. You can use it as a color television or as a PC
monitor. To be able to make use of all application options, we recommend that you should
read this operating manual carefully and keep it somewhere where you have quick access
to it, if required.
Do not touch any parts in the set and do not make changes to any settings not described
in this operating manual.
The LCD/LED screen is a high-tech product consisting of more than 900000 control elements.
Any non-active red, blue or green spots that might appear on the screen occasionally have
no effect on the performance of the screen.
Cleaning :
For safety, remove the AC plug from the wall outlet before cleaning the set.
Clean the dust on set by wiping the screen and the cabinet with a soft, clean cloth. If the
screen requires additional cleaning, use a clean, damp cloth. Do not use liquid cleaners
or aerosol cleaners or liquid containing benzol, petroleum or a chemicals.
ANTENNA CONNECTION: AV OUT
ANT IN
AV OUT
ANT IN
L1in
YPbPr
L IN 1
Connect Antenna cable to the ANT IN Socket on rear of the TV. For Good
operation of the set, good signal is required. In the strong signal area, an
indoor antenna could be used, otherwise an outdoor antenna should be used
Note: - The aerial cable should not be bundled to the power cord.
R1in
V1 in
R IN 1 V IN 1
CD/DVD Player
YPbPr INPUT
COMPONENT (YCbCr/YPbPr) DVD INPUT: 1. Connect the component outputs (YCbCr / YPbPr) of DVD player to the
component (YPbPr) input of the TV.
2. Connect audio outputs (L/R) of a DVD player to the audio input YPbPr.
3. Press the PLAY button on the DVD player.
AV INPUT
AV INPUT: - 1.Connect the composite VIDEO output of player to AV1.
2. Connect audio outputs (L/R) of a player to the audio input AV in.
3. Press the PLAY button on the Player.
Note : Selecting a Source
Press TV/AV key on remote or SOURCE key on front panel keypad. A source OSD will appear to select a
source press OK/Right or Left key on the remote or VOL + key from front panel. Press TV/AV key or source
key repeatedly to change and select source. Up/Down key on the remote or CH+/- on front panel
can be used to change sources.
HDMI
VGA INPUT
VGA
Audio in
HDMI INPUT
VGA INPUT: - 1. Connect the VGA cable from the monitor
output socket of the PC to the VGA IN socket of the TV.
2. Connect the audio cable from the PC to the VGA Audio
IN socket of the set.
3. Switch on the PC and PC screen appears on the TV set.
The set can be operated as PC monitor.
Note: - A. If the set is cold, there may be a small flicker
when the set is switched ON. This is normal, there is
nothing wrong with the set.
B. Some dot defects may appear on the screen, like Red/
Green/Blue spots. However, this will have no impact or
effect on the TV/Monitor performance.
HDMI INPUT: - 1. Connect the HDMI(High Definition Multimedia Interface) cable from the DVD HDMI
Output socket to the HDMI socket of the TV.
2. Set the HDMI mode in DVD Player (Refer User Manual of DVD Player).
Note: - TV can receive the Video and Audio signal simultaneously by using HDMI cable.
R
L
AV OUT: - This connection is used for connecting the TV/AV,
signal from TV SET 1 to TV SET 2.
VIDEO
MULTIMEDIA: - Connect / Insert standard USB and select
USB
HDMI
AV OUT
ANT IN
Multimedia source on source OSD by pressing TV/AV key.
Press OK / Right key on remote, connected USB is listed,
press OK to enter in selected USB Multimedia. Similarly front
panel keys CH+/- and VOL+ can be operated as Up/Down
and OK/Right keys on remote respectively.
NOTE: - CH +/CH- keys on Remote are represented by CH+/CH- on the TV set.
VOL+/VOL- keys on remote are represented by VOL+/VOL- on the TV set.
4. NAMES AND FUNCTION OF CONTROLS ON SET
A) Front Panel Control/Keys (Optional)
1
2
3
4
5
6
7
8
9
9
1)
2)
3)
4)
5)
8 9
6) TV/AV
7) Stand By
8) LED INDICATOR
9) IR SENSOR
10) AC Power in
VOL+
VOLCH+_
CHMENU
11)
12)
13)
14)
15)
USB
HDMI
VGA Audio In
VGA IN
YPbPr In
16)
17)
18)
19)
20)
L1
R1
V1
AV Out
ANT In
10
YPbPr
11 12 13
14
15 16 17 18
19 20
Note :
1) Above Sketches are just representation. Actual TV set may look differ than these sketches.
2) When press a key on TV key pad i.e. keys from 1 to 7, a key press indicator will appear on the
TV screen. When a key is pressed, the indicator of that key is highlighted. This is to indicate
the function of the key you are pressing. (This is an optional feature).
E-SAVER
ECO
PLAY/PAUSE
INDEX
GUIDE
INFO
MIX
DISPLAY
POWER
TXT
HOLD
CANCEL
RETURN
REVEAL
REPEAT FREEZE ANGLE
1
2
3
4
5
6
7
8
9
PICTURE
0
SOUND
SLEEP
CH
MUTE
VOL
CH
PIP/POP
PIP-POS PIP-ZOOM
SWAP
GUIDE
INFO
RETURN
TXT
INDEX
CANCEL
REPEAT
FREEZE
ANGLE
CC
MIX
HOLD
REVEAL
SUPAG
ENERGY
METER
SCENE
SELECT
MTS
ECO
SOUND
PICTURE
I/II
QV
ZOOM
VOL
TV/AV
(OPTIONAL)
VCHIP
MENU
(OPTIONAL)
(OPTIONAL)
NOTE : This is for representation actual remote and ley printing may differ.
5
POWER
Turns TV into STANDBY ON / OFF
DISPLAY
MUTE
DISPLAY: - Displays present source information with details of input signal connected.
MUTE: - Turns sound OFF or ON.
SOURCE SELECTION (TV/AV)
Press TV/AV key on remote or SOURCE key on front panel keypad, a source OSD
will appear to select a source press OK/Right key on the remote or VOL + key from
front panel to select the source. Up/Down key on the remote or CH+/- on front panel
can be used to navigate in source list.
TV/AV
SLEEP
SLEEP:- "Sleep timer max time is 120 min in steps of 5,10, 30, 60,120 minutes.
NOTE:- Sleep Timer is deactivated when set is switch to stand by or mains power supply is switched Off.
PICTURE SOUND
PICTURE: - Recalls/changes preset picture settings.
SOUND: - Recalls/changes preset sound settings.
1
2
3
4
5
6
7
8
9
0
QV
ZOOM
CH
VOL
This digit is also used for go to time in multimedia in guide Bar.
Selects program number 1 - 200 directly by using direct digit keys.
- To select 1 digit program number press desired program number & wait for few
seconds selected program number will appears on screen
- To select 2 digit or 3 digit program number press 1st, 2nd, or 3rd digit within
2 sec. after pressing 1 & 2 digit respectively.
- To enter password to lock or unlock channel and to set New Password.
- To enter Time in Timer Menu and in Multimedia mode in Guide bar.
- Will operate only in TV source for Channel change
QUICK VIEW(Q. V.):- Selects to previously viewed channel in TV Source.
ZOOM:- Zoom is for adjusting aspect ratio such as Auto/16:9/4:3/Zoom1/Zoom2 in
RF/AV1/ AV2/YPbPr/HDMI sources and 16:9/4:3 in VGA sources & Auto/16:9/4:3 in Multimedia mode.
CH+/CH– :- Navigate Up/Down the RF channel. & to turn ON TV set from Standby.
VOL+/VOL– :- To increase / decrease the volume level in all sources.
- Navigates vertically up/down through the Menu/Sub menu.
- To enter characters / numbers in program name parameter.
- Navigates Horizontally Right/Left through the Menu/Sub menu.
- To enter in Menu/Sub Menus.
- To navigate the letters in program name parameter.
- To set the time.
- Select source by Right arrow key.
- Increase/Decrease the value of selected items and to set the
parameter On/Off.
OK:- - To enter in Sub menu.
- Enter to edit program name parameter.
- Select source.
MENU: - To Select menu OSD window and to Return from Existing menu OSD.
MENU
PIP/POP
PIP-ZOOM
PREV
FR
FF
NEXT
STOP
PIP-POS
SWAP
PIP/POP: - This key/feature is Not Applicable.
PIP-POS: - This key/feature is Not Applicable.
PIP-ZOOM: - This key/feature is Not Applicable.
SWAP: This key/feature is Not Applicable.
PREV (PREVIOUS): - PREV key is used to select the previous track/item in multimedia
source and in Easy Connect feature in HDMI source.
FR (FAST REVERSE): - FR key is used for backward the playing track / item by
the speed of (X2, X4, X8, X16)
FF (FAST FORWARD): - FF key is used for forward the playing track/item by the
the speed of (X2, X4, X8, X16)
NEXT: - NEXT key is used to select next track/item for play in multimedia source.
STOP: - Press this key to stop the playback and press Play to resume the playback
again. In Easy connect in HDMI source, select the last viewed file and then press Play to
resume. To view images as thumbnail this keys can be used.
6
USB / PIP RELATED
KEYS (OPTIONAL)
PLAY/PAUSE
GUIDE
TXT
TELETEXT RELATED
KEYS (OPTIONAL)
PLAY/PAUSE: - Press this keys to play or pause TXT: -Used to enter "Teletext
track/item in multimedia source & in Easy Connect
mode" (analog and digital). In
feature.
analog mode press repeatedly to
GUIDE: - When playing the multimedia file and in Easy access-full page text picture and
Connect mode in HDMI source, press [GUIDE] key. The text, text and text and off.
task bar will show for guiding the Multimedia and Easy
connect operation in HDMI source.
INFO
RETURN
INFO: - Use this key to view the details of the
CANCEL
Multimedia file you are playing Music/Photo/Video. This
will display the information of that file in separate window. CANCEL:- Analog TV text option
To exit from this Info Window, press OK key on CANCEL used to temporarily display TV
icon.
picture until text page refreshes,
RETURN:- Use this key to return to main multimedia
menu while playing a track/item.
ECO
REPEAT
MIX
FREEZE
HOLD
ANGLE
REVEAL
CC
INDEX: - Used to get to text a-z
index page.
INDEX
SUPAG
ECO: - This key provides the different power savings
modes. The current mode is displayed with ecovision
symbol on the screen, in audio only mode display is off
and only audio is on. Press Menu key to exit audio only
mode.
gives notification
change on screen.
of content
MIX: - Mix. TV picture and text as
an overly (analog only)
HOLD: - Used to freeze the sub
page on screen, press again to
release (only used in analog text
REPEAT: - Press REPEAT on remote ,then in guide bar mode).
menu the symbol of none, one ,all will show one after
another for repeat sequences. While playing image/
video the repeat options are displayed on the screen and REVEAL:- Use this key to display
/height information in certain text
can be changed by pressing this key.
pages-quiz game solution.
FREEZE: - This key is used to Freeze the moving
picture. To exit again press Freeze key. Not effective in
multimedia.
CC: - Display the consumer
electronics control menu.
ANGLE: - This key is used for displaying the images in SUPAG: -This key can be used for
Different angles 90/180/270/360 degree, when images
subpage index display.
are viewed in multimedia.
FAVORITE: - RED KEY, GREEN KEY, YELLOW KEY,
BLUE KEY are the favorite keys used for selecting
favorite channels for four users in TV source. Use this
key to set/clear a channel from favourite list.
(RED KEY)
(GREEN KEY)
(YELLOW KEY)
(BLUE KEY)
ENERGY METER / E-SAVER: - Use this key to
display the energy saving of the TV. The
energy meter is displayed on the screen with
the current energy saving. Not effective in
multimedia source.
ENERGY
METER
SCENE
SELECT
I/II
SCENE SELECT:- This key/feature is Not
Applicable.
I/II: -If received signal is NICAM, by
pressing this key sound can be
selected stereo/mono, if received
signal is NICAM dual signal sound
can be selected dual I/ dual/II and
mono.
MTS: -1)Use this key to enable
/disable BTSC sound (mono/streo)
for the current program being
watched(This Feature is Optional)
VCHIP:- VCHIP function is not
available in India.
TELETEXT:-TEXT, MIX ,HOLD,
CANCEL,INDEX REVEAL,
SUPAG ,RED, GREEN, BLUE,
YELLOW are the key’s for teletext
function.
Note : Teletext, I/II, MTS, VCHIP
is not available in India.
VCHIP
MTS
NOTE: 1.) Teletext is not available in india.
2.) I/II is not available in india.
3.) Depending up on remote some key may not be available.
7
UM-4”AAA”
UM-4”AAA”
7. PICTURE MENU
PICTURE
Picture mode
Contrast/
Brightness/
Saturation/
Sharpness/Hue
Color Temp.
Black Back
These settings are used to adjust the Contrast(0-100), Brightness(0-100),Saturation
(0-100), Sharpness(0-100), and Hue(0-100) values for fine picture adjustment.
NOTE: Hue is enabled for NTSC channels only.
Use this option to select and change color temperature (Normal/Warm/Cool).
This function is used to ON/OFF the black back in no Signal condition.
CTI
Advance
Picture Adjust
GEOMETRIC
This function is used to select the preset picture settings. (User/Hi-Bright/Vivid
/Sports/Cinema)
DNR
Adaptive
Luma Control
Color Improve
This improves color and sharpness of the picture.
The DNR (Off/Low/Middle/High) reduce the noise by applying
temporal and spatial noise reduction filters to Video data.
This function improves Adaptive Luminance (On/Off).
The Color improve (On/Off) adjust the color.
Auto Setting
Auto setting allows the PC screen of TV to self adjust. This automatically sets the H-position
V- position, Phase and clock.
H Position
V Position
If picture is not Ok with auto setting then adjust Horizontal position(0-100)/Vertical position
(0-100) manually to adjust the desired picture settings.
Manual Clock Adjust the phase (0-31) and clock(0-100) to remove or reduce picture noise. If noise
appears adjust frequency by clock for fine adjustments.
Phase
Note : 1) The Geometric menu will be enabled for VGA source only. TV menu is disabled for
VGA Source.
8
8. SOUND MENU
SOUND
Audio Mode This function is used to select the preset sound modes (User, Standard, Music, Speech).
Equalizer
The Equilizer 120Hz, 500Hz, 1.5KHz, 5KHz, 10KHz, (0-100) can be changed by other user.
Bass
Treble
The bass function is used to vary the bass level from 0 - 100.
Balance
User can select the left/right speaker intensity by changing balance (-50 - +50).
Volume
The main speaker volume can be adjusted by varying this volume bar (0-100).
Speaker
The main speaker can be made On/Off by this option.
The treble function is used to vary the treble level from 0 - 100.
This function is used to for automatic adjustment of volume level(On/Off).
AVL
AV Out
This parameter is Fix and Variable. In Fix mode, the AV out volume is 100 by default. In Variable
AV Out Volume mode, the AVout volume can be varied from 0-100 with navigation keys.
9. CHANNEL MENU
Program No. Displays the current Program number
Change the color system (AUTO/PAL/SECAM) setting if picture is not reproduced properly.
Note : For INDIA Color system is AUTO or PAL
Change the sound system (BG/I/DK) setting if sound is not reproduced properly.
Sound System Note : For INDIA Sound system is BG.
Press right arrow key or OK key to start searching & tuning all the available channels.
Auto Search
Displays the current displayed channel. Press Left/Right navigation keys
Current
Channel of remote to change the program no.
Manual Search Store To Displays channel no. to store the current program. Press Left/Right navigation keys of
Channel remote to change the program no.
Color System
System
Displays the Sound system of the currect tuned program.
Press Left/Right Navigation keys of remote to search the program. Also the program
can be selected by directly entering the Program freq. with remote no. keys.
Select this option for Fine tunning the channel with Left right navigation keys
Fine Tune
at which either Picture or Sound is not clear even after Auto Searching.
Frequency Displays the frequency of the current Program (channel).
CHANNEL
Search
Program
Edit
User can edit the programs by Delete, Rename, Move, Skip, operation
1.To delete, Navigate to a channel to delete, press1,the channel will be deleted
2.To Rename the channel name press 2 on this option and use Up/Down keys to select
letters and Left/Right key to navigate between the characters of program name
3.To Move a channel to other program location, Press digit “3”on remote and navigate
to list for location to place this channel. Again press “3” to fix location for this channel.
4. To skip any program, press digit key 4 on that channel, then the channel will be marked in the
list. When come out of menu and navigate channels, then the channel will not appear
Favorite
Favorite channels group can be selected with (Red,Green,Yellow,Blue) keys on remote. Navigate
to a channel to be included in favorite list, press a color key, the color box same as key pressed
appear in front of channel and the channel is included in list to remove the channel from favorite list
press same key again, exit menu and press color key, the favorite OSD appear with selected channels
to change favorite channel keep pressing color key, channel will be changed. Four favorite groups
can be created with four color keys and same channel can be selected in multiple favorites.
(Favorite feature is optional).
Note : 1) Channel menu will be disabled in other source accept TV source & when ParentalDisable Search option in Hotel Mode is ON.
9
10. SETTING MENU
Select this option for display current input source and source can be changed with
Up/Down navigation keys.
The backlight value can be varied (0-10) This function is used to adjust brightness
level of panel (This feature is optional).
TV is in Normal state when made on. To save the power consumption, select power saving modes as
Eco
Power Saving low/Mid/High/Audio only. In Audio Only mode only audio is On and Picture
Vision
is off. In Audio only mode, all audio controls as Vol+/-,
& mute keys on remote will
operate to control audio. Press menu key to exit audio only mode.
User can make this Switch Off/On to enable the switch on music. The music will be played
Switch
On Music while standby Off/On. (This Feature is Optional).
Shop
This feature is used to ON/OFF the Shop mode feature. This displays the TV features
mode
with description. This is for use on Shop floor only. (This feature is Optional)
This feature operates only in HDMI source. If a CEC compliant device like Home theater or
DVD player is connected to TV in HDMI mode, then the Player controls can be operated through
TV remote. Below are the sub Menu in Easy connect.(Easy Connect feature is optional).
Press Left/Right navigation keys of TV remote to Switch On/Off the Easy Connect feature.
Easy
Connect When make this ON, then all other parameters become active.
SETTING
Input
Source
Back
Light
Easy
Connect
Press Left/Right Navigation keys for ON/OFF of this feature. If make LCD set off, then
Auto
the connected CEC device go to stand by. If CEC device is made ON then LCD also
Turn Off
becomes ON from Stand by.
Press OK key of TV remote to search the Devices connected in HDMI source It will
Device
Search
show the no. of connected devices.
Device
List
Press Ok key of TV remote on this option, then it will show the list of devices connected
with the LCD in HDMI source.
Device
Menu
When press Ok key of TV remote to operate this feature, then the main Menu disappears
and the Easy Connect Guide Menu bar is displayed on screen. The Guide bar can also
be accessed with Guide key of Remote.
The details of Easy Connect Guide menu are on next Page.
Software
Update
This is for LCD TV Software update. (For Service only)
Reset
Select this option to reset all Feature, Audio, Video parameters to Default value
10.1. EASY CONNECT DEVICE MENU INFORMATION
Play
Select this option with OK key of TV Remote to PLAY file in list of connected player
Pause
Select this option with Navigation key and OK key of TV remote. This is used to PAUSE
the running file in connected device.
FR
Select this option with Navigation key and OK key of TV remote. This is used to fast
Rewind the running file of connected player.
Prev.
Select this option with Navigation key and OK key of TV remote. This is used to Fast
Forward the running file of connected player.
Select this option with Navigation key and OK key of TV remote. This is used to
select Previous file in Player list.
Next.
Select this option with Navigation key and OK key of TV remote. This is used to
select Previous file in Player list.
Stop
Select this option with Navigation key when press OK key of TV remote then It will
stop the running file in Player and will return to main menu of the connected player.
FF
Power
By using this option, the connected player can be made OFF to stand by. When the
the player is switched OFF, the TV will return to last viewed source. To switch ON the
player again, go to HDMI source and goto Guide bar menu and again select Power option.
10
Below options are present on second page of Guide bar. Select with remote navigation
key. When select this option with TV remote OK key, then the running media file will
stop and it will return to Player Home menu.
This key works to select the Player menu functions and files etc. Press TV remote
OK key to operate this function.
Home
OK Select
Up
Left
These functions are used to navigate in the Player menu and player functions in Up/Down
and Left/Right directions. These controls work same as TV remote navigation keys.
Down
Right
Setup
Return
When select this function with TV navigation and OK keys, then it will display the
Setup menu of the connected Player.
This function is used to go to previous menu or screen of the Player, when selected
with TV remote OK key.
Note: 1) The Easy connect guide menu can be accessed from Settings menu as well as Guide Key of TV remote.
2) The above functions may work different depending on player connected with TV.
3) If connected CEC compatible device is not functioning in Easy connect, then kindly check the device settings.
HOTEL MODE CONTROL
PARENTAL CONTROL
11. PARENTAL MENU
Parent Lock
Switch
Change
Password
Make the parental switch On to lock/unlock the sources (TV/AV1/YPbPr/HDMI/VGA/
Multimedia)/channels (1-200).
Select this option to change the password (default - 0000) Enter new password
and confirm the same.
Channel Lock
Press DIGIT KEY 2 key to Lock/Unlock the channels (01-200).
Clear All
Select this option to reset all Parental options to default value.
Hotel Mode
Switch
Change
Password
OSD Display
Disable
Key Lock
Disable Search
Max Volume
Power On
Set
Make this switch On to Activate the Hotel Mode options selected by user. When
Switch is Off the Hotel Mode, its options will not Operate.
Select this option to change the password (default - 0000) Enter new password
and confirm the same.
Making this option On, the Display OSD will not appear by pressing Display
Key on remote.
Select this option On, panel keys will not operate.
Making this option On, the search options/TV menu will be disabled for user.
The main volume is limited by setting MAX volume (0-100), User cannot
increase the main volume greater than MAX volume selected.
Select the power on source (TV/AV1/YPbPr/HDMI/VGA/Multimedia)
Power On
Source
after the TV ON, the power on source will be same as specified here.
Power On Select the power on source (1-200), after the TV ON, the power
on source will be same as specified here.
Channel
Power On
Volume
Clear All
By setting the power on volume (0-100), this volume will
be set after set gets ON.
Select this option to reset all Hotel Mode options to default.
Note :
1) Use Left/Right keys on the remote change the option and up/down to navigate.
2) Press OK/Right key on remote to enter into the submenu.
3) Press CH+/- key on front panel to navigate, Vol+/- key to enter/back and to change option.
4) Default password is "0000" for parental and hotel mode.
5) If any of your CEC compatible device is not connected in Easy connect of LCDTV/LEDTV, thenPlease check your device
settings.
11
12.MULTIMEDIA GUIDE BAR INFORMATION
Use this option to Pause the running Media. Again Press the same key to resume/Play the file.
Play/Pause
FR
PREV
VIDEO / MUSIC / PHOTO / TEXT
Use this option to Fast Forward FF or Fast Rewind FR the running file.
FF
NEXT
All
Set A
Use this option to set the selection points in Media file. Press OK key and select Point
A again Press OK key and select Point B. Now the Video between A and B will repeat
again and again. To stop repetitions again Press OK key. Applicable in Video files only.
By pressing OK key on this Icon, will display all Media files present in that particular
Folder i.e. Audio or Video or Photo.
By pressing OK key on this Icon, it will display the Information about the Media file being
played. To close this window press Down Navigation Key till Close icon and press OK key on remote
AB
Playlist
INFO
This option is used to slow Forward the Video file in steps of 2X/4X/8X/16X. If select, then
the audio will not come. After 16X, the normal Play will resume. Applicable in Video.
Slow
Step
Goto Time
Zoom IN / OUT
Move
Rotate
Music
Note: -
Use this option to select Next or Previous Media file in your Play list.
Use this option to Stop the running Media file. If press OK on this icon, then it will return
to your play list from current playing File.
Use this option to Repeat the Media files with options as None/One/All files to repeat.
Press OK key to operate. Also can use Repeat key on remote.
STOP
This Option is used to move the Video file in steps. For normal operation, again press
Play Key. Applicable in Video files.
By selecting this option, can jump at any timing of the Video i.e. the Video will start
from that time of total Video time .Applicable in Video and Music files.
This is used to Zoom in or out the media file. Applicable for Images only. For Video use
Zoom key on remote.
This option is used to move the position of the Image file. This will be used if Image
file is Zoomed into big size. Applicable for Image files only..
This option is used to Rotate the Image file clockwise in 90/180/270/360 deg. Used for
Image files Only
This is a short cut for Music filed to play in background with Image files running on screen.
To operate this, first go to Music folder, then select the Music files to be played by OK
key. then go to Photo folder. play Photos. Then goto Music Icon and press OK key.
Then the Music will start playing in background of Images. There is no control on background
music files. Applicable for Photo folder only.
1.) Guide bar will be present permanently in Music Folder with Play list. To exit from this press Return key on remote.
2.) To View Guide bar in Video and Image files, press Guide key on Remote.
13.MULTIMEDIA FORMAT SUPPORT
File Type
Photo:
File Format
File suffix
Video:
JPEG\ BMP\ PNG
MPEG1\ MPEG2\ MPEG4\ RM\ RMVB\
MJPEG\FLV\ H.264
Audio
WMA\ Mp3
.jpg\ .bmp\ .png
.avi\.mpg\.mpeg\.dat\.rm\.mp4\.ts\.trp\
.asf\ flv
.wma\ .mp3
Image Formats Details
File Format
Resolution
JPEG
15360X8640
BMP
9600X6400
PNG
9600X6400
Compressed Format
Progressive JPEG
Baseline(Standard)
Baseline(Optimize)
Single Color
16 Color
256 Color
16 Bit
24 Bit
32 Bit
Progressive
Interlaced
12
Support Range
Only Support 1024x768
Support
Support
Support
Support
Support
Support
Support
Support
Support
Only Support 1200x800
Audio Formats Details
Sampling
Baud Rate
WMA
8K~48KHz
32K~320Kbps
Mono, Stereo
Mp3
32K~48KHz
32K~320Kbps
Mono, Stereo
Mp4 (AAC)
8K~48KHz
32K~320Kbps
Mono, Stereo
File Format
Audio Channel
Video Formats Details
File Format
Support Suffix
Internal Encoder
Resolution
Baud Rate
MPEG1
.DAT/.MPG/.MPEG
1920x1080P @ 30P
MPEG2
.MPG
1920x1080P @ 30P
Max 20Mbps
Max 20Mbps
MPEG4
.AVI/.MP4
DIVX,XVID
1920x1080P @ 30P
Max 20Mbps
RM\RMVB
.RM/.RMVB
RV8, RV9, RV10
1920x1080P @ 30P
Max 10Mbps
MKV
.MKV/.MOV
MPEG1,2,4
1920x1080P @ 30P
Max 20Mbps
MJPEG
.AVI
640x480P @ 30P
Max 10Mbps
DivX
.DIVX/.AVI
MPEG, DIVX, H.264 1920x1080P @ 30P
Max 20Mbps
H.264
.MKV/.MOV
H.264
1920x1080P @ 30P
Max 20Mbps
Max 20Mbps
Max 20Mbps
FLV
.FLV
H.264
1920x1080P @ 30P
VC1
.ASF
VC-1
1920x1080P @ 30P
Hard Disk Drive3 Support: You can also access below type of Hard Disk with existing USB port of TV set
Format: - FAT16, FAT32, NTFS. Capacity: - 500GB
Note :
1. The multimedia features/functions may vary from file to file depending on relative information present in the file.
2. If can't detect the connected device, it would be caused by connected device driver not by TV failure.
3. USB port of device provides 5V & max current 500mA. Because port specs adopted by certain storage
device is different from that of standard USB, so it may affect the correct identifications.
4. The reading speed will be variable due to different connected devices & different storage capacities.
5. SANSUI is not responsible if USB device is not supported, nor it is responsible for damage or loss of data.
6. Due to difference of equipment & storage capacity the time need to read information also different. The
speed of reading information may slow down temporarily, note that this is not breakdown of this unit.
7. When system is executing your last operation , please do not press function keys continuously, otherwise
it will affect processing speed of system.
8. SANSUI uses the best of the display panels. However there may be bright dots visible, which is not
a defect and does not deteriorate the product performance, viewing and Reliability.
Resolution support :
YPbPr mode
480i (60Hz), 480p (60Hz), 576i(50Hz), 576p(50Hz), 720p,(50Hz, 60Hz),1080i, (50hz, 60Hz)
VGA mode
640x480(60Hz,72Hz,75Hz), 800x600(56Hz,60Hz,72Hz,75Hz),1024x768(60Hz,70Hz,75Hz)
1280x1024(60Hz),1280x768(60Hz),1600x1200 (60Hz)
HDMI
480i(60Hz), 480P (60Hz), 576i (50Hz), 576p (50Hz) 720p (60Hz), 1080i(50Hz,60Hz),
1080P (50Hz,60Hz)
Note: - If abnormal picture is observed on screen make power Off and On.
- The set might be operate abnormally if a non standard video format is selected.
13
14
Antenna I/p
Impedance
Power Supply
Power Consumption
(Avg.)
Audio Output (RMS)
1366 X 768
1920 X 1080
40W
8W x 2
35W
170(H)x170(V) 178(H)x178(V)
58.42cm LED
54.68cm LED
45W
178(H)x178(V)
1920 X 1080
60.97cm LED
50W
178(H)x178(V)
1366 X 768
81cm LED
VHF-2-12; UHF21-69; CATV (X~Z+2,S1~S41)
AC 110-240V~50/60Hz
PAL BG/I/DK and NTSC(3.58/4.43) [NTSC- in playback only]
35W
170(H)x170(V)
1600 X 900
Display Resolution
Viewing Angle
47cm LED
19.5” HD LED 22” FHD LED 23” HD LED 24” FHD LED 32” HD LED
LCD/LED Type
SCREEN SIZE
14 TECHNICAL SPECIFICATIONS
NOTE
1) Design and specifications are subject to change without prior notice.
2) Stand assembly and Wall Mounting assembly are optional. For more
details please contact service provider.
3) Power consumption mentioned is average with standard picture/sound
conditions.
15. TROUBLESHOOTING
Manually trail to adjust HV position.
Auto Adjust, try to adjust clock manually.
15
A
B
C
D
SERVICE CELL, VIL CAMPUS,
15km STONE, AURANGABAD -PAITHAN ROAD,
CHITEGAON, TALUKA PAITHAN,
DISTRICT AURANGABAD - 431 105
PHONE NO. : (02431) - 329271, 329783, 251598
E MAIL : [email protected]
BRANCH OFFICES
SANSUI COMBO-LED (1100098898)
Rev.00 Rajmudra
Marketed by - KAIL LIMITED,
Auto Cars Compound, Adalat Road, Aurangabad,
Maharashtra, 431005, INDIA.