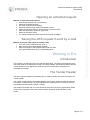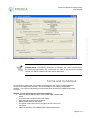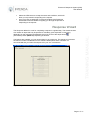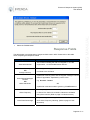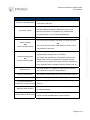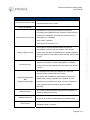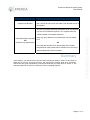
1
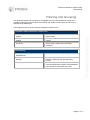
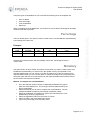
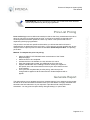
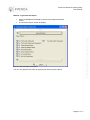
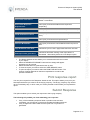
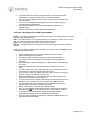
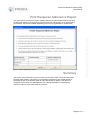
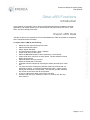
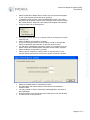
USER MANUAL
Electronic Response System (eRS)
Version 2.5.5.0
Electronic Response System (eRS)
Document information
DOCUMENT PURPOSE
This document serves the purpose of providing a quick reference to assist Intenda Solution Suite users to
use the Electronic Response system (eRS).
COPYRIGHT
Company Confidential:
© Copyright by Intenda (Pty) Ltd
This manual was created and distributed by Intenda (PTY) LTD. Our
company specialises in software solutions. Visit our websites at
www.intenda.co.za and www.globalerfx.com for more information.
All rights are reserved. No part of this publication may be copied, reproduced
or transmitted in any form or by any means, electronic, mechanical,
photocopying, recording, or otherwise, save without the written permission
from Intenda or in accordance with the provisions of the Copyright Act 1956
(as amended).
DOCUMENT VERSION CONTROL
Document Reference
Date
Module Version
Author
ISSUMBUD1
ISSUMBUD1
ISSUMBUD1
ISSUMBUD1
2008/10/13
2008/10/13
2009/01/31
2009/03/30
V2.5.1.0
V2.5.1.0
V2.5.4.0
V2.5.5.0
Caroline Barnes
Amanda Spies
Amanda Spies
Amanda Spies
Nature of input
Other information
(I.e. Publication date,
publisher etc.)
ACKNOWLEDGEMENTS
Topic / Name of
Reference Material
Person / Author
(I.e. Information,
Reference Material etc.)
Project manager
Module expert
Subject expert
Programmer
Liza Law
Cornè Smit
Richard Green
Derek Snyders
Information
Information
Definitions
Technical
Electronic Response System (eRS)
User Manual
Table of Content
TABLE OF CONTENT..........................................................................................1
ELECTRONIC RESPONSE SYSTEM (ERS) .......................................................2
INTRODUCTION ..................................................................................................2
ADVANTAGES TO USING ERS.......................................................................................................... 2
DOWNLOADING THE ERS DATA PACKAGE FROM THE INTERNET .............3
EXTRACTING THE REQUEST ........................................................................................................... 4
OPENING AN EXTRACTED REQUEST ................................................................................................. 5
SAVING THE ERS REQUEST IF SEND BY E-MAIL ................................................................................ 5
WORKING IN ERS ...............................................................................................5
INTRODUCTION .............................................................................................................................. 5
THE TENDER HEADER .................................................................................................................... 5
TERMS AND CONDITIONS................................................................................................................ 6
RESPONSE WIZARD ....................................................................................................................... 7
RECEIPT OF TENDER ..................................................................................................................... 8
READING OF ATTACHMENTS ........................................................................................................... 8
INTEND TO TENDER ...................................................................................................................... 10
TENDER LEVEL QUESTIONS.......................................................................................................... 11
TENDER LEVEL EVALUATION CRITERIA ......................................................................................... 12
ACKNOWLEDGE NON-EDITABLE DEFAULTS .................................................................................... 13
EXCHANGE RATE SETUP .............................................................................................................. 14
SET RESPONSE DEFAULTS........................................................................................................... 15
LINE RESPOND FIELDS ................................................................................................................. 15
QUICK RESPONSE ....................................................................................................................... 16
COPY LINES TO PROVIDE ALTERNATIVE OFFERS ............................................................................. 17
LINE ITEM ADDITIONAL INFORMATION ............................................................................................ 19
EVALUATION CRITERIA ................................................................................................................. 20
FILTERING AND GROUPING ........................................................................................................... 21
LINE LEVEL QUESTIONS ............................................................................................................... 22
FILTERING AND GROUPING ........................................................................................................... 23
BRANDS ...................................................................................................................................... 23
COST BREAKDOWN ...................................................................................................................... 24
PERCENTAGE .............................................................................................................................. 25
MONETARY.................................................................................................................................. 25
PRICE LIST PRICING..................................................................................................................... 26
GENERATE REPORT ..................................................................................................................... 26
PRINT RESPONSE REPORT............................................................................................................ 28
SUBMIT RESPONSE ...................................................................................................................... 28
PRINT RESPONSE ADHERENCE REPORT ....................................................................................... 30
SUMMARY ................................................................................................................................... 30
OTHER ERS FUNCTIONS .................................................................................31
EXPORT ERS DATA ..................................................................................................................... 31
IMPORT ERS DATA ...................................................................................................................... 34
RESPONSE FIELDS....................................................................................................................... 38
SUMMARY .........................................................................................................41
Page 1 of 41
Electronic Response System (eRS)
User Manual
Electronic Response System (eRS)
Introduction
The Electronic Response System, namely eRS, has been designed with input from a broad
supplier community to provide a solution that facilitates responding to eRFx’s. eRS is not only
used in responding to tenders, but also responding to contract amendments that have been
published by the buying organisation.
Advantages to using eRS
•
•
•
•
•
•
•
•
•
More structured tenders / contract amendments making it more understandable
Quicker turnaround time in responding to tenders / contract amendments
Historic, electronic data of previous tenders and / or contract amendments
Less time and manpower required to respond to tenders / contract amendments
Useful filtering mechanisms to remove items not being tendered on
All documentation attached in a single location, minimizing risk of document
misplacement
Supplier is allowed to respond, or re-submit responses as often as is necessary until
the closing date and time of the tender / contract amendment.
Various mechanisms to submit responses, lowering risk of loss if information
Warning signals if vital information has not been entered, making sure that critical
information required by the buying organisation is not overlooked
Page 2 of 41
Electronic Response System (eRS)
User Manual
Downloading the eRS data package
from the Internet
In this section you will learn how to download, obtain and extract electronic requests using the
eRS application. This section explains the process of opening an existing extracted request
and the process of saving a request that is sent by email from the buyer. It is very important
that the processes mentioned herewith are understood for the successful submission of the
electronic request.
Method: how to download the eRS package.
•
•
•
Log on to Globalerfx.com site using the log on details that was e-mailed to you when
you registered as a supplier.
Choose the applicable buyer site on which the request is published.
The buyer site opens:
Figure: Downloading the eRS Data Package from the Internet
•
•
•
•
Select the zip package. Each zip package has a unique number.
Save the package to this location C:\Program Files\Intenda (PTY)
LTD\eRS\Requests.
The data package will download to this location.
Close the internet browser.
Page 3 of 41
Electronic Response System (eRS)
User Manual
Extracting the Request
•
•
•
Double click the eRS icon on the desktop.
Select the CONTINUE button.
The Open Request screen will display:
Figure: Open request
•
•
•
•
•
To extract a new request, select the OPEN A NEW ZIPPED REQUEST
NOT IN THE LIST ABOVE button at the bottom of the screen.
Find the request located in C:\Program Files\Intenda (PTY)
LTD\eRS\Requests
Check that you are extracting the correct request.
Select the ACCEPT button to proceed.
The Tender header with all the relevant information will display:
Page 4 of 41
Electronic Response System (eRS)
User Manual
Opening an extracted request
Method: To open extracted requests:
• Double click the eRS icon on the desktop.
• Select the CONTINUE button.
• The Open request screen displays:
• Select the relevant buyer folder and request number
• Select the ACCEPT button or double click the request number
• Enter the registration number in upper case:
• Select the ACCEPT button.
• The Tender header with all the relevant information will display:
Saving the eRS request if send by e-mail
Method: Saving the eRS request if send by e-mail
• Once you have located the email, open it.
• Right click the eRS zipped tender package.
• Save the package in the Request folder under this path
C:\ProgramFiles\Intenda (PTY) LTD\eRS\Requests
Working in Ers
Introduction
In this section you will learn how to use the eRS application. The section discusses the three
main work areas in the application namely, the Tender Header, the Response Wizard and the
Tender Response. The chapter also looks at how the request will be completed and
submitted successfully.
The Tender Header
The first screen that appears immediately after a request package has been extracted is the
Tender Header.
The Tender Header reflects summarised details of the request. It also provides the following
information, company names, physical addresses and contact persons for both the buying
organisation and the supplier/ vendor company.
The supplier information will be on the left side of the screen, the buying organisation details
will be on the right side of the screen and the tender details will be at the bottom of the
screen.
Page 5 of 41
Electronic Response System (eRS)
User Manual
Figure: Tender header screen
PLEASE NOTE: The following information is important, the correct contact person
for the buying organisation The closing time and date of the request the request
number, the request reference and the request description.
Terms and Conditions
It is important to ensure that you read and understand the eRS Terms of Usage (relating to
the use of eRS application) and the Terms and Conditions of the Buying Organisation
carefully. You will not be allowed to proceed unless these Terms and Conditions have been
accepted.
Method: To read and accept the terms and conditions:
• Select the READ AND ACCEPT eRS TERMS AND CONDITIONS
button.
• The Terms and Conditions wizard will display.
• Read through the terms and conditions
• Select the OK button at the bottom.
• The status of the button will now change to Accept Terms and
Conditions.
• Select the ACCEPT eRS TERMS AND CONDITIONS button.
Page 6 of 41
Electronic Response System (eRS)
User Manual
•
•
Select the YES button to accept the terms and conditions, which will
allow you to proceed in responding to the request.
Once you have accepted the Terms and Conditions the Response
Wizard will become available navigating you through the process of
responding to the request.
Response Wizard
The Response Wizard is a tool for completing a request in a guided way. The wizard consists
of a number of steps that may be optional or mandatory (with emphasis on font style),
depending on the requirements defined by the buyer. Each of the steps has an
(information) button (What is?) explaining its function.
If all options are enabled, you may access them in any sequence. The sequence is however
the result of careful consideration on the software development side. Therefore it is
recommended that you follow the sequence for your own convenience.
Figure: Response Wizard
Page 7 of 41
Electronic Response System (eRS)
User Manual
Receipt of Tender
This option will be available if the buying company requests an acknowledgement of your
receipt of the request.
This option will require that you must have access to an e-mail account system on your
computer. In the event that no e-mail client can be found, the application will allow you to
continue with the request response process, but it is advised that you contact the buyer
telephonically to indicate receipt.
Method: To complete the receipt of tender:
•
•
•
•
•
•
Select the RECEIPT OF TENDER button.
Complete the message box area.
Select the SEND button.
A message will be sent to the buyer, whose details appear on the e-mail,
that the tender has been received by you
You can choose to type a message in the space provided or not, as soon
as the buyer receives the email, they will know what the email is all about
from the subject line.
Once the e-mail has been sent the Response Wizard screen will reappear
Reading of Attachments
The next step on the response wizard is the Reading of Attachments. This option is a
requirement from the buying company who configured the request to ensure that the attached
documentation have been read by yourself, preferably before proceeding with the completion
thereof.
Selecting this option will present you with the tender attachments screen. The attachment can
then be printed.
Method: To read / add attachments
•
•
Select the READING OF ATTACHMENTS button on the Response
Wizard.
The attachments screen will appear with all the attachments as sent by
the buyer at the top of the screen.
Page 8 of 41
Electronic Response System (eRS)
User Manual
Figure: Attachments screen
•
•
•
•
•
•
•
•
•
•
•
Select the first attachment in the received attachment/s section.
Select the OPEN ATTACHEMENT button or double click the attachment
to open it.
Read through each attachment; notice that in the description that the
status changes to open.
Edit information on these documents if requested, save it to your
preferred folder.
Select the ADD ATTACHMENT button.
Select the attachment from the relevant file.
Select the OPEN button, or double click the document.
The document will appear under the Supplied attachment section,
indicating attachments to be sent back to the buyer.
To delete an attachment, select the attachment, so that it is highlighted.
Select the DELETE ATTACHMENT button and the attachment will be
removed.
Once all attachments have been read and relevant documents attached,
select the CLOSE button. The Response Wizard will reappear.
PLEASE NOTE: Depending on how the buyer did the setup of the tender (required
fields) It is important to note that in some instances, you will NOT be able to continue
until all documents have been opened and read.
Page 9 of 41
Electronic Response System (eRS)
User Manual
Intend to tender
This option allows you to send a notification to the buying company indicating your intent to
tender. If it is mandatory, you are obliged to use this function. If you do not conform to this,
you may be disqualified from the request or tender opportunity.
This option will be available if the buying organisation requested that you indicate whether
you are going to answer the request or not. This option will require access to an e-Mail
account / system on your computer. In the event that no e-Mail account can be found, the
application will allow you to continue with the request response process, but it is advised that
you contact the buyer telephonically to indicate your intend.
Method: To Completing the Intend to tender:
•
•
Select the INTEND TO TENDER button.
The Send Mail wizard will appear:
Figure: Send mail screen
•
•
•
•
The buyer’s e-mail address appears as indicated in the figure above.
Complete the message box area.
Select the SEND button to send the message to the buyer.
Once the email has been sent to the buyer organisation, the Response
Wizard will re-appear.
Page 10 of 41
Electronic Response System (eRS)
User Manual
Tender Level Questions
Most requests will have specific questions linked to the request as a whole. This might be
questions about your company or even service level questions relating to all items on the
request. These questions are of utmost importance and in most cases mandatory. Please
make sure that great care is taken when answering these. You can always come back to the
questions at any stage of the answering process and still change the answers before
submitting the request.
Method: To complete the Tender Level Questions:
•
•
•
Select the TENDER LEVEL QUESTIONS button the tender level
questions will appear.
Select a question you want to answer, the question will be highlighted.
The questions can either be ‘yes/no’ questions, string type questions,
and number or value questions.
PLEASE NOTE: A String answer’ refers to an answer given in a free text that
includes any characters on the keyboard, numeric, alphabetical or symbolic.
A Number answer’ refers to an answer given in the form of numeric characters only.
•
•
•
•
•
•
•
The questions will be indicated as either mandatory or non-mandatory.
By checking the Only display mandatory Questions checkbox only
mandatory questions will display.
Answers to questions can also be deleted when the incorrect information
has been entered
Select the question for which you want to delete the answer, so that it is
highlighted
Select the DELETE ANSWER TO ITEMS button, the answer will be
deleted.
Select the CLOSE button to exit the screen.
The Response Wizard will re-appear.
Page 11 of 41
Electronic Response System (eRS)
User Manual
Tender Level Evaluation Criteria
Most requests will have specific Evaluation Criteria linked to the request as a whole. These
criteria will be rated and weighted and therefore mean that point scoring will be allocated to
the answers you choose from the predefined answers.
By leaving out some answers, you will get a score of zero for the specific criteria when the
request is evaluated. This might have a serious impact on your final scoring. Please make
sure that great care is taken when you answer the evaluation criteria. You can always come
back to the questions at any stage of the answering process and still change the answers
before submitting the request.
Method: To Completing the Tender Level Evaluation:
•
•
Select the TENDER LEVEL EVALUATION button.
All tender level evaluation criteria will be displayed in a tree-view
structure. Each criteria question will have a list of potential responses
that you can select from. Each response allows a comment to be added
to validate why the particular response has been selected. See
illustration in the diagram below.
Figure: Tender level evaluation categories
•
•
•
•
•
•
•
Select the criteria on the left side with a list of available answers on the
right.
Select the applicable answer, a ‘tick’ will appear indicating that you have
answered the criteria.
Type your comment in the comment box if applicable.
Answers to questions can also be deleted when incorrect information has
been entered.
To delete an answer select the criteria then select the DELETE
ANSWER TO ITEM button.
Select the CLOSE button at the bottom right.
The Response wizard will re-appear.
Page 12 of 41
Electronic Response System (eRS)
User Manual
Acknowledge non-editable Defaults
This option allows you to acknowledge that you understand certain pre-defined values set by
the buying company. You will be able to print all the fields that have been designated by the
buying organisation as response fields that do not require input from you, the supplier.
These fields have been provided with defaults and you must accept the fields as presented.
In the event that any of the non-editable fields must be queried print the report and contact
the buying organisation with all relevant queries.
If you select the option to print the report the diagram below will be displayed.
Figure: Non-editable Defaults
•
•
•
•
Select the PRINT REPORT button to print this report.
The document will be sent and printed on your default print
Select the CLOSE button.
The Response Wizard will re-appear
Page 13 of 41
Electronic Response System (eRS)
User Manual
Exchange Rate Setup
This option will enable you to specify the exchange rate relationship between the base and
quoted currencies that you will be using within your response. You will only set these values if
you use a mixture of currencies or the buying organization requested a specific currency as
the quoted currency and this differs from your quoting currency.
Base currency is defined as the foreign currency your quoted currency is based on.
Quoted currency is the currency you use for the price of the item you quote on. The Currency
Conversion Rate Setup form will allow you to select a quoted and base currency from the list
provided and specify a monetary value that indicates the relationship between the two.
Formula:
'One quoted currency' = how much of ‘the base currency'
Examples:
One South African Rand = 0.10 American Dollars
One American Dollar = 10.00 South African Rands
Method: To setup the Exchange Rate Setup:
•
•
•
•
•
From the Response Wizard select the EXCHANGE RATE SETUP button.
Choose the currency (base currency) from the drop down list provided.
Enter the exchange rate in the middle section.
Choose the quoted currency from the drop down list provided on the right hand side.
The suppliers can set-up as many exchange rates as they please.
Figure: Exchange rate setup
•
Once you have completed setting up the exchange rate set up and you select the
CLOSE button and the Response Wizard will reappear.
Page 14 of 41
Electronic Response System (eRS)
User Manual
Set Response Defaults
This option allows you to set defaults on all the items or filtered items on the request. These
items might be commodity items or service items or a combination thereof.
Some fields might have values in them, this means that the buying organisation requested
that you to use those defaults.
Method: To setup the Response Defaults:
•
•
•
•
•
•
From the Response Wizard select Set Response Defaults.
Each of the fields available can be set as a default. This can be done if the response
fields are designated as a response field for the specific request that you are working on.
Select the field that you want to default by activating the radio button next to the
applicable field in the Apply to section.
Once a field has been selected the response field will be opened and you may enter a
default value.
Complete the required information.
Select the ACCEPT button for the changes to take effect.
An eRS confirmation message will display.
Select the YES button to confirm that changes will now take place.
•
•
icon.
Select the Close
The Response Wizard will display.
•
•
Line Respond Fields
This gives you access to the detail of each line item on the request. Once you select this
button, the detail of each item is spread over 2 screens or 'pages'. You can toggle between
the 2 screens by selecting the 'Page 1' or Page 2' buttons at the bottom of the screen. At the
top right hand of the screen you will be able to select the forward or backwards buttons similar to those of a CD player. Use this screen to complete all fields required per line item.
You will also be able to move to the 'Quick Response' screen on the left hand side of the
screen next to the 'Detail' button. The 'Quick Response' screen list all the items in a tabular
format - similar to the look and feel of a spreadsheet.
Method: To complete the Line Response Fields:
•
•
From the Response Wizard select the LINE RESPONSE FIELDS (line
response fields) button.
The Tender Response tab display with the details tab open.
Page 15 of 41
Electronic Response System (eRS)
User Manual
Figure: Detail Response screen
•
•
•
•
•
•
•
•
Find 2 tabs under the Tender Response tab, Detail’ and Quick
Response.
Information captured on the detail tab reflects on the quick response tab
and vice versa.
On the detail tab all the response fields are laid out on the screen and
divided into two pages.
Response fields that are greyed out cannot be edited.
Response fields will be enabled or disabled for suppliers to complete
depending on the buying organisations requirements. This depends on
what information the buyer needs to evaluate the tender.
Response fields highlighted in red are mandatory.
To switch between pages select the appropriate tab named Page1 or
Page 2 on the bottom left.
To switch between items select the appropriate arrow facing previous,
next, first item, and last item located on the top right side of the screen.
Quick Response
The purpose of the Quick Response tab is to provide a quick and easy way to view or capture
tender response information. The grid consists of two panes, each fully customizable. Fields
that may not be changed or captured, have a grey background, which are predefined by the
buying organisation.
Page 16 of 41
Electronic Response System (eRS)
User Manual
•
•
•
Select the item code to be completed, the item will be highlighted.
Use the scroll bar at the bottom of the items, to move from the left to the
right side of the screen so that you can see all the fields column by
column.
Use the scroll bar on the right side of the screen to move from top to
bottom to view all the items in the request.
Copy lines to provide alternative offers
Copying of line items as alternative offers allows you to create extra lines within the request to
enable you to give alternative offers of items that may have different specifications from what
the original item specifications maybe. Alternative offers may have different brand names,
maybe priced at a higher or cheaper cost price or the specifications may deviate from the
buyer specifications.
Method: To create alternative offers.
• Highlight the line item to be copied.
(drop down arrow) button next to the
(copy) button at
• Select the
the left hand corner of the quick response grid.
• Choose Copy as a new line item from the drop down list on the copy
button.
• The Copy item screen will display:
Figure: Copy item screen
•
•
•
•
•
•
•
Make sure the item code and item description is the correct one you want
to copy.
Select the number of copies for new items.
Select the ACCEPT button.
The new copied lines will appear underneath the original item.
The offer number of the copied line items will change according to the
number of copies made.
The ‘Copy from previous item’ function, is used when a new line has
already been added and the information for the original item must be
copied onto this new line.
If you have made too many copies of the original line item you can delete
alternative lines as displayed in the diagram below.
Page 17 of 41
Electronic Response System (eRS)
User Manual
PLEASE NOTE Original offer items will always be numbered 0 (Zero) and cannot be
deleted, were as alternative offers will be number from 1(one) to as many numbers of copies
required.
The Quick Response grid can be printed to view all the listed items as they appear on the
grid.
Method: To print the pages of the quick response grid:
•
•
Select the
(print) button on the top of the quick response grid.
The Print preview screen display:
Figure: Print screen
•
•
Select the pages to be printed from the File menu.
Select ‘Exit’ to exit the report, Quick Response grid will reappear.
Page 18 of 41
Electronic Response System (eRS)
User Manual
Line Item Additional Information
Figure: Line Item Additional Information and Options
Under the heading Line Item Additional Information and Options sections, the following
options are available:
•
•
•
•
•
•
•
•
Evaluation Criteria
Brands
Item Questionnaire
Defaults
Item Specifications
Attachments
Cost Breakdown
Price List Pricing
Page 19 of 41
Electronic Response System (eRS)
User Manual
Evaluation Criteria
This option allows you to complete the buyer’s evaluation criteria template. These criteria will
be rated and weighted and therefore means that point scoring will be allocated to the answers
you choose from the predefined answers. By leaving out some answers, you will get a score
of zero for those criteria when your response is evaluated. This might have a serious impact
on your final scoring, so take care when you answer these.
You can always come back to the questions at any stage of the response process and still
change the answers before submitting the request.
Method: To complete the Evaluation Criteria:
•
•
Select EVALUATION CRITERIA button at the bottom of the Tender
Response screen.
The Line Item Evaluation Criteria screen displays:
Figure: Evaluation per line
•
•
•
•
•
The Evaluation Criteria supplied by the buying organisation appears on
the left bottom side of the screen.
Select the appropriate Evaluation Criteria, the predefined answers
appears on the right side of the screen.
Check the checkbox next to the applicable answers.
Select the APPLY ANSWER TO ITEM button.
Select DELETE ANSWER TO ITEM button if applicable.
Page 20 of 41
Electronic Response System (eRS)
User Manual
Filtering and Grouping
The following Filtering and Grouping can be applied to the Line item evaluation criteria which
will make responding to the line items much easier and simpler. These functions assist you as
indicated in the table below.
These appear at the top of the Line Item Evaluation Criteria Screen.
Line Items Linked to Evaluation Criteria Filter:
Items with Line Item Evaluation
Criteria.
Items Quoted on with Evaluation
Criteria.
Items Quoted on With Criteria not yet
answered.
All line items that have line item evaluation
criteria linked.
All line items that have a price with line level
criteria.
Line items where a price has been quoted but
the line level criteria have not yet been
answered.
Item Grouping:
Group Item by Item No, End User and
Alternative No.
Group by Item Number and Alternative
Number.
Group by Item Number.
This is the lowest level of grouping available.
This grouping will display all the end users
linked to a particular item per alternative
number.
This is the highest level of grouping. All end
users and alternative numbers will be displayed
in the screen for a particular item code.
Page 21 of 41
Electronic Response System (eRS)
User Manual
Line Level Questions
This option enables you to answer questions the buying organisation may have linked to
some or all line items. You can ignore the questions for items you have not responded to. If
some questions are mandatory, you have to answer them before you are able to submit your
response to the buying organisation.
Method: To Complete the Line Level Questions:
•
•
Select the ITEM QUESTIONNAIRE button at the bottom of the Tender
Response screen.
The Line Item Questionnaire screen will display:
Figure: Line Level Questionnaires
•
•
•
•
•
Select the question to be answered. The answer box at the bottom of the
screen will become active.
When answering the questions for a particular line item please refer to
the data type of the question being asked. This will indicate whether the
answer can be entered as free format text, number, value, YES/NO or a
date.
Enter or select the applicable answer.
Select APPLY ANSWER TO ITEM button.
You can delete the answer by selecting the DELETE ANSWER TO ITEM
if applicable.
Page 22 of 41
Electronic Response System (eRS)
User Manual
Filtering and Grouping
The following Filtering and Grouping can be applied to the Line item questionnaire, similar to
the filtering and grouping for Evaluation Criteria. These appear at the top of the Line item
questionnaire screen.
Line Items Linked to Questionnaires Filter:
Items with Line Item Questionnaires.
Items Quoted on with Questionnaires.
Items Quoted on With Questionnaires
not yet answered.
All line items that have line item
Questionnaires linked.
All line items that have a price with line level
Questions.
Line items where a price has been quoted
but the line level Questions have not yet
been answered.
Item Grouping:
Group Item by Item No, End User and
Alternative No.
Group by Item Number and Alternative
Number.
Group by Item Number.
This is the lowest level of grouping available.
This grouping will display all the end users
linked to a particular item per alternative
number.
This is the highest level of grouping. All end
users and alternative numbers will be
displayed in the screen for a particular item
code.
Brands
A brand is a particular make to goods/services, identifying the trade mark.
This option takes you to the Brands screen where you may view the list of brands provided by
the buying company. You may add your own if you need to. This option is available on either
the Quick Response or Detail page.
Method: To set up brands:
•
•
Select BRANDS button at the bottom of the Tender Response screen.
The Brand Maintenance screen displays:
Page 23 of 41
Electronic Response System (eRS)
User Manual
Figure: Brands Maintenance screen
•
•
•
•
•
•
•
•
•
Enter the new brand name in the brand name field.
Select the ADD NEW BRAND button.
The new brand name will now display in the existing brands grid.
Select the DELETE BRAND button to delete a record if applicable.
Select the relevant brand from the list.
Change the information in the brand field.
Select the UPDATE BRAND button.
To exit the Brands Maintenance screen select CLOSE button. The
Tender Response screen will re-appear.
On the Quick Response or Detail screen, you can choose a specific
brand applicable to the item from the drop down list.
Cost Breakdown
The Cost Breakdown assists you to break down the cost of a quoted item into its different cost
elements. The two options available in the cost break down matrix are:
•
Specifying cost breakdown elements in a free format text method. This allows you
to define as many cost elements as possible that form the make-up of the quoted price.
•
Specifying the cost breakdown based on indices, as provided and predefined by the
buying organisation, so that certain elements can be linked to specified indices.
Examples of indices are PPI, CPI, Metal indices etc. The buying organisation can
specify the available indices so that price increases can be linked to these indices.
When price changes take place on contracts the elements linked to indices can be
affected automatically by the price changes.
On the Selection option a dropdown list box displays a list of all the available price types that
a cost breakdown can be captured for. The list will always be sorted starting with the available
price type that is the furthest away from the final delivery point.
Page 24 of 41
Electronic Response System (eRS)
User Manual
If all price types are available then you would see the following list in the dropdown list.
•
•
•
•
Free On Board
Cost and Freight
Local Undelivered
Delivered
When completing the Cost Breakdown you will have to choose either Percentage or Monetary
values as methods to proceed.
Percentage
This is a default option. This option is used to create a list of cost breakdowns represented by
a percentage of the total cost.
Example:
Price Type
Cost element
Index
Cost base index
Percentage of Total Price
FOB
Purchase
CPI
1000
100%
Price
Selecting the monetary option will automatically convert the ‘Percentage to total’ to
‘Cost to total’.
Monetary
This option button is off by default. This option is used when you want to create a list of cost
breakdowns represented by an actual cost in the quoted currency (as specified on the
response detail screen) of your choice. If you did not capture any of the price types on the
response detail screen you can use this option to submit the final price as your quoted price.
Using this option will also over write the price on the response detail screen with the total of
price of all the cost elements combined.
Method: To complete the Cost Breakdown:
•
•
•
•
•
•
From the Selection section choose an applicable predefined price type to
base the cost breakdown on. The price type will be predetermined by the
buying organisation.
Select the method you will use to complete the cost breakdown. The two
methods available are either by Percentage or Monetary values.
Select the predefined Cost Element or type in the cost element if it is not
predefined by the buying organisation.
Select the applicable index from the Index I.D column.
Select the date in the Index Base Date column.
Type in the percentage or the monetary value.
Page 25 of 41
Electronic Response System (eRS)
User Manual
PLEASE NOTE: PPI is Purchase Price Index; CPI is Cost Price Index All these
indices are predefined by the buying organisation.
Price List Pricing
Price list Pricing is used to define structured price lists so that if any amendments have to be
done you only have to provide a new price list. It will not be necessary to respond to the
whole request that has been published, rather only submit a new price list that can be
captured by the buying organisation.
The price list is not end-user specific and therefore you will see that the list of items is
displayed with no relationship to the end users. If your pricing is end user specific then do not
use price lists to capture prices but rather the standard ‘Quick Response Grid’ for capturing
prices then.
Method: To complete the price list pricing:
•
•
•
•
•
•
Select the PRICE LIST PRICING button at the bottom of the Tender
Response page.
Select the item to be completed.
Activate the Price List indicator, the tick will show it is active.
Enter the supplier part number, the OEM and the Price List Price.
Supplier Part Number is the catalogue number used by the supplier for
the specific item, and will be used to link the buyers’ Item Number to that
of the supplier.
Once you have completed the price list pricing, select Accept, the
changes will be applied to all the items and the Tender Response will reappear.
Generate Report
This option allows you to generate and print a complete report of your response to the request
as well as all the documentation and attachments you have added. It is highly advisable to do
this before the final submission of your response. It provides a final checkpoint before
submission. You may print the report directly after generating it, or print it later.
Page 26 of 41
Electronic Response System (eRS)
User Manual
Method: To generate the Report:
•
•
Select the GENERATE REPORT button from the Response Wizard
screen.
The Generate Report wizard will display:
Figure: Response Report Generator
You can also generate the report by applying the following report options:
Page 27 of 41
Electronic Response System (eRS)
User Manual
Print Tender Information:
This report will print all the header level information for the
tender / amendment.
Print Tender Response
Requirements:
This report prints all the fields that are required in
responding.
Tender Questionnaires:
This report prints all the Questionnaires (tender and Item).
Tender Evaluation Criteria:
This report prints all the Evaluation Criteria (tender and
item).
Item Specifications:
This report prints all the item specifications.
Item Cost Breakdown:
This report prints all the cost breakdown elements per line
item.
Page Break after each Item:
This allows you to insert a page break after each line item.
View Report after generation:
This allows automatic viewing of the report after it is
Generated. Alternatively select the ‘View Report’ option.
•
•
•
•
•
The Report Options section allows you to customize the look and content
of your report.
Select the GENERATE REPORT button and a message will appear
prompting you to proceed.
Select the YES button to generate the item by item.
To view the report you need to select the VIEW REPORT button.
To print the report you need to select the PRINT REPORT button. The
number of pages depends on the items responded to as well as the
questions answered.
Print response report
You can print a report from the Response wizard as well. This option allows you to print your
final response before you submit it to the buying company. The buying company may set this
up as a mandatory step, in which case you will only be able to submit after you've printed the
report.
Submit Response
This option enables you to submit your response to the buying company.
The following will prohibit you from submitting your response:
•
•
If any of the mandatory response fields or questions has not been
completed, you will need to go back and complete the fields mentioned.
If any changes have been made and the report has not yet been regenerated.
Page 28 of 41
Electronic Response System (eRS)
User Manual
•
•
•
•
•
The eRS Checklist is to help you double check if you have not omitted
steps that are or might be important in your tender evaluation.
You now have an option to either continue or go back and complete what
you had omitted.
Once you have completed everything and you have gone through the
checklist select the YES button.
A message will appear ‘The recommended delivery method is via
internet upload’.
Select the OK button, the send files wizard will display.
You have four options to submit your tender:
E-mail – It sends the Tender Response directly to the buyer’s e-mail address, this is where
responses get uploaded to RFx.
Disk – This option sends your encrypted response (i.e. eRS.enc) to a disk of your choice.
You now need to get the copy of the tender through to the buyer.
Paper – This option allows you to print a report of your tender.
Internet – This option allows you to send your response through to the buyer using the
Internet.
Once you have decided which method of delivery you will use, select ‘Accept’ the eRS
confirmation message appear.
•
•
•
•
•
•
•
•
•
•
•
•
•
•
•
Acknowledge the terms and conditions attached with the request.
Select the YES button to proceed.
The request response details will now be prepared for submission.
If you select email as the method of submission, eRS will display the
standard.
Microsoft Explorer option prompting you to allow access for the response
to be sent.
Select the YES button and the request response will be sent to the
buyer.
You will receive a copy of the sent message in your emails sent items for
proof that your response has been sent to the buyer.
If you choose to save the request response to disk, you have to choose a
location to save your response, or burn a CD.
Select the SAVE button. A message will appear indicating that the file
has been successfully copied to diskette.
If you choose to print the request response, the system will prompt you to
decide how much content you want to have on the response report.
It is advised that you select ‘Complete tender schedule’ so that all the
request response details are printed on the report.
Select ‘View Report’ to view the report before printing.
Once you are satisfied with the report and the content thereof, select the
icon on the left side of the screen to print the report.
Print document
If you select the ‘Internet Upload’ method the message ‘Upload
Succeeded’ will appear once your response has been sent.
Once you have submitted your response, select the CANCEL button, the
Response Wizard will appear.
Page 29 of 41
Electronic Response System (eRS)
User Manual
Print Response Adherence Report
This option allows you to print a report, detailing adherence to the requirements as set up by
the Buying Company. You will need to print this document and submit it as an attachment to
your request. The format will differ depending on the buying organisation’s requirements.
Figure: Tender Adherence Report
Summary
This section has introduced you to the functions of the tools in eRS. The section discusses
the three work wizards. The summary of information presented on the Tender Header is
described as well as the different steps to follow the Response Wizard. Line Items are
completed. The section also elaborates the four methods available for submitting the
response, namely e-mail, Disk, Paper and Internet.
Page 30 of 41
Electronic Response System (eRS)
User Manual
Other eRS Functions
Introduction
In this chapter you will learn how to use the operational tools that are available in the eRS
application. The chapter guides you to use the Export and Import facility, the Go-To, Find,
Filter, Sort and Change prices tools.
Export eRS Data
The data in eRS can be exported to an Excel spreadsheet to make the process of completing
all the responses easier and faster.
To export data in eRS do the following:
•
•
•
•
•
•
•
•
•
•
•
•
•
Select the ‘File’ option at the top left corner.
Select External Data option.
Select ‘Export eRS data’.
The Export text file wizard – Step 1 displays.
Create a file name for the export.
Select the BROWSE button to select a directory to save the file.
Create a file name, and click on SAVE button. The file extension should
always be a CSV file.
Select the NEXT button to proceed.
Select the tender items of interest.
All tender lines are selected by checking the Select all tender lines check
box.
You have the option of specifying selection criteria of the lines that you
would like to export. You will be provided with a ‘Filter 1’ option to start
limiting the information to be exported. This selection process will affect
the number of line items that will be exported.
To set up a filter at this stage, uncheck the checkbox.
Choose a filter set-up by selecting a column or columns from the drop
down function.
Page 31 of 41
Electronic Response System (eRS)
User Manual
Figure: Export Wizard step 2
You also have the option of creating an additional filter.
•
•
•
Select the NEXT (next) button to proceed.
In step 3 of the export wizard, the columns that must be exported are
chosen by checking the checkbox next to the relevant column.
To export all columns, select the SELECT ALL button.
Figure: Wizard – Step 3
Page 32 of 41
Electronic Response System (eRS)
User Manual
•
•
•
•
•
•
•
•
•
•
•
•
•
•
Select the SELECT GRID button to export only the columns that appear
on the quick response grid as set up by the buyer.
To deselect all the columns, select the DESELECT button. This option
will allow only the default columns to be exported; these columns include
the Tender Number, Response Line Number and Supplier Part Number.
An export order can be selected here:
This option includes ‘None’ for no specific order or according to the quick
response grid.
Select the NEXT (next) button to proceed.
In step 4 of the export wizard, the information is ready to be exported.
Select the EXPORT (export) button to start the export function.
You will see the data being exported by means of a movable bar on the
wizard. When all the data has been exported, the bar will be complete.
Select the NEXT (next) button to proceed.
When export is complete, the total number of response lines on the
request and the total amount of lines in the export file will be indicated.
Select the FINISH button to complete the export.
The information will now be ready in Excel format to be worked on
outside of eRS.
You may choose to close or minimise the eRS application and work on
the exported file.
Find the location where this file was saved and open it from that location.
The file will look as shown below.
Page 33 of 41
Electronic Response System (eRS)
User Manual
Figure: Export in excel spread sheet.
PLEASE NOTE: It is very important that the CSV format is maintained because
changing the format will create errors and make the file impossible to be imported
back into eRS. The CSV is the only recognised format that can be imported into
eRS, even though the file may appear and even function same as excel. The
CSV can be exported and import as many times as necessary.
Import eRS Data
The exported and manipulated information can be imported back into eRS
•
•
•
•
Select the ‘File’ option in the top left corner of the screen.
Select the External data option to proceed.
Select the Import eRS data option.
The Batch Update Wizard - step 1 will display:
Page 34 of 41
Electronic Response System (eRS)
User Manual
•
•
•
Select the BROWSE button to locate the file to be imported.
Select the appropriate export file from its location and select the NEXT button to
proceed.
The Batch update step 2 will display:
•
•
Select the NEXT button to proceed.
The Batch Update - step 3 will display:
Page 35 of 41
Electronic Response System (eRS)
User Manual
•
•
Select the NEXT button to proceed.
The Batch Update - step 4 will display:
•
•
Select the NEXT button to proceed.
The Batch Update -step 5 will display:
Page 36 of 41
Electronic Response System (eRS)
User Manual
•
Select the UPDATE button to start the import process
You will see the data being exported by means of a movable bar on the wizard. When all the
data has been exported, the bar will be complete.
•
Select the NEXT button to proceed.
The total records in the input file will be indicated as well as the lines on the tender.
Page 37 of 41
Electronic Response System (eRS)
User Manual
•
Select the FINISH button.
Response Fields
The table below is an explanation of response fields used in eRS. Please refer to this table
when completing the Response Fields
Response Field
Description
The number indicating the offer of a supplier i.e. 0 is the
Alternative Number
Base Currency
OR
Foreign Currency
original offer, 1 is the first alternative offer etc.
The foreign currency applicable to that part of a specific item
not linked to the SA Rand.
A particular make of goods, and the supplier catalogue number
Brand Name/Catalogue
Number
OR
Make and Model
thereof if applicable, separated by a semi colon:
e.g. Duracell : Dur001
OR
A particular make and model of goods e.g. Ford Focus 1.4
The frequency in months on which price escalations is based,
Claim Frequency
i.e after a Firm Period of 12 Months, follows an escalation
every three months. (Refer to page 3 of this document)
The percentage increase applied after the Firm Period, and for
Claim Rate Percentage
each Claim Frequency following. (Refer to page 3 of this
document)
Page 38 of 41
Electronic Response System (eRS)
User Manual
Response Field
Description
A Yes or No response by the supplier indicating total
Conforms with Specification
conformance with spec.
The factor applied to calculate a comparative price whenever
the Unit of Measure offered is different from the Unit of
Conversion Factor
Measure requested, i.e Requested 1Kg, Offered 25KG.
Conversion factor = 25, thus Price divided by 25.
Conversion Factor Operator
A divide or Multiply operator for a Conversion Factor.
The country where the Item originates from when imported.
Country of Origin
OR
Country of Manufacture
OR
The country where the Item is Manufactured, even if some
components are imported.
The exchange rate used by the Supplier to convert the
imported portion of the product to SA Rand.
Current Exchange Rate
OR
Foreign Exchange Rate
The system will calculate the Comparative Price from the
Base/Foreign currency supplied by the supplier, and the
Quoted currency stated by the Buyer, if there is a difference.
(Only applicable when a Supplier responds via the Internet)
The price offered by a supplier for a specific item, and end-
Delivered Price
Delivery Period (Days).
Group Id
Import Percentage Or
% Bound to Foreign Currency
user, delivered at a specific State institution.
The period in calendar days from order receipt date to delivery.
The name of the group an item belongs to.
The percentage of the specific item linked to the foreign
currency.
The minimum number of units to be ordered for a specific item
Minimum Order Quantity
by a State Institution.
The maximum number of units that can be delivered per
Monthly Delivery Rate (units)
month, post the stipulated delivery period in days.
Page 39 of 41
Electronic Response System (eRS)
User Manual
Response Field
Description
The number of months for which the tender price is firm from
Period for which price is firm.
Price List Indicator
the effective date of the contract.
To indicate that the price of an item is based upon a price list.
Indicates the Cost of the Service Plan measured as a
percentage of the Delivered Price whenever a Service Plan is
included as a mandatory cost within the delivered Price i.e.
Service Plan as % of Price
Delivered Price = R200000
Service Plan = R20000
Service Plan as % of Price = 10
The number of units the supplier is able to supply (i.e.
manufacture of source) over the duration of the contract
Supply Capacity (units)
period, within the limits as stipulated by the supplier regarding
delivery periods in working days and the monthly delivery rates
in units.
The Currency prescribed by the Buying organisation. It Should
always be SA Rand for Contract Management. The Base /
Quoted Currency
Foreign currency part will always be converted to the Quoted
currency.
The exchange rate used by the Supplier to convert the
imported portion of the product to SA Rand.
Quoted Exchange Rate
OR
Foreign Exchange Rate
The system will calculate the Comparative Price from the
Base/Foreign currency supplied by the supplier, and the
Quoted currency stated by the Buyer, if there is a difference.
(Only applicable when a Supplier responds via eRS /
Manually)
The number of days allowed for payment by the Supplier, to
Settlement Days
qualify for Settlement discount.
Percentage discount offered by the Supplier to the Buyer
Settlement Discount
whenever an account is settled within the settlement days.
The point where an item will originate. This may be a
Source Point
distribution depot or a factory.
Page 40 of 41
Electronic Response System (eRS)
User Manual
Response Field
Description
The catalogue number used by the supplier for the specific
Supplier Part Number
item, and will be used to link the State’s Item Number to that of
the supplier.
The unit of measure offered by the supplier when it is different
from the Unit of Measure required, i.e. a Supplier offers 28
Tablets instead of 30 Tablets requested.
UOM Offered/Spec Deviation
OR
Deviation from Specification
State any other deviation from specification must be stated
here.
OR
Only state the Deviation from Specification when the Bid
Requirements clearly states that no deviation from the Unit of
Measure Required will be acceptable.
Summary
In this section, you learned how to use the export and import facility in eRS, how and when to
apply the Go-To-Line, the Find, the Filter, the Sort and the Change tools when necessary.
The section also gives explanations of response fields that you learnt about in section 4. The
response fields can be used as a reference when completing requests.
Page 41 of 41