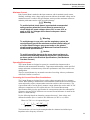
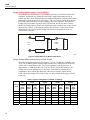
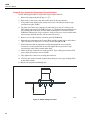
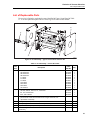
1
A40B
Precision AC Current Shunt Set
Instruction Manual
July 2008 Rev. 1, 7/09
© 2008-2009 Fluke Corporation. All rights reserved. Specifications are subject to change without notice.
All product names are trademarks of their respective companies.
LIMITED WARRANTY AND LIMITATION OF LIABILITY
Each Fluke product is warranted to be free from defects in material and workmanship under normal use and
service. The warranty period is one year and begins on the date of shipment. Parts, product repairs, and
services are warranted for 90 days. This warranty extends only to the original buyer or end-user customer of
a Fluke authorized reseller, and does not apply to fuses, disposable batteries, or to any product which, in
Fluke's opinion, has been misused, altered, neglected, contaminated, or damaged by accident or abnormal
conditions of operation or handling. Fluke warrants that software will operate substantially in accordance
with its functional specifications for 90 days and that it has been properly recorded on non-defective media.
Fluke does not warrant that software will be error free or operate without interruption.
Fluke authorized resellers shall extend this warranty on new and unused products to end-user customers
only but have no authority to extend a greater or different warranty on behalf of Fluke. Warranty support is
available only if product is purchased through a Fluke authorized sales outlet or Buyer has paid the
applicable international price. Fluke reserves the right to invoice Buyer for importation costs of
repair/replacement parts when product purchased in one country is submitted for repair in another country.
Fluke's warranty obligation is limited, at Fluke's option, to refund of the purchase price, free of charge repair,
or replacement of a defective product which is returned to a Fluke authorized service center within the
warranty period.
To obtain warranty service, contact your nearest Fluke authorized service center to obtain return
authorization information, then send the product to that service center, with a description of the difficulty,
postage and insurance prepaid (FOB Destination). Fluke assumes no risk for damage in transit. Following
warranty repair, the product will be returned to Buyer, transportation prepaid (FOB Destination). If Fluke
determines that failure was caused by neglect, misuse, contamination, alteration, accident, or abnormal
condition of operation or handling, including overvoltage failures caused by use outside the product’s
specified rating, or normal wear and tear of mechanical components, Fluke will provide an estimate of repair
costs and obtain authorization before commencing the work. Following repair, the product will be returned to
the Buyer transportation prepaid and the Buyer will be billed for the repair and return transportation charges
(FOB Shipping Point).
THIS WARRANTY IS BUYER'S SOLE AND EXCLUSIVE REMEDY AND IS IN LIEU OF ALL OTHER
WARRANTIES, EXPRESS OR IMPLIED, INCLUDING BUT NOT LIMITED TO ANY IMPLIED WARRANTY
OF MERCHANTABILITY OR FITNESS FOR A PARTICULAR PURPOSE. FLUKE SHALL NOT BE LIABLE
FOR ANY SPECIAL, INDIRECT, INCIDENTAL, OR CONSEQUENTIAL DAMAGES OR LOSSES,
INCLUDING LOSS OF DATA, ARISING FROM ANY CAUSE OR THEORY.
Since some countries or states do not allow limitation of the term of an implied warranty, or exclusion or
limitation of incidental or consequential damages, the limitations and exclusions of this warranty may not
apply to every buyer. If any provision of this Warranty is held invalid or unenforceable by a court or other
decision-maker of competent jurisdiction, such holding will not affect the validity or enforceability of any other
provision.
Fluke Corporation
P.O. Box 9090
Everett, WA 98206-9090
U.S.A.
Fluke Europe B.V.
P.O. Box 1186
5602 BD Eindhoven
The Netherlands
11/99
To register your product online, visit http://register.fluke.com
Table of Contents
Title
Page
Introduction and Specifications .........................................................................
About the Manual ..........................................................................................
Safety Information.........................................................................................
General Safety Summary ..........................................................................
Symbols.....................................................................................................
Product Description .......................................................................................
Electrical Specifications ....................................................................................
Current Shunt Absolute Accuracy.................................................................
Resistance Specifications ..............................................................................
Maximum AC-DC Difference .......................................................................
Maximum Overload Current .........................................................................
Typical Phase Displacement..........................................................................
General Specifications .......................................................................................
Dimensions (maximum) ................................................................................
Physical/Mechanical Parameters ...................................................................
Operating Environment .................................................................................
Storage and Transit Environments
(for models other than the 1 mA Current Shunt)........................................
Additional 1 mA Current Shunt Specifications .............................................
Preparing for Operation .....................................................................................
Unpacking and Inspecting the Shunts ...........................................................
Accessories ....................................................................................................
Table..........................................................................................................
Contacting Fluke ...........................................................................................
Shipping Information.....................................................................................
Storage Information.......................................................................................
Acceptance Test.............................................................................................
General Maintenance/Cleaning .....................................................................
Operating Information .......................................................................................
Feature Descriptions......................................................................................
Input/Output Connectors ...............................................................................
Maximum Current .........................................................................................
Operating Environment .................................................................................
Correcting for Current Shunt Error Contributions ........................................
Output Voltage Measurement – Loading Effect............................................
Output Voltage Measurement Using a Fluke 5790A ....................................
i
1
1
1
1
2
3
4
4
5
6
6
6
7
7
7
7
7
7
8
8
8
8
9
9
9
9
10
10
10
12
13
13
13
14
14
A40B
Instruction Manual
Output Voltage Measurement Using a Fluke 8508A ....................................
Operating Instructions........................................................................................
Introduction ...................................................................................................
Measuring Current.........................................................................................
Direct Read-out When Measuring Current....................................................
Theory of Operation...........................................................................................
Coaxial Shunts...............................................................................................
Boxed Shunts.................................................................................................
Introduction ...................................................................................................
An Overview of Calibration Methods ...........................................................
Potential Voltage Measurement Devices ..................................................
DC Considerations ....................................................................................
AC Considerations ....................................................................................
The Fluke Calibration Method ......................................................................
Recommended Tools and Equipment .......................................................
System Calibration for AC-DC Difference ...............................................
TVC Sensitivity Characterization .............................................................
UUT AC-DC Difference Measurement Sequence and Calculations ........
Current Source DC Noise..........................................................................
UUT DC Resistance Measurement ...........................................................
Repair Procedures Including Disassembly and Reassembly .............................
Repair Limits .................................................................................................
List of Tools Required for Repair..................................................................
End Plates and Guard Binding Post Replacement (Coaxial Shunts) .............
Input N-type Connector Replacement (Coaxial Shunts) ...............................
Output N-Type Connector Replacement (Coaxial Shunts) ...........................
List of Replaceable Parts ...................................................................................
ii
15
16
16
16
18
18
18
19
20
20
21
22
23
24
25
25
26
27
28
28
29
29
29
30
31
32
33
List of Tables
Table
1.
2.
3.
4.
5.
6.
7.
8.
9.
10.
11.
12.
13.
Title
Contents of the Current Shunt Set Packaging ........................................................
A40B Accessories ..................................................................................................
Features and Connectors ........................................................................................
Typical Loading Effect of a 5790A, 2.2 V Range..................................................
Typical Loading Effect of an 8508A 2 V ACV Range ..........................................
Estimating the Uncertainty of a 5790A Measurement ...........................................
Sample Calculation of Measured Current ..............................................................
Single Junction Thermal Voltage Converters ........................................................
Fluke 792A AC/DC Transfer Standard ..................................................................
Fluke 5790A Measurement Standard .....................................................................
Other Error Sources and Solutions.........................................................................
List of Recommended Equipment..........................................................................
Final Assembly.......................................................................................................
iii
Page
8
8
12
14
15
17
17
21
21
22
23
25
33
A40B
Instruction Manual
iv
List of Figures
Figure
Title
Page
1.
2.
3.
4.
5.
6.
7.
8.
9.
10.
11.
12.
13.
14.
Current Shunt Configurations ................................................................................
Features and Connectors ........................................................................................
Loading Effect of the Measurement Device...........................................................
Current Shunt - Simplified Electrical Diagram......................................................
Circuit Using a Reference Shunt Resistor to Determine Source Current...............
Sources of Error in AC Measurements ..................................................................
The Fluke Calibration System................................................................................
Calibrating Gain Difference ...................................................................................
Characterizing Sensitivity ......................................................................................
AC/DC Difference Sequence .................................................................................
Exploded View of a Shunt .....................................................................................
N Type Input Current Connector ...........................................................................
Output Voltage Connector .....................................................................................
Final Assembly – Typical Current Shunt from the Set ..........................................
3
11
14
19
20
23
24
25
26
27
30
31
32
33
v
A40B
Instruction Manual
vi
Introduction and Specifications
About the Manual
This is the Instruction Manual for the A40B Precision AC Current Shunt Set (hereafter
referred to as the Current Shunt or Current Shunts). It contains all of the information a
Calibration Technician needs to operate and maintain the Current Shunts. The manual is
divided into the following sections:
•
•
•
•
•
Introduction and Specifications
Preparing for Operation
Operation Instructions
Theory of Operation
Service Instructions
Safety Information
This section addresses safety considerations and describes symbols that may appear
either in this manual or on the Current Shunts.
A W Caution statement identifies conditions or practices that could result in damage to
the Current Shunts or equipment to which it is connected.
A XW Warning statement identifies conditions or practices that could result in injury or
death.
XW Warning
To avoid electric shock, personal injury, or death, carefully read
the information under General Safety Summary before
attempting to install, use, or service the Current Shunts.
General Safety Summary
This manual contains information and warnings that must be observed to keep the
Current Shunts in a safe condition and ensure safe operation. Using or servicing the
Current Shunts in conditions other than as specified in the Instruction Manual could
compromise your safety.
To use the Current Shunts correctly and safely, read and follow the precautions on the
next few pages, as well as, the safety instructions or warnings given throughout this
manual. In addition, follow all generally accepted safety practices and procedures when
working with and around electricity.
1
A40B
Instruction Manual
XW Warning
To avoid electric shock, personal injury, fire, or death, read the following warnings
before using the Current Shunts:
• Use the Current Shunts only as specified in this manual.
• To avoid damage to eyes, skin, and the respiratory system, do not significantly
exceed the maximum current rating of a shunt. Doing so may cause tracks on the
printed circuit boards to vaporize. (See Maximum Overload Current in the Electrical
Specifications.)
• Do not use the Current Shunts in wet environments.
• Inspect each Current Shunt before using it. Do not use the Current Shunt if it appears
damaged.
• Do not use a Current Shunt if it operates abnormally. If in doubt, have the Current
Shunt serviced.
• Have the Current Shunts serviced only by qualified service personnel.
• Do not use the Current Shunts with voltages above 30 V ac rms, 42 V ac peak, or 42 V
dc. These voltages pose a shock hazard.
• When servicing the Current Shunts, use only specified replacement parts.
• Do not dispose of batteries in fire. Do not heat, deform, solder, dissemble or modify
the batteries
• If batteries are removed from the shunt, ensure they are re-inserted with the correct
polarity.
• Use only the battery charger provided to charge the 1 mA active shunt.
• Always connect the Battery Charger / Power Adapter to the AC outlet before
connecting it to the shunt.
• When replacing the batteries, replace them all together. Use only Nickel Metal Hydride
(NiMH) batteries.
• Do not operate the batteries together with other types of batteries, or batteries with
different charge levels.
• The batteries in the 1 mA Current Shunt are always connected to the charging socket,
even when the Current Shunt is turned off.
Symbols
The following safety and electrical symbols may appear on the Current Shunt or in this
manual.
W
F
O
I
2
Risk of danger.
Important information. See manual.
~
Do not dispose of this product as unsorted
municipal waste. Go to Fluke’s website for
recycling information.
DC (Direct Current)
:
Warning. Hot or burn hazard
Power Off setting
<
Recycle
Power on setting
J
Earth ground
Precision AC Current Shunt Set
Introduction and Specifications
Product Description
The A40B Precision AC Current Shunt Set consists of 14 Current Shunts, a complement
of adapters, and a rugged transit/storage case. The Current Shunts are designed for
laboratory use in making AC-DC current measurements or absolute AC or DC current
measurements. They exhibit outstanding resistance value stability, excellent self-heating
power coefficient, and a low temperature coefficient. Five configurations of Current
Shunts comprise the set. They are as follows:
•
•
•
•
•
One boxed active shunt
Three boxed passive shunts
Five small size coaxial shunts
Three medium size coaxial shunts
Two large size coaxial shunts
1 mA
10 mA, 20 mA 50 mA
100 mA, 200 mA, 500 mA, 1 A, 2 A
5A, 10 A, 20 A
50 A, 100 A
The physical construction and the components used in the Current Shunts ensure that
amplitude displacement (error relative to DC resistance) and phase displacement at
100 kHz are small enough to be neglected in all but the highest accuracy measurements.
Voltage output is nominally 0.8 V for nominal current input. The 1 mA boxed active
Current Shunt is shown in Figure 1.
t
Inpu
t
Inpu
t
Inpu
Figure 1. Current Shunt Configurations
fim002.eps
3
A40B
Instruction Manual
Electrical Specifications
Current Shunt Absolute Accuracy
The following table shows the 1-year absolute accuracy specification stated at k=2, approximately 95% confidence for the
calibrated value. The specifications include 1-year stability, temperature effects over TCal ± 1 °C, and the measurement
uncertainty of the calibrated value.
Shunt Nominal
Current
Nominal
Resistance
(Ohms)
Specification ±μA/A, TCal ±1 °C, ≤50% RH
[1][2][3][5]
DC
1 kHz
10 kHz
30 kHz
100 kHz
800
20
55
75
75
150
10 mA
80
20
26
26
26
26
20 mA
40
20
26
26
26
26
50 mA
16
20
23
23
23
23
100 mA
8
20
24
24
24
24
200 mA
4
20
26
26
26
26
500 mA
1.6
21
27
27
27
28
1A
0.8
21
27
28
28
31
2A
0.4
21
27
30
30
48
5A
0.16
21
31
32
40
71
10 A
0.08
26
37
60
61
92
20 A
0.04
26
43
52
70
113
50 A
0.016
32
55
80
81
144
100 A
0.008
35
65
90
98
174
1 mA
[1]
[2]
[4]
The measured current is determined from:
I = (V /Rcalibrated) × (1 + (AC-DCcalibrated / 1,000,000)); where AC-DCcalibrated is expressed in ppm
Above 1 kHz interpolate the specification (si) between frequencies fupper and flower using:
si = slower + ( f i − f lower ) × ( supper − slower ) ÷ ( f upper − f lower )
[3]
[4]
[5]
4
add 20 μA/A if relative humidity is outside specification limits.
1 mA specifications apply with the battery charger disconnected.
Specifications assume no loading effects due to the voltage-sensing device. See Output Voltage Measurement - Loading
Effects in the operating information.
Precision AC Current Shunt Set
Electrical Specifications
Resistance Specifications
Shunt Nominal
Current
Nominal
Resistance
(Ohms)
Maximum
Deviation
from Nominal
Resistance
[2]
(±μΩ/Ω)
Uncertainty of
Calibrated
Value at 95%
Confidence
(±μΩ/Ω) TCal
±1ºC
12 Month
Stability
[1][2]
(±μΩ/Ω)
Temperature
Coefficient
[2]
(±ppm/ºC)
Power
Coefficient
Multiplier
[2][3]
(±ppm)
1 mA
800
250
8.2
18
5
1
10 mA
80
250
6.8
18
2.5
1
20 mA
40
250
8.2
18
4.5
1
50 mA
16
250
8.3
18
4.5
1
100 mA
8
250
8.3
18
2.5
2
200 mA
4
250
8.6
18
3.5
4
500 mA
1.6
250
9.6
18
4.5
13
1A
0.8
250
9.3
18
4.5
26
2A
0.4
250
9.4
18
4.5
26
5A
0.16
250
9.9
18
4.5
30
10 A
0.08
250
15
18
4.5
65
20 A
0.04
250
14
18
4.5
78
50 A
0.016
250
24
18
4.5
105
100 A
0.008
250
28
18
4.5
105
[1]
[2]
[3]
Stability specification combines long term change due to aging (permanent) and short term fluctuation due to humidity
changes when shunts are used and stored within specified humidity limits. Add 20 ppm if humidity is >50 % RH)
Assume rectangular distribution when combining with other uncertainty contributions.
Calibrated resistance values include the effects of power coefficient at the nominal current. For currents other than nominal,
apply the correction for power coefficient from:
⎡ ⎛ I Applied
Correction = Power _ Coefficien t _ Multiplier × ⎢1 − ⎜⎜
⎢⎣ ⎝ I No min al
[4]
⎞
⎟⎟
⎠
2
⎤
⎥
⎥⎦
TCal = ambient temperature at calibration
5
A40B
Instruction Manual
Maximum AC-DC Difference
Maximum AC-DC Difference (±ppm)
Shunt Nominal
Current
1 kHz
10 kHz
30 kHz
100 kHz
53
72
72
150
10 mA
20
20
20
40
20 mA
18
18
19
30
50 mA
13
13
14
16
100 mA
14
15
17
27
200 mA
17
17
18
28
500 mA
17
17
17
21
1A
17
19
19
23
2A
17
22
22
44
5A
23
24
34
69
10 A
28
55
58
98
20 A
37
51
80
150
1 mA
[1]
[2]
[3]
[1][2]
[3]
50 A
47
75
79
180
100 A
60
90
120
300
Specifications indicate the maximum flatness deviation from DC, and include both measured AC-DC difference and the
uncertainty of measurement. They are stated at k=2, approximately 95 % confidence
Includes 1-year stability of the AC-DC difference
Specifications for the 1 mA Current Shunt are for TCal ±1 °C
Maximum Overload Current
Shunt Nominal
Current
Maximum
Maximum Current
Sustained Current
[1]
< 5 Seconds
[2]
1 mA
10 mA
20 mA
50 mA
100 mA
200 mA
500 mA
[1]
[2]
[3]
[3]
3 mA
150 mA
250 mA
450 mA
1.2 A
1.7 A
2.7 A
2 mA
20 mA
40 mA
100 mA
200 mA
400 mA
1A
Shunt Nominal
Current
Maximum
Current < 5
[1]
Seconds
Maximum
Sustained
[2]
Current
1A
2A
5A
10 A
20 A
50 A
100 A
3.9 A
5.5 A
17 A
24 A
42 A
95 A
190 A
1.3 A
2.2 A
5.5 A
11 A
22 A
55 A
110 A
Longer than 5 seconds may cause permanent damage to the shunt. The output voltage may be considerably higher than 0.8
V.
Exceeding maximum sustained current may cause a resistance value step change
1 mA shunt batteries should be fully charged to ensure performance at 2 mA
Typical Phase Displacement
Typical Phase Displacement
6
Shunt Nominal Current
1 kHz
10 kHz
100 kHz
1 mA to 200 mA
< 0.001 º
< 0.006 º
< 0.060 º
500 mA to 2 A
< 0.003 º
< 0.030 º
< 0.300 º
2 A to 20 A
< 0.008 º
< 0.075 º
< 0.750 º
20 A to 100 A
< 0.013 º
< 0.125 º
< 1.250 º
Precision AC Current Shunt Set
General Specifications
General Specifications
Dimensions (maximum)
[1]
Shunt Value
Height
mm (inches)
Width
mm (inches)
1 mA to 2 A
5 A to 20 A
50 A and 100 A
70 (2.75)
130 (5)
200 (7.9)
70 (2.75)
130 (5)
200 (7.9)
Overall Length
mm (inches)
[1]
124 (4.9)
210 (8.25)
343 (13.5)
includes input and output connectors; subject to change by component vendor.
Physical/Mechanical Parameters
Shunt Value
Weight (maximum)
kg (lb)
Input Connector
Output Connector
1 mA to 20 A
50 A and 100 A
0.7 ( 1.6)
3.4 (7.5)
Type-N (female)
Type-LC (female)
Type-N (female)
Type-N (female)
Operating Environment
Temperature ....................................................... 13 ºC to 33 ºC
Calibration Temperature (TCal) Range............... 18 ºC to 28 ºC
[1][2]
Humidity Range for best specification
........... ≤50 % RH
Altitude ................................................................ 0 m to 3,000 m
[1]
[2]
Resistance stability is affected by humidity, but changes are reversible.
If the shunts are calibrated outside this RH, stability specifications will be met as long as the shunts are stored and used at the
same relative humidity ±10% RH.
Storage and Transit Environments (for models other than the 1 mA Current Shunt)
Temperature to avoid damage............................ -20 ºC to 140 ºC
Temperature and Humidity to maintain
[1]
performance ................................................ 5 ºC to 45 ºC; 15% to 80 % RH
Non-operating Altitude ........................................ 0 m to 12,000 m
[1]
Storage at extremes of temperature or humidity will cause a temporary change of shunt resistance by up to ±20 ppm. When
subsequently stored or used within the limits of the operating environment, the shunts will recover to their original resistance value
within 30 days.
Additional 1 mA Current Shunt Specifications
Output Resistance ............................................. 8 mΩ
Maximum Safe Output Current .......................... 11 mA (e.g., 1 V output into 90 Ω )
Maximum Capacitive Load ................................ 800 pF
Output Voltage Regulation ................................. 15 ppm / 100 pF
Maximum Output DCV Offset ............................. ±100 μV (typical ± 25 μV)
Typical Error @ 1 MHz........................................ <2%
Battery Specifications
Battery Size ................................................... AAA (44.5 x 10.5 mm)
Battery Technology ......................................... Nickel-Metal Hydride (NiMH)
Number of Batteries Required ........................ 8 (in 2 groups of 4)
Nominal Battery Voltage ................................. 1.2 V (4.8 V per group of 4)
Typical Battery Capacity ................................. 800 mAh
Charging Time (from fully discharged) ........... 100 minutes
Maximum Operating Time Between Charges:
Maximum Output Load (11 mA) ................ 18 hours
High Impedance Load ............................... 24 hours
Recommended cooling period after
charging the batteries .................................... 100 minutes
Storage and Transit Environment to preserve the batteries
Less Than 90 days ..................................... -20 ºC to 40 ºC
Less Than 1 year ........................................ -20 ºC to 30 ºC
To prevent loss of battery capacity recharge at least twice per year.
7
A40B
Instruction Manual
Preparing for Operation
This section of the manual describes how to unpack and prepare the Current Shunts for
operation.
Unpacking and Inspecting the Shunts
Note
The coaxial Current Shunts are robust when handled correctly by their
ends. Take care not to damage the horizontal struts of the coaxial shunts.
Upon receiving the Current Shunts from the carrier, carefully unpack and inspect them
for damage. If there is any sign of physical damage, notify the carrier immediately.
As part of the inspection process, check the contents against the list shown in Table 1.
Report any shortages to the nearest Fluke Technical Service Center. See Contacting
Fluke.
Save the container and any packing material for future use in storing or shipping the
Current Shunts
Table 1. Contents of the Current Shunt Set Packaging
Description
Quantity
A40B-Case ............................................. Transit/storage case for the A40B Current Shunts
1
Packing List of Items............................. Includes the serial number of the Current Shunts
1
Current Shunts
one boxed active shunt with battery charger ...... 1 mA
three boxed passive shunts................................ 10 mA, 20 mA 50 mA
five small size coaxial shunts ............................. 100 mA, 200 mA, 500 mA, 1 A, 2 A
three medium size coaxial shunts ...................... 5A, 10 A, 20 A
two large size coaxial shunts.............................. 50 A, 100 A
14
Connector Adapters
A40B-ADAPT/LC................................. LC Male to LC Male adapter
A40B-ADAPT/LCN ............................. LC Female to N Male inter-series adapter
A40B-LEAD/N ..................................... N Male to N Male lead
A40B-LEAD/4mm ................................ N to 4 mm double banana connector
1
1
1
2
Battery charger for 1 mA active shunt
CD containing the Instruction Manual (PDF)
1
1
Accessories
The LC and N adapters described in Table 2 are available as accessories:
Table 2. A40B Accessories
Accessory
8
Description
A40B-CAL/LC
High current adapter to connect two shunts in series for measurement (LC to LC)
A40B-CAL/N
Low current adapter to connect two shunts in series for measurement (N to N)
Precision AC Current Shunt Set
Preparing for Operation
Contacting Fluke
• Technical Support USA: 1-800-44-FLUKE (1-800-993-5853)
• Calibration/Repair USA: 1-888-99-FLUKE (1-888-993-5853)
• Canada: 1-800-36-FLUKE (1-800-363-5853)
• Europe: +31 402-675-200
• Japan: +81-3-3434-0181
• Singapore: +65-738-5655
• Anywhere in the world: +1-425-446-5500
Or, visit Fluke's website at www.fluke.com.
To register your product, visit http://register.fluke.com.
To view, print, or download the latest manual supplement, visit
http://us.fluke.com/usen/support/manuals.
Shipping Information
To prepare the Current Shunt Set for shipping, place them in the appropriate pre-cut foam
insert positions in the transit/storage case and secure the lid.
When shipping individual Current Shunts, completely enclose them within at least 5 cm
(2 inches) of polyurethane foam cushioning and pack them in a crush-proof container.
Storage Information
To prepare the Current Shunts for storage, place them in their transit/storage case, and
secure the lid. Then, store the container in a location that complies with the
environmental specifications described earlier in the General Specifications. Storage
outside these conditions may reduce the battery life of the 1 mA shunt or cause a
temporary change in the resistance of the Current Shunts by up to ±20 ppm. When
returned to an acceptable operating environment, the Current Shunts will recover to their
original resistance value within 30 days.
Acceptance Test
Upon initial receipt of the Current Shunts, perform the following acceptance test to
ensure that they are functional:
1. Inspect the physical condition of the Current Shunts for obvious physical damage,
including connector damage as described under General Maintenance/Cleaning.
Repair any damage before proceeding.
Instructions for contacting Fluke are provided earlier in this manual.
2. Functionally test each Current Shunt by applying the nominal current to its input. At
nominal current, the output voltage for each Current Shunt should be approximately
0.8 volts.
Note
Each Current Shunt produces 0.8 volts output for an input at nominal
operating current. The highest current shunts (10 A and above) get warm
when operating at full current. The 50 A and 100 A shunts may become
uncomfortable to touch; their operating temperature can be as high as
70 ºC (158 ºF).
9
A40B
Instruction Manual
General Maintenance/Cleaning
For General Cleaning, wipe the Carrying Case and Current Shunts with a damp cloth and
mild detergent. Do not use abrasives, isopropyl alcohol, or solvents.
W Caution
To prevent damage to the instrument:
•
Do not use aromatic hydrocarbons or chlorinated solvents
for cleaning the Current Shunts.
•
Do not spray liquid on or immerse the Current Shunts.
Other than calibration, the only maintenance the Current Shunts require is inspection of
the input and output connectors for wear or damage. The LC-type input connectors of the
50 A and 100 A shunts are robust, but the N-type connectors on the medium and small
shunts are easily damaged by misuse or mating with out-of-tolerance N-type male
connectors. The center pins of male N-type connectors are prone to moving, particularly
when assembled onto cables. If a center pin on an N-type connector protrudes too much,
the female connector on the shunt will be damaged by splaying the inner connector. If
there is any doubt about connector condition, gauge the connectors (see MIL-C-39012 for
details). Defective connectors can be replaced but it is recommended the work be
performed at a Fluke Service Center.
Operating Information
This section of the manual contains practical information the user needs to know before
and after making a current measurement. The material is intended to help the user make
high quality precision measurements.
Feature Descriptions
The features and connectors of the Current Shunts are shown in Figure 2 and described in
Table 3.
10
Precision AC Current Shunt Set
Operating Information
Rear
Front
1
2
3
4
Passive Shunt (100 mA)
Bottom
5
Top
6
7
3
1
2
Active Shunt (1 mA)
Figure 2. Features and Connectors
fim005.eps
11
A40B
Instruction Manual
Table 3. Features and Connectors
Item
Feature
Description
A
Current Input Connector
Connector for applying current to the shunt. All of the
shunts use the N-type female connectors except the 50 A
and 100 A versions which use type LC female Connectors.
B
Voltage Output Connector
Connector for measuring voltage drop across the shunt.
The output connectors are all N-type female.
C
Guard Connection
Binding post terminal for making a guard connection to
Shunt Lo.
D
PCB Struts
Low inductance connections carrying current to and from
the shunt resistors.
E
Power on/off switch
Switches power for the current Shunt on or off.
F
LED indicators
Green indicates power on. Red indicates low battery.
G
Battery charger connector
Input connector for the external battery charger.
Input/Output Connectors
XW Warning
To avoid skin burns and possible damage to the 50 A and 100 A
Current Shunts, make sure the current-carrying input
connectors are undamaged and fully tightened before applying
current to them.
The input connectors on the 50 A and 100 A shunts are of the LC-type. Under full current
conditions, the connectors will get hot to the touch. This is normal because of contact
resistance. If the connectors are not fully tightened, they will get hot enough to burn skin
and damage the shunt.
W Caution
To avoid pin damage to N-Type connectors on the Current
Shunts, make sure the male pin of a mating connector is in
tolerance and does not protrude.
All other coaxial connectors on the Current Shunts are 50 Ω, female, N-type. These
connectors are especially vulnerable to damage while being connected to a male N-type
connector. If the male connector is out-of-tolerance or its center pin protrudes too far, it
will splay the center pin of the female connector and lead to a poor connection. If there is
any doubt about the condition of the center pin in a female N-type connector, gauge the
connector (see MIL-C-39012 for details).
In extreme cases of connector damage, the connection resistance may be high enough to
prevent some current sources from driving the additional compliance voltage, particularly
at higher frequencies.
Another potential compliance voltage problem occurs when a Current Shunt is in series
with an inductance. The inductance can also burden current sources beyond their
capability. To help counter the effect, make sure the current connections are coaxial and
as short as possible.
A defective connector on a Current Shunt is replaceable. However, Fluke recommends
the work be done at a Fluke Service Center.
12
Precision AC Current Shunt Set
Operating Information
Maximum Current
Each Current Shunt is marked at the input connector with its nominal (rated) current.
Similarly, markings at the voltage output connector indicate the nominal voltage out for
nominal current in. A table in the specifications section provides maximum currents to
maintain performance and to avoid irreversible damage.
XW Warning
To avoid electrical shock hazard, use standard recommended
safety practices when the Current Shunt is connected in a
circuit which will create voltages above 30 V ac rms, 42 V ac
peak, or 42 V dc. Voltages above these levels pose a shock
hazard to the user.
W Warning
To avoid damage to eyes, skin, and the respiratory system, do
not significantly exceed the maximum overload current rating of
a Current Shunt. Doing so may cause tracks on the printed
circuit boards to vaporize. (See Maximum Overload Current in
the Electrical Specifications.)
W Caution
To avoid irreversible damage to the sense shunt resistors, do
not exceed the maximum sustained current for a Current Shunt
as shown earlier in the Electrical Specifications. (See Maximum
Overload Current.)
Operating Environment
The Current Shunts are designed to operate in a controlled environment such as
calibration and measurement laboratories. Temperature and humidity outside specified
storage and transit environment may affect their performance and, in the extreme case,
damage them.
The open coaxial shunts rely on natural convection for cooling. Adverse performance
will result if airflow is restricted.
Correcting for Current Shunt Error Contributions
The Current Shunts are designed for use with a voltage-measuring device to measure
current. When making a measurement, both instruments contribute known measurement
errors and usually require a measurement correction to achieve the best accuracy. The
Current Shunt can be used to directly measure current without the need to make AC-DC
difference comparisons to a DC current reference. The Current Measurement
Specifications table gives the specification for a measurement where the calibrated DC
resistance value and AC-DC difference are corrected for and allowance is made for the
shunt’s 12 month stability.
Use the following formula to determine a measured current, I, from voltage, and
calibrated resistance (Rcalibrated) and AC-DC difference (AC-DCcalibrated) values:
Where: AC-DCcalibrated is expressed in ppm.
⎞ ⎛ AC - DC calibrated ⎞
⎛ V
⎟⎟ × ⎜1 +
I = ⎜⎜
⎟
1,000,000 ⎠
⎝ R calibrated ⎠ ⎝
The formula above is based on the assumption that the voltmeter has infinite input
impedance at the frequency of interest.
13
A40B
Instruction Manual
Output Voltage Measurement – Loading Effect
The published specifications for a Current Shunt represent its performance under ideal
conditions. In practical use, placing the input of the voltage measurement device in
parallel with the Current Shunt introduces an additional impedance (loading effect) which
will result in a measurement error. See Figure 3. The 1 mA boxed Current Shunt has less
than 8 mΩ output resistance, so resistive loading effects are negligible. The capacitive
loading effect is less than 15 ppm per 100 pF at 100 kHz. For the non-active Current
Shunts, the loading effect becomes more significant as the resistance value of the Current
Shunt increases, that is, as the nominal current value decreases. For the most accurate
measurements, the error due to this loading effect must be calculated and used as a
measurement correction.
Current
Input
Device Input Z
Shunt Resistor
Z Connect
Voltage
output
Z Connect
feh004.eps
Figure 3. Loading Effect of the Measurement Device
Output Voltage Measurement Using a Fluke 5790A
The typical input impedance of a 5790A (input 1 or 2) is >10 MΩ (dc) in parallel with
70 pF. The 10 MΩ in parallel with the shunt resistance has a small effect on the lowest
current value Current Shunts at DC. The 5790A impedance typically decreases to
approximately 1.5 MΩ in parallel with 70 pF at 100 kHz, and, at this frequency, the
loading effect is more pronounced. For the lower value shunts, the loading error is
comparable with or exceeds the shunt error when used to measure current directly.
Table 4 shows the loading effect of the 5790A on Current Shunts in the range of 10 mA
to 200 mA.
Table 4. Typical Loading Effect of a 5790A, 2.2 V Range
DC
1 kHz
Current Loading Loading
(mA)
Error
Error
(ppm)
(ppm)
14
10 kHz
AC-DC
Diff.
(ppm)
Loading
Error
(ppm)
30 kHz
AC-DC
Diff.
(ppm)
Loading
Error
(ppm)
100 kHz
AC-DC
Diff.
(ppm)
Loading
Error
(ppm)
AC-DC
Diff.
(ppm)
1
0
0
0
-1
+1
-3
+3
-11
+11
10
-6
-6
0
-8
+2
-16
+10
-56
+49
20
-3
-3
0
-4
+1
-8
+5
-26
+23
50
-1
-1
0
-2
0
-3
+2
-10
+9
100
-1
-1
0
-1
0
-2
+1
-5
+4
200
0
0
0
0
0
-1
0
-2
+2
Precision AC Current Shunt Set
Output Voltage Measurement Using a Fluke 8508A
The input impedance of an 8508A on its DC function is >10 GΩ and the loading effect
for measuring DC current with any Current Shunt is negligible. The typical AC function
(DC coupled) low frequency input impedance of an 8508A is 1 MΩ in parallel with
135 pF. The impedance reduces with frequency to typically 550 kΩ || 135 pF at 100 kHz.
For the lower-current Current Shunts, the loading error is comparable with or exceeds the
shunt error when used to measure current directly.
Table 5 shows the loading effect of the 8508A on Current Shunts in the range of 1 mA to
1000 mA.
Table 5. Typical Loading Effect of an 8508A 2 V ACV Range
DC
1 kHz
Current Loading Loading
(mA)
Error
Error
(ppm)
(ppm)
10 kHz
AC-DC
Diff.
(ppm)
Loading
Error
(ppm)
1
0
0
0
-2
10
-80
-80
0
-82
20
-40
-40
0
50
-16
-16
100
-8
200
30 kHz
AC-DC
Diff.
(ppm)
Loading
Error
(ppm)
+2
100 kHz
AC-DC
Diff.
(ppm)
Loading
Error
(ppm)
AC-DC
Diff.
(ppm)
-6
+6
-20
+20
+2
-92
+12
-172
+92
-41
+1
-45
+5
-80
+40
0
-16
0
-18
+2
-31
+15
-8
0
-8
0
-9
+1
-15
+7
-4
-4
0
-4
0
-4
0
-8
+4
500
-2
-2
0
-2
0
-2
0
-3
+1
1000
-1
-1
0
-1
0
-1
0
-1
0
Use the following formula correct for the loading effect:
Where: AC-DCcalibrated and Loading error are expressed in ppm.
⎛ V
⎞ ⎛ AC - DC calibrated ⎞ ⎛ Loading error ⎞
⎟⎟ × ⎜1 +
I = ⎜⎜
⎟ × ⎜1 −
⎟
1,000,000 ⎠ ⎝
1,000,000 ⎠
⎝ R calibrated ⎠ ⎝
15
A40B
Instruction Manual
Operating Instructions
Introduction
This section of the manual describes how to measure both AC and DC current using any
one of the Current Shunts. The procedures are based on the assumption that the user is
familiar with the Operating Information and Specifications presented earlier in this
manual.
Measuring Current
Use the following procedure to measure current using one of the Current Shunts:
1. Analyze the circuit being tested and determine the following:
a. The approximate value of the current that flows in the circuit.
b. The frequency of the current to be measured (DC to 100 kHz).
2. Select a Current Shunt capable of safely handling the estimated current.
3. If using the 1 mA Current Shunt, switch it to On and verify that the battery low (red)
indicator is off. If the 1 mA Current Shunt has been charging, disconnect the charger.
The charging process creates heat in the battery so for the best accuracy allow the
shunt temperature to stabilize for 100 minutes after charging completes.
4. Remove power from the circuit under test and connect the input of the Current Shunt
in series with the circuit.
5. Connect an appropriate voltage measuring device to the output of the Current Shunt,
and select the correct range. The output voltage of the Current Shunt is proportional
to the input current; 0.8 V for nominal rated current.
It is generally appropriate to set the measuring device to remote guard and connect its
guard terminal to the guard on the Current Shunt. Refer to the measuring device
documentation.
6. Apply power to the circuit and measure the resulting output voltage. This output
voltage is directly proportional to the current flowing in the circuit.
7. Use the voltage measurement and the Operating Information in the previous section
of this manual to accurately determine the current level.
Determine the current using the following formula:
Where: AC-DC calibrated and Loading error are expressed in ppm.
⎛ V
⎞ ⎛ AC - DC calibrated ⎞ ⎛ Loading error ⎞
⎟⎟ × ⎜1 +
I = ⎜⎜
⎟ × ⎜1 −
⎟
1,000,000 ⎠ ⎝
1,000,000 ⎠
⎝ R calibrated ⎠ ⎝
16
Precision AC Current Shunt Set
Operating Instructions
Example: Estimating the Uncertainty of a 5790A Measurement
The following example shows how to estimate the measurement uncertainty of a
calibration measurement (ambient temperature 23 °C). It illustrates one of the
performance verification tests for the Fluke 5720A calibrator. Specifically it tests
200 mA at 1 kHz, as documented in the 5720A's full verification procedure.
Source: Fluke 5720A – 200 mA output at 1 kHz
Measurement Equipment: Fluke Current Shunt, 200 mA (calibrated at 23 °C) and a
Fluke 5790A
Make the measurement and estimate the uncertainty using the information given in Table
6. A sample calculation of Measured Current using arbitrary values is shown in Table 7.
As described in the 5720A full verification procedure, evaluating the measured current
uses limits based on the specification at 200 mA, 1 kHz of +/-145 ppm; calculated by the
5720A's 1 year, 99 % confidence specification of +/-(130 ppm of output + 3 μA). As
shown, the expanded measurement uncertainty is very adequate to reliably confirm this
level of performance.
Table 6. Estimating the Uncertainty of a 5790A Measurement
Value
(ppm)
Error Component
Standard deviation of measurement
[1]
noise
Shunt current measurement
specification (95 %)
Shunt temperature coefficient
Shunt power coefficient [2]
5790A loading effect uncertainty [3]
5790A specification (2.2 V range)
Distribution
Divisor
Value at
k=1
Squared
Value
5
normal
1
5
25
26
normal
2
13
169
0
0
1
22
rectangular
rectangular
normal
normal
1.73
1.73
2
2.58
0
0
0.5
8.53
0
0
72.71
Sum of squared value
266.96
Std uncertainty = square root of the sum
16.34
Expanded, rounded uncertainty in ppm (k = 2)
33
Expanded Uncertainty ±0.0000066 A
Notes:
[1] Value arbitrarily chosen for this example
[2] Power Coefficient = 0 as shunt is used at nominal current value
[3] Typical uncertainty at 1 kHz
Table 7. Sample Calculation of Measured Current (Arbitrary Values)
Givens/Calculations
Values
Units
5790A reading
Calibrated resistance value
Uncorrected calculated 5720A current output (V/R)
Add A40B AC-DC difference error (ppm)
Subtract 5790A loading error (ppm)
0.799977
3.999770
0.2000058
+1
0
Ω
A
ppm
ppm
Total measurement correction
+1
ppm
Corrected measurement result
Measurement uncertainty in Amperes
V
0.2000060
A
±0.0000066
A
17
A40B
Instruction Manual
Direct Read-out When Measuring Current
When using a Current Shunt with a meter that allows the displayed value to be
manipulated using math functions, the meter can be configured to give a direct reading of
current. For Example:
In the following scenario, a current source is measured with a 100 mA Current Shunt and
a Fluke 8508A.
Assumptions:
•
Calibrated DC resistance of the Current Shunt (z) = 7.999600
•
Calibrated AC-DC difference of the Current Shunt at this frequency = +7 ppm
•
Loading effect at this frequency = -9 ppm
1. Combine the AC-DC difference and loading effect numbers:
Combined ppm errors = -(+7) -9 = -16 ppm
Note
AC-DC difference error is the amount the AC value would have to be
changed to make it the same as the DC value. To change this into a
frequency flatness error, reverse the sign.
2. Convert the combined ppm errors into a multiplier (m)
⎛ − 16 ⎞
m = 1− ⎜
⎟ = 1.000016
⎝ 1,000,000 ⎠
3. Enter the z value (7.99960) into the z store of the 8508A
4. Enter the m value (1.000016) into the m store of the 8508
5. Activate divide by z and multiply by m on the 8508A
The 8508A now gives a direct reading of the current being measured.
To measure the same current level at a different frequency; calculate a new value for m
and enter the new value into the 8508A m store. The z value remains the same.
Theory of Operation
The Current Shunts are essentially a resistance through which a current is passed to
develop a voltage. They are intended for precision AC-DC current measurements in the
range 1 mA to 100 A at frequencies DC to 100 kHz. Inductance tends to make accurate
measurement difficult as current and frequency increases.
Coaxial Shunts
The coaxial shunts are especially designed for low-inductance. The design is similar to
that developed by Mendeleyev Institute, St Petersburg. The key components of the
coaxial shunts are the printed circuit board (PCB) construction and the precision resistive
elements. The design provides several parallel current paths (struts) each with its own
resistive element. Each current path is symmetrical to minimize mutual inductance.
Resistive elements comprise 1 to 8 discrete high precision bulk foil resistors per strut
depending on the current rating of the Current Shunt.
Individual PCB struts, collected in a cylindrical construction to reduce external magnetic
fields, form the path through the shunt. Figure 4 shows the current path through one of
the strut/resistor elements.
18
Precision AC Current Shunt Set
Theory of Operation
B
A
Current Input
Connector - Inner
Current Input
Connector - Outer
C
Voltage Output
Connector - Inner
Segment Top
Side Copper
Segment Bottom
Side Copper
Bulk Foil Resistor
Figure 4. Current Shunt - Simplified Electrical Diagram
feh006.png
The PCB designated A in Figure 4 is copper clad on both sides. PCBs B and C are single
sided. Current flows into the shunt through the input connector, through one side of the
PCB A, along one side of the struts to the resistor. The current return is through the
resistor and along the other side of the struts and end PCB to the input connector. The
voltage across the resistor is carried by the strut to the dual PCB end (B and C in Figure
4) and to the output connector.
The parallel current paths provided by the PCB struts and ends minimize mutual
inductance. Using numerous bulk foil resistors reduces skin effect in the resistive element
and provides excellent stability.
Boxed Shunts
With the exception of the 1 mA Current Shunt the boxed Current Shunts are electrically
simpler than the coaxial versions. Inductance and self heating become less of a problem
so the resistive elements can be enclosed to reduce external influences. The 1 mA Current
Shunt includes a battery powered amplifier to buffer the shunt resistance from loading
effects.
19
A40B
Instruction Manual
Calibration
Introduction
This section of the manual describes the calibration of the Current Shunts. The
description is presented in two parts:
1. An overview/discussion of the considerations for calibration of Current Shunts.
2. A description of the Fluke Calibration Method.
Neither of the descriptions contains detailed step by step procedures for calibrating the
Current Shunts. Rather, the descriptions are meant to provide a foundation for the
seasoned calibration technician to work with and use the Fluke method of calibrating
Current Shunts.
An Overview of Calibration Methods
Current Shunts can be used in AC-DC difference or absolute AC or DC measurements.
This requires that both AC flatness and DC resistance performance are calibrated. Both
AC and DC calibration involves passing a known current through the device being
calibrated (UUT) and measuring the voltage output.
The Fluke calibration method for the Current Shunts is to transfer calibration against
reference shunts. This eliminates the need for a calibrated current source. However, the
source current must be stable and able to provide the necessary voltage compliance
levels. Figure 5 shows the basic configuration.
I
Rs
V measurement
Ref
Std
shunt
ZL
V measurement
UUT
shunt
ZL
V source
Figure 5. Circuit Using a Reference Shunt Resistor to Determine Source Current
20
feh014.eps
Precision AC Current Shunt Set
Theory of Operation
Potential Voltage Measurement Devices
TVC
The system could use thermal voltage converters (TVC) in conjunction with a DC
voltmeter to measure the voltage output from a Current Shunt. The TVC produces a dc
output voltage proportional to the ac or dc voltage applied and is intrinsically flat across
the entire frequency range required for this application. The TVC can only be used to
compare two signals and does not provide an absolute measurement; hence its main use is
AC-DC difference measurements. There are various forms of TVC; Table 8 lists
advantages and disadvantages of the simplest: the single junction TVC (SJTVC).
Table 8. Single Junction Thermal Voltage Converters
Advantage
Disadvantage
Frequency flatness errors are generally very small.
Slow to reach thermal stability
Input impedance is mainly resistive
Low input resistance (90 Ω)
Very good output / input isolation. Negligible errors
due to common-mode current
Maximum input voltage is 0.45V. Appropriate
series resistor is required to increase input
voltage capability
Square law response offers poor amplitude
linearity
Nanovoltmeter or potentiometer /null detector
required to resolve mV output levels
Susceptible to small changes in local
environment (draughts, heat source)
Fluke 792A AC-DC Transfer Standard
The Fluke 792A can be used to make AC-DC difference measurements and has many
advantages over the SJTVC. See Table 9. It does, however, have one disadvantage that
reduces its usefulness for this application. Unlike the single junction TVC, the 792A is
subject to common-mode interference, particularly when used as the measurement device
for the Reference Standard shunt.
Table 9. Fluke 792A AC-DC Transfer Standard
Advantage
Disadvantage
Frequency flatness errors are generally very small.
Common-mode errors [1]
Solid state TVC with 2 V output.
Requires DC voltmeter to resolve output
Faster to settle than SJTVC
Input impedance varies with frequency
Smaller DC reversal error
Linear response
High input impedance
[1]
Common-mode errors are the biggest source of error for mains powered devices.
21
A40B
Instruction Manual
DMM / Measurement Standard
The output voltage of the Current Shunts is nominally 0.8 V making them ideal for use
with instruments such as the Fluke 5790A and Fluke 8508A. The obvious advantages of
this type of instrument are fast settling time and absolute measurement capability. See
Table 10. The 5790A provides AC-DC difference measurement capability although the
Current Shunts allow direct AC measurements with accuracy adequate for many
applications. Instruments like the Fluke 8508A have math functions that allow the
resistance value of the Current Shunt to be entered into memory so that the reading
displayed is the measured current.
Table 10. Fluke 5790A Measurement Standard
Advantage
Disadvantage
Fast settling
Common-mode errors [1]
Absolute (not comparative) measurements
Overall accuracy lower than TVC / DC meter
Fast readings
Input impedance varies with frequency
Good accuracy over a wide bandwidth
Frequency flatness errors must be corrected
No additional equipment required
Two inputs; ratio measurements
Very good linearity
Not as sensitive to local environment as TVC
Can do AC-DC difference transfer
[1]
Common-mode errors are the biggest source of error for mains powered devices.
DC Considerations
Note that the impedance of the measuring device is in parallel with the shunt, causing a
loading effect. Generally, the loading becomes more significant as the resistance value of
the Current Shunt increases, that is, as the nominal current value decreases.
Example
Assume the UUT is the 10 mA Current Shunt with a resistance of 80 Ω. The measuring
device across the UUT is a 0.8 V, 5 mA SJTVC. Its input impedance is typically 160 Ω.
The Reference Shunt is also a 10 mA Current Shunt, but its voltage is measured with a
Fluke 792A, 700 mV range – input impedance more than 10 MΩ. The entire 10 mA
current generated by the source passes through the Reference Shunt. Because of the
shunting effect of the SJTVC, 6.7 mA flows in the UUT and 3.3 mA flows in the SJTVC;
the UUT Current Shunt is operating at 66 % of nominal value. This would be
unacceptable for an absolute level measurement of DC (or AC). However, for an AC-DC
difference measurement, half current has long been the norm as this is how shunts are
traditionally used. Table 11 lists other potential sources of error and recommended
solutions.
22
Precision AC Current Shunt Set
Theory of Operation
Table 11. Other Error Sources and Solutions
Potential Error Source
Solution
Is the current stable, i.e., the same for both measurements?
Is the loading effect of the measuring device the same for each
measurement? It will not be if the Reference Shunt and the UUT
have significantly different resistance values resulting in a change of
the current in the circuit between measurements. The value of the
source resistance (Rs in Figure 5) influences the magnitude of the
error.
Careful selection of equipment.
How significant is the difference between different measurement
devices? Switching would allow the same device to measure both the
UUT and the Reference Shunt, but switch impedance repeatability
may introduce more problems than it solves.
All Current Shunts experience I2R self-heating to some extent. The
temperature coefficient of the Current Shunt causes a change in its
resistance value.
Careful selection of equipment.
How will DC zero errors be compensated?
Take the average of positive and
negative DC measurements (DC
reversal).
How will the measurement overcome thermal emf?
Allow all elements in the system
to stabilize at normal operating
temperature before
measurements are started.
AC Considerations
Most of the DC considerations also apply to AC measurements. Figure 6 shows the
measurement device input impedance as a resistance and capacitance to indicate that
impedance changes with frequency. The low input resistance value of SJTVC (160 Ω) is
beneficial in this respect; it swamps the capacitance. Devices with active input circuits
generally have high input resistance and capacitance becomes more influential on
frequency flatness. Tables 4, 5, and 6 provide typical values and errors for Fluke 5790A
and 792A.
I
Gu
Rs
Lo
Ref Std
Shunt
Hi
Zc
UUT
Shunt
V Source
C Gu
Hi
Gu
Lo
C Gu
Figure 6. Sources of Error in AC Measurements
feh016.eps
23
A40B
Instruction Manual
Common-mode current can be very significant in Current Shunt measurements especially
when one or more of the voltage measuring devices is mains (line) powered. The main
cause of common-mode current is capacitance between the measurement circuits and
ground. Careful guarding can reduce, but not eliminate, the effect. In Figure 6. Gu
represents instrument guards and CGu the capacitance to ground. Notice that CGu in the
lower measurement circuit is almost shorted out by the Gu / ground connections. The
voltage drop caused by connection impedances means that Gu in the lower circuit is not
exactly at ground and the difference changes with frequency. As a result, common-mode
current will cause small UUT measurement errors. Common-mode current errors usually
increase with frequency.
The errors caused by common-mode current in the Reference Standard measurement
circuit are potentially much greater. Zc in Figure 6 is the impedance of the connection
between the shunts. It can immediately be seen that the Gu / ground potential difference
in the upper circuit is higher so more common-mode current flows in CGu of the
Reference Standard measurement circuit than in the UUT circuit. Note the connection of
the detector in the upper circuit. In this configuration CGu is driven by the source current
reducing the effect of common-mode errors associated with the Reference Standard
shunt. The voltage across the UUT, Zc and the Reference Standard will increase with
frequency because of inductance. This compounds the frequency dependence of
common-mode current errors. Careful design of this connection to minimize inductance
is essential.
Common-mode chokes are often used in the input of measuring devices to reduce
common-mode effects. However, care must be taken to avoid resonances with CGu within
the frequency range of interest.
The Fluke Calibration Method
The Fluke calibration method makes automated AC-DC difference and DC Resistance
measurements. See Figure 7. The voltage outputs from the reference and UUT shunts are
each detected with a 0.8 V, 5 mA SJTVC and a Keithley 2182A nanovoltmeter. A single
manual intervention during the calibration disconnects the TVC assemblies and connects
the shunt outputs to the nanovoltmeter secondary inputs. A comparative measurement is
made to calibrate resistance at nominal current.
Clarke-Hess model 8100
Rs
I
Ref Std
Shunt
TVC assy
R
SJTVC
Keithley 2182A
Digital
Nanovoltmeter
TVC assy
Fluke
5720A
UUT
Shunt
R
SJTVC
Figure 7. The Fluke Calibration System
24
Keithley 2182A
Digital
Nanovoltmeter
feh018.eps
Precision AC Current Shunt Set
Theory of Operation
The TVC assembly comprises a 5 mA SJTVC and a 70 Ω precision series resistor to drop
the 0.8 V output of the Reference Standard shunt to the 0.45 V maximum of the SJTVC.
The components of the TVC assembly are packed in expanded polystyrene in a metal box
to provide thermal stability. Construction is coaxial. The TVC assembly input connector
is an N-type plug (male) which mates directly with the Reference Standard output
connector.
Recommended Tools and Equipment
Table 12 provides a list of recommended equipment for using the Fluke Calibration
Method to calibrate the Current Shunts. When using substitutes for the recommended
models, make sure they meet or exceed the minimum use specifications shown in the
table.
Table 12. List of Recommended Equipment
Nomenclature
Recommended Model
Minimum Use Specifications
Multifunction Calibrator
Fluke 5720A
0 to 10 volts, DC to 100 kHz
Transconductance Amplifier
Clarke-Hess 8100
Precision AC Current Shunt Set
A40B
TVC Assembly (two required)
A UHF, 5 mA Single Junction 0.8V, 5 mA DC to 100 kHz
thermocouple device or
thermal voltage convertor
such as the Fluke Model
A55, Ballantine 1394A, or
Measuretech EL1200; A
70 Ω resistor.
Nanovoltmeter (two required)
Keithley 2182A
100 A, 100 kHz
Calibrated at a National Measurement
Institute or a Fluke Service Center
10 mV DC, 1 nV resolution
System Calibration for AC-DC Difference
Periodic system calibration is required to compensate for the gain difference between the
two TVC assemblies. Figure 8 shows how this is achieved.
TVC assy
Fluke
5720A
R
SJTVC
Keithley 2182A
Digital
Nanovoltmeter 1
TVC assy
R
SJTVC
Figure 8. Calibrating Gain Difference
Keithley 2182A
Digital
Nanovoltmeter 2
feh020.eps
The Fluke 5720A produces an output of 0.8 V. The relative AC-DC difference of the
SJTC assemblies is measured and applied as a correction.
25
A40B
Instruction Manual
TVC Sensitivity Characterization
The voltage output of a SJTVC output is proportional to the square of the applied
voltage. Thus the device is inherently non-linear and transresistance gain or sensitivity
changes with input current. Sensitivity characterization minimizes the resulting errors by
determining mean sensitivity in a narrow band ±500 ppm from the nominal current.
Sensitivity characterization is performed before UUT calibration with the system
configured as for UUT measurement (Figure 7). Figure 9 shows the characterization
sequence where:
Vin is the setting on the 5720A
Vin_1 = nominal + 500 ppm
Vin_2 = nominal - 500 ppm
Vin_3 = nominal + 500 ppm
Vout_1 , 2 and 3 are the voltages reported by the measuring devices.
The gain factor n is a measure of the sensitivity of the device used to measure the output
voltage
Start
Apply Nominal
value + 500 ppm
Vin_1
Delay
Measure Vout
Vout_1
Apply Nominal
value - 500 ppm
Vin_2
Delay
Measure Vout
Vout_2
Apply Nominal
value + 500 ppm
Vin_3
Delay
Vout_3
Measure Vout
End
Figure 9. Characterizing Sensitivity
feh022.eps
VOUT _ 1 + VOUT _ 3
−1
2 × VOUT _ 2
ΔVout (in ppm)
Gain factor η =
=
VIN _ 1 + VIN _ 3
ΔVin (in ppm )
−1
2 ×V IN _ 2
The +500 ppm measurement is performed twice to counter drift in the measurement.
26
Precision AC Current Shunt Set
Theory of Operation
UUT AC-DC Difference Measurement Sequence and Calculations
In order to minimise the effects of drift, the measurement sequence is symmetrical in the
form AC1, +DC, -DC, AC2. The ±DC measurements cancel thermal emf and zero offset.
The two AC measurements compensate for drift during the measurement. Figure 10
shows the sequence where:
VDCUUT = average of magnitude of VDC+UUT and VDC-UUT
VDCSTD = average of magnitude of VDC+STD and VDC-STD
VACUUT = average of VACUUT -1 and VACUUT -2
VACSTD = average of VASTDT -1 and VACSTD -2
Start
Apply AC signal
Initial Delay
Simultaneous
measurement of
UUT and Std
To overcome short term DC noise in the Clarke Hess 8100 the
output of the reference and UUT shunts are measured
simultaneously.
VACUUT_1
VACSTD_1
Apply DC+ signal
Delay
Simultaneous
measurement of
UUT and Std
VDC+STD
VDC+UUT
Apply DC- signal
VDCUUT
VDCSTD
Delay
Simultaneous
measurement of
UUT and Std
VDC-UUT
VDC-STD
VACUUT
Calculations
VACSTD
Apply AC signal
Delay
Simultaneous
measurement of
UUT and Std
VACUUT_2
VACSTD_2
End
Figure 10. AC-DC Difference Sequence
feh024.eps
27
A40B
Instruction Manual
The AC-DC difference of the UUT shunt in ppm is determined from:
δ UUT = δ STD +
(V ACSTD − VDCSTD ) * 10 6 (V ACUUT − VDCUUT ) * 10 6
−
+ δ USTD:TVC − δ UUT :TVC
η STD × VDCSTD
ηUUT × VDCUUT
Where:
δUUT
δUUT:TVC
δSTD
δSTD:TVC
VACSTD
VDCSTD
VACUUT
VDCUUT
ηUUT
ηSTD
= AC-DC Difference of UUT in ppm
= AC-DC Difference of UUT SJTVC at the test frequency in ppm
= AC-DC Difference of reference Shunt in ppm
= AC-DC Difference of STD SJTVC at the test frequency in ppm
= Reference shunt voltage with AC current
= Reference shunt voltage, average of forward and reverse DC current
= UUT shunt voltage with AC current
= UUT shunt voltage, average of forward and reverse DC current
= Gain sensitivity of the UUT measurement system
= Gain sensitivity of the Reference Standard measurement system
Current Source DC Noise
From some transconductance amplifiers, noise on DC can be problematic. The Fluke
system addresses this problem by triggering the two nanovoltmeters at the same time so
they integrate simultaneously to maximize noise immunity.
UUT DC Resistance Measurement
The DC resistance of the UUT is determined by Ratio measurement against the Reference
Standard shunt. See Figure 7. The TVC assemblies are disconnected and the outputs of
the Reference Standard and UUT shunts are each connected to the second input of their
nanovoltmeter. DC reversal is employed to minimize thermal emf and DC zero offset
errors.
28
Precision AC Current Shunt Set
Repair Procedures Including Disassembly and Reassembly
Repair Procedures Including Disassembly and Reassembly
Repair Limits
This section of the manual provides procedures for making minor repairs to the Current
Shunts. These procedures are limited to the following replaceable parts as shown in Table
11 and Figure 14:
•
•
•
Coaxial shunt guard Binding Post
Coaxial shunt end plates
N-Type Connectors
The N-type connectors of the 10 mA, 20 mA and 50 mA boxed Current Shunts can be
replaced after removing the cover plate on the underside, but it is recommended the
Current Shunts be returned to a Fluke Service Center for repair. Other than battery
replacement, do not attempt to service the 1 mA Current Shunt.
Replacement batteries for the 1 mA Current Shunt must be NiHM. See the Battery
Specifications earlier in the General Specification section of this manual. A NiMH
battery replacement kit is available from Fluke; see Table 13. Read the Safety
Information earlier in this manual before replacing the batteries.
All other repair and/or parts replacement should be performed at a Fluke Service Center.
See Contacting Fluke earlier in this manual to find the location nearest you.
Note
A replacement procedure for the N-type connectors is included in this
manual. However, Fluke highly recommends having the work performed at
a Fluke Service Center.
The LC-type connectors (50 A and 100 A shunts) cannot be repaired or
replaced in the field. These connectors are very robust and do not need to
be replaced unless they are damaged or worn. (Excessive heat build up
under load may indicate damage or wear.) If replacement of an LC
connector is necessary, have the work performed at a Fluke Service Center.
List of Tools Required for Repair
A list of the tools required for disassembly, repair, and reassembly follows:
• 2.5 mm Allen wrench for Current Shunts rated at 20 A or less
• T25 Torx driver for Current Shunts rated at 50 A and 100 A
• 7 mm wrench (output end plate only)
• No. 10 Torx driver
• Magnetized slim line 5.5 mm wrench
• 50 W Soldering iron thin enough to work between the PCB struts
• Solder removal copper braid
• Solder suction tool
• T20 Torx driver for replacing the batteries in the 1 mA Current Shunt
29
A40B
Instruction Manual
End Plates and Guard Binding Post Replacement (Coaxial Shunts)
Note
The end plates have a small affect on the magnetic fields in the Current
Shunt and should always be in place during operation of the Current Shunt.
The magnetic effect increases with the current rating of the Current Shunt
and can change AC-DC difference by around 80 ppm at 100 A, 100 kHz.
Use the following procedure to replace the binding post and the Aluminum end plates;
see Figure 11.
1. To remove the binding post A:
a. Remove the nut and washers from the back of the post B , and
b. Pull the post out and away from the end plate.
c. Catch and save the spacer C as the post is removed.
2. To remove the output end plate D:
a. Remove the binding post as described in step 1.
b. Remove the four Allen head screws E.
c. Pull the end plate off and away from the body of the Current Shunt.
3. To remove the input end plate F:
a. Remove the four Allen head screws G.
b. Pull the end plate off and away from the body of the Current Shunt.
To remount or replace the removed components, logically reverse the removal procedure.
5
4x
7
4x
4
6
1
3
C
2
5
B
A
Figure 11. Exploded View of a Shunt
30
feh008.eps
Precision AC Current Shunt Set
Repair Procedures Including Disassembly and Reassembly
Input N-type Connector Replacement (Coaxial Shunts)
Use the following procedure to replace the type-N input connector:
1. Remove the input end plate (Figure 11- F ).
2. Remove the 3 mm screws, nuts and washers shown in Figure 11.
3. Using solder braid and the solder suction tool, remove the solder from the N-type
connector base plate/PCB joint.
4. Working between and taking care not to damage the PCB struts, melt the solder
attaching the N-type center pin from the back of PCB A and withdraw the N-type
connector. It may be necessary to repeat both solder removal steps until both the base
and the center pin are free.
5. Remove excess solder from the connector pad on PCB A.
6. Mount the new connector to the Current shunt with the original screws and washers.
7.
Position the nuts with the magnetized wrench and tighten the screws until the
connector is securely positioned. Do not fully tighten the screws as the N-type
connector may settle when residual solder melts.
8. Solder the N-type connector base to PCB B.
9. Working between the PCB struts, solder the center pin of N-type connector to the
back of the end PCB.
10. Fully tighten the 3 mm screws securing the connector.
11. Clean any flux residue from the soldered areas. Be careful not to get cleaning fluids
on the shunt resistors.
12. Replace the end plate.
Figure 12. N-Type Input Current Connector
feh010f.eps
31
A40B
Instruction Manual
Output N-Type Connector Replacement (Coaxial Shunts)
Use the following procedure to replace the N-type output connector:
1. Remove the output end plate (Figure 11- D ).
2. Remove the 3 mm screws, nuts and washers from the N-type connector.
3. Using solder braid and the solder suction tool, remove the solder from the N-type
connector base plate, PCB C.
4. The inner pin of the N-type connector is connected by 18 mm (0.71 inches) of 20
SWG tinned copper wire to PCB B. See Figure 13. Working between and taking care
not to damage the PCB struts, melt the solder attaching the wire from the back of
PCB B and withdraw the N-type connector. It may be necessary to repeat both solder
removal steps until both the base and the center pin are free.
5. Remove excess solder from the connector pad on PCB B and C.
6. Mount the new connector to the Current Shunt with the original screws and washers.
Take care that the 20 SWD wire is correctly located through PCB B.
7. Position the nuts with the magnetized wrench and tighten the screws until the
connector is securely positioned. Do not fully tighten the screws as the N-type
connector may settle when residual solder melts.
8. Solder the N-type connector base to the end PCB. Then, working between the PCB
struts, solder the connector wire to PCB B.
9. Fully tighten the 3 mm screws securing the connector.
10. Clean any flux residue from the soldered areas taking care not to get cleaning fluids
on the shunt resistors.
18 mm
11. Replace the end plate and binding post.
Figure 13. Output Voltage Connector
32
feh012.eps
Precision AC Current Shunt Set
List of Replaceable Parts
List of Replaceable Parts
User service is limited to replacing the parts identified in Figure 14 and listed in Table
13. To order replacement parts refer to Contacting Fluke earlier in this manual.
H1
J3
H2
J2
J1
feh009.eps
Figure 14. Final Assembly – Typical Current Shunt from the Set
Table 13. Final Assembly – Current Shunt Set
Ref
Des
Description
End Plate, Front
100 mA Shunt
200 mA Shunt
500 mA Shunt
1 A Shunt
2 A Shunt
5 A Shunt
10 A Shunt
20 A Shunt
50 A Shunt
100 A Shunt
H2
End Plate, Rear
100 mA, 200 mA, 500 mA, 1 A, 2 A Shunts
5A, 10 A, 20 A Shunts
50 A, 100 A Shunts
J1, J2 N-Type Connector, Female
(J2 on the 50 A and 100 A shunts use an LC-type connector, not
replaceable in the field)
J3
Binding Post, Black (coaxial shunts)
-Battery Charger for the 1 mA Current Shunt (not shown)
Fluke
Part No.
Qty
3275992
3276007
3276018
3276029
3276034
3276041
3276052
3276065
3276076
3276083
1
1
1
1
1
1
1
1
1
1
3276090
3276104
3276119
875435
1
1
1
2
3276128
H1
3359506
1
1
--
Replacement Battery Kit (not shown)
3359499
1
--
CD containing the manuals for the A40B Precision AC Current Shunt Set
(not shown)
3356284
1
33
A40B
Instruction Manual
34