1
Eurex Clearing C7
Derivatives Clearing GUI 3.0 - User Manual
Version 3.2
Change History
Date
Ver.
Change
10 June 2014
1.1.0
Production version for C7 Release 1.0
29 October 2014
2.0
- Added export for Margin Calculator
- Support for current Firefox ESR version
2.1
Updates for Production version of C7 Release 2.0
2 July 2015
3.0
Simulation version of C7 Release 3.0
28 September 2015
3.1
Updates for Simulation version of C7 Release 3.0
1 December 2015
3.2
- Further updates for Simulation version of C7 Release 3.0
- Added samples to all upload window descriptions
© Eurex 2015
Deutsche Börse AG (DBAG), Clearstream Banking AG (Clearstream), Eurex Frankfurt AG, Eurex Clearing AG (Eurex Clearing) as well as
Eurex Bonds GmbH (Eurex Bonds) and Eurex Repo GmbH (Eurex Repo) are corporate entities and are registered under German law.
Eurex Zürich AG is a corporate entity and is registered under Swiss law. Clearstream Banking S.A. is a corporate entity and is registered
under Luxembourg law. U.S. Exchange Holdings, Inc. and International Securities Exchange Holdings, Inc. (ISE) are corporate entities and
are registered under U.S. American law. Eurex Frankfurt AG (Eurex) is the administrating and operating institution of Eurex Deutschland.
Eurex Deutschland and Eurex Zürich AG are in the following referred to as the “Eurex Exchanges”.
All intellectual property, proprietary and other rights and interests in this publication and the subject matter hereof (other than certain trademarks and service marks listed below) are owned by DBAG and its affiliates and subsidiaries including, without limitation, all patent, registered design, copyright, trademark and service mark rights. While reasonable care has been taken in the preparation of this publication to
provide details that are accurate and not misleading at the time of publication DBAG, Clearstream, Eurex, Eurex Clearing, Eurex Bonds,
Eurex Repo as well as the Eurex Exchanges and their respective servants and agents (a) do not make any representations or warranties
regarding the information contained herein, whether express or implied, including without limitation any implied warranty of merchantability
or fitness for a particular purpose or any warranty with respect to the accuracy, correctness, quality, completeness or timeliness of such
information, and (b) shall not be responsible or liable for any third party’s use of any information contained herein under any circumstances,
including, without limitation, in connection with actual trading or otherwise or for any errors or omissions contained in this publication.
This publication is published for information purposes only and shall not constitute investment advice respectively does not constitute an
offer, solicitation or recommendation to acquire or dispose of any investment or to engage in any other transaction. This publication is not
intended for solicitation purposes but only for use as general information. All descriptions, examples and calculations contained in this publication are for illustrative purposes only.
Eurex and Eurex Clearing offer services directly to members of the Eurex exchanges respectively to clearing members of Eurex Clearing.
Those who desire to trade any products available on the Eurex market or who desire to offer and sell any such products to others or who
desire to possess a clearing license of Eurex Clearing in order to participate in the clearing process provided by Eurex Clearing, should
consider legal and regulatory requirements of those jurisdictions relevant to them, as well as the risks associated with such products,
before doing so.
Eurex derivatives are currently not available for offer, sale or trading in the United States or by United States persons (other than EURO
STOXX 50® Index Futures, EURO STOXX 50® ex Financials Index Futures, EURO STOXX® Select Dividend 30 Index Futures, EURO
STOXX® Index Futures, EURO STOXX® Large/Mid/Small Index Futures, STOXX® Europe 50 Index Futures, STOXX® Europe 600 Index
Futures, STOXX® Europe 600 Banks/Industrial Goods & Services/Insurance/Media/Travel & Leisure/Utilities Futures, STOXX® Europe
Large/Mid/Small 200 Index Futures, Dow Jones Global Titans 50 IndexSM Futures (EUR & USD), DAX®/MDAX®/TecDAX® Futures,
SMIM® Futures, SLI Swiss Leader Index® Futures, MSCI World/Europe/ Europe Value/Europe Growth/Emerging Markets/Emerging Markets Latin America/Emerging Markets EMEA/Emerging Markets Asia/China Free/India/Japan/Malaysia/South Africa/Thailand/AC Asia
Pacific ex Japan Index Futures, TA-25 Index Futures, Daily Futures on TAIEX Futures, VSTOXX® Futures, Gold and Silver Futures as well
as Eurex agriculture, property and interest rate derivatives).
Trademarks and Service Marks
Buxl®, DAX®, DivDAX®, eb.rexx®, Eurex®, Eurex Bonds®, Eurex Repo®, Eurex Strategy WizardSM, Euro GC Pooling®, FDAX®,
FWB®, GC Pooling®, GCPI®, MDAX®, ODAX®, SDAX®, TecDAX®, USD GC Pooling®, VDAX®, VDAX-NEW® and Xetra® are registered trademarks of DBAG.
All MSCI indexes are service marks and the exclusive property of MSCI Barra.
ATX®, ATX® five, CECE® and RDX® are registered trademarks of Vienna Stock Exchange AG.
IPD® UK Annual All Property Index is a registered trademark of Investment Property Databank Ltd. IPD and has been licensed for the use
by Eurex for derivatives.
SLI®, SMI® and SMIM® are registered trademarks of SIX Swiss Exchange AG.
The STOXX® indexes, the data included therein and the trademarks used in the index names are the intellectual property of STOXX Limited and/or its licensors Eurex derivatives based on the STOXX® indexes are in no way sponsored, endorsed, sold or promoted by STOXX
and its licensors and neither STOXX nor its licensors shall have any liability with respect thereto.
Dow Jones, Dow Jones Global Titans 50 IndexSM and Dow Jones Sector Titans IndexesSM are service marks of Dow Jones & Company,
Inc. All derivatives based on these indexes are not sponsored, endorsed, sold or promoted by Dow Jones & Company, Inc. Dow Jones &
Company, Inc. does not make any representation regarding the advisability of trading or of investing in such products.
Bloomberg Commodity IndexSM and any related sub-indexes are service marks of Bloomberg L.P.
All references to London Gold and Silver Fixing prices are used with the permission of The London Gold Market Fixing Limited as well as
The London Silver Market Fixing Limited, which for the avoidance of doubt has no involvement with and accepts no responsibility whatsoever for the underlying product to which the Fixing prices may be referenced.
PCS® and Property Claim Services® are registered trademarks of ISO Services, Inc.
Korea Exchange, KRX, KOSPI and KOSPI 200 are registered trademarks of Korea Exchange Inc.
Taiwan Futures Exchange and TAIFEX are registered trademarks of Taiwan Futures Exchange Corporation.
Taiwan Stock Exchange, TWSE and TAIEX are the registered trademarks of Taiwan Stock Exchange Corporation.
BSE and SENSEX are trademarks/service marks of Bombay Stock Exchange (BSE) and all rights accruing from the same, statutory or otherwise, wholly vest with BSE. Any violation of the above would constitute an offence under the laws of India and international treaties governing the same.
The names of other companies and third party products may be trademarks or service marks of their respective owners.
Eurex Clearing C7 – Derivatives Clearing GUI 3.0
As of December 1, 2015
Version 3.2
Table of Contents
1
Introduction . . . . . . . . . . . . . . . . . . . . . . . . . . . . . . . . . . . . . . . . . . . . . . . . . . . . . . 8
1.1
1.2
1.3
1.4
1.4.1
1.4.2
1.4.3
Purpose . . . . . . . . . . . . . . . . . . . . . . . . . . . . . . . . . . . . . . . . . . . . . . . . . . . . . . . . . . 8
Prerequisites . . . . . . . . . . . . . . . . . . . . . . . . . . . . . . . . . . . . . . . . . . . . . . . . . . . . . 8
System requirements. . . . . . . . . . . . . . . . . . . . . . . . . . . . . . . . . . . . . . . . . . . . . . . 9
System access . . . . . . . . . . . . . . . . . . . . . . . . . . . . . . . . . . . . . . . . . . . . . . . . . . . . 9
Initial authorization . . . . . . . . . . . . . . . . . . . . . . . . . . . . . . . . . . . . . . . . . . . . . . . 9
Session timeout. . . . . . . . . . . . . . . . . . . . . . . . . . . . . . . . . . . . . . . . . . . . . . . . . . 9
Connection failures . . . . . . . . . . . . . . . . . . . . . . . . . . . . . . . . . . . . . . . . . . . . . . 10
2
Common window elements . . . . . . . . . . . . . . . . . . . . . . . . . . . . . . . . . . . . . . . . . 11
2.1
2.2
2.2.1
2.2.2
2.2.3
2.2.4
2.2.5
2.2.6
2.2.7
2.2.8
2.3
2.3.1
2.3.2
2.3.3
2.4
2.5
Application header . . . . . . . . . . . . . . . . . . . . . . . . . . . . . . . . . . . . . . . . . . . . . . . . 11
Filter function . . . . . . . . . . . . . . . . . . . . . . . . . . . . . . . . . . . . . . . . . . . . . . . . . . . . 11
Multiple values . . . . . . . . . . . . . . . . . . . . . . . . . . . . . . . . . . . . . . . . . . . . . . . . . 12
Wildcard filter . . . . . . . . . . . . . . . . . . . . . . . . . . . . . . . . . . . . . . . . . . . . . . . . . . 12
Range filter . . . . . . . . . . . . . . . . . . . . . . . . . . . . . . . . . . . . . . . . . . . . . . . . . . . . 12
Drop-down list . . . . . . . . . . . . . . . . . . . . . . . . . . . . . . . . . . . . . . . . . . . . . . . . . . 12
Multi selection list . . . . . . . . . . . . . . . . . . . . . . . . . . . . . . . . . . . . . . . . . . . . . . . 13
Date and time picker . . . . . . . . . . . . . . . . . . . . . . . . . . . . . . . . . . . . . . . . . . . . . 13
Check box . . . . . . . . . . . . . . . . . . . . . . . . . . . . . . . . . . . . . . . . . . . . . . . . . . . . . 13
Radio buttons . . . . . . . . . . . . . . . . . . . . . . . . . . . . . . . . . . . . . . . . . . . . . . . . . . 13
Display tables . . . . . . . . . . . . . . . . . . . . . . . . . . . . . . . . . . . . . . . . . . . . . . . . . . . . 14
Display of results. . . . . . . . . . . . . . . . . . . . . . . . . . . . . . . . . . . . . . . . . . . . . . . . 14
Customization . . . . . . . . . . . . . . . . . . . . . . . . . . . . . . . . . . . . . . . . . . . . . . . . . . 15
Sorting functionality. . . . . . . . . . . . . . . . . . . . . . . . . . . . . . . . . . . . . . . . . . . . . . 15
Export functionality . . . . . . . . . . . . . . . . . . . . . . . . . . . . . . . . . . . . . . . . . . . . . . . 16
Message log . . . . . . . . . . . . . . . . . . . . . . . . . . . . . . . . . . . . . . . . . . . . . . . . . . . . . 17
3
Window overview . . . . . . . . . . . . . . . . . . . . . . . . . . . . . . . . . . . . . . . . . . . . . . . . . 18
4
Window layouts and descriptions . . . . . . . . . . . . . . . . . . . . . . . . . . . . . . . . . . . 20
4.1
4.1.1
4.1.2
4.1.3
4.2
4.2.1
4.2.2
4.2.3
4.3
4.3.1
4.3.2
4.3.3
4.4
4.4.1
4.4.2
4.4.3
4.5
4.5.1
4.5.2
4.5.2.1
Login . . . . . . . . . . . . . . . . . . . . . . . . . . . . . . . . . . . . . . . . . . . . . . . . . . . . . . . . . . . 20
Description . . . . . . . . . . . . . . . . . . . . . . . . . . . . . . . . . . . . . . . . . . . . . . . . . . . . 20
Functionality . . . . . . . . . . . . . . . . . . . . . . . . . . . . . . . . . . . . . . . . . . . . . . . . . . . 20
Screen elements . . . . . . . . . . . . . . . . . . . . . . . . . . . . . . . . . . . . . . . . . . . . . . . . 21
Position Overview . . . . . . . . . . . . . . . . . . . . . . . . . . . . . . . . . . . . . . . . . . . . . . . . 21
Description . . . . . . . . . . . . . . . . . . . . . . . . . . . . . . . . . . . . . . . . . . . . . . . . . . . . 21
Functionality . . . . . . . . . . . . . . . . . . . . . . . . . . . . . . . . . . . . . . . . . . . . . . . . . . . 22
Screen elements . . . . . . . . . . . . . . . . . . . . . . . . . . . . . . . . . . . . . . . . . . . . . . . . 24
Position Close Out / Re-open . . . . . . . . . . . . . . . . . . . . . . . . . . . . . . . . . . . . . . . 26
Description . . . . . . . . . . . . . . . . . . . . . . . . . . . . . . . . . . . . . . . . . . . . . . . . . . . . 26
Functionality . . . . . . . . . . . . . . . . . . . . . . . . . . . . . . . . . . . . . . . . . . . . . . . . . . . 27
Screen elements . . . . . . . . . . . . . . . . . . . . . . . . . . . . . . . . . . . . . . . . . . . . . . . . 28
Position Transfer Entry . . . . . . . . . . . . . . . . . . . . . . . . . . . . . . . . . . . . . . . . . . . . 28
Description . . . . . . . . . . . . . . . . . . . . . . . . . . . . . . . . . . . . . . . . . . . . . . . . . . . . 28
Functionality . . . . . . . . . . . . . . . . . . . . . . . . . . . . . . . . . . . . . . . . . . . . . . . . . . . 29
Screen elements . . . . . . . . . . . . . . . . . . . . . . . . . . . . . . . . . . . . . . . . . . . . . . . . 31
Position Transfer Overview. . . . . . . . . . . . . . . . . . . . . . . . . . . . . . . . . . . . . . . . . 32
Description . . . . . . . . . . . . . . . . . . . . . . . . . . . . . . . . . . . . . . . . . . . . . . . . . . . . 32
Functionality . . . . . . . . . . . . . . . . . . . . . . . . . . . . . . . . . . . . . . . . . . . . . . . . . . . 34
Send tab . . . . . . . . . . . . . . . . . . . . . . . . . . . . . . . . . . . . . . . . . . . . . . . . . . . . . . 34
4.5.2.2
Receive tab . . . . . . . . . . . . . . . . . . . . . . . . . . . . . . . . . . . . . . . . . . . . . . . . . . . . 34
4.5.3
4.6
4.6.1
Screen elements . . . . . . . . . . . . . . . . . . . . . . . . . . . . . . . . . . . . . . . . . . . . . . . . 36
Position Transfer Claim . . . . . . . . . . . . . . . . . . . . . . . . . . . . . . . . . . . . . . . . . . . . 39
Description . . . . . . . . . . . . . . . . . . . . . . . . . . . . . . . . . . . . . . . . . . . . . . . . . . . . 39
Derivatives Clearing GUI – User Manual
Page 4
Eurex Clearing C7 – Derivatives Clearing GUI 3.0
As of December 1, 2015
Version 3.2
4.6.2
4.6.3
4.7
4.7.1
4.7.2
4.7.3
4.8
4.8.1
4.8.2
4.8.3
4.9
4.9.1
4.9.2
4.9.3
4.10
4.10.1
4.10.2
4.10.3
4.11
4.11.1
4.11.2
4.11.3
4.12
4.12.1
4.12.2
4.12.3
4.13
4.13.1
4.13.2
4.13.3
4.14
4.14.1
4.14.2
4.14.3
4.15
4.15.1
4.15.2
4.15.3
4.16
4.16.1
4.16.2
4.16.3
4.17
4.17.1
4.17.2
4.17.3
4.18
4.18.1
4.18.2
4.18.3
4.19
4.19.1
4.19.2
4.19.3
4.20
Functionality . . . . . . . . . . . . . . . . . . . . . . . . . . . . . . . . . . . . . . . . . . . . . . . . . . . 40
Screen elements . . . . . . . . . . . . . . . . . . . . . . . . . . . . . . . . . . . . . . . . . . . . . . . . 41
Transaction Overview . . . . . . . . . . . . . . . . . . . . . . . . . . . . . . . . . . . . . . . . . . . . . 41
Description . . . . . . . . . . . . . . . . . . . . . . . . . . . . . . . . . . . . . . . . . . . . . . . . . . . . 41
Functionality . . . . . . . . . . . . . . . . . . . . . . . . . . . . . . . . . . . . . . . . . . . . . . . . . . . 42
Screen elements . . . . . . . . . . . . . . . . . . . . . . . . . . . . . . . . . . . . . . . . . . . . . . . . 44
Transaction Separation . . . . . . . . . . . . . . . . . . . . . . . . . . . . . . . . . . . . . . . . . . . . 48
Description . . . . . . . . . . . . . . . . . . . . . . . . . . . . . . . . . . . . . . . . . . . . . . . . . . . . 48
Functionality . . . . . . . . . . . . . . . . . . . . . . . . . . . . . . . . . . . . . . . . . . . . . . . . . . . 49
Screen elements . . . . . . . . . . . . . . . . . . . . . . . . . . . . . . . . . . . . . . . . . . . . . . . . 50
Transaction Account Transfer . . . . . . . . . . . . . . . . . . . . . . . . . . . . . . . . . . . . . . 50
Description . . . . . . . . . . . . . . . . . . . . . . . . . . . . . . . . . . . . . . . . . . . . . . . . . . . . 50
Functionality . . . . . . . . . . . . . . . . . . . . . . . . . . . . . . . . . . . . . . . . . . . . . . . . . . . 51
Screen elements . . . . . . . . . . . . . . . . . . . . . . . . . . . . . . . . . . . . . . . . . . . . . . . . 52
Transaction O/C Adjustment. . . . . . . . . . . . . . . . . . . . . . . . . . . . . . . . . . . . . . . . 52
Description . . . . . . . . . . . . . . . . . . . . . . . . . . . . . . . . . . . . . . . . . . . . . . . . . . . . 52
Functionality . . . . . . . . . . . . . . . . . . . . . . . . . . . . . . . . . . . . . . . . . . . . . . . . . . . 53
Screen elements . . . . . . . . . . . . . . . . . . . . . . . . . . . . . . . . . . . . . . . . . . . . . . . . 54
Transaction Adjustment . . . . . . . . . . . . . . . . . . . . . . . . . . . . . . . . . . . . . . . . . . . 54
Description . . . . . . . . . . . . . . . . . . . . . . . . . . . . . . . . . . . . . . . . . . . . . . . . . . . . 54
Functionality . . . . . . . . . . . . . . . . . . . . . . . . . . . . . . . . . . . . . . . . . . . . . . . . . . . 54
Screen elements . . . . . . . . . . . . . . . . . . . . . . . . . . . . . . . . . . . . . . . . . . . . . . . . 56
Give-up Overview . . . . . . . . . . . . . . . . . . . . . . . . . . . . . . . . . . . . . . . . . . . . . . . . . 56
Description . . . . . . . . . . . . . . . . . . . . . . . . . . . . . . . . . . . . . . . . . . . . . . . . . . . . 56
Functionality . . . . . . . . . . . . . . . . . . . . . . . . . . . . . . . . . . . . . . . . . . . . . . . . . . . 57
Screen elements . . . . . . . . . . . . . . . . . . . . . . . . . . . . . . . . . . . . . . . . . . . . . . . . 59
Give-up Maintenance . . . . . . . . . . . . . . . . . . . . . . . . . . . . . . . . . . . . . . . . . . . . . . 62
Description . . . . . . . . . . . . . . . . . . . . . . . . . . . . . . . . . . . . . . . . . . . . . . . . . . . . 62
Functionality . . . . . . . . . . . . . . . . . . . . . . . . . . . . . . . . . . . . . . . . . . . . . . . . . . . 62
Screen elements . . . . . . . . . . . . . . . . . . . . . . . . . . . . . . . . . . . . . . . . . . . . . . . . 63
Take-up Overview . . . . . . . . . . . . . . . . . . . . . . . . . . . . . . . . . . . . . . . . . . . . . . . . 64
Description . . . . . . . . . . . . . . . . . . . . . . . . . . . . . . . . . . . . . . . . . . . . . . . . . . . . 64
Functionality . . . . . . . . . . . . . . . . . . . . . . . . . . . . . . . . . . . . . . . . . . . . . . . . . . . 64
Screen elements . . . . . . . . . . . . . . . . . . . . . . . . . . . . . . . . . . . . . . . . . . . . . . . . 66
Take-up Maintenance. . . . . . . . . . . . . . . . . . . . . . . . . . . . . . . . . . . . . . . . . . . . . . 69
Description . . . . . . . . . . . . . . . . . . . . . . . . . . . . . . . . . . . . . . . . . . . . . . . . . . . . 69
Functionality . . . . . . . . . . . . . . . . . . . . . . . . . . . . . . . . . . . . . . . . . . . . . . . . . . . 69
Screen elements . . . . . . . . . . . . . . . . . . . . . . . . . . . . . . . . . . . . . . . . . . . . . . . . 71
Exercise Overview . . . . . . . . . . . . . . . . . . . . . . . . . . . . . . . . . . . . . . . . . . . . . . . . 71
Description . . . . . . . . . . . . . . . . . . . . . . . . . . . . . . . . . . . . . . . . . . . . . . . . . . . . 71
Functionality . . . . . . . . . . . . . . . . . . . . . . . . . . . . . . . . . . . . . . . . . . . . . . . . . . . 72
Screen elements . . . . . . . . . . . . . . . . . . . . . . . . . . . . . . . . . . . . . . . . . . . . . . . . 74
Exercise Assignment Overview . . . . . . . . . . . . . . . . . . . . . . . . . . . . . . . . . . . . . 76
Description . . . . . . . . . . . . . . . . . . . . . . . . . . . . . . . . . . . . . . . . . . . . . . . . . . . . 76
Functionality . . . . . . . . . . . . . . . . . . . . . . . . . . . . . . . . . . . . . . . . . . . . . . . . . . . 77
Screen elements . . . . . . . . . . . . . . . . . . . . . . . . . . . . . . . . . . . . . . . . . . . . . . . . 78
Deliverable Position Overview . . . . . . . . . . . . . . . . . . . . . . . . . . . . . . . . . . . . . . 79
Description . . . . . . . . . . . . . . . . . . . . . . . . . . . . . . . . . . . . . . . . . . . . . . . . . . . . 79
Functionality . . . . . . . . . . . . . . . . . . . . . . . . . . . . . . . . . . . . . . . . . . . . . . . . . . . 80
Screen elements . . . . . . . . . . . . . . . . . . . . . . . . . . . . . . . . . . . . . . . . . . . . . . . . 81
Notification Overview. . . . . . . . . . . . . . . . . . . . . . . . . . . . . . . . . . . . . . . . . . . . . . 82
Description . . . . . . . . . . . . . . . . . . . . . . . . . . . . . . . . . . . . . . . . . . . . . . . . . . . . 82
Functionality . . . . . . . . . . . . . . . . . . . . . . . . . . . . . . . . . . . . . . . . . . . . . . . . . . . 83
Screen elements . . . . . . . . . . . . . . . . . . . . . . . . . . . . . . . . . . . . . . . . . . . . . . . . 84
Notification Detail Overview . . . . . . . . . . . . . . . . . . . . . . . . . . . . . . . . . . . . . . . . 85
Derivatives Clearing GUI – User Manual
Page 5
Eurex Clearing C7 – Derivatives Clearing GUI 3.0
As of December 1, 2015
Version 3.2
4.20.1
4.20.2
4.20.3
4.21
4.21.1
4.21.2
4.21.3
4.22
4.22.1
4.22.2
4.22.3
4.23
4.23.1
4.23.2
4.23.3
4.24
4.24.1
4.24.2
4.24.3
4.25
4.25.1
4.25.2
4.25.3
4.26
4.26.1
4.26.2
4.26.3
4.27
4.27.1
4.27.2
4.27.3
4.28
4.28.1
4.28.2
4.28.3
4.29
4.29.1
4.29.2
4.29.3
4.30
4.30.1
4.30.2
4.30.3
4.31
4.31.1
4.31.2
4.31.3
4.32
4.32.1
4.32.2
4.32.3
4.33
4.33.1
4.33.2
4.33.3
Description . . . . . . . . . . . . . . . . . . . . . . . . . . . . . . . . . . . . . . . . . . . . . . . . . . . . 85
Functionality . . . . . . . . . . . . . . . . . . . . . . . . . . . . . . . . . . . . . . . . . . . . . . . . . . . 85
Screen elements . . . . . . . . . . . . . . . . . . . . . . . . . . . . . . . . . . . . . . . . . . . . . . . . 86
ITM Config for Auto Exercise . . . . . . . . . . . . . . . . . . . . . . . . . . . . . . . . . . . . . . . 86
Description . . . . . . . . . . . . . . . . . . . . . . . . . . . . . . . . . . . . . . . . . . . . . . . . . . . . 86
Functionality . . . . . . . . . . . . . . . . . . . . . . . . . . . . . . . . . . . . . . . . . . . . . . . . . . . 87
Screen elements . . . . . . . . . . . . . . . . . . . . . . . . . . . . . . . . . . . . . . . . . . . . . . . . 88
ITM Config Maintenance . . . . . . . . . . . . . . . . . . . . . . . . . . . . . . . . . . . . . . . . . . . 88
Description . . . . . . . . . . . . . . . . . . . . . . . . . . . . . . . . . . . . . . . . . . . . . . . . . . . . 88
Functionality . . . . . . . . . . . . . . . . . . . . . . . . . . . . . . . . . . . . . . . . . . . . . . . . . . . 89
Screen elements . . . . . . . . . . . . . . . . . . . . . . . . . . . . . . . . . . . . . . . . . . . . . . . . 90
Account Overview . . . . . . . . . . . . . . . . . . . . . . . . . . . . . . . . . . . . . . . . . . . . . . . . 90
Description . . . . . . . . . . . . . . . . . . . . . . . . . . . . . . . . . . . . . . . . . . . . . . . . . . . . 90
Functionality . . . . . . . . . . . . . . . . . . . . . . . . . . . . . . . . . . . . . . . . . . . . . . . . . . . 91
Screen elements . . . . . . . . . . . . . . . . . . . . . . . . . . . . . . . . . . . . . . . . . . . . . . . . 91
Upload Position Close Out . . . . . . . . . . . . . . . . . . . . . . . . . . . . . . . . . . . . . . . . . 92
Description . . . . . . . . . . . . . . . . . . . . . . . . . . . . . . . . . . . . . . . . . . . . . . . . . . . . 92
Functionality . . . . . . . . . . . . . . . . . . . . . . . . . . . . . . . . . . . . . . . . . . . . . . . . . . . 92
Screen elements . . . . . . . . . . . . . . . . . . . . . . . . . . . . . . . . . . . . . . . . . . . . . . . . 93
Upload Internal Position Transfer. . . . . . . . . . . . . . . . . . . . . . . . . . . . . . . . . . . . 94
Description . . . . . . . . . . . . . . . . . . . . . . . . . . . . . . . . . . . . . . . . . . . . . . . . . . . . 94
Functionality . . . . . . . . . . . . . . . . . . . . . . . . . . . . . . . . . . . . . . . . . . . . . . . . . . . 95
Screen elements . . . . . . . . . . . . . . . . . . . . . . . . . . . . . . . . . . . . . . . . . . . . . . . . 96
Upload External Position Transfer . . . . . . . . . . . . . . . . . . . . . . . . . . . . . . . . . . . 97
Description . . . . . . . . . . . . . . . . . . . . . . . . . . . . . . . . . . . . . . . . . . . . . . . . . . . . 97
Functionality . . . . . . . . . . . . . . . . . . . . . . . . . . . . . . . . . . . . . . . . . . . . . . . . . . . 98
Screen elements . . . . . . . . . . . . . . . . . . . . . . . . . . . . . . . . . . . . . . . . . . . . . . . . 99
Upload ITM Configurations . . . . . . . . . . . . . . . . . . . . . . . . . . . . . . . . . . . . . . . . 101
Description . . . . . . . . . . . . . . . . . . . . . . . . . . . . . . . . . . . . . . . . . . . . . . . . . . . 101
Functionality . . . . . . . . . . . . . . . . . . . . . . . . . . . . . . . . . . . . . . . . . . . . . . . . . . 101
Screen elements . . . . . . . . . . . . . . . . . . . . . . . . . . . . . . . . . . . . . . . . . . . . . . . 102
User Entitlement Maintenance . . . . . . . . . . . . . . . . . . . . . . . . . . . . . . . . . . . . . 103
Description . . . . . . . . . . . . . . . . . . . . . . . . . . . . . . . . . . . . . . . . . . . . . . . . . . . 103
Functionality . . . . . . . . . . . . . . . . . . . . . . . . . . . . . . . . . . . . . . . . . . . . . . . . . . 103
Screen elements . . . . . . . . . . . . . . . . . . . . . . . . . . . . . . . . . . . . . . . . . . . . . . . 104
(De-)Assign User Role . . . . . . . . . . . . . . . . . . . . . . . . . . . . . . . . . . . . . . . . . . . . 105
Description . . . . . . . . . . . . . . . . . . . . . . . . . . . . . . . . . . . . . . . . . . . . . . . . . . . 105
Functionality . . . . . . . . . . . . . . . . . . . . . . . . . . . . . . . . . . . . . . . . . . . . . . . . . . 106
Screen elements . . . . . . . . . . . . . . . . . . . . . . . . . . . . . . . . . . . . . . . . . . . . . . . 107
Modify User Privileges. . . . . . . . . . . . . . . . . . . . . . . . . . . . . . . . . . . . . . . . . . . . 108
Description . . . . . . . . . . . . . . . . . . . . . . . . . . . . . . . . . . . . . . . . . . . . . . . . . . . 108
Functionality . . . . . . . . . . . . . . . . . . . . . . . . . . . . . . . . . . . . . . . . . . . . . . . . . . 108
Screen elements . . . . . . . . . . . . . . . . . . . . . . . . . . . . . . . . . . . . . . . . . . . . . . . 109
Four Eye Principle - Entitlement . . . . . . . . . . . . . . . . . . . . . . . . . . . . . . . . . . . . 109
Description . . . . . . . . . . . . . . . . . . . . . . . . . . . . . . . . . . . . . . . . . . . . . . . . . . . 109
Functionality . . . . . . . . . . . . . . . . . . . . . . . . . . . . . . . . . . . . . . . . . . . . . . . . . . 110
Screen elements . . . . . . . . . . . . . . . . . . . . . . . . . . . . . . . . . . . . . . . . . . . . . . . 111
(De-)Assign User Role - Approve . . . . . . . . . . . . . . . . . . . . . . . . . . . . . . . . . . . 111
Description . . . . . . . . . . . . . . . . . . . . . . . . . . . . . . . . . . . . . . . . . . . . . . . . . . . 111
Functionality . . . . . . . . . . . . . . . . . . . . . . . . . . . . . . . . . . . . . . . . . . . . . . . . . . 112
Screen elements . . . . . . . . . . . . . . . . . . . . . . . . . . . . . . . . . . . . . . . . . . . . . . . 112
Modify User Privileges - Approve . . . . . . . . . . . . . . . . . . . . . . . . . . . . . . . . . . . 113
Description . . . . . . . . . . . . . . . . . . . . . . . . . . . . . . . . . . . . . . . . . . . . . . . . . . . 113
Functionality . . . . . . . . . . . . . . . . . . . . . . . . . . . . . . . . . . . . . . . . . . . . . . . . . . 113
Screen elements . . . . . . . . . . . . . . . . . . . . . . . . . . . . . . . . . . . . . . . . . . . . . . . 114
Derivatives Clearing GUI – User Manual
Page 6
Eurex Clearing C7 – Derivatives Clearing GUI 3.0
As of December 1, 2015
Version 3.2
4.34
4.34.1
4.34.2
4.34.3
4.35
4.35.1
4.35.2
4.35.3
4.36
4.36.1
4.36.2
4.36.3
(De-)Assign User Role - Approve Copy . . . . . . . . . . . . . . . . . . . . . . . . . . . . . . 114
Description . . . . . . . . . . . . . . . . . . . . . . . . . . . . . . . . . . . . . . . . . . . . . . . . . . . 114
Functionality . . . . . . . . . . . . . . . . . . . . . . . . . . . . . . . . . . . . . . . . . . . . . . . . . . 115
Screen elements . . . . . . . . . . . . . . . . . . . . . . . . . . . . . . . . . . . . . . . . . . . . . . . 115
Downloads . . . . . . . . . . . . . . . . . . . . . . . . . . . . . . . . . . . . . . . . . . . . . . . . . . . . . 116
Description . . . . . . . . . . . . . . . . . . . . . . . . . . . . . . . . . . . . . . . . . . . . . . . . . . . 116
Functionality . . . . . . . . . . . . . . . . . . . . . . . . . . . . . . . . . . . . . . . . . . . . . . . . . . 116
Screen elements . . . . . . . . . . . . . . . . . . . . . . . . . . . . . . . . . . . . . . . . . . . . . . . 117
Reset Password . . . . . . . . . . . . . . . . . . . . . . . . . . . . . . . . . . . . . . . . . . . . . . . . . 117
Description . . . . . . . . . . . . . . . . . . . . . . . . . . . . . . . . . . . . . . . . . . . . . . . . . . . 117
Functionality . . . . . . . . . . . . . . . . . . . . . . . . . . . . . . . . . . . . . . . . . . . . . . . . . . 117
Screen elements . . . . . . . . . . . . . . . . . . . . . . . . . . . . . . . . . . . . . . . . . . . . . . . 118
5
Appendix . . . . . . . . . . . . . . . . . . . . . . . . . . . . . . . . . . . . . . . . . . . . . . . . . . . . . . . 119
5.1
5.2
5.3
Supported ASCII characters . . . . . . . . . . . . . . . . . . . . . . . . . . . . . . . . . . . . . . . 119
Supported keyboard short-cuts . . . . . . . . . . . . . . . . . . . . . . . . . . . . . . . . . . . . 119
Glossary . . . . . . . . . . . . . . . . . . . . . . . . . . . . . . . . . . . . . . . . . . . . . . . . . . . . . . . 119
Derivatives Clearing GUI – User Manual
Page 7
Eurex Clearing C7 – Derivatives Clearing GUI 3.0
As of December 1, 2015
Version 3.2
Introduction
1
Introduction
This document provides a detailed description of Eurex Clearing’s Derivatives Clearing GUI,
which supports clearing functions through its web based graphical user interface.
Note: Data contained in the screenshots and samples in this publication are for illustrative
purposes only and should not be relied upon as a true representation of the actual clearing
house.
Cross references to other chapters within this document are always clickable, but not marked
separately.
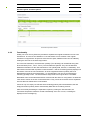
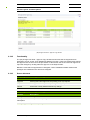
Changes applied to this document after the last version has been published (other than grammar/
spelling corrections) are marked with a change bar in the left margin as demonstrated in this
paragraph. Old change bars will be removed from version to version.
1.1
Purpose
This document is intended for Member clearing personnel using the system.
The purpose of the “Derivatives Clearing GUI 3.0 - User Manual” is to identify the supported
business functions, explain the structure and the content of the windows, and familiarize the user
with the “look and feel” of the Derivatives Clearing GUI and its features.
This user guide is intended to be a reference guide, where information about GUI windows can
be quickly retrieved. It focuses on giving detailed descriptions of all windows and related
functions.
The user guide consists of 4 chapters and an appendix:
1.2
Chapter 1 “Introduction” introduces the user guide and how to access the application.
Chapter 2 “Common window elements” describes generic functions of the application.
Chapter 3 “Window overview” gives an overview of the Derivatives Clearing GUI and window
flow.
Chapter 4 “Window layouts and descriptions” describes the Derivatives Clearing GUI windows
in detail.
The Appendix provides additional information.
Prerequisites
To ensure that each user can run the Derivatives Clearing GUI, the following prerequisites need
to be met:
A certificate signed by “Gruppe Deutsche Boerse CA” needs to be installed in the browser
(Please refer to the “Clearing GUIs - Access Guide” available on the Eurex Clearing website
for further information on how to request and install this certificate).
Working access to the Derivatives Clearing GUI. The user should check with his network and
system administrators that all network, hardware and Eurex Clearing frontend software configuration requirements have been met.
A valid user ID for the Eurex backend.
A login identification and password for the Derivatives Clearing GUI.
Derivatives Clearing GUI – User Manual
Page 8
Eurex Clearing C7 – Derivatives Clearing GUI 3.0
As of December 1, 2015
Version 3.2
Introduction
1.3
System requirements
The Derivatives Clearing GUI is a web based application which is accessed via a web browser.
To run the GUI the following requirements have to be fulfilled:
1.4
One of the following supported web browsers must be installed:
Microsoft Internet Explorer 9 or higher,
Mozilla Firefox Extended Support Release (v31 or higher),
Google Chrome v29 or higher.
Other web browsers may work as well, but are not explicitly supported by Eurex Clearing.
SSL transport and JavaScript must be enabled (for further information refer to the “Clearing
GUIs - Access Guide” available on the Eurex Clearing website).
System access
If the user meets the described prerequisites, the Derivatives Clearing GUI can be accessed via
the following URLs:
1.4.1
Simulation: https://simulation.eurexclearing.com:9443/C7_GUI/
Production: https://production.eurexclearing.com:8443/C7_GUI/
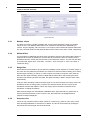
Initial authorization
In order to gain access to the Derivatives Clearing GUI a Member must be authorized by Eurex
Clearing. Therefore, the following steps have to be taken:
(1) In the first step, the Member must provide the user ID and contact details of a service
administrator to Member Services & Admission. This person is granted C7 access by setting
the RAL 102 “C7 GUI Access” to 1.
(2) On the following business day the service administrator receives a randomly created
password via email.
(3) With this initial password the service administrator can log in to the Derivatives Clearing GUI.
On the first successful login a password change is required.
(4) In the next step, the Member’s service administrator can set RAL 102 to 1 on user level to
provide C7 access for the individual users. This has to be done on the Eurex Classic GUI.
(5) On the following business day the user’s initial passwords can be created. This is done by
resetting the password for each user. Please refer to the description of the Reset Password
window for further information.
(6) The new passwords have to be communicated to the respective users. They can log in to the
Derivatives Clearing GUI with their existing Eurex user ID as a user name and their initial
password which they received from the service administrator. On the first successful login a
password change is required.
For further information refer to the “Member and User Maintenance Guide” available on the
Eurex Clearing website.
1.4.2
Session timeout
Once the user has successfully logged in to the Derivatives Clearing GUI a “session” is
established. In case of inactivity, the session expires after a certain time, currently 60 minutes.
Derivatives Clearing GUI – User Manual
Page 9
Eurex Clearing C7 – Derivatives Clearing GUI 3.0
As of December 1, 2015
Version 3.2
Introduction
Activity, in this context, is assumed as long as requests are exchanged with the backend at Eurex
Clearing. Hence, scrolling up and down in a list of already inquired records may be considered as
inactivity and the session might expire after the timeout period.
If the user tries to send a request after the session has expired, he is asked to login again and a
new session is started. Furthermore, the session is closed when the end-of-day processing
starts. During this time, no requests can be exchanged with the Eurex Clearing backend.
1.4.3
Connection failures
The Derivatives Clearing GUI is a web based application in which all functions are triggered by
user requests. Hence, no automatic notifications inform the user in case of a connection failure.
Depending on the reason for a failure, different kinds of behavior may occur:
Backend failure
In case the connection to the backend at Eurex Clearing is interrupted, every attempt to send
a request to the backend results in an error message displayed. Only data which has been
received prior to the interruption can be viewed in the GUI.
Web server failure
If the web server which hosts the Derivatives Clearing GUI happens to be unavailable, the
browser will display an error page informing the user that the web server is unable to show the
requested page. In this case, no interaction with the GUI is possible.
Missing Member certificate
If a user attempts to access the Derivatives Clearing GUI without a valid certificate, an SSL
connection error will be shown.
Network failure
Since the Derivatives Clearing GUI is a web based application, no interaction is possible if the
network connection is faulty. Should the connection via leased line be interrupted, the user
can use the URL for Internet access to the Derivatives Clearing GUI with the same certificate
as used for leased line access. In case the Internet connection is interrupted, Eurex Clearing
is not responsible for the failover concept.
With the exception of network failures all connection failures have the same effect as a logout,
i.e. the user session is terminated. To access the GUI after the problem has been solved, the
user needs to login again.
Derivatives Clearing GUI – User Manual
Page 10
Eurex Clearing C7 – Derivatives Clearing GUI 3.0
As of December 1, 2015
Version 3.2
Common window elements
2
Common window elements
The following section provides an overview of the standard window components and introduces
specific terms that are used in this document.
The screenshots shown in this user guide only serve as examples. The look and feel of the
Derivatives Clearing GUI may differ slightly depending on the used operating system and web
browser.
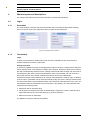
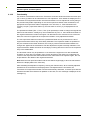
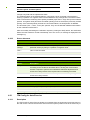
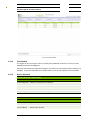
2.1
Application header
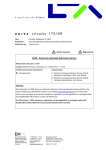
Regardless of the currently displayed window, the application header is always displayed in the
top area of the Derivatives Clearing GUI. On the left hand side it provides a menu bar to navigate
quickly through the different windows of the application. The left most menu item is the Menu
Switch which allows to toggle between clearing related windows and entitlement related
windows.
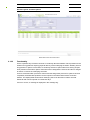
Application header
On the right hand side various functions can be accessed. First, the number of export files which
are ready for download is displayed. Clicking on this information opens the Downloads window.
Furthermore, the currently logged-in user is displayed in the application header. Next to the user
ID there is the Password Reset button if the logged-in user is entitled to use the Reset Password
function and the Logout button to log off from the current user session.
Every window provides access to the online help via the Help link. Clicking this link opens the
respective online help page for the currently displayed window.
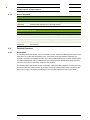
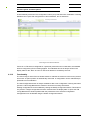
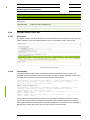
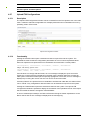
2.2
Filter function
Every window that is capable of displaying a larger set of data provides a filter function. This
makes it easier to inquire on data of interest. It is possible to make an inquiry without specifying
any filter criteria. However, it is very likely that such an inquiry results in a data set which is too
large to be displayed in the GUI (as detailed in section 2.3.1). To reduce the amount of
information to a feasible extent, different filter criteria can be entered. Different filter fields are
logically “AND” connected, i.e. an element is only included in the inquiry result if all the entered
filter criteria apply.
The filter function supports various kinds of fields, each of which offers different features to
support the user in entering filter criteria. These fields are grouped into individual sections which
can be extended and collapsed separately. The most important filters can be found in the Main
Filter section, whereas additional fields for a more detailed filtering are contained in further
sections, e.g. in the Advanced Filter section.
At the bottom of each filter area there is the Inquire button to start the inquiry and the Clear button
to empty all the filter fields at once. The inquiry result is displayed in a table (as detailed in section
2.3). It contains the data valid at the time of inquiry. The table is not updated automatically if the
data changes.
Derivatives Clearing GUI – User Manual
Page 11
Eurex Clearing C7 – Derivatives Clearing GUI 3.0
As of December 1, 2015
Version 3.2
Common window elements
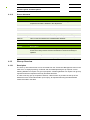
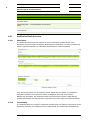
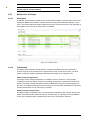
Sample filter area
2.2.1
Multiple values
The filters for Product, Clg Mbr, NCM/RC and Account Name support the inquiry of multiple
values at once. The different values have to be entered into the filter field, separated by a
comma. They are logically “OR” connected, i.e. the inquiry result contains all elements that match
any of the entered values for that particular filter and the values of the other criteria, respectively.
2.2.2
Wildcard filter
For some filters an additional drop-down list is provided to select how the entered filter criterion is
supposed to be used. By default, the “equals” filter is preselected. Hence, the inquiry returns
elements that match exactly the entered value in the respective criterion. The user can also filter
for content that “begins with”, “ends with”, “contains”, “does not equal” or “does not contain” a
certain text string.
2.2.3
Range filter
Some criteria (such as dates or prices) offer the possibility to filter explicitly for a certain range. In
this case, two entry fields are provided for one criterion to enter the lower boundary (From value)
and the upper boundary (To value). In order to inquire on exactly one specific value, both the
lower and the upper boundary need to be filled with the same value. After entering the lower
boundary and selecting another entry field, the upper boundary is filled in with the same value
automatically.
If only the lower boundary is filled in and the upper one is removed again, the inquiry returns all
elements that have a value greater or equal to the entered criterion and vice versa. If both
boundaries are filled with different values, the inquiry returns elements in between those
boundaries, including the borders.
While entering ranges it is automatically validated that the upper boundary is greater than or
equal to the lower boundary. If this is not the case, the invalid entry is highlighted and a
respective tooltip is displayed.
2.2.4
Drop-down list
If there is only a limited number of input values for a criterion (e.g. filter for call or put), a dropdown list with possibilities to choose from is offered. The list can be accessed by clicking the
downwards arrow at the right side of the filter field.
Derivatives Clearing GUI – User Manual
Page 12
Eurex Clearing C7 – Derivatives Clearing GUI 3.0
As of December 1, 2015
Version 3.2
Common window elements
2.2.5
Multi selection list
For some criteria it is possible to include multiple values in the inquiry (e.g. different currencies).
In that case, a multi selection list is offered by clicking the
button next to the filter field. One or
more items can be selected to be included in the filter result. After confirming the selection by
clicking the Ok button, they are automatically filled in into the respective filter field.
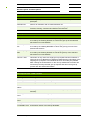
Sample multi selection list
2.2.6
Date and time picker
Filter fields which are supposed to be filled with a date provide a date picker. When the
respective filter field is accessed, a small calendar opens. The date can be selected by clicking
on the desired day. The arrows pointing to the left and the right can be used to navigate between
the months.
A similar feature is available for time filters. When such a field is accessed, the time picker opens
below it and allows to select a time using the mouse. Filtering for times always requires to fill in
the date filter as well. If the date is left blank, the respective time filter field is highlighted and a
tooltip explains that a date must be entered.
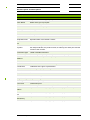
Date and time picker
2.2.7
Check box
A filter check box specifies whether a certain element should be included in the inquiry result or
not. If a filter check box is selected, the respective criterion is contained in the inquiry result.
2.2.8
Radio buttons
Radio buttons give the opportunity to select one out of several mutually exclusive options.
Usually, it is mandatory to choose an option. In this case, one radio button will always be preselected when the window is opened.
Derivatives Clearing GUI – User Manual
Page 13
Eurex Clearing C7 – Derivatives Clearing GUI 3.0
As of December 1, 2015
Version 3.2
Common window elements
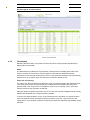
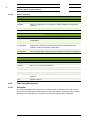
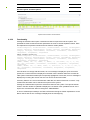
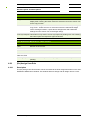
2.3
Display tables
In the Derivatives Clearing GUI inquiry results and datasets alike are presented in form of
spreadsheets. These display tables are the main part of a window. They are filled upon inquiry or
automatically when a window is called from another window to display detailed information.
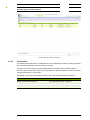
Sample display table
Directly above the table additional meta information regarding the displayed data is provided. The
total number of items is given along with an information about which items are currently
displayed. It depends on the size of the browser window how many items can be displayed at a
time. The display table automatically occupies the maximum available space to display as much
data as possible, but it might not always be possible to display all entries. In this case the table
can be scrolled vertically and horizontally.
To use the whole table in a different application, a separate export function is provided (see
section 2.4 “Export functionality”).
To further process certain records, they can be selected either by clicking the check box in the
very first column or by clicking anywhere in the respective row. Selected records are marked with
an activated check box and a different background color. Multiple items can be selected by
clicking on one row after the other. Holding the Shift key while selecting two records automatically
selects all the rows in between as well. Moreover, all rows can be selected at once by clicking the
“Select All” check box. The number of currently selected items is displayed above the table.
2.3.1
Display of results
An inquiry with only a few or even no filter criteria filled in can result in a very large number of
records. To prevent potential performance issues the number of displayed items is limited. If the
system limit of displayable items has been exceeded, the user gets to choose between three
options:
View only the first 1,000 items from the result
Download the results as an exported file (up to 10,000 items)
Refine the filter criteria to further limit the number of results.
If the number of results is even too large to prepare a downloadable file, the filter criteria need to
be refined to get a result.
Derivatives Clearing GUI – User Manual
Page 14
Eurex Clearing C7 – Derivatives Clearing GUI 3.0
As of December 1, 2015
Version 3.2
Common window elements
Data records which are currently displayed are not updated automatically if something has
changed in the background. To see the latest data, the records needs to be re-inquired.
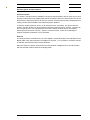
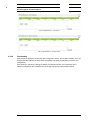
2.3.2
Customization
Display tables can be configured to the user’s individual needs. The column width can be
changed by dragging the border of the column header to enlarge or reduce the width.
Clicking the
button opens the column selection window. There, the column width can be reset
to the default. Furthermore, the order of the columns can be changed and columns that are not
needed can be hidden from the table.
Column selection window
2.3.3
Sorting functionality
The items displayed in tables can be sorted in ascending or descending order. Clicking on the
column header arranges the table content in ascending order according to that column. Another
click on the same header reverses the sorting order. The column which is currently selected for
sorting is indicated by an up- or downward arrow showing the sorting direction.
It is possible to select further columns as sorting criteria by holding down the Control key while
clicking on one column header after the other in the desired order.
A sorting scheme invoked by clicking on the column headers is only valid for the current session
or until a browser refresh. To save the sorting settings permanently, open the column sorting
window by clicking the
button. In this window, the sortable columns are listed. They can be
added to the sorting scheme. For each column, the sorting direction and the rank in the sorting
order can be defined.
Derivatives Clearing GUI – User Manual
Page 15
Eurex Clearing C7 – Derivatives Clearing GUI 3.0
As of December 1, 2015
Version 3.2
Common window elements
Column sorting window
Generally, the sorting function is available for every column. Certain attributes, however, might be
excluded from sorting. Clicking on their column header does not have any effect on the order of
the displayed items. Sorting is always applied to all items that meet the entered filter criteria,
even if only a part of the inquiry result is currently visible in the display table.
2.4
Export functionality
All main windows provide an option to export data in different file formats. To export the data as
specified in the filter section, click on one of the export file types at the bottom of the filter area.
The data is inquired based on the filter criteria at the moment the export is requested. Up to
10,000 records can be downloaded in one file. If this limit is exceeded, the user is asked to refine
the filter criteria. The following file types are supported:
XML
XLS (Microsoft Excel 2003 and newer)
CSV (comma separated values)
In addition to these file types, the Position Overview window provides an option to download the
table content in a file which can be uploaded to the Margin Calculator. If the mc export is clicked,
a CSV file is prepared that contains the necessary columns for an upload to the Margin
Calculator. This function is only available if the Clg Mbr and the NCM/RC filter fields are filled and
the Include expired positions check box is unchecked.
Independent from the format all exported files contain a CET timestamp of their creation time, the
current filter settings and the number of exported records. The export time is contained in the file
name as well.
The files are prepared in the background. When they are ready for download, all exports are
listed in the Downloads window. From there, they can be downloaded as long as the user is
logged in. Files which are not needed any longer can be removed manually from this list.
Derivatives Clearing GUI – User Manual
Page 16
Eurex Clearing C7 – Derivatives Clearing GUI 3.0
As of December 1, 2015
Version 3.2
Common window elements
2.5
Message log
The message log is part of every window that features any user action. It is located at the bottom
of each window. The message log informs the user about all relevant messages, such as details
about performed processing steps or what the result of a submitted request was (success/failure
including reason).
The message log only shows information regarding the current window. Hence, it is empty if the
window has just been opened.
Derivatives Clearing GUI – User Manual
Page 17
Eurex Clearing C7 – Derivatives Clearing GUI 3.0
As of December 1, 2015
Version 3.2
Window overview
3
Window overview
Transaction Management
Position Overview
Position Close Out / Re-open
Position Transfer Entry
Exercise Overview
Transaction Overview
Transaction Separation
Transaction Account Transfer
Transaction O/C Adjustment
Transaction Adjustment
Give-up Maintenance
Position Transfer Overview
Position Transfer Claim
Give-up Overview
Give-up Maintenance
Take-up Overview
Take-up Maintenance
Settlement
Exercise Assignment Overview
Exercise Overview
Deliverable Position Overview
Notification Overview
Notification Detail Overview
Automatic Processing
ITM Config for Auto Exercise
ITM Config Maintenance
Account Management
Account Overview
File Upload
Upload Position Close Out
Derivatives Clearing GUI – User Manual
Page 18
Eurex Clearing C7 – Derivatives Clearing GUI 3.0
As of December 1, 2015
Version 3.2
Window overview
Upload Internal Position Transfer
Upload External Position Transfer
Upload ITM Configurations
Participant Management
User Entitlement Maintenance
(De-)Assign User Role
(De-)Assign User Role - Approve
(De-)Assign User Role - Approve Copy
Modify User Privileges
Modify User Privileges - Approve
Four Eye Principle - Entitlement
(De-)Assign User Role - Approve
Modify User Privileges - Approve
(De-)Assign User Role - Approve Copy
Auxiliary Windows
Downloads
Reset Password
Derivatives Clearing GUI – User Manual
Page 19
Eurex Clearing C7 – Derivatives Clearing GUI 3.0
As of December 1, 2015
Version 3.2
Window layouts and descriptions
4
Window layouts and descriptions
This section describes the layout and functionality of individual GUI windows.
4.1
Login
4.1.1
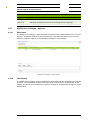
Description
The Login window is the first view that is presented when accessing the Derivatives Clearing
GUI. It is used to log in to the application and to change the user password.
Login and Change Password window
4.1.2
Functionality
Login
To login to the Derivatives Clearing GUI enter the user credentials into the Username and
Password fields and click the Login button.
Change Password
In general, the password to login to the application is valid for 90 days. 10 days before expiry the
user is asked to enter a new password. Initially, this is optional. When the password has expired,
the user is automatically redirected to the Change Password tab after the login and must enter a
new password. After three unsuccessful attempts to set a new password, the user account is
locked and the user must request a password reset from his service administrator.
A password change is also mandatory if an initial or reset password is used for login. In addition
to these cases, a password can be changed manually at any time via the Change Password tab.
The user name and the current password have to be entered to authenticate the user. Then, the
new password must be entered twice to prevent typos in the spelling. The new password must
comply with the following rules:
between 8 and 16 characters long
use at least one character from each of the following 4 categories: numeric characters (0-9),
uppercase letters (A-Z), lowercase letters (a-z), special characters
differ from the last 10 passwords
The password change is effective immediately.
Derivatives Clearing GUI – User Manual
Page 20
Eurex Clearing C7 – Derivatives Clearing GUI 3.0
As of December 1, 2015
Version 3.2
Window layouts and descriptions
4.1.3
Screen elements
Login - Fields
Field
Description
Username
User ID of the user who is supposed to be logged in.
Password
Password that belongs to the entered user ID.
Change Password - Fields
Field
Description
Username
User ID of the user whose password is supposed to be changed.
Old Password
Current password that belongs to the entered user ID.
New Password
The new password has to comply with the complexity requirements.
Repeat New
Password
To prevent typos in the password, the new password must be entered a
second time.
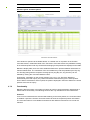
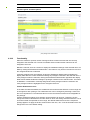
4.2
Position Overview
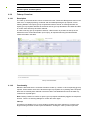
4.2.1
Description
The Position Overview window can be accessed from the Transaction Management menu in the
main menu or via the Overview button in the Transaction Overview window. It displays the
summary of position movements and the up-to-date position balances by contract. Certain types
of position adjustments can be initiated from this window. Further details about these functions
can be found in the “Functionality” section of this window.
The Position Overview window shows a summary of the up-to-date positions. In order to list only
positions of interest, a filter function is provided. At the top of the window there are various filter
fields. Upon inquiry, all positions matching the selected filter criteria are listed in the table.
Derivatives Clearing GUI – User Manual
Page 21
Eurex Clearing C7 – Derivatives Clearing GUI 3.0
As of December 1, 2015
Version 3.2
Window layouts and descriptions
Position Overview window
4.2.2
Functionality
Below the filter area there is a number of buttons to perform certain position adjustments or
initiate further functionality.
Detail
The Detail button is enabled if a single position is selected from the display table. When this
button is clicked, the Transaction Overview window is opened with detailed transaction
information for the selected position and account on the specified transaction date. Alternatively,
a double click on a position opens the respective transaction details as well.
Close Out / Re-opening
The Close Out / Re-open button is enabled if a single not-expired position with transaction date
(Tran Date) equal to the current business day is selected from the display table. Moreover,
positions held in net accounts are not eligible for close out or re-opening. Hence, the button
remains inactive if such a position is selected.
When this button is clicked, the Position Close Out / Re-open window is displayed as an overlay
window with the details of the selected position prefilled.
To close out multiple positions at once, a file upload function is provided. The Upload Position
Close Out window can be accessed by selecting Position Close Out - Upload from the File
Upload menu. In this window, a CSV file containing the respective adjustment parameters can be
uploaded.
Derivatives Clearing GUI – User Manual
Page 22
Eurex Clearing C7 – Derivatives Clearing GUI 3.0
As of December 1, 2015
Version 3.2
Window layouts and descriptions
Position Transfer
The Position Transfer button is enabled if a single not-expired position with an open long or short
quantity is selected from the display table whose transaction date (Tran Date) equals the current
business day. When this button is clicked, the Position Transfer Entry window is displayed as an
overlay window with the details of the selected position prefilled.
To transfer multiple positions at once, a file upload function is provided. The Upload Internal
Position Transfer window can be accessed by selecting Internal Position Transfer - Upload from
the File Upload menu. The Upload External Position Transfer window can be accessed by
selecting External Position Transfer - Upload. In these windows, a CSV file containing the
respective transfer parameters can be uploaded.
Exercise
The Exercise button is enabled if one or more eligible not-expired positions are selected from the
display table. Only option positions are eligible for exercise, i.e. if a position in a futures contract
is selected, the Exercise button remains disabled.
When this button is clicked, the Exercise Overview window is displayed as an overlay window
with the selected positions listed in the display table.
Derivatives Clearing GUI – User Manual
Page 23
Eurex Clearing C7 – Derivatives Clearing GUI 3.0
As of December 1, 2015
Version 3.2
Window layouts and descriptions
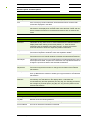
4.2.3
Screen elements
Position Overview - Filter criteria
Filter
Description
Product Line
Select a product line to filter for options or futures positions.
C/P
Filter for call or put contracts.
Curr
Filter for positions in certain currencies.
Product
Filter for positions in certain products.
Flex Contract ID
Filter for positions in a certain flexible instrument.
Maturity From
Filter for positions in listed instruments with a maturity of or later than the
specified date.
Maturity To
Filter for positions in listed instruments with a maturity of or earlier than the
specified date.
Expiration From
Filter for positions in instruments which expire on or after the specified date.
Expiration To
Filter for positions in instruments which expire on or before the specified
date.
Listed
Instruments
If this check box is selected, positions in listed instruments are shown.
Flexible
Instruments
If this check box is selected, positions in flexible instruments are shown.
Strike From
Filter for contracts with a strike price equal to or higher than the specified
price.
Strike To
Filter for contracts with a strike price equal to or lower than the specified
price.
Version
Filter for a certain contract version.
Exercise Style
Filter for positions of a certain exercise style (American or European).
Settlement
Method
Filter for positions of a certain settlement method (Cash or Physical).
Clg Mbr
Filter for positions of a certain Clearing Member.
NCM/RC
Filter for positions of a certain Non Clearing Member or Registered
Customer.
Account Name
Filter for positions booked on certain accounts.
Tran Date
Filter for a certain transaction date. This field is prefilled with the current
business day. It is required to enter a date. If no date is entered, the Inquire
button is disabled.
Include expired
positions
Include positions into the inquiry result which have already expired. This
check box is selected by default.
Position ID
Filter for positions with a certain Position ID.
Derivatives Clearing GUI – User Manual
Page 24
Eurex Clearing C7 – Derivatives Clearing GUI 3.0
As of December 1, 2015
Version 3.2
Window layouts and descriptions
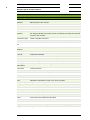
Position Overview - Buttons
Button
Description
Detail
This button is only active if a single position is selected. It opens the
Transaction Overview window with the detailed transaction information for
the selected position and account on the specified transaction date.
Close Out / Reopen
This button is only active if a single position is selected whose transaction
date (Tran Date) equals the current business day. It opens the Position
Close Out / Re-open window to close or re-open the selected position.
Position Transfer This button is only active if a single position is selected which has a sufficient
open quantity. It opens the Position Transfer Entry window to transfer the
selected position to a different account.
Exercise
This button is only active if one or more option positions are selected. It
opens the Exercise Overview window to exercise the selected positions.
Position Overview - Table columns
Column
Description
Exchange
Exchange ID.
Clg Mbr
Member ID of the Clearing Member.
NCM/RC
Member ID of the Non Clearing Member or Registered Customer.
Account Name
Account on which the position is booked.
Curr
Product currency.
C/P
Indicates a call or a put option.
Maturity
Maturity date of the contract.
Product
Product ID.
Strike
Strike price of the contract.
Version
Version of the contract.
Instrument
Symbol
The instrument symbol summarizes the contract parameters. It consists of
the call/put indicator, the product name, its maturity, the strike price and the
version of the contract.
Instrument Type
Listed or flexible instrument.
Exercise Style
Exercise style of option positions (American or European).
Flexible Contract
ID
Flexible Contract ID.
Settlement
Method
Settlement method (Cash or Physical).
Tran Date
Transaction date.
Business Date
Business date for which the positions were inquired.
Long Qty Start of
Day
Open long position at start of day.
Derivatives Clearing GUI – User Manual
Page 25
Eurex Clearing C7 – Derivatives Clearing GUI 3.0
As of December 1, 2015
Version 3.2
Window layouts and descriptions
Position Overview - Table columns
Column
Description
Short Qty Start of Open short position at start of day.
Day
Daily Long Qty
Net movements in the long position for the inquired business day.
Daily Short Qty
Net movements in the short position for the inquired business day.
Open Long
Up-to-date open long position.
Open Short
Up-to-date open short position.
Designated GU
Long
Long quantity that has been designated for give-up.
Designated GU
Short
Short quantity that has been designated for give-up.
Designated
PosTrans Long
Long quantity that has been designated for position transfer.
Designated
PosTrans Short
Short quantity that has been designated for position transfer.
Total Designated
Long
Total designated long quantity.
Total Designated
Short
Total designated short quantity.
Exer/Alloc Qty
Quantity that has been exercised or allocated.
Asgn/Noti Qty
Quantity that has been assigned for exercise or notified for delivery.
Abandoned Qty
Quantity that has been excluded from automatic exercise.
Prev ZCQ
Previous zero cost quantity.
Current ZCQ
Current zero cost quantity.
Position ID
Position identifier.
Expiration Date
Expiration date of the flexible contract.
4.3
Position Close Out / Re-open
4.3.1
Description
The Position Close Out / Re-open window is accessed from the Position Overview window via
the Close Out / Re-open button. It serves to close an open position or re-open a closed one.
Only positions of the current business day can be closed out. The maximum amount available for
re-opening cannot exceed the amount of previously closed-out positions. Note that the reopening of positions is not available indefinitely. The period for re-opening is currently configured
to 4 business days by Eurex Clearing. Any changes to the configuration will be communicated via
circular with ample lead time.
The Position Close Out / Re-open window summarizes the details of the position to be adjusted
in a table. Below this table there are various fields to enter the adjustment.
Derivatives Clearing GUI – User Manual
Page 26
Eurex Clearing C7 – Derivatives Clearing GUI 3.0
As of December 1, 2015
Version 3.2
Window layouts and descriptions
Position Close Out / Re-Open window
4.3.2
Functionality
The Position Close Out / Re-open window supports both closing and re-opening of a position.
Two radio buttons allow to toggle between these two adjustment types. The quantity to be closed
out or re-opened needs to be entered into the Quantity field.
Close Out
To perform a position close out, the Close Out radio button must be selected. In a close out
adjustment long and short quantities are set off against each other. Hence, only a position with
quantities greater than zero on both the long and the short side can be closed out.
Furthermore, the desired amount entered into the Quantity field must not exceed the available
amount on either side, i.e. Quantity ≤ (Open Long - Dsgn Long) and Quantity ≤ (Open Short Dsgn Short). If the entered quantity is larger than the amount that can be closed out without
closing fees, i.e. larger than the zero cost quantity (ZCQ), a warning is displayed which has to be
confirmed by the user to process the close out request.
The provided text fields are optional and can be used to enter further information.
The Submit button is only active if all the mandatory fields are filled according to the conditions.
Re-open
To re-open a previously closed out position, the Re-open radio button must be selected. The
desired amount entered in the Quantity field must not exceed the previously closed-out quantity.
The provided text fields are optional and can be used to enter further information.
If an error occurs, a message is displayed in the message log.
Derivatives Clearing GUI – User Manual
Page 27
Eurex Clearing C7 – Derivatives Clearing GUI 3.0
As of December 1, 2015
Version 3.2
Window layouts and descriptions
4.3.3
Screen elements
Position Close Out / Re-open - Fields
Field
Description
Close Out
Select this radio button to close out a certain quantity.
Re-open
Select this radio button to re-open a certain quantity.
Quantity
Desired quantity to be closed out or re-opened. This field is mandatory and
must fulfill the conditions explained above.
Previous ZCQ
Previous Zero Cost Quantity.
Current ZCQ
Current Zero Cost Quantity.
Text 1
This is an optional free text field.
Text 2
This is an optional free text field.
Text 3
This is an optional free text field.
Position Close Out / Re-open - Buttons
Button
Description
Submit
This button is only active if the Quantity field has been filled according to the
conditions.
Clicking the Submit button submits a request to perform the position
adjustment and closes the overlay window.
Cancel
Cancels the adjustment without any changes and closes the overlay window.
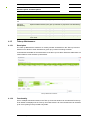
4.4
Position Transfer Entry
4.4.1
Description
The Position Transfer Entry window is accessed from the Position Overview window via the
Position Transfer button. It allows to transfer a position to a different account. This account can
be an own account (internal transfer) or an account at a different exchange member (external
transfer).
The Position Transfer Entry window summarizes the details of the position to be transferred in a
table. Below this table there are various fields to enter the transfer.
Derivatives Clearing GUI – User Manual
Page 28
Eurex Clearing C7 – Derivatives Clearing GUI 3.0
As of December 1, 2015
Version 3.2
Window layouts and descriptions
Position Transfer Entry window
4.4.2
Functionality
Positions can be transferred to a different account entirely or just partially. To specify the quantity
to be transferred, the fields Long Qty and/or Short Qty have to be filled in. The entered quantities
must not exceed the available quantity on the respective side, i.e. Long Qty ≤ (Open Long - Total
Designated Long) and Short Qty ≤ (Open Short - Total Designated Short).
A partial position transfer is not allowed for newly created future-styled contracts, because no
previous settlement price is available.
Furthermore, the transfer target needs to be defined. Two radio buttons allow to toggle between
Internal and External position transfers. Depending on the transfer type, certain entry fields are
enabled.
Internal Position Transfer
If the position should be transferred internally, the To Exchange Member field and the cash
related entry fields are disabled. In this case, only the To Account Name field is mandatory.
For an internal position transfer the user can fill in various text fields. The information entered into
the free text fields (Text 1, Text 2, Text 3) is stored in the transaction which books the transferred
quantity out of the source account. Information entered into the destination text fields
(Destination Text 1, Destination Text 2, Destination Text 3) is stored in the transaction which
books the transferred quantity in to the target account.
External Position Transfer
If the position should be transferred externally, the To Exchange Member field is mandatory.
Optionally, the To Account Name can be entered and the content of the free text fields can be
proposed by filling in the Ref ... entry fields. The receiving participant can either use these values
Derivatives Clearing GUI – User Manual
Page 29
Eurex Clearing C7 – Derivatives Clearing GUI 3.0
As of December 1, 2015
Version 3.2
Window layouts and descriptions
or enter an own text when he claims the transferred position. The information entered into the
free text fields (Text 1, Text 2, Text 3) is stored in the transaction which books the transferred
quantity out of the source account.
In case of an external transfer, the user can also transfer cash. This is possible in two ways. The
user can fill in the Cash Transfer Amount field and select the cash flow direction via the Send or
Receive radio buttons. Alternatively, the user can enter a Cash Adjustment Price. Then, the cash
amount is automatically calculated as the difference between the Cash Adjustment Price and the
position transfer price. However, this is only possible if either long or short positions are
transferred. Both Cash Transfer Amount and Cash Adjustment Price can be combined as well.
The external position transfer also allows to transfer cash alone. Therefore, the transfer quantity
fields (Long Qty, Short Qty) have to be filled with zero and a Cash Transfer Amount must be
entered.
In case the entering user is only entitled to enter external position transfers with cash with a Four
Eye approval, a second user must enter his credentials into the Approver ID and Password fields.
The Submit button is only active if all mandatory fields are filled in according to the conditions.
If an error occurs, a message is displayed in the message log.
Derivatives Clearing GUI – User Manual
Page 30
Eurex Clearing C7 – Derivatives Clearing GUI 3.0
As of December 1, 2015
Version 3.2
Window layouts and descriptions
4.4.3
Screen elements
Position Transfer Entry - Fields
Field
Description
Internal
If this radio button is selected, the entry fields relevant for an internal position
transfer are enabled.
External
If this radio button is selected, the entry fields relevant for an external
position transfer are enabled.
Long Qty
Long quantity to be transferred. To transfer a position, the entered value has
to be greater than zero and must not exceed the available quantity on the
long side of the position, i.e. Long Qty ≤ (Open Long - Total Designated
Long). It must be zero if only cash is transferred.
Short Qty
Short quantity to be transferred. To transfer a position, the entered value has
to be greater than zero and must not exceed the available quantity on the
short side of the position, i.e. Short Qty ≤ (Open Short - Total Designated
Short). It must be zero if only cash is transferred.
To Exchange
Member
Target exchange member for the position/cash transfer. This field is
mandatory for an external position transfer. It is disabled for internal position
transfers.
To Account Name Target account for the position transfer. It is mandatory for internal position
transfers.
Text 1
This is an optional free text field for the transaction on the source account.
Text 2
This is an optional free text field for the transaction on the source account.
Text 3
This is an optional free text field for the transaction on the source account.
Destination Text 1 This is an optional free text field for the transaction on the target account.
Destination Text 2 This is an optional free text field for the transaction on the target account.
Destination Text 3 This is an optional free text field for the transaction on the target account.
Cash Transfer
Amount
Cash amount entered by the initiating exchange member. If any amount is
entered, the transfer direction must be defined via the Send and Receive
radio buttons. This field is mandatory if the entered transfer quantities are
zero (solely cash transfer).
Send
If this radio button is selected, the entered Cash Transfer Amount is credited
to the To Exchange Member.
Receive
If this radio button is selected, the entered Cash Transfer Amount is debited
from the To Exchange Member.
Cash Adjustment The price used as a basis to calculate the cash adjustment for the position
Price
transfer. This field is optional and is enabled only if either a short or a long
position is selected for transfer.
Position Transfer This field displays the previous day’s settlement price for future style
Price
products and zero for premium style product.
Total Cash
Amount
This field displays the sum of the Cash Transfer Amount field and the
calculated cash adjustment. A positive amount indicates a credit of the
corresponding amount to the inquiring participant; a negative amount
indicates a debit.
Derivatives Clearing GUI – User Manual
Page 31
Eurex Clearing C7 – Derivatives Clearing GUI 3.0
As of December 1, 2015
Version 3.2
Window layouts and descriptions
Position Transfer Entry - Fields
Field
Description
Ref Text 1
Proposal for the free text field.
Ref Text 2
Proposal for the free text field.
Ref Text 3
Proposal for the free text field.
Approver ID
User ID of the approving user. This filed must be filled if the Four Eye
Principle is required.
Password
Password of the approving user.
Position Transfer Entry - Buttons
Button
Description
Calculate
This button is only active if a Cash Adjustment Price has been entered.
Submit
This button is only active if all mandatory fields have been filled according to
the conditions.
Clicking the Submit button submits a request to perform the position
adjustment and closes the overlay window.
Revert
Reverts all changes entered since the window was opened.
Cancel
Cancels the adjustment without any changes and closes the overlay window.
4.5
Position Transfer Overview
4.5.1
Description
The Position Transfer Overview window can be accessed from the Transaction Management
menu in the main menu. It displays external position transfer requests. A Non-Clearing Member
can inquire own transfer requests. A Clearing Member can inquire own transfer requests as well
as requests entered by his NCMs and RCs.
The window consists of two separate tabs to inquire for position transfers in which the user is on
the sending or receiving side. In order to list only transfer requests of interest, a filter function is
provided. At the top of the window there are various filter fields. Upon inquiry, all requests
matching the selected filter criteria are listed in the table.
Derivatives Clearing GUI – User Manual
Page 32
Eurex Clearing C7 – Derivatives Clearing GUI 3.0
As of December 1, 2015
Version 3.2
Window layouts and descriptions
Position Transfer Overview - Send tab
Position Transfer Overview - Receive tab
Derivatives Clearing GUI – User Manual
Page 33
Eurex Clearing C7 – Derivatives Clearing GUI 3.0
As of December 1, 2015
Version 3.2
Window layouts and descriptions
4.5.2
Functionality
4.5.2.1
Send tab
Below the filter area there is a number of buttons to accept, cancel or copy a pending transfer
request. These buttons are active if all selected transfer requests are in pending state. Requests
that have successfully been claimed or that have been cancelled/refused cannot be accepted or
cancelled again.
Note: Clicking a button to cancel a transfer request immediately triggers the cancellation. There
is no warning dialogue to confirm the action again.
In case the logged-in user is only entitled to accept external position transfers with cash with a
Four Eye approval, a second user must enter his credentials into the Approver ID and Password
fields after clicking the Accept or Cancel button.
Accept
This button is available if one or more pending requests have been selected. It is used by the
Clearing Member to confirm the transfer of the selected positions from his NCM/RC. After a
position transfer request has been confirmed, the Accept button becomes inactive since the
request cannot be confirmed again.
Cancel By NCM/RC
This button is available if one or more pending requests have been selected. It is used by the
initiating NCM/RC to cancel the transfer of the selected positions.
Cancel By Clg Mbr
This button is available if one or more pending requests have been selected. It is used by the
Clearing Member to cancel the transfer of the selected positions from his NCM/RC.
Copy
This button is only active if a single position transfer request has been selected. Clicking the
Copy button opens the Position Transfer Entry window prefilled with the information of the
selected transfer request. In this window the user can modify the prefilled data. Clicking the
Submit button on the Position Transfer Entry window will initiate a new position transfer process
with the entered information.
4.5.2.2
Receive tab
Below the filter area there is a number of buttons to claim, confirm or reject a pending transfer
request. These buttons are active if all selected transfer requests are in pending state. Requests
that have successfully been claimed or that have been cancelled/refused cannot be claimed,
confirmed or rejected again.
Note: Clicking a button to confirm or reject a transfer request immediately triggers the respective
function. There is no warning dialogue to confirm the action again.
In case the logged-in user is only entitled to approve external position transfers with cash with a
Four Eye approval, a second user must enter his credentials into the Approver ID and Password
fields after clicking the Confirm or Reject button.
Derivatives Clearing GUI – User Manual
Page 34
Eurex Clearing C7 – Derivatives Clearing GUI 3.0
As of December 1, 2015
Version 3.2
Window layouts and descriptions
Claim
This button is available if one or more pending requests have been selected. It is used by the
target exchange member to claim the position transfers. Clicking the Claim button opens the
Position Transfer Claim window in which the user can enter the necessary information to claim
the allocated positions.
Confirm
This button is available if one or more pending requests have been selected for which the target
NCM/RC has already specified the target account and the associated Clearing Member. It is
used by the Clearing Member who is the sponsor of the entered target account to confirm the
selected position transfers to his NCM/RC. After a transfer has been confirmed, the Confirm
button becomes inactive since the request cannot be confirmed again.
Reject By NCM/RC
This button is available if one or more pending requests have been selected. It is used by the
target NCM/RC to reject the selected position transfers.
Reject By Clg Mbr
This button is available if one or more pending requests have been selected. It is used by the
Clearing Member who is the sponsor of the entered target account to reject the selected position
transfers to his NCM/RC.
Derivatives Clearing GUI – User Manual
Page 35
Eurex Clearing C7 – Derivatives Clearing GUI 3.0
As of December 1, 2015
Version 3.2
Window layouts and descriptions
4.5.3
Screen elements
Position Transfer Overview - Filter criteria
Filter
Description
Clg Mbr
Filter for position transfers from/to a certain Clearing Member.
NCM/RC
Filter for position transfers from/to a certain Non Clearing Member or
Registered Customer.
Account Name
Filter for position transfers from/to a certain account.
Product Line
Select a product line to filter for transfers of options or futures positions.
C/P
Filter for call or put contracts.
Product
Filter for transfers of positions in certain products.
Flexible Contract
ID
Filter for transfers of positions in a certain flexible instrument.
Curr
Filter for transfers of positions in certain currencies.
Maturity From
Filter for transfers of positions in listed instruments with a maturity of or later
than the specified date.
Maturity To
Filter for transfers of positions in listed instruments with a maturity of or
earlier than the specified date.
Expiration From
Filter for transfers of positions in instruments which expire on or after the
specified date.
Expiration To
Filter for transfers of positions in instruments which expire on or before the
specified date.
Listed
Instruments
If this check box is selected, transfers of positions in listed instruments are
shown.
Flexible
Instruments
If this check box is selected, transfers of positions in flexible instruments are
shown.
Strike From
Filter for transfers of contracts with a strike price equal to or higher than the
specified price.
Strike To
Filter for transfers of contracts with a strike price equal to or lower than the
specified price.
Version
Filter for transfers of a certain contract version.
Exercise Style
Filter for transfers of positions of a certain settlement method (Cash or
Physical).
Settlement
Method
Filter for transfers of positions of a certain exercise style (American or
European).
Clg Mbr
Filter for transfers of a certain Clearing Member.
NCM/RC
Filter for transfers of a certain Non Clearing Member or Registered
Customer.
Account Name
Filter for transfers from/to certain accounts.
Allocation ID
Filter for position transfers with a certain allocation ID.
Transaction ID
Filter for position transfers with a certain transaction ID.
Derivatives Clearing GUI – User Manual
Page 36
Eurex Clearing C7 – Derivatives Clearing GUI 3.0
As of December 1, 2015
Version 3.2
Window layouts and descriptions
Position Transfer Overview - Filter criteria
Filter
Description
Alloc Status
Filter for position transfers with a certain status by selecting any combination
of the Claimed, Pending, Cancelled and Refused check boxes.
Tran Date
Filter for position transfers initiated on a certain date.
Include expired
positions
Include positions into the inquiry result which have already expired. This
check box is selected by default.
Position Transfer Overview - Buttons
Button
Description
Accept
This button is available if one or more pending requests have been selected.
It is used by the Clearing Member to confirm the transfer of the selected
positions from his NCM/RC.
Cancel By Clg
Mbr
This button is available if one or more pending requests have been selected.
It is used by the Clearing Member to cancel the transfer of the selected
positions from his NCM/RC.
Cancel By NCM/
RC
This button is available if one or more pending requests have been selected.
It is used by the initiating NCM/RC to cancel the transfer process of the
selected positions.
Copy
This button is only active if a single transfer request has been selected. It
opens the Position Transfer Entry window prefilled with the information of the
selected position transfer request.
Claim
This button is available if one or more pending requests have been selected.
It is used by the target exchange member to claim the transferred positions.
Clicking the Claim button opens the Position Transfer Claim window in which
the user can enter the necessary information to claim the allocated
positions.
Confirm
This button is available if one or more pending requests have been selected
for which the target NCM/RC has already specified the target account and
the associated Clearing Member. It is used by the Clearing Member who is
the sponsor of the entered target account to confirm the selected position
transfers to his NCM/RC.
Reject By Clg Mbr This button is available if one or more pending requests have been selected.
It is used by the Clearing Member who is the sponsor of the entered target
account to reject the selected position transfers to his NCM/RC.
Reject By NCM/
RC
This button is available if one or more pending requests have been selected.
It is used by the target NCM/RC to reject the selected position transfers.
Derivatives Clearing GUI – User Manual
Page 37
Eurex Clearing C7 – Derivatives Clearing GUI 3.0
As of December 1, 2015
Version 3.2
Window layouts and descriptions
Position Transfer Overview - Table columns
Column
Description
Exchange
Exchange ID.
Alloc ID
Allocation ID of the position transfer request. This is only available for
external position transfers.
Alloc Status
Status of the position transfer.
From Clg Mbr
Member ID of the sending Clearing Member.
From NCM/RC
Member ID of the sending Non Clearing Member or Registered Customer.
From Account
Name
Source account.
To Clg Mbr
Member ID of the receiving Clearing Member.
To NCM/RC
Member ID of the receiving Non Clearing Member/Registered Customer.
To Account Name Target account.
From Clg Mbr
Conf
Confirmation status of the sending CM.
From NCM/RC
Conf
Confirmation status of the sending NCM/RC.
To Clg Mbr Conf
Confirmation status of the receiving CM.
To NCM/RC Conf Confirmation status of the receiving NCM/RC.
Conf
Curr
Product currency.
C/P
Indicates a call or a put option.
Maturity
Maturity date of the contract.
Expiration Date
Expiration date of the flexible contract.
Product
Product ID.
Flexible Contract
ID
Flexible Contract ID.
Strike
Strike price of the contract.
Version
Version of the contract.
Instrument
Symbol
The instrument symbol summarizes the contract parameters. It consists of
the call/put indicator, the product name, its maturity, the strike price and the
version of the contract.
Exercise Style
Exercise style of option positions (American or European).
Settlement
Method
Settlement method (Cash or Physical).
Long Qty
Long quantity to be transferred.
Short Qty
Short quantity to be transferred.
Text 1
Free text field for additional information.
Text 2
Free text field for additional information.
Text 3
Free text field for additional information.
Derivatives Clearing GUI – User Manual
Page 38
Eurex Clearing C7 – Derivatives Clearing GUI 3.0
As of December 1, 2015
Version 3.2
Window layouts and descriptions
Position Transfer Overview - Table columns
Column
Description
Ref Text 1
Optional field entered by the initiating member to propose a free text.
Ref Text 2
Optional field entered by the initiating member to propose a free text.
Ref Text 3
Optional field entered by the initiating member to propose a free text.
Ref Account
Name
Optional field entered by the initiating member to propose an account.
Tran Date
Date on which the position transfer has been initiated.
Processing Mode Processing mode of the transfer.
Cash Amount
Optional cash amount to be transferred, entered by the initiating exchange
member.
Transfer Price
Transfer price of the position transfer.
Cash Adjustment Optional trade price entered by the initiating exchange member used to
Price
calculate the Total Cash Amount.
Total Cash
Amount
Total cash amount calculated by the system. It is the sum of the entered
Cash Amount and the calculated difference between the Cash Adjustment
Price and the Transfer Price.
Transaction ID
Transaction ID of the booked position transfer.
Position ID
Position ID of the transferred position.
4.6
Position Transfer Claim
4.6.1
Description
The Position Transfer Claim window can be accessed from the Position Transfer Overview
window via the Claim button. It allows the receiving exchange member to claim pending position
transfers.
Position Transfer Claim window
Derivatives Clearing GUI – User Manual
Page 39
Eurex Clearing C7 – Derivatives Clearing GUI 3.0
As of December 1, 2015
Version 3.2
Window layouts and descriptions
4.6.2
Functionality
The Position Transfer Claim window is used by the receiving exchange member to claim pending
position transfers. To claim a pending position transfer, the To Account Name and the To Clg Mbr
have to be entered. The provided text fields can be used to enter additional information. Initially,
the value proposed by the sending exchange member is used. If the text fields should be filled
with a different text, it must be entered into the respective fields. To remove the proposed content
from the text fields, there is a Delete check box in front of each field.
The To Account Name is prefilled with the value contained in the selected position transfers if it is
the same for all of the records. If this is not the case, the entry field is blank.
The updated information can be previewed in the particular fields in the list of the pending
transfers before they are actually submitted. The respective details are updated as they are
entered into the fields. However, this is only a preview of the transaction details. No changes are
applied to the pending position transfers until the request is actually submitted. The original
transfer details are shown as a tooltip by hovering with the mouse over the respective entry in the
details table.
The Submit button is active if the To Clg Mbr and the To Account Name are entered for each of
the selected position transfers.
In case the logged-in user is only entitled to claim external position transfers with cash with a
Four Eye approval, a second user must enter his credentials into the Approver ID and Password
fields.
After submitting the confirmation request, the Position Transfer Claim window is closed
automatically and the Position Transfer Overview window is inquired again to show the updated
information. If an error occurs, the Position Transfer Claim window remains open and an error
message is displayed in the message log.
Derivatives Clearing GUI – User Manual
Page 40
Eurex Clearing C7 – Derivatives Clearing GUI 3.0
As of December 1, 2015
Version 3.2
Window layouts and descriptions
4.6.3
Screen elements
Position Transfer Claim - Fields
Field
Description
To Clg Mbr
Clearing Member who is the sponsor of the target account.
To Account Name Target account for the position transfer.
Text 1
This is an optional free text field.
Text 2
This is an optional free text field.
Text 3
This is an optional free text field.
Approver ID
User ID of the approving user. This filed must be filled if the Four Eye
Principle is required.
Password
Password of the approving user.
Position Transfer Claim - Buttons
Button
Description
Submit
This button is active if the target account has been entered for all selected
position transfers.
Revert
Reverts all changes entered since the window was opened.
Cancel
Cancels the adjustment without any changes and closes the overlay window.
4.7
Transaction Overview
4.7.1
Description
The Transaction Overview window can be accessed from the Transaction Management menu in
the main menu or by opening the position details via the Details button or via double click on a
position in the Position Overview window. The Transaction Overview window displays detailed
information of transactions. Certain types of transaction adjustments can be initiated from this
window. Further details about these functions can be found in the “Functionality” section of this
window.
The Transaction Overview window shows detailed transaction information. In order to list only
transactions of interest, a filter function is provided. At the top of the window there are various
filter fields. Upon inquiry, all transactions matching the selected filter criteria are listed in the
table.
Derivatives Clearing GUI – User Manual
Page 41
Eurex Clearing C7 – Derivatives Clearing GUI 3.0
As of December 1, 2015
Version 3.2
Window layouts and descriptions
Transaction Overview window
If the window is opened via the Details button or a double click on a position in the Position
Overview window, certain filter fields of the Transaction Overview window are prefilled according
to the selected position and only transactions belonging to that position are displayed in the table.
Below the display table, there are some additional fields which provide statistical information on
selected transactions. The calculation of the accumulated buy and sell quantities (Acc Buy Qty,
Acc Sell Qty) along with the respective average prices (Avg Buy Prc, Avg Sell Prc) can be
initiated by clicking the Calculate Statistics button.
Furthermore, information on the current position (Curr Long, Curr Short) are displayed
automatically if the filter inquiry only returns transactions that all belong to the same position.
Even if historic transactions were inquired, the position displayed in these two fields is the actual
position at the time of inquiry.
4.7.2
Functionality
Below the filter area there is a number of buttons to perform certain transaction adjustments or
initiate further functionality. The following functions are only available for active transactions.
Overview
If one or more transactions are selected which belong to the same position, the Overview button
is enabled. It opens the Position Overview window to show the respective position information.
The Overview button is not available if transactions with different instruments or accounts are
selected.
Derivatives Clearing GUI – User Manual
Page 42
Eurex Clearing C7 – Derivatives Clearing GUI 3.0
As of December 1, 2015
Version 3.2
Window layouts and descriptions
Transaction Separation
Active transactions can be separated into two or more parts. This function can be invoked with
the Separation button. Since only one transaction can be separated at a time, the button is only
active if a single transaction is selected from the table. Clicking the Separation button opens the
Transaction Separation window as an overlay window with the details of the selected transaction
prefilled.
Transaction Account Transfer
Active transactions can be transferred to a different account. Therefore, all the transactions to be
transferred must be selected from the table in the Transaction Overview window. Multiple
transactions can be transferred at once. Clicking the Act Transfer button opens the Transaction
Account Transfer window as an overlay window with the details of the selected transactions
prefilled.
Transaction Open/Close Adjustment
The open/close status of active transactions can be changed. Therefore, all the transactions to
be adjusted must be selected from the table in the Transaction Overview window. Multiple
transactions can be adjusted at once. Clicking the O/C Adjust button opens the Transaction O/C
Adjustment window as an overlay window with the details of the selected transactions prefilled.
Transaction Adjustment
The custom information contained in the text fields of active transactions can be changed.
Therefore, all the transactions to be adjusted must be selected from the table in the Transaction
Overview window. Multiple transactions can be adjusted at once. Clicking the Transaction
Adjustment button opens the Transaction Adjustment window as an overlay window with the
details of the selected transactions prefilled.
Furthermore, this adjustment can be used to modify the Link Member ID and Link Beneficiary
fields as well as the eGAINS Rate ID field.
Give-up
Active transactions can be given up to another exchange member. Therefore, all the transactions
to be given up must be selected from the table in the Transaction Overview window. Multiple
transactions can be given up at once. Clicking the Give-up button opens the Give-up
Maintenance window as an overlay window with the details of the selected transactions prefilled.
Calculate Statistics
For selected transactions, statistical information can be calculated. Below the display table in the
Transaction Overview window various information fields show the accumulated buy and sell
quantities (Acc Buy Qty, Acc Sell Qty) as well as the average buy and sell prices (Avg Buy Prc,
Avg Sell Prc). These figures can be calculated for the selected transactions by clicking the
Calculate Statistics button. This function is only available if transactions with the same instrument
and maturity are selected from the table.
Derivatives Clearing GUI – User Manual
Page 43
Eurex Clearing C7 – Derivatives Clearing GUI 3.0
As of December 1, 2015
Version 3.2
Window layouts and descriptions
4.7.3
Screen elements
Transaction Overview - Filter criteria
Filter
Description
Product Line
Filter for options or futures transactions.
C/P
Filter for call or put contracts.
Curr
Filter for transactions with certain currencies.
Product
Filter for transactions with certain products.
Flex Contract ID
Filter for transactions with a certain flexible instrument.
Maturity From
Filter for transactions with listed instruments with a maturity of or later than
the specified date.
Maturity To
Filter for transactions with listed instruments with a maturity of or earlier than
the specified date.
Expiration From
Filter for transactions with instruments which expire on or after the specified
date.
Expiration To
Filter for transactions with instruments which expire on or before the
specified date.
Listed
Instruments
If this check box is selected, transactions with listed instruments are shown.
Flexible
Instruments
If this check box is selected, transactions with flexible instruments are
shown.
Strike From
Filter for contracts with a strike price equal to or higher than the specified
price.
Strike To
Filter for contracts with a strike price equal to or lower than the specified
price.
Version
Filter for a certain contract version.
Exercise Style
Filter for transactions of a certain exercise style (American or European).
Settlement
Method
Filter for transactions of a certain settlement method (Cash or Physical).
Clg Mbr
Filter for transactions of a certain Clearing Member.
Position ID
Filter for transactions which belong to a certain Position ID.
NCM/RC
Filter for transactions of a certain Non Clearing Member or Registered
Customer.
Account Name
Filter for transactions booked on certain accounts.
Tran Date From
Filter for transactions with a transaction date equal or later than the specified
date.
Tran Time From
Filter for transactions with a transaction time equal to or later than the
specified time.
Tran Date To
Filter for transactions with a transaction date equal to or earlier than the
specified date.
Tran Time To
Filter for transactions with a transaction time equal to or earlier than the
specified time.
Tran Type
Filter for a specific transaction type.
Derivatives Clearing GUI – User Manual
Page 44
Eurex Clearing C7 – Derivatives Clearing GUI 3.0
As of December 1, 2015
Version 3.2
Window layouts and descriptions
Transaction Overview - Filter criteria
Filter
Description
B/S
Filter for buy or sell transactions.
Price From
Filter for transactions in contracts with a price equal to or higher than the
specified price.
Price To
Filter for transactions in contracts with a price equal to or lower than the
specified price.
O/C
Filter for open or close transactions.
Tran Qty From
Filter for transactions with a transaction quantity equal to or higher than the
specified value.
Tran Qty To
Filter for transactions with a transaction quantity equal to or lower than the
specified value.
Order ID From
Specify the lower boundary of order IDs to filter for.
Order ID To
Specify the upper boundary of order IDs to filter for.
Orig Order ID
From
Specify the lower boundary of original order IDs to filter for.
Orig Order ID To
Specify the upper boundary of original order IDs to filter for.
Text 1
Filter for specific values entered into the text field.
Text 2
Filter for specific values entered into the text field.
Text 3
Filter for specific values entered into the text field.
Orig Trade ID
From
Specify the lower boundary of original trade IDs to filter for.
Orig Trade ID To
Specify the upper boundary of original trade IDs to filter for.
Orig Trade Type
Filter for a specific original trade type.
Trade ID From
Specify the lower boundary of trade IDs to filter for.
Trade ID To
Specify the upper boundary of trade IDs to filter for.
Orig Trade Date
From
Filter for transactions with an original trade date equal to or later than the
specified date.
Orig Trade Time
From
Filter for transactions with an original trade time equal to or later than the
specified time.
Orig Trade Date
To
Filter for transactions with an original trade date equal to or earlier than the
specified date.
Orig Trade Time
To
Filter for transactions with an original trade time equal to or earlier than the
specified time.
Entering
Participant
Filter for transactions that have been entered by a specific participant.
Derivatives Clearing GUI – User Manual
Page 45
Eurex Clearing C7 – Derivatives Clearing GUI 3.0
As of December 1, 2015
Version 3.2
Window layouts and descriptions
Transaction Overview - Filter criteria
Filter
Description
Entering User
Filter for transactions that have been entered by a specific user.
Full
If the Full inquiry mode is selected, all transactions which meet the filter
criteria are displayed in the table.
Active
The Active mode is the default inquiry mode. If it is selected, only those
transactions are displayed in the table which meet the filter criteria and can
still be modified. Reverted or transferred transactions are not listed in this
mode.
Transaction Overview - Buttons
Button
Description
Overview
This button is only active if one or more transactions are selected from the
display table which belong to the same position, i.e. have the same
instrument and are booked to the same account. It opens the Position
Overview window to show the respective position information.
Separation
This button is only active if a single transaction is selected. It opens the
Transaction Separation window to enter the separation details.
Act Transfer
This button is active if one or more transactions are selected. It opens the
Transaction Account Transfer window to transfer the selected transactions.
O/C Adjust
This button is active if one or more transactions are selected which are in the
same open/close state. It opens the Transaction O/C Adjustment window to
change the open/close state of the selected transactions.
Transaction
Adjustment
This button is active if one or more transactions are selected. It opens the
Transaction Adjustment window to change the text fields of the selected
transactions.
Give-up
This button is active if one or more transactions are selected. It opens the
Give-up Maintenance window to initiate give-up processes for the selected
transactions.
Calculate
Statistics
This button is only active if multiple transactions with the same instrument
and maturity are selected from the display table. It calculates the
accumulated buy and sell quantities (Acc Buy Qty, Acc Sell Qty) as well as
the average buy and sell prices (Avg Buy Prc, Avg Sell Prc) based on the
selected transactions.
Transaction Overview - Table columns
Column
Description
Exchange
Exchange ID.
Clg Mbr
Member ID of the Clearing Member.
NCM/RC
Member ID of the Non Clearing Member or Registered Customer.
Account Name
Account on which the transaction is booked.
Curr
Product currency.
Derivatives Clearing GUI – User Manual
Page 46
Eurex Clearing C7 – Derivatives Clearing GUI 3.0
As of December 1, 2015
Version 3.2
Window layouts and descriptions
Transaction Overview - Table columns
Column
Description
C/P
Indicates a call or a put option.
Maturity
Maturity date of the contract.
Product
Product ID.
Strike
Strike price of the contract.
Version
Version of the contract.
Instrument
Symbol
The instrument symbol summarizes the contract parameters. It consists of
the call/put indicator, the product name, its maturity, the strike price and the
version of the contract.
Instrument Type
Listed or flexible instrument.
Exercise Style
Exercise style of option positions (American or European).
Flexible Contract
ID
Flexible Contract ID.
Settlement
Method
Settlement method (Cash or Physical).
Order ID
Order number of the transaction.
Tran ID
Transaction identifier.
Suffix ID
Counter which is incremented with every modification of the transaction.
Parn Suffix ID
Reference to the parent suffix identifier.
Tran Type
Transaction type code.
Tran Type
Description
Description of the transaction type.
Tran Date
Transaction date.
Tran Time
Transaction time.
Trader ID
Indicates who entered the original trade.
Tran Status
Current transaction status.
B/S
Indicates the buy or sell side.
O/C
Indicates a transaction to open or to close a position.
Orig Tran Type
Original transaction type.
Long
Position effect on the long side.
Short
Position effect on the short side.
Tran Qty
Transaction quantity.
Tran Price
Transaction price.
Premium
Transaction based premium to be paid or received.
Text 1
Free text field for additional information.
Text 2
Free text field for additional information.
Text 3
Free text field for additional information.
Orig Exch
Indicates at which exchange the trade was initiated originally.
Orig Contract ID
Original contract identifier.
Derivatives Clearing GUI – User Manual
Page 47
Eurex Clearing C7 – Derivatives Clearing GUI 3.0
As of December 1, 2015
Version 3.2
Window layouts and descriptions
Transaction Overview - Table columns
Column
Description
Orig Trade ID
Original trade identifier.
Orig Trade Date
Original trade date.
Orig Trade Time
Original trade time.
Orig Order ID
Original order identifier.
Entering
Participant
Indicates which participant entered the transaction.
Entering User ID
Indicates which user entered the transaction.
Current Long
Current open long position.
Current Short
Current open short position.
Expiration Date
Expiration date of the flexible contract.
Position ID
Position identifier related to the transaction.
Allocation ID
Unique identifier of a give-up request entered for a transaction.
Position Effect
Indicates whether a closing error occurred for the transaction.
Prelim Tag
Indicates whether a transaction has a preliminary price.
Rate ID
This is an optional free text field (eGAINS Rate identifier).
Link Member ID
Member ID of the participant at the partner exchange.
Link Beneficiary
Beneficiary ID at the partner exchange.
Strat Link
Strategy Link ID.
Strat Type
Strategy type.
4.8
Transaction Separation
4.8.1
Description
The Transaction Separation window is an overlay window accessed from the Transaction
Overview window which allows to split one transaction into several new transactions.
It summarizes the details of the transaction to be split in a table. Below this table there are
various fields to enter the separation.
Derivatives Clearing GUI – User Manual
Page 48
Eurex Clearing C7 – Derivatives Clearing GUI 3.0
As of December 1, 2015
Version 3.2
Window layouts and descriptions
Transaction Separation window
4.8.2
Functionality
Initially, two rows of entry fields are provided to separate the original transaction into two new
transactions. In each row the details for a new transaction can be entered. If the original
transaction is supposed to be split into more than two parts, additional rows can be added by
clicking the Add row or the Add row(s) button.
For each new transaction, the transaction quantity (Tran Quantity) can be defined along with
three text fields (Text 1, Text 2, Text 3). The text fields are optional. They can be filled with
additional information for the new transactions. The quantity field, however, is mandatory. This
field needs to be filled with a positive number between 1 and the remaining quantity displayed at
the bottom of the list of new transactions. All of the original transaction quantity has to be
distributed amongst the new transactions, i.e. the separation can only be processed if the
remaining quantity is zero. The Submit button stays inactive as long as this is not fulfilled.
Redundant rows can be selected and then removed with the Remove row(s) button. At least two
rows need to remain in the list of new transactions. They cannot be removed since a separation
into less than two transactions is not feasible.
If there is only one empty row left and still a remaining quantity left to be distributed, the last
empty transaction quantity field is automatically filled with the remaining amount.
After successfully submitting the separation request by clicking the Submit button, the
Transaction Separation window is closed automatically. If an error occurs, a message is
displayed in the message log.
Derivatives Clearing GUI – User Manual
Page 49
Eurex Clearing C7 – Derivatives Clearing GUI 3.0
As of December 1, 2015
Version 3.2
Window layouts and descriptions
4.8.3
Screen elements
Transaction Separation - Fields
Field
Description
Tran Quantity
This field is mandatory. It defines the respective quantity of the new
transaction and must be filled with positive numbers between 1 and the
remaining quantity displayed at the bottom of the list of new transactions.
Text 1
This is an optional free text field.
Text 2
This is an optional free text field.
Text 3
This is an optional free text field.
Transaction Separation - Buttons
Button
Description
Add row
Adds a new row of entry fields to enter new transaction details.
Add row(s)
Adds a certain number of new rows of entry fields to enter new transaction
details. The user is prompted for the number of new rows to be added.
Remove row(s)
Removes a row of editable cells for new transaction details.
Submit
This button is only available if the remaining quantity equals zero.
Clicking the Submit button submits a request to perform the transaction
separation and closes the overlay window.
Cancel
Cancels the adjustment without any changes and closes the overlay window.
4.9
Transaction Account Transfer
4.9.1
Description
The Transaction Account Transfer window is an overlay window accessed from the Transaction
Overview window which allows to transfer transactions to another account.
It summarizes the details of the transactions to be transferred in a table. Below this table there
are various fields to enter the account transfer.
Transaction Account Transfer window
Derivatives Clearing GUI – User Manual
Page 50
Eurex Clearing C7 – Derivatives Clearing GUI 3.0
As of December 1, 2015
Version 3.2
Window layouts and descriptions
4.9.2
Functionality
Any number of transactions listed in the Transaction Overview window can be selected for an
account transfer. Their details are displayed in the Transaction Account Transfer window. All of
the transactions can be transferred at once by filling in the provided entry fields. It is mandatory to
enter the destination account into the To Account Name field. The Submit button is only active if
a destination account has been entered which is different from the source account.
Clearing Members can transfer transactions between their own and their RCs accounts.
Therefore, the To Exch Member field has to be filled with the respective member ID.
The provided text fields (Text 1, Text 2, Text 3) can optionally be used to change the original text
fields of the transactions. Initially, they are not filled with any text, i.e. the individual text fields of
the original transactions remain unchanged. If an alternative text is entered into one of the text
fields, this new text is applied to the respective text field in every transferred transaction.
The changed account as well as the updated text fields can be previewed in the list of original
transactions before they are actually submitted. The respective details are updated as they are
entered into the fields. However, this is only a preview of the transaction details. No changes are
applied to the transactions until the transfer request is actually submitted. The original transaction
details are shown as a tooltip by hovering with the mouse over the respective entry in the details
table.
The text fields cannot only be updated to a new text but the original text can also be deleted.
Therefore, a check box is provided in front of each text field. If this check box is selected, the
content of the respective text field is deleted in each transaction to be transferred. Again, this can
be previewed in the details of the original transactions.
Note: Both the destination account and the text field changes apply to all of the transactions
listed in the display table in the same way.
After submitting the transfer request by clicking the Submit button, all successfully transferred
transactions are removed from the display table. If all transfers are successful, the Transaction
Account Transfer window is closed automatically. Otherwise, it remains open with the
transactions listed which failed to be transferred. In this case, an error message is displayed in
the message log.
Derivatives Clearing GUI – User Manual
Page 51
Eurex Clearing C7 – Derivatives Clearing GUI 3.0
As of December 1, 2015
Version 3.2
Window layouts and descriptions
4.9.3
Screen elements
Transaction Account Transfer - Fields
Field
Description
To Exch Member
This field can only be used by Clearing Members to transfer transactions
between their own accounts and their RCs accounts.
To Account Name This field is mandatory. It defines the destination account of the transaction
transfer.
D
If this check box in front of a text field is selected, the original content of the
respective text field is deleted in the account transfer.
Text 1
This is an optional free text field.
Text 2
This is an optional free text field.
Text 3
This is an optional free text field.
Transaction Account Transfer - Buttons
Button
Description
Submit
This button is only active if a destination account is entered.
Clicking the Submit button submits a request to perform the transaction
account transfer and closes the overlay window if all the transactions could
successfully be transferred.
Revert
Reverts all changes entered since the window was opened.
Cancel
Cancels the adjustment without any changes and closes the overlay window.
4.10
Transaction O/C Adjustment
4.10.1
Description
The Transaction O/C Adjustment window is an overlay window accessed from the Transaction
Overview window which allows to adjust the open/close status of transactions.
It summarizes the details of the transactions to be adjusted in a table. Below this table there are
various fields to enter the open/close adjustment.
Transaction O/C Adjustment window
Derivatives Clearing GUI – User Manual
Page 52
Eurex Clearing C7 – Derivatives Clearing GUI 3.0
As of December 1, 2015
Version 3.2
Window layouts and descriptions
4.10.2
Functionality
Any number of transactions listed in the Transaction Overview window that have the same open
(O) or close (C) status can be selected for an O/C adjustment. Their details are displayed in the
Transaction O/C Adjustment window. All of the transactions can be adjusted at once by filling in
the provided entry fields. Depending on the current open/close status of the transactions, the
appropriate new open/close status is displayed in the O/C field, i.e. if the transactions are
currently “to open” (open/close status O), the new status “to close” (C) is displayed and vice
versa.
The provided text fields (Text 1, Text 2, Text 3) can optionally be used to change the original text
fields of the transactions. Initially, they are not filled with any text, i.e. the individual text fields of
the original transactions remain unchanged. If an alternative text is entered into one of the text
fields, this new text is applied to the respective text field in every adjusted transaction.
The new open/close status as well as the updated text fields can be previewed in the list of
original transactions before they are actually submitted. The respective details are updated as
they are entered into the fields. However, this is only a preview of the transaction details. No
changes are applied to the transactions until the adjustment request is actually submitted. The
original transaction details are shown as a tooltip by hovering with the mouse over the respective
entry in the details table.
The text fields cannot only be updated to a new text but the original text can also be deleted.
Therefore, a check box is provided in front of each text field. If this check box is selected, the
content of the respective text field is deleted in each transaction to be adjusted. Again, this can
be previewed in the details of the original transactions.
Note: Both the new open/close status and the text field changes apply to all of the transactions
listed in the display table in the same way.
After submitting the adjustment request by clicking the Submit button, all successfully adjusted
transactions are removed from the display table. If all adjustments are successful, the
Transaction O/C Adjustment window is closed automatically. Otherwise, it remains open with the
transactions listed which failed to be updated. In this case, an error message is displayed in the
message log.
Derivatives Clearing GUI – User Manual
Page 53
Eurex Clearing C7 – Derivatives Clearing GUI 3.0
As of December 1, 2015
Version 3.2
Window layouts and descriptions
4.10.3
Screen elements
Transaction O/C Adjustment - Fields
Field
Description
O/C
Depending on the current open/close status of the transactions, the
appropriate new status is displayed.
D
If this check box in front of a text field is selected, the original content of the
respective text field is deleted in the adjustment.
Text 1
This is an optional free text field.
Text 2
This is an optional free text field.
Text 3
This is an optional free text field.
Transaction O/C Adjustment - Buttons
Button
Description
Submit
Clicking the Submit button submits a request to perform the adjustment and
closes the overlay window if all the transactions could successfully be
updated.
Revert
Reverts all changes entered since the window was opened.
Cancel
Cancels the adjustment without any changes and closes the overlay window.
4.11
Transaction Adjustment
4.11.1
Description
The Transaction Adjustment window is an overlay window accessible from the Transaction
Overview window which allows to update the content of the text fields of transactions.
It summarizes the details of the transactions to be adjusted in a table. Below this table there are
various fields to update the individual fields.
Transaction Adjustment window
4.11.2
Functionality
Any number of transactions listed in the Transaction Overview window can be selected for a
transaction adjustment. Their details are displayed in the Transaction Adjustment window. All of
Derivatives Clearing GUI – User Manual
Page 54
Eurex Clearing C7 – Derivatives Clearing GUI 3.0
As of December 1, 2015
Version 3.2
Window layouts and descriptions
the transactions can be adjusted at once by filling in the provided entry fields.
The provided fields can be used to change the original free text fields of the transactions as well
as the Link Member ID, Link Beneficiary and the eGAINS Rate ID fields. Initially, they are not
filled with any text, i.e. the individual information of the original transactions remain unchanged. If
an alternative text is entered into one of the fields, this entry is applied to the respective field in
every transaction listed in the window.
The updated information can be previewed in the list of original transactions before they are
actually submitted. The respective details are updated as they are entered into the fields.
However, this is only a preview of the transaction details. No changes are applied to the
transactions until the adjustment request is actually submitted. The original transaction details
are shown as a tooltip by hovering with the mouse over the respective entry in the details table.
The text fields cannot only be updated to a new text but the original text can also be deleted.
Therefore, a check box is provided in front of each text field. If this check box is selected, the
content of the respective text field is deleted in each transaction. Again, this can be previewed in
the details of the original transactions.
Note: The changes apply to all of the transactions listed in the display table in the same way.
The Submit button is always active, even if no change has been entered. In this case, the
transaction information will not be changed by the adjustment request. Only the values in Tran
Date and Tran Time are updated and the Suffix ID is incremented.
After submitting the adjustment request by clicking the Submit button, all successfully adjusted
transactions are removed from the display table. If all adjustments are successful, the
Transaction Adjustment window is closed automatically. Otherwise, it remains open with the
transactions listed which failed to be updated. In this case, an error message is displayed in the
message log.
Derivatives Clearing GUI – User Manual
Page 55
Eurex Clearing C7 – Derivatives Clearing GUI 3.0
As of December 1, 2015
Version 3.2
Window layouts and descriptions
4.11.3
Screen elements
Transaction Adjustment - Fields
Field
Description
D
If this check box in front of a text field is selected, the original content of the
respective text field is deleted in the adjustment.
Text 1
This is a free text field.
Text 2
This is a free text field.
Text 3
This is a free text field.
Link Member ID
This is a free text field for the participant at the partner exchange.
Link Beneficiary
This is a free text field for the beneficiary ID at the partner exchange.
Rate ID
This is a free text field for the eGAINS Rate Identifier.
Transaction Adjustment - Buttons
Button
Description
Submit
Clicking the Submit button submits a request to perform the adjustment and
closes the overlay window if all the transactions could successfully be
updated.
Revert
Reverts all changes entered since the window was opened.
Cancel
Cancels the adjustment without any changes and closes the overlay window.
4.12
Give-up Overview
4.12.1
Description
The Give-up Overview window can be accessed from the Transaction Management menu in the
main menu. It displays pending, confirmed and cancelled/rejected give-up requests. A NonClearing Member can inquire own give-up requests. A Clearing Member can inquire own give-up
requests as well as requests entered by his NCMs and RCs.
In order to list only give-up requests of interest, a filter function is provided. At the top of the
window there are various filter fields. Upon inquiry, all requests matching the selected filter
criteria are listed in the table.
Derivatives Clearing GUI – User Manual
Page 56
Eurex Clearing C7 – Derivatives Clearing GUI 3.0
As of December 1, 2015
Version 3.2
Window layouts and descriptions
Give-up Overview window
4.12.2
Functionality
Below the filter area there is a number of buttons to accept or cancel a pending give-up request.
These buttons are active if all selected give-up requests are in pending state. Requests that have
successfully been claimed or that have been cancelled/refused cannot be cancelled or confirmed
again.
Note: Clicking a button to confirm or cancel a give-up request immediately triggers the respective
function. There is no warning dialogue to confirm the action again.
Accept
This button is available if one or more pending requests have been selected. It is used by the
Clearing Member to confirm the give-up of the selected transactions from his NCM/RC. After a
give-up request has been confirmed, the Accept button becomes inactive since the request
cannot be confirmed again.
Cancel By NCM/RC
This button is available if one or more pending requests have been selected. It is used by the
initiating NCM/RC to cancel the give-up process of the selected transactions.
Cancel By Clg Mbr
This button is available if one or more pending requests have been selected. It is used by the
Clearing Member to cancel the give-up of the selected transactions from his NCM/RC.
Derivatives Clearing GUI – User Manual
Page 57
Eurex Clearing C7 – Derivatives Clearing GUI 3.0
As of December 1, 2015
Version 3.2
Window layouts and descriptions
Cancel + New
This button is only active if a single give-up request has been selected. Clicking the Cancel +
New button opens the Give-up Maintenance window prefilled with the information of the original
give-up request. In this window the user can modify the prefilled data. Clicking the Submit button
on the Give-up Maintenance window will cancel the previously selected give-up request and start
a new give-up process with the entered information.
Derivatives Clearing GUI – User Manual
Page 58
Eurex Clearing C7 – Derivatives Clearing GUI 3.0
As of December 1, 2015
Version 3.2
Window layouts and descriptions
4.12.3
Screen elements
Give-up Overview - Filter criteria
Filter
Description
Product Line
Filter for allocations in options or futures transactions.
C/P
Filter for allocations in call or put contracts.
Curr
Filter for allocations in transactions with certain currencies.
Product
Filter for allocations in transactions with certain products.
Flex Contract ID
Filter for allocations in transactions with a certain flexible instrument.
Maturity From
Filter for allocations in transactions with listed instruments with a maturity of
or later than the specified date.
Maturity To
Filter for allocations in transactions with listed instruments with a maturity of
or earlier than the specified date.
Expiration From
Filter for allocations in transactions with instruments which expire on or after
the specified date.
Expiration To
Filter for allocations in transactions with instruments which expire on or
before the specified date.
Listed
Instruments
If this check box is selected, allocations in transactions with listed
instruments are shown.
Flexible
Instruments
If this check box is selected, allocations in transactions with flexible
instruments are shown.
Strike From
Filter for allocations in contracts with a strike price equal to or higher than the
specified price.
Strike To
Filter for allocations in contracts with a strike price equal to or lower than the
specified price.
Version
Filter for allocations in a certain contract version.
Exercise Style
Filter for allocations in transactions of a certain exercise style (American or
European).
Settlement
Method
Filter for allocations in transactions of a certain settlement method (Cash or
Physical).
Clg Mbr
Filter for allocations in transactions of a certain Clearing Member.
NCM/RC
Filter for allocations in transactions of a certain Non Clearing Member or
Registered Customer.
Account Name
Filter for allocations in transactions booked on certain accounts.
Trade Date From Filter for allocations in transactions with a trade date greater or equal the
entered date.
Trade Date To
Filter for allocations in transactions with a trade date earlier or equal the
entered date.
Business Date
From
Filter for allocations generated on or after a certain business date.
Business Date To Filter for allocations generated on or before a certain business date.
Tran ID
Filter for allocations in a transaction with a certain transaction ID.
Derivatives Clearing GUI – User Manual
Page 59
Eurex Clearing C7 – Derivatives Clearing GUI 3.0
As of December 1, 2015
Version 3.2
Window layouts and descriptions
Give-up Overview - Filter criteria
Filter
Description
To NCM/RC
Filter for give-up transactions that have been allocated to a specific
participant.
Allocation ID
Filter for an allocation with a certain allocation ID.
Alloc Status
Filter for allocations with a certain status by selecting any combination of the
Claimed, Pending, Cancelled and Refused check boxes.
Give-up Overview - Buttons
Button
Description
Accept
This button is available if one or more pending requests have been selected.
It is used by the Clearing Member to confirm the give-up of the selected
transactions from his NCM/RC.
Cancel By NCM/
RC
This button is available if one or more pending requests have been selected.
It is used by the initiating NCM/RC to cancel the give-up process of the
selected transactions.
Cancel By Clg
Mbr
This button is available if one or more pending requests have been selected.
It is used by the Clearing Member to cancel the give-up of the selected
transactions from his NCM/RC.
Cancel + New
This button is only active if a single give-up request has been selected. It
opens the Give-up Maintenance window prefilled with the information of the
original give-up request. In this window the user can modify the prefilled
data. Clicking the Submit button on the Give-up Maintenance window will
cancel the previously selected give-up request and start a new give-up
process with the entered information.
Give-up Overview - Table columns
Column
Description
Exchange
Exchange ID.
From Clg Mbr
Clearing Member of the initiating NCM/RC.
From NCM/RC
Initiating Non Clearing Member or Registered Customer.
From Account
Name
Account on which the transaction is booked.
To NCM/RC
Exchange member to whom the transaction was given-up to (take-up
member).
From Clg Mbr
Conf
Confirmation status of the give-up CM.
From NCM/RC
Conf
Confirmation status of the give-up NCM/RC.
To Clg Mbr Conf
Confirmation status of the take-up CM.
To NCM/RC Conf Confirmation status of the take-up NCM/RC.
Derivatives Clearing GUI – User Manual
Page 60
Eurex Clearing C7 – Derivatives Clearing GUI 3.0
As of December 1, 2015
Version 3.2
Window layouts and descriptions
Give-up Overview - Table columns
Column
Description
Allocation ID
Unique identifier of the give-up request.
Alloc Status
Status of the give-up request.
Curr
Product currency.
C/P
Indicates a call or a put option.
Maturity
Maturity date of the contract.
Product
Product ID.
Strike
Strike price of the contract.
Version
Version of the contract.
Expiration Date
Expiration date of the flexible contract.
Flexible Contract
ID
Flexible Contract ID.
Instrument
Symbol
The instrument symbol summarizes the contract parameters. It consists of
the call/put indicator, the product name, its maturity, the strike price and the
version of the contract.
Instrument Type
Listed or flexible instrument.
Exercise Style
Exercise style of option positions (American or European).
Settlement
Method
Settlement method (Cash or Physical).
Tran ID
Transaction identifier.
Suffix ID
Counter which is incremented with every modification of the transaction.
Trade Date
Trade date of the given-up transaction.
Business Date
Date the give-up request was generated.
Tran Date
Transaction date.
Tran Time
Transaction time.
B/S
Indicates the buy or sell side.
Orig Trade Type
Original trade type.
Tran Qty
Transaction quantity.
Tran Price
Transaction price.
Rate ID
This is an optional free text field (eGAINS Rate identifier).
Ref Account
Name
Optional field entered by the give-up member to propose a take-up account.
Ref Link Member Optional field entered by the give-up member to propose a Link Member ID.
ID
Ref Link
Beneficiary
Optional field entered by the give-up member to propose a Link Beneficiary.
Ref Text 1
Optional field entered by the give-up member to propose a free text.
Derivatives Clearing GUI – User Manual
Page 61
Eurex Clearing C7 – Derivatives Clearing GUI 3.0
As of December 1, 2015
Version 3.2
Window layouts and descriptions
Give-up Overview - Table columns
Column
Description
Ref Text 2
Optional field entered by the give-up member to propose a free text.
Ref Text 3
Optional field entered by the give-up member to propose a free text.
Ref O/C
Optional field entered by the give-up member to propose a take-up to open
or to close.
4.13
Give-up Maintenance
4.13.1
Description
The Give-up Maintenance window is an overlay window accessed from the Transaction Overview
window which allows to give up transactions to another exchange member.
It summarizes the details of the transactions to be given up in a table. Below this table there are
various fields to enter the give-up information.
Give-up Maintenance window
4.13.2
Functionality
Any number of transactions listed in the Transaction Overview window can be selected for a giveup. Their details are displayed in the Give-up Maintenance window. All of the transactions can be
given up at once by filling in the provided entry fields.
To give up transactions to another exchange member, the target member must be entered in the
To NCM/RC field. This field is mandatory. All the other entry fields can be filled optionally and will
be shown to the take-up member as a proposal.
By default, all the reference fields (Ref ...) show “No Change”, i.e. the individual entries of the
original transactions will be suggested to the take-up member. If text is entered into a reference
field, it applies to all of the transactions selected for give-up. The respective Ref ... column in the
transactions table is updated accordingly for preview.
Derivatives Clearing GUI – User Manual
Page 62
Eurex Clearing C7 – Derivatives Clearing GUI 3.0
As of December 1, 2015
Version 3.2
Window layouts and descriptions
If the give-up member doesn’t want to send any text proposals, the delete check box in front of
each entry field must be selected. In this case, the respective Ref ... columns in the transactions
table are empty and no proposals are contained in the give-up request for the deleted fields.
The Submit button is only active if the To NCM/RC field is filled with a target Member ID. Clicking
this button initiates individual give-up processes for the selected transactions. After submitting
successfully, the window is closed automatically.
As long as the give-up process is not completed the allocated transactions are still visible in the
Transaction Overview window but they are not adjustable.
Cancel + New
If the Give-up Maintenance window has been opened via the Cancel + New button of the Give-up
Overview window, all entry fields are prefilled with the information of the original give-up request.
The user can modify these entries. Clicking the Submit button will cancel the original give-up
request and submit a new request with the updated information. After submitting successfully, the
window is closed automatically.
If an error occurs, a message is displayed in the message log.
4.13.3
Screen elements
Give-up Maintenance - Fields
Field
Description
To NCM/RC
This field is mandatory. It defines the target member to whom the
transactions are given up to (take-up member).
To Account Name Proposal for the take-up account.
Ref Text 1
Proposal for the free text field.
Ref Text 2
Proposal for the free text field.
Ref Text 3
Proposal for the free text field.
Ref Link Member Proposal for the Link Member ID.
ID
Ref Link
Beneficiary
Proposal for the Link Beneficiary.
Ref O/C
Proposal for the open/close indicator.
Give-up Maintenance - Buttons
Button
Description
Submit
This button is only active if a target member ID is entered.
Clicking the Submit button submits a request to give up the transactions and
closes the overlay window if all give-up requests could successfully be
initiated.
Revert
Reverts all changes entered since the window was opened.
Cancel
Closes the overlay window without any changes.
Derivatives Clearing GUI – User Manual
Page 63
Eurex Clearing C7 – Derivatives Clearing GUI 3.0
As of December 1, 2015
Version 3.2
Window layouts and descriptions
4.14
Take-up Overview
4.14.1
Description
The Take-up Overview window can be accessed from the Transaction Management menu in the
main menu. It displays pending, confirmed and cancelled/rejected give-up requests. A NonClearing Member can inquire give-up requests allocated to himself. A Clearing Member can
inquire give-up requests allocated to himself as well as give-ups allocated to his NCMs and RCs
to confirm them after they have been claimed.
In order to list only give-up requests of interest, a filter function is provided. At the top of the
window there are various filter fields. Upon inquiry, all requests matching the selected filter
criteria are listed in the table.
Take-up Overview window
4.14.2
Functionality
Below the filter area there is a number of buttons to take-up, confirm or cancel a pending give-up
request. These buttons are active if all selected give-up requests are in pending state. Requests
that have successfully been claimed or that have been cancelled/refused cannot be taken-up,
confirmed or rejected again.
Note: Clicking a button to confirm or reject a give-up request immediately triggers the respective
function. There is no warning dialogue to confirm the action again.
Take-up
This button is available if one or more pending requests have been selected. It is used by the
target exchange member to take up the transactions. Clicking the Take-up button opens the
Derivatives Clearing GUI – User Manual
Page 64
Eurex Clearing C7 – Derivatives Clearing GUI 3.0
As of December 1, 2015
Version 3.2
Window layouts and descriptions
Take-up Maintenance window in which the user can enter the necessary information to claim the
allocated transactions.
Confirm
This button is available if one or more pending requests have been selected for which the target
NCM/RC has already specified the take-up account and the associated Clearing Member. It is
used by the Clearing Member who is the sponsor of the entered take-up account to confirm the
take-up of the selected transactions by his NCM/RC. After a take-up has been confirmed, the
Confirm button becomes inactive since the request cannot be confirmed again.
Reject By NCM/RC
This button is available if one or more pending requests have been selected. It is used by the
target NCM/RC to reject the take-up of the selected transactions.
Reject By Clg Mbr
This button is available if one or more pending requests have been selected. It is used by the
Clearing Member who is the sponsor of the entered take-up account to reject the take-up of the
selected transactions by his NCM/RC.
Derivatives Clearing GUI – User Manual
Page 65
Eurex Clearing C7 – Derivatives Clearing GUI 3.0
As of December 1, 2015
Version 3.2
Window layouts and descriptions
4.14.3
Screen elements
Take-up Overview - Filter criteria
Filter
Description
Product Line
Filter for allocations in options or futures transactions.
C/P
Filter for allocations in call or put contracts.
Curr
Filter for allocations in transactions with certain currencies.
Product
Filter for allocations in transactions with certain products.
Flex Contract ID
Filter for allocations in transactions with a certain flexible instrument.
Maturity From
Filter for allocations in transactions with listed instruments with a maturity of
or later than the specified date.
Maturity To
Filter for allocations in transactions with listed instruments with a maturity of
or earlier than the specified date.
Expiration From
Filter for allocations in transactions with instruments which expire on or after
the specified date.
Expiration To
Filter for allocations in transactions with instruments which expire on or
before the specified date.
Listed
Instruments
If this check box is selected, allocations in transactions with listed
instruments are shown.
Flexible
Instruments
If this check box is selected, allocations in transactions with flexible
instruments are shown.
Strike From
Filter for allocations in contracts with a strike price equal to or higher than the
specified price.
Strike To
Filter for allocations in contracts with a strike price equal to or lower than the
specified price.
Version
Filter for allocations in a certain contract version.
Exercise Style
Filter for allocations in transactions of a certain exercise style (American or
European).
Settlement
Method
Filter for allocations in transactions of a certain settlement method (Cash or
Physical).
Clg Mbr
Filter for allocations in transactions of a certain Clearing Member.
NCM/RC
Filter for allocations in transactions of a certain Non Clearing Member or
Registered Customer.
Account Name
Filter for allocations in transactions booked on certain accounts.
Trade Date From Filter for allocations in transactions with a trade date greater or equal the
entered date.
Trade Date To
Filter for allocations in transactions with a trade date earlier or equal the
entered date.
Business Date
From
Filter for allocations generated on or after a certain business date.
Business Date To Filter for allocations generated on or before a certain business date.
Tran ID
Filter for allocations in a transaction with a certain transaction ID.
Derivatives Clearing GUI – User Manual
Page 66
Eurex Clearing C7 – Derivatives Clearing GUI 3.0
As of December 1, 2015
Version 3.2
Window layouts and descriptions
Take-up Overview - Filter criteria
Filter
Description
From NCM/RC
Filter for give-up transactions that have been entered by a specific
participant.
Allocation ID
Filter for an allocation with a certain allocation ID.
Alloc Status
Filter for allocations with a certain status by selecting any combination of the
Claimed, Pending, Cancelled and Refused check boxes.
Take-up Overview - Buttons
Button
Description
Take-up
This button is available if one or more pending requests have been selected.
It is used by the target exchange member to take up the transactions.
Clicking the Take-up button opens the Take-up Maintenance window in
which the user can enter the necessary information to claim the allocated
transactions.
Confirm
This button is available if one or more pending requests have been selected
for which the target NCM/RC has already specified the take-up account and
the associated Clearing Member. It is used by the Clearing Member who is
the sponsor of the entered take-up account to confirm the take-up of the
selected transactions by his NCM/RC.
Reject By NCM/
RC
This button is available if one or more pending requests have been selected.
It is used by the target NCM/RC to reject the take-up of the selected
transactions.
Reject By Clg Mbr This button is available if one or more pending requests have been selected.
It is used by the Clearing Member who is the sponsor of the entered take-up
account to reject the take-up of the selected transactions by his NCM/RC.
Take-up Overview - Table columns
Column
Description
Exchange
Exchange ID.
From NCM/RC
Initiating Non Clearing Member or Registered Customer.
To Clg Mbr
Clearing Member who is the sponsor of the entered take-up account.
To NCM/RC
Exchange member to whom the transaction was given-up to (take-up
member).
To Account Name Take-up account entered by the target NCM/RC.
From Clg Mbr
Conf
Confirmation status of the give-up CM.
From NCM/RC
Conf
Confirmation status of the give-up NCM/RC.
To Clg Mbr Conf
Confirmation status of the take-up CM.
To NCM/RC Conf Confirmation status of the take-up NCM/RC.
Derivatives Clearing GUI – User Manual
Page 67
Eurex Clearing C7 – Derivatives Clearing GUI 3.0
As of December 1, 2015
Version 3.2
Window layouts and descriptions
Take-up Overview - Table columns
Column
Description
Allocation ID
Unique identifier of the give-up request.
Alloc Status
Status of the give-up request.
Curr
Product currency.
C/P
Indicates a call or a put option.
Maturity
Maturity date of the contract.
Product
Product ID.
Strike
Strike price of the contract.
Version
Version of the contract.
Expiration Date
Expiration date of the flexible contract.
Flexible Contract
ID
Flexible Contract ID.
Instrument
Symbol
The instrument symbol summarizes the contract parameters. It consists of
the call/put indicator, the product name, its maturity, the strike price and the
version of the contract.
Instrument Type
Listed or flexible instrument.
Exercise Style
Exercise style of option positions (American or European).
Settlement
Method
Settlement method (Cash or Physical).
Tran ID
Transaction identifier.
Suffix ID
Counter which is incremented with every modification of the transaction.
Trade Date
Trade date of the given-up transaction.
Business Date
Date the give-up request was generated.
Tran Date
Transaction date.
Tran Time
Transaction time.
B/S
Indicates the buy or sell side.
O/C
Indicates whether the transaction is taken up to open or to close.
Orig Trade Type
Original trade type.
Tran Qty
Transaction quantity.
Tran Price
Transaction price.
Text 1
This is an optional free text field entered by the take-up member.
Text 2
This is an optional free text field entered by the take-up member.
Text 3
This is an optional free text field entered by the take-up member.
Rate ID
This is an optional free text field (eGAINS Rate identifier)
Link Member ID
This is an optional free text field entered by the take-up member.
Link Beneficiary
This is an optional free text field entered by the take-up member.
Ref Account
Name
Optional field entered by the give-up member to propose a take-up account.
Derivatives Clearing GUI – User Manual
Page 68
Eurex Clearing C7 – Derivatives Clearing GUI 3.0
As of December 1, 2015
Version 3.2
Window layouts and descriptions
Take-up Overview - Table columns
Column
Description
Ref Link Member Optional field entered by the give-up member to propose a Link Member ID.
ID
Ref Link
Beneficiary
Optional field entered by the give-up member to propose a Link Beneficiary.
Ref Text 1
Optional field entered by the give-up member to propose a free text.
Ref Text 2
Optional field entered by the give-up member to propose a free text.
Ref Text 3
Optional field entered by the give-up member to propose a free text.
Ref O/C
Optional field entered by the give-up member to propose a take-up to open
or to close.
4.15
Take-up Maintenance
4.15.1
Description
The Take-up Maintenance window is an overlay window accessed from the Take-up Overview
window which allows to claim transactions given up by another exchange member.
It summarizes the details of the transactions to be taken up in a table. Below this table there are
various fields to enter the take-up information.
Take-up Maintenance window
4.15.2
Functionality
One or multiple transactions listed in the Take-up Overview window can be selected for take-up.
Their details are displayed in the Take-up Overview window. All of the transactions can be taken
up at once by filling in the provided entry fields.
Derivatives Clearing GUI – User Manual
Page 69
Eurex Clearing C7 – Derivatives Clearing GUI 3.0
As of December 1, 2015
Version 3.2
Window layouts and descriptions
To take up transactions from another exchange member, the take-up account must be entered in
the To Account Name field and the Clearing Member who is the sponsor of this take-up account
must be entered in the To Clg Mbr field. These fields are mandatory. All the other entry fields can
be filled optionally. The entered Clearing Member has to confirm the take-up.
By default, all the optional text fields show “No Change”, i.e. the individual proposals entered by
the give-up member into the Ref ... fields are accepted. If text is entered into a text field, it applies
to all of the transactions selected for take-up. The respective column in the transactions table is
updated accordingly for preview.
If the take-up member wants to leave the text fields of the taken up transactions empty, the delete
check box in front of each entry field must be selected. In this case, the respective columns in the
transactions table are empty.
The O/C indicator must be selected as well. By default, “No Change” is selected, i.e. the
proposals entered by the give-up member are taken. If the give-up member has not proposed an
open/close indicator, the transactions are taken up “to open”.
The Submit button is only active if the To Clg Mbr and the To Account Name fields are filled.
Clicking this button submits a request to take up the selected transactions. After submitting
successfully, the window is closed automatically.
If an error occurs, a message is displayed in the message log.
Derivatives Clearing GUI – User Manual
Page 70
Eurex Clearing C7 – Derivatives Clearing GUI 3.0
As of December 1, 2015
Version 3.2
Window layouts and descriptions
4.15.3
Screen elements
Take-up Maintenance - Fields
Field
Description
To Clg Mbr
This field is mandatory. It defines the Clearing Member who is the sponsor of
the take-up account. This Clearing Member has to confirm the take-up.
To Account Name This field is mandatory if no account has been proposed by the give-up
member. It is the account to which the transactions are taken up to.
Text 1
This is an optional free text field. If it is left blank, the proposal entered by the
give-up member is taken.
Text 2
This is an optional free text field. If it is left blank, the proposal entered by the
give-up member is taken.
Text 3
This is an optional free text field. If it is left blank, the proposal entered by the
give-up member is taken.
Link Member ID
This is an optional free text field. If it is left blank, the proposal entered by the
give-up member is taken.
Link Beneficiary
This is an optional free text field. If it is left blank, the proposal entered by the
give-up member is taken.
O/C
Defines whether the transactions are taken up “to open” or “to close”. By
default, “No Change” is selected, i.e. the proposals entered by the give-up
member are taken. If the give-up member has not proposed an open/close
indicator, the transactions are taken up “to open”.
Take-up Maintenance - Buttons
Button
Description
Submit
This button is only active if the To Clg Mbr and the To Account Name are
entered.
Clicking the Submit button submits a request to take up the transactions and
closes the overlay window if all take-up requests could successfully be
processed.
Revert
Reverts all changes entered since the window was opened.
Cancel
Closes the overlay window without any changes.
4.16
Exercise Overview
4.16.1
Description
The Exercise Overview window can be accessed from the Settlement menu in the main menu or
via the Exercise button in the Position Overview window. It displays the user’s option positions
and allows to manually exercise positions or abandon positions from automatic exercise.
The Exercise Overview window shows current options positions. In order to list only positions of
interest, a filter function is provided. At the top of the window there are various fields which can
be filled with criteria to filter for. Upon inquiry, all positions matching the selected filter criteria are
listed in the table. Below the display table, there are two separate tabs. One for position exercise
and one for abandoning.
Derivatives Clearing GUI – User Manual
Page 71
Eurex Clearing C7 – Derivatives Clearing GUI 3.0
As of December 1, 2015
Version 3.2
Window layouts and descriptions
Exercise Overview window
If the window is opened via the Exercise button in the Position Overview window, certain filter
fields of the Exercise Overview window are prefilled according to the selected positions.
4.16.2
Functionality
Unlike the filter function in the Position Overview window a filter inquiry in the Exercise Overview
window only returns options positions which have not expired yet. Only those positions can be
exercised manually or abandoned from automatic exercise.
By default, the advanced filter is set in a way that the inquiry returns all option positions which
have not expired yet (All check box selected). To filter for positions with an Exercised Qty greater
zero, only the Exercised check box must be selected. To filter for positions with an Open Long
quantity greater zero, only the Unexercised check box must be checked. And to filter for positions
with an Abandoned Qty greater zero, only the Abandoned check box must be selected. These
check boxes can be selected in various combinations to inquire the desired positions.
Filter by ITM amount
To narrow down the list of filter results even further, the filter area of the Exercise Overview
window provides an option to display only positions that are currently in-the-money or out-of-themoney by checking the respective check box on inquiry.
The filtering is done based on the available underlying price. The Price Flag column indicates
which price is used for the calculation of the ITM Per Contract and ITM Total columns.
If the user enters an own price into the Reference Price field, this price is used to calculate
simulated ITM amounts.
In this case, the ITM Per Contract and ITM Total columns in the display table are filled with the
Derivatives Clearing GUI – User Manual
Page 72
Eurex Clearing C7 – Derivatives Clearing GUI 3.0
As of December 1, 2015
Version 3.2
Window layouts and descriptions
simulated ITM amounts and the Price Flag column indicates that a user defined price was used
for the calculation.
Below the list of positions there are individual tabs for manual exercise and for abandoning.
Manual Exercise
To exercise positions manually, one or more positions need to be selected from the display table.
The exercised quantity of the selected positions can be adjusted with the fields provided in the
Exercise Manually tab. It can be increased or decreased by entering a positive or a negative
value into the Exercise Qty Change field. However, the entered value must not exceed the open
long quantity of any selected position. A negative value (unexercise) must not exceed the
previously exercised quantity of any selected position. If the entered quantity exceeds one of the
boundaries, the Exercise button is disabled.
If the user tries to exercise positions that are currently out-of-the-money, a warning message is
displayed. Only if this warning is confirmed, the position is exercised.
In case the entering user is only entitled to exercise positions with a Four Eye approval, a second
user must enter his credentials into the Approver ID and Password fields.
The provided text fields (Text 1, Text 2, Text 3) can be used to assign further information to the
exercise transaction.
Abandon from Automatic Exercise
It might be necessary to exclude certain positions from the automatic exercise process. This can
be done via the Abandon Auto Exer tab. The quantity to be abandoned can be adjusted by filling
in the Abandon Qty Change field. It can be increased or decreased by entering a positive or a
negative value. If a positive value is entered, it may exceed the current open long position.
However, a negative value must not exceed the previously abandoned quantity (Abandoned
Qty).
The abandoned quantity can only be entered on the last trading day.
In case the entering user is only entitled to abandon positions with a Four Eye approval, a second
user must enter his credentials into the Approver ID and Password fields.
If an error occurs, a message is displayed in the message log.
Derivatives Clearing GUI – User Manual
Page 73
Eurex Clearing C7 – Derivatives Clearing GUI 3.0
As of December 1, 2015
Version 3.2
Window layouts and descriptions
4.16.3
Screen elements
Exercise Overview - Filter criteria
Filter
Description
Product Line
Since only options can be exercised, the product line is fixed to O in this
window.
C/P
Filter for call or put contracts.
Curr
Filter for positions in certain currencies.
Product
Filter for positions in certain products.
Flex Contract ID
Filter for positions in a certain flexible instrument.
Maturity From
Filter for positions in listed instruments with a maturity of or later than the
specified date.
Maturity To
Filter for positions in listed instruments with a maturity of or earlier than the
specified date.
Expiration From
Filter for positions in instruments which expire on or after the specified date.
Expiration To
Filter for positions in instruments which expire on or before the specified
date.
Listed
Instruments
If this check box is selected, positions in listed instruments are shown.
Flexible
Instruments
If this check box is selected, positions in flexible instruments are shown.
Strike From
Filter for contracts with a strike price equal to or higher than the specified
price.
Strike To
Filter for contracts with a strike price equal to or lower than the specified
price.
Version
Filter for a certain contract version.
Exercise Style
Filter for positions of a certain exercise style (American or European).
Settlement
Method
Filter for positions of a certain settlement method (Cash or Physical).
Clg Mbr
Filter for positions of a certain Clearing Member.
NCM/RC
Filter for positions of a certain Non Clearing Member or Registered
Customer.
Account Name
Filter for positions booked on certain accounts.
All
If this check box is selected, exercised, unexercised and abandoned
positions are shown, as well as positions without any long quantity.
Exercised
If this check box is selected, exercised positions are shown.
Unexercised
If this check box is selected, unexercised positions are shown.
Abandoned
If this check box is selected, positions which are (partially) excluded from the
automatic exercise process are shown.
Reference Price
If a single product is filled in the Product filter, a user defined reference price
can be entered. It is used for the calculation of the ITM amounts.
Derivatives Clearing GUI – User Manual
Page 74
Eurex Clearing C7 – Derivatives Clearing GUI 3.0
As of December 1, 2015
Version 3.2
Window layouts and descriptions
Exercise Overview - Filter criteria
Filter
Description
In-the-money
Select this check box to show positions which are in-the-money based on
the user defined reference price or the underlying price.
Out-of-the-money Select this check box to show positions which are out-of-the-money based
on the user defined reference price or the underlying price.
Position ID
Filter for transactions which belong to a certain Position ID.
Exercise Overview - Fields
Field
Description
Exercise Qty
Change
Increase or decrease the amount to exercise for the selected positions by
filling in positive or negative values into this field.
Text 1
Provide further information to the exercise transaction in this text field.
Text 2
Provide further information to the exercise transaction in this text field.
Text 3
Provide further information to the exercise transaction in this text field.
Abandon Qty
Change
Increase or decrease the amount to exclude from automatic exercise for the
selected position.
Approver ID
User ID of the approving user. This filed must be filled if the Four Eye
Principle is required.
Password
Password of the approving user.
Exercise Overview - Buttons
Button
Description
Exercise
This button is only active if the conditions described above are fulfilled.
Clicking the button exercises/un-exercises the entered amount for the
selected positions.
Abandon
This button is only active if the conditions described above are fulfilled.
Clicking the button excludes/includes the entered amount from automatic
exercise for the selected position.
Exercise Overview - Table columns
Column
Description
Exchange
Exchange ID.
Clg Mbr
Member ID of the Clearing Member.
NCM/RC
Member ID of the Non Clearing Member or Registered Customer.
Account Name
Account on which the position is booked.
Curr
Product currency.
C/P
Indicates a call or a put option.
Maturity
Maturity date of the contract.
Derivatives Clearing GUI – User Manual
Page 75
Eurex Clearing C7 – Derivatives Clearing GUI 3.0
As of December 1, 2015
Version 3.2
Window layouts and descriptions
Exercise Overview - Table columns
Column
Description
Product
Product ID.
Strike
Strike price of the contract.
Version
Version of the contract.
Instrument
Symbol
The instrument symbol summarizes the contract parameters. It consists of
the call/put indicator, the product name, its maturity, the strike price and the
version of the contract.
Instrument Type
Listed or flexible instrument.
Exercise Style
Exercise style of option positions (American or European).
Flexible Contract
ID
Flexible Contract ID.
Settlement
Method
Settlement method (Cash or Physical).
Exercised Qty
Quantity that has been exercised.
Open Long
Up-to-date open long position.
Trading Unit
Contract size.
Reference Price
Price used to calculate the ITM amounts. It can either be provided by the
system or entered manually by the user.
Price Flag
Indicates whether the underlying price is preliminary, final or user defined.
Abandoned Qty
Quantity that has been excluded from automatic exercise.
Tick Size
Smallest increment in which the price of a contract may change.
Tick Value
Monetary value represented by a one-tick movement in the contract price.
ITM Per Contract In-the-money amount on a contract basis.
ITM Total
Accumulated in-the-money amount.
Designated GU
Long
Long quantity that has been designated for give-up.
Designated
PosTrans Long
Long quantity that has been designated for position transfer.
Total Designated
Long
Total designated long quantity.
Position ID
Position identifier.
Expiration Date
Expiration date of the flexible contract.
4.17
Exercise Assignment Overview
4.17.1
Description
The Exercise Assignment Overview window can be accessed from the Settlement menu in the
main menu. It displays the user’s exercised long positions and assigned short positions.
In order to list only positions of interest, a filter function is provided. At the top of the window there
are various fields which can be filled with criteria to filter for. Upon inquiry, all positions matching
the selected filter criteria are listed in the table.
Derivatives Clearing GUI – User Manual
Page 76
Eurex Clearing C7 – Derivatives Clearing GUI 3.0
As of December 1, 2015
Version 3.2
Window layouts and descriptions
Exercise Assignment Overview window
4.17.2
Functionality
The assignments for the current business day can only be inquired after the assignments have
been processed by the Eurex® System. Exercised positions are displayed immediately after the
manual exercise request has been processed.
If an error occurs, a message is displayed in the message log.
Derivatives Clearing GUI – User Manual
Page 77
Eurex Clearing C7 – Derivatives Clearing GUI 3.0
As of December 1, 2015
Version 3.2
Window layouts and descriptions
4.17.3
Screen elements
Exercise Assignment Overview - Filter criteria
Filter
Description
Product Line
Since only options can be exercised, the product line is fixed to O in this
window.
C/P
Filter for call or put contracts.
Curr
Filter for positions in certain currencies.
Product
Filter for positions in certain products.
Flex Contract ID
Filter for positions in a certain flexible instrument.
Maturity From
Filter for positions in listed instruments with a maturity of or later than the
specified date.
Maturity To
Filter for positions in listed instruments with a maturity of or earlier than the
specified date.
Expiration From
Filter for positions in instruments which expire on or after the specified date.
Expiration To
Filter for positions in instruments which expire on or before the specified
date.
Listed
Instruments
If this check box is selected, positions in listed instruments are shown.
Flexible
Instruments
If this check box is selected, positions in flexible instruments are shown.
Strike From
Filter for contracts with a strike price equal to or higher than the specified
price.
Strike To
Filter for contracts with a strike price equal to or lower than the specified
price.
Version
Filter for a certain contract version.
Exercise Style
Filter for positions of a certain exercise style (American or European).
Settlement
Method
Filter for positions of a certain settlement method (Cash or Physical).
Clg Mbr
Filter for positions of a certain Clearing Member.
NCM/RC
Filter for positions of a certain Non Clearing Member or Registered
Customer.
Account Name
Filter for positions booked on certain accounts.
Tran Date
Filter for a certain transaction date.
Exercised
Select this check box to include exercised positions in the inquiry result.
Assigned
Select this check box to include assigned positions in the inquiry result.
Position ID
Filter for transactions which belong to a certain Position ID.
Derivatives Clearing GUI – User Manual
Page 78
Eurex Clearing C7 – Derivatives Clearing GUI 3.0
As of December 1, 2015
Version 3.2
Window layouts and descriptions
Exercise Assignment Overview - Table columns
Column
Description
Exchange
Exchange ID.
Clg Mbr
Member ID of the Clearing Member.
NCM/RC
Member ID of the Non Clearing Member or Registered Customer.
Account Name
Account on which the position is booked.
Curr
Product currency.
Tran Date
Transaction date.
Instrument
Symbol
The instrument symbol summarizes the contract parameters. It consists of
the call/put indicator, the product name, its maturity, the strike price and the
version of the contract.
Instrument Type
Listed or flexible instrument.
Exercise Style
Exercise style of option positions (American or European).
Flexible Contract
ID
Flexible Contract ID.
Settlement
Method
Settlement method (Cash or Physical).
Exercised Qty
Quantity that has been exercised.
Assigned Qty
Quantity that has been assigned for exercise to the Member.
C/P
Indicates a call or a put option.
Maturity
Maturity date of the contract.
Product
Product ID.
Strike
Strike price of the contract.
Version
Version of the contract.
Tick Size
Smallest increment in which the price of a contract may change.
Tick Value
Monetary value represented by a one-tick movement in the contract price.
Position ID
Position identifier.
Expiration Date
Expiration date of the flexible contract.
4.18
Deliverable Position Overview
4.18.1
Description
The Deliverable Position Overview window can be accessed from the Settlement menu in the
main menu. It displays settlement related information for exercised/assigned (notified/allocated)
positions with physical delivery.
In order to list only positions of interest, a filter function is provided. At the top of the window there
are various fields which can be filled with criteria to filter for. Upon inquiry, all positions matching
the selected filter criteria are listed in the table.
Derivatives Clearing GUI – User Manual
Page 79
Eurex Clearing C7 – Derivatives Clearing GUI 3.0
As of December 1, 2015
Version 3.2
Window layouts and descriptions
Deliverable Position Overview window
4.18.2
Functionality
On the expiration day of futures contracts C7 randomly allocates holders of short positions to the
holders of long positions requiring physical delivery of the underlying securities. Similarly, when a
long position in options is exercised, C7 randomly selects an option seller from among all open
short positions of the same options series who will be assigned the exercise and thus is obliged
to deliver or receive the underlying securities.
As soon as the allocation process for futures and the assignment process for options has been
completed, the deliverable positions can be inquired in the Deliverable Position Overview
window. The display table shows which underlying has to be delivered or will be received.
Historical data can be inquired for 5 business days.
If an error occurs, a message is displayed in the message log.
Derivatives Clearing GUI – User Manual
Page 80
Eurex Clearing C7 – Derivatives Clearing GUI 3.0
As of December 1, 2015
Version 3.2
Window layouts and descriptions
4.18.3
Screen elements
Deliverable Position Overview - Filter criteria
Filter
Description
Product Line
Select a product line to filter for options or futures positions.
C/P
Filter for call or put contracts.
Settl Curr
Filter for positions in certain settlement currencies.
Product
Filter for positions in certain products.
Flex Contract ID
Filter for positions in a certain flexible instrument.
Maturity From
Filter for positions which expire on or after the specified date.
Maturity To
Filter for positions which expire on or before the specified date.
Expiration From
Filter for positions in instruments which expire on or after the specified date.
Expiration To
Filter for positions in instruments which expire on or before the specified
date.
Listed
Instruments
If this check box is selected, positions in listed instruments are shown.
Flexible
Instruments
If this check box is selected, positions in flexible instruments are shown.
Strike From
Filter for contracts with a strike price equal to or higher than the specified
price.
Strike To
Filter for contracts with a strike price equal to or lower than the specified
price.
Version
Filter for a certain contract version.
Exercise Style
Filter for positions of a certain exercise style (American or European).
Settlement
Method
Filter for positions of a certain settlement method (Cash or Physical).
Delivery ID
Filter for a certain Delivery ID.
Delivery Reason
Filter for exercised, assigned, notified or allocated positions only.
Clg Mbr
Filter for positions of a certain Clearing Member.
NCM/RC
Filter for positions of a certain Non Clearing Member or Registered
Customer.
Account Name
Filter for positions booked on certain accounts.
Tran Date
Filter for a certain transaction date.
Value Date
Filter for deliveries with a certain value date.
Deliverable Position Overview - Table columns
Column
Description
Exchange
Exchange ID.
Clg Mbr
Member ID of the Clearing Member.
NCM/RC
Member ID of the Non Clearing Member or Registered Customer.
Account Name
Account on which the position is booked.
Derivatives Clearing GUI – User Manual
Page 81
Eurex Clearing C7 – Derivatives Clearing GUI 3.0
As of December 1, 2015
Version 3.2
Window layouts and descriptions
Deliverable Position Overview - Table columns
Column
Description
Instrument
Symbol
The instrument symbol summarizes the contract parameters. It consists of
the call/put indicator, the product name, its maturity, the strike price and the
version of the contract.
Instrument Type
Listed or flexible instrument.
Exercise Style
Exercise style of option positions (American or European).
Flex Contract ID
Flexible Contract ID.
Settlement
Method
Settlement method (Cash or Physical).
Tran Date
Transaction date.
Exer/Alloc Qty
Quantity that has been exercised or allocated.
Asgn/Noti Qty
Quantity that has been assigned to an exercise or notified to the Member.
Trd. Unit
Relevant contract size to create the delivery instruction.
Units
Number of shares or nominal amount of the delivery instruction.
Settl Curr
Settlement currency.
CurrRec (Pay)
Settlement amount (without cash settlement) calculated for the deliverable
position.
Cash Settl
Cash adjustment calculated for the deliverable position (if applicable).
ISIN
ISIN of the delivery component.
Delivery ID
Delivery ID.
Expiration Date
Expiration date of the flexible contract.
Value Date
Value date of the delivery.
Face Value
Face value.
Sec Name
Security name.
Conv Factor
Conversion factor.
Accr Interest
Accrued interest.
Position ID
Position ID.
C/P
Indicates a call or a put option.
Maturity
Maturity date of the contract.
Product
Product ID.
Strike
Strike price of the contract.
Version
Version of the contract.
4.19
Notification Overview
4.19.1
Description
The Notification Overview window can be accessed from the Settlement menu in the main menu.
It displays open, notified and designated short positions.
Derivatives Clearing GUI – User Manual
Page 82
Eurex Clearing C7 – Derivatives Clearing GUI 3.0
As of December 1, 2015
Version 3.2
Window layouts and descriptions
Notification Overview window
4.19.2
Functionality
At the top of the window there are various filter fields. Upon inquiry, all positions matching the
selected filter criteria are listed in a table below the filter area. The user can filter for “Notified” and
“Un-notified” positions. By default, the filters are set in a way that the inquiry returns all positions
which have an Open Short or Notified Quantity greater zero, i.e. all check boxes are checked.
After selecting one position record from the display table, the Details button is enabled. Clicking
this button opens the Notification Detail Overview window for the selected position.
Derivatives Clearing GUI – User Manual
Page 83
Eurex Clearing C7 – Derivatives Clearing GUI 3.0
As of December 1, 2015
Version 3.2
Window layouts and descriptions
4.19.3
Screen elements
Notification Overview - Filter criteria
Filter
Description
Product Line
Since only futures positions can be notified, the product line is fixed to F in
this window.
Product
Filter for positions in certain products.
Curr
Filter for positions in certain currencies.
Maturity From
Filter for positions which expire on or after the specified date.
Maturity To
Filter for positions which expire on or before the specified date.
Clg Mbr
Filter for positions of a certain Clearing Member.
NCM/RC
Filter for positions of a certain Non Clearing Member or Registered
Customer.
Account Name
Filter for positions booked on certain accounts.
Position ID
Filter for positions with a certain Position ID.
Notified
If this check box is selected, positions with a notified quantity greater zero
are shown.
Un-notified
If this check box is selected, positions with an open short quantity greater
zero are shown.
Notification Overview - Buttons
Button
Description
Details
This button is only active if one position is selected from the display table.
Clicking this button opens the Notification Detail Overview window.
Notification Overview - Table columns
Column
Description
Exchange
Exchange ID.
Clg Mbr
Member ID of the Clearing Member.
NCM/RC
Member ID of the Non Clearing Member or Registered Customer.
Account Name
Account on which the position is booked.
Curr
Product currency.
Product
Product ID.
Maturity
Maturity date of the contract.
Instrument
Symbol
The instrument symbol summarizes the contract parameters. It consists of
the product name, its maturity, the strike price and the version of the
contract.
Open Short
Up-to-date open short position.
Notified Qty
Quantity that has been notified.
Designated GU
Short
Short quantity that has been designated for give-up.
Derivatives Clearing GUI – User Manual
Page 84
Eurex Clearing C7 – Derivatives Clearing GUI 3.0
As of December 1, 2015
Version 3.2
Window layouts and descriptions
Notification Overview - Table columns
Column
Description
Designated
PosTrans Short
Short quantity that has been designated for an external position transfer.
Total Designated
Short
Total designated short quantity.
Cleared
Instrument ID
Technical ID of the contract.
Position ID
Position ID.
4.20
Notification Detail Overview
4.20.1
Description
The Notification Detail Overview window can be accessed via the Details button of the
Notification Overview window. It displays details about the notification of a futures position and
allows to submit a notification or notification adjustment for the selected position.
Notification Detail Overview
Only one futures position can be notified at a time. Details like the notified, un-notified and
designated quantities of the selected position are displayed at the top of the window.
Below these information, the Notification Detail Overview window contains a table with the
underlying deliverable securities (delivery components) and their respective notified quantities.
4.20.2
Functionality
The notified quantity of a position in a particular underlying security (delivery component) can be
adjusted by selecting one underlying from the display table. This enables the Notification Qty
Derivatives Clearing GUI – User Manual
Page 85
Eurex Clearing C7 – Derivatives Clearing GUI 3.0
As of December 1, 2015
Version 3.2
Window layouts and descriptions
Change entry field and the optional text fields.
The notified quantity in the selected delivery component can be increased or decreased by
entering a positive or a negative value into the Notification Qty Change field. The entered value
must not exceed the remaining short quantity available (Open Short - Dsgn Short) of the selected
position. A negative value (decrease of notified quantity) must not exceed the previously notified
quantity. If the entered quantity exceeds one of the boundaries, the Notify button is disabled.
The text fields (Text 1, Text 2, Text 3) are optional. They can be filled with additional information
for the notification transactions.
After successfully submitting the notification request by clicking the Notify button, the Notification
Detail Overview window is closed automatically. If an error occurs, a message is displayed in the
message log.
4.20.3
Screen elements
Notification Details Overview - Fields
Field
Description
Notification Qty
Change
Increase or decrease the notified quantity of the selected position in the
particular security by filling in a positive or negative value.
Text 1
This is a free text field.
Text 2
This is a free text field.
Text 3
This is a free text field.
Notification Details Overview - Buttons
Button
Description
Notify
This button is only active if the Notification Qty Change field is filled
according to the conditions described above. Clicking the Submit button
submits a request to perform the notification/notification adjustment and
closes the overlay window if the request was successfully processed.
Cancel
Cancels the notification or notification adjustment without any changes and
closes the overlay window.
Notification Details Overview - Table columns
Column
Description
ISIN
Underlying ISIN (delivery component).
Secu Name
Security long name.
Notified Qty
Currently notified quantity of the selected position in the particular security.
4.21
ITM Config for Auto Exercise
4.21.1
Description
The ITM Config for Auto Exercise window is accessible from the Automatic Processing menu in
the main menu. It shows the minimum amount that an options position must be in-the-money to
Derivatives Clearing GUI – User Manual
Page 86
Eurex Clearing C7 – Derivatives Clearing GUI 3.0
As of December 1, 2015
Version 3.2
Window layouts and descriptions
be automatically exercised. This configuration is done per product/account combination. Clearing
Members can inquire ITM configurations of their NCM/RCs, but not edit them.
ITM Config for Auto Exercise window
If there is no ITM amount configured for a particular product/account combination, the standard
amount configured by Eurex Clearing applies. This standard amount is always shown in the
display table for the “Root” account. It cannot be deleted or modified by the user.
4.21.2
Functionality
The ITM Config for Auto Exercise window allows to maintain the minimum in-the-money amount
from which an option position is automatically exercised. A configuration can be maintained per
product/account combination.
The Add Configuration button is always available to add a new configuration. Clicking this button
opens the ITM Config Maintenance window to enter the necessary information.
Existing configurations can be modified by clicking the Modify Configuration button. This button is
only active if a single configuration has been selected from the display table. It opens the ITM
Config Maintenance window prefilled with the parameters of the selected configuration.
Configurations can be deleted using the Delete Configuration button.
Derivatives Clearing GUI – User Manual
Page 87
Eurex Clearing C7 – Derivatives Clearing GUI 3.0
As of December 1, 2015
Version 3.2
Window layouts and descriptions
4.21.3
Screen elements
ITM Config for Auto Exercise - Filter criteria
Filter
Description
Clg Mbr
Filter for configurations of a certain Clearing Member.
NCM/RC
Filter for configurations of a certain Non Clearing Member or Registered
Customer.
Product
Filter for configurations for a certain product.
ITM Config for Auto Exercise - Buttons
Button
Description
Add Configuration Clicking this button opens the ITM Config Maintenance window to add a new
configuration.
Modify
Configuration
This button is only active if a single configuration has been selected from the
display table. Clicking this button opens the ITM Config Maintenance
window to modify the selected configuration.
Delete
Configuration
This button is only active if one or more configurations have been selected
from the display table. Clicking this button deletes the selected configuration.
ITM Config for Auto Exercise - Table columns
Column
Description
Exchange
Exchange ID.
Clg Mbr
Member ID of the Clearing Member.
NCM/RC
Member ID of the Non Clearing Member or Registered Customer.
Account Name
Account to which the configuration applies.
Product
Product to which the configuration applies.
Min ITM Amount
Minimum in-the-money amount necessary to automatically exercise
positions.
Curr
Product currency.
4.22
ITM Config Maintenance
4.22.1
Description
The ITM Config Maintenance window is an overlay window accessed from the ITM Config for
Auto Exercise window via the Add or Modify Configuration buttons. It allows to enter or modify
individual ITM configurations for automatic exercise per product/account combination.
Derivatives Clearing GUI – User Manual
Page 88
Eurex Clearing C7 – Derivatives Clearing GUI 3.0
As of December 1, 2015
Version 3.2
Window layouts and descriptions
ITM Config Maintenance - Add window
ITM Config Maintenance - Modify window
4.22.2
Functionality
If the window is opened by clicking the Add Configuration button, the Clg Mbr, NCM/RC, Account,
Product and Min ITM Amount entry fields are editable. All fields are mandatory to add a new
configuration.
If the window is opened by clicking the Modify Configuration button, the information of the
selected configuration are prefilled and only the Min ITM Amount field must be filled in.
Derivatives Clearing GUI – User Manual
Page 89
Eurex Clearing C7 – Derivatives Clearing GUI 3.0
As of December 1, 2015
Version 3.2
Window layouts and descriptions
4.22.3
Screen elements
ITM Config Maintenance - Fields
Field
Description
Clg Mbr
This field is only editable if a new configuration should be added. It defines
the account sponsor of the account for which the Minimum ITM configuration
should apply.
NCM/RC
This field is only editable if a new configuration should be added. It defines
the NCM/RC of the account for which the Minimum ITM configuration should
apply.
Account Name
This field is only editable if a new configuration should be added. It defines
the account for which the Minimum ITM configuration should apply.
Product
This field is only editable if a new configuration should be added. It defines
the product for which the Minimum ITM configuration should apply.
Min ITM Amount
Minimum in-the-money amount necessary to automatically exercise
positions.
ITM Config Maintenance - Buttons
Button
Description
Submit
This button is only active if all entry fields are filled in. Clicking the Submit
button submits a request to add a new or modify the selected configuration
and closes the overlay window if the request was successfully processed.
Cancel
Cancels the modification without any changes and closes the overlay
window.
4.23
Account Overview
4.23.1
Description
The Account Overview window can be accessed from the Account Management menu in the
main menu. It displays the accounts for a Member.
Derivatives Clearing GUI – User Manual
Page 90
Eurex Clearing C7 – Derivatives Clearing GUI 3.0
As of December 1, 2015
Version 3.2
Window layouts and descriptions
Account Overview window
4.23.2
Functionality
The logged in user can inquire a list of currently set-up Member accounts. For every account,
detailed information are displayed.
Currently, this window only supports sorting for one column at a time. Multi-column sorting is not
available. To sort the result table for a certain criterion, click on the respective column header.
4.23.3
Screen elements
Account Overview - Filter criteria
Filter
Description
Account Sponsor Filter for a certain account sponsor.
Account Owner
Filter for a certain account owner.
Account Name
Filter for a certain account name.
Collateral Pool
Filter for a certain collateral pool.
Risk Netting Unit
Filter for a certain risk netting unit.
Account Overview - Table columns
Column
Description
Account Sponsor Sponsor of the account.
Account Owner
Owner of the account.
Account Name
Name of the account.
Derivatives Clearing GUI – User Manual
Page 91
Eurex Clearing C7 – Derivatives Clearing GUI 3.0
As of December 1, 2015
Version 3.2
Window layouts and descriptions
Account Overview - Table columns
Column
Description
Account
Description
Description of the account.
Collateral Pool
Unique ID of the collateral pool.
Risk Netting Unit
The margin requirements are calculated per risk netting unit.
Clearing House
Clearing house.
4.24
Upload Position Close Out
4.24.1
Description
The Upload Position Close Out window can be accessed from the File Upload menu in the main
menu. It allows to close out multiple positions at once by uploading a file in CSV format.
Upload Position Close Out window
4.24.2
Functionality
Clicking the Browse button opens a selection window to import a file into the system. The
uploaded file must contain the close out parameters as a list of comma separated values. Each
line represents one position close out and must follow a certain pattern:
“AccountSponsor”, “AccountOwner”, “AccountName”, “CallPut”, “ProductSymbol”, “FlipID”,
“Maturity”, “ExpirationDate”, “Strike”, “Version”, “SettlMethod”, “ExerStyle”,
“TransactionQuantity”, “Text1”, “Text2”, “Text3”
Sample close out upload file:
“AccountSponsor”, “AccountOwner”, “AccountName”, “CallPut”, “ProductSymbol”, “FlipID”,
“Maturity”, “ExpirationDate”, “Strike”, “Version”, “SettlMethod”, “ExerStyle”,
“TransactionQuantity”, “Text1”, “Text2”, “Text3”
“GCMFR”, “NCMFR”, “A1”, “C”, “OGBS”, “”, “DEC15”, “”, “475.000000”, “0”, “”, “”, “10”,
“Text1”, “Text2”, “Text3”
“GCMFR”, “NCMFR”, “A1”, “”, “FIAF”, “FIA2”, “”, “2015-01-17”, “”, “”, “P”, “”, “15”,
“Text1”, “Text2”, “Text3”
If the file does not comply with this format, an error message is displayed. Upon successful
upload, the content of the file is displayed in the table. All the entered values are checked for
valid syntax. Fields with invalid input are specially highlighted. In that case, an error message is
displayed by hovering the mouse over the icon next to the erroneous field.
Derivatives Clearing GUI – User Manual
Page 92
Eurex Clearing C7 – Derivatives Clearing GUI 3.0
As of December 1, 2015
Version 3.2
Window layouts and descriptions
If all entry fields for one position close out are filled with valid data, the status of that row is
“VALID”. Only close out transactions with this status can be selected for import into the system.
Clicking the Submit button imports the selected records into the system. The Upload Position
Close Out window is updated to display the new status of the uploaded records. If the import was
successful the status is changed to “PROCESSED”.
In case of a failed import attempt, the Status Information field gives further explanations on the
failure reason and an error message is displayed in the message log.
Note: When closing a position via file upload, the ZCQ is not checked.
4.24.3
Screen elements
Upload Position Close Out - Filter criteria
Filter
Description
INVALID
If this check box is selected, the list of close out transactions parsed from the
uploaded file contains all records with status “INVALID”.
VALID
If this check box is selected, the list of close out transactions parsed from the
uploaded file contains all records with status “VALID”.
PROCESSED
If this check box is selected, the list of close out transactions parsed from the
uploaded file contains all records with status “PROCESSED”.
REJECTED
If this check box is selected, the list of close out transactions parsed from the
uploaded file contains all records with status “REJECTED”.
Upload Position Close Out - Fields
Field
Description
Clg Mbr
Displays the information parsed from the uploaded file. This field can be
edited before submission.
NCM/RC
Displays the information parsed from the uploaded file. This field can be
edited before submission.
Account Name
Displays the information parsed from the uploaded file. This field can be
edited before submission.
C/P
Displays the information parsed from the uploaded file. This field can be
edited before submission.
Product
Displays the information parsed from the uploaded file. This field can be
edited before submission.
Flex Contract ID
Displays the information parsed from the uploaded file. This field can be
edited before submission.
Maturity
Displays the information parsed from the uploaded file. This field can be
edited before submission.
Expiration Date
Displays the information parsed from the uploaded file. This field can be
edited before submission.
Strike
Displays the information parsed from the uploaded file. This field can be
edited before submission.
Derivatives Clearing GUI – User Manual
Page 93
Eurex Clearing C7 – Derivatives Clearing GUI 3.0
As of December 1, 2015
Version 3.2
Window layouts and descriptions
Upload Position Close Out - Fields
Field
Description
Version
Displays the information parsed from the uploaded file. This field can be
edited before submission.
Settlement
Method
Displays the information parsed from the uploaded file. This field can be
edited before submission.
Exercise Style
Displays the information parsed from the uploaded file. This field can be
edited before submission.
Quantity
Displays the information parsed from the uploaded file. This field can be
edited before submission.
Text 1
Displays the information parsed from the uploaded file. This field can be
edited before submission.
Text 2
Displays the information parsed from the uploaded file. This field can be
edited before submission.
Text 3
Displays the information parsed from the uploaded file. This field can be
edited before submission.
Status
Displays the import status of each close out transaction. Only transactions
marked “VALID” can be selected for import.
Status Information After submitting the selected close out transactions to be imported into the
system, this field displays further information on the upload status of each
transaction.
Upload Position Close Out - Buttons
Button
Description
Browse
Opens the file selection window to choose the file to be uploaded.
Filter
Filters the list of uploaded transactions according to the selected check
boxes.
Reset
Resets the filter check boxes to the default selection (all checked).
Submit
This button is only active if at least one record is selected.
Clicking the Submit button submits a request to import the selected
transactions.
Cancel
Cancels the upload and closes the overlay window.
4.25
Upload Internal Position Transfer
4.25.1
Description
The Upload Internal Position Transfer window can be accessed from the File Upload menu in the
main menu. It allows to transfer multiple positions at once by uploading a file in CSV format.
Derivatives Clearing GUI – User Manual
Page 94
Eurex Clearing C7 – Derivatives Clearing GUI 3.0
As of December 1, 2015
Version 3.2
Window layouts and descriptions
Upload Internal Position Transfer window
4.25.2
Functionality
Clicking the Browse button opens a selection window to import a file into the system. The
uploaded file must contain the transfer parameters as a list of comma separated values. Each
line represents one position transfer and must follow a certain pattern:
“FromAccountSponsor”, “FromAccountOwner”, “FromAccountName”, “CallPut”, “ProductSymbol”,
“FlipID”, “Maturity”, “ExpirationDate”, “Strike”, “Version”, “SettlMethod”, “ExerStyle”,
“LongQty”, “ShortQty”, “ToAccountName”, “SourceText1”, “SourceText2”, “SourceText3”,
“TargetText1”, “TargetText2”, “TargetText3”
Sample transfer upload file:
“FromAccountSponsor”, “FromAccountOwner”, “FromAccountName”, “CallPut”, “ProductSymbol”,
“FlipID”, “Maturity”, “ExpirationDate”, “Strike”, “Version”, “SettlMethod”, “ExerStyle”,
“LongQty”, “ShortQty”, “ToAccountName”, “SourceText1”, “SourceText2”, “SourceText3”,
“TargetText1”, “TargetText2”, “TargetText3”
“GCMFR”, “NCMFR”, “A1”, “C”, “SBVN”, “”, “MAR14”, “”, “475.000000”, “0”, “”, “”, “10”,
“20”, “A2”, “SourceText1”, “SourceText2”, “SourceText3”, “TargetText1”, “TargetText2”,
“TargetText3”
“GCMFR”, “NCMFR”, “A1”, “”, “FIAF”, “FIA2”, “”, “2015-01-17”, “”, “”, “P”, “”, “15”, “”,
“A2”, “SourceText1”, “SourceText2”, “SourceText3”, “TargetText1”, “TargetText2”,
“TargetText3”
If the file does not comply with this format, an error message is displayed. Upon successful
upload, the content of the file is displayed in the table. All the entered values are checked for
valid syntax. Fields with invalid input are specially highlighted. In that case, an error message is
displayed by hovering the mouse over the icon next to the erroneous field.
If all entry fields for one record are filled with valid data, the status of that row is “VALID”. Only
records with this status can be selected for import into the system.
Clicking the Submit button imports the selected records into the system. The Upload Internal
Position Transfer window is updated to display the new status of the uploaded records. If the
import was successful the status is changed to “PROCESSED”.
In case of a failed import attempt, the Status Information field gives further explanations on the
failure reason and an error message is displayed in the message log.
Derivatives Clearing GUI – User Manual
Page 95
Eurex Clearing C7 – Derivatives Clearing GUI 3.0
As of December 1, 2015
Version 3.2
Window layouts and descriptions
4.25.3
Screen elements
Upload Internal Position Transfer - Filter criteria
Filter
Description
INVALID
If this check box is selected, the list of position transfer transactions parsed
from the uploaded file contains all records with status “INVALID”.
VALID
If this check box is selected, the list of position transfer transactions parsed
from the uploaded file contains all records with status “VALID”.
PROCESSED
If this check box is selected, the list of position transfer transactions parsed
from the uploaded file contains all records with status “PROCESSED”.
REJECTED
If this check box is selected, the list of position transfer transactions parsed
from the uploaded file contains all records with status “REJECTED”.
Upload Internal Position Transfer - Fields
Field
Description
Clg Mbr
Displays the information parsed from the uploaded file. This field can be
edited before submission.
NCM/RC
Displays the information parsed from the uploaded file. This field can be
edited before submission.
Account Name
Displays the information parsed from the uploaded file. This field can be
edited before submission.
C/P
Displays the information parsed from the uploaded file. This field can be
edited before submission.
Product
Displays the information parsed from the uploaded file. This field can be
edited before submission.
Flex Contract ID
Displays the information parsed from the uploaded file. This field can be
edited before submission.
Maturity
Displays the information parsed from the uploaded file. This field can be
edited before submission.
Expiration
Displays the information parsed from the uploaded file. This field can be
edited before submission.
Strike
Displays the information parsed from the uploaded file. This field can be
edited before submission.
Version
Displays the information parsed from the uploaded file. This field can be
edited before submission.
Settlement
Method
Displays the information parsed from the uploaded file. This field can be
edited before submission.
Exercise Style
Displays the information parsed from the uploaded file. This field can be
edited before submission.
Long Qty
Displays the information parsed from the uploaded file. This field can be
edited before submission.
Short Qty
Displays the information parsed from the uploaded file. This field can be
edited before submission.
Derivatives Clearing GUI – User Manual
Page 96
Eurex Clearing C7 – Derivatives Clearing GUI 3.0
As of December 1, 2015
Version 3.2
Window layouts and descriptions
Upload Internal Position Transfer - Fields
Field
Description
To Account Name Displays the information parsed from the uploaded file. This field can be
edited before submission.
Text 1
Displays the information parsed from the uploaded file. This field can be
edited before submission.
Text 2
Displays the information parsed from the uploaded file. This field can be
edited before submission.
Text 3
Displays the information parsed from the uploaded file. This field can be
edited before submission.
Destination Text 1 Displays the information parsed from the uploaded file. This field can be
edited before submission.
Destination Text 2 Displays the information parsed from the uploaded file. This field can be
edited before submission.
Destination Text 3 Displays the information parsed from the uploaded file. This field can be
edited before submission.
Status
Displays the import status of each position transfer. Only transactions
marked “VALID” can be selected for import.
Status Information After submitting the selected position transfer transactions to be imported
into the system, this field displays further information on the upload status of
each transaction.
Upload Internal Position Transfer - Buttons
Button
Description
Browse
Opens the file selection window to choose the file to be uploaded.
Filter
Filters the list of uploaded transactions according to the selected check
boxes.
Reset
Resets the filter check boxes to the default selection (all checked).
Submit
This button is only active if at least one record is selected.
Clicking the Submit button submits a request to import the selected
transactions.
Cancel
Cancels the upload and closes the overlay window.
4.26
Upload External Position Transfer
4.26.1
Description
The Upload External Position Transfer window can be accessed from the File Upload menu in
the main menu. It allows to transfer multiple positions at once by uploading a file in CSV format.
Derivatives Clearing GUI – User Manual
Page 97
Eurex Clearing C7 – Derivatives Clearing GUI 3.0
As of December 1, 2015
Version 3.2
Window layouts and descriptions
Upload External Position Transfer window
4.26.2
Functionality
Clicking the Browse button opens a selection window to import a file into the system. The
uploaded file must contain the transfer parameters as a list of comma separated values. Each
line represents one position transfer and must follow a certain pattern:
“FromAccountSponsor”, “FromAccountOwner”, “FromAccountName”, “CallPut”, “ProductSymbol”,
“FlipID”, “Maturity”, “ExpirationDate”, “Strike”, “Version”, “SettlMethod”, “ExerStyle”,
“LongQty”, “ShortQty”, “ToAccountOwner”, “ToAccountName”, “Text1”, “Text2”, “Text3”,
“RefText1”, “RefText2”, “RefText3”, “TransferDirection”, “CashTransferAmount”,
“CashAdjustmentPrice”
Sample transfer upload file:
“FromAccountSponsor”, “FromAccountOwner”, “FromAccountName”, “CallPut”, “ProductSymbol”,
“FlipID”, “Maturity”, “ExpirationDate”, “Strike”, “Version”, “SettlMethod”, “ExerStyle”,
“LongQty”, “ShortQty”, “ToAccountOwner”, “ToAccountName”, “Text1”, “Text2”, “Text3”,
“RefText1”, “RefText2”, “RefText3”, “TransferDirection”, “CashTransferAmount”,
“CashAdjustmentPrice”
“GCMFR”, “NCMFR”, “A1”, “C”, “SBVN”, “”, “MAR14”, “”, “475.000000”, “0”, “”, “”, “10”,
“20”, “TSTFR”, “A2”, “Text1”, “Text2”, “Text3”, “RefText1”, “RefText2”, “RefText3”, “S”,
“5”, “”
“GCMFR”, “NCMFR”, “A1”, “”, “FIAF”, “FIA2”, “”, “2015-01-17”, “”, “”, “P”, “”, “15”, “”,
“TSTFR”, “A2”, “Text1”, “Text2”, “Text3”, “RefText1”, “RefText2”, “RefText3”, “”, “”, “”
If the file does not comply with this format, an error message is displayed. Upon successful
upload, the content of the file is displayed in the table. All the entered values are checked for
valid syntax. Fields with invalid input are specially highlighted. In that case, an error message is
displayed by hovering the mouse over the icon next to the erroneous field.
If all entry fields for one record are filled with valid data, the status of that row is “VALID”. Only
records with this status can be selected for import into the system.
Clicking the Submit button imports the selected records into the system. The Upload External
Position Transfer window is updated to display the new status of the uploaded records. If the
import was successful the status is changed to “PROCESSED”.
In case of a failed import attempt, the Status Information field gives further explanations on the
failure reason and an error message is displayed in the message log.
Derivatives Clearing GUI – User Manual
Page 98
Eurex Clearing C7 – Derivatives Clearing GUI 3.0
As of December 1, 2015
Version 3.2
Window layouts and descriptions
4.26.3
Screen elements
Upload External Position Transfer - Filter criteria
Filter
Description
INVALID
If this check box is selected, the list of position transfer transactions parsed
from the uploaded file contains all records with status “INVALID”.
VALID
If this check box is selected, the list of position transfer transactions parsed
from the uploaded file contains all records with status “VALID”.
PROCESSED
If this check box is selected, the list of position transfer transactions parsed
from the uploaded file contains all records with status “PROCESSED”.
REJECTED
If this check box is selected, the list of position transfer transactions parsed
from the uploaded file contains all records with status “REJECTED”.
Upload External Position Transfer - Fields
Field
Description
From Account
Sponsor
Displays the information parsed from the uploaded file. This field can be
edited before submission.
From Account
Owner
Displays the information parsed from the uploaded file. This field can be
edited before submission.
From Account
Name
Displays the information parsed from the uploaded file. This field can be
edited before submission.
C/P
Displays the information parsed from the uploaded file. This field can be
edited before submission.
Product
Displays the information parsed from the uploaded file. This field can be
edited before submission.
Flex Contract ID
Displays the information parsed from the uploaded file. This field can be
edited before submission.
Maturity
Displays the information parsed from the uploaded file. This field can be
edited before submission.
Expiration
Displays the information parsed from the uploaded file. This field can be
edited before submission.
Strike
Displays the information parsed from the uploaded file. This field can be
edited before submission.
Version
Displays the information parsed from the uploaded file. This field can be
edited before submission.
Settlement
Method
Displays the information parsed from the uploaded file. This field can be
edited before submission.
Exercise Style
Displays the information parsed from the uploaded file. This field can be
edited before submission.
Long Qty
Displays the information parsed from the uploaded file. This field can be
edited before submission.
Short Qty
Displays the information parsed from the uploaded file. This field can be
edited before submission.
Derivatives Clearing GUI – User Manual
Page 99
Eurex Clearing C7 – Derivatives Clearing GUI 3.0
As of December 1, 2015
Version 3.2
Window layouts and descriptions
Upload External Position Transfer - Fields
Field
Description
To Account
Owner
Displays the information parsed from the uploaded file. This field can be
edited before submission.
To Account Name Displays the information parsed from the uploaded file. This field can be
edited before submission.
Text 1
Displays the information parsed from the uploaded file. This field can be
edited before submission.
Text 2
Displays the information parsed from the uploaded file. This field can be
edited before submission.
Text 3
Displays the information parsed from the uploaded file. This field can be
edited before submission.
Ref Text 1
Displays the information parsed from the uploaded file. This field can be
edited before submission.
Ref Text 2
Displays the information parsed from the uploaded file. This field can be
edited before submission.
Ref Text 3
Displays the information parsed from the uploaded file. This field can be
edited before submission.
Transfer Direction Displays the information parsed from the uploaded file. This field can be
edited before submission.
Cash Transfer
Amount
Displays the information parsed from the uploaded file. This field can be
edited before submission.
Cash Adjustment Displays the information parsed from the uploaded file. This field can be
Price
edited before submission.
Status
Displays the import status of each position transfer. Only transactions
marked “VALID” can be selected for import.
Status Information After submitting the selected position transfer transactions to be imported
into the system, this field displays further information on the upload status of
each transaction.
Upload External Position Transfer - Buttons
Button
Description
Browse
Opens the file selection window to choose the file to be uploaded.
Filter
Filters the list of uploaded transactions according to the selected check
boxes.
Reset
Resets the filter check boxes to the default selection (all checked).
Submit
This button is only active if at least one record is selected.
Clicking the Submit button submits a request to import the selected
transactions.
Cancel
Cancels the upload and closes the overlay window.
Derivatives Clearing GUI – User Manual
Page 100
Eurex Clearing C7 – Derivatives Clearing GUI 3.0
As of December 1, 2015
Version 3.2
Window layouts and descriptions
4.27
Upload ITM Configurations
4.27.1
Description
The Upload ITM Configurations window can be accessed from the File Upload menu in the main
menu. It allows to add ITM configurations for multiple product/account combinations at once by
uploading a file in CSV format.
Upload ITM Configuration window
4.27.2
Functionality
Clicking the Browse button opens a selection window to import a file into the system. The
uploaded file must contain the configuration parameters as a list of comma separated values.
Each line represents one product/account combination and must follow a certain pattern:
“AccountSponsor”, “AccountOwner”, “AccountName”, “Product”, “MinItmAmount”
Sample ITM Config upload file:
“AccountSponsor”, “AccountOwner”, “AccountName”, “Product”, “MinItmAmount”
“GCMFR”, “NCMFR”, “A1”, “SBVN”, “0.50”
If the file does not comply with this format, an error message is displayed. Upon successful
upload, the content of the file is displayed in the table. All the entered values are checked for
valid syntax. Fields with invalid input are specially highlighted. In that case, an error message is
displayed by hovering the mouse over the icon next to the erroneous field.
If all entry fields for one product/account combination are filled with valid data, the status of that
row is “VALID”. Only configurations with this status can be selected for import into the system.
Clicking the Submit button imports the selected records into the system. The Upload ITM
Configurations window is updated to display the new status of the uploaded records. If the import
was successful the status is changed to “PROCESSED”.
In case of a failed import attempt, the Status Information field gives further explanations on the
failure reason and an error message is displayed in the message log.
Derivatives Clearing GUI – User Manual
Page 101
Eurex Clearing C7 – Derivatives Clearing GUI 3.0
As of December 1, 2015
Version 3.2
Window layouts and descriptions
4.27.3
Screen elements
Upload ITM Configuration - Filter criteria
Filter
Description
VALID
If this check box is selected, the list of configurations parsed from the
uploaded file contains all records with status “VALID”.
INVALID
If this check box is selected, the list of configurations parsed from the
uploaded file contains all records with status “INVALID”.
UPDATED
If this check box is selected, the list of configurations parsed from the
uploaded file contains all records with status “UPDATED”.
ADDED
If this check box is selected, the list of configurations parsed from the
uploaded file contains all records with status “ADDED”.
NONE
If this check box is selected, the list of configurations parsed from the
uploaded file contains all records with status “NONE”.
Upload ITM Configuration - Fields
Field
Description
Clg Mbr
Displays the information parsed from the uploaded file. This field can be
edited before submission.
NCM/RC
Displays the information parsed from the uploaded file. This field can be
edited before submission.
Account Name
Displays the information parsed from the uploaded file. This field can be
edited before submission.
Product
Displays the information parsed from the uploaded file. This field can be
edited before submission.
Min ITM Amount
Displays the information parsed from the uploaded file. This field can be
edited before submission.
Status
Displays the import status of each product/account combination. Only
configurations marked “VALID” can be selected for import.
Status Information After submitting the selected configurations to be imported into the system,
this field displays further information on the upload status of each
configuration.
Upload ITM Configuration - Buttons
Button
Description
Browse
Opens the file selection window to choose the file to be uploaded.
Filter
Filters the list of uploaded configurations according to the selected check
boxes.
Derivatives Clearing GUI – User Manual
Page 102
Eurex Clearing C7 – Derivatives Clearing GUI 3.0
As of December 1, 2015
Version 3.2
Window layouts and descriptions
Upload ITM Configuration - Buttons
Button
Description
Reset
Resets the filter check boxes to the default selection (all checked).
Submit
This button is only active if at least one record is selected.
Clicking the Submit button submits a request to import the selected
configurations.
Cancel
Cancels the upload and closes the overlay window.
4.28
User Entitlement Maintenance
4.28.1
Description
The User Entitlement Maintenance window can be accessed from the Participant Management
menu in the main menu. It allows to assign and de-assign user roles and to modify user
privileges.
User Entitlement Maintenance window
4.28.2
Functionality
The list of users is populated based on the filter criteria. One of these users can be selected via a
check box. Each of the users with a pending Four Eye request has a button called Pending Four
Eye Request in the Pending Request column. Clicking on this button opens a window showing
the pending Four Eye request related to entitlement maintenance for this user. Based on the type
of activity pending, the corresponding detail window is opened.
Derivatives Clearing GUI – User Manual
Page 103
Eurex Clearing C7 – Derivatives Clearing GUI 3.0
As of December 1, 2015
Version 3.2
Window layouts and descriptions
Role Assignment
The Role Assignment button is only active if exactly one user has been selected from the display
table. Clicking the button opens the (De-)Assign User Role window where the user can assign
and de-assign roles to the selected user.
Modify Privileges
The Modify Privileges button is only active if exactly one user has been selected from the display
table. Clicking the button opens the Modify User Privileges window where the user can modify
the entitlement settings of the various privileges assigned to the user.
Copy Entitlement Settings
The User Entitlement Maintenance window allows to copy all entitlement settings from one user
to one or more other users. If exactly one user without pending Four Eye request is selected from
the display table, the Copy From... button is active. Clicking this button saves the selected user
as the source user for the copy function.
Then, one or more other users can be selected from the display table as target users for the copy
function. Only users without a pending Four Eye request can be target users. If this is done, the
Paste To... button becomes active. If this button is clicked, all role assignments and entitlement
settings are copied from the source user to the target user(s). Existing settings are overwritten.
If this process is interrupted by using any other function on the User Entitlement Maintenance
window (e.g. inquiry), the copy function is cancelled and has to be started at the beginning by
selecting a source user again.
4.28.3
Screen elements
User Entitlement Maintenance - Filter criteria
Filter
Description
Participant
Filter for a certain participant. This field is pre-filled with the Member ID of
the logged-in user.
User
Filter for a certain user.
Role
Filter for a certain role.
All users w/o
assigned role
Filter for all users who don’t have any roles assigned.
User Entitlement Maintenance - Buttons
Button
Description
Role Assignment This button is only active if exactly one user has been selected from the
display table. Clicking this button opens the (De-)Assign User Role window
where the user can assign and de-assign roles.
Modify Privileges This button is only active if exactly one user has been selected from the
display table. Clicking the button opens the Modify User Privileges window
where the user can modify entitlement settings.
Derivatives Clearing GUI – User Manual
Page 104
Eurex Clearing C7 – Derivatives Clearing GUI 3.0
As of December 1, 2015
Version 3.2
Window layouts and descriptions
User Entitlement Maintenance - Buttons
Button
Description
Copy From...
This button is only active if exactly one user has been selected from the
display table. Clicking the button saves the selected user as the source user
for the copy function.
Paste To...
This button is only active after a source user has been saved by clicking the
Copy From... button and one or more other users are selected as target
users. Clicking this button, copies all role assignments and entitlement
settings from the source user to the target user(s).
Four-Eye Request This button is only active if a Four Eye request is pending for a user. Clicking
the button opens the respective approval window.
User Entitlement Maintenance - Table columns
Column
Description
User
Member ID of the user.
Qualified Clearer
Qualified Clearer indicator.
Last Modifier
User ID of the last modifier.
Last Modified
Date and Time
Date and time of the last modification.
Pending Request Contains a button to open a Four Eye approval window if a request is
pending.
4.29
(De-)Assign User Role
4.29.1
Description
The (De-)Assign User Role window can be accessed via the Role Assignment button on the User
Entitlement Maintenance window. This window allows to assign and de-assign roles to a user.
Derivatives Clearing GUI – User Manual
Page 105
Eurex Clearing C7 – Derivatives Clearing GUI 3.0
As of December 1, 2015
Version 3.2
Window layouts and descriptions
(De-)Assign User Role window
4.29.2
Functionality
When the window is opened, the list of Assigned Roles contains all roles that are currently
assigned to the selected user. The list of Available Roles contains all the roles that can be
assigned to this user.
Below the role lists, there is a section to display the entitlement settings of the selected roles. It is
filled by clicking the Entitlement Details button. This button is only active if at least one role from
the Assigned Roles list is selected.
If already assigned roles are selected, clicking the Entitlement Details button populates the
display table with the current entitlement settings of privileges contained in the selected roles. If
newly assigned roles are selected, clicking the Entitlement Details button populates the display
table with the default entitlement settings of privileges contained in the selected roles. The button
is disabled if a combination of already assigned and newly assigned roles are selected. The
newly assigned roles are highlighted in the Assigned Roles list.
Custom Entitlement Levels
In the table of entitlement details, the entitlement level as well as the effective account range can
be changed for each privilege. The entitlement level can be changed by selecting a value from
the Level dropdown list. The selected value must not exceed the maximum level assignable for
the privilege.
Custom entitlement settings for a privilege can be limited to an account. Therefore, the Act
Range field must be filled with the account name for which the setting should be effective. For all
accounts outside the specified account range, the default entitlement level of the respective
privilege applies. To apply the level to all accounts of the user, “ALL” must be entered into the Act
Range field. This is the default setting.
Derivatives Clearing GUI – User Manual
Page 106
Eurex Clearing C7 – Derivatives Clearing GUI 3.0
As of December 1, 2015
Version 3.2
Window layouts and descriptions
Download Entitlement Settings
The (De-)Assign User Role window allows to download the current entitlement profile of the
selected user. Clicking the Download button saves the complete entitlement profile of the user in
CSV format. It includes the role assignments and all entitlement settings.
Upload Entitlement Settings
Previously downloaded entitlement settings can be uploaded for a different user. The file
selection button is only active if the Assigned Roles list is empty when the (De-)Assign User Role
window is opened.
Clicking the Browse button opens a selection window to import a file into the system. After
successful upload, the Assigned Roles list is updated based on the file content. Entitlement
details contained in the file can be viewed by clicking the Entitlement Details button.
The uploaded settings can be modified before they are finally applied.
After successfully submitting the changes by clicking the Submit button, the (De-)Assign User
Role window is closed automatically. If an error occurs, a message is displayed in the message
log.
4.29.3
Screen elements
(De-)Assign User Role - Buttons
Button
Description
Download
Downloads the current entitlement profile in CSV format.
Browse
Opens the file selection window to choose the file to be uploaded.
Entitlement
Details
This button is only active if at least one role from the Assigned Roles list is
selected. Clicking the button populates the display table with the entitlement
settings of the selected roles.
Submit
This button is only active if any role assignment was changed. Clicking the
Submit button submits a request to change the role assignments and closes
the overlay window.
Cancel
Cancels the adjustment without any changes and closes the overlay window.
(De-)Assign User Role - Table columns
Column
Description
Privilege ID
Privilege identifier.
Privilege
Description
Description of the privilege.
Privilege Type
Type of the privilege.
Level
Entitlement level assigned to the privilege.
Max Level
Maximum entitlement level that can be assigned to the privilege.
Act Range
Account range or individual account name for which the privilege is effective.
Derivatives Clearing GUI – User Manual
Page 107
Eurex Clearing C7 – Derivatives Clearing GUI 3.0
As of December 1, 2015
Version 3.2
Window layouts and descriptions
4.30
Modify User Privileges
4.30.1
Description
The Modify User Privileges window can be accessed via the Modify Privileges button on the User
Entitlement Maintenance window. It allows the user to modify the entitlement settings of other
users. This window lists all privileges assigned to the user via the various roles. Own privileges of
the logged-in user can only be viewed, but not modified.
Modify User Privileges window
4.30.2
Functionality
The Modify User Privileges window allows to change the entitlement levels as well as the
account range for every privilege that is assigned to the user via the various roles. The level
cannot exceed the maximum possible entitlement level based on the assigned roles.
Add Privilege Configurations
A privilege can be configured differently for multiple accounts. Therefore, a new privilege
configuration has to be added. If exactly one existing configuration is selected, the Add Using
button is activated. Clicking this button creates an additional entry for the selected privilege. In
this entry, an entitlement level and an account range can be specified. Both fields are mandatory
and the Submit button is only active if they are filled.
Delete Privilege Configurations
The Delete button is activated if one or more privilege configurations are selected. Clicking the
button marks the selected entries for deletion. The last entry for a privilege cannot be deleted.
That’s why the Delete button is disabled if the last entry of a privilege is selected.
Derivatives Clearing GUI – User Manual
Page 108
Eurex Clearing C7 – Derivatives Clearing GUI 3.0
As of December 1, 2015
Version 3.2
Window layouts and descriptions
4.30.3
Screen elements
Modify User Privileges - Buttons
Button
Description
Add Using
This button is only active if exactly one privilege configuration has been
selected from the display table. Clicking this button adds a new entry for the
selected privilege.
Delete
Clicking this button removes the selected privilege configurations. It is
deactivated if the last entry for a privilege has been selected.
Submit
This button is only active if any privilege configuration was added, changed
or deleted. Clicking the Submit button submits a request to apply all the
changes and closes the overlay window.
Cancel
Cancels the adjustment without any changes and closes the overlay window.
Modify User Privileges - Table columns
Column
Description
Privilege ID
Privilege identifier.
Privilege
Description
Description of the privilege.
Privilege Type
Type of the privilege.
Level
Entitlement level assigned to the privilege.
Max Level
Maximum entitlement level that can be assigned to the privilege.
Act Range
Account range or individual account name for which the privilege is effective.
4.31
Four Eye Principle - Entitlement
4.31.1
Description
The Four Eye Principle - Entitlement window can be accessed from the Participant Maintenance
menu in the main menu. It displays an overview of all pending Four Eye principle requests.
Derivatives Clearing GUI – User Manual
Page 109
Eurex Clearing C7 – Derivatives Clearing GUI 3.0
As of December 1, 2015
Version 3.2
Window layouts and descriptions
Four Eye Principle - Entitlement window
4.31.2
Functionality
The Initiating Participant filter is prefilled with the user’s participant ID and the pending requests
are inquired automatically when the window is opened.
If exactly one of the requests has been selected from the display table, the Details button
becomes active. Clicking this button opens the respective approval window to view the pending
changes and approve or reject them.
Depending on the type of the pending request, one of the following windows is opened:
Pending Request Type
Approval Window
Modify User Role Assignment
(De-)Assign User Role - Approve
Modify User Entitlement
Modify User Privileges - Approve
Copy User Entitlements
(De-)Assign User Role - Approve Copy
Derivatives Clearing GUI – User Manual
Page 110
Eurex Clearing C7 – Derivatives Clearing GUI 3.0
As of December 1, 2015
Version 3.2
Window layouts and descriptions
4.31.3
Screen elements
Four Eye Principle - Entitlement - Filter criteria
Filter
Description
Initiating
Participant
This filter is prefilled with the participant ID of the logged-in user.
Four Eye Principle - Entitlement - Buttons
Button
Description
Details
This button is only active if exactly one user has been selected from the
display table. Clicking this button, opens the respective approval window to
view the pending changes and approve or reject them.
Four Eye Principle - Entitlement - Table columns
Column
Description
Initiating
Participant
Member ID of the initiating participant.
Initiating User
User name of the initiating user.
Affected
Participant
Member ID of the affected participant.
Affected User
User name of the affected user.
Action Type
Type of pending Four Eye request.
Timestamp
Time when the change was submitted which triggered the Four Eye request.
4EP Indicator
Unique ID for the pending Four Eye request.
4.32
(De-)Assign User Role - Approve
4.32.1
Description
The (De-)Assign User Role - Approve window is accessed via the Details button on the Four Eye
Principle - Entitlement window or via the Pending Four-Eye Request buttons on the overview
windows. It allows to approve or reject pending user role assignments.
Derivatives Clearing GUI – User Manual
Page 111
Eurex Clearing C7 – Derivatives Clearing GUI 3.0
As of December 1, 2015
Version 3.2
Window layouts and descriptions
(De-)Assign User Role - Approve window
4.32.2
Functionality
The (De-)Assign User Role - Approve window lists all roles that are supposed to be assigned to
or de-assigned from a user. These role (de-)assignments require the approval of a second user
to be processed. In this window, the second user can approve or reject the changes by clicking
either the Approve or the Reject button.
Below the roles that are supposed to be (de-)assigned, a list of entitlement details shows which
privileges are contained in the roles to be assigned.
4.32.3
Screen elements
(De-)Assign User Role - Approve - Buttons
Button
Description
Approve
Clicking this button approves the pending Four Eye request.
Reject
Clicking this button rejects the pending Four Eye request.
Cancel
Closes the overlay window without any change.
(De-)Assign User Role - Approve - Table columns
Column
Description
Privilege ID
Privilege identifier.
Privilege
Description
Description of the privilege.
Privilege Type
Type of the privilege.
Derivatives Clearing GUI – User Manual
Page 112
Eurex Clearing C7 – Derivatives Clearing GUI 3.0
As of December 1, 2015
Version 3.2
Window layouts and descriptions
(De-)Assign User Role - Approve - Table columns
Column
Description
Level
Entitlement level assigned to the privilege.
Max Level
Maximum entitlement level that can be assigned to the privilege.
Act Range
Account range or individual account name for which the privilege is effective.
4.33
Modify User Privileges - Approve
4.33.1
Description
The Modify User Privileges - Approve window is accessed via the Details button on the Four Eye
Principle - Entitlement window or via the Pending Four-Eye Request buttons on the overview
windows. It allows to approve or reject pending changes to user privileges.
Modify User Privileges - Approve window
4.33.2
Functionality
The Modify User Privileges - Approve window lists all privileges that are supposed to be changed
for a user. These modifications require the approval of a second user to be processed. In this
window, the second user can approve or reject the changes by clicking either the Approve or the
Reject button.
Derivatives Clearing GUI – User Manual
Page 113
Eurex Clearing C7 – Derivatives Clearing GUI 3.0
As of December 1, 2015
Version 3.2
Window layouts and descriptions
4.33.3
Screen elements
Modify User Privileges - Approve - Buttons
Button
Description
Approve
Clicking this button approves the pending Four Eye request.
Reject
Clicking this button rejects the pending Four Eye request.
Cancel
Closes the overlay window without any change.
Modify User Privileges - Approve - Table columns
Column
Description
Privilege ID
Privilege identifier.
Privilege
Description
Description of the privilege.
Privilege Type
Type of the privilege.
Level
Entitlement level assigned to the privilege.
Max Level
Maximum entitlement level that can be assigned to the privilege.
Act Range
Account range or individual account name for which the privilege is effective.
4.34
(De-)Assign User Role - Approve Copy
4.34.1
Description
The (De-)Assign User Role - Approve Copy window is accessed via the Details button on the
Four Eye Principle - Entitlement window or via the Pending Four-Eye Request buttons on the
overview windows. It allows to approve or reject pending user role assignments which were
initiated via the “Copy Entitlement Settings” function.
Derivatives Clearing GUI – User Manual
Page 114
Eurex Clearing C7 – Derivatives Clearing GUI 3.0
As of December 1, 2015
Version 3.2
Window layouts and descriptions
(De-)Assign User Role - Approve Copy window
4.34.2
Functionality
The (De-)Assign User Role - Approve Copy window lists all roles that are supposed to be
assigned to a user via the “Copy Entitlement Settings” function. These role assignments require
the approval of a second user to be processed. In this window, the second user can approve or
reject the changes by clicking either the Approve or the Reject button.
Below the roles that are supposed to be assigned, a list of entitlement details shows which
privileges are contained in the roles to be assigned.
4.34.3
Screen elements
(De-)Assign User Role - Approve Copy - Buttons
Button
Description
Approve
Clicking this button approves the pending Four Eye request.
Reject
Clicking this button rejects the pending Four Eye request.
Cancel
Closes the overlay window without any change.
(De-)Assign User Role - Approve Copy - Table columns
Column
Description
Privilege ID
Privilege identifier.
Privilege
Description
Description of the privilege.
Privilege Type
Type of the privilege.
Derivatives Clearing GUI – User Manual
Page 115
Eurex Clearing C7 – Derivatives Clearing GUI 3.0
As of December 1, 2015
Version 3.2
Window layouts and descriptions
(De-)Assign User Role - Approve Copy - Table columns
Column
Description
Level
Entitlement level assigned to the privilege.
Max Level
Maximum entitlement level that can be assigned to the privilege.
Act Range
Account range or individual account name for which the privilege is effective.
4.35
Downloads
4.35.1
Description
The Downloads window can be accessed by clicking the Downloads link in the application
header. It displays the requested export files which are ready for download in a table.
Various meta information is provided for every export file, e.g. the time when the export has been
requested in CET format and the filter criteria which were applied for the display table contained
in the export.
Downloads window
4.35.2
Functionality
A click on the file name starts the download of an export file. After the download all export files
remain available in the download list until the user logs out of his session or removes the files
from the list manually.
Files which are not needed any longer can be removed from the download list by selecting the
respective files and clicking the Clear selected button. Alternatively, all files can be removed at
once by clicking the Clear all button.
Derivatives Clearing GUI – User Manual
Page 116
Eurex Clearing C7 – Derivatives Clearing GUI 3.0
As of December 1, 2015
Version 3.2
Window layouts and descriptions
4.35.3
Screen elements
Downloads - Buttons
Button
Description
Refresh
Reloads the list of requested exports which are ready for download.
Clear selected
Deletes the selected export files from the list. Hence, they cannot be
downloaded any longer.
Clear all
Deletes all export files from the list. Hence, they cannot be downloaded any
longer.
Cancel
Closes the overlay window.
4.36
Reset Password
4.36.1
Description
The Reset Password window can be accessed by clicking the Reset Password button in the
application header if the currently logged-in user is entitled to use this function. Otherwise, the
Reset Password button is not visible to the user.
The Reset Password window allows to change or reset the current password of the logged-in
user or on behalf of another user.
Reset Password window
4.36.2
Functionality
To reset the password for a user, the respective user ID has to be entered. There are two options
to set a new password: It can either be generated randomly or entered manually. If the Generate
Password check box is selected, the new password is displayed after clicking the Submit button.
Alternatively, this check box can be unchecked to enter a self chosen password. In this case, the
entered password is not displayed after clicking the Submit button. The entered password must
comply with the complexity requirements that are applicable to all new passwords. Please refer
to the description of the Change Password functionality for further details.
The reset password is valid immediately and can be used to login for 48 hours. If the reset
password is not used within this time frame, it expires and has to be reset again. During the first
login with the reset password, the user is requested to set a new personal password.
Derivatives Clearing GUI – User Manual
Page 117
Eurex Clearing C7 – Derivatives Clearing GUI 3.0
As of December 1, 2015
Version 3.2
Window layouts and descriptions
4.36.3
Screen elements
Reset Password - Fields
Field
Description
UserId
ID of the user whose password is supposed to be reset.
Generate
Password
If this check box is selected, a random password is generated and displayed
upon clicking the Submit button.
New Password
This field is active if the Generate Password check box is not selected. The
new password must comply with the complexity requirements.
Repeat New
Password
To prevent typos in the password, the new password must be entered a
second time.
Reset Password - Buttons
Button
Description
Submit
This button is only active if the Generate Password check box is selected or
if both the New Password and the Repeat New Password fields are filled.
Clicking the Submit button submits a request to reset the password for the
entered user.
Cancel
Closes the overlay window.
Derivatives Clearing GUI – User Manual
Page 118
Eurex Clearing C7 – Derivatives Clearing GUI 3.0
As of December 1, 2015
Version 3.2
Appendix
5
Appendix
5.1
Supported ASCII characters
Index
32
Character
33
34
35
36
37
38
39
40
41
42
43
44
45
46
47
!1
“
#
$
%
&
‘
(
)
*
+
,
-
.
/
Index
48
49
50
51
52
53
54
55
56
57
58
59
60
61
62
63
Character
0
1
2
3
4
5
6
7
8
9
:
;
<
=
>
?
Index
64
65
66
67
68
69
70
71
72
73
74
75
76
77
78
79
Character @
A
B
C
D
E
F
G
H
I
J
K
L
M
N
O
Index
80
81
82
83
84
85
86
87
88
89
90
91
92
93
94
95
Character
P
Q
R
S
T
U
V
W
X
Y
Z
[
\
]
^
_
Index
96
97
98
99 100 101 102 103 104 105 106 107 108 109 110 111
`
a
b
Character
Index
Character
c
d
e
f
g
h
i
j
k
l
m
n
o
112 113 114 115 116 117 118 119 120 121 122 123 124 125 126
p
q
r
s
t
u
v
w
x
y
z
{
|1
}
~
1.The exclamation mark ‘!’ (33) and the pipe ‘|’ (124) are not supported in text fields.
5.2
5.3
Supported keyboard short-cuts
Ctrl + C
Copy selected contents to the clipboard.
Ctrl + V
Paste the contents of the clipboard.
Ctrl + A
Select all elements from the element where the focus is currently, e.g. if
focus is in a text field all characters in the text field are selected.
Ctrl + P
Open print menu of browser.
Tab
Switch to next focusable element.
Glossary
API
The Application Programming Interface defines the communication between
different software components.
ATM
An option position is At-The-Money if its exercise price is equal to the price of
the underlying product.
CET
Central European Time.
CSV
A file in CSV (Comma-Separated Values) format contains different values
separated by a delimiter. Those files can be imported into and exported from
the system.
DCM
Direct Clearing Member.
GCM
General Clearing Member.
GUI
A Graphical User Interface is the application frontend that is presented to the
user to interact with the system.
ISIN
International Securities Identification Number.
ITM
An option position is In-The-Money if its intrinsic value is greater than zero.
Derivatives Clearing GUI – User Manual
Page 119
Eurex Clearing C7 – Derivatives Clearing GUI 3.0
As of December 1, 2015
Version 3.2
Appendix
NCM
A Non Clearing Member is an exchange participant that does not hold a
clearing license. Such a participant must have a clearing agreement in effect
with a General Clearing Member or a company-affiliated Direct Clearing
Member.
OTM
An option position is Out-of-The-Money if its intrinsic value is less than zero.
RAL
Various Resource Access Levels define access rights for certain functions.
RC
A Registered Customer is an individually segregated client of a Clearing
Member who has no access to the trading or clearing environment. The
respective GCM has to fulfill all necessary back-office functions.
XLS
XLS is the proprietary file format for Microsoft Excel spreadsheets.
ZCQ
The Zero Cost Quantity is the potential number of contracts that can be closed
out without late closing fees being charged.
Derivatives Clearing GUI – User Manual
Page 120