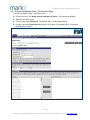
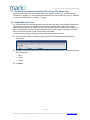
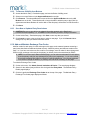
1
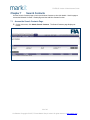
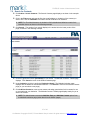
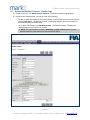
FIA Electronic Give-Up
Agreement System (EGUS)
Version 2
Administrator Guide
19 November 2007
FIA EGUS Version 2 Administrator Guide
Copyright
Unpublished work © 2007 Markit Group Limited
This work is an unpublished, copyrighted work and contains confidential information. Only authorized
users are permitted to access this work. Any unauthorized use, disclosure, reproduction or
dissemination, in full or in part, in any media or by any means, without the prior written permission of
Markit Group Limited will subject the unauthorized party to civil and criminal penalties.
Trademarks
Mark-it™, Markit, Markit Loans™, Markit RED™, and Markit Connex™ are trademarks of Markit
Group Limited. Other brands or product names are trademarks or registered trademarks of their
respective holders and should be treated as such.
Data Services Agreement and Use Restrictions
You are bound by the terms and conditions of the Data Services Agreement as agreed to by your
employer or its affiliate. In particular, access to the Markit website is limited to the number of
locations and to the number of users specifically set forth in such Data Services Agreement whether
such use is through physical transfer of a copy, electronic access through a wide area network of any
description, or by any other means whatsoever. The Markit system and website contain trade
secrets. Accordingly, you are expressly prohibited from (i) modifying, translating, reverse engineering,
or disassembling any of the information, services or data found on such system and website, or (ii)
creating derivative works based thereon, in each case, except as expressly permitted, if at all, by the
Data Services Agreement governing your use thereof. Unauthorized copying of the Markit website or
this user manual constitutes copyright infringement. Software piracy is theft.
To the extent anything in this user manual is inconsistent with or conflicts with the terms and
conditions of the applicable data services agreement or the terms of use, the terms and conditions of
the Data Services Agreement or the Terms of Use, as applicable, shall control.
Each user upon his initial accessing of the Markit website must agree and acknowledge as a
condition to his access thereto to be bound by the terms and conditions of the data services
agreement through which it was provided a username and password.
Limited Warranty and Disclaimer
Except for the express limited warranties set out in the applicable Data Services Agreement, Markit
makes, and the user and the client it is associated with receives, no warranties, express, implied,
statutory or allegedly extended in any communication with the user or the client it is associated with.
Markit specifically disclaims any implied warranty or merchantability or fitness for a particular
purpose. Markit does not warrant that the operation of the program or website, or use of this
publication shall be uninterrupted or error free. In no event shall Markit be liable for any damages,
including without limitation, direct damages, punitive or exemplary damages, damages arising from
loss of data, cost of cover, or other special, incidental, consequential or indirect damages of any
description arising out of the use or inability to use the Markit system or website or accompanying
documentation, however caused, and on any theory of liability.
This user guide may be updated or amended from time to time and at any time by Markit in its sole
and absolute discretion and without notice thereof. Markit is not responsible for informing any client
of, or providing any client with, any such update or amendment. Please regularly check the Markit
website to obtain the current version of this manual.
Any download or distribution of data from the Markit website is subject to restrictions on the use
thereof as set forth in the Data Services Agreement entered into between Markit and the client
institution through which you were provided a username and password. Access to the website is
expressly conditioned upon the compliance by each user with the restrictions, terms and conditions
set forth in its client institution Data Service Agreement. It is the responsibility of each user to be
familiar with the restrictions, terms and conditions contained in the Data Services Agreement.
2 of 42
Confidential. Copyright © 2007, FIA and Markit Group Limited. All rights reserved. www.markit.com
FIA EGUS Version 2 Administrator Guide
Table of Contents
Chapter 1 Overview ................................................................................................................................ 5
1.1 System Overview ............................................................................................................................. 5
1.2 Firm Administrator Functions ........................................................................................................... 5
1.3 FIA Administrator Functions............................................................................................................. 6
1.4 Markit Support Super User Functions.............................................................................................. 6
Chapter 2
Get Started & Site Map ......................................................................................................... 7
Chapter 3 Search Institutions................................................................................................................ 8
3.1 Access the Search Institutions & Parties Page................................................................................ 8
3.2 Search for Institutions ...................................................................................................................... 8
Chapter 4 Maintain Institution ............................................................................................................. 10
4.1 Access the Maintain Institution Page ............................................................................................. 10
4.2 Maintain Institution Details ............................................................................................................. 11
4.3 Save Institution Details................................................................................................................... 11
4.4 Shortcut: Add New Party for Institution .......................................................................................... 11
4.5 Shortcut: Add New Contact for Institution ...................................................................................... 12
4.6 Shortcut: View All Parties for Institution ......................................................................................... 12
4.7 Shortcut: View All Contacts for Institution ...................................................................................... 12
Chapter 5 Search Parties ..................................................................................................................... 13
5.1 Access the Search Parties Page ................................................................................................... 13
5.2 Search for Parties .......................................................................................................................... 13
Chapter 6 Add and Maintain Parties ................................................................................................... 14
6.1 Access the Maintain Party - Details Page...................................................................................... 15
6.2 Add and Maintain Party Details...................................................................................................... 16
6.2.1
Party Info (Institution, Party Name, Active / Inactive, & Primary Contact)....................... 16
6.2.2
Agreement Options.......................................................................................................... 17
6.2.3
Billing Details ................................................................................................................... 17
6.2.4
Documentation Contacts ................................................................................................. 18
6.2.5
Billing Contacts ................................................................................................................ 19
6.3 Save New or Updated Party Details .............................................................................................. 19
6.4 Shortcut: View All Contacts for a Party .......................................................................................... 20
6.5 Delete a Party ................................................................................................................................ 20
6.6 Access the Maintain Party - Permissions Page ............................................................................. 21
6.7 Set EGUS User Agreement Status & Party Type (FIA Admin Only) ............................................. 22
6.8 Enable Rate Data Feed.................................................................................................................. 22
6.9 Set Broker Visibility for Customer and Trader Parties Only........................................................... 23
6.9.1
To Add Visibility to Brokers.............................................................................................. 23
6.9.2
To Remove Visibility from Brokers .................................................................................. 24
6.9.3
Save New or Updated Party Permissions ....................................................................... 24
6.10 Add and Maintain Exchange Firm Codes ...................................................................................... 24
Chapter 7 Search Contacts.................................................................................................................. 26
7.1 Access the Search Contacts Page ................................................................................................ 26
7.2 Search for Contacts ....................................................................................................................... 27
Chapter 8 Add and Maintain Contacts (and Permission EGUS Users)........................................... 28
8.1 Access the Maintain Contacts - Details Page ................................................................................ 29
8.2 Add and Maintain Contact Details.................................................................................................. 30
8.2.1
Contact Info ..................................................................................................................... 30
8.2.2
Contact Account Locked.................................................................................................. 30
8.2.3
Contact Mailing Address.................................................................................................. 31
8.2.4
View Contact Username (i.e. Login ID) ........................................................................... 31
8.2.5
Save New or Updated Contact Details ............................................................................ 31
3 of 42
Confidential. Copyright © 2007, FIA and Markit Group Limited. All rights reserved. www.markit.com
FIA EGUS Version 2 Administrator Guide
8.3
8.4
8.5
8.6
8.7
8.8
Reset (Send / Display) Password .................................................................................................. 31
Unlock a Locked Account............................................................................................................... 32
Delete a Contact ............................................................................................................................ 32
Access the Maintain Contact - Permissions Page ......................................................................... 32
Assign a Contact as a Firm Administrator...................................................................................... 33
Assign Permissions (Roles) to a Contact for Parties ..................................................................... 34
8.8.1
Remove Permissions....................................................................................................... 35
8.8.2
Save New or Updated Contact Permissions ................................................................... 35
Chapter 9 FIA Administrator Only Functions .................................................................................... 36
9.1 Add New Institution ........................................................................................................................ 36
9.2 Change Institution Status (Make Active / Inactive) ........................................................................ 37
9.3 Manage Signed User Agreements for a Party ............................................................................... 37
9.4 Indicate Party Type (Broker, Customer, or Trader) ....................................................................... 38
9.5 Generate EGUS Billing Reports..................................................................................................... 39
9.5.1
Access the Billing Reports Page ..................................................................................... 39
9.5.2
Generate a Bill for Executed Agreements Report ........................................................... 39
9.5.3
Generate a Bill for Storage Report .................................................................................. 40
Chapter 10 Markit Support / Super User Only Functions ................................................................... 41
10.1 Resolve Connex - EGUS Username Issues .................................................................................. 41
10.1.1 Verify User’s Email Address / EGUS Username ............................................................. 41
10.2 Delete an Institution, Party, or Contact .......................................................................................... 41
Chapter 11 Contact Us & Help............................................................................................................... 42
4 of 42
Confidential. Copyright © 2007, FIA and Markit Group Limited. All rights reserved. www.markit.com
FIA EGUS Version 2 Administrator Guide
Chapter 1
Overview
Welcome to the FIA Electronic Give-Up Agreement System (EGUS). This section provides an
overview of the system and the primary functions for EGUS Administrators, including Firm, FIA, and
Super User Administrators).
1.1
System Overview
The Electronic Give-Up Agreement System or EGUS provides participating Futures Industry
institutions with the ability to electronically initiate, execute, and store executed Futures Industry
Association (FIA) uniform standard give-up agreements for their institutions. Only institutions who
have signed the FIA Tech User Agreement can use EGUS. The User Agreement, signed by
participating institutions on behalf of the underlying entities (parties), provides EGUS the ability for
electronic approvals to replace actually signing each agreement.
EGUS users can initiate an agreement, select from a list of standard agreements or copy an existing
agreement, or amend an existing agreement by creating a new version, and route the agreement to
the designated counterparties for review and approval. Users can monitor the progress of the
agreement as the counterparties review the agreement.
Each party has access to contact information for the counterparties on an agreement. Each party can
search the EGUS database for agreements on which they are a named counterparty.
1.2
Firm Administrator Functions
When a firm becomes an EGUS participant, the FIA adds the institution and relevant institution details
in EGUS. The EGUS Firm Administrator can perform the following functions for the Administrator
firm’s Institution, Parties, and Contacts:
•
Maintain Institution Details
•
Add New and Maintain Party Details
•
Add and Maintain Party Permissions (i.e. Broker Visibility for Customers and Traders &
Enable Rate Data Feed for External Systems)
•
Add and Maintain Party Exchange Firm Codes, including Primary Exchange Firm Code
•
Add New Contacts and Maintain Contact (i.e. System Users) Details
•
Send / View Temporary User Passwords
•
Unlock Locked User Accounts
•
Add and Maintain Contact Permissions / Roles (Reader, Processor, Approver, Maintain Rate
Schedules) & Alerts (Alert on Execution and Never Alert)
•
Manage Notification List of Contacts for Agreements using Contact Permissions page
 WARNING: Firm Administrators should not add new parties unless instructed to by the FIA.
Note that Markit Support Super Users can also perform these functions, and FIA Administrator can
perform a subset of these functions.
Instructions for how to perform these functions are provided in the EGUS online Admin Help and this
Administrator documentation.
5 of 42
Confidential. Copyright © 2007, FIA and Markit Group Limited. All rights reserved. www.markit.com
FIA EGUS Version 2 Administrator Guide
1.3
FIA Administrator Functions
FIA Administrators only can also perform the following functions:
•
Add New Institutions & Parties
•
Change Institution Status (Active or Inactive)
•
Indicate Signed User Agreement Received for a Party (Compliant and Non-Complaint
Parties)
•
Set Party Type (Customer, Trader, Broker)
•
Generate Billing Reports
Instructions for how to perform these functions are provided in the EGUS online Admin Help and this
Administrator documentation.
FIA Administrators can also add the initial party and user, i.e. the Institution Admin, for Institutions,
and access Admin pages to assist in troubleshooting issues and researching questions.
1.4
Markit Support Super User Functions
Super Users only can perform the following additional functions:
•
Resolve Username Issues and Reset Connex Passwords
•
Delete Unused Institutions, Parties, or Contacts
Instructions for how to perform these functions are provided in the EGUS online Admin Help and this
Administrator documentation.
Super Users can also perform the following functions as part of their EGUS support role:
•
Send / View Temporary User Passwords
•
Unlock Locked User Accounts
•
Access Admin pages to assist in troubleshooting issues and researching questions
•
Access Workflow pages (My Queue, View / Manage Agreement, etc.) to assist in
troubleshooting issues and researching questions
6 of 42
Confidential. Copyright © 2007, FIA and Markit Group Limited. All rights reserved. www.markit.com
FIA EGUS Version 2 Administrator Guide
Chapter 2
Get Started & Site Map
See the Get Started topic in the FIA EGUS User Guide for information about and instructions for
obtaining user accounts, logging in to EGUS, and using Connex with EGUS.
The following diagram provides a map or visual overview of the pages in EGUS.
7 of 42
Confidential. Copyright © 2007, FIA and Markit Group Limited. All rights reserved. www.markit.com
FIA EGUS Version 2 Administrator Guide
Chapter 3
Search Institutions
Use the Search Institutions & Parties page to look up and select Institutions to view their details.
From this page, you can access the Maintain Institution page by clicking on an Institution name (for
Firm and FIA Administrators) and the Add New Institution page by clicking on the Add Institution
button (for FIA Administrators only). You can also search for Parties and access the New Party option
(for FIA Administrators only) on this page (see Search Parties for details).
3.1
Access the Search Institutions & Parties Page
; On the main menu, click Admin, Search Institutions & Parties. The Search Institutions &
Parties page displays.
3.2
Search for Institutions
To use the Admin > Search Institutions & Parties page to search for institutions:
 NOTE: For Firm Administrators, the institution and parties for their firm display automatically
on this page, so no Institution search is necessary.
; Click in the Name field (see field outlined in hot pink at top left of example graphic below) and
enter the beginning of the name of the institution you want to find.
 TIP: Instead of searching by Party, you can search by Institution first and then click the
Parties icon to view all the parties for an institution.)
; The default Search for option is Institution, so it is only necessary to choose Institution if you
are switching from a Party search to an Institution search.
; Click Search. The results of your search display in the list below, as shown below outlined in hot
pink at bottom left.
; Click Reset to clear the page and perform a new search.
; Under the Institution column heading, click the hyperlinked [Institution Name]. The Maintain
Institution Details page displays. Click Cancel to return to the Search Institutions & Parties page
(or you can select a different page).
; Under a Contacts column heading, click the
icon for the institution or party for which you want
to view all contacts. The Search Contacts page displays. You can either enter no search criteria
and click Search, or you can refine your search by entering search criteria and then clicking
Search.
8 of 42
Confidential. Copyright © 2007, FIA and Markit Group Limited. All rights reserved. www.markit.com
FIA EGUS Version 2 Administrator Guide
The contact or contacts that match your search for the selected institution display in the results
list, as shown in the following example.
to return to the Search Institutions & Parties page. See the Search Contacts topic for
Click
details.
; Under the Parties column heading, click the
icon for the institution for which you want to view
all parties. The parties for the selected institution display in the Party list on the right side of the
page as shown in the following example.
 NOTE: For Firm Administrators, the parties for their institution display automatically.
; Click a party name to access the Maintain Party page for the selected party (see Add and
Maintain Parties). Click Cancel to return to the Search Institutions & Parties page or perform
additional maintenance on the Maintain Party page.
; Only for FIA Admins: Click New above the Institution table at left to create a new institution. The
New Institution page displays ready for you to add a new institution (see Maintain Institution).
; Click Add New Party above the Party table on the right to create a new party for the selected
institution. The New Party page displays ready for you to add a new party (see Add and Maintain
Parties).
 WARNING: Firm Administrators should not add new parties unless instructed to by the FIA.
9 of 42
Confidential. Copyright © 2007, FIA and Markit Group Limited. All rights reserved. www.markit.com
FIA EGUS Version 2 Administrator Guide
Chapter 4
Maintain Institution
Only an FIA Administrator can add a new institution. Once the FIA adds an institution and then adds
the initial party and the EGUS Firm Administrator for the institution, the institution’s Firm Administrator
can use the Maintain Institution function to update the institution’s main information in EGUS.
4.1
Access the Maintain Institution Page
; On the main menu, click Admin, Search Institutions & Parties. The Search Institutions &
Parties page displays.
; Search for the institution you want to maintain.
; Click the hyperlinked Institution [Name]. The Maintain Institution page displays as follows.
10 of 42
Confidential. Copyright © 2007, FIA and Markit Group Limited. All rights reserved. www.markit.com
FIA EGUS Version 2 Administrator Guide
4.2
Maintain Institution Details
For existing institutions where you are the Firm Administrator, you can update the following
information:
 NOTE: You can not update your institution name. Contact the FIA if you need to update your
institution name.
 HINT: Once you have entered data in a field, press Tab to move the cursor to the next field.
; Access the Maintain Institution page.
; Under Primary Contact, click the drop-down list and select the contact you want to be the
primary EGUS contact for your institution.
 NOTE: You must first have added the contact for the contact to display in this list. If no
contact displays or the contact you want does not display, save your data on this page, click
Add New Contact, add the new contact and save, return to the Maintain Institution page,
select the new contact as the Institution Primary Contact, and click Save.
; Type or validate the mailing address for your institution in the fields provided. A drop-down list of
valid country codes is provided.
; Click Save.
4.3
Save Institution Details
On the Maintain Institution page:
; Click Save to save the data you entered.
; Click Cancel to return to the previous page (or select a new page). If you click Cancel without
saving first, any data you entered is not saved.
4.4
Shortcut: Add New Party for Institution
The Maintain Institution page includes a shortcut button that allows you to add a new party from the
Maintain Institution page:
; Access the Maintain Institution page.
; Click Add New Party. The New Party page displays. See the Add and Maintain Parties topic for
details.
; When you are done, click Cancel to close the New Party page and return to the Maintain
Institution page.
 WARNING: Firm Administrators should not add new parties unless instructed to by the FIA.
11 of 42
Confidential. Copyright © 2007, FIA and Markit Group Limited. All rights reserved. www.markit.com
FIA EGUS Version 2 Administrator Guide
4.5
Shortcut: Add New Contact for Institution
A shortcut button allows you to add a new contact from the Maintain Institution page:
; Access the Maintain Institution page.
; Click Add New Contact. The New Contact page displays. See the Add and Maintain Contacts
(and Permission EGUS Users) topic for details.
; When you are done, click Cancel to close the New Contact page and return to the Maintain
Institution page.
4.6
Shortcut: View All Parties for Institution
A shortcut button allows you to view a list of all parties for the institution while on the Maintain
Institution page:
 NOTE: This institution must have at least one party added for this option to be valid.
; Access the Maintain Institution page.
; Click View All Parties The Search Institutions & Parties page displays with a list of all parties for
the current institution.
; Click Close to close the window and return to the Maintain Institution page.
4.7
Shortcut: View All Contacts for Institution
A shortcut button allows you to view a list of all contacts for the institution while on the Maintain
Institution page:
 NOTE: This institution must have at least contact added for this option to be valid.
; Access the Maintain Institution page.
; Click View All Contacts. The Party Details pop-up window opens with a list of all contacts for
the current institution.
; Click Close to close the window and return to the Maintain Institution page.
12 of 42
Confidential. Copyright © 2007, FIA and Markit Group Limited. All rights reserved. www.markit.com
FIA EGUS Version 2 Administrator Guide
Chapter 5
Search Parties
Use the Search Institutions & Parties page to look up and select Parties to view their details. Use this
page to access the Maintain Party - Details & Permissions page and the Add New Party function (for
FIA Administrators only).
5.1
Access the Search Parties Page
; On the main menu, click Admin, Search Institutions & Parties. The Search page displays.
5.2
Search for Parties
To use the Admin > Search Institutions & Parties page to search for parties:
 NOTE: For Firm Administrators, the institution and parties for their firm display automatically on
the Search Institutions & Parties page.
; In the Filters panel, click in the Name field (see field shown outlined in bright pink at left in
example graphic below) and enter the entire name or just the beginning of the name of the party
you want to find.
; Select the Party option in the Filters ‘Search for’ selection area. See option circled in bright pink
below.
; Click Search. The results of your search display in the Party list on the right side of the page, as
shown in the example below.
; Under the Party column heading, click a hyperlinked [Party Name]. The Maintain Party Details
page displays with the information for the selected party. Click Cancel to return to the Search
Institutions & Parties page.
; Click Add New Party. The Maintain Party Details page displays where you can add a new party
for an Institution if you are an FIA Administrator, for the selected institution.
 WARNING: Firm Administrators should not add new parties unless instructed to by the FIA.
13 of 42
Confidential. Copyright © 2007, FIA and Markit Group Limited. All rights reserved. www.markit.com
FIA EGUS Version 2 Administrator Guide
Chapter 6
Add and Maintain Parties
Use the Add New Party function and the Maintain Party - Details and Permissions pages to add new
parties and maintain existing parties for your institution. You maintain three main types of information
for EGUS parties:
 WARNING: Firm Administrators should not add new parties unless instructed to by the FIA.
Party Tab
Description
Details
- Party active / inactive status indicator
- Agreement workflow defaults, e.g. number of Approvers required for an
agreement for this party
- Party mailing address
- Party Contacts for documentation, billing, and attention
Permissions
- Party EGUS status and Party Type (set by FIA)
- Enable EGUS Rate Data Feed for external systems for the party
- Broker Visibility for Customer / Trader Party Types
Exchange Firm Codes
- Primary firm codes for exchanges for the party
- Alternate firm codes for exchanges for the party
- Used by external systems only and can be overridden for individual
agreements
14 of 42
Confidential. Copyright © 2007, FIA and Markit Group Limited. All rights reserved. www.markit.com
FIA EGUS Version 2 Administrator Guide
6.1
Access the Maintain Party - Details Page
To access the Maintain Party - Details page:
; On the main menu, click Admin, Search Institutions & Parties. The Search page displays.
; On the Search page, you can do either of the following:
•
To add or update information for an existing party, search for that party and then click the
desired [Party Name]. The Maintain Party - Details page displays with the information for the
selected party as shown in the following example graphic.
•
Or, to add a new party, click the Add New Party button above the Party list on the right side
of the page. The Maintain Party - Details page displays ready for you to add a new party.
 WARNING: Firm Administrators should not add new parties unless instructed to by the
FIA.
 NOTE: FIA Administrators access the add New Party and New Contact options from the
Maintain Institution page (rather than from the Search pages).
15 of 42
Confidential. Copyright © 2007, FIA and Markit Group Limited. All rights reserved. www.markit.com
FIA EGUS Version 2 Administrator Guide
6.2
Add and Maintain Party Details
On the Party - Details page, for parties where you are the Firm Administrator for the associated
institution, you can add or update the following information:
•
Party Info
•
Agreement Options
•
Billing Details
•
Documentation Contacts
•
Billing Contacts
See the specific topics for instructions.
 WARNING: Firm Administrators should not add new parties unless instructed to by the FIA. Firm
Administrators can maintain Party - Details for their party.
 HINT: Once you have entered data in a field, press the Tab key to move to the next field.
6.2.1
Party Info (Institution, Party Name, Active / Inactive, & Primary Contact)
; Access the Party - Details page and use the Party Info panel, as shown below.
; Under Parent Institution, click the Select Institution drop-down list and select the institution.
This option is enabled only when creating a new party; otherwise, it is view only.
; In the Party Name field, type the full, legal name for this party.
 CAUTION! Only FIA Administrators can update party names. So, be sure the names you
give to the FIA are exactly as your firm wants them to appear on all EGUS Give-Up
Agreements for the parties and, as possible based on legalities, names that others will find
recognizable and provide for easy searching in EGUS.
; Select or deselect the Active checkbox for this party:
•
Select the Active checkbox (the default) to allow the contacts assigned to this party to add
the parties to agreements in EGUS and make the party information available for viewing by
other parties in EGUS (as per visibility rules) in the Directory, etc.
•
Deselect the Active checkbox to not allow the contacts assigned to this party to add the
parties to agreements in EGUS and make the party information unavailable for viewing by
other parties in EGUS in the Directory, etc.
 HINT: You can make the party inactive, and then, once you have entered all information
correctly, make it active. You can only add to agreements and perform workflow actions for
active agreements; inactive agreements can not be added to agreements and you can not
perform workflow actions for agreements in progress with these parties.
; Under Primary Contact, click the Select from All Contacts drop-down list and select the
contact you want to be the primary EGUS contact for this party.
 NOTE: You must first have added the desired contact for the contact to display in this list.
 NOTE: Save the new or updated Party details now or add more details.
16 of 42
Confidential. Copyright © 2007, FIA and Markit Group Limited. All rights reserved. www.markit.com
FIA EGUS Version 2 Administrator Guide
6.2.2
Agreement Options
; Access the Party - Details page and use the Agreement Options panel, as shown below.
; Click in [number of approvers] drop-down list to select the number of approvers required for a
Give-Up Agreement by this party. You can select 1 or 2 approvers.
; Select the Preferred Initiator. Warn other parties that this party prefers to initiate new
agreements checkbox if this party prefers to initiate Give-Up Agreements in EGUS. If you select
this checkbox, EGUS will warn other parties who try to initiate an agreement with this party.
; Select the This party trades on Italian Exchanges. Send reminder for Transitory Agreement
at agreement execution checkbox if this party trades on Italian Exchanges. If you select this
checkbox, EGUS will remind Processors for this party to send a Transitory Agreement upon
execution of all agreements for this party.
 NOTE: Save the new or updated Party details now or add more details.
6.2.3
Billing Details
The Billing Address entered in this panel is used as this Party’s address for the Give-Up Agreement
Contact List.
; Access the Party - Details page and use the Billing Details panel, as shown below.
; Click the Copy from Parent Institution checkbox to insert this party’s parent institution’s Billing
Address as this party’s Billing Address.
 HINT: If the addresses are similar but not the same, you can copy the Parent Institution’s
address and then make any necessary changes.
; Type or validate the mailing address for this party the fields provided. A drop-down list of valid
country codes is provided.
 NOTE: Save the new or updated Party details now or add more details.
17 of 42
Confidential. Copyright © 2007, FIA and Markit Group Limited. All rights reserved. www.markit.com
FIA EGUS Version 2 Administrator Guide
6.2.4
Documentation Contacts
Use this option to maintain the list of Documentation Contacts and the Documentation Contacts group
email address for this party. Documentation Contacts added here will appear on Agreement Contact
Lists for this party.
; Access the Party - Details page and use the Documentation Contacts panel, as shown below.
To add a Documentation Contact:
; In the Documentation Contacts panel All Contacts box, select one or more contacts.
 HINT: Click to select one contact. Use Shift+click to select contiguous multiple contacts and
Ctrl+click to select non-contiguous multiple contacts.
; Click Add. The selected contacts are moved from the All Contacts box to the Documentation
Contacts box on the right and will now appear as documentation contacts on this party’s
Agreement Contact Lists as Documentation Contacts.
To remove a Documentation Contact:
; Select one or more contacts in the Documentation Contacts box.
; Click Remove. The selected contacts are moved from the Documentation Contacts box to the
All Contacts box on the left and will no longer appear on this party’s Agreement Contact Lists as
Documentation Contacts.
 NOTE: Save the new or updated Party details now or add more details.
18 of 42
Confidential. Copyright © 2007, FIA and Markit Group Limited. All rights reserved. www.markit.com
FIA EGUS Version 2 Administrator Guide
6.2.5
Billing Contacts
Use this option to maintain the list of Billing Contacts and the Billing Contacts group email address for
this party. Billing Contacts added here will appear on Agreement Contact Lists for this party. This
email address is used by EGUS users to contact all Billing Contacts at this party.
; Access the Maintain Party - Details page and use the Billings Contacts panel, as shown below.
To add a Billing Contact:
; In the Billing Contacts panel All Contacts box, select one or more contacts.
 HINT: Click to select one contact. Use Shift+click to select contiguous multiple contacts and
Ctrl+click to select non-contiguous multiple contacts.
; Click Add. The selected contacts are moved from the All Contacts box to the Billing Contacts
box on the right and will now appear as billing contacts on this party’s Agreement Contact Lists as
Billing Contacts.
To remove a Billing Contact:
; Select one or more contacts in the Billing Contacts box.
; Click Remove. The selected contacts are moved from the Billing Contacts box to the All
Contacts box on the left and will no longer appear on this party’s Agreement Contact Lists as
Billing Contacts.
 NOTE: Save the new or updated Party details now or add more details.
6.3
Save New or Updated Party Details
 CAUTION: Be sure to save all new or updated information entered on the Details and
Permissions tabs separately—i.e. click Save on each tab after you add or change information.
On the Maintain Contact - Details page:
; Click Save to save the new or any updated information for the party.
; Click Cancel to return to the previous page or select a new page. If you click Cancel without
saving first, any data you entered will not be saved.
19 of 42
Confidential. Copyright © 2007, FIA and Markit Group Limited. All rights reserved. www.markit.com
FIA EGUS Version 2 Administrator Guide
6.4
Shortcut: View All Contacts for a Party
On the Maintain Contact - Details page:
; Click View All Contacts. The Party Details pop-up window displays with a list of all contacts for
the current party. Click Close to return to the Maintain Party - Details page or perform additional
searches on the Search Contacts page.
 NOTE: This party must have at least one contact added for this option to be valid.
6.5
Delete a Party
Only a party that has not yet been used on an EGUS Agreement can be deleted and only a Markit
CRT Representative “Super User” can delete a party. Please contact Markit Support for assistance.
20 of 42
Confidential. Copyright © 2007, FIA and Markit Group Limited. All rights reserved. www.markit.com
FIA EGUS Version 2 Administrator Guide
6.6
Access the Maintain Party - Permissions Page
To access the Maintain Party - Permissions page:
; On the main menu, click Admin, Search Institutions & Parties. The search page displays.
; Search for the desired party.
; Click the hyperlinked Party Name. The Maintain Party – Details page displays.
; Click the hyperlinked Permissions tab at the top of the page. The Maintain Party - Permissions
page displays as follows.
21 of 42
Confidential. Copyright © 2007, FIA and Markit Group Limited. All rights reserved. www.markit.com
FIA EGUS Version 2 Administrator Guide
6.7
Set EGUS User Agreement Status & Party Type (FIA Admin Only)
Only FIA Administrators can set or update EGUS User Agreement Status (i.e. indicates if a party
conformed or compliant, i.e. has a signed EGUS adherence document) and Party Type (i.e. indicates
if a party is an EGUS Broker, Customer, or Trader).
6.8
Enable Rate Data Feed
For external systems to download agreement and rate data, each party must enable the data feed for
those systems. Currently, the available external systems are GPS, Gains, and eGains. EGUS
institutions and parties do not need this or any other special permission enabled to access their own
data via this rate data feed (their internal billing systems only require proper “credentials” to identify
them as an EGUS institution / party to download their own data).
To allow external systems to access the party’s agreement and rate data feed:
; Access the Admin Party - Permissions page, and use the Enable Rate Data Feed panel, as
shown below.
; Select the checkbox for one or more external systems for which you want to enable the rate data
feed for this party:
•
GPS
•
Gains
•
eGains
; Click Save.
22 of 42
Confidential. Copyright © 2007, FIA and Markit Group Limited. All rights reserved. www.markit.com
FIA EGUS Version 2 Administrator Guide
6.9
Set Broker Visibility for Customer and Trader Parties Only
Each Firm Administrator must set Broker visibility for each Customer or Trader party in their
institution. If a Customer / Trader party grants a Broker visibility, i.e. adds the Broker to its Approved
Broker list, the Broker party can add the Customer / Trader party to Give-Up Agreements and view
the Customer / Trader party’s information on other EGUS screens. If a Customer or Trader party
does not grant a Broker visibility, i.e. does not add the Broker to its Approved Broker list, that Broker
can not add the Customer or Trader party to an agreement or view that Customer or Trader party on
other EGUS screens.
 IMPORTANT NOTE: Broker Party Administrators can not set Customers or Traders as visible to
their Broker Parties; instead, a Broker Party representative must contact the FIA to request
visibility to the desired Customer or Trader parties. Optionally, Brokers can use the Party Not
Found option on the Select Party pop-up window to request visibility to Customer or Trader
parties. (You can access the Select Party pop-up window by clicking on the Customer or Trader
Party Search button on the Initiate Agreement page Select Parties panel.)
 NOTE: See Party Visibility overview for more information.
To maintain Broker Visibility for a party, access the Party – Permissions page and use the Broker
Visibility panel, as shown below.
6.9.1
To Add Visibility to Brokers
; Access the Admin Party - Permissions page, and use the Broker Visibility panel.
; In the Broker Visibility panel All Brokers box on the left, select one or more institutions and/or
parties:
•
Click the plus icon to expand the list of parties for a selected institution.
•
Click the minus icon to collapse the list of parties for a selected institution.
•
To select (or deselect) all parties for an institution, select the checkbox next to the institution
name.
•
To select (or deselect) individual parties within an institution, click the plus icon next to the
institution to display all parties for that institution and select (or deselect) the checkboxes for
individual parties as desired.
; Click Add. The selected contacts are moved from the All Brokers box to the Approved Brokers
box on the right. These Brokers can now include this party on their Give-Up Agreements and
they can view this party’s information on EGUS screens.
; Click Save.
23 of 42
Confidential. Copyright © 2007, FIA and Markit Group Limited. All rights reserved. www.markit.com
FIA EGUS Version 2 Administrator Guide
6.9.2
To Remove Visibility from Brokers
; Access the Admin Party - Permissions page, and use the Broker Visibility panel.
; Select one or more Brokers in the Approved Brokers box at right.
; Click Remove. The selected Brokers are moved from the Approved Brokers box to the All
Brokers box on the left. These Brokers will no longer be able to add this party to their Give-Up
Agreements and these Brokers will not be able to view this party’s information on EGUS screens.
; Click Save.
6.9.3
Save New or Updated Party Permissions
 CAUTION: Be sure to save all new or updated information entered on the Details and
Permissions tabs separately—i.e. click Save on each tab after you add or change information.
; On the Admin Party - Permissions page, click Save to save any data you entered.
; Click Cancel to return to the previous page or select a new page. If you click Cancel without
saving first, any data you entered will not be saved.
6.10 Add and Maintain Exchange Firm Codes
Add firm codes for each party for each exchange on this page so the external systems accessing a
party’s rate data feed can attribute the data correctly. Add both primary and alternate codes on this
page, i.e. if you have more than one firm code for an exchange, enter all codes for the exchange and
select one per exchange to be used as the primary (or default) code to be transmitted by EGUS.
 NOTE: On the Accounts & Rates workflow page, you can select an alternate firm code (other
than the primary code) for any exchange for a party on any agreement, i.e. you can override
the primary exchange firm code for a party for a specific agreement. You can only add new
firm codes or change the default (i.e. primary) firm code for an exchange on this page.
To maintain Exchange Firm Codes:
; On the main menu, click Admin, Search Institutions & Parties. The search page displays.
; Search for the desired party and then click the hyperlinked Party Name. The Maintain Party –
Details page displays.
; Click the hyperlinked Exchange Firm Codes tab at the top of the page. The Maintain Party –
Exchange Firm Codes page displays as follows.
24 of 42
Confidential. Copyright © 2007, FIA and Markit Group Limited. All rights reserved. www.markit.com
FIA EGUS Version 2 Administrator Guide
; To add a new exchange firm code:
•
Click on an Exchange drop-down list box and select the exchange you want.
•
Type the firm code in the Firm Code field for this exchange.
•
Select the Primary checkbox if this code is to be used as the primary (i.e. default) firm code
for this exchange. (If not, leave the checkbox blank / unselected.)
 NOTE: If the exchange has more than one firm code for this party, you must select one (and
only one) code as the primary.
; Click Add to add a new row if you need to add more exchange firm codes than the number of
rows provided on the page. The row is added at the end of the list. Use the above instructions to
add the exchange firm code information.
; To delete exchange firm code(s):
•
Select the checkbox(es) to the left of the Exchange Firm Code row(s) you want to delete.
•
Click Delete. The selected row(s) are deleted.
; Click Save. Your additions and/or modifications are saved.
25 of 42
Confidential. Copyright © 2007, FIA and Markit Group Limited. All rights reserved. www.markit.com
FIA EGUS Version 2 Administrator Guide
Chapter 7
Search Contacts
Use the Search Contacts page to look up and select Contacts to view their details. Use this page to
access the Maintain Contacts - Details page and the Add New Contact function.
7.1
Access the Search Contacts Page
; On the main menu, click Admin, Search Contacts. The Search Contacts page displays as
follows.
26 of 42
Confidential. Copyright © 2007, FIA and Markit Group Limited. All rights reserved. www.markit.com
FIA EGUS Version 2 Administrator Guide
7.2
Search for Contacts
; Click Admin > Search Contacts. The Search Contacts page displays, as shown in the example
above.
; Click in the Filters area and type the first, last, email address, or institution of the contact you
want to find. Use the Institution Filter field to find all contacts for an institution.
 NOTE: For Firm Administrators, the Institution field is disabled and defaults to each firm’s
institution name, as shown in the following example.
; Click Search. The results of your search display in the results list in the lower portion of the
page, as shown in the following example.
; Click the hyperlinked contact [Last Name] to view details. The Maintain Contacts - Details page
displays. Click Cancel to return to the Search Contacts page.
; Under Institution, click the hyperlinked [Institution Name]. The Maintain Institution page
displays with the details for the selected institution. Click Cancel to return to the Search Contacts
page (or you can select a new page).
; Click Add New Contact to create a new contact and assign permissions for this contact for one
or more parties at your institution. The Maintain Contact - Details page displays ready for you to
add a new contact.
 NOTE: FIA Administrators access the Add New Party and Add New Contact options from
the Maintain Institution page (rather than from the Search pages).
27 of 42
Confidential. Copyright © 2007, FIA and Markit Group Limited. All rights reserved. www.markit.com
FIA EGUS Version 2 Administrator Guide
Chapter 8
Add and Maintain Contacts (and Permission
EGUS Users)
Use the Add New Contact function and the Maintain Contact - Details and Permissions pages to add
new and maintain contacts for your institution’s parties:
Party Tab
Description
Details
- Contact name
- Contact active / inactive status indicator
- Contact account locked indicator
- Contact username / email address
- Agreement workflow defaults, e.g. number of Approvers required for an
agreement for this party
- Contact mailing address
Permissions
For Contact:
- Administrator indicator
- Agreement workflow permissions (e.g. Processor, Approver, Maintain
Rate Schedules)
- Agreement alert options (e.g. Alert on Execution, Never Alert)
28 of 42
Confidential. Copyright © 2007, FIA and Markit Group Limited. All rights reserved. www.markit.com
FIA EGUS Version 2 Administrator Guide
8.1
Access the Maintain Contacts - Details Page
; On the main menu, click Admin, Search Contacts. The Search Contacts page displays.
; On the Search Contacts page, you can do either of the following:
•
To add or update information for an existing contact, search for that contact and then click the
desired [Last Name]. The Maintain Contact - Details page displays with the information for
the selected contact as shown below.
•
Or, to add a new Contact, click Add New Contact. The Maintain Contact - Details page
displays ready for you to add a new contact.
 NOTE: FIA Administrators access the New Party and New Contact options from the
Maintain Institution page (rather than from the Search pages).
29 of 42
Confidential. Copyright © 2007, FIA and Markit Group Limited. All rights reserved. www.markit.com
FIA EGUS Version 2 Administrator Guide
8.2
Add and Maintain Contact Details
For contacts where you are the Firm Administrator for the associated institution and party, you can
add or update the following contact information:
 NOTE: For data entry on this page, use upper- and lower-case characters as appropriate.
 HINT: Once you have entered data in a field, press the Tab key to move to the next field.
8.2.1
Contact Info
; Access the Contact - Details page.
; Under Parent Institution, click the Select Institution drop-down list and select the institution for
which you want to create this new contact. This field is available only to FIA Administrators when
adding new Institutions and is view only for existing contacts.
; In the Title field, type the contact’s business title using upper- and lower-case characters.
 NOTE: This field is for titles such as President, Vice President, Legal Counsel, Document
Processor, etc. (not for titles such as Mr. or Ms.) to be listed on Agreement Contact Sheets.)
; In the First Name field, type the contact’s first names.
; In the Middle Name field, type the contact’s middle name if desired.
; In the Last Name field, type the contact’s last name.
; In the Email Address field, type the contact’s email address, i.e. also used as EGUS username.
This field is available only to FIA Administrators when adding new Institutions and is view only for
existing contacts.
 NOTE: The email address entered in this field is also used as the EGUS username, i.e. to log
in to the system, and can not be duplicated in the system.
; In the Phone Number field, type the contact’s business phone number.
; In the Fax Number field, type the contact’s business fax number.
 HINT: For Primary, Documentation, and Billing Contacts, the Phone and Fax Numbers and
Email Addresses entered here are viewed and used by many EGUS users and printed on
Give-Up Agreement Contact Sheets, so take extra care to ensure that they are kept up-todate and entered accurately and completely (e.g. so callers from other countries can easily
determine how to dial the Contact’s phone and fax numbers).
; Select or deselect the Active checkbox for this contact:
•
Select the Active checkbox (the default) to allow this contact to use EGUS and make the
contact information available for viewing by other parties in EGUS (as per visibility rules).
•
Deselect the Active checkbox to not allow this contact to use EGUS and make the Contact
information unavailable for viewing by other parties in EGUS.
 NOTE: Save the new or updated Contact information now or add more details.
Once you save a new contact for the first time, the Contact’s assigned username displays on the
page in a separate view only field above the buttons in the middle of the page. An EGUS Contact
username is typically the user’s email address, but can vary, i.e. it might be the user’s Connex
username.
8.2.2
Contact Account Locked
; Access the Contact - Details page.
; Select or deselect the Account Locked checkbox, as desired.
 NOTE: Save the Contact now or add more details.
30 of 42
Confidential. Copyright © 2007, FIA and Markit Group Limited. All rights reserved. www.markit.com
FIA EGUS Version 2 Administrator Guide
8.2.3
Contact Mailing Address
The Contact Mailing Address entered in this panel is used as this Contact’s address for the
Agreement Contact Sheet and when the Contact Details display in EGUS.
; Access the Contact - Details page.
; Click the Copy from Parent Institution checkbox if you want to insert the contact’s parent
institution’s Billing Address as the contact’s Mailing Address.
 HINT: If the addresses are similar but not the same, you can copy the Parent Institution’s
address and then make any necessary changes.
; Type or validate the mailing address for this party the fields provided. A drop-down list of valid
country codes is provided.
 NOTE: Save the new or updated Contact now or add more details.
8.2.4
View Contact Username (i.e. Login ID)
; Access the Admin, Contact - Details page.
; See the Username field. An EGUS Contact username is typically the user’s email address, but
can vary, i.e. it might be the user’s Connex username.
8.2.5
Save New or Updated Contact Details
 CAUTION: Be sure to save all new or updated information entered on the Details and
Permissions tabs separately—i.e. click Save on each tab after you add or change information.
; Access the Contact - Details page.
; Click Save to save any data you entered. The new or updated Contact is saved.
 IMPORTANT NOTE: When you adding a new Contact and click Save for the first time, EGUS
automatically sends an EGUS Password Reset email message to the new user at the email
address on the Contact Details page. On any subsequent save, the message is not sent
automatically. If you need to reset an existing (saved) user’s password, use the Send or
Display Temporary Password button (see the Reset (Send / Display) Password topic for
details).
; Add Permissions for this Contact (see Assign Permissions (Roles) to a Contact for Parties) or
click New to add the details for another Contact.
; Or, click Cancel to return to the previous page – if you have not saved yet, this option allows you
to discard your data and not save; if you have saved already, your data is still saved.
8.3
Reset (Send / Display) Password
When an Administrator adds and saves a new user for the first time, EGUS automatically sends a set
password message to that user. If users forget their password or need to reset their password for
other reasons, EGUS Firm Administrators can use two buttons, Send Temporary Password and
Display Temporary Password, on the Maintain Contact Details page to reset user passwords:
; Click Admin, Search Contacts. The Search Contacts page opens.
; Look up and select the last name of the contact whose password you want to reset. The
Maintain Contact - Details page displays.
; Click one of the following two buttons:
•
Send Temporary Password – Sends an EGUS Password Reset email message to the
Contact’s email address entered on the Maintain Contact – Details page. The message
includes a URL link (good for 6 hours) that the user can click to reset his/her password.
31 of 42
Confidential. Copyright © 2007, FIA and Markit Group Limited. All rights reserved. www.markit.com
FIA EGUS Version 2 Administrator Guide
•
Display Temporary Password – Generates and displays a temporary password that you
can relay to a user over the phone. Use this option if the user does not receive the EGUS
Password Reset message for any reason, e.g. the firewall or junk mail filter at the user’s firm
does not accept the message. The user can log in to EGUS using this temporary password
once—upon login, the user is immediately required to reset to a password of his/her choice.
 NOTE: Save the new or updated Contact now or add more details.
8.4
Unlock a Locked Account
 NOTE: EGUS automatically locks out a user who makes three unsuccessful login attempts.
; Click Admin, Search Contacts. The Search Contacts page opens.
; Look up and select the last name of the contact whose account you want to unlock. The
Maintain Contact - Details page displays. If the user has been locked out, the Account Locked
checkbox is selected.
; Deselect the Account Locked checkbox.
; Click Save. The user’s account is now unlocked and re-enabled for login.
 NOTE: Typically, you would also Reset Password the user’s password (use the Send/Display
Temporary Password option) as the cause the unsuccessful login attempts may have been a
forgotten password entered incorrectly. You may also want to verify the user, user party, and that
the user is logging in using the correct email address / EGUS username.
8.5
Delete a Contact
Only a contact that has not yet performed workflow actions for EGUS Agreements and that is not
used as a Documentation or Billing Contact or Attn contact for any party can be deleted. Only a
Markit CRT Representative “Super User” or an FIA Administrator can delete contacts. Please contact
Markit Support for assistance.
8.6
Access the Maintain Contact - Permissions Page
; On the main menu, click Admin, Search Contacts. The Search Contacts page displays.
; Search for the contact whose system usage permissions you want to maintain: enter search
criteria and click Search. (Use Reset to clear a search and start over.) The results display in the
data table in the lower portion of the page.
; Click the contact’s hyperlinked Last Name. The Maintain Contact - Details page displays.
; Click the hyperlinked Permissions tab at the top of the page. The Maintain Contact Permissions page displays as follows.
32 of 42
Confidential. Copyright © 2007, FIA and Markit Group Limited. All rights reserved. www.markit.com
FIA EGUS Version 2 Administrator Guide
8.7
Assign a Contact as a Firm Administrator
Administration access to EGUS is set at the Institution level, i.e. Firm Administrators can add and
maintain parties and their permissions and contacts and their permissions for all parties at an
institution. Both FIA Administrators and Firm Administrators can enable Contacts at an Institution as
Firm Administrators. An institution can enable as many Administrators as necessary for their firm.
 NOTE: Firm Administrators can have other permissions as well, e.g. they can also be Readers,
Processors, Approvers and/or Maintain Rate Schedule users for parties at their institution.
 NOTE: On the Admin tab pages, Firm Administrators can only view, add, and maintain
information for their institution—they can not view, add, or maintain information for other
institutions (or other institutions’ parties or contacts).
 NOTE: All Firm Administrator user accounts are valid for only one institution. If a Firm
Administrator needs to administer EGUS Admin information for more than one institution, the
Firm Admin needs an EGUS Username / Contact record for each institution.
To assign a Contact / EGUS user as a Firm Administrator:
; On the Search Contacts page, look up and select the Contact you want to enable as an Admin for
the selected institution. The Contact’s information displays on the Maintain Contacts - Details
page.
; Click the Permissions tab.
; Select the Enable Institution Admin Access checkbox for that Contact.
33 of 42
Confidential. Copyright © 2007, FIA and Markit Group Limited. All rights reserved. www.markit.com
FIA EGUS Version 2 Administrator Guide
; Click Save. This EGUS User / Contact can now perform all Firm Administrator functions for this
Institution.
 TIP: Newly added permissions apply only after the user logs off EGUS, closes the browser,
opens a new browser, and re-logs in to EGUS.
8.8
Assign Permissions (Roles) to a Contact for Parties
Firm Administrators assign Contact roles that specify the actions the person can perform as an EGUS
user on behalf of each party at the user’s parent institution. In summary, users in the following EGUS
roles can perform these basic functions and receive or not receive alerts for selected parties within
an institution:
Permission / Role
Description
Readers
Only view (as restricted by visibility rules) Give-Up Agreements and
use the Directory for assigned parties
Processors
Initiate, view, and manage the workflow for Give-Up Agreements and
use the Directory – they can perform all EGUS actions, except
approving and terminating agreements for assigned parties
Approvers
View, approve, and terminate Give-Up Agreements and use the
Directory for assigned parties
Alert on Execution
Alert when an agreement is executed for assigned parties
Never Alert
Never alert for designated parties. Note that this permission ensures
that this contact / user is not added to any new forums, does not
receive any email messages, and is removed from all existing forums
even for agreements in progress for assigned parties
Maintain Rate Schedules
View, maintain, and delete Rate Schedules for assigned parties
A user can have any combination of user roles / permissions (i.e. Reader, Processor, Approver,
Admin, and/or Maintain Rate Schedules); however, Processors and Approvers must also have
Reader permission.
On this page, you can also designate that Contacts never receive alerts or receive alerts when
agreements are executed for selected parties. A Contact can be sent alerts without being a user, i.e.
assigned system role(s) of Reader, Processor, Approver, Maintain Rate Schedules, and/or Institution
Admin.
 NOTE: A contact / EGUS user can be assigned to any number of parties and be assigned the
same or different roles for each party—all within one institution.
 NOTE: You can add a Contact and designate the person as a Billing and / or Documentation
Contact for one or more parties without assigning the user any permissions or roles (even
Reader), i.e. EGUS access is not required.
To assign permissions or roles to this contact for one or more parties:
 WARNING: Do not assign user permissions for non-conformed (purple italic) parties as it
prevents users from logging in to EGUS. (Note that parties without EGUS User Agreements are
called non-conformed parties and their names display in purple bold italic font, e.g. Unknown
Customer. Conformed parties display as underlined links in green regular font, .e.g. Known
Customer.)
; On the Search Contacts page, look up and select the Contact for whom you want to assign
permissions. The selected Contact’s information displays on the Maintain Contacts - Details
page.
34 of 42
Confidential. Copyright © 2007, FIA and Markit Group Limited. All rights reserved. www.markit.com
FIA EGUS Version 2 Administrator Guide
; Click the Permissions tab.
; Select the Reader, Processor, Approver, and/or Maintain Rate Schedules role checkboxes for
the functional permissions you want to assign to this user for each party listed for this institution.
 NOTE: By default, EGUS users with Processor and/or Approver permission must also have
Reader permission. So, if you select Processor and/or Approver, the system automatically
also selects Reader.
 NOTE: EGUS Contacts can be saved with no permissions / roles for any parties, e.g. to be
used as agreement / workflow Contacts—not to act as EGUS users. Even if these users log
in to EGUS, they can not access or use the EGUS workflow tabs. These non-user Contacts
are often added solely to be notified upon agreement execution and/or to be listed on
Agreement Contact Pages.
 NOTE: An EGUS user can be both an Institution Admin and an EGUS agreement workflow
user—these users can view and use both Admin tab functions and the user workflow tabs
(Agreements, My Queue, Tools, etc.).
; Select the Alert on Execution checkbox this user should be notified when agreements are
executed for the selected party. This option is often used for Contacts who are not assigned
Reader, Processor, or Approver permissions but still need to be notified when an agreement is
executed (and only upon execution—no interim notifications are sent).
; Select the Never Alert checkbox if this user should never receive notifications for agreement
workflow actions or on execution for the selected party.
 NOTE: Adding the Never Alert option to a user’s permissions ensures that the user is not
added to any forums, does not receive any email messages, and is removed from any forums
even for agreements in progress for indicated parties.
 NOTE: Removing the Never Alert option from a user’s permissions ensures that the user is
added to all current and future active forums for all agreements from the Review through
Execution states.
; Click Save. The selected permissions are now assigned to the selected user for the indicated
party or parties.
 TIP: Newly added permissions apply only after the user logs off EGUS, closes the browser,
opens a new browser, and re-logs in to EGUS.
8.8.1
Remove Permissions
Use the instructions to assign permissions to a contact (see the Assign Permissions (Roles) to a
Contact for Parties topic), except that instead of selecting a checkbox to assign a permission, you
deselect it to remove the permission—and then Save your changes. Be sure that you remove the
permission for the correct party and for all parties necessary. Use the vertical scroll bar to ensure you
have reviewed all parties for this institution.
8.8.2
Save New or Updated Contact Permissions
 CAUTION: Be sure to save all new or updated information entered on the Details and
Permissions tabs separately—i.e. click Save on each tab after you add or change information.
On the Maintain Contact - Permissions page:
; Click Save to save any data you entered.
; Click Cancel to return to the previous page or select a new page. If you click Cancel without
saving first, any data you entered is not saved.
35 of 42
Confidential. Copyright © 2007, FIA and Markit Group Limited. All rights reserved. www.markit.com
FIA EGUS Version 2 Administrator Guide
Chapter 9
FIA Administrator Only Functions
In addition to the functions available to Firm Administrators, FIA Administrators can perform the
following additional functions:
•
Add New Institution
•
Change Institution Status (Active or Inactive)
•
Indicate Signed User Agreement Received for a Party (i.e. Conformed Parties)
•
Set Party Type (Broker, Customer, or Trader)
•
Delete an Unused Institution, Party, or Contact
•
Generate Billing Reports
This section provides instructions for these functions available only to FIA Administrators.
 NOTE: FIA Administrators access the add New Party and New Contact options from the
Maintain Institution page (rather than from the Search pages).
9.1
Add New Institution
Only FIA Administrators can add new institutions.
To add a new institution:
; On the main menu, click Admin, Search Institutions & Parties. The Search Institutions &
Parties page displays.
; Click the New button above the institution area of the page. The Maintain Institution page
displays—ready for you to add a new institution. Use the Maintain Institution page for all
management functions described in this document.
; Type the Institution Name.
; Select the Active checkbox to enable this Institution in EGUS.
; Click Save.
 CAUTION! The institution name you enter here must be the full, legal name of the Institution.
This name is used throughout EGUS and on Give-Up Agreements, and must be recognizable
and accurate. This name can not be changed once you save the institution.
36 of 42
Confidential. Copyright © 2007, FIA and Markit Group Limited. All rights reserved. www.markit.com
FIA EGUS Version 2 Administrator Guide
9.2
Change Institution Status (Make Active / Inactive)
FIA Administrators can use this option to make an institution Active, whereby all users at that
institution and all of its parties can log in and use the system to initiate and manage Give-Up
Agreements for the institution’s parties. Also, the institution’s parties can be included in Give-Up
Agreements initiated by the institution’s parties and other parties.
FIA Administrators can use this option to make an institution Inactive, whereby no users at that
institution can log into or use the system, but the institution’s parties can still be included in Give-Up
Agreements initiated by other parties.
To set / change an institution’s status:
; On the main menu, click Admin, Search Institutions & Parties. The Search Institutions &
Parties page displays.
; Enter your search criteria and click Search. The search results display as a list below the Search
Filters.
; Find the institution you want and click the Institution Name. The Maintain Institution page
displays with the information for the selected institution.
; Select or deselect the Active checkbox:
•
Select the Active checkbox to enable this Institution and all of its Parties and Contacts in
EGUS, i.e. make the Institution Active.
•
Deselect the Active checkbox to disable this Institution and all of its Parties and Contacts in
EGUS, i.e. make the Institution Inactive.
; Click Save.
9.3
Manage Signed User Agreements for a Party
FIA Administrators use this function to indicate whether a party has signed the EGUS User
Agreement, i.e. to indicate that the party is compliant. Access this function from the Maintain Party –
Permissions page.
 IMPORTANT NOTE: Parties without EGUS User Agreements in place are called non-conformed
parties. Non-conformed Party names display in purple bold italic font, e.g. Unknown Customer.
Conformed parties display as underlined links in green regular font, .e.g. Known Customer.
To indicate a signed User Agreement has been received for a party:
; On the main menu, click Admin, Search Institutions & Parties.
; Search for and select the party (i.e. click the Party Name) you want.
; Click the hyperlinked Party Name. The Maintain Party – Details page displays.
; Click the hyperlinked Permissions tab at the top of the page. The Maintain Party - Permissions
page displays. Use the FIA Admin panel, as shown below.
37 of 42
Confidential. Copyright © 2007, FIA and Markit Group Limited. All rights reserved. www.markit.com
FIA EGUS Version 2 Administrator Guide
; Select the User Agreement Signed checkbox.
; Enter the name of the person who signed the agreement in the Signed by field.
; Enter the date the agreement was signed in the Signed on field.
; Enter the FIA Vendor ID for this party in the FIA Vendor ID field. This field is required for the FIA
Billing Reports.
; Click Save.
9.4
Indicate Party Type (Broker, Customer, or Trader)
FIA Administrators use this function to indicate whether a party is a Customer and/or Trader. In
EGUS, new parties are set to Customer and Trader.
Party Type is a key setting for EGUS Parties (i.e. counterparties on EGUS Agreements. The valid
Party Types are Customer, Trader, or Broker. A party can either be a Customer, a Trader, a Broker,
or in rare cases, both a Customer and a Trader.
 NOTE: When users search in EGUS for a party in a certain Party Role (e.g. Executing Broker,
Clearing Broker, Trader, Customer, etc.) to be added on an agreement, only the parties of the
relevant type are retrieved for that Party Role. So, if a user is adding an Executing Broker to an
agreement, only the Broker Parties display for all searches; if a user is adding a Customer, only
Customer Parties display; etc.
; On the main menu, click Admin, Search Institutions & Parties.
; Search for and select the party (i.e. click the Party Name) you want.
; Click the hyperlinked Party Name. The Maintain Party – Details page displays.
; Click the hyperlinked Permissions tab at the top of the page. The Maintain Party - Permissions
page displays.
; To indicate that a party is a:
•
Customer: Select the Party is a Customer and Customer must maintain Broker visibility
checkbox.
•
Trader: Select the Party is a Trader and Trader must maintain Broker visibility checkbox.
 NOTE: A party can be both a Customer and a Trader. In this case, select both the
Customer and Trader checkboxes.
•
Broker: Do NOT select either the Customer or Trader checkbox.
 IMPORTANT NOTE: If a party is not selected as a Customer and/or a Trader, EGUS
assumes it is a Broker.
; Click Save.
38 of 42
Confidential. Copyright © 2007, FIA and Markit Group Limited. All rights reserved. www.markit.com
FIA EGUS Version 2 Administrator Guide
9.5
Generate EGUS Billing Reports
FIA Administrators can use this option to generate Billing Reports for EGUS institutions.
9.5.1
Access the Billing Reports Page
; On the main menu, choose Admin, Billing. The Generate Billing Reports page displays as
follows.
9.5.2
Generate a Bill for Executed Agreements Report
; On the main menu, choose Admin, Billing. The Generate Billing Reports page displays.
; Select the Bill for Executed Agreements radio button.
; Enter the Start Date and End Date for the report using the standard EGUS date format.
 NOTE: The report includes data for the start and end dates entered.
; Click Generate. The report is generated in an MS-Excel (xls) file in CVS format. Open or save
the file as desired.
; This report includes the following data:
Field Name
Description
Institution
Text. Parent Institution name
Party
Text. Party name where Party Role is Executing Broker or Dealer on Agreement ID
Vendor ID
Text, as supplied by FIA Admin on Maintain Party Permissions page
Agreement ID
Numeric, as assigned by system to every agreement. Select Executed agreements
only
Executed Date
Date of execution for online agreements
Uploaded Date
Date of upload for uploaded legacy agreements
Uploaded Inst
Text. Institution name who uploaded the agreement
Uploaded Party
Text. Party name who uploaded the agreement
39 of 42
Confidential. Copyright © 2007, FIA and Markit Group Limited. All rights reserved. www.markit.com
FIA EGUS Version 2 Administrator Guide
9.5.3
Generate a Bill for Storage Report
; On the main menu, choose Admin, Billing. The Generate Billing Reports page displays.
; Select the Bill for Storage radio button.
; Enter the Start Date and End Date for the report using the standard EGUS date format.
 NOTE: The report includes data for the start and end dates entered.
; Click Generate. The report is generated in an MS-Excel (xls) file in CVS format. Open or save
the file as desired.
; This report includes the following data:
Field Name
Description
Institution
Text. Parent Institution name
Party
Text. Party name where Party Role is Executing Broker or Dealer on Agreement ID
Vendor ID
Text, as supplied by FIA Admin on Maintain Party Permissions page
Executed
Agreements
Count of total number of executed agreements in EGUS where this Party is named
and executed date is before End Date
40 of 42
Confidential. Copyright © 2007, FIA and Markit Group Limited. All rights reserved. www.markit.com
FIA EGUS Version 2 Administrator Guide
Chapter 10
Markit Support / Super User Only Functions
EGUS “Super Users,” or Markit Client Relations Team (CRT) Representatives or Developers with all
privileges, can perform all of the functions that other EGUS users and Administrators can perform and
delete Institutions, Parties, and Contacts. They perform functions based only on Firm user and
Admin and FIA Admin requests for assistance or errors found in the system or data.
 CAUTION! Markit CRT Super Users can not perform FIA Admin Only functions.
10.1 Resolve Connex - EGUS Username Issues
If an EGUS Administrator can not save a new Contact due to an issue with the email address, i.e.
the Contact’s default EGUS username, it may be because this person has already been added as a
Contact in EGUS or already has a username in Connex. If the user already has a Connex account,
the Connex username and password will also be used as the user’s EGUS username and
password—and all related support actions, e.g. reset password, etc.—need to be performed using
the Connex Admin tool. Only Super Users can resolve username issues, so please contact Markit
Support if a username issue arises.
10.1.1 Verify User’s Email Address / EGUS Username
To verify a user’s email address / EGUS username:
; Click Admin, Search Contacts.
; Look up and click the Last Name of the contact you want. The selected contact’s information
displays on the Maintain Contact - Details page.
; See the view only Email and Username fields in the middle of the page.
10.2 Delete an Institution, Party, or Contact
In EGUS, only a Super User can delete an Institution (that has no parties or contacts that have been
used on an agreement), or a Party or Contact (that has not been used on an Agreement).
; Look up and select the entity (i.e. Institution, Party, or Contact) you want to delete on the Search
Institutions and Parties page or the Search Contacts page. The selected entity detail information
displays on the Maintain [Entity] page.
; Click Delete.
; Click Yes when asked to confirm the deletion. The selected entity is deleted from the EGUS
database.
41 of 42
Confidential. Copyright © 2007, FIA and Markit Group Limited. All rights reserved. www.markit.com
FIA EGUS Version 2 Administrator Guide
Chapter 11
Contact Us & Help
Administrator Help is available online when you click the Admin Help link in the FIA EGUS header.
In the Admin Help, you can access the information in this Administrator Guide. Admin users also
have access to the User Help—just click the Help link in the header.
For questions not answered in this guide, please contact Markit Client Relations by:
•
Live instant help via Markit Connex, or
•
email at [email protected], or
•
phone in North America at +1 877-7-Markit (i.e. +1 877-762-7548), or
in Europe at +44 (0) 20 7260 2111
For information about Markit’s other services, please contact a Markit sales representative by:
•
email at [email protected], or
•
phone in:
London
+44 (0) 207 260 2345
Madrid
+34 91 185 2659
New York
+1 (212) 931 4910
Singapore +65 6823 1370
Tokyo
+813 4360 8280
Toronto
+1 (416) 481 4923
42 of 42
Confidential. Copyright © 2007, FIA and Markit Group Limited. All rights reserved. www.markit.com