1
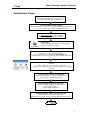
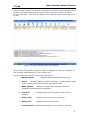
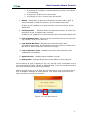
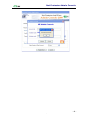
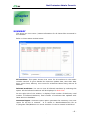
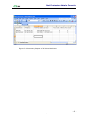
Net Protector Admin Console Net Protector Admin Console USER MANUAL www.indiaantivirus.com -1. Net Protector Admin Console Introduction Admin Console is a Centralized Anti-Virus Control and Management. It helps the administrators of small and large office networks to manage the Anti-Virus software on all the clients. Advantages of using Admin Console Software: • Centralized Installation of Anti-Virus to client PCs • Centralized updates of all nodes from one point. This saves on Internet bandwidth usage and reduces the internet download traffic. PCs which do not have internet connectivity also remain automatically updated. • Report on LAN Virus infection, or threat outbreak status. • Easy maintenance of all clients. • Enforcing and applying policy settings easily to single or group or all the PCs. • Advanced Security of Desktops, Servers and Laptops in the LAN • Ease in applying service packs of Operating System and updates of Anti-Virus to all nodes Administrator of Admin Console can monitor the LAN machines and check as on which PCs Net Protector Anti-Virus is installed/not, the Antivirus Update date of each node, virus count in memory, virus count of last scan, last scanned date and time, Status of NPAV Shield and other important security information. In turn Administrator can take the appropriate action through the Admin console software. He can solve all issues on all client PCs, by selecting multiple machines and sending various commands to PCs. Various Commands available are Scan PC, Scan Memory, Scan for viruses, scheduled scanning, Mal-ware cleaning, Spy-ware cleaning, cleaning of all types of viruses and Update Anti-Virus etc. -2. Net Protector Admin Console Installation Steps INSTALL Admin Console Install Admin Console Server on any one PC on LAN (Installation File: G:\NPServer) Activate Admin Console License: Select the correct no. of users you have purchased Send the License No. + Inst Code to us, & receive the Activation Code RUN ChangePolicy.exe Run ChangePolicy.exe on each client PC. This utility is available in the install CD Enum LAN: Click on ENUM LAN in option on Admin Console toolbar to view all PC in LAN ADD CLIENT PCs One by One Double click on any one PC in the list. Provide User Name + Password of that CLIENT PC. This will install agent on the client PC & show machine status ON Check Status Of the PC If status shows OFF, then go to that client & Click > Start > Run > type: agent > Click OK * If Windows Firewall is ON, then click on unblock for the firewall prompt Remote Install of NPAV on Client PCs Select one PC on which you wish to install AntiVirus Select Admin > Install NetProtector Manual Install of NPAV on Client PCs You can also install NPAV by going to client PC Click - Start > Run > \\Server\NPClient\NpSetup Activate the NPAV License for each client PC Select Admin > Set/Reset Unlock Code Double click on each PC and provide the respective Unlock Code. Installation is complete -3. Net Protector Admin Console Admin console network has variety of options for controlling and managing PCs in network. Window below gives a glimpse of the main grid interface of admin console after login. Let’s uncover each of menu options & their functionality one by one. Figure 1.0 Admin Console main Grid window As you log in successfully to admin console, it displays the main grid window. It also shows a small shield icon in the system trey. The grid above has various columns as listed below. 1. Machine Name Displays Machine added for monitoring. 2. Status - Displays Machine Status. If machine is Connected to admin console server then status is ON or else status is OFF 3. NPAV Update - Displays on which date, selected machine is updated with latest Antivirus definition 4. Last Scan – Displays date when last scan is done on this machine. 5. Virus Count - Displays virus count on this machine 6. Memory Vir - Displays Memory virus count. 7. Scan Progress - Displays percentage (%) of scanning. It shows -4. Net Protector Admin Console a. If scanning is complete, it shows Scanning is done, else shows b. c. % of scanning. If agent.exe is OFF then it shows N/A. If scanning is not in running then shows OFF. 8. Shield - Shows Zero-V-Anti-Virus Protection shield is ON or OFF. If shield is Exited (closed) at client PC, then it shows status OFF. If NPAV is not installed on a client machine, then this column shows status OFF. 9. File Protection - Displays Online file protection status. If online File protection is ON, it displays ON, else OFF. If NPAV is not installed on a client machine then this shows status OFF. 10. Last Command Sent - Shows the last command sent to this machine. E.g. Memory scan, Virus Scan etc. 11. Last Result Received - Displays last command which was successfully processed. If command was not successful or status show OFF then it shows Unknown command: sending. 12. Last Connection Time - Displays time when last connection was established successfully. 13. Agent Version - Displays Agent software version 14. Expiry Date - Displays Expiry date of the NPAV on that machine. At the bottom of grid it displays a log. Log has list of all commands sent to client machines and their results. It displays Date, Time and command sent to the client machine along with its IP address. Admin console shows a virus alert pop up whenever a virus is found at client PCs. It displays message as shown below. This shows total virus found on disk and total virus found in memory. Figure 3.3 Virus Alert Screen -5. Net Protector Admin Console Admin First menu option is Admin and its sub-menus, are shown below. Figure 1.1 Admin Menu & Sub-Options 1. ADD CLIENT This is used to add a new client machines which are available on network. It displays following window. Enter following information to add a PC Machine Name (name of machine as seen in the network) IP Address of the machine User Name (windows login name) Password (windows password) -6. Net Protector Admin Console Figure 1.2 Add New Client window If client machine name is user1 and windows login name is “user1” and password “pass1234”, then use this information to add a PC. After entering correct information & authentication is successful then it will display following window. Figure 1.3 Add client Success Message Note: If your organization has same user name and password forAll Clients for network login. This remembers the login and password, so that you need not to enter it for each user. You may add n number of client machines following the above steps. Please note that this number can not exceed the total number of licenses you have purchased. In case either of the information entered is incorrect then you will get following error message. Reenter correct information to over come this error. -7. Net Protector Admin Console Figure1.4 Error Message on incorrect login info. Note: While adding client if you get an error then check username and password is correct OR client PC allows remote access. Run “Changepolicy.exe” on the client PC to allow remote access from server PC. Changepolicy.exe is available at \\SERVER MACHINE\NPSERVER\CHANGEPOLICY.EXE OR Login, password on client PC is not blank. Troubleshooting Tip: After adding a client PC, if its status becomes “OFF” then Try pinging the client PC from the server PC. Also check if TCP/IP link between Server and client PC is connected. Both PCs should be connected. Check if “Agent.exe” is running in the Process tab inside Task Manager. If not then click on Start>Run. Type agent.exe and click on OK. This will start the agent.exe. If Windows firewall is ON, then you need to open the TCP/IP ports for admin console server and client communication. TCP/IP Ports to be opened are : 5100, 5150, 5200 -8. Net Protector Admin Console 2. Remove Client Use this option to remove the client machine from the network. When the Remove Client window is displayed, on that select the particular machines to be removed. Press OK. It will delete that client machines from main grid i.e. from monitoring list. Figure1.5 Client Remove Successfully 3. Enumerate Machine on LAN This option searches all available machines in the Network and displays them. Red color indicates machine name is not added to main grid for monitoring. Blue color indicates that machine added to main grid for monitoring. On successful Enumeration, it displays following window. -9. Net Protector Admin Console Figure.1.6 Searching Machines in the Network 4. Start Agent If Agent is OFF on client machine, you can start it using this option. Agent.exe is needs to be on every client machine to be monitored. Hence every client machine can communicate with server. When agent is running, then after 10 seconds, Status column will become ON. This means client is ready for monitoring and can take commands from server. NOTE: If the agent is already running on client PC, then server PC can not start the agent there. Then you need to use End Process option from task manager to stop the agent.exe. After this, only the server can start agent at client PC. 5. Stop Agent Use this option to Stop Agent.exe from a client machine. To stop a client, select a client machine from monitoring list & Click on Stop agent. This will stop the agent. After 10 seconds, Status column will show the status as OFF. If you do not choose any client machine and select command for stop agent then, it will show following error. - 10 . Net Protector Admin Console If status column shows OFF i.e. the client is not connected to server, and select to stop agent then it will display following error. 6. Install Net Protector This will install Net Protector Antivirus. It requires agent.exe to be running at client machine. It will start the remote installation. After few seconds, it completes the installation & shows “Installation completed successfully”. 7. Uninstall Net Protector These will Uninstall Net Protector Antivirus on selected client machine. It requires agent.exe to be running at client machine. This Uninstallation will complete without client interfere and silently. It shows following message box after uninstall the product. Before Uninstallation select the required machine for Uninstall the product. 8. Install Net Protector Directly This option does not require Agent.exe to be running on client machine. Use this option for installation of NPAV, if you have problem running agent.exe at client machine. Select a client on which you want to install NPAV. Then click on Install Net Protector Directly. 1) It will start remote installation. After few seconds it will complete the installation. 2) If already install Net Protector then it will show following message. - 11 . Net Protector Admin Console Figure 1.7 Installing Net Protector Directly If you select No, then it will Abort the Installation process and stop the installation. Select Yes, it will show following message. Select Upgrade button. It will Upgrade NPAV. It uninstalls earlier version of NPAV and installs newer version. It will prompt for user input during this. 9. Set / Reset Unlock Code Clicking on this option you can Set or Reset unlock code of Admin console client. Click on Set / Reset Unlock code option this will launch Remote Unlock Wizard window. This window displays a list of all NPAV clients present in the network. It displays machine name, its IP Address, Installation Code, Unlock Code, and Expiry Date of NPAV. • You need to set the unlock code when NPAV is installed first time at the client machine Or machine is formatted. See window below which shows a machine with NPAV not registered. - 12 . Net Protector Admin Console • You need to reset unlock code when NPAV license needs to be renewed. See window below which shows machine with license information and license date. Double click on a client, to Set Unlock Code. Check the Reset Unlock code option in case you want to reset the code. Enter the installation code and unlock received from NPAV team. Click OK to complete the registration process. - 13 . Net Protector Admin Console 10. Set Login Name / Password You can enable or disable admin console authentication. By enabling Login name and Password to admin console, it will not let any user to intrude in Admin Console Server. If login name/password is set, on start of Admin console it asks for login name and password. It displays following window. Figure1.8 Admin Console Login Window On successful input of login information, it opens the Admin console Grid. On incorrect login information, it displays following error message. - 14 . Net Protector Admin Console Clients This Client option introduces seven sub option. Refer to window below. Figure 2.1 Client & its Sub Menus 1. Select All Clients Using this option, you can select all client machines that are available in the main window grid at a time. It will display all client PCs with tick marked. You can send any command to these machines. 2. Clear All Checks This will clear the selection of Client machines which are checked in the admin console grid. 3. Invert Checks This will invert the current client PCs’ selection. E.g. C1, C2, C3 clients are selected & C4, C5, C6 are not selected. Now if chosen invert checks option in this scenario, it will select C4, C5, C6 clients and deselect C1, C2, C3. You can perform operation on the remaining set. 4. Show Infected Client - 15 . Net Protector Admin Console This option will display all infected client machines in the admin console network. All Infected machines will be shown with tick mark in the Admin Grid. Now you can take action on them like clean them. 5. Show Clean Clients This will show all client machines which are not infected or are clean from the Viruses. They will be indicated with a tick mark in the Admin Grid. 6. Select Online Clients If you want to know how many client PCs are currently online OR are connected to admin console server, then use Select Online Clients option. Admin console will be display all online clients. This functionality same as that it shows ON or OFF in Status column. 7. Select Offline Clients This shows only offline clients in the admin console list. If any of the client machines are offline i.e. their status column displays status OFF, then such machines will be displayed in the grid list as checked. Status OFF indicates, Agent.exe is not running and these machines can not receive any command from server. - 16 . Net Protector Admin Console Scan Scan option has following six submenus. Refer to window below. Figure 3.1 Scan & its Sub Menus 1. Memory Scan On Memory Scan option, it will scan selected Client Machines’ memory. It creates list of the processes currently running in memory and scans against the virus database. It scans only the running processes. 2. Virus Scan Click this option to start Virus scanning on a client PC. When this scanning is going on then you can see the Net Protector Scanning window at the client PC. It will also display a small optical lense icon in system tray. See figure 2.0 3. Virus Scan Silent This option starts virus scanning silently on targeted machines. While scanning is going on then it does not show the scanning window on the screen but displays a small tray icon on the toolbar. It keeps updating scanned percentage as it continues. Screen below shows the same - 17 . Net Protector Admin Console Figure2.0 Lens Icon & % completed in System trey. 3. Scan Windows Directory Click Scan Window Directory to launch scanning of window directory at a client machine. This scans only windows directory. You need to select machine on which window scanning needs to be started. Scanning progress can be seen on the main gird. See the window below for the scanning details. 4. Stop Scanning Use this option to stop all scanning processes on the selected client machine. It will stop virus scanning & windows scanning if it is running on a client machine. 5. Process Scanner Process Scanner checks and enumerates all processes currently running in the memory at a client PC. Also it checks for all known Malwares that are running. Refer the report below, for the process details. - 18 . Net Protector Admin Console - 19 . Net Protector Admin Console UPDATE Update Menu option has 4 sub menu options. Refer to the window below. 1. NPAV Update This updates the NPAV virus database and related files. It downloads the latest NPAV files & virus database. This update process runs in silent mode. After completion of update it displays Update NPAV Database: OK and Update NPAV Database: Process Successfully in the main grid interface of Admin Console. Window below shows downloading is started, Figure 2.1 Downloading Update file via Internet & its tray icon. - 20 . Net Protector Admin Console 2. File Update This is an additional utility. Using this, you can send single file to a fixed path on a client machine. You can copy file to following directories. Root Programs Directory Net Protector Directory Server Application Directory Windows Directory System Directory Particular Path This option launches Update File on Client window. Refer to window below. Figure 2.2 Sending Files to various Paths You can select a file which you want to copy using browse option. Also selects destination path using one of six options - Root, Programs Directory, Net Protector Directory, Server Application Directory, Windows Directory, and System Directory. You may define sub path along with selected directory. E.g. selection is windows folder and sub path is “system32”. On OK, the chosen file is sent to destination path on client machine. If no sub path is selected and the sub path is not entered, it shows error message, see below. Figure 2.3 Error occurring for entering sub path - 21 . Net Protector Admin Console It shows successful message after command completion. Refer to window below. Figure 2.4 Successful file sending message Refer to the log at the bottom of the screen for success or failure of file copy. You may send a file to a generic path by choosing Particular Path option. Here enter correct destination path in that text box. e.g. G:\WINDOWS\pchealth\UploadLB\Config. Select the OK button. It shows successful message after command completion. 3. Add To Block List This option will block selected file from the client pc. It will prohibit file’s creation in future. This option launches Add Entry to File Block List window. Refer to window below. Figure 2.5 File Blocking paths Specify the file name to be blocked in File Name. Enter accurate file size used for accurate detection of file to be blocked File Size. Select ignore size if you don’t know the size of file. You may use one of six options to specify the file path. - 22 . Net Protector Admin Console 4. Windows Directory System Directory Programs Directory Root Particular Path Ignore path Update Path This option is used to change the update settings of a client machine remotely. Clicking on update path option, Update Setting window will appear. Refer to window below. Figure 2.6 Update Setting using various Proxy & Server • Update From Internet Use this option to update from internet. You need to enter the correct IP Address, Port Number, Client machine’s login name & password in the given fields. - 23 . Net Protector Admin Console • Update From LAN This functionality is used when internet is available only on one pc. You want to use PC to update NPAV on all other machines. Choose a folder ZVUpdate of the PC which is on internet, and you want to take updates from. This folder should be shared as READ ONLY, so that every client can read from this Folder. e.g. \\Machine name\ZVUpdate. - 24 . Net Protector Admin Console STATUS Status Menu has three sub menu options. 1. Refresh Client Status This option refreshes the client’s status which is selected. This will connect to that particular pc. Get the latest status and display it on the Admin console grid. It may take time to show the OFF / ON status. 2. Send Message This option sends a text message to client machines selected. Click on Send Message option you will see the window message ‘Network Messaging Service’. Refer to window below. - 25 . Net Protector Admin Console Figure 2.7 Network Messaging Service text box You can send text message of max 256 characters. This message will be displayed on selected client machines. This message is sent to provide information or to guide him with set of commands. Refer to window below. Figure 2.8 Network Messaging Service The message is displayed at the client machine. 3. Clear Log You can clear the Log that is displayed at the bottom of admin grid. This log displays all commands sent to client machines and their results. - 26 . Net Protector Admin Console REPORTS Reports Menu has following 3 sub-menu options. Refer to the window below. 1. Memory Scan Report Use this option after you have scanned Memory of a client machine. Clicking this option it will open Memory Scan Report for the selected client machine. Refer to the window, shows the memory scan report. - 27 . Net Protector Admin Console Figure 2.9 Scanning Report of Memory It shows scanning report of running processes & their loaded modules in memory Of client PC. It also shows how many Files are scanned and infected files. Memory scan report option displays an error, if the Memory scan report is not available for a client machine. Refer to the error below indicating the same. 2. Virus Scan Report Use this option after you have scanned a client machine for Viruses. Clicking this option it will open Virus Scan Report for the selected client machine. Refer to the window, shows the virus scan report. - 28 . Net Protector Admin Console Figure 3.0 Virus Scan Report This scan report shows complete scanning details of selected machine. It also shows how many Files are scanned and infected files. 3. Process Scan Report Use this option to view the running processes of selected a client PC. It checks and enumerates all running memory processes at client PC. It also checks them for all known Malwares, viruses, Trojans and worms. Refer to window below. - 29 . Net Protector Admin Console Figure 3.1 Process Scanning Report Process Statistics displays detail information of a Selected Process. It shows following details of a process, 1. Type - It shows KNOWN PROCESSES, OUR PROCESSES and UNKNOWN PROCESS that are currently running on your PC. In KNOWN PROCESSES, it shows processes running from windows and Application path. In OUR PROCESS, it shows NPAV related processes. All other remaining processes are listed under UNKNOWN PROCESSES. 2. Exe Path – This column shows path of the running process. 3. PID - It shows process identifier of the running process. 4. Size - Size displays the size of the process file. 5. Modification Date - Modification date displays date on which this file was modified. 6. Creation Date - This displays file creation date. It also shows name of the virus in Type column in case it has infected running process. User can kill the infected process using Kill Process option. For this, select any Row and click on Kill Process button. Select a row in Process statistics. It will show details in the Process Details section. - 30 . Net Protector Admin Console - 31 . Net Protector Admin Console POLICY SETTINGS Policy settings has four sub options listed below, 1. Set Shield Set shield launches, Client Shield Setting window. This provides complete security of client pc. It includes Online Protection, File system Protection, Malware Protection, Start Up settings and password. Refer the window below. Figure 3.2 Client Shield Setting - 32 . Net Protector Admin Console These setting will be effective on the selected client PCs in main grid. Online Protection This option scans every file which is going to be executed on your PC. If online protection level is Normal, it scans user executed processes only. If the online protection is High, it scans all the processes i.e. user initiated & system initiated. Note: It recommended keeping this setting on High so that NPAV gives best protection. File Protection • File system Protection: When selected this option, it scans every new file that is copied to the system. It also scans the files which are modified • Prompt on Virus Detection: If enables it will prompt the user in case virus is found, else will not prompt user on virus detection. Malware Protection Enable Malware File Blocking option allows you to enable malware protection. • Delete Malware On Detection: When this option is selected, it will delete the malware as detected. If this option is not selected, it will just quarantine the malware. • Prompt on Malware Detection: When this option is selected & malware is detected, NPAV will clean the malware and notify user. If it is deselected, it will not prompt the user but cleans the malware. Start Up items This will start following virus checks on windows startup or machine boot • Run the worm trapper: This will scan all the scheduled RUN entries. • Scan memory for virus infection: This will scan all running processes for virus infection. • Start Zero-V antivirus shield: this will enable the Zero-V antivirus shield. Password You can set the password for the NPAV Settings window at a client PC. Refer the window below where the password will be set. - 33 . Net Protector Admin Console Figure 3.4 Password Setting If user at client PC wants to modify the NPAV settings, he will have to enter correct password to the access of settings. To enable the password, enter password in Password field & enter same password in Confirm field. 2. Set Schedule Set schedule allows setting NPAV scanning schedule at a client PC. By default Scheduler, gives schedule of six processes. Refer to Set schedule window shown below. You can specify additional schedules or delete or modify the existing ones using Add, Delete and Edit option. Reset all option is used to reset the modified schedule to default schedule. Figure 3.5 Client Schedule Setting - 34 . Net Protector Admin Console • SpyWare Update: This will check for latest updates for virus definitions • • • • • • • at scheduled time. Whenever Internet is available, it will download the latest virus database. Memory Scan: This will scan the memory for viruses at scheduled time. Full Virus Scan: This will scan all the drives on the PC for viruses at scheduled time. You may schedule this during lunch hours or late evenings. Processes Recorder: This executes Process Recording utility at scheduled time. This utility collects details of all the currently running processes. Malware Scanner: This executes Malware Scanner at scheduled time. It finds and notifies unknown running Malware programs. Centralized Reporting: This option copies all scanning reports at all client PCs to server at the scheduled time. Use this option, if all PCs are on LAN/Network. Email Backup: On scheduled time, this option takes email backup (Outlook and MS Express). Worm trap Scan: This will schedule worm trapper scanning. To add or modify a schedule, check and choose a row in scheduler grid. Click on Add or Edit based on your requirement. It will display following window. This window has following fields Scan Applied: This allows scheduling of SpyWare Update, Memory Scan, Full Virus Scan, Processes Recorder, Malware Scanner, Centralized Reporting, Email Backup & Worm trap Scan. Frequency: This allows setting scheduler frequency. Schedule can be executed Daily or at an interval or at specific time or at startup or weekly. Schedule Date: Choose a date / day here when schedule is to be executed. - 35 . Net Protector Admin Console Schedule Time: Choose a time on which schedule is to be executed. Activate this Schedule: Select this so as to make the schedule active. Schedule set here will be effective from next restart of client PC. 4. Set Online Protection This will launch set online Protection window. It has two options. Change shield State: Using this you can enable or disable Zero-V Antivirus shield. File Protection State: Using this you can enable or disable File protection. 5. Set Virusscan Schedule Set virusscan schedule allows you to set virus scanning schedule. This option is same as that of schedule. This is provided separately as it has high usage. Figure 3.6 Virus Scan Schedule window - 36 . Net Protector Admin Console SHUTDOWN Shutdown menu introduces four sub options listed below, 1. Restart Client Machine This option will restart the selected client machines. Before restarting the machine, it will show following message at client machine so that client can save the open documents or open programs. Figure 3.7 Shutdown Alert Message 2. Shut Down Client Machine This will shut down the selected client machine remotely. 3. Exit Admin Console Software This option is used to exit Admin console software. - 37 . Net Protector Admin Console HELP 1. Registration This is used to Register Admin Console and Activate License for your purchased license. After installing the Admin Console it will install. At the time of Registration it will show following window - 38 . Net Protector Admin Console Enter the Username. This should be user name of windows login of your PC where you have installed the Admin Console software (Server PC). Enter the Password in the password field. This is the windows login password of your PC. Note: After installation of admin console, Auto detect server name and IP address option on the window is checked & it displays server name and IP address of your PC. Please change the IP address to match the local LAN IP if required Based on the number of licenses you have purchased, select the Appropriate Users from the Select Number of Client License option. Select Register Now button. It will display following screen. Please Enter License Code that is provided inside the admin console CD box, or if you do not have this Box, then check your emails for this number. Call Helpdesk and provide with license code and installation code. The helpdesk team will provide you the Net Protector Admin Console Activation Code. Enter Activation Code and then click on “Activate” to activate and start using Net Protector Admin Console. After completion on License code and Activation Code you will see following window, - 39 . Net Protector Admin Console - 40 . Net Protector Admin Console 2. About This will displays Admin Console license details. This shows you how many client licenses are registered. Refer to window below. Figure 3.8 About window - 41 . Net Protector Admin Console SUMMARY This gives you virus count / status information for all clients PCs connected in the network. Refer to client status window below. All machines: This option shows virus count for all machines in the admin console network. It gives details like Antivirus Update date, Last Scan date time, Virus Count, Memory virus count for a Machine Name along with its IP Address. Infected machines: You can to view all infected machines by selecting this option. All the Infected machines will be displayed in Red Color. On the right side of the window, it displays Total number of Machines, total number of Infected Machines, total number of machines Not updated with latest antivirus database. Generate Report: Generate report option generates the summary virus scan report for all PCs in network. It is stored in MachineStatus.CSV file at C:\Program Files\NPServer on server machine. It can be viewed in MS Excel. - 42 . Net Protector Admin Console Figure 3.9 Summary Report of all client Machines - 43 . Net Protector Admin Console Abbreviations PC : Personal Computer NPAV : Net Protector Anti Virus - 44 . Net Protector Admin Console Technical Support Our technical helpdesk team is happy to help you to solve your queries You may contact our technical help desk in following way: Telephone: (IST 9:00 am to 9:00 pm) Call us on o +91 20 60205631 o +91 9823977433 o +91 9226896708 Email : Email us at [email protected] Online Service : Visit us at www.indiaantivirus.com/service.html - 45 . Net Protector Admin Console Copyright Information © Biz Secure Labs Pvt. Ltd., Pune India This document and the product “Net Protector AntiVirus” and “Net Protector Admin Console” is a copyright of Biz Secure Labs Pvt. Ltd, Pune, India. All rights are reserved by Biz Secure Labs Pvt. Ltd. No part of this software and this document may be reproduced, duplicated or modified in any form or incorporated into any information retrieval system, electronic or any other or transmitted in any form without the written prior permission of Biz Secure Labs Pvt. Ltd, Pune. Windows 2000, Windows XP, Windows 2003 and Windows Vista are trademarks of Microsoft Corporation. NetWare is a trademark of Novell Corporation. All brand names and product names used in this manual may be trademarks, registered trademarks or trade names of their respective companies. - 46 .