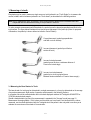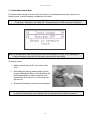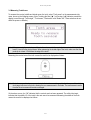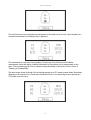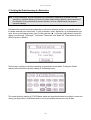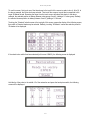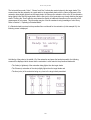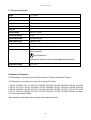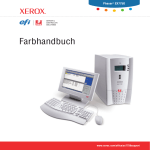
1
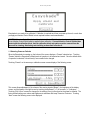
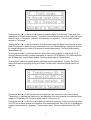
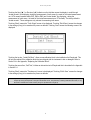
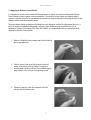
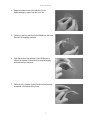
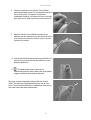
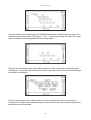
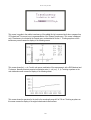
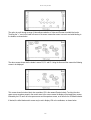
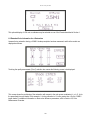
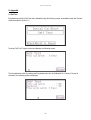
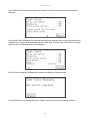
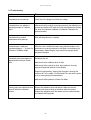
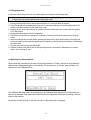
VITA Easyshade
®
Operating manual
Date of issue: 5 -04
Teeth
V
Eq
ui p
ic s
Service
aterials
ing M
eer
en
Vita System
me
nt
A ll - C
e ra
m
3D - Master
VITA Easyshade
Table of Contents
1. Getting started ................................................................................................................................. 2
1.1 Installation of the unit.....................................................................................................................2
1.2 Power-up ..................................................................................................................................... 2
1.3 Selecting Power-on defaults ........................................................................................................ 3
1.4 Applying an Infection Control Shield ............................................................................................ 6
2. Calibrating Easyshade .................................................................................................................... 9
3. Measuring a tooth .......................................................................................................................... 12
3.1 Measuring the base shade of a tooth ........................................................................................ 12
3.1.1 Normal measurement mode ................................................................................................... 13
3.1.2 Measurement averaging mode ............................................................................................... 15
3.2 Measuring tooth areas ............................................................................................................... 16
4. Verifying the shade accuracy of a restoration ............................................................................ 18
5. Measuring a shade tab ................................................................................................................. 22
6. Operating in extended mode .......................................................................................................... 23
6.1 Extended color information for a tooth ....................................................................................... 23
6.2 Extended color information for a restoration .............................................................................. 28
7. Care and maintenance .................................................................................................................. 29
7.1 Packing for transport ................................................................................................................. 29
8. Cleaning and disinfecting ............................................................................................................. 29
9. Appendix ........................................................................................................................................ 30
9.1 Self test ...................................................................................................................................... 30
9.2 Troubleshooting ......................................................................................................................... 32
9.3 Changing the lamp ..................................................................................................................... 34
9.4 Replacing the calibration block .................................................................................................. 34
9.5 Color measurement overview .................................................................................................... 36
9.6 Interpolated 3D-Master shades .................................................................................................. 41
9.7 Technical specifications ............................................................................................................. 42
9.8 Patents and trademarks ............................................................................................................. 42
9.9 Glossary .................................................................................................................................... 43
9.10 Warranty .................................................................................................................................. 44
Symbol Definitions
Attention, consult accompanying documents
Single use
Power ON / Power Off (push-push)
1
VITA Easyshade
1. Getting started
VITA Easyshade® provides accurate shade determination for natural and bleached teeth and a variety of
restorations. Easyshade displays its output on a touch-screen that is also used to make menu selections and
enter data.
1.1 Installation of the unit
1.
2.
3.
4.
Open the Easysshade shipping container and remove the top layer of foam packing material.
Remove the Easyshade base unit and hand piece and remove the protective plastic bags from those
components.
Set the base unit down on a flat surface and rest the hand piece in the cradle.
Plug the Power Cable into the rear of the left side of the instrument and into an appropriate power outlet.
Easyshade is now ready to power up. Refer to page 1 “Quick Start Guide“ ot turn to section 1, “Getting
started“, page 2.
1.2 Power-up
Turn on the Easyshade by pressing the power switch located on the left front of the unit. The fan will turn on
and the screen will display the Easyshade logo.
In the above screen, the three characters following “Release” (shown as underscores) identify the Software
version. The second three characters (also shown as underscores) identify the Shade Table version. During
lamp warm-up, the following screen is displayed:
When lamp warm-up is complete, the following screen is displayed:
2
VITA Easyshade
Easyshade is now ready to be calibrated. Calibration is required each time you power-up the unit, or each time
you apply an Infection Control Shield, but not required between each measurement.
CAUTION: Do not calibrate Easyshade with an Infection Control Shield that has been in contact with a patient.
A new Infection Control Shield must be applied before calibration. If a used Infection Control Shield makes
contact with the calibration block, then the calibration block and retainer must be removed from the
base unit for cleaning, disinfecting and sterilizing as described in Section 8.
1.3 Selecting Power-on Defaults
When the Easyshade is warming up, the bottom of the screen displays a “Presets” selection box. Touching
“Presets” allows the Easyshade’s default mode of operation to be selected and saved. Once the default mode
of operation is selected, it should rarely if ever needed to be changed.
Touching “Presets” on the warm-up or calibration screen causes display of the following screen:
This screen allows adjustment of the volume of the warning signals (“Beeps”), the brightness of the display
screen, and the timeout of the light source by touching the decrease (“<<”) or increase (“>>”) indicators.
Touching “Exit & Save” causes the changes to the settings (if any) to be saved as the power-on defaults. The
factory default settings are volume and brightness at maximum and Lamp Timeout at 5 minutes. Touching
“Next” causes the following screen to be displayed:
3
VITA Easyshade
Touching the Next (“►”) or Previous (“◄”) indicators causes the display to scroll through “Tooth single” (the
measurement of the base shade of a tooth), “Tooth areas” (the measurement of the cervical, middle and incisal
areas of a tooth), or “Restoration” (verification of the accuracy of a restoration). The factory default mode of
operation is “Tooth single”.
Touching the Next (“►”) or Previous indicators in the second bar causes the display to scroll through "Normal
Mode Only (displays the results of a single measurement of a tooth) "Standard/Average" (displays the result of
the a single measurement of a tooth or the average of several measurements). The factory default mode is
"Normal Mode Only".
Touching the Next (“►”) or Previous indicators in the third bar causes the display to scroll through "3D &
Classical" (displays the result of a single measurement of a tooth in VITA 3D-Master or VITA Classical shades)
and "3D-Master only" (only 3D-Master shades). The factory default mode is "3D-Master only".
Touching “Back” causes the volume/brightness adjustment screen to be displayed. Touching “Exit & Save”
causes the changes to the settings (if any) to be saved. Touching "Next" causes the following screen to be
displayed:
Touching the Next (“►”) or Previous indicators in the upper bar (“◄”) causes the screen to scroll through
"Translucency On" (indicates the translucency in the middle third of the tooth compared to an equivalent shade
sample) or "Translucency Off". The factory default mode is "Translucency On".
Touching the Next (“►”) or Previous (“◄”) indicators in the third bar causes the screen to scroll through "Show
LCH OFF" (do not display detailed color information for a measurement) and "Show LCH ON" (for displaying the
results of a measurement as L (lightness), C (chroma) and H (hue)). The factory default mode is "Show LCH
OFF".
4
VITA Easyshade
Touching the Next (“►”) or Previous (“◄”) indicators on the third bar causes the display to scroll through
“Incisal ceramic” (for displaying, during the measurement of tooth areas, the result of the incisal measurement
as a VITA ceramic enamel shade, EN1, EN2 or EN3) and “Incisal shade” (for displaying - during the
measurement of tooth areas - the result of the incisal measurement as a VITA shade). The factory default is
“Incisal ceramic”. These settings are only relevant for measuring tooth areas.
Touching “Back” causes the “Tooth Single” screen to be displayed. Touching “Exit & Save” causes the changes
to the settings (if any) to be saved as the power-on defaults. Touching “Next” causes the following screen to be
displayed:
Touching the top bar, “Install Cal Block”, allows a new calibration block to be installed on the Easyshade. This
will only be required if the calibration block that was shipped with the instrument is lost or damaged. Refer to
Section 9.4 in the Appendix, “Replacing the Calibration Block”.
Touching the second bar, “Self Test”, initiates an interactive test of Easyshade that is described in the Appendix
in Section 9.1.
Touching “Back” causes the “Translucency” screen to be displayed. Touching “Exit & Save” causes the changes
to the settings (if any) to be saved as the power-on defaults.
Note:
If you have made changes to Easyshade settings on any of the Preset menus that you don’t want to save, you may abort the
changes by turning off Easyshade. Throughout the Presets menus, and particularly if entering Calibration Block data, it may
be easier to activate touch-screen areas by using a Q-Tip rather than a finger tip.
5
VITA Easyshade
1.4 Applying an Infection Control Shield
It is important to properly clean and disinfect Easyshade prior to patient use and to use Easyshade Infection
Control Shields to prevent patient cross-contamination. The Infection Control Shields also must be used to
protect the optics in the probe tip from damage and provide a non-slip surface when contacting the tooth to help
assure accurate shade determination results.
These non-sterile shields are made of polyurethane, are non-allergenic, and are for single patient use only. A
box of 40 shields is shipped with Easyshade. Infection Control Shields may be re-ordered from VITA in
quantities of 4 boxes of 40 shields (VITA Order No. D39003). It is recommended that you wear gloves while
applying the Infection Control Shield.
1. Remove a Shield from the package and hold the shield at
the top (the wide end).
2. Peel the corner of the cover film (as shown) from the
pocket of the Infection Control Shield. To make this
process easier, bend the Infection Control Shield slightly
away from the corner that you are beginning to peel.
3. Continue to peel the cover film completely off of the
Infection Control Shield pocket.
6
VITA Easyshade
4. Graps the bottom corner of the Infection Control
Shield and begin to peel it from the cover film.
5. Continue to peel the Infection Control Shield from the cover
film until it is completely removed.
6. Open the pocket of the Infection Control Shield (this is
easier if the Infection Control Shield is stretched slightly)
and insert the tip of the probe.
7. Pull back on the Infection Control Shield until the probe tip
is centered in the bottom of the pocket.
7
VITA Easyshade
8. Continue to pull back on the Infection Control Shield,
stretching the shield at least 2-3 cm beyond the retainer at
the top of the probe. The material can withstand
considerable streching. It is important to have a uniformly
tight stretch and to avoid unevenness over the probe tip.
9. When the Infection Control Shield is stretched to its
maximum, pull the shield down over the retainer at the top
of the probe; then release the shield to secure it in place,
hooked on the retainer.
10. Verify that the Shield is stretched uniformly and flatly over
the face of the probe tip and that the shield has not torn
during the application.
11.
The shield should remain in place for all
measurements with the same patient. After single-patient
usage the shield should be properly disposed.
The photo shows an improperly positioned Infection Control
Shield. The shield is not stretched uniformly over the tip of the
probe. This non-uniform distribution of material over the probe tip
may cause inaccurate shade measurement.
8
VITA Easyshade
2. Calibrating Easyshade
Note: Easyshade is calibrated at the factory for the Calibration Block that is shipped with the instrument.
If you own more than one Easyshade, care must be taken not to switch Calibration Blocks between
Easyshade units, which would compromise the accuracy of measurements. The last three digits of the
Easyshade serial number are engraved in the side of the calibration block for identification.
After Easyshade has been powered-on and the lamp has warmed up, the following screen is displayed to
instruct the user to calibrate Easyshade before making a measurement.
1. Remove Easyshade from the cradle.
2. Apply an Infection Control Shield as described in
section 1.3.
3. Grasp the Hand Piece and insert the probe tip
into the calibration port aperture so that is makes
perpendicular contact with the calibration block.
Note:
When the probe is perfectly vertical, it is not perpendicular to the calibration block. To be
perpendicular to the calibration block, the probe must be tipped slightly toward the front of the
instrument.
Also, to assure that the Infection Control Shield fits properly into the calibration block aperture, the
Hand Piece must be held straight in front of the Easyshade for calibration. The above photo shows
the Hand Piece turned 30° to the right, which is the maximum permissible angular deviation (right or
left) for proper Easyshade calibration.
9
VITA Easyshade
4. Press the probe tip downward onto the calibration block, maintaining 90° contact between the probe tip
and the calibration block with pressure sufficient to activate the Calibration switch. Calibration begins
when the screen below is displayed:
Hold the probe tip steadily in place until the Easyshade emits a single “Beep” and displays the following screen,
which indicates that a successful calibration has been made:
Caution: If the probe is lifted off of the calibration block too soon, before the "Beep" is heard, the calibration
measurement may be compromised and should be repeated as indicated by the following screen:
10
VITA Easyshade
If Easyshade is set to measure a single area on a tooth and “Normal Mode Only” has been selected in the
Preset menus, once the probe has been lifted out of the calibration port and the instrument is successfully
calibrated, the following screen is displayed:
If Easyshade is set to measure a single area on a tooth and “Normal or Average” has been selected in the
Preset menus, then the following screen is displayed:
To display shade matching results based on the average of a series of measurements of a tooth, touch
“Average OFF” on the above screen to change it to “Average ON”. Measurement averaging is described in
section 3.1.2.
11
VITA Easyshade
3. Measuring of a tooth
Easyshade may be used to measure a single area on a tooth (referred to as “Tooth Single”) or to measure the
cervical, middle, and incisal areas (referred to as “Tooth Areas”) as described in the following sections.
Note: Prior to measuring a tooth, an Infection Control Shield must be applied to the Easyshade probe and
Easyshade must be calibrated according to the procedure in section 2.
To make accurate measurements with Easyshade, the probe tip must be placed perpendicular and flush to the
tooth surface. The figure below illustrates correct and incorrect placement of the probe tip. (Note: for purposes
of illustration, the probe tip is shown without an Infection Control Shield.)
Correct placement: (probe tip perpendicular
and flush on tooth surface)
Incorrect placement: (probe tip not flush on
surface of tooth)
Incorrect incisal placement:
(probe tip must be have a minimum distance of
2 mm to the incisal edge)
Incorrect cervical placement:
(probe tip too close to gingival tissue.
Maintain minimum distance of 2 mm to tissue margin.)
3.1 Measuring the Base Shade of a Tooth
The base shade of a tooth may be determined in a single measurement, or it may be determined as the average
of several measurements. Both modes of operation are discussed in the following Sections.
In all modes it should be verified whether the tooth shade displayed matches the Toothguide 3D-MASTER or
VITAPAN classical shade sample.
Should a shade deviation be found, the measurement is repeated in the "Average" mode (see page 15,
Measurement Averaging Mode). If this is done and the shade you have found is not identical with the values
measured, use the shade determined with the Toothguide since the patient is also only able to use his eyes to
evaluate the correctness of the shade of his restoration.
12
VITA Easyshade
3.1.1 Normal Measurement Mode
To measure the base shade of a tooth, select “Tooth single” on the measurement style menu, shown on the
following screen, on which Averaging is available but is not active.
Note:
Touching the Next (“►”) or Previous (“◄”) indicators causes the display to scroll through “Tooth single”,
“Tooth areas”, “Restoration” and “Shade Tab”. These selections do not affect the power-on defaults.)
Note: It is recommended to clean and remove any stains from the surface of a tooth prior to measurement.
It may be necessary to wipe the tooth with gauze to prevent the tip from sliding.
To measure a tooth:
1. Hold the probe tip steay at 90° to the surface of the
tooth.
2.
While holding the probe tip steadily against the tooth,
press the Measurement Button on the Hand Piece until
the Easyshade beeps to indicate completion of the
measurement, which may be 1 to 2 seconds after the
light turns off.
3. Easyshade will display the results of the measurement.
Note: If the probe tip is moved off of the tooth prior to the Easyshade sounding a beep, an error message or
an erroneous measurement may be displayed and the measurement may need to be repeated.
13
VITA Easyshade
On the following screen, Easyshade shows that the nearest Classical shade is A1 and that the nearest
interpolated 3D-Master shade is 1M1.5. Touching either the Classical or the 3D-Master measurement causes
the display of additional information on the positioning of the measurement in color space. This information may
be of use to examiners having knowledge of color theory. Refer to Section 6, “Operating in Extended Mode”.
In some cases, Easyshade will display one or two alternate Classical shades in a smaller font below the nearest
Classical shade, which is displayed in a larger font. Below are two such examples:
The above example shows that the nearest Classical shade is A3, but that the measurement is actually between
A3 and A3.5. The example below shows that the nearest Classical shade is A2, but that the measurement is
actually between A2, B3 and A3. B3 and A3 are very close neighbors in the VITA Classical color space.
14
VITA Easyshade
3.1.2 Measurement Averaging Mode
The Measurement Averaging Mode is intended to be used for teeth that have regions of many different colors,
such as teeth with enamel hypoplasia, tetracycline staining, or a blotchy appearance. Measurement Averaging
is available for making single-location measurements of teeth or restorations, and is not available for measuring
tooth areas. The Measurement Averaging mode effectively increases the measurement area of the Easyshade
probe by averaging a range of colors over a measurement area and determining an average shade. To display
the average result of a series of measurements of the same tooth, Averaging must be made available in the
Presets menu, as described in Section 1.2, and turned ON as shown in the following display:
In this mode of operation, the tooth may be measured several times. Each time the tooth is measured, the
shade is displayed along with the number of measurements that have been averaged. It is recommended that
the tooth is measured a minimum of three times and that the tooth is measured until two successive
measurements report the same shade.
NOTE: When working in the Averaging mode, it is important to return to the Menu after completing the
measurement of a tooth to reset the Average counter and prevent more than one tooth from being
averaged.
15
VITA Easyshade
3.2 Measuring Tooth Areas
To measure the cervical, middle and incisal areas of a tooth, select “Tooth areas” on the measurement style
menu, shown on the following screen. (Note: Touching the Next (“►”) or Previous (“◄”) indicators causes the
display to scroll through “Tooth single”, “Tooth areas”, “Restoration” and “Shade Tab”. These selections do not
affect the power-on defaults.)
Note: When measuring the cervical area of the tooth, make sure that the probe tip is in contact with the tooth at
least 2.0 mm from the gingival tissue. When measuring the incisal edge of the tooth, make sure that the
probe tip is at least 2.0 mm from the edge of the tooth.
Measuring the cervical area of the tooth causes the result to be displayed as follows:
Note: If a tooth area needs to be re-measured, touch the tooth area on the graphical tooth map and the solid
circle target will return to that site, allowing the new measurement to be made. The measurement results
from the other two areas will remain unchanged.
On the above screen, the “OK” indicates that the cervical area has been measured. The solid circle target
indicates that the middle 1/3 of the tooth is the next area to be measured. Measuring the middle of the tooth
causes the result to be displayed as follows:
16
VITA Easyshade
The solid circle target now is prompting the measurement of the incisal area of the tooth. Upon completion of a
successful measurement, the following screen is displayed:
The measurement of tooth areas is now complete. Touching any of the Classical or the 3D-Master
measurements causes the display of additional information on the positioning of the measurement in color
space. This information may be of use to examiners having knowledge of color theory. Refer to Section 6,
“Operating in Extended Mode”.
The above screen shows the shade of the incisal edge reported as a VITA ceramic enamel shade. Alternatively,
depending on the selection of the Preset menu described in Section 1, the incisal edge may be reported as a
VITA shade, as shown below:
17
VITA Easyshade
4. Verifying the Shade Accuracy of a Restoration
Note: To verify a restoration, only the base shade of the restoration is measured in the middle 1/3 of the
restoration. A minimum thickness of 0.8 mm of ceramic material must be present to assure accuracy of
the verification. A very translucent all-ceramic restoration, such as a Spinell veneer may produce
inaccurate readings.
Easyshade allows dental technicians and dentists to verify that a restoration shade is an acceptable match to
the shade measured at the natural tooth. To verify a restoration, select “Restoration” on the measurement style
menu, shown on the following screen. (Note: Touching the Next (“►”) or Previous (“◄”) indicators causes the
display to scroll through “Tooth single”, “Tooth areas”, “Restoration” and “Shade Tab”. These selections do not
affect the power-on defaults.)
The first step in verifying a restoration is selecting the prescribed intra-oral shade. Touching the “Shade”
selection area of the screen causes the display of the following screen:
This screen allows the selection of VITA 3D-Master shades and interpolated shades by touching the screen and
moving your finger either to a 3D-Master shade or over a point midway between two or four shades.
18
VITA Easyshade
To use this screen, first touch one of the three boxes in the top left of the screen to select a hue (L, M or R). In
the above example, the M hue has been selected. Then touch the screen at a point that corresponds to the
target 3D-Master shade. Removing the finger from the touch screen will select that shade. In the above
example, the selected position is midway between value groups 2 and 3, yielding a 2.5 value group. Similarly,
the selected chroma position is midway between 2 and 3, yielding a 2.5 chroma.
Touching the “Classical” selection area at the top-right of this screen causes the display of the following screen,
from which a Classical shade may be selected. Similarly, touching “3D-Master” causes the selection panel for
3D shades to be displayed.
If the shade to be verified has been selected (in this case 2.5M2.5), the following screen is displayed:
Hold the tip of the probe to the middle 1/3 of the restoration and press the hand piece switch; the following
screen will be displayed:
19
VITA Easyshade
The horizontal lines under “Value”, “Chroma” and “Hue” indicate the nominal values for the target shade. This
screen shows that the restoration is a good match to the prescribed shade, with the Value (or lightness) of the
restoration being slightly lighter than the target shade, the Chroma (the saturation of the color) of the restoration
being slightly lower than the target shade, and the Hue (color) of the restoration very closely matching the target
shade. Touching the “Good” selection area causes the display of additional information on the accuracy of the
measurement in color space. This information may be of use to examiners having knowledge of color theory.
Refer to Section 6, “Operating in Extended Mode”.
If a Classical shade is entered as the prescribed intro-oral shade for the restoration (in this example A3), the
following screen is displayed:
Hold the tip of the probe to the middle 1/3 of the restoration and press the hand piece switch; the following
screen will be displayed which shows that the restoration is a fair match to the prescribed shade with:
• The Value (or lightness) of the restoration being lighter than the target shade.
• The Chroma (or saturation of the color) slightly lighter than the target shade and
• The Hue (color) of the restoration being very close to the target shade prescribed.
20
VITA Easyshade
Touching the “Fair” selection area causes the display of additional information on the accuracy of the
measurement in color space. This information may be of use to examiners having knowledge of color theory.
Refer to Section 6, “Operating in Extended Mode”. Touching the “Menu” selection area causes the display of the
measurement style menu:
4.1 Assessing the Quality of a Restoration
Each of the above screens showing the comparison of the measurement results with the entered shade also
evaluates the quality of the comparison as Good, Fair, or Adjust.
1.
“Good” means that an expert at shade matching may see little or no difference between the
restoration and the target shade to which it has been verified.
2.
“Fair” means that an expert at shade matching may see a noticeable but acceptable difference
between the restoration and the target shade to which it has been verified. For an anterior restoration,
this may not be acceptable.
3.
“Adjust” means that an Expert at shade matching may see a noticeable difference between the
restoration and the target shade to which it has been verified, and that the restoration should be
adjusted to be an acceptable shade match.
21
VITA Easyshade
5. Measuring a Shade Tab
To learn how to use Easyshade, it is initially useful to practice using the instrument by measuring VITA
3D-Master or Classical shade tabs.
To measure a shade tab, select “Shade Tab” on the measurement style menu, shown on the following screen.
(Note: Touching the Next (“►”) or Previous (“◄”) indicators causes the display to scroll through “Tooth single”,
“Tooth areas”, “Restoration” and “Shade Tab”. These selections do not affect the power-on defaults.)
The shade tab may now be measured by holding the probe tip at 90° to surface at the middle 1/3 of the tab,
pressing the measurement button on the Hand Piece, and waiting until the Easyshade “beeps” to indicate
successful completion of the measurement. A screen is then displayed that compares the measurement results
with the closest shade match as determined by Easyshade.
Note: In the “Shade Tab” mode of operation, Easyshade does not display detailed positioning of the
measurements in color space. This mode is to be used for practicing shade-taking measurements.
22
VITA Easyshade
6. Operating in Extended Mode
After a shade measurement is reported, additional information on optical characteristics can be displayed by
simply touching the reported Classical or 3D-Master shade. This information may be of use to examiners having
knowledge of color theory. For references on color theory, refer to the Appendix, Section 9.5, Color
Measurement Overview.
6.1 Extended Color Information for a Tooth
Assume that a tooth has been measured and the results are displayed as follows:
Touching the reported 3D-Master shade causes the following screen to be displayed:
This screen shows the positioning of the tooth in 3D-Master color space. It shows that the tooth has a red Hue,
an interpolated Value of 3.5 and a Chroma of 1. Touching anywhere on this screen causes display of the
following screen:
23
VITA Easyshade
The above screen shows the positioning of the 3D-Master measurement in Value-Chroma color space. This
initial screen shows all Hue values. Touching the "+ " und " - " areas on the scroll bar to the right of the screen
causes the display to scroll through different Hues, as shown below:
The option to scroll through a range of Hues allows evaluation of Value and Chroma at variable Hue levels.
Touching the "+ " area in the lower left corner of the screen causes the screen to zoom-in and adds labeling to
the shades, as shown below:
The above screen shows that the Value is between a 3 and a 4 and that the Chroma is very close to a 1.
Touching the color space screen anywhere except in the control areas in the corner causes the display of the
translucency screen, shown below:
24
VITA Easyshade
This screen is a guide to the relative translucency of the middle third of a measured tooth when compared to a
VITA shade tab. This screen is not a recommendation of the "Enamel" translucency. This screen is displayed
only if Translucency is activated in the Presets menu, as described in Section 1. Touching anywhere on the
translucency screen causes the display of the following screen:
This screen shows the L, a, b, C and h color space coordinates of the measurement, with a D65 illuminant and
2º observer. Normally these are reported as tristimulus sets: (L, a, b) or (L, C, h). Touching anywhere on the
color tristimulus screen causes the display of the following screen:
This screen shows the spectrum for the tooth in the wavelength range 400 to 700 nm. Touching anywhere on
this screen causes the display of the original shade-match results screen:
25
VITA Easyshade
A similar sequence of screens is displayed upon touching on the Classical shade:
C1
This screen shows the difference between the color space positioning of the tooth tristimulus values and the
corresponding Shade Tab. The bar graphs show that the tooth is darker, slightly less chromatic, and much more
reddish than a C2. Touching anywhere on this screen causes the display of the following screen:
The above screen shows the positioning of the Classical measurement in Classical Value-Chroma color space.
This initial screen shows all Hue values. Touching the " + " and " – " areas on the scroll bar to the right of the
screen causes the display to scroll through different Hues, as shown below:
26
VITA Easyshade
The option to scroll through a range of Hues allows evaluation of Value and Chroma at variable Hue levels.
Touching the "+ " area in the lower left corner of the screen causes the screen to zoom-in and adds labeling to
the shades, as shown below:
The above screen shows that the shade is near a D2, C1 and C2. Using the Hue scroll bar causes the following
screen to be displayed:
This screen shows that when Hue is also considered, C2 is the nearest Classical shade. Touching the colorspace screen anywhere except in the control areas in the corner causes the display of the translucency screen,
followed by the LCh and Lab color-space screen and the spectrum screen, as is done for the 3D-Master shades.
If desired, the initial shade match screen may be set to display LCH color coordinates, as shown below:
27
VITA Easyshade
This optional display of LCH color coordinates may be selected as one of the Presets described in Section 1.
6.2 Extended Color Information for a Restoration
Assume that a restoration having a 2.5M2.5 shade prescription has been measured, and that the results are
displayed as follows:
Touching the quality assessment (“Good”) selection box causes the following screen to be displayed:
This screen shows the positioning of the restoration with respect to the color space coordinates (L, a, b, C, h) for
the prescribed intra-oral shade. In this example, L for the restoration is 1.8 units greater than L for the 2.5M2.5
target shade. For additional information on these color difference parameters, refer to Section 9.5, Color
Measurement Overview.
28
VITA Easyshade
7. Care and Maintenance
Although the cable connecting the Easyshade Hand Piece to the base unit is reinforced with a stainless steel
monocoil, care should be taken not to bend the cable, or close a door or a drawer on the cable, in such a way
that the cable develops a kink. If the cable becomes kinked, the wires and fiber optic components in the cable
may be damaged.
Care should be taken not to drop the Easyshade Hand Piece or accidentally pull the Hand Piece cable in such a
way that the base unit is pulled off a work surface and falls onto the floor.
To assure that the Easyshade is operating properly, periodically test VITA shade tabs to verify the accuracy of
the instrument.
7.1 Packing for Transport
Place the VITA Easyshade with the front facing downward into the lower layer of foam packing material; the
cable of the hand piece should be laid around the Easyshade as shown in the Quick Start Guide. It must be
assured that the cable is not laid around too closely to avoid bending or kinking.
When Easyshade has been placed correctly into the lower layer of foam packing material, the upper layer of
foam packing material can be up on top of it.
The empty space (intended to store the User Manual) below the cover of the shipping container can be filled
with additional packaging material, e.g. foam material.
8. Cleaning and Disinfecting
After each patient use, the Easyshade hand piece and base unit should be wiped down with a dental operatory
surface disinfectant wipe such as MetriWipes®, Sani-Cloth® Plus, Sani-Cloth HB®, or Asepti-Wipe®. The
recommended surface wipes are based on quaternary ammonium compounds.
Iiodine or phenyl phenol-based products must not be used to clean or disinfect Easyshade since permanent
discoloration may result that is not covered by the Limited Product Warranty (Section 9.10).
Easyshade must be calibrated only with a fresh Infection Control Shield. In the event that the Calibration Block
becomes contaminated, the Calibration Block and Retainer must be removed from its fixture on the cradle arm
and sterilized using a steam or chemical autoclave per the directions of the sterilizer’s manufacturer.
Note: The dentist or health care provider should follow the CDC’s recommendations for universal
precautions during the use of Easyshade at all times.
29
VITA Easyshade
9. Appendix
9.1 Self Test
Easyshade has a built-in Self Test that is initiated through the following screen, accessible through the “Presets”
menus described in Section 1.2.
.
Touching "Self Test"” begins the test and displays the following screen:
Test the calibration switch by inserting the Easyshade probe into the Calibration Port 3 times. If the test is
successful, the following screen is displayed:
30
VITA Easyshade
Test the Hand Piece by pressing the probe switch 3 times. If the test is successful, the following screen is
displayed:
Cover the tip of the Easyshade probe, place the probe against an opaque surface, or insert the probe into the
Caibration Port in order to eliminate background light. Press "Next" to initiate a test of the dark level, the lamp
and the shutter. The following screen is then displayed:
When the test is completed, Easyshade will reset itself and display the following screen:
Touching "Back" returns the Easyshade to the "Presets" menu from which the Self Test was initiated.
31
VITA Easyshade
9.2 Troubleshooting
Problem
Then …
Easyshade does not power-up
Check that unit is plugged in and has line voltage
Easyshade does not calibrate or
repeatedly prompts to "Calibrate
Again"
Make sure that the probe tip is properly placed into the calibration port
aperture and held at a 90º angle and is not being lifted before hearing
the “beep” that indicates completion of calibration. Reposition the
probe as needed.
Easyshade will not make a
measurement after power-up
Wait until lamp warm-up is complete.
A measurement is made and
Easyshade displays "---" in place of a
Classical or 3D-Master shade.
Either the color is outside the known range of dental shades, or the
probe was not correctly positioned or was lifted or moved during the
measurement. Measure again, being careful to use proper probe
placement technique.
Consistently inaccurate shades are
displayed when testing on Shade
Tabs.
Recalibrate the unit
Make sure that the calibration block is clean.
Make sure that the probe tip is clean, then recalibrate. Use only
approved Easyshade Infection Control Shields.
Repeat the measurement, assuring that the probe is touching the
surface at 90° in the middle 1/3 of the Shade Tab, and that the probe
tip is not moving during the measurement.
Make sure that Easyshade is in Shade Tab Mode.
Pressing probe onto calibration block
does not initiate the calibration
process
Remove the calibration block and retainer. Make sure that the
calibration block moves freely up and down within the retainer.
Replace the calibration block and retainer onto the cradle assembly
and calibrate the Easyshade.
32
VITA Easyshade
Problem
Inaccurate or inconsistent
shades are displayed when
measuring natural teeth.
Then …
Make sure that Easyshade is in Tooth Mode.
Recalibrate the unit.
Make sure that the probe tip is clean, then recalibrate. Use only approved
Easyshade Infection Control Shields.
Repeat the measurement, assuring that the probe is touching the surface at 90°
in the middle 1/3 of the tooth, and that the probe tip is not moving during the
measurement.
Make sure the tooth is clean and free of any easily removable stains before
measuring.
Determine whether any restorative materials, e.g. amalgam or composite
fillings, are present in the tooth that may be contributing to measurement
variations. Measure the shade of an adjacent natural tooth of comparable
shade.
The shade of the tooth being measured may be inconsistent for natural
reasons. Switch to the "Averaging Mode" and take several measurements in
approximately the same area of the tooth until a consistent shade is reported.
Error Message
Then …
“Write Flash”
(“Key”, “Fail”, or “Verify”)
“Lamp Intensity Low)” or
“Lamp Not Secure”
Call the VITA-Hotline at: +49 - 7761 / 562 222.
“Please Re-measure”
- “Unstable”
- “Lifted too soon”
- “Angle out of range”
- “Too close to edge”
- “Surface too irregular”
- Hold probe still during measurement.
- Wait for “beep” before lifting probe.
- Hold probe perpendicular to surface.
- Hold probe at least 2mm from edge.
- Measure a different area if possible
Check lamp per the instructions in Section 9.3. Replace if
necessary.
“Please Re-calibrate”
- “Bias level"
- “Check cal block”
- Hold probe still during measurement
- Check top surface of calibration block
“HP”
(“Config”, Enum”, “Reset”, PreCnt”, “Sample”, “Bias”, “Contl”, “Stop”,
“Per”, “Oper”, “Addr”, “Disc”, “Inter”, “StpSamp:, “SetCntrl”, “SetPre”,
“SmpTime”, “Gate”, or “StrSamp”)
Turn off Easyshade power. Wait 10 seconds then turn on
power to Easyshade. If Error Message is still displayed, call
VITA-Hotline at: +49 - 7761 / 562 222.
33
VITA Easyshade
9.3 Changing the lamp
In the event that the lamp burns out, it should be replaced according to the following steps:
Note: Care should be taken to wipe off the bulb surface before installing it. Fingerprints on the surface of a
halogen bulb can become carbonized and impair light output.
1. Unplug the Easyshade from the power source and allow it to cool for at least 30 minutes.
2. Place Easyshade with the display down on a soft, non-abrasive surface to protect the display screen. Be
careful to not place pressure on the Hand Piece cradle.
3. Remove the two screws at the bottom of the base unit that hold the lamp cover in place with the supplied
3/32” Allen wrench.
4. Unplug the lamp connector from the lamp board.
5. The lamp is held in place by a spring-clip. Firmly pull on the end of the lamp to remove it from the lamp
holder.
6. Insert the new lamp into the lamp holder, pressing the lamp until it is firmly held in place by the spring-clip.
Avoid over-insertion of the lamp that would cause the lamp to contact the shutter mechanism. Avoid touching
the bulb surface.
7. Plug the lamp connector into the lamp board.
8. Replace the lamp cover and secure the two mounting screws. Reconnect the Easyshade to the power
source. It is now ready for use.
9.4 Replacing the Calibration Block
When Easyshade is warming up, the bottom of the screen displays a “Presets” selection box that allows the
default mode of Easyshade operation to be selected. The second screen of “Presets” also provides for the
replacement of the Calibration Block.
The Calibration Block will need to be replaced only if the Calibration Block shipped with the Easyshade has
been lost or damaged. Each replacement Calibration Block is shipped with a document containing a series of
twenty 4-digit numbers.
By selecting "Install Cal Block" on the above screen, the following screen is displayed:
34
VITA Easyshade
Selecting “Next” on the above screen will display the screen that is used to enter the 4-digit calibration numbers
provided with the replacement Calibration Block. Numbers are sequentially entered into the 4-digit Code Box by
touching numbers on the keypad at the left side of the screen.
Select the 4 numbers for block Code A. Once the fourth digit has been entered, the screen will automatically
advance for the entry of block Code B. If you need to correct an entry at any time, simply touch the number then
touch the replacement number on the touch keypad.
On any of the Calibration Block screens, selecting the "<<" and ">>" buttons will cause the display of the
previous or next screen, respectively. Once the final block Code has been entered, the Calibration Block data
will be automatically updated.
Caution: Touching the “Exit” button prior to completing the entry of Block Codes will abort the operation and
require that the process be restarted.
35
VITA Easyshade
9.5 Color Measurement Overview
The perception of color involves three elements: a light source, an object (which in this discussion is a tooth)
and an observer. Although gloss, translucency and opalescence all affect the appearance of a tooth, this
overview will be restricted to color measurement.
To begin, it is important to understand that the terms "light source" and "illuminant" have precise and different
meanings. “Light source” is a general term for an emitter of visible electromagnetic radiation, such as a candle,
incandescent bulb or the sun. Since the perceived color of some objects changes with different light sources,
specifying the color of an object requires that the light source be defined. An "Illuminant" is a specification of a
particular light source. Common illuminants include:
Illuminant Description
Color temperature (Kelvin)
A
Tungsten lamp
2856
B
Direct sunlight
4870
C
Average daylight from an overcast sky
6770
D65
A "non-real" standard – mathematical construct
6500
D55
A "non-real" standard – mathematical construct
5500
Easyshade uses the D65 (6,500 ºK) illuminant for shade matching. This illuminant is a mathematical construct
that cannot be physically realized as a light source, but is close to average northern sky daylight.
Specular Light
Specular light, commonly referred to as “glare”, is reflected off the surface of an object and, with the exception of
metals, contains no color information about the object. Color measurement instruments therefore must indicate
whether a measurement is made with specular light included or excluded. Specular light is an important
consideration with respect to the shade-matching of teeth.
When an examiner looks at a tooth, there are often “hot-spots” of specular light present. To match the shade
accurately, the examiner will shift the line of vision to eliminate these hot-spots from consideration. These hotspots also are present for camera-based shade-matching systems, and if not mathematically eliminated from
consideration during the shade-matching calculation, they can compromise the accuracy of the measured
shade. Importantly, Easyshade uses a patented probe design that provides a specular-excluded measurement,
assuring that glare off the surface of the tooth will not compromise the accuracy of the measurement.
36
VITA Easyshade
Color Space
A device-independent color space is
required for measuring and quantifying
color that is independent of the
measuring system. Several such
systems have been developed to be
true representations of colors as
perceived by the human eye. The most
commonly used color space is based on
the three colors red, green and blue
(also referred to as X, Y and Z). The
Commission Internationale d'Eclairage
(CIE) is an international standards
organization with respect to the
measurement and reporting of color.
The CIE L*a*b* color space has a
vertical axis that indicates relative
lightness or darkness. The two
horizontal axes represent the amounts of
red/green and yellow/blue. In the L*a*b*
color space:
Figure 3. CIE L*a*b* color space
• “L” is a measure of the Lightness of an object, ranging from 0 (Black) to 100 (White).
• “a” is a measure of redness (a > 0) or greenness (a < 0).
• “b” is a measure of yellowness (b > 0) or blueness (b < 0).
The L*a*b* color space is shown in Figure 1. Along the vertical axis (the “neutral” axis), between black (L=0) and
white (L=100) is a continuous range of gray shades.
The CIE L*C*h* system is a cylindrical coordinate representation of the L*a*b* color space. In any horizontal
color plane in the L*a*b* color space, “C” (or Chroma) is measured as the distance from the vertical (neutral or
gray) axis, and “h” (or Hue) is the angle of displacement as measured from the red/green axis. This is shown in
the color plane below, which is a horizontal slice (a region of constant L) from Figure 1.
The axes for the L*C*h* color space are the same as for the L*a*b* color space. The difference between the
systems is that the L*C*h* color space (often referred to simply as “LCh”) uses cylindrical coordinates, while the
L*a*b* color space (often referred to as “CIE Lab” or simply “Lab”) uses Cartesian coordinates.
37
VITA Easyshade
Figure 4. Chroma (C) and Hue (h)
The LCh system defines the three visual aspects that are most often used to define a color:
• L – Value is the brightness of the color. It is the degree of lightness or darkness of a color relative to a
series of grays ranging from white (L=100) to black (L=0).
• C – Chroma is the saturation or strength of a color. It is the difference between the color and a gray
having the same brightness, measured as the distance from the neutral axis. It is sometimes referred to
as the purity of the color.
• h – Hue is what we commonly call color (red, yellow, green, blue or some other color). It corresponds to
the physical wavelength of light. It is represented as an angle ranging from 0° to 360°. Angles that
range from 0° to 90° are reds, oranges and yellows; 90° to 180° are yellows, yellow-greens and greens;
180° to 270° are greens, cyans (blue-greens) and blues; 270° to 360° are blues, purples, and
magentas, returning again to red at 360°.
The Vita 3D-Master® System
In the VITA 3D-Master system, the range of normal Lightness for human teeth is represented by Value Groups
ranging from 0 (the lightest) to 5 (the darkest). Within a given Value Group, the Chroma is represented by a
number ranging from 1 to 3. Also within a given Value Group, Hue is represented by L (yellowish), M (neutral),
or R (slightly red).
38
VITA Easyshade
The Observer
In addition to the light source and the object, the third element in the perception of color is the Observer. For
color to be measured and reported on a device-independent basis, the perceptual characteristics of the observer
must be defined. The L*a*b* and L*C*h* systems are both based upon a model for human color perception (an
“Observer”) that was published in 1931 by the CIE, and updated in 1964. The L*a*b* color space (CIE Lab),
developed in 1976, improves upon the XYZ color space and chromaticity diagram developed in 1931 in that the
L*a*b* color space is more perceptually uniform.
The standard observer is based upon the experimentally determined sensitivities of the human eye over the
range of visible light from 380 nm to 720 nm. Depending on the relative size of the area being viewed, the
perception of color can change slightly. This is because the color sensing cells in the eye (cones) are
concentrated in a central area of the retina called the fovea centralis. Cells that are very sensitive to lightness,
but not color are distributed throughout the retina, outside of the fovea centralis. In 1931 the CIE defined color
matching functions for a 2º field of view (the “2º Observer”) and in 1964 they published color matching functions
for a 10° field of view (the “10º Observer”). For determining the color of an object the size of tooth, the 2°
Observer is the appropriate choice for color matching functions.
The 1931 and 1964 color matching functions are shown in Figure 3 and Figure 4.
Figure 5. Color matching functions for the 2° Observer
39
VITA Easyshade
Figure 6. Color matching functions for the 10° Observer
Color Measurement Instruments
For measuring the color of teeth, two basic types of instruments are used. A colorimeter uses three filters
corresponding to the peaks in the three color matching functions. A colorimeter directly measures the XYZ
tristimulus values (corresponding to the three color-matching functions, xbar, ybar and zbar) for the sample
under the illuminant, from which the L*a*b* and L*C*h* values for that illuminant may be calculated. Since a
colorimeter does not capture full spectral data, the resulting information cannot be accurately transformed to
show the effects on L*a*b* and L*C*h* of different illuminants.
In contrast, a visible-range spectrophotometer (such as Easyshade) captures the full spectrum in the (typical)
range 400nm to 700nm. From this spectrum, using the color matching functions of the standard observer and
the spectrum of the illuminant, the XYZ tristimulus functions and subsequently the L*a*b* and L*C*h* values are
calculated. By changing the spectrum of the illuminant, L*a*b* and L*C*h* values may be calculated to show the
impact on perceived color of changing the light source. This is an important distinction between a colorimeter
and a spectrophotometer.
Color Differences
The L*a*b* color space provides a three-dimensional representation for the perception of color. If two points in
space, representing two measurements, are coincident then the color difference between the two is zero. As the
distance in color space between two points (L*1, a*1, b*1 and L*2, a*2, b*2) increases, it is reasonable to
assume that the perceived color difference between the stimuli that the two points represented increases
accordingly. One common measure of color difference is therefore the Euclidean distance between the two
points in the three-dimensional space, referred to as “∆E”. The term ∆E is derived from the German word for
sensation Empfindung. ∆E therefore literally means difference in sensation. A superscript asterisk is sometimes
used to denote a CIE Lab difference thus, ∆E*.
40
VITA Easyshade
Unfortunately several evaluations of CIE Lab have shown that ∆E is not a particularly good measure of the
magnitude of perceptual color difference. ∆ECMC, ∆E94, and ∆E2000 all improve upon the original ∆E by adding
corrections for the color-difference non-uniformity of L*a*b* color space.
In Extended Mode, Easyshade reports on ∆L, ∆a, ∆b, ∆C, ∆h, and for general purposes of comparison, ∆E
and ∆ELC, which is ∆E calculated excluding h.
References
Richard S. Hunter and Richard W. Harold, The Measurement of Appearance, John Wiley & Sons, 1987.
Fred W. Billmeyer, Jr. and Max Saltzman, Principles of Color Technology, John Wiley & Sons, 1981.
Anni Berger-Schunn, Practical Color Measurement, John Wiley & Sons, 1994
Praktische Farbmessung, Muster-Schmidt Verlag, 1991
9.6 Interpolated 3D-Master Shades
The 26 VITA 3D-Master shades (plus 3 Bleaching shades) are shown bold in the following tables. The tables
als include 52 interpolated shades that are achieved by equally mixing the appropriate 3D-Master porcelains.
Easyshade measures teeth and restorations to the nearest 3D-Master interpolated shade.
41
VITA Easyshade
9.7 Technical specification
Height
7” (17.8 cm)
Width
11” (29.9 cm)
Depth
9” (22.9 cm)
Weight
3 lbs (1.4 kg)
Illuminant
D65
Observer
2°
Spectral range
400 nm – 700 nm
Spectral resolution
25 nm
Measurement mode
Specular excluded
Measurement area
Diameter: 5 mm
Lamp estimated life
Average operational life: 100 hours
Power
115-220 Volt, 50/60 Hz, 1.0 A
Classification
UL 2601-1
Class I Equipment
Type B Applied Part
IPX0
Equipment not suitable in presence of flammable anesthetic mixture
Temperature range
0ºC to 40ºC
9.8 Patents and Trademarks
VITA Easyshade™ is powered by the Pocket Spectrometer™ Engine and Shaderite™ System.
VITA Easyshade is covered by one or more of the following US Patents:
5,745,229; 5,759,030; 5,851,113; 5,871,351; 5,880,826; 5,883,708; 5,926,262; 5,966,205; 6,038,016; 6,040,902;
6,118,521; 6,127,673; 6,188,471; 6,222,620; 6,233,047; 6,239,868; 6,246,471; 6,246,479; 6,249,339; 6,249,340;
6,249,348; 6,254,385; 6,264,470; 6,271,913; 6,301,004; 6,307,629; 6,362,888; 6,373,573; 6,381,017; 6,414,750;
6,417,917; 6,449,041; 6,490,038; 6,501,542; 6,519,037; 6,538,726; 6,570,654; 6,573,984; 6,583,866, and other
U.S. and Foreign Patents Pending.
Other trademarks shown herein are the property of their respective owners.
42
VITA Easyshade
9.9 Glossary
3D-Master Shades
Refers to the 26 natural tooth shades and optional 3 bleached shades found in the VITA
3D-Master tooth guide system.
Chroma
The saturation (strength or vividness) of a color. It is the difference between the color and
a gray having the same brightness, measured as the distance from the neutral axis. It is
sometimes referred to as the purity of the color.
Classical Shades
Refers to the 16 original VITA shades found on the VITAPAN classical shade guide,
which was originally called the Lumin Vacuum shade guide.
Colorimeter
A color measurement device that measures colors using the tristimulus method, similar
to the human eye, and expresses colors in numerical form using internationally
recognized color systems (XYZ tristimulus, L*a*b color space, L*C*h color space and Yxy
color space)
Hue
What we commonly call color (red, yellow, green, blue or some other color). It
corresponds to the physical wavelength of light. In the L*C*h* system it is represented as
an angle ranging from 0° to 360°. Angles that range from 0° to 90° are reds, oranges
and yellows; 90° to 180° are yellows, yellow-greens and greens; 180° to 270° are
greens, cyans (blue-greens) and blues; 270° to 360° are blues, purples, and magentas,
returning again to red at 360° (the same as 0°).
Interpolated
The mixture of two or more shades of porcelain to achieve an intermediate shade. For
example, 3M2 can be mixed with 3M3 to achieve the shade 3M2.5.
Metamerism
The phenomenon of having two samples match under one light condition but not under
other light sources. Samples of this type will have the same color coordinates but
different spectral reflectance curves for the matching light sources.
Spectrophotometer An instrument for color measurement that measures the spectral reflectance of a color
and converts it into a tristimulus value or internationally accepted numerical form. It can
also display spectral data, providing a highly detailed definition of the color measured.
Value
The luminance of the color. It is the lightness or darkness of a color relative to a series of
grays ranging from white (L = 100) to black (L = 0).
43
VITA Easyshade
44
With the unique VITA SYSTEM 3D-MASTER®
all natural tooth shades are systematically determined
and completely reproduced.
Teeth
V
me
nt
A ll - C
e ra
m
Please note: Our products should be used according to the working instructions.
We cannot be held liable for damages resulting from incorrect handling or usage.
The user is furthermore obliged to check the product before use with regard to its suitability
for the intended area of applications. We cannot accept any liability if the product is used in
conjunction with materials and equipment from other manufacturers which are not compatible
or not authorized for use with our product. Furthermore, our liability for the correctness of this
information is independent of the legal ground and, in as far as legally permissible, is limited
to the invoiced value of the goods supplied excluding turnover tax. In particular, as far as
legally permissible, we do not assume any liability for profit loss, for indirect damages,
for consequential damages or for claims of third parties against the purchaser.
Claims for damages based on fault liability (culpa in contrahendo, breach of contract,
unlawful acts, etc.) can only be made in the case of intent or gross negligence.
Date of issue of these directions for use: 05/04.
VITA Zahnfabrik H.Rauter GmbH & Co.KG
Postfach 1338 · D-79704 Bad Säckingen/Germany
Tel. +49/(0) 7761/ 562-0 · Fax +49/(0) 7761/ 562-299
Hotline: +49/(0) 7761/ 562-222 · Fax +49/(0) 7761/ 562-446
www.vita-zahnfabrik.com · info @vita-zahnfabrik.com
1215 E - 0504 (1.) S
Eq
ui p
3D - Master
ic s
Service
aterials
ing M
eer
en
Vita System