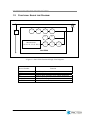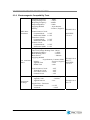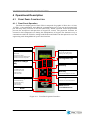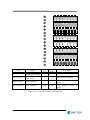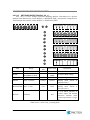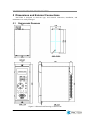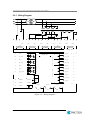
1
P&C Technologies Co., Ltd. User’s Guide Over Voltage & Under Voltage Relay: PAC-E500 Over Voltage & Under Voltage Relay (PAC-E500) User’s Manual Table of Contents 1 Overview ........................................................................ 5 1.1 Features .............................................................................. 5 1.2 Functional Single Line Diagram ....................................... 6 2 Technical Data ............................................................... 7 2.1 General Specifications ...................................................... 7 2.1.1 2.1.2 2.1.3 2.1.4 2.1.5 2.1.6 Current Input ............................................................................. 7 Rated Control Source ............................................................... 7 Rated Frequency ...................................................................... 7 Contact Output ......................................................................... 7 Contact Input ............................................................................ 7 Case ........................................................................................... 7 2.2 Protection Elements .......................................................... 8 2.2.1 2.2.2 2.2.3 2.2.4 2.2.5 Over Voltage Protection ........................................................... 8 Under Voltage Protection ......................................................... 8 Ground Over Voltage Protection ............................................. 8 Negative Phase Sequence Over Voltage Protection .............. 8 Under Frequency Protection ................................................... 9 2.3 Environmental Tests .......................................................... 9 2.3.1 2.3.2 2.3.3 2.3.4 Insulation Tests......................................................................... 9 Electromagnetic Compatibility Tests .................................... 10 Mechanical Tests .................................................................... 11 Environmental Conditions ..................................................... 11 3 Functional Description ............................................... 12 3.1 Protection Functions ....................................................... 12 3.1.1 3.1.2 3.1.3 3.1.4 3.1.5 Over Voltage ............................................................................ 12 Under Voltage.......................................................................... 13 Ground Over Voltage .............................................................. 14 Negative Phase Sequence Over Voltage .............................. 16 Under Frequency .................................................................... 17 3.2 Additional Functions ....................................................... 18 3.2.1 3.2.2 3.2.3 3.2.4 3.2.5 3.2.6 2/76 Control ..................................................................................... 18 Measurement & Metering ....................................................... 19 Programmable Logic .............................................................. 19 Self Diagnosis ......................................................................... 21 Communication ...................................................................... 21 Setting & Configuration Software ......................................... 22 Over Voltage & Under Voltage Relay (PAC-E500) User’s Manual 4 Operational Description ............................................. 23 4.1 Front Panel Construction ................................................ 23 4.1.1 4.1.2 4.1.3 Front Panel Operation ............................................................ 23 LEDs ........................................................................................ 24 Keypad..................................................................................... 24 4.2 Key Manipulation & Menu ............................................... 25 4.2.1 4.2.2 Basic Principle of Key Manipulation ..................................... 25 Menu Tree ................................................................................ 26 4.3 Initial Display .................................................................... 28 4.4 Menu Tree Display ........................................................... 28 4.4.1 DISPLAY Menu ........................................................................ 29 4.4.1.1. 4.4.1.2. 4.4.1.3. 4.4.1.4. 4.4.1.5. 4.4.1.6. 4.4.1.7. 4.4.2 SETTING Menu........................................................................ 34 4.4.2.1. 4.4.2.2. 4.4.2.3. 4.4.2.4. 4.4.2.5. 4.4.2.6. 4.4.2.7. 4.4.2.8. 4.4.2.9. 4.4.2.10. 4.4.2.11. 4.4.2.12. 4.4.2.13. 4.4.2.14. 4.4.2.15. 4.4.2.16. 4.4.2.17. 4.4.2.18. 4.4.2.19. 4.4.2.20. 4.4.3 DISPLAY/STATUS .................................................................... 29 DISPLAY/STATUS/CONTACT INPUT...................................... 30 DISPLAY/STATUS/CONTACT OUTPUT.................................. 30 DISPLAY/STATUS/SELF DIAGNOSIS..................................... 30 DISPLAY/STATUS/PROTECTION ........................................... 31 DISPLAY/MEASURE ................................................................ 32 DISPLAY/SYSTEM INFO. ......................................................... 33 SETTING/SYSTEM ................................................................... 34 SETTING/SYSTEM/POWER SYSTEM ..................................... 35 SETTING/SYSTEM/CB CONTROL........................................... 36 SETTING/SYSTEM/ PT FUSE MONITOR ................................ 37 SETTING/SYSTEM/COM .......................................................... 37 SETTING/SYSTEM/DNP3.0 ...................................................... 38 SETTING/SYSTEM/CONTACT INPUT ..................................... 39 SETTING/SYSTEM/CONTACT OUTPUT ................................. 40 SETTING/SYSTEM/LED ........................................................... 42 SETTING/SYSTEM/PASSWORD ........................................... 43 SETTING/PROTECTION ......................................................... 44 SETTING/PROTECTION/OV1 (59_1) ..................................... 45 SETTING/PROTECTION/OV2 (59_2) ..................................... 46 SETTING/PROTECTION/UV1 (27_1) ..................................... 47 SETTING/PROTECTION/UV2 (27_2) ..................................... 48 SETTING/PROTECTION/OVG1 (59G_1)................................ 49 SETTING/PROTECTION/OVG2 (59G_2)................................ 50 SETTING/PROTECTION/OVG3 (59G_3)................................ 51 SETTING/PROTECTION/NSOV (47) ...................................... 52 SETTING/PROTECTION/UF (81)............................................ 52 COMMAND Menu .................................................................... 54 4.4.3.1. COMMAND/CONT OUT TEST .................................................. 54 4.4.3.2. COMMAND/PANEL TEST ........................................................ 55 3/76 Over Voltage & Under Voltage Relay (PAC-E500) User’s Manual 5 Dimensions and External Connections .................... 56 5.1 Dimensioned Drawings ................................................... 56 5.2 External Connections ...................................................... 58 5.2.1 5.2.2 5.2.3 5.2.4 5.2.5 5.2.6 5.2.7 Control Source........................................................................ 58 CT Connections ...................................................................... 58 PT Connections ...................................................................... 59 Input/Output Contacts Connection ....................................... 61 RS232 Port Connection .......................................................... 61 RS485 Port Connection .......................................................... 62 Wiring Diagram ....................................................................... 63 6 Setting & Configuration Software ............................. 64 6.1 Setting Software ............................................................... 64 6.1.1 6.1.2 6.1.3 6.1.4 6.1.5 6.1.6 6.1.7 6.1.8 Program Menu ........................................................................ 64 Device Selecting ..................................................................... 65 Communication Port Setting ................................................. 65 System Configuration ............................................................ 66 Protection Setting................................................................... 67 Contact In/Out Setting ............................................................ 68 LED Setting ............................................................................. 69 Monitor .................................................................................... 70 Appendix A. TC Characteristics Curves ....................... 71 Appendix B. Ordering Option......................................... 75 4/76 Over Voltage & Under Voltage Relay (PAC-E500) User’s Manual 1 Overview PAC-E500, Over Current & Earth Fault Relay is a microprocessor-based numerical protection relay designed for the management and protection of a distribution feeder. PAC-E500 has the protection elements of Over Voltage (OVR), Under Voltage (UVR), Ground Over Voltage (OVGR), Negative Phase Sequence Over Voltage and Under Frequency. It uses Normal Inverse of TC curves (1 OVR and UVR, 2 OVGR). Also it provides the measurements of Lineto-Line voltage, 3 phase currents and voltages, Sequence Voltage, THD (Total Harmonic Distortion), frequency, and PT fuse fail monitor, and control functions for a circuit breaker. Programmable Logic is designed for the replacement of external wiring for the sequence logic and it has 48 configurable logic components. The configurations of contact inputs/outputs are very easy with Programmable Logic. Programmable Logic is specially designed software for easy maintenance and operation of PAC-E500. 1.1 FEATURES 5/76 Numerical-type Over Voltage (OVR), Ground Over Voltage (OVGR), Under Voltage, Negative Phase Sequence Over Voltage, and Under Frequency Protections Various TC Curves including 1 OVR and UVR, 2 OVGR. Digital Indication of Setting and Metering on LCD (2 Lines × 16 Characters) Self-Diagnosis and Internal Status Monitoring Operation Blocking of Individual Relay Element by External Contact Inputs during the Relay Maintenance Configurable System Frequency (50 / 60Hz) Easy setting of 4 Contact Outputs and 4 Programmable LED to use Logic Contact Output: Available Trip and Signaling Contact Direct Trip/Close Control of 1 CB from Front Panel Locally and SCADA remotely Useful PC Application (Setting Tool) : System Configuration, Protection & Logic Setting, Monitoring & Measurement Self-Test Function of Contact Output by Manual Trip Emulation Access Security by Password for Setting Change and CB Control. Communication Interface - RS-232C (Front and Rear), RS485C (SCADA Communication) - Protocol: MODBUS, DNP3.0, IEC60870-5-103 Measurement: 3-phase voltages, Sequence Voltages, Thermal, Frequency EMI/EMC Performance Reinforced. Over Voltage & Under Voltage Relay (PAC-E500) User’s Manual 1.2 FUNCTIONAL SINGLE LINE DIAGRAM 27_1 27_2 59_1 59_2 47 81 59G_1 3 59G_2 ,3 52 Measurement (V, V0, V1, V2, F, VG) 59G_2 ,2,3 PAC-E500 <Figure 1.2. PAC-E500 Functional Single Line Diagram> Device Number 59_1,2 27_1,2 47 81 59G_1,2,3 52 6/76 Function Over Voltage Protection Under Voltage Protection Negative Phase Sequence Over Voltage Protection Under Frequency Protection Ground Over Voltage Protection CB (AC Circuit Breaker) Over Voltage & Under Voltage Relay (PAC-E500) User’s Manual 2 Technical Data 2.1 GENERAL SPECIFICATIONS 2.1.1 Current Input Rated Current Input range Thermal Withstand Capability Burden AC 1A/5A (50/60Hz) 0.01 ~ 50 * In 3 times of rated value: Continuous 20 times of rated value: 4 sec 40 times of rated value: 2 sec 100 times of rated value: 1 sec <0.5VA / phase 2.1.2 Rated Control Source Voltage : 110 ~ 220 VAC±20%, 80 ~ 300 VDC, Power Consumption: <30 VA (Option: 24 ~ 48 VDC) 2.1.3 Rated Frequency 50Hz or 60Hz 2.1.4 Contact Output For Trip: 4points (2A, 2C), Configurable 10A / 0.3sec / AC 250V / Resistive Load Rated Load 30A / 0.3sec / DC 125V / Resistive Load 1A / 0.1 (PF) / AC 250V Switching capacity 1A / 25ms (L/R time constant) / DC 125V 2.1.5 Contact Input 4 Points Dry Contact, Configurable When no applied voltage >1000 DC 125V When voltage supplied <10ms Recognition time 2.1.6 Case Construction IP Protection Level Material 7/76 Draw-out type IP51 Steel with Hard-Combustion Plastic Cover Over Voltage & Under Voltage Relay (PAC-E500) User’s Manual 2.2 PROTECTION ELEMENTS 2.2.1 Over Voltage Protection Pickup TC Curve Multiplier DT operate time Reset Operation accuracy Timing accuracy 5~170V (1V step) -Inverse -Definite Time 0.01 ~ 10.0 (0.01 step) 0.00 ~ 60.00 sec (0.01 sec step) >97 ~ 98 % of pickup value < 2 of set value < 35ms (Inst., op. time <700ms) 3 (op. time >700ms) 2.2.2 Under Voltage Protection Pickup TC Curve Multiplier DT operate time Reset Operation accuracy Timing accuracy 5~170V (1V step) -Inverse -Definite Time 0.01 ~ 10.0 (0.01 step) 0.00 ~ 60.00 sec (0.01 sec step) >102~103 % of pickup value < 2 of set value < 35ms (Inst., op. time <700ms) 3 (op. time >700ms) 2.2.3 Ground Over Voltage Protection Pickup TC Curve Multiplier DT operate time Reset Operation accuracy Timing accuracy 5~170V (1V step) -Inverse Trip, Inverse Alarm -Definite Time 0.01 ~ 10.0 (0.01 step) 0.00 ~ 60.00 sec (0.01 sec step) >97 ~ 98 % of pickup value < 2 of set value < 35ms (Inst., op. time <700ms) 3 (op. time >700ms) 2.2.4 Negative Phase Sequence Over Voltage Protection Pickup DT operate time Reset Operation accuracy Timing accuracy 8/76 5~170V (1V step) 0.00 ~ 60.00 sec (0.01 sec step) >97 ~ 98 % of pickup value < 2 of set value < 35ms (Inst., op. time <700ms) 3 (op. time >700ms) Over Voltage & Under Voltage Relay (PAC-E500) User’s Manual 2.2.5 Under Frequency Protection UV Pickup OC Pickup dF/dT Pickup Freq Pickup DT operate time Reset Operation accuracy Timing accuracy 2.3 5 ~ 170 V (1 V step) 0.10 ~ 20.00 * In (0.01 * In step) -10.00 ~ -0.10 Hz (0.01 Hz step) 45.00 ~ 65.00 Hz (0.01 Hz step) 0.00 ~ 180.00 sec (0.01 sec step) >102`103 % of pickup value < 2 of set value < 35ms (Inst., op. time <700ms) 3 (op. time >700ms) ENVIRONMENTAL TESTS 2.3.1 Insulation Tests To measure with 500 Vdc insulation resistance tester Insulation resistance Dielectric test voltage Impulse test voltage 9/76 Overall Electric Circuit – Enclosure Between Electric Circuits Between Contacts Applied Time: 1 min (50/60 Hz) : 10MΩ : 5 MΩ : 5 MΩ Overall Electric Circuit – Enclosure : 2kV Between Electric Circuits : 2 kV Between Contacts : 1 kV Applied Waveform: 1.250s Applied Time: Each Positive/Negative 3 times Overall Electric Circuit – Enclosure Between Transducer Circuits Transducer Circuit – Control Circuit Between Electric Circuits Between Contacts Terminals : 5kV : 5 kV : 5 kV : 3 kV : 3 kV IEC60255-5, ANSI/IEEE C37.90.0 IEC60255-5 IEC60255-5 Over Voltage & Under Voltage Relay (PAC-E500) User’s Manual 2.3.2 Electromagnetic Compatibility Tests Vibrating Frequency Voltage Rising Time Repeating Frequency Output Impedance Applying Method Polarity : 1MHz : 75nsec : 400Hz : 200 : Asynchronous : Positive, Negative IEC60255-22-1 1MHz burst disturbance Control Source Circuit Common Mode 2.5 kV Differential Mode 1.0 kV Transducer Circuit Common Mode 2.5 kV Differential Mode 1.0 kV Contact Circuit Common Mode 2.5 kV Differential Mode 1.0 kV Voltage Rising Time : 5nsec 50% Peak Voltage Holding Time : 50nsec Repeating Frequency : 2.5kHz Burst Holding Time : 15msec Burst Period : 300msec Applying Method : Asynchronous, Common Mode Fast transients Polarity : Positive, Negative / burst Applied Time : 1min Halted Time : 1min Electrostatic discharge 10/76 ANSI/IEEE C37.90.1 IEC60255-22-4 class Ⅳ, ANSI/IEEE C37.90.1 Control Source Circuit Transducer Circuit I/O Contact Circuit Ground Circuit : 4 kV : 4 kV : 4 kV : 4 kV Polarity Applied Count Applied Interval : Positive, Negative : 10 times : 1sec IEC60255-22-2 class Ⅲ Applied Part – Enclosure Contact Mode Air Mode : 6.0 kV : 8.0 kV Over Voltage & Under Voltage Relay (PAC-E500) User’s Manual Voltage Waveform Current Waveform Output Impedance Applying Method Polarity Applied Count Applied Interval Compound Surge : 1.2 50sec : 8 20sec : 2 : Asynchronous : Positive, Negative : 3 times : 30sec Control Source Circuit Common Mode 2.0 kV Differential Mode 1.0 kV Transducer Circuit Common Mode 2.0 kV Differential Mode 1.0 kV Contact Circuit Common Mode 2.0 kV Differential Mode 1.0 kV Radiated Susceptibility Applied Frequency :25MHz ~ 1GHz Electric Field Strength : 10V/m 80% AM modulation Applying Method : Front Distance from Antenna: Cross and Horizontality Dwell Time : 1sec IEC60255-22-5 class Ⅳ IEC60255-22-3 class Ⅲ ANSI/IEEE C37.90.2 2.3.3 Mechanical Tests Vibration Impulse Frequency: 16.7 Hz Wide: 0.4 mm Direction: front/back/left/right/top/bottom Time: 600 sec (10 min) Volume: 30 g (g: Acceleration of gravity) Applying Method :front/back/left/right/top/bottom - twice per each, total six times IEC60255-21-1 class Ⅱ IEC60255-21-2 class Ⅱ 2.3.4 Environmental Conditions Temperature -20 oC ~ +70 oC Humidity Daily average ~ 100 % Altitude <2000 m No abnormal vibration, impact, inclination, or magnetic field effect No explosive/combustible dust, combustible/corrosive gas, or salinity 11/76 Over Voltage & Under Voltage Relay (PAC-E500) User’s Manual 3 Functional Description 3.1 PROTECTION FUNCTIONS 3.1.1 Over Voltage PAC-E500 has 2 over voltage protection elements (OV1 (59_1), OV2 (59_2)), is going to use them at the same time. This protection detects the fault using Phase Voltage values. In case of the voltage higher than pick-up, it operates Definite Time characteristic that has operate time as ‘DELAY’ when ‘MODE’ is ‘DEFINITE TIME’, and Inverse Time Delayed characteristic is a has operate time as ‘MULTIPLIER’ when ‘MODE’ is ‘INVERSE CURVE’ Inverse Time Delayed characteristic can be represented as the following functions. 10.5 T 1.75 TM sec V 1 Vs T TM : Trip time in second : Time multiplier V : Voltage input Vs : Pickup Voltage setting Trip time for V/Vs ≥8 are identical to those for V/Vs = 8. FUN CTION = EN ABLE 59_ PKP_ A 59_ PKP_ OR 59_ PKP_ B VA > PICKUP 59_ PKP_ C VB > PICKUP 59_ OP_ A DELAY VC > PICKUP 59_ OP_ OR 59_ OP_ B 59_ OP_ C BLOCK = YES 59_ OP_ A MU LTIPLIER CON T IN #1 = ON 59_ OP_ OR 59_ OP_ B . . . CON N ECTION = PROT_ BLK 59_ OP_ C . . . CON T IN #4 = ON CON N ECTION = PROT_ BLK MODE = DEFIN ITE TIME VA/VB/VC: A/B/C phase Feeder Voltage VA / VB / VC : A/B/C상 피더전압 FUNCTION: Setting Function of Over Voltage FUNCTION : 과전압계전요소의 Function 설정 MODE: Setting Mode of Over설정 Voltage MODE : 과전압계전요소의 MODE PICKUP : 과전압계전요소의 설정값 PICKUP: Setting PickupPICKUP of Over Voltage DELAY : 과전압계전요소의 DELAY DELAY: Setting Delay of Over설정값 Voltage Multiplier : 과전압계전요소의 MULTIPLIER 설정값 Multiplier: Setting Multiplier BLOCK : 과전압계전요소의 BLOCKOver 설정 Voltage BLOCK: Setting Block of: 접점입력 Over Voltage CONNECTION = PROT_BLK CONNECTION이 PROT_BLK임을 나타냄 CONT IN #1~#4 =ON : 접점입력의 Connection 상태가 LOGICof"1"임 CONNECTION-PROT_BLK: Contact input is shown PROT_BLK CONT IN #1~#4-1: Contact input is LOGIC “1” 59_PKP_A/B/C : 과전압 계전요소의 상별 Pickup 59_PKP_OR : 과전압 계전요소의 최소 한상이 Pickup 59_PKP_A/B/C: Each phase pickup for Over Voltage 59_OP_A/B/C : 과전압 계전요소의 상별 Operation 59_PKP_OR: The계전요소의 least 1 phase Over Voltage is pickup 59_OP_OR : 과전압 최소 for 한상이 Operation 59_OP_A/B/C: Each phase Operation for Over Voltage 59_OP_OR: The least 1 phase for Over Voltage is Operation <Figure 3.1.1. OV1 (59_1), OV2 (59_2) Logic Diagram> 12/76 Over Voltage & Under Voltage Relay (PAC-E500) User’s Manual 3.1.2 Under Voltage PAC-E500 has 2 under voltage protection elements (UV1 (27_1), UV2 (27_2)), is going to use them at the same time. This protection detects the fault using Phase Voltage values. In case of the voltage lower than pick-up, it operates Definite Time characteristic that has operate time as ‘DELAY’ when ‘MODE’ is ‘DEFINITE TIME’, and Inverse Time Delayed characteristic is a has operate time as ‘MULTIPLIER’ when ‘MODE’ is ‘INVERSE CURVE’ Inverse Time Delayed characteristic can be represented as the following functions. 8 T TM sec 2.2 V 1 Vs T TM : Trip time in second : Time multiplier V : Voltage input Vs : Pickup Voltage setting Logic Diagram of Under Voltage element operation is as follows. FUN CTION = EN ABLE 27_ PKP_ A 27_ PKP_ OR 27_ PKP_ B VA < PICKU P 27_ PKP_ C VB < PICKU P 27_ OP_ A DELAY VC < PICKU P 27_ OP_ OR 27_ OP_ B 27_ OP_ C BLOCK = YES 27_ OP_ A MULTIPLIER CON T IN #1 = ON CON N ECTION = PROT_ BLK 27_ OP_ OR 27_ OP_ B . . . 27_ OP_ C . . . CON T IN #4 = ON CON N ECTION = PROT_ BLK MODE = DEFIN ITE TIME VA / VB / VC : A/B/C A/B/C상 피더전압 VA/VB/VC: phase Feeder Voltage FUNCTION : 저전압계전요소의 Function 설정 FUNCTION: Setting Function of Under Voltage MODE : 저전압계전요소의 MODE 설정 MODE:: 저전압계전요소의 Setting Mode ofPICKUP Under설정값 Voltage PICKUP DELAY : 저전압계전요소의 설정값 PICKUP: Setting PickupDELAY of Under Voltage Multiplier 저전압계전요소의 MULTIPLIER 설정값 DELAY:: Setting Delay of Under Voltage BLOCK : 저전압계전요소의 BLOCK 설정 Multiplier: Setting Multiplier Under Voltage CONNECTION = PROT_BLK : 접점입력 CONNECTION이 PROT_BLK임을 나타냄 BLOCK: Setting Block of Under Voltage CONT IN #1~#4 =ON : 접점입력의 상태가 LOGIC "1"임 CONNECTION-PROT_BLK: Connection of Contact input is shown PROT_BLK 27_PKP_A/B/C : 저전압 계전요소의 상별 Pickup CONT IN #1~#4-1: Contact input is LOGIC “1” 27_PKP_OR : 저전압 계전요소의 최소 한상이 Pickup 27_OP_A/B/C : 저전압 계전요소의 상별 Operation 27_PKP_A/B/C: phase최소 pickup forOperation Under Voltage 27_OP_OR : 저전압 Each 계전요소의 한상이 27_PKP_OR: The least 1 phase for Under Voltage is pickup 27_OP_A/B/C: Each phase Operation for Under Voltage 27_OP_OR: The least 1 phase for Under Voltage is Operation <Figure 3.1.2. . UV1 (27_1), UV2 (27_2) Logic Diagram > 13/76 Over Voltage & Under Voltage Relay (PAC-E500) User’s Manual 3.1.3 Ground Over Voltage PAC-E500 has 3 ground over voltage protection elements (OVG1 (59G_1), OVG2 (59G_2), OVG3 (59G_3)), is going to use them at the same time. This protection detects the fault using Ground Over Voltage values. In case of the ground voltage higher than pick-up, it operates Definite Time characteristic that has operate time as ‘DELAY’ when ‘MODE’ is ‘DEFINITE TIME’, and Inverse Time Delayed characteristic is a has operate time as ‘MULTIPLIER’ when ‘MODE’ is ‘INVERSE CURVE’. Inverse Time Delayed characteristic has 2 curves, ‘Trip’ and ‘Alarm’. Inverse Time Delayed characteristic can be represented as the following functions. - Inverse Trip Curve 12.15 T 0 . 35 TM sec 2 V 1 Vs -Inverse Alarm Curve 24.75 T 4.15 TM sec 2.23 V 1 Vs T TM : Trip time in second : Time multiplier V : Voltage input Vs : Pickup Voltage setting Trip time for V/Vs ≥8 are identical to those for V/Vs = 8. Logic Diagram of 3 phase Ground Over Voltage element operation is as follows. 14/76 Over Voltage & Under Voltage Relay (PAC-E500) User’s Manual FU N CTION = EN ABLE 59G_PKP VN > PICKUP BLOCK = YES 59G_OP DELAY CON T IN #1 = ON CON N ECTION = PROT_ BLK . . . . . . 59G_OP MULTIPLIER CON T IN #4 = ON CON N ECTION = PROT_ BLK MODE = DEFIN ITE TIME VN: Feeder Ground Voltage VN : 피더 지락전압 FUNCTION: Setting Function of Ground Over Voltage FUNCTION : 지락 과전압계전요소의 MODE: Setting Mode of Ground OverFunction Voltage 설정 MODE : 지락 과전압계전요소의 MODE PICKUP: Setting Pickup of Ground Over설정 Voltage PICKUP : 지락 과전압계전요소의 PICKUP 설정값 DELAY: Setting Delay of Ground DELAY Over Voltage DELAY : 지락 과전압계전요소의 설정값 Multiplier:: Setting Multiplier GroundMULTIPLIER Over Voltage설정값 Multiplier 지락 과전압계전요소의 BLOCK: Setting Block of GroundBLOCK Over Voltage BLOCK : 지락 과전압계전요소의 설정 CONNECTION-PROT_BLK: of Contact input is shown PROT_BLK CONNECTION = PROT_BLK : Connection 접점입력 CONNECTION이 PROT_BLK임을 나타냄 CONTIN IN#1~#4 #1~#4-1: Contact input is LOGIC CONT =ON : 접점입력의 상태가 “1” LOGIC "1"임 59G_PKP:: 지락 Pickup for Ground Over Voltage 59G_PKP 과전압 계전요소의 Pickup 59G_OP:: Operation for계전요소의 Ground Over Voltage 59G_OP 지락 과전압 Operation <Figure 3.1.3. OVG1 (59G_1), OVG2 (59G_2), OVG3 (59G_3) Logic Diagram> 15/76 Over Voltage & Under Voltage Relay (PAC-E500) User’s Manual 3.1.4 Negative Phase Sequence Over Voltage Negative Phase Sequence Over Voltage protection detects the fault using Negative Phase Voltage values. In case of the negative phase voltage higher than pick-up, it operates Definite Time characteristic that has operate time. Logic Diagram of Under Current element operation is as follows. FUN CTION = EN ABLE 47_ PKP V2 > PICKU P BLOCK = YES 47_ OP DELAY CON T IN #1 = ON . . . CON N ECTION = PROT_ BLK . . . CON T IN #4 = ON CON N ECTION = PROT_ BLK V2:V2 Negative Phase Feeder Voltage : 역상 피더전압 FUNCTION: Setting Function of Negative Phase Sequence Over Voltage FUNCTION : 역상 과전압계전요소의 Function 설정 PICKUP: Setting of NegativePICKUP Phase Sequence PICKUP : 역상 Pickup 과전압계전요소의 설정값 Over Voltage DELAY: Setting of Negative Phase Sequence DELAY : 역상Delay 과전압계전요소의 DELAY 설정값 Over Voltage BLOCK: Setting of Negative Phase Sequence Over Voltage BLOCK : 역상Block 과전압계전요소의 BLOCK 설정 CONNECTION = PROT_BLKConnection : 접점입력 of CONNECTION이 나타냄 CONNECTION-PROT_BLK: Contact input isPROT_BLK임을 shown PROT_BLK CONT #1~#4Contact =ON : 접점입력의 상태가 CONT IN IN #1~#4-1: input is LOGIC “1”LOGIC "1"임 47_PKP : 역상for 과전압 계전요소의 Pickup Over Voltage 47_PKP: Pickup Negative Phase Sequence 47_OP : 역상 과전압 계전요소의 47_OP: Operation for Negative PhaseOperation Sequence Over Voltage <Figure 3.1.4 NSOV (47) Logic Diagram> 16/76 Over Voltage & Under Voltage Relay (PAC-E500) User’s Manual 3.1.5 Under Frequency Under Frequency protection detects the fault using frequency value of A-phase voltage. In case of the frequency of A-phase voltage lower than FREQ PICKUP, it operates and requisite fault detection is added when each ‘Block’ element is set. Voltage is input lower than ‘UV PICKUP’ when UV PICKUP is set and in case of under frequency the protection element doesn’t operate blocked. And ‘OC BLOCK’ and ‘dF/dT BLOCK’ operate in the same way. Logic Diagram of Under Frequency element operation is as follows. FUN CTION = ENABLE 81_ PKP Frequency < FREQ_ PICKUP BLOCK = YES DELAY CONT IN #1 = ON . . . CON N ECTION = PROT_ BLK . . . CONT IN #4 = ON CON N ECTION = PROT_ BLK UV BLOCK = NO VA > UV PICKUP VB > UV PICKUP VC > UV PICKUP OC BLOCK = NO IA < OC PICKUP Frequency: Frequency of A-phase feeder voltage Frequency : A상 피더전압의 주파수 VA/VB/VC: A/B/C phase feeder voltage VA/VB/VC : A/B/C상 피더전압 IA:: A상 A-phase feeder current IA 피더전류 FUNCTION: Setting Function of Under Frequency FUNCTION : 저주파계전요소의 Function 설정 FREQPICKUP PICKUP: Setting FREQ PICKUP of Under Frequency e FREQ : 저주파계전요소의 FREQ PICKUP 설정값 DELAY: Setting Delay of Under DELAY : 저주파계전요소의 DELAYFrequency 설정값 UV : 저주파계전요소의 저전압Block Blockof설정 UVBLOCK BLOCK: Setting Under Voltage Under Frequency OC : 저주파계전요소의 과전류 Block 설정 Frequency OCBLOCK BLOCK: Setting Over Current Block of Under BLOCK : 저주파계전요소의 BLOCK 설정 BLOCK: Setting Block of Under Frequency CONNECTION = PROT_BLK : 접점입력 CONNECTION이 PROT_BLK임을 나타냄 CONNECTION-PROT_BLK: Connection of Contact input is shown PROT_BLK CONT IN #1~#4 =ON : 접점입력의 상태가 LOGIC "1"임 CONT IN #1~#4-1: Contact input is LOGIC “1” 81_PKP : 저주파계전요소의 Pickup 81_PKP: Pickup for Under Frequency 81_OP : 저주파계전요소의 Operation 81_OP: Operation for Under Frequency <Figure 3.1.5. UF (81) Logic Diagram> 17/76 81_ OP Over Voltage & Under Voltage Relay (PAC-E500) User’s Manual 3.2 ADDITIONAL FUNCTIONS 3.2.1 Control PAC-E500 supports direct CB Trip/Close control function (One CB). Control functions of PAC-E500 also provide a local/remote selection for control location. As for remote control, PAC-E500 communicates with an upper master system (SCADA) through the rear RS485 port (Protocol: Modbus). To control CB, a contact input should be allocated for CB STATUS input (CB_OPENED or CB_CLOSED). If there are many contact inputs allocated for CB status, “Contact Input #1” status is the first priority for CB control. In case no contact input is allocated for CB status, CB control function is not available and all LEDs related to CB control (Local/Remote, Open/Close) are off. Local / Remote (L/R) Control Position To control the circuit breaker, the operator must get the appropriate right to control. The Local/Remote button renders CB control right to the local operators on site or to the remote operators in control center. Remote operator cannot control CB on the local mode, and vice versa. Security check by password inhibits the random mode change. To change the control position mode (Local to Remote and Remote to Local), press L/R button and enter the password using arrow keys and ENT key. After correct password input, local and remote control positions can be toggled. CB OPEN / CLOSE This function performs trip (open)/close control actions of CB. CB Open or Close button on the front panel is activated only on the Local mode (“L” LED on). On the Remote mode, only control command from SCADA through communication is accepted. Before control command via front panel, SELECT button and Password enter are required first. SELECT button is the concept to prevent the mal-operation on the front panel and this concept is the same with SBO (Select Before Operate) concept in communication protocol, i.e. DNP3.0, where SCADA (master system) selects first the equipment to control remotely before setting out actual control command to keep other masters from selecting the same equipment so that control right is granted to that SCADA only. This dedicated concept is adopted equally to Local control and this is also used for mal-operation prevention of direct open/close command. After the correct password enter and SELECT button again, then a phrase that CB is selected is displayed on LCD and SELECT LED is blinking. After while, CB OPEN/CLOSE buttons are activated for 15 seconds. 18/76 Over Voltage & Under Voltage Relay (PAC-E500) User’s Manual 3.2.2 Measurement & Metering Current Voltage Frequency Sequence RMS Current value of fundamental component & phase angle of A-phase Range: 0.01 ~ 50 * In RMS Measuring accuracy: 2 (0.10 ~ 0.20 * In) 0.5 (0.20 ~ 1.20 * In) ±1.0 % (>1.20 * In) RMS Voltage value of fundamental component & phase angle per phase and line-to-line Metering range: 2.00~999.99V (Phase voltage) 2.00~999.99V (line-to-line voltage) Measured based on A-phase voltage Metering range: 40 ~ 70 Hz Measuring Accuracy: 0.03 Hz Positive, Negative, Zero Sequence Values of Current 3.2.3 Programmable Logic Input Logic Reset Type Reset Delay Feature CB Open/Close control, Protection element is pickup, Self-diagnosis, Contact Input OR8 (8 input OR) HALF-OR8 (Non inverting 4 input & inverting 4 input OR) AND8 (8 input AND) HALF-AND8 (Non inverting 4 input & inverting 4 input AND) Self (latched until delay timer is expired) Manual (latched until annunciator reset is issued) 0.00 ~ 60.00 sec (0.01 sec step) Control contact output and LED using Logic Input#1 Input#2 Input#3 Input#4 Input#5 Input#6 Input#7 Input#8 Reset Type = Self Input#1 Input#2 Input#3 Input#4 Input#5 Input#6 Input#7 Input#8 0.00 ~ 60.00 LED#1~#4 Reset Type = Manual Input#1 Input#2 Input#3 Input#4 Input#5 Input#6 Input#7 Input#8 S Q Input#1 Input#2 Input#3 Input#4 Input#5 Input#6 Input#7 Input#8 R Logic Annunciator <Figure 3.2.3. Logic Design (Contact Output & LED)> 19/76 Contact Out #1 ~ #4 Over Voltage & Under Voltage Relay (PAC-E500) User’s Manual Input Group Logic CB Control Contact Input System Protection elements 20/76 Input L_OFF L_ON CB_OPEN_CTL CB_CLOSE_CTL CONT_IN #1 … CONT_IN #4 SYS_ERR PROT_PKP_OR PROT_OP_OR 59_1_PKP_OR 59_1_PKP_A 59_1_PKP_B 59_1_PKP_C 59_1_OP_OR 59_1_OP_A 59_1_OP_B 59_1_OP_C 59_2_PKP_OR 59_2_PKP_A 59_2_PKP_B 59_2_PKP_C 59_2_OP_OR 59_2_OP_A 59_2_OP_B 59_2_OP_C 27_1_PKP_OR 27_1_PKP_A 27_1_PKP_B 27_1_PKP_C 27_1_OP_OR 27_1_OP_A 27_1_OP_B 27_1_OP_C 27_2_PKP_OR 27_2_PKP_A 27_2_PKP_B 27_2_PKP_C 27_2_OP_OR 27_2_OP_A 27_2_OP_B 27_2_OP_C Description Logic ‘0’ Logic ‘1’ CB Open Control (Local or Remote) CB Close Control (Local or Remote) Contact input#1 status … Contact input#4 status Self-diagnosis error is occurred Any protection element is picked up Any protection element is operated At least 1 phase of 59_1 is picked up Phase A of 59_1 is picked up Phase B of 59_1 is picked up Phase C of 59_1 is picked up At least phase of 59_1 is operated Phase A of 59_1 is operated Phase B of 59_1 is operated Phase C of 59_1 is operated At least 1 phase of 59_2 is picked up Phase A of 59_2 is picked up Phase B of 59_2 is picked up Phase C of 59_2 is picked up At least phase of 59_2 is operated Phase A of 59_2 is operated Phase B of 59_2 is operated Phase C of 59_2 is operated At least 1 phase of 27_1 is picked up Phase A of 27_1 is picked up Phase B of 27_1 is picked up Phase C of 27_1 is picked up At least phase of 27_1 is operated Phase A of 27_1 is operated Phase B of 27_1 is operated Phase C of 27_1 is operated At least 1 phase of 27_2 is picked up Phase A of 27_2 is picked up Phase B of 27_2 is picked up Phase C of 27_2 is picked up At least phase of 27_2 is operated Phase A of 27_2 is operated Phase B of 27_2 is operated Phase C of 27_2 is operated Over Voltage & Under Voltage Relay (PAC-E500) User’s Manual 59G_1_PKP 59G_1_OP 59G_2_PKP 59G_2_OP 59G_3_PKP 59G_3_OP 47_PKP 47_OP 81_PKP 81_OP PT_FUSE_FAIL 59G_1 is picked up 59G_1 is operated 59G_2 is picked up 59G_2 is operated 59G_3 is picked up 59G_3 is operated 47 is picked up 47 is operated 81 is picked up 81 is operated PT_FUSE_FAIL is operated <Table 3.2.3. Logic Input Table> 3.2.4 Self Diagnosis As monitoring internal operating status, self-diagnosis function is provided to prevent the mal-operations of PAC-E500 internal systems. When any abnormality is detected for diagnosis items, ERROR LED on front panel is on and SYSTEM ERROR message is displayed on LCD. The diagnosis status for each item is listed on LCD in the menu of DISPLAY/STATUS/SELF DIAGNOSIS. After fixing the trouble and RESET button, this ERROR status is reset. Main diagnosis items are as follows. Memory Setting A/D Converter Calibration 3.2.5 Communication Front Rear 21/76 1 RS232 Port (19200 BPS, ModBus Protocol) For maintenance and Setting software (Engineering Tool) 1 RS232 Port (19200 BPS, ModBus Protocol) For maintenance and Setting software (Engineering Tool) 1 RS485 Port (300 ~ 38400 BPS, DNP3.0/Modbus/ IEC870-5-103 Protocol) For SCADA communication Over Voltage & Under Voltage Relay (PAC-E500) User’s Manual 3.2.6 Setting & Configuration Software PAC-E500 has the dedicated setting software. Through RS232 port on front or rear panel of PAC-E500 to notebook computer’s RS232 port, maintenance and batch jobs are easily done. In the following, the functions of this tool are described briefly. System Configuration & Set Value Upload to PC and Batch Download to PAC-E500 Set Value & Recorded Data Saving The manipulation of setting software is explained in more detail on chapter 6 and the following figure shows protection page of setting program. <Figure 3.2.6. Protection Page of Setting software > 22/76 Over Voltage & Under Voltage Relay (PAC-E500) User’s Manual 4 Operational Description 4.1 FRONT PANEL CONSTRUCTION 4.1.1 Front Panel Operation The front-face display panel of PAC-E500 is composed of a graphic LCD 16 char 2 lines, 13 LED’s, 11 keypad buttons, and a RS232C communication port. Cover put on front panel play part that keep away invasion of dust and unnecessary button operation. Password protection prevents the unexpected mal-operation of keypad for control. The protection functions are executed in the background even during the manipulations of keypad. The alternative way to communicate with PAC-E500 for settings modification and fault/event data upload is to use the engineering tools through RS232C port in the front-face. 조임 나사 Screw Display Display LCD LCD Indicators Indicators LED LED --Run 전원LED 인가 상태 LED --System 자기진단 Error상태 LED표시 LED --Protection 보호계전Element 요소 Pickup Pickup LED LED --Protection 보호계전Element 요소 Trip TripLED LED Up/Down/Left/Right 방향 Key Key - 설정값 변경 및 메뉴간 이동 --Local/Remote 제어권(Local)표시 LED LED --Control 제어권(Remote)표시 LED Select LED Open제어 LED 선택 LED --CB 차단기 CloseOpen LED LED --CB 차단기 - 차단기 Close LED --Local/Remote 차단기 제어권 Key변경 Key --Control 차단기Select 제어 Key 선택 Key OpenOpen Key Key --CB 차단기 CloseClose Key Key --CB 차단기 Screw 조임 나사 Programmable LED 4 Configurable LED - 사용자의 설정에 맞게 표시하 기 위한 LED Reset Key Reset Key - 계전기 보호요소 동작 복귀, 자기진단기능 수동 복귀 CB차단기 Control LED LED 제어부 CB차단기 Control Key Key 제어부 -2 각종 계측치 및 설정 정보를 Line LCD for indicating 표시하기 2Line metering and위한 setting valueLCD Menu Key Menu Key Change of set -Confirm 설정된and 정정치 확인 및value 변경 Enter Key Enter Key --Confirm 정정치 set 설정 확인, value and 비밀번호 Password 확인 Key RS232 Connector RS232 Port for -Local PC와의Maintenance 연계를 위한 RS232 통신 포트 <Figure 4.1.1. Front Panel Operator Interface> 23/76 Over Voltage & Under Voltage Relay (PAC-E500) User’s Manual 4.1.2 LEDs RUN: Green is on when power is supplied. Test: Green is on and blinking when contact outputs are set out and during LCD/LED test on front panel. Red is on when self-diagnosis function detects device abnormalities. Relaying operation is inhibited. Details of abnormality are displayed on LCD, and even if the abnormal state returns to normal, LED is not reset to off but latched on. Manual RESET only returns to reset status. RUN (Green) ERROR (Red) PICK UP (Yellow) TRIP (Red) Yellow is on when a protection element is picked up. Programmable LED * 4 (Red) L (Red) R (Green) SELECT (Yellow) OPEN (Green) CLOSE (Red) Red is on when any trip signal is outputted. LED is latched on until manual RESET. Red is on when each logic status (contact outputs #1~#4) is 1 (ON). Reset depends on Reset Type (Self/Manual) and Reset Delay time (0.00~60.00sec). Red is on in L/R LEDs when LOCAL control mode. (Any contact input should be allocated for CB status and password is required for control mode change.) Green is on in L/R LEDs when REMOTE control mode. (Any contact input should be allocated for CB status and password is required for control mode change.) Yellow is blinking when CB control is SELECTed. Green is on when contact input CB status is OPEN. (Any contact input should be allocated for CB status.) Red is on when contact input CB status is CLOSE. (Any contact input should be allocated for CB status.) 4.1.3 Keypad UP ARROW DOWN RIGHT LEFT Menu Move, Value Change Menu Move, Menu Item Selection Menu Move, Escape to Upper Menu / Cancel Item RESET Manual Reset of System Error and Trip LED MENU Enter into Menu Tree Display ENT Setting Value Enter and Confirm L/R Local / Remote Control Mode Change CONTROL SELECT CB Control Selection (Password) OPEN CB Trip Control CLOSE CB Close Control 24/76 Over Voltage & Under Voltage Relay (PAC-E500) User’s Manual 4.2 KEY MANIPULATION & MENU 4.2.1 Basic Principle of Key Manipulation LCD display of PAC-E500 mainly consists of Initial Display and Menu Tree Display. And Menu Tree Display is entered through MENU keypad button. Two display modes are alternated by MENU and Left keypad buttons. In the Menu Tree Display, 4 arrow keys determine the tree node and value change, and ENT key sets the determined values. All the menu items and set values take the rollover schemes using Up/Down keys. [Setting Value Change] 1) All menus except PASSWORD display page numbers on the upper-right side of LCD. Press right arrow button on this page-numbered display. 2) If password is required, press ENTER button after inputting each digit of password. Right/Left keys are used to move cursor to each digit and Up/Down keys be used to input the password number/character of each digit. 3) After correct Password input and Right arrow key again, the set value is blinking to be ready for change. 4) After scrolling the required set value using Up/Down arrow keys, press ENT button. If Left arrow key is pressed before ENT button, the value is not changed and remains the previously saved value. This action confirms the input of a new set value. 5) Using Left arrow key a few times as exiting SETTING menu, the changed set values are saved in the memory to confirm the change save to YES. 6) Entering password into SETTING menu is required once for several value changes until exiting SETTING menu. [Control Position Mode Change: Local / Remote] 1) Only if one or more contact inputs are allocated for CB Open/Closed status, CB control and related status are activated. In case all LEDs for control and related status are off, please check first the configuration of contact inputs and set contact input for CB status. 2) To change the CB control position between Local from control panel and Remote from SCADA (master system), press L/R button. 3) The password is required, and arrow keys and ENT button are used to input the password. 4) After correct password and L/R button again, control position is changed between Local (L) and Remote (R), and each LED (L: Red, R: Green) is toggled on and off. [CB Control from Front Panel] 1) Only if one or more contact inputs are allocated for CB Open/Closed status, CB control and related status are activated. In case all LEDs for control and related status are off, please check first the configuration of contact inputs and set contact input for CB status. 2) In case the control position is Remote (R, Green LED is on.), it should be changed to Local (L, Red LED is on.) using the previous method of Control Position Mode Change. 3) Press SELECT button to confirm CB control intention. 4) The password is required for SELECT, and arrow keys and ENT button are used to input the password. 5) After correct password input, CB control is finally actuated using OPEN / CLOSE buttons. In case control command is the same with the current status of CB, the description of the same status (OPENED or CLOSED) is displayed on LCD and no control command goes out. 6) At all times, the password is required for CB control. 25/76 Over Voltage & Under Voltage Relay (PAC-E500) User’s Manual 4.2.2 Menu Tree Menu of PAC-E500 mainly consists of DISPLAY, SETTING, and COMMAND. DISPLAY menu is composed of STATUS, MEASURE, and SYS INFO sub menus. STATUS menu is used to monitor the statuses of input/output contacts, the results of selfdiagnosis, and start/operated statuses of protection elements. MEASURE menu is used to display the measurement and metering of electric values, sequence current, and frequency. SYS INFO menu is used to display the system information of MPU and DSP S/W versions for maintenance. SETTING menu is composed of SYSTEM and PROTECTION sub menus. This menu is used for settings modification. SYSTEM menu is composed of POWER SYSTEM, CB CONTROL, PT FUSE MONITOR, COM, DNP3.0, CONTACT INPUT, CONTACT OUTPUT, LED, and PASSWORD. POWER SYSTEM is used for setting of frequency, frequency tracking, phase CT ratio, Primary and Secondary of phase/ground PT and PT Connection. CB CONTROL is used for time setting TRIP and CLOSE PULSE. COM is used for communication setting. DNP3.0 is used for setting of DNP when communication method is DNP3.0. CONTACT INPUT / OUTPUT and LED are used for setting contact input/output and Programmable LED respectively. PASSWORD is used when change password. PROTECTION menu is composed of protection elements, OV1 (59_1), OV2 (59_2), UV1 (27_1), UV2 (27_2), OVG1 (59G_1), OVG2 (59G_2), OVG3 (59G_3), NSOV (47) and UF (81), and is used setting each of protection elements. COMMAND menu is composed of CONT OUT TEST and PANEL TEST sub menus. This menu is used to test output contacts and LCD/LEDs of front-face display panel. 26/76 Over Voltage & Under Voltage Relay (PAC-E500) User’s Manual MAIN Display DISPLAY STATUS CONTACT INPUT CONT IN#1 ~ 4 CONTACT OUTPUT CONT OUT#1 ~ 4 SELF DIAGNOSIS MEMORY, SETTING, AD CONVERTER, CALIBRATION, PT FUSE MONITOR PROTECTION OV1(59_1), OV2(59_2), UV1(27_1), UV2(27_2), OVG1(59G_1), OVG2(59G_2), OVG3(59G_3), NSOV(47), UF(81) VOLT(VAB), VOLT(VBC), VOLT(VCA), VOLT(VA), VOLT(VB), VOLT(VC), VOLT(VN), CURR(IA), SEQ(V0), SEQ(V1), SEQ(V2), THD(VA), THD(VB), THD(VC), FREQUENCY MEASURE SYSTEM INFO. SETTING SYSTEM Version Information POWER SYSTEM FREQUENCY, FREQ TRACK, PHS CT RATIO, PHS PT PRI, PHS PT SEC, GND PT PRI, GND PT SEC, PT CONNECT, FREQUENCY CB CONTROL TRIP PULSE, CLOSE PULSE PT FUSE MONITOR FUNCTION, POS UV PKP, NEG OV PKP, DELAY COM FUNCTION, SLAVE ADDR, BPS, PROTOCOL DNP3.0 TX DELAY, LINK CONFIRM, LINK RETRY, LINK TIMEOUT, SBO TIMEOUT, WR TIME INT, COLD RESTART CONTACT INPUT CONT IN#1 ~ 4 CONTACT OUTPUT CONT OUT#1 ~ 4 LOGIC, INPUT1~8, RESET TYPE, RESET DELAY LED LED#1 ~ 4 LOGIC, INPUT1~8, RESET TYPE, RESET DELAY PASSWORD PROTECTION COMMAND OV1(59_1) FUNCTION, MODE, PICKUP, DELAY, MULTIPLIER, BLOCK OV2(59_2) FUNCTION, MODE, PICKUP, DELAY, MULTIPLIER, BLOCK UV1(27_1) FUNCTION, MODE, PICKUP, DELAY, MULTIPLIER, BLOCK UV2(27_2) FUNCTION, MODE, PICKUP, DELAY, MULTIPLIER, BLOCK OVG1(59G_1) FUNCTION, MODE, PICKUP, DELAY, MULTIPLIER, BLOCK OVG2(59G_2) FUNCTION, MODE, PICKUP, DELAY, MULTIPLIER, BLOCK OVG3(59G_3) FUNCTION, MODE, PICKUP, DELAY, MULTIPLIER, BLOCK NSOV(47) FUNCTION, PICKUP, DELAY, BLOCK UF(81) FUNCTION, UV PICKUP, OC PICKUP, dF/dT PKP, FREQ PICKUP, DELAY, UV BLOCK, OC BLOCK, dF/dT BLOCK, BLOCK CONT OUT TEST PANEL TEST <Figure 4.2.2. PAC-E500 Overall Menu Tree> 27/76 Over Voltage & Under Voltage Relay (PAC-E500) User’s Manual 4.3 INITIAL DISPLAY Initial display divides normal and error display according to self-diagnosis. User takes proper action when self-diagnosis status except PT FUSE MONITOR is “FAIL” one or more and must reset manual after make normally self-diagnosis. LCD is indicated SYSTEM OK, when result of self-diagnosis is OK as following. PAC - E 5 0 0 S Y S T EM OK LCD is indicated SYSTEM ERROR, when result of self-diagnosis is FAIL as following. PAC - E 5 0 0 SY S T EM 4.4 ERROR MENU TREE DISPLAY To convert Initial Display into Menu Tree Display are operated through ENT and MENU buttons. Menu Tree Display is entered through MENU keypad button. Two display modes are alternated by MENU and Left keypad buttons. In the Menu Tree Display, 4 arrow keys determine the tree node and value change, and ENT key sets the determined values. All the menu items and set values take the rollover schemes using Up/Down keys. To convert Menu Tree Display into Initial Display are operated through Left arrow Escape keypad button and main menus first child nodes of the root consist of DISPLAY, SETTING, and COMMAND. DISPLAY menu shows status of I/O contacts, self-diagnosis results, starting and operating status of protection elements, metering of electric values, and software version of DSP. SETTING menu lets password for setting and control, analog circuit configuration, realtime system clock, CB setup, communication, input/output contacts and programmable LED setup, operation setup for protection elements, calibration data. COMMAND menu is used to test output contacts and LCD/LEDs of front-face display panel. In the following, each of the specific sub menus is explained. PAC - E 5 0 0 S Y S T EM OK ▶D I S P L A Y MENU ▶S E T T I N G MENU ▶C O M M A N D MENU 28/76 Over Voltage & Under Voltage Relay (PAC-E500) User’s Manual 4.4.1 DISPLAY Menu DISPLAY menu is composed of STATUS, MEASURE, and SYS INFO sub menus. ▶D I S P L A Y ▶D I S P L A Y ENT ▶S T A T U S ▶D I S P L A Y ▶M E A S U R E ▶D I S P L A Y ▶S Y S T E M I NFO . 4.4.1.1. DISPLAY/STATUS DISPLAY menu is composed of CONTACT INPUT, CONTACT OUTPUT, SELF DIAGNOSIS, and PROTECTION sub menu. Each of sub menus shows contact input, contact output, self-diagnosis and operating status of protection elements. ▶D I S P L A Y ▶S T A T U S ▶S T A T U S ▶C O N T A C T I NPUT ▶S T A T U S ▶C O N T A C T OUT PUT ▶S T A T U S ▶S E L F D I AGNOS I S ▶S T A T U S ▶P R O T E C T I O N 29/76 Over Voltage & Under Voltage Relay (PAC-E500) User’s Manual 4.4.1.2. DISPLAY/STATUS/CONTACT INPUT This menu displays On/Off status information of 4 contact inputs. ▶S T A T U S ▶C O N T A C T CON T I NPUT : 2 / 4 I N# 3 3 / 4 I N# 4 4 / 4 OU T # 1 1 / 4 OF F CON T : I N# 2 OF F CON T : 1 / 4 OF F CON T : I N# 1 OF F 4.4.1.3. DISPLAY/STATUS/CONTACT OUTPUT This menu displays On/Off status information of 4 contact outputs. ▶S T A T U S ▶C O N T A C T CON T OUT PUT : DE ENERG I Z ED CON T : OU T # 3 3 / 4 DE ENERG I Z ED CON T : 2 / 4 DE ENERG I Z ED CON T : OU T # 2 OU T # 4 4 / 4 DE ENERG I Z ED 4.4.1.4. DISPLAY/STATUS/SELF DIAGNOSIS This menu displays self-diagnosis results. System works normally if status of all selfdiagnosis except PT FUSE MONITOR is OK. ▶S T A T U S MEMO R Y ▶S E L F : D I AGNOS I S OK S E T T I NG : 30/76 1 / 4 OK 2 / 4 Over Voltage & Under Voltage Relay (PAC-E500) User’s Manual AD : CONV ER T ER OK CAL I BRA T I ON : 3 / 4 4 / 4 OK 4.4.1.5. DISPLAY/STATUS/PROTECTION This menu displays picked-up started and operated status of 9 protection elements. Phase elements show started and operated phases A, B, and C, and ground elements show “PK” and “OP” symbols, when the fault current is picked up and the relaying element is signaled to operate. ▶S T A T U S OV1 ( 5 9 _ 1 ) ▶P R O T E C T I O N PKP : ABC , 1 / 9 OP : ABC OV2 ( 5 9 _ 2 ) PKP : ABC , 2 / 9 OP : ABC UV 1 ( 2 7 _ 1 ) PKP : ABC , 3 / 9 OP : ABC UV 2 ( 2 7 _ 2 ) PKP : ABC , 4 / 9 OP : ABC OVG1 ( 5 9G_ 1 ) PKP : PKP , OP : OP OVG2 ( 5 9G_ 2 ) PKP : PKP , NSOV ( 4 7 ) PKP : PKP , UF ( 8 1 ) PKP : PKP , 31/76 6 / 9 OP : OP OVG3 ( 5 9G_ 3 ) PKP : PKP , 5 / 9 7 / 9 OP : OP 8 / 9 OP : OP 9 / 9 OP : OP Over Voltage & Under Voltage Relay (PAC-E500) User’s Manual 4.4.1.6. DISPLAY/MEASURE This menu displays measurement and metering data of electric values. PAC-E500 has 1 current input and 4-voltage input. (Frequency is show according to input value of A-phase voltage.) ▶D I S P L A Y VOL T ( VAB ) ▶M E A S U R E : 0 . 0 0 V , < VOL T ( VBC ) : 0 . 0 0 V , < VOL T ( VCA ) : 0 . 0 0 V , < VOL T ( VA ) : 0 . 0 0 0 . 0 0 V , < 0 . 0 0 V , < 0 . 0 0 V , < 0 . 0 0 V , < 0 . 0 0 A , < 0 . 0 0 V , < 32/76 0 . 0 0 0 . 0 0 . 0 0 . 0 0 . 0 0 . 0 1 0 / 1 5 V , < SEQ ( V 2 ) : 0 . 0 9 / 1 5 SEQ ( V 1 ) : 0 . 0 8 / 1 5 SEQ ( V 0 ) : 3 / 1 5 7 / 1 5 CURR ( I A ) : 0 . 0 6 / 1 5 VOL T ( VN ) : 2 / 1 5 5 / 1 5 VOL T ( VC ) : 0 . 0 4 / 1 5 VOL T ( VB ) : 1 / 1 5 0 . 0 1 1 / 1 5 V , < 0 . 0 Over Voltage & Under Voltage Relay (PAC-E500) User’s Manual THD ( VA ) : 0 . 0 1 2 / 1 5 % THD ( VB ) : 0 . 0 1 3 / 1 5 % THD ( VC ) : 0 . 0 1 4 / 1 5 % FREQUENCY : 1 5 / 1 5 0 . 0 0Hz 4.4.1.7. DISPLAY/SYSTEM INFO. This menu is used to display the system information of DSP S/W versions for maintenance. ▶D I S P L A Y ▶S Y S T E M 33/76 PAC - E 5 0 0 I NFO . Ve r : V1 . 0 0 Over Voltage & Under Voltage Relay (PAC-E500) User’s Manual 4.4.2 SETTING Menu SETTING menu is composed of SYSTEM and PROTECTION sub menus. This menu is used for settings modification. Basically, modifying settings and viewing are carried out in 2 ways: through LCD and keypad, and engineering tool batch download using Setting software. SETTING menu has 2 submenus; SYSTEM is for the general system setup and PROT COMP is for protection elements. Password enter is always required when the setting values are to be changed, and the updated setting values are stored and reflected after yes/no confirmation escaping SETTING menu. And, once the password is entered using ENT key, it doesn’t need to be entered again while in SETTING menu. New values are set and selected using arrow keys and ENT keypad button. ▶S E T T I N G ▶S E T T I N G ENT ▶S Y S T E M ▶S E T T I N G ▶P R O T E C T I O N 4.4.2.1. SETTING/SYSTEM SYSTEM menu is composed of POWER SYSTEM, CB CONTROL, PT FUSE MONITOR, COM, DNP3.0, CONTACT INPUT, CONTACT OUTPUT, LED, and PASSWORD. POWER SYSTEM is used for setting of frequency, frequency tracking, phase CT ratio and ground CT. CB CONTROL is used for time setting TRIP and CLOSE PULSE. PT FUSE MONITOR is used for time of CB pulse setting. COM is used for communication setting. DNP3.0 is used for setting of DNP when communication method is DNP3.0. CONTACT INPUT / OUTPUT and LED are used for setting contact input/output and Programmable LED respectively. PASSWORD is used when change password. ▶S E T T I N G ▶S Y S T E M ▶S Y S T E M ▶P OW E R S Y S T EM ▶S Y S T E M ▶C B CON T ROL ▶S Y S T E M ▶P T FUSE ▶S Y S T E M ▶C O M ▶S Y S T E M ▶D N P 3 . 0 34/76 MON I T OR Over Voltage & Under Voltage Relay (PAC-E500) User’s Manual ▶S Y S T E M ▶C O N T A C T I NPUT ▶S Y S T E M ▶C O N T A C T OUT PUT ▶S Y S T E M ▶L E D ▶S Y S T E M ▶P A S S WO R D 4.4.2.2. SETTING/SYSTEM/POWER SYSTEM POWER SYSTEM is used for setting of frequency, frequency tracking, phase CT ratio, phase PT primary, phase PT secondary, ground PT primary, ground PT secondary and PT connect. ▶S E T T I N G FREQUENCY ▶P OW E R : S Y S T EM 6 0 FREQ : : TRACK CT 5 : 5 PT : 0 1 1 0 . 0 PHS PT : 0 1 1 0 . 0 PHS PT : 1 1 0 . 0 PT 1 1 0 . 0 GND : 2 / 1 0 RAT I O3 / 1 0 PHS GND 35/76 Hz D I SABLE PHS : 1 / 1 0 PT 1 1 0 . 0 PR I 4 / 1 0 V PR I S EC 5 / 1 0 V 6 / 1 0 V S EC 7 / 1 0 V S EC V 8 / 1 0 Over Voltage & Under Voltage Relay (PAC-E500) User’s Manual GND : Item Range FREQUENCY FREQ TRACK PHS CT RATIO PHS PT PRI PHS PT PRI PHS PT SEC GND PT PRI GND PT PRI GND PT SEC PT CONNECT 50Hz / 60Hz ENABLE/DISABLE 1 ~ 6000: 5 1 ~ 1000 0.0 ~ 999.9 50.0 ~ 250.0 0 ~ 1000 0.0 ~ 999.9 50.0 ~ 250.0 WYE / DELTA Setting unit 1 1 0.1 0.1 1 0.1 0.1 S EC 1 1 0 . 0 PT : PT 9 / 1 0 V CONNEC T 1 0 / 1 0 WY E Basic value 60Hz DISABLE 5 0 110.0 110.0 0 110.0 110.0 WYE Description Frequency setting Frequency tracking setting Phase CT ratio setting Ground CT ratio setting Phase PT Primary setting Phase PT Secondary setting Ground PT Primary setting Ground PT Primary setting Ground PT Secondary setting PT connect setting <Table 4.4.2.2. POWER SYSTEM Setting Item> 4.4.2.3. SETTING/SYSTEM/CB CONTROL CB CONTROL is used for time setting TRIP and CLOSE PULSE. ▶S E T T I N G TR I P ▶C B : CON T ROL Item TRIP PULSE CLOSE PULSE Range 0.1 ~ 5.0s 0.1 ~ 5.0s Setting unit 0.1s 0.1s Basic value 5.0s 5.0s 5 . 0 PULSE : s 5 . 0 1 / 2 s CLOSE Description Time setting of CB Trip Time setting of CB Close <Table 4.4.2.3. CB CONTROL Setting Item> 36/76 PULSE 2 / 2 Over Voltage & Under Voltage Relay (PAC-E500) User’s Manual 4.4.2.4. SETTING/SYSTEM/ PT FUSE MONITOR PT FUSE MONITOR functions monitor of connecting transformer. FUSE MONITOR is composed of FUNCTION, POS UV PKP, NEG OV PKP and DELAY, used for setting of use or not of monitoring function, positive under voltage pickup, negative over voltage pickup and delay time of operation. ▶S E T T I N G ▶P T FUSE FUNC T I ON : MON I T OR D I SABLE POS : UV 1 7 0 NEG : 1 / 4 2 / 4 PKP 3 / 4 V OV 1 7 0 PKP V DELAY : Item Range Setting unit 4 / 4 6 0 . 0 0 Basic value s Description FUNCTION ENABLE/DISABLE POS UV PKP 5 ~ 170 V 1V 170V NEG OV PKP 5 ~ 170 V 1V 170V DELAY 0.00 ~ 60.00sec 0.01s 60.00sec Setting of use or not Setting of positive under voltage pickup Setting of negative over voltage pickup Delay time setting of operation <Table 4.4.2.4. PT FUSE FAILURE MONITORING Setting Item > 4.4.2.5. SETTING/SYSTEM/COM COM menu is composed of FUNCTION, SLAVE ADDR, BPS, and PROTOCOL and each menu set up communication function, slave address, BPS and protocol. ▶S E T T I N G FUNC T I ON ▶C O M : D I SABLE SLAVE ADDR : 1 BPS : 37/76 1 / 4 2 / 4 3 / 4 3 0 0 Over Voltage & Under Voltage Relay (PAC-E500) User’s Manual PROTOCOL : Item Range FUNCTION SLAVE ADDR ENABLE/DISABLE 1 ~ 65534 BPS 300 ~ 38400 PROTOCOL MODBUS/DNP3.0/IEC870 Setting unit 1 4 / 4 MO D B U S Basic value DISABLE 1 9600 MODBUS Description Setting of use or not Slave address setting Setting of communication speed Protocol setting <Table 4.4.2.5. COM Setting Item> 4.4.2.6. SETTING/SYSTEM/DNP3.0 DNP3.0 menu is composed of TX DELAY, LINK CONFIRM, LINK RETRY, LINK TIMEOUT, SBO TIMEOUT, WR TIME INT and COLD RESTART, and each menu set up Tx delay, Link confirm, Link retry, Link timeout, SBO timeout, Write time interval and Cold restart. ▶S E T T I N G TX ▶D N P 3 . 0 : DELAY 0 L I NK : : : RETRY T I MEOU T 1 SBO 2 / 7 3 / 7 1 I NT 0 m i n COL D 5 / 7 ms e c T I ME : 4 / 7 ms e c T I MEOU T : 38/76 CON F I RM 1 L I NK : ms e c NEVER L I NK WR 1 / 7 RESTART D I SABLE 6 / 7 7 / 7 Over Voltage & Under Voltage Relay (PAC-E500) User’s Manual Item TX DELAY LINK CONFIRM LINK RETRY LINK TIMEOUT SBO TIMEOUT WR TIME INT COLD RESTART Range 0 ~ 65000msec NEVER/ALWAYS /SOMETIMES 0~5 1 ~ 65000msec 1 ~ 65000msec 0 ~ 65000min ENABLE/DISABLE Setting unit 1msec Basic value 0msec Tx delay setting NEVER 1msec 1msec 1msec 1min Description Link confirm setting 0 1msec 1msec 0min DISABLE Link retry setting Link timeout setting SBO timeout setting Write time interval setting Cold restart setting <Table 4.4.2.6. DNP3.0 Setting Item> 4.4.2.7. SETTING/SYSTEM/CONTACT INPUT PAC-E500 has 4 Contact Input, it set each contact input “CONTACT INPUT”. There are NOT CONNECTED, CB OPENED, CB CLOSED, ANNUN RESET, PROT BLOCK and GENERAL INPUT in setting value of CONTACT INPUT. That CB may control, only if one or more contact inputs are allocated for CB Open/Closed status. In that case, CB is controlled the fastest contact input. ▶S E T T I N G ▶C O N T A C T CON T : I NPUT Item Range CONT IN #1~#4 NOT_CONNECTED/ CB_OPENED/ CB_CLOSED/ ANNUN_RESET/ PROT_BLOCK/ GENERAL_INPUT Setting unit I N# 3 I N# 4 3 / 4 4 / 4 NOT _ CONNEC T ED Basic value Description NOT_CONNECTED Setting of contact input <Table 4.4.2.7.1. CONTACT INPUT Setting Item> 39/76 2 / 4 NOT _ CONNEC T ED CON T : I N# 2 NOT _ CONNEC T ED CON T : 1 / 4 NOT _ CONNEC T ED CON T : I N# 1 Over Voltage & Under Voltage Relay (PAC-E500) User’s Manual Contact Input elements NOT_CONNECTED CB_OPENED CB_CLOSED ANNUN_RESET PROT_BLOCK GENERAL_INPUT Description No effect Open CB, when input is logic “1”. Close CB, when input is logic “1” Operate Annunciator Reset, if there is status change of Input Logic. Do action that protection element make BLOCK, when input is logic “1” and BLOCK of protection element is “Yes”. Used general Contact Input <Table 4.4.2.7.2. CONTACT INPUT Setting elements> 4.4.2.8. SETTING/SYSTEM/CONTACT OUTPUT PAC-E500 has 4 Contact output and Contact output is set at “CONTACT OUTPUT”. There are LOGIC, 8 INPUT, RESET TYPE and RESET DELAY in setting value of Contact Output가 있습니다. Setting factor of LOGIC has OR8 and AND8 that are composed 8 Non-Inverting Input, and HALF-OR8 and HALF-AND8 that are composed 4 Non Inverting Input and 4 Inverting Input. Setting Factor of INPUT has System status, Contact Input/Output status and Operating status protection element, and RESET TYPE has two setting items; 1) SELF with RESET DELAY time and 2) MANUAL of LATCH type. RESET DELAY has Off Reset Delay time between 0.00sec ~ 60.00sec. ▶C O N T A C T ▶S E T T I N G ▶C O N T A C T OUT PUT ▶C O N T OUT # 1 ▶C O N T A C T ▶C O N T OUT PUT OUT # 3 ▶C O N T A C T ▶C O N T OUT PUT OUT # 2 ▶C O N T A C T ▶C O N T OUT PUT OUT PUT OUT # 4 - CONTACT OUT (CONT OUT#1 ~ 4) ▶C O N T A C T ▶C O N T OUT PUT OUT # 1 L OG I C : OR 8 I NPUT # 1 : 40/76 2 / 1 1 L _OFF I NPUT # 2 : 1 / 1 1 L _OFF 3 / 1 1 Over Voltage & Under Voltage Relay (PAC-E500) User’s Manual I NPUT # 3 : 4 / 1 1 L _OFF I NPUT # 4 : 5 / 1 1 L _OFF I NPUT # 5 : 6 / 1 1 L _OFF I NPUT # 6 : 7 / 1 1 L _OFF I NPUT # 7 : 8 / 1 1 L _OFF I NPUT # 8 : L _OFF RESET : Item LOGIC INPUT #1~#8 Range Setting unit OR8/HALF-OR8/ AND8/HALF-AND8 Refer to Table 3.2.3.3. RESET TYPE SELF/MANUAL RESET DELAY 0.00 ~ 60.00sec TYPE DELAY1 1 / 1 1 6 0 . 0 0 Basic value OR8 s Description Operator setting Input setting of Operator 0.01sec 0.00sec Form of Contact Output setting Off delay setting (Activated when RESET TYPE is “SELF”) <Table 4.4.2.8. CONTACT OUTPUT Setting Item> 41/76 1 0 / 1 1 SELF RESET : 9 / 1 1 Over Voltage & Under Voltage Relay (PAC-E500) User’s Manual 4.4.2.9. SETTING/SYSTEM/LED PAC-E500 provides 4 Programmable LED for the convenience of user. The setting method is same with CONTACT OUTPUT. ▶S E T T I N G ▶L E D ▶L E D ▶L E D # 1 ▶L E D ▶L E D # 2 ▶L E D ▶L E D # 3 ▶L E D ▶L E D # 4 - LED (LED#1 ~ 4) ▶L E D L OG I C ▶L E D # 1 : OR 8 I NPUT # 1 : 42/76 8 / 1 1 L _OFF I NPUT # 8 : 7 / 1 1 L _OFF I NPUT # 7 : 6 / 1 1 L _OFF I NPUT # 6 : 5 / 1 1 L _OFF I NPUT # 5 : 4 / 1 1 L _OFF I NPUT # 4 : 3 / 1 1 L _OFF I NPUT # 3 : 2 / 1 1 L _OFF I NPUT # 2 : 1 / 1 1 L _OFF 9 / 1 1 Over Voltage & Under Voltage Relay (PAC-E500) User’s Manual RESET : Item Range LOGIC INPUT #1~#8 Setting unit OR8/HALF-OR8/ AND8/HALF-AND8 Reference Table 3.2.3.3. RESET TYPE SELF/MANUAL RESET DELAY 0.00 ~ 60.00sec DELAY1 1 / 1 1 6 0 . 0 0 Basic value OR8 1 0 / 1 1 SELF RESET : TYPE s Description Operator setting Input setting of Operator 0.01sec 0.00sec Form of Contact Output setting Off delay setting (Activated when RESET TYPE is “SELF”) <Table 4.4.2.9. LED Setting Item> 4.4.2.10. SETTING/SYSTEM/PASSWORD There are 2 types of passwords for PAC-E500: Settings modification password and Control action password. Both passwords are same and 4-digit decimal 0~9 numbers and have the initial values of “0000” on delivery of PAC-E500. ▶S Y S T E M N EW ▶P A S S WO R D : P A S S WO R D * * * * [PASSWORDS setting steps] 1) 2) 3) 4) 5) 43/76 Right arrow key from PASSWORDS menu in Menu Tree Select which password to change using Up/Down keys and Right key Enter original settings modification password if required Change or select each of 4 digit values using arrow keys and ENT key Save setting changes in escaping SETTING menu or Change other values Over Voltage & Under Voltage Relay (PAC-E500) User’s Manual 4.4.2.11. SETTING/PROTECTION PROTECTION menu is composed of protection elements, OV1 (59_1), OV2 (59_2), UV1 (27_1), UV2 (27_1), OVG1 (59G_1), OVG2 (59G_2), OVG3 (59G_3), NSOV (47) and UF (81), and is used setting each of protection elements. ▶S E T T I N G ▶P R O T E C T I O N ▶P R O T E C T I O N ▶O V 1 ( 5 9 _ 1 ) ▶P R O T E C T I O N ▶O V 2 ( 5 9 _ 2 ) ▶P R O T E C T I O N ▶U V 1 ( 2 7 _ 1 ) ▶P R O T E C T I O N ▶U V 2 ( 2 7 _ 2 ) ▶P R O T E C T I O N ▶O V G 1 ( 5 9 G _ 1 ) ▶P R O T E C T I O N ▶O V G 2 ( 5 9 G _ 2 ) ▶P R O T E C T I O N ▶O V G 3 ( 5 9 G _ 3 ) ▶P R O T E C T I O N ▶N S O V ( 4 7 ) ▶P R O T E C T I O N ▶U F ( 8 1 ) 44/76 Over Voltage & Under Voltage Relay (PAC-E500) User’s Manual 4.4.2.12. SETTING/PROTECTION/OV1 (59_1) OV1 (59_1) is Over Voltage protection including Definite Time-delayed. It operates Definite Time characteristic, when ‘MODE’ is ‘DEFINITE TIME’, and operates voltage Inverse Time Delayed characteristic, when ‘MODE’ is ‘INVERSE CURVE’. ▶P R O T E C T I O N FUNC T I ON ▶O V 1 ( 5 9 _ 1 ) : 1 / 5 D I SABLE MO D E : 2 / 5 DEF I N I TE T I ME P I CKUP : 1 7 0 3 / 5 V DELAY : 6 0 . 0 0 4 / 5 s MU L T I P L I E R : 1 0 . 0 0 BLOCK : Item FUNCTION Range PICKUP ENABLE/DISABLE DEFINITE TIME / INVERSE CURVE 5~170V DELAY 0.00 ~ 60.00sec MODE MULTIPLIER 0.01 ~ 10.00 BLOCK YES/NO Setting unit 1V 0.01sec 0.00sec 0.01 10.00 NO Description Protection Elements setting Operation Mode setting Pickup setting Operation delay time setting (Setting when ‘Mode’ is ‘Definite Time’) Multiplier setting (Setting when ‘Mode’ is ‘Inverse Curve’) Ban protection function It is set PROT_BLOCK of Contact Input, and banned protection function when Contact input status is Logic “1”. <Table 4.4.2.12. OVG1 (59_1) Setting Item> 45/76 5 / 5 NO Basic value DISABLE DEFINITE TIME 170V 4 / 5 Over Voltage & Under Voltage Relay (PAC-E500) User’s Manual 4.4.2.13. SETTING/PROTECTION/OV2 (59_2) OV2 (59_2) is Over Voltage protection including Definite Time-delayed. It operates Definite Time characteristic, when ‘MODE’ is ‘DEFINITE TIME’, and operates voltage Inverse Time Delayed characteristic, when ‘MODE’ is ‘INVERSE CURVE’. ▶P R O T E C T I O N FUNC T I ON ▶O V 1 ( 5 9 _ 1 ) : 1 / 5 D I SABLE MO D E : 2 / 5 DEF I N I TE T I ME P I CKUP : 1 7 0 3 / 5 V DELAY : 6 0 . 0 0 4 / 5 s MU L T I P L I E R : 1 0 . 0 0 BLOCK : Item FUNCTION Range PICKUP ENABLE/DISABLE DEFINITE TIME / INVERSE CURVE 5~170V DELAY 0.00 ~ 60.00sec MODE MULTIPLIER 0.01 ~ 10.00 BLOCK YES/NO Setting unit 1V 0.01sec 0.00sec 0.01 10.00 NO Description Protection Elements setting Operation Mode setting Pickup setting Operation delay time setting (Setting when ‘Mode’ is ‘Definite Time’) Multiplier setting (Setting when ‘Mode’ is ‘Inverse Curve’) Ban protection function It is set PROT_BLOCK of Contact Input, and banned protection function when Contact input status is Logic “1”. <Table 4.4.2.13. OVG2 (59_2) Setting Item> 46/76 5 / 5 NO Basic value DISABLE DEFINITE TIME 170V 4 / 5 Over Voltage & Under Voltage Relay (PAC-E500) User’s Manual 4.4.2.14. SETTING/PROTECTION/UV1 (27_1) UV1 (27_1) is Over Voltage protection including Definite Time-delayed. It operates Definite Time characteristic, when ‘MODE’ is ‘DEFINITE TIME’, and operates voltage Inverse Time Delayed characteristic, when ‘MODE’ is ‘INVERSE CURVE’. ▶P R O T E C T I O N FUNC T I ON ▶U V 1 ( 2 7 _ 1 ) : 1 / 5 D I SABLE MO D E : 2 / 5 DEF I N I TE T I ME P I CKUP : 1 7 0 3 / 5 V DELAY : 6 0 . 0 0 4 / 5 s MU L T I P L I E R : 1 0 . 0 0 BLOCK : Item FUNCTION Range PICKUP ENABLE/DISABLE DEFINITE TIME / INVERSE CURVE 5~170V DELAY 0.00 ~ 60.00sec MODE MULTIPLIER 0.01 ~ 10.00 BLOCK YES/NO Setting unit 1V 0.01sec 0.00sec 0.01 10.00 NO Description Protection Elements setting Operation Mode setting Pickup setting Operation delay time setting (Setting when ‘Mode’ is ‘Definite Time’) Multiplier setting (Setting when ‘Mode’ is ‘Inverse Curve’) Ban protection function It is set PROT_BLOCK of Contact Input, and banned protection function when Contact input status is Logic “1”. <Table 4.4.2.14. UV1 (27_1) Setting Item> 47/76 5 / 5 NO Basic value DISABLE DEFINITE TIME 170V 4 / 5 Over Voltage & Under Voltage Relay (PAC-E500) User’s Manual 4.4.2.15. SETTING/PROTECTION/UV2 (27_2) UV1 (27_2) is Over Voltage protection including Definite Time-delayed. It operates Definite Time characteristic, when ‘MODE’ is ‘DEFINITE TIME’, and operates voltage Inverse Time Delayed characteristic, when ‘MODE’ is ‘INVERSE CURVE’. ▶P R O T E C T I O N FUNC T I ON ▶U V 1 ( 2 7 _ 2 ) : 1 / 5 D I SABLE MO D E : 2 / 5 DEF I N I TE T I ME P I CKUP : 1 7 0 3 / 5 V DELAY : 6 0 . 0 0 4 / 5 s MU L T I P L I E R : 1 0 . 0 0 BLOCK : Item FUNCTION Range PICKUP ENABLE/DISABLE DEFINITE TIME / INVERSE CURVE 5~170V DELAY 0.00 ~ 60.00sec MODE MULTIPLIER 0.01 ~ 10.00 BLOCK YES/NO Setting unit 1V 0.01sec 0.00sec 0.01 10.00 NO Description Protection Elements setting Operation Mode setting Pickup setting Operation delay time setting (Setting when ‘Mode’ is ‘Definite Time’) Multiplier setting (Setting when ‘Mode’ is ‘Inverse Curve’) Ban protection function It is set PROT_BLOCK of Contact Input, and banned protection function when Contact input status is Logic “1”. <Table 4.4.2.15. UV2 (27_2) Setting Item> 48/76 5 / 5 NO Basic value DISABLE DEFINITE TIME 170V 4 / 5 Over Voltage & Under Voltage Relay (PAC-E500) User’s Manual 4.4.2.16. SETTING/PROTECTION/OVG1 (59G_1) OVG1 (59G_1) is Ground Over Voltage protection including Definite Time-delayed. It operates Definite Time characteristic, when ‘MODE’ is ‘DEFINITE TIME’, and operates voltage Inverse Time Delayed characteristic, when ‘MODE’ is ‘INVERSE TRIP’ or ‘INVERSE ALARM’ in accordance with each time characteristic curve. ▶P R O T E C T I O N FUNC T I ON ▶O V G 1 ( 5 9 G _ 1 ) : 1 / 5 D I SABLE MO D E : 2 / 5 DEF I N I TE T I ME P I CKUP : 1 7 0 3 / 5 V DELAY : 6 0 . 0 0 4 / 5 s MU L T I P L I E R : 1 0 . 0 0 BLOCK : Item FUNCTION Range PICKUP ENABLE/DISABLE DEFINITE TIME / INVERSE CURVE 5~170V DELAY 0.00 ~ 60.00sec MODE MULTIPLIER 0.01 ~ 10.00 BLOCK YES/NO Setting unit 1V 0.01sec 0.00sec 0.01 10.00 NO Description Protection Elements setting Operation Mode setting Pickup setting Operation delay time setting (Setting when ‘Mode’ is ‘Definite Time’) Multiplier setting (Setting when ‘Mode’ is ‘Inverse Curve’) Ban protection function It is set PROT_BLOCK of Contact Input, and banned protection function when Contact input status is Logic “1”. <Table 4.4.2.16.OVG1 (59G_1) Setting Item> 49/76 5 / 5 NO Basic value DISABLE DEFINITE TIME 170V 4 / 5 Over Voltage & Under Voltage Relay (PAC-E500) User’s Manual 4.4.2.17. SETTING/PROTECTION/OVG2 (59G_2) OVG2 (59G_2) is Ground Over Voltage protection including Definite Time-delayed. It operates Definite Time characteristic, when ‘MODE’ is ‘DEFINITE TIME’, and operates voltage Inverse Time Delayed characteristic, when ‘MODE’ is ‘INVERSE TRIP’ or ‘INVERSE ALARM’ in accordance with each time characteristic curve. ▶P R O T E C T I O N FUNC T I ON ▶O V G 2 ( 5 9 G _ 2 ) : 1 / 5 D I SABLE MO D E : 2 / 5 DEF I N I TE T I ME P I CKUP : 1 7 0 3 / 5 V DELAY : 6 0 . 0 0 4 / 5 s MU L T I P L I E R : 1 0 . 0 0 BLOCK : Item FUNCTION Range PICKUP ENABLE/DISABLE DEFINITE TIME / INVERSE CURVE 5~170V DELAY 0.00 ~ 60.00sec MODE MULTIPLIER 0.01 ~ 10.00 BLOCK YES/NO Setting unit 1V 0.01sec 0.00sec 0.01 10.00 NO Description Protection Elements setting Operation Mode setting Pickup setting Operation delay time setting (Setting when ‘Mode’ is ‘Definite Time’) Multiplier setting (Setting when ‘Mode’ is ‘Inverse Curve’) Ban protection function It is set PROT_BLOCK of Contact Input, and banned protection function when Contact input status is Logic “1”. <Table 4.4.2.17.OVG2 (59G_2) Setting Item> 50/76 5 / 5 NO Basic value DISABLE DEFINITE TIME 170V 4 / 5 Over Voltage & Under Voltage Relay (PAC-E500) User’s Manual 4.4.2.18. SETTING/PROTECTION/OVG3 (59G_3) OVG3 (59G_3) is Ground Over Voltage protection including Definite Time-delayed. It operates Definite Time characteristic, when ‘MODE’ is ‘DEFINITE TIME’, and operates voltage Inverse Time Delayed characteristic, when ‘MODE’ is ‘INVERSE TRIP’ or ‘INVERSE ALARM’ in accordance with each time characteristic curve. ▶P R O T E C T I O N FUNC T I ON ▶O V G 3 ( 5 9 G _ 3 ) : 1 / 5 D I SABLE MO D E : 2 / 5 DEF I N I TE T I ME P I CKUP : 1 7 0 3 / 5 V DELAY : 6 0 . 0 0 4 / 5 s MU L T I P L I E R : 1 0 . 0 0 BLOCK : Item FUNCTION Range PICKUP ENABLE/DISABLE DEFINITE TIME / INVERSE CURVE 5~170V DELAY 0.00 ~ 60.00sec MODE MULTIPLIER 0.01 ~ 10.00 BLOCK YES/NO Setting unit 1V 0.01sec 0.00sec 0.01 10.00 NO Description Protection Elements setting Operation Mode setting Pickup setting Operation delay time setting (Setting when ‘Mode’ is ‘Definite Time’) Multiplier setting (Setting when ‘Mode’ is ‘Inverse Curve’) Ban protection function It is set PROT_BLOCK of Contact Input, and banned protection function when Contact input status is Logic “1”. <Table 4.4.2.18.OVG3 (59G_3) Setting Item> 51/76 5 / 5 NO Basic value DISABLE DEFINITE TIME 170V 4 / 5 Over Voltage & Under Voltage Relay (PAC-E500) User’s Manual 4.4.2.19. SETTING/PROTECTION/NSOV (47) NSOV (47) is Negative Sequence Phase Over Voltage protection. In case of the negative phase voltage higher than pick-up, it operates Definite Time characteristic that has operate time. ▶P R O T E C T I O N FUNC T I ON ▶N S O V ( 4 7 ) : 1 / 4 D I SABLE P I CKUP : 1 7 0 2 / 4 V DELAY : 3 / 4 6 0 . 0 0 s BLOCK : Item Range FUNCTION PICKUP ENABLE/DISABLE 5~170V DELAY 0.00 ~ 60.00sec BLOCK YES/NO Setting unit 4 / 4 NO Basic value Description 1V DISABLE 170V 0.01sec 0.00sec Protection Elements setting Pickup setting Operation delay time setting (Setting when ‘Mode’ is ‘Definite Time’) Ban protection function It is set PROT_BLOCK of Contact Input, and banned protection function when Contact input status is Logic “1”. NO <Table 4.4.2.19.NSOV (47) Setting Item> 4.4.2.20. SETTING/PROTECTION/UF (81) UF (81) is Under Frequency protection. In case of the frequency of A-phase voltage lower than FREQ PICKUP, it operates and requisite fault detection is added when each ‘Block’ element is set. Voltage is input lower than ‘UV PICKUP’ when UV PICKUP is set and in case of under frequency the protection element doesn’t operate blocked. And ‘OC BLOCK’ and ‘dF/dT BLOCK’ operate in the same way. ▶P R O T E C T I O N FUNC T I ON ▶U F ( 8 1 ) : UV : 52/76 1 / 1 0 D I SABLE P I CKUP 1 7 0 V 2 / 1 0 Over Voltage & Under Voltage Relay (PAC-E500) User’s Manual OC : P I CKUP 1 0 . 0 0 dF / d T : : A PKP - 1 0 . 0 0 FREQ 3 / 1 0 4 / 1 0 Hz P I CKUP 6 5 . 0 0 5 / 1 0 Hz DELAY : 1 8 0 . 0 0 UV : B LOCK Item Range FUNCTION UV PICKUP OC PICKUP dF/dT PKP FREQ PICKUP DELAY UV BLOCK OC BLOCK dF/dT BLOCK ENABLE/DISABLE 5~170V 0.10 ~ 20.00*In -10.00 ~ -0.10Hz 1V 0.01*In 0.01Hz Basic value DISABLE 170V 20.00*In -10.00Hz 45.00 ~ 65.00Hz 0.01Hz 59.00Hz 0.00 ~ 180.00sec YES/NO YES/NO YES/NO 0.01sec BLOCK YES/NO 53/76 Setting unit 8 / 1 0 NO B LOCK 9 / 1 0 NO BLOCK : 7 / 1 0 B LOCK dF / d T : s NO OC : 6 / 1 0 1 0 / 1 0 NO Description Protection Elements setting Under Voltage Pickup setting Over Current Pickup setting Transient frequency Pickup setting Frequency Pickup setting 180.00sec Operation delay time setting NO Under Voltage Block setting NO Over Current Block setting NO Transient frequency Block setting Ban protection function It is set PROT_BLOCK of Contact NO Input, and banned protection function when Contact input status is Logic “1”. Over Voltage & Under Voltage Relay (PAC-E500) User’s Manual 4.4.3 COMMAND Menu <Table 4.4.2.20. UF (81) Setting Item> COMMAND menu is composed of CONT OUT TEST and PANEL TEST sub menus. This menu is used to test output contacts and LCD/LEDs of front-face display panel. All the submenus are required to enter the password. ▶C O M M A N D ▶C O M M A N D ENT ▶C O N T OUT TEST ▶C O M M A N D ▶P A N E L 4.4.3.1. TEST COMMAND/CONT OUT TEST CONT OUT TEST command is used to test contact outputs individually. ▶C O M M A N D ▶C O N T OUT CON T TEST : OU T # 3 OU T # 4 DE ENERG I Z ED [CONT OUT TEST command steps] 1) 2) 3) 4) Right arrow key from CONT OUT TEST menu in Menu Tree Select test item of 16 contact outputs using Up/Down key and Right key Enter settings modification password if required Execute Energized or DeEnergized test using Up/Down key ”Run/Test” LED blinking green or Error message 5) Left key to escape and Repeat steps 2~4 for other items 54/76 2 / 4 3 / 4 DE ENERG I Z ED CON T : OU T # 2 DE ENERG I Z ED CON T : 1 / 4 DE ENERG I Z ED CON T : OU T # 1 4 / 4 Over Voltage & Under Voltage Relay (PAC-E500) User’s Manual 4.4.3.2. COMMAND/PANEL TEST PANEL TEST command is used to test LCD and LEDs on front-face display panel. ▶C O M M A N D TEST TESTTESTTEST ▶P A N E L TEST TESTTESTTEST TEST [PANEL TEST command steps] 1) Right arrow key from PANEL TEST menu in Menu Tree 2) Enter settings modification password and Right arrow key again 3) LCD and all LEDs blinking or Error message, and Return to Menu Tree 55/76 Over Voltage & Under Voltage Relay (PAC-E500) User’s Manual 5 Dimensions and External Connections PAC-E500 is designed as draw-out type, and external connection, installation, and maintenance are easily managed. 5.1 DIMENSIONED DRAWINGS <Figure 5.1 Dimensioned Drawings of PAC-E500> 56/76 Over Voltage & Under Voltage Relay (PAC-E500) User’s Manual 5.1. Terminal Block Diagram <Figure 5.2 Terminal Block Diagram of PAC-E500> PAC-E500 No 16 Description No Description IA+ 1 IA- 17 VA+ 2 VA- 18 VB+ 3 VB- 19 VC+ 4 VC- 20 VN+ 5 VN- 21 TS1_COM 6 TS1_NO 22 TS2_COM 7 TS2_NO 23 TS3_COM 8 TS3_NO 9 TS3_NC 24 TS4_COM 25 TS4_NC 10 TS4_NO 26 DI1_COM 11 DI1_P 27 DI2_COM 12 DI2_P 28 PWR+ 13 DI3_P 29 PWR- 14 DI4_P 30 FG 15 DI3_4_COM <Table 5.2 Terminal Block Diagram Table> 57/76 Over Voltage & Under Voltage Relay (PAC-E500) User’s Manual 5.2 EXTERNAL CONNECTIONS 5.2.1 Control Source Control source or Energizing input to PAC-E500 necessitates validation between the permitted ranges. If the control source is connected to other than control source terminal, protection units and internal circuits are damaged. AC or DC SURGE PWR+ PWR- 30 28 29 Internally Fused PAC-E500 PAC-E100 <Figure 5.3.1 Control Source Terminal Connection of PAC-E500 > 5.2.2 CT Connections Refer to the Table 5.2. Terminal Block Diagram Table in the above A B C <Figure 5.3.2. CT Connections> 58/76 PAC-E500 16 IA+ 1 IA- Over Voltage & Under Voltage Relay (PAC-E500) User’s Manual 5.2.3 PT Connections Refer to the Table 5.2. Terminal Block Diagram Table in the above. A B C PAC-E500 Fuse Fuse 17 2 18 3 19 4 VA+ VAVB+ VBVC+ VC- <Figure 5.3.3.1. V-Connections PT Connections – ABC Rotation> A B C PAC-E500 Fuse Fuse Fuse 17 2 18 3 19 4 <Figure 5.3.3.2. Normal PT Connections> 59/76 VA+ VAVB+ VBVC+ VC- Over Voltage & Under Voltage Relay (PAC-E500) User’s Manual A B C N PAC-E500 Fuse Fuse Fuse 17 2 18 3 19 4 VA+ VAVB+ VBVC+ VC- <Figure 5.3.3.3. 3P4L PT Connections> A B C PAC-E500 20 20 <Figure 5.3.3.4. GPT Connections> 60/76 VN+ VN- Over Voltage & Under Voltage Relay (PAC-E500) User’s Manual 5.2.4 Input/Output Contacts Connection Refer to the Table 5.2. Terminal Block Diagram Table in the above. + PAC-E500 6 21 TS1_NO 11 26 DI1_P TS1_COM T C (Wet) – DI1_N DC 125V <Figure 5.3.4 DI & DO Connection of PAC-E500> 5.2.5 RS232 Port Connection Refer to the Table 5.2. Terminal Block Diagram Table in the above. Notebook PC PAC-E500 1: NA 2: TXD 1 3: RXD 4: NA 5: Signal Ground 5 6: NA 7: NA 9 Pins 8: NA RS232 9: NA D-sub Connector Female Pin No. 2 & 3 1 5 RS232 D-sub Connector <Figure 5.3.5 RS232 Port Connection of PAC-E500> 61/76 Over Voltage & Under Voltage Relay (PAC-E500) User’s Manual 5.2.6 RS485 Port Connection Refer to the Table 5.2. Terminal Block Diagram Table in the above. PAC-E500 Twisted Pair SCADA + ZT (*) 1 SHIELD – Chassis Grounded only 5 Rear RS485 D-sub Connector (*) ZT : 120 (Terminal Resistor) <Figure 5.3.6 RS485 Port Connection of PAC-E500> 62/76 2:RS485_DATA+ 3:RS485_DATA5:RS485_COM Over Voltage & Under Voltage Relay (PAC-E500) User’s Manual 5.2.7 Wiring Diagram A A B B C C 16 1 17 2 18 3 19 4 20 5 IA + IA - VA + VA - VB + VB - VC + VC - VN + VN - Current Inputs 11 DI1_P 26 DI1_COM 12 DI2_P 27 DI2_COM 13 DI3_P 14 DI4_P 15 DI3_4_COM Voltage Input DIGITAL I/O C o n t a c t C o n t a c t I n p u t s O u t p u t s DC 28 POWER+ POWER 29 POWER- POWER 30 SURGE AC or DC RS232C RS232C RS485 DB-9 DB-9 DB-9 Front Rear Rear <Figure 5.3.7 Wiring Diagram> 63/76 TS1_NO 6 TS1_COM 21 TS2_NO 7 TS2_COM 22 TS3_NO 8 TS3_COM 23 TS3_NC 9 TS4_NO 10 TS4_COM 24 TS4_NC 25 Over Voltage & Under Voltage Relay (PAC-E500) User’s Manual 6 Setting & Configuration Software Operate status, setting and metering information are shown and changed through Setting software of PAC-E500. 6.1 SETTING SOFTWARE Modification of settings or/and system configuration is generally performed using keypad buttons in the LCD menu on front panel of PAC-E500. But this job is handled item by item at one time. So, this setting tool is used to facilitate a batch job. Refer to the figure of RS232 connection in the previous section, and the ModBus protocol is used. All the data can be saved in files as project concept and the specific setting values are downloaded to PAC-E500 just by opening the saved project data file. Other functions include event data uploading & listing, fault data uploading, and data printing. Caution : Certainly, COMport must be used 1 port of front or rear because RS232C port located front and rear panel of PACE500 is not communicate at the same time. 6.1.1 Program Menu Setting software menu is composed of port setting, file input/output and setting of relay, and each menu is described below. ▪Program Menu Device Selecting Selected 3 kind of PAC-E Series (3 type) Open Save Saved Project File Loading Report Edited Data Saving to Text File and Printing COM Communication Port Selection on PC. (Addr: 1 fixed) Connect RS232 Port Communication Connection and Initialization Disconnect Upload Communication Disconnection and Port Closing Download Edited Data on the program Transfer from PC to PAC-E500. Setting Open setting page of System, Protection, Contact In/Out, LED Open indicating page of Measuring value, status of self-diagnosis, Contact input/output and LED output. Version Information of Setting Software New Project Generation for Setting Finished Project Generation for Setting Edited Data Saving to File as Different Name Program Exit Monitor About New Close Save As Exit Edited Data Saving to File Set Data on PAC-E500 Transfer from PAC-E500 to PC <Table 6.1.1. Program Menu> 64/76 Over Voltage & Under Voltage Relay (PAC-E500) User’s Manual 6.1.2 Device Selecting It must be selected to control relay model because setting software is program that control 3 types relay by 1 program. Press “Device Selecting” ( ) button, show window as below figure and select to control relay model. <Figure 6.1.2. Device Selecting> 6.1.3 Communication Port Setting It can use to select 1 of 15 ports and another COMport when it can’t use COMport due to other equipment. Address is fixed 1 when communicate through RS232C port. It must be set Address as COM Address of PAC-E500 when communicate through RS485 port. <Figure 6.1.3. Port setting> 65/76 Over Voltage & Under Voltage Relay (PAC-E500) User’s Manual 6.1.4 System Configuration This configuration is related to general system setting of PAC-E500. Setting items are Power System, Circuit Breaker Control, Password, COM, and DNP communication. Each item’s function is the same as that of LCD menu on front panel, and refer to chapter 4 Operational Description for more detailed explanation. <Figure 6.1.4. Setting Tool-System Configuration> 66/76 Over Voltage & Under Voltage Relay (PAC-E500) User’s Manual 6.1.5 Protection Setting This setting is a main settings modification of PAC-E500 and is related to the setting items of protection elements. In the sub-frames, it is separated into OVR (OV1, OV2), UVR (UV1, UV2), OVGR (OVG1, OVG2, OVG3), NSOV (47) and UF (81). The selected TC curve represents each inverse time element and reflects the change of time dial multiplier. Refer to LCD setting menu on chapter 4 Operational Description for more detailed explanation. <Figure 6.1.5. Setting Tool-Protection > 67/76 Over Voltage & Under Voltage Relay (PAC-E500) User’s Manual 6.1.6 Contact In/Out Setting This setting is set up contact input/output of PAC-E500. Setting items are 4 Contact Input and 4 Contact Output. Refer to LCD setting menu on chapter 4 Operational Description for more detailed explanation. <Figure 6.1.6. Setting Tool-Contact Input/Output> 68/76 Over Voltage & Under Voltage Relay (PAC-E500) User’s Manual 6.1.7 LED Setting This setting is each of Programmable LED respectively. Refer to LCD setting menu on chapter 4 Operational Description for more detailed explanation. <Figure 6.1.7. Setting Tool-Programmable LED> 69/76 Over Voltage & Under Voltage Relay (PAC-E500) User’s Manual 6.1.8 Monitor Monitor display shows status monitoring of PAC-E500. Elements or status monitoring is composed of Measurement, Self Diagnosis, Protection Component, LED Output, Breaker and Contact Input/ Output, and there is “Annun Reset” button on front panel’s left. Refer to LCD setting menu on chapter 4 Operational Description for more detailed explanation. <Figure 6.1.8. Setting Tool-Monitoring> 70/76 Over Voltage & Under Voltage Relay (PAC-E500) User’s Manual Appendix A. TC Characteristics Curves <Figure A.1 Over Voltage Curve> 71/76 Over Voltage & Under Voltage Relay (PAC-E500) User’s Manual <Figure A.2 Under Voltage Curve> 72/76 Over Voltage & Under Voltage Relay (PAC-E500) User’s Manual <Figure A.3 Ground Over Voltage TRIP Curve> 73/76 Over Voltage & Under Voltage Relay (PAC-E500) User’s Manual <Figure A.4 Ground Over Voltage Alarm Curve> 74/76 Over Voltage & Under Voltage Relay (PAC-E500) User’s Manual Appendix B. Ordering Option P A C - E 5 0 0 - I P C Ordering Option : Communication 1 - Communication : Modbus 2 - Communication : DNP3.0 3 - Communication : IEC870-5-103 Ordering Option : Power Supply 1 - Power Supply : 24 ~ 48 V 2 - Power Supply : 80 ~ 300VDC or 110V Ordering Option : Normal Current 75/76 1 - Normal Current : 1A 2 - Normal Current : 5A Over Voltage & Under Voltage Relay (PAC-E500) User’s Manual P&C Technologies Co., Ltd. Head of Office & Factory Address Tel Fax #898-43, Hogye-Dong, Dongahn-Gu, Anyang, Gyonggi-Do, 431-080, Korea 82 31 4525791 82 31 4525793 Seoul Office Address 5F, Kwangmyung B/D, #115-3, Bangi-dong, Songpa-gu, Seoul, 138-050 Korea Tel Fax Homepage 82 2 22408106 82 2 22408188 http://www.pnctech.co.kr/ 76/76