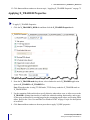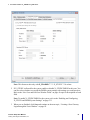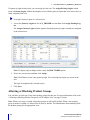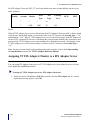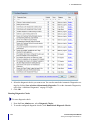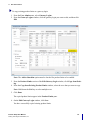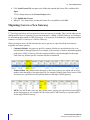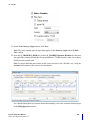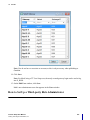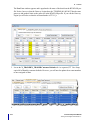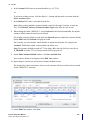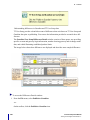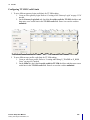
1
TT User Setup User Manual VERSION 7.X DOCUMENT VERSION 7.17.0.DV1 3/5/14 This document and all related computer programs, example programs, and all TT source code are the exclusive property of Trading Technologies International, Inc. (“TT”), and are protected by licensing agreements, copyright law and international treaties. Unauthorized possession, reproduction, duplication, or dissemination of this document, or any portion of it, is illegal and may result in severe civil and criminal penalties. Unauthorized reproduction of any TT software or proprietary information may result in severe civil and criminal penalties, and will be prosecuted to the maximum extent possible under the law. Information in this document is subject to change without notice. Companies, names, and data used in examples herein are fictitious unless otherwise noted. No part of this document may be reproduced or transmitted in any form or by any means, electronic or mechanical, for any purpose, without the express written permission of TT. All trademarks displayed in this document are subject to the trademark rights of TT, or are used under agreement by TT. These trademarks include, but are not limited to, service brand names, slogans and logos and emblems including but not limited to: Trading Technologies®, the Trading Technologies Logo, TT™, X_TRADER®, X_RISK®, MD Trader®, Autospreader®, X_STUDY®, TT_TRADER®, TT CVD®, ADL®, Autotrader™, TT Trainer™, Back Office Bridge™, TTNET™. All other referenced companies, individuals and trademarks retain their rights. All trademarks are the property of their respective owners. The unauthorized use of any trademark displayed in this document is strictly prohibited. Copyright © 2004-2014 Trading Technologies International, Inc. All rights reserved. Table of Contents User Administration: X_TRADER or X_RISK Users . . . . . . . . . . . . . . . . . . . . . . . . . . . . . . . . . . . 69 Creating and Editing X_TRADER or X_RISK Users. . . . . . . . . . . . . . . . . . . . . . . . . . . . . . . . Applying Basic User Properties. . . . . . . . . . . . . . . . . . . . . . . . . . . . . . . . . . . . . . . . . . . . . . . . . Applying X_TRADER Properties . . . . . . . . . . . . . . . . . . . . . . . . . . . . . . . . . . . . . . . . . . . . . . . Applying X_RISK Properties . . . . . . . . . . . . . . . . . . . . . . . . . . . . . . . . . . . . . . . . . . . . . . . . . . Creating and Managing X_TRADER Customer Defaults. . . . . . . . . . . . . . . . . . . . . . . . . . . . . Configuring X_STUDY and FMDS . . . . . . . . . . . . . . . . . . . . . . . . . . . . . . . . . . . . . . . . . . . . . Creating a New Gateway Login through the Users Window . . . . . . . . . . . . . . . . . . . . . . . . . . Generating a Gateway Login for all Gateways . . . . . . . . . . . . . . . . . . . . . . . . . . . . . . . . . . . . . Assigning Gateway Logins to a User Through the Users Window. . . . . . . . . . . . . . . . . . . . . . Allowing or Blocking Product Groups . . . . . . . . . . . . . . . . . . . . . . . . . . . . . . . . . . . . . . . . . . . 69 69 72 73 73 80 82 83 83 84 User Administration: Administrative Users . . . . . . . . . . . . . . . . . . . . . . . . . . . . . . . . . . . . . . . . . . 85 Creating and Editing Administrative Users. . . . . . . . . . . . . . . . . . . . . . . . . . . . . . . . . . . . . . . . Creating a Super Administrator . . . . . . . . . . . . . . . . . . . . . . . . . . . . . . . . . . . . . . . . . . . . . . . . . Creating a Group Administrator . . . . . . . . . . . . . . . . . . . . . . . . . . . . . . . . . . . . . . . . . . . . . . . . Creating a Gateway Login Administrator . . . . . . . . . . . . . . . . . . . . . . . . . . . . . . . . . . . . . . . . . Creating a Password Administrator . . . . . . . . . . . . . . . . . . . . . . . . . . . . . . . . . . . . . . . . . . . . . . Creating a View Only User . . . . . . . . . . . . . . . . . . . . . . . . . . . . . . . . . . . . . . . . . . . . . . . . . . . . Creating a Collect Log Files Only User . . . . . . . . . . . . . . . . . . . . . . . . . . . . . . . . . . . . . . . . . . Configuring the Outgoing Email Settings . . . . . . . . . . . . . . . . . . . . . . . . . . . . . . . . . . . . . . . . . 85 85 86 88 89 91 92 93 User Administration: FIX Adapter . . . . . . . . . . . . . . . . . . . . . . . . . . . . . . . . . . . . . . . . . . . . . . . . . . 95 TT FIX Adapter and TT User Setup Overview . . . . . . . . . . . . . . . . . . . . . . . . . . . . . . . . . . . . . 95 Setting Up a TT FIX Adapter Server. . . . . . . . . . . . . . . . . . . . . . . . . . . . . . . . . . . . . . . . . . . . . 96 Setting Up a FIX Adapter Client User. . . . . . . . . . . . . . . . . . . . . . . . . . . . . . . . . . . . . . . . . . . 100 Setting Up an Account Default . . . . . . . . . . . . . . . . . . . . . . . . . . . . . . . . . . . . . . . . . . . . . . . . 104 Assigning TT FIX Adapter Client(s) to a FIX Adapter Server . . . . . . . . . . . . . . . . . . . . . . . . 110 Allowing or Blocking Product Groups for a FIX Adapter User . . . . . . . . . . . . . . . . . . . . . . . 112 User Maintenance. . . . . . . . . . . . . . . . . . . . . . . . . . . . . . . . . . . . . . . . . . . . . . . . . . . . . . . . . . . . . . 113 How to Maintain Users . . . . . . . . . . . . . . . . . . . . . . . . . . . . . . . . . . . . . . . . . . . . . . . . . . . . . . Resetting a User Password. . . . . . . . . . . . . . . . . . . . . . . . . . . . . . . . . . . . . . . . . . . . . . . . . . . . Auto Generating and Emailing a User's Password . . . . . . . . . . . . . . . . . . . . . . . . . . . . . . . . . Unlocking Users . . . . . . . . . . . . . . . . . . . . . . . . . . . . . . . . . . . . . . . . . . . . . . . . . . . . . . . . . . . Forcing a User Logoff . . . . . . . . . . . . . . . . . . . . . . . . . . . . . . . . . . . . . . . . . . . . . . . . . . . . . . . Activating and Deactivating Users . . . . . . . . . . . . . . . . . . . . . . . . . . . . . . . . . . . . . . . . . . . . . Configuring and Running Diagnostic Checks . . . . . . . . . . . . . . . . . . . . . . . . . . . . . . . . . . . . . Allowing or Blocking Product Groups for Specific Markets . . . . . . . . . . . . . . . . . . . . . . . . . Updating the Supported Product Groups List . . . . . . . . . . . . . . . . . . . . . . . . . . . . . . . . . . . . . 113 113 114 114 115 116 116 119 120 Gateway Login Administration Basics . . . . . . . . . . . . . . . . . . . . . . . . . . . . . . . . . . . . . . . . . . . . . 121 Gateway Logins Overview . . . . . . . . . . . . . . . . . . . . . . . . . . . . . . . . . . . . . . . . . . . . . . . . . . . Assign to Available Users Window Field Descriptions . . . . . . . . . . . . . . . . . . . . . . . . . . . . . Available Users list . . . . . . . . . . . . . . . . . . . . . . . . . . . . . . . . . . . . . . . . . . . . . . . . . . . . . . Selected Users list . . . . . . . . . . . . . . . . . . . . . . . . . . . . . . . . . . . . . . . . . . . . . . . . . . . . . . . Login Attributes . . . . . . . . . . . . . . . . . . . . . . . . . . . . . . . . . . . . . . . . . . . . . . . . . . . . . . . . iv 121 121 121 121 121 TT User Setup User Manual Trading Technologies International, Inc. Table of Contents Gateway Login Window Field Descriptions . . . . . . . . . . . . . . . . . . . . . . . . . . . . . . . . . . . . . . 123 Customizing the Gateway Logins Window. . . . . . . . . . . . . . . . . . . . . . . . . . . . . . . . . . . . . . . 131 Creating Gateway Logins . . . . . . . . . . . . . . . . . . . . . . . . . . . . . . . . . . . . . . . . . . . . . . . . . . . . . . . 135 Creating a New Gateway Login . . . . . . . . . . . . . . . . . . . . . . . . . . . . . . . . . . . . . . . . . . . . . . . Assigning the MemberGroupTrader ID. . . . . . . . . . . . . . . . . . . . . . . . . . . . . . . . . . . . . . . . . . Disabling Start-of-Day Records . . . . . . . . . . . . . . . . . . . . . . . . . . . . . . . . . . . . . . . . . . . . . . . Assigning Gateways to Gateway Logins. . . . . . . . . . . . . . . . . . . . . . . . . . . . . . . . . . . . . . . . . Mapping a TTORD to an Exchange Trader . . . . . . . . . . . . . . . . . . . . . . . . . . . . . . . . . . . . . . Adding Gateways to Existing TTORDs . . . . . . . . . . . . . . . . . . . . . . . . . . . . . . . . . . . . . . . . . Assigning Accounts . . . . . . . . . . . . . . . . . . . . . . . . . . . . . . . . . . . . . . . . . . . . . . . . . . . . . . . . . Configuring Risk . . . . . . . . . . . . . . . . . . . . . . . . . . . . . . . . . . . . . . . . . . . . . . . . . . . . . . . . . . . Assigning Users to a Gateway Login . . . . . . . . . . . . . . . . . . . . . . . . . . . . . . . . . . . . . . . . . . . Editing a User's Gateway Login Attributes . . . . . . . . . . . . . . . . . . . . . . . . . . . . . . . . . . . . . . . Assigning Gateways to Multiple Gateway Logins . . . . . . . . . . . . . . . . . . . . . . . . . . . . . . . . . 135 135 136 137 138 140 141 143 144 146 150 Account Administration . . . . . . . . . . . . . . . . . . . . . . . . . . . . . . . . . . . . . . . . . . . . . . . . . . . . . . . . . 153 Account Administration Overview . . . . . . . . . . . . . . . . . . . . . . . . . . . . . . . . . . . . . . . . . . . . . 153 Creating Accounts . . . . . . . . . . . . . . . . . . . . . . . . . . . . . . . . . . . . . . . . . . . . . . . . . . . . . . . . . . 154 Assigning One or More Accounts to an Account Group. . . . . . . . . . . . . . . . . . . . . . . . . . . . . 156 Account Group Administration . . . . . . . . . . . . . . . . . . . . . . . . . . . . . . . . . . . . . . . . . . . . . . . . . . . 159 Account Group Administration Overview. . . . . . . . . . . . . . . . . . . . . . . . . . . . . . . . . . . . . . . . 159 Creating Account Groups . . . . . . . . . . . . . . . . . . . . . . . . . . . . . . . . . . . . . . . . . . . . . . . . . . . . 160 Assigning Accounts to an Account Group . . . . . . . . . . . . . . . . . . . . . . . . . . . . . . . . . . . . . . . 162 Gateway Login Risk Administration . . . . . . . . . . . . . . . . . . . . . . . . . . . . . . . . . . . . . . . . . . . . . . . 165 Risk and Administration Overview . . . . . . . . . . . . . . . . . . . . . . . . . . . . . . . . . . . . . . . . . . . . . Gateway Login Level Risk . . . . . . . . . . . . . . . . . . . . . . . . . . . . . . . . . . . . . . . . . . . . . . . . Account and Account Group Level Risk . . . . . . . . . . . . . . . . . . . . . . . . . . . . . . . . . . . . . User Level Risk . . . . . . . . . . . . . . . . . . . . . . . . . . . . . . . . . . . . . . . . . . . . . . . . . . . . . . . . Product Limits Overview. . . . . . . . . . . . . . . . . . . . . . . . . . . . . . . . . . . . . . . . . . . . . . . . . . . . . Configuring Gateway Login Risk . . . . . . . . . . . . . . . . . . . . . . . . . . . . . . . . . . . . . . . . . . . . . . Creating Product Limits for Gateway Logins . . . . . . . . . . . . . . . . . . . . . . . . . . . . . . . . . . . . . Copying Product Limits to Additional Gateways or Gateway Logins . . . . . . . . . . . . . . . . . . 165 165 165 165 166 166 168 172 Account and Account Group Risk Administration . . . . . . . . . . . . . . . . . . . . . . . . . . . . . . . . . . . 175 Adding Account-Level Risk Checking . . . . . . . . . . . . . . . . . . . . . . . . . . . . . . . . . . . . . . . . . . Adding Account Group-Level Risk Checking . . . . . . . . . . . . . . . . . . . . . . . . . . . . . . . . . . . . Creating Product Limits for Accounts and Account Groups. . . . . . . . . . . . . . . . . . . . . . . . . . Creating Margin Limits for Accounts and Account Groups . . . . . . . . . . . . . . . . . . . . . . . . . . Copying Product Limits to Additional Accounts or Account Groups. . . . . . . . . . . . . . . . . . . Copying Account-Based Product Limits to Additional Gateways . . . . . . . . . . . . . . . . . . . . . 175 176 176 180 181 182 User Level Risk Checking . . . . . . . . . . . . . . . . . . . . . . . . . . . . . . . . . . . . . . . . . . . . . . . . . . . . . . . 185 Adding User-Level Risk Checking . . . . . . . . . . . . . . . . . . . . . . . . . . . . . . . . . . . . . . . . . . . . . 185 Setting Pre-Trade Price Controls . . . . . . . . . . . . . . . . . . . . . . . . . . . . . . . . . . . . . . . . . . . . . . . 187 TT User Setup User Manual Trading Technologies International, Inc. v Table of Contents Price Controls Overview . . . . . . . . . . . . . . . . . . . . . . . . . . . . . . . . . . . . . . . . . . . . . . . . . . Price Checking Overview . . . . . . . . . . . . . . . . . . . . . . . . . . . . . . . . . . . . . . . . . . . . . . . . . Example: Static Price Range Control . . . . . . . . . . . . . . . . . . . . . . . . . . . . . . . . . . . . . . . . Example: Directional Price Range Control . . . . . . . . . . . . . . . . . . . . . . . . . . . . . . . . . . . Enabling and Setting the Pre-trade Price Controls . . . . . . . . . . . . . . . . . . . . . . . . . . . . . . Setting Order Throughput Controls . . . . . . . . . . . . . . . . . . . . . . . . . . . . . . . . . . . . . . . . . . . . . Order Throughput Controls Overview . . . . . . . . . . . . . . . . . . . . . . . . . . . . . . . . . . . . . . . Order Rejection Overview . . . . . . . . . . . . . . . . . . . . . . . . . . . . . . . . . . . . . . . . . . . . . . . . Example: Order Throughput Control . . . . . . . . . . . . . . . . . . . . . . . . . . . . . . . . . . . . . . . . Enabling and Setting the Order Throughput Controls . . . . . . . . . . . . . . . . . . . . . . . . . . . Overriding the Order Throughput Controls . . . . . . . . . . . . . . . . . . . . . . . . . . . . . . . . . . . 187 188 188 189 190 191 191 192 192 193 194 User Group Administration . . . . . . . . . . . . . . . . . . . . . . . . . . . . . . . . . . . . . . . . . . . . . . . . . . . . . . 195 User Group Administration Overview. . . . . . . . . . . . . . . . . . . . . . . . . . . . . . . . . . . . . . . . . . . Creating User Groups . . . . . . . . . . . . . . . . . . . . . . . . . . . . . . . . . . . . . . . . . . . . . . . . . . . . . . . Creating User Groups for Order Passing . . . . . . . . . . . . . . . . . . . . . . . . . . . . . . . . . . . . . . . . . Assigning Users to a User Group . . . . . . . . . . . . . . . . . . . . . . . . . . . . . . . . . . . . . . . . . . . . . . Assigning User Groups to Gateway Logins . . . . . . . . . . . . . . . . . . . . . . . . . . . . . . . . . . . . . . Assigning User Groups to a Gateway Login . . . . . . . . . . . . . . . . . . . . . . . . . . . . . . . . . . Assigning Gateway Logins to a User Group . . . . . . . . . . . . . . . . . . . . . . . . . . . . . . . . . . Assigning User Groups to an Account . . . . . . . . . . . . . . . . . . . . . . . . . . . . . . . . . . . . . . . . . . 195 195 197 199 200 201 202 203 Publishing to Guardian . . . . . . . . . . . . . . . . . . . . . . . . . . . . . . . . . . . . . . . . . . . . . . . . . . . . . . . . . 205 Publishing to Guardian . . . . . . . . . . . . . . . . . . . . . . . . . . . . . . . . . . . . . . . . . . . . . . . . . . . . . . 205 Displaying Detailed Differences . . . . . . . . . . . . . . . . . . . . . . . . . . . . . . . . . . . . . . . . . . . . . . . 206 Understanding Publish Warnings . . . . . . . . . . . . . . . . . . . . . . . . . . . . . . . . . . . . . . . . . . . . . . 208 Server Administration . . . . . . . . . . . . . . . . . . . . . . . . . . . . . . . . . . . . . . . . . . . . . . . . . . . . . . . . . . 209 Collecting Log Files . . . . . . . . . . . . . . . . . . . . . . . . . . . . . . . . . . . . . . . . . . . . . . . . . . . . . . . . Using Version Control Rules. . . . . . . . . . . . . . . . . . . . . . . . . . . . . . . . . . . . . . . . . . . . . . . . . . Resetting the Guardian Exchange Tree . . . . . . . . . . . . . . . . . . . . . . . . . . . . . . . . . . . . . . . . . . Editing the Currency Exchange Rates . . . . . . . . . . . . . . . . . . . . . . . . . . . . . . . . . . . . . . . . . . . Adding and Deleting Currencies . . . . . . . . . . . . . . . . . . . . . . . . . . . . . . . . . . . . . . . . . . . . . . . Editing Product Margins . . . . . . . . . . . . . . . . . . . . . . . . . . . . . . . . . . . . . . . . . . . . . . . . . . . . . Viewing and Clearing Product Margin Conflicts . . . . . . . . . . . . . . . . . . . . . . . . . . . . . . . . . . Viewing and Publishing Licenses . . . . . . . . . . . . . . . . . . . . . . . . . . . . . . . . . . . . . . . . . . . . . . Viewing Licenses . . . . . . . . . . . . . . . . . . . . . . . . . . . . . . . . . . . . . . . . . . . . . . . . . . . . . . . Loading and Publishing Licenses . . . . . . . . . . . . . . . . . . . . . . . . . . . . . . . . . . . . . . . . . . . Migrating Users to a New Gateway. . . . . . . . . . . . . . . . . . . . . . . . . . . . . . . . . . . . . . . . . . . . . Understanding Server Messages . . . . . . . . . . . . . . . . . . . . . . . . . . . . . . . . . . . . . . . . . . . . . . . System Settings . . . . . . . . . . . . . . . . . . . . . . . . . . . . . . . . . . . . . . . . . . . . . . . . . . . . . . . . . . . . Introducing System Settings . . . . . . . . . . . . . . . . . . . . . . . . . . . . . . . . . . . . . . . . . . . . . . . Configuring Concurrent Login Rules . . . . . . . . . . . . . . . . . . . . . . . . . . . . . . . . . . . . . . . . Configuring Password Locking Rules . . . . . . . . . . . . . . . . . . . . . . . . . . . . . . . . . . . . . . . Customizing the Failed Login Attempt Message . . . . . . . . . . . . . . . . . . . . . . . . . . . . . . . Configuring Password Rules . . . . . . . . . . . . . . . . . . . . . . . . . . . . . . . . . . . . . . . . . . . . . . Automatic Diagnostics . . . . . . . . . . . . . . . . . . . . . . . . . . . . . . . . . . . . . . . . . . . . . . . . . . . vi 209 210 212 212 214 215 217 219 219 221 222 225 226 226 227 228 229 230 232 TT User Setup User Manual Trading Technologies International, Inc. 1 TT Gateway and the Exchange Enabling and Configuring X_STUDY and FMDS System Settings . . . . . . . . . . . . . . . . 233 Reports . . . . . . . . . . . . . . . . . . . . . . . . . . . . . . . . . . . . . . . . . . . . . . . . . . . . . . . . . . . . . . . . . . . . . . 237 Displaying and Exporting Reports. . . . . . . . . . . . . . . . . . . . . . . . . . . . . . . . . . . . . . . . . . . . . . Displaying a Report . . . . . . . . . . . . . . . . . . . . . . . . . . . . . . . . . . . . . . . . . . . . . . . . . . . . . Exporting a Report as HTML or CSV . . . . . . . . . . . . . . . . . . . . . . . . . . . . . . . . . . . . . . . Tracking the TT Product Version Number . . . . . . . . . . . . . . . . . . . . . . . . . . . . . . . . . . . . . . . Using Audit Trail to Track Database Updates. . . . . . . . . . . . . . . . . . . . . . . . . . . . . . . . . . . . . Displaying Logged in Users . . . . . . . . . . . . . . . . . . . . . . . . . . . . . . . . . . . . . . . . . . . . . . . . . . Viewing Server Messages . . . . . . . . . . . . . . . . . . . . . . . . . . . . . . . . . . . . . . . . . . . . . . . . . . . . Displaying Running Servers . . . . . . . . . . . . . . . . . . . . . . . . . . . . . . . . . . . . . . . . . . . . . . . . . . Viewing Server Status . . . . . . . . . . . . . . . . . . . . . . . . . . . . . . . . . . . . . . . . . . . . . . . . . . . . . . . Generating an ICE Product Groups Report . . . . . . . . . . . . . . . . . . . . . . . . . . . . . . . . . . . . . . . 237 238 238 239 241 243 246 247 248 248 Tutorials . . . . . . . . . . . . . . . . . . . . . . . . . . . . . . . . . . . . . . . . . . . . . . . . . . . . . . . . . . . . . . . . . . . . . 251 How to Setup a New User Who Will Trade Using a TTORD Gateway Login. . . . . . . . . . . . 251 How to Map an Additional Gateway Login to an Existing TTORD User . . . . . . . . . . . . . . . 260 How to Set Up an Administrator Who Uses Both X_RISK and TT User Setup. . . . . . . . . . . 263 How to Set Up a Third-party Risk Administrator . . . . . . . . . . . . . . . . . . . . . . . . . . . . . . . . . . 267 Creating the Gateway Login Group . . . . . . . . . . . . . . . . . . . . . . . . . . . . . . . . . . . . . . . . . 268 Creating the Third-party Gateway Login Administrator . . . . . . . . . . . . . . . . . . . . . . . . . 268 Assigning Users to the Third-party Gateway Logins . . . . . . . . . . . . . . . . . . . . . . . . . . . . 269 How to Create a New User by Copying an Existing User. . . . . . . . . . . . . . . . . . . . . . . . . . . . 269 How to Assign Existing Product Limits to Other Gateway Login IDs Simultaneously . . . . . 274 How to Change Multiple Product Limit Values Simultaneously . . . . . . . . . . . . . . . . . . . . . . 276 How to Set Up Customer Defaults . . . . . . . . . . . . . . . . . . . . . . . . . . . . . . . . . . . . . . . . . . . . . 277 How to Update Customer Defaults Across Multiple Users Simultaneously. . . . . . . . . . . . . . 281 How to Review Changes Prior to Publishing to Guardian . . . . . . . . . . . . . . . . . . . . . . . . . . . 285 How to Change the Message Users Receive When Their Logins Fail . . . . . . . . . . . . . . . . . . 288 How to Use Wildcard Characters in Filters. . . . . . . . . . . . . . . . . . . . . . . . . . . . . . . . . . . . . . . 290 How to Set Up a Tiered Administrator . . . . . . . . . . . . . . . . . . . . . . . . . . . . . . . . . . . . . . . . . . 291 How to Set Up a Drop Copy TT FIX Adapter Server and Corresponding FIX Adapter Clients . 296 Creating TT FIX Adapter Servers . . . . . . . . . . . . . . . . . . . . . . . . . . . . . . . . . . . . . . . . . . 297 Creating TT FIX Adapter Client Users . . . . . . . . . . . . . . . . . . . . . . . . . . . . . . . . . . . . . . 301 How to Set Up an Order Routing TT FIX Adapter Server and Corresponding FIX Adapter Clients 308 Creating TT FIX Adapter Servers . . . . . . . . . . . . . . . . . . . . . . . . . . . . . . . . . . . . . . . . . . 308 Creating TT FIX Adapter Client users . . . . . . . . . . . . . . . . . . . . . . . . . . . . . . . . . . . . . . . 312 How to Set up a User for Autospreader SE or Synthetic SE . . . . . . . . . . . . . . . . . . . . . . . . . . 319 Creating TT SIM Credit Limits and Product Limits . . . . . . . . . . . . . . . . . . . . . . . . . . . . . . . . 322 Allowing a User to Log onto X_TRADER using TT SIM mode . . . . . . . . . . . . . . . . . . . 322 Configuring TT SIM Credit Limits . . . . . . . . . . . . . . . . . . . . . . . . . . . . . . . . . . . . . . . . . 323 Configuring TT SIM Product Limits . . . . . . . . . . . . . . . . . . . . . . . . . . . . . . . . . . . . . . . . 324 Appendix . . . . . . . . . . . . . . . . . . . . . . . . . . . . . . . . . . . . . . . . . . . . . . . . . . . . . . . . . . . . . . . . . . . . . 327 Field Descriptions . . . . . . . . . . . . . . . . . . . . . . . . . . . . . . . . . . . . . . . . . . . . . . . . . . . . . . . . . . 327 TT User Setup User Manual Trading Technologies International, Inc. vii 1 TT Gateway and the Exchange Context Menus. . . . . . . . . . . . . . . . . . . . . . . . . . . . . . . . . . . . . . . . . . . . . . . . . . . . . . . . . . . . . 344 Users Window . . . . . . . . . . . . . . . . . . . . . . . . . . . . . . . . . . . . . . . . . . . . . . . . . . . . . . . . . 344 Gateway Logins Window . . . . . . . . . . . . . . . . . . . . . . . . . . . . . . . . . . . . . . . . . . . . . . . . . 345 Product Limits Window . . . . . . . . . . . . . . . . . . . . . . . . . . . . . . . . . . . . . . . . . . . . . . . . . . 346 X_TRADER Customer Defaults Window . . . . . . . . . . . . . . . . . . . . . . . . . . . . . . . . . . . . 347 Product Group Permissions Window . . . . . . . . . . . . . . . . . . . . . . . . . . . . . . . . . . . . . . . . 348 User's Gateway Login Attributes Window . . . . . . . . . . . . . . . . . . . . . . . . . . . . . . . . . . . . 349 Accounts Window . . . . . . . . . . . . . . . . . . . . . . . . . . . . . . . . . . . . . . . . . . . . . . . . . . . . . . 349 User Groups Window . . . . . . . . . . . . . . . . . . . . . . . . . . . . . . . . . . . . . . . . . . . . . . . . . . . . 350 FIX Adapter Account Defaults . . . . . . . . . . . . . . . . . . . . . . . . . . . . . . . . . . . . . . . . . . . . . 351 Unlock Users/Reset Passwords Window . . . . . . . . . . . . . . . . . . . . . . . . . . . . . . . . . . . . . 352 Audit Trail, Environment Server Status, Reports, TT User Setup Servers, and View Connected Clients Windows . . . . . . . . . . . . . . . . . . . . . . . . . . . . . . . . . . . . . . . . . . . . . . . . . . . . . 353 Shortcut Keys. . . . . . . . . . . . . . . . . . . . . . . . . . . . . . . . . . . . . . . . . . . . . . . . . . . . . . . . . . . . . . 353 File Menu . . . . . . . . . . . . . . . . . . . . . . . . . . . . . . . . . . . . . . . . . . . . . . . . . . . . . . . . . . . . . 353 User Admin Menu . . . . . . . . . . . . . . . . . . . . . . . . . . . . . . . . . . . . . . . . . . . . . . . . . . . . . . 354 Server Admin Menu . . . . . . . . . . . . . . . . . . . . . . . . . . . . . . . . . . . . . . . . . . . . . . . . . . . . . 354 Reports Menu . . . . . . . . . . . . . . . . . . . . . . . . . . . . . . . . . . . . . . . . . . . . . . . . . . . . . . . . . . 355 Help Menu . . . . . . . . . . . . . . . . . . . . . . . . . . . . . . . . . . . . . . . . . . . . . . . . . . . . . . . . . . . . 355 TT User Setup Feature and TT Product Compatibility . . . . . . . . . . . . . . . . . . . . . . . . . . . . . . 356 TT User Setup User Manual Trading Technologies International, Inc. viii Getting Started What's New in TT User Setup 7.X 7.4.40 Enhancements This release adds support for the Order Passing feature, which allows members of one user group to pass one or more orders to members of another user group. For more information about Order Passing in X_TRADER, refer to the X_TRADER Help. For information about configuring user groups to pass orders, refer to the User Group Administration topic. Also, this release supports TT Update, which provides software updates to supported TT applications (currently X_TRADER® 7.17.10, X_RISK® 7.17.10, TT User Setup 7.4.40, and TT User Setup 7.17.20 and higher). This eliminates the need for customers to repackage client software when new versions of the supported applications are released. Once end users have installed TT Update on their X_TRADER or X_RISK workstations, TT User Setup administrators can create version rules that determine which TT software updates are available to their users. Once TT User Setup administrators have installed TT Update on their TT User Setup client workstations, TT Update also automatically updates TT User Setup clients to a version that matches the TT User Setup server. For more information about TT Update, refer to the TT Update Help in the online Help Library. For information about setting Version Rules, refer to “Using Version Control Rules”. 7.4.12 Enhancements This release adds the ability to override the user-level Orders per second limit (which applies to all gateways) with settings that can be configured for individual gateways. To override the user-level Per TT Gateway, prevent more than X orders per second setting, open the Users' Gateway Login Attributes window, edit a Gateway Login attribute, and set Prevent more than X orders per second to a value that applies to this gateway. This value overrides the user-level setting. You can also set this override from the User's Gateway Login tab and when assigning a gateway to a user. For more details, refer to “Editing a User's Gateway Login Attributes”, and “Assigning Users to a Gateway Login”. 7.4.11 Enhancements This release introduces additional price reasonability controls that allow a TT User Setup administrator to restrict how far off the market an order can be placed. This is configurable per product and at an account or account group level. 7.4.9 Enhancements As of TT User Setup 7.4.9, the Manual Fill (MF) access allowed and Start of Day (SOD) access allowed options are a single option called Manual Fill (MF) and Start of Day (SOD) access allowed. TT User Setup User Manual Trading Technologies International, Inc. 7 1 Getting Started When upgrading to TT User Setup 7.4.9 or later, TT User Setup automatically checks the new combined option for any users that had either of the old options checked. 7.4.8 Enhancements • • Account Groups: TT User Setup administrators can now place multiple account numbers into a single account group for the purpose of risk checking. TT Gateways check new orders against any configured limits for the account group, based on the combined positions and working orders of each account in the group. For more information about account groups, refer to the “Account Administration Overview” topic. Account-Based and Account Group-Based Risk Checking: Administrators can now configure risk limits for a particular account or place multiple account numbers into a single account group and configure risk checking for the group as a whole. This includes controlling the maximum order size of a single order, the worst-case maximum long or short positions that can be attained per product and/or contract, and the worst-case sum of all long and short contracts per product. Per account or account group, administrators can also define margin limits that apply to individual TT Gateways. When a client submits an order that includes an account, the TT Gateway checks the order against the limits of the account. If the account belongs to an account group, the TT Gateway risk checks based on the combined positions and working orders of all the accounts in the group. Additionally, per account or account group, administrators can: • • Enable or disable risk checking. Enable or disable trading per product. For more information refer to the “Adding Account-Level Risk Checking” and “Adding Account Group-Level Risk Checking” topics. Note: No account or account group risk checking will take place until risk checking is enabled and the gateways have been upgraded to 7.16.8. This will allow administrators to configure new limits without impacting their current setups. • • • • 8 Preventing the Use of Undefined Accounts: Administrators can determine whether or not to allow an order to be submitted with an account number that is not defined in TT User Setup. For more information refer to the “Applying Basic User Properties” topic. Allowing Traders to Change Accounts on Fills: Administrators can determine whether or not to allow traders to update the account number on a fill. For more information refer to the “Applying Basic User Properties” topic. Disabling Start-of-Day Records: Per Gateway Login (MGT), you can configure whether a Gateway should automatically generate Start-of-Day records. When the Disable "Auto-Calculate-SOD" option is checked, gateways will not generate Start-of-Day records for the configured Gateway Login. For more information refer to the “Disabling Start-of-Day Records” topic. Specifying the Accounts Allowed for Manual Fill and Start-of-Day Publishing: If a TT User Setup administrator has given a user the ability to publish manual fills or SODs, the administrator can allow the user to publish SOD records and/or Manual Fills for any account number, or the administrator can limit the user to specific accounts. For more information refer to the “Applying X_RISK Properties” topic. TT User Setup User Manual Trading Technologies International, Inc. 1 Getting Started 7.4.7 Enhancements Operator ID: The new Operator ID field is used to identify the trader or operator to the exchange. The field is accessible from a user's Gateway Login tab (as a column in the Gateway Login table), when assigning a Gateway Login to a user (refer to the “Assigning Users to a Gateway Login” topic), and from the User's Gateway Login Attributes window (refer to the “Editing a User's Gateway Login Attributes” topic). Note: You can assign the same Operator ID to multiple users from the User's Gateway Login Attributes window or the Assign to users window. 7.4.6 Enhancements • • • Price controls: TT User Setup allows you to restrict the price band in which orders can be entered for a given user to a pre-determined number of ticks above or below the current market price. For more information, refer to the “Setting Pre-Trade Price Controls” topic. Order throughput controls: TT User Setup allows you to limit the rate at which orders can be submitted. For more information, refer to the “Setting Order Throughput Controls” topic. GTC/GTDate order controls: TT User Setup allows you to prevent GTC and GTDate orders per user. For more information, refer to the “Applying Basic User Properties” topic. 7.4.5 Enhancements There are no new user features in this release. 7.4.4/7.4.3 Enhancements • • Machine Gun Order Support: TT User Setup allows you to enable or disable the X_TRADER Machine Gun option (for versions of X_TRADER that support the Machine Gun option). For more information, refer to the “New User and Edit User Window Fields” topic. Eurex Persist Order Support: TT User Setup allows you to configure whether Eurex orders sent from X_TRADER automatically persist (supported in X_TRADER 7.12 and later). For more information, refer to the X_TRADER Properties section of the “New User and Edit User Window Fields” topic. 7.4.2 Enhancements • • • TT SIM Support: TT User Setup supports TT SIM mode trading using existing gateway logins and user profiles. If needed, you can also configure credit limits and product limits that apply only to TT SIM trades, and you can configure a user to only trade in TT SIM mode. For more information, refer to the “Creating TT SIM Credit Limits and Product Limits” topic. Copying User Enhancements: TT User Setup now provides additional options when copying users, including copying admin gateway logins, customer defaults, and account defaults. The Copy User feature continues to support copying direct trader gateway logins as well as copying TTORD gateway logins. For more information, refer to the “Copying Users” topic. Replacing Account Numbers in Customer Default Records: You can replace one or more customer default account numbers with similar account numbers based on selected patternmatching rules. For example, you can append or prefix the existing account numbers with addi- TT User Setup User Manual Trading Technologies International, Inc. 9 1 • • • • • • • Getting Started tional characters, or replace the first or last n characters with other characters. This is useful for making slight modifications to many accounts at once, for example, if multiple users have similar account numbers that only differ slightly because of the current restriction that TTORDs must be assigned unique accounts. For more information, refer to the “Creating and Managing X_TRADER Customer Defaults” topic. Collect Log Files Only Permissions: TT User Setup includes a new permission type, Collect Log Files Only. A user with this permission type will be able to collect any log files in the trading environment, including log files containing sensitive trading information. This user cannot view or edit any user or system settings. For more information, refer to the “Creating a Collect Log Files Only User” topic. Add and Delete Currencies: Super administrators can now set the primary currency and add and delete currencies from within TT User Setup. The administrator publishes any changes to Guardian. For more information refer to the “Adding and Deleting Currencies” topic. Viewing and Publishing Licenses: Super administrators can now view, load, and publish licenses from within TT User Setup. Previously this functionality was only available from Guardian. For more information refer to the “Viewing and Publishing Licenses” topic. Editing Product Margins: Super administrators can edit the product margins, per market, from within TT User Setup. This functionality was previously only available in Guardian. For more information refer to the “Editing Product Margins” and “Viewing and Clearing Product Margin Conflicts” topics. Viewing Logged in Users: The logged in users report has been expanded to display a list of logged in users based on gateway connection, product license, and product license per number of markets. Viewing the logged in users report allows you to determine how your licenses are currently being used and how many licenses you have available. For more information refer to the “Displaying Logged in Users” topic. Migrating Users to a New Gateway: TT User Setup now includes a tool to migrate users from one gateway to another. This is useful when you are adding another flavor of a gateway to your environment (i.e. adding a CME-B Gateway as a backup in an environment that contains a CME-A Gateway), or if a gateway is rebranded (i.e. migrating users that connect to a CBOT-A Gateway to a CME-A Gateway). For more information refer to the “Migrating Users to a New Gateway” topic. Collect Log Files: When collecting Log files you can now select the IP address from a list of usernames. For more information refer to the “Collecting Log Files” topic. 7.4.1 Enhancements • • • 10 Adding gateways to multiple gateway logins: Added a Mass Add Gateways button to the Gateway Logins window. This allows you to add gateways to multiple gateway logins at once. For more information, refer to the “Assigning Gateways to Multiple Gateway Logins” topic. Copying multiple product limits to a gateway: Added a Mass Copy to Other Gateway button to the Product Limits window. This allows you copy any selected product limits from one gateway to another. For more information, refer to the “Copying Product Limits to Additional Gateways or Gateway Logins” topic. Using the P&L risk algorithm: Added the Use P&L risk algorithm option to the User window's Risk Check section. If Use P&L risk algorithm is checked, the P&L risk algorithm is used for risk checking, and the P/L based on setting in X_TRADER defaults to Risk Algorithm. If Use P&L risk algorithm is unchecked, the Last Traded Price is used for risk checking. For more information, refer to the “Adding User-Level Risk Checking” topic. TT User Setup User Manual Trading Technologies International, Inc. 1 Getting Started • • • • Resetting the Guardian exchange tree: Added the Reset Guardian Exchange Tree feature to the Server Admin menu. This feature removes any exchanges and IP addresses where there are no running services, for all Guardians in the environment. It is identical to the Reset Exchange Tree feature on the Guardian Tools menu. For more information, refer to the “Resetting the Guardian Exchange Tree” topic. Editing currency exchange rates: Added the Edit Currency Exchange Rates feature to the Server Admin menu. This feature allows you to edit the exchange rates listed in Guardian. These exchange rates are used in P&L and risk calculations in TT client applications, such as X_TRADER. For more information, refer to the “Editing the Currency Exchange Rates” topic. Creating a gateway login that automatically applies to all gateways: Added the Generate Admin Gateway Logins for all gateways option to the User window's Gateway Logins tab. Checking this option allows you to create a gateway login that can log into all available gateways. This is especially useful if setting up a Universal Login for Historical Fill Servers, for example, so that fills are always captured for all gateways. For more information, refer to the “Generating a Gateway Login for all Gateways” topic. Configuring Product Group Permissions for CME: Added product filtering for CME product groups. CME product groups automatically appear on the Product Group Permissions tab and are allowed by default. For more information, refer to the “Allowing or Blocking Product Groups” topic. 7.4 Enhancements • Product Group Permissions: Added Product Group Permissions settings that administrators use to allow or block user access to product groups in supported markets (also referred to as Product Filtering). For example, an administrator can allow a trader to trade and access market data for ICE US Futures, but prevent a trader from trading or accessing market data for OTC GAS products. For more information, refer to the “Allowing or Blocking Product Groups” topic. Note: The following TT software versions (and later) support Product Group Permissions: FIX Adapter 7.6.1, X_TRADER 7.9.0, X_RISK 7.5, X_TRADER API 7.7.0, TT API 7.2.0, and ICE Gateway 7.14.1. • • • ICE Compliance Reports: Added the ICE Compliance report to the Reports menu (renamed to Ice Product Group Report in 7.4.1). The report lists users with ICE credentials (exchange trader MGTs), users with blocked ICE product groups, ICE live Gateways, ICE Gateway connections, and the versions of recently used TT products. Administrators generate and send the report to ICE to show that only the allowed users can access market data for the specified product groups. For more information, refer to the “Generating an ICE Product Groups Report” topic. TT API allowed: Added the TT API allowed option to the user settings. Check this option to give the user permission to access the TT API. TT API allowed is unchecked by default and is only applicable to TTNET customers. Staged order and DMA order permissions: Added staged order and Direct Market Access (DMA) order settings for X_TRADER and FIX Adapter client users. Administrators can allow or prevent staged order creation, staged order management, and DMA order creation. Staged order and DMA order permissions are compatible with X_TRADER 7.9, FIX Adapter 7.7, and Synthetic SE 7.2. For more information refer to the “New User and Edit User Window Fields” and FIX Adapter (client role) tab descriptions in the “New User and Edit User Window Fields” topic. TT User Setup User Manual Trading Technologies International, Inc. 11 1 • Getting Started Server Messages window enhancement: Added a Show only Warnings and Errors checkbox to the Server Messages window. Check this option to display only warnings and errors in the Server Messages window. for this TT User Setup Client. For more information refer to the “Understanding Server Messages” topic. 7.3 Enhancements • • • • • • • • Tiered administration enhancement: Added two TT User Setup user types: a View Only Administrator (has read only privileges) and a Gateway Login Administrator (can manage gateway logins and risk, but who cannot create users). Diagnostic checks tool: Added an option to run diagnostic checks that list potential setup issues. Copying Users: Added the ability to copy a user's TTORD IDs and non-TTORD IDs when copying a user. Forced logoff: Added functionality that allows an administrator to shut down a user's running X_TRADER application to reclaim the X_TRADER license. User-Level Risk: Added risk functionality to the user properties Main tab that allows an administrator to determine whether a user can log in and actively trade, how much credit is available for placing orders, and in what currency any filled orders will be calculated. This enhancement is especially helpful for users who are assigned to multiple Direct Trader Logins as it allows an administrator to set one limit for the user, as opposed to several. FIX Adapter Server and Client users: Added the ability to configure TT FIX Adapter servers and corresponding FIX client users. The New User and Edit User windows contain new FIX Adapter tabs, and the User Admin menu contains a new FIX Adapter Account Defaults menu item. Views: Added a View or New User View drop-down-list to the Users, New User, and Edit User windows that allows an administrator to show only the tabs that are applicable to the type of user being created. For example, when creating a FIX Adapter server user, the administrator selects the FIX Adapter Server View to show only FIX Adapter server tabs. X_STUDY/FMDS configuration enhancement: Added a tab to the System Settings window that allows an administrator to enable or disable X_STUDY and FMDS at a system level, and to configure the primary and secondary X_STUDY/FMDS server settings for the entire system. When X_STUDY and FMDS are enabled at the system level, the administrator can enable or disable X_STUDY and FMDS on a per user basis, and can also override the FMDS server settings if needed. If you have questions, suggestions, or other information to share about features and functionality, please visit the TT™ online user forum at http://forums.tradingtechnologies.com. Introduction to TT User Setup TT User Setup serves as the central location for managing all TT Users, their gateway login information, their risk, and more. 12 TT User Setup User Manual Trading Technologies International, Inc. 1 Getting Started User Administration Administrators create new usernames and passwords and configure various contact information, user login properties, X_RISK permissions, X_TRADER customer defaults, product limits, and product group permissions. Administrators also assign usernames to gateway logins as needed. Users then log into TT applications with this username. Gateway Login Administration Gateway logins consist of Member, Group, and Trader IDs (MGTs) and the corresponding gateways. These MGTs can be used to log into a gateway/exchange. Administrators assign usernames created in TT User Setup to gateway logins (MGTs and associated gateways). Users log into TT applications (such as X_TRADER) with the unique username and password created by the Administrator. Risk administration allows you to set limits on maximum order quantity, additional margin, maximum position, etc., as well as establish parameters for credit, ignoring P&L, allowing trading, currency, etc. Account/Account Group Administration Administrators create accounts, which they can assign to an account group. Per account or account group, administrators can determine which products are tradable, specify various limits on maximum order size and position per product, and configure additional margin per product. Tiered Administration TT User Setup supports several levels of Administrator permissions: • • • • • • Super Administrator: Provides complete access to TT User Setup functionality. Group Administrator: Provides permission to view, edit, and create users, gateway logins, and accounts that exist in one of the user groups the administrator is designated to manage. Also provides the option to prevent a group administrator from creating or editing direct trader gateway logins, as well as from assigning those logins directly to traders. Gateway Login Administrator: Provides permission to assign gateway logins and gateway login attributes to users in the user groups the administrator is designated to manage. Password Administrator: Provides permission to unlock users and reset passwords for some user groups or all user groups. View Only: Provides permission to view users, gateway logins, and accounts that exist in one of the user groups the administrator is designated to view. View-only Administrators can also view system settings, and relevant diagnostic checks. Collect Log Files Only: Provides permission to collect any log files in the trading environment, including log files containing sensitive trading information. This user cannot view or edit any user or system settings. TT User Setup User Manual Trading Technologies International, Inc. 13 1 Getting Started Server Administration From the System Settings window, administrators can configure the login rules, set password rules and restrictions, set the default behavior for newly added product groups, configure automatic diagnostics, and enable and configure FMDS for the system. From the Version Rules window, administrators can create and manage rules that reject logins or warn users when the users is attempting to connect to TT User Setup with a specific version of X_TRADER or X_RISK Administrators can also Collect Log Files from other machines on their gateway, reset the Guardian exchange tree, and edit currency tables. FIX Adapter Administration Administrators can create TT FIX Adapter Order Routing Servers, FIX Adapter Drop Copy Servers, and their corresponding FIX Adapter client users. Administrators also assign FIX Adapter servers and clients login information, contact information, gateway logins, and FIX Adapter account defaults. Reports Administrators can view the list of users that are connected in an environment, an audit trail of the changes to the database, and various additional reports that list user and system information. These reports can all be exported to CSV or HTML. Users (either logged in or not) can also monitor Server activity and status using the Server Messages, TT User Setup Servers and Environment Server Status windows, which provide updates on login attempts, server up/downs, error conditions, active servers in your environment, etc. Logging Into TT User Setup Use the TT Login window to log into TT User Setup. To log in successfully, a TT User Setup Server must be running as a Master server. For a detailed description on the role of a Master server, refer to the TT User Setup System Administration Manual Note: Without logging in, you can still access TT User Setup's Server Messages, TT User Setup Servers, and Environment Server Status windows. To log into TT User Setup: 1. On your desktop, double-click the TT User Setup icon. The TT Login window appears. 14 TT User Setup User Manual Trading Technologies International, Inc. 1 Getting Started 2. In the Username and Password fields, enter a valid username and password. Note: For first-time logins, the default username is TTSYSTEM and the default password is 12345678. TT Recommends that you change this password by clicking Change Password. 3. To populate the Username field automatically the next time you log in, check the Remember my Username option. 4. Click Login. If the login is successful, the TT User Setup Control Panel appears. TT User Setup User Manual Trading Technologies International, Inc. 15 1 Getting Started Additional Login Requirements Before an administrator can log into TT User Setup, another administrator must grant them the appropriate TT User Setup permissions from the New User or Edit User window, as seen below. Warning: Ensure that None is selected for users that are not allowed to log into TT User Setup. Additionally, only users with the Active option checked can log onto TT User Setup. 16 TT User Setup User Manual Trading Technologies International, Inc. 1 Getting Started To log out of TT User Setup without automatically closing the application: From the TT User Setup Control Panel, open the File menu and select Logout. Using the Control Panel The TT User Setup Control Panel includes a Toolbar and a Menu bar. Note: Use the Find Control Panel option (available on most right-click menus) to bring the control panel into focus. This is useful when other screens have overlapped the control panel. Use the Toolbar to access the various TT User Setup windows. The buttons that appear on the Toolbar are as follows: TT User Setup User Manual Trading Technologies International, Inc. 17 1 Button Getting Started Function Opens the Users window, which allows you to set up new users and their login properties, contact, and password information. Opens the Gateway Logins window and allows you to configure a gateway login. A gateway login includes Member, Group, and Trader IDs, account numbers, and pre-trade risk parameters which traders use to log into gateways. Note: The Gateway Logins window in TT User Setup 7.1 - 7.4 is very similar to the Trader Setup window in Guardian. Even if you do not set up users for universal login, you can still manage your Guardian trader and risk setup from this window. Opens the Product Limitswindow, which allows you to view and edit all product limits across all traders. Opens the X_TRADER Customer Defaults window, which allows you to view and edit customer defaults used in X_TRADER. 18 TT User Setup User Manual Trading Technologies International, Inc. 1 Getting Started Button Function Opens the Publish to Guardian window, which allows you to publish risk data and order routing to Guardian. Note: The publish icon changes from a gray and green icon to a yellow and green icon when TT User Setup and Guardian are out-ofsync. This occurs when a change is made to TT User Setup or Guardian, but not both. You must publish the changes to bring TT User Setup and Guardian back in synch. Note: If DisableProductLimitPublishingMode is on, then only order routing data is published to Guardian (refer to the TT User Setup System Administration Manual for more information about the DisableProductLimitPublishingMode parameter). Opens the Diagnostic Checks window, which lists potential set up issues. Opens the Reports window, from which you can run various user and system reports. Opens the Audit Trail window, which tracks updates made to the database. Using the Menu Options TT User Setup User Manual Trading Technologies International, Inc. 19 1 Getting Started Use the Menu bar to access various TT User Setup functions and windows. Note: TT User Setup permits only one primary window to be open at any given time. For example, if you have a Users window open and you want to access the Gateway Logins window, you must first close the Users window. TT User Setup disables certain Control Panel and Menu options when a primary window is open. Note: Use the Find Control Panel option (available on most right-click menus)to bring the control panel into focus. This is useful when other screens have overlapped the control panel. The following is a list of menu options: • Use the File menu to access login and logout features. The options available from the File menu include: Option Function Login Opens the TT Login window. Logout Logs you out of TT User Setup without closing the application. The Login, Server Messages, and Server Status options remain available. Opens the Publish to Guardian window, from which you can publish risk and order routing data to Guardian. Publish to Guardian Note: If DisableProductLimitPublishingMode is on, then only order routing data is published to Guardian (refer to the TT User Setup System Administration Manual for more information about the DisableProductLimitPublishingMode parameter). Exit Closes the TT User Setup client. • Use the User Admin menu to perform user and gateway login setup functions. The options available from the User Admin menu include: 20 TT User Setup User Manual Trading Technologies International, Inc. 1 Getting Started Option Users Gateway Logins Function Opens the Users window, which allows you to create and manage users. Opens the Gateway Logins window, which allows you to manage and create gateway logins. Gateway logins are the MemberGroupTrader IDs used to log into TT Gateways. Each gateway login can have different account numbers and risk limits. For a more complete list of gateway login functionality, refer to the topics in the Gateway Logins section of this Help system. Accounts Opens the Accounts window, which allows you to create and edit account numbers, assign accounts to an account group, and to edit account groups. Once you create an account, you can configure account-based risk. Product Limits Opens the Product Limits window, which allows you to view and edit all product limits across all traders. X_TRADER Customer Defaults Opens the Customer Defaults window, which allows you to configure customer defaults for X_TRADER users. Customer defaults determine order parameters, such as account number, that are to be applied to a trader's order. Product Group Permissions Opens the Product Group Permissions window, which allows you to allow or block user access to individual product groups in supported markets. Users' Gateway Login Attributes Opens the Users' Gateway Login Attributes window, which allows you to edit specific login attributes such as Auto Login and Available to User across all users. TT User Setup User Manual Trading Technologies International, Inc. 21 1 Option Getting Started Function User Groups Opens the User Groups window, which allows you to create and edit user groups. You can configure TT User Setup Administrators to manage one, multiple, or all user groups. Account Groups Opens the Account Groups window, which allows you to create and edit account groups. Once you create an account group you can assign accounts to the group and configure account-group based risk. FIX Adapter Account Defaults Opens the Account Default List window, which allows you to create order values used by TT FIX Adapter when sending orders. Unlock Users/Reset Passwords Opens the Unlock Users/Reset Passwords window, which allows you to unlock any locked out users, as well as reset their passwords. Diagnostic Checks Opens the Diagnostic Checks window, which lists potential set up issues based on the information available in the TT User Setup database. • Use the Server Admin menu to configure the system settings, manage version rules, and collect log files. The options available from the Server Admin menu include: Option Function System Settings Opens the System Settings window, which allows you to enable and set specific password rules and login properties, enable and disable automatic diagnostic checks, and configure the X_STUDY/FMDS settings. Version Rules Opens the Version Rules window, which allows you to create rules that allow or prevent users from logging in with specified versions of X_TRADER or X_RISK. Collect Log Files Opens the Collect Log Files window, which allows an administrator to collect remote log files. 22 TT User Setup User Manual Trading Technologies International, Inc. 1 Getting Started Option Reset Exchange Tree Function Resets the Guardian exchange tree for all Guardians in the environment. This removes any exchanges and IP addresses where there are no running services. Opens the Currency Exchange Rates window, which allows you to edit the exchange rates listed in Guardian. These exchange rates are used in P&L and risk calculations. Currency Exchange Rates Note: If you use TT User Setup to edit the currency exchange rates, do not edit currency rates with Guardian. Add/Remove Currencies Opens the Currencies window, which allows you to add currencies, delete currencies, and to set the primary currency. Product Margins Opens the Product Margins window, which allows you to edit product margins for available products and publish the changes to Guardian. License Setup Opens the License Setup window, which allows you to view the current environment license file, view other LMT files, and to publish the license to Guardian. Migrate Users to New Gateway Opens the Migrate Users to New Gateway window that allows you to migrate users to a new gateway, based on how they are configured for a current gateway. You can select whether or not to copy the source gateway's Gateway Login, FIX client, and automatic and mandatory login settings. • Use the Reports menu to access user and server reports. The options available from the Reports menu include: TT User Setup User Manual Trading Technologies International, Inc. 23 1 Options Getting Started Function Logged in Users Opens Logged in Users window, which allows you to view all users currently logged in and connected to TT servers. Audit Trail Opens the Audit Trail window, which tracks updates made to the data in TT User Setup. Run Reports Opens the Reports window, from which you can generate various reports that display user and system information. Server Messages Opens the Server Messages window, which allows you to monitor all TT User Setup server activity. TT User Setup Servers Opens the TT User Setup Servers window, which allows you monitor the status of each TT User Setup Server. Environment Server Status Opens the Environment Server Status window, which shows whether the servers in your environment are active. ICE Product Groups Report Creates an ICE Product Groups report that ICE uses to verify that only the allowed users can access market data for the specified product groups. • Use the Help menu to access the Help System and version information. The options available from the Help menu include: Option Function Help Topics Accesses the TT User Setup Help System. What's New Accesses the What's New topic of the help system. TT Remote Help Center Launches a browser directed to the TT Remote Help Center. About TT User Setup Displays the version and copyright information for TT User Setup. 24 TT User Setup User Manual Trading Technologies International, Inc. 1 Getting Started Data Grid Functionality TT User Setup uses data grids to display collections of records. For example, the users that the logged in administrator can view are displayed in the data grid that appears on the Users window. From most data grids you can complete the following tasks: • • • • • • “Creating, Editing, and Deleting Records” “Editing and Deleting Multiple Records (Mass Editing)” “Applying Filters” “Sorting by a Column” “Showing, Hiding, and Arranging Columns” “Generating an HTML or CSV Report from any Window” Creating, Editing, and Deleting Records Most of the TT User Setup windows allow you to create, edit, and delete records using similar methods. This topic describes those basic methods: Creating a New Record This procedure describes how to create a new user record from the Users window. The same techniques can be used to create records in the Gateway Logins, Product Limits, Customer Defaults, Account Default List, and Version Rules windows. To create a new record: TT User Setup User Manual Trading Technologies International, Inc. 25 1 Getting Started 1. Open a data grid window, for example, Users. Note: When creating a user, select a specific view from the New User View drop-down list. The view determines which tabs are on the New User window. For more information about this feature refer to the “Using Views” topic. 2. Do one of the following: • Click New. • Right-click the data grid and then click New. • Select a user and then click Copy, or right-click a user and select Copy from the context menu. Refer to the Copying a Record topic if needed. The New User window appears with the Main tab selected. Copying a Record Copied records are pre-filled with most or all of the data from the original. You must change one or more values to make the record unique. When copying a user, you have the option to copy Direct Trader gateway logins, Admin gateway logins, TTORD gateway logins, customer defaults and account defaults. You copy gateway logins, product limits, customer defaults, and account defaults, and you can also copy product limits from one gateway or gateway login to another. To copy a gateway login, product limit, customer default, or account default record: 1. Open a data grid window. For example, Gateway Logins. 2. Select the record that you want to copy, and click Copy. You can also right-click the record and select Copy from the context menu. 26 TT User Setup User Manual Trading Technologies International, Inc. 1 Getting Started 3. Click Copy. 4. Enter or change any fields as needed and then click Save. You have successfully created a new record by copying an existing record. To copy a user record: Refer to “Copying Users”. To copy a product limit to a gateway or gateway login: Refer to “Copying Product Limits to Additional Gateways or Gateway Logins”. Editing a Record This procedure describes how to edit an existing gateway login record from the Gateway Logins window. The same techniques can be used to edit records in the Users, Product Limits, Customer Defaults, Account Default List, and Version Rules windows. To edit a Gateway Login: 1. From the User Admin menu, select Gateway Logins. TT User Setup User Manual Trading Technologies International, Inc. 27 1 Getting Started Note: Use the Refresh button to refresh your window if the data becomes stale. The Refresh feature is useful, when for example, multiple administrators are updating records in TT User Setup. 2. Do one of the following: • Double-click the row for the gateway login you want to update • Select a gateway login row, and click Edit or right-click a gateway login row, and select Edit from the context menu. • Select multiple gateway logins and then click Edit, or right-click the selected gateway logins, and then click Edit from the context menu. Refer to the “Editing and Deleting Multiple Records (Mass Editing)” topic if needed. The Edit Gateway Login window appears with the Gateway Login Info tab selected. Note: Uneditable fields are disabled (grayed out). Deleting a Record This procedure describes how to delete an X_TRADER customer default record from the Customer Defaults window. The same techniques can be used to delete records in the Users, Product Limits, Gateway Login, Account Default List, and Version Rules windows. Note: TT User Setup permanently removes deleted users from the database. To delete a customer default: 1. From the User Admin menu, select X_TRADER Customer Defaults. 28 TT User Setup User Manual Trading Technologies International, Inc. 1 Getting Started 2. Do one of the following: • Click the row of the customer default you want to delete, and then click Delete. • Right-click the row of the customer default you want to delete, and then select Delete from the context menu. • Select multiple customer defaults, click or right-click the selected customer defaults, and then click Delete. 3. When prompted to confirm the deletion, click OK. Editing and Deleting Multiple Records (Mass Editing) Most data grids support editing and deleting multiple records at once (also referred to as mass-editing). The Users, Gateway Logins, Product Limits, Customer Defaults, Account Default List, Users' Gateway Login Attributes, and Version Rules windows support mass edits and mass deletions, while the Accounts and User Groups windows only support mass deletions. To edit multiple records: 1. Open a data grid window. For example, Users. 2. While pressing the Ctrl key, click the rows you want to edit. You can also press the Shift key. 3. Click Edit. 4. On the edit multiple logins warning message, click OK. A window appears that allows you to edit all the selected records. In this example, the Edit Multiple Users window appears. This window contains the most commonly mass-edited fields. TT User Setup User Manual Trading Technologies International, Inc. 29 1 Getting Started Note: Fields with different values display <values differ>; checkboxes with different values display as either shaded or shaded and checked, depending on your Windows Theme; fields with common values display those common values; and fields that cannot be edited are disabled (grayed-out). 5. Edit one or more fields as needed (e.g. change the User group field to London). 6. When you are finished editing, save your changes and close the window. The data grid shows the updated user information. You successfully edited multiple users' information. To delete multiple records: 1. 2. 3. 4. Open a data grid window. Press the Ctrl or Shift keys, and select the rows you want to delete. Click Delete. On the delete confirmation warning message, click OK. You have successfully deleted multiple users. Applying Filters 30 TT User Setup User Manual Trading Technologies International, Inc. 1 Getting Started Filters make it easier to locate specific data in data grids by displaying only the rows that match the column filter(s). Filters can be blank, non-blank, or a string (including wildcards) that you enter. To filter a column: 1. From the User Admin menu or Server Admin menu, select any window with a grid display (e.g., the Gateway Logins window). The filter options are above each column in the column header row. Note: The available filter options vary based on the data displayed in the associated column's fields. 2. To display the available filters, select the column you want to filter and click the drop-down arrow. The filter options available in every applicable window include: Filter Function [No Filter] Removes the current filter. [Blank] Displays only login records with no data in the column. [Non-Blank] Displays only those records that contain data in the column. <string> Displays only those records that contain all or part of the string you entered. You can also enter the +, =, and ? wildcards to display partial or exact matches. Refer to Using Wildcards later in this section for more information. 3. For each column, enter or select a filter. A filtered column's drop-down selection displays a yellow background. TT User Setup User Manual Trading Technologies International, Inc. 31 1 Getting Started Note: Partial filter matches are considered a match. For example, the TTDEMO1 filter matches TTDEMO1, TTDEMO10, TTDEMO100, etc. You have successfully applied a filter to a column. Filtering by an Exact Match You use an = filter symbol to indicate that the text that follows the symbol must filter by an exact match. For example, if you enter =Eurex in a Gateway column filter, the data grid displays only Eurex (no flavor) Gateways. Auto Filter The auto-filter feature also automatically adjusts the content of a column as you enter or delete text in a filter. As you begin typing, your column begins to filter. For example, typing the letter B in the Gateway filter will show only gateways that begin with the letter B. Every subsequent letter typed, further filters the column. Using Wildcards TT User Setup allows you to include wildcards with the filter text to further filter the display: • 32 + matches multiple characters. For example, type +-A in a Gateway column filter to display only A-flavored gateways, as shown: TT User Setup User Manual Trading Technologies International, Inc. 1 Getting Started • ? matches a single character. For example, type ?B in a Group column filter to display groups such as ABC, MB9, NB8, etc,. To view a brief description of the wildcards, place your mouse pointer in a column header. Sorting by a Column Use TT User Setup's column sorting function to control the display of data in various windows. You can sort by columns alphabetically (A-Z or Z-A) or numerically. For example, sort by the Last Changed column of the Users window to determine which users were most recently added or edited. TT User Setup indicates sort order by placing a number in the header of a sorted column. The number one indicates the highest priority, the number two indicates the second-highest priority, and so on. A down arrow indicates the items are sorted in descending order and an up arrow indicates an ascending order. To sort the columns: • • From the data grid, click the column headers from the lowest priority to the highest priority. For more information refer to “Sorting from the Data Grid” Right-click the data grid and select Specify sort criteria. Set the sort order from the Sort dialog box. For more information refer to “Sorting from the Sort Dialog Box”. Sorting from the Data Grid To manually sort the columns from the data grid: TT User Setup User Manual Trading Technologies International, Inc. 33 1 Getting Started 1. Open a data grid window, for example, Gateway Logins. 2. On the column header row, click one of the column titles. Note: You can sort by more than one column by clicking on each column's title. When clicking, for example, on the Gateway Login window's Gateway column title, the column sorts alphabetically. 3. To sort in descending order, click the column heading again. 4. When sorting multiple columns, click the lowest priority column first. TT User Setup assigns the highest priority to the column clicked last. You have successfully sorted by a column. 34 TT User Setup User Manual Trading Technologies International, Inc. 1 Getting Started Sorting from the Sort Dialog Box Use the Sort dialog box to specify the sort criteria for multiple columns of any window that contains a grid. To set the sort order from the Sort dialog box: 1. Open a data grid window. For example, Gateway Logins. 2. Right-click in one of the columns, and on the context menu, select Specify sort criteria. The Sort dialog box appears. 3. Use the transfer buttons (<,<<,>>,>) to select the columns to sort. 4. In the Sort by these columns section, double-click any column to toggle between ascending (Asc) or descending (Desc) sort order. 5. Use the Move Up and Move Down buttons to assign a priority to each column. TT User Setup assigns the topmost column priority one. 6. Click Apply and then OK. You have successfully sorted by a column. Showing, Hiding, and Arranging Columns TT User Setup User Manual Trading Technologies International, Inc. 35 1 Getting Started You access the Show/Hide/Arrange Columns dialog box from the context menu of any window that includes a data grid. Each window lists the visible and hidden columns and the order in which visible columns will appear. By default, TT User Setup displays all available columns in each window. Note: For a list and description of the columns and fields available in each TT User Setup window, refer to the “Field Descriptions” topic. To show or hide columns: 1. Open a data grid window. For example, Users. 2. Right-click in one of the columns, and on the context menu, select Show/Hide/Arrange columns. 3. In the Visible Columns section, click the column you want to hide. 4. Click the < transfer button to move the visible column to the Hidden Columns section. Note: You can transfer all columns by clicking the << transfer button. 5. Use the Move Up, Move Down, and Move to Top buttons to arrange the columns in the order you prefer. Note: Use the Restore Default Column Order button to revert to the original column order. 6. Click Close. 36 TT User Setup User Manual Trading Technologies International, Inc. 1 Getting Started Generating an HTML or CSV Report from any Window Right-click in any data grid window to display a context menu that allows you to export to HTML and CSV files. These options allow you to view data in either an Internet browser or a spreadsheet application, to generate a report, or to save that data for future viewing. The content of the report depends on the sorting or filtering currently applied. The following procedure describes generating an HTML or CSV report from the Users window. To generate an HTML or CSV report from the Users window: 1. Open an applicable TT User Setup window (e.g. the Users window). 2. Right-click anywhere in the grid display. The context menu appears. 3. Click either the Export to HTML or Export to CSV option. The Windows Save As dialog box appears. Note: Any filters, sorting, or hidden columns applied to a window affect the content illustrated in a report. 4. Select the destination for the.html or .csv report file, and assign a file name. The .html file report opens automatically after saving. 5. To display the CSV report, double-click the .csv file. The report displays in a spreadsheet application. You have successfully exported HTML or CSV data and generated a report. TT User Setup User Manual Trading Technologies International, Inc. 37 1 38 Getting Started TT User Setup User Manual Trading Technologies International, Inc. User Administration Basics User Administration Basics From the Users window (accessed from the User Admin menu) you can create or edit all of the user types needed in TT User Setup. This includes • • • • Administrative users (refer to “Creating and Editing Administrative Users” on page 85) X_TRADER or X_RISK users (refer to “Creating and Editing X_TRADER or X_RISK Users” on page 69) FIX Adapter clients (refer to “Setting Up a FIX Adapter Client User” on page 100) FIX Adapter servers (refer to “Setting Up a TT FIX Adapter Server” on page 96) Note: The Users window is a standard data grid with the exception of the New User View menu. Refer to the “Data Grid Functionality” on page 25 and “Using Views” on page 39 topics. For a list of all the fields on all the user administration windows refer to the “New User and Edit User Window Fields” on page 41 topic. Note: You can create a new user by copying an existing user record. Refer to the “Copying Users” on page 64 topic as needed. Using Views The New User and Edit User windows contain all the fields needed to create any type of user. However, some fields apply only to X_TRADER/X_RISK users, while others apply only to FIX Adapter Servers, FIX Adapter Clients, or TT User Setup administrators. Selecting the appropriate view from the View or New User View drop-down determines what the New User or Edit User window displays. The View and New User View options are: • • • • “X_TRADER/X_RISK Fields” on page 39 “FIX Adapter Server Fields” on page 40 “FIX Adapter Client Fields” on page 40 “TT User Setup Admin Fields” on page 41 X_TRADER/X_RISK Fields To create an X_TRADER or X_RISK user, select X_TRADER/X_RISK fields as the View. TT User Setup User Manual Trading Technologies International, Inc. 39 2 User Administration When you create or edit a user, the New User or Edit User window includes the following tabs: FIX Adapter Server Fields To create a FIX Adapter Server user, select FIX Adapter Server fields as the View . When you create or edit a user, the New User or Edit User window includes the following tabs: FIX Adapter Client Fields To create a FIX Adapter Client user, select FIX Adapter Client fields as the View . 40 TT User Setup User Manual Trading Technologies International, Inc. 2 User Administration When you create or edit a user, the New User or Edit User window includes the following tabs: TT User Setup Admin Fields To create a Super Administrator, Group Administrator, Gateway Login Administrator, Password Administrator, or view-only user, select TT User Setup Admin fields as the View . When you create or edit a user, the New User or Edit User window includes the following tabs: New User and Edit User Window Fields This topic describes all of the New User and Edit User window tabs, buttons, and fields. The available tabs and associated windows include the following: TT User Setup User Manual Trading Technologies International, Inc. 41 2 • • • • • • • User Administration “Main” on page 42 “Gateway Logins” on page 46 “X_TRADER/X_RISK” on page 48 “FIX Adapter” on page 58 “TT User Setup Permissions” on page 61 “Outgoing Email Settings” on page 63 “Product Group Permissions Settings” on page 64 Main The Main tab contains the user's basic information. This tab is appears for all user types. Fields Description A Universal Login ID used to log into a TT application (e.g., JDOE) Username Note: Usernames are limited to 11 characters. Display name An identifier whereby you easily recognize the user (e.g., John Doe). An identifier used to categorize users (e.g., Chicago). You can use it to group traders in the X_RISK Position window. User group (optional) Note: The user group also determines which TT User Setup administrators can manage which users. The user's login password (e.g., 12345678). Password / Confirm password Note: Password fields only appear in the New User window before a user has been saved. Active Enables a user's login. If this field is unchecked, the user is considered "inactive". Inactive users cannot log in. 42 TT User Setup User Manual Trading Technologies International, Inc. 2 User Administration Fields Description Password never expires Sets the user's password to never expire. Locked out Indicates whether the user is currently locked out. Limit the number of concurrent logins Allows you to restrict the number of times a single user's login can be in use simultaneously. You must also enforce the Concurrent Logins rules at the system level for this field to have affect. Refer to “Configuring Concurrent Login Rules” on page 227 if needed. Force logoff Allows you to shut down a user's running X_TRADER application to reclaim the X_TRADER license. The user cannot log back in until Force logoff is unchecked. TT API allowed Enables a user's ability to access the TT API. This option is unchecked by default and is only applicable to TTNET customers. GTC/GTDate orders allowed Determines whether a user can place Good Till Cancel and Good Till Date orders. User Defined Fields Stores optional information, such as MGT, account number, etc. Contact fields Stores the user's Country, Address, City, State, Zip, Email, and Phone Number. Enables a user's ability to trade. The Trading allowed option is visible only after saving a new user; it is checked by default. Trading allowed TT User Setup User Manual Trading Technologies International, Inc. Note: The Trading Allowed option must be checked for any user that will add, modify, or delete orders. This means that non-tradable administrator logins (e.g. TTADMXXX100 or TTORDTSXXXMGR) must have the Trading Allowed option checked to delete orders, even though they are unable to trade. 43 2 Fields User Administration Description Credit Determines the overall dollar amount a trader can lose during a given trading session. Enter 0 to reset the credit to unlimited. Currency Determines the currency of the credit value above. Determines if the P&L risk algorithm is used to risk check this user. Use P&L risk algorithm If Use P&L risk algorithm is checked, the P&L risk algorithm is used for risk checking. Additionally, the P/L based on setting in X_TRADER defaults to Risk Algorithm. If Use P&L risk algorithm is unchecked, the Last Traded Price is used for risk checking. The P/L based on X_TRADER setting remains editable. Prevent orders that are more than X ticks from the market price Determines how far from the market price a user may enter an order (in ticks). Check the Only enforce a maximum price on buy orders and a minimum price on sell orders option to allow traders to sell above the specified range and to buy below it .For more information about pre-trade price controls, refer to “Setting Pre-Trade Price Controls” on page 187. Per TT Gateway, prevent more than X orders per second Limits the number of orders per second, per TT Gateway. This setting applies to all Gateways that a user logs in to. For more information about pre-trade order throughput controls on a per user basis, refer to “Setting Order Throughput Controls” on page 191. 44 TT User Setup User Manual Trading Technologies International, Inc. 2 User Administration Fields Description Determines if this user has a different credit limit for TT SIM trading. Enter 0 to reset the credit to unlimited. Override credit for TT SIM When Override credit for TT SIM is checked, the user's credit limit while trading on TT SIM is set to the value in the TT SIM credit field. If Override credit for TT SIM is not checked, the user's credit limit applies to both TT SIM and non TT SIM trading. Determines if orders submitted by this user will be rejected if they are sent with an account that is not defined in TT User Setup. Submitting orders with undefined accounts allowed (if applicable) When Submitting orders with undefined accounts allowed is checked, the user can submit an order with any account number unless restricted by customer defaults or their TTORD. If Submitting orders with undefined accounts allowed is not checked, then TT Gateways will reject orders from this user that are sent with an account that is not defined in TT User Setup. TT User Setup User Manual Trading Technologies International, Inc. 45 2 Fields User Administration Description Determines if this user should be allowed to update the account number on a fill. When Account changes on fills allowed is checked, the user can change the account number on a fill. If the users customer defaults are restricted, then only accounts that are predefined in the customer defaults are available. Account changes on fills allowed Note: When applying account-based risk checking, TT does not recommend checking the Account changes on fills allowed option until this user is using X_TRADER 7.17 or later. If a user with a pre-7.17 version of X_TRADER is allowed to change an account on a fill, the account number on the fill will not be updated in all TT products (including the gateways where account-based risk checking is done). This could lead to discrepancies between what is displayed in client applications and how risk is actually being calculated. Note: When the Account changes on fills allowed option is checked, users with X_TRADER 7.17 or later can modify the account on a fill, and this update will be processed as a part of account-based risk on the gateways. Note that no risk check actually takes place on the modification; therefore changing the account could cause an account to go over its limits. However, any subsequent orders will be risk checked based on the modified fills. Gateway Logins 46 TT User Setup User Manual Trading Technologies International, Inc. 2 User Administration Use the Gateway Logins tab to assign gateway logins or to view or edit product limits. This tab appears for X_TRADER, X_RISK, and FIX Adapter users. Buttons/Fields Description New /Edit Creates a new gateway login. Refer the “Creating a New Gateway Login through the Users Window” on page 82 topic for more information. Remove Removes the selected gateway login(s). Assign Existing Logins Assigns existing gateway logins to the user. Refer to the “Assigning Gateway Logins to a User Through the Users Window” on page 83 topic for more information. View/Edit Product Limits Accesses all product limits for the given user. Refer to the “Creating Product Limits for Gateway Logins” on page 168 topic. Generate Admin Gateway Logins for all gateways Enables the Member/Group/Trader fields which allow you to configure an MGT that can log into all available gateways. This is especially useful if setting up a Universal Login for something like Historical Fill Server, for example. This way, you can ensure that HFS always logs into all gateways. For more information about administrator gateway logins, refer to the Administrator Logins section of the TT User Login and Risk Administration guide. Avail to User* Indicates whether a user has access to a given gateway login after performing a universal login. Avail to FIX Client Indicates whether a FIX Client has access to a given gateway login after performing a universal login. Auto Login* Specifies if a user of a specific gateway login will be automatically logged into the associated gateways. TT User Setup User Manual Trading Technologies International, Inc. 47 2 Buttons/Fields User Administration Description Mandatory Login* Specifies whether a user of a specific gateway login will be automatically logged into a given gateway. Algo Deployment Allowed* Indicates whether the user is allowed to deploy strategies to an Algo SE Server. This setting is only valid when the Gateway is an Algo SE Server. Algo Sharing Allowed* Indicates whether the user is allowed to share algorithms with other users on Algo SE servers. This setting is only valid when the Gateway is an Algo SE Server and when the Algo deployment allowed option is checked. Default Account* Specifies the default account type as defined by the exchange (A1-A9, G1, G2, M1-M3, P1-P3, or U1-U3. Operator ID* Specifies the Operator ID that is used to identify the trader or operator to the exchange. Max Orders/Sec The maximum rate of orders allowed per TT Gateway. This value overrides the user-level Per TT Gateway, prevent more than X orders per second setting. The value entered in the Prevent more than X orders per second (overrides the User-Level setting) field displays in Max Orders/Sec. You can edit the maximum orders per second in this column per TT Gateway for the selected user. * These fields are available as columns in the Gateway Logins table. Use the Show/Hide/Arrange columns option to view any hidden columns. X_TRADER/X_RISK The X_TRADER/X_RISK tab applies to X_TRADER and X_RISK users. It contains the following sub tabs: • • 48 “X_TRADER Properties” on page 49 “X_TRADER Customer Defaults” on page 52 TT User Setup User Manual Trading Technologies International, Inc. 2 User Administration • • “X_RISK Properties” on page 57 “X_STUDY/FMDS” on page 57 X_TRADER Properties The X_TRADER Properties tab has the following buttons: Buttons/Fields Description X_TRADER mode Determines whether X_TRADER starts up as X_TRADER or X_TRADER Pro. TT SIM login allowed Determines whether the user is allowed to log onto X_TRADER using TT SIM mode. This option is checked by default. Live (non-TT SIM) login allowed Determines whether the user is allowed log onto X_TRADER using non-TT SIM mode (production). This option is checked by default. Determines whether the user can configure the Avoid orders that cross in X_TRADER. If you leave the Avoid orders that cross option unchecked in TT User Setup (which is the default), the user can configure the Avoid orders that cross option in X_TRADER as needed. Avoid orders that cross If you check the Avoid orders that cross option, the user cannot edit the Avoid orders that cross option. You must also configure the default crossed order behavior (Cancel resting or Reject new) for the user. Cancel resting sends a cancel request on the working order and places the new order. Reject new rejects the new order. TT User Setup User Manual Trading Technologies International, Inc. 49 2 Buttons/Fields User Administration Description Determines whether the user can configure the Quoting option in X_TRADER. Quoting/RFQ allowed If you leave Quoting/RFQ allowed checked (which is the default setting), the user can turn the X_TRADER Quoting functionality on or off. Otherwise, the user cannot enable Quoting in X_TRADER. For information about X_TRADER's quoting functionality, refer to the X_TRADER Help. Determines whether the user can configure the Wholesale Trades option in X_TRADER. Wholesale trades allowed If you leave Wholesale trades allowed checked (which is the default setting), the user can turn X_TRADER's Wholesale Trades option on or off. Otherwise, the user cannot enable Wholesale Trades in X_TRADER. For information about the X_TRADER wholesale trading functionality, refer to the X_TRADER Help. Staged order creation allowed Determines whether the user is allowed to create staged orders. This option is unchecked by default. Staged order management allowed Determines whether the user is allowed to claim and work staged orders. This option is unchecked by default. 50 TT User Setup User Manual Trading Technologies International, Inc. 2 User Administration Buttons/Fields Direct Market Access (DMA) order creation allowed Description Determines whether the user is allowed to create DMA orders. This option is checked by default. Determines whether the user can configure the Machine Gun option on the X_TRADER Order Entry property tab. Machine gun orders allowed If you leave Machine gun orders allowed checked (which is the default setting), the user can turn X_TRADER's Machine Gun option on or off. Otherwise, the user cannot enable the Machine Gun option in X_TRADER. For information about the X_TRADER machine gun order entry property, refer to the X_TRADER Help. TT User Setup User Manual Trading Technologies International, Inc. 51 2 Buttons/Fields User Administration Description Determines whether Eurex orders sent from X_TRADER are automatically set to persist, or whether the user can configure the Persist orders and Only GTC options in the Eurex section of the X_TRADER Order Entry property tab. • • Eurex - Persist orders • User Controlled: The user can turn X_TRADER's Eurex Persist Orders and Only GTC options on or off as needed. This is the default setting. Persist all orders: All Eurex orders sent from X_TRADER will be set to persist and the user will not be able to turn X_TRADER's Eurex Persist orders option off. Persist all GTC orders: Eurex GTC and TIF orders sent from X_TRADER will be set to persist and the user will not be able to turn X_TRADER's Eurex Only GTC option off. For information about the X_TRADER Eurex order properties, refer to the X_TRADER Help. X_TRADER Customer Defaults The X_TRADER Customer Defaults tab has the following buttons and fields: Buttons/Fields Description New/Edit Creates a new customer default. Refer to the “Creating and Managing X_TRADER Customer Defaults” on page 73 topic for more information. Copy Copies the selected customer default. Delete Deletes the selected customer default(s). Copy from User Copies an existing customer default from another user within your environment. 52 TT User Setup User Manual Trading Technologies International, Inc. 2 User Administration Buttons/Fields Description Replace Account Numbers Replaces one or more customer default account numbers with similar account numbers based on selected pattern-matching rules. Restrict user from editing their local Customer Defaults Forces the trader to use only these customer defaults. The data grid has the following fields: Fields Description Customer Sets the name of the profile. Selected Determines whether the customer is added to the X_TRADER Customer List window so the user can trade for those customers. Market Lists available markets. Enter an asterisk (*) to apply the account and account type to all markets the trader is logged into. Gateway Specifies the market flavor a user is able to log into and trade on using the assigned gateway login (e.g. CME-A). Product type Lists product types, including: Future, Spread, Option, Strategy, Stock, Bond, Swap, Energy, FOREX, NDF, or Warrant . Enter an asterisk (*)to use all product types. TT User Setup User Manual Trading Technologies International, Inc. 53 2 Fields Product User Administration Description Specifies a specific product. Enter an asterisk (*) to apply the account and account type to all products in the exchange. You can include multiple products by entering each product type, separated with only a comma (no spaces in between). X_TRADER versions 7.8 and later support multiple Products. X_TRADER versions prior to 7.8 accept only the first product listed. Specifies the customer account number. It associates the trade with a specific customer, and middle or back office may use the Account # as a sub account. Account # Some exchanges (e.g., CME) require an account number. If the user's MGT is a TTORD that is risk managed in Guardian, the Account # must match one of the accounts. 54 TT User Setup User Manual Trading Technologies International, Inc. 2 User Administration Fields Description Indicates one of the following account types: • • Account type • • • • • • • • • • A1: First Agent Account (e.g., broker) A2-A9: Second Agent Account Ninth Agent Account G1: Pre-Designated Giveup Trade G2: Designated Giveup Trade G3: Second Giveup Trade M1: First Market Maker Account M2: Second Market Maker Account M3: Third Market Maker Account P1: First Principal Account (e.g., proprietary trader) P2: Second Principal Account P3: Third Principal Account U1-U3:Unallocated—for orders that have not been allocated to a customer. Give up Indicates the clearing member code. Used for Give-up trade accounts only. FFT2 & FFT3 Used for annotation purposes by the trader or back office (sub-account). The back office manager usually dictates how to use these free-form text fields. Indicates the time the order is in force, including: • • Time in force (TIF)* • TT User Setup User Manual Trading Technologies International, Inc. GTD (Good Till Day): Order is valid only for the current trading day. GTC (Good Till Cancel): Order is valid until you cancel it or the contract expires. GIS (Good in Session): Order is valid only for the current trading session. Some exchanges, like Euronext, have products with different trading sessions in one day. 55 2 Fields User Administration Description Indicates the order type and determines whether the order is sent as a Limit or Market order. • • Order type* • • Limit: Works at a specific price. Mkt (Market): Works the inside market. MTL (Market Limit): Sends a Market order with the condition that on a partial fill, the remaining quantity rests as a Limit order at the price that was just hit or taken. Available on TOCOM and SGX. BL (Best Limit): Joins the best bid or offer without being required to enter a price. Available on TOCOM. Specifies if the user has an order restriction, such as FOK, IOC, or LSM. Order restriction* Note: Support and definitions for order restrictions are determined by each exchange. Refer to each exchange’s market rules for additional information. Indicates the type of position the user can establish with the order: Open/Close* • • • Open: Opening a position. Close: Closing a position. FIFO: Handled in a first-in, first-out manner (TOCOM only). Specifies the maximum quantity allowed per trade for the specified account. This value is only used when Enforce max order qty is enabled. Max order qty* You can establish a high quantity that does not restrict normal trading, yet still provides security against an erroneous trade. The Maximum Order Qty field in Guardian overrides this setting. 56 TT User Setup User Manual Trading Technologies International, Inc. 2 User Administration Fields Description * Unavailable in X_TRADER 7.8 and later. X_RISK Properties The X_RISK tab has the following fields: Fields Description Contract Session Prices (CSP) access allowed Determines whether the user can publish Contract Session Prices in X_RISK. Instant Messages (IM) access allowed Determines whether the user can send instant messages in X_RISK. Manual Fill (MF) access allowed Determines whether the user can publish manual fills in X_RISK. Start of Day (SOD) access allowed Determines whether the user can publish Start of Day records in X_RISK. Restrict X_RISK administrator to publishing MF/SODs to accounts within the User Groups listed below If Manual Fill (MF) access allowed or Start of Day (SOD) access allowed is checked, this option limits the X_RISK administrator to accounts in the specified user groups. X_STUDY/FMDS The X_STUDY/FMDS tab has the following fields: Fields X_STUDY/FMDS allowed for this user TT User Setup User Manual Trading Technologies International, Inc. Description Determines if the user has X_STUDY/FMDS enabled. The option is only available when the X_STUDY/FMDS Allowed system setting is enabled. For a detailed description of FMDS and X_STUDY settings, refer to the “Enabling and Configuring X_STUDY and FMDS System Settings” on page 233 topic. 57 2 Fields User Administration Description Override system settings with user settings Overrides the FMDS server system settings with settings for this user. Primary FMDS Server settings/Secondary FMDS Server settings Specifies the IP address, port, service, and timeout settings for the primary and secondary FMDS server. FIX Adapter The FIX Adapter tab applies to FIX Adapter Server and Client users. It contains the following tabs: • • • “FIX Adapter (server role)” on page 58 “FIX Adapter (client role)” on page 58 “Account Defaults” on page 59 FIX Adapter (server role) The FIX Adapter tab fields vary depending on the selected role (client or server). When you set the FIX Adapter role to FIX Adapter Server, you can create either an Order Routing server type or a Drop Copy server type. Fields Description FIX Adapter role Indicates that this user is a FIX Adapter server or FIX Adapter client. For more information about FIX Adapter server and client users, refer to the “TT FIX Adapter and TT User Setup Overview” on page 95 topic. Order routing server/Drop copy server Sets the FIX Adapter Server type. Available FIX client users Lists the available FIX client users. The following FIX clients can connect to this FIX Adapter Lists the clients that the FIX adapter will connect to the Gateways on behalf of. FIX Adapter (client role) The FIX Adapter tab fields vary depending on the selected role (client or server). When you set the FIX Adapter role to FIX Adapter Client, you can allow or prevent staged orders, enable debugging, and assign the client a FIX Adapter server. 58 TT User Setup User Manual Trading Technologies International, Inc. 2 User Administration Fields Description FIX Adapter role Select FIX Adapter Server or FIX Adapter Client. For more information about FIX Adapter server and client users, refer to the “TT FIX Adapter and TT User Setup Overview” on page 95 topic. Staged order creation allowed Determines whether the user is allowed create staged orders. This option is unchecked by default. Direct Market Access (DMA) order creation allowed Determines whether the user is allowed to claim and work staged orders. This option is checked by default. Adds debug messages generated by the Order Server/Price Server to the log files. Enable debug logging for orders/Enable debug logging for prices Note: Because the log file size may increase significantly and performance may be affected, only enable these fields when troubleshooting the connection between FIX Adapter and either Server. Note:TT FIX Adapter 7.8 and later ignores the Enable debug logging for orders setting. The FIX client user can connect to the following FIX Adapters The client can connect to these FIX Adapter servers. Account Defaults The Account Defaults tab has the following buttons and fields: TT User Setup User Manual Trading Technologies International, Inc. 59 2 Buttons/Fields User Administration Description New/Edit Creates a new account default. Refer the “Setting Up an Account Default” on page 104 topic for more information. Copy Copies the selected account default. Delete Deletes the selected account default(s). Copy from User Copies an existing account default from another user within your environment. Restrict user from overriding Account Defaults Forces the trader to use only these account defaults. The data grid has the following fields: Fields Description Priority Type Key Account # The customer account number. Enter an asterisk (*) to match any account number. Key Market The name of the market. Enter an asterisk (*) to match any market. Key Gateway The name of the gateway. Enter an asterisk (*) to match any gateway. Key 60 TT User Setup User Manual Trading Technologies International, Inc. 2 User Administration Fields Description Type Product type The product type (e.g. futures, options, spreads, etc.) associated with a security that a trader can trade. Enter an asterisk (*) to apply the account default to all product types. Key Account type The type of account associated with the trader. Value Clearing account Indicates the clearing member code. Used for Give-up trade accounts only. Value FFT2/FFT3 The freeform fields, often used for annotations by traders or back offices. Value TT User Setup Permissions The TT User Setup permissions apply to Super Administrators, Group Administrators, Password Administrators, and users that cannot log into TT User Setup or have View only permissions. Fields Description None Prevents the user from logging into TT User Setup. Super Administrator Provides complete access to TT User Setup functionality. A user with Super Administrator permissions has no restrictions in TT User Setup. TT User Setup User Manual Trading Technologies International, Inc. 61 2 Fields Group Administrator User Administration Description Provides permission to view, edit, and create users, gateway logins, and accounts that exist in one of the user groups the administrator is designated to manage. A Group Administrator can manage multiple user groups, but can exist in a single user group only. The Able to manage Gateway Logins and Able to Create Direct Trader Logins options allow to you grant these permissions to the Group Administrator. Gateway Login Administrator Provides permission to manage one or more gateway logins. A user with gateway login Administrator permissions cannot edit users, but can assign gateway logins and gateway login attributes to users in a user group the administrator is designated to manage. Additionally, you can allow the gateway login administrator to manage only specific groups using the Restrict Gateway Login Administrator option. Password Administrator Provides permission to unlock users and reset passwords for some user groups or all user groups, depending on the restrictions applied. You can allow the administrator to only manage specific groups using the Restrict Password Administrator option. View Only Provides permission to view any TT User Setup data window. A user with View Only permissions cannot edit data in any accessible window. Additionally, you can allow the administrator to only manage specific groups using the Restrict View Only user option. 62 TT User Setup User Manual Trading Technologies International, Inc. 2 User Administration Fields Collect Log Files Only Description Provides permission to collect any log files in the trading environment, including log files containing sensitive trading information. The user will not be able to view or edit any users or settings, but will be able to view the TT User Setup server messages, TT User Setup server status, and environment server status reports. Outgoing Email Settings The Outgoing Email Settings apply to Super Administrators, Group Administrators, and Password Administrators. Fields Description Enable outgoing email settings Enables the email settings for TT User Setup administrators who need to email user passwords. SMTP server host or IP address Specifies the email server used for sending email. SMTP port Specifies the port used for sending email (25 is standard for most ports). SMTP server requires authentication Enables SMTP server authentication. This is an optional setting that is only necessary if your email server requires authentication. When this option is enabled you must provide an SMTP server account name and password. Use SSL Enables SSL. This is an added security measure required by most servers. From email address Specifies the string that appears in the From field of the email sent to the recipient. Email subject Specifies the subject that appears in the password email. TT User Setup User Manual Trading Technologies International, Inc. 63 2 Fields User Administration Description Additional message text Specifies miscellaneous user instructions (optional). Include username in message Includes the email recipients username in the email. Product Group Permissions Settings Administrators can allow or block access to product groups in supported markets. For example, an administrator can allow trading on ICE US Futures, but prevent trading on ICE UK Futures. Buttons Description Allow Allows the user to access the selected product group(s). Block Prevents the user from accessing the selected product group(s) The Product Groups data grid fields are: Fields Description Product Group Specifies the product group that supports the allow/block feature. Allowed Specifies whether the user can access the product group. You can also check or uncheck this option from within the table. Market Specifies the product group's market. TT User Login and Risk Administration Copying Users When copying a user, you can choose to copy only Direct Trader gateway logins, admin gateway logins, TTORD gateway logins, customer defaults, and account defaults. The available options depend on which settings are available in the user record being copied. 64 TT User Setup User Manual Trading Technologies International, Inc. 2 User Administration This topic describes how to copy a user record (including the TTORD). To copy an existing user record: 1. Open a data grid window, for example, Users. 2. Select the record that you want to copy, and then click Copy. You can also right-click the record and select Copy from the context menu. The Copy User - Options window appears. Any options that are not available for the currently selected user are disabled. TT User Setup User Manual Trading Technologies International, Inc. 65 2 User Administration The Copy User Options are as follows: • • • 66 Copy Direct Trader Gateway Logins: If you are copying a user with direct trader gateway logins, check this option to copy the direct trader gateway logins. Copy Admin Gateway Logins: If you are copying a user with admin gateway logins, check this option to copy the admin gateway logins. Copy TTORD Gateway Logins: If you are copying a user with TTORD gateway logins, check this option to copy the TTORD gateway logins. TT User Setup User Manual Trading Technologies International, Inc. 2 User Administration Note: If the user is assigned multiple TTORDs, you can copy the TTORDs as they are, but the option to create a new TTORD with the same credit and product limited is disabled. • • To use the same TTORD, select Copy TTORDs as they are. To create a new TTORD that has the same credit and product limits, select Create a new TTORD with the same credit and Product Limits, enter a new Member, Group, and Trader, and then enter new or unused Account. • Copy Customer Defaults: Copy the customer defaults to the new user. • Copy Account Defaults: Copy the account defaults to the new user. 3. Select the options as needed and then click Continue Copy. 4. TT User Setup copies the user based on the selected options and opens the New User window. • • On the Main tab, enter Login information for the new user and edit any other user specific settings (like Contact and User-Level Risk settings). The X_TRADER Customer Defaults tab is populated with any copied customer defaults. If needed, use the Replace Account Numbers button to assign new account numbers to the customer defaults. Refer to “Creating and Managing X_TRADER Customer Defaults” on page 73 if needed. • The Gateway Login tab is populated with any copied gateway logins. TT User Setup User Manual Trading Technologies International, Inc. 67 2 User Administration Edit the gateway logins as needed. Note: If you copied any TTORDs, remember to edit the gateway login and update the Account numbers if needed. • Edit the settings on the remaining tabs as needed. When you are finished, click Save. You have successfully created a new user by copying an existing user. 68 TT User Setup User Manual Trading Technologies International, Inc. User Administration: X_TRADER or X_RISK Users Creating and Editing X_TRADER or X_RISK Users To create an X_TRADER or X_RISK user, complete the following topics: • • • • • • • • • “Applying Basic User Properties” on page 69 “Applying X_TRADER Properties” on page 72 “Applying X_RISK Properties” on page 73 “Creating and Managing X_TRADER Customer Defaults” on page 73 “Configuring X_STUDY and FMDS” on page 80 “Creating a New Gateway Login through the Users Window” on page 82 “Generating a Gateway Login for all Gateways” on page 83 “Assigning Gateway Logins to a User Through the Users Window” on page 83 “Allowing or Blocking Product Groups” on page 84 Applying Basic User Properties Edit the user properties using the Main tab on the New User or Edit User window. The procedures in this topic describe how to create a new X_TRADER or X_RISK user, but they apply to editing or copying existing users as well. Refer to the “Creating, Editing, and Deleting Records” on page 25 topic for other methods you can use to create or edit users. To create an X_TRADER or X_RISK user and apply the general user properties: 1. 2. 3. 4. From the User Admin menu, select Users. Select X_TRADER/X_RISK fields from the New User View drop-down. Click New User. On the Main tab, enter the user's Login and Contact information as needed. Refer to the “New User and Edit User Window Fields” on page 41 topic for descriptions of each field. TT User Setup User Manual Trading Technologies International, Inc. 69 3 User Administration: X_TRADER or X_RISK Users Note: If TT User Setup lists a version number after a field (e.g., XT 7.8), then the field or feature only applies to that version and later of X_TRADER or FIX Adapter. 5. Leave the Active option checked if this user should be able to log in. 6. Set the password expiration and concurrent login settings as needed. 7. To allow Good Till Cancel and Good Till Date orders, leave the GTC/GTDate orders allowed setting enabled. 8. Configure whether or not the gateways will immediately reject orders submitted with an account that is not defined in TT User Setup, or whether the gateways will allow undefined accounts as long as it is permitted by the customer default settings. Check the Submitting orders with undefined accounts allowed option to allow undefined accounts, or uncheck the option to prohibit undefined accounts. 70 TT User Setup User Manual Trading Technologies International, Inc. 3 User Administration: X_TRADER or X_RISK Users 9. Leave the Account changes on fills allowed option unchecked to prevent the user from updating the account number on a fill. If the user should not be prevented from updating the account number on a fill, check the Account changes on fills allowed option. Note: When applying account-based risk checking, TT does not recommend checking the Account changes on fills allowed option until this user is using X_TRADER 7.17 or later. If a user with a pre-7.17 version of X_TRADER is allowed to change an account on a fill, the account number on the fill will not be updated in all TT products (including the gateways where account-based risk checking is done). This could lead to discrepancies between what is displayed in client applications and how risk is actually being calculated. Note: When the Account changes on fills allowed option is checked, users with X_TRADER 7.17 or later can modify the account on a fill, and this update will be processed as a part of account-based risk on the gateways. Note that no risk check actually takes place on the modification; therefore changing the account could cause an account to go over its limits. However, any subsequent orders will be risk checked based on the modified fills. 10. Enter any User Defined fields, as needed. 11. In the User-Level Risk section: 1. Leave the Trading allowed option checked if the X_TRADER user should be able to trade. Additionally, set a Credit limit and the Currency. Enter 0 to reset the credit to unlimited. Note: The Trading Allowed option must be checked for any user that will add, modify, or delete orders. This means that non-tradable administrator logins (e.g. TTADMXXX100 or TTORDTSXXXMGR) must have Trading Allowed option checked to delete orders, even though they are unable to trade. 2. To use the P&L risk algorithm to risk check this user, check the Use P&L risk algorithm option; the P/L based on setting in X_TRADER defaults to Risk Algorithm and is uneditable. To use the Last Traded Price for risk checking, uncheck the Use P&L risk algorithm option; the P/L based on setting in X_TRADER remains editable. 3. To configure how far from the market price a user may enter an order (in ticks), check the Prevent orders that are more than X ticks... checkbox and enter the number of ticks. If you only want to enforce this setting for buy orders above the limit and sell orders below the market check the Only enforce... checkbox. For more information about pre-trade price controls, refer to “Setting Pre-Trade Price Controls” on page 187. 4. To prevent more than a specific number of orders per second, check the Per TT Gateway, prevent more than... checkbox and enter the number of orders per second. For more information about pre-trade order throughput controls, refer to “Setting Order Throughput Controls” on page 191. 5. To set a different user profile credit limit for TT SIM trading, check the Override credit for TT SIM checkbox and then enter a new credit limit in the TT SIM credit field. Enter 0 to reset the credit to unlimited. TT User Setup User Manual Trading Technologies International, Inc. 71 3 User Administration: X_TRADER or X_RISK Users 12. Click Save and then continue to the next topic, “Applying X_TRADER Properties” on page 72. Applying X_TRADER Properties To apply X_TRADER Properties: 1. Click the X_TRADER/X_RISK tab and then click the X_TRADER Properties tab. 2. From the X_TRADER mode drop-down, select whether the user's X_TRADER application opens as X_TRADER or X_TRADER Pro. Note: When the trader is using TT SIM mode, TTUS always sends the X_TRADER mode as X_TRADER PRO. 3. Use the remaining fields on this tab to specify behavior when orders cross, to allow access to the X_TRADER's quoting functionality, to enable the wholesale trading functionality, and to specify the users permissions for creating staged orders, managing staged orders, and creating DMA orders. Refer to the “New User and Edit User Window Fields” on page 41 topic for descriptions of each field. 4. Click Save and then continue to the next procedure to apply X_RISK properties. 72 TT User Setup User Manual Trading Technologies International, Inc. 3 User Administration: X_TRADER or X_RISK Users Applying X_RISK Properties The X_RISK Properties determine whether to allow a user to use manual fill, start of day record, contract session price, and send message functionality in X_RISK. To apply X_RISK Properties: 1. From the X_TRADER/X_RISK tab, click the X_RISK Properties tab. Note: This feature works only with compatible versions of X_RISK (7.4.2 or later). 2. Check the desired options. Refer to the X_RISK Help and the “New User and Edit User Window Fields” on page 41 topic for descriptions of each option. 3. Check the Contract Session Prices (CSP) access allowed, Instant Messages (IM) access allowed, Manual Fill (MF) access allowed, and Start of Day (SOD) access allowed options to enable CSP, IM, MF, and/or SOD access in X_RISK as needed. 4. If Manual Fill (MF) access allowed or Start of Day (SOD) access allowed is checked, you can check the Restrict X_RISK administrator to publishing... option to restrict the administrator to publishing to accounts in specified user groups. 5. Click Save and then continue to the next topic, “Creating and Managing X_TRADER Customer Defaults” on page 73. Creating and Managing X_TRADER Customer Defaults This section describes the following: • • • • “Customer Defaults Overview” on page 74 “How Customer Defaults Appear in X_TRADER” on page 74 “Creating a Customer Default” on page 75 “Replacing an Account Number” on page 77 TT User Setup User Manual Trading Technologies International, Inc. 73 3 User Administration: X_TRADER or X_RISK Users Customer Defaults Overview Use the X_TRADER Customer Defaults window to create order templates X_TRADER applies to orders. By providing X_TRADER users with customer defaults, you limit the amount of data the traders have to enter to place a trade, thereby making the trading process faster and easier for the traders. You can create multiple customer default templates for each trader, and you can prevent traders from changing their own customer defaults. You can access the X_TRADER customer defaults from the X_TRADER user's X_TRADER/ X_RISK tab, or by selecting X_TRADER Customer Defaults from the User Admin menu. Both options are similar, except that you can create and edit customer defaults for multiple users from the Customer Defaults window. How Customer Defaults Appear in X_TRADER A TT User Setup administrator can configure customer defaults for traders using X_TRADER 7.6 or later. X_TRADER receives the customer defaults, which the trader may be required to use, depending on the Restrict user from editing their local Customer Defaults setting. • • When you check the Restrict user from editing their local Customer Defaults option, the trader must use the configured customer default(s). When you uncheck the Restrict user from editing their local Customer Defaults option, then the trader can choose to use the configured customer default(s) by checking the Sel option in the X_TRADER Customer Defaults window. Note: TT User Setup automatically assigns users <DEFAULT> customer default entry in TT User Setup. If you do not edit the <DEFAULT>customer default record, and if you do not create any other customer defaults, X_TRADER does not use the TT User Setup's customer defaults for that user. If you 74 TT User Setup User Manual Trading Technologies International, Inc. 3 User Administration: X_TRADER or X_RISK Users later edit the <DEFAULT>customer default or add a new customer default, X_TRADER begins picking up customer defaults from TT User Setup after it is restarted. Assigned customer defaults determine the defaults applied to a trader's orders. For example, a selected user whose Customer = <DEFAULT>, Market = LIFFE, and Account # = ACT555 means that when the <DEFAULT> user trades on LIFFE and has only his <DEFAULT> Customer selected (that could be the only customer he has), the trader uses account number ACT555. When one user has multiple customer default records with the same Customer value, X_TRADER uses the record that best matches a trader's transaction. In the following example, the user has five customer default records that all have the same Customer name and trade Futures Product Types in the CME Market. If the user trades on the CME-A flavored Gateway, the highlighted customer default row would be the best match and therefore only that record would be applied. When one user has multiple customer default records with different customer names, X_TRADER allows the user to choose a customer before entering an order. After the user chooses a customer, X_TRADER chooses the best matching customer default per that customer. For the most control over a traders customer defaults, use the same customer setting for all of a trader's customer defaults and check the Restrict user from editing their local Customer Defaults option. Creating a Customer Default To create a customer default: 1. From the X_TRADER Customer Defaults tab or the Customer Defaults window, click New. The New Customer Default window appears. TT User Setup User Manual Trading Technologies International, Inc. 75 3 User Administration: X_TRADER or X_RISK Users 2. Enter the Customer name for this default and select the Market, Gateway, Product type, and Product defaults that this customer default uses. These options together make up the key for this record. Two records cannot have the same key. 3. Enter an Account number or click the browse button to select an account number. If you enter an account that does not exist, TT User Setup creates it. 4. Select the Account type and then enter the Give up clearing member code and the free-form text fields (FFT2 and FFT3) . 5. Select the Time in force for orders, the Order type, Order restriction (if any), and the type of position (Open/Close/FIFO). 6. If you want to set a maximum quantity allowed per trade, check the Enforce max order qty option and then enter an order quantity in the Max order qty field. Max order qty is typically used to prevent traders from accidentally entering too large of an order (e.g. 10000 instead of 1000). Note: the Time in force, Order type, Order restriction, Open/Close, Enforce max order qty, and Max order qty options are not available in the X_TRADER customer defaults starting with X_TRADER 7.8. These options are moved to the X_TRADER order options. 7. Click Save and then Close. The new customer default appears in both the Edit User and Customer Default windows. Note: Changes do not take affect until the trader starts X_TRADER. 76 TT User Setup User Manual Trading Technologies International, Inc. 3 User Administration: X_TRADER or X_RISK Users 8. Continue to the next procedure to configure X_STUDY and FMDS settings. Note: You can choose to lock down customer defaults and force a trader to use only the defaults set up by a TT User Setup administrator by checking the Restrict user from editing their local Customer Defaults option, which is available on the Users window's X_TRADER Customer Defaults tab. Replacing an Account Number Use this procedure to assign a new account to one or more customer defaults. The old accounts are unassigned but not deleted, and then the new accounts are created (if needed) and assigned to the selected customer defaults. To replace an account number in a customer default: 1. From the Customer Defaults window, click Replace Account Numbers. The Replace Account Numbers window appears. TT User Setup User Manual Trading Technologies International, Inc. 77 3 User Administration: X_TRADER or X_RISK Users 2. Configure the account replacement rules to determine how the existing account numbers will be replaced. • In the Step 1section, select the characters to remove, if any. You can remove the first n characters, the last n characters, or all characters before or after a specified set of characters. • In the Step 2 section, enter the characters to add, if any. You can add characters to the start or end of the account. Example: When creating a new user by copying an existing user account (refer to “Copying Users” on page 64), the account numbers in the customer defaults are also copied. 78 TT User Setup User Manual Trading Technologies International, Inc. 3 User Administration: X_TRADER or X_RISK Users However, the account numbers for the new user end in _b instead of _a. In this case you would remove the last character and then add the letter b at the end. 3. Click Review Changes. The Review Account Number Changes window appears. 4. Click Apply Changes. The account numbers are replaced. TT User Setup User Manual Trading Technologies International, Inc. 79 3 User Administration: X_TRADER or X_RISK Users Configuring X_STUDY and FMDS This topic describes how to enable and configure the X_STUDY and FMDS settings per user. For information about enabling and configuring the X_STUDY and FMDS settings for the entire system, refer to “Enabling and Configuring X_STUDY and FMDS System Settings” on page 233. To enable X_STUDY/FMDS functionality for a user: 1. From a user's X_TRADER/X_RISK tab, click the X_STUDY/FMDS tab. 80 TT User Setup User Manual Trading Technologies International, Inc. 3 User Administration: X_TRADER or X_RISK Users Note: This feature works only with X_TRADER 7.7.3 / X_STUDY 7.3.0 or later. 2. If X_STUDY is allowed for the system, enable or disable X_STUDY/FMDS for this user. You can also select whether to override the FMDS system settings with settings you configure here. Refer to the “New User and Edit User Window Fields” on page 41 topic for descriptions of each field. Note: To enable X_STUDY/FMDS for the system, refer to the “Enabling and Configuring X_STUDY and FMDS System Settings” on page 233. 3. When you are finished, click Save and continue to the next topic, “Creating a New Gateway Login through the Users Window” on page 82. TT User Setup User Manual Trading Technologies International, Inc. 81 3 User Administration: X_TRADER or X_RISK Users Creating a New Gateway Login through the Users Window Gateway logins are the MemberGroupTrader IDs used to log into TT Gateways. Each gateway login can have its own account numbers and risk limits. Note: For more information about configuring Gateways Logins, refer to the User Login and Risk Administration Reference Manual. When creating a gateway login through the Gateway Login window, you must manually assign the gateway login to a user. However, when created via the Users window, the gateway login is automatically assigned to the user you are editing or creating. Note: For a detailed description on creating a gateway login through the Gateway Logins window, refer to the “Creating a New Gateway Login” on page 135 topic. To create a new gateway login using the Users window: 1. Access the Gateway Logins tab for an X_TRADER user. 2. Leave the Generate Admin Gateway Logins for all gateways option unchecked. To use this option, refer to “Generating a Gateway Login for all Gateways” on page 83. 3. To create a new gateway login, click New. You can also edit an existing login by selecting it and clicking Edit. 4. Follow the procedures in the “Assigning the MemberGroupTrader ID” on page 135 topic, starting with step 2. 82 TT User Setup User Manual Trading Technologies International, Inc. 3 User Administration: X_TRADER or X_RISK Users Generating a Gateway Login for all Gateways In some instances, you may want to configure an admin user to connect to all gateways. To do this, you can create a gateway login for each gateway and assign the gateway logins to the admin user, or you can use the Generate Admin Gateway Logins for all gateways feature one time. This feature allows you to add additional gateways to your trading environment without having to update the administrative user. This is especially helpful when setting up, for example, a Username for your Historical Fill Server. Each time your HFS starts up, it will connect to all available gateways. You won’t need to reconfigure your HFS each time a new gateway is added. To create an administrator gateway login that will be used for all gateways: 1. Access the Gateway Logins tab for an X_TRADER user. 2. Check the Generate Admin Gateway Logins for all Gateways option. The Gateway Logins table is replaced with the Member/Group/Trader fields. Note: When you use the Generate Admin Gateway Logins for all gateways option, TT User Setup removes any existing gateway logins for this user. 3. Enter an administrator gateway login into the Member/Group/Trader fields (e.g. TTADM XXX VIEW, CME04 XXX MGR, TTORDAB 001 VIEW, etc.). For more information about administrator gateway logins, refer to the Administrator Logins section in the TT User Login and Risk Administration guide. Assigning Gateway Logins to a User Through the Users Window TT User Setup User Manual Trading Technologies International, Inc. 83 3 User Administration: X_TRADER or X_RISK Users If a gateway login already exists, you can assign it to the user. The Assign Existing Logins button opens a Gateway Logins window that displays a list of all the gateway logins that exist, but are not currently assigned to the user. To assign Gateway Logins to a selected user: 1. Access the Gateway Logins tab for an X_TRADER user and then click Assign Existing Logins. The Assign Gateway Logins window appears listing the gateway logins currently not assigned to the selected user. Note: To display only exchange traders, check the Hide TTORDs option. 2. Select one or more rows and then click Assign. Note: Click New to create a new gateway login. You can assign any logins you create to the user. The login is assigned to the selected user(s). 3. Click Save. Allowing or Blocking Product Groups You can allow or block any of the listed product groups for this user. For more information refer to the “Allowing or Blocking Product Groups for a FIX Adapter User” on page 112 topic. Note: When a new user is created, all product groups are allowed by default. When a new product group or market is added, it is allowed for all users by default. The administrator must manually block the product groups for the appropriate users. 84 TT User Setup User Manual Trading Technologies International, Inc. User Administration: Administrative Users Creating and Editing Administrative Users TT User Setup supports the following administrative users who have varying levels of permissions to create, manage, and view users. • • None: Reserved for a user who cannot log into TT User Setup. This is the default setting. Super Administrator: Provides complete access to TT User Setup functionality. A user with Super Administrator permissions has no restrictions in TT User Setup. Refer to “Creating a Super Administrator” on page 85. Note: Super Administrator permissions is the equivalent of having TT User Setup Access in a pre-7.2 version of TT User Setup. • Group Administrator: Provides permission to view, edit, and create users, gateway logins, and accounts that exist in one of the user groups the administrator is designated to manage. A Group Administrator can manage multiple user groups, but can exist in a single user group only. Refer to “Creating a Group Administrator” on page 86. Note: An optional setting is available that limits a Group Administrator to creating TTORDs only. • • • • Gateway Login Administrator: Provides permission to manage one or more gateway logins. A user with Gateway Login Administrator permissions cannot edit users, but can assign gateway logins and gateway login attributes to users in a user group the administrator is designated to manage. Refer to “Creating a Gateway Login Administrator” on page 88. Password Administrator: Provides access to only unlock users and reset passwords for some user groups or all user groups, depending on the restrictions applied. Refer to “Creating a Password Administrator” on page 89. View Only: Provides permission to view any TT User Setup data window. A user with View Only permissions cannot edit data in any accessible window. Refer to “Creating a View Only User” on page 91. Collect Log Files Only: Provides permission to collect any log files in the trading environment, including log files containing sensitive trading information. This user cannot view or edit any user or system settings. Refer to “Creating a Collect Log Files Only User” on page 92. Creating a Super Administrator A Super Administrator can log into TT User Setup and have access to all functionality. users who had TT User Setup Access in a pre-7.2 version of TT User Setup automatically receive Super Administrator permissions. Note: Only a Super Administrator can access reports, audit trails, log files, and the System Settings window. TT User Setup User Manual Trading Technologies International, Inc. 85 4 User Administration: Administrative Users To create a Super Administrator: 1. From the User Admin menu, select Users. 2. Set the New User View to TT User Setup Admin fields. 3. Click New. Note: To give an existing user administrative privileges, select the user from the Users window and click Edit. You can then change the View to TT User Setup Admin fields. 4. On the Main tab, edit any Login, Contact, or User Defined fields as needed. 5. Click the TT User Setup Permissions tab. 6. Select the Super Administrator option and then click Save. 7. Skip to the “Configuring the Outgoing Email Settings” on page 93 topic. Creating a Group Administrator A Group Administrator can view, edit, and create users, gateway logins, and accounts that exist in one of the groups the administrator is designated to manage. A Group Administrator must be configured to manage at least one user group, and could potentially manage all of the user groups. Depending on the options selected, the Group Administrator can manage gateway logins and create Direct Trader gateway logins.. Note: Group Administrators cannot grant permissions they have not been granted themselves. For example, if the administrator does not have X_RISK Manual Fill Access, then the administrator cannot assign Manual Fill access to any other users in a user group he manages. Group administrators also cannot create a gateway login that shares an order book (identical Member and Group IDs) with a gateway login from another user group. To create a Group Administrator: 1. From the User Admin menu, select Users. 2. Set the New User View to TT User Setup Admin fields. 3. Click New. 86 TT User Setup User Manual Trading Technologies International, Inc. 4 User Administration: Administrative Users Note: To give an existing user administrative privileges, select the user from the Users window and click Edit. You can then change the View to TT User Setup Admin fields. 4. On the Main tab, edit any Login, Contact, or User Defined fields as needed. 5. Click the TT User Setup Permissions tab. 6. Select the Group Administrator option. 7. To allow this administrator to manage gateway logins, check the Able to manage Gateway Logins option. Note: When copying a user, a Group Administrator cannot copy the user's gateway login(s) unless the Able to manage Gateway Logins option is checked. 8. To allow this Group Administrator to create and edit Direct Trader gateway logins, check the Able to create Direct Trader Gateway Logins option. When the option is unchecked, the administrator cannot create or edit Direct Trader gateway logins, but can create and edit TTORDs. 9. At the bottom of the window, the Available User Groups list displays the user groups that you can assign to the administrator to manage. More than one administrator can manage the same group. 10. Using the transfer arrow buttons (>, >>, <, <<), move one or more user groups from the Available User Groups list to the Can only manage the following User Group list. 11. After adding groups to the list, check the Default(s) option to assign any users, gateway logins, or accounts created by this administrator to the checked user groups.. Note: You must select at least one user group as the Default user group. For example, if a user group named Chicago is selected as a Default, when the group administrator creates a gateway login, it will be automatically assigned to the Chicago user group. TT User Setup User Manual Trading Technologies International, Inc. 87 4 User Administration: Administrative Users 12. Click Save. 13. Skip to the “Configuring the Outgoing Email Settings” on page 93 topic. You successfully created a Group Administrator. Creating a Gateway Login Administrator A Gateway Login Administrator can manage gateway logins by assigning them and their attributes to various users in user groups the administrator is designated to manage. To create a Gateway Login Administrator: 1. From the User Admin menu, select Users. 2. Set the New User View to TT User Setup Admin fields. 3. Click New. Note: To give an existing user administrative privileges, select the user from the Users window and click Edit. You can then change the View to TT User Setup Admin fields. 4. On the Main tab, edit any Login, Contact, or User Defined fields as needed. 5. Click the TT User Setup Permissions tab. 6. Select the Gateway Login Administrator option. 7. To allow this administrator to manage each gateway login in every available user group, uncheck the Restrict Gateway Login Administrator to User Groups listed below option. 8. To restrict this administrator to managing specific user groups, check the Restrict Gateway Login Administrator to User Groups listed below option. A list of the available user groups appears. 88 TT User Setup User Manual Trading Technologies International, Inc. 4 User Administration: Administrative Users 9. From the Available User Groups list, click to select the user group that you want assigned to the Gateway Login Administrator. If the group does not exist, click the Create button and add it. Note: Press the Ctrl key to select multiple groups from the list. 10. Using the transfer arrow buttons (>, >>, <, <<), move one or more user group from the Available User Groups list to the Can only manage Gateway Logins in the following User Groups list. 11. After you have added groups to the Can only manage Gateway Logins in the following User Groups list, check the Default(s) option to assign this group to any gateway logins created by this administrator. 12. Click Save . Creating a Password Administrator A Password Administrator can “Unlocking Users”and “Resetting a User Password”for some user groups or all user groups. A Password Administrator can only access the Unlock Users/Reset Passwords window. To create a Password Administrator: 1. From the User Admin menu, select Users. 2. Set the New User View to TT User Setup Admin fields. 3. Click New. Note: To give an existing user administrative privileges, select the user from the Users window and click Edit. You can then change the View to TT User Setup Admin fields. 4. On the Main tab, edit any Login, Contact, or User Defined fields as needed. 5. Click the TT User Setup Permissions tab. 6. Select the Password Administrator option. TT User Setup User Manual Trading Technologies International, Inc. 89 4 User Administration: Administrative Users 7. To allow this administrator to manage all passwords in all available user groups, uncheck the Restrict Password Admin to User Groups listed below option. 8. To restrict this administrator to managing specific user groups, check the Restrict Password Admin to User Groups listed below option. A list of the available user groups appears. 9. From the Available User Groups list, click to select the user group that you want assigned to the Password Administrator. If the group does not exist, click Create and add it. Note: Press the Ctrl key to select multiple groups from the list. 10. Using the transfer arrow buttons (>, >>, <, <<), move one or more user group from the Available User Groups list to the Can only see Users in the following User Groups list. Note: A Password Administrator must be configured to manage at least one user group. 11. Click Save. 12. Skip to the “Configuring the Outgoing Email Settings” topic. 90 TT User Setup User Manual Trading Technologies International, Inc. 4 User Administration: Administrative Users Creating a View Only User A view only user can view but not edit data in any TT User Setup data window. To create a View Only user: 1. From the User Admin menu, select Users. 2. Set the New User View to TT User Setup Admin fields. 3. Click New. Note: To give an existing user administrative privileges, select the user from the Users window and click Edit. You can then change the View to TT User Setup Admin fields. 4. On the Main tab, edit any Login, Contact, or User Defined fields as needed. 5. Click the TT User Setup Permissions tab. 6. Select the View Only option. 7. To allow this user to view all users in all available user groups, uncheck the Restrict View Only User to User Groups listed below option. 8. To restrict this administrator to viewing specific user groups, check the Restrict View Only User to User Groups listed below option. 9. From the Available User Groups list, click to select the user group that you want assigned to the View Only user. If the group does not exist, click Create and add it. Note: Press the Ctrl key to select multiple groups from the list. TT User Setup User Manual Trading Technologies International, Inc. 91 4 User Administration: Administrative Users 10. Using the transfer arrow buttons (>, >>, <, <<), move one or more user group from the Available User Groups list to the Can only see Users in the following User Groups list. 11. Click Save. Creating a Collect Log Files Only User A Collect Log Files Only user can use the Collect Log Files feature to collect any log files in the trading environment, including log files containing sensitive trading information. This user cannot view or edit any user or system settings, but can view the TT User Setup server messages, TT User Setup server status, and environment server status reports. To create a Collect Log Files Only user: 1. From the User Admin menu, select Users. 2. Set the New User View to TT User Setup Admin fields. 3. Click New. Note: To give an existing user administrative privileges, select the user from the Users window and click Edit. You can then change the View to TT User Setup Admin fields. 4. On the Main tab, edit any Login, Contact, or User Defined fields as needed. 5. Click the TT User Setup Permissions tab. 6. Select the Collect Log Files Only option. 92 TT User Setup User Manual Trading Technologies International, Inc. 4 User Administration: Administrative Users 7. Click Save. Configuring the Outgoing Email Settings TT User Setup allows you to send newly generated passwords to users over email. This functionality is available only to Super Administrators, Group Administrators, and Password Administrators. Note: When upgrading from a pre-7.2 version of TT User Setup, TT User setup populates the Outgoing Email Settings tab with the Email Account settings (if available). To enable and set up outgoing email settings: 1. Access the Edit User or New User window for a Super Administrator, Group Administrator, or Password Administrator, and then click the Outgoing Email Setting tab. TT User Setup User Manual Trading Technologies International, Inc. 93 4 User Administration: Administrative Users 2. Check the Enable outgoing email settings option. 3. Enter the SMTP server host or IP address and SMTP port (typically port 25). 4. If the SMTP server requires authentication, check the SMTP server requires authentication option and enter the Account name and Password. 5. If your SMTP server requires SSL, check the Use SSL option. 6. Enter the From email address, Email subject, and Additional message text for the outgoing email messages, and check the Include username in message option if needed. 7. To test the email settings, click Send Test Email and enter an email address that should receive the test email. You should then verify that the test email was received. 8. Click Save. 94 TT User Setup User Manual Trading Technologies International, Inc. User Administration: FIX Adapter TT FIX Adapter and TT User Setup Overview As of TT User Setup 7.3.1, administrators use TT User Setup rather than the FIX Adapter Configuration Tool (FACT) to manage both TT FIX Adapter Servers and FIX Adapter Clients. TT FIX Adapter Server Users You configure TT FIX Adapter Servers as users in TT User Setup. You also define which gateway logins FIX Adapter Server users use to connect to the TT Gateways. Note: Gateway logins are the MGTs, risk limits, and accounts. You can configure TT FIX Adapter Servers as either Order Routing TT FIX Adapters or Drop Copy TT FIX Adapters. TT FIX Adapter Client Users You configure FIX Adapter client users as users in TT User Setup. You also configure which TT FIX Adapters they may connect to and which gateway logins they use to connect the TT FIX Adapters. Migrating from the FIX Adapter Configuration Tool (FACT) to TT User Setup The following table describes the most important functionality removed from FACT. Field Where it was in FACT Where it is now Gateways Gateway Login Parameters Global Gateway Connection Settings or Individual Gateway Connection Settings TT User Setup: The Gateway Logins tab of a user designated as a FIX Adapter Server. Rollover Times Individual Gateway Settings No longer supported Individual FIX Sessions TT User Setup: The Gateway Logins tab of a user designated as a FIX Adapter Client. Individual FIX Sessions in Order Routing configurations TT User Setup: The Gateway Logins tab of a user designated as a FIX Adapter Client. FIX Sessions Session Login Order Routing Credentials TT User Setup User Manual Trading Technologies International, Inc. 95 5 Field Account Defaults Trade Filters User Administration: FIX Adapter Users Where it was in FACT Where it is now Individual FIX Sessions in Order Routing configurations TT User Setup: The Account Defaults tab on the FIX Adapter tab of a user designated as a FIX Adapter Client. Individual FIX Sessions in Drop Copy configurations TT User Setup: The Gateway Logins tab of a user designated as a FIX Adapter Client. For a detailed description of TT User Setup user administration functionality previously managed in FACT, refer to the Migrating to Version 7.6.0 Appendix in the TT FIX Adapter System Administration Manual Version 7.6. Setting Up a TT FIX Adapter Server Use TT User Setup to configure a user as a TT FIX Adapter server, which logs into one or more TT Gateways on behalf of all its FIX clients. You must configure the FIX Adapter server user as either a Drop Copy or Order Routing FIX Adapter server. • Order Routing The order routing configuration type allows FIX Adapter client users to use all the functionality offered by the TT FIX Adapter Server. For more information on how order routing functionality is used by a TT FIX Adapter Server, refer to the Configure: Order Routing chapter in the TT FIX Adapter System Administration Manual Version 7.6. • Drop Copy The Drop Copy configuration type allows FIX Adapter client users to use all the functionality offered by the TT FIX Adapter Server, except for routing orders. For more information on how a TT FIX Adapter Server uses drop copy functionality, refer to the Configure: Drop Copy chapter in the TT FIX Adapter System Administration Manual Version 7.6 The following table describes how drop copy gateway logins determine viewing privileges. 96 TT User Setup User Manual Trading Technologies International, Inc. 5 User Administration: FIX Adapter Users Gateway Login TTADM/XXX/VIEW <Member ID>/XXX/VIEW <Member ID>/<Group ID>/VIEW Viewing Privileges Indicates the orders and fills for all FIX Adapter client user's gateway logins are visible to the TT FIX Adapter Server. Indicates the orders and fills for all FIX Adapter client user's gateway logins with the same Member ID are visible to the TT FIX Adapter Server. Indicates the orders and fills for all FIX Adapter client user's gateway logins with the same Member ID and Group ID are visible to the TT FIX Adapter Server. Additionally, you must designate the credentials (called gateway logins) that the FIX Adapter server uses to log into the TT Gateways. TT FIX Adapter server logs into each TT Gateway once and acts on behalf of all FIX Adapter client users. Note: The TT FIX Adapter Server must be able to connect to the Gateways to which a related FIX Client is able to connect, and it must be able to view the orders and fills of any FIX Client connecting to the FIX Adapter. For a detailed description of the various types of logins used in a TT environment, refer to the TT User Login and Risk Administration Reference Guide. To set up a TT FIX Adapter Server: 1. From the TT User Setup Control Panel, open the User Admin menu and click Users. The Users window appears. 2. From the New User View list select FIX Adapter Server fields. 3. Click New. The New User window appears. TT User Setup User Manual Trading Technologies International, Inc. 97 5 User Administration: FIX Adapter Users 4. On the Main tab, enter the FIX Adapter Server's Login, Contact information, and User Defined fields as needed. The Username and Display fields are typically the name of the FIX Adapter Server. The Password is the password that TT User Setup uses to authenticate the FIX Adapter Server after startup. For detailed descriptions of the remaining fields, refer to the “New User and Edit User Window Fields” on page 41 topic. The following figure shows the Login and Contact sections of Main tab for a new FIX Adapter Server, CCDC. Note: TT recommends that you leave the Password never expires option checked. 5. On the New User window, click the FIX Adapter tab. If a version requirement message appears, click OK. The FIX Adapter Role field automatically populates with FIX Adapter Server. Existing FIX client users appear in the Available FIX client users or The following FIX client users can connect to this FIX Adapter table. If FIX client users have not been created, these tables are empty. 98 TT User Setup User Manual Trading Technologies International, Inc. 5 User Administration: FIX Adapter Users 6. Click the Drop copy server or Order routing server radio button. 7. Click the Gateway Logins tab. 8. If the gateway login to which you want to map does not exist, click New and create a new gateway login. For detailed instructions refer to the Creating a New Gateway Login topic. Otherwise, if the gateway login already exists, click the Assign Existing Logins button, and select the appropriate MGT(s). For detailed instructions refer to the “Assigning Gateways to Gateway Logins” on page 137 topic. 9. Click Save. TT User Setup User Manual Trading Technologies International, Inc. 99 5 User Administration: FIX Adapter Users You have successfully set up a TT FIX Adapter Server. After completing the “Setting Up a FIX Adapter Client User” on page 100 topic, continue to the “Assigning TT FIX Adapter Client(s) to a FIX Adapter Server” on page 110 topic. Setting Up a FIX Adapter Client User Use TT User Setup to configure a FIX Adapter client, which connects to Order Routing or Drop Copy TT FIX Adapter servers. When creating a TT FIX Adapter client user that connects to an Order Routing TT FIX Adapter, you must also designate one or more sets of credentials (gateway logins) that will be used to route orders. This procedure is similar to setting up a TTORD in Guardian, except in TT User Setup you can create the TTORD and assign it to a FIX Adapter client in one step. The gateway logins to which a FIX Adapter client user is assigned determine how the Client submits orders, and to which orders and fills the Client can subscribe. A FIX Adapter client user can be assigned to more than one TTORD gateway login per Gateway, or a single Direct Trader gateway login per Gateway. Note: The FIX Client can only log into a FIX Adapter that is configured to route orders that the FIX Client can also route. Example 1: Assume a FIX client user has a gateway login for CME-A with MGT: TTORD AAA 001, and a FIX Adapter has a gateway login for CME-A with MGT: TTORD BBB MGR. In this case, the FIX Adapter is unable to load orders and fills for the FIX Client. TT User Setup will not allow the FIX client user to log in. Example 2: Assume a FIX client user has a gateway login for CME-A with MGT: TTORD AAA 001, and a FIX Adapter has a gateway login for CME-A with MGT: TTORD XXX MGR. In this case, the FIX Adapter and the FIX Adapter client have compatible MGTs. TT User Setup allows the FIX client user to log in. To set up a FIX Adapter client user: 1. From the TT User Setup Control Panel, open the User Admin menu and click Users. The Users window appears. 2. From the New User View list, select FIX Adapter Client fields. 3. Click New. The New User window appears. 100 TT User Setup User Manual Trading Technologies International, Inc. 5 User Administration: FIX Adapter Users 4. On the Main tab, enter the FIX Adapter client user's Login, Contact information, User-Level Risk, and User Defined fields as needed. The Username is the RemoteCompId, and the Password is the password used to authenticate the Client on the FIX Adapter Server. The following table describes options that allow or prevent connectivity in specific instances: Field When orders will be rejected The TT FIX Adapter cannot connect to a FIX client with an expired password. Password never expires Because FIX Adapter client users cannot update an expired password using the same procedure as an X_TRADER user, TT recommends that you prevent password expiration by leaving the Password never expires option checked. Active If the Active option is unchecked, the FIX client is considered "inactive" and therefor cannot log into TT FIX Adapter. Force logoff If the Force logoff option is checked, the TT FIX Adapter will disconnect the FIX client. The FIX client cannot log back in until the Force logoff option is unchecked. The following shows the Login section of the Main tab for new TT FIX Adapter Client, AB. TT User Setup User Manual Trading Technologies International, Inc. 101 5 User Administration: FIX Adapter Users 5. Configure the remaining options on the Main tab as needed. Refer to the “New User and Edit User Window Fields” on page 41 topic for descriptions of the remaining fields. The following table describes options that can cause orders to be rejected in specific instances. These settings only apply to FIX clients of Order Routing FIX Adapters. Field When orders will be rejected Trading allowed If the Trading Allowed option is unchecked the TT FIX Adapter will reject all orders from the FIX client. GTC/GTDate orders allowed If the GTC/GTDate... option is unchecked the TT FIX Adapter will reject all GTC and GTDate orders sent by the FIX client. 102 TT User Setup User Manual Trading Technologies International, Inc. 5 User Administration: FIX Adapter Users Field When orders will be rejected Prevent orders that are more than X ticks away from the market price If the Prevent orders... option is checked the TT FIX Adapter will reject any orders that are submitted with a price that is outside the defined price band. Additionally, it will reject orders if it is unable to successfully establish a price subscription for the instrument. Per TT Gateway, prevent more than X orders per second The TT Gateway will reject all orders that exceed the orders per second limitation. 6. Click the Gateway Logins tab. 7. If the gateway login to which you want to map does not exist, click New and create a new gateway login. For detailed instructions refer to the Creating a New Gateway Login topic. Otherwise, if the gateway login already exists, click the Assign Existing Logins button and select the appropriate MGT(s). For detailed instructions, refer to the “Assigning Gateways to Gateway Logins” on page 137 topic. Make sure to check the Avail to FIX Client option if the FIX client will have access to the gateway login after logging in. 8. Click the FIX Adapter tab. TT User Setup User Manual Trading Technologies International, Inc. 103 5 User Administration: FIX Adapter Users 9. Configure the Staged order routing settings as needed. These settings are valid only when this FIX client connects to an order routing TT FIX Adapter server. 1. To allow the user to create staged orders check the Staged order creation allowed option. 2. To allow the user to create DMA orders, check the Direct Market Access (DMA) order creation allowed option. 10. Click Save. You have successfully set up a FIX Adapter client user. After completing the “Setting Up a TT FIX Adapter Server” on page 96 topic, continue to the “Setting Up an Account Default” on page 104 topic, and then to the “Assigning TT FIX Adapter Client(s) to a FIX Adapter Server” on page 110 topic. Setting Up an Account Default This section provides a brief overview of account defaults, how to create an account default record, and how the TT FIX Adapter Server uses a FIX Adapter client user's account default key values populate default values before submitting an order to the TT Gateway. Account Default Overview Account defaults are a set of rules that a TT FIX Adapter uses to provide a default account type, clearing account, or free form data when it is omitted from an order. The account defaults, created in TT user Setup, contain two types of data: • • Keys that the TT FIX Adapter server uses to match incoming orders to particular rules. Default values that TT FIX Adapter server adds to outgoing orders and fills when needed. The following is a list of values available in the New Account Defaults or Edit Account Defaults window. 104 TT User Setup User Manual Trading Technologies International, Inc. 5 User Administration: FIX Adapter Users Field Description Type username The name of the FIX Adapter client user. In the TT FIX Adapter Configuration Tool (FACT), username was known as RemoteCompId. Key Account # The customer account number. Enter an asterisk (*) to match any account number. Key Market The name of the market. Enter an asterisk (*) to match any market. Key Gateway The name of the gateway. Enter an asterisk (*) to match any gateway. Key Product type The product type (e.g. futures, options, spreads, etc.), associated with a security. Enter an asterisk (*) to indicate match any product type. Key Account type The type of account associated with the trader. Default value Clearing Account The member code for the clearing member; used for give-up trades only. Default value FFT2/FFT3 The freeform text fields; often used for annotations by traders or back offices. Default value From the Account Defaults tab, within the New User or Edit User window, you can set the Restrict user from overriding Account Default option to specify whether a TT FIX Adapter Server rejects orders containing default values (e.g. Clearing Account) that don not match or that conflict with a FIX Adapter client user's account default values. TT User Setup User Manual Trading Technologies International, Inc. 105 5 User Administration: FIX Adapter Users For example, based on the values in the illustration below, if the restrict override option is checked, an order must match all of the values, including a Clearing Acct value and an FFT2 value. However, if the restrict value is unchecked, only the "key" values (Account #, Market, Gateway, and Product type) must match. 106 TT User Setup User Manual Trading Technologies International, Inc. 5 User Administration: FIX Adapter Users Creating an Account Default The following procedure describes how to create an account default from the User window. You can also access the New Account Default window by selecting FIX Adapter Account Defaults from the User Admin menu. To create an account default: 1. From the User Admin menu, select Users. The Users window appears. 2. Double-click the row of an existing user. The Edit User window appears. TT User Setup User Manual Trading Technologies International, Inc. 107 5 User Administration: FIX Adapter Users 3. Click the FIX Adapter tab and then click the Account Defaults tab. 4. On the Account Defaults tab, click New. The New Account Default window appears. 5. Enter data in the Account #, Market, Gateway, and Product type "key" fields as needed. The image below shows a New Account Default window with the "key" fields completed. Note: You can type an account number directly in the Account # field, or you can click the ... button, select an account from the Select Account window, and then click Select. 6. Click Save. The new account default appears in the Edit User window. 7. On the Edit User window, click Save. You have successfully set up an account default. How FIX Adapter Servers Match an Account Default TT FIX Adapter Server uses a FIX Adapter client user's account default key values to match incoming orders received from the FIX client application prior to submitting the orders to the TT Gateway. When TT FIX Adapter Server receives an order message from a FIX Adapter Client user, it starts the process of matching the order to the “key” values in the set of account defaults. If it finds a match, TT FIX Adapter Server inserts any specified default values into the order before routing it to the specified TT Gateway. If the Restrict user from overriding Account Default option is checked, all the "key" and default values are taken into consideration when matching an order. 108 TT User Setup User Manual Trading Technologies International, Inc. 5 User Administration: FIX Adapter Users You can create more than one account default with the same "key" values, and TT FIX Adapter server uses the match with the highest priority. To define the order in which TT FIX Adapter server prioritizes account defaults, follow the procedure below. To prioritize account defaults: 1. On the New User or Edit User window, select the FIX Adapter tab and then select the Account Defaults tab. 2. Highlight the row of the account default you'd like to give the highest priority. 3. From the buttons on the window's right, click Move to Top. The highlighted row becomes the first row displayed, is assigned a number one in the first column, and is given top matching priority. 4. To prioritize additional rows, click the row, and use the Move Up and Move Down buttons. You have successfully prioritized account defaults. Example: Account Defaults Order Matching Assume an administrator configures two FIX Adapter Client users with the same set of account defaults, but in a different order. If each FIX Adapter client sends a TT FIX Adapter server an order that contains a market of CME and a product type of NRG, the clients will receive different results as follows. TT user Setup includes the following account default entries for FIX Adapter Client user ABC: Prod Type Market Acct Type Priority Account 1 * CME NRG G1 2 * * * A1 TT User Setup User Manual Trading Technologies International, Inc. Clearing Acct FFT2 FFT3 999 109 5 User Administration: FIX Adapter Users For FIX Adapter Client user XYZ, TT user Setup includes the same account defaults, but in reverse order, as shown: Prod Type Market Acct Type Priority Account 1 * * * A1 2 * CME NRG G1 Clearing Acct FFT2 FFT3 999 Result: When TT FIX Adapter Server receives the message from FIX Adapter Client user ABC, it finds a match in the first account defaults listed, so it routes the order to the TT Gateway with Account Type = “G1” and Give-Up = “999”. When TT FIX Adapter Server receives the same message from FIX Adapter client user XYZ, it matches the first row. Even though the second account defaults entry represents a more precise match, TT FIX Adapter server stops looking after it finds the first match. Consequently, when TT FIX Adapter server receives this message, it routes it to the TT Gateway with Account Type = “A1”. Note: For more account default order matching and routing examples, refer to the Understanding Account Defaults section of the TT FIX Adapter Reference Manual. Assigning TT FIX Adapter Client(s) to a FIX Adapter Server You can assign FIX Adapter client users to a TT FIX Adapter server from either the server or client user's New User or Edit User window. To assign a TT FIX Adapter server to a FIX Adapter client user: 1. On the client user's New User or Edit User window, click the FIX Adapter tab. If a version requirement message appears, click OK. 110 TT User Setup User Manual Trading Technologies International, Inc. 5 User Administration: FIX Adapter Users 2. Use the transfer arrow buttons (>, <, >>, <<) to select the FIX Adapter server users to which each client can connect. 3. If checked, the Enabling Debug Logging for Orders and Enabling Debug Logging for Prices options prompt the selected TT FIX Adapter server to generate verbose debugging information. Note: Because a significant increase in the amount of data logged affects performance, only check the debug options when troubleshooting. 4. Save and close the Users window. 5. Repeat this procedure for each FIX Adapter client user. You have successfully assigned a FIX Adapter server to a FIX Adapter client. To assign TT FIX Adapter clients to the TT FIX Adapter server: 1. On the server user's New User or Edit User window, click the FIX Adapter tab. If a version requirement message appears, click OK. TT User Setup User Manual Trading Technologies International, Inc. 111 5 User Administration: FIX Adapter Users 2. Use the transfer arrow buttons (>, <, >>, <<) to select the FIX Adapter client users that can connect to this server. 3. Save and close the Users window. You have successfully assigned FIX Adapter clients to a FIX Adapter server. Allowing or Blocking Product Groups for a FIX Adapter User You can allow or block any of the listed product groups for a FIX Adapter client user. For more information refer to the “Allowing or Blocking Product Groups for Specific Markets” on page 119 topic. Note: When a new user is created, all product groups are allowed by default. When a new product group or market is added, it is allowed for all users by default. The administrator must manually block the product groups for the appropriate users. 112 TT User Setup User Manual Trading Technologies International, Inc. User Maintenance How to Maintain Users User maintenance includes: • • • • • • “Resetting a User Password” on page 113 “Auto Generating and Emailing a User's Password” on page 114 “Unlocking Users” on page 114 “Forcing a User Logoff” on page 115 “Activating and Deactivating Users” on page 116 “Allowing or Blocking Product Groups for Specific Markets” on page 119 Resetting a User Password A Super Administrator, Group Administrator, or Password Administrator can reset passwords for users in one or more defined user groups. When resetting a password, a user's existing password is replaced; the Password administrator does not need to know the user's existing password to reset that password. Note: A Password Administrator cannot reset a Super Administrator's or Group Administrator's password. To reset a password: 1. To force the user to change their password at the next login, check the Require user to change initial password option on the Password Rules tab of the System Settings window. Refer to the “Configuring Password Rules” on page 230 topic if needed. 2. From the User Admin menu, select Unlock Users/Reset Passwords. 3. Click the row of the user whose password you want to reset, and then click Reset Password. Note: Alternatively, you can click the Password button on the Main tab of the Edit User window. The Password change window appears. 4. In the New Password and Confirm New Password fields, enter the new password. 5. Click Save. Note: If you have configured the Outbound Email Settings, you can also generate and email a new password using the Auto Generate Password button. Refer to “Auto Generating and Emailing a User's Password” on page 114 topic. You have successfully reset a password. TT User Setup User Manual Trading Technologies International, Inc. 113 6 User Maintenance Auto Generating and Emailing a User's Password Administrators that have been configured for outgoing email (refer to the “Configuring the Outgoing Email Settings” on page 93 topic) can create an automatically-generated password and email it to the email address that is configured in the Email field in the Contact section of the Edit User window. TT User Setup's audit trail records when an email address is changed, a password is generated, etc. To auto generate an existing user's password: 1. From the User Admin menu, select Users, and then select the user whose password you want to generate. 2. On the Main tab, in the Contact section, ensure the Email field contains a valid email address. TT User Setup sends the password to this email address. 3. In the Login section, click the Password button. The Password change window appears. Note: For enhanced security, you can disable the user's ability to enter a password. For a detailed description on disabling the New Password fields, refer to the TT User Setup System Administration Manual Version 7.4. 4. Click Auto Generate Password. 5. When prompted to confirm that you would like to proceed, click Yes. TT User Setup sends the user an email message that includes that user's new password and username. You have successfully auto generated a user's password. Unlocking Users Users become locked out when they exceed the password locking rules, the number of failed login attempts, or the days of inactivity. For a detailed description on enforcing password locking rules, refer to the “Configuring Password Locking Rules” on page 228 topic. A Super Administrator, Group Administrator, or Password Administrator can unlock users either in all available user groups or in a restricted number of user groups. To unlock a user: 1. From the User Admin menu, select Unlock Users/Reset Passwords. The Unlock Users/Reset Passwords window appears. 2. Click the row of the user you want to unlock. 114 TT User Setup User Manual Trading Technologies International, Inc. 6 User Maintenance 3. Click Unlock. You have successfully unlocked a user. Forcing a User Logoff TT User Setup allows you to force a logged in X_TRADER user's application to shut down immediately, and restrict that user from logging back in until the Force logoff option is unchecked. When a user is forced to logoff, that user's license(s) become available to other users. You can force a user logoff from the Edit User window or from the Logged in Users report. The Force logoff option disabled when editing multiple users. To force a user logoff using the Edit User window: 1. From the Users window, click the user you want to log off, and then click Edit. 2. On the Main tab, in the Login section, check the Force logoff option. 3. When the warning message appears, click OK to close any instance of X_TRADER to which the user is logged in, or click Cancel to leave the Force logoff feature unchecked. 4. On the Edit User window, click Save. You have successfully logged off a user. The user is unable to log on until you uncheck the Force logoff option. To force a user logoff using the Logged in Users report: 1. From the Reports menu, select Logged in Users. The Logged in Users window appears. 2. To refresh the window, click Refresh. 3. On the By User tab, select a logged in user and then click Force Logoff. 4. When the warning message appears, click OK to close any instance of X_TRADER to which the user is logged in. TT User Setup User Manual Trading Technologies International, Inc. 115 6 User Maintenance You have successfully logged off a user. The user is unable to log on until you uncheck the Force logoff option on the Edit User window. Activating and Deactivating Users Inactive users cannot log in using their usernames, but their information remains available. To activate or deactivate a user: 1. From the New User or Edit User window, check the Active option to activate the user, or uncheck the Active option to deactivate the user. 2. Click Save. You have successfully activated or deactivated a user. To display inactive users: 1. From the User Admin menu, select Users. 2. Check the Show inactive users option. You have successfully displayed inactive users. Configuring and Running Diagnostic Checks TT User Setup allows you to run diagnostic checks that list potential set up issues based on the information available in the TT User Setup database. For example, Gateway Logins missing Accounts and Missing Product Limits. Configuring Diagnostics To configure the diagnostic checks: 1. From the User Admin menu, select Diagnostic Checks. 2. Click the Click to run diagnostic checks link. 116 TT User Setup User Manual Trading Technologies International, Inc. 6 User Maintenance Note: TT User Setup does not display records that include users, gateway logins, or accounts the administrator type (e.g. Group Administrator) is not permitted to manage. 3. Click Configure diagnostic checks. TT User Setup User Manual Trading Technologies International, Inc. 117 6 User Maintenance 4. Select the diagnostic checks you want to run. You can also match the Automatic Diagnostics settings by clicking Sync selection with automatic diagnostics. To set the Automatic Diagnostics, refer to the “Automatic Diagnostics” on page 232 topic. 5. Click OK. Running Diagnostics Checks To run a diagnostic check: 1. From the User Admin menu, select Diagnostic Checks. 2. To run the configured diagnostic checks, click Run/Refresh Diagnostic Checks. 118 TT User Setup User Manual Trading Technologies International, Inc. 6 User Maintenance 3. To resolve an issue in the Diagnostics Checks window, click on the blue highlighted text for the issue you want to resolve. TT User Setup opens the window that is causing the error. 4. Correct the problem and re-run the diagnostic check. Allowing or Blocking Product Groups for Specific Markets Some markets have specifically defined product groups. ICE for example, has product groups such as OTC Gas, OTC Power, and US Futures. Instead of allowing a user to subscribe to all products in a market, you can allow or block each available product group, per user. If a product group is blocked, a user logging into a TT application will not have access to any of the products in that group. This includes the ability to view market data for that product or to trade that product. TT User Setup allows all newly added product groups or markets for all users. TT User Setup also allows all the product groups or markets for all newly added users. It is up to the TT User Setup administrator to block access to product groups. Note: The following TT software versions (and later) support Product Group Permissions: FIX Adapter 7.6.1, X_TRADER 7.9.0, X_RISK 7.5, XTAPI 7.7.0, TT API 7.2.0, CME Gateway 7.14. 3, ICE Gateway 7.14.1, OSE Gateway 7.17.35. You can manually allow or block each product for each X_TRADER, X_RISK, and FIX Adapter client user from the Product Group Permissions window or tab. If a market (i.e., an exchange) is not listed in the Product Group Permissions tab, the user is allowed to access all products for that market. To manually allow or block product groups: TT User Setup User Manual Trading Technologies International, Inc. 119 6 User Maintenance 1. From the User Admin menu, select Product Group Permissions. Note: You can also access the product group permission for a single user by selecting the Product Groups tab from the New User or Edit User windows. 2. Filter or sort the Product Group Permissions window as needed to locate the product group(s) you want to allow or block. 3. Select the product group(s) and click Allow or Block. If you select only one product you can also check or uncheck the Allowed option. Updating the Supported Product Groups List The TT User Setup software includes the available product groups at the time the software was released. If a supported exchange adds or removes a product group, or if TT adds support for a new market, your TAM will send you a file that will update your list of supported product groups. To manually allow or block product groups: 1. Copy the file you received from your TAM to the ~tt/config directory on each Master and Slave TT User server in your system. 2. Restart the TT User Setup service. 120 TT User Setup User Manual Trading Technologies International, Inc. Gateway Login Administration Basics Gateway Logins Overview Use the Gateway Logins window to create or edit gateway logins. Gateway logins are the MemberGroupTrader IDs used to log into TT Gateways. Each can have their own account numbers and risk limits, and multiple gateway logins can be assigned to a single user. To create or edit a gateway login, refer to “Creating a New Gateway Login” on page 135. You can customize the Gateway Logins window by hiding TTORDs, hiding exchange traders, and expanding or collapsing the Gateway/Exchange Trader view. Refer to “Customizing the Gateway Logins Window” on page 131 for more information. From the Gateway Logins window you can also assign users to existing gateway logins. Refer to the “Assigning Users to a Gateway Login” on page 144 topic. Note: The Gateway Logins window is a standard data grid with additional options that allow you to hide TTORDs, hide Exchange Traders, and expand or collapse the Gateway/Exchange Trader view. Refer to the “Data Grid Functionality” on page 25 topic if needed. Assign to Available Users Window Field Descriptions To access the Assign to Available Users window, click Assign to Users from the Gateway Logins window. The Gateway Logins tab of the New User and Edit User windows contains the same fields. This topic describes all of the Assign to Available Users window fields: Available Users list The Username, Display Name, and Group fields contain read-only values defined in the New User or Edit User window. Selected Users list The Username, Display Name, Group, and Gateway fields are read-only values that are defined in the New User or Edit User window. The Available To User, Available To FIX Client, Automatically Login, Clearing Member, Default Account, Preferred IP, Max Orders/Sec, and Operator ID fields are defined on the User's Gateway Login Attribute window, but can be edited by selecting one or more users and editing the Login Attributes from this window. Login Attributes The Login Attributes section has the following fields: TT User Setup User Manual Trading Technologies International, Inc. 121 7 Field Gateway Login Administration Basics Description Available to User Indicates whether a user can have access to a given gateway login after performing a universal login. Available to FIX Client Indicates whether a FIX Client user can have access to a given gateway login after performing a universal login. Automatically Login Specifies whether a user of a specific gateway login will be automatically logged into a given gateway. Mandatory Login Indicates whether the user must log onto this Gateway when logging into TT applications. Check this option to prevent users from bypassing risk limits by not logging into a specific Gateway. Algo deployment allowed Indicates whether the user is allowed to deploy strategies to an Algo SE Server. This setting is only valid when the Gateway is an Algo SE Server. Algo sharing allowed Indicates whether the user is allowed to share algorithms with other users on Algo SE servers. This setting is only valid when the Gateway is an Algo SE Server and when the Algo deployment allowed option is checked. Clearing Member Designates a member firm of a clearing house through which trades are settled. Default Account Specifies the default account type as defined by the exchange (A1-A9, G1, G2, M1-M3, P1-P3, or U1-U3. Preferred IP Specifies the IP address of the Gateway. The preferred IP is used when there are multiple Gateways running with the same flavor name. 122 TT User Setup User Manual Trading Technologies International, Inc. 7 Gateway Login Administration Basics Field Max Orders/Sec Description The maximum rate of orders allowed per TT Gateway. This value overrides the user-level Per TT Gateway, prevent more than X orders per second setting. The value entered in the Prevent more than X orders per second (overrides the User-Level setting) field displays in Max Orders/Sec. You can edit the maximum orders per second in this column per TT Gateway for the selected user. Operator ID Specifies the Operator ID that is used to identify the trader or operator to the exchange. Gateway Login Window Field Descriptions This topic describes all of the New Gateway Login and Edit Gateway Login window tabs and fields. The available tabs and associated windows are as follows: Gateway Login Info The Gateway Login Info tab contains the gateway login basic information as well as the Gateways/ Exchange Traders, Accounts, Product Limits, and Group Permissions sections. TT User Setup User Manual Trading Technologies International, Inc. 123 7 Field Gateway Login Administration Basics Description Specifies the broadest type of ID. The Member may identify one of the following: • • Member • The exchange on which the user trades. The firm with which the individual user is associated. A branch office. Member content depends on exchange-specific requirements, as described in the Trader Login Requirements table in the TT User Login and Risk Administration Reference Guide. Group Identifies traders who share an order book (i.e., traders with the same Member and Group can access orders from a common order book). Brokers who manage each other’s customer accounts often use groups. Traders who do not want to share an order book use a unique Group. Trader Specifies the user-specific identifier for the individual trader. Exchanges might have specific requirements regarding the Trader ID portion as well. For example, on CME a Trader ID can be used to uniquely identify each trader within a firm. 124 TT User Setup User Manual Trading Technologies International, Inc. 7 Gateway Login Administration Basics Field Description Note: The Member, Group, and Trader fields form a unique Member/Group/Trader set, also called an MGT. Password/ Confirm password Specifies the password for an Exchange MGT. Passwords are only needed for Exchange Trader Logins in some markets. When not needed, TT User Setup disables the Password and Confirm Password fields. Alias Identifies a given gateway login. It is typically the proper name of the user assigned to the gateway login. Disable "Auto-Calculate-SOD" Determines whether or not the gateways assigned to this gateway login will be prevented from generating Start-of-Day records. When the Disable "Auto-Calculate-SOD" option is checked, gateways will not generate Start-of-Day records for the configured Gateway Login. Add to Guardian Designates whether a gateway login will be published to Guardian. The Add to Guardian option is only needed for TTORDs and gateway logins that will be risk checked. This option is not available when DisableProductLimitPublishingMode is on (refer to the TT User Setup System Administration Manual for more information about the DisableProductLimitPublishingMode parameter). Risk Check Specifies whether Guardian risk checks orders sent with this gateway login. When Risk Check is checked, the related risk settings will be applied to a trader's orders. TT User Setup User Manual Trading Technologies International, Inc. 125 7 Field Gateway Login Administration Basics Description Trading allowed Determines whether the gateway login can actively trade. Ignore P&L Determines if P&L is used in available credit calculations. Credit Specifies the sum of money available at the start of a trading session, which can be affected by a trader's margin and P&L. Currency Specifies the currency for the Credit field (e.g. USD = United States Dollar). Determines if traders using this gateway login have a different credit limit for TT SIM trading. Override credit for TT SIM When Override credit for TT SIM is checked, the user's credit limit while trading on TT SIM is set to the value in the TT SIM credit field. If Override credit for TT SIM is not checked, the user's credit limit applies to both TT SIM and non TT SIM trading. Gateways The Gateways section on the Gateway Login Info tab appears when the MGT entered is not a TTORD. It lists the Gateways assigned to this gateway login. To add additional Gateways, click Add Gateways (which opens the Select Gateway window) and then select a Gateway to add. Exchange Traders The Exchange Traders section on the Gateway Login Info tab appears when the MGT entered is a TTORD. It lists the exchange traders mapped to and from this gateway login. You can map exchange traders to this gateway login using the Map to Exchange Traders button. From the Map to Exchange Traders window, you can also Create new exchange traders. 126 TT User Setup User Manual Trading Technologies International, Inc. 7 Gateway Login Administration Basics Field Gateway Description Specifies the TT Server that typically connects to a given exchange. A trader connects to a Gateway to trade. Specifies the broadest type of ID. The Member may identify one of the following: • • Member • The exchange on which the user trades. The firm with which the individual user is associated. A branch office. Member content depends on exchange-specific requirements, as described in the Trader Login Requirements table in the TT User Login and Risk Administration Reference Guide. Group Identifies traders who share an order book (i.e., traders with the same Member and Group can access orders from a common order book). Brokers who manage each other’s customer accounts often use groups. Traders who do not want to share an order book use a unique Group. Trader Specifies the user-specific identifier for the individual trader. Exchanges might have specific requirements regarding the Trader ID portion as well. For example, on CME a Trader ID can be used to uniquely identify each trader within a firm. Accounts Use the Accounts section to assign or remove accounts. The Accounts section has the following fields: TT User Setup User Manual Trading Technologies International, Inc. 127 7 Field Gateway Login Administration Basics Description Account #s The account number that a trader uses when entering orders. An account number is required for orders submitted with TTORD gateway logins. You can also assign an account number to a trader's customer default(s). (refer to “Creating and Managing X_TRADER Customer Defaults” on page 73. Description An optional description of the account number. When you click Assign Accounts, the Assign Accounts to Gateway Login window appears. From this window you can select available accounts (by moving an account to the Selected Accounts list), or you can Create a new account. Product Limits The Product Limits section contains the following fields: Field Description Gateway The server a user logs into and trades on using an assigned gateway login (e.g. CME-A). Product The name of the product that the trader is allowed to trade. If the product limit applies to all product names for a given Gateway, enter an asterisk (*). Product Type The product types to which this product limit applies: Future, Spread, Option, Strategy, Stock, Bond, Swap, Energy, FOREX, NDF, or Warrant. 128 TT User Setup User Manual Trading Technologies International, Inc. 7 Gateway Login Administration Basics Field Description The margin amount configured in Guardian for a given product. Margin is the amount of money deducted from a trader's available credit for holding a position. Margin Note: If the Product field is set to *, TT User Setup disables the margin field. The percentage above or below the exchangeset margin requirement that a trader must have available to trade the contract. Addl Mrgn% Max Ord Qty TT User Setup User Manual Trading Technologies International, Inc. In other words, entering a positive percentage increases the exchange margin requirement when calculating risk limits, and entering a negative percentage decreases the exchange margin requirement. The maximum individual order size that the trader can entered at a time for a specified product. 129 7 Field Gateway Login Administration Basics Description The number of contracts the trader can be long or short for a given contract or product. Max Position Note: The selected Product Type determines how the Max Position field is used for risk checking. For more information, refer to the TT User Login and Risk Administration Reference Guide. Max Long/Short The sum of all the long contracts and the sum of all the short contracts on a given product. Trade Out allowed Whether the trader can exceed the maximum order quantity and available credit limits to reduce his or her risk for the specified contract. Last Changed The date of the most recent update to a given product limit. Last Changed By The username of the administrator who most recently updated the given product limit. CreatedDate The date the product limit was created. ID A unique identifier for a product limit. The ID is used in the Audit Trail to distinguish product limit changes. It can help identify a product limit after the product name, for example, is changed. Group Permissions The Group Permissions tab allows you to assign the user groups that are permitted for this gateway login. Use the transfer buttons (>, <, <<) to add users to the Gateway Login permitted in the following User Groups section. You can also click Create to create a new user group. 130 TT User Setup User Manual Trading Technologies International, Inc. 7 Gateway Login Administration Basics To allow a group administrator to edit and directly assign this gateway login, check the Group Admins can assign this Gateway Login directly to users without using a TTORD option. If you uncheck this option, Group Administrators can only map the gateway login to a TTORD (to use it indirectly). Customizing the Gateway Logins Window The Gateway Logins window displays a list of Member, Group, and Trader IDs (MGTs) and associated gateways. You assign users to these gateway logins, which allows the user to log into TT applications such as X_TRADER with their user names and passwords. The MGTs displayed can include direct trader logins, TTORD logins, and administrator logins. To display gateway logins: From the User Admin menu, select Gateway Logins. The Gateway Logins window appears. Note: Use the Refresh button to refresh your window if the data becomes stale. The Refresh feature is useful, when for example, multiple administrators are updating records in TT User Setup. You can customize the gateway login display so that TTORDs are filtered from view. Hiding TTORDS To hide TTORDs: TT User Setup User Manual Trading Technologies International, Inc. 131 7 Gateway Login Administration Basics From the Gateway Logins window, check the Hide TTORDs option. The Gateway Logins window displays only non-TTORD gateway logins. Hiding Exchange Traders To hide Exchange Traders: From the Gateway Logins window, check the Hide Exchange Traders option. The Gateway Logins window displays only non-Exchange Trader gateway logins. Enabling the Expanded Gateway/Exchange Trader View When a single MGT has more than one tradable gateway assigned, TT User Setup condenses the rows for each entry into a single row and replaces the Gateway name with an asterisk (*) and the number of gateway rows hidden. To list all the gateways (for example, so that you can filter by a specific gateway type), enable the expanded gateway/exchange trader view. To expand the gateway/exchange trader view: 1. From the User Admin menu, select Gateway Logins. The Gateway Logins window appears. An asterisk in the Gateway column indicates multiple rows are available. 2. Check the Expanded Gateway/Exchange Trader View option. 132 TT User Setup User Manual Trading Technologies International, Inc. 7 Gateway Login Administration Basics Each entry expanded into separate rows. TT User Setup User Manual Trading Technologies International, Inc. 133 7 134 Gateway Login Administration Basics TT User Setup User Manual Trading Technologies International, Inc. Creating Gateway Logins Creating a New Gateway Login Gateway logins are the MemberGroupTrader IDs used to log into TT Gateways. You can assign unique account numbers and risk limits to each gateway login, and you can assign multiple gateway logins to a single user. To create a gateway login, complete the following tasks: • • • • • • “Assigning the MemberGroupTrader ID” on page 135 “Disabling Start-of-Day Records” on page 136 “Assigning Gateways to Gateway Logins” on page 137 (for Exchange Trader IDs) OR “Mapping a TTORD to an Exchange Trader” on page 138. “Assigning Accounts” on page 141 “Configuring Risk” on page 143 “Publishing to Guardian” on page 205 Assigning the MemberGroupTrader ID A gateway login is either an Exchange Trader ID or a TTORD ID. • • Exchange Trader ID: A login assigned in part by the exchange that indicates the user’s membership with the exchange. All traders need an exchange trader ID or must be associated with one to trade with an exchange. TTORD ID: A proxy login that allows multiple logins to be mapped to a single exchange membership. It also allows for more configurable order routing and risk limit setups. For more information about defining gateway logins, refer to the TT User Login and Risk Administration Reference Manual. To assign the MemberGroupTrader ID: 1. From the User Admin menu, select Gateway Logins and then click New. Note: You can also create gateway logins from the New User or Edit User window. For more information refer to “Creating a New Gateway Login through the Users Window” on page 82 The New Gateway Login window appears. TT User Setup User Manual Trading Technologies International, Inc. 135 8 Gateway Login Administration Basics 2. Enter the appropriate ID data in the Member, Group, and Trader fields. 3. When creating Direct Trader gateway logins on certain Gateways (e.g., Eurex, ICE, CBOT, and LIFFE), the Password and Confirm Password fields are enabled because they are required by the exchange. Enter the appropriate password in the fields. 4. Do one of the following: 5. For exchange traders, continue to the “Assigning Gateways to Gateway Logins” on page 137 topic. 6. For TTORDs, continue to the “Mapping a TTORD to an Exchange Trader” on page 138 topic. Note: When you enter a TTORD in the Member field, the Map to Exchange Traders button appears automatically. Otherwise the Add Gateways button appears. Disabling Start-of-Day Records Per Gateway Login (MGT), you can configure whether a Gateway should automatically generate Startof-Day records. When the Disable "Auto-Calculate-SOD" option is checked, gateways will not generate Start-of-Day records for the configured Gateway Login. To disable Start-of-Day Records: 1. Open the New Gateway Logins or Edit Gateway Logins window. 136 TT User Setup User Manual Trading Technologies International, Inc. 8 Gateway Login Administration Basics 2. Check the Disable "Auto-Calculate-SOD" option to prevent SOD records from being generated for this gateway login. Assigning Gateways to Gateway Logins When creating an exchange trader login, you must assign at least one gateway to the gateway login. To assign a gateway to a gateway login: 1. From the Edit Gateway Login window, click Add Gateways. Note: You can also assign gateway(s) to one or more gateway login(s) from the Gateway Logins window. Refer to the “Assigning Gateways to Multiple Gateway Logins” on page 150 topic. The Select Gateway window appears. TT User Setup User Manual Trading Technologies International, Inc. 137 8 Gateway Login Administration Basics Note: If you add a new market to the TT User Setup environment, you must restart the TT User Setup server before the new market is available from the Select Gateway window. 2. Click the row of the gateway(s) you want to add, and click Select. Note: You might need to create a password, depending on the gateway to which you mapped the gateway login. 3. If you want to manage risk for this gateway login, check the Add to Guardian option and continue to the “Assigning Accounts” on page 141 topic. Otherwise, click Save. You have successfully created a gateway login. Mapping a TTORD to an Exchange Trader While the TT system associates a trader's order book and risk limits with a TTORD, the trader's trades go to the exchange using the Exchange Trader credentials configured here. TT User Setup allows you to map TTORD gateway login(s) to one or more exchange traders. 138 TT User Setup User Manual Trading Technologies International, Inc. 8 Gateway Login Administration Basics When setting up a TTORD, you use the Map to Exchange Traders button to assign the TTORD to the Exchange Traders. For more information about how to configure TTORDs, refer to the TT User Login and Risk Administration Reference Guide. Note: You cannot save a TTORD gateway login unless it is mapped to at least one exchange trader. To map a TTORD gateway login to an exchange trader: 1. From the Edit Gateway Login window, click Map to Exchange Traders. This button only appears when the Member portion of the MGT is a TTORD. The Map Exchange Traders to window appears. This window displays both exchange traders not currently assigned to the TTORD (Available Exchange Traders) and those that are currently assigned to the TTORD (Selected Exchange Traders). 2. Using the transfer arrow buttons (>, >>, <, <<), move one or more exchange traders (MGTs) from the Available Exchange Traders section to the Selected Exchange Traders section. Note: If the exchange trader does not exist, click Create to create it. After you save the new exchange trader, it is automatically added to the Selected Exchange Traders section. 3. Click Done. Additional exchange traders appear in the Edit Gateway Login window. 4. Because you are creating a TTORD gateway login, you must also assign an account number. Continue to the “Assigning Accounts” on page 141 topic. TT User Setup User Manual Trading Technologies International, Inc. 139 8 Gateway Login Administration Basics Adding Gateways to Existing TTORDs You can assign gateway(s) to existing TTORDs from the Gateway Logins window. This is useful when the TTORD already exists and is assigned to the correct exchange traders, but needs to be assigned additional gateways. Note: The selected gateway logins must all be tradable TTORDs. Example: 50 traders trade on the CME-A gateway using unique TTORDs. Later, a CME-B gateway is added as a backup to CME-A. In this case you could add the CME-B Gateway to the traders' existing TTORDs To assign gateways to existing TTORDs: 1. From the Gateway Logins window, select one or more gateway logins (make sure to select only TTORDs). 2. Click Add Gateways/Exchange Traders. 3. From the Add Gateways/Exchange Traders to TTORDs window, select The selected TTORDs are already assigned to the correct exchange traders, but I want to add a new gateway..., and then click Continue. The Add New Gateway to TTORDs Based on Existing Gateway window appears. 4. Select the Gateway(s) to add to the TTORD, and then click OK. 5. When prompted to change the TTORD to use the new exchange trader MGT, click Yes if the TTORD should be configured to use the new exchange trader MGT, or click No if the TTORD should continue to use the original exchange trader MGT. 140 TT User Setup User Manual Trading Technologies International, Inc. 8 Gateway Login Administration Basics You have successfully added a gateway to an existing TTORD. Note: Added gateways are configured with the Available to User setting unchecked by default; users cannot trade on the new gateways. To make the gateway available to an individual user, access the Gateway Logins tab on the Edit User window and check the Available to User checkbox. To make the gateway available to multiple users, access the User's Gateway Login Attributes window, select the gateway's users, click Edit and then check the Available to User checkbox. Assigning Accounts You must assign one or more accounts to a gateway login in the following situations: • • The Add to Guardian risk feature is checked. You are creating a TTORD ID. Note: When entering orders, a Trader using a TTORD must use one of the account numbers assigned to the TTORD. TT recommends configuring the trader's customer defaults to help ensure that proper account numbers are used (refer to “Creating and Managing X_TRADER Customer Defaults” on page 73 for more information). To assign an Account: 1. From the Edit Gateway Login window, click Assign Accounts. The Assign Accounts to Exchange Trader ID window appears. TT User Setup User Manual Trading Technologies International, Inc. 141 8 Gateway Login Administration Basics 2. If accounts have already been created, use the arrow buttons to transfer one or more accounts from the Available Accounts section to the Selected Accounts section. Note: Accounts are case sensitive. For example, one trader's account number can be CME1 , and another's can be cme1. 3. If you need to create a new account, click Create, enter the account number and description, and then click Save. The new account appears in the Selected Accounts section. 4. Click Done. 5. When you are finished adding accounts, do one of the following: 6. Add risk limits (refer to the “Configuring Risk” on page 143 topic) 7. Uncheck the Risk Check option to disable risk checking. 8. After you configure or disable risk limits, Save your changes. 9. If needed, publish the changes to Guardian (refer to “Publishing to Guardian” on page 205). 142 TT User Setup User Manual Trading Technologies International, Inc. 8 Gateway Login Administration Basics Configuring Risk To configure risk: 1. On the New Gateway Logins or Edit Gateway Logins window, check Add to Guardian. The Risk Check option is checked by default. 2. Enter or edit data in the Risk Check, Credit, Currency, Trading allowed, Ignore P&L, and Risk Check fields as needed. If traders using this gateway login need to have a different credit limit for TT SIM trading, check the Override credit for TT SIM checkbox and enter the TT SIM credit limit into the TT SIM credit field. 3. In the Product Limits section, click New Product Limit. The New Product Limit window appears. TT User Setup User Manual Trading Technologies International, Inc. 143 8 Gateway Login Administration Basics 4. If this product limit applies only to TT SIM trading, check the Use Product Limit for TT SIM only checkbox. When creating TT SIM product limits you must enter a specific Product; you cannot enter a wildcard (*). 5. Select an available Gateway and Product type, enter an applicable Product, set the Margin and Additional Margin %, set the Maximum order quantity, Maximum position, and Maximum long/short, and then check or uncheck the Trade Out allowed option. Enter 0 to reset the Maximum order quantity, Maximum position, and Maximum long/shortto unlimited. 6. Click Save. For more detailed information, refer to the “Configuring Gateway Login Risk” on page 166 , Creating Product Limits for Gateway Logins, and “Creating TT SIM Credit Limits and Product Limits” on page 322 topics. Assigning Users to a Gateway Login You can assign one or more users to a specific gateway login from the Gateway Logins window. While assigning the users, you can also edit the Login Attributes for that login. Note: You can also assign one or more gateway logins to a single user from the New User or Edit User window. Refer to the “Assigning Gateway Logins to a User Through the Users Window” on page 83 topic for more information. To assign users to a gateway login: 1. From the User Admin menu, select Gateway Logins and then click the gateway login you want to assign to one or more users. 144 TT User Setup User Manual Trading Technologies International, Inc. 8 Gateway Login Administration Basics 2. Click Assign to Users. The Assign Gateway Login to Available Users window appears. 3. The Available Users list displays all the users you can assign to this gateway login. Select the user(s) that you want to assign to the gateway login. Note: Press the Ctrl key to select multiple users. 4. Using the transfer arrow buttons (>, <, >>, <<), move the selected user(s) from the Available Users section to the Selected Users section. Note: When assigning a user to a TTORD that is used for multiple Gateways, each Gateway appears as a separate entry in the Selected Users list. TT User Setup User Manual Trading Technologies International, Inc. 145 8 Gateway Login Administration Basics 5. Review the login attributes listed for the users in the Selected Users list. If any attributes need to be changed (for example, if you wanted to disable Auto Login), select the user, edit the attributes in the Login Attributes section, and then click Set login attributes. If you select multiple users, the change will apply to the selected users. Note: Use the Prevent more than X orders per second (overrides the User-Level setting) option to set the maximum rate of orders per second allowed per TT Gateway and override the user-level setting. For more details, refer to “Overriding the Order Throughput Controls” on page 194. Note: The Auto Login option is selected automatically when a user is assigned to a gateway login. 6. Click Save. You have successfully assigned users to a gateway login. Editing a User's Gateway Login Attributes The User's Gateway Login Attributes window displays all the users, the gateway logins to which they are assigned, and various attributes applied to each specific login. Use this window to edit attributes across one or more users simultaneously. The login attribute options include: Login Attribute Description Available to User Indicates whether a user has access to a given gateway login after performing a universal login. Available to FIX Client Indicates whether a FIX Client has access to a given gateway login after performing a universal login. Automatically login Specifies that a user will automatically be logged into a gateway after logging into X_TRADER. 146 TT User Setup User Manual Trading Technologies International, Inc. 8 Gateway Login Administration Basics Login Attribute Description Mandatory login Indicates whether the user must log onto this Gateway when logging into TT applications. Check this option to prevent users from bypassing risk limits by not logging into a specific Gateway. Algo deployment allowed Indicates whether the user is allowed to deploy strategies to an AlgoSE Server. This setting is only valid when the Gateway is an AlgoSE Server. Algo sharing allowed Indicates whether the user is allowed to share algorithms with other users on Algo SE servers. This setting is only valid when the Gateway is an AlgoSE Server and when the Algo deployment allowed option is checked. Default Account Refers to the account and associated numeric CTI value for all orders sent through an order session. For more information on CTI/Origin values, refer to the TT CME Gateway System Administration Manual or any other applicable TT Gateway System Administration Manual. Clearing Member Designates a member firm of a clearing house through which trades are settled. Preferred IP Specifies the IP address of the gateway through which you want the user's first login attempt to be made. If unavailable, TT User Setup automatically selects an alternate IP address of the same gateway type. Operator ID Specifies the Operator ID that is used to identify the trader or operator to the exchange. Prevent more than X orders per second (overrides the User-Level setting) The maximum rate of orders per second allowed per TT Gateway. This setting overrides the rate set for all TT Gateways assigned to a user. Scenario: The following procedure describes a situation in which multiple users connected to the same gateway (e.g. CME) lose access, and you must quickly make an alternative gateway (e.g. CMEA) available to each user simultaneously. TT User Setup User Manual Trading Technologies International, Inc. 147 8 Gateway Login Administration Basics Note: This procedure assumes that each applicable user has been assigned to both the CME and CMEA gateways. For a detailed description of assigning users, refer to “Assigning Users to a Gateway Login” on page 144. To provide an alternative gateway to multiple users: 1. From the User Admin menu, select User's Gateway Login Attributes. The User's Gateway Login Attributes window appears. 2. Filter the Gateway column by entering CME into the Gateway filter field. 3. Holding down the Ctrl key, click the applicable user rows for which you want to make the associated login unavailable. Note: Alternatively, you could enter =CME as the Gateway filter, and then press the Ctrl and a keys to select all the CME Gateways. 4. Click Edit. On the Edit multiple user Gateway Login records prompt, click OK . The Edit Multiple User Gateway Login Attributes window appears. 148 TT User Setup User Manual Trading Technologies International, Inc. 8 Gateway Login Administration Basics 5. Uncheck the Available to User option to disable the feature. 6. Click Save. The Available To User column on the User's Gateway Login Attributes window shows the value unchecked. 7. On the User's Gateway Login Attributes window, filter the Gateway column by =CME-A. 8. Holding down the Ctrl key, click the applicable user rows for which you want to make the associated login available. 9. Click Edit. On the Edit multiple user Gateway Login records prompt, click OK. The Edit Multiple User Gateway Login Attributes window appears. 10. Check the Available to user option to enable the feature. 11. Click Save. TT User Setup User Manual Trading Technologies International, Inc. 149 8 Gateway Login Administration Basics The CME-A gateway is made available to the applicable user's associated gateway login. Note: A single user cannot have more than one MGT login set to Available To User for identical gateways. In the example above, user RADAMS can only have one CME-A row marked Available To User even if he has two different MGTs for CME-A. You have successfully provided multiple users access to an alternative gateway. Assigning Gateways to Multiple Gateway Logins You can assign gateway(s) to multiple gateway login(s) from the Gateway Logins window. This is useful when the same gateways need to be added to more than one gateway login, or when you must add a new Exchange Trader to multiple TTORD Gateway Logins. Note: The selected gateway logins must all be tradable TTORDs or all be exchange traders and nontradable TTORDs. You cannot mass add gateways to a mixed selection of tradable TTORDs and exchange traders. To assign gateways to multiple gateway logins: 1. From the Gateway Logins window, select one or more gateway logins (make sure to select only TTORDs or only exchange traders). 2. Click Add Gateways/Exchange Traders. 3. If you selected TTORDs: 1. From the Add Gateways/Exchange Traders to TTORDs window, select I want to create a new exchange trader or choose an existing one..., and then click Continue. The Map Exchange Traders to window appears. 150 TT User Setup User Manual Trading Technologies International, Inc. 8 Gateway Login Administration Basics 2. Move one or more exchange traders (MGTs) from the Available Exchange Traders section to the Selected Exchange Traders section and then click Done. Note: If the exchange trader does not exist, click Create to create it. After you save the new exchange trader, it is automatically added to the Selected Exchange Traders section. For more information, refer to the “Mapping a TTORD to an Exchange Trader” on page 138 topic. 3. When prompted to change the TTORD to use the new exchange trader MGT, click Yes to configure the TTORD to use the new exchange trader MGT, or click No to configure the TTORD to use the original exchange trader MGT. 4. If you did not select TTORDs: 1. From the Select Gateway window, select one or more gateways, and then click Select. For more information, refer to the “Assigning Gateways to Gateway Logins” on page 137 topic. Note: If you add a new market to the TT User Setup environment, you must restart the TT User Setup server before the new market is available from the Select Gateway window. 2. When prompted to assign new gateways to users that are assigned one of the selected MGTs, click Yesto assign the user(s) to the new gateway, click No if you do not want to assign the user to the new gateway. You have successfully assigned the selected gateways. TT User Setup User Manual Trading Technologies International, Inc. 151 8 152 Gateway Login Administration Basics TT User Setup User Manual Trading Technologies International, Inc. Account Administration Account Administration Overview Typically, an order sent to the exchange includes an account number. Account numbers are usually entered into the account field (in X_TRADER, for example). In TT User Setup, risk administrators can predefine accounts. Once defined, administrators can: • • • • Add accounts to customer defaults (e.g. to predetermine which accounts will be applied to which orders) Assign accounts to traders’ Gateway Logins Add accounts to account groups Configure risk limits for accounts/account groups Note: Account-based risk-checking is independent of any risk checking that may be configured for the user or Member/Group/Trader (MGT). Note: When accounts are added to an account group, the account group's risk settings are used instead of the account's risk settings. For more information about account groups, refer to the “Account Administration Overview” on page 153 topic. To create and configure accounts, refer to the following topics: • • • • • “Creating Accounts” on page 154 “Assigning One or More Accounts to an Account Group” on page 156 “Adding Account-Level Risk Checking” on page 175 “Creating Product Limits for Accounts and Account Groups” on page 176 “Creating Margin Limits for Accounts and Account Groups” on page 180 Note: The Accounts window is a standard data grid except that you cannot copy or mass-edit accounts. Refer to the “Data Grid Functionality” on page 25 topic if needed. TT User Setup User Manual Trading Technologies International, Inc. 153 9 Account Administration Overview Creating Accounts Create accounts from the Accounts window. You can also assign product and margin limits to an account, or disable trading for an account. Note: To assign an account to an account group refer to the “Assigning One or More Accounts to an Account Group” on page 156 topic. To create a new account: 1. From the User Admin menu, select Accounts. 2. From the Accounts window, click New. 154 TT User Setup User Manual Trading Technologies International, Inc. 9 Account Administration Overview 3. In the New Account window, enter the new account name into the Account name field, and a description into the Account description field. 4. Configure the product limits as described in the “Creating Product Limits for Accounts and Account Groups” on page 176 topic. When you are ready for the product limits to be applied, check the Apply product limits option. No account or account group risk checking will take place until this option is enabled. 5. To allow users with this account to trade, check the Allow trading option. To reject trades submitted with this account number, uncheck the Allow trading option. Note: Users logging in with Gateway Logins that end in MGR (e.g., TTADM XXX MGR) can delete orders, regardless of whether or not “Allow Trading” is checked for a given account. 6. Configure any gateway-specific margin limits as described in the “Creating Margin Limits for Accounts and Account Groups” on page 180 topic. 7. If needed, you can permission an account for use within one or more specific user groups. 1. Click the Group Permissions tab. TT User Setup User Manual Trading Technologies International, Inc. 155 9 Account Administration Overview 2. Use the transfer buttons (<,<<,>>,>) to select users from the Available User Groups list and add them to the Account permitted in the following User Groups list. 3. If the group does not exist, click Create. 8. Click Save. 9. To assign risk limits to the account group refer to the “Adding Account Group-Level Risk Checking” on page 176 topic. You have successfully created a new account group. Note: To prevent users from using accounts that have not been defined in TT User Setup, make sure the Submitting orders with undefined accounts allowed option is unchecked (the default setting). To configure this setting, refer to the “Applying Basic User Properties” on page 69 topic. Note: To only allow an X_RISK administrator to publish manual fills or start-of-day records to accounts within specified user groups, configure the Restrict X_RISK administrator to publishing... option. To configure this setting, refer to the “Applying X_RISK Properties” on page 73 topic. Assigning One or More Accounts to an Account Group You can assign one or more accounts to a single account group from the Accounts window. To create an account refer to the “Creating Accounts” on page 154 topic and to create an account group, refer to the “Creating Account Groups” on page 160 topic. To assign accounts to an account group: 1. From the User Admin menu, select Accounts. 156 TT User Setup User Manual Trading Technologies International, Inc. 9 Account Administration Overview 2. From the Accounts window, select one or more accounts to assign to a group, and then click Assign to Account Group. This option is also available from the right-click menu. 3. From the Assign Account Group window, select an account group and then click OK. If the account group does not exist, click New and create an account group ( refer to the “Creating Account Groups” on page 160 topic if needed). The accounts will lose any existing risk configuration and inherit the risk parameters of the assigned groups. 4. To remove an account from an account group, select one or more accounts and then select Remove from account group. Note: To assign risk limits to the account group refer to the “Adding Account Group-Level Risk Checking” on page 176. Note: To determine which accounts are assigned to a group, you can either filter the Account Group column in the Accounts window, or open the Edit Account Group window and view the list of Associated Accounts. TT User Setup User Manual Trading Technologies International, Inc. 157 9 158 Account Administration Overview TT User Setup User Manual Trading Technologies International, Inc. Account Group Administration Account Group Administration Overview Account groups allow TT User Setup administrators to configure combined risk limits for all of the accounts assigned to an account group. New orders that are submitted with an account in a given account group are checked against the limits of the account group, based on the combined positions and working orders of each account in the group. This is independent of any risk checking that may be configured for the user or Member/Group/Trader (MGT). Per group, administrators can configure product-specific position and order size limits as well as TT Gateway-specific margin limits. With account group product limits, administrators can also disable trading per product. Note: To manage accounts that are not in account groups, refer the “Account Administration Overview” on page 153 topic. To create and configure accounts, refer to the following topics: • • • • • “Creating Account Groups” on page 160 “Assigning Accounts to an Account Group” on page 162 “Adding Account Group-Level Risk Checking” on page 176 “Creating Product Limits for Accounts and Account Groups” on page 176 “Creating Margin Limits for Accounts and Account Groups” on page 180 TT User Setup User Manual Trading Technologies International, Inc. 159 10 Account Group Administration Note: The Account Groups window is a standard data grid except that you cannot copy or mass-edit accounts. Refer to the “Data Grid Functionality” on page 25 topic if needed. Creating Account Groups Create account groups from the Account Groups window, or when assigning an account to an account group. To create a new account group: 1. From the User Admin menu, select Account Groups. 2. From the Account Groups window, click New. 160 TT User Setup User Manual Trading Technologies International, Inc. 10 Account Group Administration 3. In the New Account Group window, enter the new account group name into the Group name field. 4. In the Group Description field, enter a description, if needed. 5. Configure the product limits as described in the “Creating Product Limits for Accounts and Account Groups” on page 176 topic. When you are ready for the product limits to be applied, check the Apply product limits option. No account or account group risk checking will take place until this option is enabled. 6. If you want trades submitted with an account in this account group to be rejected, uncheck the Allow trading option. Otherwise leave the Allow trading option checked. Note: Users logging in with Gateway Logins that end in MGR (e.g., TTADM XXX MGR) can delete orders, regardless of whether or not “Allow Trading” is checked for a given account group. 7. Configure any gateway-specific margin limits as described in the “Creating Margin Limits for Accounts and Account Groups” on page 180 topic. 8. Click Save. You have successfully created a new account group. Note: You can also access the Edit Account Group window by clicking Edit Account Group on the Accounts window. Note: To assign accounts to the account group, refer to the “Assigning Accounts to an Account Group” on page 162 topic. TT User Setup User Manual Trading Technologies International, Inc. 161 10 Account Group Administration Assigning Accounts to an Account Group You can assign one or more accounts to a single account group from the Accounts window. To create an account refer to the “Creating Accounts” on page 154 topic and to create an account group, refer to the “Creating Account Groups” on page 160 topic. To assign accounts to an account group: 1. From the User Admin menu, select Accounts. 2. From the Accounts window, select one or more accounts to assign to a group, and then click Assign to Account Group. This option is also available from the right-click menu. 162 TT User Setup User Manual Trading Technologies International, Inc. 10 Account Group Administration 3. From the Assign Account Group window, select an account group and then click OK. If the account group does not exist, click New and create an account group (refer to the “Creating Account Groups” on page 160 topic if needed). The accounts will lose any existing risk configuration and inherit the risk parameters of the assigned groups. 4. To remove an account from an account group, select one or more accounts and then select Remove from account group. Note: To assign risk limits to the account group refer to the “Adding Account Group-Level Risk Checking” on page 176. Note: To determine which accounts are assigned to a group, you can either filter the Account Group column in the Accounts window, or open the Edit Account Group window and view the list of Associated Accounts. TT User Setup User Manual Trading Technologies International, Inc. 163 10 164 Account Group Administration TT User Setup User Manual Trading Technologies International, Inc. Gateway Login Risk Administration Risk and Administration Overview TT User Setup Administrators can configure Gateway Login level risk, account and account group level risk, and user level risk. Gateway Login Level Risk You can configure Gateway Login level risk when creating or editing a Gateway Login, and when creating or editing Product Limits for Gateway Logins. Per Gateway Login you can configure: • • • • • Whether or not Guardian risk checks orders sent. Whether or not the Gateway Login can be used to trade. Whether or not P&L is used in available credit calculations. The the sum of money available at the start of a trading session and the currency allowed. Product-specific position and order limits. For more information refer to “Configuring Gateway Login Risk” on page 166, “Creating Product Limits for Gateway Logins” on page 168, and “Copying Product Limits to Additional Gateways or Gateway Logins” on page 172. Account and Account Group Level Risk You can configure account and account group level risk when creating or editing and account or account group. Per account or account group you can configure: • • Product-specific position and order limits. TT Gateway-specific margin limits. For more information refer to “Adding Account-Level Risk Checking” on page 175, “Adding Account Group-Level Risk Checking” on page 176, “Creating Product Limits for Accounts and Account Groups” on page 176, “Creating Margin Limits for Accounts and Account Groups” on page 180, “Copying Account-Based Product Limits to Additional Gateways” on page 182, “Copying AccountBased Product Limits to Additional Gateways” on page 182. User Level Risk You can configure user level risk when creating or editing a user profile. Per user you can configure: • • • • Whether or not this user can trade. The the sum of money available at the start of a trading session and the currency allowed. How far from the market price a user may enter an order (in ticks). The maximum number of orders per second, per TT Gateway. For more information refer to “Adding User-Level Risk Checking” on page 185, “Setting Pre-Trade Price Controls” on page 187, and “Setting Order Throughput Controls” on page 191. TT User Setup User Manual Trading Technologies International, Inc. 165 11 Risk Administration Product Limits Overview Use the Product Limits window to set additional margin, the maximum order size, the maximum contracts, and allow or forbid trading out for a specific product type and product on a specific Gateway. The Product Limits window has two tabs: Gateway Login Limits and Account Group Limits. • • To edit or create product limits for Gateway Logins, refer to the “Creating Product Limits for Gateway Logins” on page 168 topic. You can also assign existing product limits to existing gateway logins. Refer to “Copying Product Limits to Additional Gateways or Gateway Logins” on page 172 if needed. To edit or create product limits for accounts or account groups, refer to the “Creating Product Limits for Accounts and Account Groups” on page 176 topic. Note: The Product Limits window is a standard data grid. Refer to “Data Grid Functionality” on page 25 if needed. Configuring Gateway Login Risk When creating, editing, or copying a gateway login, you can append specific Guardian risk data to the login. The risk fields include: • • • • • Risk Check: Determines whether Guardian risk checks orders sent with this gateway login. When Risk Check: is checked, the related risk settings are applied to a trader's orders. Trading allowed: Determines if a gateway login can be used to trade. Ignore P&L: Determines whether P&L is used in available credit calculations. Credit: Specifies the sum of money available at the start of a trading session, which can be affected by a trader's margin and P&L. Enter 0 to reset the credit to unlimited. Currency: Specifies the currency for the Credit field (e.g. USD = United States Dollar). To edit the risk settings for an existing gateway login: 166 TT User Setup User Manual Trading Technologies International, Inc. 11 Risk Administration 1. 2. 3. 4. Do one of the following: From the User Admin menu, select Gateway Logins. A user's Edit User window, click the Gateway Logins tab. On the Gateway Logins window, click a login row and then click Edit. Note: You can also edit risk data when creating a new gateway login. 5. On the Edit Gateway Login window, check the Add to Guardian option(risk settings are always published to Guardian). Note: The Add to Guardian option is checked automatically after "TTORD" is entered in the Member field. TTORDs must all be published to Guardian. Note: The Add to Guardian option does not appear if DisableProductLimitPublishingMode is on. Risk checking is based solely on the Risk Check checkbox. Refer to the TT User Setup System Administration Manual for more information about the DisableProductLimitPublishingMode parameter. The risk options enable. 6. Configure the Risk Check, Trading allowed, Ignore P&L, Credit, and Currency fields as needed. Note: Risk settings and product limits disable when Risk Check is unchecked. 7. If traders using this gateway login need a different credit limit for TT SIM trading, check the Override credit for TT SIM and enter the TT SIM credit limit into the TT SIM credit field. 8. Click Save. Note: You must assign an account if either of the following is true: The Add to Guardian option is checked, or the Gateway Login is a TTORD and DisableProductLimitPublishingMode is on. TT User Setup User Manual Trading Technologies International, Inc. 167 11 Risk Administration Creating Product Limits for Gateway Logins You set up and change product limits for specific gateway logins using the New Product Limit and Edit Product Limit windows. You can access these windows through the Gateway Logins window, the Gateway Logins tab on the Edit User window, or by selecting Product Limits from the User Admin menu. Note: You can also create product limits per account or account group. For more information, refer to the “Creating Product Limits for Accounts and Account Groups” on page 176 topic. This section describes creating product limits from the Gateway Logins window. To create a new product limit from the Gateway Logins window: 1. From the Gateway Logins window, select a gateway login and then click Edit. 2. In the Product Limits section of the Gateway Login Info tab, click New Product Limit. Note: To copy one of the product limits listed in the Product Limits table, select the product limit and then click Copy. To copy one of the product limits that are available to the Gateways listed in the Gateways section, click Copy from Existing and then select the product limit to copy. The New Product Limit window appears. 168 TT User Setup User Manual Trading Technologies International, Inc. 11 Risk Administration Note: Product Limits created via the Product Limits window are available only to the users who are assigned to the MGT ID (gateway login). 3. Select or enter a value in the applicable fields as needed. Product limit fields include the following: • • • Gateway: Specifies the gateway to which the limits apply. Product type: Specifies whether this limit applies to an option, future, spread, etc. Product: Specifies the product (e.g. FGBL ODAX, etc.) to which the limits apply. An asterisk indicates that the limit applies to all products of the specified product type, unless an additional product limit exists with a specific product. For example:Assume you have two product limits configured for the CME-A Gateway: for one limit the product is * (all products) with a maximum position of 10, and for the other limit the product is ES with a maximum position of 5. When trading ES, the account is limited to a maximum position of 5, and when trading all other products on the CME-A Gateway, the maximum position limit is 10. • Margin: Displays the margin that is currently configured for the specified product. • Additional margin (%): Specifies a percentage above or below the margin that a trader must have to trade the contract. In other words, additional margin increases or decreases the margin requirement when calculating risk limits. Maximum order qty: Specifies a limit on the maximum individual order size that can be entered for a specified product. To set the order quantity to unlimited, enter 0. Maximum position: Specifies a position limit for a given product; maximum position can have various meanings depending on whether it's related to a Future, Option, Spread, or Strategy. For details, refer to the Defining Maximum Position section of this topic. To set the maximum position to unlimited, enter 0. • • Note: If you enter 0 in the Max Ord Qty or Max Pos fields, the 0 is defined, converted to, and displayed as "Unlimited". • Maximum long/short: Limits the worst case total of long or short contracts per product. For more detailed information about using this limit, refer to the Defining Maximum Long Short section of this topic. To set the maximum long and short position to unlimited , enter 0. Note: The Maximum long/short feature requires a specific X_TRADER 7.8. • Trade Out allowed - Determines whether the trader can exceed maximum order quantity and/or available credit limits to reduce risk for the specified contract. 4. Click Save. TT User Setup User Manual Trading Technologies International, Inc. 169 11 Risk Administration Note: Use the Save and Add New functionality to add many similar limits. The limit you created appears in the Product Limits section. Defining Maximum Position The following describes the differences in maximum position depending on whether maximum position is related to a Future, Option, Spread, or Strategy. • • Future: Limits the maximum outright futures position to the value in the Maximum Position field. In other words, it limits the maximum position (long or short) that a trader may accumulate at the product level (the sum total of all delivery months). Traders that only trade calendar spreads, for example, will never reach this limit because their positions in one contract offset the positions in another contract. Spread: A spread can be either an Intra-Product spread (e.g., all legs belong to the same product) or an Inter-Product spread (e.g., legs will belong to multiple products). • Intra-Product Spread: Limits the maximum contract-level position for each delivery month to the value in the Maximum Position field. The Maximum Position field does not put a hard limit on the number of spreads that a trader may enter; it only limits the position for each contract of a product. • Inter-Product Spread: Does not use the Maximum Position field for risk checking. To manage position risk on Inter- Product Spreads, you must enter both FUTURE and SPREAD type position limits for each of the products that comprise that Inter-Product Spread. For example, if the limit is 5, an account can buy 5 calendar spreads, because each contract in the spread is limited to a long or short position of 5. This check would also apply to the futures contract being traded directly, so in the previous example, no more futures could be bought in the contract that is long 5 and no more cold be sold in the contract that is short 5. • • Option:Limits the maximum option position to the value in the Maximum Position field. In other words, limits the maximum position (long or short) that a trader may accumulate at the product-level (the sum total of all delivery months at all exercise prices). For the purposes of risk checking, calls and puts are treated as separate products. For example, buying a call and selling a put will not result in a flat position, but instead will result in two separate positions that do not offset each other. Strategy: Limits the maximum contract-level position for each call or put of a specific strike price and delivery month to the value in the Maximum Position field. The Maximum Position field does not put a hard limit on the number of strategies that a trader may enter; it only limits the position for each contract of a product. Note: To allow trading of spreads or strategies, you must also configure product limits for the products that comprise the spreads or strategies. Note: The rules for configuring all other product types are identical to the rules for configuring futures and spreads, except that limits for energy product are configured in lots. Copying from existing product limits 170 TT User Setup User Manual Trading Technologies International, Inc. 11 Risk Administration To copy existing product limits to a gateway login: 1. From the User Admin menu, select Gateway Logins. 2. From the Gateway Logins window, click the gateway login you want to edit, and then click Edit. Note: The Add to Guardian option must be checked for product limits to be enabled. 3. From the Product Limits section of the Edit Gateway Login window, click Copy from Existing. 4. From the Copy from Existing Product Limits window, select the rows that you want to copy. Note: Hold down the Ctrl key to select multiple rows. 5. Click Done. The copied product limits appear in the Product Limits pane. 6. On the Edit Gateway Login window, click Save. You have successfully copied existing product limits. TT User Setup User Manual Trading Technologies International, Inc. 171 11 Risk Administration Copying Product Limits to Additional Gateways or Gateway Logins You can copy product limits from one or more gateways to another gateway, or you can copy product limits from one or more gateway logins (e.g., MGTs) to additional gateway logins. To copy product limits to additional Gateway Logins: 1. Do one of the following: • From the User Admin menu, select Product Limits. • From the Edit User window, select the Gateway Logins tab and click View/Edit Product Limits. The Product Limits window appears. Note: Accessing limits through the Edit User window displays only product limits that correspond with a TTORD or Exchange Trader that have been assigned to that user. 2. Highlight one or more product limit rows. 3. Click Mass Copy to Other Gateway Logins. The Select Gateway Logins window appears. 4. Highlight one or more Member/Group/Trader IDs to which you want the product limits assigned, and then click Select. The selected product limits are assigned to the applicable gateway logins. 172 TT User Setup User Manual Trading Technologies International, Inc. 11 Risk Administration To copy product limits from one or more gateways to another gateway: 1. Do one of the following: • From the User Admin menu, select Product Limits • From the Edit User window, select the Gateway Logins tab and click View/Edit Product Limits. The Product Limits window appears. Note: Accessing limits through the Edit User window displays only product limits that correspond with a TTORD or Exchange Trader that have been assigned to that user. 2. Highlight one or more product limit rows. 3. Click Mass Copy to Other Gateway. The Select Gateway window appears. 4. Highlight a gateway to which the product limits will be copied, and then click Select. TT User Setup copies each selected product limit to the selected gateway. TT User Setup User Manual Trading Technologies International, Inc. 173 11 174 Risk Administration TT User Setup User Manual Trading Technologies International, Inc. Account and Account Group Risk Administration Adding Account-Level Risk Checking At the account level, you can configure product-specific position limits, product-specific order size limits, and TT Gateway-specific margin limits. The user and gateway login's risk settings still apply, but orders submitted with an account will also be checked against the limits of the account. Note: When an account is added to an account group, any account-based risk settings are removed and the account group's risk settings are enforced instead. To manage risk for an account group, refer to “Adding Account Group-Level Risk Checking” on page 176. Configuring product limits per account also allows you to perform the following tasks which are not available for Gateway Logins: • • Disable trading per product (to easily prevent trading on one or more specific products without having to specifically define each individual product that is allowed to be traded). Configure a maximum position limit of zero (thereby limiting trading to spreads). To add risk checking to an account, refer to the following topics: • • “Creating Product Limits for Accounts and Account Groups” on page 176 “Creating Margin Limits for Accounts and Account Groups” on page 180 Note: To prevent a user from updating the account number on a fill, make sure the Account changes on fills allowed option is unchecked (the default setting for new users). When applying account based risk checking, TT does not recommend checking the Account changes on fills allowed option until the users are using X_TRADER 7.17 or later. If users are not using X_TRADER 7.17, then account numbers on fills are not updated in all TT products (this includes the gateways where account-based risk checking is done). This could lead to discrepancies between what is displayed in client applications and how risk is actually being calculated. When the Account changes on fills allowed option is checked, users who are using X_TRADER 7.17 or later can modify the account on a fill, and this update will be processed as a part of account based risk on the gateways. Note that no risk check actually takes place on the modification; therefore changing the account could cause an account to go over its limits. However, any subsequent orders will be risk checked based on the modified fills. To configure the Account changes on fills allowed option, refer to the “Applying Basic User Properties” on page 69 topic. TT User Setup User Manual Trading Technologies International, Inc. 175 12 Account and Account Group Risk Administration Adding Account Group-Level Risk Checking You can configure product-specific position limits, product-specific order size limits, and TT Gatewayspecific margin limits, per account or account group. The user and gateway login's risk settings still apply, but orders submitted with an account will also be checked against the limits of the account group, based on the combined positions and working orders of all accounts in the group. Note: To configure account-based risk instead of account-group risk refer to “Adding Account-Level Risk Checking” on page 175. You cannot configure account-based risk for an account that belongs to an account group. Configuring product limits per account group also allows you to perform the following tasks, which are not available for Gateway Logins: • • Disable trading per product (to easily prevent trading on one or more specific products without having to specifically define each individual product that is allowed to be traded). Configure a maximum position limit of zero (thereby limiting trading to spreads). To add risk checking to an account group, refer to the following topics: • • “Creating Product Limits for Accounts and Account Groups” on page 176 “Creating Margin Limits for Accounts and Account Groups” on page 180 Note: To prevent a user from updating the account number on a fill, make sure the Account changes on fills allowed option is unchecked (the default setting for new users). When applying account based risk checking, TT does not recommend checking the Account changes on fills allowed option until the users are using X_TRADER 7.17 or later. If users are not using X_TRADER 7.17, then account numbers on fills are not updated in all TT products (this includes the gateways where account-based risk checking is done). This could lead to discrepancies between what is displayed in client applications and how risk is actually being calculated. When the Account changes on fills allowed option is checked, users who are using X_TRADER 7.17 or later can modify the account on a fill, and this update will be processed as a part of account based risk on the gateways. Note that no risk check actually takes place on the modification; therefore changing the account could cause an account to go over its limits. However, any subsequent orders will be risk checked based on the modified fills. To configure the Account changes on fills allowed option, refer to the “Applying Basic User Properties” on page 69 topic. Creating Product Limits for Accounts and Account Groups You can set up and change product limits for a single account or for an account group. If an account belongs to an account group, only the account group settings are used. Account and Account Group risk requires TT Gateways 7.17 and later. 176 TT User Setup User Manual Trading Technologies International, Inc. 12 Account and Account Group Risk Administration Note: You can also create product limits per Gateway Login. For more information refer to the “Creating Product Limits for Gateway Logins” on page 168 topic. When configuring product limits for an account or account group you can determine which products are tradable, specify various limits on maximum order size and position per product, and configure additional margin per product. Note: Account-based product limits do not have a Trade out allowed option like Gateway Login-based product limits. Traders can always trade out of account positions. This procedure describes creating product limits from the Account Group window, but the same procedure applies when creating product limits from the Accounts window. You can also edit account group product limits from the Account Group Limits tab of the Product Limits window using the field descriptions in step 4 of the following procedure. To create a new product limit from the Account Groups window: 1. From the User Admin window, select Account Groups to manage product limits for an account group. 2. From the Account Groups window, create or edit an account group. If you have assigned accounts to an account group, you can also edit that group by selecting any assigned account in the Accounts window and clicking Edit Account Group. The Account Group window appears. 3. In the Product Limits section, click New. Note To copy one of the product limits listed in the Product Limits table, select the product limit and then click Copy. TT User Setup User Manual Trading Technologies International, Inc. 177 12 Account and Account Group Risk Administration The New Product Limit window appears. 4. Select or enter a value in the applicable fields as needed. Product limit fields include the following: • • • • Account Group: Specifies the account group to which the limits apply. Gateway: Specifies the gateway to which the limits apply. Check the Show all gateways option to populate the Gateway drop-down with all gateways. Product type: Specifies whether this limit applies to an option, future, spread, etc. Product: Specifies the product (e.g. FGBL ODAX, etc.) to which the limits apply. An asterisk indicates that the limit applies to all products of the specified product type, unless an additional product limit exists with a specific product. For example:Assume you have two product limits configured for the CME-A Gateway: for one limit the product is * (all products) with a maximum position of 10, and for the other limit the product is ES with a maximum position of 5. When trading ES, the account is limited to a maximum position of 5, and when trading all other products on the CME-A Gateway, the maximum position limit is 10. • • • • • 178 Prevent orders that are more than X ticks from the market price - Determines how far from the market price a user may enter an order (in ticks). You can allow traders to sell above this range and buy below it by checking the Only enforce a maximum price on buy orders and a minimum price on sell orders option. Margin: Displays the margin that is currently configured for the specified product. Additional margin (%): Specifies a percentage above or below the margin that a trader must have to trade the contract. In other words, additional margin increases or decreases the margin requirement when calculating risk limits. Maximum order qty: Specifies a limit on the maximum individual order size that can be entered for a specified product. To apply a maximum order quantity, check the Maximum order qty option and enter a value. Maximum position: Specifies a position limit for a given product; maximum position can have various meanings depending on whether it's related to a Future, Option, Spread, TT User Setup User Manual Trading Technologies International, Inc. 12 Account and Account Group Risk Administration or Strategy. For details, refer to the Defining Maximum Position section of this topic. To apply a maximum position, check the Maximum position option and enter a value. • Maximum long/short: Limits the worst case total of long or short contracts per product. For more detailed information about using this limit, refer to the Defining Maximum Long Short section of this topic. To apply a limit, check the Maximum long/short option and enter a value. • Allow trading: Specifies whether the product in the product field can be traded. 5. Click Save. Note: Use the Save and Add New functionality to add many similar limits. The limit you created appears in the Product Limits section. 6. To enable the product limits, check the Apply product limits option. 7. Click Save. Defining Maximum Position The following describes the differences in maximum position depending on whether maximum position is related to a Future, Option, Spread, or Strategy. • • Future: Limits the maximum outright futures position to the value in the Maximum Position field. In other words, it limits the maximum position (long or short) that a trader may accumulate at the product level (the sum total of all delivery months). Traders that only trade calendar spreads, for example, will never reach this limit because their positions in one contract offset the positions in another contract. Spread: A spread can be either an Intra-Product spread (e.g., all legs belong to the same product) or an Inter-Product spread (e.g., legs will belong to multiple products). • Intra-Product Spread: Limits the maximum contract-level position for each delivery month to the value in the Maximum Position field. The Maximum Position field does not put a hard limit on the number of spreads that a trader may enter; it only limits the position for each contract of a product. • Inter-Product Spread: Does not use the Maximum Position field for risk checking. To manage position risk on Inter- Product Spreads, you must enter both FUTURE and SPREAD type position limits for each of the products that comprise that Inter-Product Spread. For example, if the limit is 5, an account can buy 5 calendar spreads, because each contract in the spread is limited to a long or short position of 5. This check would also apply to the futures contract being traded directly, so in the previous example, no more futures could be bought in the contract that is long 5 and no more cold be sold in the contract that is short 5. • Option: Limits the maximum option position to the value in the Maximum Position field. In other words, limits the maximum position (long or short) that a trader may accumulate at the product-level (the sum total of all delivery months at all exercise prices). For the purposes of risk checking, calls and puts are treated as separate products. For example, buying a call and selling a put will not result in a flat position, but instead will result in two separate positions that do not offset each other. TT User Setup User Manual Trading Technologies International, Inc. 179 12 • Account and Account Group Risk Administration Strategy: Limits the maximum contract-level position for each call or put of a specific strike price and delivery month to the value in the Maximum Position field. The Maximum Position field does not put a hard limit on the number of strategies that a trader may enter; it only limits the position for each contract of a product. Note: To allow trading of spreads or strategies, you must also configure product limits for the products that comprise the spreads or strategies. Note: The rules for configuring all other product types are identical to the rules for configuring futures and spreads, except that limits for energy product are configured in lots. Creating Margin Limits for Accounts and Account Groups Margin limits allow you to configure credit limits per account or account group that apply to individual TT Gateways. Because P&L per account can span all exchanges, account-based margin limits ignore P&L. Additionally, margin limits apply, even if product limits are not applied. This allows you to create margin limits without creating product limits. Margin Example: Account ABC has a $7,000 margin limit. If the margin for 1 ES contract is $3500, and Trader_1 buys 1 ES contract in account ABC, the available credit in account ABC would be $3500. If Trader_2 then buys 1 ES contract in the same account, the available credit in account ABC would be $0. No additional ES contracts can be bought in account ABC, and up to four can be sold. You can set up and change margin limits for a single account or for an account group. If an account belongs to an account group, only the account group settings are used. This section describes creating margin limits from the Account Group window. You can also create margin limits from the Accounts window. To create a new margin limit from the Account Groups window: 1. From the User Admin window, select Account Groups. 2. From the Account Groups window, create or edit an account group. If you have assigned accounts to an account group, you can also edit that group by selecting any assigned account in the Accounts window and clicking Edit Account Group. The Account Group window appears. 180 TT User Setup User Manual Trading Technologies International, Inc. 12 Account and Account Group Risk Administration 3. In the Margin Limits section, enable margin checking for any applicable gateway by checking the Enabled option. To show to only gateways that are running or have been previously configured, check the show only configured or visible gateways option. 4. For each gateway you enable, enter a Margin Limit and the Currency for the limit. 5. Click Save. Copying Product Limits to Additional Accounts or Account Groups You can copy product limits from one or more account/account groups to another account/account group. To copy product limits to additional accounts or account groups: 1. From the User Admin menu, select Product Limits. The Product Limits window appears. 2. Select the Account/Account Group Limits tab. 3. Highlight one or more product limit rows. TT User Setup User Manual Trading Technologies International, Inc. 181 12 Account and Account Group Risk Administration 4. Click Mass Copy to Other Account or Account Group. The Select Account or Account Group window appears. 5. Select an account or account group, or click New to create a new account or account group. The selected product limits are assigned to the applicable account/account group. Copying Account-Based Product Limits to Additional Gateways You can copy one or more account/account group-based product limits to additional gateways. To copy product limits to additional Gateway Logins: 1. From the User Admin menu, select Product Limits. The Product Limits window appears. 182 TT User Setup User Manual Trading Technologies International, Inc. 12 Account and Account Group Risk Administration 2. Select the Account/Account Group Limits tab. 3. Highlight one or more product limit rows. 4. Click Mass Copy to Other Gateway. The Select Gateway window appears. 5. Highlight a gateway to which the product limits will be copied, and then click Select. TT User Setup copies each selected product limit to the selected gateway in the appropriate account. TT User Setup User Manual Trading Technologies International, Inc. 183 12 184 Account and Account Group Risk Administration TT User Setup User Manual Trading Technologies International, Inc. User Level Risk Checking Adding User-Level Risk Checking You can configure risk settings on a per-user basis in addition to the risk settings configured for individual gateway logins. This allows you to set overall credit and currency settings that apply to all the user's trades using any or all of the gateway logins. The gateway login's risk settings still apply, but the trader will have an additional overall credit restriction. Note: User level risk checking requires X_TRADER 7.8 or later or FIX Adapter 7.6 or later. The user-level risk checking fields and options include: • • • • • • • Credit - Specifies the sum of money available at the start of a trading session, which can be affected by a trader's margin and P&L. Enter 0 to reset the credit to unlimited. Currency - Specifies the currency for the Credit field (e.g. USD = United States Dollar). Trading allowed - Determines whether a user can trade. Use P&L risk algorithm - Determines whether or not to use the P&L risk algorithm to risk check this user. The P/L based on setting in X_TRADER defaults to Risk Algorithm and is uneditable. If the Use P&L risk algorithm is not checked, risk checking uses the Last Traded Price and the P/L based on setting in X_TRADER remains editable. Prevent orders that are more than X ticks from the market price - Determines how far from the market price a user may enter an order (in ticks). You can allow traders to sell above this range and buy below it by checking the Only enforce a maximum price on buy orders and a minimum price on sell orders option. Per TT Gateway, prevent more than X orders per second - Limits the number of orders per second, per TT Gateway. Override credit for TT SIM - Provides a different credit limit for TT SIM Trading. To add user-level checking to an existing user: 1. From the User Admin menu, select Users. 2. From the Users window, click a user row and then click Edit. The Edit User window appears and defaults to the Main tab. 3. In the User-Level Risk section, check the Trading allowed option to allow the user to trade. Note: Trading allowed is checked by default. TT User Setup User Manual Trading Technologies International, Inc. 185 13 User Level Risk Checking 4. In the Credit field, enter a monetary limit as needed. Note: The default setting is for unlimited credit. Enter 0 to reset the credit to unlimited. 5. In the Currency field, enter the currency of the configured credit limit. 6. To risk check this user using the P&L risk algorithm, check the Use P&L risk algorithm option. This also sets the P/L based on setting in X_TRADER to Risk Algorithm (and makes the P/L based on setting unedtable). To use the Last Traded Price for risk checking, uncheck the Use P&L risk algorithm option (the P/L based on setting in X_TRADER remains editable). 7. To configure how far from the market price a user may enter an order (in ticks), check the Prevent orders that are more than X ticks... checkbox and enter the number of ticks (from 1 to 100000). If you only want to enforce this setting for buy orders above the limit and sell orders below the market check the Only enforce... checkbox. For more information about pre-trade price controls, refer to “Setting Pre-Trade Price Controls” on page 187. 8. To prevent more than a specific number of orders per second, check the Per TT Gateway, prevent more than X orders... checkbox and enter the number of orders per second. For more information about pre-trade order throughput controls, refer to “Setting Order Throughput Controls” on page 191. 9. If the user needs a different credit limit for TT SIM trading, check Override credit for TT SIM and enter the TT SIM credit limit into the TT SIM credit field. Enter 0 to reset the credit to unlimited. 10. Click Save. 186 TT User Setup User Manual Trading Technologies International, Inc. 13 User Level Risk Checking Setting Pre-Trade Price Controls The price control features allow an administrator to configure how far from the market price a user may enter an order. Orders submitted outside the defined price band will be rejected. This topic contains the following sections: • • • • • “Price Controls Overview” on page 187 “Price Checking Overview” on page 188 “Example: Static Price Range Control” on page 188 “Example: Directional Price Range Control” on page 189 “Enabling and Setting the Pre-trade Price Controls” on page 190 Price Controls Overview The User-Level Risk section on the Main tab of the User profile contains the pre-trade price controls. To configure how far from the market price a user may enter an order (in ticks), check the Prevent orders that are more than X ticks from the market price checkbox and enter the number of ticks. The administrator can set the number of ticks to a static range or a directional range by checking or unchecking the Only enforce a maximum price on buy orders and a minimum price on sell orders checkbox: TT User Setup User Manual Trading Technologies International, Inc. 187 13 • • User Level Risk Checking Static range (uncheck the enforce option) - Buy and sell orders must be within the configured price band. Orders submitted outside the defined price band will be rejected in all TT order routing applications. Directional range (check the enforce option) - Buy orders must be below the maximum price, and sell orders must be above the minimum price. Orders submitted outside the defined price band or will be rejected in all TT order routing applications. These pre-trade price controls are also configurable on the New Product Limit window when configuring Accounts and Account Groups. Price Checking Overview The price check uses the last traded price as the market price, as long as it falls between the bid and ask. Otherwise, the price check uses the midpoint of the bid and ask. If the bid and ask are not both available, then the price check will use the first available price from the ask, bid, settlement, or close, in that order. The price check is performed as follows: • • • • • The price check is performed on all real orders, both new and changed, at the time the orders are executed. The price check is not performed on synthetic or parent orders. For exchange traded spreads and/or strategy orders, the price check is applied based on the spread/strategy price. If the order contains multiple legs, the check is applied to each individual leg. The price check does not apply to NYSE Liffe Block orders sent via X_Block. The price check applies to exchange prices only, not to implied price functionality. Example: Static Price Range Control In this example an administrator has configured a user with a price control of 4 ticks and has also specified that the range is not directional. If the current last traded price is 2.0, then the user will only be able to place an order that is above 0.0 (the low point of the price band) and below 4.0 (the high point of the price band). All other orders will be rejected by the software. 188 TT User Setup User Manual Trading Technologies International, Inc. 13 User Level Risk Checking Static Price Range Example Example: Directional Price Range Control In this example an administrator has configured a user with a price control of 4 ticks and has also specified that the range is directional. If the current last traded price is 2.0, then the user will only be able to place a buy order that is below 4.0 (the high point of the price band) or a sell order that is above 0.0 (the low point of the price band). All other orders will be rejected by the software. Directional Price Range Example TT User Setup User Manual Trading Technologies International, Inc. 189 13 User Level Risk Checking Enabling and Setting the Pre-trade Price Controls To enable and set the pre-trade price controls: 1. From the User Admin menu, select Users. 2. From the Users window, click a user row and then click Edit. The Edit User window appears and defaults to the Main tab. The User-Level Risk section contains the pre-trade price controls. 3. To configure how far from the market price a user may enter an order (in ticks), check the Prevent orders that are more than X ticks from the market price checkbox and enter the number of ticks. If you only want to enforce this setting for buy orders above the market and sell orders below the market check the Only enforce a maximum price on buy orders and a minimum price on sell orders checkbox. 4. Click Save. 190 TT User Setup User Manual Trading Technologies International, Inc. 13 User Level Risk Checking Setting Order Throughput Controls The order throughput control feature allows an administrator to configure the number of orders per second that a trader may send to a given TT Gateway. The TT Gateway will reject orders submitted in excess of the configured limit per second. This topic contains the following sections: • • • • • “Order Throughput Controls Overview” on page 191 . “Order Rejection Overview” on page 192 . “Example: Order Throughput Control” on page 192 . “Enabling and Setting the Order Throughput Controls” on page 193 . “Overriding the Order Throughput Controls” on page 194 . Order Throughput Controls Overview The User-Level Risk section on the Main tab of the User profile contains the order throughput controls. To prevent more than a specific number of orders per second, check the Per TT Gateway, prevent more than X orders per second checkbox and enter the number of orders per second. Note: Use the Prevent more than X orders per second (overrides the User-Level setting) option to set the maximum rate of orders per second allowed per TT Gateway and override the user-level setting. For more details, refer to “Overriding the Order Throughput Controls” on page 194. The TT Gateway calculates the number of orders per second as follows: TT User Setup User Manual Trading Technologies International, Inc. 191 13 • • • User Level Risk Checking Each add, change, and delete message to the exchange counts as an individual message. Cancel/replace actions count as two messages (a delete and an add). Cross/Intention to Cross (ITX)/Wholesale/Over-the-counter (OTC)/Inquire/series create/RFQs do not count towards the number of orders per second limitation. Order Rejection Overview The TT Gateway accepts orders while the number of orders in a one-second time frame remains at or below the configured maximum. When the maximum number of orders allowed in a second is exceeded, the TT Gateway rejects all new add orders. When one or both messages in a cancel/replace action exceeds the limits, the TT Gateway rejects both the delete and the add portion of the cancel/ replace action, and the order remains working. The TT Gateway counts, but will never reject stand alone delete orders. Example: Order Throughput Control In this example an administrator has configured a user with an allowed order throughput of 500 orders per second. The TT Gateway will allow no more than 500 orders per second for that user. It will accept all orders up to and including the 500th order in a one-second time frame, and will reject ALL subsequent orders within that second. 192 TT User Setup User Manual Trading Technologies International, Inc. 13 User Level Risk Checking Order Throughput Example Enabling and Setting the Order Throughput Controls To enable and set the order throughput controls: 1. From the User Admin menu, select Users. 2. From the Users window, click a user row and then click Edit. The Edit User window appears and defaults to the Main tab. The User-Level Risk section contains the order throughput controls. TT User Setup User Manual Trading Technologies International, Inc. 193 13 User Level Risk Checking 3. To prevent more than a specific number of orders per second, check the Per TT Gateway, prevent more than X orders per second checkbox and enter the number of orders per second. Note: Use the Prevent more than X orders per second (overrides the User-Level setting) option to set the maximum rate of orders per second allowed per TT Gateway and override the user-level setting. For more details, refer to “Overriding the Order Throughput Controls” on page 194. 4. Click Save. Overriding the Order Throughput Controls To override the maximum orders per second allowed for all TT Gateways assigned to a selected user, check the Prevent more than X orders per second (overrides the User-Level setting) option on the Assign Gateway Login to Available Users or Edit User Gateway Login window. This option allows you to set the maximum rate of orders per second allowed per TT Gateway. The value entered for this option also appears in the Max Order/Sec (Override) column in the Selected Users pane of the Assign to Available Users window. For each selected user, you can edit the value in this column on a per TT Gateway basis to control the rate per gateway instead of assigning one rate for all gateways assigned to a user. To set the Prevent more than X orders per second (overrides the User-Level setting) option, refer to “Editing a User's Gateway Login Attributes” on page 146 and “Assigning Users to a Gateway Login” on page 144. 194 TT User Setup User Manual Trading Technologies International, Inc. User Group Administration User Group Administration Overview User groups allow you to group users, accounts, and gateway logins. You can then limit an administrator to managing one or more specific user group(s) (and therefore only a subset of users and gateway logins within a given trading network) by editing the TT User Setup Permissions for that administrator. From the Select User Group window you can select an existing user group, or create a new user group. • • • To add or edit a user group, refer to the “Creating User Groups” on page 195 topic. To assign gateway logins to a selected user group, refer to the “Assigning User Groups to Gateway Logins” on page 200 topic. To create an administrative user that is limited to managing specific user groups, refer to “Creating a Group Administrator” on page 86. Note: The User Groups window is a standard data grid except that you cannot copy or mass-edit user groups. Refer to the “Data Grid Functionality” on page 25 topic if needed. Creating User Groups From the User Groups window, you can create user groups to set up divisions in your organization. After you create user groups, you can assign users, gateway logins, and accounts to those user groups. X_RISK administrators can then use the user groups to group P/L or positions for multiple traders via X_RISK's Position window. You can also set up TT User Setup Administrators to manage particular user groups. TT User Setup User Manual Trading Technologies International, Inc. 195 14 User Group Administration Note: A Group Administrator can create user groups, but cannot edit or delete them. To create a new user group: 1. From the User Admin menu, select User Groups. Note: You can also access the User Groups window by clicking Select Group on the Edit User window. 2. From the User Groups window, click New. 3. In the New User Group window, enter the new user group name into the Name field. 4. Click Save. Newly-created user groups appear in the User Groups window. 196 TT User Setup User Manual Trading Technologies International, Inc. 14 User Group Administration Note: When a Group Administrator or Gateway Login Administrator creates a new user group, that user group is added automatically to the list of groups the administrator can manage. You have successfully created a new user group. Creating User Groups for Order Passing Order passing allows a user group (e.g., execution traders) to “pass” visibility and management of open, working orders to another user group. Using X_TRADER® 7.17.10 or higher, the order originator always has full visibility of the current order status and sees all order updates and partial fills that occur while the order is being “watched” by another user group. The two user groups do not need to share their order books; the passing action just adds temporary visibility and management of the order to the other group. Note: Only Super Administrators can configure order passing for a user group. A Group Administrator can create user groups, but cannot edit or delete them or configure them for order passing. However, they can view the order passing settings. To create a new user group for order passing: 1. From the User Admin menu, select User Groups. Note: You can also access the User Groups window by clicking Select Group on the Edit User window. 2. From the User Groups window, click New. TT User Setup User Manual Trading Technologies International, Inc. 197 14 User Group Administration 3. In the New User Group window, enter the new user group name into the Name field. 4. Click Order passing. The Order passing fields appear in the New User Group window. 5. Click an available User Group to pass orders with the new User Group. 198 TT User Setup User Manual Trading Technologies International, Inc. 14 User Group Administration Select as many User Groups as necessary. Click All User Groups to select all the available groups. The Show account on passed orders option is checked by default to allow accounts to be shown on the working orders passed in X_TRADER. Uncheck this option to hide assigned accounts from the other user groups. 6. Click Save. The following warning message appears. The message is a reminder to configure each selected User Group for order passing. Newly-created user groups appear in the User Groups window. Note: When a Group Administrator or Gateway Login Administrator creates a new user group, that user group is added automatically to the list of groups the administrator can manage. You have successfully created a new user group for order passing. Assigning Users to a User Group Use the New User or Edit User window to assign users to a user group. Users can exist in only one user group at any given time. However, multiple users can belong to the same user group. To assign existing users to a user group: 1. From the User Admin menu, select Users, and then select one or more users to assign to a user group. 2. Click Edit. 3. On the Main tab of the New User or Edit User window, click the User group field's Select Group button. TT User Setup User Manual Trading Technologies International, Inc. 199 14 User Group Administration 4. On the Select User Group window, select a user group and then click Select. 5. Click Save. The selected user group appears in the Users window's Group column for the applicable username. You have successfully assigned one or more users to a user group. Assigning User Groups to Gateway Logins As with users, gateway logins can be assigned to user groups. If a gateway login is assigned to a user group, any administrator of that user group can manage the gateway login. 200 TT User Setup User Manual Trading Technologies International, Inc. 14 User Group Administration However, gateway logins automatically inherit the user groups associated with any users mapped to those gateway logins. consequently, you only need to assign groups to gateway logins for users that do not have gateway logins assigned. The rules for inheriting user group permissions include the following: • • • When a user is mapped to a gateway login, the gateway login automatically inherits the user's user group. User groups inherited by a gateway login change if the parent is changed. For example, when a user's user group changes, the inherited user group for the user's gateway login also changes. A Direct Trader gateway login is automatically assigned any user group of a TTORD to which it is mapped. For example, if an account (123) is assigned to a gateway login (TTORDTT001001), and the gateway login is mapped to a user (JDOE) who belongs to a user group (XT Traders), the account 123 and gateway login TTORDTT001001 become part of the user group (XT Traders). A Group Administrator who can manage the XT Traders user group, can also manage the JDOE user, the 123 account and gateway login TTORDTT001001. You can either assign Groups to a gateway login, or you can assign gateway logins to a group. Assigning User Groups to a Gateway Login To assign a user group to a gateway login manually: 1. From the User Admin menu, select Gateway Logins. 2. Select a gateway login row and then click Edit. The Edit Gateway Login window appears with the Gateway Login Info tab selected. 3. Click the Group Permissions tab. 4. Use the transfer buttons (<, <<, >, >>) to move selected user groups from the Available User Groups list, to the Gateway Login permitted in the following User Groups list. The Gateway Login permitted in the following User Groups section contains the following fields: 5. User Group: Displays the name of the user group. 6. Users with Gateway Login: Displays users in the given user group to whom the gateway login is assigned. 7. TTORDs with Gateway Login: Displays TTORDs in the given user group that are mapped to this Direct Trader gateway login. 8. To allow a group administrator to edit and directly assign this gateway login, check the Group Admins can assign this Gateway Login directly to users without using a TTORD option. If this option is unchecked, Group Administrators can only map the gateway login to a TTORD (to use it indirectly). TT User Setup User Manual Trading Technologies International, Inc. 201 14 User Group Administration 9. Click Save. Assigning Gateway Logins to a User Group To manually assign a gateway login to a user group: 1. From the User Admin menu, select User Groups. 2. Select a user group row and then click Assign Gateway Logins. The Assign Gateway Logins to User Group window appears. 3. Use the transfer buttons (<, <<, >, >>) to move selected user groups from the Available Gateway Logins list, to the Assigned Gateway Logins list. 202 TT User Setup User Manual Trading Technologies International, Inc. 14 User Group Administration 4. Click Save. Assigning User Groups to an Account When a gateway login is assigned to a user group (refer to “Assigning User Groups to Gateway Logins” on page 200), the user group automatically inherits any accounts that have been assigned to the gateway login and any user group assigned to users who have the account in their customer defaults. If an account is assigned to a user group, any administrator of that user group can manage the account. You can also manually assign user groups to an account. To assign user groups to an account manually: 1. From the User Admin menu, select Accounts. 2. Select the account to assign, and then click Edit . 3. On the Edit Account window, click the Group Permissions tab. 4. Use the transfer buttons (<,<<,>>,>) to select users from the Available User Groups list and add them to the Account permitted in the following User Groups list. The Account permitted in the following User Groups section contains the following fields: • • • User Group: Displays the name of the user group. Users with Account: Displays users in the given user group to whom the account is assigned. Gateway Logins with Account: Displays gateway logins in the given user group to which this account is assigned. TT User Setup User Manual Trading Technologies International, Inc. 203 14 User Group Administration 5. Click Save. 204 TT User Setup User Manual Trading Technologies International, Inc. Publishing to Guardian Publishing to Guardian If you make changes to the product limits or gateway login risk settings, you must publish the changes to Guardian before the changes take effect. If TT User Setup and Guardian become out of synch, the Publish icon on the control panel changes (as indicated below), to indicate that data needs to be published: In addition, a message appears indicating that TT User Setup and Guardian are out of synch. Note: Because publishing sends data over the trading network, which could impact trading performance, TT recommends avoiding or limiting publishing during trading hours. When you click the Publish icon, the Publish to Guardian window appears and displays any differences in trader data between TT User Setup and Guardian. The differences fall into one of three categories (as listed in the Record Exists in column): • • • TT User Setup only - A gateway login exists in TT User Setup, but not Guardian. For example, gateway logins have been added to TT User Setup, but have not yet been published to Guardian. Guardian and TT User Setup - Changes to a previously published gateway login have been made in TT User Setup but not published to Guardian. Guardian only - A gateway login exists in Guardian, but not TT User Setup. For example, gateway logins have been deleted from TT User Setup, but have not yet been deleted from Guardian (by publishing). To publish records to Guardian: 1. Do one of the following: 2. From the File menu, select Publish to Guardian. 3. On the toolbar, click the Publish to Guardian icon. The Publish to Guardian window appears. 4. Highlight the records you want to publish. 5. Click Publish Selected Gateway Logins to Guardian. The following image specifies the records that require publishing. TT User Setup User Manual Trading Technologies International, Inc. 205 15 Publishing to Guardian Note: TT User Setup includes an optional server-side setting, DisableProductLimitPublishing, which causes TT User Setup to disregard all changes that are not related to order routing when checking for differences between Guardian and TT User Setup. Order routing data includes TTORD to exchange trader mappings and TTORD account numbers. This option must only be used with FIX Adapter 7.6 and later when all traders who are risk checked in the environment are using X_TRADER 7.8 or later. For a detailed description on disabling product limit publishing, refer to the TT User Setup System Administration Manual. Displaying Detailed Differences TT User Setup provides a detailed account of differences that exist between TT User Setup and Guardian data prior to publishing. You can use the information provided to reconcile these differences. The Guardian/User Setup Differences Details window consists of three sections; 206 TT User Setup User Manual Trading Technologies International, Inc. 15 Publishing to Guardian • • • ID: TTORD or Exchange Trader data, which provides specific account and gateway login information. Gateway Logins/Exchange Traders: The Gateways or Exchange Traders to which the ID is mapped. Product Limits: which show the limits established through TT User Setup for the applicable TTORD or Exchange Trader. A TTORD or Exchange Trader record appears in the Guardian/User Setup Differences Details window when any of the following conditions apply: • • • • The ID is in TT User Setup, but not in Guardian. The ID is in Guardian, but not in TT User Setup. The ID is in both TT User Setup and Guardian, but there are data differences. The record is in both TT User Setup and Guardian, but the Add to Guardian option is unchecked in TT User Setup. To access the Differences Details window: 1. From the File menu, select Publish to Guardian. 2. Select a single differences row and then click View Differences Details. Alternatively, you can double-click the row. The following image shows how differences are displayed and describes some sample differences. Note: If DisableProductLimitPublishingMode is on, Risk-related fields are not published and are therefore not listed in the difference detail (refer to the TT User Setup System Administration Manual for more information about the DisableProductLimitPublishingMode parameter). TT User Setup User Manual Trading Technologies International, Inc. 207 15 Publishing to Guardian Understanding Publish Warnings After publishing, TT User Setup provides some helpful hints about your data that might indicate erroneous setups. For example: Note: Gateway logins where Member and Group are the same will share an order book. After clicking Publish, a status window appears and shows each successfully-published gateway login. The message for a successful publish concludes with Done Publishing. 208 TT User Setup User Manual Trading Technologies International, Inc. Server Administration Collecting Log Files TT User Setup allows you to collect remote log files from other machines on your gateway directly from your client-side machine. The machines from which you collect log files must be set up in the same trading environment as your own. Note: Collecting log files could cause significant network traffic. As such, it is recommended that large log files not be collected during peak trading hours. Note: You can also collect specific logfiles from the TT User Setup server’s logfiles folder using the TT User Setup Command Line Client application. Refer to the Advanced Data Collection topic in chapter 4 of the TT User Setup System Administration Manual for more information. To collect log files: 1. From the Server Admin menu, select Collect Log Files. The Collect Log Files window appears. 2. In the IP address field, enter the address of the remote machine from which you want the log file data collected, or, click Select IP Address and select the IP Address from the list of usernames. 3. Click OK. The zip file, <IP address>_<DDMMYYYY>.zip, will be placed in your <root drive>:\tt\logfiles directory. If they are present on the local machine, some of the following types of files will be included in the zip file: TT User Setup User Manual Trading Technologies International, Inc. 209 16 • • • • • • • • • • • • • • Server Administration TT application and local machine-specific diagnostic settings. For example, netstat, ipconfig, tcpip registry, etc. TT application installation log files for each installed product version. TT application log files. TT application crash dump files. TT client application audit logs. TT application-specific CSV export files. TT server or client-specific data files. For example, order tables, risk limits, risk audit files, license files, currency table, etc. Guardian Product Table fields. TT Gateway audit files. TT application configuration files, including Aconfig.xml and Aconfig_local.xml. The Tick Table. The Windows Dr. Watson error log . Information about the local host. Login profile-specific information on a local machine. You have successfully collected log files. Using Version Control Rules TT User Setup allows a Super Administrator (non-MultiBroker) or TT Adminstrators (MultiBroker) to define rules for which versions of TT software can be used within a trading environment. By using version rules, you can, for example, prevent potential issues related to logging in with X_TRADER applications that are too old. For example, to reject logins from X_TRADER versions prior to version 7.8.1.1, you would create a rule that specified that the X_TRADER application must be greater than or equal to 7.8.1.1. When creating rules, consider the following: • • A user can have only one rule per application. Rules configured for a specific user take precedent over rules configured for all users. To create a new version control rule... 1. From the Server Admin menu, select Version Rules. 210 TT User Setup User Manual Trading Technologies International, Inc. 16 Server Administration 2. Click New. The New Version Rule window appears. 3. From the Applies To list, select the user or user group to whom a rule applies. (or select All Users or All User Groups). 4. From the Application list, select the application to which you want the rules to apply. 5. From the Operator list, choose from the following: • Must be between • Must be equal to • Must be greater than or equal to TT User Setup User Manual Trading Technologies International, Inc. 211 16 Server Administration • Must be less than or equal to 6. In the Version field, input a version in the following format: 1.1.1.1. Note: If the selected application is managed by TT Update, select a TT Client version from the drop-down menu in the Version field. 7. In the Or Else field, select one of the following: • Select Reject a Login if the user's login will be rejected with a message that indicates why the login is rejected. Note: If the selected application is managed by TT Update, users will be required to upgrade or downgrade to a version that complies with this version rule. • Select Warn User if a message will alert the user to the warning, but login will be allowed. Note: If the selected application is managed by TT Update, users will be allowed but not required to upgrade or downgrade to a version that complies with this version rule. 8. In the Additional Message field, define text that displays after the message that appears indicating the reason the user was warned or had their login rejected. 9. Click Save. Resetting the Guardian Exchange Tree The Reset Guardian Exchange Tree option removes any exchanges and IP addresses where there are no running services, for all Guardians in the environment. To reset the Guardian exchange tree: 1. From the Server Admin menu, select Reset Guardian Exchange Tree. 2. When prompted to confirm the reset, click Yes. The Guardian exchange tree resets. Editing the Currency Exchange Rates The Edit Currency Exchange Rates feature allows you to edit the exchange rates listed in Guardian. These exchange rates are used in P&L and risk calculations in X_TRADER and X_RISK. Note: If you use TT User Setup to edit the currency exchange rates, do not edit currency rates with Guardian. To edit the currency exchange rates: 212 TT User Setup User Manual Trading Technologies International, Inc. 16 Server Administration 1. From the Server Admin menu, select Currency Exchange Rates. The Currency Exchange Rates window appears. 2. Select the currency you want to edit, and click Edit (you cannot select multiple currencies). The Edit Exchange Rate window appears. 3. Enter the exchange rate into either field; TT User Setup calculates the other field value for you. In the example above, one Argentinean Peso exchanges to 0.2442 Australian Dollars. TT User Setup automatically calculates the reverse exchange at one Australian Dollar to 4.095 Argentinean Pesos. TT User Setup User Manual Trading Technologies International, Inc. 213 16 Server Administration 4. Click OK. Note: To reset an exchange rate, access the Edit Exchange Rate window and set both values to 0. 5. When you are finished editing exchange rates, click Publish Exchange Rates. You have successfully edited the currency exchange rates. Adding and Deleting Currencies When logged on as a Super Administrator you can add or delete currencies, and you can select the primary currency that clients applications use when displaying P/L and available credit. Administrators previously performed these tasks from the Currency Table window in Guardian. In X_TRADER and X_RISK 7.11 and later, the currency display option is configured within X_TRADER/X_RISK. To add a currency: 1. From the Server Admin menu, select Add/Remove Currencies. The Currencies window appears. 2. Click New. The New Currency window appears. 214 TT User Setup User Manual Trading Technologies International, Inc. 16 Server Administration 3. Enter the 3-letter designation for the new currency, and then click Save. The new currency appears in the currencies table as Unpublished. 4. Repeat steps 2 and 3 as needed to add more currencies. 5. When you are finished adding currencies, click Publish Currencies to publish the currencies to Guardian. You have successfully added currencies. To delete a currency: 1. 2. 3. 4. 5. From the Currencies window, select the currency to delete. Click Delete. When prompted to permanently delete the currency, click OK. Repeat steps 2 and 3 as needed to delete more currencies. When you are finished deleting currencies, click Publish Currencies to publish the currency changes to Guardian. You have successfully deleted currencies. To change the primary currency: 1. From the Currencies window, select the primary currency from the Primary currency dropdown list. 2. Click Publish Currencies to publish the currency changes to Guardian. You have successfully set the primary currency. Editing Product Margins TT User Setup User Manual Trading Technologies International, Inc. 215 16 Server Administration The Product Margins window displays a list of products for each market, as well as information related to those products such as Product Type and Margin. When Super Administrators edit and then publish margin values for a given product, the changes are published to each gateway flavor within the market that lists the product. When TT User Setup detects multiple gateways with different margins for the same products, TT User Setup adds a comment to the Comments/Conflicts column and also makes an entry in the Product Table Conflicts window. The Super Administrator can view and clear the conflicts. Refer to the “Viewing and Clearing Product Margin Conflicts” on page 217 topic. To edit the product margins: 1. From the Server Admin menu, select Product Margins. The Product Margins window appears. 2. Select one or more product margins, and then click Edit. 216 TT User Setup User Manual Trading Technologies International, Inc. 16 Server Administration 3. In the Margin field, enter the new margin, and then click OK. 4. When you are finished editing margins, click Save and Publish All. You have successfully edited the project margins. Note: Although the Guardian product tables are updated, the Guardian GUI on the TT User Setup Server will not display the new settings from TT User Setup until the Guardian service is restarted. Viewing and Clearing Product Margin Conflicts When TT User Setup detects multiple gateways with different margins for the same products, TT User Setup adds a comment to the Comments/Conflicts column and also makes an entry in the Product Table Conflicts window. Conflicts typically happen when a product margin has been changed outside of TT User Setup. A TT User Setup Super administrator can view and clear the conflicts. To view and clear any product margin conflicts: 1. From the Server Admin menu, select Product Margins. The Product Margins window appears. TT User Setup User Manual Trading Technologies International, Inc. 217 16 Server Administration 2. Click View All TTUS Guardian Conflicts. The Product Table Conflicts window appears. Each conflict is listed separately; TT User Setup allows you to resolve the conflict by selecting the TT User Setup value or the Guardian value for each product. 3. Select the TT User Setup or Guardian values as needed: • To use the value in TT User Setup, click Use this margin for the TT User Setup row. Or if you want to use the value in TT User Setup for all conflicts in this market, click Use TT User Setup value to resolve all <gateway> conflicts. • To use the value in Guardian, click Use this margin for the Guardian row. Or if you want to use the value in TT User Setup for all conflicts in this market, click Use Guardian value to resolve all <gateway> conflicts. Example: In the above example , the CONF, FDAX, and other products have different margins on EUREX, EUREX-A, and EUREX-B. To resolve the conflicts, you could select the appropriate Use this margin for each product. Alternatively, if you always want to use the EUREX-B margin, you could select Use Guardian Eurex-B margin values to resolve all Eurex conflicts just once. 4. To undo changes, click Undo, or Undo All. 5. When you are finished resolving conflicts, click Done. TT User Setup returns to the Product Margins window. 6. Click Save and Publish. Note: Although the Guardian product tables are updated, the Guardian GUI on the TT User Setup Server will not display the new settings from TT User Setup until the Guardian service is restarted. 218 TT User Setup User Manual Trading Technologies International, Inc. 16 Server Administration Viewing and Publishing Licenses TT licenses and bills its products using license files, which define the number and type of TT client and server applications that the customer has paid to use. Most TT software except TT’s Guardian application requires license files. These license files are as follows: • • TTLICENSE.LMT (referred to as the .LMT file): This file is the actual license file that must be loaded into the TT trading environment in order to run TT software. Only one .LMT file controls the entire TT system. However, this file must be updated whenever the customer installs new products or renews his license with TT. TT encrypts this license file. All licenses in the .LMT file include an expiration date after which you can no longer use the software. TT1300SW.dll. The .dll file contains the keys used to decrypt the TTLICENSE.LMT file. Customers must review and renew their licenses on a quarterly basis. You can use TT User Setup to monitor the number of licensed applications (and their associated IP addresses) that are logged into the system, and to load license files. This functionality was previously provided only by Guardian. This topic contains the following sections: Viewing Licenses To view a TT license: 1. Log onto TT User Setup as a Super Administrator. 2. From the Server Admin menu select License Setup. The License Setup window appears: TT User Setup User Manual Trading Technologies International, Inc. 219 16 Server Administration The license table contains the following information: Field Description Client/Server Lists whether this license is a Client license or a Server license. TT Product Lists the TT Product to which the license applies. Qty Lists the number of licenses assigned. Start Date The date the license becomes valid. Expiration Date The date the license expires. Prod/SIM Lists whether the license applies to environments running in Prod mode or SIM mode. Min Version Internal use only. 220 TT User Setup User Manual Trading Technologies International, Inc. 16 Server Administration Field Description In Effect If the current date is between the license Start Date and Expiration Date, and if the Prod/ SIM setting for the license matches the Prod/ SIM setting in guardian, the license is considered in effect (In Effect is set to yes). If the license is expired or set to a different Prod/ SIM setting than guardian, the license is not in effect. # of Markets The number of markets to which the license applies. If the license applies to all market the value is "All". Exchange The exchange to which this license applies. If this field is blank, the license applies to all exchanges for the product. IP Address Used by server products to specify the IP address that the server product is allowed to run on. 3. When you are finished viewing the licenses, close this window. Or, to load and publish licenses, continue to the next topic. Loading and Publishing Licenses Before traders can use the TT Trading System, you must install the appropriate license file. Note: A TT Gateway does not appear in Guardian until its license has been loaded. Note: If you replace a pre-existing license file with a newer one (i.e., you’ve added new components to your network such as X_TRADER® workstations), TT recommends that you verify that the filename of the new license matches the filename of the old license file, and the date of the license file is more recent than the old license file. To load the license in TT User Setup: 1. Copy the .LMT, .dll, and license text files to a folder that is accessible to this TT User Setup client. 2. Log onto TT User Setup as a Super Administrator. 3. From the Server Admin menu select License Setup. The License Setup window appears. TT User Setup User Manual Trading Technologies International, Inc. 221 16 Server Administration 4. Click Load License File, navigate to the folder that contains the license files, and then click Open. TT User Setup returns to the License Setup window. 5. Click Publish this License. 6. When TT User Setup alerts you that the license file was published, click OK. Migrating Users to a New Gateway TT User Setup includes a tool to migrate users from one gateway to another. This is useful when you are adding another flavor of a gateway to your environment (i.e. adding a CME-B Gateway as a backup in an environment that contains a CME-A Gateway), or if a gateway is rebranded (i.e. migrating users that connect to a CBOT-A Gateway to a CME-A Gateway). When you migrate users, all data related to the source gateway is copied for all the users that are mapped to the source gateway. • Customer Defaults: Any gateway-specific customer defaults are copied and saved as a customer default for the target gateway. For example, if the user had a customer default that applied to the source CME-A Gateway, then the customer default is copied and applied to the target CME-Gateway. Market-specific customer defaults are unaltered. • Product Limits: Any product limits that apply to the source gateway are copied and saved as product limits that apply to the target gateway. For example, product limits for the source CMEA Gateway are copied and saved as product limits for the target CME-B gateway. • MGTs: Any MGTs that a user may have for the source gateway are copied and saved as MGTs for the target gateway. For example, MGTs for the source CME Gateway are copied as MGTs for the target CME-B Gateway. 222 TT User Setup User Manual Trading Technologies International, Inc. 16 Server Administration Note: When migrating, you can chose to remove the gateway login information for the original gateway, or you can keep the gateway login information for both the original and the new gateways. To migrate users to a new gateway: 1. From the Server Admin menu, select Migrate Users to New Gateway. The Migrate Users to New Gateway window appears. TT User Setup User Manual Trading Technologies International, Inc. 223 16 Server Administration 2. Use the browse buttons to select the Source Gateway (the gateway from which the users will be migrated) and the Target Gateway (the gateway to which the users will be migrated). 3. Check or uncheck the Delete Gateway Logins related to source gateway checkbox. • If the users will retain the gateway login information for the source gateway, leave the checkbox unchecked. This option is typically used when adding additional gateways. • To delete the gateway login information for the source gateways, check the checkbox. This option is typically used when gateways have been rebranded. 224 TT User Setup User Manual Trading Technologies International, Inc. 16 Server Administration 4. Select how the Available to User or Available to FIX Client login attributes will be set for the new gateway logins. • Select Copy source settings to target to use the source gateway's settings. • Select Set all to available (checked) to set the option on for all users that were mapped to the source gateway, regardless of the current setting. • Select Set all to unavailable (unchecked) to set the option off for all users that were mapped to the source gateway, regardless of the current setting. 5. Select how the Automatically Login login attribute will be set for the new gateway logins. • Select Copy source settings to target to use the source gateway's settings. • Select Set all to auto (checked) to set the Automatically Login login attribute on for all users that were mapped to the source gateway, regardless of the current setting. • Select Set all to manual (unchecked) to set the Automatically Login login attribute off for all users that were mapped to the source gateway, regardless of the current setting. 6. Select how the Mandatory Login login attribute will be set for the new gateway logins. • Select Copy source settings to target to use the source gateway's settings. • Select Set all to mandatory (checked) to set the Mandatory Login login attribute on for all users that were mapped to the source gateway, regardless of the current setting. • Select Set all to optional (unchecked) to set the Mandatory Login login attribute off for all users that were mapped to the source gateway, regardless of the current setting. 7. Click Start Update. You have successfully migrated users to a new gateway. Understanding Server Messages The TT User Setup Server (Master or Slave) frequently updates its local database with the most current data. You can monitor all server activity through a Server Messages window, which is available through the TT User Setup Client. Note: You do not need to be logged in to view server messages. You use the Server Messages window to monitor server activity including login attempts, server ups or downs, error conditions, etc,. In addition, the window shows occurrences of database replication whereby administrator changes processed by the Master server are replicated by any Slave servers running in the environment. For detailed information regarding server replication refer to the TT User Setup System Administrator Manual. Note: When logged in as a non-Super Administrator, the administrator can only view logins for users the administrator is designated to manage. To access the Server Messages window: 1. From the Reports menu, select Server Messages. The following is an example of the Server Messages window and some of the types of messages it displays: TT User Setup User Manual Trading Technologies International, Inc. 225 16 Server Administration Note: The Server Messages window appears automatically whenever an error is received. The Server Messages window displays only messages that occur while the client is running. Refer to the server log files (in the ~tt/logfiles directory) for current and previous log messages. 2. To stop the Server Messages window from scrolling automatically to the most recent message (at the bottom), uncheck the Scroll automatically to most recent message option. 3. To display only warnings and errors, check the Show only Warnings and Errors checkbox. 4. To configure the number of hours of messages the Server Messages window displays, set the Hours of message history to keep for display field. System Settings Introducing System Settings Use the System Settings window to configure server properties like: • • • 226 Concurrent Logins: Limits the number of times a single username can be logged in concurrently. Password Locking: Prevents users from logging in after certain limits are surpassed (i.e., incorrect login attempts or days of inactivity). An administrator can configure a message for a user whose login attempt fails for any reason. Password Rules: Defines the level of password complexity required for all users changing their password, the number of unique passwords required before reusing a prior password, and the length of time a password is valid. TT User Setup User Manual Trading Technologies International, Inc. 16 Server Administration • • Automatic Diagnostics: Determines which potential problems TT User Setup Diagnostic Checks automatically searches for. X_STUDY and FMDS Settings: Allows an administrator to enable or disable X_STUDY and its related FMDS settings. Note: Only Super Administrators have access to the System Settings because these properties apply to all users. Configuring Concurrent Login Rules Administrators can limit the number of times a single user can be logged in concurrently (based on the number of IP addresses from which a user has logged in). If a user attempts to log in with a username that has already reached the assigned maximum number of logins, the login fails until that user ID closes a client connection and releases a license. TT SIM logins do not affect concurrent license counts. Note: The concurrent login feature works for users logged in using Universal Login only. Warning: To correctly control time delays, you must synchronize the machine times for each TT User Setup server. To limit the number of concurrent logins: 1. From the Server Admin menu, select System Settings. The System Settings window appears and defaults to the General tab. 2. Check the Enforce maximum concurrent logins per user option. 3. In the Seconds that a user must wait between successful login attempts field, select the number of seconds (between 0 and 100) that must pass before a single user is allowed to perform any subsequent logins. Select a value long enough to allow all GuardServers to synchronize and have an accurate count of the number of current logins for each user. The default value of 12 seconds is sufficient for most networks. TT User Setup User Manual Trading Technologies International, Inc. 227 16 Server Administration Note: If the number of seconds defined for this setting is too low, a user could log into a second or third machine before Guardian ever realizes that the first login took place. Be sure to set the seconds high enough to ensure that users cannot surpass their concurrent login limitations. 4. Click Save. 5. For this setting to affect a user, you must check the Limit the number of concurrent logins option for that user and set the Max number allowed field to an appropriate value. These settings are located on the Main tab of the user's New User or Edit User window. You have successfully limited the number of concurrent logins. Configuring Password Locking Rules Use the password locking feature to prevent users from logging in after defined limits are surpassed. As an administrator, you may not lock out a user. However, you can configure users to be locked out when either of the following conditions occurs: • • A user enters an incorrect password too many times. A user does not attempt a login within a certain number of days. TT User Setup provides the user with a notification whenever the user's status has changed to "locked". You can unlock users from the Edit User window. Note: The Locked Out column on the Users window lists all the locked out users in your trading environment. To set password locking rules: 1. From the Server Admin menu, select System Settings. The System Settings window appears and defaults to the General tab. 2. Check the Automatically lock out users due to failed attempts or inactivity option. 228 TT User Setup User Manual Trading Technologies International, Inc. 16 Server Administration 3. In the Number of failed login attempts before user status is set to LOCKED field, select a number between 1 and 100 to designate how many incorrect passwords a user can enter before the user's status is set to "locked". Note: The default value is 3. 4. In the Days of inactivity allowed before user status is set to LOCKED field, select a number between 1 and 100 to designate the number of days of inactivity before a user's status is set to "locked". Note: The default value is 30. 5. Click Save. You have successfully set password locking rules. Customizing the Failed Login Attempt Message If a user login fails, TT User setup prompts the user with a standard message. From the Failed Login Rules section in the System Settings window, you can configure a custom message that appears after the standard message. To activate and customize the failed login attempt message: 1. From the Server Admin menu, select System Settings. 2. On the System Settings window, click the General tab. 3. In the Failed Login Rules section, check the Apply an additional failed login message to users option. 4. In the text box, edit the default message or create a new message. 5. Click Save. Note: The message in the text box appears after a failed login attempt. TT User Setup User Manual Trading Technologies International, Inc. 229 16 Server Administration Configuring Password Rules Use the Password Rules to configure password complexity, password reuse, and password expiration rules. • The Password Complexity section defines the level of password complexity required for all users changing their password. In addition, you may incorporate password reuse restrictions. Note: Password complexity changes are enforced the next time the user changes their password.TT User Setup initiates a password change when password expiration rules take effect, when a user manually changes their password, or when the administrator manually resets the user's password. • The Password Reuse section defines the number of unique passwords required before allowing a login to reuse a password. Note: Password reuse restrictions are calculated from the last n times a user's password was changed, not from when password reuse restrictions were enabled or edited. • The Password Expiration properties define the length of time a password is valid. As an administrator you can require a user's password to expire after a fixed number of days. However, if you want to prevent a specific user's password from expiring, check the Password never expires option on the Create New User or Edit User window. Note: Password expiration is calculated from the last time a user's password was changed, not from when password expiration rules were enabled or edited. To set password rules: 1. From the Server Admin menu, select System Settings. The System Settings window appears and defaults to the Password Rules tab. 230 TT User Setup User Manual Trading Technologies International, Inc. 16 Server Administration 2. Check the Enforce password complexity rules option to enable related fields. 3. Specify values in the Minimum length (6-20) and Maximum length (6-20) fields to set minimum and maximum password lengths. Note: The default values are 6 and 20. 4. Check any or all of the following options: • Passwords must contain at least one lowercase letter • Passwords must contain at least one uppercase letter • Passwords must contain at least one digit • Passwords must contain at least one non-alphanumeric character TT User Setup User Manual Trading Technologies International, Inc. 231 16 Server Administration 5. To configure the system to enforce password reuse restrictions, select the check box next to Enforce password reuse restrictions and then select the Number of unique passwords required before reusing a prior password. 6. To configure the system to enforce password expiration rules, select the check box next to Enforce password expiration rules , and then select the number of days until the password expires and the number of days prior to password expiration that the system will begin issuing expiration warnings. This setting does not apply to users with passwords that never expire. 7. If users must change their initial password after login or after an administrator updates the password, check the Require user to change initial password option. This setting does not apply to users with passwords that never expire. 8. Click Save. You have successfully set password expiration rules. Automatic Diagnostics TT User Setup allows you to run diagnostic checks that list potential set up issues based on the information available in the TT User Setup database. For example, Gateway Logins missing Accounts and Missing Product Limits. The Automatic Diagnostics window allows you to select the diagnostics checks that all clients will automatically run. When the TT User Setup Server detects one of the automatically configured errors, it opens the Server Messages window and displays an Automatic diagnostics checks error. To configure Automatic Diagnostics: 1. From the Server Admin menu, select System Settings. 2. Select the Automatic Diagnostics tab. 232 TT User Setup User Manual Trading Technologies International, Inc. 16 Server Administration 3. Select the diagnostics that TT User Setup will automatically detect and report. 4. Click Save. Enabling and Configuring X_STUDY and FMDS System Settings X_STUDY uses the FMDS server to obtain historical data to display in a chart for a given contract. The X_STUDY/FMDS settings available in TT User Setup allow you to designate or change the FMDS server to which one or more user's X_STUDY(s) connects. In addition, you can set up a secondary FMDS server to which X_STUDY connects if the primary server is down. X_STUDY and FMDS must be enabled and configured at a system level before it can be enabled and configured at a user level. To enable and configure X_STUDY and FMDS for a user, refer to the “Configuring X_STUDY and FMDS” on page 80 topic in the User Administration section. TT User Setup User Manual Trading Technologies International, Inc. 233 16 Server Administration Note: This option is only available for X_TRADER version 7.7.3 or later and X_STUDY 7.0.3 or later. To enable X_STUDY/FMDS functionality for this TT User Setup system: 1. From the Server Admin menu, select System Settings. 2. On the System Settings window, click the X_STUDY/FMDS Settings tab. 3. Ensure the X_STUDY/FMDS Allowed option is checked. 234 TT User Setup User Manual Trading Technologies International, Inc. 16 Server Administration 4. For the Primary FMDS Server section, enter the IP address and Port of the FMDS Server. You cannot save X_STUDY/FMDS settings unless the IP address field is populated. 5. In the Service field, type the service number. The Service field is an additional qualifier used to differentiate multiple FMDS machines within a network. This value must match the X_STUDY workstations’ Communications setting. The default setting is 250. 6. In the Timeout (secs) field, type the number of seconds to wait to connect to each FMDS server. Note: Typically the default value can be used in the Port, Service, and Timeout fields. 7. To set up a secondary FMDS server, repeat steps 4-6 in the Secondary FMDS Server section. 8. Click Save. You have successfully configured your FMDS server(s). TT User Setup User Manual Trading Technologies International, Inc. 235 16 236 Server Administration TT User Setup User Manual Trading Technologies International, Inc. Reports Displaying and Exporting Reports Use the Run Reports option to view reports of user's login and gateway information and to check for possible setup errors. The available reports include: Report Description TT Product Version/User Usage Displays version information for client applications (e.g. X_TRADER) that have logged in. Most Recent X_TRADER Version Displays the most recent version of X_TRADER, per user, that have logged in. Gateway Versions Displays a list of Gateways running in the environment. Currently, TT User Setup only displays the 7.15.1 (and later) ICE Price Server. Users and their Gateway Logins Displays a list of users by username and includes each user's MGT data. Users and their Gateway Login counts Displays a list of the number of gateway logins for each user. Users and their Risk Parameters (collapsed) Displays a list of users and their associated risk parameters including Credit, Currency, Ignore P&L, etc. Users and their Risk Parameters (expanded) Displays a list of users and additional riskrelated parameters including Auto Login, Preferred IP, etc. Users and their Product Limits Displays a list of users by username and includes each user's product limit data. Users and their Product Limits including TT SIM Displays a list of users by username and includes each user's product limit data. TT User Setup User Manual Trading Technologies International, Inc. 237 17 Report Reports Description Product Limit Counts Displays the quantity of product limits per MGT. Users and their Accounts Displays a list of users and their gateway login and customer default accounts. Order Books with mismatched Credit/Currency Displays MGTs that share an order book, but are associated with different credit and currencies. Order Books with mismatched Product Limits Displays MGTs that share an order book, but are associated with different product limits. CME Product Group Permissions Displays a list of users with available CME Gateway Logins, and lists whether each CME market is allowed or blocked. Displaying a Report To display a report: 1. From the Reports menu, select Run Reports. The Reports window appears. 2. From the Report drop-down list, select a report type and then click Run. You have successfully displayed a report. Exporting a Report as HTML or CSV You can export reports to HTML or CSV from the Reports window. The content of the report depends on the sorting or filtering currently applied. 238 TT User Setup User Manual Trading Technologies International, Inc. 17 Reports To export a report as HTML: 1. From the Reports menu, select Run Reports. The Reports window appears. 2. From the Report drop-down list, select a report type. 3. Click Run. The type of report you selected appears. 4. To save the report as HTML, click Export as HTML or to save the report as CSV, click Export as CSV. The Windows Save As dialog box appears. 5. Select the destination for your .html or .csv file and give the report a file name. 6. Click Save. The file saves to the location selected. If you selected .html, your selected report also automatically opens in your Internet browser. You have successfully exported a report. Note: You can also copy data directly from any report to a spreadsheet, word processor, text editor, etc by selecting the data with your mouse and pressing Ctrl+C. Use Ctrl+V or the destination application's paste function to paste the selected data. Tracking the TT Product Version Number Use the TT Product Version/User Usage report to track the use of TT product's version numbers and related login activity. Tracking version number is useful for both administrators and traders. For example, if you know what version of X_TRADER your traders use, you can inform those traders when they need to upgrade. TT User Setup User Manual Trading Technologies International, Inc. 239 17 Reports The report displays a history of client versions and logins related to specific version, username, product, and IP address keys. In the report, a new row is displayed for each combination of the four "key" fields. For example, a trader with a single username and IP address, who uses both X_TRADER and X_RISK is displayed in two separate rows; one for X_TRADER and one X_RISK. The fields displayed in the TT Product Version/User Usage report include the following: Field Description Username Universal Login ID used to log into one or more TT Gateways (e.g., JDOE). Display Name An identifier whereby you easily recognize the user (e.g., John Doe). User Group An identifier used to categorize users (e.g., Chicago). Status An identifier as to whether the user is active or inactive. Email The user's email contact. Phone The user's telephone contact. IP Address An identifier of the machine on which the TT product resides. TT Product The specific TT product (e.g., X_TRADER). Version Version number of the TT product. Last Recorded The last date and time at which a report was exported. User's Most Recent Version Record The newest version information for client applications (e.g. X_TRADER) that have logged in. First Recorded The initial date and time a report was exported. Number of Recordings The total number of reports that you have exported. File Location The directory in which your .html or .csv file is stored. Most Recent Recorded Login Date/Time for this Username The date and time the user last logged in with a specific username on the specific IP address. 240 TT User Setup User Manual Trading Technologies International, Inc. 17 Reports To display TT product version in a report: 1. From the Reports menu, select Run Reports. The Reports window appears. 2. From the Report drop-down list, select TT Product Version/User Usage. 3. Click Run. The report appears. Using Audit Trail to Track Database Updates Use the Audit Trail window to track updates made to the database. Database updates are logged automatically in the UserSetupDbUpdates.ini file and include a daily record that is viewable in a standard Internet browser. Updates are categorized based on the date and time of the update, the type of update (e.g., update user email account), the username and IP address of the user that made the update, and the application in which the update was performed. The Audit Trail window displays a list of available log files, and shows the date the files were created and the size of the log files. To display a logfile via the Audit Trail window: 1. From the Reports menu, select Audit Trail. TT User Setup User Manual Trading Technologies International, Inc. 241 17 Reports 2. From the Audit Trail window, click View Audit Trail File. The TT User Setup Database Updates file appears in your Internet browser. 242 TT User Setup User Manual Trading Technologies International, Inc. 17 Reports Note: You can copy data into Excel or any other applicable application. You have successfully displayed a logfile via the Audit Trail window. Displaying Logged in Users TT User Setup allows you to list all users currently logged into the trading environment. You can display a list of logged in users based on username, gateway connection, product license, and product license per number of markets. Viewing the logged in users report allows you to determine how your licenses are currently being used and how many licenses you have available. Note: When logged in as a Group Administrator, TT User Setup only displays the user and gateway logins that exist in one of the user groups the administrator has permission to manage. TT User Setup User Manual Trading Technologies International, Inc. 243 17 Reports To view connected users: 1. From the Reports menu, select Logged in Users. The Logged in Users window appears. 2. To refresh the window, click Refresh. 3. View the Logged in Users window tabs as needed: • Use the By User tab to list each user that is currently consuming a license. You can also force a logoff from this tab. • 244 Use the By Gateway tab to determine which users are connected to which gateways using which MGTs. TT User Setup User Manual Trading Technologies International, Inc. 17 Reports • Use the By Product License tab to determine how many licenses are available for each product. • Use the By Product License/Number of Markets tab to determine how many licenses are available for each license type. For example, you may have five 5-license X_TRADER licenses and one 1-license X_TRADER license available. You have successfully viewed the connected users. TT User Setup User Manual Trading Technologies International, Inc. 245 17 Reports Viewing Server Messages The TT User Setup Server (Master or Slave) frequently updates its local database with the most current data. You can monitor all server activity through a Server Messages window, which is available through the TT User Setup Client. Note: You do not need to be logged in to view server messages. You use the Server Messages window to monitor server activity including login attempts, server ups or downs, error conditions, etc,. In addition, the window shows occurrences of database replication whereby administrator changes processed by the Master server are replicated by any Slave servers running in the environment. For detailed information regarding server replication refer to the TT User Setup System Administrator Manual. Note: When logged in as a non-Super Administrator, the administrator can only view logins for users the administrator is designated to manage. To access the Server Messages window: 1. From the Reports menu, select Server Messages. The following is an example of the Server Messages window and some of the types of messages it displays: Note: The Server Messages window appears automatically whenever an error is received. 246 TT User Setup User Manual Trading Technologies International, Inc. 17 Reports The Server Messages window displays only messages that occur while the client is running. Refer to the server log files (in the ~tt/logfiles directory) for current and previous log messages. 2. To stop the Server Messages window from scrolling automatically to the most recent message (at the bottom), uncheck the Scroll automatically to most recent message option. 3. To display only warnings and errors, check the Show only Warnings and Errors checkbox. 4. To configure the number of hours of messages the Server Messages window displays, set the Hours of message history to keep for display field. Displaying Running Servers TT User Setup allows you to view all TT User Setup servers currently running. This list of servers appears in the TT User Setup Servers window. For each trading environment, you TT recommends that you install multiple TT User Setup servers. However, only one of those servers can be designated as the Master server. All other servers must be designated as Slaves, which contain identical data to that of the Master and serve as a backup in case another server fails. Using this window, an administrator can more easily locate each TT User Setup server and also ensure there is only a single Master server running. To view running servers: 1. From the Reports menu, select TT User Setup Servers. The TT User Setup Servers window appears. 2. To refresh the window, click Rescan network for User Setup Servers. 3. To exit the window, click Close. You have successfully viewed the running servers. TT User Setup User Manual Trading Technologies International, Inc. 247 17 Reports Viewing Server Status The Environment Server Status window shows server status information for the exchanges listed in the Guardian Exchange tree. From this window you can sort and filter by exchange, service, or IP address to view the status of each server. Access this window from the Reports menu. Generating an ICE Product Groups Report The ICE Product Groups report collects information about the users' product group permissions settings, the trading environment, and the TT applications used to connect to the trading environment. The report includes: • • • • • • The time and date that the named administrator created the report on the named TT User Setup server. Timestamp and configuration settings for the users that connect to ICE gateways. A list of the allowed and blocked product groups, per customer. A product group is only listed as blocked when all traders assigned to a given customer are blocked from the product group. A list of users that have blocked ICE product groups, along with which product groups are blocked, and when an administrator created the block.. A list of ICE live Gateways and ICE Live Gateway connections. This information identifies the network as a valid trading environment. The versions of recently used TT products and the date that the user connected. This allows ICE to determine if users can connect using older TT applications that do not support product filtering. Note: Product groups that are marked allowed may not actually be allowed if the TT gateway is not configured to subscribe to those products. When you generate the report, TT User Setup creates two zip files, one encrypted and one unencrypted. Both zip files contain identical .bin and .csv files. Typically you send both versions of the file to ICE. Note: If you want the ICE Product Group report to list the product permissions per customer, then you must associate each user with a customer. To group users by customer, on the user’s Main tab, enter the customer name into the Organization field. 248 TT User Setup User Manual Trading Technologies International, Inc. 17 Reports To generate an ICE Product Groups report: 1. From the Reports menu, select ICE Product Groups Report. 2. When prompted to create the ICE product groups report file, click Yes. TT User Setup generates the ttus_ice_product_group<timestamp>.zip and ttus_ice_product_group<timestamp>.zip.server.zip files and copies them to the ~tt\logfiles\ folder. TT User Setup User Manual Trading Technologies International, Inc. 249 17 250 Reports TT User Setup User Manual Trading Technologies International, Inc. Tutorials How to Setup a New User Who Will Trade Using a TTORD Gateway Login In this tutorial you will learn how to setup a new X_TRADER user (John Doe). Using the unique TTORD ID you will create, John can log into, and trade on, several TT gateways. In addition, this tutorial will illustrate how to setup John with pre-trade risk limits, order defaults, account numbers, etc. To setup a user to trade several markets using X_TRADER and a non-registered trader login: 1. From the User Admin menu, select Users. 2. From the Users window, set the New User View to X_TRADER/X_RISK fields. 3. Click New. The New User window appears. TT User Setup User Manual Trading Technologies International, Inc. 251 18 Tutorials 4. On the Main tab, enter the following: 1. Enter the X_TRADER Login information. This is the Username and Password the X_TRADER user uses to log in. 2. Check the Active option to activate the user login. 3. Configure User-Level Risk, if needed. 4. Add Contact and User Defined Fields information if needed. 5. From the X_TRADER/X_RISK tab, click the X_TRADER Properties tab, and then select an X_TRADER mode. 252 TT User Setup User Manual Trading Technologies International, Inc. 18 Tutorials 6. Click Save. 7. On the Gateway Logins tab, click New. The New Gateway Login window appears. Note: A "gateway login" consists, in part, of the MGT and corresponding gateways that a user logs into. On the New Gateway Login window, you can create the unique TTORD ID that John Doe will use when trading. The steps below illustrate mapping John's TTORD ID to real registered Trader IDs (Exchange Traders) and TT gateways. In addition, follow the steps to setup pre-trade risk parameters that apply to all orders submitted by John's new TTORD ID. 8. To create a TTORD login, enter a Member ID beginning with TTORD and a Group and Trader ID. The Member ID must be 7 characters or less. Note: To prevent John's MGT from sharing an order book with others, the Member and Group fields must be unique. TT User Setup User Manual Trading Technologies International, Inc. 253 18 Tutorials Note: The Add to Guardian option is automatically checked for any tradable TTORD. The Add to Guardian option does not appear if DisableProductLimitPublishingMode is on. 9. Click Map to Exchange Traders. The Map Exchange Trader to window appears, whereby for example, you can map TTORDJS 001 001 to registered trader IDs. 10. If there are no available exchange traders, you can create one by clicking Create. 254 TT User Setup User Manual Trading Technologies International, Inc. 18 Tutorials The New Exchange Trader window appears. 11. Click the Market field or the ... button, select a Gateway, and then click Select. The Market and Gateway fields automatically populate with your selection. 12. Complete the Member, Group, and Trader fields and click Save. 13. If there are available exchange traders in the Map Exchange Trader to window, you can skip Steps 9 and 10, and use the arrow buttons to transfer multiple IDs from the Available Exchange Traders section to the Selected Exchange Traders section. 14. Click Done. 15. On the New Gateway Login window, click Assign Accounts. Note: You are required to assign a unique account number when setting up a new TTORD ID. The Assign accounts window displays a list of all accounts not currently in use by another ID. TT User Setup User Manual Trading Technologies International, Inc. 255 18 Tutorials 16. Using the arrow buttons, transfer one or more records from the Available Accounts section to the Selected Accounts pane. Note: In order to trade, John Doe would be required to use one of the selected account numbers. 17. If there are no available accounts to select, click Create. 18. On the New Account window, enter the Account name and Account description and then click Save. You can also enter configure account-based risk from the New Account window 256 TT User Setup User Manual Trading Technologies International, Inc. 18 Tutorials (refer to the “Account Administration Overview” on page 153 topic if needed). 19. On the Assign accounts window, click Done. Note: You can set up John's account numbers as order defaults when setting his customer defaults. 20. On the New Gateway Login window, in the Guardian data section, either uncheck the Risk Check setting or click the New Product Limit button and set up products for John to trade. Note: Because John's TTORD is mapped to CME, you should set up product limits that apply to the CME gateway. As such, John can trade all Futures on CME and is subject to the limits illustrated above. 21. On the New Product Limit window, apply any applicable limits and then click Save. All newly created data appears in the New Gateway Login window. TT User Setup User Manual Trading Technologies International, Inc. 257 18 Tutorials Note: For a detailed description of product limit functionality, refer to the product limit topics in the Risk Management section. 22. In the Guardian data section, check the Trading allowed option to turn on trading for this TTORD. Note: When the Trading allowed option is not checked, all orders placed by this MGT are rejected. 258 TT User Setup User Manual Trading Technologies International, Inc. 18 Tutorials 23. On the New Gateway Login window, click Save. Note: The newly created gateway login data appears in the Gateway Login tab on the Edit User window. 24. From the X_TRADER/X_RISK tab, click the X_TRADER Customer Defaults tab, and enter any applicable customer default data. Keep in mind that a TTORD may have only one customer default account to trade with. Note: To ensure that John enters orders on the correct account, in the <Default> row, verify the Account field contains John's correct account number. For a detailed description of customer default functionality, refer to the customer defaults topics in the Managing Users section. TT User Setup User Manual Trading Technologies International, Inc. 259 18 Tutorials 25. On the Edit User window, click the Save button. The newly created user and associated data display in the Users window. 26. On the control panel, click the Publish to Guardian icon. Note: TTORDs must be published to Guardian to be valid. How to Map an Additional Gateway Login to an Existing TTORD User In this tutorial you will learn to update an existing TTORD user (John Doe). Using John's unique TTORD ID (TTORDJS001001) you will add a Eurex gateway to the CME, BrokerTec, and CBOT Gateways that John currently logs into. In addition, you will add corresponding product limits to John's Eurex Gateway Login. To map an additional gateway login to an existing TTORD user: 1. From the User Admin menu, select Users. The Users window appears. 2. In the Display Name column filter, type John's display name to easily locate his user record. 3. To open the Edit User window for JDOE, double-click on the row associated with John's user record. For additional ways to access the Edit User window, refer to “Creating, Editing, and Deleting Records” on page 25. 260 TT User Setup User Manual Trading Technologies International, Inc. 18 Tutorials 4. Click the Gateway Logins tab and then double-click the row for any of John's existing logins. The Edit Gateway Logins window appears. 5. Click Map to Exchange Traders. 6. On the Available Exchange Traders section of the Map Exchange Traders to window, type Eurex in the Gateway column filter to easily locate any available Eurex MGTs. TT User Setup User Manual Trading Technologies International, Inc. 261 18 Tutorials Note: If there are no Eurex MGTs available, click the Create button to open the New Exchange Trader ID window, and create a Eurex MGT. 7. Using the arrow buttons, transfer a Eurex MGT from the Available Exchange Traders section to the Selected Exchange Traders pane. 8. Click Done. 9. On the Edit Gateway Login window, click Save and then Close. 10. On the Edit User window, click New to create a new product limit. 11. Select Eurex for the Gateway field, and edit the data in one or more additional fields (e.g. Change the maximum order quantity to 2000). 12. Click Save. John's new product limits display in the Product Limits window. 13. Close the Product Limits window. 14. On the Edit User window, click Save. 262 TT User Setup User Manual Trading Technologies International, Inc. 18 Tutorials 15. Click Close. Note: To apply John's new gateway login settings, you must publish them to Guardian. How to Set Up an Administrator Who Uses Both X_RISK and TT User Setup In this tutorial you will learn to create an admin-type user (Mark) that is able to log into both X_RISK and TT User Setup. In addition, you will set up Mark so that he can create new users, assign risk parameters in TT User Setup, publish SODs, and monitor trading via X_RISK. Note: As part of the administrator setup procedure, you should set up an administrator email account for the dissemination of newly generated passwords. For the procedure for setting up such an account, refer to the topic “Configuring the Outgoing Email Settings” on page 93. To set up an administrator who uses both X_RISK and TT User Setup: 1. From the User Admin menu, select Users. 2. From the Users window, set the New User View to TT User Setup Admin fields. 3. Click New. The New User window appears. TT User Setup User Manual Trading Technologies International, Inc. 263 18 Tutorials 4. On the Main tab: 1. Assign Mark a Username, Display name, and Password. 2. Select Password never expires. 3. Add any other data in the applicable fields, and 4. Click Save. 5. On the TT User Setup Permissions tab, click to select either Super Administrator or Group Administrator. Note: If you select the Group Administrator option, you must assign at least one user group to that group Administrator. 6. Change the View to X_TRADER/X_RISK fields. Notice that the TT User Setup Permissions tab remains. 7. From the X_TRADER/X_RISK tab, select the X_RISK Properties tab, and then select the X_RISK options as needed. 264 TT User Setup User Manual Trading Technologies International, Inc. 18 Tutorials 8. Click Save. Note: Selecting any of the X_RISK options allows Mark to monitor risk via X_RISK. If you allow Mark to publish manual fills (Manual Fill (MF) access allowed) or start-Of-Day records (Start of Day (SOD) access allowed), you can restrict Mark to publishing only to accounts that exist in specified user groups by checking the Restrict X_RISK administrator to publishing ... option. 9. Select the Gateway Logins tab. 10. Click New. The New Gateway Login window appears. Note: You may instead select to click the Assign Existing Logins button. For a detailed description of that procedure, refer to the “Assigning Gateway Logins to a User Through the Users Window” on page 83 topic. 11. Enter a Member, Group, and Trader (MGT) ID. TT User Setup User Manual Trading Technologies International, Inc. 265 18 Tutorials Note: Use TTADM for a full admin. 12. Click Add Gateways. The Select Gateway window appears. 13. Select a Market, a Gateway, and click Done. Repeat this step for each gateway that Mark would log into. 266 TT User Setup User Manual Trading Technologies International, Inc. 18 Tutorials Note: You do not have to associate an account, as this is only necessary when publishing to Guardian. 14. Click Save. Note: For Mark, being a TT User Setup user, the newly created gateway login can be used to log into X_RISK. 15. On the Edit User window, click Save. Mark's new administrator user data appears in the Users window. How to Set Up a Third-party Risk Administrator TT User Setup User Manual Trading Technologies International, Inc. 267 18 Tutorials In this tutorial you will learn how to create an administrator that will only manage risk for a select group of TT Gateways. This is useful when you use a third-party's exchange credentials but do not want that third-party to create users, edit non-risk settings, or edit risk settings that do not belong to them. Example: ABC Trading hosts two TT Gateways (CME-A and Eurex-A) and manages traders using TT User Setup. To provide traders access to an ICE Gateway, ABC Trading uses the credentials of a second company, XYZ Futures. Because XYZ Futures owns the ICE credentials, XYZ Futures administrators want to manage risk for any ICE trades. However, because the traders also trade CME and Eurex, ABC Trading administrators want to manage risk for any CME or Eurex trades, as well as all other aspects of the users' configuration. ABC Trading administrators also want to control which traders can trade on the XYZ Futures Gateways. To satisfy these requirements, ABC Trading administrators will create a new TT User Setup group that contains only the ICE gateway logins. They will then assign the new group to an XYZ Futures Gateway Login administrator. When the XYZ Futures administrator logs in, he will be able to manage the gateway logins (which include all the risk limits) for the XYZ Futures Gateways. XYZ Futures administrators will not be able to assign these gateway logins to users. This will be done by ABC Trading. Creating the Gateway Login Group To create a group that contains only gateway logins: 1. 2. 3. 4. Log into TT User Setup as a super administrator. From the User Admin menu, select User Groups. From the User Groups window, click New. Create a new user group that will only be used for the third-party's gateway logins (e.g XYZFuturesRisk). 5. If TT User Setup already contains some or all of the third-party gateway logins, you can assign them to this new user group by clicking Assign Gateway Logins and then selecting the available gateway logins. The third-party administrator will also be able to create new gateway logins as needed. 6. Continue to the next section, “Creating the Third-party Gateway Login Administrator” on page 268. Creating the Third-party Gateway Login Administrator To create an administrator that can only manage gateway logins: 268 TT User Setup User Manual Trading Technologies International, Inc. 18 Tutorials 1. From the User Admin menu, select Users. 2. In the Users window, set the New User View to TT User Setup Admin fields, and then click New. 3. On the Main tab of the New User window, enter the appropriate Login data, including Username and any additional data in the applicable fields. 4. On the TT User Setup Permissions tab select the Gateway Login Administration option. Leave Restrict Gateway Login Administrator to User Groups listed below checked. 5. Move the third-party group you created in the previous section to the Can only manage Gateway Logins in the following User Groups section. 6. Click Save and then click Close. When the third-party gateway login administrator logs in, TT User Setup displays only the gateway logins that you assigned to the third-party gateway login group. The gateway login administrator can create new gateway logins, as long as they do not conflict with your current gateway logins. The gateway logins that the gateway login administrator creates cannot be used until you assign them to a trader. Assigning Users to the Third-party Gateway Logins To assign users to the third-party gateway logins you must log into TT User Setup as an administrator that can access both the third-party user group and the traders' user group(s). You can then access the Gateway Logins window and assign the gateway logins. How to Create a New User by Copying an Existing User In this tutorial you will learn to create a new user (Matt), whose setup is similar to a user who has already been created (Brenda). While creating the new user, you will incorporate TT User Setup's copying features to duplicate elements of Brenda's setup and apply them to Matt's setup. To use the copy function to create a user who has a similar setup to an existing user: 1. From the User Admin menu, select Users. The Users window appears. TT User Setup User Manual Trading Technologies International, Inc. 269 18 Tutorials 2. Highlight the row for BTAYLOR, and click Copy. The Copy User - Options window appears. Any options that are not available for the currently selected user are disabled. For example, BTAYLOR does not have any direct trader or admin gateway logins. 270 TT User Setup User Manual Trading Technologies International, Inc. 18 Tutorials 3. For this tutorial, select the following options: • • • Select Copy TTORD Gateway Logins. Select Create a new TTORD... to copy TTORD Gateway Logins as a new TTORD. Enter a new Member (TTORDJS) Group (001) and Trader (002). Because Matt has the same Member and Group as Brenda, they will share an order book. • Enter an account number of TT111_b. This is mandatory for TTORDs and must be an account that doesn't exist or is currently not assigned to another Gateway Login. • Select Copy Customer Defaults. 4. Click Continue Copy. TT User Setup User Manual Trading Technologies International, Inc. 271 18 Tutorials The New User window appears and is populated with most of the data from the BTAYLOR profile. Notice, however, that the Gateway Logins have the TTORDJS 001 002 MGT but the same gateways and product limits as the gateways in the BTAYLOR profile. If you edit the Gateway Logins you will also see that the account number is TT111_b. 5. Locate the X_TRADER/X_TRADER Customer Defaults tab. As requested, TT User Setup copied all of Brenda's customer defaults. However, you will need to update the account numbers to ones assigned to Matt. 6. 272 TT User Setup User Manual Trading Technologies International, Inc. 18 Tutorials Click Replace Account Numbers. The Replace Account Numbers window appears. Configure the account replacement rules to determine how the existing account numbers will be replaced. • In the Step 1section, check Remove characters and set the options to The first 1 characters. • In the Step 2 section, check Add characters, At end, and then enter b into the Characters to add field. 7. Click Review Changes. TT User Setup User Manual Trading Technologies International, Inc. 273 18 Tutorials The Review Account Number Changes window appears. 8. Click Apply Changes. The account numbers are replaced. 9. On the Main tab, assign Matt a new Username and Display Name, edit any other applicable fields, and click Save. You have successfully copied a user. How to Assign Existing Product Limits to Other Gateway Login IDs Simultaneously In this tutorial you will learn how to assign one or more of John Doe's product limits to several other gateway logins simultaneously. To assign product limits to several gateway logins simultaneously: 274 TT User Setup User Manual Trading Technologies International, Inc. 18 Tutorials 1. From the User Admin menu, select Product Limits. The Product Limits window appears. 2. Select the Gateway Login Limits tab, and then filter the Users column by JDOE. For a detailed description on filtering functionality, refer to the “Applying Filters” on page 30 topic. 3. Highlight the product limits you want to assign. 4. Click Mass Copy to Other Gateway Logins. The Select Gateway Logins window appears. 5. Highlight several MGTs to which you want the product limits applied and click Select. 6. If an overwrite message appears, click Yes to continue. TT User Setup User Manual Trading Technologies International, Inc. 275 18 Tutorials John's product limits are applied to the MGTs you selected accordingly. Note: Assigning additional product limits helps to differentiate multiple MGTs. How to Change Multiple Product Limit Values Simultaneously In this tutorial you will learn how to use the Product Limits window to change several product limit values at the same time. In the example you will learn to update the maximum order quantity for multiple traders placing CBOT Futures orders on a specific gateway flavor. To change multiple product limit values simultaneously: 1. From the User Admin menu, select Product Limits. The Product Limits window appears. 2. Click the Gateway column title to filter rows alphabetically. For a detailed description of filtering functionality, refer to the “Applying Filters” on page 30 topic. 3. While pressing the Ctrl key, click all the product limit rows for a flavor-specific gateway (e.g. Eurex). 4. Click Edit. 5. On the edit multiple limits warning, click OK. The Edit Multiple Product Limits window appears. 276 TT User Setup User Manual Trading Technologies International, Inc. 18 Tutorials Note: Columns containing various values will display <values differ> (e.g. One row may have CME as the Gateway value and another may have Eurex). 6. In the Maximum order qty field, set the quantity to a new value, such as 100, and then click Save. Changes to the maximum order quantity are reflected in the Product Limits window. How to Set Up Customer Defaults • • In the first example you control which customer defaults can be selected, as well as which attributes are associated with each customer default record. In the second example you can select from multiple customers, each with their own unique set of customer defaults (created in TT User Setup by an administrator). This second option would typically be used by a broker who trades for several customers. For a detailed description of how to use customer defaults, refer to the “Creating and Managing X_TRADER Customer Defaults” on page 73 topic. Example 1 Set up customer defaults for a trader where you control which customer default attributes the trader can select from, such as what account is used when trading on different markets. To set up customer defaults where you define the account the trader uses: 1. From the User Admin menu, select Users. The Users window appears. 2. Highlight the row of the user for whom you want to create customer defaults. 3. Click Edit. TT User Setup User Manual Trading Technologies International, Inc. 277 18 Tutorials The Edit User window appears. 4. From the X_TRADER/X_RISK tab, click the X_TRADER Customer Defaults tab. 5. Highlight the <DEFAULT> customer row and click Edit. The Edit Customer Default window appears. 278 TT User Setup User Manual Trading Technologies International, Inc. 18 Tutorials 6. In the Account # field enter an account identifier (e.g. ACT111). -orTo select an existing account, click the ellipsis (...) button and then pick an account from the Select Account window. 7. In the Market field, make a selection from the list. Note: When creating multiple customer default records for the same Customer, at least one "key" field (Market, Gateway, Product, Product Type) must differ for each record. 8. When editing the initial <DEFAULT> record, Selected is checked and uneditable; the default customer default cannot be deselected or deleted. For all other customer default records check the Selected option to enable the customer default. On the Edit User field Selected is displayed as Sel. The record(s) you select defines which defaults are applied to the trader. For example, the Account # field defines which account number the trader uses. Note: For customer defaults created in TT User Setup, Sel is the only field you can edit via X_TRADER. All other TT User Setup-created fields are grayed out. 9. On the Edit Customer Default window, click Save and Add New. Your customer default record appears in the Edit User window. 10. Repeat Steps 6-9 and create several more customer default records. The image below shows an instance where several customer default records have been created for the <DEFAULT> customer. 11. On the Edit User window, click Save. TT User Setup User Manual Trading Technologies International, Inc. 279 18 Tutorials You have successfully set up customer default records. Example 2 Set up unique customer defaults for a broker who trades for several customers. To set up unique customer defaults for a broker who trades for several customers: 1. From the User Admin menu, select Users. The Users window appears. 2. Highlight the row of the user for whom you want to create customer defaults. 3. Click Edit. The Edit User window appears. 4. From the X_TRADER/X_RISK tab, click the X_TRADER Customer Defaults tab. 5. Click New. The New Customer Default window appears. 280 TT User Setup User Manual Trading Technologies International, Inc. 18 Tutorials 6. In the Customer field, enter a unique identifier (e.g. CUST1). 7. Enter additional data in the applicable fields as needed. 8. Check the Selected option to enable the customer default. 9. Click Save and Add New. 10. Repeat Steps 6-9 until multiple Customers have been created. 11. Click Save. You have successfully set up customer default records for multiple customers. How to Update Customer Defaults Across Multiple Users Simultaneously TT User Setup User Manual Trading Technologies International, Inc. 281 18 Tutorials Assume there are multiple users in your system placing orders for a customer (DMiller), and that the account number associated with DMiller is 1091982. In this tutorial you will learn to update the default account number being used by several of your users when entering orders for DMILLER. To simultaneously update the account number being used by several users: 1. From the User Admin menu, select X_TRADER Customer Defaults. The Customer Defaults window appears. Note: All customer default rows with <DEFAULT> as the Customer are displayed with a blue background. 2. Filter the Customer column by DMILLER. 3. Highlight all the rows with DMILLER in the Customer field. 4. Click Edit. Note: If an edit warning message appears, click OK to proceed. The Edit Multiple Customer Defaults window appears. 282 TT User Setup User Manual Trading Technologies International, Inc. 18 Tutorials Note: Columns containing various values display <values differ> (e.g. One row may have CME as the Market value and another may have Eurex). 5. In the Account # field, click the ellipsis button. The Select Account window appears. TT User Setup User Manual Trading Technologies International, Inc. 283 18 Tutorials 6. Filter the Account # field by 1091982. 7. Highlight the row with an Account Description of DMiller and click Select . The Account # field on the Edit Multiple Customer Defaults window is populated. 8. Click Save. The Customer Defaults window updates to reflect the change in the account number. 284 TT User Setup User Manual Trading Technologies International, Inc. 18 Tutorials How to Review Changes Prior to Publishing to Guardian In this tutorial you will learn how to use the Publish to Guardian window. This includes: • • • • How to recognize when Guardian and TT User Setup data are out of synch. How to recognize when there are differences between Guardian and TT User Setup data. How to read data in the Publish to Guardian window. How to import data from Guardian. To publish records to Guardian: 1. From the File menu, select Publish to Guardian (or click the Publish to Guardian icon on the toolbar). The Publish to Guardian window appears. 2. Highlight the differences you want to publish. 3. Click the Publish Selected Gateway Logins to Guardian button. Recognizing when Guardian and TT User Setup data is out of sync TT User Setup provides a pop-up message window that notifies you when data needs to be published to Guardian. This message appears automatically when you make a change that causes TT User Setup and Guardian to be out of sync. The message also appears if you open the TT User Setup client when TT User Setup and Guardian are out of sync. TT User Setup User Manual Trading Technologies International, Inc. 285 18 Tutorials Understanding differences in Guardian and TT User Setup data TT User Setup provides a detailed account of differences that exist between TT User Setup and Guardian data prior to publishing. You can use the information provided to reconcile these differences. The Guardian/User Setup Differences Details window consists of three panes; one providing specific account and gateway login information, another showing gateway and exchange trader data, and a third illustrating established product limits. The image below shows how differences are displayed and describes some sample differences. To access the Differences Details window: 1. From the File menu, select Publish to Guardian. -orOn the toolbar, click the Publish to Guardian icon. 286 TT User Setup User Manual Trading Technologies International, Inc. 18 Tutorials The Publish to Guardian window appears. 2. Click a single differences row. 3. Click View Differences Details. The Guardian/User Setup Differences Details window appears. Reading data in the Publish to Guardian window The Publish to Guardian window specifies differences in trader data between TT User Setup and Guardian and allows you to publish that data in order to synchronize both systems. Publishable records are categorized into one of the three following options and assist in defining differences: • • • TT User Setup only - Applies to unpublished gateway logins created in TT User Setup. Guardian and TT User Setup - Applies to records where, for example, a TT User Setup login is mapped to an exchange to which the same Guardian login is not mapped. Guardian only - Applies to unpublished trader IDs created in Guardian. The image below shows how differences can be displayed. TT User Setup does not support setting up risk in Guardian. However, for instances where risk was published outside of TT User Setup (e.g. records exist in Guardian only), you can use the Import from Guardian option. Note: Because TT User Setup automatically imports all trader data from Guardian when the TT User Setup Server starts up, you will rarely use this functionality. To import data from Guardian: TT User Setup User Manual Trading Technologies International, Inc. 287 18 Tutorials 1. From the File menu, select Publish to Guardian. -orOn the toolbar, click the Publish to Guardian icon. The Publish to Guardian window appears. 2. Right-click in the grid display to open a context menu. 3. Click Import from Guardian (Advanced). 4. To import additional gateway logins, on the Import message, click OK. After importing, the highlighted records (that were Guardian Only) appear in the Gateway Logins window. Matching values for records that are both Guardian and TT User setup will be overwritten. Note: Records are never deleted from TT User Setup after importing, but are appended instead. Once imported, the Guardian Only entries from the Guardian/TT User Setup Differences window will no longer be displayed. How to Change the Message Users Receive When Their Logins Fail 288 TT User Setup User Manual Trading Technologies International, Inc. 18 Tutorials This tutorial shows how an administrator edits the message the users receive after a failed login attempt. To enable and edit the failed login attempt message your users receive: 1. From the Server Admin menu, select System Settings. The System Settings window appears. 2. Select the General tab. TT User Setup User Manual Trading Technologies International, Inc. 289 18 Tutorials 3. In the Failed Login Attempts section, check the Apply an additional failed login message to users option to enable the functionality. 4. In the corresponding free-form text box, edit the default message or create an entirely new message. 5. Click Save and then click Close. Note: TT User Setup displays the additional failed login message after a failed login attempt. How to Use Wildcard Characters in Filters In this tutorial you will learn how to use wildcard characters to filter the Gateway Login window's Gateway column for all A-flavored gateways. This allows you t locate specific user and login data more quickly. Wildcard character options include the following: • • + is a wildcard used to match multiple characters. ? is a wildcard used to match a single character. To use a wildcard character to filter for all A-flavored gateways: 1. From the User Admin menu, select Gateway Logins. The Gateway Logins window appears. Note: Wildcard characters can be used when filtering a column in any window with a grid display. 2. Click in the filter display in the Gateway column header. 3. Type the following: +-A. The Gateway column displays only A-flavored gateways. 290 TT User Setup User Manual Trading Technologies International, Inc. 18 Tutorials You have successfully filtered the Gateway column for all A-flavored gateways. How to Set Up a Tiered Administrator In this tutorial you will learn how to setup a new Group Administrator (AMURPHY). After creating the Group Admin user, you will give the user access to the user group (Chicago) that you will also create. In addition, this tutorial will illustrate how to assign gateway logins to a user group, select the user groups that a group administrator can manage, enable the permission to create direct trader gateway logins, and edit the user group of multiple users. To set up a group administrator: 1. From the User Admin menu, select Users. 2. In the Users window, set the New User View to TT User Setup Admin fields. 3. Click New. The New User window appears. 4. On the Main tab, enter the appropriate Login data, including Username (e.g. AMURPHY), and any additional data in the applicable fields. TT User Setup User Manual Trading Technologies International, Inc. 291 18 Tutorials 5. Click Save. 6. Click the TT User Setup Permissions tab and select the Group Administration option. 7. Ensure the Able to create Direct Trader Gateway Logins option is selected. 8. If the group that this administrator will manage is not in the Available User Groups list, click Create. The New User Group window appears. 292 TT User Setup User Manual Trading Technologies International, Inc. 18 Tutorials 9. Enter the Name of a new group (e.g. Chicago), and click Save. The new group is added automatically to the Can only manage the following User Groups pane. Note: If the Default(s) option is checked, any direct traders created by the Group Administrator automatically go into that default group (e.g. Chicago). 10. Click Save and then click Close. 11. On the Users window, select (highlight) multiple users and click Edit. 12. On the Edit Multiple Records warning, click OK to proceed. The Edit Multiple Users window appears. TT User Setup User Manual Trading Technologies International, Inc. 293 18 Tutorials 13. From the User group field, click Select Group. The Select User Group window appears. 14. Highlight the Chicago option and click Select. 15. On the Edit Multiple Users window, click Save and then Close . 16. Close the Users window. 17. From the User Admin menu, select User Groups. The User Groups window appears. 294 TT User Setup User Manual Trading Technologies International, Inc. 18 Tutorials 18. Click the Chicago user group, and click Assign Gateway Logins. The Assign Gateway Logins to User Group 'Chicago' window appears. Note: The Assign Gateway Logins section shows that you inherit any gateway logins mapped to the users you added to the user group. This rule also applies to accounts. 19. Assign additional gateway logins and click Save. 20. To test the group administrator's permissions, logout of TT User Setup, and then log back in using the login of the user you created (e.g. AMURPHY). If this is the first time logging in, the system prompts you to change the password. TT User Setup User Manual Trading Technologies International, Inc. 295 18 Tutorials The Users window only displays the users that belong to the group(s) that the group administrator is allowed to manage. How to Set Up a Drop Copy TT FIX Adapter Server and Corresponding FIX Adapter Clients In this tutorial, you will learn how to set up IDs for a Drop Copy TT FIX Adapter server as well as FIX Adapter client users that will connect to it. After creating the IDs, you will then be able to assign the FIX Adapter clients to the FIX Adapter server. The following example demonstrates these tasks. Example: ClearCo hosts three TT Gateways (CME-A, Eurex-A, and LIFFE-C) used by traders at two separate firms, AB Asset Management and YZ Capital. The credentials used by the traders at these firms for all TT Gateways are as follows: AB Asset Management: YZ Capital: TTORDAB / 001 / 001 TTORDYZ / 001 / 001 TTORDAB / 001 / 002 TTORDYZ / 001 / 002 TTORDAB / 002 / 001 TTORDYZ / 002 / 001 TTORDAB / 002 / 002 TTORDYZ / 002 / 002 TTORDAB / 003 / 001 TTORDYZ / 003 / 001 TTORDAB / 004 / 001 TTORDYZ / 004 / 001 These firms require a copy of all fills for all of their traders. ClearCo's Back Office Department also requires a copy of all fills for all traders. Based on these requirements, ClearCo needs to set up a new Drop Copy TT FIX Adapter Server (CCDC) and three FIX Adapter client users (AB, YZ, and CCBO). 296 TT User Setup User Manual Trading Technologies International, Inc. 18 Tutorials Complete all of the sections in both of the following topics: Creating TT FIX Adapter Servers Creating a Drop Copy TT FIX Adapter Server in TT User Setup consists of the following tasks: Creating a FIX Adapter Server Username To create a FIX Adapter Server username 1. From the TT User Setup Control Panel, open the User Admin menu and click Users. The Users window appears. 2. From the New User View list select FIX Adapter Server fields. 3. Click New. The New User window appears. 4. On the Main tab, enter data in the following fields: • Username: An identifier for the TT FIX Adapter Server (limited to 11 characters). • Display name: An identifier for the TT FIX Adapter Server. • User group: An identifier used to categorize users (e.g., Chicago). For a detailed description on user groups, refer to the TT User Setup User Guide. • Password/Confirm password: The password associated with this username, which is used to authenticate TT FIX Adapter Servers. • Country: The location of the TT FIX Adapter Server machine. • Zip: The Zip code in which the TT FIX Adapter Server machine is located. Zip is necessary only if the Country selected is the United States. The following figure shows the Login and Contact sections of Main tab for the new FIX Adapter Server, CCDC. TT User Setup User Manual Trading Technologies International, Inc. 297 18 Tutorials TT recommends that you leave the Password never expires option checked. 5. On the New User window, click the FIX Adapter tab. If a version requirement message appears, click OK. The FIX Adapter Role field automatically populates with FIX Adapter Server. If FIX client users have been created, they appear in the Available FIX client users or The following FIX client users can connect to this FIX Adapter table. If FIX client users have not been created, these tables are empty. 298 TT User Setup User Manual Trading Technologies International, Inc. 18 Tutorials 6. Click the Drop copy server radio button. 7. Continue to the next section. Assigning TT Gateway Credentials When creating a Drop Copy TT FIX Adapter, you must designate the credentials (called gateway logins) that the user uses to login to the TT Gateways. TT FIX Adapter Server logs into each TT Gateway once and acts on behalf of all FIX Adapter client users. Thus, the gateway logins (MGTs) that the TT FIX Adapter server uses to log into the TT Gateways must have the authority to act on behalf of all FIX Adapter client users. Specifically, the MGTs TT FIX Adapter Server uses to log into the TT Gateways must have permissions to view all orders and fills of all FIX Adapter client users. In our example: • • • TT FIX Adapter client user AB requires a copy of all fills for all traders with a Member ID of TTORDAB. TT FIX Adapter client user YZ requires a copy of all fills for all traders with a Member ID of TTORDYZ. TT FIX Adapter client user CCBO requires a copy of all fills for all traders. The credentials that have permissions to view all of these fills is TTADM/XXX/VIEW. TT User Setup User Manual Trading Technologies International, Inc. 299 18 Tutorials To assign credentials to the FIX Adapter Server user 1. On the New User or Edit User window for the CCDC user, click the Gateway Logins tab. 2. If the gateway login to which you want to map does not exist, click New. The New Gateway Login window appears. If the gateway login already exists, click the Assign Existing Logins button, and select the appropriate MGT(s). 3. On the Gateway Login Info tab, enter a Member, Group, and Trader. The following figure shows a new gateway login (TTADM/XXX/VIEW) for the new TT FIX Adapter server user, CCDC. For a detailed description of the various types of logins used in a TT environment, refer to the TT User Login and Risk Administration Reference Guide. 4. Click the Add Gateways button. The Select Gateway window appears. A TT FIX Adapter Server must be configured to connect to the TT Gateways from which the associated FIX Adapter client users require fills. 5. Hold down the Ctrl key, click CME-A, Eurex-A, and LIFFE-C gateway options, and click the Select button. 6. On the New Gateway Login window, click the Save button. If a message that this gateway login is tied to multiple gateways appears, click OK. TT User Setup returns to the Gateway Login tab of the New User or Edit User window. 300 TT User Setup User Manual Trading Technologies International, Inc. 18 Tutorials 7. Save and close the New User or Edit User window. 8. Continue to the next section. Creating TT FIX Adapter Client Users Creating a TT FIX Adapter client user in TT User Setup that connects to a Drop Copy TT FIX Adapter consists of the following tasks: Creating a FIX Adapter Client Username To create a client username 1. From the TT User Setup Control Panel, open the User Admin menu and click Users. The Users window appears. 2. From the New User View list select FIX Adapter Client fields. 3. Click New. The New User window appears. 4. On the Main tab, enter data in the following fields: 5. Username: The name of the FIX Adapter client user. In FIX, this is also known as RemoteCompId. 6. Display name: An identifier for the TT FIX Adapter client user. 7. User group: An identifier used to categorize users (e.g., FIX Adapter). For a detailed description on user groups, refer to the TT User Setup User Guide. TT User Setup User Manual Trading Technologies International, Inc. 301 18 Tutorials 8. Password/Confirm Password: The password associated with this username which is used to authenticate TT FIX Adapter client users. The following shows the Login section of the Main tab for new TT FIX Adapter Client, AB. Because FIX Adapter client users are unable to update an expired password using the same procedure as an X_TRADER user, TT recommends that you leave the Password never expires option checked. For information about the other user fields, refer to the TT User Setup User Guide. 9. Repeat this procedure to create users YZ and CCBO 10. Continue to the next procedure. Assigning TT Gateway Credentials When creating a TT FIX Adapter client user that connects to a Drop Copy TT FIX Adapter, you must designate one or more sets of credentials (gateway logins) that have permissions to view the fills that 302 TT User Setup User Manual Trading Technologies International, Inc. 18 Tutorials are required. This procedure is similar to setting up a TTORD in Guardian, except in TT User Setup you can create the TTORD and assign it to a FIX Adapter client in one step. In our example: • • • TT FIX Adapter client user AB requires a copy of all fills for all traders with a Member ID of TTORDAB. For this user, you could either list each MGT individually, or simply use TTORDAB/XXX/VIEW. TT FIX Adapter client user YZ requires a copy of all fills for all traders with a Member ID of TTORDYZ. For this user, you could either list each MGT individually, or simply use TTORDYZ/XXX/VIEW. TT FIX Adapter client user CCBO requires a copy of all fills for all traders. For this user, you could either list each MGT individually, or simply use TTADM/XXX/VIEW. To assign these credentials to each of the FIX Adapter client users: 1. On the New User or Edit User window, click the Gateway Logins tab. 2. For our example, client user AB uses the TTORDAB/XXX/VIEW MGT and Client user YZ uses the TTORDYZ/XXX/VIEW MGT. Because neither MGT has been created, you must add new gateway logins. 1. Click New to open the New Gateway login where you can enter gateway login information as follows: 2. Click Add Gateways to open the Select Gateway window where you can select the CME-A, Eurex-A, and LIFFE-C Gateways. TT User Setup User Manual Trading Technologies International, Inc. 303 18 Tutorials For a detailed description of the various types of logins used in a TT environment, refer to the TT User Login and Risk Administration Reference Guide 3. The FIX Adapter server user, however, uses the TTADM/XXX/VIEW MGT which we created in the “Creating a FIX Adapter Server username” on page 308 procedure. Because the MGT exists, we just need to assign the existing login to the FIX Adapter server user. 1. Click Assign Existing Logins. 2. Select the three TTADM/XXX/VIEW MGTs (use the Member filter to display only TTADM members if needed), and then click Assign. The Assign Gateway Login window appears. 4. On the New User or Edit User window, click Save. The following figure shows how the newly created gateway logins display in the New User or Edit User window. 304 TT User Setup User Manual Trading Technologies International, Inc. 18 Tutorials 5. Continue to the next section. Assigning a TT FIX Adapter Server to a FIX Adapter Client User To assign the TT FIX Adapter servers to which a FIX Adapter client user can connect: 1. On the New User or Edit User window, click the FIX Adapter tab. If a version requirement message appears, click OK. 2. Use the transfer arrow buttons (>, <, >>, <<) to select the FIX Adapter server users to which each client can connect. For our example, move the CCDC Server from the Available Fix Adapters list to the This FIX Client User can connect to the following FIX Adapter Servers list. 3. If checked, the Enabling Debug Logging for Orders and Enabling Debug Logging for Prices options prompt the selected TT FIX Adapter Server to generate verbose debugging information. TT User Setup User Manual Trading Technologies International, Inc. 305 18 Tutorials Because a significant increase in the log file size affects performance, only check these options when troubleshooting. 4. Save and close the Users window. 5. Repeat this procedure for each FIX Adapter Client user. 6. Continue to the next section. Running the TT User Setup Diagnostic Checks Use the Diagnostics Check utility after adding or modifying users to confirm that all of the data in TT User Setup is consistent and valid. Invalid data can cause FIX Adapter Client Logins to fail. To run the Diagnostic Check: 1. From the TT User Setup Control Panel, open the User Admin menu and click Diagnostic Checks. The Diagnostic Checks window appears. 2. Click Configure diagnostic checks. 3. From the Configure Diagnostics window, check any FIX Adapter-related options (L, M, and N), and then click OK. 306 TT User Setup User Manual Trading Technologies International, Inc. 18 Tutorials 4. From the Diagnostics Checks window, click Run/Refresh Diagnostic Checks. Any issues are listed by issue type and include a summary of the issue. For a detailed explanation of an issue type, click explain this. 5. Resolve any issues discovered through the diagnostic check. 6. To run other diagnostic checks, re-open the Configure Diagnostics window and select your typical diagnostic checks (or click Sync selection with automatic diagnostics to select only the checks that are configured to run automatically). After the diagnostic checks are selected, click OK and then click Run/Refresh Diagnostic Checks. When all the issues are resolved, you are finished with this tutorial. TT User Setup User Manual Trading Technologies International, Inc. 307 18 Tutorials How to Set Up an Order Routing TT FIX Adapter Server and Corresponding FIX Adapter Clients In this tutorial, you will learn how to set up IDs for an Order Routing TT FIX Adapter Server as well as FIX Adapter client users that will connect to it. After creating the IDs, you will then be able to assign the FIX Adapter Clients to the FIX Adapter Server. The following example demonstrates these tasks. Example: ClearCo is an FCM that hosts two TT Gateways (CME-A and Eurex-A). AB Asset Management is one of their customers. Three traders (BOB, BILL, and MIKE) at AB Asset Management would like to use their own FIX application to route orders to these TT Gateways. Traders BOB and BILL must have the ability to see each others orders. Trader MIKE does not share an order book with anyone. The traders will be mapped as follows: AB-BOB -> TTORDAB/001/001 AB-BILL -> TTORDAB/001/002 AB-MIKE -> TTORDAB/002/001 Based on these requirements, ClearCo needs to set up a new Order Routing FIX Adapter Server (CCOR) and three FIX Adapter client users (AB-BOB, AB-BILL, and AB-MIKE). Complete all of the sections in both of the following topics: Creating TT FIX Adapter Servers Creating an Order Routing TT FIX Adapter Server in TT user Setup consists of the following tasks: Creating a FIX Adapter Server username To create a FIX Adapter Server username 1. From the TT User Setup Control Panel, open the User Admin menu and click Users. 308 TT User Setup User Manual Trading Technologies International, Inc. 18 Tutorials The Users window appears. 2. From the New User View list select FIX Adapter Server fields. 3. Click New. The New user window appears. 4. On the Main tab, enter data in the following fields: • • Username: An identifier for the TT FIX Adapter Server (limited to 11 characters). • Display name: A more detailed description of the TT FIX Adapter Server (not limited to 11 characters). • User group: An identifier used to categorize users (e.g., Chicago). For a detailed description on user groups, refer to the TT user Setup user Guide. • Password/Confirm password: The password associated with this username, which is used to authenticate TT FIX Adapter Servers. • Country: The location of the TT FIX Adapter Server machine. • Zip: The Zip code in which the TT FIX Adapter Server machine is located. Zip is necessary only if the Country selected is the United States. The following figure shows the Login and Contact sections of Main tab for the new FIX Adapter Server, CCOR. TT recommends that you leave the Password never expires option checked. 5. On the New User window, click the FIX Adapter tab. If a version requirement message appears, click OK. TT User Setup User Manual Trading Technologies International, Inc. 309 18 Tutorials The FIX Adapter Role field automatically populates with FIX Adapter Server. If FIX client users have been created, they appear in the Available FIX client users grid. If FIX client users have not been created, this grid is empty. 6. Click the Order routing server radio button. 7. Continue to the next section. Assigning TT Gateway Credentials When creating an Order Routing TT FIX Adapter, you must designate the credentials (called gateway logins) used to login to the TT Gateways. TT FIX Adapter Server logs into each TT Gateway once and acts on behalf of all FIX Adapter client users. Thus, the gateway logins (MGTs) that the TT FIX Adapter Server uses to log into the TT Gateways must have the authority to act on behalf of all FIX Adapter client users. Specifically, the MGTs TT FIX Adapter Server uses to log into the TT Gateways must have permissions to view all orders and fills of all FIX Adapter client users. In our example: • • 310 TT FIX Adapter client user AB-BOB will route orders as TTORDAB/001/001 and will need to see all orders/fills for this MGT. TT FIX Adapter client user AB-BILL will route orders as TTORDAB/001/002 and will need to see all orders/fills for this MGT. TT User Setup User Manual Trading Technologies International, Inc. 18 Tutorials • TT FIX Adapter client user AB-MIKE will route orders as TTORDAB/002/001 and will need to see all orders/fills for this MGT. The credentials that have permissions to view all of these orders and fills is TTORDAB/XXX/MGR You could also use a higher-level MGT, such as TTADM/XXX/MGR, for the TT Gateway logins; however, TT does not recommend this approach because of its impact on performance. TT FIX Adapter could spend a considerable amount of time processing order and fill updates for which the FIX clients have neither interest nor permission to see. To assign credentials to the FIX Adapter Server user 1. On the New User or Edit User window for the CCDC user, click the Gateway Logins tab. 2. If the gateway login to which you want to map does not exist, click New. The New Gateway Login window appears. If the gateway login already exists, click the Assign Existing Logins button, and select the appropriate MGT(s). 3. On the Gateway Login Info tab, enter a Member, Group, and Trader. The following figure shows a new gateway login (TTORDAB/XXX/MGR) for the new TT FIX Adapter server user, CCOR. For a detailed description of the various types of logins used in a TT environment, refer to the TT user Login and Risk Administration Reference Guide. 4. Click Add Gateways. The Select Gateway window appears. A TT FIX Adapter Server must be configured to connect to the TT Gateways from which the associated FIX Adapter client users will require fills. 5. Hold down the Ctrl key, click CME-Aand Eurex-A gateway options, and click Select. 6. On the New Gateway Login window, click Save. TT user Setup returns to the Gateway Login tab of the New User or Edit User window. TT User Setup User Manual Trading Technologies International, Inc. 311 18 Tutorials 7. Save and close the New User or Edit User window. 8. Continue to the next section. Creating TT FIX Adapter Client users Creating a TT FIX Adapter client user in TT user Setup that connects to an Order Routing TT FIX Adapter consists of the following tasks: Creating a FIX Adapter Client username To create a client username 1. From the TT user Setup Control Panel, open the user Admin menu and click users. The users window appears. 2. From the New user View list select FIX Adapter Client fields. 3. Click New. The New User window appears. 4. On the Main tab, enter data in the following fields: 5. Username: The name of the FIX Adapter Client user. In FIX, this is also known as RemoteCompId. 6. Displayname: A more detailed description of the TT FIX Adapter Client user (typically the full name of the client). 7. User group: An identifier used to categorize users (e.g., FIX Adapter CCOR). For a detailed description of user groups, refer to the TT user Setup user Guide. 312 TT User Setup User Manual Trading Technologies International, Inc. 18 Tutorials 8. Password/Confirm Password: The password associated with this username which is used to authenticate TT FIX Adapter Client users. The following shows the Login section of the Main tab for new TT FIX Adapter Client, ABBOB. Because FIX Adapter Client users are unable to update an expired password using the same procedure as an X_TRADER user, TT recommends that you leave the Password never expires option checked. For information about the other user fields, refer to the TT user Setup user Guide. 9. Repeat this procedure to create users AB-BILL and AB-MIKE. 10. Continue to the next procedure. Assigning TT Gateway Credentials When creating a TT FIX Adapter Client user that connects to an Order Routing TT FIX Adapter, you must designate one or more sets of credentials (gateway logins) that will be used to route orders. This procedure is similar to setting up a TTORD in Guardian, except in TT user Setup you can create the TTORD and assign it to a FIX Adapter client in one step TT User Setup User Manual Trading Technologies International, Inc. 313 18 Tutorials In our example: • • • TT FIX Adapter Client user AB-BOB will route orders as TTORDAB/001/001. TT FIX Adapter Client user AB-BILL will route orders as TTORDAB/001/002. TT FIX Adapter Client user AB-MIKE will route orders as TTORDAB/002/001. To assign these credentials to each of the FIX Adapter client users: 1. On the New User or Edit User window, click the Gateway Logins tab. 2. For our example, Client user AB-BOB uses the TTORDAB/001/001 MGT, Client user ABBILL uses the TTORDAB/001/002 MGT, and Client user AB-MIKE uses the TTORDAB/ 002/001 MGT. Because none of these MGTs have been created, you must add new gateway logins. 1. Click New to open the New Gateway login where you can enter gateway login information as follows: 314 TT User Setup User Manual Trading Technologies International, Inc. 18 Tutorials After creating one gateway login, you can use the Save and Add New button on the New Gateway Login window (or the Copy button on the Gateway Logins window) to quickly create another similar gateway login. Because AB-BOB and AB-BILL use the same Member and Group, they will share an order book. For a detailed description of the various types of logins used in a TT environment, refer to the TT user Login and Risk Administration Reference Guide 2. Click Map to Exchange Traders to open the Map Exchange Traders to window where you can select the CME-A and Eurex-A Exchange traders. 3. Use the transfer arrow buttons (>, <, >>, <<) to move the CME-A and Eurex-A Exchange Traders from the Available Exchange Traders table to the Selected Exchange Traders table. If the exchange traders do not exist, click Create and create them. 4. Click Done. 5. On the New Gateway Login window, click the Assign Accounts button. The Assign Accounts window appears. TT User Setup User Manual Trading Technologies International, Inc. 315 18 Tutorials 6. Use the transfer arrow buttons (>, <, >>, <<) to move the account(s) from the Available Accounts table to the Selected Accounts table. If the account does not exist, click Create Accounts to create it. The Selected Accounts are the account numbers that the FIX client must use to place orders using this TTORD. 7. Click Done. 8. From the Gateway Login Info tab, set the credit limits as needed, and then click Save. The following figure shows how the newly created gateway logins display in the New User or Edit User window. 3. On the New User or Edit User window, click Save. 4. Continue to the next section. Assigning a TT FIX Adapter Server to a FIX Adapter Client user To assign the TT FIX Adapter Servers to which a FIX Adapter Client user can connect: 1. On the New User or Edit User window, click the FIX Adapter tab. If a version requirement message appears, click OK. 316 TT User Setup User Manual Trading Technologies International, Inc. 18 Tutorials 2. Use the transfer arrow buttons (>, <, >>, <<) to select the FIX Adapter Server users to which each client can connect. For our example, move the CCOR Server from the Available Fix Adapters list to the This FIX Client user can connect to the following FIX Adapter Servers list. 3. If checked, the Enabling Debug Logging for Orders and Enabling Debug Logging for Prices options prompt the selected TT FIX Adapter Server to generate verbose debugging information. Because a significant increase in the log file size will affect performance, only check these options when troubleshooting. 4. Save and close the Users window. 5. Repeat this procedure for each FIX Adapter Client user. 6. Continue to the next section. Running the TT user Setup Diagnostic Checks Use the Diagnostics Check utility after adding or modifying users to confirm that all of the data in TT user Setup is consistent and valid. Invalid data can cause FIX Adapter Client Logins to fail. To run the Diagnostic Check: 1. From the TT user Setup Control Panel, open the User Admin menu and click Diagnostic Checks. The Diagnostic Checks window appears. 2. Click Configure diagnostic check. 3. From the Configure Diagnostics window, check any FIX Adapter-related options (L, M, and N), and then click OK. TT User Setup User Manual Trading Technologies International, Inc. 317 18 Tutorials 4. From the Diagnostics Checks window, click the Run/Refresh Diagnostic Checks button. Any issues will be listed by issue type and will includes a summary of the issue. For a detailed explanation of an issue type, click explain this. 5. Resolve any issues discovered through the diagnostic check. 6. To run other diagnostic checks, re-open the Configure Diagnostics window and select your typical diagnostic checks (or click Sync selection with automatic diagnostics to select only the checks that are configured to run automatically). After the diagnostic checks are selected, click OK and then click Run/Refresh Diagnostic Checks. When all the issues are resolved, you are finished with this tutorial. 318 TT User Setup User Manual Trading Technologies International, Inc. 18 Tutorials How to Set up a User for Autospreader SE or Synthetic SE Configuring a user to use Autospreader SE and Synthetic SE servers is almost identical to configuring a user to trade on any other TT Gateway. • • If a trader logs into all TT Gateways with the same TTORD gateway login, you can map the trader's TTORD to Autospreader SE or Synthetic SE. If a trader uses an Exchange Trader gateway login or uses multiple TTORD gateway logins to connect to a set of TT Gateways, you can assign new Autospreader SE or Synthetic SE gateway logins to the trader. This tutorial will show you how to establish an Autospreader SE or Synthetic SE gateway login, and then how to configure a user to connect to the Autospreader SE or Synthetic SE using that gateway login. One procedure describes how to configure a user that has an existing TTORD, and the other procedure describes how to configure a user that does not have an existing TTORD. To establish an Autospreader SE or Synthetic SE gateway login: As an administrator you create Autospreader SE and Synthetic SE gateway logins. You can allow multiple traders to share an order book by assigning gateway logins that have the same Member and Group IDs. Note: Traders who want to share, view, and modify orders working on an Autospreader SE or Synthetic SE Server must log onto the same Autospreader SE or Synthetic SE with the same Member and Group IDs, and log onto the same TT Gateway(s) with the same Member and Group IDs. TT recommends establishing a naming convention so that you can quickly differentiate between gateway logins assigned by the exchange and synthetic gateway logins which can be made up for Autospreader SE or Synthetic SE. For example: • • • • • • • TTSSE / SE1 / 001 TTSSE / SE1 / 002 TTSSE / SE2 / 001 TTASE / SE1 / 001 TTASE / SE1 / 002 TTASE / SE2 / 001 ...etc After you have determined your Autospreader SE and Synthetic SE gateway login naming convention, you can configure a user that either has an existing TTORD or does not have an existing TTORD to connect to the Autospreader SE or Synthetic SE. Note: A trader who does not use a TTORD gateway login for Autospreader SE or Synthetic SE can see the working orders of any traders that do use TTORDs for Autospreader SE or Synthetic SE, provided TT User Setup User Manual Trading Technologies International, Inc. 319 18 Tutorials the TTORD is mapped to an exchange trader ID whose Member and Group IDs match the Member and Group IDs of the original trader. To add an Autospreader SE or Synthetic SE gateway login to a user with an existing TTORD: 1. From the Users tab, select a user that logs into Gateways using a TTORD, and then click Edit. 2. From the Edit User window, select the Gateway Logins tab, select a TTORD gateway login, and then click Edit. 3. From the Gateway Login Info tab, click Map to Exchange Traders. If the Autospreader SE or Synthetic SE Exchange Trader does not exist, click Create to create a new Synthetic SE exchange trader. Otherwise, if the Autospreader SE or Synthetic SE Exchange Trader already exists, move it to the Selected Exchange Traders list and skip to step 6. 320 TT User Setup User Manual Trading Technologies International, Inc. 18 Tutorials 4. Select an Autospreader SE or Synthetic SE Market and Gateway, and then enter a unique gateway login created in the To establish an Autospreader SE or Synthetic SE Gateway Login procedure above. 5. Click Save. The newly created Exchange Trader appears as a Selected Exchange Trader in the Map Exchange Traders window. 6. Click Done. To add an Autospreader SE or Synthetic SE Gateway login to a user without an existing TTORD: 1. From the Users window, select a user that does not log into Gateways using a TTORD, and then click Edit. 2. From the Edit User window, select the Gateway Login tab. 3. If the Autospreader SE or Synthetic SE gateway login does not exist, click New. Otherwise, if the Autospreader SE or Synthetic SE gateway login already exists, click Assign Existing Logins, select the gateway login, and then skip to step 5. 4. Enter a unique gateway login created in the To establish an Autospreader SE or Synthetic SE Gateway Login procedure above, click Add Gateways, and then select the appropriate Auto- TT User Setup User Manual Trading Technologies International, Inc. 321 18 Tutorials spreader SE or Synthetic SE server. Because risk is already configured for the Gateway to which Synthetic SE connects, there is no need to set up risk for the Synthetic SE gateway login. 5. Click Save. 6. The newly created gateway login can be assigned to other traders as needed. Creating TT SIM Credit Limits and Product Limits TT User Setup supports TT SIM mode trading using existing gateway logins and user profiles. Gateway logins and user profiles are configured as usual, with the following exceptions: • • • If you want the credit limit to be higher or lower for TT SIM trading, you can set a different TT SIM credit limit for gateway logins and user profiles. If you do not set a TT SIM credit limit, then non-TT SIM credit limits are used. If your existing product limits are configured with wildcards (*), you must configure a new product limit that has a specific product type and product. Users trading in TT SIM mode will not be able to see instruments with product limits that are configured with wildcards. If you want the product limits to be different for TT SIM mode trading, you can create a new product limit and specify that it only applies to TT SIM trading. If you do not create a TT SIM Only product limit, TT User Setup will use the existing product limit settings for the instrument. Allowing a User to Log onto X_TRADER using TT SIM mode To allow a user to log onto X_TRADER using TT SIM Mode, open the user's profile in TT User Setup and check the TT SIM login allowed checkbox on the X_TRADER Properties tab. 322 TT User Setup User Manual Trading Technologies International, Inc. 18 Tutorials Configuring TT SIM Credit Limits 1. To set a different gateway login credit limit for TT SIM trading: 1. Create or edit a gateway login. Refer to “Creating a New Gateway Login” on page 135 if needed. 2. On the Gateway Login Info tab, check the Override credit for TT SIM checkbox and then enter a new credit limit in the TT SIM credit field. Enter 0 to reset the credit to unlimited. 2. To set a different user profile credit limit for TT SIM trading: 1. Create or edit a user profile. Refer to “Creating and Editing X_TRADER or X_RISK Users” on page 69 if needed. 2. On the Main tab, check the Override credit for TT SIM checkbox and then enter a new credit limit in the TT SIM credit field. Enter 0 to reset the credit to unlimited. TT User Setup User Manual Trading Technologies International, Inc. 323 18 Tutorials Note: If this user willonly be able to trade in TT SIM mode, uncheck the Live (non-TT SIM) login allowedLove checkbox on the X_TRADER Properties tab. Configuring TT SIM Product Limits To add a product limit that applies only to TT SIM trading: 1. Create a new product limit. Refer to “Creating Product Limits for Gateway Logins” on page 168 if needed. 2. Check the Use Product Limit for TT SIM only checkbox. 324 TT User Setup User Manual Trading Technologies International, Inc. 18 Tutorials The Additional margin, Maximum order qty, Maximum position, and Maximum long/ short fields are highlighted to indicate that the product limit is for TT SIM only. 3. Enter the Additional margin, Maximum order qty, Maximum position, and Maximum long/ short values as needed. Enter 0 to reset the Maximum... fields to unlimited. TT User Setup User Manual Trading Technologies International, Inc. 325 18 326 Tutorials TT User Setup User Manual Trading Technologies International, Inc. Appendix Field Descriptions When you open a window in TT User Setup, pre-selected default columns appear in that window. These default columns vary from window to window. Each window includes a customized Hide/Show window that lists all of the columns available in that window. You can hide or show columns in the various data grid windows by configuring the Visible Columns list in the Show/Hide/Arrange Columns dialog box. The following table describes the columns available in TT User Setup and the window(s) in which the columns appear: Column Title Associated Windows Description Account Description Accounts Window An optional field that is associated with the gateway login and ordinarily consists of the login's MGT IDs, alias, and other applicable login data as needed. Account Group Accounts Window A unique identifier to group multiple accounts. Acct/Account #s GW Logins tab, XT CD tab, XT FA Account Defaults tab, FA Account Defaults, GW Login, Assign Accounts, Accounts, User Groups A unique identifier assigned to a login (TTORD or Exchange Trader) to be used by customer default records and when incorporating risk. Account Changes Allowed Users Determines if this user is allowed to update the account number on a fill. Account Type - see Default Account TT User Setup User Manual Trading Technologies International, Inc. 327 19 Column Title Associated Windows Appendix Description GW Logins tab, GW Login Window Designates whether risk parameters are applied to a gateway login. Addl Mrgn% Product Limits Window Specifies an additional required margin above or below the amount in the Margin column. Address Users Optional contact data for a particular user. Admin Groups Users Identifies the user groups that this administrator can manage or view. Admin Type Users The type of administrator. Add to Guardian Determines whether trades submitted with this account or an account in this account group will be allowed or rejected. Allow Trading Account/Account Group Product Limits Window Allowed XT Product Group Permissions tab Determines whether the product group is allowed or blocked. GW Logins tab, User GWL Attributes, Assign to Available Users Indicates whether the user is allowed to deploy strategies to an Algo SE Server. This setting is only valid when the Gateway is an Algo SE Server. Algo Deployment Allowed 328 Note: Users logging in with Gateway Logins that end in MGR (e.g., TTADM XXX MGR) can delete orders, regardless of whether or not “Allow Trading” is checked for a given account or account group. TT User Setup User Manual Trading Technologies International, Inc. 19 Appendix Column Title Algo Sharing Allowed Alias Associated Windows Description GW Logins tab, User GWL Attributes, Assign to Available Users Indicates whether the user is allowed to share algorithms with other users on Algo SE servers. This setting is only valid when the Gateway is an Algo SE Server and when the Algo deployment allowed option is checked. GW Logins tab, GW Login Window, Accounts Window An identifier associating Guardian data with a gateway login. Typically the proper name of the user assigned to the gateway login. GW Logins tab, Selected Users, User GWL Attributes, Assign to Available Users Specifies if a user of a specific gateway login will be automatically logged into the associated gateways. Gateway Logins window Determines whether or not the gateways assigned to this gateway login will be prevented from generating Startof-Day records. When AutoGen SOD Positions is no, gateways will not generate Start-of-Day records for the configured Gateway Login. Selected Users Determines if you can log into your assigned gateway using your assigned MGT. Assigned Accounts - see Accounts Assigned Gateway Logins see Gateway Logins Assigned Users - see Users Auto Login Auto-Gen SOD Positions? Available TT User Setup User Manual Trading Technologies International, Inc. 329 19 Column Title Associated Windows Appendix Description Available to FIX Client/Avail to FIX Client Assign to Available Users, User GWL Attributes, GW Logins tab Indicates whether a FIX Client has access to a given gateway login after performing a universal login. Available to User/Avail to User GW Logins tab, User GWL Attributes, Assign to Available Users Indicates whether a user has access to a given gateway login after performing a universal login. City Users Optional contact data for a particular user. Clearing Members GW Logins tab, Selected Users, User GWL Attributes, Assign to Available Users Designates a member firm of a clearing house through which trades are settled. Comments Displays an error description GW Logins tab, GW Login when a product being saved Window, Product Limits Windoes not exist in the product dow table. Country Users Optional contact data for a particular user. Create Non-TTORD Users Identifies whether this administrator can create Direct Trader Gateway logins. Created Date Users The date the user was created. Credit (per MGT) GW Logins tab, GW Login Window The sum, available at the start of a trading session, against which a single MGT can entering orders, whereby only that trader's activity can affect the credit limit. Currency GW Logins tab, GW Login Window The currency in which trades are calculated (e.g. USD = United States Dollar). Clearing Account - see Give up 330 TT User Setup User Manual Trading Technologies International, Inc. 19 Appendix Column Title Associated Windows Description XT CD tab Ordinarily the proper name of a user, which is used to define customer default records. DB Location TT User Setup Servers The location of your TT User Setup database files on your machine. Default Account GW Logins tab, Selected Users, User GWL Attributes, Assign to Available Users, FA Account Defaults, XT FA Account Defaults tab Specifies the default account type as defined by the exchange (A1-A9, G1, G2, M1-M3, P1-P3, or U1-U3. Customer Assign Accounts: Text describing what an account is used for (e.g. proprietary trading, customer account, broker error account, etc). Description Assign Accounts/Account Groups Account Groups: An optional description of the account group. Display Name Directly Assignable to Users TT User Setup User Manual Trading Technologies International, Inc. Users, Selected Users, Assign to Available Users, UserGWL Attributes, FA tab An identifier associated with the username that appears in grid displays to help identify a gateway login. Gateway Logins Determines if group administrators can assign the gateway login directly to users without using a TTORD (direct traders). 331 19 Column Title Associated Windows Appendix Description Users When Price Controls are enabled, this setting determines if the trader can only place buy and sell orders that are within the configured price band (static), or if the trader can place buy orders below the minimum price limit, and above the maximum price limit (directional). DMA Order Creation Users Determines whether the user is allowed to create Direct Market Access (DMA) orders. Edit Gateway Logins Users Identifies whether the administrator can manage gateway logins. Email Users The email address used when generating a user's password. Exch Group GW Logins tab, Gateway Logins, User GWL Attributes The exchange trader's group ID mapped to the TTORD. Exch Member GW Logins tab, Gateway Logins, User GWL Attributes The exchange trader's member ID mapped to the TTORD. Exch Trader GW Logins tab, Gateway Logins,User GWL Attributes The exchange trader's trader ID mapped to the TTORD. Exchange ID Select Gateway The Exchange ID listed in the AConfig file. Environment Server Status Monitors active servers within your environment and determines and displays which have an appropriate license. TT User Setup Servers The location of your TTUserSetupServer.exe file on your machine. Directional Price Range Exchange License EXE file 332 TT User Setup User Manual Trading Technologies International, Inc. 19 Appendix Column Title Associated Windows Description Users Determines whether the user is allowed to claim and work staged orders. Users Determines if debug messages generated by the Order Server are logged to the log files FA Price Logging Users Determines if debug messages generated by the Price Server are logged to the log files FA Role User GWL Attributes, Users The Fix Adapter role (client or server) Users Determines whether the user is allowed to create staged orders. XT CD tab, FA Account Defaults, XT FA Account Defaults tab, Free Form Text Field #2. A value assigned by a user of TT's X_TRADER application, and displayed in X_RISK for annotation purposes by the trader or back office (sub-account). First <DEFAULT> XT CD tab Specifies whether a <DEFAULT> customer default entry was the first such default created for that user. FMDS Primary/Secondary IP Addr Users Specifies the IP address setting for the primary and secondary FMDS server. FMDS Primary/Secondary Port Users Specifies the port setting for the primary and secondary FMDS server. FMDS Primary/Secondary Service Users Specifies the service setting for the primary and secondary FMDS server. Users Specifies the timeout setting for the primary and secondary FMDS server. FA DMA Order Creation FA Order Logging FA Staged Order Creation FFT 2-3 FMDS Primary/Secondary Timeout TT User Setup User Manual Trading Technologies International, Inc. 333 19 Column Title Force logoff Associated Windows Users Appendix Description Whether or not the user has been forced to log off. Specifies the gateway a user is able to log into and trade on using their assigned gateway login (e.g. CME). Gateway GW Logins tab, XT FA Account Defaults tab, FA Account Defaults, GW Login, Product Limits, User GWL Attributes, Select Gateway,Assign to Available Users Gateway Logins User Groups The gateway logins assigned to a given group. XT CD tab, FA Account Defaults, XT FA Account Defaults tab, Give Up Member. The member for whom a separate party completes a transaction. Note: If a gateway alias is defined in aconfig, the Gateway column displays <gateway> to represent the alias. Generated Group - see Group Generated Member - see Member Generated Trader - see Trader Give Up /Clearing Account 334 TT User Setup User Manual Trading Technologies International, Inc. 19 Appendix Column Title Associated Windows Description Gateway Login: The unique Group ID used to identify an exchange trader or TTORD as part of their MGT. Group /Group Permissions Users, Selected Users, GW Logins tab, GW Login, Product Limits, Accounts, Account Groups, User GWL Attributes, Assign to Available Users, User Groups, FA Account Defaults, FA tab Group Admins User Groups The group administrators assigned to a given group Users Determines if the user is allowed to enter Good Till Cancel and Good Till Date orders. GUI View Users The user view that determines which fields are visible when creating or editing a user (All, X_TRADER/X_RISK, FIX Adapter Server, FIX Adapter Client, or TT User Setup Admin) Handling Cross Orders Users The default crossed order behavior. ID Product Limits Window A unique identifier of a product limit that is reflected in the Audit Trail where it's used to distinguish product limit changes. Ignore P&L GW Logins tab, GW Login Window Determines if P&L is used in margin, credit, and position calculations. IP Address TT User Setup Servers, Environment Server Status The IP Address of the machine where your server has been set up. GTC Allowed TT User Setup User Manual Trading Technologies International, Inc. User: Identifies the group name for multiple exchange traders and/or TTORDs, and may reflect some aspect of those traders (e.g. Energy Traders). 335 19 Column Title Associated Windows Appendix Description Last Changed Users, GW Logins tab, GW Login Window, Product Limits Window, Accounts Window, User GWL Attributes The date of the most recent update to the applicable TT User Setup data. Last Changed By Users, GW Logins tab, GW Login Window, Product Limits Window, Accounts Window, User GWL Attributes The login ID used to make the most recent update to the applicable TT User Setup data. Last Failed Login Attempt Users The most recent time that a particular user has attempted and failed to log into TT User Setup. Last Logged In Users The most recent time that a particular user logged into TT User Setup. Limited Login Users Limits the number of concurrent logins. Locked Out Users Indicates whether a user has surpassed defined limits for the number of times an incorrect password is entered or the amount of time that has passed since the user's last login attempt. Mandatory Login Assign to Available Users, User GWL Attributes, GW Logins tab Specifies whether a user of a specific gateway login will be automatically logged into a given gateway. Margin Product Limits Window Amount required for collateral on a position. Market XT CD tab, XT FA Account Defaults tab, FA Account Defaults tab, FA Account Defaults, XT Product Group Permissions tab, Select Gateway window The exchange (e.g. CME) where the account is allowed to trade. Master/Slave TT User Setup Servers Indicates whether each running server is a Master server or a Slave server. 336 TT User Setup User Manual Trading Technologies International, Inc. 19 Appendix Column Title Associated Windows Description Max Login Allowed Users Specifies the limit on the number of concurrent logins allowed. Max Long/Short Product Limits Window Specifies the limits on a long or short position. Max Ord Qty Product Limits Window, XT CD tab A limit on the maximum order size for the selected trader/product. Max Orders/Sec The maximum rate of orders allowed per TT Gateway. This value overrides the userlevel Per TT Gateway, prevent more than X orders per second setting. The value entered in the Prevent more than X orders per second (overrides the User-Level setting) field displays in Max Orders/Sec. Max Orders/Sec You can edit the maximum orders per second in this column per TT Gateway for the selected user. Max Pos Product Limits Window A limit on the position for the selected trader/product to the specified number of contracts. Member GW Logins tab, GW Login Window, Product Limits Window, Accounts Window, User GWL Attributes The unique Member ID used to identify an exchange trader or TTORD as part of their MGT. Users When XR MF Access and/or XR SOD Access is yes, this specifies if the user is limited to accounts in specified user groups when publishing manual fills and/or Start of Day records in X_RISK. MF/SOD Group Restrictions TT User Setup User Manual Trading Technologies International, Inc. 337 19 Column Title Associated Windows Appendix Description Most Recent Heartbeat Environment Server Status Dynamically updated time a signal is submitted by the active servers in your environment. O/C XT CD tab Designates whether the trader's position is Open or Closed. Users Determines the allowed number of orders, per second, per TT Gateway. This value is enforced when the Restrict Order Throughput option is checked. Organization Users Contact information for a user. This field is required if you want the ICE Product Groups report to list the product permissions per customer. Otherwise this field is optional. Other Users GW Logins tab Lists the users that share a particular gateway login. Operator ID GW Logins tab, User GWL Attributes, Assign to Available Users Specifies the Operator ID that is used to identify the trader or operator to the exchange. Password Admins User Groups The password administrators assigned to a given group. Phone Number Users Optional contact data for a particular user. Preferred IP GW Logins tab, Selected Users, User GWL Attributes, Assign to Available Users Specifies the IP address of the gateway through which you want the user's first login attempt to be made. Users Determines if the user is restricted to entering orders within a specified number of ticks from the market price. Orders Per Second Price Controls Enabled 338 TT User Setup User Manual Trading Technologies International, Inc. 19 Appendix Column Title Associated Windows Description Priority XT FA Account Defaults tab, FA Account Defaults Specifies the priority of the FIX adapter account default. When an order matches more than one account default (based on key values), TT FIX Adapter server uses the match with the highest priority. Product XT CD tab, Product Limits Window Defines the product (e.g. FGBL ODAX, etc.) that a trader can trade. Product Group XT Product Group Permissions tab The product group (e.g. CA Futures). Product Type XT CD tab, XT FA Account Defaults tab, FA Account Defaults, Product Limits Window Defines the product type (e.g. futures, options, spreads, etc.) that a trader can trade. Pwd Never Expires Users Indicates whether there is a time limit enabled on a users' login password. Restrict XT CD tab Specifies if the user has an order restriction, such as FOK, IOC, or LSM. Users Determines if the user is limited to a specified number of orders per second, per TT Gateway. Users Identifies whether or not this user is restricted from overriding Fix Adapter account defaults. Restrict XT Cust Defaults Users Identifies whether or not this user is restricted from overriding X_TRADER customer defaults. Risk Check GW Logins tab, GW Login Window Specifies whether Guardianrelated risk checking is enabled. Restrict Order Throughput Restrict FA Account Defaults TT User Setup User Manual Trading Technologies International, Inc. 339 19 Column Title Associated Windows Appendix Description Running Since TT User Setup Servers Specifies the date and time that a particular server was started. Sel XT CD tab Specifies if a customer default has been enabled. Server Name Environment Server Status Identifies an active server in your environment (e.g. Login Server). Staged Order Creation Users Determines whether the user is allowed to create staged orders. Staged Order Mgmt Users Determines whether the user is allowed to claim and work staged orders. State Users Optional contact data for a particular user. Status Users, Environment Server Status, FA Account Defaults Indicates whether a user and/ or server is active. SMTP From Address Users Specifies the string that appears in the From field of the email sent to the recipient. Smtp Host Users Specifies the email server used for sending email. Smtp Port Users Specifies the port used for sending email SMTP Requires Authentication Users Enables SMTP server authentication. SMTP Use SSL Users Enables SSL. SMTP Username Users Determines if the email recipients username is included in the email. Users The number of ticks from the market the user is allowed to trade. This value is enforced when Price Controls Enabled is checked. Ticks 340 TT User Setup User Manual Trading Technologies International, Inc. 19 Appendix Column Title Associated Windows Description TIF XT CD tab Time in Force (e.g. GTD, GTC). Time On Server TT User Setup Servers Amount of time since the server was started. Trader GW Logins tab, GW Login The unique Trader ID used to Window, Product Limits Winidentify an exchange trader or dow, Accounts Window, User TTORD as part of their MGT. GWL Attributes Trade Out allowed Product Limits Window Designates whether you can exceed maximum order quantity, maximum position, and/ or available credit limits to get closer to a flat (safe) position. Trading allowed GW Logins tab, GW Login Window Determines if a gateway login can be used to actively trade. Determines if a user can add, modify, or delete orders. Trading allowed User Window Main tab Type XT CD tab TT User Setup User Manual Trading Technologies International, Inc. Note: Non-tradable administrator logins (e.g. TTADMXXX100 or TTORDTSXXXMGR) must have Trading Allowed option checked to delete orders, even though they are unable to trade. Type of order (limit, market, etc.). 341 19 Column Title Associated Windows Appendix Description Users Determines if orders submitted by this user will be rejected if they are sent with an account that is not defined in TT User Setup. XT CD tab Indicates that the option to enforce a maximum order quantity has or has not been enabled. Users Determines if the P&L risk algorithm is used to risk check this user. When Use P&L Risk Algo is set to yes, the P&L risk algorithm is used for risk checking. In X_TRADER, the P/L based on setting defaults to Risk Algorithm and is uneditable. When Use P&L Risk Algo is set to no, risk checking uses the Last Traded Price. The P/ L based on X_TRADER setting remains editable. Users Displays optional user information such as MGT, account number, or any information you choose to enter. User FMDS Settings Users Overrides the FMDS server system settings with settings for this user. Username/Users Users, Selected Users, GW Login , Product Limits, Accounts, Account Groups, User GWL Attributes, Assign to Available Users, FA tab Universal Login ID used to log into one or more TT Gateways (e.g., JDOE). Undefined Accounts Allowed Use Max Use P&L Risk Algo User Defined 1-6 342 TT User Setup User Manual Trading Technologies International, Inc. 19 Appendix Column Title Associated Windows Description User Group - see Group User Status - see Status Version TT User Setup Servers The version of TT User Setup associated with an active server. X_RISK Access Users Specifies whether you have permission to use X_RISK. X_STUDY/FMDS Users Determines if the user has X_STUDY/FMDS enabled. Users Specifies whether X_TRADER will start up (as X_TRADER or X_TRADER Pro). Users Specifies whether you have permission to use X_RISK's Contract Session Prices functionality. XR IM Access Users Specifies whether you have permission to use X_RISK's Instant Message functionality. XR MF Access Users Specifies whether you have permission to use X_RISK's Manual Fill functionality. Users Specifies whether you have permission to use X_RISK's Start of Day functionality. Users Determines whether the user can configure the Avoid orders that cross setting in X_TRADER. If XT Avoid Orders that is set to yes, the user can configure the Avoid orders that cross option in X_TRADER as needed. X_TRADER Mode XR CSP Access XR SOD Access XT Avoid Orders that Cross TT User Setup User Manual Trading Technologies International, Inc. 343 19 Column Title Associated Windows Appendix Description XT Quoting/RFQ Users Determines whether the user can configure the Quoting option in X_TRADER. If XT Quoting/RFQ is set to yes, the user can turn the X_TRADER Quoting functionality on or off. Otherwise, the user cannot enable Quoting in X_TRADER. XT Restrict Client Override Users Restricts users from editing their customer defaults. XT Wholesale Trades Users Determines whether the user can configure the Wholesale Trades option in X_TRADER. If XT Wholesale Trades is set to yes, the user can turn X_TRADER's Wholesale Trades option on or off. Otherwise, the user cannot enable Wholesale Trades in X_TRADER. Zip Users Optional contact data for a particular user. Context Menus You use a context menu to access various TT User Setup functionality. To access a context menu: Right-click anywhere in the related window. Users Window 344 TT User Setup User Manual Trading Technologies International, Inc. 19 Appendix The options available from the Users window context menu include: Option Function New Accesses the New User window, which allows you to create a user by applying values such as username, display name, password, and user group. Edit Accesses the Edit User window, which allows you to change login, contact, and miscellaneous user defined data. Copy Accesses the New User window, which allows you to create a user who has login, location, permissions, or gateway login information similar or identical to that of an existing user. Delete Permanently removes the selected user. Export to HTML Exports data to an HTML file, which you can use to generate a report. Export to CSV Exports data to a CSV file, which you can use to generate a report. Specify sort criteria Opens the Sort dialog box that you can use to determine the order in which data is displayed. Show/Hide/Arrange columns Accesses the Show/Hide/Arrange Columns dialog box for you to select which columns to display. Find Control Panel Brings the control panel into focus. This is useful when other screens have overlapped the control panel. Gateway Logins Window The options available from the Gateway Logins window context menu include: Option New TT User Setup User Manual Trading Technologies International, Inc. Function Accesses the New Gateway Login window, which allows you to create a login by applying values such as Member, Group, and Trader ID. 345 19 Option Appendix Function Edit Accesses the Edit Gateway Login window, which allows you to change MGT, gateway, and account data. Copy Accesses the New Gateway Login window, which allows you to create a gateway login that has for example, credit, product limit, and gateway information similar or identical to that of an existing gateway login. Delete Permanently removes the selected gateway login. Export to HTML Exports data to an HTML file, which you can use to generate a report. Export to CSV Exports data to a CSV file, which you can use to generate a report. Specify sort criteria Opens the Sort dialog box that you can use to determine the order in which data is displayed. Show/Hide/Arrange columns Accesses the Show/Hide/Arrange Columns dialog box for you to select which columns to display. Find Control Panel Brings the control panel into focus. This is useful when other screens have overlapped the control panel. Product Limits Window The options available from the Product Limits window context menu include: Option Function New Accesses the New Product Limit window, which allows you to create a product limit by applying values such as Product, Additional margin, and Maximum order quantity. Edit Accesses the Edit Product Limit window, which allows you to change gateway, product, margin, quantity, and position values. 346 TT User Setup User Manual Trading Technologies International, Inc. 19 Appendix Option Function Copy Accesses the New Product Limit window, which allows you to create a product limit that has for example, gateway, product, and product type information similar or identical to that of an existing gateway login. Delete Permanently removes the selected product limit. Export to HTML Exports data to an HTML file, which you can use to generate a report. Export to CSV Exports data to an CSV file, which you can use to generate a report. Specify sort criteria Opens the Sort dialog box that you can use to determine the order in which data is displayed. Show/Hide/Arrange columns Accesses the Show/Hide/Arrange Columns dialog box for you to select which columns to display. Find Control Panel Brings the control panel into focus. This is useful when other screens have overlapped the control panel. X_TRADER Customer Defaults Window The options available from the X_TRADER Customer Defaults window context menu include: Option Function New Accesses the New Customer Default window, which allows you to create a customer default by applying values such as username, customer, market, and product. Edit Accesses the Edit Customer Default window, which allows you to change Customer, account #, and TIF values for example. TT User Setup User Manual Trading Technologies International, Inc. 347 19 Option Appendix Function Copy Accesses the New Customer Default window, which allows you to create a customer default that has for example, Market, Product, and account type information similar or identical to that of an existing customer default. Delete Permanently removes the selected customer default. Replace Account Numbers Replaces one or more customer default account numbers with similar account numbers based on selected pattern-matching rules. Export to HTML Exports data to an HTML file, which you can use to generate a report. Export to CSV Exports data to an CSV file, which you can use to generate a report. Specify sort criteria Opens the Sort dialog box that you can use to determine the order in which data is displayed. Show/Hide/Arrange columns Accesses the Show/Hide/Arrange Columns dialog box for you to select which columns to display. Find Control Panel Brings the control panel into focus. This is useful when other screens have overlapped the control panel. Product Group Permissions Window The options available from the Product Group Permissions window context menu include: Option Function Export to HTML Exports data to an HTML file, which you can use to generate a report. Export to CSV Exports data to an CSV file, which you can use to generate a report. Specify sort criteria Opens the Sort dialog box that you can use to determine the order in which data is displayed. 348 TT User Setup User Manual Trading Technologies International, Inc. 19 Appendix Option Function Show/Hide/Arrange columns Accesses the Show/Hide/Arrange Columns dialog box for you to select which columns to display. Find Control Panel Brings the control panel into focus. This is useful when other screens have overlapped the control panel. User's Gateway Login Attributes Window The options available from the User's Gateway Login Attributes window context menu include: Option Function Edit Accesses the Edit User Gateway Login Attributes window, which allows you to change values such as default account, clearing member, and preferred IP. Export to HTML Exports data to an HTML file, which you can use to generate a report. Export to CSV Exports data to an CSV file, which you can use to generate a report. Specify sort criteria Opens the Sort dialog box that you can use to determine the order in which data is displayed. Show/Hide/Arrange columns Accesses the Show/Hide/Arrange Columns dialog box for you to select which columns to display. Find Control Panel Brings the control panel into focus. This is useful when other screens have overlapped the control panel. Accounts Window The options available from the Accounts window context menu include: Option New TT User Setup User Manual Trading Technologies International, Inc. Function Accesses the New Account window, which allows you to create an account by applying values such as account number and account description. 349 19 Option Appendix Function Edit Accesses the Edit Account window, which allows you to change account number and account description values. Delete Permanently removes the selected account. Export to HTML Exports data to an HTML file, which you can use to generate a report. Export to CSV Exports data to an CSV file, which you can use to generate a report. Specify sort criteria Opens the Sort dialog box that you can use to determine the order in which data is displayed. Show/Hide/Arrange columns Accesses the Show/Hide/Arrange Columns dialog box for you to select which columns to display. Find Control Panel Brings the control panel into focus. This is useful when other screens have overlapped the control panel. User Groups Window The options available from the User Groups window context menu include: Option Function New Accesses the New User Group window, which allows you to create a user group. Edit Accesses the Edit User Group window, which allows you to change the name of the user group. Delete Permanently removes the selected user group. Export to HTML Exports data to an HTML file, which you can use to generate a report. Export to CSV Exports data to an CSV file, which you can use to generate a report. Specify sort criteria Opens the Sort dialog box that you can use to determine the order in which data is displayed. 350 TT User Setup User Manual Trading Technologies International, Inc. 19 Appendix Option Function Show/Hide/Arrange columns Accesses the Show/Hide/Arrange Columns dialog box for you to select which columns to display. Assign Gateway Logins Opens the Assign Gateway Logins to User Group window, which allows you to move multiple gateway logins to and from a given user group. Find Control Panel Brings the control panel into focus. This is useful when other screens have overlapped the control panel. FIX Adapter Account Defaults The options available from the Account Default List window context menu include: Option Function New Accesses the New Account Default window, which allows you to create a FIX Adapter account default by applying values such as Username, Account #, Market, Gateway, and Product type. Edit Accesses the Edit Account Default window, which allows you to edit a FIX Adapter account default. Copy Accesses the New Account Default window, which allows you to create a new FIX Adapter account default based off an existing account default. Delete Permanently removes the selected FIX Adapter account default. Export to HTML Exports data to an HTML file, which you can use to generate a report. Export to CSV Exports data to an CSV file, which you can use to generate a report. Specify sort criteria Opens the Sort dialog box that you can use to determine the order in which data is displayed. TT User Setup User Manual Trading Technologies International, Inc. 351 19 Option Appendix Function Show/Hide/Arrange columns Accesses the Show/Hide/Arrange Columns dialog box for you to select which columns to display. Find Control Panel Brings the control panel into focus. This is useful when other screens have overlapped the control panel. Unlock Users/Reset Passwords Window The options available from the Unlock Users/Reset Passwords window context menu include: Option Function Unlock Unlocks users either in all available user groups or in a restricted number of groups.. Reset Password Reset a password(s) either in all available user groups or in a restricted number of user groups. Refresh Updates the Unlock Users/Reset Passwords window to reflect any changes in the lock or password status. Export to HTML Exports data to an HTML file, which you can use to generate a report. Export to CSV Exports data to an CSV file, which you can use to generate a report. Specify sort criteria Opens the Sort dialog box that you can use to determine the order in which data is displayed. Show/Hide/Arrange columns Accesses the Show/Hide/Arrange Columns dialog box for you to select which columns to display. Find Control Panel Brings the control panel into focus. This is useful when other screens have overlapped the control panel. 352 TT User Setup User Manual Trading Technologies International, Inc. 19 Appendix Audit Trail, Environment Server Status, Reports, TT User Setup Servers, and View Connected Clients Windows The options available from each window's context menu include: Option Function Export to HTML Exports data to an HTML file, which you can use to generate a report. Export to CSV Exports data to a CSV file, which you can use to generate a report. Specify sort criteria Opens the Sort dialog box that you can use to determine the order in which data is displayed. Show/Hide/Arrange columns Accesses the Show/Hide/Arrange Columns dialog box for you to select which columns to display. Shortcut Keys You use the shortcut keys as an alternative to choosing commands from the various TT User Setup menus. To use the shortcut keys: Click the button combinations as listed in the table below to access the related menu or window. The available shortcuts include: File Menu File Menu Shortcut File Menu ALT, F Login ALT, F, L Logout ALT, F, O Publish to Guardian ALT, F, P Exit ALT, F, X TT User Setup User Manual Trading Technologies International, Inc. 353 19 Appendix User Admin Menu User Admin Menu Shortcut User Admin Menu ALT, U Users ALT, U, U Gateway Logins ALT, U, L Accounts ALT, U, A Product Limits ALT, U, P X_TRADER Customer Defaults ALT, U, C Product Group Permissions ALT, U, R User's Gateway Login Attributes ALT, U, W User Groups ALT, U, G Account Groups ALT, U, O FIX Adapter Account Defaults ALT, U, F Unlock Users/Reset Passwords ALT, U, K Diagnostic Checks ALT, U, D Server Admin Menu Server Admin Menu Shortcut Server Admin Menu ALT, S System Settings ALT, S, Y Version Rules ALT, S, V Collect Log Files ALT, S, C Reset Exchange Tree ALT, S, R Currency Exchange Rates ALT, S, E Add Remove Currencies ALT, S, C 354 TT User Setup User Manual Trading Technologies International, Inc. 19 Appendix Server Admin Menu Shortcut Product Margins ALT, S, P License Setup ALT, S, L Migrate Users to New Gateway ALT, S, M Reports Menu Reports Menu Shortcut Reports Menu ALT, R Logged in Users ALT, R, L Audit Trail ALT, R, A Run Reports ALT, R, R Server Messages ALT, R, M TT User Setup Servers ALT, R, S Environment Server Status ALT, R, E ICE Product Group Reports ALT, R, I Help Menu Help Menu Shortcut Help Menu ALT, H Help Topics ALT, H, H What's New ALT, H, W TT Remote Help Center ALT, H, T About TT User Setup ALT, H, A TT User Setup User Manual Trading Technologies International, Inc. 355 19 Appendix TT User Setup Feature and TT Product Compatibility Field Feature Force a user logoff New User/Edit User Main tab GTC/GTDate orders allowed Allow or Prevent Good Till Cancel and Good Till Date orders New User/Edit User Main tab Trading allowed Allow or prevent trading, adding, modifying, or deleting orders New User/Edit User Main tab Credit Configure user credit limit New User/Edit User Main tab Currency Configure credit currency New User/Edit User Main tab Use P&L risk algorithm Use the P&L risk algorithm to risk check a user. New User/Edit User Main tab Force logoff Prevent orders that are more than X ticks from the market price Only enforce a maximum price on buy orders and a minimum price on sell orders 356 Set how far from the market price a user may enter an order (in ticks) Minimum Version Supported Location X_TRADER 7.7.6 FIX Adapter 7.8 X_TRADER 7.12 Algo SE 7.3 Autospeader SE 7.3 Synthetic SE 7.3 FIX Adapter 7.8.1 X_TRADER 7.8 FIX Adapter 7.6 X_TRADER 7.8 FIX Adapter 7.6 X_TRADER 7.8 FIX Adapter 7.6 X_TRADER 7.11 FIX Adapter 7.7.1 Both controls are available in two locations: New User/Edit User Main tab Account Group/New or Edit Account Group/New or Edit Product Limit X_TRADER 7.12 Algo SE 7.3 Autospeader SE 7.3 Synthetic SE 7.3 FIX Adapter 7.8.1 TT User Setup User Manual Trading Technologies International, Inc. 19 Appendix Feature Per TT Gateway, prevent more than X orders per second Prevent more than X orders per second New User/Edit User Main tab TT Gateways 7.16.1 Submitting orders with undefined accounts allowed (if applicable) Allow an order to be submitted with an account number that is not defined in TT User Setup. New User/Edit User Main tab TT Gateways 7.16.8 Account changes on fills allowed Allows traders to update the account number on a fill New User/Edit User Main tab Generate Admin Gateway Logins for all Gateways Generate Admin Gateway Logins for all Gateways New User/Edit User Gateway Logins tab Disable "Auto-Calculate-SOD" Determines whether or not the gateways assigned to this gateway login should automatically generate Start-of-Day records. New Gateway Login window TT Gateways 7.16.8 X_TRADER® mode Set X_TRADER Mode to X_TRADER or X_TRADER Pro New User/Edit User X_TRADER Properties tab X_TRADER 7.6.0 TT User Setup User Manual Trading Technologies International, Inc. Location Minimum Version Supported Field X_TRADER 7.12.2 X_RISK 7.12.2 HFS 7.X X_TRADER 7.X TT API 7.2 X_RISK 7.10 357 19 Field Feature Location Appendix Minimum Version Supported Avoid orders that cross Allows the user to toggle the Avoid Orders That Cross option in X_TRADER New User/Edit User X_TRADER Properties tab X_TRADER 7.7.0 Quoting/RFQ allowed Allows the user to toggle the Quoting option in X_TRADER New User/Edit User X_TRADER Properties tab X_TRADER 7.8.0 Wholesale trades allowed Allows the user to toggle the Wholesale option in X_TRADER New User/Edit User X_TRADER Properties tab X_TRADER 7.8.0 Staged order creation allowed Allows the user to create staged orders. New User/Edit User X_TRADER Properties tab X_TRADER 7.11 Synthetic SE 7.2 Allows the user to Staged order manageclaim and work ment allowed staged orders New User/Edit User X_TRADER Properties tab X_TRADER 7.11 Synthetic SE 7.2 Direct Market Access (DMA) order creation allowed Allows the user to create DMA orders New User/Edit User X_TRADER Properties tab X_TRADER 7.11 Machine gun orders allowed Allows the user to toggle the Machine Gun option in X_TRADER New User/Edit User X_TRADER Properties tab X_TRADER 7.11 358 TT User Setup User Manual Trading Technologies International, Inc. 19 Appendix Minimum Version Supported Field Feature Location Eurex - Persist orders Determines whether Eurex orders sent from X_TRADER are automatically set to persist, or whether the user can configure the Persist orders and Only GTC options in X_TRADER New User/Edit User X_TRADER Properties tab X_TRADER 7.X Forces the user to use only the specified customer defaults. New User/Edit User X_TRADER Properties tab X_TRADER 7.6.0 Manual Fill (MF) access allowed Allows the user to publish manual fills in X_RISK New User/Edit User X_RISK Properties tab X_RISK 7.4.2 Start of Day (SOD) access allowed) Allows the user to publish Start of Day records in X_RISK New User/Edit User X_RISK Properties tab X_RISK 7.4.2 Contract Session Prices (CSP) access allowed Allows the user to publish Contract Session Prices in X_RISK New User/Edit User X_RISK Properties tab X_RISK 7.4.2 Instant Messages (IM) access allowed Allows the user to send instant messages in X_RISK New User/Edit User X_RISK Properties tab X_RISK 7.4.2 Restrict user from editing their local Customer Defaults TT User Setup User Manual Trading Technologies International, Inc. 359 19 Field Feature Location Appendix Minimum Version Supported X_STUDY® / FMDS allowed for this user Enables X_STUDY/ FMDS for the user when X_STUDY/ FMDS is enabled for the system New User/Edit User X_STUDY/FMDS tab X_TRADER 7.7.3 X_STUDY 7.3.0 Override system settings with user settings Overrides the FMDS system settings with the FMDS user settings New User/Edit User X_STUDY/FMDS tab X_TRADER 7.7.3 X_STUDY 7.3.0 X_STUDY/FMDS Allowed Enables X_STUDY/ FMDS for the system System Settings X_STUDY/FMDS Settings tab X_TRADER 7.7.3 X_STUDY 7.3.0 Staged order creation allowed Allows the FIX client to claim and work staged orders New User/Edit User FIX Adapter tab (client role) FIX Adapter 7.8 Synthetic SE 7.2 Allows the FIX client to create DMA orders New User/Edit User FIX Adapter tab (client role) FIX Adapter 7.8 Synthetic SE 7.2 Enable debug logging for orders Adds debug messages generated by the Order Server to the log files New User/Edit User FIX Adapter tab (client role) FIX Adapter 7.6 (note: FIX Adapter 7.8 and later ignore this setting) Enable debug logging for prices Adds debug messages generated by the Price Server to the log files New User/Edit User FIX Adapter tab (client role) FIX Adapter 7.6 (note: FIX Adapter 7.8 and later ignore this setting) Direct Market Access (DMA) order creation allowed 360 TT User Setup User Manual Trading Technologies International, Inc. 19 Appendix Field Maximum long short Mandatory Login Feature Sets the maximum number of contracts the trader can be long or short for a given product Automatically logs a user of a specific gateway login into a given gateway Location New/Edit Product Limit window Assign to available users tab New User/Edit User Gateway Logins tab User's Gateway Login Attributes window Minimum Version Supported X_TRADER 7.8 X_TRADER 7.17 New/Edit Customer Default window * These fields do not apply to X_TRADER® versions 7.8 or later Order type Indicates the order type and determines whether the order is sent as a Limit or Market order New/Edit Customer Default window * These fields do not apply to X_TRADER® versions 7.8 or later Order restriction Specifies if the user has an order restriction, such as FOK, IOC, or LSM New/Edit Customer Default window * These fields do not apply to X_TRADER® versions 7.8 or later Open/Close Indicates the type of position the user can establish with the order New/Edit Customer Default window * These fields do not apply to X_TRADER® versions 7.8 or later Time in force Indicates the time the order is in force TT User Setup User Manual Trading Technologies International, Inc. 361 19 Field Feature Location Appendix Minimum Version Supported Specifies the maximum quantity allowed per trade for the specified account New/Edit Customer Default window * These fields do not apply to X_TRADER® versions 7.8 or later Account Info Adds risk checking to accounts. New/Edit Account window TT Gateways 7.16.8 Account Group Info Adds risk checking to account groups New/Edit Account Group window TT Gateways 7.16.8 Account and Account Group Info Adds risk checking to accounts and account groups. Edit Account and Account Group window TT Gateways 7.16.8 Enforce max order qty Max order qty 362 TT User Setup User Manual Trading Technologies International, Inc.