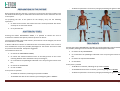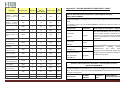
1
LASER THERAPY I.A.C.E.R. Srl MNPG135-00 13/02/14 INDEX BACK .................................................................................................................. 21 HELP ................................................................................................................... 21 INFORMATION ON THE MANUAL INFORMATION ON THE MANUAL .......................................................................... 4 WARRANTY .......................................................................................................... 4 NOTES .................................................................................................................. 5 CAUTIONS ............................................................................................................ 6 ! WARNINGS !....................................................................................................... 7 INTRODUCTION OF THE TECHNOLOGY ................................................................... 8 INTENDED USE...................................................................................................... 9 DEVICE DESCRIPTION ...........................................................................................10 SETTING UP............................................................................................................... 10 SWITCHING ON AND SAFETY KEY ............................................................................. 11 DESCRIPTION OF THE EQUIPMENT .......................................................................12 ACCESSORIES ............................................................................................................ 13 PROGRAMMING PANEL ............................................................................................ 13 OUTPUT AND SUPPLY ............................................................................................... 13 HOW TO USE OF THE DEVICE ................................................................................14 OPERATION ............................................................................................................... 14 PREPARATIONE OF THE PATIENT ..........................................................................15 ANATOMICAL ZONES ...........................................................................................15 TREATMENTS.......................................................................................................15 MODIFY ..................................................................................................................... 16 START ........................................................................................................................ 16 SAVE.......................................................................................................................... 17 PROCEDURE ........................................................................................................17 PATIENTS CLIENT .................................................................................................17 OPEN a CARD: ........................................................................................................... 18 MODIFY the CARD: ................................................................................................... 18 TOOLS BAR ..........................................................................................................18 MANUAL ................................................................................................................... 19 SETTINGS ............................................................................................................ 21 LANGUAGE ............................................................................................................... 21 DEFAULT ................................................................................................................... 21 MEMORY .................................................................................................................. 22 INFO ......................................................................................................................... 22 MAINTENANCE ................................................................................................... 23 CLEANING THE PROBES ............................................................................................ 24 ELECTROMAGNETIC INTERFERENCES ................................................................... 24 TROUBLESHOOTING CHART................................................................................. 25 Appendix A – ENVIROMENTAL PROTECTION ........................................................... 26 Appendix B – LABELS ................................................................................................ 26 Appendix C – LIST OF PROTOCOLS ........................................................................... 27 INFORMATION ON THE MANUAL - use of the machine; NOTE These contain important information and useful tips for operating the equipment CAUTIONS - owner; - responsible; The CAUTION message appears before operations, which, if not correctly performed, may cause damage to the machine and/or its accessories. - people in charge of moving; - installers; - users; - people in charge of maintenance. This document provides valuable information regarding the installation, set up and use of I-TECH LA4000 equipment. This user manual must to be considered as a part of the device and must to be keep safe for future references until the disposal of the device. The operating instructions must be available for consultation in the vicinity of the machine and stored properly ! WARNING ! This signals operations or situations, which, if unknown to the operator, or incorrectly carried out, may harm the operator. WARRANTY - improper use of the device; IACER srl guarantees the quality of its products for a period of 24 months from the date of purchase, when information contained in this manual regarding installation, use and maintenance. For professional user the warranty period last for 12 months from the date of purchase. During the warranty period, at the discretion of the company, will be repaired or replaced defective products. - use against to specific national regulations; The replacement of the device is not expected in any case. - inappropriate set-up; The warranty does not cover any malfunction or damage caused by: The company will not assume any responsibility for any major cases such as : - defects in power; 1) incorrect connection and installation; - serious shortcomings in the maintenance; 2) incorrect use due to non-compliance with instructions contained in this manual; - changes and unauthorized interventions; -use of not original spare part ; 3) use of the machine in environmental conditions which do not conform with those specified for the product; - total or partial non-observance of the instructions; 4) improper or inadequate maintenance; - exceptional events. 5) unauthorized opening of the outer casing; If you need further information, please contact IACER srl. 6) tampering or unauthorized modifications; WRITING CONVENTIONS 7) use of non-original accessories. To highlight some sections of the document, underlining is used. MNPG135-00 IACER srl registered offices provide the warranty. Pag. 4 Should you need to return the goods then please note the packing instructions as follows. Enclose a copy of the purchasing receipt. - Before sending the machine back for suspected malfunction, we recommend that first you carefully consult sections regarding MAINTENANCE and TROUBLESHOOTING of the manual, as a large part of the problems and faults are usually due to inadequate maintenance or small technical problems which can often be easily solved by the user himself. - When re-packing the equipment for return to the manufacturer, proceed as follows: - 1. unplug the machine and any connections, devices, applicators etc; - 2. carefully clean and disinfect all parts of the machine and accessories which have been in contact with patients. Any equipment which the technical department does not consider hygienic (Italian law T.U.S. 81/2008 on safety in the workplace) will not be accepted; - 3. disassemble accessories and any mechanical supports; - 4. use original box and packing materials; - 5. enclose detailed information regarding the nature of the problem in order to facilitate the technical department’s intervention and save time on repair. - NOTES PRELIMINARY NOTES − The installation of the device does not require any special care, is therefore simple and immediate. USE - Each time you select the SMART-CARD will take a few seconds to allow the machine to recognize and load the card: meanwhile it shows the message PLEASE WAIT. - The selection of the SMART-CARD is possible only if previously inserted into the slot. - To prevent erasure or formatting of SMART-CARD, confirmation is required. - The EMISSION of treatments included on patient’s cards is always POINT emission. - Using the MANUAL mode the emission is CONTINUOUS. - The emission is possible thanks to the pedal, after pressing the pedal the device will emit a short beep to confirm the emission. - In MANUAL mode the pedal has to be pressed for the time set. Removing the activation of the pedal the treatment will be stopped until it will be pressed again. - When there is no contact with the pedal, the device will emit a short beep to inform about the suspension of the emission and of TIMER. - POINT EMISSION: for every single laser spot is necessary to push the pedal. MNPG135-00 - MANUAL EMISSION: to make a treatment with this emission is necessary to push the pedal only one time and the probe will continue to emit for the time set. The program saved in MANUAL section will be with continuous emission, controlled through the use of probe. The total maximum duration will be the one manually setted and can be changed before starting the treatment. After opening a patient’s card, it will not possible to save the data changed during the treatment on the card in the same card. It will be possible to create customized protocols following instructions in MANUAL for treatment with continuous emission, or the instructions in TREATMENTS for point emission. Each time you click the START button or the STOP button the machine will emit a long confirmation beep. During the treatment with standard protocol or MANUAL mode, the modified parameters can be saved directly by creating a customized treatment, as shown in SAVE and MANUAL. To bring up the virtual keyboard window it is necessary to click on the writing pad to fill in; to let it disappear it’s necessary to click on keyboard icon or on display While writing to select the entered string it’s necessary to touch the first letter of word and scroll the text to be selected keeping the contact with display, the string will be in blue highlighted; to delete it select the appropriate keys on the virtual keyboard To move into windows or the virtual keyboard into the display, it’s necessary to touch the blue bar at the top and drag. While CREATING A CARD, it’s necessary to enter field NAME or SURNAME. Without these data, an info window will appear and indicate that it’s necessary to include these info to save the card. The device controls and warns the user about the insertion of a card using an already used before. To close the warning window it’s necessary to click on OK. While MODIFYING PATIENT’S CARD it’s possible to click on SAVE key to save the new data on selected card, old data will be deleted and overwritten and it will not be possible to recover them. While MODIFYING to cancel the modifications it’s possible to click on CANCEL and to repeat, if necessary, the operation. Only the main anatomical zones can be selected and therefore connected to the protocols of therapeutic suggestion. When the treatment is going to start, after the selection the key START is replaced from the key STOPS and vice versa. The option SCREEN SAVER cannot be selected in this version of device. To FORMAT a memory means deleting all the data it contains. Once started the CALIBRATION OF THE SCREEN it is necessary to carry out and complete it, it is not possible to press ESC as otherwise indicated in instructions on video. When selected MUSIC if the MP3 FILE LIST is empty even if BACKGROUND MUSIC is active, it will be necessary to deactivate and reactivate again the selection of this box. The maximum number of pieces to be loaded on LIST OF LISTENING is 10 Using the RIGHT ARROW the selected piece is loaded in the LIST OF LISTENING and it’s not eliminated in MP3 FILE LIST Using the LEFT ARROW selected file is eliminated from the LIST OF LISTENING Pag. 5 MAINTENANCE − For an optimal use of the device and to guarantee its maximum performance, it is recommended to perform maintenance at the correct time and suggested ways. - CAUTIONS PRELIMINARY NOTES - The customer is liable for all damage caused by inadequate packaging of the material. Keep the original packaging of the unit: it will be needed if the unit is returned to the company. - Do not use the equipment in places where it might get wet. - Before operating the machine carefully check the correctness of the connections according to the instructions. - Do not use accessories other than the ones provided: they might damage the unit, causing the warranty to become void. In case you have any problems or difficulties with installation, contact IACER srl technical support. - If using the same extension for the unit and other units, make sure that the total current being absorbed by the connected units, does not exceed the max current allowed for that type of cable and that, however, it does not exceed 15 A. - The therapeutic suggestions are stored in the permanent memory of the machine. These protocols can be edited but not possible to save any changes. - The protocols of therapeutic suggestion preloaded on the machine cannot be deleted. - It is not possible to define a number of sessions suggested to evaluate the effectiveness of the treatment, since they are related to the power delivered to the patient undergoing treatment. It is task of the physician to decide the number of therapy sessions which subject the patient according to the specific requirements of the case, in order to ensure to the patient himself the execution of an effective treatment in time and place in conditions of absolute safety. - Always control the integrity of the cable and of the probe/applicator connector: they must not be damaged or worn. USE - The laser radiation that outgoings from the device is dangerous: always use the appropriate glasses, always avoid the exposition of the eyes to the direct or reflected laser beam. - Before beginning any treatment both operator and patient must wear the PROTECTIVE GLASSES. - Before switching the device on, be sure that the INTERLOCK key, that allows to start up the machine, is connected. - DURING THE TREATMENT IN CONTINUOUS MODE IT’S FORBIDDEN TO KEEP THE PROBE STEADY IN A POINT, IT’S ABSOLUTELY NECESSARY TO MOVE THE PROBE TO CARRY OUT A SORT OF SCANNING ON THE TREATED AREA. MNPG135-00 - - - - Before starting the treatment, check that the handpiece has been set to the proper spot position, which must be the same as indicated on the screen in order to have a correct supply. The Smart Card has to be introduced keeping the golden chip facing up. A new Smart-Card has to be initialized using FORMATTING before being used. If the card is introduced in wrong way or is not formatted or results not correct, a warning window will appear with the information about the error. Close the window clicking OK to continue. SMART-CARD option is visible (and therefore selectable) only if the smart-card is properly inserted in its slot. In case of lacked insertion of the Smart-card in its slot or Improper insertion, the option button SMART CARD is not visible, for which a possible selection does not involve any action. The selection of programs to be loaded takes place by default in the user memory, that in cases of non-presence of the Smart-card (due to its lack or to an improper insertion in its slot) is the only support of available memory to load customized programs. After saving on the patient’s card the fields NAME and SURNAME, it will not be possible to change them anymore The device, when the patient’s card is inserted, controls the name and informs the user if this has already been used. Close the warning window clicking on OK to continue Use different names for each customized protocol. To avoid putting the same name for two different therapies it’s necessary to control the list of the therapies before creating a new customized one. Before saving the customized protocol it’s necessary to control that the associated name has been entered, to avoid that a therapy without reference name is saved. On request we can provide the user manual in electronic form. Because of security reasons, the only specific software must be loaded into each machine. In case of exchange of software, the machine may immediately stop all its functions, requiring the intervention of IACER srl technical assistance. CLASS A emission: the device can be used in hospital/environment taking into account that the machine could make interference with other electronic device in the same environment. MAINTENANCE - Use the probes/applicators with care: any misuse may affect their performance and features. - Under no circumstances technicians not authorized by IACER Srl are allowed to open and/or disassemble the probe/applicator: such tampering, besides damaging its characteristics, immediately invalidate the right to warranty. - The equipment should never be disassembled for cleaning or inspection purposes: the units does not have to be cleaned internally, and if for some reason the unit must be opened, it should only be done by specialized technicians authorized by IACER Srl. - Do not use thinners, detergents, acid solutions, aggressive solutions or flammable liquids to clean the external parts of the unit and accessories. Using these substances, or misusing the accessories, will cause the immediate voiding of all warranty rights, as well as irreparably damaging the unit and the accessories. Pag. 6 For an optimal use of the device and of its performance it is recommended to process the routine maintenance. - For a correct replacement of the installed fuses, observe the following indications: 1. open the fuse box using a screwdriver, making sure you insert the screwdriver in the slot on the fuse box and levering up outwards; 2. remove the fuse holder making it slide along the track; 3. remove the installed fuses and replace them with new ones; 4. replace the fuse holder into the fuse box, making it slide along the track; 5. close the fuse box plastic door. − It is recommended to perform periodic maintenance every year, in order to check: o the intensity of any leakage currents; o the continuity and thus the integrity, of the ground conductor; o the correctness of the value of insulation resistance; in order to ensure the electrical safety of the device, ensure that it is operating in a safe guaranteed. For this kind of intervention you should contact a qualified service technician or alternatively IACER srl or one of its authorized service centers. WORKING PROBLEM - Only technicians authorized by the manufacturer may access the interior of the unit. - You should contact IACER srl or its authorized service centers for any repair work or further information. - ! WARNINGS ! PRELIMINARY NOTES - The perfect functionality of the device is guaranteed in accordance with the rules of installation and of use included, only with original accessories and spare parts. - If there are problems or installation difficulties, please contact the IACER srl technical assistance department. - The correct position while moving the machine: the apparatus has to be moved exclusively by gripping it with both hands on the curved profiles of the lid. - Before connecting the cable to the mains plug, check that the equipment wasn’t damaged during transport. Ensure that the power supply specifications on the mains socket correspond with the information on the label attached to the back of the unit. - The electric current that powers the unit is VERY DANGEROUS. Before connecting or disconnecting the power cable from the connecter on the unit, make sure it is plugged out from the mains socket. - The power cable has an earthed plug for safety reasons. - Only use with a mains socket suitable for use with earthed systems - The equipment should only be connected to electrical systems that fully comply with regulations. - Connect the equipment directly to the wall socket without using extensions. Failure to comply with these warnings may result in dangerous electrical discharges that could cause injury operators and compromise the functioning of the unit. MNPG135-00 - If you want to install an extern interlock circuit, contact exclusively qualified technicians and supply them the scheme correspondent to the room used for the emission of the treatment. A bad installation of the device can to generate serious ocular lesions. - The laser therapy treatments must be provided, under the strict control of the operator, patients conscious, able to interact with the operator in response to stresses transmitted by the device; in case of default to the indications given, IACER srl shall not be consider responsible for any accidents . The use of the controls or regulations or the execution of different procedures from those specified in this user manual can cause the exposition to dangerous radiation. The operator has the responsibility to verify that the issuing head remains well in contact to the zone of treatment, to avoid the emission to different zones from those to be treated. The laser radiation that outgoings from the device is dangerous: always use the appropriate glasses. Always avoid the exposition of the eyes to the direct or reflected laser beam. It is recommended not to start treatment if the machine is not in perfect mechanical condition or if the laser does not present characteristics of approved for this purpose (see the specifications table). During the delivery the hand piece must be positioned in contact with the part to be treated. After activating the hand piece through the pedal contact, avoid that it moves or is directed to different areas. THE PROBE MUST NEVER BE DIRECTED TO AREAS OF BODY SENSITIVE TO THE LASER RADIATION, FOR EXAMPLE THE EYES. ALWAYS AVOID THE EXPOSITION OF THE EYE TO THE DIRECT OR REFLECTED LASER BEAM. Use a different name for each custom protocol, otherwise you will have two different protocols with the same name. Do not leave the device switched on unattended, always switch off after use. Use only probes accurately cleaned and disinfected after each treatment in order to avoid environmental or person contamination. The operator must pay attention to the necessity of a periodic maintenance (every 2 years) of the probes/applicators. IACER srl authorised personnel should carry out such operations. It is absolutely forbidden the use of the device in presence of anaesthetic and inflammable substances and in highly oxygen concentration environment. In case of noncompliance IACER will be not responsible of possible accidents. It is absolutely forbidden to cover the ventilation slots: such an action may not allow the machine to work in safe conditions. In case of non-compliance with this indication, IACER srl will not be responsible for any accidents. It’s important to pay the attention of the operator to the necessity to verify the correctness of the electric installation of device before activating the supply switch. It is advisable to suspend the therapeutic treatment if it were to appear some disturbances during its emission. It’s strongly advised not to hold the device on in state of start without using the probe, it could overheat. USE - - - - − − − − − − − − − − Pag. 7 − If the button OK is pressed to confirm the software updating before having connected the USB-port to the source containing the software updating, the device goes out from the main program and enters in the updating routine waiting for the USB connection. A screen indicates the missed connection. If the support to connect to carry out the updating is not available, it is necessary to switch off the device and turn it on again through the general switch to restart the device with the available software. MAINTENANCE - The probe is connected to the device through optical fiber , DO NOT fold strongly, do NOT extract or disconnect and do NOT tamper the connection cable of the probe, if you do not follow such recommendations the fibers or the optical system of beam transmission can be damaged and could cause injuries to the patient or the operator - Not to twist the probe cable. - Do NOT let liquid enter the gaps, do NOT use in oxygen-rich environments, do NOT cover the ventilation slots of device. - Do not to use chemical solvents or abrasive detergents to carry out the cleanliness of the probe and of the lens: control of the head of treatment to detect cracks that could let the liquid enter. - The solvents of the adhesive and the solutions used to clean and disinfect have to evaporate before using the laser device, especially if they are flammable solutions, to avoid the risk of fire of the endogenous gas. - If the beam spot is absent or with reduced intensity, switch off the device and contact the assistance centre. - For safety reasons before carrying out any maintenance or cleaning the unit, YOU MUST turn off the equipment with the power switch at the back and unplug the socket connected to the mains. - Before every treatment, it is recommended to clean with caution all of the accessories and the parts of the equipment that have been to contact with the patient. - The operator must pay attention to the necessity of a periodic maintenance of the probes/applicators. IACER srl authorized personnel should carry out such operations. - The cleaning and disinfection must be done systematically before the therapeutic treatment which subject the patient. - Do not use thinners, detergents, acid solutions, harsh solutions or flammable liquids to clean the outside of the unit and its accessories. The use of these substances, with the improper use of accessories, irreparably damages the equipment and the warranty will lapse. - Always control the integrity of the cable and of the probe/applicator connector: they must not be damaged or worn. - It is advised that personnel with technical preparation substitute the fuses, to perform the operation in safety conditions. - Do not open the device: inside there are high voltages that may be hazardous. - Only personnel authorized by the manufacturer may access the internal components. For repairs and further information please contact IACER srl or its authorized service centers. WORKING PROBLEM − Do NOT OPEN the unity, as HIGH VOLTAGE ELECTRICITY is present and may prove VERY DANGEROUS. MNPG135-00 INTRODUCTION OF THE TECHNOLOGY The evolution of light The new laser I-TECH LA4000 is realised in optical fibre that allows beam laser application directly on the skin without loses. Thus you can make sure that the laser performs its therapeutic action as an impressive regenerative stimulation in chronic pathologies, in the acceleration of the inflammation resolution and of the oedema in acute pathologies, and in the rapid resolution of painful articular, muscular, neurogenal and soft tissues syndromes, both acute and chronic. I-TECH LA4000 allows an immediate improvement in the symptoms of inflammatory and degenerative pathologies in the orthopedic, neurologic, dermatologic domain and a reduction of recovery times and presents itself as an indispensable therapy, especially in Sports Medicine, since it allows rapid recovery for many sportsmen, for whom time is a determining factor in their career. The advantages of Laser therapy Laser therapy is not based on the generation of heat, but on photochemical and photo-biological effects on cells and tissues. Observations have shown that if the laser light is supplied in the right quantities, you will obtain a stimulation of certain cellular functions, especially in the presence of cells with functional deficiencies. The biological action in using the Laser therapy produces a series of effects on the cells in function of a “stimulating” action on mitochondrial functions with a higher production of ATP. The applications of I-TECH LA4000 laser produce a number of effects on the treated tissues: increase in hematic flow: vasodilatation of capillaries and arteries; biostimolation: tissue regeneration, stimulation of the protein synthesis, simulation of the production of ATP, stimulation of the fibroblast mitosis, increase in collagen and elastin; anti-inflammatory effect; anti-oedematous effect, with stimulation of the lymphatic system; analgesic effect: increase in the perception threshold of nerve endings. Pag. 8 I-TECH LA 4000 is therefore a laser with the following characteristics: thanks to the adjustable power up to 4000 mW and to the wavelength of 940 nm, it allows the stimulation of the deepest layers of the treated tissue thus favouring a rapid and diffused cellular re-generation; with I-TECH LA 4000 it is possible to obtain a deep tissue stimulation and this makes possible to treat the most internal tissues and structures (such as the femoral joint) and chronic pathologies such as arthrosis; thanks to its characteristics I-TECH LA 4000 may be used in many fields such as sports medicine, orthopaedics, neurology, dermatology, rheumatology, odontology (conservative parodontology, medical treatment by implants, oral pathology, surgery, removal of tartar with pain) and acupuncture; crucial in acute, chronic and degenerative inflammations such as knee arthritis. I-TECH LA4000 carries out an important therapeutic action for the regeneration of chronic pathologies, for the acceleration of the healing process in the acute pathology of oedema inflammation. Furthermore it is very effective in the fast resolution of painful articular, muscle, neurogenic syndromes and soft tissues. INTENDED USE I-TECH LA4000 is an electro-medical device that delivers treatments of laser-therapy, with the help of power laser up to 4000mW for the provision of treatment though a specific probe. I-TECH LA4000 is an active therapeutic device, not invasive, used especially by physiotherapists, physicians and pain therapists. The use of I-TECH LA4000 is reserved to operators that can guarantee the safety and the correct use of the machine thanks to their professional training. The operator, in fact, should be qualified to be able to use such equipment, and he should have passed an adapted training, or should operate under the control of a medical adequately qualified to the use of the equipment, in order to guarantee safety conditions to the patient. Such equipment can be used in hospital environment outpatient, nevertheless, it is important to know that the user follows the medical instructions to use INDICATIONS The application fields that can profit from using the laser-therapy I-TECH LA4000 are the following: 1. Sports traumatology Extensions and muscular strains, articular distortions, epicondylitis, tendinitis and enteritis, contusions, hematomas and bruises, bursitis. 2. Arthro-rheumatic pathology Arthrosis, sciatica, scapular and humeral periarthritis, arthropathy of hands and feet, epicondylitis, hip arthrosis at its initial stage, gonalgia with or without effusion, myogenic stiff neck, lumbago, myositis. 3. Rehabilitative therapy Articular motor rehabilitation after removing plaster apparatuses or after orthopaedic surgical operations. MNPG135-00 Pag. 9 4. General medicine and dermatology Decubitus ulcers, cheloids, torpid sores for its well-known bio-stimulating and antiinfectious effects. CONTRA-INDICATIONS − Direct radiation in the eye: 3R class lasers are potentially dangerous for the retina- even if a damage of the retina is highly unusual. The special safety goggles supplied with the machine must be worn by both patient by the operator. − Pregnancy: the laser is contraindicated for use over the pregnant uterus. can still be used in pregnant women with the foresight to not radiate over the abdomen. − Neoplasms: you must not use the laser on a primary lesion or secondary nondiagnosed. Laser treatment may be granted to relieve pain during the terminal stage of disease, it is recommended that this be performed only with the full consent of the patient. − Thyroid: the laser should not be used in any case above the gland. − Bleeding: vasodilatation may worsen the bleeding. − Immuno-suppressive therapy: laser therapy is contraindicated in patients who have undergone such type of drug therapy. − In the skin and injuries suspects: never laser radiation on angiomas, black points or injuries suspects on the skin. − Treatments over the sympathetic ganglia, the vagus nerve and region of the heart in patients with heart disease: laser therapy can significantly alter the function neural, and is therefore contraindicated in this regions body patients with heart disease. Other − Atopic dermatitis and eczema in the acute phase − Inflammatory processes in place at the site to be treated − Abrasions or bruises − Photoallergy − Photo dermatitis. − Recent surgery or cryotherapy in cutaneous sites to treat − Warnings Photosensitivity reactions: in some patients taking drugs known, the latter are due to reactions of photosensitization. It is not clear how the combination of laser and drugs MNPG135-00 triggers this response. It is recommended that patients at risk allergic, or patients with a history of such reactions are "tested" with a minimum time of treatment. - Means of fixation, metal plates, plastic NOT constitute contraindication to the use of lasers which can be safely used on metallic implants, sutures and plastics DEVICE DESCRIPTION Standard kit: -User manual; - n.1 alimentation cable; - n.2 spare fuses (see technical data); - n.1 handle; - n.1 pedal; - n.1 interlock key; - n.1 smart-card - n.2 safety glasses. Check the contents of the package and should any of the items be missing then contact your local authorized IACER srl dealer. SETTING UP Installation of the equipment is fast and simple. The recommended environmental conditions when installing the equipment are as follows: − room temperature: from +10° to +40°C; − humidity level: from 10% to 80% without condensation; − avoid direct exposure to sunlight, chemical products and vibrations. Pag. 10 CONNECTIONS This operation prepares I-TECH LA4000 for use, determining the switching on of the LCD illuminated display that shows that the equipment is ready to operate. The power entry module can be found on the back of the unit and consists of a threepole socket for the cable set, an extractible fuse box with two fuses (see technical specifications) and the main switch. The LCD display will be illuminated showing a presentation screen, with a helm of progression showing the loading in course: Plug the power supply cable three-pin plug into the integrated board and ensure that it is correctly plugged into the connector. Insert the key into the INTERLOCK connector. 1. wait for a few seconds or press SKIP: in the initial page it will appear a screen asking to PRESS THE NUMERICAL CODE; 2. digit the PIN of access: a long beep indicates that the code is correct two short beeps indicate wrong pin and therefore the negation to access; 3. after that you have digit the correct code you will be on the starting screen of the device where you can choose the proper operation mode. connect the pedal by inserting the connector in the connection back panel of the device. Once you have checked that installation and assembly have been carried out according to instructions provided up to this point in the manual, switch on the machine making sure that the display screen is turned on correctly. The default code is 1234, change it to follow the steps below. The main screen consists of 4 BUTTONS primary and in a TOOLBAR with 6 buttons accessories. The following describes the function of each key. ACCESSORIES The devices is supplied with the following accessories: Accessories description Power cable supply Spare FUSES Smart-card Interlock Pedal User manual Laser protective glasses for the operator, model YG3 Laser protective glasses for the patient, model OLV Handle Display pen MI23LPS B1B4 1 1 1 1 1 1 1 1 1 1 SWITCHING ON AND SAFETY KEY After having installed and positioned the equipment following the instructions supplied in the previous chapters, and after applying the cable which connects the handles with the appropriate connector, plug the power plug into the mains socket (230 Vac) and turn on the equipment by switching the ON/OFF on the back panel. MNPG135-00 Pag. 11 DESCRIPTION OF THE EQUIPMENT Emergency button Colour graphic display TOUCH SCREEN Output and supply Optical fiber LASER HANDLE Ventilation fan Programming panel MNPG135-00 Pag. 12 ACCESSORIES PROGRAMMING PANEL audio Connector SPACER Position 0 Window for entering SMART card Position 3 Position 2 Position 1 Handle USB connector, used for programming the processor SMART-CARD OUTPUT AND SUPPLY Interlock Pedal Emergency button Fuses box General switch ON/OFF MNPG135-00 Ground Terminal Bipolar jack for power cable supply Optical fiber laser handle connector Interlock connector Pedal connector Pag. 13 HOW TO USE OF THE DEVICE This section provides important information and instructions on how to make the best use of the equipment for laser therapy I-TECH LA 4000. − FREQUENCY in Hz I-TECH LA4000 gives the operator a list of protocols that can be used as therapeutic suggestions for beginning a specific treatment. It is possible to choose the program of therapy to use between different typologies: With the first turn on of the device, you can set the language from the six available; proceed as indicated in LANGUAGE. − STANDARD PROGRAMS, Protocols already present in the device, these cannot be cancelled or modified in a definitive manner, or The following paragraphs illustrate the operations that have to be carried out by the operator to better exploit the capacities and the technical peculiarities of the equipment. − PERSONALIZED PROGRAMS that are created by the operator depending on specific requirements, based on the standard protocols or created in a free procedure, and memorized in the Smart-Device or in the user’s memory. OPERATION The treatment of laser therapy I-TECH LA4000 has two typologies of operation, in fact the emission of the ray can happen AT POINTS or in MANUAL manner: THE EMISSION TO POINTS allows emitting some laser ad characterized from a specific Power, Lasted and Area of Action; such data can be determined by the operator across the choice of one between the therapeutic protocols of suggestion already present in the equipment or by changing directly the parameters according to the actual requirements. THE MANUAL EMISSION allows using the laser radiation managing the emission spot manually, in this case can be planned the following parameters: Max. emission TIME, POWER. The power distributed is conducted using the OPTICAL FIBER that guarantees high effectiveness and full manageability of application. One of the peculiarities of the features of the I-TECH LA4000 is represented from the HANDLE. This special HANDLE allows therefore having a greater fan of action and more specific based on the anatomical treatment zone. The standard advised programs are the fruit of the experience throughout the years of supporting the professional experts. In the appendix C. It’s contained a list of the available protocols described according to the anatomical zones to treat and the relevant possible pathologies. Once the parameters for the treatment have been chosen on the display, it will appear the relevant window to the work program chosen, it is therefore ready for its execution simply by pressing the START key and following the procedure described in the present manual. If the background music is selected, the pressing of the START button will determine not only the beginning of the chosen therapeutic treatment, but also the beginning of the musical brand selected. In case the therapeutic treatment is suspended, the musical brand listened will be immediately interrupted. I-TECH LA4000 gives the possibility to create and to save personalized programs and patient cards. The operator has the possibility to choose the value of the parameters of the treatment based on the actual necessity. The two different supports of memory that can be used for such purposes are, an inside MEMORY, and a further outside one called SMART CARD. The parameters that can be modified by the operator are: Besides the possibility to save the relevant data to programs or files, it is also possible to eliminate them. Both memories can BE FORMATTED in any moment to be re-used with new patients or with the other compatible devices. − PULSED that is the percentage of energy that should be emitted − AREA the size of the surface on which is wanted to work − DENSITY that identifies the quantity of energy to emit for cm2 − TIME that indicates the time of action or radius emitted. MNPG135-00 It is possible to use the user’s memory also to load and to perform programs already memorized. Pag. 14 PREPARATIONE OF THE PATIENT − Before applying the laser therapy, is necessary to prepare the skin of the patient. This will allow to the laser light to reach better the aimed zones and to reduce the skin risk of annoyance. TO SAVE the parameters if necessary changed proceeding like guide in SAFE HEAD NECK CHEST ARMS SHOULDER For preparing the skin of the patient for the therapy, carry out the following operations: 1. to wash the skin where the head of the laser will be positioned with water and soap or to clean with alcohol. 2. to dry well the skin. HANDS ABDOMEN ANATOMICAL ZONES LEGS Pressing the button ANATOMICAL ZONES, it is possible to choose the area of treatment to load the therapeutic protocols presents on device: The anatomical zones are: 1. to choose the ANATOMICAL ZONES; 2. to choose the wanted anatomical zone in the body present in the screen choosing between those indicated in the previous figure; 3. to run between the pathologies indicated in the strip using the lateral scroll bar; 4. to choose the PATHOLOGY 5. to click on OPEN At this point it is possible − TO START the treatment, following the procedure STARTS − TO CHANGE the data of the treatment, proceeding like guide in MODIFY MNPG135-00 LUMBAR ZONE FEET The programs loaded in the inside memory of the device can be changed, but cannot be overwritten or cancelled. It will be sufficient to choose an anatomical zone of the body shown in the screen to have available the strip of the possible pathologies for the chosen zone and to load the protocol of associated therapeutic suggestion. BACK TREATMENTS Pressing the button TREATMENTS is possible to load the pathology required between the possible pathologies and to load the associated therapeutic treatment: 1. to choose the key TREATMENTS 2. to run between the pathologies indicated in the strip using the lateral scroll bar 3. to choose the required PATHOLOGY 4. to click OPEN At this point is possible − TO START the treatment, following the procedure STARTS − TO CHANGE the data of the treatment, proceeding like guide in MODIFY − TO SAVE the parameters if necessary changed proceeding like guide in SAVE Pag. 15 2. to touch the button STARTS MODIFY To change the present parameters on the screen it is necessary to choose the required one and to act on the arrow that will appear near the value. The following parameters can be modified: PULSED, DENSITY, SPOT AREA, TIME SPOT and the FREQUENCY HZ. To change the parameter FREQUENCY HZ is sufficient to choose the arrows + and -. To change the other fields it is necessary first to select what wanted, which will be emphasized in dark blue, and to work on the arrows that will appear on the data. Once chosen a field to change those modifiable will appear in grey those not modifiable will remain in black All parameters are bound between them means of the specific connections; in the following table are the existing connections between the different components after modifications: Parameters adjustable Parameters that are subject to change automatically PULSE DENSITY TIME POINTS x POWER x DENSITY SPOT AREA TIME POINTS - - x x x - FREQUENCY in the screen the notice PULSED and SPOT TIME will appear in boldface, indicating that it will be possible to change such values during the treatment • in the screen the arrows concerning increase/decrease of the frequency HZ will result in relief, indicating that it will be possible to change such value during the treatment 3. to proceed to the emission of the first SPOT activate the pedal applying a pressure through the foot • once happened the contact the emission of the impulse will begin, indicated by a beep; will be increased the calculation of the SPOT both as quantity of energy that as accumulation of emission times • it is possible between the spots to change o the percentage of PULSED (through that will be also changed the POWER and the SPOT TIME), o the SPOT TIME (through that will be changed the DENSITY) o the frequency HZ (through that will be changed the POWER and the SPOT TIME) choosing and working on the relevant arrows. x x START Clicking START will be possible to begin the treatment. In the timer will be accumulated the emission time of each emitted spot. The supply of each spot happens means the utilization of the pedal that will allow the activation of the emission. The calculation is accumulated until STOP will be selected and therefore the treatment finishes. To start the treatment: • 4. to emit all successive spot remove and restore alternately the contact on the pedal 5. once finished the treatment touch STOP. IMPORTANT for the emergency situations: STOP BUTTON In case they should appear up some problems also critics during the treatment or there should be the necessity to INTERRUPT IMMEDIATELY the supply for any reason it is possible to use the SAFETY STOP BUTTON. The STOP key allows to interrupt immediately the supply of the laser turning completely out the equipment and therefore disconnecting the net. After having activated the emergency key to continue to use I-TECH LA4000 will be necessary to turn the device on using the general switch in the back panel. 1. to position the probe on the part to treat MNPG135-00 Pag. 16 4. to fill the following fields: SAVE To save possible modifies of the parameters: 1. to touch the SAVE button; 2. in the window that appears, select the type of memory where you want to save the personalized program; 3. to touch the data entry box • it will appear a virtual keyboard that will allow to introduce the desired words • NAME (obligatory insertion) • SURNAME (obligatory insertion) • DATE OF BIRTH • treatment in the STRIP TREATMENTS • RESULT • Nr SESSIONS • CASE HISTORY 4. to click on the icon keyboard upwards on the left to close the virtual keyboard 5. to click on the voice to introduce 5. to click on OK to confirm the name 6. to work on controls to fill the fields: delete entirely the • 6. to click on SAVE to confirm the save of the program; the device will emit a long beep of confirmation and it will reappear the previous screen with the data for the SURNAME NAME fields and DATE OF BIRTH, it will appear a virtual keyboard to make modifications; once finished click on the ICON keyboard upwards to close the virtual keyboard • in case of modifications to TREATMENT or Nr SESSIONS, will appear the whole list and the scroll bar, click on the voice or the data to select it • licking on the icon rubber it is possible to introduced name 7. to start the program saved to proceed how described in the section STARTS PROCEDURE Choosing the key PROCEDURE is possible to display the USER MANUAL of the device PATIENTS CLIENT With the button PATIENT’S CARD is possible to OPEN a FILE previously saved in the memory or to CREATE a new CARD CREATE a FILE 7. in case of modification RESULT or CASE HISTORY will appear a WRITING window with the text to change and an ENTRY PANEL to use for the modifications; once finished click on ICON KEYBOARD to close the ENTRY PANEL and therefore EXIT from WRITING window to end the writing to click on SAVE to save the data introduced At this point is possible • TO START the treatment, following the procedure STARTS • TO CHANGE the data of the treatment, proceeding like guide in ALTERATION At the end of the treatment referred to the selected card, the number of TRAT. PERFORMED / SESSIONS will be automatically increased. 1. to click the button PATIENT CARD Once reached the number indicated on patient’s card, it will appear a window that will indicate TREATMENTS COMPLETED FOR "patient’s name". 2. to choose the button CREATE CARD Close the window with OK and continue choosing the required function. 3. to choose the required memory in the dialog frame appeared on the screen MNPG135-00 Pag. 17 The card that finished the number of sessions will not be able to perform treatments. To be able to continue to use it is necessary to change the NUMBER OF SESSIONS following the procedure MODIFY. OPEN a CARD: 1. to click the button PATIENT’S CARD 2. to choose the button OPEN CARD 3. to choose the memory from which to load the INTERNAL MEMORY or SMART CARD • if you want to use the key FORMAT it is necessary to consult the manual in section MEMORIES> FORMAT 4. Touch the card to open and the written will be emphasized in dark blue 5. Touch the required card • if you want to use the key ELIMINATE consult the manual in the section MEMORIES> ELIMINATE 6. Select OPEN to open the card At this point is possible if necessary to change the parameters of the card before beginning the treatment. MODIFY the CARD: 1. Select MODIFY • You can modify the following data: o DATE OF BIRTH • if you have to change DATE OF BIRTH touch in the white space at the end of the string, it will appear a virtual keyboard to use to change the data; once finished click on the ICON keyboard upwards to close the virtual keyboard • in case of modifications to TREATMENT or Nr SESSIONS, will appear the whole strip and the scroll bar, choosing the new voice this will replace the precedent • in case of modification RESULT or CASE HISTORY will appear a WRITING window with the text to change and an ENTRY PANEL to use for the modifications; once finished click on ICON KEYBOARD to close the ENTRY PANEL and therefore EXIT from WRITING window to end the writing 4. click on SAFE to save the new data overwriting the old one and choose EMISSION to begin the treatment At this point is possible • TO START the treatment, following the procedure STARTS • TO CHANGE the data of the treatment, proceeding like guide in ALTERATION At the end of the treatment referred to the selected card, the number of TRAT. PERFORMED/SESSIONS will be automatically increased. Once reached the number indicated on patient’s card, it will appear a window that will indicate TREATMENTS COMPLETED FOR "patient’s name". Close the window with OK and continue choosing the required function. The card that finished the number of sessions will not be able to perform treatments. To be able to continue to use it is necessary to change the NUMBER OF SESSIONS following the procedure MODIFY. o Selected Treatment LIST OF TREATMENTS o RESULT o Nr SESSIONS o CASE HISTORY TOOLS BAR On the screen downwards there is a series of button having service functions, like: HOME, that allows to return the initial screen from whatever menu; 2. to click on the voice to change 3. to work on the controls to make modifications: MNPG135-00 Pag. 18 MANUAL, that allows to visualize the program of default on each of the output channels, with the possibility to personalize it and to save it on one of the secondary memory supports available (memory user, smart-card). LOAD, that allows to load on the selected channel a program present on one of the secondary memory supports of the device (memory user, smart card) BACK, that allows to go back the screen immediately preceding to the selected one HELP, that allows to obtain indications and suggestions about the selected operation SETTING, that allows to define the working conditions of the device. • frequency HZ To change the parameter FREQUENCY HZ is sufficient to choose the arrows + and -. To change the parameter TIME is sufficient to choose the arrows right and left. To change the field PULSED it is necessary first to select what wanted, which will be emphasized in grey, therefore to work on the arrows that will appear on the data. All parameters are bound between them through specific connections; based on the connections that exist between the different components the modification on PULSED and FREQUENCY allow to select automatically the required quantity of POWER; the TIME of emission will determine the increase of the DENSITY during the treatment. At his point is possible MANUAL It allows to use the machine with free procedure. The free procedure allows to create and to use programs in MANUAL typology of emission and therefore continuous, the time of emission can be planned both manually with the modification of the parameter TIME, that through the use of probe that allows the stop of the emission. The default parameters related to the suggested standard protocols present on the device will be loaded. To make appear different initial data it is necessary to change them as described in the section DEFAULT. In FREE PROCEDURE there is the possibility to change the data that appear depending on the personal requirements, choosing manually the required values. To set the values of the treatment it will be sufficient to follow the instructions described in the following paragraph MODIFY the parameters. TO START the treatment, following the procedure START the treatment described later on TO SAVE the personalized protocol proceeding as described in SAVE. TO START the treatment: After clicking the key START, begins the calculation backwards of the TIMER. The calculation and the emission continue until: - the setted time ends: in this case the system emits a long bip of warning there is the contact on the metallic side the key STOP is clicked in this case the treatment finished. To start the treatment: 1. click START; 2. position the probe on the part to treat CHANGE the parameters 3. activate the supply pressing the pedal and begin immediately to move the applicator so as to scan all the interested zone The following parameters can be modified: 4. the TIME of emission will start the calculation backwards of the TIMER • PULSED • TIME MNPG135-00 5. Keep the pedal pressed for all time necessary for the treatment Pag. 19 6. It will be shown the increase of the quantity of DENSITY depending on the time to suspend the treatment remove the contact with the metallic plates of the probe to continue the treatment restore the contact of the fingers on the metallic part of the probe to finish the supply during the treatment press STOP 7. at the conclusion of the countdown it will appear an informative window: THERAPY FINISHED TO SAVE the data of the treatment. TO START the treatment with the suggested settings follow the procedure STARTS. TO CHANGE the suggested parameters proceed like guide in MODIFY. TO SAVE the parameters if necessary changed proceed like guide in SAVE. CARDS In this section is possible to load a memorized PATIENT’S CARD. 1. select LOAD CARDS 2. select the MEMORY or SMART CARD where the required card is saved 8. press OK to confirm and to close the window. IMPORTANT: In continuous procedure the treatment should not be applied in a manner that the handle is motionless always in the same point, but it is necessary to move continually scanning the zone interested. • choosing FORMAT you can format the selected memory as described on the appropriate section MEMORIES> FORMAT 3. touch the desired card • LOAD select ELIMINATE to proceed to the phase of elimination as described on the appropriate section MEMORIES> ELIMINATE It allows loading the required program choosing between 4. select OPEN to open the card; select EMISSION. • • • the list of the therapeutic suggestions in the inside memory; the list of the PATIENTS’ CARD the list of personalized PROTOCOLS THERAPEUTICAL SUGGESTIONS From this list is possible to load one of the therapeutic programs of suggestion already stored: TO CHANGE the data of the card proceed as guide in the section MODIFIY. At this point is possible TO START the treatment, TO CHANGE the parameters of the treatment. TO START the treatment follow the procedure STARTS. 1. Select LOAD TO CHANGE the data of the treatment to proceed like guide in ALTERATION. 2. Scroll the list of the present THERAPEUTIC SUGGESTIONS on the screen using the side scroll bar PROTOCOLS 3. choose the wanted protocol 4. click on OPEN to open the screen containing the data of the protocol At this point is possible TO START the treatment, In this section is possible to load a PROTOCOL choosing between those personalized: 1. Select LOAD PROTOCOLS 2. select the MEMORY or SMART CARD where the required card is saved • choosing FORMAT you can format the selected memory as described on the appropriate section MEMORIES> FORMAT TO CHANGE the data of the treatment, MNPG135-00 Pag. 20 3. touch the required protocol in the TREATMENTS list • By pressing the button TOOLS, it will appear a screen where it is possible to choose: − LANGUAGE − DEFAULT − MEMORY − INFO TO START the treatment − SCREEN TO CHANGE the parameters of the treatment − SOUNDS TO SAVE the parameters of the following the procedure described in SAVE − MUSIC select ELIMINATE to proceed to the phase of elimination as described on the appropriate section MEMORIES> ELIMINATE 4. select OPEN to open the card At this point is possible TO CHANGE the parameters of the treatment before starting it: if the EMISSION is MANUAL proceed as described in MANUAL> CHANGE the data of the treatment if the EMISSION is AT POINTS proceed as described in MODIFY TO START THE TREATMENT if the EMISSION is MANUAL proceed as described in the MANUAL section> START the treatment, if the EMISSION is AT POINTS proceed as described in the section START. BACK By pressing the button BACK, it is possible to go out from the screened present and to proceed reluctant, going back on the operation immediately preceding or if necessary to the screened main. LANGUAGE By pressing the button LANGUAGE it is possible to choose the linguistic options of the device. In order to select the desired language, touch the respective line in the list and press the button OK to select the language. All the messages and the orders of the device will come visualized in the chosen language. Wait for a short time for the loading of the new dictionary, a beep of confirmation will be emitted and the menu TOOLS will appear in the new language. DEFAULT In this submenu you can Set default parameters for the “free/manual procedure”, that can be chosen by clicking on the MANUAL button present in the TOOLBAR. HELP By pressing the button HELP after choosing a specific operation to do, you will receive indications/ suggestions about the selected operation. SETTINGS It allows to change and to save in the internal memory the basic settings that will be automatically recalled every time the device will be switched on. MNPG135-00 change the ACCESS CODE To change default parameters use the corresponding arrows. You can modify the following values: − FREQUENCY − PULSED MODE − TIME Pag. 21 Click on SAVE to store set values. To change the access code click on the button CHANGE CODE. Dial the new code using the keyboard that appears on the screen and click on SAVE. MEMORY If the smart-card is not inserted correctly in the specific slot, then it is not possible to format it; in this case, the list of the programs stored in the user memory will appear on the screen by default and this will be the only secondary memory support available for formatting. INFO Pressing the beating MEMORY, you can FORMAT the memory slots and cancel ALL the stored files or ELIMINATE single files in the user memory or in the smart-card. The available memories can contain two typologies of data, CUSTOMER DATASHEETS and personalized TREATMENTS, you can choose needed section by clicking on the button CHANGE. Press the INFO button to visualize the diagnostic information of the device at rest in real time. This information can be shown: − TENSION 33V Choose the type of memory to be used MEMORY or SMART-CARD using the button CHANGE choose the type of database you want to see. − TENSION 66V − TEMPERATURE After choosing the data you can proceed to FORMATTING the slots. − PHOTODIODE SENSOR − FIRMWARE VERSION FORMATTING: 1. select the button FORMAT 2. in the window that will appear choose: • YES to confirm formatting • NO to cancel the formatting The formatting of the Smart-Card shall be carried out when a NEW CARD, that has never been used before, is inserted. The function FORMAT can also be used, after selecting the smart-card as secondary memory storage, to delete it completely, and get it ready, for example, to be used with a different device. DATA ELIMINATION: 1. Select data to eliminate, after selecting it will be marked in blue Besides, it is possible to get information on the SOFTWARE VERSION. The software version is indicated inside the button down on the left from the screen. By pressing the button of the software version loaded in the device, a window will pop up and you will be asked if you wish to update the software. Push the X button in the toolbar, present in the screen, to exit the upgrade interface. Instead, to update the software, connect USB port in the front panel of I-TECH LA4000 with the relative cable to the source containing the software update, then click the OK button on the bar of the window. After some minutes the confirmation of the successful updating of the SOFTWARE will appear and you will be required to SWITCH OFF and TURN ON again the device to launch the new version. Then the I-TECH LA4000 will have on board the updated software version. 2. click on ELIMINATE 3. A window containing the parameters of the chosen therapy will pop up and you will be required to choose: MNPG135-00 • YES to confirm elimination • NO to cancel elimination SCREEN Push the SCREEN button to select any of the following screen settings: − BACKGROUND Pag. 22 − SCREEN SAVER 1. click on the icon SOUND − SCREEN CALIBRATION 2. enable or disable the buzzer by clicking the control box BUZZER ON and set the beep tone, using the corresponding arrows for selection. To MODIFY the COLOUR of the BACKGROUND 1. choose BACKGROUND 2. choose a THEME 3. choose MODIFY • use the arrows corresponding to the Red, Green and Yellow colours to create a new colour • click on DEFAULT to choose the colour reset in the device • choose GREY SCALE to load the chosen colour 4. choose SAVE to load the chosen colour TO ACTIVATE the SCREEN SAVER: 3. enable or disable the sound intermittence when the device is working by clicking on the control box SOUND WHEN EMITTING and using the corresponding arrows for selection to set the intermittence interval of the acoustic signal. When you set the sound setting, push the save button for use the chosen settings MUSIC Clicking on the icon MUSIC it is possible to choose the possibility of listening to some music tracks in the background during the treatment 1. Enable listening by clicking on the control box BACKGROUND MUSIC • 1. Choose SCREEN SAVER 2. Enable the screen saver clicking on the box SCREEN SAVER ON • to disable the screen saver click again on the box SCREEN SAVER ON 3. Choose a SCREEN SAVER from the list 4. Set the time after which the SCREEN SAVER will start. 5. Click on SAVE to confirm your choices. To disable the screen saver click again on the box SCREEN SAVER ON. To calibrate the screen of the device: 1. Push the button SCREEN CALIBRATION 2. Follow the instructions that will appear on the screen At the end of the calibration procedure, an update screen will appear and then it will go back to the previous screen shot. SOUND Push the button SOUND to select the acoustic settings of the device, that will go off when confirming chosen functions, such as START SCREEN SAVER, etc.: MNPG135-00 to disable listening select again the control box BACKGROUND MUSIC 2. choose a track from the track list MP3 FILE LIST 3. load the files in the PLAYLIST by selecting them and clicking on the RIGHTWARD ARROW • to remove a track from the PLAYLIST select it and click on the LEFTWARD ARROW 4. after loading the tracks click on SAVE. Connect the audio support to the connector placed on the programming panel to start the listening. MAINTENANCE The devices for laser therapy I-TECH LA4000 do not request special maintenance operations, with they need just periodic maintenance and cleaning of the application probes, in order to guarantee the best operating conditions, the effectiveness of the treatment and the safety of the patient. The device shall be cleaned in its outer part with a soft cloth dampened with warm water, or using non inflammable cleaning liquids. You can clean the same way the front control panel. Pag. 23 In order to guarantee the functioning of the device in conditions of total security for the patient, we advise that the device undergoes regular proof tests and calibration every 2 years. this operation shall be carried out exclusively be skilled technical personnel authorized IACER srl. WORKING PROBLEMS Calibration can be performed only by personnel authorized by the Fabricant. It is recommended to clean carefully with denatured ethyl alcohol and wad of cotton the ending part of the probe (the output lens) to avoid dimming (skin sebum and other) and encrustations, paying attention that it does not penetrate inside the glass in the head of the probe. The products used to clean and disinfect shall be left to evaporate before using the laser device, especially if you are using inflammable products, to avoid the risk of burning of the endogenous gas. Put back to its place with care the probes/applicators at the conclusion of every treatment. CLEANING THE PROBES The fiber optical handle is a delicate component that needs a daily intervention. The following suggestions are indispensable not to ruin either the fiber or the lens. IACER advises: − to eliminate the dust with a soft cloth − to clean the part with neutral nonabrasive products − to dry carefully with a cloth Do not tangle the cable of the probe. Do not let the liquids penetrate in the gaps. Do not use chemical solvents or abrasive detergents. Contact the centers authorized by IACER srl information on the original accessories and the spare parts. Do not spray or pour liquids on the outer container of the devices I-TECH LA4000 nor on the ventilation holes. Do not put the device in the water. After cleaning the device from the outside, dry perfectly all parts before switching on the device. For no reason shall the device dismantled with the purpose of cleaning or checking it: there is no need to clean the device I-TECH LA4000 from the inside, and at any rate MNPG135-00 The devices for laser therapy I-TECH LA4000 were designed and engineered adopting advanced technological solutions, qualitative components, for a continuous use, always efficient and reliable. In the case, however, any operating problem shall come up, we recommend that you consult the following guidelines before contacting an authorized assistance centre. When the conditions expressed hereunder take place, unplug the device form the electrical system and contact the IACER srl technical assistance centre: • • • the cable or the integrated power block in the rear side are worn or damaged; some liquid entered in the device; the device was exposed to rain. ELECTROMAGNETIC INTERFERENCES The devices for laser therapy I-TECH LA4000 were designed and engineered in conformity with the DIRECTIVE on the ELECTROMAGNETIC COMPATIBILITY 2004/108/CE in force, with the purpose of supplying a reasonable protection from harmful interferences in residential, civil and hospital installations. On the basis of their operation principle the devices for laser therapy I-TECH LA4000 generate an acceptable quantity of radiofrequency energy and they have an adequate level of immunity to radiating electromagnetic fields: in such conditions harmful interferences cannot take place to radio-electric communications, to the operation of electronic medical equipment used for monitoring, diagnosis, therapy and surgery, to the operation of electronic devices for the office, such as computers, printers, photocopy machines, fax, etc. and to any electric or electronic device used in such environments, provided these comply with the directive on the ELECTROMAGNETIC COMPATIBILITY. At any rate, in order to forestall any problem of interference, we advise to use any device for laser therapy in a place that is sufficiently far away from critical equipment for the monitoring of vital functions of the patients and use them with caution in the therapeutic applications on pacemaker holders. Pag. 24 efficiency of treatment. TROUBLESHOOTING CHART PROBLEM The LCD display in the frontal panel does not turn on: the device does not work. POSSIBLE CAUSE The power plug is inserted not correctly in the socket. The power chord is not inserted correctly in the connector of the device. The power chord is worn out or interrupted. The switch is off. Fuse/s is/are defective or interrupted The electric circuit of control is broken The LCD display in the frontal Defective components in the control panel does not electric board turn on. Some Defective keys or buttons commands of the front control Faulty components on electronic panel do not control circuit. work correctly The device does not start to emit laser The unit functions normally but with a significant decrease in MNPG135-00 SOLUTION Verify that the socket works properly. TECHNICAL FEATURES Replace the power chord Turn on the switch. Replace missing, defective or interrupted fuse/s. Contact a IACER srl assistance centre. Contact the fabricant Contact the fabricant Check that the parameters have been set correctly. Laser source does not function or has run out. Check laser source emissions operating. 230 Vac, 50-60 Hz, ±10% Power supply: 115 Vac, 50-60 Hz, ±10% * Maximum power absorbed by the net: 70 VA Double fuse of protection on the net, 230 Vac delayed type (T) : 115 Vac* 630 mA-T - 5 x 20 mm 1,6 A-T - 5 x 20 mm LCD back-lit display graphic 320 X 240 pixels TOUCH SCREEN Maximum Power 4W ± 20% Emission wavelength of the diode laser 940 nm Laser classification 4 DNRO (direct light) 1,215 Divergence 440mrad Impulse duration programmable Emission CONTINUOUS Selectable percentage of emitted power 0% - 100% Frequency of emission 100 Hz – 10000 Hz Pulsed mode 10% - 100% Characteristic of the signal light Red light led Classification according to the directive 93/42/CEE IIB Output channels 1 Contact the fabricant Faulty or depleted laser source. Contact the fabricant Possible break down in power generator circuit of the unit. Insert the DIN safety key into the back No safety key or the interlock circuit socket or ensure the Smart-Card is is open. inserted, reset the safety conditions. Insert correctly the plug and the cable in the connector of the device. Parameters not set correctly. Faulty components on electronic control circuit. Faulty supply on laser circuit. The equipment starts up, or seems to work normally, but there is no emission. Pag. 25 Class of isolation / parts applied according to the rule EN 60601-1 I / BF Protection level from the entrance of liquids according to the rule IPX0 EN 60601-1 Minimum optical density (protection factors of the necessary 1.03 a 0.5 m distance protective goggles at the minimum advisable distance) Command of execution of the treatment Storage / transport conditions Pedal Produced in optical fiber (10 : 80) % without condensation temperature environment (-40 : +70) °C relative humidity (10 : 100) % without condensation Atmospheric pressure (500 : 1060) hPa * on demand defocused Configuration of the laser probe relative humidity APPENDICES Connection specific for the device Programmable treatment time Up to 99 minutes contact The devices ITECH LA4000 were designed and engineered to have minimal negative environmental impact, in consideration of their operational and safety requirements. 6 mm Distance of the laser beam from POSITION 1 the skin of the patient POSITION 2 13 mm POSITION 3 28 mm contact 2.24 mm Diameter of the spot on the skin POSITION1 of the patient POSITION 2 Rigorous standards were followed in order to minimize the amount of waste, use of toxic materials, noise, non-required radiation and energy consumption. 21 mm A thorough research was carried out to design the unit so as to optimize power consumption in accordance with energy saving principles. 4.86 mm This symbol means that the product shall not be disposed of as domestic waste 7.85 mm POSITION 3 10.47 mm contact ~ 4 mm 2 Spot area on the skin of the POSITION 1 patient POSITION 2 ~ 18.6 mm 2 ~ 48.4 mm 2 POSITION 3 ~ 86.1 mm 2 Protocols in memory 32 Number of protocols that can be saved in the user memory 200 Number of protocols that can be saved in the smart-card 200 Table container External dimensions (Width * Height * Depth) : 39x17,5x28 cm Weight of the device body: 5 Kg Conditions of use MNPG135-00 temperature environment Appendix A – ENVIROMENTAL PROTECTION (+10 : +40) °C The user must dispose of scrap equipment by taking it to a recognised centre of recycling of electrical and electronic equipment. Appendix B – LABELS Symbol Meaning Certification by notified body N°0476 Class of the equipment I BF Manufacturer Manifactured the Consult the user manual Pag. 26 Symbol Meaning Warning , you must consult the product’s document Label placed on the device near the connector of the laser probe with its characteristics The product must be dispose of as “electronic waste”, not as “domestic waste” Emission frequency Appendix C – LIST OF PROTOCOLS Business model of the equipment Serial number Output features Pathology Frequency (Hz) Time (min) Output power supply Density N° (without Spot area (mm) session spacer) (J/cmq) Frequency supply of the therapeutic treatment Arthritis of large articulations 5000 2 5,0 8,61 12-15 Activity percentage of the equipment on each treatment course Pertrochanteric bursitis 4000 3 5,0 8,61 12 Subacromial bursitis 4000 3 5,0 4,84 12 Patellar chondropathy 10000 3 3,0 4,84 15 Muscular contractures 5000 2 8,0 8,61 5-10 Dorsalgia 10000 2 5,0 8,61 12 Haematoma (results) 5000 2 8,0 8,61 Labels "caution laser beam", placed on the back of the device Haematoma (recent) 1000 2 4,0 8,61 Labels of "caution laser beam", placed near the connector of the laser probe, on the back of the device Gonarthrosis intra-articular oedema 10000 3 8,0 8,61 12-15 Gonarthrosis 5000 2 8,0 8,61 12 Lumbago 10000 3 1,5 8,61 10-15 Lumbosciatica 10000 2 1,5 8,61mm rachide,1,86mm Valleix points 12-15 Painful shoulder 5000 3 5,0 8,61 15-20 Painful shoulder 5000 2 5,0 4,84 12-15 Painful (chronic) 10000 2 5,0 4,84 15 Label Meaning Label indicating the ESD sensitive part Emergency STOP label INTERLOCK label with Optical fiber LASER PROBE MNPG135-00 shoulder Pag. 27 Density N° (without Spot area (mm) session spacer) (J/cmq) Pathology Frequency (Hz) Time (min) Strain of the collateral external ligament of the knee (chronic) 5000 2 Strain of the collateral external ligament of the knee 1000 Adduct.tendin. Thigh 1 5000 2 1,5 Tendinitis of the biceps of the arm 10000 3 1,5 Tendinitis of the buttock, middle and small. 10000 Tendinitis of the short peroneal tendon. 5000 2 1,5 4,84 12 Tendinitis of the long peroneal tendon. 10000 2 1,5 4,84 12 Tendinitis of quadriceps 5000 3 1,5 8,61 12 Tendinitis of the Sartorius tendon 5000 3 1,5 1,86 12 Tendinitis of the triceps of the arm 1000 2 1,5 4,84 12 Tendinitis of the biceps of the femur 5000 2 1,5 8,61 12 Tendinitis of the semi-membranous 1. 10000 2 1,5 8,61 12 Tendinitis of supraspinatus the 2000 2 1,5 4,84 12 Tendinitis of patellar tendon the 5000 3 1,5 8,61 12 Tendinitis of the tibial 1 2000 2 1,5 8,61 12 Achille’s tendinitis 5000 3 1,5 8,61 12 Trigger points 4000 2 4,0 1,86 5-12 MNPG135-00 the Appendix D – ELECTRO-MAGNETIC COMPATIBILITY TABLES Guidance and manufacturer’s declaration – electromagnetic emissions 2 1,5 1,5 4,84 12 FOR ALL ME EQUIPMENT 15 The ME EQUIPMENT is intended for use in the electromagnetic environment specified below. 4,84 12 The customer or the user of the ME EQUIPMENT should assure that it is used in such an environment. 4,84 10 4,84 Emissions test 3 1,5 4,84 12 Compliance Electromagnetic environment – guidance Group 1 The ME EQUIPMENT uses RF energy only for its internal function. Therefore, its RF emissions are very low and are not likely to cause any interference in nearby electronic equipment. RF Emissions CISPR 11 RF Emissions CISPR 11 Class A Harmonic emissions IEC 61000-3-2 Class A Voltage fluctuations/ flicker emissions Complies The ME EQUIPMENT is suitable for use in all establishments, including domestic establishments and those directly connected to the public low voltage power supply network that supplies buildings used for domestic purposes . IEC 61000-3-3 Guidance and manufacturer’s declaration – electromagnetic immunity FOR ALL ME EQUIPMENT The ME EQUIPMENT is intended for use in the electromagnetic environment specified below. The customer or the user of the ME EQUIPMENT should assure that it is used in such an environment. Immunity test IEC 60601 Test level Compliance level Electromagnetic environment –guidance Pag. 28 ± 6kV contact ± 6kV contact Electrostatic discharge (ESD) IEC 61000-4-2 Electrical transient/burst ± 8kV air ± 8kV air ± 2kV per power ± 2kV power ± 1kV for input lines Surge IEC 61000-4-5 Voltage dips, short interruptions and voltage variations on power supply input lines IEC 61000-4-11 Power (50/60Hz) / synthetic material, the relative humidity should be at least 30 %. be at levels characteristic of a typical location in a typical commercial or hospital environment IEC 61000-4-8 supply lines NOT output APPLICABLE Mains power quality should be that of a typical commercial or hospital environment <5% UT (>95% dip Mains power quality <5% UT for in UT) for 0.5 should be that of a 0.5 cycles cycles typical commercial or hospital environment. If 40% UT (60% dip 40% UT for 5 the user of the ME in UT) for 5 cycles cycles EQUIPMENT requires continued operation 70% UT (30% dip 70% UT for during power mains in UT) for 25 25 cycles interruptions, it is cycles recommended that the ME EQUIPMENT be <5% UT (>95% dip <5% UT for 5 powered from an in UT) for 5 sec sec uninterruptible power supply or a battery. 3A/m NOTE : UT is the a.c. mains voltage prior to application of the test level. per ± 1kV line(s) to ± 1kV line(s) Mains power quality line(s) to line(s) should be that of a ± 2kV line(s) to ± 2kV line(s) typical commercial or hospital environment earth to earth frequency 3A/m magnetic MNPG135-00 field If floors are covered with fast supply lines IEC 61000-4-4 Floors should be wood, concrete or ceramic tile. Guidance and MANUFACTURER’S declaration – electromagnetic IMMUNITY – FOR ME EQUIPMENT THAT ARE NOT LIFE-SUPPORTING The ME EQUIPMENT is intended for use in the electromagnetic environment specified below. The customer or the user of the ME EQUIPMENT should assure that it is used in such an environment. Immunity test IEC 60601 level Test Compliance level Electromagnetic environment –guidance Portable and mobile RF communications equipment should be used no closer to any part of the ME EQUIPMENT, including cables, than the recommended separation distance calculated from the equation applicable to the frequency of the transmitter. Recommended distance Conducted RF 3Vrms 3V IEC 61000-4-6 150kHz to 80MHz ( V1 ) separation 3,5 P V d= 1 3 .5 P d= E1 Radiated RF 3V/m 3V/m from 80 MHz to 800 MHz IEC 61000-4-3 80MHz to 2,5GHz ( E1 ) 7 P d= E1 from 800 MHz to 2,5 GHz Power frequency magnetic fields should Pag. 29 where P is the maximum output power rating of the transmitter in watts (W) according to the transmitter manufacturer and d is the recommended separation distance in metres (m). Field strengths from fixed RF transmitters, as determined by an electromagnetic site survey,*1 should be less than the compliance level in each frequency range.*2 Rated output maximum Distanza di separazione alla frequenza del trasmettitore (m) 150 kHz ÷ 80 MHz 80 MHz ÷ 800 MHz 800 MHz ÷ 2.5 GHz power of transmitter (W) 3,5 P V d= 1 3,5 P E d= 1 7 P E d= 1 0.01 0.12 0.12 0.23 0.1 0.37 0.37 0.74 NOTE 1 : At 80 MHz and 800 MHz, the higher frequency range applies. 1 1.17 1.17 2.33 NOTE 2 : These guidelines may not apply in all situations. 10 3.69 3.69 7.38 Electromagnetic propagation is affected by absorption and reflection from structures, objects and people. 100 11.67 11.67 23.33 *1: Field strengths from fixed transmitters, such as base stations for radio (cellular/cordless) telephones and land mobile radios, amateur radio, AM and FM radio broadcast and TV broadcast cannot be predicted theoretically with accuracy. For transmitters rated at a maximum output power not listed above, the recommended separation distance d in metres (m) can be determined using the equation applicable to the frequency of the transmitter, where P is the maximum output power rating of the transmitter in watts (W) according to the transmitter manufacturer. Interference may occur in the vicinity of equipment marked with the following symbol : To assess the electromagnetic environment due to fixed RF transmitters, an electromagnetic site survey should be considered. If the measured field strength in the location in which the ME EQUIPMENT is used exceeds the applicable RF compliance level above, the ME EQUIPMENT should be observed to verify normal operation. If abnormal performance is observed, additional measures may be necessary, such as reorienting or relocating the ME EQUIPMENT . NOTE 1: At 80 MHz and 800 MHz, the separation distance for the higher frequency range applies. NOTE 2: These guidelines may not apply in all situations. Electromagnetic propagation is affected by absorption and reflection from structures, objects and people. *2: Over the frequency range 150 kHz to 80 MHz, field strengths should be less than [V1] V/m. Recommended separation distances between communications equipment and the ME EQUIPMENT portable and mobile RF The ME EQUIPMENT is intended for use in an electromagnetic environment in which radiated RF disturbances are controlled. The customer or the user of the ME EQUIPMENT can help prevent electromagnetic interference by maintaining a minimum distance between portable and mobile RF communications equipment (transmitters) and the ME EQUIPMENT as recommended below, according to the maximum output power of the communications equipment. MNPG135-00 Pag. 30 MNPG135-00 Pag. 31 Sede Amministrativa e magazzino: 30030 MARTELLAGO (VE) – Via S. Pertini 24/A Tel. 0039 041 5401356 – Fax 0039 041 5402684 Cod. Fisc./P.IVA IT 00185480274 R.E.A. VE N. 120250 – M. VE001767 e-mail: [email protected] Internet: www.itechmedicaldivision.com