1
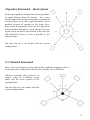
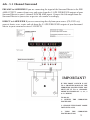
SURROUND MASTER
SM-465
User Manual 1.0
English
Copyright 2012 Involve Audio
This manual is available in multiple languages on our web site.
www.involveaudio.com
Welcome to a whole new world of sound!
KEY FEATURES of your Surround Master
• Creates a surround sound experience from any stereo recording, even if it
wasn’t originally recorded in surround sound.
• Reproduces every sound that was recorded, including subtle sounds that
other systems ignore.
• Produces a true 360-degree circular surround sound accurately.
• Surround Master provides a surround solution for 2, 4, 4.1 or 5.1 speaker
systems
• Only system able to fully decode INVOLVE encoded content
• Separates the centre channel in 5.1 systems better than any other product
• Plug & Play - Eliminates the need for multiple decoders i.e. prologic2, DTS,
SRS, cinema, hall or other artificial modes.
2
IMPORTANT INFORMATION
To ensure that you get the best possible experience from
your SURROUND MASTER, please read the following
points before continuing with the set up of your system.
• This product has no user serviceable components inside, do not attempt to
open it – doing so will void the warranty.
• Before making or changing any connections between the speakers and your
audio equipment, ensure that all equipment is turned off.
• Any faults or problems should be referred to a qualified repair technician.
Contact your supplier or Involve Audio for information.
• Do not place any liquids on or around the SURROUND MASTER.
WARNING Risk of electrical shock
Do not attempt to open or gain access.
No user-servicable parts within.
3
Quick start installation
1) Unpack
Remove your surround master from its box and remove all packaging and connect to power.
2) Speaker Positioning
TSS: Two Speaker Surround
Position the speakers as you would with a conventional stereo setup with the listener between 1 to
2 speaker separation widths in front of the speaker. Ensure you are sitting exactly at the half-way
point of the two speakers. Note that the 2-channel surround effect works outside this zone but the
effect is reduced and varies with the listener.
You may also use a sub woofer with this system configuration.
4
4 Speaker Surround – ideal system
Situate your speakers evenly in four corner positions,
an equal distance from the listener - for a most
realistic and truely circular surround we recommend
that the listener sits as close as possible to the central
position between all speakers in the room. Since
many room arrangements don’t suit the placement
of rear speakers behind the seated position, the rear
speakers may need to be placed more to the sides but
still behind the listener, as close as possible to the
diagram below:
You may also use a sub woofer with this system
configuration.
5.1 Channel Surround
Please refer to the diagram to the right for the standard arrangement for 5.1
surround sound configuration that you may already have established.
Wherever possible and practical, we
suggest using the 4-channel system above with the centre speaker in the
usual position,
You may also use a sub woofer with this
system configuration.
5
3) Amplifier Settings
If you have a surround sound amplifier your amplifier may be set to a particular mode which will
negate the Surround Master experience. Ensure you have your amplifier set to a pass through mode
such as “Direct Mode”. Please refer to your amplifier manual for further instructions.
If you leave your amplifer set on Pro Logic II, Theatre or other surround sound enhancement modes you will cancel the Surround Master surround sound experience.
4) Connections
Cables
Three cables (RCA) are provided with your Surround Master. You will find these beneath the
cardboard insert within the Surround Master packaging. One is an input cable to connect your
Stereo Out signal to the Surround Master line input jacks. Two additional cables are provided
with three plugs on each end. These cables can be used to connect your Audio amplifiers with the
Surround Master.
These cables are included to ensure your Surround Master can be used immediately. You may want
to use higher quality cables as they may improve the quality of your system.
The Surround Master always accepts left/right stereo inputs for all modes. Connect these either
directly to your source (CD, DVD, TUNER or TV) line cable outputs OR to the pre-out of your
amplifier.
6
2ch- TSS (Two Speaker Surround)
PRE AMP to AMPLIFIER Connect cables from the 2 CH SURROUND outputs of your Surround
Master to your stereo amplifier POWER AMP INPUT if you are connecting the input of the Surround
Master to the PRE AMP OUTPUT.
DIRECT to AMPILIFIER Connect cables from the 2 CH SURROUND outputs of your Surround
Master to your stereo amplifier AUXILIARY INPUT (or equivalent) if you are connecting directly
from your source (CD, DVD etc)
IMPORTANT!
IF THE FRONT SWITCH ON THE
SURROUND MASTER IS SET TO
FOUR SPEAKER+ MODE (Factory
Setting) YOU MUST SET IT TO 2
CHANNEL MODE.
TO DO SO:
1) SWITCH
MASTER OFF;
THE
SURROUND
2) CHANGE THE FRONT MODE
SWITCH TO 2 CH;
3) TURN THE SURROUND MASTER
BACK ON.
7
4ch - Four Channel Surround
PRE AMP to AMPLIFIER If you are connecting from a pre-amp to the input of the Surround
Master, connect front and rear from the 4 CH SURROUND outputs of your Surround Master to
the inputs of your POWER AMP (multichannel, or 2x stereo amplifiers, 4 x monoblocks and so on)
DIRECT to AMPILIFIER If you are connecting directly from your source (CD, DVD etc) to the
input of the Surround Master, connect front and rear from the 4 CH SURROUND outputs of your
Surround Master to your receiver amplifier (multichannel) inputs.
IMPORTANT!
IF THE FRONT SWITCH IS SET
TO 2 CHANNEL MODE ON THE
SURROUND MASTER THEN YOU
MUST SET IT TO 4+ CHANNEL
MODE TO ENABLE ALL 4, 4.1, 5
or 5.1 MODES.
TO DO SO:
1) SWITCH THE
MASTER OFF
SURROUND
2) CHANGE THE FRONT MODE
SWITCH TO 4 CH;
3) TURN THE
MASTER BACK ON.
SURROUND
8
4ch - 5.1 Channel Surround
PRE AMP to AMPLIFIER If you are connecting the input of the Surround Master to the PRE
AMP OUTPUT, connect front, rear, and centre from the 5.1 CH SURROUND outputs of your
Surround Master to your 5 channels POWER AMP inputs. Connect the Sub output from the
Surround Master to your active or passive sub-woofer accordingly.
DIRECT to AMPILIFIER If you are connecting directly from your source (CD, DVD etc),
connect fronts, rears, centre and sub from the 5.1 CH SURROUND outputs of your Surround
Master to your surround receiver 5.1 INPUTS.
IMPORTANT!
IF THE FRONT SWITCH IS SET
TO 2 CHANNEL MODE ON THE
SURROUND MASTER THEN YOU
MUST SET IT TO 4+ CHANNEL
MODE TO ENABLE ALL 4, 4.1, 5
or 5.1 MODES.
TO DO SO:
1) SWITCH THE
MASTER OFF
SURROUND
2) CHANGE THE FRONT MODE
SWITCH TO 4 CH;
3) TURN THE
MASTER BACK ON.
SURROUND
9
Power
Connect the supplied 9V plug-pack to the DC Power input of your Surround Master and then plug
it into the electrical wall outlet.
Congratulations! You are now ready to experience surround sound at its finest.
Switches
On the front panel there are two switches.
The left-hand switch is the POWER switch:
LEFT – Power off (pass-through mode)
NOTE: When the Surround Master is switched off the signal will pass through the unit
as if it was not there.
RIGHT – Power on.
The right hand switch is for MODE selection:
LEFT – TSS(Two Speaker Surround)
RIGHT - 4ch / 5.1ch
IMPORTANT NOTE!
If you change modes from 2 to 4 channels or the other way around, the unit must be turned off and
back on after 5 seconds, to allow the software to reset to the new mode.
10
Fun Things to Try with your Surround Master.
With the power off the Surround Master is inactive and the unimproved stereo signal will pass
through. That is, the signals from the source will be passed through as if the Surround Master were
not present. So, by turning the Surround Master off and on you can easily demonstrate the effect
of the Surround Master. Another great demonstration of how Surround Master performs can be seen if your system has
rear speakers. If you listen to your system with only the rear speakers turned on and the Surround
Master turned off,. you will hear little or nothing coming from the rear speakers. But, if you
turn the Surround Master on, you can hear everything from the ambient sound present in most
recordings to a full presentation of rear speaker sound, depending on the recoding.
Specifications
Power Input………………………………….............……………9VDC
Power Consumption …………………………..............…………500ma
Inputs / Outputs………………………………….............………Analogue
DC Plug pack…………………………………….............………100-240VAC input 50/60hz
9VDC output 1.66a
SNR…………………………………………............……………>90dB (conservative)
Weight (packaged)………………………….............……………Less than 1kg / 2Lbs
For test results and technical data on the Surround Master please refer to the Involve Audio website
www.involveaudio.com
This manual is available in multiple languages on our web site.
11
Involve Audio Limited 3 Year Warranty
Who is covered:
This warranty is extended only to the original end-use purchaser or the person receiving the product as a gift, and shall not
be extended to any other person or transferee.
What is covered/For how long:
Unless a different warranty period is stated in the Owner’s guide provided with your Involve Audio product, for a period of
3 years from the date of retail purchase by the original end-use purchaser, Involve Audio warrants that this product, when
delivered to you in new condition, in original packaging, from a Involve Audio authorized reseller or directly from Involve
Audio and used in normal conditions, is free from any defects in manufacturing, materials and workmanship.
What is not covered:
This warranty does not cover defects resulting from improper or unreasonable use or maintenance; failure to follow operating
instructions; accident; excess moisture; insects; lightning; power surges; connections to improper voltage supply; unauthorized alteration or modification of original condition; damages caused by inadequate packing or shipping procedures; loss
of, damages caused by use with non-Involve Audio products; product that requires modification or adaptation to enable it
to operate in any country other than the country for which it was designed, manufactured, approved and/or authorized, or
repair of products damaged by these modifications; and products purchased from unauthorized dealers.
What we will do:
During the warranty period, we will, at our sole option, repair or replace (using new or refurbished replacement parts) any
defective parts within a reasonable period of time and free of charge.
What we will not do:
Pay shipping, insurance or transportation charges from you to us, or any import fees, duties and taxes.
What you must do to obtain Limited Warranty Service:
Return product, with proof of purchase from an authorized Involve Audio dealer or from Involve Audio to Involve Audio,
using the following procedures:
1. Contact the Involve Audio organization in your country/region (visit Involveaudio.com for Involve Audio contact information) for specific return and shipping instructions.
2. Label and ship the product, freight prepaid, to the address provided by Involve Audio organization.
3. Place any necessary return authorization number prominently on the outside of the carton. Cartons not bearing a return
authorization number, where required, will be refused
Other conditions:
THE PROVISIONS OF THIS LIMITED WARRANTY ARE IN LIEU OF ANY OTHER WARRANTY, WHETHER EXPRESSED OR IMPLIED, WRITTEN OR ORAL, INCLUDING ANY WARRANTY OF MERCHANTABILITY OR FITNESS
FOR A PARTICULAR PURPOSE. INVOLVE AUDIO PTY LTD MAXIMUM LIABILITY SHALL NOT EXCEED THE
ACTUAL PURCHASE PRICE PAID BY YOU FOR THE PRODUCT. IN NO EVENT SHALL INVOLVE AUDIO BE LIABLE
FOR LOSS OF, DAMAGE TO OR CORRUPTION OF STORED DATA, OR FOR SPECIAL, INCIDENTAL, CONSEQUENTIAL, OR INDIRECT DAMAGES HOWSOEVER CAUSED INCLUDING WITHOUT LIMITATION THE REPLACEMENT OF EQUIPMENT AND PROPERTY, AND ANY COSTS OF RECOVERING, PROGRAMMING OR REPRODUCING ANY PROGRAM OR DATA STORED IN OR USED WITH YOUR INVOLVE AUDIO PRODUCT.
This warranty is void if the label bearing the serial number has been removed or defaced.
Other legal rights:
This limited warranty gives you specific legal rights, and you also may have other rights that vary from state to state or country
to country. Some places do not allow limitations on implied warranties or the exclusion or limitation of incidental or consequential damages, so the above limitations or exclusions may not apply to you.