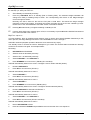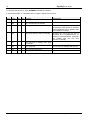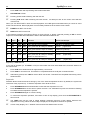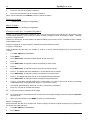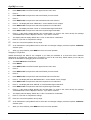
1
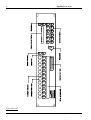
SoftCUE Advanced Cuelight System user guide for software version 2.16 Copyright Andera Ltd 1992-2006 Designed by Andera Ltd Sales, Installations and Service : for Howard Eaton Lighting Limited. Howard Eaton Lighting Limited Winterlands Resting Oak Hill, Cooksbridge Lewes East Sussex BN8 4PR +44 (0)1273 400 670 +44 (0)1273 408 900 (fax) 2 SoftCUE User Guide The information contained in this document is subject to change without notice. Andera/Howard Eaton Lighting Ltd makes no warranty of any kind with regard to this material, including, but not limited to, the implied warranties of fitness for a particular purpose. Andera/Howard Eaton Lighting Ltd shall not be liable for errors contained herein or for incidental or consequential damages in connection with the furnishing, performance or use of this material or the product(s) it describes. Andera/Howard Eaton Lighting Ltd reserve the right to change the design and specification of this product as required for improvement and operational enhancements. This Issue 2.2A of the User Guide has been reformatted for distribution as a pdf file. Andera/HEL Ltd 1992-2006 software v2.16 user guide v2.2a 061128 SoftCUE User Guide 3 Front panel view 6 Rear Panel view 7 Introduction 8 User guide conventions 8 Connections 9 First Time Users 9 Applying Power 9 Fault Warnings 9 Panel Illumination 10 Expander Cuelights 10 Simple Operation 11 Use in Manual Mode 11 Cuelight Selection 11 Giving a Standby 11 Acknowledgement of Standby 11 Clearing a Standby 11 Giving a GO 11 Clearing a GO 12 Manual GO Options 12 Hints 12 Manual Override 12 Advanced Operation 13 To select a show for recording 13 To clear an entire show 13 To record a STANDBY cue. 13 To record a GO cue 14 To record a cue with multi-part GO 14 To run through a show. 14 To recall an event. 14 To give a STANDBY. 15 To cancel a STANDBY 15 To hold a STANDBY 15 To cancel Hold 16 To give a GO. 16 To preview a GO 16 To manually give multi-part GO cues. 17 Rapid cue sequences 17 Additional Facilities Event Marks (#) Andera/HEL Ltd 1992-2006 software v2.16 19 19 user guide v2.2a 061128 SoftCUE User Guide 4 Inserting Cues 19 Deleting Cues 19 Linking / Skipping Events 19 Bypassing a LINKed Event 20 Stopwatch 20 Operator ALERT 21 Stage Manager ALERT 21 MENU selections 21 Library Storage 22 To Save a Show TO Memory Card 22 To Load a Show FROM Memory Card 23 To FORMAT a Memory Card 24 Lamp Fail Detection 25 Enable/Disable Lamp Fail Detection 25 Selection for Lamp Fail Detection 25 Duplicating Cuelights 26 Moving Cuelights 26 Changing Cuelight Data : Copy/Move/Swap/Delete 26 Copying Cuelight Data 26 Moving Cuelight Data 27 Swapping Cuelight Data 27 Deleting Cuelight Data 28 MIDI Show Control 29 Connection to MIDI systems 29 MSC Command Description. 29 MSC Operation (Receive) 29 MSC Configuration (Receive) 29 MSC Operation (Transmit) 30 MSC Configuration (Transmit) 30 MSC GO TIME 31 MSC DEFAULT 31 Configuration Options 32 To set the default record step 32 To set automatic acknowledge 32 To set GO time 32 To set GO timer 33 To set manual GO 33 To set language 34 To set time and date 35 Fault Detect 36 Special Functions Andera/HEL Ltd 1992-2006 software v2.16 36 user guide v2.2a 061128 SoftCUE User Guide 5 System Information 36 System Initialisation 37 Service Support 37 Software support 38 Suggestions 38 Appendix A : Power ON Self Test messages 39 Appendix B : Standard System configuration 40 Appendix C : Summary of Menu facilities 41 Appendix D : Software version History 43 Appendix E : Connector Pinouts 44 Remote Cuelight Outstations (3 pin XLR) 44 Remote Cuelight Outstations (Multipole Connector) 44 MIDI Ports 45 Computer Ports (PORT #1, PORT #2) 45 Expansion Port 45 Andera/HEL Ltd 1992-2006 software v2.16 user guide v2.2a 061128 6 SoftCUE User Guide Front panel view Andera/HEL Ltd 1992-2006 software v2.16 user guide v2.2a 061128 SoftCUE User Guide 7 Rear Panel view Andera/HEL Ltd 1992-2006 software v2.16 user guide v2.2a 061128 SoftCUE User Guide 8 Introduction SoftCUE is a memory cue light system which brings the technology of lighting and sound systems to the theatre's prompt corner. It may be used in a conventional mode using 'Standby' and 'Go' switches and has the unique advantage of being a cuelight system with full recording and playback facilities for up to six shows. Memory cards allow secure data storage and the portability of shows from one venue to another. User guide conventions The following conventions are used throughout the SoftCUE user guide : Press : means press and release the designated push-button Press and Hold : means press and hold down the designated push-button. Push buttons are shown by name in BOLD. Useful hints are shown with a + prompt. To get the most from your SoftCUE system, and to avoid any frustration, please take the time to read this user guide before you unpack and connect the system. Andera/HEL Ltd 1992-2006 software v2.16 user guide v2.2a 061128 SoftCUE User Guide 9 Connections The SoftCUE Advanced Cuelight System comprises a Stage Manager Control and up to 48 cue lights. A Master control unit allows connection of 12 cue lights, each additional 12 cue lights require an Expansion control unit. Each cuelight requires a twin-screened cable back to the Stage Manager Control, terminated in standard 3 pin XLR connectors. All Connections are made to the rear panel. Alternate XLR connectors are available to special order. A 38 way multi-pole connector is provided for connection of cue lights in fixed installations, or where the individual XLR connections are not convenient. When cuelights are connected via the multi-pole connector, the corresponding XLR cuelight connector should NOT be used. Connections are also provided for MIDI IN, MIDI OUT and MIDI THRU. These use the MIDI standard 5 pin DIN connector. PORT#1 and PORT#2 are provided for future expansion, and are not supported by current software. If your system comprises one or more 12 way Expansion units, a 37way flat ribbon cable will have been supplied. This should be fitted between the EXPANSION PORT of the Master and the EXPANSION PORT of each Expansion unit. The supplied cable MUST be used, and additional extensions are NOT permitted. Mains power (85-260 v AC 47-63Hz) is connected at the rear of the Master unit and each Expansion unit. We recommend that these are all connected to the same supply. First Time Users If you are using SoftCUE for the first time, we recommend you experiment with MANUAL operation, and the operation of the MENU facilities before switching to PROGRAM and recording your 'standby' and 'go' events. SoftCUE has been designed to be simple and easy to operate - but there will always be times when it helps to consult the user guide first! Applying Power At power up, SoftCUE will briefly display a Software Version Identity on the alphanumeric display. SoftCUE will then perform the following Self-Tests. • Verify integrity of user configuration data. • Verify integrity of previously recorded Show (Event ) data. On a successful completion of Power On Self Test (POST) routines, the message "Self-test OK" will be displayed for approximately two seconds. + SoftCUE will briefly display the current memory used (%) before restoring to the show and event number in use at the time the system was turned off. A full list of possible POST error messages is listed in appendix A. If you are applying power for the first time, please refer to appendix B for a summary of the default settings for various user options. + If you are tired of watching the information displayed at power up, press and hold the 7 push. Fault Warnings When Lamp Test has been enabled, Cue lights which are not connected, or have a lamp fault on the remote cuelight will show as a Flashing Amber on the Stage Manager Control. Please read the section on Lamp Fail Detection. SoftCUE will also test for short-circuits whenever an attempt is made to illuminate a cuelight. In the event that a short circuit fault is found, the drive circuit will shut down, and the fault will be shown as a Flashing Amber on the Stage Manager Control. Further details are given in the section on configuration options (Fault Detect), later in this guide. Andera/HEL Ltd 1992-2006 software v2.16 user guide v2.2a 061128 10 SoftCUE User Guide Panel Illumination Although not immediately obvious if you are using your SoftCUE in a bright rehearsal room, all the front panel buttons are dimly illuminated to aid operation in a typical (dark) prompt corner. During use, some push buttons illuminate brightly to indicate operational status. Expander Cuelights If your system has been supplied with expander cuelights, which allow for multiple SoftCUE remote cuelights to be connected in place of a single SoftCUE, please consult the additional user guide supplied with the expander cuelight. Andera/HEL Ltd 1992-2006 software v2.16 user guide v2.2a 061128 SoftCUE User Guide 11 Simple Operation Use in Manual Mode In Manual mode, SoftCUE emulates conventional cue lights systems. No recording facilities are available, however the enhanced self-checking features of SoftCUE continue to operate and warn of cuelight outstation lamp or cable failure. Please read the section on LAMP FAIL DETECTION to enable this feature. • • Turn KEY SWITCH to RUN. • Press NEXT or LAST to select desired show. Repeat as required until "MANUAL" appears. Press and hold down SHOW. The currently active show number will be shown on the alphanumeric LED display. Cuelight Selection Cue lights may be selected/deselected by pressing any of CUELIGHTS (1-48). Cue lights that have been preselected will show as Amber on the Stage Manager Control. Giving a Standby • All selected cue lights may be given a Standby by pressing STANDBY. Additional cue lights may be added to the standby by pressing the appropriate CUELIGHT. When set to standby, the LED above the corresponding CUELIGHT will change from Amber to Flashing Red and the remote cuelight will be set to Flashing Red. Acknowledgement of Standby + The remote cuelight may (optionally) acknowledge the standby, in which case both the local and remote indication will change from Flashing Red to Red. Cuelights may optionally be set to automatically acknowledge. Please refer to the section on menu options "OPTIONS/SET AUTO-REPLY". Clearing a Standby Individual cue lights that have been given an erroneous standby, or for which the standby is no longer required, can have the standby cancelled. • • Press CLR, which will illuminate for approximately 1.5 seconds. + Alternatively, press and hold CLR and press the corresponding CUELIGHT(s). Press the corresponding CUELIGHT (1-48). This MUST be completed whilst the CLR push is still illuminated. As each CUELIGHT is cleared, the CLR push will remain illuminated for another second, making it easy to clear several CUELIGHTS in succession. Cancelling a standby will also cancel the preselection of the cuelight. Giving a GO The SoftCUE system may be configured for "LATCHED" or "TIMED" manual GO operation, so please read the next sections carefully and check the current configuration if in doubt. Once a set of cue lights have been given the standby, the GO push will cause a GO on all cue lights currently in Standby. This emulates the "master" go facility of a conventional cuelight system. Individual cue lights may be given a GO by pressing the appropriate CUELIGHT. Remember that a cuelight can only be given a GO if it has already been given the Standby. If it is NOT already on Standby, pressing the CUELIGHT will put it on Standby and a second press will put it on GO. Andera/HEL Ltd 1992-2006 software v2.16 user guide v2.2a 061128 SoftCUE User Guide 12 Clearing a GO A second press of GO will cause all cuelights on GO to revert to standby. If you wish to cancel the GO for all the cuelights currently on GO, and take them off Standby at the same time • • Press CLR, which will illuminate for approximately 1.5 seconds. Press GO to cancel both the GO and the Standby. This MUST be completed whilst the CLR push is still illuminated. Alternatively, press and hold CLR and press the GO. To clear the GO on an individual cuelight. • Pressing the CUELIGHT which is on GO will clear the GO and the cuelight will revert to STANDBY. Individual cuelights may be taken OFF STANDBY as well as OFF GO whilst a latched GO is active. • • Press CLR, which will illuminate for approximately 1.5 seconds. Press the appropriate CUELIGHT to cancel both the GO and standby. This MUST be completed whilst the CLR push is still illuminated. Alternatively, press and hold CLR and press the corresponding CUELIGHT. Manual GO Options + The default GO operation in Manual mode is "LATCHED"; the GO will stay on until manually cleared. If required, the GO operation can be "TIMED", in which case the GO will stay on for the duration of the systems GO TIME. Please refer to the "OPTIONS/SET MANUAL GO" and "OPTIONS/SET GO TIME" section of the Menu facilities. + When "TIMED" operation is selected, and the "GO TIME" is OFF, the GO is active only while the GO push is held down. This is the preferred configuration when very rapid cue sequences are required to be given, and short or long GO cues can be called as required. Hints When SoftCUE is used in manual mode, the selected cue lights will remain in Standby until switched off by a second operation of STANDBY, or until individually cancelled, or until a master GO is cancelled. This allows SoftCUE to be used to give rapid, successive GO cues. + + If there are no recorded events in any of the six shows, SoftCUE will default to Manual operation. It is NOT possible to change shows whilst STANDBY is selected (illuminated). Deselect Standby by pressing STANDBY, and continue. + If required, STANDBY may be enabled before the selection of any cue lights, in which case the individual cue lights will be set to standby as each CUELIGHT (1-48) is pressed. This is designed to provide the closest possible emulation of conventional systems. + For ease of operation, the STANDBY and GO pushbuttons are duplicated on each 12 way Expansion system. They act in parallel with the STANDBY and GO pushbuttons on the Master control unit. Manual Override • • + Press IMGO which will illuminate. Operation of any of the CUELIGHTS (1-48) will send an immediate GO. Normally, the GO is active for the time the GO push is held down. This allows the stage manager maximum control of the system. If required, the remote cue lights can be set to have a default "go" time. Please refer to the "OPTIONS/SET GO TIME" section of the Menu facilities. Andera/HEL Ltd 1992-2006 software v2.16 user guide v2.2a 061128 SoftCUE User Guide 13 Advanced Operation The power of SoftCUE is evident in the ability to record selections of cue lights for STANDBY or GO. Each stage management action, i.e. that of calling a "standby" or calling a "go" is assigned an event number, and the required cuelight selection and action recorded against that event. Events may rapidly be recalled for "playback" in sequence as the production progresses. To select a show for recording • • Turn KEY SWITCH to PROGRAM. The key cannot be removed from the key switch in PROGRAM mode. • Press NEXT or LAST to select desired show. Repeat as required until the desired show number appears. + In PROGRAM mode, NEXT and LAST will cycle through all possible shows (1 to 6) and Manual. • Release SHOW. The display will now indicate the Event number last accessed in the selected show. + Releasing SHOW in PROGRAM mode while the display shows "MANUAL" will result in the message "SHOW ??". This is correct, as it is NOT possible to record on the Manual show. Press and hold down SHOW. The currently active show number will be shown on the alphanumeric LED display. Either press and hold SHOW and select a valid show number for recording or return the KEY SWITCH to RUN to operate SoftCUE in Manual mode. + Whenever SoftCUE is in recording mode the alphanumeric LED display will flash the word "PROGRAM" alternately with the time of day. To clear an entire show WARNING Clearing a show will delete ALL event data for the selected show. It is NOT possible to restore the data unless you have previously saved it on a memory card. • • • • • Turn KEY SWITCH to PROGRAM. Select desired Show number. Press and hold CLR. Press SHOW Release CLR Display will now briefly indicate "SHOW MEM CLEARED" and then revert to displaying " 1 readiness for recording the first event. PROGRAM" in To record a STANDBY cue. • Press NEXT/LAST to select desired event number . + By default, SoftCUE will advance in event steps of 1. This may be altered - please refer to the menu facilities described elsewhere in this user guide. • Select the CUELIGHTS (1-48) required to be given an standby for the cue. On pressing each cuelight channel, the LED above each push-button will change to Amber to show that the cuelight has been selected. A cuelight may be deselected by a second operation of the push-button. + CLR may be used to deselect all cuelight channels. • Press STANDBY to record the event The push-button will illuminate (Red) and the LED above each cuelight selected for the cue will illuminate (Red) whilst the STANDBY push-button is held down. + + SoftCUE will automatically advance to the next event number, ready for recording. By default, the cue lights selected for the recording of the standby will remain preselected (showing in Amber), in readiness for recording a subsequent "go". Andera/HEL Ltd 1992-2006 software v2.16 user guide v2.2a 061128 SoftCUE User Guide 14 To record a GO cue • Press NEXT/LAST to select desired event number . + By default, SoftCUE will advance in event steps of 1. This may be altered - please refer to the menu facilities described elsewhere in this user guide. + If you have just recorded an event (either as standby or go), SoftCUE will automatically have selected the next event number for you and you may skip this step. • Select the CUELIGHTS (1-48) required to be given an "go" for the cue. On pressing each cuelight channel, the LED above each push-button will change to Amber to show that the cuelight has been selected. A cuelight may be deselected by a second operation of the push-button. + CLR may be used to deselect all cuelight channels. • Press GO to record the event The push-button will illuminate (Green) and the LED above each cuelight selected for the cue will illuminate (Green) whilst the GO push-button is held down. + + SoftCUE will automatically advance to the next event number, ready for recording. Once a GO has been recorded, the cuelights are deselected, in readiness for the selection and recording of the next event. To record a cue with multi-part GO • • Record the standby event + Standby and GO events can be interleaved as required. Record as many GO events as are required. To run through a show. • • Turn KEY SWITCH to RUN. Press and hold down SHOW. The currently active show number will be shown on the alphanumeric LED display. • Press NEXT or LAST to select desired show. Repeat as required until the desired show number appears. + In RUN mode, NEXT and LAST will only allow the selection of shows with recorded cues, and the MANUAL mode of operation. • Release SHOW. The display will now indicate the Event number most recently accessed in the selected show. To recall an event. • Press NEXT/LAST to select desired event number. + + SoftCUE will automatically move to the next/last recorded event number. Press and hold NEXT/LAST to auto increment /decrement through the event number list. As each event number is selected , the cuelight channels recorded in the event will be previewed on the LED's above each of the CUELIGHT push buttons. (1-48). Selected cue lights show in Amber. The type of event (STANDBY/GO) will be shown on the alphanumeric display. • Cue lights may be selected/deselected from the preview state prior to sending a Standby by pressing the appropriate CUELIGHT push (1-48). + To rapidly reset SoftCUE to the first recorded event number in the current show, press and hold SHOW, press GO, release SHOW. When Lamp Fail Detect is ON, Cue lights which are not connected, or have a lamp fault on the remote cuelight will show as Flashing Amber on the Stage Manager Control. Andera/HEL Ltd 1992-2006 software v2.16 user guide v2.2a 061128 SoftCUE User Guide 15 To give a STANDBY. • Press STANDBY. The STANDBY push will illuminate Red. All selected cue lights (those showing Amber) will be set to Standby at the cuelight outstations. Standby is indicated by Flashing Red at the cuelight outstation and on the Stage Manager Control. + A SoftCUE cuelight outstation may optionally acknowledge the standby by pressing the STANDBY push on the outstation whilst it is flashing (Red). When a standby has been acknowledged, the Flashing Red changes to Static Red illuminated on both the cuelight outstation and the Stage Manager control. + If required, cue lights may be set to automatically acknowledge standbys. This can be useful when the cuelight is known to be out of reach of the stage crew staff, or is for use by cast who would not normally acknowledge calls. Please refer to the "OPTIONS/SET AUTO-REPLY" section of the Menu facilities. + Additional cue lights may be added to the standby by pressing the required CUELIGHT (1-48). Note, however, that a subsequent (Master) GO will only give a GO for cuelights that are recorded in the event. If an additional cuelight is placed on STANDBY, and does not have any recorded GO events, it will never be given a GO until the individual CUELIGHT is pressed the second time. + Additional cue lights may be preselected for standby before the STANDBY is given, by pressing the required CUELIGHT (1-48). Preselected cue lights will show in Amber on the Stage Manager Control. + If the event has been recorded as a "GO", pressing STANDBY will have no effect. To cancel a STANDBY Individual cuelight Standbys may be CANCELLED if they are no longer required, or have been given in error. • • Press CLR which will illuminate for approximately 1.5 seconds. Press the corresponding CUELIGHT (1-48). This MUST be completed whilst the CLR push is still illuminated. As each CUELIGHT is cleared, the CLR push will remain illuminated for another second, making it easy to clear several CUELIGHTS in succession. Alternatively, press and hold CLR and press the corresponding CUELIGHT. The entire standby may be cancelled if it is not required, or has been given in error. • • Press CLR which will illuminate for approximately 1.5 seconds. Press STANDBY. This MUST be completed whilst the CLR push is still illuminated. Alternatively, press and hold CLR and press STANDBY. + If the entire standby is cancelled, the individual cuelights will remain selected (amber) and the standby can be given again by pressing STANDBY. + If you cancel a STANDBY, and then re-enable STANDBY for the cuelight, it will only be given a GO on the next recorded event for that cuelight. To hold a STANDBY Individual cuelight Standbys may be HELD if there is some production problem which requires the GO for a particular cuelight to be delayed, and it is not yet evident that the Standby/GO should actually be cancelled. • • Press 7 which will illuminate for approximately 1.5 seconds. + Whilst the cuelight is HELD, all further recorded events for the cuelight will be ignored. Thus the cuelight may remain on STANDBY through subsequent events that would otherwise have given the GO. + When the problem has been cleared, the individual cuelight GO may be given by pressing the appropriate CUELIGHT. This action will automatically release the HOLD and the CUELIGHT push will no longer be illuminated. Press the corresponding CUELIGHT (1-48). The CUELIGHT push will illuminate (White). This MUST be completed whilst the 8 push is still illuminated. To cancel Hold • Press 7 which will illuminate for approximately 1.5 seconds. Andera/HEL Ltd 1992-2006 software v2.16 user guide v2.2a 061128 SoftCUE User Guide 16 • Press the corresponding CUELIGHT (1-48) which is currently on HOLD. The hold will be released and the cuelight will be given the GO as appropriate in further playback of recorded events. This MUST be completed whilst the 8 push is still illuminated. To give a GO. • Press GO. The GO push will illuminate Green. All cue lights on standby (i.e. those showing Red/Flashing Red) will be set to GO at the cuelight outstations. GO is indicated by Green at the cuelight outstation and on the Stage Manager Control. + + If the event has been recorded as a "STANDBY", pressing GO will have no effect. Additional cue lights may be given a "go" by pressing the required CUELIGHT (1-48). Normally, the GO is active for the time the GO push is held down. This allows the stage manager maximum control of the system. If required, the remote cue lights can be set to have a default "go" time. Please refer to the "OPTIONS/SET GO TIME" section of the Menu facilities. To preview a GO The situation can frequently arise whereby several cue lights are on standby, and the next event is recorded as a GO for only some of the cue lights currently on standby. In this situation, the normal amber preview is unable to be displayed, as the standby (Red) LED illumination takes priority. In order to verify which cue lights will actually be given a GO on pressing the GO, a GO preview function is provided. • Whilst waiting to give the GO, press 3. Those cue lights which are recorded to be given a GO will flash Green on the Stage Manager Control. The state of the remote cuelight lamps will not be affected. Andera/HEL Ltd 1992-2006 software v2.16 user guide v2.2a 061128 SoftCUE User Guide 17 To manually give multi-part GO cues. • • Send Standby as described previously. Press any CUELIGHT that is in standby (Red or Flashing Red). The selected cuelight outstation will change from Red (or Flashing Red) to Green. The corresponding LED mimic on the Stage Manager Control changes to Green. Normally, the GO is active for the time the GO push is held down. This allows the stage manager maximum control of the system. If required, the remote cue lights can be set to have a default "go" time. Please refer to the "OPTIONS/SET GO TIME" section of the Menu facilities. + + Pressing GO will send any cue lights remaining in standby to GO. If all cue lights have been manually given a GO, it is necessary to press GO before SoftCUE will advance to the next recorded event number. Rapid cue sequences In some situations, there is insufficient time between cues to call the show with STANDBY followed by a GO, and in practice, the Stage Manager will want to call a STANDBY for Cues X through Y. SoftCUE's advanced playback operation allows this to be achieved very simply. The standby event is recorded as normal. Subsequent "go" events are recorded without interleaved "standby" events for the relevant cue lights. An example follows : Recording : • • • • • KEY SWITCH to PROGRAM. Select a show as described previously. Select event 1 as described previously. Select CUELIGHT 1 and CUELIGHT 2 Press STANDBY to record event 1 (Standby QL1 and QL2) SoftCUE automatically advances to event 2. Cuelights 1 and 2 remain selected (amber). • • Deselect CUELIGHT 2 Press GO to record event 2 (GO QL1) SoftCUE automatically advances to event 3. • • Select CUELIGHT 2 Press GO to record event 3 (GO QL2) SoftCUE automatically advances to event 4. • • Select CUELIGHT 2 Press STANDBY to record event 4 (Standby QL2) SoftCUE automatically advances to event 5. Cuelight 2 remains selected (amber). • • Deselect CUELIGHT 2 and select CUELIGHT 1. Press GO to record event 5 (GO QL1). SoftCUE automatically advances to event 6. • • Select CUELIGHT 1 and CUELIGHT 2 Press GO to record event 6 (GO QL1 and QL2) SoftCUE automatically advances to event 7. • • Return KEY SWITCH to RUN Press and hold down SHOW and press GO to return to the start of the cue sequence. Andera/HEL Ltd 1992-2006 software v2.16 user guide v2.2a 061128 SoftCUE User Guide 18 To Playback the sequence, press STANDBY and GO as indicated. In the following table, "s" indicates that the cuelight is selected in the event. Event Action QL1 QL2 Comment 1 SB s s QL1 and QL2 put on standby. 2 GO s 3 GO 4 SB 5 GO s 6 GO s Special Notes QL1 given GO; QL2 stays on standby. Because the next action for QL1 is recorded as a GO (event 5), SoftCUE will automatically stay on standby after the completion of the go. s QL2 given GO,QL1 stays on standby. Because the next action for QL2 is recorded as a STANDBY(event 4), SoftCUE will automatically extinguish the standby after the GO. QL1 remains on standby. s QL2 put back on standby, QL1 stays on standby. QL1 given GO s QL1 remains on standby after the GO. QL1 and QL2 given GO Andera/HEL Ltd 1992-2006 software v2.16 user guide v2.2a 061128 SoftCUE User Guide 19 Additional Facilities Event Marks (#) Event marks may be added to any recorded standby event, during operation in RUN. Event marks may be used when using NEXT/LAST to rapidly advance/return to "marked" events. This is particularly useful during rehearsals when you may have to return to a particular point in the show time after time. • • KEY SWITCH in RUN. + It is NOT possible to mark GO events. Press # to mark a cue. The Event number will now appear as SB 1# etc. To delete the mark on an event, press # a second time. The mark will be deleted on the release of the pushbutton. To advance to the next "marked" event. • • • Release #. + If there is no next marked event, you will advance to the end of the show. Press and hold #. Press NEXT. To return to the previous "marked" cue. • • • Release #. + If there is no last marked event, you will be returned to the beginning of the show. Press and hold #. Press LAST. Inserting Cues SoftCUE allows for the recording of up to 9 cues between each integer value event number. • • • KEY SWITCH to PROGRAM. • • Release INS. Press and hold INS . Press NEXT/LAST to select desired target event number. Each operation of NEXT/LAST will change the displayed event number by 0.1. Record event as required. Deleting Cues • • • • • KEY SWITCH to PROGRAM. Select event you no longer require using NEXT/LAST. Press CLR to deselect all cuelights. Press STANDBY or GO. The SB or GO will be cleared from the alphanumeric display. KEY SWITCH to RUN. Linking / Skipping Events SoftCUE allows for the recording of links from one event to another. This may be used to skip a section of a production, or loop back to accommodate an unknown number of curtain calls etc. • • • KEY SWITCH to PROGRAM Press LINK which will start flashing. If the event is already linked, the link will be displayed, otherwise the current event will continue to be displayed. Press NEXT/LAST to select desired target event number. Andera/HEL Ltd 1992-2006 software v2.16 user guide v2.2a 061128 SoftCUE User Guide 20 • Press LINK which will stop flashing and remain illuminated. • KEY SWITCH to RUN + + Pressing 7 while LINK is flashing will clear the link. Pressing CLR while LINK is flashing will clear the link. An attempt to link to the current event will also clear the link. When you use NEXT/LAST in both record and playback, the LINK light is illuminated when you reach an event which has been linked. Normal playback of events always advances to the linked event number. + + # NEXT does NOT use the link. NEXT does NOT use the link. In the following example, the linking of Event 14 back to Event 11 allows continued pressing of GO to call the sequence LX GO/TABS GO/TABS GO/LX GO/LX GO/TABS GO/TABS GO etc. Event Action QL1 QL2 Comment Special Notes/Example 10 SB RED RED QL1 and QL2 put on standby. Standby LX, Standby TABS 11 GO GRN RED QL1 given GO; QL2 stays on standby. LX GO 12 GO RED GRN QL2 given GO,QL1 stays on standby. TABS GO (Tabs IN) 13 GO RED GRN QL2 given GO, QL1 stays on standby. TABS GO (Tabs OUT) 14 GO GRN RED QL1 given GO, QL2 stays on standby LX GO (Lights ON) LX GO (Lights OFF) (Lights OFF) Event 14 linked to Event 11 11 GO GRN RED QL1 given GO, QL2 stays on standby Bypassing a LINKed Event If you wish to playback (i.e. STANDBY or GO) an event which has a link associated with it, and NOT advance to the linked event: • • + Press CLR which will illuminate for approximately 1.5 seconds. Press LINK to cancel the link. This MUST be completed whilst the CLR push is still illuminated. Alternatively press 7 then LINK in order to NOT use the link. This MUST be completed whilst the 7 push is still illuminated. Stopwatch SoftCUE allows rehearsal and show timing by use of the internal stopwatch function. By default, the system will show time of day at power up. To start the stopwatch from 00:00 seconds : • • Press STOPWATCH which will illuminate to show that the stopwatch is in use. • • Press STOPWATCH again to continue timing. Press STOPWATCH a second time to pause the timer. The STOPWATCH push will commence flashing to indicate that the stopwatch is paused. To cancel the stopwatch operation, and return to time of day display, press and hold STOPWATCH for two seconds. + The TIME push may be used to toggle between stopwatch and time of day display whenever the stopwatch is running. When the time of day is displayed, the stopwatch continues to operate. + In time of day display, the ":" between hours and minutes flashes each second. Andera/HEL Ltd 1992-2006 software v2.16 user guide v2.2a 061128 SoftCUE User Guide 21 Operator ALERT This function allows the Stage Manager to flash a cuelight's STANDBY lamp without actually giving a normal STANDBY. The local and remote cuelight mimics will automatically flash with a distinctive pattern that is faster than the normal Flashing RED used for STANDBY. This would normally be used to attract attention - usually requiring the technician to make voice contact with the Stage Manager. • Press and hold TIME. After a few seconds, the TIME push will start to flash in a distinctive on-on-on-off pattern. Release TIME. • • Press and hold the corresponding CUELIGHT (1-48) for the duration of the required alert. + It is still possible to "call" the show using the master STANDBY and GO pushed whilst you are using the ALERT function. Press TIME a second time to cancel the alert function. Stage Manager ALERT This function allows any technician to alert the Stage Manager. The local and remote cuelight mimics will automatically flash with a distinctive pattern that is faster than the normal Flashing RED used for STANDBY. Stage Manager Alert may be used to inform the Stage Manager that the technician has a problem and requires voice contact or assistance. • Press and hold the remote CUELIGHT. After a few seconds, the Standby mimic will start to flash in a distinctive on-on-on-off pattern. Release the remote CUELIGHT at the end of the required alert. + + It is not necessary for the cuelight to be on Standby in order to give a Stage Manager Alert. It is not possible to give a Stage Manager Alert whilst the remote cuelight is on GO. MENU selections Many SoftCUE options are set or viewed using the MENU facilities. • • To activate, press MENU, which will illuminate. Menu options are displayed using the NEXT/LAST pushes. + + If you have selected a menu option in error, or change your mind, press 7. To select a menu option, press 3. When you have finished with the MENU facilities, please remember to deselect MENU to return to normal modes of operation. Some menu selections may require you to change data entry fields. The CLR/ç and INS/è pushes are used to move left and right as required. A summary of menu options is shown in appendix C. + When you exit from using the MENU facilities, SoftCUE will restore the local cuelights to the state that existed when you entered the MENU mode. The remote cuelight status is preserved whilst you are in MENU mode. Andera/HEL Ltd 1992-2006 software v2.16 user guide v2.2a 061128 SoftCUE User Guide 22 Library Storage SoftCUE uses a compact solid state memory card for library storage of show data. Show data is transferred to and from the card using selections from the MENU. Before it can be used in SoftCUE, a new memory card will need to be formatted. The memory cards are normally supplied without the battery fitted. Fitting instructions are supplied with the card and should be followed carefully. To Save a Show TO Memory Card • • • • • • • + + + Turn KEY SWITCH to RUN (for security) Ensure Memory Card is fitted. Ensure Memory Card is NOT Write protected. (Switch is fitted to Memory Card) Select Show number Press MENU. Press NEXT/LAST until the menu entry SAVE SHOW -> CARD appears Press 3 Display will show "CARD NOT FITTED " if the memory card is not fitted. Display will show "CARD PROTECTED" if the card write protect switch is in the protect position. Display will show "CARD BATT FAIL" if the memory card battery is faulty. The system will normally show "FROM SHOW [n]" where [n] is the number of the current show. • If you wish to save from a different show, increment/decrement the displayed show number using NEXT/LAST. + It will only be possible to select shows which contain recorded event data. • • Press 3 if you wish to continue. Press 7 if you DO NOT wish to continue. The system will normally show "TO CARD [a]" where [a] is a letter code. Letters codes A-Z are used to indicate areas on the memory card in which show data may be recorded. • If you wish to save to a different slot on the card, increment/decrement the displayed card number using NEXT/LAST. • • Press 3 if you wish to continue. Press 7 if you DO NOT wish to continue. If the card already contains data in card slot [a], the message "OVERWRITING [a]" will appear. • • Press 3 if you wish to continue. Press 7 if you DO NOT wish to continue. A final confirmation will be displayed "SHOW [n] TO CARD [a]". • • Press 3 if you wish to continue. Press 7 if you DO NOT wish to continue. A successful record will cause the display to show "SAVING nnn" followed by "SHOW SAVED", where 'nnn' is the event number being transferred. + If the show only contains a small number of events, recording will be quite rapid, and you may not see the message "SAVING nnn" ! + We recommend you Write Protect the Memory Card for security. ( A Switch is fitted to the Memory Card) • When you have finished, press MENU to return to normal operation. Andera/HEL Ltd 1992-2006 software v2.16 user guide v2.2a 061128 SoftCUE User Guide 23 To Load a Show FROM Memory Card • • • • • + + Turn KEY SWITCH to PROGRAM Write Protect Memory Card for security. (Switch is fitted to Memory Card) Ensure Memory Card is fitted. Press MENU and select the LOAD CARD -> SHOW item using NEXT/LAST. Press 3 Display will show "CARD NOT FITTED " if the memory card is not fitted. Display will show "CARD BATT FAIL" if the memory card battery is faulty. The system will normally show "FROM CARD [a]" where [a] is a letter code of the card's show. If you wish to load from a different card show, increment/decrement the displayed card show number using NEXT/LAST. + It will only be possible to select shows which contain recorded event data. • • Press 3 if you wish to continue. Press 7 if you DO NOT wish to continue. The system will normally show "TO SHOW [n]" where [n] is a number 1 to 6. If the selected show number already contains event data, SoftCUE will ask for confirmation that you wish to overwrite the previous data by displaying the message : "OVERWRITING n ?" • • Press 3 if you wish to continue. Press 7 if you DO NOT wish to continue. A final confirmation prompt will be issued : "CARD [a] TO SHOW [n]" where [a] is the letter code of the show as recorded on the card and [n] is the number of the show you are going to load the data into. • • Press 3 if you wish to continue. Press 7 if you DO NOT wish to continue. A successful record will cause the display to show "LOADING nnn" followed by "SHOW LOADED", where 'nnn' is the event number currently being transferred. + If the show only contains a small number of events, loading will be quite rapid, and you may not see the message "LOADING nnn" If the show contains a large number of events, loading may take some time, and you may see the message "LOADING nnn" for up to 90 seconds. • When you have finished, press MENU to return to normal operation. Andera/HEL Ltd 1992-2006 software v2.16 user guide v2.2a 061128 SoftCUE User Guide 24 To FORMAT a Memory Card WARNING Formatting a Memory Card will DELETE all data on the card. If you format a card the previous data CANNOT be retrieved from it. • • • Press MENU Press NEXT/LAST until the OPTIONS item appears Press 3 The menu item "FORMAT CARD" will appear. • • Press 3 if you wish to continue. Press 7 if you DO NOT wish to continue. You will be asked for confirmation "ARE YOU SURE ?" • • • Press 3 if you wish to continue. Press 7 if you DO NOT wish to continue. When you have finished, press MENU to return to normal operation. Andera/HEL Ltd 1992-2006 software v2.16 user guide v2.2a 061128 SoftCUE User Guide 25 Lamp Fail Detection A unique SoftCUE facility allows for identification of cue lights that are not connected, or that have open circuit Standby or Go lamps. Unlike conventional cuelight systems, SoftCUE provides warning of faults before any Standby or Go cues are actually called. A lamp fail warning is shown as a flashing AMBER LED on the Stage Manager Control. Once a show has been programmed, the cue lights actually used for the show can be assigned to lamp detect. This ensures that the cue lights which are not in use (and possibly not connected), do not generate unnecessary fault warnings. The selection of cue lights to be included in the lamp fail tests is recorded for each show. A separate selection may also be made for use during the MANUAL mode of operation. In some situations, such as programming events in advance of the show having been set, when some or all of the cue lights are known to be disconnected, it is advantageous to disable the Lamp Fail Detection facility; this is available as one of the Menu facilities. Enable/Disable Lamp Fail Detection • • • • • + Press MENU. "LAMP TEST" appears as the first item in the menu. Press 3 to select the item. The current state of lamp fail detection will be shown. (ON/OFF) Press NEXT/LAST to alter the state of lamp fail detection. Press 3 to confirm the action. If you did NOT want to change the state of the menu item , press 7. Press MENU to return to normal operations. Lamp testing does not begin until you have left the MENU mode. Selection for Lamp Fail Detection If you are using LAMP TEST for the first time, you may find that no lamps appear to have failed, even though there are clearly no cue lights connected. The most likely explanation is that you have not made a selection of cue lights for which lamp testing should be enabled, for the current show. • • • • • • Press MENU, which should illuminate. Press NEXT/LAST until "OPTIONS" appear as the menu item. Press 3 Press NEXT until "SET LAMP DETECT" appears as the menu item. Press 3 The system will respond with the prompt: "FOR MANUAL SHOW" if you were in MANUAL mode, or + "FOR SHOW 1" if you were in SHOW 1 etc. "FOR SHOW 6" if you were in SHOW 6 etc. Alternative show selection may be made using NEXT/LAST. If you are setting LAMP TEST for use the MANUAL mode of operation : • Select the cue lights required to lamp fail detect by pressing the appropriate CUELIGHT (1-48). Selected cue lights will show in AMBER. Cue lights no longer required to lamp fail detect may be deselected by a second press of the appropriate CUELIGHT. • • Press 3 if you wish to accept the selection Press 7 if you DO NOT wish to accept the selection. If you are setting LAMP TEST for any show (show 1 - show 6). • • Press SHOW to automatically select those cue lights which are currently in use (i.e. recorded) in the show. You may change the selection by pressing the appropriate CUELIGHT (1-48). Selected cue lights show in AMBER. Cue lights no longer required to lamp fail detect may be deselected by a second press of the appropriate CUELIGHT. Andera/HEL Ltd 1992-2006 software v2.16 user guide v2.2a 061128 SoftCUE User Guide 26 • • Press 3 if you wish to accept the selection. Press 7 if you DO NOT wish to accept the selection. When you have finished, press MENU to return to normal operation. Duplicating Cuelights Please refer to Changing Cuelight Data. Moving Cuelights Please refer to Changing Cuelight Data. Changing Cuelight Data : Copy/Move/Swap/Delete Imagine you have to add another cuelight for use on the Fly Floor because the original unit is obscured by some recently added masking. In the event you require a second cuelight to follow an existing cuelight : SoftCUE provides a COPY function. Imagine you are touring, and the theatre has different cabling to the previous venue : SoftCUE provides a MOVE and a SWAP function. Imagine a cuelight is no longer required : SoftCUE provides a DELETE function. Copying Cuelight Data COPY duplicates the data from one cuelight to another, so that a second cuelight may be used as a slave cuelight. • • • • • • • • • • • • Turn KEY SWITCH to PROGRAM. Press MENU. Press NEXT/LAST until "EDIT SHOW" appear as the menu item. Press 3. Press NEXT/LAST as required to select the SHOW you wish to alter. Press 3. Press NEXT/LAST as required to select the COPY QL DATA function. Press 3. The display will show "FROM QL 1" as the default source cuelight. Press NEXT/LAST as required to select the required source CUELIGHT. Press 3. The display will show "TO QL 2" as the default target CUELIGHT. Press NEXT/LAST as required to select the required target CUELIGHT. Press 3. If the target cuelight already has recorded data (i.e. exists in the current show) the message "OVERWRITING 2" will be displayed. Press 3 if you wish to continue. • • The display will now display "COPY QL 1 to QL 2" and wait for confirmation. + + Press 7 to cancel the operation at any stage. • Press 3 if you wish to complete the change. As an alternative to using NEXT/LAST to select the source/target cuelight, press the required CUELIGHT selection push. When you have finished, press MENU to return to normal operation. Moving Cuelight Data MOVE relocates the data for a cuelight onto another cuelight, so that the original cuelight may be programmed for another use within the show. • • Turn KEY SWITCH to PROGRAM. Press MENU. Andera/HEL Ltd 1992-2006 software v2.16 user guide v2.2a 061128 SoftCUE User Guide • • • • • • • • • • 27 Press NEXT/LAST until "EDIT SHOW" appear as the menu item. Press 3. Press NEXT/LAST as required to select the SHOW you wish to alter. Press 3. Press NEXT/LAST as required to select the MOVE QL DATA function. Press 3. The display will show "FROM QL 1" as the default source cuelight. Press NEXT/LAST as required to select the required source CUELIGHT. Press 3. The display will show "TO QL 2" as the default target CUELIGHT. Press NEXT/LAST as required to select the required target CUELIGHT. Press 3. If the target cuelight already has recorded data (i.e. exists in the current show) the message "OVERWRITING 2" will be displayed. Press 3 if you wish to continue. • • The display will now display "MOVE QL 1 to QL 2" and wait for confirmation. + + Press 7 to cancel the operation at any stage. • Press 3 if you wish to complete the change. As an alternative to using NEXT/LAST to select the source/target cuelight, press the required CUELIGHT selection push.. When you have finished, press MENU to return to normal operation. Swapping Cuelight Data SWAP interchanges the data for two cuelights. If you take your SoftCUE to a venue that uses a different assignment of cuelights (for example the LX operator is now on QL2 not QL1), SWAP allows you to edit your show as an alternative to replugging at the rear of the unit. • • • • • • • • • • • • Turn KEY SWITCH to PROGRAM. Press MENU. Press NEXT/LAST until "EDIT SHOW" appear as the menu item. Press 3. Press NEXT/LAST as required to select the SHOW you wish to alter. Press 3. Press NEXT/LAST as required to select the SWAP QL DATA function. Press 3. The display will show "BETWEEN QL 1" as the default source cuelight. Press NEXT/LAST as required to select the required source CUELIGHT. Press 3. The display will show "AND QL 2" as the default target CUELIGHT. Press NEXT/LAST as required to select the required target CUELIGHT. Press 3. If the target cuelight already has recorded data (i.e. exists in the current show) the message "OVERWRITING 2" will be displayed. Press 3 if you wish to continue. • • The display will now display "SWAP QL 1 & QL 2" and wait for confirmation. + + Press 7 to cancel the operation at any stage. • Press 3 if you wish to complete the change. As an alternative to using NEXT/LAST to select the source/target cuelight, press the required CUELIGHT selection push. When you have finished, press MENU to return to normal operation. Andera/HEL Ltd 1992-2006 software v2.16 user guide v2.2a 061128 SoftCUE User Guide 28 Deleting Cuelight Data DELETE erases all the STANDBY and GO selections for a single cuelight, from all events in the specified show. Note that if an event had only one QL selected, and the QL data is deleted, the event will still exist, it will just do nothing. • • • • • • • • • • • • • Turn KEY SWITCH to PROGRAM. + Press 7 to cancel the operation at any stage. • When you have finished, press MENU to return to normal operation. Press MENU. Press NEXT/LAST until "EDIT SHOW" appear as the menu item. Press 3. Press NEXT/LAST as required to select the SHOW you wish to alter. Press 3. Press NEXT/LAST as required to select the DELETE QL DATA function. Press 3. Press NEXT/LAST as required to select the required CUELIGHT. Press 3. The display will show "DELETE QL 1". Press 3 if you wish to continue. The display will now display "ARE YOU SURE ?" and wait for confirmation. Press 3 if you wish to complete the change. Andera/HEL Ltd 1992-2006 software v2.16 user guide v2.2a 061128 SoftCUE User Guide 29 MIDI Show Control SoftCUE may be used as part of a complete show control system. SoftCUE is normally a controlled device, in the terms defined by the MIDI Show Control (MSC) 1.0 specification as published by the MIDI Manufacturers Association. The purpose of MIDI Show Control is to allow MIDI systems to communicate with and control dedicated intelligent control equipment in theatrical, live performance, multi-media, audio-visual and similar environments. Connection to MIDI systems The MIDI OUT from your Midi Show Control system should be linked to the MIDI IN connector of the SoftCUE. Other MIDI devices may be connected to the MIDI THRU connector provided on the rear panel. From version 2.11 onwards, SoftCUE generates MSC commands in response to remote cuelight push button actions. These may be used to control other equipment that can receive and interpret Midi Show Control commands. If this is required, connections should be made to the MIDI OUT connector. + + + + MSC (receive) device id is defaulted to 1 MSC (receive) command format is defaulted to (0x50) Process Control MSC (transmit) device id is defaulted to 1 MSC (transmit) command format is defaulted to (0x50) Process Control MSC Command Description The following Midi Show Control commands, complying with MSC version 1.0, are currently supported : RESET LOAD GO. MSC RESET Similar to SHOW GO. Rewinds to the beginning of the show and takes all cue lights off standby/go. MSC LOAD nnn.n The cue lights recorded in event nnn.n will be placed on STANDBY. MSC GO The cue lights currently on STANDBY will be given a GO. MSC GO nnn.n The cue lights recorded in event nnn.n will be given a GO. MSC Operation (Receive) • Press MSC, which will illuminate, to enable MSC data reception. Pressing MSC a second time will disable MSC data reception. + If the SoftCUE is to be used in a stand-alone situation, controlled by another show control computer, MSC data reception may be set automatically at power up by setting the configuration option, "MSC DEFAULT", to MSC ON. MSC Configuration (Receive) • • • • • • Press MENU. Press NEXT/LAST until "OPTIONS" appear as the menu item. Press 3. Press NEXT/LAST until "MSC SETUP" appears as the menu item. Press 3. Press NEXT/LAST until the required set-up option is displayed. Andera/HEL Ltd 1992-2006 software v2.16 user guide v2.2a 061128 SoftCUE User Guide 30 The MSC configuration options for receiving MSC commands are MSC RX DEVICE ID and MSC RX COMMAND FORMAT. Valid device id's are in the range 0 to 111 (decimal). SoftCUE will also respond to the "ALL CALL" device id. The command format is displayed in hexadecimal notation, as this is the format presented in the Midi Show Control specification, which should be used as a reference when changing this parameter. The default command format of 0x50 (Process Control) has been selected, as the version 1.0 MSC specification does not specifically refer to cuelight systems ! • • • • • Press 3. Press NEXT/LAST until the required value is displayed. Press 3 if you are happy with the alterations. Press 7 if you DO NOT wish to use the alterations you have just made. When you have finished, press MENU to return to normal operation. MSC Operation (Transmit) The current implementation of MSC is designed to allow other systems to be triggered by operator actions on a remote cuelight. SoftCUE uses the SET command to transmit contact close, contact open and the special case of "STANDBY ACKNOWLEDGE". When a remote cuelight contact is pressed, SoftCUE transmits a message of the format : F0 F7 <tx device id> <msc> <tx command format> 06 cc cc vv vv F7 where cc cc is a generic control number 1-48 corresponding to remote cuelights 1-48 and vv vv is a generic control value [0== contact release, 1 == contact press, 2== Standby Acknowledge] Numbers in this example are shown in hexadecimal format. The initials "msc" are used to denote the Midi Show Control sub-id #1 (02H). In accordance with the MSC specification, the data for cc cc and vv vv are transmitted low byte first. Every operation of a remote cuelight will therefore generate at least TWO MSC messages, corresponding to the press and release. If the remote cuelight has been pressed in response to the cuelight being placed on Standby, a third MSC message will be generated, interleaved between the press and release message. NOTE : the cuelight must NOT be set to auto-reply if you require the acknowledge message. NOTE : it is not currently possible to detect cuelight pushbutton operation whilst the GO lamp is illuminated. MSC Configuration (Transmit) • • • • • • Press MENU. Press NEXT/LAST until "OPTIONS" appear as the menu item. Press 3. Press NEXT/LAST until "MSC SETUP" appears as the menu item. Press 3. Press NEXT/LAST until the required set-up option is displayed. The MSC configuration options for transmitting MSC commands are MSC TX DEVICE ID and MSC TX COMMAND FORMAT. Valid device id's are in the range 0 to 111 (decimal). The command format is displayed in hexadecimal notation, as this is the format presented in the Midi Show Control specification, which should be used as a reference when changing this parameter. The default command format of 0x50 (Process Control) has been selected, as the version 1.0 MSC specification does not specifically refer to cuelight systems ! • • • Press 3 Press NEXT/LAST until the required value is displayed. Press 3 if you are happy with the alterations. Andera/HEL Ltd 1992-2006 software v2.16 user guide v2.2a 061128 SoftCUE User Guide • • 31 Press 7 if you DO NOT wish to use the alterations you have just made. When you have finished, press MENU to return to normal operation. MSC GO TIME The MSC GO time is used to determine the duration of a GO as triggered by reception of a MSC GO command. • • • • • • • • • • • Press MENU. Press NEXT/LAST until "OPTIONS" appear as the menu item. Press 3. Press NEXT/LAST until "MSC SETUP" appears as the menu item. Press 3. Press NEXT/LAST until "MSC GO TIME" is displayed. Press 3. Press NEXT/LAST to select the desired GO time. Press 3 if you are happy with the alterations. Press 7 if you DO NOT wish to use the alterations you have just made. When you have finished, press MENU to return to normal operation. MSC DEFAULT This configuration option determines whether or not the SoftCUE powers up with the MSC pushbutton illuminated - i.e. MSC receiver enabled. • • • • • • • • • • • Press MENU. Press NEXT/LAST until "OPTIONS" appear as the menu item. Press 3. Press NEXT/LAST until "MSC SETUP" appears as the menu item. Press 3. Press NEXT/LAST until "MSC DEFAULT" is displayed. Press 3. Press NEXT/LAST to select the desired option. Press 3 if you are happy with the alterations. Press 7 if you DO NOT wish to use the alterations you have just made. When you have finished, press MENU to return to normal operation. Andera/HEL Ltd 1992-2006 software v2.16 user guide v2.2a 061128 SoftCUE User Guide 32 Configuration Options To set the default record step The record step may be changed so that when you initially record events, there are plenty of intermediate event numbers "unused". This may allow more freedom in adding standby events during rehearsals. Even when you have recorded with a record step of 1, it is possible to add up to 9 events using the INSert function. The default record step may be changed at any time. • • • • • • • Press MENU. Press NEXT/LAST until "SET RECORD STEP" appear as the menu item. Press 3. Press NEXT/LAST until the desired record step appears. Record steps between 1 and 9 are valid. Press 3 if you are happy with the alterations. Press 7 if you DO NOT wish to use the alterations you have just made. When you have finished, press MENU to return to normal operation. To set automatic acknowledge Another powerful SoftCUE feature is the ability to assign particular cuelights to automatically acknowledge. This can be useful when the cuelight is known to be out of reach of the stage crew staff, or is for use by cast who would not normally acknowledge calls. A separate assignment is set for each of the six shows, and for the manual mode of operation. • • • • • • Press MENU. Press NEXT/LAST until "OPTIONS" appear as the menu item. Press 3. Press NEXT/LAST until "SET AUTO-REPLY" appears as the menu item. Press 3. The system will respond with the prompt: "FOR MANUAL SHOW" if you were in MANUAL mode, or "FOR SHOW 1" if you were in SHOW 1 etc. .... "FOR SHOW 6" if you were in SHOW 6 etc. + Alternative show selection may be made using NEXT/LAST. • Select the cue lights required to automatically acknowledge by pressing the appropriate CUELIGHT (148). Selected cue lights will show in RED. Cue lights no longer required to automatically acknowledge may be deselected by a second press of the appropriate CUELIGHT. • • Press 3 if you wish to accept the selection. + CLR may be used to quickly deselect the current assignment. • When you have finished, press MENU to return to normal operation. Press 7 if you DO NOT wish to accept the selection. To set GO time The remote GO time is the minimum time the Green GO lamp is illuminated on a remote cuelight. It also determines the time the GO mimic on the Stage Manager Control remains on. Please note that when using the system to call a pre-recorded show, SoftCUE will advance to preview the next event even whilst the GO is active on the remote cuelights. • Press MENU. Andera/HEL Ltd 1992-2006 software v2.16 user guide v2.2a 061128 SoftCUE User Guide • • • • • • • • 33 Press NEXT/LAST until "OPTIONS" appear as the menu item. Press 3. Press NEXT/LAST until "SET GO TIME" appears as the menu item. Press 3. Press NEXT/LAST until the required remote go time is displayed. Press 3 if you are happy with the alterations. Press 7 if you DO NOT wish to use the alterations you have just made. When you have finished, press MENU to return to normal operation. To set GO timer The GO timer is an optional timer which can be automatically displayed on the Stage Manager Control after each GO event is given. This can be useful when there are several successive GO events that need to be called in a precise time sequence. After the timer period, the display will automatically return to displaying the time of day (or stopwatch time if stopwatch is enabled). • • • • • • • • • Press MENU. Press NEXT/LAST until "OPTIONS" appear as the menu item. Press 3. Press NEXT/LAST until "SET GO TIMER" appears as the menu item. Press 3. Press NEXT/LAST until the required remote go timer time period is displayed. Press 3 if you are happy with the alterations. Press 7 if you DO NOT wish to use the alterations you have just made. When you have finished, press MENU to return to normal operation. To set manual GO The operation of GO can, for manual operation, be changed from "LATCHING" to "TIMED". + The default GO operation in Manual mode is "LATCHED"; the GO will stay on until manually cleared. If required, the GO operation can be "TIMED", in which case the GO will stay on for the duration of the systems GO TIME. Please refer to the "OPTIONS/SET MANUAL GO" and "OPTIONS/SET GO TIME" section of the Menu facilities. • • • • • • • • • Press MENU. + Press NEXT/LAST until "OPTIONS" appear as the menu item. Press 3. Press NEXT/LAST until "SET MANUAL GO" appears as the menu item. Press 3. Press NEXT/LAST until the required manual go option is displayed. Press 3 if you are happy with the alterations. Press 7 if you DO NOT wish to use the alterations you have just made. When you have finished, press MENU to return to normal operation. When Manual GO "TIMED" operation is selected, and the "GO TIME" is OFF, the GO is active for the time the GO push is held down. This is the preferred configuration when very rapid cue sequences are required to be given, as short or long GO cues can be called as required. Andera/HEL Ltd 1992-2006 software v2.16 user guide v2.2a 061128 SoftCUE User Guide 34 To set language As standard, SoftCUE messages and MENU facilities are provided in English. Other languages may be fitted as required. • • • • • • • • • Press MENU. Press NEXT/LAST until "OPTIONS" appear as the menu item. Press 3. Press NEXT/LAST until "SET LANGUAGE" appears as the menu item. Press 3. Press NEXT/LAST until the required language is displayed. Press 3 if you are happy with the alterations. Press 7 if you DO NOT wish to use the alterations you have just made. When you have finished, press MENU to return to normal operation. Andera/HEL Ltd 1992-2006 software v2.16 user guide v2.2a 061128 SoftCUE User Guide 35 To set time and date + SoftCUE always uses a twenty four hour clock. • • • • • Press MENU. Press NEXT/LAST until "OPTIONS" appear as the menu item. Press 3. Press NEXT/LAST until "SET DATE/TIME" appears as the menu item. Press 3. The system will display date month year. The first digit of the date will be flashing. This indicates the data which may be changed by pressing NEXT/LAST until the correct data is displayed. • • • • • • • • • • • • • • • • • • + + Press INS/è to move to the next digit, which will start flashing. Press NEXT/LAST until the correct data is displayed. Press INS/è to move to the month, which will start flashing. Press NEXT/LAST until the correct month is displayed. Press INS/è to move to the first year digit, which will start flashing. Press NEXT/LAST until the correct data is displayed. Press INS/è to move to the second year digit, which will start flashing. Press NEXT/LAST until the correct data is displayed. Press INS/è to move to the first hour digit, which will start flashing. Press NEXT/LAST until the correct data is displayed. Press INS/è to move to the second hour digit, which will start flashing. Press NEXT/LAST until the correct data is displayed. Press INS/è to move to the first minute digit, which will start flashing. Press NEXT/LAST until the correct data is displayed. Press INS/è to move to the second minute digit, which will start flashing. Press NEXT/LAST until the correct data is displayed. Press 3 if you are happy with the alterations. Press 7 if you DO NOT wish to use the alterations you have just made. Press CLR/ç to step back to the previous field. You do not have to alter every field if the data is already correct. Step to the field which requires correction using INS/è and/or CLR/ç, make the alterations using NEXT/LAST and save the changes by pressing 3 if you are happy with the alterations. Although SoftCUE does not currently use the date information, we recommend you set it appropriately, to ensure compatibility with any future operational enhancements. • When you have finished, press MENU to return to normal operation. Andera/HEL Ltd 1992-2006 software v2.16 user guide v2.2a 061128 SoftCUE User Guide 36 Fault Detect In addition to open circuit testing (lamp test), SoftCUE monitors the cuelights for short circuits. In the event that a short is detected when a Standby or GO cuelight should be illuminated, the output drive circuit will shut down, to protect the internal electronics. A short circuit fault will be indicated on the Stage Manager control as a flashing AMBER on the corresponding cuelight LED indicator. The drive circuit will re-attempt to drive the remote cuelight when the state of the cuelight changes (e.g. from standby to go). If required, short circuit testing may be disabled. • • • • • • • • • + Press MENU. Press NEXT/LAST until "OPTIONS" appear as the menu item. Press 3. Press NEXT/LAST until "FAULT DETECT" appears as the menu item. Press 3. Press NEXT/LAST until the required state of fault detect is displayed. Press 3 if you are happy with the alterations. Press 7 if you DO NOT wish to use the alterations you have just made. When you have finished, press MENU to return to normal operation. Short circuit testing is shown as S/C TEST on the alphanumeric display. It is normally left enabled (ON). Special Functions System Information • • • • • Press MENU. Press NEXT/LAST until "OPTIONS" appear as the menu item. Press 3. Press NEXT/LAST until "SYSTEM INFO" appears as the menu item. Press 3. The version number of the software fitted will be displayed. • Press 3. An indication of the percentage of memory in use to store show events will be displayed. • When you have finished, press MENU to return to normal operation. + SoftCUE is designed to allow the recording of six shows. Internally, shows are recorded on two independent memory devices. Shows 1,2 and 3 are recorded on device #1, Shows 4,5 and 6 on device #2. In the event that Show 1 is a particularly large show, you may get the message MEMORY FULL when attempting to load another large show as Show 2. If this occurs, you should try to load the second large show as Show 4,5 or 6. Andera/HEL Ltd 1992-2006 software v2.16 user guide v2.2a 061128 SoftCUE User Guide 37 System Initialisation WARNING All show data and system configuration options will be cleared. This action should NOT normally be required. If you suspect that data may have been corrupted, possibly due to component failure, it may be necessary to reinitialise the SoftCUE internal memory. We strongly recommend you consult your supplier before taking this action. We also recommend that you attempt to save all existing shows onto a NEW memory card prior to system re-initialisation. DO NOT attempt to save to a card which has known good data. • Press and hold the CLR and STOPWATCH pushes whilst applying power to SoftCUE. Release the pushes when the message "REINITIALISING.." appears. Service Support Please contact your local distributor. We have designed SoftCUE to be as reliable as possible, however there are occasions when things go wrong. System is connected to power but there are no messages appearing on the alphanumeric displays, and no LEDs or push-button illuminate. Check FUSE. The fuse is fitted to the IEC mains receptacle on the rear of the unit. A spare fuse is provided in the receptacle. If the external fuse has blown, and replacing it does not allow the system to operate, there is an internal fuse on the power supply which may have blown. Failure of the internal fuse would normally indicate a more serious fault and we suggest you contact your supplier for further advice. If the SoftCUE is reporting LAMP FAIL (Flashing Amber) for a cuelight : Check external connections. Check that external connectors are properly mated with the rear panel connectors of SoftCUE. Ensure that there is only ONE cuelight attached to each output. Check Standby and Go lamps in cuelight. If the SoftCUE is NOT reporting a LAMP FAIL for a cuelight and you expect it do so Check User configuration. Check that fault detect is enabled for the particular cuelight, and that LAMP TEST is ON. If the SoftCUE is reporting a SELF TEST fault. Please consult appendix A. Intermittent or erratic operation : Check internal connections. Check that all internal cables are properly seated on the printed wiring boards. WARNING Switch off and remove mains connection BEFORE removing the cover. The orientation of the internal power and ribbon cables is critical to the correct operation of SoftCUE. DAMAGE may occur if these cables are incorrectly inserted. Please note the correct orientation of all cables BEFORE removal, and replace accordingly. If in doubt, ASK your supplier. Andera/HEL Ltd 1992-2006 software v2.16 user guide v2.2a 061128 38 SoftCUE User Guide Software support Software upgrades will be supplied free of charge to registered owners during the warranty period, providing the unit is returned, carriage paid, to the supplier. On conclusion of the warranty period, extended warranty software upgrade contracts will be offered. Please consult your supplier for further details. Suggestions We are always keen to get feedback from users. Suggestions concerning the operation of this product should be sent (preferably by fax or email) to Howard Eaton Lighting Limited. The company reserves the right to change the design and specification of this product as required for improvement and operational enhancements. Andera/HEL Ltd 1992-2006 software v2.16 user guide v2.2a 061128 SoftCUE User Guide 39 Appendix A : Power ON Self Test messages Power On Self Test error messages : SELF-TEST OK SELF-TEST ERR 1 SELF-TEST ERR 2 SELF-TEST ERR 3 SELF-TEST FAIL SELF-TEST ERR 1 SoftCUE has found a fault in the battery backed RAM which holds the state of functions preserved during power down; for example GO time, Standby AUTO-Acknowledge, Manual GO latch state, MSC command id. If you press 3, SoftCUE will restore this data to factory defaults and continue. This error message will generally be displayed following a software upgrade; in such cases the desired user defaults must be re-entered, and the self-test message ignored. If you experience this error message at any other time, please check the state of the various configuration options. SELF-TEST ERR 2 SoftCUE has found a fault in the basic show data. This fault will occur if you are upgrading from version 2.04 to version 2.1 or later. Press 3 to repair the data and continue. If you experience this error message at any other time, we recommend that you re-initialise your system and reload the show data from the memory card. SELF-TEST ERR 3 SoftCUE has found a serious fault in the internal show data. This message will have been preceded by an error message ** Show nn Failed **. If you press 3, an attempt will be made to repair the data and continue, however at least part and possibly ALL of the show will be discarded, and the data should be considered as suspect. It may mean that there is a problem with internal hardware or software. If you missed noting which Show had failed, power down and start again. If you must continue from this error state, then SoftCUE will be usable in RUN mode but you should NOT attempt to use it in PROGRAM mode until you have re-initialised the system. If you ignore this warning, you will almost certainly corrupt the data even further! If you have important shows in your SoftCUE that are NOT on a memory card, please copy them to a NEW memory card (not your backup card). If you experience this error message, we recommend that you re-initialise your system and reload the show data from the memory card. Please contact your supplier for further information. Andera/HEL Ltd 1992-2006 software v2.16 user guide v2.2a 061128 SoftCUE User Guide 40 Appendix B : Standard System configuration Standard System Configuration (as delivered) SHOW1 not recorded SHOW2 not recorded SHOW3 not recorded SHOW4 not recorded SHOW5 not recorded SHOW6 not recorded LAMP TEST OFF SET RECORD STEP RECORD STEP IS 1 SET AUTO-REPLY FOR MANUAL SHOW : No cuelights selected FOR SHOW 1 : No cuelights selected ... FOR SHOW 6 : No cuelights selected SET LAMP DETECT FOR MANUAL SHOW : All cue lights selected. SET GO TIME REM GO TIME OFF SET GO TIMER GO TIMER OFF SET LANGUAGE ENGLISH SET DATE/TIME : correct for UK systems FAULT DETECT S/C TEST ON Andera/HEL Ltd 1992-2006 software v2.16 user guide v2.2a 061128 SoftCUE User Guide 41 Appendix C : Summary of Menu facilities Possible error/warning messages are shown in ( ). LAMP TEST LAMP TEST ON [default] LAMP TEST OFF SAVE SHOW TO CARD (CARD NOT FITTED) (CARD BATT FAIL) (CARD FULL) (CARD PROTECTED) (CARD UNFORMATTED) (NO SHOWS TO SAVE) FROM SHOW TO CARD SHOW TO CARD OVERWRITE ? (CARD WRITE ERROR) LOAD SHOW FROM CARD (CARD NOT FITTED) (CARD UNFORMATTED) (NO SHOWS ON CARD) FROM CARD TO SHOW CARD TO SHOW OVERWRITE ? SET RECORD STEP RECORD STEP IS 1 [default] .... RECORD STEP IS 9 OPTIONS FORMAT CARD (CARD NOT FITTED) (CARD BATT FAIL) (CARD PROTECTED) ARE YOU SURE ? SET AUTO REPLY [default is NONE] SHOW 1 ... SHOW 6 MANUAL SET LAMP DETECT FOR SHOW 1 ... FOR SHOW 6 FOR MANUAL SHOW Andera/HEL Ltd 1992-2006 software v2.16 user guide v2.2a 061128 SoftCUE User Guide 42 Summary of Menu facilities continued SET GO TIME REM GO TIME OFF [default] ... REM GO TIME 9 S SET GO TIMER GO TIMING OFF [default] TIMING FOR 5 S ... TIMING FOR 60 S SET MANUAL GO MANUAL GO LATCHED [default] MANUAL GO TIMED MSC SETUP MSC DEFAULT MSC OFF [default is MSC OFF] MSC ON MSC GO TIME MSC GO TIME n SC [default is 2 seconds] MSC RX DEVICE ID DEVICE ID 0 [default is 1] .... DEVICE ID 111 MSC RX COMM FMT COMM FMT IS xx [default is 0x50] MSC TX DEVICE ID DEVICE ID 0 [default is 1] .... DEVICE ID 111 MSC TX COMM FMT COMM FMT IS xx [default is 0x50] SERIAL PORT (NOT AVAILABLE) LANGUAGE ENGLISH [default] language_1 Language_2 SET DATE/TIME FAULT DETECT S/C TEST OFF S/C TEST ON [default] SYSTEM INFO SOFTCUE VER X.X MEMORY USED % Andera/HEL Ltd 1992-2006 software v2.16 user guide v2.2a 061128 SoftCUE User Guide 43 Appendix D : Software version History version released 1.x comment R+D development & prototype evaluation. 2.0 930503 Initial Production release. 2.01 930514 Maintenance release; IMGO latchup and start-up with very large (600 cue) shows problem fixed. 2.02 R+D use only. 2.03 930608 Latching GO added for manual mode. 2.04 2.1 930630 930911 2.11 2.12 931109 931231 2.14 2.15 2.16 981020 990729 040923 Delayed clear added. Improved Delayed Clear. MSC SETUP menu implemented. Overlapping GO timing problem removed. Menu Mode preserves Cuelight data. Link function added. Copy/Move/Swap/Delete function added. Transfers to/from Memory card now display event numbers. Self-Test reporting improved. Power up messages extended. Development version/LDI preview. Improved response to NEXT/LAST. Improved setup of lamp detect selection. Improved power up restoration of previous event state. Improved ability to add/delete QL on standby during playback. Rewind of show now automatically selects all QL that need to be on Standby. Bypassing Linked events simplified. NEXT/LAST fault on event 1 fixed. Operator QL Alert facility added. Stage Manager Alert facility added. QL HOLD facility added. MSC remote QL message generation added. Spanish added as language 1. Stopwatch time duration increased Fix probem with Clock and **some** variants of 8032 processors Andera/HEL Ltd 1992-2006 software v2.16 user guide v2.2a 061128 SoftCUE User Guide 44 Appendix E : Connector Pinouts Remote Cuelight Outstations (3 pin XLR) XLR SoftCUE Cable Pin 1 Common Screen Pin 2 Standby red Pin 3 Go blue WARNING : SoftCUE cuelights are NOT operationally or electrically compatible with other cuelight systems. Cuelight lamp failure may occur if a SoftCUE cuelight is connected to an existing 24v system. Remote Cuelight Outstations (Multipole Connector) Pin Function Pin Function A QL1.SBY Y QL7.SBY B QL1.GO Z QL7.GO C QL1.Common AA QL7.Common D QL2.SBY BB QL8.SBY E QL2.GO CC QL8.GO F QL2.Common DD QL8.Common H QL3.SBY EE QL9.SBY J QL3.GO FF QL9.GO K QL3.Common HH QL9.Common L QL4.SBY JJ QL10.SBY M QL4.GO KK QL10.GO N QL4.Common LL QL10.Common P QL5.SBY MM QL11.SBY R QL5.GO NN QL11.GO S QL5.Common PP QL11.Common T QL6.SBY RR QL12.SBY U QL6.GO SS QL12.GO V QL6.Common TT QL12.Common W not used X not used WARNING : Duplicate cuelights must NOT be connected to SoftCUE via the Multipole and XLR connectors at the same time. Correct operation of the cuelights is not guaranteed. Andera/HEL Ltd 1992-2006 software v2.16 user guide v2.2a 061128 SoftCUE User Guide 45 MIDI Ports 5 pin DIN 180 MIDI IN MIDI THRU MIDI OUT 1 nc nc nc 2 nc Screen Screen 3 nc nc nc 4 RX+ TX+ TX+ 5 RX- TX- TX- Computer Ports (PORT #1, PORT #2) Pin Function 1 NC 2 RxD 3 TxD 4 NC 5 GND 6 DSR 7 RTS 8 CTS 9 RI (nc) Expansion Port This port is provided for the interconnection of SoftCUE Master and Expansion units only. No other connections are permitted. Andera/HEL Ltd 1992-2006 software v2.16 user guide v2.2a 061128