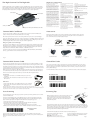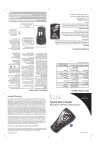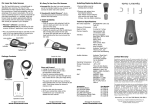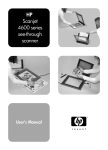
1
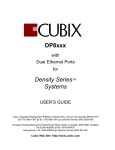
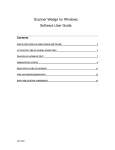
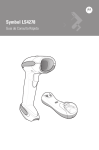
Limited Warranty
Manufacturer warrants that this laser bar code scanner will be free of defects in material and workmanship for one (1) year
from the date of shipment. Manufacturer will, at its option, either repair, replace or refund the purchase price paid by buyer for
the defective Products. Such repair, replacement or refund shall be buyer’s sole remedy in the event of Manufacturer’s breach
of this limited warranty. Repaired or replaced parts or product may include new, reconditioned or re-manufactured parts and
equipment at Manufacturer’s option. All costs associated with shipment to Manufacturer for warranty service, including but not
limited to freight, duties, insurance and customs fees are buyer’s responsibility. Manufacturer will pay the freight costs (duties,
insurance, customs and any other fees are buyer’s responsibility) associated with the return shipment to buyer. The method of
shipment will be at Manufacturer’s discretion. Repair or replacement of any parts or equipment does not extend the period of
warranty provided for herein. THIS LIMITED WARRANTY IS MANUFACTURER’S ONLY WARRANTY. MANUFACTURER DOES NOT
GIVE WARRANTIES OF MERCHANTABILITY OR WARRANTIES OF FITNESS FOR A PARTICULAR PURPOSE. To take advantage of this
warranty, buyer should contact the seller not Manufacturer. Manufacturer does not warrant that the Product or associated software will run error free or without interruptions. Manufacturer is not liable for loss of data, loss of profit, cost of cover, indirect,
incidental or consequential damages.
Quick Start Guide
ROV™ Scanner
ROV™ Scanner with Bluetooth®
The warranty set forth herein does not cover and Manufacturer will have no obligations hereunder if any non-conformance
is caused in whole or in part by; accident, transportation, neglect, misuse, alteration, modification, or enhancement of the
products or incorporation, interfacing, attachment of any feature, program, or device to the products by a person or entity other
than Manufacturer, failure to provide a suitable installation environment, use of the products for other than the specific purpose
for which the products are designed or any use of the product not in accordance with the User Manual or other misuse or abuse
of the product.
Microvision, Inc. 6222 185th Avenue NE Redmond, WA 98052
Microvision and ROV are trademarks of Microvision, Inc. Windows and Windows Mobile are trademarks of Microsoft Corporation. The Bluetooth word, mark, and logo are owned by the Bluetooth SIG, Inc. and any use of such marks by Microvision, Inc., is
under license.
DA0120035 Rev A
Class 1 Laser Product
Prodotto Al Laser Di Classe 1
Klasse 1 Laserprodukt
Laserprodukt Klasse 1
Luokka 1 Lasertuote
Produto Laser Da Classe 1
Produit Laser De Classe 1
Producto Laser De La Clase 1
Laserprodukt Der Klasse 1
Laserprodukt Klass 1
[Bar Code]
SN XXXX XXXX XXXX
MANUFACTURED YYYY/MM/DD
Disposal: Do not
dispose of this
product in unsorted
municipal waste.
To dispose of this
product, contact
seller.
Laser Safety: This device employs a laser. Do not remove the cover or attempt to service this device due to the possibility of eye
damage.
Install Batteries
Use alkaline AAA batteries or NiMH rechargable AAA batteries in your scanner.
Please remove the batteries when you store your scanner for more than 30 days.
1. Press the battery cover release button, then
slide and lift the battery cover.
2. Insert the batteries as shown.
3. To replace the battery cover, make sure that
the cover tabs fit into the cover slots, and then
slide the cover until it clicks into place.
Laser Sicherhelt: In das Gerat ist ein Laser eingebaut. Nehmen Sie dei Abdeckung nicht ad und versuchen Sie nicht, das Gerat
zu reparieren. Es besteht die Gefahr einer Augenverletzung.
Caution: Use of controls or adjustments or performance of procedures other than those specified herein may result in hazardous laser radiation exposure.
Warnung :Die Vomahme von Regelungen oder Einstellungen oder die Durchfuhrung con Verfahren, die nicht in diesem Dokument angegeben sind, kann eine gefahrliche Einwirkung von Laserstrahlung zer Forge haben.
Look for firmware updates at: www.microvision.com/barcode/support
Page 3
Connect With Confidence
Scanner Features
ROV™ Scanner
ROV Scanner w/Bluetooth®
Get more with SerialMagic Pro
Platform
Windows, Linux, iDen, Mac
Windows®, Windows Mobile® (Pocket PC), Mac®, BlackBerry®, Palm®,
Symbian™ (Nokia E-series only)
Interface
Serial, USB
Bluetooth
Bar Codes
UPC/EAN/JAN, Code 39, Code 128, RSS, Codabar, Interleaved 2 of 5
Connect with SerialMagic Pro to get more from your ROV scanner. SerialMagic captures bar code
data and translates it into keyboard input, but also gives you the power to:
• Set the target application
• Add bar code data in spreadsheet columns
• Use programmable actions
• Use the simple API
Memory
Stores over 4,000 UPC-A codes in non-volatile memory
Power
3 AAA alkaline batteries (not included)
-or3 AAA NiMH rechargeable batteries (not included)
Scan Engine
Microvision proprietary MEMS-based design
Dimensions
Length: 4.5in (11.4cm); Width: 2in (5cm); Height 1in (2.5cm)
Weight: 2.5oz (3.7oz with batteries)
Bluetooth® class 2, 2.0 compliant
Radio
To learn more about getting more from your ROV scanner with SerialMagic, go to
www.microvision.com/barcode/connected
Get full integration with Microvision Scanner SDK
You can use Microvision Scanner SDK (software development kit) to fully integrate your ROV
scanner into any product solution that requires a hand-held scanner. The Scanner SDK gives you
control of all scanner functions, gives you full management of scanner data, and control of time
and date stamps. The Scanner SDK is available in Windows®, Windows Mobile®, and BlackBerry®
versions.
To learn more about fully integrating your ROV scanner into your software application, go to
www.microvision.com/barcode/connected
Page 5
Page 12
Indicator Table
Connect ROV™ Scanner With Bluetooth®
Green LED
Blue LED
Bluetooth Discoverable
2 blinks every 2
seconds
Bluetooth Connected
1 blink every 2
seconds
Beeper
1 blink
1 beep
Memory Full
3 blinks
3 beeps
Uploading
2 blinks every
second
None
Upload Complete
1 blink
3 different
beeps
Sleeping
None
Dead Battery
Double-blinks 3
times
None
You can connect your ROV Scanner with Bluetooth to your host computer or mobile device using
a wireless connection. Make sure you install the scanner batteries before you try to connect your
ROV Scanner.
Wake up your ROV Scanner with Bluetooth
Good Scan
Low Battery (after good 2 blinks
scan) or other error
Page 10
SerialMagic Pro gives you the flexibility to work with software that runs on Windows®, Windows
Mobile®, BlackBerry®, Palm®, and Symbian™ devices.
Press and release the Scan button on your scanner to put the scanner in Discoverable Mode. Your
scanner is ready to connect when the blue LED double-blinks every two seconds.
When your ROV Scanner with Bluetooth is connected to a host, the blue LED blinks once every
second.
None
Activate your ROV Scanner with Bluetooth
2 different
beeps (beboop)
Specific instructions for connecting your ROV Scanner with Bluetooth vary by operating system
and by software application. Please refer to the appropriate user guide for specific connection
instructions.
2 different
beeps 3
times (beboop)
Page 7
Regulatory Information
The Right Scanner For The Right Job
UL Listed to U.S. and Canadian standards
The Microvision ROV™ Scanner and ROV™ Scanner with Bluetooth® give you a powerful combination of high-performance, durability, and affordability. Your Microvision scanner can be used
many ways. You can use your scanner right out of the box, enhance your scanner with specific
third party software applications, or integrate your scanner into a custom application.
scan button
scan window
LED
FCC Declaration of Conformity
This device complies with Part 15 of the FCC
Rules. Operation is subject to the following
two conditions: (1) this device may not cause
harmful interference (2) this device must
accept any interference received including
interference that may cause undesired operations. This applies to all product options.
FCC Radio Frequency Interference Statement
NOTE: This equipment has been tested and
found to comply with the limits for a Class B
digital device, pursuant to Part 15 of the FCC
Rules. These limits are designed to provide
reasonable protection against harmful
interference in a residential installation. This
equipment generates, uses and can radiate
radio frequency energy and, if not installed
and used in accordance with the instructions,
may cause harmful interference to radio communications. However, there is no guarantee
that interference will not occur in a particular
installation.
If this equipment does cause harmful interference to radio or television reception, which
can be determined by turning the equipment
off and on, the user is encouraged to try to
correct the interference by one or more of the
following measures:
serial port
battery door with optional Bluetooth radio
» Reorient or relocate the receiving antenna.
» Increase the separation between the equipment and receiver
» Connect the equipment into an outlet on a
circuit different from that to which the receiver
is connected.
» Consult the dealer or an experienced radio/
TV technician for help.
To comply with FCC RF exposure compliance
requirements, a separation distance of at
least 20 cm must be maintained between the
antenna of this device and all persons. This
transmitter must not be collocated or operating in conjunction with any other antenna or
transmitter.
CAUTION: Changes or modifications to
this equipment not expressly approved by
manufacturer could void the user’s authority
to operate this equipment.
Notice for Canada
Radio Interference Notice for Canada
This Class B digital apparatus complies with
Canadian ICES-003.
Cet appareil numérique de la classe B est
conforme á la norme NMB-003 du Canada.
Complies with 21 CFR 1040.10 and 1040.11
except for deviations pursuant to Laser Notice
No. 50, dated July 26, 2001.
Compliance Information
Product Name: ROV Laser Bar Code Scanner
Product Number: MS2200
Options: All
The product herewith complies with the
requirements of Low Voltage Directive
73/23/EEC, EMC Directive 89/336/EEC, WEEE
Directive 2002/96/EC, and carries the “CE” mark
accordingly.
Product Name: ROV Cordless Laser Bar Code
Scanner
Product Number: MS2200-BT
Options: All
The product herewith complies with the requirements of R&TTE Directive 99/5/EC, WEEE
Directive 2002/96/EC, and carries the “CE” mark
accordingly. The equipment also carries the
Class 2 equipment identifier:
Laser
Type: Semiconductor laser AlGaInP
Maximum output power: 5mW
Divergence:
X axis: 6-15 degrees
Y axis: 22-38 degrees
Wavelength: 650-660nm
Laser
Typ: Halbleiterlaser AlGaInP
Ausgabeleistung: 5 mW
Strahlabweichung:
X Achse: 6-15 Grad
Y Achse: 22-38 Grad
Wellenlänge: 650-660nm
Connect With Confidence
Accessories
You can connect with confidence using your ROV Scanner or ROV Scanner with Bluetooth:
cable or wireless, real-time or batch, fixed location or roaming.
Microvision offers a number of accessories that make using your ROV scanner easier and
more efficient. To order the accessory you want, contact your reseller or contact Microvision at www.microvision.com/barcode/connected
Microvision provides three levels of connectivity software for your scanner. Scanner Wedge
gives you a quick and easy way to use a scanner out of the box. SerialMagic adds the power and
flexibility of programmable actions and a simple API. The Microvision SDK gives you the control
to fully integrate a Microvision scanner into your software application.
Get going with Scanner Wedge
You can use Scanner Wedge to connect your Microvision ROV Scanner and ROV Scanner with
Bluetooth to a host computer or mobile device. Scanner Wedge captures bar code data from
your ROV Scanner, translates the scanned bar code data into keyboard input, then sends the
keyboard data to a Windows®, Windows Mobile®, or BlackBerry® device.
Scanner USB Cable
Scanner Serial Cable
To learn more about no-hassle connectivity with Windows, Windows Mobile, and BlackBerry
devices, go towww.microvision.com/barcode/connected
Scanner Holster
Scanner Boot
Page 4
Scanner Dock
(Serial and USB)
Page 13
Connect ROV Scanner Cable
Control Bar Codes
You can connect your ROV Scanner to a host computer with a serial cable (included) or a USB
cable (sold separately). If you turn off the host computer before connecting the scanner cable,
remember to turn the computer on to activate and use your scanner. You can unplug your ROV
Scanner from the cable and use it in batch mode to scan and save bar codes. Then just reconnect
and upload the bar codes to your host computer.
You can use control bar codes to control how your scanner operates. When you scan control
bar codes, they act as commands and tell the scanner what to do. You can use the control bar
codes on this page to clear all bar codes from the scanner memory or reset the scanner to its
factory default settings.
Before you use a serial cable, or USB cable in serial mode, make sure that your host application
can communicate with the serial port so the application can receive bar code data. You do not
have to start a software application before you use the USB cable in keyboard mode.
For more information about control bar codes, go to: www.microvision.com/barcode/support
Clear Bar Codes
Serial cable
1. Connect the serial cable to an available serial port on your host
computer.
2. Connect the other end of the serial cable to the serial port on your
ROV Scanner.
Restore Factory Settings
USB cable
1. Connect the USB cable to an available USB port on your computer.
2. Connect the other end of the USB cable to the serial port on your
ROV Scanner.
Note: The Microvision USB cable operates in two modes: serial mode or keyboard mode. In serial mode, the
USB cable emulates a serial cable. In keyboard mode, the USB cable sends bar codes as if they were typed on
a keyboard. For more information, see the USB Cable Quick Start Guide.
Scanning Tips
Start Scanning
Use the sample bar code on this page to perform your first scan with your ROV Scanner or ROV
Scanner with Bluetooth.
If you use Scanner Wedge, start Scanner Wedge and go to the Trace page before you begin
to scan. If you use SerialMagic, iMagic, Media Organizer, eCell, or another software program,
please read the appropriate user guide for information about preparing to scan.
1. Point the scanner at the bar code on this page.
2. Press and hold the Scan button and make sure that the red laser line appears.
3. Aim the laser line so that it crosses the entire bar code.
The scanner beeps and the LED indicator flashes when the scan is successful.
4. When you hear the scanner beep, or see the LED indicator flash, release the Scan button.
Sample Bar Code
1234567
If you are using Scanner Wedge, you should see the bar code 1234567 on the Trace page.
Minimize Scanner Wedge. Open the software program you want to use, put the insertion point
where you want the scanned data, and start to scan.
Page 8
Page 11
Make sure that the laser line is across the bar code you want
to scan and than move the scanner to change the scan
angle. If you do not see the scanner laser line, make sure
that there are batteries in the scanner and the batteries
have sufficient power.
If your software program does not receive bar code data and you are using Scanner Wedge, go
to the Trace screen. If you see bar codes on the Trace screen, then your scanner is working. If you
do not see bar codes, go to the Connections screen to make sure that your scanner is connected
and activated. If you are using SerialMagic or a custom application, please refer to the appropriate user guide to find troubleshooting information.
Look for firmware updates at: www.microvision.com/barcode/support
Contact Microvision Product Support
Telephone: 1 (866) 333 3542
Email: [email protected]
On the Web:
http://www.microvision.com/barcode/support
For more information about using your scanner
with Scanner Wedge, go to: www.microvision.
com/barcode/connected
Page 9