1
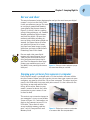
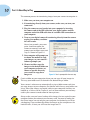
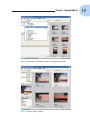
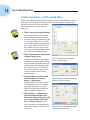
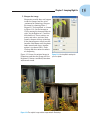
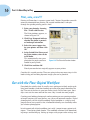
Chapter 1
AL
Jumping Right In
In This Chapter
RI
Having some fun with your digital camera
TE
Getting out and shooting
Transferring images from your camera to your computer
MA
Opening images in Photoshop
Printing and saving your photographs
D
Thinking about digital workflow
I
RI
GH
TE
n the past year or so, just about everyone I know has gone out and purchased a digital camera. If you haven’t noticed, all the consumer electronic circulars in the Sunday paper have entire sections dedicated to digital
cameras, accessories, and printers. Yep, right next to the cell phone
page. Digital cameras may be the latest rage, but unlike the iPod,
I bet that most digital cameras end up like old film cameras,
collecting dust on the shelf.
CO
PY
I know people who purchased their digital cameras
two years ago and never bothered to learn how to
transfer images to their computer. After filling up
their memory cards, they display the pictures they
took by turning on the camera and reviewing the
pictures on the 11⁄2 inch LCD. Funny thing is, these
are the same people that are planning on buying the
latest and greatest that is available on the market!
The point here is to figure out the basics about how to
use your camera, load images to your computer, and
then go out and have some fun. Don’t forget to make a few
prints, by the way!
8
Part I: A New Way to Play
Using Your Digital Camera
Though all the hundreds of different digital camera models that are available
today look different from one another, they all have the same basic operation.
All run on batteries that need charging from time to time. All need some sort
of memory card inserted. (Do this properly: They only go in one way!) They
all have an on-off switch and a shutter button. The most important part of
your digital camera is the user’s manual that comes with each one. Don’t
forget to read yours!
Using your digital camera is as easy as 1, 2, 3. . .
1. Learn how to turn on your
camera.
This step may seem a little
basic, but each manufacturer
does it differently. Don’t be
Figure 1-1: Power switches are located in
embarrassed: I admit I’ve
different spots on different cameras.
fumbled a few times with new
cameras finding out where the
simple buttons and gizmos are. See Figure 1-1 for the on/off button on a
digital camera.
2. Get comfortable with your lens.
Play around by zooming in and out. Most digital cameras come equipped
with a zoom lens with which you can zoom out for wide-angle shots or
for some cool landscape shots. Zoom in to the image of a person for a
great candid portrait.
3. If you are shooting indoors, turn on the built-in flash.
4. Make sure your shooting mode is set correctly.
Automatic mode, surprisingly, works for many shots you take. Automatic
mode is great for now until Chapter 6 covers more advanced shooting
modes.
5. Compose your subject.
Make sure you’re not shooting into the sun: You don’t want your subjects dark with a light background. Look for things in the scene that will
detract from your shot, like power lines running across the horizon or
telephone poles sticking out of a person’s head. Make sure your scene is
square and not tilted. Try to get in the habit of taking the time to compose your shot: You will be surprised how much of a difference it makes!
6. Depress your shutter halfway to focus, the rest of the way to take the
picture.
On most digital cameras, pressing the shutter half way focuses the shot,
and pressing the shutter the rest of the way opens the shutter and takes
the picture.
Chapter 1: Jumping Right In
Get out and shoot
The way to become a better photographer and get the most from your digital
camera is to just use the thing. Take
it with you wherever you go. Get used
to carrying it around and shooting
some photos like the one shown in
Figure 1-2, which I shot in a parking
garage. After parking my car, I looked
around, grabbed my digital camera,
and shot the skyline. Get over that
embarrassed feeling of taking pictures of things when other people are
around. Just ignore them, or better
yet, take their picture! As a bonus,
you then have more images to play
with when you begin to edit them in
Photoshop, later in this book.
For one week, take your digital
camera with you wherever you go.
Take pictures that week of everything and everyone interesting to
you. You’ll be amazed at how many
photos you would have missed if
you didn’t have your digital camera
with you!
Figure 1-2: Take your camera wherever you go:
You never know what you can find!
Copying your pictures from camera to computer
Every digital camera is packaged with a CD that includes software utilities
for your camera. Before you can transfer pictures from your camera to your
computer, you need to install the CD on your computer. The other item you
need is that USB cable that came with your camera. It’s that cable with the
big thingy on one end and the little
thingy on the other. Refer to your
owner’s manual to locate the cable
connection on your camera: It can
be hard to find!
The easiest way to transfer images to
you computer is to use a card reader,
shown in Figure 1-3. Card readers are
devices that connect to your PC via
USB cable. These devices often
accept multiple memory card forFigure 1-3: Think of your camera or card reader
mats, such as CompactFlash and
as an external disk: Your computer does!
Memory Stick.
9
10
Part I: A New Way to Play
The common process for transferring images from your camera to computer is:
1. Make sure you turn your computer on.
2. If transferring directly from your camera, make sure you turn your
camera off.
3. Plug the camera or card reader into your computer by inserting
the camera end of the USB cable into your digital camera and the
computer end of the USB cable into an available USB connection on
your computer.
4. Turn on your digital camera if transferring directly from the camera
or plug in a memory card into
the card reader.
After a few seconds, your computer should recognize the
camera or memory card and
prompt you to choose your next
step, as shown in Figure 1-4.
5. Your computer will prompt you
to choose the method to copy
your images, or your camera’s
software prompts you.
6. Choose to either copy the
images to the default folder on
your computer or better yet,
choose a specific directory
you created to copy these
Figure 1-4: You’re prompted for the next step.
images to.
Create a folder on your computer where you can copy all your images to.
This way your folder won’t be buried in the default images folder.
Your camera’s software may automatically assign a folder name each time
you copy images to your computer. Get familiar with the way your folders are
set up. After your images are copied safely to your computer and they are
backed up, as discussed in Chapter 4, you can then reformat your memory
card in your camera to make room for more pictures.
Always make sure you have a backup of the images that are copied to your
computer before you reformat your memory card. You want to make sure
that these images are not only on your computer, but backed up to CD for
safe-keeping. If you accidentally delete the images on the computer or the
hard disk fails, at least you still have the images on CD.
Chapter 1: Jumping Right In
Invest in a USB card reader. Prices for these devices have come way down
and most of these can read multiple memory card formats. Using card readers to download images is quicker and safer. Some computers even have
these built right in!
Playing with Photoshop CS2
Now that you took some photographs, copied them to your computer, and
backed them up to CD, get on Photoshop and do some messing around.
Select Photoshop from the Windows Start menu, or double-click the icon on
your Windows or Mac desktop.
Photoshop CS2 presents you with the Welcome screen (see Figure 1-5) every
time you start up Photoshop. This screen provides you with an easy way to
view help documents and other information about Photoshop CS2.
Figure 1-5: The Photoshop Welcome Screen.
You can deselect the Show This Dialog at Startup check box in the lower left
of the Photoshop Welcome Screen if you don’t want to see this window every
time you start Photoshop.
Browsing for images
One of the biggest improvements to Photoshop in CS2 is Bridge, shown in
Figure 1-6. An update to the File Browser, Bridge provides you with a powerful
file management tool that allows you to visually select images you want to edit
as well as organize and catalog these images.
11
12
Part I: A New Way to Play
Figure 1-6: Bridge is an easy way to view, open, and organize files.
To open an image in Photoshop:
1. Select File ➪ Browse.
2. Select the folder you copied images to by using the Folders palette
located within Bridge (see Figure 1-7).
Adobe did a nice job keeping the Folders palette functionality similar to
Windows Explorer, only more tailored toward working with images.
When you start Bridge, it will display images in the browser from the
folder you last visited.
3. Double-click the folder you want to view, as shown in Figure 1-8.
4. Select an image that you want to open in Photoshop by double-clicking
the image.
You are ready to perform plastic surgery on your photos . . . I mean edit
your photos!
Chapter 1: Jumping Right In
Figure 1-7: Bridge works like Windows Explorer: You drill down to your folder.
Figure 1-8: Viewing images in Bridge.
13
14
Part I: A New Way to Play
A little tweak here, a little tweak there
Without spending the next few hours going through some elaborate steps to
make edits to the image and print, I leave the heavy editing stuff for later.
For now, you can do some quick edits
and see how the image you choose
prints out.
1. Make a copy of the original image.
As a rule of thumb, I never make
edits to original images: I always
work on a copy. As shown in Figure
1-9, the first thing I do is save this
image under another working directory. Choose File ➪ Save As to do
this. Make sure you save this file
into a new or existing folder where
you store your working images.
2. Make a backup of the background
(original image) layer.
Another rule I have in my digital
workflow is to never work on the
original layer. Duplicate the background copy of the original layer
by choosing Layer ➪ Duplicate
Layer. You can now safely tweak
without working on the background image.
3. Tweak Brightness/Contrast and
Hue/Saturation by choosing
Image ➪ Adjustments.
Figure 1-9: Never work on the original:
Save as a working image.
Figure 1-10: Increase contrast by moving
the Contrast slider to the right.
Go to Brightness/Contrast and in
the Brightness/Contrast window,
and move the Bright-ness and
Contrast sliders to your desired
look, as shown in Figure 1-10.
4. Choose Image ➪ Adjustments ➪
Hue/Saturation and move the
Saturation slider to the right until
you see the desired colors pop
out, as shown in Figure 1-11.
Don’t overdo it, just enough until
you see the colors as you want to
see them.
Figure 1-11: Increase color by moving the
Saturation slider to the right.
Chapter 1: Jumping Right In
5. Sharpen the image.
Sharpening usually does not happen
inside the camera and has to be
performed in Photoshop. Sharpen
the image by choosing Filter ➪
Sharpen ➪ Unsharp Mask, as shown
in Figure 1-12. Set the Amount to
150 by moving the Amount Slider to
right. Set the Radius to 1.5 and the
threshold to 8. These settings are
pretty safe unless you have your
camera sharpen settings turned up.
If the photo appears weird, turn the
Amount slider down until the photo
looks normal and sharp. Another
option is to choose Edit ➪ Fade
Unsharp Mask to soften the effects
of sharpening.
Figure 1-13 shows the original image in
Photoshop and then the image with the
Brightness/Contrast and Hue/Saturation
adjustments made.
Figure 1-12: Unsharp Mask settings for
your first photo.
Figure 1-13: The original image and the image edited in Photoshop.
15
16
Part I: A New Way to Play
Print, save, score!!!
Printing in Photoshop is a process upon itself. Chapter 18 provides you with
extensive information on printing. For a quick introduction, I take you
through the quickie-printing process here.
1. Print your photo by choosing
File ➪ Print with Preview.
The Print windows appears, as
shown in Figure 1-14.
2. Click Page Setup and indicate
whether the photo is portrait
or landscape orientation.
3. Select the correct paper size
for your printer and then click
OK.
4. In the Scaled Print Size area of
the Print window, select Scale
to Fit Media.
This automatically sizes your
photo for the paper you have
loaded in your printer.
Figure 1-14: The Print with Preview window.
5. Click Print and then OK.
Watch your work of art magically appear on your printer.
Consider this a quick preview: There are going to be many more steps in this
book to help you in making dynamic images you can be proud of.
Get with the Flow: Digital Workflow
Everybody has a daily ritual. It usually starts getting out of bed, maybe grabbing some breakfast, and then heading out to do what people do during the
day. The rest of the time is spent on similar rituals. For the most part, most
days start out the same and end the same. Hey, it works for most people!
Creating great looking photographs and organizing an ever growing number
of images requires the same process any successful outcome requires. Digital
photographers call this digital workflow. Digital workflow is a step-by-step
progression of best practices that, if followed faithfully, can absolutely make
you a better photographer.
In tech-weenie talk, digital workflow starts with “proper image capture techniques.” Translation: good shootin’. The workflow continues with downloading images and backing up. Setting up images with proper color settings and
Chapter 1: Jumping Right In
making sure your equipment and Photoshop are set up properly are part of
the digital workflow. The order of adjustments you make to an image is
important to your digital workflow as are the procedures you use for sizing,
sharpening, printing, and saving. Phew! That’s a mouthful! The bottom line is
that digital photography is a complex process: The more disciplined you are
with best practices, the better your photography will become.
The remaining chapters in this book not only show you how to use this wonderful image-editing software called Photoshop, but also provide the best
practices of digital photography and how all this relates to the overall digital
workflow.
17
18
Part I: A New Way to Play