1
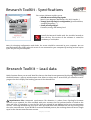
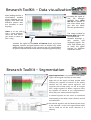
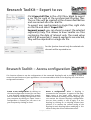
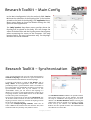
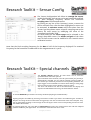
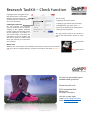
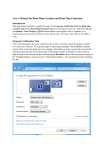
Physilog Research ToolKit
User manual
Version 1.2
Release date: 10.11.2015
Introduction
Thank you for purchasing our Physilog®4 system, the world’s
thinnest 10D wearable sensor.
Gait Up’s goal is to provide you with a user-friendly setup to
accurately measure movement in sports and clinics. The Research
ToolKit is our software allowing you to work with the raw data of
the Physilog®4 sensors and to customize your system.
We hope you will enjoy working with your Physilog®4 sensors, and
we welcome your suggestions for future improvement.
www.gaitup.com © 2015
Research ToolKit - Specifications
This unique Software enables you to
• Read & extract all Physilog signals
(Accel, Gyro, Magneto, Barometer, GPS, ECG, Droplet,…)
• Change your Physilog®4’s configuration (synchronization,
sampling frequency, …)
• Check your Physilog®4’s
firmware, config, and battery level
v1.1.0
Install the Research ToolKit with the installer located on
the USB key. This version of the software is suited for
windows 32 and 64 bits.
Note: for changing configuration and checks, the sensor should be connected to your computer. You can
read and extract the signals when the sensor is not connected to your computer by working on local copies
of the .bin files on your computer.
Research ToolKit – Load data
READ function allows you to read *.BIN files that are the data format generated by Physilog. Upon hitting
the READ button, a pop-up window opens that allows to select one or several files you intend to read. A
progress bar then displays the loading process of the selected files.
! Asynchronous Files: Automatic synchronous file detection is robust from Physilog®4 firmware
version 4.2.5.0 upwards. For files recorded with prior versions, the file synchronization is based on the
date and time of recording. In case the files that you upload do not belong to the same measurement
session, a message window may pop up to warn you that data from different files are not coming from
the same measurement. If you decide to continue the READ process, the resulting data will have a length
equal to the shortest measurement session.
www.gaitup.com © 2015
Research ToolKit – Data visualization
After loading the files, a
visualization window
opens allowing you to
display data from the
different sensors that
are included in each
Physilog.
Visualize the signal of
one
file
amongst
multiple files: select
the file of interest in
the «Files» block. Here
you also see which
files are synchronized.
Zoom in or out with
the +/- icons and then
select the area where
you want to zoom to
(for + only)
Visualize the signal of the sensor of interest (Accel, Gyro, Baro,
Magneto, Synchro and gold options such as Droplet, etc): select
which channel to display in the «Sensors» box. For specifications
of Synchro channel check section about configuring your Physilog.
The image marked by
Sensor Axes shows the
correspondence
between Physilog’s 3Axis
sensors
and
displayed signals. The
color code allows you
to study the signal
change on different
axes of the sensor.
Research ToolKit – Segmentation
Signal Segmentation: It is possible to mark specific
regions of the signal manually, for later study.
Right click on the signal and keep pressed while
selecting the segment of interest in the display
window. You can select several segments. Two
segments that overlap partly on will be merged
into a single segment. To delete a segment: select
the segment of interest in the «Segmentation»
block, and press «Delete selected segment».
A selected segment on one sensor is transferred
automatically to the other sensor channels and all
the loaded files.
All selected segments will be labeled (mask value)
in the exported *.csv file. The segmentation labels
will be saved for all the sensor channels of a
Physilog.
www.gaitup.com © 2015
Research ToolKit – Export to csv
Click Export all files in the «CSV files» block to export
a csv file for each of the synchronized Physilog files.
The csv files will be created at the chosen destination
and are named after the .bin file.
To export non synchronized or single files, right click
on the file and select “Export File”.
Segment export: you can chose to export the selected
segment(s) only. This allows to have smaller csv files
containing the data of interest only. The mask value
will still be exported. If several segments are selected,
they will be exported to a single csv file.
For the Synchro channel only the selected subchannels will be exported to csv.
Research ToolKit – Access configuration
This function allows to see the configuration of the connected Physilog®4 and to change it so that it
meets the specifications of your application. It is recommended to work on one Physilog at a time to limit
configuration mistakes.
Create a new configuration: By clicking on
the ‘New Configuration’ button you can start
a new Physilog configuration from scratch.
You can load an existing configuration from
your computer by clicking on ‘Open’. Once a
configuration is created, you can save it to
your computer by clicking on ‘Save’.
Access a configuration: When a Physilog is
connected to the computer, it appears in the dropdown menu in the upper right corner of the
CONFIG window. By clicking on ‘from Physilog’, you
can retrieve the current Physilog’s configuration.
You can then modify it and re-apply it to the
Physilog by clicking on ‘to Physilog’ button. Best
practice is to retrieve the current config of the
Physilog for each Physilog before modifying it. This
allows to keep the correct calibration values.
www.gaitup.com © 2015
Research ToolKit – Main Config
In the ‘Main Configuration’ tab, the read-only field, ‘Device
ID’ shows the identifier of the Physilog (this is the number
printed on the back of the Physilog). The ‘Application’ dropdown menu allows to chose the default settings for Gait,
Sports or other applications.
The ‘Body location’ drop-down menu specifies where the
Physilog will be placed on the body. This will change the
name of the data files and the Physilog name that appears
when connecting the sensor to the computer. The body
location field is for users’ information only. The Physilog’s
behavior will not be modified.
Research ToolKit – Synchronization
In the ‘Synchronization’ tab, you can create and manage a
network of Physilogs. This allows the synchronization of
the measurement data between several Physilogs.
A network of Physilogs is made of one ‘Master’ and as
many ‘Slaves’ as the application needs. The ‘Master’
periodically emits a synchronization frame. The radios on
the ‘Slaves’ sides are periodically turned on to receive the
synchronization frame sent by the ‘Master’. In the
‘SensorMode’ menu, you can select if the Physilog is a
‘Master’ or a ‘Slave’. If your Physilog doesn’t need to be in
a Physilog network, ‘Sensor Mode’ can be set to ‘No Radio’
to reduce the power consumption.
The sensors communicate on the selected RF channel. The
‘RF Channel’ slide bar allows to chose the channel of the
Physilog network. Inside one network all Physilog need to
be set to the same RF channel.
If you have multiple Physilog networks, make sure to
select a different ‘RF Channel’ for each of them. Also, each
network needs one (and only one) ‘Master’ sensor.
The ‘RF Master Interval’ modifies the period between
two synchro frames sent by the ‘Master’. This field
can only be modified if the Physilog is set to be a
‘Master’. The ‘RF Slave Duration’ defines how long the
radio of the ‘Slave’ is turned on to receive a synchro
frame sent by the ‘Master’. The ‘RF Slave Period’
defines the time period between two activations of
the radio on the ‘Slave’ side.
www.gaitup.com © 2015
Research ToolKit – Sensor Config
The ‘Sensor Configuration’ tab allows to manage the sensors
inside the Physilog. Each sensor can be activated and modified.
The ‘Max Sampling Frequency’ defines the maximum
sampling rate of all activated sensors.
By clicking on any line of the ‘Summary’ menu, a sensor slot
will be selected. Once a line has been highlighted, a sensor can
be Activated. To activate a sensor, select the sensor from the
‘Sensor Type’ drop-down menu. A specific sampling rate can be
chosen for each sensor by modifying the value of the
‘Sampling Freq Divider’ field.
For Accel and Gyro the sensor range can be selected in the
‘Range’ drop-down menu. The offsets and gain of the three
axes of these sensors can be modified in the ‘Inertial sensor
calibration’ section.
Note that the final sampling frequency for the Baro is half of the frequency displayed. The maximal
frequency for the barometer is 100Hz and for the magnetometer it is 50 Hz.
Research ToolKit – Special channels
The Synchro channel contains all data which can be used for
synchronization with other systems.
Upon activation of this channel, the main push button [0/1] activity is
automatically recorded. You can add an external control module or
the custom sync module if you have the corresponding hardware. The
input trigger can be activated to measure either falling or rising edge
from an external input such as Qualisys synchro system.
The same sub-channels are also to be selected for the display and
export of recorded data when using the ‘Read’ function of RTK.
To activate Bluetooth you need the necessary hardware (Physilog®4 Gold Bluetooth).
Physilog Droplets are added by selecting ‘Accel Extern’ and/or ‘Gyro Extern’ and indicating the number of
droplets. The range of the accelerometer and gyroscope can then be selected for each of the droplets. They
can be managed by clicking on the triangle at the left upper corner of the corresponding channel to show
the hidden sub-channels
For Physilog gold GPS, you must add the GPS channel and select the measurement rate and best adapted
platform model for your application. The maximum measurement rate is 10Hz.
www.gaitup.com © 2015
Research ToolKit – Check function
Physilog’s name will appear in the
drop-down menu in the CHECK
window. If several sensors are
connected to your computer, select
the sensor of interest.
You can verify:
1. Physilog’s firmware version
2. Physilog’s type (Silver 10D, Gold 10D+)
Updating the firmware
For this function the computer
must be connected to the internet.
Clicking on the Update Firmware
button, the RTK checks if the version
of your Physilog is up-to-date. If a
new version exists, it will show the
instructions to do the update. You
will need to perform a master reset
while your Physilog is connected to
the computer.
3. Configuration type (Gait, Sport,. . . )
4. Time of last battery level measurement
5. Battery level estimation
You may need to press on the arrows to
see the full information written in each
box
Main button
Master reset:
Maintain the reset button, then maintain main button, release the reset button,
and once LED has stopped blinking, release main button. LED blinks ORANGE 3
times
Reset button
At Gait Up, we welcome your
feedback and questions.
Please contact us at:
EPFL Innovation Park,
Bâtiment C
CH-1015 Lausanne
tel: +41 79 101 1990
mail: [email protected]
web: www.gaitup.com
www.gaitup.com © 2015