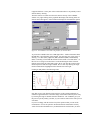
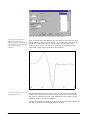
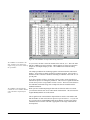
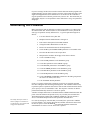
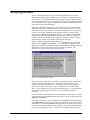
1
Tutorial
C3dEditor
By Motion Lab Systems, Inc.
C3dEditor Tutorial Manual
Revision History
First Printing - January, 1999
Version 2.31 of the C3dEditor.
Intended Audience
This manual is written for anyone using the Motion Lab Systems C3dEditor program to edit or modify C3D
files. This program runs on any of the Windows 95, Windows 98 or Windows NT operating systems – it is
assumed that the user is familiar with the operating system that they are using. Manuals for these products are
available from the manufacturers.
The following are registered trademarks:
AMASS
ExpertVision3D, KinTrak
Motus
Move3D, Events
ProReflex, MacReflex
VICON
Windows 95, Windows 98, Windows NT
Adtech.
Motion Analysis Corporation.
Peak Performance Technologies Inc.
National Institutes of Health.
Qualisys AB
Oxford Metrics, Limited.
Microsoft Corporation.
Year 2000 compliance
Motion Lab Systems, Inc. has reviewed and tested the C3dEditor for Year 2000 (Y2K) compliance. The
program will continue to function correctly on and beyond the year 2000 and will not produce erroneous results
as a result of changing centuries.
Motion Lab Systems, Inc.
4326 Pine Park Drive • Baton Rouge, LA 70809-2397 • U.S.A.
Phone (225) 928-GAIT (4248) • Fax (225) 928-0261
Email: [email protected]
http:\\www.emgsrus.com
Printed in the United States of America
© 1996-1999, Motion Lab Systems, Inc.
ii • Contents
User Manual C3D Editor
Contents
C3D FILES ......................................................................................................................................................................... 5
AN OVERVIEW .................................................................................................................................................................. 5
THE C3D FORMAT ............................................................................................................................................................ 6
Physical Measurements................................................................................................................................................ 6
Parameter Information ................................................................................................................................................ 6
Summary ...................................................................................................................................................................... 7
REGISTRATION .................................................................................................................................................................. 8
USING THE C3DEDITOR ............................................................................................................................................. 11
OPENING A C3D FILE ...................................................................................................................................................... 11
VIEWING THE C3D FILE STRUCTURE............................................................................................................................... 14
VIEWING ANALOG DATA ................................................................................................................................................ 14
VIEWING 3D DATA ......................................................................................................................................................... 17
VIEWING THE PARAMETERS ............................................................................................................................................ 19
EDITING THE C3D FILE.............................................................................................................................................. 23
PARAMETERS AND GROUPS ............................................................................................................................................ 23
EDITING PARAMETERS .................................................................................................................................................... 23
CREATING NEW GROUPS AND PARAMETERS .................................................................................................................. 24
DELETING GROUPS AND PARAMETERS ........................................................................................................................... 28
EDITING 3D AND ANALOG DATA.................................................................................................................................... 29
CREATING NEW DATA .................................................................................................................................................... 30
DELETING DATA ............................................................................................................................................................. 32
FILTERING 3D DATA....................................................................................................................................................... 32
INTERPOLATING 3D DATA .............................................................................................................................................. 34
FILTERING ANALOG DATA.............................................................................................................................................. 34
CHANGING THE SAMPLING RATES .................................................................................................................................. 37
3D marker data .......................................................................................................................................................... 37
Analog Data ............................................................................................................................................................... 37
APPENDING AND MERGING DATA ................................................................................................................................... 38
IMPORTING DATA FROM EXCEL ...................................................................................................................................... 39
AUTOMATING THE C3DEDITOR....................................................................................................................................... 41
VERIFYING THE DATA ..................................................................................................................................................... 43
SCALED DATA VS. INTEGER DATA .............................................................................................................................. 44
User Manual C3D Editor
Contents • iii
C3D Files
An Overview
Clinical Gait and Biomechanics Laboratories around the world use motion capture
systems manufactured by several different manufacturers. Each system often stores
the data in a different "standard" digital file format. As a result, a user can study a
single subject with each manufacturers system but comparing results is difficult
without a common data interchange standard.
Some companies have even
introduced new systems or upgraded
old equipment so that the new data
formats are incompatible with data
recorded in the same laboratory by
an earlier version of their own
software!
This relative incompatibility of basic information in a laboratory serves to isolate
each clinical biomechanics laboratory. When laboratories use different motion
capture systems, they cannot exchange data freely, even within large hospital
organizations and networks. Because of this isolation, laboratories have no way to
share any of the results of their studies or easily submit the lab to peer review
except with another person using the same data collection system. Each laboratory
has to either write its own software, or use software that is specific to the format of
their 3D capture system.
At the root of this problem is the fact that a study performed in one lab is only
comparable with a similar study in another lab if the two labs use identical
equipment. We need a "Rosetta stone" that can make data from any manufacturer
intelligible to any user. It would have to have the following properties:
User Manual C3D Editor
•
The ability to store 3D and analog data in an unprocessed form. It is not
essential that data is stored without processing, but the format needs the
ability to support raw co-ordinate and analog sample data.
•
Preserve information that describes the physical laboratory such as
EMG channels used, force plate positions, and marker sets etc.
•
Store Trial information relating to the circumstances of the test session
such as sample rates, filenames, dates, EMG muscles recorded etc.
•
Store Subject information - name, age at trial, with physical parameters
such as the subjects weight and leg length etc.
•
Store calculated analysis results such as gait timing, cycle information
and related information.
•
Flexibility and compatibility - it must provide the ability to store new
information without making older data obsolete.
•
A public specification and file format description.
C3D Files • 5
Such a tool exists today and has been proved in continuous use over many years. The
C3D data file format was developed at the National Institutes of Health by Andrew
Dainis in 1987 and conforms to a public C3D file specification.
The design of the C3D file format was originally driven by the need for a convenient
and efficient format to store data. The format stores 3D coordinate and numeric data
for any measurement trial, together with all the various parameters that describe the
data, in a single file.
The ability to store a multitude of information about the data is the feature that sets
the C3D format apart from every other biomechanics format. Early in the design of
the C3D format it was realized that it was unlikely that one, ironclad, specification
would fit every biomechanics need. As a consequence of this insight, the C3D file
usually stores within itself, a number of common parameters that describe the 3D
data. This allows anyone to define, generate, and store any number of user, or lab
defined, data items within the C3D file so that anyone opening a C3D file can access
them.
Since the C3D format is not tied to any specific manufacturer it can be freely adapted
to store the information that the users require.
The C3D Format
The C3D format treats information as if it belongs to one of two classes:
•
Physical Measurements.
•
Information about the parameters of the measurements.
Physical Measurements
The C3D specification expects physical measurements to be one of two types, either
positional information (3D coordinates) or numeric data (analog information).
Each 3D coordinate is stored as a raw X, Y, Z data samples with information about
the sample - accuracy (the average error or residual), and camera contribution (which
cameras were used to produce the data).
Storing related information in a
single file gives a greater degree of
confidence in the data and makes it
easier to retrieve the relevant data.
Each sample of numeric data can contain analog information from sources such as
EMG and Force Plates etc. These numeric samples (typically analog data) are
linked to the 3D samples so that it is easy to determine the correct numeric data
values for any 3D sample within the file. The C3D format can store multiple
numeric samples per 3D coordinate sample so that analog, and other data sources,
can be sampled faster than the 3D sample rate. As a result many C3D files contain
both analog and 3D data linked frame by frame which is a big improvement over
formats that store analog and video data separately.
Parameter Information
In addition to physical measurement data, a typical C3D file will also contain
information about the data such as measurement units and data point labels etc.
However, unlike most equipment specific formats, the C3D file format can also store
database information such as the subjects name, diagnosis and other items that may
be specific to an evaluation protocol or an individual laboratory. All that is required
to share this data between different labs is that they both agree that the shared data
should have a particular name. The contents of the data or the nature of the accessing
6 • Contents
User Manual C3D Editor
system is immaterial once the laboratories agree on the description and name of any
particular item.
Summary
Welcome to the world of easy C3D
A C3D file provides a means of storing all the raw data and patient database values
file access and interchangeable data!
that would be required by any clinical database. Data stored in the C3D format can
provide a means of standardizing the interchange of information and can enable
multi-center studies across a wide variety of hardware and software platforms.
The C3dEditor is a powerful tool that allows you to manipulate the data, and data
related parameters, in the C3D file with ease. For instance:
•
The effects of changing the force plate location or applying a different
scale factor to the analog inputs can be tried out by editing the
associated C3D parameters.
•
Unwanted data can be deleted from the file or additional analog
channels or 3D points can be created to store information. This can be
very useful if you have written an analysis program that expects a
certain number of analog channels or 3D points to be present in the file.
•
Analog and 3D data can be filtered and gaps in the 3D data can be
filled automatically by interpolation to clean up poor quality data. The
C3dEditor allows you to define a low pass filter for force data while
applying a band pass filter to EMG data on a channel by channel basis.
•
You can rapidly assess the quality of the data in any C3D file by
plotting it. The C3dEditor contains two powerful tools for this – 3D
points can be instantly highlighted in red if the residuals are too high,
while it’s easy to display every sample of any analog channel to see the
fully bandwidth of the analog data.
•
Almost every command in the C3dEditor can by run automatically
from a batch file whenever a C3D file is opened. Complex operations
to create Parameters and Data can be repeated reliably on any number
of files.
•
The C3dEditor reads and writes every C3D file format automatically
and can convert data from one format to another in seconds. You never
have to worry about the format of and C3D file that you open because
the C3dEditor translates them for you. Files are automatically saved in
their native format but other C3D formats can be specified.
•
The C3dEditor makes it easy to create C3D files from almost any data
source by providing the ability to import 3D point values and analog
values from a Microsoft Excel spreadsheet. This means that you can
create C3D files from almost any data source – including any hardware
systems that do not generate C3D files themselves.
The C3dEditor is a fully supported program written by a company that fully
understands the C3D file format and has made a commitment to support it. Any
registered user can obtain support on a daily basis from Motion Lab Systems or
submit C3D file for analysis by our experts. Most questions are answered with 24
hours.
The C3dEditor is available for evaluation in a limited edition that becomes fully
functional upon registration. Updates to the program can be downloaded from our
web site at any time.
User Manual C3D Editor
C3D Files • 7
Registration
We start by assuming that you managed to install the C3dEditor on your computer.
Look for the C3dEditor icon on your desktop and double-click on it to start the
C3dEditor program. If you can not find the icon then look for a Program Group
called Gait Lab and an entry titled MLS – C3D Editor. These are the standard
locations that will be configured when you perform a normal C3dEditor installation
which will install the application and its related demonstration files in the
C:\Program Files\MLS\C3dEditor\… directory tree.
If you have any problems at this point you can try removing the C3dEditor and
reinstalling it – the C3dEditor uninstall program is called REMOVE.EXE and can be
found in the same directory as the C3dEditor. It will uninstall the C3dEditor
application and remove all the C3dEditor specific registry entries. If you remove a
registered copy of the C3dEditor then you will have to enter the registration
information again when you reinstall the program.
If you entered the registration information correctly during installation the C3dEditor
will display your name and location when it is started. If you made a mistake or did
not register the program then the opening screen will display a notice that the
program is an unregistered copy of the program.
Figure 1 - An unregistered copy of the C3dEditor
If you believe that you entered the correct registration details during installation then
you can register the program now by selecting the Registration option from the Help
menu and correcting any errors in the information that you entered. The Registration
information must be entered exactly as shown on your software license.
An unregistered copy will not allow you to view all analog channels or edit large
files and will keep reminding your that it’s unregistered. You will only be able to
view data in the first eight analog channels and will not be able to save any files that
contains more than 100 frames of 3D points or markers. Registered software has
none of these little annoyances.
8 • Contents
User Manual C3D Editor
Figure 2 - Registering the C3dEditor
If you have not purchased a copy of the C3dEditor then just enter your name and
location or organization information and enter the evaluation registration number of
0000-0000-0000-0000 – the application will then run in an evaluation mode. Once
you have registered the C3dEditor you will see your name and location information
displayed on the background whenever there are no files open.
User Manual C3D Editor
C3D Files • 9
Using the C3dEditor
Opening a C3D file
You are now ready to start using the C3dEditor…
Figure 3 - Opening a C3D file in the C3dEditor
If you selected the default installation options when the C3dEditor was installed you
will have some sample data copied into a subdirectory and the information about
these files will be entered as the most recently used files. You can open these files
quickly from the File menu by selecting them with the mouse. The first file in the
list should be a file called demo4.c3d – use your mouse to select this file and click on
it to load the file into the C3dEditor.
You can open several C3D files at the Once you have opened demo4.c3d the C3dEditor will display the contents of the
same time in the C3dEditor and copy
C3D file header in the lower left window area and the structure of the file and
parameters and data between them.
information about some events in the upper two windows. The Graphical window
on the right side will be blank as you have not selected any information to display.
User Manual C3D Editor
Using the C3dEditor • 11
Figure 4 - The Tree, Events and Data window display information about the file.
From a quick glance at this initial view of the C3D file that we have just opened we
can immediately determine quite a bit of information about the contents of the file.
The top two windows show that:
•
The file contains four parameter groups with POINT, ANALOG,
FORCE_PLATFORM and SUBJECT information. Parameter Group
names are always displayed in CAPITAL LETTERS to distinguish
them from data and header items within the Tree display.
•
The Events window to the right of the Tree window shows that there
are four events recorded in the file. The labels of three of the events
(HS, TO and IC) suggest that the file contains at least one gait cycle –
Heel Strike, Toe Off and Initial Contact.
When a C3D file is first opened, the Data window below the Tree window will
always display the contents of the C3D file header, together with some other usful
information that can be deduced from reading the file header. This information can
always be viewed by clicking on the Header Information tree item in the Tree
window.
The C3d File header can tell us quite a lot about the data within the file:
•
12 • Contents
The file contains both analog and 3D data (Analog Channels and 3D
Points are both non-zero).
User Manual C3D Editor
The C3dEditor reads and saves data
in any C3D format as well as
translating any C3D file into any one
of three ASCII formats.
•
The data is stored in an Intel PC format (File Format)
•
The data is stored as integer values (Data Type).
•
Last Frame – the file contains 193 frames of data for 12 targets (3D
Points).
•
Analog Channels – the file contains 16 analog data channels.
•
Sampling Rate – the 3D data has a 50 Hz. frame rate
•
There are two analog samples (A to V Ratio) for every 3D frame – so
the effective analog sample rate is 100 Hz – two analog samples per
50Hz 3D point sample.
Note that the C3dEditor opened the file automatically after determining the correct
file format. If we were trying to analyze this data using a software package that
was unable to read an Intel file format then we could simply select the Save As
option form the File menu and convert this file to another C3D format that the
program could read. Try this – save the file as a DEC integer file using a different
file name…
In addition to being able to read and write C3D files in any standard format (DEC,
SUN, PC with INT or REAL data) the C3dEditor can also convert any C3D file to
any of three ASCII text file formats that are easily read by almost any other program.
For ease of use, and to keep the file sizes reasonable, the data is saved in separate
files so that you can easily create a file that contains only analog data, 3D data or just
the parameter information. These are accessed via the three text save commands –
Save Analog Data, Save 3D Marker Data, and Save Parameter Data.
If you make any changes to a C3D
Finally – you can stop editing a C3D file by selecting Close from the File menu or
file then the C3dEditor will always
clicking on the Window close button in the top right corner of the File Window.
prompt you to save the file before you
Exiting the C3dEditor also closes the file – you’ll be prompted to save it if you’ve
exit.
changed anything in the file.
You should now know how to open a C3D file in the C3dEditor and discover some
basic information about the contents and format of the file. You can convert the data
in the file to another C3D file format or save it as ASCII text.
It’s worth noting that that many other programs are not as flexible as the C3dEditor
and assume that the C3D data is presented to them in a specific C3D format (for
example DEC Integer). Don’t change the C3D file format of important files without
checking that your other applications can read the files.
User Manual C3D Editor
Using the C3dEditor • 13
Viewing the C3D file structure
The multitude of information in the C3D file structure can appear to be very complex
when you first start to use these files. Many first-time users find this intimidating
and start to treat C3D files as a black box that, once they have managed to extract
their data, they never use again.
The programmers at Motion Lab Systems have been using and creating C3D files for
over ten years. We have written the C3dEditor to make C3D files easy to use and
navigate while allowing the average user complete control and access to their data
and information contained in the C3D file.
Most common C3D files will contain
both Data and Parameters.
So let’s see what’s in the file… We’ve already determined some basic, but very
important, information about the overall contents and type of file and you may
have noticed that, once we’d determined the format of the file, we talked about
either data (3D and/or analog data) and parameters (POINT, SUBJECT etc). Let’s
start with the data…
Don’t worry if you don’t know what
Groups and Parameters are at this
point – we’re going to explain them
when we get to the section “Viewing
the Parameters”
We’ll start by looking at the data in the demo4.c3d file that we just opened. The
Tree window in the top left corner of the screen shows the structure of the C3D
file. The first three entries in this window are always Header, Analog and 3D Data
which are always present. The various groups of parameters follow these three
items – we’ll get to them later…
Viewing Analog Data
Remember that you can click on the
help button in the toolbar…
You can select a view of the analog data by first double-clicking the mouse on the
Analog item in the Tree window. This will select the Analog data and expand the
tree to display all the analog data items that are stored in the file. There can be
quite a few so you’ll usually see a scroll bar on the right side at this point.
Analog data consists of a number of channels that contain samples of analog
information. The C3dEditor will display these channels in numerical order (starting
at channel 1) together with a “Label” that is intended to describe the analog channel.
In the case of the demo4.c3d file we can guess from the labels used (FX1, FY1, FZ1,
MX1 etc) that the analog information is from two force plates since we seem to have
two sets of labels, each consisting of three forces (FX, Fy, and FZ) and three
moments (MX, MY, and MZ). Force plate #1 occupies channels 1 through 6 while
force plate #2 occupies channels 9 through 14. Channels 7-8 and channels 15-16
may be unused since there is no specific label attached to them other than a channel
number which may simply be the default for this particular file.
You may remember that there was a parameter group in the Tree window called
FORCE_PLATFORM. So it’s a safe assumption that we can find more information
about the exact configuration of the force plates by looking at the parameters in that
group since the published C3D Format specifies that positional and calibration
information about Force Plates is stored in this parameter group. We’ll do that later
but first let’s take a graphical look at the data…
14 • Contents
User Manual C3D Editor
Check that the Edit, Frames and
Scale buttons are all up (that is they
do not show up shaded which would
indicate that they’re down – play
with them if you’re not certain).
First let’s check that your copy of the C3dEditor is setup more or less the same
way as the one that I used to generate the illustration – this is important because
otherwise you’ll see a different graphical view of the data. Now select analog
channel 3 which contains the FZ1 data (vertical force from the first force plate).
You should see an illustration that looks a lot like the one below.
Figure 5 - The C3dEditor provides many different ways of viewing the data.
Context sensitive help is available by
pressing the F1 key while examining
the options. Select any item and
press F1 for detailed information
about the feature.
Depending on your screen resolution you may see quite a bit more of the data
editing window (lower left) and the graphic window (on the right side). You can
change the appearance of the graphic plots by selecting different plotting options.
You can select the graphic view on the right side and display the Tools menu by
clicking anywhere in the graphic area with the right mouse button. This will
display the Tools menu – select options at the bottom of the menu to display the
options setting for the C3dEditor.
There are three pages of options – we are interested in the middle page which
controls the Views options. At this point the Options for the General page and the
Interpolation page are not relevant to the discussion – we’ll get to these later on.
User Manual C3D Editor
Using the C3dEditor • 15
Figure 6 - The graphs are controlled by the Views page in Options.
Select the Views options by clicking on the Views tab which shows the following
choices:
16 • Contents
•
Scale Analog Data – checking this option will display all analog data
as scaled the individual analog scale parameters associated with each
channel . If the option is not checked then data will be shown as analog
sample values.
•
Scale 3D Data – this option will display all 3D data as scaled in lab coordinate units (usually millimeters). If the option is not checked then
data will be shown using the integer storage format.
•
Show Analog Sub Frames – when analog data contains more than one
sample per video frame this option will display every analog sample.
This will greatly increase the horizontal length of the analog graph but
will eliminate the filtering effect that is seen when only displaying a
single analog sample per video frame.
•
Show 3D Plots in Red if Residual > – 3D data that has residual values
that are greater than the value entered here will be plotted in red.
•
Vertical Analog Data Scale – this is the vertical size of the analog
graph in inches. Analog data is displayed one channel at a time.
•
Vertical 3D Data Scale – this is the vertical size of a single 3D data
graph in inches. As there are three components to 3D data (X, Y, Z)
there are three graphs plotted.
•
Distance between frames – Analog Data – this sets the horizontal
scale of the analog data.
•
Distance between frames – 3D Data – this sets the horizontal scale of
the 3D data.
•
Choose Distance between Frames to fit screen – this option overrides
all display options except the “sub-frames” option and forces the
graphical data to fit within the screen boundaries.
User Manual C3D Editor
You can use these options to independently adjust the scaling of the Analog and 3D
data to fit the screen. If your current view of the analog data does not show the
entire data channel then adjust these values to produce the graph size that you like
and show the whole of the analog graph.
The Scale button affects the
display of analog and 3D data
Note the range of data that is displayed – 2078 through to a peak of 3018. These
are integer sample values, exactly as recorded by the analog data collection system.
Now click on the Scale button in the toolbar to apply the analog scale parameters
that are associated with this channel of data…
The first thing that you’ll notice is that the graph flips upside down – this is a result
of the analog scaling value for this channel being negative which is normal for force
data. Closer examination of the graph will show that the values of the data range
have also changed. The data now appears to have a range of -22.32 through to a
value of -721.68 and these numbers are also reported in the same format in the data
window in the lower left side of the C3dEditor. Click on the scale button a couple of
times and watch the values change as the scaling factors are applied and removed
from the analog data.
Figure 7 - Force data can be viewed with the scaling factors applied.
The C3dEditor must be in Edit mode
before any data can be manually
altered – this includes the event
status.
The red vertical lines on the graph correspond with the times shown in the Events
box next to the tree window. These will only appear if events have been defined in
the C3D file header and the status of these events is ON. The events can be edited
by double-clicking on the desired event in the Events box which will bring up the
Events edit window if the C3dEditor is in Edit mode.
Now let’s have a look at some 3D marker data…
Viewing 3D Data
First we roll up the analog display tree by double clicking on the Analog Data header
in the Tree window (top left side of the C3dEditor). Now double click on the 3D
User Manual C3D Editor
Using the C3dEditor • 17
Data header to expand the tree and display the contents of the 3D data values. These
expand down in the same way as the analog channels and list the available marker
trajectories in the file. Each trajectory will normally have an associated parameter
label which will be displayed with the marker number. These labels are stored as
parameters and usually follow a labeling convention set up when the data was
recorded.
In this case we can see that there is data from twelve markers and we can guess that
this is bilateral data from a subject with six markers on each side of the body.
When a group name is highlighted
(such as Analog Data, Point, Analog
etc.) the right arrow will display the
sub-items in the tree and the left arrow
will close an expanded tree.
You can use the up and down arrows to move through the tree. Whenever an
Analog Data or 3D Data entry is highlighted the contents of the item will be
displayed in the graphical window to the right. Use the arrow keys to select the first
marker ( 1<RASI> ) in the 3D Data. This should produce a display similar to this:
Figure 8 - 3D points can be viewed as X,Y,Z values and graphed at the same time.
Use the Scale button on the
toolbar to switch the display of
data values between integer and
real-world values (millimeters).
You may have to adjust the graphical window options slightly in order to be able to
view all the graphs. The graphical window will display three graphs in order of X
co-ordinate, Y co-ordinate, and Z co-ordinate. Note that this display is unscaled,
that is to say that the values shown for the co-ordinates are the integer values stored
in the file. Click on the Scale button in the toolbar to change this to display the
actual 3D data values. The Scale button action for Analog and 3D data is
independent – setting Scale ON for 3D data does not set it ON for Analog data.
The events in the C3D file header show up as red vertical lines. They appear at
exactly the same time positions in the graphs of both the analog and 3D data.
18 • Contents
User Manual C3D Editor
You can rapidly assess the quality of
3D data in the C3D file by
highlighting every part of the
trajectory with high residual values
in red. High residuals may indicate
inaccurate 3D coordinates.
The graphed marker trajectories will be in black – possibly with some parts of the
graphs showing in red as in the illustration. These sections of the graph indicate
the parts of the marker trajectories that have residual values that are greater than a
set value. You can set the residual value from the Tools menu by right-clicking in
the graph area and choosing options. Select the Views tab and modify the value in
the box marked Show 3D Plots in Red if Residual >. Any trajectory point that has
a residual that is greater than this value will be highlighted in red.
Figure 9 - Set the residual highlight value in the Views page in Options.
The residual values associated with each 3D point can be seen in the Data window in
the lower left corner of the C3dEditor window.
Figure 10 - The data window displays all the information about 3D points.
This window displays the frame numbers and coordinate values of each 3D sample
together with each associated residual value and camera contribution mask. In the
example shown above the data is scaled. Note that the residual value is always a
scaled value even when the 3D data is displayed as unscaled INTEGER values.
Viewing the Parameters
Now that we’ve had a look at the data let’s examine some of the information that’s
stored in the C3D file about the data. The ability to store both data and information
User Manual C3D Editor
Using the C3dEditor • 19
about the data in an extendable and easily accessible manner is one of the principal
features of the C3D file format.
If you already know how the groups
and parameters are structured and
are just reading this tutorial to
understand the C3dEditor then you
can skip the next two paragraphs.
We start off by returning to the Tree window in the upper right corner of the
C3dEditor window – all navigation in a C3D file starts at this point since this
window shows the complete structure of the file and allows you to select any item
for examination or editing. It helps, at this point, to know a little about the
structure of the parameters in a C3D file…
The basic concept is that all of the information about the 3D and Analog Data can be
grouped according to its association with the data. Therefore all Parameters in a
C3D file are stored in Groups – you’ll see these two words very often as you read
through the tutorial and manual so it’s a good idea to get a firm grasp of their
meaning. A Group is simply a collection of related Parameters that all have some
loose association with each other. As you move through the parameters you’ll see
that the POINT group contains parameters that deal with either the 3D Data or the
display of the data. The ANALOG group contains parameters that define and
control the analog information while parameters that relate specifically to any force
plates are stored in the FORCE_PLATFORM group.
The standard C3D parameters were
first defined for use with AMASS –
the Adtech Motion Analysis Software
System. This remains the standard
for parameter definition although
many hardware manufacturers are
adding additional parameters and
groups to the parameters defined in
the AMASS User’s Manual.
In general you will find that almost all C3D files will contain at least a minimum of
two groups – these are the POINT and ANALOG groups. Most C3D files will
contain other groups such as FORCE_PLATFORM and SEG as well. However,
it’s important to note that the groups will not always contain the same parameters.
The C3D file specification defines the way that data and parameters are stored.
The specification does not require that specific parameters of groups exist in a file,
although the majority of the parameters in the normal POINT, ANALOG and
FORCE_PLATFORM groups have well defined functions and contain well
documented values.
Now that you have a little background information about the C3D parameters we can
return to looking at the Tree window which has the 3D Data section expanded at the
end of the previous section.
Double-click on the 3D Data item in the Tree to close this section and then doubleclick on the POINT parameter group to expand this and see what parameters are in
the POINT group. Your data window should now look like the illustration to the
right if you are looking at the demo4.c3d file.
Note that if you open other C3D files then you may see different parameter groups
and values in them - this is quite normal. While most C3D files will have a POINT
and ANALOG group it is not required that every file contain identical parameters.
The sample C3D files that are supplied with the C3dEditor have different parameters
and groups. After you have been through this tutorial you may want to use the
C3dEditor to view these differences between the supplied demonstration files.
Remember that you can use the
keyboard arrow keys to more around
the Tree window.
20 • Contents
Let’s start off by examining the parameter RATE – move the cursor to the
parameter RATE in the group POINT (we will describe this as POINT: RATE in
this manual) and click on the item. It will be highlighted and the data window will
be updated with the contents of the RATE parameter.
User Manual C3D Editor
Figure 11 - C3D Parameter information.
The data window displays everything that there is to know about the parameter that
you have selected. In addition, every item in this parameter can be changed (we’re
going to get to the actual editing in a bit).
For the parameter that we’ve selected (POINT: RATE) this window tells us that it’s
name is RATE and that it’s number is 1 – the number is an internal value that
identifies the group that owns the parameter. This parameter has a description string
that tells us what the parameter controls - * Video data frame rate – not all
parameters have this description (often it’s left blank) but it’s very useful because it
can be used to provide information about the function of the parameter. If you create
any parameters with the C3dEditor you’ll find that it’s a good idea to always add a
description to the parameter.
The POINT: RATE parameter is shown as locked ( i.e. TRUE )– this indicates that
normal programs that access the C3D file should not attempt to change the value of
the parameter. Although the C3D editor allows you to change the locked state and
edit the value of locked parameters it’s not a good idea to so without a thorough
understanding of the consequences.
It’s usually not a good idea to change
the data type unless you are trying to
correct an error in the file format
where a parameter has been created
with the wrong data type.
The data type is FLOAT – this parameter has a floating point value which means
that it can contain data with fractional information (as opposed to INTEGER or
BYTE values which can only hold whole numbers). The C3dEditor allows you to
switch between numeric data types (BYTE, INTEGER and FLOAT) but not
between the CHAR type and a numeric types. When you switch between the
numeric types, the parameter data will be converted to the new type. This will
cause the data value to be rounded to the nearest whole number when you convert
float data to integer or byte and back again.
And finally – the parameter has 0 dimensions . It’s a single value in other words and
not an array. The value of the parameter is shown as the Data<0> value and is
50.000 - in other words – this file contains Video data that has a frame rate of 50 Hz.
OK – that was easy – now lets look at a parameter that contains an array of values.
The POINT: LABELS parameter contains the ASCII labels that are used to identify
the 3D data – these are often called marker labels. Use the mouse or the keyboard
arrow keys to highlight the LABELS entry and you’ll see an example of a parameter
that has an array of data associated with it.
Notice that there is now a scroll bar on the right side of the Data window that can be
used to scroll through the data since this parameters contains 12 separate data values
and more than fills the window. You can use the mouse to scroll through the data or
use the keyboard arrow keys.
User Manual C3D Editor
Using the C3dEditor • 21
Figure 12 - Displaying the parameter values.
This parameter has the same number as the previous one that we looked at –
indicating that it’s a member of the same group. Unlike the POINT: RATE
parameter this one is unlocked. It’s usually OK to modify an unlocked parameter if
you need to do so.
Since the POINT: LABELS parameter is used to record the ASCII labels that are
used to quickly identify the data this parameter has a CHAR data type – it’s used to
store characters.
It’s worth mentioning that the first
programs that created C3D files were
written in FORTRAN and this
heritage is visible at some levels of
the C3D file structure.
22 • Contents
The big difference between the POINT: LABELS parameter and the POINT:
RATE parameter is that this one contains an array of data. The dimensions line
tells us how many dimensions are in the array – this is followed by a description of
the dimensions themselves. This is a 4 by 12 array – it contains twelve data entries
(the labels themselves). Each label is four characters in size.
User Manual C3D Editor
Editing the C3D File
Parameters and Groups
So far all we’ve done is to look at the data and parameters without trying to change
anything. In fact, if you have tried to edit any of the data you’ll have found that you
can’t edit anything. This is because (if you followed the instructions at the start of
the tutorial) the data and parameter edit functions have been turned off. If you just
want to browse through the data then this is the safest way to use the C3dEditor.
Click on the Edit button in the
toolbar to toggle the editing of 3D
data, Analog Data and Parameters.
Look at the toolbar and click on the Edit button to enable editing. When this
button is down, you can double-click on any of the data items in the Data window
to open the editing dialogs and change any part of the data or any parameter. The
ability to change data or parameters is disabled when the Edit button is up. In
addition the various menu items that involve editing or changing the data are also
disabled.
Editing Parameters
Now that the C3dEditor is in Edit Mode we can try changing some of the data. Since
we’ve been looking at the POINT: LABEL parameters let’s start with those first.
Double-click anywhere in the Data window to open the parameter editing dialog –
you’ll see the following dialog appear that enables you to change almost any part of
the POINT: LABELS parameter. Move your mouse over the various items to get a
quick description of the function of each part of the parameter editor dialog.
User Manual C3D Editor
Editing the C3D File • 23
Figure 13 - The parameter editor display allows any aspect of the parameter to be changed.
Please be cautious when you edit
C3D file parameters – changing
some characteristics of a parameter
may cause programs that access the
C3D file to fail.
The Parameter Editor dialog allows you to edit the contents of any parameter and
change any property of the parameter. In the example above the parameter name is
LABELS – it has a description which is Point Labels. Both of these may be
changed if you wish by simply clicking on the item and editing it using the
keyboard arrow keys and normal editing keys (Insert, Delete, End etc.)
This parameter is not Locked which means that other programs may change the
parameter data. Setting this item by clicking in the associated box will mark the
parameter as Locked. Since the C3dEditor is designed to allow access to any part of
the C3D file structure the setting of this parameter characteristic has no effect on the
ability of the C3dEditor to change parameters.
The Group to which the parameter belongs is controlled by the parameter number
(do you remember seeing that earlier?) – the group box allows you to move this
parameter to another group if you wish . All you have to do is select one of the other
groups already present in the C3D file from the list that’s presented in the Group
box. You can not create a new group from this dialog in the C3dEditor – if you want
to create a new group then use the Edit menu and select the New option which will
be the next topic after we’ve finished describing the rest of the Parameter Editor.
The Data Type can be changed to any of the items in the Data Type list. Since this is
a CHAR variable there really aren’t any other choices but if you were editing a
parameter with a numeric Data Type then you would be able to change the Data
Type to INTEGER, FLOAT or BYTE.
Many parameters are interlinked so if
you change the number of data
values in LABELS then you will need
to add additional DESCRIPTIONS
too.
The LABELS parameter has two dimensions which are shown in the Dimension
List. The first dimension is the length of each label, while the second dimension is
the number of labels in the parameter. If you wanted to add additional labels to
this parameter then you would need to change the second value – changing the first
value will alter the size of each label.
And finally – the parameter data. This is probably the item that you are most likely
to want to edit. Simply double click on any data item and use the normal editing
keys to change the parameter to a new value. Remember that in this case the labels
can not be more than 4 characters long – if you create any labels that are longer than
4 characters then they will be truncated as soon as you finish editing them. If you
want to use longer LABELS then you will need to increase the size of the first
dimension in the dimension list.
Creating New Groups and Parameters
All parameters in the C3dEditor can be changed in the same way using the same
Parameter Editor dialog that we’ve just used but this does not allow you to create
new groups or parameters.
The creation of new Groups and Parameters is a very simple process, made easy by
the C3dEditors’ use of the Windows point and click interface. If you want to create
new parameters then all you will need to do is open the Edit menu from the menu bar
at the top of the C3dEditor, select the New option and chose the item that you want
to create from the menu.
24 • Contents
User Manual C3D Editor
Although it’s not required that
Groups have Descriptions you will
find that it’s really useful to fill this
field in so that you will know the
general purpose or function of the
Group.
You can create both groups and parameters from this menu so lets start by creating
a new Group. Select Group from the Edit - New menu option and you’ll be
presented with a dialog box that will ask for a Name and Description. The group
name is required, all the other boxes are optional except the Number box which
will already be filled in with a suitable group number (it’s a good idea not to
change it).
Figure 14 - New C3D groups can be created with any name or number.
You can create locked groups by checking the Locked box but this is not commonly
done – usually parameters are locked on an individual basis so it would be normal to
leave the Locked Box unchecked.
Let’s create a group – the general convention is that Group and Parameter names are
in UPPER CASE letters so let’s create a group called INFO by typing in “INFO” to
the Name box and “Test group” to the Description. Click on OK when you’re done
and you’ll see that the group has been added to the Tree window. Click on the INFO
group and you’ll see that the Data window displays the same information that we just
entered.
Figure 15 - The C3dEditor can display the group information.
If any of this information is wrong then you can double-click on the Data window to
bring up the same dialog that we used to create the group and correct any errors.
Now that we’ve created a new group the next step is to create some parameters for
this group. This is done in the same way as creating the group except that we have to
provide quite a bit more information to create a parameter. Although the C3dEditor
makes it very easy to create parameters it’s still a good idea to have a written
description of the parameters that you are going to create before you start editing a
C3D file. So let’s define three parameters that we’re going to add to the INFO
group:
User Manual C3D Editor
•
INFO: FULL_NAME – a string of 64 characters that can be used to
store a persons name.
•
INFO: DATE – a string in the form MMM-DD-YYYY that will hold a
date. For clarity we’ll use a three letter abbreviation for the month, two
numbers for the day and the full century for the year.
Editing the C3D File • 25
•
INFO: HEIGHT – a value that will record the persons height. This
will be a REAL value so that we can use real numbers. There’s no
assumption about the units that the height will be measured in but it
would be sensible to assume that it will be entered in the same units as
the data. These are recorded in the POINT: UNITS parameter.
Let’s get started - open the Edit menu from the menu bar at the top of the C3dEditor,
select the New option and choose Parameter the menu. The first question is going to
be – is this a character string or a numeric parameter?
Figure 16 - Parameters can be created as Char (text) or Numeric values
This is important because, although it’s possible to change between numeric data
types (INTEGER, FLOAT and BYTE), it’s not possible to change from CHAR to
numeric data and back again.
For compatibility with older
programs it’s a good idea to always
use upper case letters for the names
of groups and parameters.
We’ll create them in the same order that we defined them so the first parameter
will be CHAR so select OK and enter the Parameter Editor. Fill in the Name as
FULL_NAME and add a Description such as “Full name of subject”. There’s no
requirement to make this a Locked parameter so we can leave the Locked box
unchecked.
Now go to the Group selection box and pick the group that is to contain this
parameter from the list of existing groups that will be displayed. The parameter
editor defaults to displaying the first group so you’ll need to specifically select the
INFO group from the list.
The size of the parameter is set in the Dimensions List – this needs to be changed to
the correct size for this parameter which is 64. Since it’s a single string of characters
there will only be a single dimension.
Since the Data Type is CHAR there’s nothing to change here so we can add the
subjects name by just double-clicking in the parameter data window on the right side
of the dialog box and entering the value for the FULL_NAME parameter. We’ll just
pick something at random – Janet N. Brad. At this point your Parameter Editor
should look like this:
26 • Contents
User Manual C3D Editor
Figure 17 - The parameter editor allows complete control over any parameter type.
Click OK to create the new parameter and it’s done. You can select the new
parameter from the Tree window and check that it contains the right values – if
anything is wrong you can simply double-click on the window to return to the
Parameter Editor and make the necessary changes and corrections. Then click OK to
save them and you’re done – you should be able to see the parameter defined exactly
as shown in the Data window here:
Figure 18 - Information about any selected parameter is displayed in the data window.
Now create the other two parameters that we defined earlier. The DATE parameter
is fairly simple although you’ll discover that we did not define one important piece
of information when we wrote down its details earlier – you’ll have to figure that out
while you’re creating the parameter.
The easy to use, intuitive design of
the C3dEditor is the result of many
years experience with C3D files and
makes any editing task simple to
accomplish.
User Manual C3D Editor
Remember that if you make mistakes you can double-click on the parameter to
correct the error. Look in the first group in the Tree window if you create a
parameter and can not find it in the appropriate group. Parameters will be created
in the first group by default and your parameter may be there if you forgot to select
the correct group for the new parameter. If this happens then just double-click on
the parameter and change the assigned group to the correct group.
Editing the C3D File • 27
Note that all the names of the groups and parameters are in upper case – this is not
required by the C3D specification but some older programs will expect that these
names are in upper case so it’s a good idea to stay with the convention for
compatibility. If you write any programs that access C3D parameters then you
should not assume that parameter and group names are always upper case.
The Data window displays for the two parameters that you’ve added should look like
these two illustrations below:
Figure 19 - The data window provides verification of any new parameter values.
The one item that we had not defined earlier was the dimension of the DATE
parameter – since this is a string of characters separated by dashes we need to allow
for eleven characters ( 3 + 1 + 2 + 1 + 4 ). Since we did not know what the date
would be I just entered a blank date to check the parameter size.
Figure 20 - The data window displaying the HEIGHT parameter information.
Deleting Groups and Parameters
When any Group or Parameter is
deleted the Undo button on the
toolbar will become active and can
be used to restore the last item that
you deleted.
The only other thing to cover is deleting groups and parameters. This is very easy
as all you have to do is highlight either the parameter or the group in the Tree
window and then go to the Edit menu at the top of the C3dEditor and select Delete.
You can delete parameters individually or simply delete the group. Deleting the
group will also delete all the parameters associated with the group – you’ll be
asked to confirm the operation so it’s difficult to make a mistake.
If you delete a parameter or group in error you can use the Undo button on the
toolbar to undo the results of the last operation.
Remember to be cautious when deleting parameters and groups in any C3D file as
they will often contain information about the 3D point and analog data that describes
the information stored in the C3D file. Do not delete any parameters or groups
unless you are absolutely certain that they are not required.
28 • Contents
User Manual C3D Editor
Editing 3D and Analog Data
The C3dEditor allows you to create, delete or edit the 3D and Analog data in any
C3D file. We’ll start off by editing the 3D data so (using the demo4.c3d example
file) select the 3D Data from the tree windows and double-click on it to expand the
list of 3D trajectories. We’ll start with RASI (Right Side ASIS marker) so click on
the RASI label and you’ll see that the graphical; window on the right side is now
displaying the X, Y, and Z co-ordinate values and the Data window is displaying the
numerical values.
You can use the scroll bars to browse through the Data window as there’s nearly 200
frames of data in the file. The individual titles to the Data window can be moved
from side to side so that you can see all of the data or you can use the horizontal
scroll bar. Note that in the following illustration the Edit and Scale buttons are both
down (selected) and that the Frames button is not selected.
Figure 21 - The C3dEditor provides many convenient ways to edit the data.
You can use the standard Windows
keyboard shortcuts to Copy and
Paste samples of data between
frames – use Ctl-C to copy and Ctl-V
to paste.
To change any data values in the Data Window simply double-click on the number
that you want to change and enter a new value. The new data value will be
displayed in both the Data window and the Graphical Window on the right. Any
values that you enter will be checked to make sure that they fall within legal ranges
for the C3D file.
Figure 22 – 3D point data can be changed directly in the Data window.
User Manual C3D Editor
Editing the C3D File • 29
You may also edit the residual value and the camera mask – setting the residual to a
value of –1 will mark the point as invalid and a gap will appear in the graphical
display at that frame. If you enter data to estimate the position of a point that is
initially shown with a residual of –1 then you must reset the residual value to 0.0
before the new data will be used in the graphical display or by other programs that
access the new C3D file.
Analog data is edited in exactly the
same way as 3D data except that it
does not contain any residual or
mask information.
When editing Analog data you will find that there can be multiple samples per
frame. These additional samples of data are shown in the Data window and can be
edited in the same way as the 3D data. The graphical display of analog data that
has more than one sample per frame is affected by the Frames button which
controls the display of the additional samples. When this button is UP the
graphical display will only show the first sample of each frame of data.
Figure 23 - Analog values can be edited in the Data window
The vertical scale of the graphical display of analog data is automatically calculated
to display the entire range of data. This is normally the best view so that you can see
the quality of the signal, for example making it easy to assess the amount of noise
on the baseline of Force Plate signals. If you want to see the analog signal scaled so
that the full range available to the recorded signal is shown then you can simply edit
the first two samples of analog data to 0 and 4096 – the maximum and minimum
values of 12-bit integer data. The display will then show then entire dynamic range
available to the analog channel.
Creating New Data
You must be in Edit more to create
new data in a C3D file.
The C3dEditor can create new data in a C3D file by adding analog channels,
additional 3D trajectories, or by adding additional frames of data to existing C3D
files. Each of these features is available from the New option in the Edit menu at
the top of the C3dEditor.
Frames of data can be added at any point in the C3D file. They can be inserted at
the beginning of the file, at the end of the file or at any point within the file. The
number of analog channels or 3D marker trajectories in the file will not change when
frames are added to a file.
The new frames can be preset with a range of values. The data will be inserted into
the file so that it appears that the new frames are part of the original file but will
contain only the data values chosen at the time that the frames are created. If frames
are added inserted into existing data then the data values will be interrupted and will
resume and the end of the new data frames.
Analog Channels can be inserted into a C3D file. Analog channels are always
appended to the end of any existing analog channels and can be created with a preset,
static, analog value or can be pre-loaded with either a square wave or sine wave.
This feature has been primarily added so that analog channels can be “manufactured”
to test C3D filtering programs that access the analog data channels. In addition to
30 • Contents
User Manual C3D Editor
creating the analog channel the C3dEditor also creates the basic ANALOG
Parameters that are needed to describe the new channel. This feature makes it easy
to add any number of analog channels to a C3D file.
Figure 24 - The C3dEditor makes it easy to create a new analog channel.
If you are creating a channel and preloading it with a signal then you will also have
to specify the signal amplitude (in terms of minimum and maximum signal values)
and the frequency. When you specify the signal frequency remember to take the
analog sampling rate into account – you can not create an analog signal that changes
faster than the signal can be sampled.
Figure 25 - New analog channels can be pre-loaded with calibration data.
The Undo button can reverse any analog channel creation operation if it is used
immediately after the channel has been created.
3D Marker channels can be inserted into a C3D file at the end of an existing list of
markers. New 3D marker channels can be preloaded with a set of co-ordinate values
to simulate a single point that is fixed in the 3D co-ordinate space.
User Manual C3D Editor
Editing the C3D File • 31
Deleting Data
You must be in Edit mode to delete
data from a C3D file.
While the C3dEditor makes it easy to delete a 3D trajectory or any analog channel
of data from a C3D file you will want to exercise this option with caution. Both
3D Data and Analog data have Parameters associated with specific channels –
these will need to be updated whenever a 3D trajectory or Analog channel is
deleted.
To delete data from a C3D file you must first select the 3D Data or Analog channel
from the Tree window and then use the Edit menu at the top of the screen to access
the Delete function. A warning message will then be displayed:
Figure 26 - The C3dEditor will always warn before deleting data.
Undo will reverse the results of the
last C3dEditor operation.
If you answer Yes to this message then the data will be removed from the C3D file
and all remaining 3D Data points or Analog channels will be renumbered. If you
made a mistake this is the time to fix it as the Undo button on the toolbar will
restore the data if necessary.
While it’s easy to delete data from the C3D file you may have to edit the Parameters
to reflect the changes in the file structure. For example if you are removing an entire
Force Plate from the C3D file then you will also have to change the Parameters that
describe the Force Plate and the various ANALOG group Parameters that describe
the analog channels that have been deleted. This can become complex and you may
wish to create a batch file to automate this task if you have several files to repair in
this manner.
Filtering 3D Data
The C3dEditor incorporates a powerful digital filter that can clean up noisy 3D data
by removing unwanted frequency components in the data. A typical use for this
would be to remove high frequency noise from a marker trajectory. Let’s look at the
LTOE trajectory in the demo4.c3d file – as you can see there is some noise in the
vertical (Z) component of data following the event markers HS and IC.
Figure 27 - Raw 3D point data display showing some noise.
32 • Contents
User Manual C3D Editor
It appears that there is some jitter in the recorded data that we can probably remove
from the data by filtering.
The filter menu is accessible from the Tools menu at the top of the C3dEditor
window or by right-clicking on the graphical data display and selecting Filter 3D
from the menu that appears. Either method will display the 3D Data filter options:
Figure 28 - The C3dEditor can includes a digital filter for 3D Point data.
At present the C3dEditor filter uses a FIR digital filter – further information about
the FIR filter is provided later in this manual. You can apply one of four types of
filtering – Low Pass (LPF), High Pass (HPF), Band Pass (BPF) and Band Stop
(BSF). Generally you will find that 3D data is filtered with a Low Pass Filter – in
this case we’re using a Low Pass filter at 6 Hz and filtering the frame selection.
Options exist to filter the entire frame range (All) or only filter the sections of the
marker trajectories that have high residuals. We are also only filtering the single
marker LTOE which is highlighted in the Channels list on the right.
Clicking on OK produces the following result:
Figure 29 - 3D Point data after filtering to remove the noise.
Note that we have only filtered a single trajectory in this operation although we
could have applied the filter to the entire range of 3D marker channels just as easily
by selecting the range of channels from the channel list. The C3dEditor gives you
the power to quickly modify your data yet you remain in control of the entire process
at all times.
If you are not happy with the results of any filter operation then you can use the
Undo button to reverse the operation. Remember that the Undo button can only
“undo” the last data modification so you should check the results before you move
User Manual C3D Editor
Editing the C3D File • 33
on to additional changes. No changes are made to the original C3D file until you
exit the C3dEditor and save the data – your original file will remain unchanged until
you overwrite it with a new file. You can automatically apply filtering to any 3D
trajectory when the C3D file is first opened by taking advantage of the C3dEditors
powerful batch mode.
Interpolating 3D Data
3D marker data often contains gaps in the data and if you look through the
trajectories in the demo4.c3d file you will see that there are small breaks in the
trajectories of two markers RANK (Right Ankle) and LHEE (Left Heel). The
C3dEditor can generate data to fill in most small gaps of this type. Right-click on
the graphical display and select the Interpolate option to display the control for this
operation.
Figure 30 - The C3dEditor can interpolate missing 3D points.
The default is to filter gaps of less than 10 frames – these are small gaps and this
setting will probably do fine. Click on the “Interpolate All Channels” box to tell the
C3dEditor to check for gaps in every 3D marker channel and then click OK. The 3D
Data will be interpolated and the gaps filled. Go back to the graphical display and
examine both RANK and LHEE markers to verify the interpolation. You can use the
Undo button on the toolbar to reverse the operation if you do not like the results.
Filtering Analog Data
The C3dEditor includes a powerful analog filter using the same FIR filter techniques
as we used for the 3D Marker Data. The analog filter is only available when the
C3dEditor is in Edit mode.
Check that the C3dEditor Frames button is UP (displaying only a single sample from
each video frame). Then select the FX1 analog channel in the example file
demo1.c3d and look at the analog data for this channel.
The initial view is typical of that of many analog display programs – a single analog
sample is displayed from each video frame. The data appears to have some ringing
around frame 75 but otherwise seems OK.
However, looking at the Data window in the C3dEditor reveals that the analog data
in this file has multiple samples per video field. If you look briefly at the file header
information you’ll see that the video rate is 60 Hz and that the analog to video ratio
is 10 – thus the true analog sample rate is 600 Hz.
34 • Contents
User Manual C3D Editor
Select the Frames display on the
C3dEditor toolbar to see every
analog sample in the data.
As a result of displaying only a single sample from each video field we are not
seeing the all of the data. Now select the Frames mode by clicking on the Frames
button in the toolbar. The C3dEditor will now display every single analog sample
for the selected channel – you will see the analog display expand and a scroll bar
appear at the bottom of the screen.
Now let’s scroll through the data and have another look at the analog signal around
frame 75 and you’ll immediately see a dramatic change in the analog signal that was
not visible in the previous display!
It seems that the ringing that appeared at the end of the force plate strike is actually a
burst of noise in the data that is probably entirely unrelated to the force plate data.
Examining the other analog channels reveals that this appears to be an interference
problem that affects only the first force plate.
Figure 31 - Raw analog data containing spurious noise.
This type of noise can easily be removed from the data without any major effect on
the force plate information. The noise appears to be very high frequency while the
majority of the force data is much lower in frequency.
This demonstrates why it’s essential to evaluate the quality of all analog data by
looking at every sample in the file – not just a single sample per frame.
Right-click on either the Data Window or the graphical display to display the tools
menu and choose the Filter Analog option which will display the Analog Filter
options control dialog box:
User Manual C3D Editor
Editing the C3D File • 35
Figure 32 - The analog filter can be applied to any analog channel.
You can also separate the noise
signal from the force data by
applying a high pass filter at 100 Hz
– this will show the noise component
while removing the force
component…
Since we want to remove the high frequency noise and leave the slower force plate
data untouched we will use a Low Pass Filter – so our Filter Type will be LPF. We
can choose the filter point and so we will set a relatively high point to filter
frequencies above 100 Hz. To start off we’ll just filter the one channel so now
click on OK to apply the filter at 100 Hz to the FX channel:
Figure 33 - The analog signal after a 100Hz Low Pass filter has been applied.
Use the Undo button to return to the
original data if necessary.
The data immediately cleans up as shown above. If you want to see how the data
looked before it was filtered (or you are not happy with the results of the filtering
and want to try again) then just click on the Undo button on the Toolbar to restore
the analog channel to its previous condition.
You can now filter the other channels for this force plate by repeating the filtering on
the range of channels from FY through to MZ for this plate.
36 • Contents
User Manual C3D Editor
Changing the Sampling Rates
It’s easy to change both the basic 3D sampling rate and the analog to video rate by
using the tools provided with the C3dEditor. Both features are accessible from the
Tools menu at the top of the C3dEditor provided that the C3dEditor is in Edit mode.
Increasing the sample rates simply
produces more samples from the
original data. It does not change the
frequency components of the original
data.
These tools are commonly used to adjust two different C3D files so that they both
have common video and analog rates for comparison by another program that
requires a particular video frame rate or analog data rate. Remember when you use
this feature that no really new data is generated.
3D marker data
The analog rate is determined by the
number of analog samples per 3D
sample, you will be simultaneously
changing the analog sample rate when
you change the 3D sampling rate!
The 3D (or Video) sampling rate will initially display the Sampling Frequency at
which 3D data has been recorded. This can be changed by entering a new value and
selecting OK. This will then change the 3D sample rate to match the new rate and
will adjust the total number of 3D and Analog samples accordingly.
Figure 34 - The sample rate of the 3D point data can be easily changed.
If you make a mistake then the Undo
button on the toolbar will restore the
original 3D rate and data samples.
The new 3D sample rate will be stored in the standard parameter POINT: RATE as
well as in the C3D file header. Note that simply changing the locked parameter
POINT: RATE will not have the same effect as this simply records the rate at
which data changes in the C3D file – it does not change the data in any way and
might result in a corrupted C3D file.
Analog Data
Simply changing the locked
ANALOG: RATE parameter will not
affect the analog data and may result
in a corrupted C3D file.
User Manual C3D Editor
Selecting Analog to Video Ratio from the Tools menu will initially display the
Analog to Video Ratio which is the number of analog samples that exist for each
3D sample. Like the 3D or Video rate, this can be changed by entering a new
value and selecting OK.
Editing the C3D File • 37
Figure 35 - Changing the Analog sample rate is as simple as entering a new value.
This will then change the number of analog samples that exist for each 3D sample.
The new effective analog rate will be stored in the standard parameter ANALOG:
RATE as well as in the C3D file header.
It is very important to understand that editing the values of the RATE parameters in
the POINT and ANALOG groups does not have the same effect as actually changing
the raw data sample rates. Both of these parameters should normally be locked to
indicate that they should not be editted. However some manufacturers applications
may incorrectly set the parameters as unlocked.
Appending and Merging Data
Data from two separate C3D files can be joined together by the C3dEditor. This is a
powerful feature that can be used to generate complex C3D files from a number of
smaller files. Data can be either appended or merged:
Appending data to a C3D file means that data from an additional C3D file is added
to the start or the end of the current open C3D file. This can be used to construct a
long C3D file from a number of shorter files. When an append operation is to be
performed both the data files must meet the following conditions:
•
Identical data format – either integer or real data.
•
The same number of analog channels
•
The same number of 3D markers
•
The same 3D sample frequency
•
The same analog to video ratio
Merging data to a C3D file is different from appending data in that a merge
operation combines selected data from the two C3D files into the same frame range.
For instance a merge operation could be carried out on two files, one file being a
subject walking through the calibration volume while the second file could be a set
of calibration markers captured in a separate data record generated immediately
before the subject session. Merging the two files together would produce a single
C3D file that appeared to contain data from a subject walking through the calibration
markers without any problems of marker view obstruction.
38 • Contents
User Manual C3D Editor
Importing Data from Excel
You must be able to run the Microsoft The C3dEditor can also import data from the Microsoft Excel spreadsheet which
Excel spreadsheet program on your
gives anyone the ability to create C3D compatible data files from almost any data
computer in order to import data into
source that can be read into a spreadsheet. If you chose to install the demonstration
the C3dEditor.
data supplied with the C3dEditor then the …\demo directory will contain a sample
Excel spreadsheet called example.xls that can be used to demonstrate this process.
The process of importing data into a C3D file requires that we have a C3D file open
to hold the data. The standard C3dEditor installation includes a small C3D file
called dummy.c3d that contains some basic parameters but does not contain any data.
This is supplied to make the import process relatively easy so that we can import the
spreadsheet data into an empty file that contains only the basic Parameter
information. The basic process for importing 3D data is:
1.
Assemble the data in an Excel spreadsheet in the correct order (X-Y-Z
columns).
2.
Open the dummy.c3d file in the C3dEditor.
3.
Switch to Excel and select the range of data for a single marker that
you wish to import into the C3D file and copy it using the right-mouse
button menu in Excel.
4.
Switch to the C3dEditor and select a marker to receive the data from
the Tree window. Right-click in the Data window or the Graphical
window and select import from the menu. The data will be imported
into the selected 3D marker.
5.
Repeat the last two actions until all the data is in the C3D file and then
save the file under a new name.
6.
Finally use the C3dEditor to create the appropriate Parameters that may
be needed to describe the data and save the file in the appropriate
format.
Analog data can be imported in exactly the same way. Multiple samples per 3D
point can be imported as sequential values in a column or by selecting multiple
samples on a single row in the spreadsheet.
Remember that you will almost certainly need to either create or modify several
parameters in the new file to describe the data that you have imported. This is
probably easiest if it’s done interactively through the C3dEditors graphical interface
for an individual file.
Let’s start by opening the spreadsheet file – use Explorer to select and open the file
which will normally be C:\Program Files\MLS\C3dEditor\Demo\example.xls -
User Manual C3D Editor
Editing the C3D File • 39
Figure 36 - The C3dEditor can import data directly from Excel.
The C3dEditor is not limited to 3D
As you can see, the data is stored in columns in the order X, Y, Z – this is the order
data. 2D data can be imported by
that the C3dEditor will expect 3D data. Analog data may be stored as consecutive
simply storing zeros in one column of
samples or as multiple samples per line – the C3dEditor will read both analog
the spreadsheet.
formats.
The sample spreadsheet has formatting together with frame numbers and column
headers – none of this is actually needed for an import operation. All we need is a
minimum of three columns of numbers containing co-ordinates in the order X, Y, Z
per 3D point.
If you have a number of files to create then you may want to create a batch file to
automate the process of creating the parameters. This can save a significant amount
of time when you have a large number of files to create. The next section discusses
the C3dEditor batch mode using some example files that are included with the
standard installation.
The C3dEditor will automatically
calculate the correct POINT: SCALE
value when data is imported from
Excel.
When you have finished importing the data and saved the file under a new name
you will notice that the new file is a DEC REAL formatted file – this is because the
original dummy.c3d file was in this format.
This is significant as it means that the imported data is stored as real numbers and
that the POINT: SCALE value has been preset to a special value of –1. If you now
save your new file as an INTEGER format file the POINT: SCALE value will be
calculated and saved with a value that is appropriate to the range of data that has
been imported.
40 • Contents
User Manual C3D Editor
If you are creating C3D files from scratch to transfer data into another program such
as MOVE3D then you may find it easiest to open one of the sample files that is often
supplied with applications such as MOVE3D. You can then use the C3dEditor to
copy the parameters from a known good file into your new file. This means that you
will probably only have to edit parameter values rather than creating new parameters
and groups.
Automating the C3dEditor
Many biomechanics and gait laboratories produce larger numbers of C3D files that
all contain similar data. In this situation it’s not uncommon to need to perform the
same type of operation on many different files – a typical requirement might be as
follows:
1.
Low Pass filter the force plate data
2.
Bandpass filter the EMG channels 1 through 10
3.
Enter muscle descriptions for the EMG channels
4.
Change the EMG channel labels to read "mV"
5.
Remove the unwanted ANALOG: GAIN parameters
6.
Set the FORCE_PLATFORM: ZERO parameter to a reasonable value
7.
Filter the 3D data with a 6 Hz low pass filter.
8.
Interpolate the 3D data to fill all gaps of less than 12 frames.
9.
Create a SUBJECT Group
10. Create NAME parameters in the SUBJECT group.
11. Create SEX parameters in the SUBJECT group.
12. Create HEIGHT parameters in the SUBJECT group.
13. Create NUMBER parameters in the SUBJECT group.
14. Create PROJECT parameters in the SUBJECT group.
15. Create DOB parameters in the SUBJECT group.
16. Create a MARKER_DIAMETER parameter in the SEG group and set
the value to 25.4mm (or one inch).
17. Lock the POINT: RATE parameter.
Clearly if we had to perform these operations on each file we would be spending
more time editing the data files than generating them! The C3dEditor makes it easy
to perform repetitive operations such as these with its built-in batch mode that allows
you to specify a series of commands in a file This sequence of actions can then be
performed automatically whenever a C3D file is opened.
A number of sample batch files are included with the C3dEditor that demonstrate the
power of the batch feature and provide an easy way to build your own batch files.
The default batch file supplied with C3dEditor is batch.cfg – this file contains a
series of commands that perform all of the operations described above.
The sample batch file contains a
number of different commands to
provide filtering, interpolation and
configuration information..
User Manual C3D Editor
Let’s start by closing any C3D files that you currently have open in the C3dEditor
to avoid confusion. Now use the options menu (available from the File menu when
no files are open) to select the batch.cfg file as the batch file that contains the
commands that we want to execute when a file is opened.
Editing the C3D File • 41
If you have used the default installation for the C3dEditor then the Batch File entry
should contain the line:
C:\Program Files\MLS\C3dEditor\batch\batch.cfg
The batch file specifies actions that are to be performed whenever a C3D file is
opened. It is a text file and can easily be edited with NotePad, EMACS or any other
ASCII text editor. You may want to view it or print it out to follow the operations
that it performs. It’s very easy to edit this, or any other batch file, to perform almost
any sequence of operations. Examine the sample batch files, supplied with the
C3dEditor, for detailed examples of individual commands – each command is
defined in the user manual.
To demonstrate the power of the batch mode we’ll open one of the demonstration
files in one window, then turn on the batch mode and open the same file a second
time. Since we now have the batch mode ON the commands in the batch.cfg file
will be executed when the file is opened the second time and we will be able to
compare the results of the batch operation directly:
1.
Turn the batch mode ON from the file menu by clicking on the Batch
Mode option in the File menu (a check will appear by the option).
2.
Open the file gaitdata.c3d in the demo directory there will be a slight
pause as the batch commands are performed.
3.
Now save the new file as gaitdata new.c3d
4.
Turn the batch mode OFF from the file menu by clicking on the Batch
Mode option again in the File menu (the check will disappear from the
option). Any file opened while the batch mode is OFF will not be
affected by the commands contained within the batch file.
Now that the batch mode is OFF you can open the file gaitdata.c3d in the demo
directory again – this time the batch commands will not be performed since the batch
mode is no longer in operation.
You can now use the Window Tile command to view both versions of the C3D file
at the same time – you can browse through the Tree and Data windows and clearly
see the effects of each of the edits that have been performed when the file was
opened – for example:
•
The Tree window shows the new SUBJECT group has been created.
You can view the new parameters in the Data window.
•
The effects of the analog band pass filtering in the EMG channels are
subtle but clearly show the reduced baseline artifact in during muscle
activity, particularly in channels E02 and E03 (use the Frame button to
display every analog sample).
•
The effect of the low pass filters on the force data is more dramatic –
look at the FY1 signal in both files around frame 151 during the end of
the signal transition.
The batch mode is the ideal tool for automating the creation of parameters and large
scale edits to multiple files. The default batch.cfg file simply performs the edits and
then displays the information – no changes are made to the original file. You can tell
the C3dEditor to automatically save the results of any batch operation by editing the
SAVE setting in any batch file. This allows you to open a C3D file, automatically
perform a series of complex changes and then write the new information back to the
C3D file.
42 • Contents
User Manual C3D Editor
Verifying the data
As you’ve probably figured out by now, the C3D file parameters come in many
shapes and sizes and it can be a complex job to check that every single parameter in
a file is correct. The C3dEditor addresses this problem with a file validity checker in
the Tools menu that allows you to check that any given file contains Parameters that
meet a criteria that you can specify, 3D Data that lies within the data limits specified
in the parameters and valid analog data.
The format of the C3D file parameters is specified in a validity file which contains
simple text descriptions of the characteristics of the parameters that are expected to
exist in the C3D file. You can have several different validity files for each group of
C3D files. The default installation of the C3dEditor will place a sample validity
check file, called valid.cfg, in the program directory. This contains commands that
are designed to check the gaitdata.c3d file and report any differences between the
contents of the file and the data that the C3D file is expected to contain. We’ll now
demonstrate this validity check together with the batch processing:
Start the C3dEditor and open the demonstration file gaitdata.c3d – go to the Tools
menu and select Validity, then Parameter… This will perform a validity check of
the parameters in the file, using the information in the default file valid.cfg and report
and differences between the contents of the file and our expectations. Any
differences are reported in the Validity Results window.
Figure 37 - The Validity Results window
In this case we can see that there are a number of parameters missing from the C3D
file that are defined in the valid.cfg file. These are the parameters that we had
created earlier using the batch file so it’s reasonable to assume that the problem is
that we do not have any description of the new parameters in our default validity
check. Use the Validity check to test the 3D and Analog data – you’ll find that both
the 3D and Analog data appears to be fine so let’s fix the problems with the
parameters…
Close the gaitdata.c3d file and then check that the default batch file that we are using
is still the batch.cfg file supplied with the sample files. This can be checked from the
File menu using Options.
Set the batch mode ON – a check will appear by the File menu option displaying the
current Batch Mode selection. Any file that is opened will be processed by the batch
commands so let’s open the gaitdata.c3d file again and run the validity check on the
parameters after the batch edits have been performed. This time the Validity Results
window will not display any errors – you can browse through the parameters in the
User Manual C3D Editor
Editing the C3D File • 43
Tree window and see the changes that have been made to update the C3D file
contents.
However, if you now run the Validity checks on the 3D data you’ll find that the
filtering performed in the batch file has changed the 3D coordinates very slightly and
the Validity check will now report that the 3D data is out of limits for five of the
markers. This is because the SEG: DATA_LIMTS parameters for positive X were
very close to the data before the filter operation – we can fix this minor problem by
quickly editing the + X value in SEG: DATA_LIMITS to 3550 (it’s the 4th item in
the data array). If this type of report is generated frequently then you may want to
change the DATA_LIMITS parameters used to collect the coordinate information.
Scaled Data vs. INTEGER Data
Data can be stored in the C3D file in two basic formats – as REAL numbers or as
INTEGER numbers that are scaled to produce REAL numbers.
•
A REAL number is stored as a floating point value that has a decimal
component – the following are examples of REAL numbers …
3.14792, -1.5262, 2.0000 etc.
•
An INTEGER number is stored as a value without a decimal
component – the following are examples of INTEGER numbers …
3627, -62, 1 etc.
Two of the common C3D file formats are the DEC INTEGER and PC INTEGER
formats which store the 3D data as INTEGERS. Since data rarely comes in exact
values the C3D file contains a scale factor that is a REAL value which is used to
produce the exact “real-world” value when applied to the stored INTEGER values.
The setting of the Scale button in
the Toolbar controls only the
displayed format of the data – it
does not change the data.
44 • Contents
The C3dEditor can read and write 3D data in both REAL and INTEGER formats
and can display both the INTEGER values and the REAL values depending on the
state of the Scale button in the toolbar. In general you will want to select the
REAL scaled data when you are looking at 3D marker positions and the INTEGER
data when you are looking at the analog samples. The C3dEditor will remember
the selections that you use for each data type and apply them automatically when
you select the data for viewing or editing.
User Manual C3D Editor