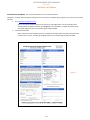
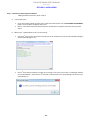
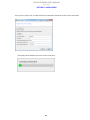
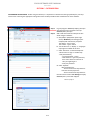
1
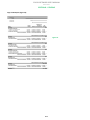
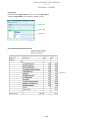
AUTOMOTIVE FINISHES COLOR SOFTWARE USER’S MANUAL revised March 2011 colour formula YE6166BC colour formula RE44665BC colour formula BL20766BC COLOR SOFTWARE USER’S MANUAL March 2011 INTRODUCTION / TABLE OF CONTENTS Thank you for choosing Pro-Spray® Automotive Finishes. This color software user’s manual is designed to assist you in the activation, installation, customization and use of your Pro-Spray® Color Software. TABLE OF CONTENTS Page SECTION A ACTIVATION SECTION B INSTALLATION Computer Requirements ........................................................................................ B-1 Install on Computer ................................................................................................ B-2 SECTION C CUSTOMIZATION Setting User Preferences ........................................................................................ C-1 Setting Inventory .................................................................................................... C-2 SECTION D UTILIZATION Search Screen ......................................................................................................... Comparing Variances.............................................................................................. Mixing on Scale....................................................................................................... Creating Custom Variants ....................................................................................... Ratio Manager ........................................................................................................ Mix History ............................................................................................................. Create Reports........................................................................................................ SECTION E A-1 D-1 D-5 D-6 D-7 D-9 D-12 D-13 REFERENCE Support ................................................................................................................... E-1 Variant Descriptions ............................................................................................... E-1 COLOR SOFTWARE USER’S MANUAL March 2011 SECTION A - ACTIVATION ACTIVATING THE SOFTWARE. This must be done before you can install the software. Complete a Pro-Spray Paint Info System Activation Form and send it to ComputerLogic for approval. This form can be accessed two ways: 1. Go to www.Pro-SprayFinishes.com. Click on the ‘Paint Information System’ link, then click ‘User Registration’ to access a PDF file of the Pro-Spray Paint Info System Activation Form (Figure 1). Print the PDF file, complete all portions of the form (print legibly) and fax it to ComputerLogic at (478) 477-6008. 2. Install the software CD. Where instructed in the installation process, complete the Pro-Spray Paint Info System Activation Form E-mail the form, or print, complete (print legibly) and fax it to ComputerLogic at (478) 477-6008. Figure 1. A-1 COLOR SOFTWARE USER’S MANUAL March 2011 SECTION B - INSTALLATION INSTALLING THE SOFTWARE. Review the requirements below before installing the software to ensure that your computer is configured adequately. Pro-Spray MixLogic Hardware/Software Requirements March 2011 Hardware Internet Connection Processor Minimum Not Required 1GHz RAM Free disk space Screen resolution 1 GB 5GB 1024 x 768 Advised DSL/Cable or better 2.8GHz (single user) 3.0 GHz or faster (server) 2GB or greater 10GB 1024 x 768 System Software Operating System(1,2) Internet browser .NET Framework Microsoft Installer Minimum Windows XP Pro SP3 IE7 3.5 SP1 4.5 Advised Windows 7 IE8 3.5 SP1 4.5 or greater Additional Software Required3 Adobe Acrobat Reader 9.0 Microsoft SQL Express 2008 SP1 1 For Windows Vista (all versions), service pack 1 is required. 2 Software is not supported on the following Operating Systems: -Windows XP Home/Media Edition -Windows Server 2003 3 SQL Express 2008 SP 1 MUST be installed by the MixLogic system update disk. B-1 COLOR SOFTWARE USER’S MANUAL March 2011 SECTION B - INSTALLATION Step 1: Install the Pro-Spray Computer Software *Adding for Multi-License User will be in Step 3 A. Internet Only Users: 1. 2. B. Go to the Pro-Spray website and click on the “Paint Information System” link. If ACTIVATING THE SOFTWARE (page A-1) has not been completed, do that first. Click on “Load ‘Paint Information System’ Browser” and follow the installation instructions until you reach Step 3. Offline Users: Updated either by CD or via the Internet rd 1. Load the 3 Party CD into the CD drive of the local PC or the network PC (server) and the Installation Program will automatically begin to run. 2. Once 3 Party disk has installed, it will give you a message “Your system is up to date. The MixLogic software rd can now be installed.” Please remove 3 Party disk, and now load the ‘Pro Spray MixLogic’ CD and it too will automatically run. rd B-2 COLOR SOFTWARE USER’S MANUAL March 2011 SECTION B - INSTALLATION 3. Follow the installation instructions on the Pro Spray MixLogic CD. *Note Microsoft SQL Server 2008 Express should only be installed on “Stand Alone” systems. The user will be prompted with this message before installing SQL Server 2008. B-3 COLOR SOFTWARE USER’S MANUAL March 2011 SECTION B - INSTALLATION Step 2: Finalize the Activation Process by Entering your ‘System ID’ Number where Required At the end of the installation process (Step 1) you will be instructed to enter your ‘System ID’ code and you will need to call (800) 933-6564 to receive this number. You must be able to read your computer’s System ID number to the support representative and they will be able to help you with this process when you call. Step 3: Multi-License User for Internet or CD ROM Install A. Internet Install: 1. If installing a multi-license, you will see the following screen, then click [OK]. B-4 COLOR SOFTWARE USER’S MANUAL March 2011 SECTION B - INSTALLATION 2. B. Save the file to a USB stick or other network location that can be accessed by any client workstations. CD ROM Install: 1. The user will load the ProSpray Software Installation CD – they must have access to the subscription key exported from the main computer. 2. Once the installer is complete, the setup wizard will start. Click [Import Subscription]. B-5 COLOR SOFTWARE USER’S MANUAL March 2011 SECTION B - INSTALLATION 3. C. Browse to the MixLogic Subscription file that was exported from the server. If the MixLogic Subscription file is valid, the user will continue to the Proxy setup screen: B-6 COLOR SOFTWARE USER’S MANUAL March 2011 SECTION B - INSTALLATION If the user has a proxy server, he will check the proxy radio button and fill out the proxy server information: Click [Next] and the software will connect to the central server. B-7 COLOR SOFTWARE USER’S MANUAL March 2011 SECTION B - INSTALLATION Step 4: Use the Paint Information System. If you have any questions or need assistance with any issue, please call Customer Support at (800) 288-6564. B-8 COLOR SOFTWARE USER’S MANUAL March 2011 SECTION C - CUSTOMIZATION CUSTOMIZING THE SOFTWARE. Before using the software, it is important to customize the settings specifically for your shop and each user. Choosing the appropriate settings will ensure the best possible results and efficient use of this software. Step 1: Step 2: Screen 1 . Screen 2. Log into program. Screen 1 (ProSpray) will open. Click [Settings] tab in menu bar at the top. Screen 2 (Users) will open. Add or edit information for each person who will be using the software: a. Click [Add] or [Edit] button (lower right corner). Window 2 (User Settings) opens. Complete/edit each field as prompted: ‘User Name’ - type in name ‘User Initials’ - type in initials b. ‘User Preferences’ → ‘Display’ → ‘Language’ : only English is available at this time c. Under ‘Password’ → ‘Password Required’ - Select either ‘At Login’ or ‘At Mix Only’ - Click [Set Password] - ‘Current Password’ - type in - ‘New Password’ - type new password, then write it down for reference in case you might forget it. - verify new password. d. Under ‘Defaults’: ‘Mix Unit of Measure’ - Click on choice from drop-down list ‘Color mix amount preference’ - Click on choice from drop-down list Once all choices made in User Settings click [OK]. Screen 2 (Users) screen will reappear. continue to page C-2 Window 2 C-1 COLOR SOFTWARE USER’S MANUAL March 2011 SECTION C - CUSTOMIZATION Step 3: Screen 2. Screen 3. In Screen 2, click [Workstation] tab in menu bar. Screen 3 (Setup Workstation) will open. a. Click [Add]. Window 3a (Settings > Add Mixing Scale) opens. b. From drop-down list under ‘Scale Type’, click on your selection. c. In box under ‘Location Name’ type in where scale is located (for example, Mixing Room). Click [Next]. d. In Window 3b (Specify PC Scale Settings), under ‘Connection Port’, ‘Scale Brand’ and ‘Scale Model’, select choices from drop-down lists. Click [Finish]. e. Click [Label Printer]. In ‘Windows Printer Name’, ‘Select Mix Label Layout’ and ‘Select Number of Automatic Labels’, click on your selection for each. Click [OK] to close the window. Click [OK] in pop-up box. Screen 3 will re-open. continue to page C-3 Window 3a. Window 3b. C-2 COLOR SOFTWARE USER’S MANUAL March 2011 SECTION C - CUSTOMIZATION Step 4: Click [Shop Preferences] tab in menu bar. Screen 4 (Settings) will open. Click on each of the tabs listed below, read all descriptions to aid in making the correct selection, then choose the appropriate selections based on your shop set-up. [RTS Ratios]- Both boxes (‘Color Mixes’ and ‘Product Mixes’) should be checked as shown in Screen 4. [Mixing Queues] - These should be enabled if the user queues mixes prior to mixing and must be enabled for any user of an Ecomix. Click [Add] to add a queue. [Stock] - In order to see the mix price estimate and recalculation advice, user pricing must be enabled. If mix cost is confidential and user should not see it, this feature should be disabled. [Repair Orders] - Click [Enable] for ‘Repair Orders’ and select either [Yes] or [No] under Repair Order Required’. [Reporting] - Choose selections from drop-down lists under ‘Set Preferences for Reporting’. Type info in boxes under ‘Shop Information Shown on Report’. [Register Use] - Select ‘Enable’ from drop-down lists beside ‘Registration and VOC Tracking’. In drop-down list under ‘Active Rule’, select ‘California Rule’. [Search Configuration] - Click in all boxes that apply under ‘Available Paint Systems’, keeping in mind that this will also affect your Inventory drop-down list in the next section. Once all choices made in ‘Settings’ click [OK]. Click [OK] in pop-up box verifying that preferences have been saved. Screen 3. Screen 4. Step 5: You may set up ‘Mix Ratio’ favorites now. See page D-9, Figure 17 for instructions. continue to page C-4 ‘ C-3 COLOR SOFTWARE USER’S MANUAL March 2011 SECTION C - CUSTOMIZATION Step 6: Click [Search] to return to Screen 1 (ProSpray). Click [Inventory] so that you can establish your inventory information. Screen 5 will appear. Use drop-down under ‘Paint System’ to choose product category, then enter data under each column (listed below). The inventory set-up process will be time consuming and tedious, but once established, it is very easy to maintain. Screen 1 . [In Stock] - Inventory currently on hand. [Open %] - Indicates percentage of product amount remaining in an open container. [Stocking Quantity] - Designates minimum quantity to be kept in inventory. IMPORTANT NOTE: Click [Save Changes] on left side of screen after setting each column and/or screen. [On Order] [Received] Enter appropriate pricing in remaining pricing columns. Click [Adjust Own Price] to adjust all prices. To list To a certain percentage above or below list Set to “X” amount Screen 5. After establishing ‘In Stock’ and ‘Stocking Quantity’, click [Create Purchase Order] on left side of screen. Window 5a will appear. - If you choose to add additional products to the P.O., type the part number exactly as shown in the inventory list into the box beside [Add]. Click [Add]; part number will appear in the list. - Enter your P.O. number in the space in upper right of screen. You must enter a number here if you wish to generate a report. - Once a P.O. is created, by clicking [Place Order], it can be found by clicking on [View Reports] in the Search screen. Window 5a. The customization of your color software is complete, though you may add users or edit settings as necessary. C-4 COLOR SOFTWARE USER’S MANUAL March 2011 SECTION D - UTILIZING ACCESS THE PROGRAM. If you are using “Internet Live” version, make sure your computer is connected to the internet. Double-click software icon. When ProSpray screen appears, click [User] or [Administrator]. Search for a Standard Color Formula 1. In the ‘Search’ section, click to choose your ‘Paint System’ from drop-down list (Figure 1). Solvent Basecoat has been selected as an example. Figure 1. 2. Enter the search criteria of your color. Search fields are ‘Manufacturer’, ‘Color Code’, ‘Year’, ‘Description’ and ‘Formula Code’ (Figure 2a). Not all fields require data to be entered; the most frequently used fields are ‘Manufacturer’ and/or ‘Color Code’, which narrows the search. As you type, a drop-down list of choices will appear (Figure 2b). Click on your selection from the list (Color Code “12” was used as an example here) and click the [Search] button. A screen with your Search Results (Figure 3) will appear. Figure 2a. Figure 2b. D-1 COLOR SOFTWARE USER’S MANUAL March 2011 SECTION D - UTILIZING 3. In the ‘Search Results’ window below (Figure 3), many new features are available. To see specific formula information, simply double-click your choice. Figure 3a. You can arrange the fields in the order of your preference. Simply click and drag the columns or double-click a column to sort from A to Z or Z to A based on that selected column. Personalization of the data grid and screen elements are saved on a “per user” basis, so each user can have a personalized view of the screen. The user can also set a default for the paint system that is selected in the drop-down. This, as with the other screen personalizations, is a user-level setting. Figure 3b. A checkmark identifies an original (#1 shade) color that has a variance. Figure 3c. In the ‘Accent Colors’ area, accent colors linked to a standard color (for example, “12”) are listed.“Dual-Tone Codes” (upper and lower codes) will also be listed in this section. Double-click to see the formula. Figure 3. 4. Once you have double-clicked a formula, you will access a screen (Figure 4) that shows ‘Color Information’ (Figure 4a), ‘Color Variants’ (Figure 4b) and ‘Color Formula (Absolute)’ (Figure 4c). You can compare (Figure 4d) the standard to the variants or simply choose between the standard and any variants listed. Double-click your color to go to the formula page. Figure 4a. Figure 4b. Figure 4e. Click [Standard] or any variant to access formula information. Figure 4c. Figure 4d. Click [Compare] to compare Standard to Variances. Figure 4. D-2 COLOR SOFTWARE USER’S MANUAL March 2011 SECTION D - UTILIZING Searching for a Three-Stage Color Formula Layer 1 (Figure 5a) Figure 5b. Look up color as normal. Double-click to access to Variant screen. Now ground coat and mid coat are linked. They can be accessed on same formula screen. Select drop-down list under ‘Stage’ to view 2nd stage. Figure 5c. ‘Formula Messages’ alerts painter that this is a multi-layer formula. Layer 2 (Figure 5d) D-3 COLOR SOFTWARE USER’S MANUAL March 2011 SECTION D - UTILIZING Searching for a Dual Tone Color Formula Enter in Dual Tone Code in ‘Color Code’ box (Figure 6a). ‘Search Results’ will display (Figure 6b). In the ‘Accent Colors’ area, the color combinations will be shown (Figure 6c). Simply double-click on color needed to mix. Figure 6a. Figure 6b. Figure 6c. Searching for a Bumper Color Bumper colors with Matted Clearcoats are similar to Three-Stage colors. Stage 1 is color coat (Figure 7a) and Stage 2 is the Matted Clearcoat (Figure 7b). ‘Formula Messages’ (Figure 7c) indicates that a Matted Clearcoat may be need. ‘Stage’ box is active. Figure 7a. Stage 1 = Color Coat Figure 7b. Stage 2 = Matted Clearcoat Figure 7c. ‘Formula Messages’ section indicates this is a Matted Clear coat. Spray a test panel and properly mix and activate the clearcoat. D-4 COLOR SOFTWARE USER’S MANUAL March 2011 SECTION D - UTILIZING Comparing Standards & Variances If you want to compare formulas click [Compare] (Figure 8a) located in the ‘Task Links’ list (upper left side of window). Compare Formulas window will appear. Click your items (Figure 8b) you want to compare. Figure 8a. Figure 8b. Click on your color to access the ‘Color Information/Color Formula’ screen, where you can select the ‘Solids’ level (Figure 9b) and ‘Stage’ (Figure 9c). In ‘Mix Amount’ area (Figure 9d), choose ‘Amount’, ‘Unit’ size and ‘Mix Amount Type’ (Figure 9e). Under ‘Formula Messages’ (Figure 9f), pricing, suffix information and other messages are displayed. If necessary, RTS (Ready to Spray) feature is displayed. This allows you to mix a ready to spray color with your choice of thinner/activator if needed/available. Figure 9a. Click on any history link (blue text) to go back to desired previous page. Figure 9b. Choose ‘Solids’ level: High, Medium or Normal. Figure 9c. ‘Stage’ box links multi-layer formulas together. Simply choose 1 or 2 layer from drop-down list. Figure 9d. Figure 9e. ‘Mix Amount Type’: choose from ‘Color Only’ or ‘RTS’ from drop-down list. Figure 9f. D-5 COLOR SOFTWARE USER’S MANUAL March 2011 SECTION D - UTILIZING Mixing on a Scale Send to Mix on Scale by clicking ‘Mix on Scale’ under ‘Task Links’ (Figure 10a). A window will appear which instructs you to enter a repair order (Figure 10b). Place empty can on scale. Set Weight as default as needed. Click [Mix]. NOTE: Set Inventory levels in ‘Inventory’ tab to at current inventory levels or warning box will appear that you have insufficient inventory to mix. Figure 10a. Figure 10b. ‘Mix Color’ screen (Figure 11a) appears showing the formula and the first component and weight. Mix accordingly. You will be prompted once each component is completed. A warning (Figure 11b) will display if you over- or under-poured. Each component will be tracked for mixing accuracy. Click [Next] to go to next component, click [Recalculate] (Figure 11c) if necessary. Click [Finish] (Figure 11d) when complete. Figure 11a. Figure 11b. NOTE: Over-pours and under-pours are tracked, stored on customer database and can be viewed in Mix History. Figure 11c. Figure 11d. D-6 COLOR SOFTWARE USER’S MANUAL March 2011 SECTION D - UTILIZING Create and Save Custom Variant If you adjust a color to match a specific car you can document this new color and save it in your database. Click [Save as Custom Variant] (Figure 12) with the color you want to adjust in the formula screen. Figure 12. Figure 13 (Specify the Color Formula) window will appear and show the options you have available as instructed below: There are four methods of creating custom formulas: 1. Save as a Custom Variant Will inherit the formula with focus on the calling screen Will inherit the paint system from the formula with focus on the calling screen Will be associated with the Pro-Spray formula in future searches A user may not make a custom variant of a custom variant 2. Create a new variant Does not inherit a formula Does not inherit the paint system The user must build the formula from scratch Will be associated with the Pro-Spray formula in future searches 3. Create a custom color (called from the main Search screen) Does not inherit a formula Does not inherit the paint system The user must build the formula from scratch Will not be associated with the Pro-Spray formula in future searches 4. Save mix as custom color (called from mix history) Saves the completed mix as a formula If the mix is linked to a Pro-Spray formula it will appear as a variant to that formula Figure 13a. Click here to add a toner to new color. Figure 13b. Click a toner from the drop-down list. Figure 13c. Adjust toner gram weights by entering new amount in box. Figure 13d. Click [X] to delete a toner from formula. Figure 13e. Click [Add Toner]. Figure 13. Figure 13f. Click [Next] to review the changes. Formula Rules Adjustment window (Figure 14 on next page) appears. D-7 COLOR SOFTWARE USER’S MANUAL March 2011 SECTION D - UTILIZING Formula Rules Adjustment - Figure 14 Figure 14. Click [Next]. Specify Custom Color Details window (Figure 15) appears, allowing you to add in details of color (see box below – Figure 15a through Figure 15d). Figure 15a. Enter info for ‘Custom Color Description’, ‘Customer Reference’, and ‘Sprayout ID or Location’. Figure 15b. Select choices from drop-down lists in ‘Stage’ and ‘Color Group’. Figure 15c. Add ‘Notes’ in space provided. Figure 15. Figure 15d. Once all color details added, click [Finish]. Custom color now appears with other variant(s) already listed (Figure 16 – next page) D-8 COLOR SOFTWARE USER’S MANUAL March 2011 SECTION D - UTILIZING Figure 16a. Custom color listed under ‘Color Variants’ section. User-created formulas will always display first on the variant screen. Figure 16. Ratio Manager Click [Mixing Ratios] (Figure 17a) from top menu bar. Choose your favorite clearcoat, primer or sealer and have the ability to choose specific activator and thinner based on your needs. Figure 17a. Figure 17b. Choose product you want to mix on scale – for example, PSC-7000. Figure 17. A new window (Figure 18 – next page) will appear so that you can add your thinner. D-9 COLOR SOFTWARE USER’S MANUAL March 2011 SECTION D - UTILIZING Add your thinner (Figure 18). Figure 18a. Click on thinner choice. Figure 18b. Click on this box. Figure 18c. Add thinner percentage – in this example, 10%. Figure 18. Double-click to select desired activator and show activator speeds (Figure 19). Figure 19. D-10 COLOR SOFTWARE USER’S MANUAL March 2011 SECTION D - UTILIZING Formula is ready to mix. Under ‘Mix Amount’ area (Figure 20a), designate your ‘Amount’ and ‘Unit’ to mix. Click [Mix on Scale] (Figure 20b) to send to scale. Figure 20b. Figure 20a. Saving your Favorite Ratios Follow the same steps as above; pick your thinner and %. Double-click on [No More Additives] to select your activator. When activators appear on the screen, click on your activator of choice. Then click [Save as Favorite] (Figure 21c). Figure 21a. Click once to select activator. Figure 21b. Check ‘Current Selection’ to ensure you have the additives you intended. Figure 21c. A window will appear allowing you to choose a number for your favorite. Then click [Select] (Figure 21d). Figure 21d. D-11 COLOR SOFTWARE USER’S MANUAL March 2011 SECTION D - UTILIZING Then you can go to ‘Favorite Ratios’ (Figure 22a) and select by ‘Favorite Number’ (Figure 22b) or by double-clicking your choice (Figure 22c) to mix your favorite product. Once selected you can choose how much you want to mix and send to scale. Figure 22a. Figure 22b. Figure 22c. Mix History You can view Mix History (Figure 23a). Figure 23a. Figure 23b. You can enter in search criteria if you are looking for specific mix. Figure 23c. A detail of every mix that was mixed on the scale is present. Double-click a choice for details of that selection (see below). Details of mix can be reviewed. You can check what was originally searched (Figure 24a). Mix results can be reviewed to the original formula to check mix accuracy (Figure 24b). Figure 24b. Figure 24a. D-12 COLOR SOFTWARE USER’S MANUAL March 2011 SECTION D - UTILIZING Create Reports You can create a report by selecting ‘Create Report’ (Figure 25a) under ‘Favorite Links’ at left side of screen. Click on which report you want to view (Figure 25b). Figure 25a. Figure 25b. Paint Usage Select ‘Date Range’ (Figure 26a), ‘Mix Status’ (Figure 26b), and ‘Product Categories’ (Figure 26c) then click [OK] (Figure 26d). A copy of the report is shown on the next page. Figure 26a. Figure 26b. Figure 26c. Figure 26d. D-13 COLOR SOFTWARE USER’S MANUAL March 2011 SECTION D - UTILIZING Copy of Paint Usage Report (Figure 27) Figure 27. VOC Report Select ‘Date Range’ (Figure 28a) then click [OK] (Figure 28b). A copy of the report is shown on the next page. Figure 28a. Figure 28b. D-14 COLOR SOFTWARE USER’S MANUAL March 2011 SECTION D - UTILIZING Copy of VOC Report (Figure 29) Figure 29. D-15 COLOR SOFTWARE USER’S MANUAL March 2011 SECTION D - UTILIZING Repair Order Click ‘Date Range’ (Figure 30a) for report. Use arrows (Figure 30c) in ‘Providers’ (Figure 30b) to be included or excluded in report. Figure 30a. Figure 30b. Figure 30c. Copy of Repair Order Report (Figure 31) Figure 31. D-16 COLOR SOFTWARE USER’S MANUAL March 2011 SECTION E - REFERENCE CONTACT INFORMATION In the U.S. In the U.K. Pro-Spray Automotive Finishes Pro-Spray Automotive Finishes, Ltd. 600 Nova Drive SE Massillon, Ohio 44646 Unit H, Normandy Lane, Stratton Business Park, Biggleswade, Bedfordshire SG18 8QB Sales Support: Phone: 1-800-776-0933 Sales Support: Tel: + 44 (0) 1767 314320 E-mail: [email protected] Product Technical Support: Phone: 1-800-776-0933 Product Technical Support: Tel: + 44 (0) 1767 314320 Color Software Technical Support: ComputerLogic Phone: 1-800-288-6564 www.ProSprayFinishes.com www.ProSprayH2O.com facebook.com/prospray VARIANT COLOR CODE DESCRIPTIONS E-1 AUTOMOTIVE FINISHES Pro-Spray® Automotive Finishes • An Alco Industries Company • 600 Nova Drive S.E. • Massillon, Ohio 44646 Tel: (330) 830-6000 • Technical Support (800) 776-0933 • Fax (330) 830-6005 www.ProSprayFinishes.com • www.ProSprayH2O.com • facebook.com/prospray PCSUM—rev. 03/11