1
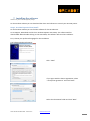
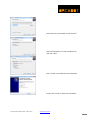
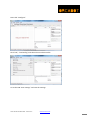
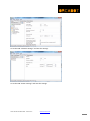
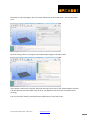
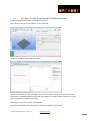
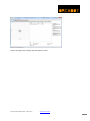
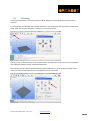
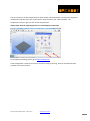
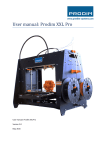
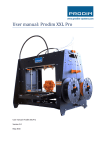
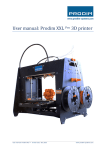
User manual: Orcabot XXL
User manual: Orca XXL
Version 1.4
Sept 2014
User manual: Orcabot XXL - version 1.4
- www.orcabot.com -
2
1. Content
1.
Content ............................................................................................................................................ 3
2.
Welcome to the world of 3D printing ............................................................................................. 4
3.
Safety ............................................................................................................................................... 5
4.
Specifications................................................................................................................................... 6
Printing ................................................................................................................................................ 6
Dimensions .......................................................................................................................................... 6
Temperature........................................................................................................................................ 6
Electrical .............................................................................................................................................. 6
5.
FFF 3D-print technology .................................................................................................................. 7
6.
Setting up the Orca.......................................................................................................................... 8
7.
Installing the software ................................................................................................................... 10
Step 1, driver install .................................................................. Fout! Bladwijzer niet gedefinieerd.
Step 2, Repetier install .................................................................................................................. 10
8.
Printer Settings .............................................................................................................................. 12
9.
Installing Print Profile .................................................................................................................... 14
10.
Prepare G-code for printing ...................................................................................................... 18
11.
Prepare G-code for printing with dual extruder ....................................................................... 20
12.
Printing ...................................................................................................................................... 22
13.
Replacing material ..................................................................................................................... 26
14.
Calibration of the 2nd extruder .................................................................................................. 27
Print the calibration print .................................................................................................................. 27
Change the offset value..................................................................................................................... 27
User manual: Orcabot XXL - version 1.4
- www.orcabot.com -
3
2. Welcome to the world of 3D printing
Thank you for choosing Orcabot as supplier for your 3D printing partner!
This user manual is designed to show you some basic steps in the 3D printing world. A world that is
our future, full of challenges and opportunities.
It is essential that you read through this manual, as there are also some tips how to work safe and
secure.
Let’s start making amazing things!
User manual: Orcabot XXL - version 1.4
- www.orcabot.com -
4
3. Safety
Safety alert symbols precede each safety message in this manual. These symbols
indicate potential safety hazards that could harm you or others or cause product or
property damage.
Warning:
Warning:
The Orca generates high temperatures. Do not reach inside the machine
when operating. Always allow the Orca to cool down first.
The Orca includes moving parts. Never reach the Orca when the machine
is in operation.
Warning:
Do not leave the Orca unattended during operation.
Caution:
Only use the power supply provided with your Orca.
Caution:
We recommend only to use materials supplied by Orcabot. Other
materials can have unexpected properties with can influence the quality
or worse.
In case of emergency disconnect power supply from wall socket.
Caution:
Caution:
Orca melts plastic during printing. Plastic odors are emitted during this
operation. Make sure to set up the Orca in a well-ventilated area.
User manual: Orcabot XXL - version 1.4
- www.orcabot.com -
5
4. Specifications
Printing
Print technology:
Fused Filament Fabrication (FFF)
Layer resolution:
50 µm
Position resolution:
50 µm
Nozzle diameter:
0,35mm-0,4mm
Filament:
1,75mm Orcabot filament
Dimensions
Build volume:
360x280x230mm
Frame dimensions:
620x400x520mm
Total weight:
Temperature
Ambient operating temperature:
10˚C - 40 ˚C
Storage temperature:
0˚C - 50 ˚C
Electrical
AC input:
88-264 VAC
Frequency range:
47-63 Hz
DC Voltage:
24V
Rated Current:
13A
User manual: Orcabot XXL - version 1.4
- www.orcabot.com -
6
5. FFF 3D-print technology
Fused filament fabrication (FFF) is an additive manufacturing technology commonly used for
modeling, prototyping, and production applications.
FFF works on an "additive" principle by laying down material in layers; a plastic filament or metal
wire is unwound from a coil and supplies material to produce a part.
The technology was developed by S. Scott Crump in the late 1980s and was commercialized in 1990.
User manual: Orcabot XXL - version 1.4
- www.orcabot.com -
7
6. Setting up the Orca
After unpacking the Orca, the next step is setting up the printer. A few things are important:
-
The Orca must be placed on a smooth and level surface
There must be an electric socket, recommended is a socket with an on/off switch
It is recommended to choose a room or place which has a decent ventilation
Before testing and connecting the printer to the computer, choose a solid table or desk, to put the
printer on. Next step is to install the glassplate (use the 4 clamps), spool holders and tube holders
including tube at the right side of the machine.
Fig.1: Glassplate
Fig. 2: Tubeholder
Fig. 3: Spoolholder
Next step is to connect the power cable. You can find the
connection on the right side of the machine (at the
bottom). Here you can also find the On/Off switch.
Fig. 4: Power cable and On/Off switch.
User manual: Orcabot XXL - version 1.4
- www.orcabot.com -
8
Switch the machine on and connect the Orca with a computer via the USB cable.
You can find the USB port at the back of the machine. Above the USB port, there is
another On/Off switch for safety.
Once the USB cable is connected, the computer will detect a new USB device on one of the COM
ports. In the next chapter you can find the description how to install the printer driver and software.
User manual: Orcabot XXL - version 1.4
- www.orcabot.com -
9
7. Installing the software
Windows only, there is also an Apple OS package.
On the Orcabot website you can download the driver and software to control your Orca 3D printer.
Step 1, Orcabot Repetier Host install
On the Orcabot website you can find the software for the Orcabot XXL.
Go to Support; Downloads and click on: Orcabot Repetier Host Setup. The software will be
downloaded. When double clicking on the executable, the software will start the installation.
First, choose your preferred language for the installation.
The following dialog will appear:
Click: “Next”
If you agree with the license agreement, select
“I accept the agreement” and click “Next”.
Select the destination folder and click “Next”.
User manual: Orcabot XXL - version 1.4
- www.orcabot.com -
10
Select the start menu folder and click “Next”.
Select the checkbox to create a desktop icon
and click “Next”.
Click “Install” to proceed with the installation.
Finally click “Finish” to finish the installation.
User manual: Orcabot XXL - version 1.4
- www.orcabot.com -
11
8. Printer Settings
Start Orcabot Repetier Host and select “Printer settings” in the right top corner.
Please enter the following settings in the four TAB’s and after that press “Apply” and “OK”.
User manual: Orcabot XXL - version 1.4
- www.orcabot.com -
12
User manual: Orcabot XXL - version 1.4
- www.orcabot.com -
13
9. Installing Print Profile
Next step is to install the latest Print Profiles in Orcabot Repetier Host (during the installation of
Orcabot Repetier Host the basic printfiles are installed). These files include the layer height and
settings for printing a specific material like: PLA, ABS, Nylon etc..
You can download the latest Repetier Print Profiles from the Orcabot website.
Go to the TAB Slicer and click on the button “Manager”.
Select “Slic3r” at the left side of the dialog and click “Apply”.
User manual: Orcabot XXL - version 1.4
- www.orcabot.com -
14
Next click “Configure”.
Click “File”; “Load Config” and select the Orca Slic3r Profile.
Go to the TAB “Print settings” and save the settings.
User manual: Orcabot XXL - version 1.4
- www.orcabot.com -
15
Go to the TAB “Filament settings” and save the settings.
Go to the TAB “Printer settings” and save the settings.
User manual: Orcabot XXL - version 1.4
- www.orcabot.com -
16
Make sure you also select the new profiles in the Repetier drop down menu’s.
User manual: Orcabot XXL - version 1.4
- www.orcabot.com -
17
10.
Prepare G-code for printing
Before anything can be printed, a 3D file must be exported to or saved as a “.STL” file. These files are
suitable for 3D printing. Make sure when saving the file, that the Z-axis is pointing in the right
direction (UP).
In Repetier STL files can be loaded and will be shown in 3D. Just click on the button “Add object” in
the TAB Object Placement and choose the STL file or files. Everytime when a new object is loaded, it
will be placed automaticaly in the screen and will be show in the list of STL objects. It is also possible
tot manually move them with the mouse, or use the button: “Center object”.
There is also the possibility to scale the models or place/rotate them with coordinates.
User manual: Orcabot XXL - version 1.4
- www.orcabot.com -
18
Next step is to Slice the Object. Go to the Slicer TAB and click “Slice with Slic3r”. This can take some
time.
After the slicing is done, the program will automatically change to the tab G-code.
In the object screen a blue “layered” object will show up (if not click on the “Show Filament” button).
The dark blue line show the object layer by layer. The light blue lines show the Z-movements (no
printing).
You can save the G-code by pressing the Save Job button on top of the screen.
User manual: Orcabot XXL - version 1.4
- www.orcabot.com -
19
11.
Prepare G-code for printing with dual extruder
For printing with dual extruder you need two STL files.
Open Slic3r via the button “Configure” on the TAB Slicer.
Go to File; Combine multi-material STL files…
After that, select the first file, click Open, select the second file, click open and click cancel. This
sequence is also defining which spool will be used. Spool 1 / Extruder 1 will be used for file 1 and
Spool 2 / Extruder 2 will be used for file 2.
Next step is to save the new file as an AMF file.
Click on the Add button and select the file. The file will appear on the screen.
User manual: Orcabot XXL - version 1.4
- www.orcabot.com -
20
Choose the right Print settings and click Export G-code.
User manual: Orcabot XXL - version 1.4
- www.orcabot.com -
21
12.
Printing
It is always important to start with a clean Printbed. Degrease the Printbed with a towel and e.g.
Acetone.
To start printing, the Orcabot XXL must be switched on and connected to the computer via the USB
cable. After that click on the button “Connect” in the top left corner.
The big “Cross” with the arrows are for manual control of the printer. In the corners you can find the
home buttons (homeX, homeY, homeZ and homeALL).
Be careful! Only use homeZ / HomeALL when the Z-is calibrated. Try some arrows and make some
moves to make sure that the printer is online and correctly connected.
User manual: Orcabot XXL - version 1.4
- www.orcabot.com -
22
The next step is to set the temperature for the Extruder and the Printbed. First fill in the requested
temperature and after that click on the button “Heat Extruder” and “Heat Printbed”. The
temperature values in grey are the current temperatures.
Always wait untill the right temperature is reached before continuing!
For temperature settings, please go to www.orcabot.com.
If the temperature is reached, the printer is almost ready for printing, but first manually feed the
extruder with some material.
User manual: Orcabot XXL - version 1.4
- www.orcabot.com -
23
Click in Repetier on the button Extrude for e.g. 50mm. Press the material softly and slowly in the
extruder until the extruder takes the material. Feed it until a good amount of material is flowing
through the extruder underneath. After this, use tweezers to remove the material.
Warning: the heater is very hot, so don’t touch it with bare hands!
Warning: never touch the printer bed or extruder with bare hands!
User manual: Orcabot XXL - version 1.4
- www.orcabot.com -
24
Always use tweezers or pliers to remove prints from the bed. If the bed is touched with bare hands,
it’s possible that the bed lose its cohesion. If so, then degrease the bed with acetone.
If this is done, press “Run Job”.
While printing, it’s always very important to
check the first layer and amount of printed
material.
With this wheel on the Z-axis, the height of the
bed can be changed (this is only useful for the
first layer while printing).
Check the line of material. If it’s too thin turn
the wheel clockwise to raise the bed a bit. Do
this until the lines are completely closed. If the
lines are too thick and the material is really
“sweeping up”, then turn the wheel counter clockwise to lower the bed a bit.
After printing, the machine will automatically cool of and lower and move the bed away from the
extruder head. Wait for the machine to cool off and then remove the printed object. Reminder,
never touch the bed of extruder with bare hands. Use pliers or tweezers for removing parts (not
manually, otherwise you need to degrease again).
User manual: Orcabot XXL - version 1.4
- www.orcabot.com -
25
13.
Replacing material
If the spool with material is (almost) empty, or when another material or color is wanted, it is time to
replace the spool.
Switch on the printer and run Printer interface.
Switch on the heater and wait till it has reached
its temperature.
Try to leave min. 1 cm filament sticking out.
After that, Retract the extruder via the Retract
button in Repetier and remove the old filament
which was in the extruder. After that insert the
new filament.
User manual: Orcabot XXL - version 1.4
- www.orcabot.com -
26
14.
Calibration of the 2nd extruder
This manual describes how to calibrate the 2nd extruder according to the 1st extruder.
You can calibrate the extruder by taking the following steps:
Print the calibration print
1. Start the printer and connect the printer with the Orcabot Repetier Host software.
2. Print the calibration print with the dual heads (PLA).
(You can use also a file with double extruder, where you can measure the offsets.)
3. Measure the offsets between the two heads.
Change the offset value
4. Put a USB stick in the Orcabot XXL.
5. Enter manually the command M511 (TAB manual control). The software will copy a .CFG file with
settings from the printer to the USB stick.
6. Open the CFG file on a computer. Use Notepad or Wordpad.
7. Change the following line:
8. Extruder_1_offset = x.x, y.y, z.z
;
9. When extruder two has to move for example X -1mm, you have to change the X-value -1mm. The
same for the Y and Z. A negative Z offset means the nozzle comes closer to the bed.
10. Save the file again on the USB stick and put the stick in the printer.
11. Enter manually the command M510 to copy the file to the printer.
12. Disconnect the printer.
13. Reboot the printer
14. Home all axis and check the printer.
User manual: Orcabot XXL - version 1.4
- www.orcabot.com -
27


![User Manual BS 15 [ASL]](http://vs1.manualzilla.com/store/data/005675346_1-422b291500c6ff99ebe2f8b515793259-150x150.png)