1
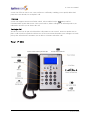
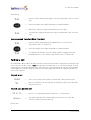
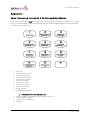
IP 530
User Manual
IP 530 User Manual
Document No. 099
Version No. V5.51/0411/1
© Copyright SpliceCom Ltd
SpliceCom Ltd
The Hall Business Centre, Berry Lane
Chorleywood, Herts WD3 5EX
Tel: 01923 287700
Website: www.splicecom.com
IP 530 User Manual
Contents
Introduction ........................................................................................................... 3
About this manual .............................................................................................................................................................. 3
How your IP 530 will operate ............................................................................................................................................ 3
Feature Highlights .............................................................................................................................................................. 3
Your IP 530 ............................................................................................................. 4
Basic Call Handling ................................................................................................. 6
Making a call ....................................................................................................................................................................... 6
Redialling a previously dialled number ............................................................................................................................ 6
Answering a call ................................................................................................................................................................. 6
Rejecting a call.................................................................................................................................................................... 7
Ending a call........................................................................................................................................................................ 7
Placing a call on hold ......................................................................................................................................................... 7
Transferring a call ............................................................................................................................................................... 7
Parking a call ....................................................................................................................................................................... 8
Conference Calls ................................................................................................................................................................ 9
Call Waiting ....................................................................................................................................................................... 10
Switching to and from Hands-free .................................................................................................................................. 10
Muting a call ..................................................................................................................................................................... 11
Changing the volume ...................................................................................................................................................... 11
Do Not Disturb ................................................................................................................................................................. 12
Call History ............................................................................................................ 13
View the contents of your Call History ........................................................................................................................... 13
Viewing details of a call ................................................................................................................................................... 14
Redialling a number ......................................................................................................................................................... 14
Ringing back a caller ........................................................................................................................................................ 14
Deleting a call ................................................................................................................................................................... 14
Internal Contacts Directory ..................................................................................... 16
Using The Internal Directory ........................................................................................................................................... 16
Blacklisting a number....................................................................................................................................................... 18
Voicemail .............................................................................................................. 22
Receiving a message ....................................................................................................................................................... 22
Diverting an incoming call to voicemail ......................................................................................................................... 22
Listening to a message .................................................................................................................................................... 22
Message Management ................................................................................................................................................... 22
Recording a Greeting ....................................................................................................................................................... 24
Using an Assistant telephone number ........................................................................................................................... 25
Leaving a message for a colleague ................................................................................................................................ 25
Transfer a call to a colleague’s voicemail ....................................................................................................................... 26
Adding a name tag to a caller’s telephone number ..................................................................................................... 26
Mobility ................................................................................................................. 28
Follow Me ......................................................................................................................................................................... 28
Call Forwarding ................................................................................................................................................................. 29
Extension Anywhere ........................................................................................................................................................ 30
V5.51/0411/1
i
Contents
IP 530 User Manual
IP 530 User Manual
IP 530 Administration ............................................................................................. 31
Setting the time on your IP 530 ...................................................................................................................................... 31
Phone Information ........................................................................................................................................................... 31
Partnering your IP 530 with your PC or laptop ......................................................... 33
Appendix 1 ............................................................................................................ 34
Voice Processing, Voicemail & Call Forwarding Options ............................................................................................... 34
V5.51/0411/1
ii
Contents
IP 530 User Manual
IP 530 User Manual
Introduction
About this manual
This manual contains all that you need to know to operate your IP 530 connected to a SpliceCom
maximiser system using version 3.2 software. This manual assumes that the IP 530 terminal has been
connected and configured by your System Administrator, and is ready for use. If this is not the case
please refer to your System Administrator for further assistance.
How your IP 530 will operate
Your User Account
You are a “User” of the SpliceCom maximiser telephone system and as such you have a User account
on the system. Your User name will be used to identify you as you make, receive and transfer calls.
Each of your colleagues will also have a User account and will be identified in the same way, by their
User name.
Logging On
In all implementations the IP 530 will be your permanent desktop phone and as such it will have been
automatically allocated to you by your System Administrator therefore there will be no need for you to
log in or log out.
Idle Display
The default display on your telephone when idle will display the time and date, together with your
User Name in the top LH corner.
Feature Highlights
Context Sensitive Display and Soft Keys
You can use your IP 530 to do far more than just making and taking telephone calls. Six preprogrammed keys are provided for the most frequently used telephony tasks – Hold/Transfer,
Handsfree, Last Number Redial , Voicemail, Conference and Mute – whilst all other features are
managed through a backlit, monochrome Context Sensitive Display, with four soft keys whose
function changes depending on the task. This makes the IP 530 both functional and easy-to-use.
Internal Directory
Your IP 530 offers an internal contact directory for up to 100 different people, companies or
departments. This directory allows you to store multiple telephone numbers against each entry,
making it easy to make or transfer telephone calls to those that you regularly speak to
Voicemail
The SpliceCom maximiser system provides easy-to-use voicemail functionality allowing your callers to
leave a message and via your IP 530, makes it easy for you to manage these messages.
Conference Calls
V5.51/0411/1
3
Your IP 530
IP 530 User Manual
IP 530 User Manual
Your IP 530 offers an easy to use 3-way conference call facility, enabling you to quickly add a third
party when your already on a telephone call.
Intercom
Your IP 530 supports an Intercom facility which, when enabled on the maximiser Unified
Communication system that your IP 530 is connected to, allows colleagues to call and speak to you
without the need for you to answer the call.
Parking a Call
All calls received can be put on hold and the call remains in your control. However another way to
place a call on hold is to park the call into one of the system areas that allow your colleagues to easily
pick up the call and in the meantime you are able to continue with other calls.
Your IP 530
V5.51/0411/1
4
Your IP 530
IP 530 User Manual
IP 530 User Manual
MUTE
The Mute key will enable you to turn on or off this facility. Please refer to page 11
for further details.
The Volume Down button will enable you to reduce the handset or hands-free or
ringing volume on your IP 530. Please refer to 11 for further details.
The Volume Up button will enable you to increase the handset or hands-free or
ringing volume on your IP 530. Please refer to page 11 for further details.
The Speaker button will place your phone off-hook and enable you to use handsfree mode. Please refer to page 10 for further details.
HOLD/RECALL
The Hold/Recall key is used place calls on hold and/or transfer them. Please refer
to page 7 for further details.
MESSAGE
The Message key will provide you with direct access to your voicemail messages.
Please refer to page 22 for further details.
CONF
The Conference key allows 3-way conference calls to be easily set-up. Please refer
to page 8 for further details.
The Last Number Redial key allows the last number dialled from the IP 530 to be
automatically re-dialled. Please refer to page 6 for further details.
The Volume Up button can also be used to scroll up through entries on the
display. Please refer to page 13 for further details.
The Volume Down button can also be used to scroll down through entries on the
display. Please refer to page 13 for further details.
The blue Message Waiting Indicator will light if you have received a new voicemail
message. Please refer to page 22 for further details.
The blue Power Indicator shows that the IP 530 is active.
V5.51/0411/1
5
Your IP 530
IP 530 User Manual
IP 530 User Manual
Basic Call Handling
Making a call
Send
1
Lift the handset or press the Handsfree key. You will hear dial tone.
2
Dial the number (internal or external) required using the alpha-numeric
keypad
3
Press the “Send” Soft Key (extreme LHS), or wait for the number to be dialled.
4
The Context Sensitive Display screen will show the number you are calling.
Context Sensitive Display
Call Status will display the name of the person you have called (if known by the system), the number
you have dialled and the length of time of the call.
Cancel
1
If you have started to make a call, have changed your mind and wish to stop
the call press the Soft Key underneath “Cancel” (extreme RHS) or replace your
handset.
If you are required to enter further digits once the call has been made, for example, when presented
with an auto attendant use the alpha-numeric keypad to enter the digits.
Redialling a previously dialled number
Send
1
Press the Redial key. You will be presented with you Dialled Calls list.
2
Use the Scroll Up/Down keys to select the number (or name) that you wish
to dial.
3
Press the soft key underneath “Send” to dial the number.
Answering a call
On receiving a call your handset will ring and Context Sensitive Display will show the details of the call:
First line - the caller’s name (if recognised by the system)
Second line - the caller’s number (if presented)
This information enables you to answer the call in the required manner.
Answer
V5.51/0411/1
1
To answer the call lift your handset, or press the Handsfree key, or press
the Soft Key under “Answer” (extreme LHS).
6
Basic Call Handling
IP 530 User Manual
IP 530 User Manual
Once the call has been answered the Context Sensitive Display will change to show:
First line - the caller’s name (if recognised by the system), or the caller’s
number
Second line - the length of time that the call has been in progress
Rejecting a call
Reject
1
If you do not wish to answer the call press the Soft Key underneath
“Reject” (extreme RHS).
The call will be passed to your Forward on Busy number (if set), or passed to voicemail (if enabled), or
cancelled. (Please refer to your System Administrator for further information on your Forward on Busy
number).
Ending a call
Cancel
1
Replace your handset, or press the Handsfree key, or press the Soft Key
underneath “Cancel” (extreme RHS).
Please note:
• The Handsfree key will only end the call if used in hands-free mode, otherwise this key will switch
from handset to hands-free mode.
Placing a call on hold
Hold
Resume
1
Press the “Hold” Soft Key (extreme LHS).
2
External callers will be played “music on hold” if configured. (Please refer
to your System Administrator for further details).
3
To retrieve the call, press the “Resume” Soft Key (extreme LHS).
Transferring a call
Announced Transfer
HOLD/RECALL
HOLD/RECALL
V5.51/0411/1
1
Place the call on hold by pressing the HOLD/RECALL key.
2
Enter the number to be dialled (internal or external number).
3
Wait for the call to be answered and announce the caller
4
To transfer the original call, press the HOLD/RECALL key.
7
Basic Call Handling
IP 530 User Manual
IP 530 User Manual
Alternatively,
Tran
Tran
1
Place the call on hold by pressing the soft key underneath “Tran” (2nd from
LHS)
2
Enter the number to be dialled (internal or external number).
3
Wait for the call to be answered and announce the caller.
4
To transfer the original call, press the soft key underneath “Tran” (2nd from
LHS).
Unannounced Transfer (Blind Transfer)
Tran
Tran
1
Place the call on hold using the HOLD/RECALL key, or the soft key
underneath “Tran” (2nd from LHS).
2
Enter the number to be dialled (internal or external number).
3
To complete the transfer, once the called number is ringing, press the
HOLD/RECALL key, or the soft key underneath ”Tran” (2nd from LHS).
Parking a call
The Park facility allows calls to be put on hold in a system area so that the call can be picked up by any
other extension on the system. maximiser provides four Park Slots (1, 2, 3 and 4) by default. If a call
is parked in one of these Park Slots users of PCS 580, 570, 560, 410 and 100 IP 530s or PCS 60 and PCS
50 IP Softphones or Phone Partners, with access to these park slots, will see the parked call and can
retrieve it if required.
To park a call
Hold
1
Once on the call press the soft key underneath “Hold” (extreme LHS).
*51
2
Dial *51 to Park the call. The Park Slot on which the call is now held will be
announced to you.
To pick up a parked call
*52 to *55
1
Dial *52 - *55 to pickup up calls in Park Slots 1 – 4 respectively.
Answer
2
Your phone will ring as the Parked call is presented to you. Press the
“Answer” Soft Key to pick-up the call.
Please note:
V5.51/0411/1
8
Basic Call Handling
IP 530 User Manual
IP 530 User Manual
•
•
•
If a parked call is not picked up within 5 minutes (the default Park Timeout) the call will be
represented to you and can be answered in the normal way.
If you are unable to pick up a call parked by a colleague you may be operating within a different
“Company” to your colleague. Please refer to your System Administrator for further details.
If you belong to a “Company” this Company may be configured with a different Park Timeout to
the default 5 minutes described above. Please refer to your System Administrator for further
details.
Conference Calls
The conferencing facility allows you to create a 3-way conversation between yourself and two internal
and/or external calls. (Please note that this feature must be enabled on your telephone system.
Please refer to your System Administrator for further information.)
Creating a conference call
CONF
CONF
1
Make a call to the first number required (internal or external)
2
During the call press the CONF key to put the call on hold.
3
Using the alpha-numeric keypad enter the internal or external number of
the person you wish to join the conference.
4
When the person you have called answers press the CONF key again and
all three parties will be conferenced together. The two parties’ names or
numbers will be shown on the Context Sensitive Display.
5
Please note: If you hang up the call, the other two parties will be
disconnected.
To end a conference call
Cancel
1
Replace your handset, or press the Handsfree key, or press the soft key
underneath “Cancel” (extreme RHS) to end the conference. All calls will be
cleared.
Please note that pressing the Speaker button will only end the conference if the IP 530 is used in
hands-free mode otherwise this button will switch from handset to hands-free mode.
Cancelling a conference call
You may wish to cancel the conference and return to a 2-way conversation with your calls as follows.
Split
Switch
V5.51/0411/1
1
Press the soft key underneath “Split” (2nd from RHS).
2
Both calls will be placed on hold. The first call you made to create the
conference will be shown on the Context Sensitive Display.
3
Press the soft key underneath “Switch” (2nd from RHS) to toggle between
the two held calls on the display.
9
Basic Call Handling
IP 530 User Manual
IP 530 User Manual
Resume
4
Press the soft key underneath “Resume” (extreme LHS) to continue with the
call to the party shown on the display.
CONF
1
Whilst on a call to any one of the two parties, you can return to a 3-way
conference at by pressing the CONF key (providing the other party is still on
Hold).
If one of the conference members ends their call you will return to a 2-way conversation with the
other member of the conference.
Call Waiting
Call Waiting is a facility that allows you to receive a second call while still connected to another call.
The use of this feature is controlled by your System Administrator who will inform you whether this
facility has been enabled on your extension.
Handling a waiting call
Reject
1
When a second call is presented you will hear a beep in your handset (or
speaker if using handsfree and a Incoming call message will appear on your
screen, along with the name or number of the person calling you.
2
If you do not wish to answer the call press the context sensitive key
underneath Reject (2nd from RHS). The call will be passed to your Forward on
Busy number (if set) or passed to voicemail (if enabled) or cancelled.
(Please refer to your System Administrator for further information on your
Forward on Busy number.)
2
If you wish to answer the 2nd call press the context sensitive key underneath
Answer (2nd from LHS). The original call will be put on hold.
2
If you wish to answer the 2nd call press the context sensitive key underneath
Cancel (extreme RHS). The original call will be terminated and your IP 530
will ring with the 2nd call.
Alternatively,
Answer
Alternatively,
Cancel
Switching to and from Hands-free
You may wish to switch between hands-free and handset operation without interrupting the call.
1
From handset to hands-free – press the Handsfree key and replace the
handset. From hands-free to handset – lift the handset.
Please note that if you press the Handsfree key whilst in hands-free mode you will end the call.
V5.51/0411/1
10
Basic Call Handling
IP 530 User Manual
IP 530 User Manual
Muting a call
The Mute facility will allow you to prevent a caller from hearing, for example, your conversation with
another colleague.
MUTE
1
Press the Mute key to mute your call.
2
The Muted message will appear in the centre of the Context Sensitive
Display.
3
Press the Mute key again to turn this feature off.
Changing the volume
You can change the ringing volume and conversation volume at any time during or before a call.
Changing the Volume before a call
Hands-free volume
1
Press the Handsfree key.
2
Press the Volume Up or Down keys as required.
3
Press the Handsfree key when finished.
1
Lift your handset.
2
Press the Volume Up or Down keys as required.
3
Replace the handset when finished.
Handset volume
Changing the Ringing Volume
1
Press the Volume Up or Down keys as required. The ringing volume will
increase or decrease appropriately.
Changing the Volume during a call
Hands-free volume
If you have answered the call using the Handsfree key:
V5.51/0411/1
11
Basic Call Handling
IP 530 User Manual
IP 530 User Manual
1
Press the Volume Up or Down keys as required. The hands-free volume will
increase or decrease appropriately.
Handset volume
If you have answered the call using the handset:
1
Press the Volume Up or Down buttons as keys. The volume of your handset
will increase or decrease appropriately.
Do Not Disturb
The Do Not Disturb facility allows you set your extension as permanently busy. This is useful if, for
example, you are holding a meeting in your office and do not wish to be disturbed.
Turning on Do Not Disturb
DND
1
Press the soft key underneath DND (2nd from RHS).
2
The DND icon will appear in the top RHS of the Context Sensitive Display to
indicate that this feature has been set.
When DND is enabled:
•
•
Your calls will be automatically passed to your Forward on Busy number, if configured, or to
voicemail, if enabled. (For further information on your Forward on Busy Number please refer to
your System Administrator.)
Your entry in the Contacts Directory will display the blue DND icon
to inform your colleagues
that your extension has Do Not Disturb set. Your colleagues who are using a PCS 50, 60, 100,
410 or PCS 570 will also be informed that you have Do Not Disturb set via their respective
directories.
Turning off Do Not Disturb
DND
V5.51/0411/1
1
Press the soft key underneath DND (2nd from RHS).
2
The DND icon will no longer appear in the top RHS of the Context Sensitive
Display to indicate that this feature is no longer active.
12
Basic Call Handling
IP 530 User Manual
IP 530 User Manual
Call History
The History soft key (extreme LHS) allows you to view and manage a historical list of your outgoing
and incoming calls - internal & external answered & missed. (For further information on voicemail
please refer to page Error! Bookm ark not defined..)
View the contents of your Call History
History
•
•
1
Press the soft key underneath History (extreme LHS).
A list of calls in historical order will be displayed.
Entries are listed in date and time order with the newest at the top.
Each entry will display the number or name (if recognised by the system) of the caller or the number
or name (if recognised by the system) you called.
Back
1
Use the Scroll Up/Down keys to display the entry required.
2
Use the soft key underneath Back (extreme LHS) to return to the default
Context Sensitive Display view.
Identifying the type of call
Signifies an incoming call
Signifies an outgoing call
Signifies an un-answered incoming call
Missed Calls
An incoming call received by your phone that is not answered will be registered (even if a voicemail is
subsequently left) as an un-answered call in your Call History.
View
Back
1
The un-answered call icon will flash in the top RH corner of the context
sensitive display and the text “1 New Missed Call” will also appear directly
underneath the time. If a voicemail has been left the text “New Voice Mail”
appears instead of the Missed Call message.
2
Press the soft key underneath View (extreme LHS) to view this call.
3
Use the soft key underneath Back (extreme LHS) to return to the default
Context Sensitive Display view.
When you return to the default Context Sensitive Display, the un-answered call icon and text relating
to it will no longer be displayed.
V5.51/0411/1
13
Call History
IP 530 User Manual
IP 530 User Manual
Viewing details of a call
Option
OK
1
Whilst viewing the Call History list press the soft key below Option (2nd from
RHS).
2
Use the Scroll Up/Down keys to select Detail.
3
Use the soft key underneath OK (extreme RHS) to view further details of the
call.
Call details include:
•
•
•
The name of the caller (if known by the system).
The number of the caller (if presented to the system).
The day, date and time of the call.
Redialling a number
You may wish to redial a number that you have previously dialled, this can be done by selecting the
original call from the Call History.
History
Send
1
Press the soft key underneath History (extreme LHS).
2
Use the Page Down and Page Up buttons to display the entry required.
3
Use the soft key underneath Send (extreme RHS) to call this number.
Ringing back a caller
You may wish to call the number of a previous caller; this can be done from the Calls History in exactly
the same manner
History
Send
1
Press the soft key underneath History (extreme LHS).
2
Use the Page Down and Page Up buttons to display the entry required.
3
Use the soft key underneath Send (extreme RHS) to call this number.
Please note that if the caller’s number has been withheld or not received by the system this facility will
not be available.
Deleting a call
To manually delete an entry from your Call History;
History
V5.51/0411/1
1
Press the soft key underneath History (extreme LHS).
2
Use the Page Down and Page Up buttons to display the entry required.
14
Call History
IP 530 User Manual
IP 530 User Manual
Delete
Back
3
4
Use the soft key underneath Delete (2nd from LHS) to permanently remove
this entry.
Use the soft key underneath Back (extreme LHS) to return to the default
Context Sensitive Display view.
Deleting everything in Call History
To you wish to manually delete every entry in your Call History;
History
Option
1
Press the soft key underneath History (extreme LHS).
2
Press the soft key below Option (2nd from RHS).
3
Use the Scroll Up/Down keys to select Delete All.
OK
4
OK
5
Back
6
V5.51/0411/1
Use the soft key underneath OK (extreme RHS) to delete all entries in your
Call History.
You will be presented with a warning screen – Delete all records? – Cancel
or OK. Press the soft key under OK (extreme RHS) for 2nd time to complete
the deletion of all entries in your Call History.
Use the soft key underneath Back (extreme LHS) to return to the default
Context Sensitive Display view.
15
Call History
IP 530 User Manual
IP 530 User Manual
Internal Contacts Directory
Your IP 530 provides you with an Internal Directory of up to 100 entries, which provides you with a list
of Contacts and telephone numbers, enabling you to make calls quickly and easily; and to match
incoming telephone numbers so that you can identify callers and handle the calls in the appropriate
manner.
Your IP 530 utilises this directory to enable to you quickly and easily call a colleague, an external
customer or supplier, for example, and an internal department.
The directory enables you to call or transfer a call to a colleague without having to remember their
extension number. Each of your colleagues will have a User account on the maximiser telephone
system and you can enter a list of your names making it easier for you to phone either their extension
number, mobile or another (typically home) number.
The directory enables you to call or transfer a call to an external contact such as a customer, supplier,
partner, etc. that you have entered
The directory will also enable you to enter phone numbers, place phone calls and transfer calls to an
internal Department where the call can be answered by any one of a group of people, such as Sales,
Support, Accounts etc.
The directory will display your list of numbers alphabetically once you have created them enabling you
to call or transfer calls to regularly used numbers.
(Please note that the IP 530’s Internal Directory is completely separate from the system wide
maximiser Unified Directory, access to which is not available via the IP 530. This Internal Directory also
replaces the need for maximiser Favourites, which again are not supported on the IP 530.
Using The Internal Directory
Adding Contacts to your Internal Directory
Dir
Enter
Add
Save
1
Press the soft key underneath Dir (2nd from LHS).
2
Use the Scroll Up/Down keys to select Contacts.
3
Press the soft key underneath Enter (extreme RHS).
4
Press the soft key underneath Add (2nd from LHS).
5
Enter Contact’s name using the alpha-numeric keypad.*
6
Use the Scroll Up/Down keys to toggle between the other fields (Office,
Mobile and Other (Home) and enter the relevant telephone numbers.
7
When you’ve finished press the soft key underneath Save (extreme RHS).
*Please note, once entering a name and numbers from the alpha-numeric keypad, different entry
modes are available to you depending on your preference. These can be changed using the soft key
V5.51/0411/1
16
Internal Directory
IP 530 User Manual
IP 530 User Manual
that is 2nd from the LHS. Options are; 2aB (numeric, upper and lower case text), abc (lower case text
only), ABC (upper case text only), or 123 (numeric only).
Adding Contacts from your Call History
History
Option
OK
Save
1
Press the soft key underneath History (extreme LHS).
2
Use the Page Down and Page Up buttons to highlight the entry required.
3
Press the soft key below Option (2nd from RHS).
4
Use the Scroll Up/Down keys to select Add to Contacts.
5
Press the soft key underneath OK (extreme RHS) to create a contact with
this name and/or telephone number.
6
Enter Contact’s name using the alpha-numeric keypad.*
7
Use the Scroll Up/Down keys to toggle between the other fields (Office,
Mobile and Other (Home) and enter the relevant telephone numbers.
8
When you’ve finished press the soft key underneath Save (extreme RHS).
Viewing your Directory entries
Dir
Enter
Option
OK
1
Press the soft key underneath Dir (2nd from LHS).
2
Use the Scroll Up/Down keys to select Contacts.
3
Press the soft key underneath Enter (extreme RHS).
4
Use the Scroll Up/Down keys to view your Contacts.
5
Once you have highlighted the Contact you require, press the soft key
below Option (2nd from RHS).
6
Use the Scroll Up/Down keys to highlight Detail.
7
8
Press the soft key underneath OK (extreme RHS) to display further details on
your chosen Contact.
Use the Scroll Up/Down keys to view your Contact’s office, mobile and
other/home telephone numbers.
Searching for Directory entries
Dir
Search
1
Press the soft key underneath Dir (2nd from LHS).
2
Use the Scroll Up/Down keys to select Contacts.
3
Press the soft key underneath Search (2nd from LHS).
4
OK
V5.51/0411/1
5
Search for a particular entry using the alpha-numeric telephony keypad. e.g.
In ‘ABC” or “abc” mode, If an entry starts with A press “2” once, if it starts
with B press “2” twice, etc. Any part of the Contact name can be searched
for.
Once you have entered your search string using the alpha-numeric keypad
press the soft key underneath OK (extreme RHS).
17
Internal Directory
IP 530 User Manual
IP 530 User Manual
6
All the Contacts that match your search will be shown on the Context
Sensitive Display. Use the Scroll Up/Down keys to further refine this list if
necessary.
Making calls via the Directory
Dir
Enter
Send
1
Press the soft key underneath Dir (2nd from LHS).
2
Use the Scroll Up/Down keys to select Contacts.
3
Press the soft key underneath Enter (extreme RHS).
4
Use the Scroll Up/Down keys to view your Contacts.
5
6
Dial
7
Once you have highlighted the Contact you wish to call, press the soft key
below Send (extreme RHS).
Use the Scroll Up/Down keys to highlight the number you wish to call
(Office, Mobile or Other (Home).
Press the soft key underneath Dial (extreme RHS) to make the call.
Transferring calls via the Directory
Hold
Dir
Enter
Send
Tran
Select
1
Place the call on hold by pressing the soft key under Hold (extreme LHS).
2
Press the soft key underneath Dir (2nd from LHS).
3
Use the Scroll Up/Down keys to select Contacts.
4
Press the soft key underneath Enter (extreme RHS).
5
Use the Scroll Up/Down keys to select the desired Contact.
6
Once you have highlighted the Contact you wish to call, press the soft key
below Send (extreme RHS).
7
Wait for the call to be answered and announce the caller.
8
To transfer the original call, press the soft key underneath “Tran” (2nd from
LHS).
9
You will be prompted by the display to connect the call to your Contact to
the number of the call you currently have on hold, or to a new call. Use the
Scroll Up/Down keys to highlight the call on hold.
10
Press the soft key under Select (extreme RHS) to complete the Transfer.
Blacklisting a number
Your IP 530 gives you the ability to Blacklist entries in your Internal Directory. Calls placed to you from
any phone numbers you have stored against these Contacts will not ring your phone. Instead their call
will be passed to your Forward on Busy number (if set), or passed to voicemail (if enabled), or
cancelled. (Please refer to your System Administrator for further information on your Forward on Busy
number).
V5.51/0411/1
18
Internal Directory
IP 530 User Manual
IP 530 User Manual
Adding a Blacklisted Contact to your Internal Directory
Dir
Enter
Add
Save
1
Press the soft key underneath Dir (2nd from LHS).
2
Use the Scroll Up/Down keys to select Blacklist.
3
Press the soft key underneath Enter (extreme RHS).
4
Press the soft key underneath Add (2nd from LHS).
5
Enter Contact’s name using the alpha-numeric keypad.*
6
Use the Scroll Up/Down keys to toggle between the other fields (Office,
Mobile and Other (Home) and enter the relevant telephone numbers.
7
When you’ve finished press the soft key underneath Save (extreme RHS).
*Please note, once entering a name and numbers from the alpha-numeric keypad, different entry
modes are available to you depending on your preference. These can be changed using the soft key
that is 2nd from the LHS. Options are; 2aB (numeric, upper and lower case text), abc (lower case text
only), ABC (upper case text only), or 123 (numeric only).
Blacklisting an existing Contact
Dir
Enter
Option
OK
OK
1
Press the soft key underneath Dir (2nd from LHS).
2
Use the Scroll Up/Down keys to select Contacts.
3
Press the soft key underneath Enter (extreme RHS).
4
Use the Scroll Up/Down keys to view your Contacts.
5
Once you have highlighted the Contact you require, press the soft key
below Option (2nd from RHS).
6
Use the Scroll Up/Down keys to highlight Move to Blacklist.
7
Press the soft key underneath OK (extreme RHS).
8
You will be presented with a warning screen – You selected move to
Blacklist? – Cancel or OK. Press the soft key under OK (extreme RHS) for 2nd
time to complete the Blacklisting of this contact.
Removing Blacklisting from a Contact
Dir
Enter
V5.51/0411/1
1
Press the soft key underneath Dir (2nd from LHS).
2
Use the Scroll Up/Down keys to select Blacklist.
3
Press the soft key underneath Enter (extreme RHS).
4
Use the Scroll Up/Down keys to select the blacklisted Contact.
19
Internal Directory
IP 530 User Manual
IP 530 User Manual
Option
5
Press the soft key underneath Option (2nd from RHS).
6
Use the Scroll Up/Down keys to highlight Move to Contacts.
OK
7
Press the soft key underneath OK (extreme RHS).
OK
8
You will be presented with a warning screen – Move selected to Contacts? –
Cancel or OK. Press the soft key under OK (extreme RHS) for 2nd time to
remove Blacklisting from this Contact.
6
Use the Scroll Up/Down keys to highlight Delete.
7
Press the soft key underneath OK (extreme RHS).
8
You will be presented with a warning screen – Delete Selected? – Cancel or
OK. Press the soft key under OK (extreme RHS) for 2nd time to delete this
blacklisted Contact.
Alternatively,
OK
OK
Adding a Blacklisted Contact from your Call History
History
Option
OK
Save
1
Press the soft key underneath History (extreme LHS).
2
Use the Page Down and Page Up buttons to highlight the entry required.
3
Press the soft key below Option (2nd from RHS).
4
Use the Scroll Up/Down keys to select Add to Blacklist.
5
Press the soft key underneath OK (extreme RHS) to create a blacklisted
Contact with this name and/or telephone number.
6
Enter Contact’s name using the alpha-numeric keypad.*
7
Use the Scroll Up/Down keys to toggle between the other fields (Office,
Mobile and Other (Home) and enter the relevant telephone numbers.
8
When you’ve finished press the soft key underneath Save (extreme RHS).
*Please note, once entering a name and numbers from the alpha-numeric keypad, different entry
modes are available to you depending on your preference. These can be changed using the soft key
that is 2nd from the LHS. Options are; 2aB (numeric, upper and lower case text), abc (lower case text
only), ABC (upper case text only), or 123 (numeric only).
Viewing your Blacklisted Contacts
Dir
Enter
V5.51/0411/1
1
Press the soft key underneath Dir (2nd from LHS).
2
Use the Scroll Up/Down keys to select Blacklist.
3
Press the soft key underneath Enter (extreme RHS).
20
Internal Directory
IP 530 User Manual
IP 530 User Manual
Option
OK
4
Use the Scroll Up/Down keys to view your blacklisted Contacts.
5
Once you have highlighted the Contact you require, press the soft key
below Option (2nd from RHS).
6
Use the Scroll Up/Down keys to highlight Detail.
7
8
Press the soft key underneath OK (extreme RHS) to display further details on
your chosen blacklisted Contact.
Use the Scroll Up/Down keys to view your blacklisted Contact’s office,
mobile and other/home telephone numbers.
Searching for Blacklisted Contact entries
Dir
Search
1
Press the soft key underneath Dir (2nd from LHS).
2
Use the Scroll Up/Down keys to select Blacklist.
3
Press the soft key underneath Search (2nd from LHS).
4
OK
5
6
V5.51/0411/1
Search for a particular entry using the alpha-numeric telephony keypad. e.g.
In ‘ABC” or “abc” mode, If an entry starts with A press “2” once, if it starts
with B press “2” twice, etc. Any part of the blacklisted Contact name can be
searched for.
Once you have entered your search string using the alpha-numeric keypad
press the soft key underneath OK (extreme RHS).
All the blacklisted Contacts that match your search will be shown on the
Context Sensitive Display. Use the Scroll Up/Down keys to further refine this
list if necessary.
21
Internal Directory
IP 530 User Manual
IP 530 User Manual
Voicemail
SpliceCom’s maximiser business telephone system features integrated voicemail, which is available
to answer your SpliceCom IP 530 when you are busy or unavailable. Typically your voicemail will
answer any call that has rung for 20 seconds. Your System Administrator can enable this facility for
you, if not already available.
Receiving a message
If you are busy on a call or do not answer your phone the caller will be automatically passed to your
voicemail and will be able to leave a message. By default, your extension will ring for 20 seconds
before your extension is considered “not answered.” Your System Administrator will be able to tell
you if this default setting has been changed.
The blue Message Waiting indicator located at the top RH corner of the
SpliceCom IP 530 will light to indicate that you have a new message. In
addition the text “New Voice Mail” appears on the Context Sensitive Display
and the Message Waiting Icon in the top RH corner of the display will flash
Diverting an incoming call to voicemail
Reject
1
Press the soft key underneath Reject key (extreme RHS) to send the incoming
call to your voicemail.
The call will be passed to voicemail, unless you have Forward on Busy set. (Please refer to your System
Administrator for information on the Forward on Busy feature.)
Listening to a message
MESSAGE
1
2
3
Press the MESSAGE key to access your voicemail.
Depending on your system configuration, you may be prompted for an
account (extension) number and/or access code (pin/password).
The voicemail system will then automatically play your new messages in
time order, followed by any old messages you might have.
Message Management
Whilst listening to a message the following management options are available through the alphanumeric keypad of your IP 530:
V5.51/0411/1
22
Voicemail
IP 530 User Manual
IP 530 User Manual
Saving a message
7
1
Whilst listening to a message press 7 on the alpha-numeric keypad at any
time to save it.
Note: Once you have listened to a message, it will be automatically deleted
after 3 days, unless you choose to save it. A message is marked as listened to
once you have played the first 10 seconds.
Deleting a message
3
1
Whilst listening to a message press 3 on the alpha-numeric keypad at any
time to delete.
Forwarding a message
Whilst listening to a message you may wish to forward it to a colleague, or to your email account (as a
.wav file attachment).
5
1
1
2
Whilst listening to a message press 5 on the alpha-numeric keypad at any
time to access the message forwarding menu.
Press 1 on the alpha-numeric keypad to copy the message to another
voicemail user and add an explanatory message.
Alternatively,
2
2
Press 2 on the alpha-numeric keypad to copy the message to another
voicemail user.
Alternatively,
V5.51/0411/1
23
Voicemail
IP 530 User Manual
IP 530 User Manual
3
2
Press 3 on the alpha-numeric keypad to forward the message to your email
account.
2
Press 0 on the alpha-numeric keypad to exit from the Message Forwarding
menu.
Alternatively,
0
Checking on a caller’s telephone number
Whilst listening to a message you may wish to check on the caller’s number. (Please note that if the
caller’s number has been withheld this feature will not be available.)
9
1
Whilst listening to a message press 9 on the alpha-numeric keypad to check
on the caller’s number, which will then be announced to you.
Ringing back a caller
Whilst listening to a message you may wish to ring back the caller. The number that they rang from
can be dialled while listening to the message. (Please note that if the caller’s number has been
withheld this feature will not be available.)
0
1
Whilst listening to a message press 0 on the alpha-numeric keypad at any
time to return the call.
Recording a Greeting
A default message will be played to a caller when transferred to your voicemail. However you may
wish to record your own personal message.
You can record two voicemail greetings. Firstly, you have a daily greeting that can be used to inform a
caller of your whereabouts on a particular day, for example – “You have reached Alice Barker’s
voicemail on Tuesday, 4 July. I am currently in a meeting until 11 o’clock. Please leave a message and
I will call you on my return.” Your second greeting, the permanent greeting, can be used to give a
message that can be used on any day, for example – “You have reached Alice Barker’s voicemail.
Sorry I am unable to take your call. Please leave a message and I will get back to you as soon as
possible.” If you record a permanent greeting your daily greeting is deleted at midnight and the
permanent greeting is then used until a new daily greeting is recorded.
Recording a daily greeting
MESSAGE
*2
2
7
1
Press the MESSAGE key to access your voicemail.
2
Enter *2 on the alpha-numeric keypad to enter the New Greeting Recording
menu.
3
Press 2 on the alpha-numeric keypad to record a new greeting.
4
Once you have recorded your new greeting, press 7 on the alpha-numeric
keypad to save it. Hanging up will also have the same effect.
Alternatively,
V5.51/0411/1
24
Voicemail
IP 530 User Manual
IP 530 User Manual
3
4
To delete your newly recorded greeting and/or restore the default greeting
press 3 on the alpha-numeric keypad.
4
Press 0 on the alpha-numeric keypad to exit from the New Greeting
Recording menu.
4
Press 1 on the alpha-numeric keypad to listen to the list of options.
Alternatively,
0
Alternatively,
1
Recording a permanent greeting
MESSAGE
*6
3
1
Press the MESSAGE key to access your voicemail.
2
Enter *2 on the alpha-numeric keypad to enter the Extra Greeting Recording
menu.
3
Press 3 on the alpha-numeric keypad to record a new Permanent Greeting.
4
Once you have recorded your new greeting, hang up.
4
Press 0 on the alpha-numeric keypad to exit from the Extra Greeting
Recording menu.
4
Press 1 on the alpha-numeric keypad to listen to the list of options.
Alternatively,
0
Alternatively,
1
Using an Assistant telephone number
You may wish to give your callers the option to be transferred to a colleague rather than leave a
message; this might be your assistant or another member of your team. Your System Administrator
will need to configure this option/set-up the Assistant telephone number for you.
Once this feature has been configured your caller can press 0 while listening to your greeting and be
transferred to your Assistant telephone number. You will need to re-record your greeting to inform
your callers that facility is available.
Leaving a message for a colleague
You will automatically transfer to your colleague’s voicemail if they are busy or do not answer their
phone.
However you can connect directly to a colleague’s voicemail to leave a message, as follows:
V5.51/0411/1
25
Voicemail
IP 530 User Manual
IP 530 User Manual
#
1
Press # on the alpha-numeric keypad immediately dialling your colleague’s
extension number.
2
Your call will be immediately forwarded to your colleague’s voicemail. Leave
your message when prompted.
Transfer a call to a colleague’s voicemail
HOLD/RECALL
1
Place the call on hold using the HOLD/RECALL key.
1
Place the call on hold using the “Tran” Soft Key (2nd from LHS).
2
Press # on the alpha-numeric keypad immediately before dialling your
colleague’s extension number.
3
Once ringing complete the transfer by pressing the HOLD/RECALL key.
3
Once ringing complete the transfer by pressing the “Tran” Soft Key (2nd from
LHS).
Alternatively,
Tran
#
HOLD/RECALL
Alternatively,
Tran
Please note: that this facility will only be available if voicemail has been enabled for your colleague.
Adding a name tag to a caller’s telephone number
Whilst listening to a message you may wish to record the caller’s name, which will then be played
back to you immediately before you listen to any new message they might leave in the future.
*
2
7
1
2
3
Whilst listening to a message press * on the alpha-numeric keypad to enter
the Configuration Options Menu.
Press 2 on the alpha-numeric keypad to record a name tag for the caller’s
number of the message that you were listening to.
Once you have finished recording your greeting either press 7 or hang-up to
save the name tag.
Alternatively.
2
3
To re-record the name tag press 2 on the alpha-numeric keypad.
3
To delete the record the name tag press 3 on the alpha-numeric keypad.
3
To abandon the name tag recording process press 3 on the alpha-numeric
keypad at any time.
Alternatively.
3
Alternatively.
0
Alternatively.
V5.51/0411/1
26
Voicemail
IP 530 User Manual
IP 530 User Manual
0
V5.51/0411/1
3
To listen to all the options again press 0 on the alpha-numeric keypad at any
time.
27
Voicemail
IP 530 User Manual
IP 530 User Manual
Mobility
The maximiser Unified Communication system that your IP 530 is connected to provides flexible
Mobility and Call Forwarding facilities that allow you to still handle telephone calls whilst you’re away
from your desk or out of the office. A simple “Follow Me” facility for personal/DDI calls is provided
through the maximiser system itself.
The Follow Me feature allows you to configure your extension so that your calls follow you to an
internal extension or to an external number so that when you are, for example, working at another
desk, working at home, or using your mobile etc, your calls will still reach you. You could also use this
feature when you are, for example, on holiday and wish all your calls to be diverted to your assistant
or another colleague.
Please note: If your calls are forwarded to an internal extension and that extension is not answered or
busy the caller will be passed to your voicemail and the call will be logged as a missed call on your IP
530.
Follow Me
Setting your Follow Me telephone number
*56
#
Send
1
2
3
Dial *56 followed by the telephone number to which you want your calls
forwarded to and then # via the alpha-numeric keypad.
Press the soft key underneath “Send” (extreme LHS), or wait for the number
to be dialled.
You will be played a “Thank You” acknowledgement when this action has
been completed and the call will be automatically cleared down.
Forwarding your calls using Follow Me
*57
Send
1
2
Dial *57 the alpha-numeric keypad.
Press the soft key underneath “Send” (extreme LHS), or wait for the number
to be dialled.
You will be played a “Thank You” acknowledgement when this action has
been completed and the call will be automatically cleared down.
Turning Follow Me off
*58
Send
V5.51/0411/1
1
2
Dial *58 the alpha-numeric keypad.
Press the soft key underneath “Send” (extreme LHS), or wait for the number
to be dialled.
You will be played a “Thank You” acknowledgement when this action has
been completed and the call will be automatically cleared down.
28
Mobility
IP 530 User Manual
IP 530 User Manual
Call Forwarding
There is also a further Mobility facility that uses your contact numbers, which are pre-stored on
maximiser. This application is controlled through the same voice processing system that handles your
voicemails. This allows you to control the forwarding of your phone calls when you’re away from your
desk, or out of the office. Your System Administrator will need to set-up the telephone numbers you
wish to utilise when forwarding your phone. Typically this will be your home and mobile numbers,
however, you can also add up to two more numbers if required. Alternatively, if you are using
SpliceCom’s Vision Mobility web portal in conjunction with your IP 530 you can add these numbers
your self. See your System Administrator for further details
Forwarding calls to your home number
MESSAGE
*3
3
1
Press the MESSAGE key to access your voicemail.
2
Enter *3 on the alpha-numeric keypad to enter the Call Forwarding menu.
3
4
The list of Call Forwarding options will be played to you. Press 3 on the alphanumeric keypad to select your home number.
Once you have set your Call Forwarding number you will be returned to the
Main Configuration menu and played the options. Hang up your call.
Forwarding calls to your mobile number
MESSAGE
*3
4
1
Press the MESSAGE key to access your voicemail.
2
Enter *3 on the alpha-numeric keypad to enter the Call Forwarding menu.
3
4
The list of Call Forwarding options will be played to you. Press 4 on the alphanumeric keypad to select your mobile number.
Once you have set your Call Forwarding number you will be returned to the
Main Configuration menu and played the options. Hang up your call.
Forwarding calls to your 1 st spare number
MESSAGE
*3
5
1
Press the MESSAGE key to access your voicemail.
2
Enter *3 on the alpha-numeric keypad to enter the Call Forwarding menu.
3
4
The list of Call Forwarding options will be played to you. Press 5 on the alphanumeric keypad to select your spare1 number.
Once you have set your Call Forwarding number you will be returned to the
Main Configuration menu and played the options. Hang up your call.
Forwarding calls to your 2 nd spare number
MESSAGE
*3
V5.51/0411/1
1
Press the MESSAGE key to access your voicemail.
2
Enter *3 on the alpha-numeric keypad to enter the Call Forwarding menu.
29
Mobility
IP 530 User Manual
IP 530 User Manual
6
3
4
The list of Call Forwarding options will be played to you. Press 6 on the alphanumeric keypad to select your spare2 number.
Once you have set your Call Forwarding number you will be returned to the
Main Configuration menu and played the options. Hang up your call.
Forwarding calls to your current number
MESSAGE
*3
7
1
Press the MESSAGE key to access your voicemail.
2
Enter *3 on the alpha-numeric keypad to enter the Call Forwarding menu.
3
4
The list of Call Forwarding options will be played to you. Press 7 on the alphanumeric keypad to forward calls to the telephone you are calling from.
Once you have set your Call Forwarding number you will be returned to the
Main Configuration menu and played the options. Hang up your call.
Please note: this facility will only be available if the phone you are calling from presents its number to
the maximiser Unified Communication system.
Cancelling Call Forwarding
MESSAGE
*3
2
1
Press the MESSAGE key to access your voicemail.
2
Enter *3 on the alpha-numeric keypad to enter the Call Forwarding menu.
3
4
The list of Call Forwarding options will be played to you. Press 2 on the alphanumeric keypad to cancel your call forwarding.
Once you have set your Call Forwarding number you will be returned to the
Main Configuration menu and played the options. Hang up your call. Your
incoming personal/DDI telephone calls will once more be presented to your
IP 530.
Extension Anywhere
Extension Anywhere is a further Mobility refinement offered through the maximiser Unified
Communication system, whereby, you can both make receive calls from your home or mobile
telephone, as though you were in the office. This means that your callers or recipients of your calls
will be unaware that you are working at home, for example. You will not incur call charges and you
will be able to transfer calls as if you were in the office. If you are interested in using this facility
please refer to your System Administration for further details.
Please note: The above m ethods utilise the m aximiser Unified Com m unication
system , to which your IP 530 is connected, to control M obility on a com pany
wide-basis. There are also som e M obility and Call Forwarding options to be
found on the m enus of your IP 530 – these m ust NOT be used as they will
only operate on a local basis only, in total isolation from the rest of the
system .
V5.51/0411/1
30
Mobility
IP 530 User Manual
IP 530 User Manual
IP 530 Administration
Setting the time on your IP 530
The time and date that appear on the Context Sensitive Display of your IP 530 is supplied by the
maximiser Unified Communication system that it is connected to. If the time displayed on your
phone is incorrect, please undertake the following steps.
Menu
Enter
Enter
Enter
Enter
Switch
Switch
Save
1
Press the soft key underneath Menu (extreme RHS).
2
Use the Scroll Up/Down keys to select 3. Settings.
3
Press the soft key underneath Enter (extreme RHS)
4
Use the Scroll Up/Down keys to select 1. Basic Settings.
5
Press the soft key underneath Enter (extreme RHS)
6
Use the Scroll Up/Down keys to select 2. Time & Date.
7
Press the soft key underneath Enter (extreme RHS)
8
Use the Scroll Up/Down keys to select 1. SNTP Settings.
9
Press the soft key underneath Enter (extreme RHS)
10
Press the soft key under Switch to change the setting for 1.Time Zone
11
Use the Scroll Up/Down keys to select 4. Daylight Saving.
12
13
Press the soft key under Switch to change the setting for 4. Daylight Saving to
Automatic.
Press the soft key underneath Save (extreme RHS) to save and activate your
changes.
Phone Information
Your system administrator will require the set up information of the phone in order to upgrade and
troubleshoot your handset, if required. This information can be accessed as follows:
Menu
Enter
1
Press the soft key underneath Menu (extreme RHS).
2
Use the Scroll Up/Down keys to select 1. Status.
3
Press the soft key underneath Enter (extreme RHS).
The following information is displayed:
• 1. IP – IP address of the IP 530
• 2. MAC – hardware/MAC address of the IP 530
• 3. Firmware – software version currently running on the IP 530
V5.51/0411/1
31
IP 530 Administration
IP 530 User Manual
IP 530 User Manual
• 4. More – Further information that can be accessed using the soft key
underneath Enter (extreme RHS).
1. Network
a. MAC
b. WAN Type
c. WAN IP
d. WAN Mask
e. LAN Type
f. LAN IP
g. LAN Mask
h. Gateway
i. Pri DNS
j. Sec DNS
2. Phone
a. Model
b. Hardware
c. Firmware
d. Product ID
e. MAC
3. Accounts
a. 1st Account
b. 2nd Account
V5.51/0411/1
32
IP 530 Administration
IP 530 User Manual
IP 530 User Manual
Partnering your IP 530 with your PC or laptop
Even greater personal productivity can be realised when you partner your IP 530 phone with Vision
Mobility, one of the modules in SpliceCom’s web based Vision application suite. This desktop
productivity application delivers many of the value added maximiser system features via a standard
web browser.
Some of the extra features you can gain access to when using Vision Mobility in conjunction with the
IP 530 include;
Access to company wide Unified maximiser Directory
o Users, Departments & Contacts
o Look-up and dialling
• Ability to add new Contacts to the Unified maximiser Directory
• Personal Speed Dials & Busy Lamp Field
• Mobility Control
o Divert Type
o Out of Office Message
o Extension Anywhere
o Do Not Disturb with Exception List
• Visual Call History including voicemail
• Control forwarding/copying of voicemail to email
• Setting Forward on Busy and Forward on No Answer
• Setting your default Home page
• Changing your voicemail access PIN
For further details on Vision Mobility please contact your System Administrator.
•
*Please note that an ESP Licence is required when using Vision Mobility for outbound dialling.
**Please note that the Vision Mobility Call Transfer and Call Hang-up keys cannot be used in conjunction with IP 530.
V5.51/0411/1
33
Partnering your IP 530
IP 530 User Manual
IP 530 User Manual
Appendix 1
Voice Processing, Voicemail & Call Forwarding Options
Once you’ve accessed the maximiser Voice Processing system (by pressing the MESSAGE key on your
IP 530), you can navigate your way through messages and call forwarding options by using the alphanumeric keypad on the IP 530.
1.
2.
3.
4.
5.
6.
7.
8.
9.
0.
*.
Play help
Skip forward 2 seconds
Delete this message
Play previous message
Forward this message
Play next message
Save this message
Skip back 2 seconds
This caller’s number
Return this call
Configuration Options
1.
2.
3.
0.
5. Voicemail Forwarding Options
Copy to another voicemail user with a message from you
Copy to another mailbox
Copy to your email address
Abandon
V5.51/0411/1
34
Appendices
IP 530 User Manual
IP 530 User Manual
*. Forwarding Options
1. Play Help
2. Record a new greeting
1. Options
2. Record a new greeting
3. Delete any new recording or restore default greeting
7. Save new greeting (or hangup)
0. Abandon
3. Set call forwarding
1. Options
2. Cancel forwarding
3. Forward personal/DDI calls to home number
4. Forward personal/DDI calls to mobile number
5. Forward personal/DDI calls to spare1 number
6. Forward personal/DDI calls to spare2 number
7. Forward personal/DDI calls to your current number
0. Abandon
4. Add a name tag to a number (to be played immediately before voicemail messages)
1. Options
2. Record new tag
3. Delete tag
7. Save tag
0. Abandon
5. Change your access code
6. Record extra greetings
1. Options
2. Normal
3. Permanent
4. In meeting
5. At lunch
6. On holiday
7. Off site
0. Abandon
V5.51/0411/1
35
Appendices
IP 530 User Manual
SpliceCom
Defining next-generation communication
The Hall Farm Business Centre, Berry Lane, Chorleywood, Hertfordshire WD3 5EX Tel: 01923 287700 Fax: 01923 287722
Email: [email protected] Website: www.splicecom.com