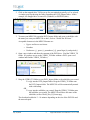
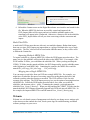
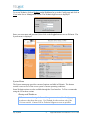
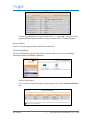
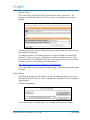
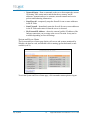
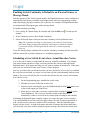
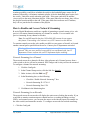
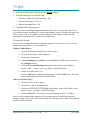
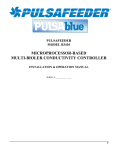
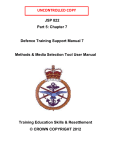
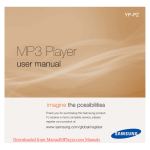
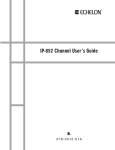
1
Digital Broadcaster Version 3.4 User Manual – Utilities For: B-Series, C-Series, S-Series Analog, SDI, HD-SDI, ASI, and IPTV The Digital Broadcaster User Manual covers the following TelVue products. B-Series Server B100 B1000 B3000 Lite B3000 B3000-SDI C-Series Encoder C500 C1000 S-Series Archive Server S1000 S2000 S3000 Each model may include several products. For example, B3000 includes B3000, B3100, B3200, B3300, B3400, etc. C-series Encoders function like B-series Servers with the encoder option but without any playout channels. The Config, Content, and Record sections of this manual cover the C-series Encoder. S-series Archive Servers share the same Content Management application as B-series Servers. The Config and Content sections of this manual cover the S-series Archive Server. July 24, 2008 ii Digital Broadcaster User Manual v. 3.4 rev. 3421 Trademarks TelVue ™ is a registered trademark. All other products, services, or company names mentioned herein are claimed as trademarks and trade names by their respective companies. © 2003-2008 TelVue Corporation. All rights reserved. No portion of this manual may be copied by any means without the prior consent of TelVue Corporation. TelVue Corporation 501 Forrestal Road Princeton, NJ 08540 USA http://www.telvue.com Telephone: 800.885.8886 All specifications, notices and warnings are subject to change without notice. Class A Statement This computer-based video server has been tested by the original manufacturer and found to comply with the limits for a Class A digital device, pursuant to Part 15 (EN61000-3-2) of the FCC Rules. These limits are designed to provide reasonable protection against harmful interference when the equipment is operated in a commercial environment. This equipment generates, uses, and can radiate radio frequency energy and, if not installed and used in accordance it this instruction manual, may cause harmful interference to radio communications. Operation of this equipment in a residential area may cause interference in which case the user will be required to correct the interference at the user’s expense. This device complies with Part 15 (EN61000-3-2) of the FCC rules. Operation is subject to the following two conditions: 1. This device may not cause harmful interference. 2. This device must accept any interference that may cause undesired operation. Changes or modifications to this unit not expressly approved by the party responsible for compliance could void the user's authority to operate the equipment. Digital Broadcaster User Manual v. 3.4 rev. 3421 iii July 24, 2008 Table of Contents Utilities ............................................................................................................. 1 Calendar Tool....................................................................................................................1 DVD Import Utility...........................................................................................................1 Multi-Title DVDs...........................................................................................................3 Webmin ............................................................................................................................3 System Menu .................................................................................................................4 Servers Menu.................................................................................................................6 Networking Menu ..........................................................................................................6 Hardware Menu ............................................................................................................8 Others Menu..................................................................................................................9 Typical Use Cases.......................................................................................... 11 Encoding a Live Source while Broadcasting....................................................................11 Extending an Encoder without Re-Entering Metadata......................................................12 Using Third-Party Editing Software ................................................................................12 Enabling Switch Continuity to Default to an External Source or Message Board .............13 Scheduling a Live Switch Event whose Actual Duration Varies.......................................13 How to Enable and Access Network Streaming ...............................................................14 Network Streaming for a Channel................................................................................14 Network Streaming for an Encoder..............................................................................14 Viewing the Stream......................................................................................................15 Disabling Network Streaming ......................................................................................16 Setting Up Vodcasts, Podcasts, and a Video Portal ..........................................................16 For Vodcasts ...............................................................................................................16 For Podcasts ...............................................................................................................16 Video Portal ................................................................................................................16 Text Crawls and Overlays ...............................................................................................18 Scheduling a Text Crawl..............................................................................................18 Scheduling the Station Logo Overlay ...........................................................................19 Scheduling the Clock Overlay......................................................................................19 Setting Up an RSS Weather Feed.................................................................................20 Publishing Your Schedule to Other Media.......................................................................21 Making the Program Guide Available on your Website................................................21 Copying the Program Guide to a Text File ..................................................................22 Controlling the Program Guide........................................................................................22 Replicating Sections of Your Schedule............................................................................23 Technical Support ......................................................................................... 24 Glossary ......................................................................................................... 25 Digital Broadcaster User Manual v. 3.4 rev. 3421 v July 24, 2008 Utilities The utilities used with the Digital Broadcaster are described in this section. Calendar Tool The calendar tool is used to select dates for scheduling events and more. 1. Click on the Calendar icon to the right of the date you want to add or change. The calendar window opens, highlighting the date that was currently in the date box, or today’s date, if the date box was empty. 2. If needed, scroll through the months by clicking on the left-arrows (<<) and rightarrows (>>). 3. Click on the day. To select today’s date, click on the Today button at the bottom of the calendar window. The calendar window closes and the date you selected is displayed in the date box. 4. If the calendar window is open and you do not want to change the date, close it by clicking outside the calendar window. DVD Import Utility The TelVue DVD Import utility is an integrated hot folder that allows DVD VIDEO_TS folders to be drag-and-dropped across the network to the Digital Broadcaster. The utility automatically ingests all titles on the DVD as MPEG-2 Program Streams and adds them to the application’s content library. Note: This utility supports only the VIDEO_TS format. These instructions are for Windows- and Mac-based systems, but are readily adapted for use with Linux and other operating systems with drag-and-drop capability. Note: This utility only requires the VIDEO_TS folder. If you have access to the VIDEO_TS folder, you do not need to burn a DVD. 1. Insert the DVD into your computer’s DVD drive. Digital Broadcaster User Manual v. 3.4 rev. 3421 1 July 24, 2008 2. Click on the mapped drive TelVue set up for your uploads (typically vol1 or upload). A window pops up showing the folder containing the DVD_Import folder. In this example, the mapped drive is named P: (Windows) or PSGPUB (Mac). Windows Mac 3. To name your MPEG file, open the DVD_Import folder and create a subfolder with the name you want your MPEG file to have, such as “World War II Extras.” Acceptable characters in the MPEG filename are: o Upper- and lower-case letters o Numbers o Underscore (_), space ( ), parentheses [( )], pound sign (#), and period (.) 4. Open a new window and show the contents of the DVD drive. Find the VIDEO_TS folder. (If you have access to the VIDEO_TS folder without a DVD, open a new window and find the VIDEO_TS folder.) Windows Mac 5. Drag the VIDEO_TS folder to your DVD_Import folder or the subfolder you created. To copy into the DVD_Import folder: Drag the VIDEO_TS folder onto the DVD_Import folder. The MPEG file will be automatically named with a timestamp. OR To copy into the subfolder you created: Drag the VIDEO_TS folder onto the subfolder you created. The MPEG file will have the name of the subfolder, such as World_War_II_Extras.mpg. The download could take 3 – 10 minutes depending on the size of the DVD file and the network speed. July 24, 2008 2 Digital Broadcaster User Manual v. 3.4 rev. 3421 Windows Mac 6. Refresh the Content screen on the Digital Broadcaster user interface and watch for the file. When the MPEG file has been successfully created and imported, the DVD_Import folder will be empty and an icon with the subfolder name or the timestamp will appear in the Content tab. Otherwise, a Status.txt file in the subfolder or the DVD_Import folder will tell you what went wrong with the conversion and import. Multi-Title DVDs A multi-title DVD has more than one title on it, not multiple chapters. Rather than import them one at a time, DVD Import can import them as a group of multiple titles or as a single, merged title. The files’ titles will all be based on the subfolder name, so they will be easier to find on the Content list. Importing Multiple MPEG Files To import each title as a separate MPEG file, follow the DVD Import procedure above. The name you give the subfolder will begin all the titles on the MPEG files. For example, if the DVD contains 30 PSAs, you could name the subfolder PSA. When you drag and drop the VIDEO_TS folder into the named subfolder, the DVD Import utility uses the subfolder name at the beginning of each MPEG title. Continuing the example, the MPEG files would be named PSA_title1.mpg, PSA_title2.mpg . . . PSA_title30.mpg. Merging into a Single MPEG File You can merge several titles from one DVD into a single MPEG file. For example, you might have recorded the first part of a meeting, stopped recording during the break, and resumed recording when the meeting reconvened. The DVD will have a title for each segment of the meeting. The DVD import process gives you the option of merging them into one MPEG file. Follow the DVD Import procedure above, but, when you create the subfolder, end the name with a + (plus). Continuing the example, you might name the subfolder Town_Council_Meeting+. When you drag and drop the VIDEO_TS folder into the named subfolder, DVD Import sequentially appends each DVD title into one MPEG file. In the example, the imported MPEG file would be named Town_Council_Meeting.mpg. Webmin Webmin is a web-based system of management tools that let you change server settings such as the timeserver that controls the clock, check system logs for troubleshooting, and install software packages on your server. Digital Broadcaster User Manual v. 3.4 rev. 3421 3 July 24, 2008 To access Webmin, click on Webmin on the Dashboard or go to the Config page and click on View in the Server Management section. The Webmin login screen is displayed. Enter your user name and password, then click on the Login button to access Webmin. The System menu is displayed. System Menu The System menu page provides a menu of options available in Webmin. The bottom section is an overview of the server system’s current operating conditions. Some Webmin actions are also available through the User Interface. TelVue recommends using the UI for these actions. Bootup and Shutdown TelVue recommends using the Server Management section of the Config page to reboot or shut down the server. Use Webmin for these actions only if the UI is inaccessible. Contact TelVue Technical Support as soon as possible. July 24, 2008 4 Digital Broadcaster User Manual v. 3.4 rev. 3421 Read the cautions next to each option before using it. System interruption can last from a few seconds to several hours if the server performs a full filesystem check during a restart. If you often have to reboot or restart your server, or if you are not sure if this action is appropriate, contact TelVue Technical Support for assistance. Change Passwords TelVue recommends using the User Management section of the Config page to change user passwords. Software Packages Warning: Contact TelVue Technical Support before installing any upgrades to your server. In most cases, TelVue Technical Support can install upgrades remotely. Do not attempt to install third-party software on your TelVue server without consulting TelVue Technical Support. To install an upgrade, click on the Software Package icon. Click on the radio button for the upload folder or local computer with the upgrade (software package). Choose the package name from the drop-down list or browse for it. When you have selected the software package click on the Install button. System Logs To view the table of system logs, click the System Logs icon. Digital Broadcaster User Manual v. 3.4 rev. 3421 5 July 24, 2008 To view the information in a log, click the word View to its right. Logs can provide useful troubleshooting information. For help, contact TelVue Technical Support. Servers Menu The Servers menu page provides an interface to share files. Networking Menu The Networking menu page provides links to sections where you can view and change information about ports and host addresses. . Network Interfaces To see a table of network interfaces on this system, click on the Network Interfaces icon. July 24, 2008 6 Digital Broadcaster User Manual v. 3.4 rev. 3421 o Name – the port name of the interface. The interfaces eth0 and eth1 are the ports on the back of a typical TelVue server. o Type – the type of port this is, typically an Ethernet port. o IP Address – if the IP address is static, it is shown here. Otherwise the address comes from DHCP. TelVue generally recommends a static IP address so any possible port forwarding does not become stale due to IP address changes. If DHCP is used, the assignment should match the MAC address of the Digital Broadcaster. o Netmask – If DHCP is used, the netmask is automatic; otherwise the netmask is listed. o Activate at boot? – If the network interface is activated when the server is booted, this column displays Yes. To edit any network interface information, click on the interface name, make the changes, and click on Save. Host Addresses To see a table of host IP addresses and the hostnames associated with each IP address, click on the Host Addresses icon. An IP address may have more than one hostname associated with it. To add a new hostname to the system, click on Add a new host address above the table. Enter information about the new host. Digital Broadcaster User Manual v. 3.4 rev. 3421 7 July 24, 2008 o IP Address – Enter the IP address for the new host. o Hostnames – Enter one or more hostnames this host will use. Click the Create button to create the new host or click on Return to host addresses list to exit the screen without creating a new host. Hardware Menu The Hardware menu page provides a menu of hardware monitoring options. You can look at the RAID devices on your system and check the links for the services keeping time for your system. On some systems, such as those using Arica cards, the RAID information is password-protected. RAID Status The RAID status page displays an icon for each RAID device on your system. Click the icon for a RAID device to see information about its file, size, and usage. If you are having difficulty with a RAID device, please contact TelVue Technical Support. Contact information is at the end of this manual. July 24, 2008 8 Digital Broadcaster User Manual v. 3.4 rev. 3421 System Time The System Time page lets you select a different time zone or timeserver. The timeserver controls the clock on your TelVue server so it should be as accurate as possible. To change time zones, select a different time zone from the drop-down list at the top of the page and click Save. To change the primary or secondary timeserver, enter the IP address of a different timeserver. You may use your own timeserver or select a public timeserver. If you are in an area that uses Daylight Saving Time, make sure the timeserver is in an area with DST also. One source of timeserver IP addresses is http://ntp.isc.org/bin/view/Servers/StratumTwoTimeServers. To exit the System Time page without making changes, click on another menu option or logout. Others Menu The Others menu page provides links to custom commands and allows you to view the status of the TelVue server. These commands are designed for TelVue customers using Webmin. Custom Commands To exit the Custom Commands page, click on another menu option or logout. Digital Broadcaster User Manual v. 3.4 rev. 3421 9 July 24, 2008 o Network Status – Runs a command on the server that outputs the current IP Routing Table status entries and the hardware, memory and IP addresses, transmit and receive amounts, network transmit and receive packet troubleshooting information. o Stop Firewall – temporarily stops the firewall for one or more addresses in the IP Table. o Start Firewall – Immediately starts the firewall for one or more addresses in the IP Table and restarts it when the server is rebooted. o My External IP Address – shows the external (public) IP address of the Internet connection you are using at the server's location. It may not be available depending on firewall settings. System and Server Status The System and Server Status page displays all servers and systems monitored by Webmin, the host for each, and whether each is running (green checkmark) or not available (red X). To exit the System and Server Status page, click on another menu option or logout. July 24, 2008 10 Digital Broadcaster User Manual v. 3.4 rev. 3421 Typical Use Cases These examples describe some of the most popular uses of the Digital Broadcaster. Additional information and use cases may be found on TelVue’s self-service web portal at http://www.princetonservergroup.com/support. Encoding a Live Source while Broadcasting To broadcast a live event and capture that event for future playout on the Digital Broadcaster, split the live feed from the source to the live broadcast and to the onboard MPEG Encoder connected to the Digital Broadcaster. The TelVue Switch Module can split the inputs as well as the outputs. Required Equipment • Digital Broadcaster • Onboard MPEG Encoder • Video feed from live source • TelVue Switch Module With the on-board encoder (or an external encoder) you may encode a live source while broadcasting in one of the following ways. • If you have a video switch, set up cross-points for the live source as an input to the route to the live channel output (live programming) and to the output that feeds the encoder. Then schedule an encode for the duration of the event. The events populated would look like: o Add Switch: Live Source Channel Output for duration of the event o Add Switch: Live Source Encoder Input for duration of event o Add Capture: For duration of event with the file name. Subsequent playbacks can play directly off of the digital file. • If you do not have a video switch, you can use the encoder input as an “IP Video” switcher to broadcast live while encoding as follows. 1. Plug the live source into the encoder 2. From Config Feed Setup, enable Network Streaming on the encoder. Set the IP address to 127.0.0.1 and use a UDP port not in use by any other streaming applications that may send networked data to the video server. 3. From Config Feed Setup, add a new stream named “Live Encoder” and assign it the UDP port set in the above step. 4. From Programming Classic View, choose Add Stream Event, select the “Live Encoder” as the feed, and set the appropriate time and duration. Digital Broadcaster User Manual v. 3.4 rev. 3421 11 July 24, 2008 5. From Programming Classic View, choose Add Capture Event and fill in the appropriate time and duration. The same technique above can be used with an external encoder appliance such as TelVue’s C500 streaming encoder. In this case connect the live source to the external encoder unit and stream that encoder to the IP address of the Digital Broadcaster on an available UDP port into which the server can tune. Extending an Encoder without Re-Entering Metadata If your installation has external encoders, rather than encoders that are internal to a TelVue server or integrated with it, you can automate some of the process of getting files onto your S-series archive or B-series broadcast server. To extend an encoder on a broadcast or archive server without re-entering the metadata for the file you plan to encode, set the feed name and FTP server to match, then set the Master FTP File Server to FTP back to the feed. 1. Go to the Content page on the archive or broadcast server where you want to import the content. Use the Add Program function to enter the placeholder. In the Source Information section, make sure the Location field matches the Feed Name of the encoder. 2. On the other server’s Config page in the Feed Setup section, select capture configuration. Set the Program Feed Server Host to the name or IP address of the TelVue server where the metadata was entered for the placeholder in Step 1. 3. On the same capture configuration page, check the FTP Master File on Capture box so the pulldown of Master File FTP Servers displays. Select the archive or broadcast server’s upload folder (directory). 4. Go to the Record page of the server with the external encoder. Add the capture or manual encode for the external encoder. The Unattached Program pulldown will include the archive or B-series server so you can select the placeholder. When the encoded file is completed, the encoder will FTP to the media import folder. Because the filename will match the placeholder, the encoded file will auto-import to the root media folder, such as vol1. You cannot specify a subfolder when auto-importing. Using Third-Party Editing Software Look on the TelVue support portal for guidelines on using several of the popular video editing software packages with your TelVue server. The USB key that came with your server has an addendum to this manual with guidelines for: Trimming DVD-compliant, MPEG-2 files. Re-encoding files so they are DVD-compliant. Note: TelVue’s recommendations regarding the use of third-party software packages are subject to change without notice. July 24, 2008 12 Digital Broadcaster User Manual v. 3.4 rev. 3421 Enabling Switch Continuity to Default to an External Source or Message Board With the optional Video Switch control module, the Digital Broadcaster can be configured to automatically switch away to another switch input source when no programming is airing, rather than simply playing a continuity file or playlist. For example, the Digital Broadcaster can automatically fill program gaps with a message board. To enable continuity switching: 1. Go to Config Channel Setup Channels and click the Edit icon channel. for the specific 2. In the Continuity section, check Enable Continuity. 3. Select the desired input switch port from the Continuity Switch pull-down menu. Note: For continuity switching to work properly, the channel’s Switch Input and Switch Output settings must match the switch input to which the channel is connected and the switch output that the video server channel typically plays out. If you are already using a continuity file or playlist, continuity switching will not take effect until the current file or playlist completes or a scheduled program runs. Scheduling a Live Switch Event whose Actual Duration Varies Live events can be shorter or longer than the time you originally scheduled. For example your station might schedule a weekly, two-hour switch to the camera at the high school basketball game. If the game runs long you will want to continue to broadcast it. If the game ends early you will want to show your viewers a related program. One way to control what you broadcast when you have switched to a live event is to schedule the event for less time than you expect it to run, then lock the switch manually until the event finishes. The server will still play the event after the switch event, but viewers will continue to see the live event. 1. On the Programming page, schedule the switch event. 2. Schedule an event to follow the switch event. 3. After the switch event begins, go to the Dashboard and click the Lock option next to the switch output you want to lock. 4. When the live event ends, release the switch lock by clicking the Unlock option on the Dashboard. The event you scheduled to play at that moment is immediately visible to viewers from its current point according to the schedule. Continuing the basketball game example, suppose you expect the game to last two hours. You could schedule the switch event to the game camera for only 90 minutes and follow it with a switch event to your news studio feed for 90 minutes. After the basketball game begins, lock the switch. As long as the game ends after 90 minutes but before three hours you can notify your news studio to begin post-game coverage, then release the switch lock. Digital Broadcaster User Manual v. 3.4 rev. 3421 13 July 24, 2008 Another possibility would be to schedule the switch to the basketball game camera for 90 minutes, followed by a 60-minute continuity playlist. After the basketball game begins, lock the switch. Unlock the switch when the game ends. If the game ends after 90 minutes, viewers will see the entire 60-minute playlist. If the game ends after two hours, they will see the playlist from the middle to the end. If the game ends after two hours and 25 minutes, they will see just the last five minutes of the playlist. How to Enable and Access Network Streaming B-series Digital Broadcaster models are capable of generating a network stream (a.k.a. web preview) for remote channel monitoring of a channel or encoder. You can enable web preview streaming for any channel or encoder. Note: Pro and HD models that play 1920x1080i HD content do not support this feature. Transcoding a live stream is very CPU-intensive at this bitrate. To monitor remotely across the web, enable port 8686 on your router or firewall, or forward another external port to port 8686 on the server. Contact your IT department as needed. Warning: Network streaming can send large amounts of data across your network. This can cause network congestion if not coordinated with your IT department. Please confirm with your IT department before enabling. Network Streaming for a Channel The network stream for a channel will show video playouts only. External sources from a video switch or device will not be streamed. JPEG images and overlays will not be streamed. To configure a channel for network streaming: 1. Click the Config tab. 2. In the Channel Setup section, click the link for channels. 3. Under Actions, click the Edit icon . 4. In the Monitoring box, set the following: o Check the “Enable Network Streaming?” box. o Network Streaming IP: 127.0.0.1 o Network Streaming Port: 1234 5. Click Save in the Monitoring box. Network Streaming for an Encoder The network stream for an encoder will display the entire source feeding the encoder. If you would like to monitor a station output or channel and see everything including overlays, JPEGs, and external sources, you can route the source to the encoder input (for example via the video switch) and stream the encoder. To configure an encoder for network streaming: 1. Click the Config tab. July 24, 2008 14 Digital Broadcaster User Manual v. 3.4 rev. 3421 2. In the Feed Setup section, click the link for encoder settings. 3. In the Monitoring box, set the following: • Check the “Enable Network Streaming?” box. • Network Streaming IP: 127.0.0.1 • Network Streaming Port: 1234 4. Click Save in the Monitoring box. Only one resource including channels and encoder feeds may be streamed at a time. If you try to enable network streaming for a resource and another resource is already streaming, you will see a note such as “To enable network streaming for this channel, disable network streaming for Encoder Feed 1” in place of the Monitor box. Viewing the Stream Once you have configured network streaming to generate a web preview you can view the stream with a media player. Two examples are: Windows Media Player: 1. Click on the Windows Media Player icon to open it. 2. Click on Now Playing .. (More) Options… 3. Click on the Network tab. 4. In the Streaming proxy settings section, highlight the HTTP protocol and click the Configure button. 5. Click on the Use the following proxy server radio button. In the Address window, enter: mms://<server_ip_address>:8686/b1000.mp4 6. In the Port window enter 1234 7. Click the OK button to return the Options page. Click the OK button. The video stream should appear in Windows Media Player. Video LAN Client (VLC): 1. Click on the VLC icon to open it. 2. Click on File .. Open Network Stream. . . 3. Click on the HTTP/HTTPS/FTP/MMS radio button. In the URL window, enter: mmsh://<server_ip_address>:8686/b1000.mp4 4. Click the OK button. The video stream should appear in the VLC window. After you have monitored the channel for a few minutes and are satisfied the playout or encode is going well, return to the Channel Setup or Feed Setup section of the Config tab and disable network streaming. Digital Broadcaster User Manual v. 3.4 rev. 3421 15 July 24, 2008 Disabling Network Streaming 1. Click the Config tab. 2. In the Channel Setup section, click the link for channels, then under Actions, click the Edit icon OR In the Feed Setup section, click the link for encoder settings. 3. In the Monitoring box, uncheck the “Enable Network Streaming?” box. 4. Click Save in the Monitoring box. Setting Up Vodcasts, Podcasts, and a Video Portal Many web browsers can act as RSS readers. As more and more installations make podcasts and vodcasts of their content available, managers should be mindful of resources. Portals may be subject to hacking, large files might take time to load and frustrate users, and popular feeds could overwhelm bandwidth and crash your website. If your server has been configured for vodcasting and podcasting, make sure the firewall has been configured to allow access. To prevent hacking and other attacks, TelVue advises using port 3000 only for internal, trusted users such as employees. Enable port 50000 for external users who would access the feeds via your website. In these settings, nnn.nnn.nnn.nnn stands for the IP address of your server. For Vodcasts URL for the internal feed used by trusted users: http://nnn.nnn.nnn.nnn:3000/netcast/vodcast URL for the feed available on your website: http://nnn.nnn.nnn.nnn:50000/netcast/vodcast For Podcasts URL for the internal feed used by trusted users: http://nnn.nnn.nnn.nnn:3000/netcast/podcast URL for the feed available on your website: http://nnn.nnn.nnn.nnn:50000/netcast/podcast Video Portal URL for the internal feed used by trusted users: http://nnn.nnn.nnn.nnn:3000/ video_portal URL for the feed available on your website: http://nnn.nnn.nnn.nnn:50000/video_portal July 24, 2008 16 Digital Broadcaster User Manual v. 3.4 rev. 3421 The Video Portal includes two options for searching and browsing content. Search – To search for content by keyword, type a keyword or phrase in the Search box and press the Search button. All available content that matches the search is displayed. The keyword may appear as typed in the file name, program, episode name, program or episode code, description, or other content metadata. Browse by Category – To see all content of a specific category, press the Browse by Category tab and click on one of the categories from the list. To stop browsing and display all content again, click on the Search tab, clear the search field, and press the Search button. When a video thumbnail or link is clicked, the video will play using the Quicktime embedded player. Serving Media Files Locally If the media files on your video portal are served locally by the TelVue Archive server, the media root URL will be served on standard web port 80 using http://nnn.nnn.nnn.nnn/media/psg/vol1. If you are serving your media files locally, be aware of the bandwidth constraints at your installation. For example, if your facility Internet bandwidth is 1Mbps for upload, then at 256Kbps per media file, you could serve at most 4 simultaneous videos in real-time and that would slow down any other upstream web traffic from your facility. Vodcasts and podcasts are rarely watched live so if they download a little slower that may be fine, whereas users on the Video Portal will generally expect real-time access. If your installation experiences a problem providing sufficient bandwidth, contact TelVue to discuss hosting options. One method for your community to access your podcast and vodcast files is using the iTunes application. Within iTunes, you can enter the podcast or vodcast URL in the URL section of the Subscribe to Podcast option. Digital Broadcaster User Manual v. 3.4 rev. 3421 17 July 24, 2008 Text Crawls and Overlays Text crawl, overlay, and “lower third text ticker” are some of the terms used for the messages that move across the bottom of the television screen during a broadcast. The Web Application uses the term “overlay.” TelVue includes some sample overlays with your system, including a text crawl, a clock display, and a station logo. Overlays will look different on a television screen depending on the size and color of the overlay, the size of the screen, and what else is playing at the time. Some overlays will not play when continuity is running. It is advisable to experiment with overlays in-house before using them in a live broadcast. Scheduling a Text Crawl The text crawl overlay can be used to run a message across the television screen during a broadcast. 1. In the Web Application, go to the Programming tab in Classic View and click on Add Overlay. 2. From the File pull-down menu select overlay/Text_Crawl_Overlay.html. 3. Position X and Y control where the text will crawl across the screen. Leave X at 0. The recommended range for Y is 360 (about one third up from the bottom of most screens) to 430 (the very bottom of most screens). If you have not run this overlay before set Y to 400. 4. If your overlay will cover part of the broadcast you can enter a number for the alpha blend from 1-255, where 255 is opaque and 1 is transparent. If you have not run this overlay before, leave the alpha blend blank. 5. Set the Chroma Key to Black. 6. Enter a duration in HH:MM:SS format. The overlay will crawl repeatedly across the screen for as long as you specify. 7. Enter date and time information as with any other event. TelVue recommends allowing at least 10 seconds between the end of one overlay and the start of the next. 8. Uncheck the Track Content Metadata box. 9. Enter text in the Title field. The overlay will start with the title. Use only standard ASCII characters. 10. Enter any additional overlay text in the Description field. Use only standard ASCII characters. 11. Click on Save. To see the text crawl overlay event, click on the Programming tab. To see the actual overlay, connect a monitor to your network. Once the overlay has begun, you cannot edit it, but you can unschedule it if it is not playing properly. July 24, 2008 18 Digital Broadcaster User Manual v. 3.4 rev. 3421 Scheduling the Station Logo Overlay You can put your station logo in an overlay in the corner of the screen during broadcasts. 1. If your station logo is not already in PNG format, convert it. 2. Look on your server for the file /overlay/StationLogo.png. 3. Replace the old StationLogo.png with your logo file by copying your station logo file to the same folder and renaming it StationLogo.png. 4. Check the Content tab for the file StationLogo.html. It should display your station logo. If StationLogo.html is not on the Content tab, import it. 5. Go to the Programming tab and schedule StationLogo.html as an overlay. a. From the File pull-down menu select overlay/Station_Logo.html. b. To display the station logo in the lower right corner of the screen, set X and Y to 0. c. Leave the alpha blend blank. d. Choose Black from the chroma key pulldown menu. e. Enter a duration in HH:MM:SS format. The logo will display for as long as you specify. f. Enter date and time information as with any other event. TelVue recommends allowing at least 10 seconds between the end of one overlay and the start of the next. g. Make sure the Include in Program Guide box is unchecked and the Track Content Metadata box is checked. h. Click on Save. 6. Check the playout on a monitor. Once the overlay has begun, you cannot modify it, but you can unschedule it if it is not playing properly. If you want to move the logo higher on the screen, modify future playouts and set Y to a negative number. To move the logo to the left, set X to a negative number. Scheduling the Clock Overlay You can place a clock in an overlay in the corner of the screen. For example, some installations display a clock when continuity is running. This overlay includes the date and time, but not the temperature. See Setting Up an RSS Weather Feed for information on how to include the temperature in this overlay. 1. From the File pull-down menu select overlay/Clock_Overlay.html. 2. To display the clock in the lower right corner of the screen, set X and Y to 0. 3. Leave the alpha blend blank. 4. Choose Black from the chroma key pulldown menu. Digital Broadcaster User Manual v. 3.4 rev. 3421 19 July 24, 2008 5. Enter a duration in HH:MM:SS format. The clock will display for as long as you specify. 6. Enter date and time information as with any other event. TelVue recommends allowing at least 10 seconds between the end of one overlay and the start of the next. 7. Make sure the Include in Program Guide box is unchecked and the Track Content Metadata box is checked. 8. Click on Save. Check the clock display on a monitor. Once the overlay has begun, you cannot modify it, but you can unschedule it if it is not playing properly. If you want to move the clock higher on the screen, modify future playouts and set Y to a negative number. To move the clock to the left, set X to a negative number. Setting Up an RSS Weather Feed Your installation can use a live RSS feed from the National Weather Service to display local temperature in an overlay. 1. In the Web Application, click on the Content tab and look for the file overlay/Clock_Overlay.html. If it is not there, import it. (Look in the overlay folder.) 2. In a new browser window or tab, go to http://www.weather.gov/data/current_obs. 3. Select your state from the drop-down list. 4. Find the observation location nearest your station and click on its XML button in the RSS column. This redirects you to the RSS feed for that observation location. Copy the URL from the address line in your browser. 5. Return to the PSG Web Application and click on the Content tab. 6. Find the Clock_Overlay thumbnail and edit it. 7. In the Description field, type RSS= and paste the URL you copied. The end result should look similar to: RSS=http://www.weather.gov/xml/current_obs/KEWR.rss (Make sure it starts with http://, not feed://. If your browser redirected you to the feed:// page, replace feed:// with http:// in the Description field.) 8. In the Position fields, leave X and Y at their default values. 9. Leave the Alpha Blend blank. 10. Set the Chroma Key to Black. 11. Click the Save button. As a test, go to the Programming tab in Classic View and schedule the clock overlay for one minute. If you want to move the clock higher on the screen, edit the metadata again and set Y to a negative number. To move the clock to the left, set X to a negative number. July 24, 2008 20 Digital Broadcaster User Manual v. 3.4 rev. 3421 Once you are satisfied with the appearance of the clock overlay, go to the Programming tab and schedule Clock_Overlay. For example, you could schedule it to play at 07:15:00 with a duration of 10 seconds, recurring every day until the end of the year. You could then replicate the playout so it plays at 08:15:00, 09:15:00, etc. The end result would be a time and temperature update 15 minutes after every hour. Publishing Your Schedule to Other Media The Digital Broadcaster includes an integrated, searchable, web-based Program Guide to which you can link from your site without having to re-enter program information. You can link the Program Guide to your website or export it to a spreadsheet or text file. Making the Program Guide Available on your Website 1. Open the Digital Broadcaster Web Application port (typically port 50000) on your router or firewall. Consult your IT department for how to do this properly at your installation. 2. Link to the web site program guide module. The format for the link is http://nnn.nnn.nnn.nnn:50000/external_schedule/simple_day_schedule?id=# where nnn.nnn.nnn.nnn is the public IP address that routes port 50000 to the Digital Broadcaster and # is the channel id, such as “1” for output channel 1, “2” for output channel 2, etc… on a multi-channel server. 3. Regularly set the metadata for your content and events so the Program Guide will show useful information. Users can select the day they want to view your schedule using the Calendar Picker. The results show the program start times, the program names, and the next air date for each program. Users can also search the Program Guide by keyword to find specific air times of their favorite shows. 4. To link to the external Program Guide from your own website HTML code, insert code using the following format: Digital Broadcaster User Manual v. 3.4 rev. 3421 21 July 24, 2008 <a href= “http://nnn.nnn.nnn.nnn:50000/external_schedule?id=#”>Schedule For Channel 10</a> where nnn.nnn.nnn.nnn is the server IP address and # is the channel number. Copying the Program Guide to a Text File 1. Go to the program guide page at http://nnn.nnn.nnn.nnn:50000/external_schedule/simple_day_schedule for a single-channel system or http://nnn.nnn.nnn.nnn:50000/external_schedule/simple_day_schedule?id=# for a mutli-channel system where nnn.nnn.nnn.nnn is the public IP address that routes port 50000 to the Digital Broadcaster and # is the channel id, such as “1” for output channel 1, “2” for output channel 2, etc… on a multi-channel server. 2. Highlight and copy the text you want. 3. Open a simple text editor such as NotePad, WordPad, or TextEdit and paste the text into a blank file. 4. If you need the schedule for more dates, use the calendar picker at the left to display another date and repeat Steps 2 – 3. 5. Rename and save the file to a local drive or device. Controlling the Program Guide To prevent fillers such as PSAs, switch events, etc. from displaying in the Program Guide and external schedule, you can individually de-select the “Include In Program Guide” metadata for each event. With some planning, however, you can avoid this. In the Category Setup section of the Config page, add a category such as “Fillers” and leave “Include In Guide Default” unchecked. TelVue includes a PSA (not in guide) category to get you started. Put your PSAs, fillers, and other non-Program Guide events in these categories. Now when you schedule them, they will automatically be excluded from the Program Guide and external schedule. For example: 1. Go to Config Manage Content Categories. 2. Add a new category called Filler and uncheck “Include In Guide Default.” 3. On the Content page in Calendar View, use Advanced Search in the sidebar to locate your fillers. 4. Use Bulk Actions to add multiple filler files to the Filler category. 5. Now when you drag and drop these filler programs in Calendar View or schedule them from Classic View, they will not be displayed in the Program Guide or external schedule. July 24, 2008 22 Digital Broadcaster User Manual v. 3.4 rev. 3421 Replicating Sections of Your Schedule Programming managers often want to replicate sections of the schedule so they play at the same time each day of the week, such as six hours of cartoons on Saturday mornings. Combining exporting with importing also provides a simple way to copy large scheduling blocks. For example, to copy one week’s schedule into another week: 1. On the Programming tab in Classic View, filter the schedule for the week you want to copy. 2. Use the checkboxes to select the events you want to copy. 3. From the Export Selected As pulldown select an export format, such as Native. 4. Click the Export button. This saves the event in a file called export_native.csv on your desktop or in your download folder. Note: Some filesystems permit you to rename the CSV file. 5. If you need to edit the CSV file, use a simple text editor such as WordPad to open it. Some operating systems mark CSV files to open in a spreadsheet program such as Excel by default. These programs often reformat dates so the file will no longer be CSV-compatible. Use your system’s Open With . . command, or open the text editor first and use its Open . . command to open the CSV file. Make your changes and save the file as a CSV file. Return to the Programming page in Classic View. 6. On the Import File line, browse for the CSV file you saved. 7. From the Format pulldown select the import format you used when you exported the file. 8. In the Start Date field, enter the date of the first day in the new week. 9. In the Time field, enter the time you want the first event to begin. The default is midnight. 10. Click the Import button. When the application has finished importing, it displays a report on the status of the import. 11. To see the scheduled events, return to the Programming tab or go to the Program Guide tab and display the week you want. Digital Broadcaster User Manual v. 3.4 rev. 3421 23 July 24, 2008 Technical Support TelVue offers technical support by telephone, email, and Internet portal. • Toll-free: 1-800-885-8886 • Email: [email protected] • Support portal: http://www.princetonservergroup.com/support.php You will need your User ID and password to login to the support portal. The support portal offers a self-service database of solutions, documents, and frequently asked questions. July 24, 2008 24 Digital Broadcaster User Manual v. 3.4 rev. 3421 Glossary This glossary includes terms that are particular to the TelVue products. Definitions of common server and broadcast terms are available in many online glossaries. Calendar icon – an icon that, when clicked, opens a calendar so you can select a date to view or insert in a form field. x Cross – an action that allows an operator to follow a particular event with an event of another type. A typical cross is from a switch event to a playout event. Delete – to remove content from the library list and the server database. Use this option to remove outdated content from the server. Once content has been deleted, it can only be retrieved by finding a copy elsewhere and reloading it onto the server database. Delete Icon – a trash-can icon that, when clicked, triggers the deletion procedure for the device, configuration, etc. Digital Broadcaster – a digital video server designed by TelVue. Edit Icon – a pencil-and-paper icon that, when clicked, opens an editing window for the device, configuration, etc. Export Icon – an icon that, when clicked, initiates a copying or an export function. Event – a function performed by the Digital Broadcaster. Typical events are overlays, playouts, switch device events, and live MPEG stream events. Home Path – The switch input/output configuration as set in Config Switch Configuration. Home Port – the input for each switch output as set in Config Switch Configuration. Import Icon – an icon that, when clicked, initiates an import function. Manual Switch – the use of the switch faceplate, rather than an event or the dashboard, to change the switch path. Onboard MPEG Encoder – an optional video encoder device that converts data into MPEG format and can be controlled by the Web Application. Overlay – a text crawl, station logo, or other graphics that are displayed on the screen along with the active playout. Playlist – a list of content that can be scheduled as continuity to play in a looping sequence rather than playing just a single content file as continuity. Playlists are scheduled only as continuity, not as ordinary playout events. Playout – a file that can play on the server. Podcast – a digital audio file, or a series of such files, that is distributed over the Internet using syndication feeds for playback on portable media players and personal computers. + Plus – an action that allows the operator to schedule an event to follow an event as soon as it ends. Digital Broadcaster User Manual v. 3.4 rev. 3421 25 July 24, 2008 Purge – to remove content from the library list, but preserve it on the Digital Broadcaster’s database. This is less permanent than deleting content. To put purged content back on the list, import it again. Switch Path – The route of programming as it comes from an input feed, passes through the switch, and goes to an output channel. Test Icon (Accept Icon) connection to a device. Today Icon – a green-checkmark icon that, when clicked, tests the – an icon that, when clicked, insert’s today’s date into a form field. User Interface (UI) – the Web Application used for configuration and content management. The terms User Interface and Web Application are used interchangeably. Vodcast – a digital video file, or a series of such files, that is distributed over the Internet using syndication feeds for playback on portable media players and personal computers. Web Application – TelVue’s web-based application for digital broadcast automation, content, and video server management. It is embedded on the Digital Broadcaster. Also called the User Interface, or UI. July 24, 2008 26 Digital Broadcaster User Manual v. 3.4 rev. 3421