1
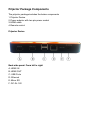
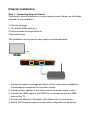
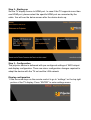
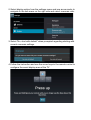
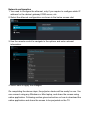
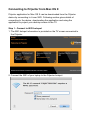
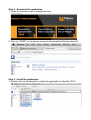
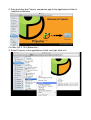
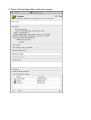
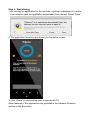
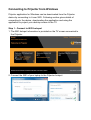
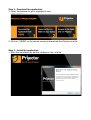
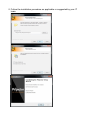
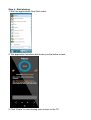
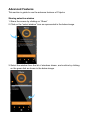
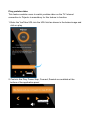
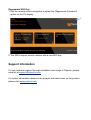
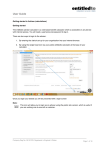
Prijector Instruction Manual
November 2013
Introduction!
3
Safety Instructions!
3
Important disclaimers!
3
Prijector Package Components!
Prijector Device!
Prijector Installation!
4
4
5
Step 1 - Connecting Prijector Device!
5
Step 2 - Starting up!
6
Step 3 - Configuration!
6
Display configuration!
6
Network configuration!
8
Connecting to Prijector from Mac OS X!
9
Step 1 - Connect to WiFi hot-spot!
9
Step 2 - Download the application!
10
Step 3 - Install the application!
10
Step 4 - Start sharing!
13
Connecting to Prijector from Windows!
14
Step 1 - Connect to WiFi hot-spot!
14
Step 2 - Download the application!
15
Step 3 - Install the application!
15
Step 4 - Start sharing!
17
Advanced Features!
18
Sharing selective window!
18
Play youtube video!
19
Regenerate WiFi Key!
20
Support Information!
20
Introduction
Prijector is a slick and powerful device that directly connects to your
Television or to any projector. It enables one to present wirelessly from any
laptop.
Prijector enables instant and wireless presentation with just a click of the
“Share” button from any laptop or mobile. It is intuitive and extremely user
friendly.
Safety Instructions
• The user manual includes all the information of safe and correct operation
instruction. To avoid accident and product damaged, please make sure go
through all the content carefully before using the product.
• Please keep the product away from high temperature, humid and dusty
environment.
• Do not drop or crash the product.
• Do not cut off power of the device when it is formatting or upgrading.
Otherwise it will cause operation system error. !
• Do not dismantle the device. Do not clean it by alcohol, thinner and
Benzene.
Important disclaimers
1.The prijector device is not water proof.
2.The screen-shots in the document are only for representational purpose.
The actual look and feel might be different from the screenshots provided
below.
3.Upgrade of firmware and software on the device should be done only
based on recommendation by Prijector. Any unauthorized access to the
device memory could lead to service disruption.
Prijector Package Components
The prijector package includes the below components
1.Prijector Device
2.Power adaptor with two pin power socket
3.HDMI cable
4.Remote control
Prijector Device
Back side panel: From left to right
A: HDMI IN
B: HDMI OUT
C: USB Ports
D: Ethernet
E: Micro SD
F: DC-IN: 12V
Prijector Installation
Step 1 - Connecting Prijector Device
The prijector device installation is a very simple process. Below are the things
required for the installation
1.Prijector package
2.TV set with HDMI input port
3.LAN connection through ethernet
4.Internet access
The installation can be done in easy steps as mentioned below
HDMI
Ethernet
1. Unpack the prijector package and check all the components available in
the package as mentioned in the earlier section.
2. Connect power adapter to the device and to the power supply socket
3. Connect the HDMI cable to the HDMI Out on the device and the HDMI
input on the TV
4. Connect the ethernet LAN cable to the ethernet port on the device
5. Switch ON the power supply and start with configuration of the device
Step 2 - Starting up
Set the TV display source to HDMI port. In case if the TV supports more than
one HDMI port, please select the specific HDMI port as connected by the
cable. You will see the below screen after the device boots up.
Step 3 - Configuration
The prijector device is delivered with pre-configured settings of WiFi hotspot
and display configuration. There are minor configuration changes required to
adapt the device with the TV set and the LAN network
Display configuration
1.Use the arrow keys on the remote control to go to “settings” on the top right
portion of the TV display. Press “ENTER” to enter settings menu.
2.Select display option from the settings menu and use arrow marks to
navigate to the sub menu on the right side and select overscan ratio.
3.Select “No, start with default” when prompted regarding starting with
current overscan settings.
4.Follow the instruction and use the arrow keys in the remote control to
configure the exact display area of the TV
Network configuration
1.You need to configure the ethernet, only if you require to configure static IP
address for the device/ gateway/ DNS server, etc.
2.Select the ethernet configuration as shown in the below screen shot
3.Use the remote control to navigate to the options and enter relevant
information.
4.Select save to apply the changes.
On completing the above steps, the prijector device will be ready for use. You
can connect using any Windows or Mac laptop, and share the screen using
native application. Following section gives instruction on how to download the
native application and share the screen to be projected on the TV.
Connecting to Prijector from Mac OS X
Prijector application for Mac OS X can be downloaded from the Prijector
device by connecting to it over WiFi. Following section gives details of
connecting to the device, downloading the application and using the
application to project your desktop screen to the TV.
Step 1 - Connect to WiFi hot-spot
1. The WiFi hotspot information is provided on the TV screen connected to
the Prijector.
2. Connect the WiFi of your laptop to the Prijector hotspot
Step 2 - Download the application
1. Open the browser to go to myprijector.com
2. Click on “HERE” on the above screen to download the Prijector.dmg file.
Step 3 - Install the application
1. Double click on the dmg file to install the application to the Mac OS X
2. Drag and drop the Prijector companion app in the applications folder to
complete installation
For Mac OS X 10.9 (Mavericks)
3. Select Prijector in the applications folder and right click on it
4. Check “Prevent App Nap” on the info screen
Step 4 - Start sharing
1.On starting the application for the first time, a prompt is displayed to confirm
if you want to open the application downloaded from internet. Select ʻOpenʼ
2.The application launches and shows you the below screen.
3.Click “Share” to start sharing your screen on the TV.
Other features of the applications are provided in the Advance Features
section of this document.
Connecting to Prijector from Windows
Prijector application for Windows can be downloaded from the Prijector
device by connecting to it over WiFi. Following section gives details of
connecting to the device, downloading the application and using the
application to project your desktop screen to the TV.
Step 1 - Connect to WiFi hot-spot
1. The WiFi hotspot information is provided on the TV screen connected to
the Prijector.
2. Connect the WiFi of your laptop to the Prijector hotspot
Step 2 - Download the application
1. Open the browser to go to myprijector.com
2. Click on “HERE” on the above screen to download the Prijector.exe file.
Step 3 - Install the application
1. Start the installation by double clicking on the .exe file
2. Follow the installation procedure as applicable or suggested by your IT
team.
Step 4 - Start sharing
1.Start the applications from Start menu.
2.The application launches and shows you the below screen.
3.Click “Share” to start sharing your screen on the TV.
Advanced Features
This section is guide to use the advance features of Prijector
Sharing selective window
1.Share the screen by clicking on “Share”
2.Click on the “select window” icon as represented in the below image
3.Select the window from the list of windows shown, and confirm by clicking
on the green tick as shown in the below image.
Play youtube video
This feature enables users to watch youtube video on the TV. Internet
connection to Prijector is mandatory for this feature to function.
1.Enter the YouTube URL into the URL field as shown in the below image and
click on play.
2.Controls like Play, Pause Stop, Forward, Rewind are available at the
bottom of the application panel
Regenerate WiFi Key
1.Use the remote control navigation to select the “Regenerate Password”
option on the TV display
2.The WiFi hotsport service restarts with a new WiFi key.
Support Information
For any technical support through installation and usage of Prijector, please
email us at [email protected]
For further information related to the product and latest news on the product
please visit www.prijector.com