1
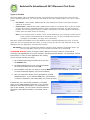
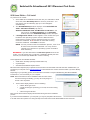
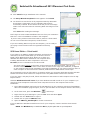
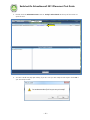
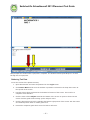
Switched-On Schoolhouse 2013 Placement Test Installation Guide MMVI Alpha Omega Publications, Inc. Switched-On Schoolhouse® 2013, Switched-On Schoolhouse®. Switched-On®, and their logos are registered trademarks of Alpha Omega Publications®, Inc. All Rights Reserved. No part of this publication may be reproduced, stored in an electronic retrieval system, or transmitted in any form by any means – electronic, mechanical, photocopy, recording, or otherwise – without the prior written permission of Alpha Omega Publications®, Inc. Brief quotations may be used in literary review. Switched-On Schoolhouse® 2013 Placement Test Guide Installing Switched-On Schoolhouse ® Switched-On Schoolhouse® 2013 (SOS) is easy to install since most of the components install themselves. There are wizards to walk you through the others. Before you start be sure your computer meets the recommended minimum system requirements, ensuring that the program can run at its best. Recommended Minimum System Requirements Note: Only English language versions of Microsoft® XP, Vista, Windows 7 and 8 are supported. Minimum Requirements Optimal Performance XP Service Pack 3 Microsoft IE 7 or higher 1 GHz or higher processor 512 MB Memory (RAM) 3 GB hard drive space 1024 X 768 or higher resolution monitor, 16 bit color CD-ROM drive Adobe Reader* Printer recommended Microsoft IE 7 or higher 2 GHz or higher processor 2 GB Memory (RAM) 4 GB hard drive space 1024 X 768 or higher resolution monitor, 32 bit color CD-ROM drive Adobe Reader* Printer recommended Vista Service Pack 2 1.4 GHz or higher processor 1 GB Memory (RAM) (2 GB for 64-bit) 3 GB hard drive space 1024 X 768 or higher resolution monitor, 16 bit color CD-ROM drive Adobe Reader* Printer recommended 2 GHz or higher processor 4 GB Memory (RAM) 4 GB hard drive space 1024 X 768 or higher resolution monitor, 32 bit color CD-ROM drive Adobe Reader* Printer recommended Windows 7 & 8 1.4 GHz or higher processor 2 GB Memory (RAM) 3 GB hard drive space 1024 X 768 or higher resolution monitor, 16 bit color CD-ROM drive Adobe Reader* Printer recommended Dual core processor 4 GB Memory (RAM) (2 GB for 32-bit) 4 GB hard drive space 1024 X 768 or higher resolution monitor, 32 bit color CD-ROM drive Adobe Reader* Printer recommended Note: The requirements in the first row of the table above are minimal. Depending on the configuration of your computer, you may find you need to run SOS on a computer that exceeds these requirements, giving you more memory and a faster processing speed. Vista & Windows 7 Aero Users: We strongly recommend that you use a computer meeting the requirements for optimal performance. ~2~ Switched-On Schoolhouse® 2013 Placement Test Guide Types of Installs SOS Home Edition offers two different installs; a full install and a client install. If this is the first time you are installing SOS 2013, you must do a full install on the main computer before you can do a client install. • • Full Install – SOS Teacher, SOS Student and the database all reside on the same computer. (takes 25-30 minutes) Client Install – SOS Student and/or SOS Teacher reside on a computer which is part of a home network linked to the main SOS computer, which contains the full install. For SOS to function properly, the client computer requires a constant connection to the main computer with the full install. (each one takes around 10 minutes) Note: If you currently have an earlier version of SOS installed on your computer, please remove it first, and then install Switched-On Schoolhouse 2013. If you have SOS 2012 and wish to migrate your database, see page 19 for instructions. SOS 2013 installs the database server and database, and the tutorials separately this year, so it may seem as if you are repeating the same steps. In a way you are, but first you will install the server, and database; then the application, and finally the tutorials. XP USERS: If you have or had Internet Explorer version 6 (IE 6) loaded on a computer where you plan to install SOS, please go to www.update.microsoft.com to upgrade IE. ATTENTION XP Users: When you begin installing SOS 2013 a check is done to ensure that all necessary base applications are on your computer, including Windows Installer 4.5, Framework 3.5 and Framework 4.0. If any of these applications are missing, you see a screen like the one below. 1. All unchecked items begin installing when you click the Install button. 2. Put SOS Installation Disc 2 into your CD-DVD ROM drive when prompted and then click OK. 3. The installation may take 2-3 minutes. Click the Reboot button when prompted. (You only need to reboot if Windows Installer 4.5 must be installed.) 4. After you computer restarts you are prompted to put SOS Installation Disc 1 in your CD-DVD ROM drive. (If Framework 3.5 must be installed, it will install before you see this prompt.) If Framework 4.0 is not already installed, it is installed when you put SOS Installation Disc One in your CD-DVD ROM drive. Once Windows Installer 4.5, Framework 3.5 and 4.0 are installed, you can continue with the install as described in the SOS Home Edition - Full Install section below. ~3~ Switched-On Schoolhouse® 2013 Placement Test Guide SOS Home Edition – Full Install 1 To perform a full install: 1. Insert SOS 2013 Installation Disc One into your CD-ROM or DVD drive and select Run Setup.exe if a choice is presented. You may briefly see an Initializing pop-up. It will disappear automatically. 2. The SOS 2013 Setup window displays. Select Switched-On 2013 - Full Home Install (top choice). Attention Windows Vista and Windows 7 & 8 Users: You may need to click Run Setup.exe on the AutoPlay window before the SOS 2013 Setup window will open. 2 3. A Configuration Check window appears. This verifies that your hardware and operating system meet the SOS minimum requirements. Anything with a checkmark next to it meets minimum standards. An X indicates an item NOT meeting minimum standards. Click Next to continue. NOTE: You may continue with the installation process, even if not all items meet minimum standards. You may need to upgrade your hardware or operating system for SOS to work effectively. 3 WARNING: If you have items listed in the Windows System section of this screen, you must fix them prior to continuing or installation will likely fail. Click each link you see that says “Click to fix…” before continuing. These applications are installed with SOS: • Adobe Flash TM Player (Already installed with IE 10) • Crystal Reports • SOS 2013 SQL 2008 R2 Express Server Microsoft Internet Explorer (IE) is required but not included in the SOS install. It should have been installed when you purchased your computer. Go to www.microsoft.com to download IE free. Please contact the seller if you have difficulty with this. Depending on your operating system, Microsoft®.NET Framework 3.5 maybe installed along with Microsoft®.NET Framework 4.0, if it’s not already on your computer. 4 NOTE: Both Framework and server installation take some time. When the server first begins installing, you may not see anything for a minute or two. Be patient. 4. Three screens display while the server is installing: • A black “DOS” type screen • A small window pops up advising you to wait, the server is being installed. • A Server Progress window. Each of these three windows displays several times during the server installation process. If you have a firewall installed on your computer, you may be prompted to allow access to an SQL Server file “sqlservr.exe” during this step of the SQL Server install. Please allow access for this file. ~4~ 4 Switched-On Schoolhouse® 2013 Placement Test Guide 5 The Switched-On Schoolhouse 2013 - Home Edition Database AOP Setup window displays again to walk you through the database installation process step-by-step. 5. Click Next on the Welcome screen when it displays. 6. On the Customer Information screen, enter: • User Name: Only letters, numbers, and spaces are allowed. Punctuation marks and other special characters are not permitted. • Organization: This might be your last name or something like “Home”. 6 Serial Number: The 16 digit serial number is on the inside front cover of this guide. Enter it exactly as it appears. • 7. The Destination Folder screen (for the database) displays. To retain the location where the database is automatically placed, click Next. If you must change this default location, click Change, enter the path to the folder you want to use. Click OK when finished. We HIGHLY recommend you leave the SOS database in the default location. 7 8. Setup Information screen displays. Enter the following information and click Next when you are ready to continue: 9. • Teacher username (Must be no longer than 20 characters. Only letters, numbers and spaces are permitted) Displays on messages sent within the application. • Teacher password – Type in your password. Passwords maybe 1-12 characters long. They are case sensitive and may not contain blank spaces or special characters. Be sure to write down your password. You need it to login to SOS Teacher after your installation is complete. • Teacher password confirm – Enter your password again. • Teacher first name – This is what displays on your Home Page. It cannot be changed after SOS is installed. • Initial term description (i.e. the name of your school year) – the current school year is the default, you may change it. Click Install to continue. This may take several minutes. After it is finished installing a completion screen displays. ~5~ 8 9 Switched-On Schoolhouse® 2013 Placement Test Guide 10 10. On the Setup Wizard Completed window, click Finish. The SOS Database is now finished installing. 11. You see a Preparing to Install pop-up and then the Welcome screen again. This time the Switched-On Schoolhouse 2013 - Home Edition application is ready to be installed. Click Next to continue. 12. The End User License Agreement (EULA) displays. Read this agreement carefully. If you agree to the terms, click the checkbox beside the “I accept...” statement and click Next. 13. Destination Folder screen displays. Click Next. (This adds the application shortcut icons to your desktop.) 11 If you do not want the shortcut icons on your desktop, click to remove the checkmark next to Add application icons to desktop and before you click Next 14. Click Install to begin installation of the application. A Progress window displays during installation. 15. The Setup Wizard Completed screen appears. Click Finish. 12 16. Again you see a Preparing to Install pop-up and then the Welcome screen appears. This time to install the Switched-On Schoolhouse 2013 – Home Edition Tutorials. Click Next to continue. 17. The Destination Folder for the tutorials displays. Click Next. 15 16 17 13 14 ~6~ Switched-On Schoolhouse® 2013 Placement Test Guide 18. Click Install to begin installation of the tutorials. 18 19. The Setup Wizard Completed screen appears. Click Finish. 20. You should now see the list of all programs needed by SOS. Each should have a checkmark next to it indicating that all were successfully installed. At the bottom of the list you see a message inside a box with instructions on accessing SOS. See image on next page. Click Close after reading this message. 19 Don’t forget to remove SOS Installation Disc One from your CD-ROM or DVD drive. Your full installation of SOS is now complete. If you are using a home network and want to perform a client install on one or more networked computers, continue below. If you are installing SOS on only this one computer, you are ready to go to page 10 and continue with the registration and setup steps. 20 SOS Home Edition – Client Install If you want to run SOS on multiple computers and have them networked, the client install allows you to do that. The Full Install (which MUST be done first) allows you to have your database and SOS Teacher installed on one computer while installing SOS Student on other computers in the home. Be aware, there is a limitation to the client install: The client install requires a connection to the network at all times to function. This can be a wireless network. Since the client version does not have its own copy of the database; it depends on the computer with the full installation to provide the database. If your home network is down or either computer is removed from the network, SOS Student or SOS Teacher cannot open. We recommend you do the full install on a computer where you can access both SOS Teacher and SOS Student and do the client install on a computer where only SOS Student needs to be accessed. If you are using a 3rd party firewall, follow manufacturer’s instructions to add exception rules for SQL Express 2008. Attention Windows Firewall users: If you have Windows Firewall turned on for your computers you must first create exceptions to allow the client computers access to the computer with the Full Installation: 1. Insert SOS Installation Disc One into the CD-ROM drive on the computer with the Full Installation. When the installation program opens, close it. (Do this ONLY on the computer with the full install.) 2. At the same time, press the Windows ( ) and e keys. 3. Right-click the green SOS logo or your CD-ROM drive and select Open. 4. Double-click the Tools folder to open it. 5. Double-click to open the FWConf folder. 6. Open the FWConf_ReadMe.pdf for further instructions. If you do NOT have Windows Firewall turned on for your computer, continue with the Client Install below. NOTE: The Windows key is beside the Alt key by the space bar on your keyboard. ~7~ Switched-On Schoolhouse® 2013 Placement Test Guide Once you have completed the Full Install, you can do a Client Install. NOTE: If the Client computer does not have Windows Installer 4.5 and Framework 3.5 already installed, you will be prompted to put SOS Installation Disc Two into your CD-DVD ROM drive. 1 1. Insert SOS Installation Disc One into the CD-ROM drive on the client computer. The SOS Setup window displays. Click the second option, Switched-On 2013 - Client Install for Home Network. A Configuration Check window appears to verify your hardware and operating system meet the SOS minimum requirements. Anything with a checkmark next to it meets minimum standards. An x indicates an item NOT meeting minimum standards. NOTE: You may continue with the installation process, even if not all items meet minimum standards. You may need to upgrade your hardware or operating system for SOS to work effectively. WARNING: If you have items listed in the Windows System section of this screen, you must fix them prior to continuing or installation will likely fail. Click each link you see that says “Click to fix…” before continuing. 2. After you click Next, the Switched-On Schoolhouse Home Edition Setup window opens with a list of required components. Those with a checkmark are already installed. The ones with another icon beside them will be installed. Click Install. The installation of the needed programs begins. Click Next. 2 NOTE: This process may take some time depending on the applications being installed. SOS installs these applications on the Client computer: • Adobe FlashM Player (Already installed with IE 10) • Crystal Reports Microsoft Internet Explorer (IE) is required, but not included in the SOS install. It should have been installed when you purchased your computer. Please contact the seller if you do not have IE. You can download IE free by going to www.microsoft.com. Please contact the seller if you have difficulty with this. Depending on your operating system, Microsoft®.NET Framework 3.5 maybe installed along with Microsoft®.NET Framework 4.0, if not already on your computer. The Switched-On Schoolhouse 2013 - Home Edition - AOP Setup Wizard window displays, showing that Switched-On Schoolhouse® is to be installed. It walks you through the installation process step-by-step. 3 3. The End User License Agreement (EULA) displays. Read this agreement carefully. If you agree to the terms of the agreement click the circle beside the “I agree…” statement and click Next. ~8~ Switched-On Schoolhouse® 2013 Placement Test Guide 4. The Custom Setup Screen displays. If you want only the SOS Student features installed: 4 • Select Teacher and highlight: X this feature will not be available If you want only SOS Teacher features installed: • Select Student and highlight: X this feature will not be available Click Next. 5. The Destination Folder & Desktop Icons screen displays. Click Next, unless you need to change the location where the application is automatically placed or you don’t want the shortcut icons for SOS Teacher and SOS Student on your desktop. 5 We HIGHLY recommend leaving SOS in the default location. If you must change the default location of SOS, click Change and enter the pathname to the folder to be used, and then click OK. To remove the shortcut icons on your desktop, remove the check beside Add application Icons to desktop, then click Next. 6. On the Database Selection window, locate the computer where your full install resides, either by using the dropdown menu or typing in the computer name followed by: \SOSHOME80 in the blank textbox. Click Next after the location is selected. 6 NOTE: To locate the computer name of the computer where the full install resides, go to the computer with the full install and press the Windows key and the Pause/Break key at the same time. When you click Next, the application tries to connect to the database on the computer with the full install. If one is found, continue with Step 8. If a connection cannot be made, a message displays that it could not connect to a valid 7 database. Repeat Step 7 until you have a valid connection. NOTE: Locate the procedure “Client Installation Troubleshooting” at www.aophomeschooling.com/support/ for further assistance. 7. Once you have successfully located the database connection, the Wizard is ready to begin the installation screen displays. Click Install. 8. After all of your new files are copied, you see the completion confirmation screen. Click Finish. 9. You see the Welcome screen again. This time the SwitchedOn Schoolhouse 2013 - Home Edition Tutorials are ready to be installed. Click Next to continue. 10. The Destination Folder (for the Tutorials) screen displays. Click Next. ( 11. Click Install to begin installation of the tutorials. 12. The Setup Wizard Completed screen appears. Click Finish. ~9~ 8 Switched-On Schoolhouse® 2013 Placement Test Guide 13. You should now see the list of all programs needed by SOS. Each should have a checkmark next to it indicating that all were successfully installed. At the bottom of the list you see a message inside a box with instructions on accessing SOS. Click Close after reading this message. 13 Your Client installation process is complete. If you have no additional computers where you plan to install SOS Client, you are ready to move onto Registration and Setup. Go to ’Logging In’ below. If you have additional computers where you want to install SOS Client, return to Step 1 on page 8. Don’t forget to remove the application disc from your CD-ROM or DVD drive! Logging In Unless you chose to remove the icons in Step 13 on page 6, you should see an icon that looks similar to the one to the right. Double-click that icon to open SOS Teacher. If you do not have the icon on your desktop, you can still open SOS Teacher> On your computer’s task bar, press the Windows and e keys together > All Programs > AOP > SwitchedOn Schoolhouse 2013 Home > SOS Teacher As a teacher, you use a single account to perform all your administrative functions, including grading student work. You are asked to log in with a teacher password each time you start work in SOS Teacher. This protects your account, blocking others from answer keys, student grades, and teacher controls. 1. Enter your password (the one you created during installation – see Step 8 on page 5) in the password field. (Check your caps lock key if you get an error message, it is case sensitive.) 2. Click the Login button. Registration The first time you login, you are asked to register your software installation. Switched-On Schoolhouse® requires the registration process be completed within 30 days from the time you install the software. We recommend you register upon initial login and eliminate the daily reminders for both you and your student(s). When you click Yes on the Product Registration pop-up box, the application automatically attempts to connect you to the AOP website page for SOS registration. If a connection is detected, you are automatically connected to the SOS Registration page where you can complete the registration electronically. (See Registering On-Line below.) ~ 10 ~ Switched-On Schoolhouse® 2013 Placement Test Guide If an internet connection is not detected, you are presented with an option to register electronically from another computer or if you have no internet access, to register by telephone. To register electronically, click the first option, I have access to the internet from another computer. You then see a page that looks like the one to the right. You can click the Print Instructions button to print a copy of this page to take with you to the other computer. Alternately, you can copy the serial number provided in Step 2 on this page. Either way, follow these steps to complete the registration process. 1. On the alternate computer, open a browser and go to http://sosreg.aop.com and then see Registering On-Line below. 2. Enter the serial number. 3. Follow the instructions on the form. 4. Copy the Registration Code you receive on the Thank You page when the registration process is completed on-line. 5. Return to the original computer with the full installation of SOS and enter the Registration Code in the four boxes shown in Step 4 of the SOS Registration page (as shown in the image above,) 6. Click OK. Register By Telephone If you cannot register electronically, click the second option, I have no access to the internet. You then see the toll-free number to call along with your product name and installation serial number. The service representative needs the following information from you: • • • • • • First and Last Name Address, City, State Zip/Postal Code Country Email address Phone number AOP has several optional products / services available that the Customer Service Representative (CSR) may offer you. For example, if you want to receive the Daily Focus, a daily devotional or the Homeschool View, an electronic newsletter, you will also be asked to provide your e-mail address. The CSR will give you a registration code when the process is complete. You must enter it into the four boxes in Item 4 on the screen exactly as given. We recommend that you write it down and keep it in a secure place, possibly on the sticker with your serial number in the front of this guide. Click OK when you are finished. Remain on the line with the CSR until you have a message confirming your successful registration. ~ 11 ~ Switched-On Schoolhouse® 2013 Placement Test Guide Registering On-line If an internet connection is detected, an account login screen similar to the SOS Online Registration screen to the right is displayed. Once a screen similar to the SOS Online Registration screen below is displayed, you can complete the registration process electronically. If your serial number is not already populated, please enter it in the Serial Number field. If it is prepopulated, please complete the form by entering: • • • • • • • Year of your SOS edition First and Last Name Address, City, State Zip/Postal Code Country E-mail Address Phone Number Next, you see a list of optional products and services AOP offers, for example the Daily Focus, a daily inspirational devotion for homeschool families or the Homeschool View, an electronic newsletter for homeschool families. Leave the checkmark beside the ones you want to receive. Click SUBMIT to finish your registration. A new window opens with a message confirming the successful registration of your SOS software installation. This message includes your registration code. Please, write this number down and keep it in a secure location (like the front cover of this guide) or print the page and put it in a safe place. Click OK on this message screen after noting the registration number. If your full SOS install is on another computer go to the previous page and continue with Step 5 to complete your registration process. Should you misplace either your serial number or registration number, you can find them on the About page of your SOS application. Click the About link in the upper right corner of your Home Page for access. If you are using the Classic theme, click the SOS logo on your Home Page for access. Register Later If you choose not to register your product immediately, you can access the application for up to 30 days after installation. Each time you open your Teacher application you see a registration reminder with the number of days you have to register before your software is disabled. Click Yes anytime you see this message to register. If you do not register by the end of the 30 day grace period, a message appears on day 30 advising you that SOS will be disabled if you do not register today. Click Yes to register now and follow the procedures beginning on page 11. ~ 12 ~ Switched-On Schoolhouse® 2013 Placement Test Guide If you have not registered by day 31, a message appears when SOS Teacher or SOS Student are opened advising you that SOS has been disabled and cannot be opened until the product has been registered. Registration can only be performed from the SOS Teacher application. Students receive a message advising them to notify their teacher that they cannot continue. When you try to open SOS Teacher, click OK on the message to register the product at this time. Setting Up Students and Placement Tests After Switched-On Schoolhouse® is installed, you need to install the placement tests and add the student(s) who will be taking the tests. These instructions assume this is your first installation of SOS. 1. Open SOS Teacher. 2. Enter your Password on the Login screen. 3. Use the Setup Wizard (It opens automatically the first time you login.) to add students and install the placement tests. The Setup Wizard provides several setup options. These instructions assume you wish to complete placement testing before considering other setup options. Setup Wizard – Click Next to begin School Term – Click Next. You already have a school term. You set it up during installation. Calendar – Select No. Click Next. Calendar – (view calendar) Click Next. Student Setup (introduction) – Click Next. Student Setup (options) – Click Add. Enter Student Username, First Name and Last Name. Click Next. Curriculum Setup (introduction) – Click Next. Curriculum Setup (Install curriculum) – Click Install and follow the steps below: 1. Put SOS Installation Disc Two in your CD/DVD ROM drive, and then Browse to that drive. 2. Open the Placement Tests folder in the pop-up window. 3. Open the subject folder of your choice (one of the five available). 4. Double-click contents.sosx. 5. On the prompt, choose Leave on CD-ROM. 6. To load additional tests, click Install and repeat the above steps. 7. Click Next when finished installing placement tests. Curriculum Setup (assigning curriculum) – Follow instructions on screen and click Next when finished. Curriculum Setup (assigning sample lessons) – Select No and click Next to finish. NOTE: Placement Test Disc Two must be available to the student while he or she is taking the quizzes/tests. NOTE: You can use the Setup Wizard at any time. Select Application on the SOS Teacher Home Page and then select Setup Wizard. Many of the setup options provided there are also accessible through Administration on the Teacher Home Page. See the electronic User Manual to learn more. ~ 13 ~ Switched-On Schoolhouse® 2013 Placement Test Guide Testing begins at the 300 level. The student should expect to take several quizzes/tests until he or she finds it too difficult to progress further. If you want the student to start at a higher level: 1. Go to the Assignments page in SOS Teacher (Lesson Book widget on the Home Page), 2. Select the Student 3. Click the Subject in the Student Schoolwork section of the page (lower half). 4. Click the Edit Subject button. NOTE: Each folder in the Placement Test subject represents a level. For example, if I thought my student should be at the 7th grade level, I would start testing at Level 5. To skip Levels 3 and 4: 5. While holding down the Shift Key on your keyboard, click the folder for Level 3 and Level 4 6. Click the Remove button 7. Click the Save button. 8. Click the OK button on the Select Due Dates window that appears. 9. Click the Close button on the Edit Student Subject window. You are returned to the Assignments page. When the student opens their first assignment, the testing will begin at level 5 quiz 1. Taking the Placement Tests Once students have been added and placement tests assigned in SOS Teacher (as we did using the Setup Wizard), testing can begin in SOS Student. Students should follow the instructions below to work through the placement tests. 1. From the desktop, double-click the SOS Student icon to open SOS Student and login. 2. Click the Click to see your Schoolwork link in the Schoolwork widget on the SOS Student Home Page. ~ 14 ~ Switched-On Schoolhouse® 2013 Placement Test Guide 3. Double-click the Placement Test name in Today’s Schoolwork at the top of the screen to open the test. 4. You see a small box pop open asking if you are sure you are ready to take a quiz. Click Yes if you are ready to start. ~ 15 ~ Switched-On Schoolhouse® 2013 Placement Test Guide 5. Click Show Problems at the bottom of the quiz/test. 6. Click Grade and Continue to advance from problem to problem. (Once the student does a problem, the Show Problems button becomes the Grade button. Once the Grade button is clicked, the Continue button becomes available (beside the Grade button. See the picture on the next page.) ~ 16 ~ Switched-On Schoolhouse® 2013 Placement Test Guide SOS prompts the student when a quiz/test is complete. The student should repeat Steps 3-5 to work through the next quiz/test. Gathering Test Data To see the results of the placement tests; 1. Open SOS Teacher and enter the password on the Login screen. 2. Click Lesson Book and be sure the student in question is selected in the drop-down menu at the top-left of the screen. 3. Find the subject being evaluated in the bottom left section of the screen. There will be a composite score beside it. 4. Click the name of the subject tested at the bottom of the screen. It opens to show the test scores of all the grade levels making up this subject’s score. 5. Click the placement test level to populate the bottom right portion of the screen with the scores of individual quizzes within a certain grade level. 6. Record the composite grade level scores for further reference. ~ 17 ~ Switched-On Schoolhouse® 2013 Placement Test Guide Interpreting the Test Scores The placement tests reflect the content of the SOS program, and give some indication of the student’s knowledge of a particular grade level or subject. Hard and fast rules for placement are difficult to determine; some general principles can offer guidance for placement. A composite score in the mid-70’s or above for a given grade level indicates the student is ready for the next higher grade level. A conversation with the student concerning their feeling of competence in the particular grade level in question helps shape decisions concerning placement. Elementary students should be placed by the parent, as they are able to assess the maturity level and knowledge base of the student. When talking with your student, ask leading questions to help guide the conversation. This technique can yield useful information for placement, especially with younger students. Questions such as, “What did you have trouble with?” or, “Did you have any trouble with the reading?” can provide much needed information concerning the readiness of the student for a particular grade level. ~ 18 ~ Switched-On Schoolhouse® 2013 Placement Test Guide Upgrading to SOS 2013 Home Edition If you have a version of SOS prior to the 2012 version that you need to remove: 1. 2. 3. 4. 5. Press the Windows ( ) and r keys at the same time. Type “control” into the run box and click the OK button. Select Add/Remove Programs (it might say Programs and Features). Select the program to be removed. Click Remove. Upgrading from 2012 to 2013 If you are currently running the 2012 version of SOS, you can upgrade directly to the SOS 2013 edition. Your upgrade makes your 2012 database available in the new program. If you have the client version installed, you need to upgrade the Full Install BEFORE doing anything with the client installation. If you plan to use 2013 curriculum, you must upgrade your application. The 2012 to 2013 upgrade process automatically backs up your database and restores it for use with the 2013 version of SOS. As a precaution, you should always perform a backup from your existing installation before you install the new version. Need help doing a backup? Open your existing installation of SOS Teacher, click Help? > select SOS Teacher > Application > Backing Up Files or view the Backup/Restore tutorial. If you are upgrading from 2012 to 2013, do NOT uninstall your 2012 version of SOS. The upgrade process automatically migrates your data and uninstalls the old version for you. You may notice there are duplicate icons for both SOS Teacher and SOS Student for a very brief time during the upgrade process; this is expected. There will only be one set when the upgrade is done. To complete your upgrade from 2012: Go to page 4 of this guide and follow the instructions in the SOS Home Edition - Full install section. If you also need to perform a Client Install (page 7), do this after you finish the Full Install on your primary computer. ~ 19 ~