1
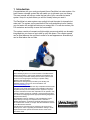
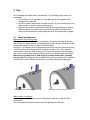
Atmos
EasySolar
User Operating Instructions
for
Atmos EasySolar
Atmos Heating Systems
West March
Daventry
Northants, NN11 4SA
Tel: 01327 871990
Fax: 01327 871905
e-mail: [email protected]
internet: www.atmos.co.uk
Issue 1.3.11
1 Introduction
Congratulations with your newly purchased Atmos EasySolar hot water system. You
have chosen a durable system that will enable you to generate your own energy.
This user manual will help you make the best use of your new solar hot water
system. Keep it in a place where you will find it easily when you need it.
The EasySolar hot water system uses sunlight to heat the water for domestic hot
water use. The system can be used both for flat roofs and pitched roofs. Heating
your hot water with sunlight will reduce your energy bills. You will also reduce your
CO2 emissions and so help to save the environment.
The system consists of compact and light weight components which can be easily
integrated into your home so as to take up very little space. The collector panels
can be fitted between the roof tiles to make for a neat appearance. Alternatively it
can be fitted above the roof tiles.
Building Regulations and the Benchmark Checklist
Atmos Heating Systems is a licensed member of the Benchmark
Scheme which aims to improve the standards of installation and
commissioning of domestic heating and hot water systems in the
UK and to encourage regular servicing to optimise safety,
efficiency and performance.
Benchmark is managed and promoted by the Heating and
Hotwater Industry Council. For more information visit
www.centralheating.co.uk
Please ensure that the installer has fully completed the Benchmark
Checklist on the inside back pages of the installation instructions
supplied with the product and that you have signed it to say that
you have received a full and clear explanation of its operation. The
installer is legally required to complete a commissioning checklist
as a means of complying with the appropriate Building Regulations
(England and Wales).
All installations must be notified to Local Area Building Control
either directly or through a Competent Persons Scheme. A
Building Regulations Compliance Certificate will then be issued to
the customer who should, on receipt, write the Notification Number
on the Benchmark Checklist.
The Benchmark Checklist may be required in the event of any
warranty work and as supporting documentation relating to home
improvements in the optional documents section of the Home
Information Pack.
2
How does it work?
The EasySolar system consists of one or more collectors (A) and an insulated
storage tank (B) which contains 100 litres of water. The collectors are fitted on the
roof and the storage tank is fitted inside the house.
The sun shines
When the sun shines the collectors are heated by the sun. When the collector
reaches a certain temperature a small pump that is incorporated in the storage tank
starts up. This pump circulates the water in the storage tank through the collectors
and the heat is stored in the storage tank.
The sun stops shining
When the sun stops shining the pump stops and the water drains out of the
collectors through gravity. This prevents frost damage to the collectors in winter.
When the temperature in the storage tank reaches its maximum level the pump will
also stop. This prevents the tank overheating.
Hot water is used
When hot water is used, cold water flows into the internal heat exchanger of the
storage tank. This heat exchanger prevents the domestic water mixing with the
water that is stored in the tank but ensures that the cold water is quickly heated up.
From the storage tank the preheated domestic water flows to the combi boiler or to
the hot water cylinder. Because the water has been preheated less energy is
needed to bring the water up to the required temperature. This saves on your
energy bill. If the temperature of the water coming from the storage tank is high
enough it can go direct to the hot water taps. This requires a thermostatic diverter
valve.
3 Use
Once installed the system works automatically. The following points need to be
considered:
• The best time to use hot water is in the afternoon or evening when the
storage tank is warmest.
• Set the hot water temperature no higher than 60° on your combi boiler or hot
water cylinder in order to minimise energy use.
• When the sun shines intermittently the pump will keep switching on and off.
When the pump is not working the collectors may still be collecting heat
which will be transferred to the storage tank once the pump starts up again.
3.1 Yearly maintenance
Maintenance of the storage tank
Because no antifreeze is used it is not necessary to replace the water in the tank.
We do however advise that the connecting pipes and the wiring is checked and the
storage tank topped up once a year. Do this as follows:
Unplug the 12V adaptor from the socket and wait for ten minutes. Remove the plug
from the overflow outlet and insert the overflow connector. Put a tray or bucket
underneath to catch any water coming out. Remove the plug from the filling point
and insert the yellow hose provided for this purpose. Fill the tank with clean water.
Make sure the yellow hose is held firmly in position whilst water is flowing
into the tank. Stop filling as soon as water flows from the overflow outlet. Allow the
surplus water to flow out before replacing the overflow plug and the filling plug.
filling plug and overflow plug
filling hose and overflow connector
Maintenance of collectors
Keep the gutters of the collectors free from leaves so that rain water can flow
unhindered.
This only applies when the collectors are fitted between the roof tiles.
3.2 Faults
If the storage tank is not collecting heat even though the sun shines this indicates a
fault.
To check for any malfunction follow the following procedure. This will only work
when the sun is shining.
Ensure the storage tank is cold by drawing off hot water. This may take 10 minutes
if the storage tank is very warm to start with.
1. Is there 240V on the socket? Yes=>2, No=>13
2. Is there 12V feed to the storage tank? Yes=>3. No=>4
3. Are the wires from the collector thermostat and the 12V feed to the tank
connected correctly? Yes=>6. No=>5
4. The 12V adaptor is faulty. Atmos can supply a replacement.
5. Ensure the wires are connected correctly. The wires from the collector
thermostat are interchangeable. Does the pump start up within 10 minutes?
Yes=>6, No=>7
6. Does the red pipe become warm after a few minutes? No=>8
7. Disconnect the wires to the collector thermostat from the connector block on the
tank and then connect the two terminals on this block with a short piece of wire.
Does the pump start up? Yes=>9, No=>10
8. Unplug the 12V adaptor from the socket. Top up the tank with water. Plug the
12V adaptor back into the socket. Does warm water begin to flow into the tank
after a few minutes? Yes=>12, No=>11
9. The collector thermostat is faulty or the wiring to the collector thermostat is
interrupted.
10. There is a fault with the storage tank pump or the wiring to the pump is
interrupted.
11. Are the red pipe and the blue pipe to the collectors sloping back towards the
storage tank at all points? Yes=>14. No=>15
12. Check the system for leakage.
13. Ensure there is 240V on the socket.
14. Check the flow restrictors for blockages. There is one flow restrictor for each
collector and one for the storage tank.
15. Ensure that the red pipe and the blue pipe to the collectors are sloping back
towards the storage tank at all points. Flush the pump on the storage tank as
described in the Installation manual.
4 Materials
The collectors and the storage tank can easily be disassembled and the
components recycled.
Collector
Collector tray
Insulation
Pipe insulation
Absorber
Side profiles
Cover
ABS
Rockwool
EPDM
Copper
Aluminium
Hardened glass
Storage tank
Insulation
Connecting rings
Tank
Heat exchanger
Sheeting
Pump
EPP
Steel
PE
Copper / brass
Aluminium/PE/PMMA
Stainless steel /Noryl
Accessories
Wakaflex
Collector pipes
Pipe connectors
Flexible connector pipes
Pipe insulation
Polyisobutene / aluminium
PA
Stainless steel
Stainless steel
EPDM
5 Warranty
1. The Warranty card must be completed and the signed copy received by
Atmos within 14 days of installation. By signing the Warranty card the buyer
agrees that the goods have been delivered in a satisfactory condition (transport
damage is outside the scope of this warranty).
2. The Benchmark Checklist must be completed on commissioning the whole
system, and a copy returned to Atmos with the Warranty card. Failure to
complete the Benchmark checklist invalidates the warranty.
3. The warranty is two years from the date of invoice of supply of goods, and
provides for the replacement of faulty parts.
4. The warranty covers any material, construction or operation faults that are found
to be of original manufacturing origin.
5. Any alleged faulty part must first be returned to Atmos for inspection. Provided
that it is agreed that the fault is of original manufacturing origin (see paragraph 6
below), a replacement part will be dispatched free of charge within 3 working
days. If it is not a manufacturing fault, the replacement part (including carriage)
will have to be paid for before dispatch.
6. Any warranty provision shall not apply if Atmos determine that the fault is due to
improper application, improper use, neglect, accidental damage or injudicious
treatment, non-observance of instructions contained in Atmos manuals or due to
improper repair, adjustment, installation or maintenance.
7. This warranty shall not apply if the fault is caused by scale, failure or abnormality
of water supply, abnormal or high voltage or impact of any external influence
that adversely affects the normal operation of the product.
8. In the event of full payment for a product not being received, Atmos shall be
discharged from all further contractual or warranty obligations.
9. If the original installation was carried out by an approved Atmos Installer Partner,
the warranty shall be ten years from date of invoice of installation (as stated on
Warranty card) for the replacement of faulty parts. Additionally the warranty will
cover the associated labour cost for repair during the first two years. This
installer warranty is subject to the conditions 4 to 8 above.