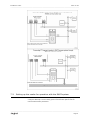
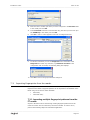
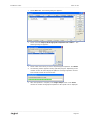
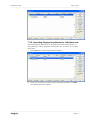
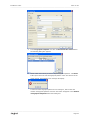
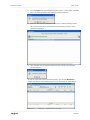
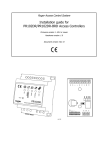
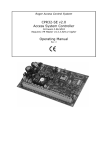
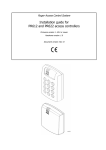
1
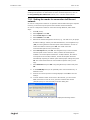
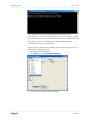
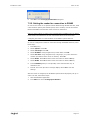
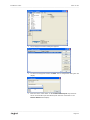
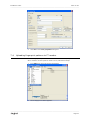
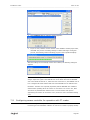
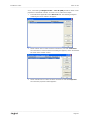
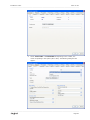
F7 Fingerprint Reader Integration in Roger Access Control System F7 EN Rev. D.doc 2007-10-29 _________________________________________________________________________________________ 1. Contents 1. Contents ............................................................................. 2 2. Glossary and terms ............................................................. 3 3. Purpose of this document ................................................... 3 4. General description............................................................. 3 5. Installation and use guidelines ........................................... 4 6. Basic operation ................................................................... 4 6.1. 6.2. 7. 6.1.1. 6.1.2. User enrollment methods ........................................................5 User programming .................................................................5 User identification............................................................... 7 Using F7 reader in the RACS ............................................... 8 7.1. Physical connections of the reader ........................................ 8 7.2. Setting up the reader for operation with the RACS system ....... 9 7.3. 7.4. 7.5. 8. User enrollment.................................................................. 4 7.2.1. 7.2.2. Setting the reader for connection to Ethernet network .............. 10 Setting the reader for connection to RS485 ............................. 13 Importing fingerprints from the reader .................................15 7.3.1. Importing multiple fingerprint patterns from the F7 reader ........... 15 7.3.2. Importing fingerprint patterns for individual user ........................ 17 Uploading fingerprint patterns to F7 readers .........................19 Configuring access controller for operation with F7 reader ......20 Technical specification...................................................... 24 _________________________________________________________________________________________ Page 2 F7 EN Rev. D.doc 2007-10-29 _________________________________________________________________________________________ 2. Glossary and terms False Acceptance Rate — FAR A rate which measures how often an unauthorized user is improperly recognized as authorized and gets access to the system. False Rejection Rate — FRR A rate which measures how often an authorized user, who should get access to the system is rejected, because the system does not recognize him properly. User A person registered in a reader. Enroller User authorized to enroll new users in the system and to erase the existing ones. Admin Admin User authorized to perform advanced operations in the system except of registering users having administrative rights. Supervisor User authorized to perform all operations in the device and to modify all the options. 3. Purpose of this document This document is not supposed to explain all programming and functionality of the F7. This document is intended to explain an integration of the F7 fingerprint reader in the Roger Access Control System (RACS). If you want to get more information about various configuration options, refer to the original manufacture’s manual delivered together with a F7 unit, or visit his web site. 4. General description F7 is an easy to use biometric device, which can work both in an standalone mode or as a slave device connected to the access controller. The F7 is equipped with an LCD display, a keypad and an optical fingerprint sensor. Reader can be programmed manually, using a built-in keypad or remotely from PC (through RS232, RS485 or Ethernet). Using Wiegand data output it can be interfaced as a slave reader to various access controllers including PRxx2 series as well. _________________________________________________________________________________________ Page 3 F7 EN Rev. D.doc 2007-10-29 _________________________________________________________________________________________ 5. Installation guidelines Do not install the F7 reader in locations covered with intensive light (sunlight, halogen light etc.), because it may affect the finger print scanning process, and thus cause the fingerprint verification to fail. F7 reader should be installed in a dry, protected area far from source of heat and strong, direct light. Keep the sensor surface clean. Sensor glass should be occasionally cleaned with soft damp cloth with neutral cleaning agents. Do not use sandpapers or surface aggressive liquids like alcohol or petrol solvents, this can damage the fingerprint scanner. Please note, that warranty doesn’t cover sensor damages which result from lightning damage, misuse and improper maintenance. 6. Basic operation Generally, in the RACS, the F7 is used for two purposes: User enrollment during initial programming phase; User identification during normal system operation. Keypad The keypad consists of the following keys: OK — confirm key; confirming current operation, answering Yes. C (Cancel) — canceling current operation, answering No. M (menu) – display menu of available options. Navigation keys: (up) — scrolling up; (down) — scrolling down; (Power) — switching a power on/off; (Bell) — Door Bell; 0…9 — numeric keys. 6.1. User enrollment Depending on the version, the reader is able to register 500,1000 or 1500 users. Each user has its ID number (ID= 00001.. 65534) and 1-10 fingerprints patterns. The user’s ID corresponds to the position of the user in the F7 reader’s users list and should be identical as the user’s ID in the RACS system. Note: Although the specific user identification requires enrolling only one fingerprint pattern, it is recommended to enroll at least 2 or 3 fingerprints for a single user. When the finger, which has been used for enrollment, is cut, the system will be able to identify the user using alternative (second or third) fingerprint pattern. The only disadvantage which arise from multiple fingerprints registered in a reader’s memory is the increased time required for configuration of a unit. During enrollment of a new user, a fingerprint is scanned three times. Once the reader verifies that these three fingerprints are the same, the new fingerprint _________________________________________________________________________________________ Page 4 F7 EN Rev. D.doc 2007-10-29 _________________________________________________________________________________________ pattern is stored in the reader's memory and can be later imported to the RACS system database. 6.1.1. User enrollment methods There are three different methods of user enrollment: Enroll FP — only fingerprint of the user is enrolled; An enrollment mode which suits for most users who have good quality fingerprints. Enroll FP & PWD — fingerprint and password are enrolled; An enrollment mode which suits for those users for whom the fingerprints have been enrolled successfully, but there are problems with verification. Enroll PWD — only password is enrolled; An enrollment mode which suits for the small group of users (usually not exceeding 1 percent of all the users) for whom the system can not read fingerprints. From the RACS system perspective, the most important is the first mode of enrollment. 6.1.2. User programming Note: The process of users enrollment in an empty system should start from enrollment the user having administrator rights (Admin, Enroller or Supervisor) This is especially important for security reasons. In case there is no administrator in the reader, every person having an access to a reader may enroll new users and delete existing ones. Programming the Admin user After a device is switched on, the Welcome message and a current date are displayed on the LCD display. In order to enroll a new Admin, perform the following operations: 1. Press M (menu). 2. Select User Manage. Press OK. 3. Select Enroll Admin. Press OK. 4. Select Enroll FP. Press OK. 5. The Admin Accredit message displays with inversed text box below. Use navigation keys () for cycling between different administrative roles of the user enrolled (Admin, Enroller, Supervisor). Select Admin (or Supervisor) and press OK. 6. The New Enroll? message displays. Press OK. 7. System will ask for the user ID. In the UserID field enter admin’s ID. In the empty system this defaults to 00001. Set the number according to the main users list in the RACS system and press OK to confirm. 8. The New Enroll xxxxx-0 message appears (where xxxxx is the user’s ID, and 0 indicates the number of fingerprints currently enrolled in the reader for the specific user). After a while, the Place Finger... message appears. 9. Place finger on the sensor. When the reader reads it, the Remove Finger message appears, and then Second Press. At this moment you should place the same finger on the sensor again. If everything goes well also this time, the _________________________________________________________________________________________ Page 5 F7 EN Rev. D.doc 2007-10-29 _________________________________________________________________________________________ Third Press message appears. If the system does not recognize the fingerprint properly during the procedure, the Please Try Again...message appears. The procedure lasts until the system properly identifies three consecutive attempts of storing the fingerprint which belongs to the same finger. 10. The New Enroll message appears with the user’s ID below and a number of the fingerprint being enrolled, eg.00001-1 and a question OK(Save)?. Press OK in order to confirm the fingerprint of the new administrator. 11. The New Enroll Continue? message displays. In order to enroll the other fingerprint for the same administrator press C (then the system switches to the Backup Enroll mode). Press OK to continue the process of enrolling other administrators. Note: It should be noted that when the procedure of enrollment a new Admin is initiated, and then you select OK in the step 10., the system will start the process of enrollment another administrator. This should be taken into account in order to avoid the situation, that the administrative rights are mistakenly assigned to ordinary user. The enrollment of ordinary users has been explained in the next sections of this manual. 12. The process of enrollment the other fingerprints is similar to the process of enrollment the first one (steps 7 – 10). The difference is that in case of enrollment backup fingerprints in the upper part of an LCD display, the Backup Enroll instead of New Enroll message appears. When the system asks Backup Enroll Continue?, then in order to enroll an another backup fingerprint for the same user, press OK. Note: When somebody attempts to enroll the fingerprint, which had been enrolled earlier, the FP Enrolled Already message appears, and the system will refuse to enroll the fingerprint. Programming Normal users Only the user with administrator rights is allowed to enroll new users in the system. To enroll a new user perform the following steps: 1. Press M (menu). The Admin Affirm message appears. Place your finger on the sensor in order to perform verification. If the reader recognizes the finger as belonging to an administrator, the menu displays which allows for performing the other steps of programming (see below). Otherwise, the Please Try Agn. Access Deny! message displays meaning that the fingerprint read does not belong to the administrator and programming can not be continued. Note: If after pressing M the system does not display Admin Affirm message, it means, that the administrator has not been defined. In such a case, you should enroll an administrator according to the procedure described in the previous section. 2. Select User Manage. Press OK. 3. Select Enroll User. Press OK. 4. Select Enroll FP. Press OK. _________________________________________________________________________________________ Page 6 F7 EN Rev. D.doc 2007-10-29 _________________________________________________________________________________________ 5. 6. 7. The New Enroll? message displays. Press OK. System will ask for the user ID. Enter user’s ID in the UserID field. It defaults to the next available (unassigned) ID number in the system. Enter ID number and press OK to confirm. 8. The New Enroll xxxxx-0 message appears, where xxxxx indicates the ID entered before and 0 is the number of fingerprints which have been stored in the system for the specific ID so far.. After a while, the Place Finger... message appears. 9. Ask the user for placing her(his) finger on the sensor. When the reader reads it, the Remove Finger message appears, and then Second Press. Ask the user for putting her(his) finger on the sensor again. If everything goes well also this time, the Third Press message appears. If the system does not recognize the fingerprint properly during the procedure, the Please Try Again...message appears. The procedure lasts until the system properly identifies three consecutive attempts of storing an fingerprint as belonging to the same finger. 10. The New Enroll message appears with the user’s ID below and the number of the fingerprint being enrolled, e.g. 00002-1 and a question OK(Save)?. Press OK in order to confirm the fingerprint of the new user. 11. The New Enroll Continue? message displays. In order to enroll the other fingerprint for the same user, press C (then the system switches to the Backup Enroll mode). Press OK to continue the process of enrolling other users. 6.2. User identification The main function of the F7 fingerprint reader is verifying users identity based on her(his) fingerprint pattern. After scanning, the fingerprint is compared with patterns stored in the reader’s memory, and when the verification is successful, the user’s ID number is sent over Wiegand outputs (lines: D0 and D1) to the access controller. When F7 reader is idle for specific time (10 minutes by default) it enters standby mode. In this state, the process of users identification can not be performed. The reader switches to the active mode after the user presses any key on the keypad. In the active mode there is the Welcome message and the current date and time displayed on the LCD display. In order to check his identity, the user should follow these steps: 1. Make sure that the device is in the active mode. If not, press any key on the keypad. The reader switches into the active mode. 2. Place your finger on the sensor’s surface. The FP Verify. Remove Finger. message displays. If the check is successful, the UserId xxxxx Verified! message appears, where xxxxx is the ID number of the user in the system. 3. If the identification of the user fails, the Please Try Again! message appears Place your finger on the sensor’s surface again. If several verification attempts fail, contact your system administrator and ask him for enrolling your fingerprint again. _________________________________________________________________________________________ Page 7 F7 EN Rev. D.doc 2007-10-29 _________________________________________________________________________________________ 7. Using F7 reader in the RACS Started from release 4.2, the RACS system is prepared for using a F7 Fingerprint reader. In order for the reader to properly operate in the RACS system, ID numbers of users defined in the reader's memory should be the same as in the database of the RACS system. F7 reader is used in the RACS for two main reasons: Allows for enrollment of fingerprints patterns and storing them in the system’s database (through importing). Allows for users verification based on their fingerprints. The general scheme for cooperation the RACS system with the F7 reader is as follows: 1. Physical connection of the reader to the access controller through Wiegand lines. 2. Physical connection of the reader to the managing computer through RS485 or Ethernet. 3. Configuration of the F7 reader for operation with the RACS system. 4. Enrolling fingerprints into F7 reader. The ID numbers of users registered in F7 must be identical as those, which have been defined in the PR Master database. 5. Importing fingerprints patterns to the RACS database. 6. Exporting fingerprint patterns to the rest of F7s in the system. 7. Using the readers for user identification. 7.1. Physical connections of the reader F7 reader should be connected to the access controller using Wiegand output lines (D0 and D1), also it should be connected either to RS485 or LAN communication bus. The Wiegand interface is used by a reader to output ID number of a user which was identified through fingerprint whereas RS485 or LAN is required for download/upload of the fingerprints patterns from/to the F7 reader. The connection diagrams according to the specific transmission modes are presented in the following figures. _________________________________________________________________________________________ Page 8 F7 EN Rev. D.doc 2007-10-29 _________________________________________________________________________________________ 7.2. Setting up the reader for operation with the RACS system Before the F7 reader can work with the RACS system, it should be properly configured. Basically it covers setting up the communication options and the relevant data transfer parameters. _________________________________________________________________________________________ Page 9 F7 EN Rev. D.doc 2007-10-29 _________________________________________________________________________________________ Note: For security reasons, the process of setting up the reader should start from enrolling its Supervisor. For instructions on how to enroll the Supervisor, refer to the Programming the Admin user section, in 5.1.2 section of this manual. 7.2.1. Setting the reader for connection to Ethernet network In order to configure the reader for co-operation with the RACS through a computer network, you should set up the speed of the network and the IP address. In order to configure the reader for connection through Ethernet, follow these steps: 1. Press M (menu). 2. Select Options. Press OK. 3. Select Comm Opt. Press OK. 4. Select IP Addr. Press OK. 5. Enter the IP address assigned to the device, eg. 192.168.0.201 (for proper IP address settings, contact your LAN administrator). Use navigation keys () for moving between individual parts of the IP address. In order to confirm the address entered, press OK. The reader enters the communication options menu (Comm Opt). 6. Select Net Speed and press OK. Use navigation keys to select relevant network speed modes. There are 10M-F, 100M-F and AUTO options available. The 10M-F option indicates the 10 MB/s network, the 100M-F corresponds to the 100 Mb/s network, and the AUTO option allows for automatically adjusting of network speed. Select proper settings and press OK. The reader enters back the communication options menu (Comm Opt). 7. Select Ethernet and press OK. Using navigation keys select Y and press OK. 8. In the COMM Key field you can optionally enter communication key. It defaults to zero. 9. Press C. The Comm Opt Save? message displays. Press OK to save the settings. 10. To check that the reader can be seen in the network, you can use the PING command. In order to use it, open the command line window (Start/Run/cmd) or enter it directly in the Run dialog box: If the communication is OK, the system will display the following answer: _________________________________________________________________________________________ Page 10 F7 EN Rev. D.doc 2007-10-29 _________________________________________________________________________________________ The message Request timed out indicates, that the reader can not be communicated. In such a case it is likely, that you have made a mistake in setting up the IP address, the network speed or the communication in the Ethernet has not been switched on. In such circumstances you should carefully follow the configuration procedure from the beginning. After the reader is configured, the PR Master System should be properly set up. In order to do this, follow these steps: 1. Start the PR Master application. 2. From Edit menu select F7 Fingerprint Readers. 3. The F7 Fingerprint readers dialog box appears. _________________________________________________________________________________________ Page 11 F7 EN Rev. D.doc 2007-10-29 _________________________________________________________________________________________ 4. To add a new fingerprint reader click Add. The F7 Configuration dialog box will display. 5. In the Reader description or name field enter the name of the reader. In the Communication port list box select TCP/IP. In the IP field enter the IP Address of the device (the same you have set up in the reader). You need to take care that all the address group consisted of three digits. It is especially important when the specific group contains number consisting of less than three digits. For instance, instead of 192.168.0.11 you should enter 192.168.000.011. In the Password field enter the communication key (the same which you have entered in the reader using COMM Key option). 6. 7. Click OK. A new F7 reader appears in the list of configured devices. To test the connection you can use Diagnostic menu commands. Click Diagnostic and select any command, eg. Read date and time. If the configuration was successful, the following dialog box displays: _________________________________________________________________________________________ Page 12 F7 EN Rev. D.doc 2007-10-29 _________________________________________________________________________________________ 8. Click OK to close F7 Fingerprint Readers dialog box. 7.2.2. Setting the reader for connection to RS485 In order for the reader to co-operate with the RACS through RS 485 data bus, serial communication options (data transfer speed, device number) must be set and the RS232 and RS485 communication mode need to be switched on. Note: For some reasons, in order to use communication in RS485 mode, the RS232 mode needs to be switched on as well. It should be taken into account when configuring the reader for communication via the RACS's system data bus. In order to configure the reader for connection through the RS485 data bus, follow these steps: 1. Press M (menu). 2. Select Options. Press OK. 3. Select Comm Opt. Press OK. 4. Select BaudRate. Using navigation keys select 9600. Press OK. 5. Select Dev Num. Using navigation keys or digit keys (0..9) enter the device 6. Select RS232. Press OK. Select Y value and confirm it with the OK key. 7. Select RS485. Press OK. Select Y value and confirm it with the OK key. 8. In the COMM Key field you can optionally enter communication key. It number (the address of the device on the bus). Press OK. defaults to zero. 9. Press C. The Comm Opt Save? message displays. Press OK to save the settings. After the reader is configured, the PR Master System should be properly set up. In order to do this, follow these steps: 1. Start the PR Master application. 2. From Edit menu select F7 Fingerprint Readers. _________________________________________________________________________________________ Page 13 F7 EN Rev. D.doc 2007-10-29 _________________________________________________________________________________________ 3. The F7 Fingerprint readers dialog box appears. 4. To add a new fingerprint reader click Add. The F7 Configuration dialog box will display. 5. Enter the name of the reader. In the Communication port drop-down list select communication port the RACS system has been connected to. The Device address field displays. _________________________________________________________________________________________ Page 14 F7 EN Rev. D.doc 2007-10-29 _________________________________________________________________________________________ 6. Enter the device number (the same you have configured in the Dev Num field in the reader) and click OK. 7. In the Password field enter communication key (the same you have set up in the COMM Key in the reader) and click OK. 8. 9. Click OK. A new F7 reader appears in the list of configured devices. To test the connection you can use Diagnostic menu commands. Click Diagnostic and select any command, e.g Read date and time. If the configuration was successful, the following dialog box displays: 10. Click OK to close F7 Fingerprint Readers dialog box. 7.3. Importing fingerprints from the reader After fingerprints of users have been enrolled in the F7 reader, they can be imported to the RACS. Fingerprint patterns can be imported to the database of the RACS using one of the two modes available: bulk mode; individual mode; 7.3.1. Importing multiple fingerprint patterns from the F7 reader Import in the bulk mode is done through reading fingerprint patterns from the reader for all the users for whom they have been enrolled. In order to do so, perform the following steps in the PR Master application: _________________________________________________________________________________________ Page 15 F7 EN Rev. D.doc 2007-10-29 _________________________________________________________________________________________ 1. Select Users tab. The following dialog box appears: 2. Select command Import/Read fingerprint templates from reader... . The following dialog box appears: 3. Select reader from which you want to import fingerprint patterns. Click Read. 4. The following window appears showing operation progress. Depending on the number of users for whom fingerprint patterns are being imported it can last from several seconds to several minutes. 5. After the operation is complete, in the Finger templ column in the Users window the number of fingerprint templates for the specific user is displayed. _________________________________________________________________________________________ Page 16 F7 EN Rev. D.doc 2007-10-29 _________________________________________________________________________________________ 7.3.2. Importing fingerprint patterns for individual user Importing fingerprint patterns can be also performed in the individual mode, i.e. during defining or editing properties of the specific user. In order to do so, follow these steps: 1. Select Users tab. The following dialog box appears: 2. Select user, for whom you want to import the fingerprint pattern. Click Edit. The following dialog box appears: _________________________________________________________________________________________ Page 17 F7 EN Rev. D.doc 2007-10-29 _________________________________________________________________________________________ 3. In the Fingerprint templates area click the Read from the reader button. The following dialog box appears: 4. Select reader from which you want to import fingerprint patterns. Click Read. If the system does not find the fingerprint pattern of the user selected in the reader chosen, the following error message will display: If it does find the fingerprint pattern we are looking for, after a while the number of fingerprint patterns read from the reader will appear in the Number of fingerprint templates field of the dialog box. _________________________________________________________________________________________ Page 18 F7 EN Rev. D.doc 2007-10-29 _________________________________________________________________________________________ 5. Click OK to close User properties dialog box. 7.4. Uploading fingerprint patterns to F7 readers Once the fingerprints patterns are enrolled into RACS database, they can be sent to all F7 readers in access system In order to do so, follow these steps: 1. From Edit menu select F7 Fingerprint Readers. 2. The F7 Fingerprint readers appears. _________________________________________________________________________________________ Page 19 F7 EN Rev. D.doc 2007-10-29 _________________________________________________________________________________________ 3. 4. Click Configure all. The following warning appears: If you are sure, that the current content of the database contains proper data, click Yes. The process of sending settings to readers will begin. During this process, the following window indicating progress of the operation displays: After the settings are successfully sent to all F7 readers, the following dialog box appears: Note: After the configuration of the readers is complete, the system automatically assigns Supervisor rights to the MASTER user of the RACS. Because the MASTER user in the RACS has the ID =0, which does not exist in the F7, the MASTER user in F7’s is assigned ID=5555 and the PIN code of the MASTER user as defined in the PR Master. Therefore it is especially important, that the MASTER user of RACS is defined before updating all the F7 readers. In case there is no such a user, there will not be any administrator defined in F7’s. In such scenario each person approaching the reader can access the menu, enroll new users and delete existing ones. 7.5. Configuring access controller for operation with F7 reader The last configuration step needed for integration a reader with RACS is to select a terminal type in the PR Master software. In order for F7 reader to properly identify _________________________________________________________________________________________ Page 20 F7 EN Rev. D.doc 2007-10-29 _________________________________________________________________________________________ users, a terminal type Wiegand reader – User ID (BIN) should be chosen in the properties of the PRxx2 controller. In order to do so, follow these steps: 1. In the PR Master application select Networks tab. The following dialog box containing the list of networks will appear: 2. Select network the F7 reader has been connected to, and click Controllers. The Controllers in network: Network XX dialog box appears, where XX indicates the name of the network chosen. 3. Select controller the F7 reader has been connected to and click Properties. The Controller properties window appears: _________________________________________________________________________________________ Page 21 F7 EN Rev. D.doc 2007-10-29 _________________________________________________________________________________________ 4. Select TerminalID1 or TerminalID0 tab depending on the number, the reader is operating in the system (ID1 or ID0). The following dialog box will appear: _________________________________________________________________________________________ Page 22 F7 EN Rev. D.doc 2007-10-29 _________________________________________________________________________________________ 5. From the Type drop-down list select Wiegand reader – UserId (BIN). Click OK. 6. When you close the window, the following dialog box appears: 7. Click Yes. The process of transferring data to the controller will begin. While this process is being done, the following window showing progress of the operation is displayed: 8. After the data are successfully transferred to the controller, the following window appears: In order to check if the system operates properly, you can start Monitoring window and observe if the authorized users may successfully use theirs fingers _________________________________________________________________________________________ Page 23 F7 EN Rev. D.doc 2007-10-29 _________________________________________________________________________________________ 8. Technical specification Technical specification Input voltage 10 — 15 VDC Current consumption Standby mode: 50 mA Active mode: 400 mA Outputs Relay output 3A/12VDC. Communication interfaces TCP/IP, RS232 or RS485 Verification speed max. 2 seconds FRR (False Rejection Rate) max. 1% FAR (False Acceptance Rate) max. 0.0001% Operating temperature 0..45°C Relative humidity 20..80 % Dimensions W82 x D35 x H180 The symbol of a crossed-through waste bin on wheels means that the product must be disposed of at a separate collection point. This also applies to the product and all accessories marked with this symbol. Products labeled as such must not be disposed of with normal household waste, but should be taken to a collection point for recycling electrical and electronic equipment. Recycling helps to reduce the consumption of raw materials, thus protecting the environment. Contact information: Roger sp. j. 82-416 Gościszewo Gościszewo 59 Phone: 055 272 0132 Fax: 055 272 0133 e-mail: [email protected] _________________________________________________________________________________________ Page 24