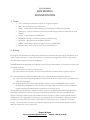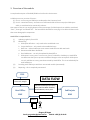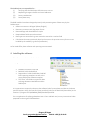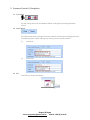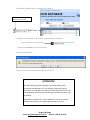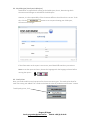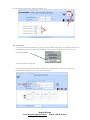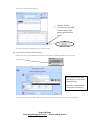
1
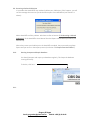
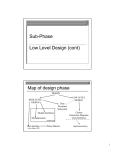
CISIS DATABASE
BME MODULE
(Benefit Monitoring & Evaluation)
USER MANUAL
for Sub Projects
By Greg Regan
Gregory D Regan
Email: [email protected]
Mobile: +855 (0) 25 99 95
Gregory D Regan
Email: [email protected]
Mobile: +855 (0) 25 99 95
CISIS DATABASE
BME MODULE
DOCUMENTATION
1. Terms
·
·
·
·
·
·
·
·
·
CISIS - Cambodian Information System on Irrigation Schemes
BME – Benefit Monitoring and Evaluation
PPMS – An alternative name to BME (Project Performance Monitoring System)
SubProject – a specific collection of Communes and Villages (and the households of those
villages)
Project – a specific group of SubProjects
MOWRAM - Ministry of Water Resources and Meteorology
MS Access – Microsoft Access database software
NWISP – North West Irrigation (a specific section of MOWRAM)
Baseline Year – the first survey year for a given SubProject
2. History
The original CISIS database was designed to facilitate data collection and reporting on Cambodia’s circa
3,000 irrigation schemes. It covers areas such as infrastructure, management, operation, agricultural
uses, distribution network and yearly budgeting.
The BME Module was designed as an addition to the existing CISIS database. Its purpose is to assess the
correlation between
(a) improvements in irrigation schemes and
(b) improvements in the quality of life of the communities served by those irrigation schemes
This author decided to develop the BME module as a separate MS Access database because…
(a) it was felt that the original database may become stressed once used as multi-user database for
which it was designed
(b) the BME Module was conceived by NWISP, a specific section of MOWRAM. At the time of
development, MOWRAM’s IT infrastructure was fragmented and it was not clear that NWISP
and the existing CISIS administrators could share a common server.
As such, BME was designed as a separate module. However, the BME module feeds off geographical
information contained in CISIS such as government defined Provinces, Districts, Communities and
Villages. This data is passed from CISIS to BME to ensure that the 2 systems remain aligned and that
maintenance of this geographical information is not duplicated. The information is passed via a data
package so that the two systems don’t require direct communication (e.g. residing on a common
server). The two systems can reside in completely separate locations and the data updates (CISIS to
BME) can be done by email or flash drive.
Gregory D Regan
Email: [email protected]
Mobile: +855 (0) 25 99 95
It should be noted that while BME was conceived by NWISP, the module has been designed so that new
Projects/SubProjects can be added at any time.
The BME was originally designed as a spreadsheet calculation. It was recognized that this would be
difficult to maintain over time …..
(a) Data entry is decentralized so each MOWRAM Commune Office, responsible for a given
SubProject, requires its own spreadsheet. These need to be collated somehow.
(b) Spreadsheets are easy to corrupt rendering collation difficult
(c) The spreadsheet format does not match that of the paper surveys which increases the likelihood
of errors e.g. data being entered in the wrong field
(d) Volume of information: the NWISP Project alone includes 11 SubProjects, each of which will
survey around 100 households per survey year. Each survey has around 200 fields. A complete
evaluation will require two to three survey years. Other Projects are foreseen in future.
Gregory D Regan
Email: [email protected]
Mobile: +855 (0) 25 99 95
3. Overview of the module
A complete description of the BME/PPMS can be found in the Annexes.
A SubProject survey consists of 2 parts…
(1) Part A – one survey per SubProject conducted at the Commune level
(2) Part B – Household Survey. A maximum of 100 households will be surveyed per SubProject
which is considered to be statistically relevant.
One aspect of Part A is to roughly determine the percentage of a SubProjects that could be considered
“Poor”, “Average” and “Better Off”. The households selected for surveying in Part B should then match
that same demographic composition.
Head Office is responsible for…
(i)
Updating regularly from CISIS
(ii)
Maintaining
a. SubProject definition – only needs to be established once
b. Project definition – only needs to be established once
c. Bank lists – where SubProject must contact Head Office to add new banks
d. Recommended Water Standards
e. Email Addresses - can only be updated by Head Office
f. SubProjects’ survey years: once a survey year is finished for a SubProject, Head Office
can deactivate that year to prevent accidental changes to the survey data. SubProjects
can only add data to survey years determined by Head Office. This is set individually for
each SubProject.
(iii)
Providing each SubProject with their customized module (automated)
(iv)
Reporting – this is completely automated
CISIS
DATA FLOW
Provinces, Districts,
Communes, Villages
Head Office
Definitions (SubProjects/Projects),
Banks, National Water Standards,
Email Addresses, Survey Years
BME
SubProjects
BME
Survey Data
Reports
Gregory D Regan
Email: [email protected]
Mobile: +855 (0) 25 99 95
The SubProjects are responsible for…
(i)
Verifying that the SubProject Definitions are correct
(ii)
Requesting changes to Banks and email addresses
(iii)
Survey coordination
(iv)
Survey data entry
The BME modules have been designed primarily with promoting ease of data entry by the
SubProvinces…
· Software screens are bilingual (Khmer/English)
· Data entry screens match the paper format
· Data exchange with Head Office is simple
· Required data fields cannot be omitted
· Data types are controlled e.g. text cannot be entered in a number field
· Calculations that were previously done by the user on the previous survey form are now
handled by the module (e.g value of production)
As for Head Office, data collation and reporting are automated.
4. Installing the software
The software must be installed in the location …
C:\Program Files\MOWRAM_BME
Overview of the sub folders
· Database: holds the Front End
· BackEnd: holds the BackEnd
· SupportDocs: holds the MS Word and MS
Excel reporting templates as well as the
empty SubProject software template
· The “Data” sub folders are used for data
exchange between Head Office and the
SubProjects
It is imperative to respect the above as the software looks for templates and data in the above
specific locations. Also, the Front End (user interface) looks for the Back End (data tables) in the
location C:\Program Files\MOWRAM_BME\Database\BackEnd.
For an explanation of splitting a database into a Front and Back end, see my instructional video
prepared for the original CISIS database.
Gregory D Regan
Email: [email protected]
Mobile: +855 (0) 25 99 95
5. Common Controls / Navigation
5.1. Translation
You can change the screen text between Khmer and English by selecting the above
control.
5.2. Code / Name
The official government naming of Provinces, Districts, Communes and Villages also uses
a numbering system. When selecting any of these, you can switch between…
(i)
Code view
(ii)
Name view
5.3. Exit
To exit forms, use the Exit button…
Gregory D Regan
Email: [email protected]
Mobile: +855 (0) 25 99 95
5.4. Deleting records…
On many forms, you will find this control to delete records…
Check the Check Box to
activate the delete button
By default, the button is disabled (shown in grey) as shown above. This is a safeguard so that
the Delete Button is not accidently pressed. To activate it, check the check box.
Once activated, the delete button will appear in colour…
Once the delete button is clicked, as a further safeguard against accidental deletion, the user
will be warned, normally twice, that the record is about to be deleted.
DELETING RECORDS IN SUB FORMS
The process for deleting a record in a subform is different. Look at the form below…
Add / Edit Sub Projects Form
This form contains the following subforms:
·
·
Communes
Villages
Gregory D Regan
Email: [email protected]
Mobile: +855 (0) 25 99 95
To delete the “010303-Ponley” commune, first select it…
The black arrowhead indicates
which record is selected
Click the black arrowhead. It will change in appearance to look like this…
(white arrowhead, black background)
… then press the Delete key on your keyboard.
You will get this warning …
If you are sure you want to delete the record, click “Yes”.
ATTENTION!
Be careful deleting records. Deleting a record may delete other
information that depends on it. For example, SubProjects require
Communes. If you delete a Commune, the SubProject attached to it will
also be deleted. The survey data attached to that SubProject will in turn
be deleted.
Safeguards have been built into the software to prevent accidental
deletion but ultimately, the responsibility belongs to the user.
Gregory D Regan
Email: [email protected]
Mobile: +855 (0) 25 99 95
5.5. Adding New Records
Normally, records are added to forms using an “Add Record” button which may look like one of
the following…
When adding records to some forms, the form background colour will change to light green
indicating the form is in “New Record” mode….
New Record mode
Normal mode
In “New Record” mode, some forms will have an “Undo” button.
Use this if you decide to cancel adding the new record.
When all the necessary data has been completed for the new record, you may see the “Save”
button…
Click this to save the new record. The form will return to “Normal” mode (the green background
will disappear).
Gregory D Regan
Email: [email protected]
Mobile: +855 (0) 25 99 95
ADDING RECORDS TO SUBFORMS
Let’s return to the example illustrated in 5.4 above.
The Phkoam commune is selected.
To add a new village, just select the
next vacant row indicated by
Click the drop-down arrow to see
records available for selection
Select a new village from the drop-down list
5.6. Saving convention
Data changes are saved automatically. Unlike MS Word or MS Excel, there is no “Save” button to
click after making data changes.
Gregory D Regan
Email: [email protected]
Mobile: +855 (0) 25 99 95
6. SUBPROJECT PROCESSES
The SubProject Main Menu pictured above shows SubProject processes in their logical sequence
6.1. Import from Head Office
From time to time, Head Office will email you with a data update which will be attached to
the email as a zip file.
For imports from Head Office (and also exports to Head Office), you have the choice of using
MS Outlook or not.
If you normally use MS Outlook for your email, then you can check the “Do you use
Outlook?” option…
Selecting the Outlook option completely automates the process. The BME software will
automatically open Outlook, search the inbox for Data Export files from Head Office, save
and then process them.
Gregory D Regan
Email: [email protected]
Mobile: +855 (0) 25 99 95
To activate the Import button, click the check box
If you are not using Outlook, you can save the Data Export zip file to your desktop. The BME
software will move the zip file to the data subfolder then process it.
Press the
button to run the import process. This will update the
SubProject BME module with additions or deletions to Provinces, Districts, Communes and
Villages, translations, banks, email addresses and survey years.
IMPORTANT!
You must do an Import from Head Office the very first
time you install the software. The software will not
work correctly without it.
If you do not receive a Data Export file from Head
Office, you must contact them.
Gregory D Regan
Email: [email protected]
Mobile: +855 (0) 25 99 95
6.2. My SubProject (check your SubProject)
Head Office is responsible for setting up the SubProjects, that is, determining which
Communes and Villages are included in the SubProject.
However, it is the responsibility of the Commune Office to check that this is correct. To do
this, click the
Communes and Villages…
button to see a report showing your SubProject,
If the information on the report is not correct, email Head Office with any corrections.
Note: to see the report in Khmer, choose the language with the language selector before
running the report….
6.3. Yearly Prices
Next, you need to add rice and crop prices for the current survey year. This needs to be done for
each new survey year added. This is used to calculate the value of production and farmers’ income.
To add yearly prices, click
Gregory D Regan
Email: [email protected]
Mobile: +855 (0) 25 99 95
On the yearly prices screen, follow the steps 1 to 4…
6.4. Households
In order to add a household survey, you first need to add a household. Once added, surveys can
be added for the current survey year and later survey years. To add a household, press the
“Household” button…
The Households form appears…
First check if the Household has been added. Use the SubProject, Commune, Village and
Household drop down lists to search for a household…..
Gregory D Regan
Email: [email protected]
Mobile: +855 (0) 25 99 95
If it does not exist, click
The background colour will change to light green indicating we are in “New Household” mode.
If you did not really want to add a new household, click the the “Undo” button.
To add a new household, select the SubProject, Commune and Village where the household is
located. Now you can add the Household details in Part 2 of the form…
Once you have completed all the fields, the “Save” button will appear…
Click to save the
household
indicates that all required data
has been entered
Gregory D Regan
Email: [email protected]
Mobile: +855 (0) 25 99 95
Once saved, the form returns to “Normal”mode (blue background)…
·
·
If you want to start the survey
directly, you can select a survey
year.
The “Start Survey” year will
appear
6.5. Survey Section A
You must complete Survey Section A for each SubProject in every survey year. In Survey Section
A, there is only one survey to complete.
To start, click
You must select a SubProject and
Survey Year or the “Start Survey”
button will not appear
Click to start the surrvey
Gregory D Regan
Email: [email protected]
Mobile: +855 (0) 25 99 95
The first screen of Part A appears…
·
·
Complete all fields.
To move to the next table,
click the button on the
bottom right side of the
screen
You must complete all tables A1 to A5 in the section
6.6. Survey Section B (Household surveys)
Each survey year, each SubProject will have a maximum of 100 household surveys to enter.
To start, click
Find a household by selecting
the SubProject, Commune and
Village it belongs
Select the Household from the
“Households” drop down list
Select a survey year, then the “Start Survey” button will appear. Click this to start entering data.
Gregory D Regan
Email: [email protected]
Mobile: +855 (0) 25 99 95
·
·
·
·
Complete all data
Click the button at bottom
right to move to the next table
in section
Continue until you have
completed all sections B1 to
B8
NB: there is no Table B5
“Wealth Group” on Table B0 is the field that corresponds to the “By Wealth Group”
on the MS Word Summary Report.
If you see many “n/a” in one of the Wealth Group columns, it means no household
survey data has been entered for that Wealth Group
Gregory D Regan
Email: [email protected]
Mobile: +855 (0) 25 99 95
6.7. View Report
Once you have finished all data entry for a survey year, you can run two kinds of reports
To go to the Reports screen, click
Shows reporting indicators
split by Wealth Group for one
survey year
Shows one summary column for each
completed survey year.
It does not show a split by Wealth
Group
Gregory D Regan
Email: [email protected]
Mobile: +855 (0) 25 99 95
NOTE: you must select a year to run the “Detail by Wealth Group”
report. If you do not select a year or Sub Project, the button will be
disabled e.g…….
no year selected
Button disabled
Check to activate the
“Export to Head Office”
button
6.8. Export to Head Office
6.8.1. Export Using MS Outlook
For this to work, you must have a correctly operating email address working in your MS
Outlook.
Check here to use this method
Make sure you are connected to the Internet.
Click
MS Outlook will be opened automatically and an email to Head Office will be created
with a DataExport zip file attached. When the process is finished, be sure to click “Send
All” in MS Outlook or the email may stay in your Outbox ….
Gregory D Regan
Email: [email protected]
Mobile: +855 (0) 25 99 95
6.8.2. Export not using MS Outlook
If you do not use MS Outlook for your email, do not select “Do you use Outlook?”…
Click
A DataExport zip file will be saved to your desktop (e.g.
CISIS_BME_SubProjectExportModule_002_Po Pi Deum.zip)
Email this to Head Office.
WARNING!
Do not change the name of any zip files created by the BME software.
Gregory D Regan
Email: [email protected]
Mobile: +855 (0) 25 99 95
6.9. Restoring a Deleted SubProject
It’s possible that Head Office may accidently delete your SubProject. If this happens, you will
see this message the next time you do the Data Import from Head Office (see section 6.1
above)…
Advise Head Office of this problem. Ask them to refer to Section “6.13 Restoring a Deleted
SubProject” of the Head Office User Manual. Run the Export to Head Office procedure (see
Section 6.8).
When they restore your SubProject in the Head Office module, they must send you a Data
Export and you must run the Import process (see Section “6.1 Import from Head Office”).
6.10.
Running Compact and Repair Database
You should compact and repair your database regularly. This keeps the database
running efficiently.
To do this, click here…
6.11.
Gregory D Regan
Email: [email protected]
Mobile: +855 (0) 25 99 95