1
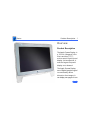
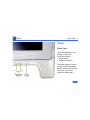
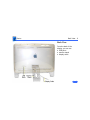
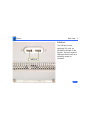
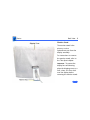
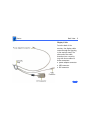
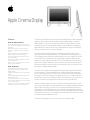
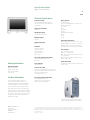
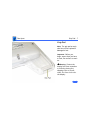
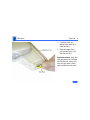
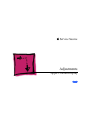
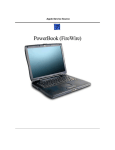
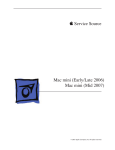
K Service Source
Apple Cinema Display
K Service Source
Basics
Apple Cinema Display
Basics
Product Description - 1
Overview
Product Description
The Apple Cinema Display is
a 22-inch (diagonal) thinfilm transistor (TFT),
active-matrix liquid crystal
display. At introduction, it
was the largest flat-panel
display ever released.
The Apple Cinema Display
uses a digital graphics signal
to consistently deliver
distortion-free images. It
can display two pages of text
Basics
Product Description - 2
and graphics simultaneously with extra space for on-screen
tools and palettes. The wide-screen format allows DVD movie
viewing and editing without letterbox borders (depending on
the aspect ratio set by the DVD movie).
Compared to traditional CRTs, the LCD delivers three times
the contrast ratio, twice the brightness, and twice the
sharpness. And the leading-edge industrial design takes up a
fraction of the space required by traditional CRTs.
The Cinema Display is bundled with selected Power Mac G4
computers with an AGP (accelerated graphics port) DVI
graphics card.
Basics
Features - 3
Features
The Apple Cinema Display offers:
• 22-inch (diagonal) thin-film transistor (TFT), activematrix liquid crystal display
• wide-format 1600 x 1024 screen resolution that
displays two pages of text or full-screen DVD movies
• 160-degree (horizontal and vertical) extra-wide
viewing angle
• 24-bit color
• 16.7 million colors
• power/instant-on switch that turns on both display and
computer simultaneously, or takes system in and out of
sleep mode
• Digital Visual Interface (DVI) 24-pin connector with
Transition Minimized Differential Signaling (TMDS)
• two USB ports; each supplies 500 mA
Basics
Features - 4
• small footprint with tilt-stand adjustment of 10 to 30
degrees
• light weight of 25 lb (11.4 kg)
Basics
Front View - 5
Views
Front View
The front underside of the
display includes the
following controls:
• power button
• brightness buttons
The power button is preset
to turn on both the display
and the Power Mac G4 at the
same time (or put the
system in sleep mode).
Basics
Back View - 6
Back View
From the back of the
display, you can see
• USB ports
• monitor stand
• display cable
Basics
Back View - 7
USB Ports
Two USB ports (each
supplying 500 mA) are
provided on the back of the
monitor. The ports support
USB input devices such as a
keyboard, mouse, or
trackball.
Basics
Back View - 8
Monitor Stand
The monitor stand is the
primary service
replacement part from the
display assembly.
For instructions to remove
the monitor stand, refer to
the Take Apart chapter.
Important: To protect the
display face and housing,
place the shipping cover or a
soft, clean, lint-free cloth
over the display before
removing the monitor stand.
Basics
Back View - 9
Display Cable
From the back of the
monitor, the display cable
routes through the opening
in the monitor stand. The
other end of the cable
branches into a security
ring with three cables to
these connectors:
• power adapter connector
• USB connector
• DVI connector
Basics
DVI - 10
New Technology
DVI
The Apple Cinema Display is the first Apple display to
support Digital Visual Interface (DVI).
DVI is a technology developed by a consortium of companies
that enables a system to store and display moving video
images. A DVI connector is more advanced than a standard
VGA connector. With DVI, all content transferred over this
interface is well preserved from start to finish for highquality digital images.
Basics
DVI - 11
Following is an illustration of the DVI connector:
Basics
U.S. Repair Strategy - 12
Repair Strategy
U.S. Repair Strategy
The Apple Cinema Display is serviced through the service
facilitation process. Customers may choose carry-in repair
service through an Apple-authorized service provider
(AASP) who will then facilitate a mail-in repair or
customers can receive mail-in service from Apple directly.
Ordering
Apple-authorized service providers planning to support the
Cinema Display may facilitate service by calling 800-9192775 and selecting option 6.
For more details on this facilitation process, please refer to
the Facilitation Process in the archived service notices
Basics
U.S. Repair Strategy - 13
section of the Service Source CD. (Open the Notices Archive
folder at the top level of the Main CD. The complete path is
Notices Archive: Service Notices Archive: Service Source
Startup: Service Information: Notices: Service Notices:
Archived List: Facilitation Process.)
Parts
To order replacement parts, use the AppleOrder system and
refer to Apple Cinema Display in the Service Price Pages.
Large businesses, universities, and K-12 accounts must
provide a purchase order for all transactions, including
orders placed through the AppleOrder system.
AASPs not enrolled in AppleOrder may fax their orders to
Service Provider Support (512-908-8125) or mail them
to the following address:
Basics
U.S. Repair Strategy - 14
Apple Computer, Inc.
Service Provider Support / MS 212-SPS
2323 Ridgepoint Drive
Austin, TX 78754
For U.S. inquiries, please call Service Provider Support
(800-919-2775, option #1).
Warranty and AppleCare
The Cinema Display is covered under the Apple One-Year
Limited Warranty. The AppleCare Protection Plan is also
available for this product. Service Providers are
reimbursed for warranty and AppleCare Protection Plan
repairs facilitated for this display. For pricing information,
refer to the Service Price Pages.
Basics
Canada Repair Strategy - 15
Canada Repair Strategy
Although the Cinema Display is not available in Canada at
this time, Canadian Service Providers are still expected to
honour the North American warranty. To limit “no fault
found” returns on the unit, please use the following
procedure when you require a service repair:
1. Troubleshoot the unit to ensure the problem isn't with
the software or with the computer.
2. After confirming the issue is with the display, call
Technical Service Provider Support (TSPS) at 800217-9517 (have your 10-digit service account
number, beginning with 61, ready). Be prepared to
explain the issue, your troubleshooting steps, and the
display's serial number to the TSPS phone agent.
3. After verifying the troubleshooting you've performed,
the TSPS phone agent will authorize the repair by giving
Basics
Canada Repair Strategy - 16
you the whole-unit service replacement part number,
and a Vantive case number.
4. Use AppleOrder to place the order for the whole-unit
service replacement by manually populating the Part
Number field with the part number given to you by the
TSPS. Then mark the order for review, and put the
Vantive case number in the Comments field. Failure to do
so will result in your order being declined.
When you receive the whole-unit service replacement,
return the old display as you would any other service
module.
K Service Source
Specifications
Apple Cinema Display
Specifications
Introduction - 1
Introduction
Specifications information for the Cinema Display can be found in
the Spec Database, which you can access from the Service Source
CD in one of three ways:
• Launch it directly by double-clicking the Apple Spec Database
runtime alias at the top level of the Main Service Source CD.
• Select Apple Spec Database from the Service Source drop-down
main menu.
• Click the Acrobat toolbar icon for the database, which is near
the right end of the toolbar with the letters “SP.”
To access product specifications on the Web, click Apple Spec on
the Troubleshoot and Repair page.
Apple Cinema Display
Features
Spectacular display performance
• 22-inch (diagonal) thin film transistor (TFT) activematrix liquid crystal display delivers bright, sharp text
and graphics
• Wide-format design with 1,600 by 1,024 pixels
displays two full pages of text or full-screen DVD
movies
• Designed to work with the Power Mac G4 digital
graphics interface for distortion-free images
• Lightning-fast pixel response supports full-motion
digital video playback
• Extrawide (160°) viewing angle maximizes visibility
and color performance
• Support for a true 16.7 million colors for use in all
graphics-intensive applications
Simple, elegant design
• Streamlined design minimizes desktop footprint
• Built-in two-port USB hub for easy connection of
peripheral devices
• Integrated stand makes adjustment of viewing angle
effortless
• Unique integrated cable simplifies connection and
minimizes desktop clutter
• Power/instant-on switch turns on both the display
and the computer simultaneously, or puts the system
in and out of sleep mode
• Complies with strict TCO 95 standards for low power
consumption, low emissions, and recyclability
The Apple Cinema Display brings an entirely new visual perspective to the desktop computing
experience. With an enormous virtual workspace, elegant industrial design, and industryleading all-digital LCD technology, it’s perfect for those who have been waiting to own the
highest-performance LCD flat-panel display available. And the combination of the powerful
Apple Power Mac G4 computer with the many unique features of the Apple Cinema Display
makes this the ideal solution for creative professionals.
If you work with large, unwieldy page layouts, manipulate complex 3D models, or edit
QuickTime movies, this display is made for you. Its unique wide format and high-resolution
22-inch (diagonal) screen provide an incredibly large work area. You can display DVD movies
in their native HDTV format without the annoying letterbox, making the display a perfect
companion for use with Apple’s DVD player or Final Cut Pro software. And even with two full
pages of text and graphics displayed on screen simultaneously, there’s still plenty of room for
tear-off menus, palettes, and tool bars. With all this extra space to work, you’ll spend a lot less
time scrolling or toggling between windows.
Those who work in graphics-intensive professions will appreciate the Apple Cinema Display’s
technical innovations. Using a pure digital interface, it delivers distortion-free images every
time. The display supports a true 16.7 million colors and uses the latest wide-angle viewing
technology to ensure that colors appear consistently and uniformly, from edge to edge. All of
this behind-the-scenes technology makes the Apple Cinema Display easy on your eyes, day in
and day out—something you’ll appreciate next time you’re burning the midnight oil.
Although its virtual workspace is enormous, the Apple Cinema Display takes up only a small
part of your physical desktop—and quite attractively, at that. Its elegantly streamlined industrial
design includes many built-in conveniences, such as a two-port self-powered USB hub that
makes it easy to connect USB devices such as your keyboard or other peripherals. A patented
hinge design lets you effortlessly adjust the screen to your preferred viewing angle, and a handy
one-button switch lets you turn on the display and the Power Mac G4 at the same time—or put
your system to sleep and awaken it at a touch.
The Apple Cinema Display—you’ll never look at your work the same way again.
Specification Sheet
Apple Cinema Display
2
Technical Specifications
Screen size and type
• 22 inches (diagonal viewable image size)
• Thin film transistor (TFT) active-matrix liquid
crystal display
Display colors (maximum)
• 16.7 million
Viewing angle (typical)
• 160˚ horizontal; 160˚ vertical
Brightness (typical)
• 180 cd/m2
Contrast ratio (typical)
• 300:1
•
•
•
•
Resolutions
1,600 by 1,024 pixels*
1,280 by 800 pixels
1,024 by 640 pixels
800 by 500 pixels
*Optimum resolution.
User controls (hardware and software)
• System startup/sleep, power on/off
• Brightness
Ordering Information
Apple Cinema Display
Order No. M7478LL/A
• Apple Displays software
• Power cord and adapter
• User’s manual
For More Information
For more information about this product, or
to find out where to buy Apple products, visit
www.apple.com/products on the World Wide Web,
or call 800-538-9696. To purchase this product
from the Apple Store, go to www.apple.com/store.
Screen treatment
• Antiglare hardcoat
Agency approvals
• FCC Part 15 Class B
• CISPR 22 Class A (EN5008211f)—complies with
European EMC directive
• DOC Class B
• MPR II
• VCCI Class 2
• CE Mark
• EPA ENERGY STAR compliant
• IEC 950
• NUTEK
• TCO 95
•
•
•
•
Environmental requirements
Operating temperature: 50° to 95° F (10° to 35° C)
Storage temperature: –40° to 116° F (–40° to 47° C)
Operating humidity: 20% to 80%, noncondensing
Operating altitude: 0 to 10,000 feet (0 to 3,048 m)
Size and weight
• Height: 18.9 inches (47.9 cm)
• Width: 23.1 inches (58.8 cm)
• Depth: 8.3 inches (21.0 cm) minimum; 12.2 inches
(31.0 cm) maximum
• Weight: 25 pounds (11.4 kg)—display; 14 ounces
(398 g)—power supply
System requirements
• Power Mac G4 computer with AGP 2X expansion slot
and built-in USB
Connectors and cables
• Digital Visual Interface (DVI) 24-pin connector with
Transition Minimized Differential Signaling (TMDS)
• Two-port self-powered USB hub
• DC connector for DC input
Power supply electrical requirements
• Line voltage: 100V to 240V AC
• Frequency: 50 to 60 Hz, single phase
• Power: less than 62W (operating)
Apple stands behind its products with world-class
service and support. Offering quality parts, extended
hardware service options, phone support, and support
via the Internet, we provide you with support choices
that meet your needs. For more information, visit
www.apple.com/support.
Nothing works and looks better with a new Power Mac G4
computer than an Apple Cinema Display (sold separately).
Apple Computer, Inc.
1 Infinite Loop
Cupertino, CA 95014
408-996-1010
www.apple.com
© 1999 Apple Computer, Inc. All rights reserved. Apple, the Apple logo, and QuickTime are trademarks of Apple Computer, Inc., registered in the U.S. and
other countries. Apple Cinema Display, the Apple Store, Final Cut Pro, and Power Mac are trademarks of Apple Computer, Inc. ENERGY STAR is a U.S.
registered mark. Other product and company names mentioned herein may be trademarks of their respective companies. Product specifications are subject
to change without notice.
August 1999 L04178A
K Service Source
Troubleshooting
Apple Cinema Display
Troubleshooting
General/ - 1
General
The Symptom Charts included in this chapter will help you
diagnose specific symptoms related to your product. Because cures
are listed on the charts in the order of most likely solution, try
the first cure first. Verify whether or not the product continues to
exhibit the symptom. If the symptom persists, try the next cure.
For additional assistance, click here for the linked user’s manual;
or contact Apple Technical Support.
Troubleshooting
General/First Checklist - 2
First Checklist
Important: Many displays returned for repair are found to be fully
operational. Read this checklist to prevent needless module
replacement and unnecessary time delays.
The Cinema Display is not compatible with all computers.
This display works with selected Power Mac G4 computers with
AGP.
Verify connections
Symptoms that mimic display failures can be caused by loose cable
connections or a loose DVI graphics card in the computer. Check
cable connections and verify there are no bent pins. Ensure that
the DVI graphics card is securely connected in the computer.
Protect the display from static discharge.
To prevent possible damage to the display from electro-static
discharge, always plug in the computer to a grounded power outlet
before connecting the Cinema Display to the computer.
Shut down the display or put it to sleep when it will not be used
for an extended period.
A constant and unchanging image that is left on an LCD screen for
an extended period of time (approx. 24 hours) can leave a
residual ghost image. To remove the image, either shut down the
display or put it into sleep mode using the Energy Saver control
panel. The time it takes to recover depends on how long the
original image was left on the screen. It generally takes between
one and two times as long to remove the ghost image as it took to
create it.
With the display in sleep mode using Energy Saver, the power
light is amber and the backlights are off. Although a screen saver
can be used, some screen savers keep the display backlights in
use, thereby decreasing the useful life of the backlights.
Troubleshooting
Symptom Charts/No Image - 3
Symptom Charts
No Image
No image (screen is black); green power light on
1.
2.
3.
4.
5.
Adjust front panel brightness (it may be set too low).
Shut down the computer and monitor. Disconnect monitor
cables. Check cables for bent pins. Reconnect monitor cables,
and restart computer and monitor.
If screen brightness has decreased over time, the most likely
condition is the backlights failing. If you suspect backlight
failure, contact Apple Technical Support.
Replace the DVI graphics card in the computer.
In the US, call Apple Technical Support at 800-919-2775.
In Canada, call 800-217-9517.
Troubleshooting
Symptom Charts/Screen Resolutions - 4
Screen Resolutions
Blurry or wavy screen image at different resolutions
1.
2.
Use one of the resolutions that are listed as Recommended in
the Monitors control panel. Note: Some resolutions from the
Show All list can produce less than optimal results
(fuzziness, black bars on sides or top and bottom of display
area).
For best results, set screen resolution to 1600 x 1024 using
the control strip or the Monitors control panel. 1600 x
1024 is the native resolution for the Cinema Display, and it
produces the sharpest screen image.
With some resolutions, vertical black bar is on both sides of
screen
Select one of the resolutions that are listed as Recommended in the
Monitors control panel.
Troubleshooting
Symptom Charts/Screen Color - 5
Screen Color
Screen colors are not correct
1.
2.
3.
Allow the display to warm up for 30 minutes.
Check color accuracy by using a familiar desktop pattern or a
solid color test pattern. Open the Monitors control panel,
click Color, and verify that a suitable ColorSync Profile is
selected. Click Calibrate in the Color menu to change the color
calibration.
Open the Monitors control panel and check that Color Depth is
not set to Grays.
Color intensity varies; large patch of color not uniform
For best results, allow the display to warm up for 30 minutes to
reach peak color quality. When displaying a large area of a single
color, the color might not appear uniform throughout the area.
This symptom can occur if the display has not warmed up.
Troubleshooting
Symptom Charts/Screen Brightness - 6
Screen Brightness
Screen image dim
1.
2.
3.
4.
Adjust front panel brightness (it may be set too low). If you
see no change, check the USB cable connections.
Open the Monitors control panel and click the Color button.
Verify that “Apple Cinema Display” is selected as the
ColorSync Profile.
From the Monitors control panel, click Calibrate in the Color
menu and try changing the color calibration settings.
If screen brightness has decreased over time, the most likely
condition is the backlights failing. If you suspect backlight
failure, contact Apple Technical Support.
Pressing brightness controls on the front underside of the display
have no effect
Check the USB cable connections. Reconnect cables if necessary.
Troubleshooting
Symptom Charts/Focus - 7
Focus
Screen image blurry
1.
Using the Monitors control panel or the control strip, set
screen resolution to 1600 x 1024.
Note: 1600 x 1024 is the native resolution for the Cinema
Display, and it produces the sharpest screen image. Although
you can “magnify” the screen image to enlarge fonts and
graphics by selecting other screen resolutions, some
blurriness might occur when using non-native resolutions.
2. Open the Appearance control panel and select Fonts. Deselect
the checkbox for “Smooth all fonts on screen.”
Troubleshooting
Symptom Charts/Error Messages - 8
Error Messages
Error message reads ÒThis monitor is not supported by this
version of the Apple Displays SoftwareÓ
1.
2.
Ensure that computer is compatible. Verify that DVI graphics
card is secured correctly. (Refer to “First Checklist” at the
beginning of this chapter.)
Install Apple Displays Software that came with the Apple
Cinema Display. For installation instructions, refer to page
11 of the linked user’s manual.
Error message reads ÒThis version of the system software is not
supported by the Apple Displays SoftwareÓ
If this message occurs in the Apple Displays Software installer,
check that you selected the startup hard disk in the Installation
dialog box.
Troubleshooting
Symptom Charts/Error Lights - 9
Error Lights
Power light flashes amber in repeating sequence of three short
flashes
1.
2.
3.
Turn off the display, and turn it on again.
Ensure the correct DVI graphics card is installed.
Install Apple Displays Software that came with the Apple
Cinema Display. For installation instructions, refer to page
11 of the linked user’s manual.
Power light flashes amber in repeating sequence of two short
flashes and one long flash
This symptom indicates a problem with the backlights. In the US,
call Apple Technical Support at 800-919-2775. In Canada, call
800-217-9517.
Troubleshooting
Symptom Charts/Miscellaneous - 10
Miscellaneous
Screen freezes
This symptom occurs when Energy Saver conflicts with a screen
saver program. Turn off either the screen saver program or
Energy Saver, and restart the computer.
Computer shuts down or sleeps when monitor power button is
pressed
The Cinema Display’s power button is preset to shut down or put
to sleep both the display and the computer. To change the power
button setting so it affects the display only, open the Monitors
control panel and select the power button setting in Preferences.
Click the Monitor Power button.
Troubleshooting
Symptom Charts/Miscellaneous - 11
Change made in Monitors control panel does not affect screen
image
1.
2.
3.
If you have more than one display connected to the computer,
use the control panel that shows the Apple Cinema Display
name in the title bar.
Disconnect all peripheral USB devices except the Apple
Cinema Display, the Apple keyboard, and the mouse.
Install Apple Displays Software that came with the Apple
Cinema Display. For installation instructions, refer to page
11 of the linked user’s manual.
No on-screen display when brightness button pressed; or no
power mode options in Monitors control panel
1.
2.
Ensure display’s USB cable connector is plugged into
computer’s USB port.
Install Apple Displays Software that came with the Apple
Cinema Display. For installation instructions, refer to page
Troubleshooting
Symptom Charts/Miscellaneous - 12
3.
11 of the linked user’s manual.
Restart computer.
Letterbox bars on top and bottom of screen when viewing DVD
movie
The aspect ratio, set by the DVD movie, determines whether
letterbox borders are present or not. You cannot adjust the display
to eliminate letterbox borders if they are preset on the DVD.
Preferences button missing from Monitors control panel
Ensure display’s USB cable connector is plugged into computer’s
USB port.
Tilt mechanism on monitor stand is fixed in one position
1.
2.
Grasp the center top of the display to adjust its vertical angle
(the tilt adjustment range is 10 to 30 degrees).
Move the display to a smoother flat surface.
Troubleshooting
Symptom Charts/Miscellaneous - 13
Note: Some flat surfaces can cause the monitor stand to stick.
When the display is lifted, the monitor stand should spring back
to its uppermost position.
3.
Replace the monitor stand.
Residual image still visible after the screen image changes
Allowing a constant and unchanging image to remain on the display
screen for a long period of time can leave a faintly visible residual
image when the screen finally changes. This is a temporary
symptom that does not affect the functionality of the display. To
remove the image, either shut down the display or put it to sleep
using the Energy Saver control panel. The time it takes to recover
depends on how long the original image was left on the screen. It
generally takes between one and two times as long to remove the
ghost image as it took to create it.
To prevent the symptom, recommend that the customer use the
Troubleshooting
Symptom Charts/Miscellaneous - 14
Energy Saver control panel to put the screen to sleep (darkening
the display face) when it is not in use. With the display in sleep
mode using Energy Saver, the power light is amber and the
backlights are off. Although a screen saver can be used, some
screen savers keep the display backlights in use, thereby
decreasing the useful life of the backlights.
K Service Source
Take Apart
Apple Cinema Display
Take Apart
Safety Guidelines - 1
General
Safety Guidelines
Before handling the Apple Cinema Display,
ensure that you have a clean, flat work surface. Protect the
display from scratches or nicks by placing the shipping
cover or a soft, clean, lint-free cloth over it. Remove all
jewelry that could scratch or damage the display screen or
plastic housing.
±Warning:
Important: When lifting or carrying the display, grasp the
edges. Do not lift the display by the stand or cables.
Important: Do not place books or other objects under the
display to raise the display height or change the viewing
angle. Place the display on a flat and stable surface.
Take Apart
Safety Guidelines - 2
Important: Do not press or put hard objects against the
display screen or lay the monitor face-down without a
protective cover.
Take Apart
Monitor Stand - 3
Procedures
Monitor Stand
Important: Before you
begin, ensure that you have
a clean, flat surface to work
on. Grasp the display by its
edges and place it so the back
faces you.
Protect the
display face from scratches
or nicks by placing the
shipping cover or a soft,
clean, lint-free cloth over
the display.
±Warning:
Take Apart
Monitor Stand - 4
1. Carefully place the
display face-down on a
clean surface.
2. Use a 5/64-inch hex
wrench to remove the
three screws at the top
hinge of the monitor
stand.
Take Apart
Monitor Stand - 5
3. With the screws
removed, grasp the
monitor stand and pull it
away from the back of
the display.
Note: The hinge cap fits
between the monitor
stand and the hinge.
Take Apart
Monitor Stand - 6
4. Separate the hinge cap
from the monitor stand.
5. Route the display cable
through the opening in
the monitor stand.
Replacement Note: Before
replacing the monitor stand,
ensure the display cable is
routed through the opening
in the monitor stand.
Take Apart
Grip Pad - 7
Grip Pad
Note: The grip pad on each
side foot can be replaced if
damaged or lost.
Important: Before you
begin, ensure that you have
a clean, flat surface to work
on.
Protect the
display face from scratches
or nicks by placing the
shipping cover or a soft,
clean, lint-free cloth over
the display.
±Warning:
Take Apart
Grip Pad - 8
1. Carefully place the
display face-down on a
clean surface.
2. Grasp the edge of the
grip pad and peel it off
the monitor foot.
Replacement Note: Align the
new grip pad to the recessed
area of the foot. Press to fit
until the grip pad is flush
with the bottom of the foot.
K Service Source
Adjustments
Apple Cinema Display
Adjustments
- 1
Linked User’s Manual
You can adjust the screen brightness using the brightness
buttons on the front of the Apple Cinema Display or you can
use the Monitors control panel.
Refer to page 11 “About Your Apple Displays Software” in
the linked Apple Cinema Display user’s manual. This page
describes the basic picture and color settings that can be
adjusted using control panels, the Control Strip, Digital
Color Meter, and Mac Help.
Click here to open the user’s manual.
K Service Source
Exploded View
Apple Cinema Display
Exploded View
1
Apple Cinema Display
Display Assembly, Back
(Not Offered)
Grip Pad
922-3944
Power Cord
922-3942
Hinge Cap
922-3945
Monitor Stand
922-3941
Power Adapter
922-3943
Display Assembly, Front
(Not Offered)