1
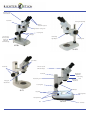
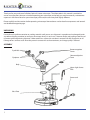
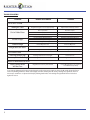
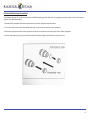
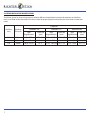
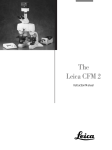
Richter Optica
[email protected]
Instructions for:
S6-BL, S6-TS, S6-SPS, S6-ILST Models
Trinocular port for
c-mount adapter
Zoom Knob
Focusing Holder Clamp
Diopter
adjustable eyepieces
Magnification locking screw
Focusing Knob
LED Lights
Separate light
intensity control
switches for
reflected &
transmitted light
Built-in Ring
Light Adapter
Focusing Knob
S6T-BL
S6-SPS
Zoom Knobs
Focus Knobs
Trinocular port for
C-Mount Adapter
Magnification
Adjustment
Track Stand
Head Locking
Screw
Head locking screw
Auxiliary Lens
Attachment
Ring Light
Attaches Here
Focusing Knob
S6-TS
LED Lights
Stage Clips
Glass Stage Plate
Intensity Controls
Base
S6T-ILST
On / Off Switch
Thank you for your purchase of a Richter Optica S6 stereo microscope. The information in this manual is provided to
answer most questions that can arise when operating your microscope and to help you avoid unneccesary maintenance
expenses in the future. Based on your microscope purchased, the stand may look slightly different.
Please carefully read instructions before operating microscope. Nomenclature used to describe components and controls
are identified on opposite page.
UNPACKING
Do not discard styrofoam container or packing materials until you are sure shipment is complete and undamaged (retain
stryrofoam shipping container to store your microscope when it is not in use). Remove all tape and packing material used
to protect microscope during shipment. Make certain lens surfaces do not come in contact with dirt, fingerprints or oil.
Damage of lens surfaces occur when they come in contact with such contaminants, and image quality is reduced.
ASSEMBLY
Eyeshields
Remove eyepiece
covers
Eyepieces
Remove objective
cover
Body
Upper Light Source
Wire
Power cord
Glass Plate
1
OPERATION
1.
Illumination (only for S6-BL, S6-ILST & S6-TD-LED Models)
a.
Before operating the microscope, adjust the intensity controls located on each side of the
base to the minimum position. This should be done prior to each time light is turned on or
off. Failure to do so will signifcantly shorted the life of the bulb.
b.
Make certain that the main voltage of your microscope corresponds to the voltage of your
power outlet, either 120v or 220v. Insert microscope power cord into power outlet.
c.
The S6 on lighted LED stand includes a glass stage plate. This plate is ideal for viewing.
transparent specimen slides or specimens that are thin enough for light to pass through
them (insect wings, plant leaves, etc.) Alternate black/white contrast plates can be used
when viewing opaque objects or for dissecting.
To remove the stage plate on ILST stand: loosen locking set screw on front of base by
unscrewing it to the left.
d.
2.
For models S6-BL & S6-ILST, there are rocker switches on the base of the microscope.
These switches are used to turn the light on/off. The rheostat control knobs will not work
if the rocker switch is in the “off” position.
Interpupillary Adjustment
This will permit each user to adjust the spacing between eyepieces
to accommodate distance between their eyes. While looking
through the microscope eyepieces with both eyes, grasp eyepiece
tube housings with both hands and rotate them, moving eyepieces
apart or together until a full field of view is observed and the images
blend into one. Interpupillary distance is now corrected for your
own inter-ocular distance and does not require further adjustment
unless another user changes the adjustment.
3.
Focusing
a.
Adjust zoom control knobs (located on both sides of the head) so that the lowest magnification
number “0.7” is positioned at the white notch index on head. Lower magnifications have larger
fields of view, making it easier to position and locate area to be viewed.
b.
Place object on stage plate.
2
Focusing Continued:
c.
Position focusing knobs in the center of focusing range.
d.
Use included allen key to lock and set magnification if desired.
d.
On mounted post models, the height of the viewing head can
be adjusted up or down on the post in order to focus on
different sized objects. Loosen the locking knob located on the
locking support collar, allowing the support collar to slide down
to bottom of post. While firmly holding focusing holder
containing viewing head with one hand, loosen locking knob
located on back of focusing holder so that head can move
freely up or down on post.
While looking through microscope, move viewing head up or down on post until object can be
seen in approximate focus. Tighten focusing holder locking knob. Position the support collar
under the focusing block and tighten locking knob on support collar. It is not necessary to make
this adjustment every time you change objects to
be viewed, so long as the different objects are of
similar thickness or height.
3
e.
On models with lighted post stands, the up/down
movement of the viewing head is limited to the
traverse permitted by the regular focusing knobs.
f.
Both eyepieces have a knurled diopter adjustment
ring. Rotate the diopter until the zero (0) lines up
with the notch on the diopter.
g.
Adjust zoom control to the highest magnification
by aligning the number “4.5” on the zoom knob.
h.
While looking through the right eyepiece with one
eye, rotate focusing knob until specimen comes
into sharp focus through the right eyepiece.
i.
Adjust zoom control knob to the lowest
magnification.
j.
Adjust the right diopter until the image is sharp.
Do not change the focusing knob position. Repeat to adjust the right diopter.
k.
The image should now be sharp throughout the zoom power range.
MAINTENANCE
WARNING: For your own safety, turn switch off and remove plug from power source before maintaining your
microscope. If the power cord is worn, cut or damaged in any way, have it replaced immediately to avoid shock or
fire hazard.
1.
Optical Maintenance
a.
b.
Do not attempt to disassemble any lens components. Consult a microscope service technician
when any repairs not covered by instructions are needed.
Prior to cleaning any lens surface, brush dust or lint off lens surface using a camel hair brush. You
can also use an ear syringe or canned compressed air, sold by computer stores.
c.
To clean eyepiece lenses, do not remove from eyepiece tube. Clean only the outer lens surface.
Breathe on lens to dampen surface, then wipe with lens paper or use a cotton swab
moistened with distilled water. Wipe lenses with a circular motion, applying as little pressure as
possible. Avoid wiping dry lens surface as lenses are scratched easily. If excessive dirt or grease
gets on lens surfaces, a small amount of Windex can be used on a cotton swab or lens tissue. To
clean objective lenses, do not remove objectives from microscope. Clean front lens element only,
following same procedure.
2.
Mechanical Maintenance
The only mechanical adjustment the microscope might require is the tension of the focusing mechanism.
This has been adjusted at the factory, but over the course of time it may loosen and cause the head of the
microscope to slip downward on the focusing block.
The tension adjustment collar is located between arm and focus knob on left side of microscope when the
stage is facing towards you. With a jewelers type screwdriver, loosen slotted set screw located on knurled
surface of the tension adjustment collar. Turn collar clockwise to tighten tension, counter-clockwise to
loosen tension. After adjusting, tighten set-screw to lock collar into place.
NOTE: It is recommended that you leave the tension as loose as possible for ease of focusing, yet not so
loose that it permits the head of the microscope to drift downward from its own weight and cause the
microscope to “drift” out of focus.
4
TROUBLESHOOTING
Problem
Reason for Problem
Solution
OPTICAL SYSTEM
Too Bright / Dark
Brightness degree is not set appropriately
Adjust rheostat intensity control
Dirt on Specimen
Clean the sample
Dirt on Eyepieces
Dirt on Objective Lens
Dirt on Stage
Incorrect Interpupillary Distance
Incorrect Diopter Setting
Two Different Magnification Eyepieces
Clean the Eyepieces
Clean the Objective
Clean the Stage
Readjust Interpupillary Distance
Readjust Diopters
Insert Same Eyepieces
Unclear Image
Dirt on Objective Lens
Clean the Objective
Images Blurs on Zoom
Incorrect Diopter Setting
Readjust Diopters
Incorrect Working Distance or Focusing Setting
Check Working Distance & Focusing
Focusing Knob Tension is Too Tight
Loosen tension*
Focusing Knob Tension is Too Loose
Tighten tension*
Dirt in Field of View
Double Images
FOCUSING UNIT
Focusing Knob is Stiff
Microscope Head is Falling
ADJUST MAGNIFICATION
Zoom Control Knob
Will Not Turn
Magnification lock may be Activated
Loosen Magnification Lock Screw on
Front of Microscope Body
*Loosening & Tightening focusing tension depends on the microscope stand you have. The BL stand adjusts the focus
tension by holding both focus knobs (left & right) and while holding the left steady, rotating the right knob. The ILST
microscope stand focus is adjusted similarly by holding both knobs and rotating the right knob forward or back to
tighten or loosen.
5
EYEPIECE RETICLE INSTALLATION
The Richter Optica S6 stereo microscope widefield high-eyepoint 10x and 15x eyepieces both accept a 25mm diameter
reticle. To install the reticle:
1. Remove the eyepiece from the eyetube and turn the eyepiece upside down.
2. Twist out and remove the threaded retaining ring from the bottom of the eyepiece.
3. Place the eyepiece reticle in the eyepiece with the inscription side facing the front of the eyepiece.
4. Screw the retaining ring back into the bottom of the eyepiece to hold the reticle in place.
6
S6 STEREO MICROSCOPE MAGNIFICATION
The Richter Optica S6 stereo microscope can acheive different magnifications based on the eyepieces and auxiliary
lenses used. Refer to the chart below in order to select the proper eyepiece and auxiliary lens accessories to meet your
needs.
Eyepieces
7
Auxiliary
Lens
Working
Distance
0.5x
1x (none)
1.5x
Widefield 10x
Widefield 15x
Total
Magnification
Field Size
(mm)
Total
Magnification
Field Size
(mm)
165mm
3.5x - 22.5x
57.1 - 8.9
5.25x - 33.75x
42.9 - 6.7
100mm
45mm
7x - 45x
10.5x - 67.5x
28.5 - 4.4
10.5x - 67.5x
21.4 - 3.3
19 - 3
15.75x - 101.25x 14.2 - 2.2
Widefield 20x
Field Size
Total
(mm)
Magnification
7x - 45x
28.6 - 4.4
14x - 90x
21x - 135x
14.3 - 2.2
9.5 - 1.5