1
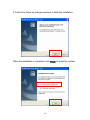
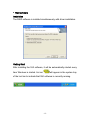
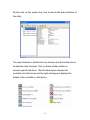
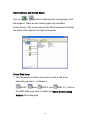
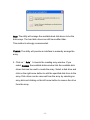
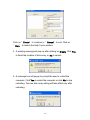
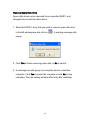
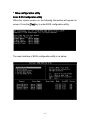
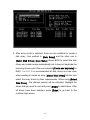
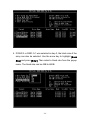
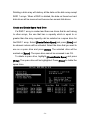
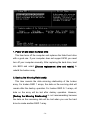
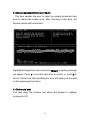
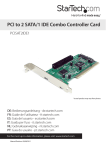
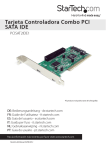
Serial-ATA RAID Card Version 1.0 Contents Features …………...........……………………………….P.4 Specifications …………...........……………………………….P.5 Package Content..........………………………………….P.5 System Requirement …………………………………….P.6 Driver Installation …………………………………….…....P.6 Windows 2000/XP/2003 Fresh Installation….........................P.9 Driver and software installation ……………………….….….....P.16 Bios configuration utility……………………………. P.22 -2- Overview Serial ATA is the next-generation internal storage inter-connect, designed to replace parallel ATA technology. Serial ATA is the proactive evolution of the ATA interface from a parallel bus to serial bus architecture. This architecture overcomes the electrical constraints that are increasing the difficulty of continued speed enhancements for the classic parallel ATA bus. Introduction The PCI SATA Host Card is PCI Serial-ATA I Controller Card which provides an efficient and economical way for users increasing the speed or fault-tolerance of their PC. It is fully compliant Serial ATA ports on the device side to access Serial ATA storage media such as hard disk drives, CD-RW and DVD-ROM drives. -3- Features The Serial-ATA PCI card is a true 32-bit PCI-Bus Serial-ATA card. It supports the following I/O feature. ‧ Supports ATA 133 high performance hard disk drive. ‧ Supports hard disk drive larger than 137 GB (48-bits LBA). ‧ Dual independent ATA channels and maximum connection of four hard disk drives allowed. ‧ Supports Ultra DMA mode 6/5/4/3/2/1/0, DMA mode 2/1/0, and PIO mode 4/3/2/1/0. ‧ Supports PCI Plug and Play. PCI interrupt sharing and coexists with mainboard IDE controller. ‧ Supports IDE bus master operation. ‧ Supports RAID 0, 1, 0+1, and JBOD. ‧ 4 KB to 64 KB striping block size support. ‧ Bootable disk or disk array support. ‧ Windows-based RAID configure and management software tool. (Compatible with BIOS) ‧ Real-time monitoring of device status and error alarm with popup message box and beeping. ‧ Supports hot-swap failed disk drive in RAID 1 and 0+1 array. ‧ Mirroring automatic background rebuilds support. ‧ ATA SMART function support. ‧ Microsoft Windows 98, Me, NT4.0, 2000, XP operating systems support. ‧ Event log for easy troubleshooting. ‧ On-line help for easy operation for RAID software. -4- Specifications Interface: PCI 32 bit/66 MHz Mode: Serial ATA I Controller: VIA VT6421 RAID: RAID 0 (Striping) , RAID 1 (Mirroring) , RAID 0 + 1 (Striping + Mirroring ) and JBOP Channel: Two internal Serial ATA ports and one interface ATA ports O.S. Support: Windows98, Me, NT4.0, 2000, XP, 2003 Environment: Operation temperature: 0℃~57℃ Storage temperature:-20℃~85℃ Operation humidity: 5℃~95% RH Package Content Check if the following items are present and in good condition upon opening your package. Contract your retailer if any of the items is damaged or missing. 1. Serial-ATA PCI Host Controller × 1 2. Serial-ATA Cable x 1 3. CD Driver x 1 4. User Manual x 1 -5- System Requirements z Available PCI slot z Serial-ATA or ATA driver z Serial-ATA or ATA cables z Driver support Windows 98SE / ME / 2000 / XP / 2003 Driver Installation Windows 2000/XP/2003 Fresh Installation Follow the instructions in this section if you are performing a new installation of Windows 2000/XP/2003 and you wish to boot from a device attached to the SATA PCI Card. 1. Power off the system. Insert the SATA host card into an available PCI slot. Connect Serial ATA cable(s) between the SATA host card and the Serial ATA device(s). Power up the system. 2. Copy all files from directory into the diskette. Put your Windows 2000/XP/2003 CD into the CD-ROM/DVD drive, or the 2000 / XP / 2003 [ Ex : \Serial-ATA\ Serial-ATA\VIA\DriverDisk\] 3. Boot diskette #1 in the floppy drive if your system cannot boot from the CD. -6- 4. Install Step by Step 4.1 Press [ F6 ] for third party SCSI or driver installation at the beginning of text mode installation. 4.2 Press [ S ] when setup asks if you want to specify an additional device, and insert the diskette which you had copied. -7- 4.3 Press [ Enter ] and select [ VIA RAID Controller ]. 4.4 Press [ Enter ] again when prompted to continue on with text mode setup. 5. Follow the setup instructions to select your choice for partition and file system. 6. After setup examines your disks, it will copy files from the CD to the hard drive selected above and restart the system. After restart the setup process will resume to finish the installation. 7. Once the operating system installation has completed you can follow the instructions in section 4 to verify controller was installed correctly. -8- Driver and software installation 1. After Windows has finished booting up, the system will automatically find the newly installed adapter and prompt the Found New Hardware Wizard window. Click Cancel to skip it. 2 Insert the RAID driver and software installation CD or diskettes. Browse the CD or diskettes and double click on setup.exe to begin the driver and software installation. [ Ex : \Serial-ATA\ Serial-ATA\VIA ] -9- 3 Confirm the follow-up dialogue windows to finish the installation. When the installation is completed, click Finish to restart the system. - 10 - Verify Installation 1. Right-click on My Computer and the select Properties from the popup menu. 2. From the popup window, click on Hardware, then click on Device Manager. 3. Expand the SCSI and RAID controllers tree as shown below. If the VIA IDE RAID Host Controller does not exist or there is a “ ?” or “ !” marking on the device icon, then the driver has not been installed correctly and needs to be reinstalled. - 11 - Raid software Installation The RAID software is installed simultaneously with driver installation. Getting Start After installing the GUI software, it will be automatically started every time Windows is started. An icon will appear in the system tray of the tool bar to indicate that GUI software is currently running. - 12 - Double click on the system tray icon to launch the main interface of the utility. The main interface is divided into two windows and the toolbar above contain the main functions. Click on these toolbar buttons to execute specific functions. The left windowpane displays the controller and disk drives and the right windowpane displays the details of the controller or disk drives. - 13 - View Controller and Device Status Click on or button to determine the viewing type of left windowpane. There are two viewing types: By controllers and by device. Click on the object in the left windowpane to display the status of the object in the right windowpane. Create Disk Array 1. The following four buttons are used to create a disk array depending on users’ RAID1, preference: Span, RAID 0, and RAID 0+1. Click on the RAID button you want to create, the Select Array Creating Method will be displayed. - 14 - Auto: The utility will arrange the available hard disk drives to be the disk arrays. The hard disk drives can still be modified later. This method is strongly recommended. Custom: The utility will provide an interface to manually arrange the array. 2. Click on “ Auto” to launch the creating array window. If you select Custom, the available disks window lists the available disk drives that can be used to create the array. Select a disk drive and click on the right arrow button to add the specified disk drive to the array. Disk drives can be removed from the array by selecting an array disk and clicking on the left arrow button to remove the drive from the array. - 15 - Click on “ Create” to continue or “ Cancel” to exit. Click on “ Help” to launch the Help Topics window. 3. A warning message will pop up after clicking on Create. Click Yes to finish the creation of disk array, or No to cancel. 4. A message box will popup to prompt the user to restart the computer. Click Yes to restart the computer or click No to skip restarting. The new disk array setting will take effect only after restarting. - 16 - Delete Disk Array 1. Select the disk array that you want to delete from the left windowpane. Click on Remove Array . A warning message wills popup. 2. Click Yes to delete the specified disk array or click No to cancel. - 17 - 3. A message box wills popup to prompt the user to restart the computer. Click Yes to restart the computer or click No to skip restarting. The new setting will take effect only after restarting. Warning: Deleting a disk array will destroy all the data on the disk array except RAID 1 arrays. When a RAID 1 array is deleted, the data on these two hard disk drives will still remain and become two normal disk drives. Add and Remove Spare Disk Drive Add Spare Disk Drive A spare disk drive can be added when a RAID 1 array is created. The capacity of the spare disk drive must be greater than or equal to the capacity of the RAID 1 array. If there is no spare disk drive in a RAID 1 array, user can add a spare disk drive after RAID 1 array is created by clicking on 1. Select the RAID 1 array in the left windowpane and click on Then the available disk drives will be listed in a popup window. - 18 - . 2. Select a disk drive and click on OK to add a spare disk drive to RAID 1. 3. A warning message wills popup. Click Yes to finish adding the spare disk, or No to cancel. 4. A message box wills popup to prompt the user to restart the computer. Click Yes to restart the computer or click No to skip restarting. The new setting will take effect only after restarting. - 19 - Remove Spare Disk Drive Spare disk drives can be removed from a specified RAID 1 and changed into normal hard disk drives. 1. Select the RAID 1 array that you want to remove spare disk drive in the left windowpane and click on . A warning message wills popup. 2. Click Yes to finish removing spare disk, or No to cancel. 3. A message box wills popup to prompt the user to restart the computer. Click Yes to restart the computer or click No to skip restarting. The new setting will take effect only after restarting - 20 - Bios configuration utility Enter BIOS Configuration Utility When the system powers on, the following information will appear on screen. Press the [Tab] key to enter BIOS configuration utility. The main interface of BIOS configuration utility is as below: - 21 - Create Disk Array 1. Use the arrow keys to navigate the menu. Select [Create Array] and press [Enter] to call out the list of creation steps. 2. Select [Array Mode] and press [Enter]. A list of array modes will appear. Highlight the target array mode that you want to create, and press [Enter] to confirm the selection. If RAID 1 or RAID 0/1 is selected, an option list will popup and enable the users to select Create only or Create and duplicate. Create only will allow BIOS to only create an array. The data on the mirroring drive may be different from the source drive. [Create and duplicate] allows BIOS to copy the data from the source to the mirroring drive. - 22 - 3. After array mode is selected, there are two methods to create a disk array. One method is [Auto Setup] and the other one is [Select Disk Drives]. [Auto Setup] allows BIOS to select the disk drives and create arrays automatically but it does not duplicate the mirroring drives even if the user selected [Create and duplicate] for RAID 1 or 0+1. It is recommended all disk drives are new ones when wanting to create an array. [Select Disk Drives] lets the user select the array drives by their requirements. When using [Select Disk Drives] , the channel column will be activated. Highlight the drives that you want to use and press [Enter] to select them. After all drives have been selected, press [Enter] to go back to the creation steps menu. - 23 - 4. If RAID 0 or RAID 0+1 was selected in step 2, the block size of the array can also be selected. Use the arrow key to highlight [Block Size] and press [Enter]. Then select a block size from the popup menu. The block size can be 4KB to 64KB. - 24 - 5. Use the arrow key to highlight [Start Create Process] and press [Enter]. A confirmation message will appear. Press Y to finish the creation, or press N to cancel the creation. 6. Important note: All existing content in the hard drive will be destroyed during array creation. Delete Disk Array A RAID can be deleted after it has been created. To delete a RAID, use the following steps: 1. Select [Delete Array] and press [Enter]. The channel column will be activated. 2. Select the member of an array that is to be deleted and press [Enter]. A warning message will display. Press Y to delete or press N to cancel. - 25 - Deleting a disk array will destroy all the data on the disk array except RAID 1 arrays. When a RAID is deleted, the data on these two hard disk drives will be reserved and become two normal disk drives. Create and Delete Spare Hard Drive If a RAID 1 array is created and there are drives that do not belong to other arrays, the one that has a capacity which is equal to or greater than the array capacity cab be selected as a spare drive for the RAID 1 array. Select [Create/Delete Spare] and press [Enter] and he channel column will be activated. Select the drive that you want to use as a spare drive and press [Enter]. The selected drive will be marked as [Spare]. The spare drive cannot be accessed in an OS. To delete a spare drive, highlight [Create/Delete Spare] and press [Enter]. The spare drive will be highlighted. Press [Enter] to delete the spare drive. - 26 - Select Boot Array User can select a disk array as boot device if user wants to boot operating system from an array. Boot disk array cannot be selected if the operating system does not boot from the disk array. Highlight the [Select Boot Array] item, then press [Enter] and the channel column will be activated. Then highlight the target disk array and press [Enter]. If user selects a disk array that has a boot mark and press [Enter], its boot setting will be canceled. View Serial Number of Hard Drive Highlight [Serial Number View] and press [Enter]. Use arrow key to select a drive, the selected drive’ s serial number can be viewed in the last column. The serial number is assigned by the disk drive manufacturer. - 27 - View Array Status Press the [F1] key to show the array status on the screen. If there are no disk arrays then nothing will be displayed on the screen. Duplicate Critical RAID 1/0+1 Array When booting up the system, BIOS will detect if the RAID 1 or RAID 0+1 array has any inconsistencies between user data and backup data. If BIOS detects any inconsistencies, then the status of the disk array will be marked as critical and BIOS will prompt the user to duplicate the RAID 1 or 0+1 to make the backup data consistent with the user data. - 28 - Continue to boot will enable duplicating the array after booting into OS. Rebuild Broken RAID 1/0+1 Array When booting up the system, BIOS will detect if any member disk drives of RAID has failed or is absent. If BIOS detects any disk drive failures or missing disk drives, the status of the array will be marked as broken. If BIOS detects a broken RAID 1 array but there is a spare hard drive available for rebuilding the broken array, the spare hard drive will automatically become the mirroring drive. BIOS will show a main interface just like a duplicated RAID 1 main interface. [Continue to boot] enables the user to duplicate the array after booting into operating system. If BIOS detects a broken RAID 1 or 0+1 array but there is no spare hard drive available for rebuilding the array, BIOS will provide several operations to solve such problem. - 29 - 1. Power off and check the failed drive This item turns off the computer and replaces the failed hard drive with a good one. If your computer does not support APM, you must turn off your computer manually. After replacing the hard drive, boot into BIOS and select [Choose replacement drive and rebuild] to rebuild the broken array. 2. Destroy the Mirroring Relationship This item cancels the data mirroring relationship of the broken array. For broken RAID 1 arrays, the data on the surviving disk will remain after the destroy operation. For broken RAID 0+1 arrays, all data on the array will be lost after destroy operation. However, [Destroy the Mirroring Relationship] is not recommending because the data on the remaining disk will be lost when you use the hard drive to create another RAID 1 array. - 30 - 3. Choose replacement drive and rebuild This item enables the user to select an already-connected hard drive to rebuild the broken array. After choosing a hard drive, the channel column will be activated. Highlight the target hard drive and press [Enter], a warning message will appear. Press Y to use that hard drive to rebuild, or press N to cancel. Please note that rebuilding the array will destroy all the data on the replacement hard drive. 4. Continue to boot This item skips the problem and allows the system to continue booting into OS. - 31 -