1
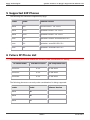
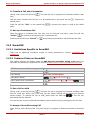
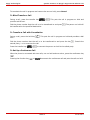
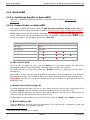
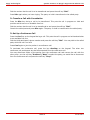
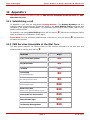
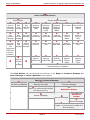
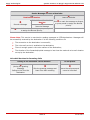
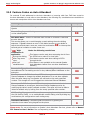
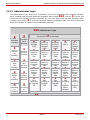
Epygi Technologies
Quadro Features on Epygi's
Supported IP Phones List
Revision
Revised By
Updated for 3.1.x image
AshotS, AramK, LianaB
Updated with feature codes for Aastra
9112i, Aastra 9133i
AshotA, AramS, LianaB
May 26, 2006
Added the sections “2. IP Phone Testing
Policy” and “6. Future IP phone list”.
AshotS, HarutG
June 15,
2006
MG’s comments incorporated
LianaB
July 7, 2006
Future IP List updated
LianaB, AshotS
July 25, 2006
Added feature codes for Snom 300,
Thomson, and IP250. Updated for 4.0.x
LianaB
Sept 8, 2006
Updated for the supported IP Phones
Sona
Dec 1, 2006
Revised
Andy White
Jan 23, 2007
Quadro variants:
Quadro IP PBXs
Filename:
Quadro features on Supported IP Phones.doc
Date
Version:
Template:
Support Template.dot
Last saved:
1/23/2007 5:31:00 PM by Sona Grigoryan
Revision: 1.0
Abstract: This document describes how to use the Quadro IP PBX
telephony features on the supported IP phones.
Please Note: This document contains confidential and proprietary information owned by Epygi Technologies Ltd. Any copying, use or disclosure of
the document or the information contained herein without the written permission of Epygi Technologies Ltd. is strictly prohibited.
Epygi Technologies
Quadro Features on Epygi's Supported IP Phones List
Table of Contents:
1
Introduction......................................................................5
2
IP Phone Testing Policy ....................................................5
3
References ........................................................................5
4
Requirements and Preparations ........................................5
5
Supported SIP Phones ......................................................6
6
Future IP Phone List .........................................................6
7
SIP Phone Support Definitions ..........................................7
8
Quadro Features on Supported IP Phones.........................7
9
Limitations and Differences for the Supported IP Phones .8
10 Quadro Feature Codes on Supported IP Phones ................9
11 Quadro PBX Services Accessible during a call .................10
11.1 Snom300 SIP Phone............................................................... 10
11.1.1
Limitations Specific to Snom300 ...................................... 10
11.1.2
Features Codes on Snom300 ........................................... 10
11.2 Snom320.............................................................................. 12
11.2.1
Limitations Specific to Snom320 ...................................... 12
11.2.2
Features Codes on Snom320 ........................................... 12
11.3 Snom360.............................................................................. 13
11.3.1
Limitations Specific to Snom360 ...................................... 13
11.3.2
Features Codes on Snom360 ........................................... 13
11.4 Aastra480i ............................................................................ 15
11.4.1
Limitations Specific to Aastra480i..................................... 15
11.4.2
Feature Codes on Aastra480i........................................... 15
11.5 Aastra 9112i ......................................................................... 17
11.5.1
Limitations Specific to Aastra9112i ................................... 17
11.5.2
Feature Codes on Aastra9112i ......................................... 17
11.6 Aastra 9133i ......................................................................... 19
11.6.1
Limitations Specific to Aastra9133i ................................... 19
11.6.2
Feature Codes on Aastra9133i ......................................... 19
12 Appendix 1 ......................................................................21
12.1 Establishing a call .................................................................. 21
12.2 PBX Services Accessible at the Dial Tone ................................... 21
12.2.1
To Use Busy Auto-redial ................................................. 22
12.2.2
To Call Back.................................................................. 22
PAGE 2
23-Jan-2007
Epygi Technologies
Quadro Features on Epygi's Supported IP Phones List
12.2.3
To Activate Forwarding Service ........................................ 22
12.2.4
To Switch Do Not Disturb Mode........................................ 22
12.2.5
To Block Last Caller........................................................ 23
12.2.6
Call Routing Management ............................................... 23
12.2.7
Voice Mail Services ........................................................ 23
12.3 Feature Codes on Auto Attendant ............................................. 26
12.3.1
Administrator Login........................................................ 27
PAGE 3
23-Jan-2007
Epygi Technologies
Quadro Features on Epygi's Supported IP Phones List
Document Revision History
Revision
Date
Description
Valid for models
1.0
15-Jan-07
Split from the Using Quadro Features
on IP Phones document
IP PBXs
PAGE 4
23-Jan-2007
Epygi Technologies
Quadro Features on Epygi's Supported IP Phones List
1 Introduction
This document describes the Quadro IP PBX telephony services and features on the supported IP
phones list and it provides the feature codes for these phones.
The features and feature codes described in this document are functional regardless of whether
the IP phone is connected to the Quadro IP PBX locally when the phone is configured as a local IP
extension or remotely when the phone is configured as a remote extension.
2 IP Phone Testing Policy
In order to maintain compatibility between Epygi IP PBX products and 3rd party IP phones, Epygi
will periodically review the available released phone SW from the vendor and test this SW against
the IP PBX products for functional compatibility. This review is done for each phone at a minimum
of four times per year. Based on the results, the SW may or may not be recommended for use,
with or without functional restrictions. Epygi will focus on a phone SW image that maximizes the
functionality of the Epygi IP PBX products rather than testing for the latest release. It is possible
that the recommended IP phone SW is not the latest released. The testing of the IP phones is
done with regards to the functionality and services of the Quadro, and not the independent
features of the particular model. Epygi will deviate from this policy on a case-by-case basis and
will accelerate testing of a particular IP phone model or SW release when necessary.
Epygi reserves the right to eliminate or add new IP phones from the supported list at anytime due
to market or technical reasons.
3 References
•
Quadro Manual-II: Administrator’s Guide for the corresponding release.
•
Quadro Manual III: Extension User's Guide for the corresponding release.
•
IP Phones and IP Lines Configuration Guide.
4 Requirements and Preparations
•
Software 3.1.x or higher is running on the Quadro IP-PBX.
•
Quadro IP-PBX is connected to the network and all network settings are properly
configured.
•
IP phones are connected to the Quadro IP PBX, powered up and appropriately configured.
PAGE 5
23-Jan-2007
Epygi Technologies
Quadro Features on Epygi's Supported IP Phones List
5 Supported SIP Phones
The following SIP Phones are supported by Epygi.
Vendor
Model
Software Version
Aastra
480i
Firmware Version: 1.4.1.1077
Aastra
9112i
Application version: 1.4.1.1077
Aastra
9133i
Application version: 1.4.1.1077
Snom
300
Application-Version: snom300-SIP 6.5.1
Snom
320
Application: snom320-SIP 6.5.1
Snom
360
Application: snom360-SIP 6.5.1
6 Future IP Phone List
The following phones and releases are currently under consideration for testing:
IP Phone Model
Firmware Version
Test Completion Date
Snom 300
6.5.2
15-Jan-2006
Snom 320
6.5.2
15-Jan-2006
Snom 360
6.5.2
15-Jan-2006
The following phones are currently under consideration for being supported:
Vendor
Model
Aastra
53i
Aastra
55i
Aastra
57i
Software Version
PAGE 6
23-Jan-2007
Epygi Technologies
Quadro Features on Epygi's Supported IP Phones List
7 SIP Phone Support Definitions
Support is defined by the testing level and support commitment by Epygi. Epygi and the SIP IP
Phone manufacturer will be working together to create a feature set and implementation strategy
for the supported models. The feature set will be unique only for the two parties involved.
The SIP Phone support allows the partners to attain flexibility for future feature development.
Support is defined as the following:
•
Online and phone support with advanced knowledge of IP Phone.
o
Detailed configuration knowledge of all Epygi tested and supported features
o
Basic IP Phone functionality and setup
o
Detailed knowledge of interoperability limitations
•
Configuration guidance from Epygi support staff.
•
Extensive regression testing of the features.
•
IP Phone firmware control and distribution.
o
Epygi will custom label firmware file names for the Supported endpoints to allow the
firmware approved and distributed by Epygi to be uploaded to the IP Phone.
o
Controlled distribution of IP Phone firmware to control the level of firmware uploaded
to the IP Phones.
8 Quadro Features on Supported IP Phones
Almost all Quadro IP PBX telephony services and features are applicable on the supported IP
phones. Most of them are identical to those on FXS (analogue) phones from the configuration and
usage perspective.
The limitations and differences regarding the configuration and functionality on FXS (analogue)
phones are listed in Limitations and Differences. The configuration options for telephony services
and features are out of scope in this document. For information about the Quadro IP PBX services
and features, and their configuration refer to Manual II-Administrator’s Guide published on
Epygi’s Technical Support Web Portal. Quadro IP PBX telephony services and features on the
supported IP phones are listed below.
•
Voice mail system
•
Auto-redialling
•
Call back to last caller
•
Enable/Disable Call forwarding
•
Call Park (Alternative)
•
Do Not Disturb
•
Block Last Caller
•
Line Information
•
Administrator login
PAGE 7
23-Jan-2007
Epygi Technologies
Quadro Features on Epygi's Supported IP Phones List
•
Call Routing Management
•
Incoming Call blocking
•
Outgoing Call blocking
•
Call forwarding Unconditionally
•
Call forwarding If busy
•
Call forwarding If No Answer
•
Call waiting
•
Call hold
•
Call park
•
3-way Calling (call conferencing)
•
Call pickup
•
Speed dialling
•
Many extension ringing
•
Call hunting
•
Caller ID
•
Hiding Caller ID
•
Hold music
•
Call Queue
•
User Permissions (Password Protection)
•
Call Transfer Blindly
•
Call Transfer w/t Consultation
•
Paging
•
Intercom
•
Receptionist
9 Limitations and Differences for the Supported IP
Phones
The following Quadro IP PBX services working on FXS (analogue) phones, are not currently
working on any supported SIP phones:
•
Hotline
•
Distinctive ringing (will be implemented in future releases)
The features codes for the following Quadro IP PBX services differ from those on FXS phones and
are specific for each supported IP phone. Refer to the chapter 12 for feature codes of these
services:
•
Call hold
•
Call Waiting
•
3-way Calling (call conferencing)
PAGE 8
23-Jan-2007
Epygi Technologies
•
Call Blind Transfer
•
Call Transfer w/t Consultation
Quadro Features on Epygi's Supported IP Phones List
Caller ID configuration for IP phones is different from that on FXS (analogue) phones. No special
configuration on the Quadro IP PBX is needed for IP phones. This service can be configured on the
IP phone only.
The following Quadro IP PBX services are functional on the supported IP phones only:
•
Paging (exception is the Aastra480e analogue phone which also supports paging)
•
Intercom
•
Receptionist (see the document Receptionist Setup on Quadro published on Epygi’s
Technical Support Web Portal).
The following Quadro IP PBX services are working with some limitations or slight differences on
SIP phones compared to the way they are working on analogue phones.
The Voice Mail Indication feature is working with the following limitation:
•
Voice Mail Indication is activated on the Quadro IP PBX, but the indication type (lamp, tone,
or ringing) should be selected on the phone. For more information on the voice mail
indication types available on your IP phone and how to activate them, please refer to the
User’s Manual of the telephone.
The User Password Protection feature is working with the following difference:
•
If the User Password Protection is activated on the Quadro for outgoing calls, Quadro will
ask for password after dialling the called destination and not upon lifting the handset as it
is on analogue phones.
For other Quadro services not supported by an individual SIP phone, refer to Limitations
Specific to the corresponding Phone section below.
Please note: If a particular feature is supported both by the Quadro and the SIP phone, the
Quadro’s feature must be used. Using a SIP phone’s feature not supported by the Quadro is left to
the discretion of the user.
10 Quadro Feature Codes on Supported IP Phones
A feature code is a combination of keys dialed on an IP phone connected to the Quadro IP PBX to
access its telephony services. Each feature has its own feature code. Quadro IP PBX telephony
features are divided into two groups: PBX and Auto Attendant services.
Each group above has its own hierarchy.
PBX services comprise of the following:
•
PBX services accessible at the dial tone
•
PBX services accessible during a call.
The feature codes for PBX services accessible at the dial tone and Auto Attendant services
are the same on different IP phones and identical to those on FXS phones. Refer to Appendix 1 for
these codes.
The feature codes for PBX services accessible during a call vary on different IP phones
(exception is the Call Park). For those codes, please refer to the Feature Codes for the
corresponding Phone in the section below.
PAGE 9
23-Jan-2007
Epygi Technologies
Quadro Features on Epygi's Supported IP Phones List
11 Quadro PBX Services Accessible during a call
The feature codes for PBX services accessible during a call vary depending on the SIP phone.
The exception is the Call Park feature, which is common for all IP phones discussed below.
To Park a Call
This service requires initial configuration from the Quadro web management. At least one extension should be
configured as a call park extension.
In order to park a call put the call to park on hold by switching to a free line and dial f. The
system will play the extension number and the SIP username of a call park extension. This is
usually the first available extension initially configured for call parking.
To retrieve the parked call locally, dial the prompted call park extension number on any phone
locally connected to the Quadro. In case of remote access, dial the SIP username of the extension.
The system will ask for authentication. Enter the password of the call park extension or press r if
the extension does not have a specified password.
Attention: Call Park is valid within the specified timeout, during which hold music (if configured)
will be played to the held party. When the Call Park timeout expires, the phone initiating call
parking will start ringing, and if the parked call is not picked up, or if the phone is off hook, the
parked party will automatically be disconnected.
11.1 Snom300 SIP Phone
11.1.1 Limitations Specific to Snom300
There are no additional limitations except for those mentioned in section Limitations and
Differences.
11.1.2 Features Codes on Snom300
This section presents the feature codes for PBX Services accessible during a call specific to
Snom300 and serves as a supplement to section Quadro Feature Codes on Supported IP Phones.
Please note: The feature codes presented below assume that the Snom300 is in the default
configuration, i.e. the programmable keys function as specified by default. If this is not the case,
use the programmable keys programmed to have the identical function as indicated for the
corresponding feature.
PBX Services accessible during a
Keys
call
Call Hold
Free line key (L1 or L2)
Call Waiting
Key with a blinking LED
Call Blind Transfer
Transfer Æ dial the number Æ
Call Transfer with Consultation
Free line key Æ dial the numberÆ
Transfer
Call Conference
Press the key programmed for a conference call
(Absent in the default configuration)
PAGE 10
Æ consultÆ
23-Jan-2007
Epygi Technologies
Quadro Features on Epygi's Supported IP Phones List
To Put a Call on Hold
During a call, press a free line key. While a call is on hold, you can make a second call by dialing
the desired phone number.
To resume a call on hold, press the ‘line’ key again.
To Accept an Incoming Call When on a Call
Press the key with a blinking LED. This puts the call in progress on hold and receives an incoming
call.
To switch between the calls, use the line key associated with the corresponding call.
To terminate the call in progress and resume the one on hold, press Cancel.
To Blind Transfer a Call
During a call, press the Transfer key to put the call in progress on hold.
Dial the phone number that the held call is to be transferred to and press
will be transferred to the specified destination.
. The person on hold
To Transfer a Call with Consultation
During a call, press a free line key to put the active call on hold.
Dial the phone number that the held call is to be transferred to and press the
called party (ie. to announce the call).
key. Consult the
Press the Transfer key to connect the person on hold to the called party.
To Make a Conference Call
When the phone is connected with two calls, one on hold and one active, press the key
programmed as the Conference key.
Press this Conference key again to disconnect the conference and put each participant on hold.
PAGE 11
23-Jan-2007
Epygi Technologies
Quadro Features on Epygi's Supported IP Phones List
11.2 Snom320
11.2.1 Limitations Specific to Snom320
There are no additional limitations except for those mentioned in section Limitations and
Differences.
11.2.2 Features Codes on Snom320
This section presents the feature codes for PBX Services accessible during a call specific to
Snom320 and serves as a supplement to section Quadro Feature Codes on Supported IP Phones.
PBX Services accessible during a
call
Keys/Soft Keys
Call Hold
Call Waiting
Key with a blinking LED
Call Blind Transfer
“Xfer”
Call Transfer with Consultation
Call Conference
1
Æ dial the numberÆ
Æ dial the numberÆ
Æ consult Æ “Xfer”
“Cnf.On”
To Put a Call on Hold
During a call, press the hold key
. This puts the call in progress on hold and provides a dial
tone on a free line. While a call is on hold, you can make a second call by dialing your desired
again or the line key
phone number. To resume a call on hold, press either the hold key
associated with the held call.
You can also put a call on hold and immediately receive a dial tone by pressing any free line key.
To Accept an Incoming Call
Press the key with a blinking LED. This puts the call in progress on hold and receives the incoming
call.
To terminate the call in progress and resume the one on hold, press Cancel.
To Blind Transfer a Call
During a call, press the soft key “Xfer” or the transfer key
hold and provides a dial tone.
. This puts the call in progress on
Dial the phone number that the call is to be transferred to and press
be transferred to the specified destination.
1
. The person on hold will
The names of soft keys are taken into inverted commas.
PAGE 12
23-Jan-2007
Epygi Technologies
Quadro Features on Epygi's Supported IP Phones List
To Transfer a Call with Consultation
During a call, press the hold key
tone.
. This puts the call in progress on hold and provides a dial
Dial the phone number that the call is to be transferred to and press the key
second party.
Press the soft key “Xfer” or the transfer key
party.
. Consult the
to connect the person on hold to the called
To Set Up a Conference Call
When the phone is connected with two calls, one on hold and one active, press the soft key
“Cnf.On”
to connect all three parties for a conference call.
disconnects the conference call and drops the calls.
Pressing the function key “Cnf.Off” or
11.3 Snom360
11.3.1 Limitations Specific to Snom360
There are no additional limitations except for those mentioned in section Limitations and
Differences.
11.3.2 Features Codes on Snom360
This section presents the feature codes for PBX Services accessible during a call specific to
Snom360 and serves as a supplement to section Quadro Feature Codes on Supported IP Phones.
PBX Services accessible during a call
Keys
Call Hold
Call Waiting
Key with a blinking LED
Call Blind Transfer
Æ dial the numberÆ
Call Transfer with Consultation
Æ dial the numberÆ
Æ consultÆ
Call Conference
To Put a Call on Hold
During a call, press the hold key
. This puts the call in progress on hold and provides a dial
tone on a free line. While a call is on hold, you can make a second call by dialing your desired
phone number. To resume the call on hold, press either the flash key
associated with the held call.
or the line key
You can also put a call on hold and immediately receive a dial tone by pressing any free line key.
To Accept a Second Incoming Call
Press the key with a blinking LED. This puts the call in progress on hold and receives an incoming
call.
PAGE 13
23-Jan-2007
Epygi Technologies
Quadro Features on Epygi's Supported IP Phones List
To terminate the call in progress and resume the one on hold, press Cancel.
To Blind Transfer a Call
During a call, press the transfer key
provides a dial tone.
. This puts the call in progress on hold and
Dial the phone number that the call is to be transferred to and press
be transferred to the specified destination.
. The person on hold will
To Transfer a Call with Consultation
During a call, press the hold key
tone.
. This puts the call in progress on hold and provides a dial
Dial the phone number that the call is to be transferred to and press the key
second party, i.e. to announce the call.
Press the transfer key
. Consult the
to connect the person on hold to the called party.
To Set Up a Conference Call
When the phone is connected with two calls, one on hold and one active, press the conference key
.
Pressing the function key
or
disconnects the conference call and puts the calls on hold.
PAGE 14
23-Jan-2007
Epygi Technologies
Quadro Features on Epygi's Supported IP Phones List
11.4 Aastra480i
11.4.1 Limitations Specific to Aastra480i
There are no additional limitations except for those mentioned in section Limitations and
Differences.
11.4.2 Feature Codes on Aastra480i
This section presents the feature codes for PBX Services accessible during a call specific to
Aastra480i and serves as a supplement to section Quadro Feature Codes on Supported IP Phones.
Please Note: Almost all PBX services described in the Feature Codes for SIP Phones section
can be accessed by using corresponding soft keys. For example, instead of dialing he to get
the line information, you can press the soft key “Line info.”
PBX Services
Keys / Soft Keys
Call Hold
Hold
Call Waiting
“Pickup” 2
Call Blind Transfer
Xfer Æ dial the number Æ “Call” Æ Xfer
Call Transfer with Consultation
Xfer Æ dial the number Æ “Call” Æ consult Æ Xfer
Call Conference
Conf Æ dial the number Æ “Call” Æ Conf
To Put a Call on Hold
To put a call in progress on hold, press the Hold key on the phone keypad. The LED of the
corresponding line key will start blinking, indicating that you have a call on hold.
To resume the call on hold, either press the “Pickup” soft key or press the line key with a
blinking LED.
While a call is on hold you can make a second call by switching to an available free line: press the
corresponding line key. This provides a dial tone on that line enabling you to make a second call.
Please Note: You can put a call on hold and switch directly to another line by pressing a free line
key during a call.
To Accept a Second Incoming Call
To accept a second call when you are in a call, either press the line key with a flickering LED or
press the “Pickup” soft key. Accepting a second call puts the call in progress on hold.
To switch between the calls, use the line keys L1 to L4: press the key with a blinking LED to
resume the call on hold and put the current one on hold.
To terminate a second call and return to the held one, press the “Drop” then “Pickup” soft keys.
To Blind Transfer a Call
Press the Xfer key during a call to be transferred. This puts the call in progress on hold and
provides a dial tone on an available free line.
2
The names of the soft keys are in quotes.
PAGE 15
23-Jan-2007
Epygi Technologies
Quadro Features on Epygi's Supported IP Phones List
Dial the number that the call is to be transferred and press the soft key “Dial”.
Press Xfer again when you hear ringing. The party on hold is transferred to the called party.
To Transfer a Call with Consultation
Press the Xfer key during a call to be transferred. This puts the call in progress on hold and
provides a dial tone on an available free line.
Dial the number that the call is to be transferred to and press the soft key “Dial”.
Consult the called part and press Xfer again. The party on hold is transferred to the called party.
To Set Up a Conference Call
Press the Conf key on the keypad during a call. This puts the call in progress on hold and switches
to an available free line.
Dial the third participant’s phone number and press the soft key “Dial”. You may talk to the called
party while first call is on hold.
Press Conf again to join the parties in a conference call.
To terminate the conference call, press the key Goodbye on the keypad. The other two
conference call participants are also disconnected from the conference call.
You may disconnect either of the parties from the conference call and resume the call with the
other party: use the soft key “Previous”/“Next” to select the party you would like to disconnect
from the conference call and press the soft key “Drop”.
PAGE 16
23-Jan-2007
Epygi Technologies
Quadro Features on Epygi's Supported IP Phones List
11.5 Aastra 9112i
11.5.1 Limitations Specific to Aastra9112i
The functionality of the call park feature (see To Put a Call on Hold) is different on the Aastra
9112i.
The Aastra9112i phone has only one line. Pressing the Hold button does not provide a dial tone.
Therefore, when parking a call, use the Xfer key to receive the dial tone to dial f.
Please note. Using the Xfer key may not always work correctly, as it has been designed for
different functionality.
See also section Limitations and Differences.
11.5.2 Feature Codes on Aastra9112i
This section presents the feature codes for PBX Services accessible during a call specific to
Aastra9112i and serves as a supplement to section Quadro Feature Codes on Supported IP
Phones.
Please Note: Using corresponding programmable keys can access some of the PBX services
described in the Feature Codes for SIP Phones section.
PBX Services
Keys / Soft Keys
Call Hold
Hold
Call Waiting
Swap
Call Blind Transfer
Xfer Æ dial the number Æ Xfer
Call Transfer with Consultation
Xfer Æ dial the number Æ “Dial” Æ consult Æ Xfer
Call Conference
ConfÆ dial the number Æ “Dial” Æ Conf
To Put a Call on Hold
To put a call in progress on hold, press the Hold key on the phone keypad. The LED will start
blinking, which indicates that you have a call on hold.
To resume the call on hold, press the Hold key.
While a call is on hold you can make a second call: press Xfer key on the phone keypad. This
provides a dial tone on that line enabling you to make a second call.
Please Note: You can put a call on hold and switch directly to another line by pressing the Swap
key during a call.
To Accept a Second Incoming Call
To accept a second call when you are in a call, press the Swap key. Accepting a second call puts
the call in progress on hold.
To switch between the calls, press the Swap key.
PAGE 17
23-Jan-2007
Epygi Technologies
Quadro Features on Epygi's Supported IP Phones List
To Blind Transfer a Call
Press the Xfer key during a call to be transferred. This puts the call in progress on hold and
provides a dial tone on a free line available.
Dial the number that the call is to be transferred to and press the key Xfer again. The party on
hold is transferred to the called party.
To Transfer a Call with Consultation
Press the Xfer key during a call to be transferred. This puts the call in progress on hold and
provides a dial tone on an available free line.
Dial the number that the call is to be transferred and press the soft key “Dial”.
Consult the called party and press Xfer again. The party on hold is transferred to the called party.
To Set Up a Conference Call
During a call, press the Conf key on the keypad. This puts the call in progress on hold and
switches to an available free line.
Dial the third participant’s phone number and press the soft key “Dial”. You may talk to the called
party while the other is on hold.
Press Conf again to join the parties in a conference call.
You may disconnect either of the parties from the conference call and resume the call with the
other party: use the soft key “Up”/“Down” to select the party you would like to disconnect from
the conference call and press the soft key “Drop”.
To terminate the conference call just hang up the phone.
PAGE 18
23-Jan-2007
Epygi Technologies
Quadro Features on Epygi's Supported IP Phones List
11.6 Aastra 9133i
11.6.1 Limitations Specific to Aastra9133i
There are no additional limitations except for those mentioned in section Limitations and
Differences.
11.6.2 Feature Codes on Aastra9133i
This section presents the feature codes for PBX Services accessible during a call specific to
Aatra9133i and serves as a supplement to section Quadro Feature Codes on Supported IP Phones.
Please Note: If the Aastra9133i phone is connected to the Quadro locally, i.e. the phone is
configured as a Quadro’s local IP extension using the auto-configuration then almost all PBX
services described in the Feature Codes for SIP Phones section can be accessed by using the
corresponding programmable keys.
PBX Services
Keys / Soft Keys
Call Hold
Hold
Call Waiting
Line keys
Call Blind Transfer
Xfer Æ dial the number Æ Xfer
Call Transfer with Consultation
Xfer Æ dial the number Æ “Dial” Æ consult Æ Xfer
Call Conference
Conf Æ dial the number Æ “Dial” Æ Conf
To Put a Call on Hold
To put a call in progress on hold, press the Hold key on the phone keypad. The LED of the
corresponding line key will start blinking, indicating that you have a call on hold.
To resume the call on hold, press the Line Key with a blinking LED.
While a call is on hold you can make a second call by pressing the key of a free line. This provides
a dial tone on that line enabling you to make a second call.
Please Note: You can put a call on hold and switch directly to another line by pressing a free line
key during a call.
To Accept a Second Incoming Call
To accept a second call when you are in a call, press the line key with a flickering LED. For
example, L1 is in call, L2 is blinking, press Line Key L2. Accepting a second call puts the call in
progress on hold.
To switch between the calls, press line keys and put the current one on hold.
PAGE 19
23-Jan-2007
Epygi Technologies
Quadro Features on Epygi's Supported IP Phones List
To Blind Transfer a Call
Press the Xfer key during a call to be transferred. This puts the call in progress on hold and
provides a dial tone on an available free line.
Dial the number that the call is to be transferred to and press the key Xfer again. The party on
hold is transferred to the called party.
To Transfer a Call with Consultation
During a call to be transferred, press the Xfer key. This puts the call in progress on hold and
provides a dial tone on an available free line.
Dial the number that the call is to be transferred to and press the soft key Dial.
Consult the called party and press Xfer again. The party on hold is transferred to the called party.
To Make a Call Conference
Press the Conf key on the keypad during a call. This puts the call in progress on hold and switches
to an available free line.
Dial the third participant’s phone number and press the soft key Dial. You may talk to the called
party while the other is on hold.
Press Conf again to join the parties in a conference call.
You may disconnect either of the parties from the conference call and resume the call with the
other party: use the soft key Up/Down to select the party you would like to disconnect from the
conference call and press the soft key Drop.
To terminate the conference call just hang up the phone.
PAGE 20
23-Jan-2007
Epygi Technologies
Quadro Features on Epygi's Supported IP Phones List
12 Appendix 1
This section presents the feature codes for PBX services accessible at the dial tone and Auto
Attendant services.
12.1 Establishing a call
To establish a call, dial the appropriate Routing Number. The Routing Numbers and the
available routes to/from/through Quadro are listed in the Local Routing Table configured and
managed by the Quadro’s administrator. For information about routing rules, please refer to your
Quadro’s administrator.
To establish a call using Speed Calling service dial the pound (r) and the pre-configured Calling
Code (a suitable key combination of two digits).
Please Note: You may accelerate establishing a connection by using the pound (r) sign dialed at
the end of the number.
12.2 PBX Services Accessible at the Dial Tone
The table below presents the feature codes for PBX services accessible at the dial tone and
characterized by starting with the key .
Services
Keys
Enter Voice Mail System
a
Busy Autoredial
b
Call Back
c
Forwarding
e
Activating/deactivating
Call Park
f
After putting the call on hold
Do Not Disturb
hc
Activating/deactivating
Block Last Caller
(Within 10 sec. after terminating the call)
hd
Getting the line Information
he
Administrator login
hf
Call Routing Management
hh
PAGE 21
23-Jan-2007
Epygi Technologies
Quadro Features on Epygi's Supported IP Phones List
12.2.1 To Use Busy Auto-redial
This service is functional for SIP and PBX calls only. For PSTN calls, this feature works as a single redial with no
multiple attempts to reach the called destination.
Dial
b to redial the last number that you called.
If the called number is busy after dialing b, keep the handset lifted to activate the automatic
redialing of the last called number for the time period specified on the Auto-redial Settings page
(User loginÆCall HandlingÆAuto-redial).
The auto-redial terminates as soon as:
•
the called number is idle and you hear ring back tones
•
the specified Auto-redial Period has expired
A beep sound will be heard if auto-redialing is not possible.
12.2.2 To Call Back
Dial c. The system will call back the last caller.
"The dialed number doesn't exist" voice message will be played if call back is not possible.
12.2.3 To Activate Forwarding Service
Dial e and hang up. The Unconditional Call Forwarding service with the settings specified for
Any Address/Other Addresses on the Caller ID Based Services page will be activated (User
loginÆ Supplementary Services).
Use the same key combination to deactivate the service.
This feature code will have no effect if unconditional forwarding is not configured for Any
Address/Other Addresses. The system will ask you to configure the forwarding settings first.
12.2.4 To Switch Do Not Disturb Mode
Dial hc and hang up. Your phone will not ring during the period indicated on the Do Not
Disturb Settings page (User loginÆCall Handling) and all incoming calls will be directly forwarded
to your voice mail if the voice mail service is activated.
Use the same key combination to deactivate the DND service.
PAGE 22
23-Jan-2007
Epygi Technologies
Quadro Features on Epygi's Supported IP Phones List
12.2.5 To Block Last Caller
Dial hd. The last caller will be blocked and a corresponding entry will be added to the Caller
ID Based Services (User loginÆSupplementary Services) page.
Attention: This service can be activated within 10 seconds after call termination. To unblock the
blocked party, go to the Caller ID Based Services page and disable the Incoming Call
Blocking service for the blocked address. If no other services are enabled for the address, you
may delete the entry from the table.
Blocking the caller with anonymous caller ID such as anonymous@anonymous or a similar address
will result in blocking all callers with unknown caller address.
12.2.6 Call Routing Management
Dial hh, to manage the routing entries in the Call Routing Table, i.e. to enable/disable certain
dialing rules by dialing key combinations pre-configured on each routing entry. Since multiple
routing rules may have the same enabler/disabler key combinations (the same key may be used
as an enabler for one routing rule, and as a disabler for another one), dialing a certain key will
affect all the pre-configured routing rules.
Please note: If the routing record has an authorization enabled on the enabler/disabler key,
administrator's password will be required to be inserted after the key. Once the administrator's
password is dialed, system plays a confirmation about the accepted configuration and the state of
the optioned routing rule(s) will be modified.
If administrator's password has been inserted incorrectly for 3 times, no status changes will be
applied to any of the routing record(s), even to those which have no authorization enabled.
12.2.7 Voice Mail Services
a Enter Voice Mail Services
The Voice Mail Services are divided
into two main parts: Voice Mailbox
and Review System Messages.
Each of these parts has a hierarchy
that is described below.
a
Exit
Voice Mail
Services
PAGE 23
b
c
Go to the top of Go one level up in
the
the
Voice Mail Services Voice Mail Services
Tree
Tree
23-Jan-2007
Epygi Technologies
Quadro Features on Epygi's Supported IP Phones List
a
Enter Voice Mail Services
b
d
Voice Mailbox
b
Review System Messages
c
d
f
g
i
j
Send a
Play
Get
First
Message
Date/Tim
or Leave a Message
e info
Reminder
e
Play
Previous
Message
h
Play
Play Next
Current Message
Message
Play
Print the
Delete
Last
attached
Current
FAX
Message Message
(and press
START on
the FAX
machine)
r
d
e
Incoming
Blocking
Message
(IBM)
b
Listen to
current GM
c
b
Listen to
current IBM
d
Restore
Default IBM
Your Name
b
b
Listen to
current OBM
Listen to
current
Name
c
Record a New
IBM
Restore
Default GM
f
Outgoing
Blocking
Message
(OBM)
c
Record a
New GM
d
a
Reply or
Forward
a
Message
b
Greeting
Message
(GM)
c
Record a
New OBM
Record a
New Name
d
d
Restore
Default OBM
g
Out of Office
Message
(OFM)
b
Listen to
Current
OFM
c
Record a New
OFM
d
Restore
Default
Name
Restore
Default
OFM
r
Stop Recording or Playback
The Voice Mailbox has the following sub-hierarchy in the Reply or Forward a Message and
Send a Message or Leave a Reminder menu options:
a
Reply or Forward a Message
a
Call Back immediately
b
c
Reply by Voice Mail
Forward a Message
Dial b to mark the message as
Urgent, or press pound to assign
the Normal priority.
Dial
Destination Number
r
Record a Message
r
Record a Message
Dial additional
Destination
Number
r
Record a Message
Dial b to mark the message as
Urgent, or press pound to assign the
Normal priority.
PAGE 24
23-Jan-2007
Epygi Technologies
Quadro Features on Epygi's Supported IP Phones List
b
Send a Message or Leave a Reminder
Dial
Destination Number
r
Record a Message
r
Leave a reminder
Dial additional Destination
Dial b to mark the message as Urgent,
Number
or press pound to assign the Normal
r
priority.
Record a Message
Dial b to mark the message as Urgent, or press pound
to assign the Normal priority.
Please Note: This service is restricted to sending messages to PSTN destinations. Messages will
be successfully received by the destination if all the following conditions fit:
•
The connection to the destination is successful;
•
The voice mail service is enabled on the destination;
•
There is enough space in the voice mailbox of the destination;
•
The duration of the forwarded/replied message is less than the maximal voice mail duration
set up by the destination.
Voice Mail Services for Incoming Calls:
Calling to the extension’s Voice Mailbox
In call queue
a
(during the greeting
message)
Calling to the Zero Out
destination
r
Skip the greeting message and
start Voice Mail recording
PAGE 25
a
Leave the call queue and
record a Voice Mail
23-Jan-2007
Epygi Technologies
Quadro Features on Epygi's Supported IP Phones List
12.3 Feature Codes on Auto Attendant
For external IP calls addressed to the Auto Attendant or incoming calls from FXO lines routed to
the Auto Attendant or local calls to Auto Attendant, the following key combinations are available to
access and manipulate within Auto Attendant services:
Incoming call to Auto Attendant Services or dial locally
Extensions Menu - establishing a connection to an extension on the called
Quadro
Remote Enquiry - establishing a connection to the mailbox of an extension
on the called Quadro
Call Relay Menu - mainly for external calls (IP/FXO or IP/ISDN). Local calls
are also allowed.
This service allows you to avoid hanging up and redoing the entire dialing
sequence. If Quadro detects an error in the dialed number or you decide to
cancel the call and start a new one, enter the combination to interrupt the
call and get an invitation to make a new one.
Keys
(already in)
a
c
“” digit
Under the following restrictions:
combination is
applicable:
• This feature can be used when accessing the AA from
the PSTN line to make IP or local calls
• During the dialing,
•
This
feature can be used when calling to PSTN
• After ring tones
through the AA
start,
• This feature is not available on the second Quadro
• After call
Auto Attendant (calling from one Auto Attendant to
establishment.
another)
Remote Configuration Menu – allows remote enabling/disabling of
Unconditional Call Forwarding service for Any Address/Other Addresses on the
extension.
e
Non Permanent Call Back – allows PSTN callers registered in the Authorized
Phones Database to change the callback destination for a one-time callback.
After the caller hangs up, the Quadro will call back to the newly specified
number. This change will not be logged into Authorized Phones Database.
f
Permanent Call Back – allows PSTN callers registered in the Authorized
Phones Database to reconfigure Authorized Phones Database entries by
modifying the caller's and/or callback numbers. The caller will then be able to
initiate a callback only by calling from the newly specified caller number.
g
Call Routing Management Menu - allows managing the routing entries in
the Call Routing Table, i.e. to enable/disable certain dialing rules by dialing key
combinations pre-configured on each routing entry.
Extensions Directory - accesses Quadro extensions by spelling the
extension’s user name using keypad on the phone
h
r
Please note: For more information on Quadro’s Auto Attendant Services, please refer to Manual
III: Extension User's Guide of the corresponding release.
PAGE 26
23-Jan-2007
Epygi Technologies
Quadro Features on Epygi's Supported IP Phones List
12.3.1 Administrator Login
The administrator login allows only modification of the auto attendant (AA) greeting message,
menu message and Universal Extension Messages. After dialing hf, use key b to enter and
review the auto attendant greeting message, key 2 to enter and review the auto attendant menu
message, and use key d to enter the Universal Extension Messages menu. The key combinations
below are available to modify the auto attendant greetings.
hf Administrator Login
b
Auto
Attendant
Greeting
b
Listen to
Current
AA
Greeting
c
Record a
New
AA
Greeting
d
Restore
Default
AA
Greeting
r
Stop
Recording
or
Playback
d
c
Auto
Attendant
Menu
Message
b
Listen to
AA Menu
Message
c
Record a
New
AA Menu
Message
d
Restore
Default
AA Menu
Message
r
Stop
Recording
or
Playback
Universal Extension Messages
b
Greeting
Message
(GM)
b
Listen to
Current
GM
c
Record a
Universal
GM
d
Restore
System
Default
GM
r
Stop
Recording
or Playback
GM
d
Incoming
Blocking
Message
(IBM)
b
Listen to
Current
IBM
c
Record a
Universal
IBM
d
Restore
System
Default
IBM
r
Stop
Recording or
Playback
IBM
e
Outgoing
Blocking
Message
(OBM)
b
Listen to
Current
OBM
c
Record a
Universal
OBM
d
Restore
System
Default
OBM
r
Stop
Recording or
Playback
OBM
f
Your
Name
b
Listen to
Current
Name
recorded
c
Record a
Universal
Name
d
Restore
System
Default
Name
r
Stop
Recording
or
Playback
Name
Message
g
Out of
Office
Message
(OFM)
b
Listen to
Current
OFM
c
Record a
Universal
OFM
d
Restore
System
Default
OFM
r
Stop
Recording
or
Playback
OFM
a Administrator Logout
PAGE 27
23-Jan-2007