1
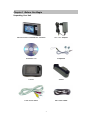
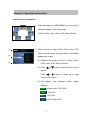
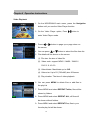
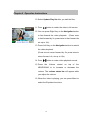
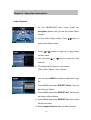
NEUROS442 40GB HDD
User Manual
Personal AV Jukebox
It is important to read this instruction book prior to using your new product for the first time.
Important safety instruction and FCC / CE information
This device generates and uses radio
frequency (RF) energy, and if not installed
and used properly, this equipment may
cause interference to radio and television
reception. If this equipment does cause
interference to radio or Television
reception (which you can determine by
Unplugging the unit), try to correct the
interference by one or more of the
following measures:
z Re-orient the receiving antenna (that is,
the antenna for the radio or television
that is “receiving” the interference).
z Move the unit away from the equipment
that is receiving interference.
z Plug the unit into a different wall outlet so
that the unit and the equipment receiving
interference are on different branch
circuits.
If these measures do not eliminate the
interference, please consult your dealer or
an experienced radio/television technician
for additional suggestions.
FCC Declaration of Confirmation
This equipment has been
tested and found to
comply with the limits for a
Class B digital device,
pursuant to Part 15 of the
FCC Rules. These limits
are designed to provide reasonable
protection against harmful interference in a
residential installation. This equipment
generates, uses, and can radiate radio
frequency energy and, if not installed and
used in accordance with the instructions,
may cause harmful interference to radio
communications.
However, there is no guarantee that
interference will not occur in a particular
installation. If this equipment does cause
harmful interference to radio or television
reception, which can be determined by
turning the equipment off and on, the user
is encouraged to try to correct the
interference by one or more of the
following measures:
z Reorient or relocate the receiving
antenna.
z Increase the separation between the
equipment and receiver.
z Connect the equipment into an outlet on
a circuit different from that to which the
receiver is connected.
z Consult the dealer or an experienced
radio/TV technician for help.
This device complies with Part 15 of the
FCC Rules. Operation is subject to the
following two conditions: (1) this device
may not cause harmful interference, and
(2) this device must accept any
interference received, including
interference that may cause undesired
operation.
CE Declaration of Confirmation
NEUROS442 is here with confirmed to
comply with the requirements set out in
the directive on the Approxmation of the
Laws of the member States relating to
Electromagnetic Compatibility and Low
Voltages Directive.
1
Table of Contents
Chapter 1
Before You Begin ....………………..……...……………………....4-8
Warning ..……………………………..…………………………..……4
Safety Notes ………………......……..…………………………..…...4
Power Sources ………………………...…...…………………………5
Listening with Earphone ……………..………………………………5
Battery …………………………………..…..…………………………6
Non-use Period ………….……………..…..…………………………6
Back Up Your Data ………………………….……………….............6
Unpacking Your Unit .………………..…………...…………….........7
Specifications ….……………………..……………………………….8
Chapter 2
Overview of Buttons and Jacks ….………………………………9-10
Front View ………………………...…..………………………...........9
Top View ...………………………...…………………………...........10
Bottom View ……………………...…………………………............10
Chapter 3
Software Installation………………………………………………… 11
Chapter 4
How to Download ………......……………………...…………....12-14
Chapter 5
Download DRM protected music to the NEUROS442 …………..15
Chapter 6
Operation Instructions ..………………..………...……………..16-28
Power On and Off ……………….…...…………………………......16
Basic Screen Information …………………………………………..17
Video Playback ………………………………………………………18
Audio Playback ………………………………………………………20
Photo Viewer ...………………………………………………………22
Personal Video Recording ………………………………………….23
Audio Recording …...………………………………………………..25
2
Table of Contents
Set Up …………...……………………………………………………26
Files Editor …………………………………………………………...28
Note……………………………………………………………………30
Chapter 7
Trouble Shooting ………………………………………………...31-33
Chapter 8
Limitation .……………….….……………………...…………….34-35
The limitation for WMA/WMV format supported ………………….34
The limitation of PDDRM ...…………………………………………34
Chapter 9
Maintenance …….…………………………………………………...36
How to keep your NEUROS442 working properly ………………36
Chapter 10
Glossary …….…………………………………………………..…...37
3
Chapter 1 Before You Begin
Warning
Use of this product is for your personal use only.
Unauthorized recording or duplication of copyrighted material may infringe upon
the rights of third parties and may be contrary to copyright laws.
Safety Notes
Keep away from strong magnetic fields.
Keep out of direct sunlight. Exposure to direct sunlight or extreme
heat may cause damage or malfunction.
Stay away from high temperature.
Don’t subject to excessive force or impact.
Don’t disassemble the body personally.
Don’t expose to rain or moisture.
4
Chapter 1 Before You Begin
Power Sources
Be sure that the used local voltage is corresponding with the included AC Power
adapter before using NEUROS442. If the AC power supply exceeds the limit it
may cause malfunction or permanent damage to this music box.
Listening with Earphone
1. Preventing hearing damage
Avoid using earphones at high volume.
Hearing experts advise against continuous, loud and extended play. If you
experience a ringing in your ears, reduce volume or discontinue use.
2. Road safety
Do not use earphone while driving, cycling, or operationg any motorized
vehicle. It may create a traffic hazard and is illegal in many areas. It can also
be potentially dangerous to play your earphones at high volume while walking,
especially at pedestrian crossings. You should exercise extreme caution or
discontinue use in potentially hazardous situations.
3. Caring for others
Keep the volume at a moderate level. This will allow you to hear outside
sounds and to be considerate to people around you.
5
Chapter 1 Before You Begin
Battery
The NEUROS442 has a non-removable battery. If the NEUROS442 is not used
for a while the battery may need to be re-charged.
Non-use Period
To prevent unnecessary power leakage, we recommend to use the “Lock” key
when it is unused.
Back Up Your Data
As with any device that has a hard drive or rotating magnetic media, you should
back up the drive regularly.
6
Chapter 1 Before You Begin
Unpacking Your Unit
NEUROS442 Personal AV Jukebox
AC / DC adapter
Software CD
Earphone
Pouch
Stand
Line in/out cable
Mini USB cable
7
Chapter 1 Before You Begin
Specifications
Display
3.6” Slim Type Trans-reflective TFT Color LCD
Luminance 230 cd / m2
White LED Backlight
QVGA Resolution 320 × RGB × 240 Pixel
Support Track Title, Artist display
Storage
2.5” 40 GB HDD
Features
Video Player-Supports MPEG 4 / DivX 3.11, 4.0, 5.0 / WMV9
Video Recording-Support MPEG 4 / DivX 5.0
Audio Player-Support MP3/ ADPCM/ WMA
Audio Recording-Supports MP3 / ADPCM
Photo Viewer-Supports JPEG / GIF / BMP
File Format
MP4 / ASF / AVI / WMA / WMV / MP3 / JPG / BMP / GIF
Movie Playback
Up to D1 (720 × 480) size 30 frames per-second
Max Bit Rate: Up to 4MB
Photo Viewer
Slide show with background music
Audio Output
5 step EQC (Normal / Rock / Jazz / Pop / Classic)
File System
FAT32 / FAT16 / FAT12
Multi Disk Support (HD / SD)
Files Copy / Delete / Make Directory
Copy Rate: 1 Mbyte (Copy file between different disks)
Playing Time
Audio Mode: Up to 9 Hr
Video Mode: Up to 5 Hr
Multi-Language
English / French / Italian / Spanish / Dutch / Portuguese / German
8
Chapter 2 Overview of Buttons And Jacks
Front View
Illustration 1
1. Power: Press Power button to power on / off system.
2. VOL + / -: Press VOL + to increase the volume level; press VOL- to decrease
the volume level.
3. Headphone jack: Plug the headphone in.
4. TV / Lock: If you have connected a cable to the LINE OUT jack, press this
button to display the NEUROS442 user interface and multimedia content on
the connected screen. Or:
Press TV / LOCK button for 2 seconds, keys will be locked.
Press TV / LOCK button for 2 seconds again, keys will be unlocked.
5. Navigation key: Use this key to navigate through your NEUROS442.
6. PLAY / PAUSE: Press to play and pause for playback use and confirm your
actions with this button.
7. Back / Exit: Press to stop or move to the previous menu.
8. MENU: Press key to enter the settings menu.
9
Chapter 2 Overview of Buttons And Jacks
Top View
Illustration 2
1. AV IN / OUT: Plug AV cable here to enable AV Line-in recording.
2. Earphone Jack: Plug the earphone here.
3. USB Port: Connect the mini USB connector of the supplied USB cable here,
and connect the other end to PC host.
4. DC IN Jack Plug in the supplied AC Adapter here to recharge.
Bottom View
Illustration 3
1. SD / MMC Slot: Insert a memory card to copy files to your NEUROS442.
2. Reset: If your NEUROS442 AV Jukebox appears to be locked up, use a pencil to
reset the system.
10
Chapter 3 Software Installation
Insert the CD into the CD-ROM drive of your PC.
A startup menu will automatically appear. The following options appear:
1. Windows Media DRM Driver
After installation of this driver, Windows automatically detects your
NEUROS442 as a Portable Media Device.
2. Windows Media Player 10
Install Windows Media Player 10 only if it is not installed on your system
already.
3. Video Toolbox
Install the Video Toolbox if you want to convert video files on your system to
the appropriate Windows Media or MPEG4 format.
4. User’s Guide
You can find a copy of this user’s guide in PDF format (English only).
5. Browse CD
Use this option to start your computer’s explorer to browse the cd.
6. Exit
Exit the menu.
Select the software you want to install and follow the instructions appearing on
your screen.
11
Chapter 4 How to Download
The procedure of downloading data into NEUROS442:
1. Connect NEUROS442 to your PC using USB cable. The NEUROS442 is
automatically locked when connected to the PC. A small icon at the bottom of
the display indicates that the NEUROS442 is connected to a PC.
2. Open Windows Explorer, you can see NEUROS442 shows with a drive letter
(for example: F: )
3. Select the drive and folder where the data you want to download to the
NEUROS442 is located on the PC (for example: D:)
4. Select the files or folders you want to copy or move to the NEUROS442.
12
Chapter 4 How to Download
5. On the Edit menu, select Copy (or press CTRL+Z) to copy the items selected
to the NEUROS442, or click Cut to move the item to the NEUROS442.
6. Open the drive named NEUROS442 (for example F:NEUROS442) and select
the folder you want the content to copy or move to. For video, audio or photo’s,
please place the files in the appropriate folder.
13
Chapter 4 How to Download
7. On the Edit menu, click Paste.
8. Disconnect the NEUROS442 from the PC after all the files have been
transferred.
14
Chapter 5 Download DRM protected music to the NEUROS442
DRM (Digital Rights Management) enables users to legally download music from
the internet and to protect the rights of the owner of the content. The DRM license
is automatically transferred with the music file to your PC. Once downloaded, use
Windows Media Player to synchronize DRM protected music with your
NEUROS442.
The NEUROS442 uses Windows Media DRM. See Table 2 on page 35 for
limitations on the Windows Media DRM music the NEUROS442 can play.
Install the Windows Media DRM Driver supplied on the Software CD first. After
installation, Windows Media Player automatically recognizes the NEUROS442 as
a Portable Media Device.
You can now use Windows Media Player to synchronize music to the
NEUROS442.
15
Chapter 6 Operation Instructions
Power On and Off
Power
1. Press Power Button for 2~3 seconds to power on
NEUROS442.
2. After startup animation, you will see the main menu
and can start using NEUROS442.
3. To power off NEUROS442, press Power button
again for 2~3 seconds the player will be shut down.
4. When the Player is freezes, you can press Reset
using a pencil to reboot the Player.
16
Chapter 6 Operation Instructions
Basic Screen Information
1. After switching the NEUROS442 on, there are 7
options available in the main menu.
(Video, Photo, Files, Voice, PVR, Setup, Audio)
(1)
2. While viewing the Video, Photo, Files, Voice, PVR,
Setup or Audio menu, the same type of information
(2)
appears on screen.
(1). Displays the mode you are in- Video, Photo,
(3)
Files, Voice, PVR, Setup or Audio.
(2). Press
or
button to select the item on the
or
button to page up or page
screen.
Press
down on the screen.
(3). The Battery icon displays current power
capacity.
full green bar: 75%-100%
: 50%-75%
: 25%-50%
red bar: below 25%
17
Chapter 6 Operation Instructions
Video Playback
1. On the NEUROS442 main menu, press the Navigation
button until you see the Video Player function.
2. On the Video Player option, Press
button to
enter Video Player mode.
3. Press
or
button to page up or page down on
the screen.
4. You can press
or
button to select the files from list.
5. File details will be shown on the screen:
(1). File size: the size of video file
(2). Video code: support MP4S / M4S2 / WMV9 /
DVX 3.11 4.0 5.0
(3). Video bitrate: Max bitrate up to 4MB
(4). Video size: Up to D1 (720x480) size 30 frames
(5). Play duration: The time of video playback.
6. You can press MENU to delete files or add files to
the play list
7. Press MENU and select REPEAT Folder; files will be
shown by folders.
8. Press MENU and select REPEAT ALL; all files will
be shown without folders.
9. Press MENU and select REPEAT Fav; files in your
favorite play list will be shown.
18
Chapter 6 Operation Instructions
10. Select Update Play list after you edit the files.
11. Press
button to watch the video in full screen.
12. You can press Right Key on the Navigation button
to fast-forward the video playback.
(Press once
to fast-forward by 2x, press twice to fast-forward 4x,
00:01:52
etc up to 16x).
13. Press Left Key on the Navigation button to rewind
the video playback.
(Press once to return-forward by -2x, press twice to
return-forward -4x, etc up to 16x).
14. Press
15. Press
button to make video playback normal.
the
Volume
control
on
top
of
the
NEUROS442 to to increase or decrease the
volume. The volume status bar will appear while
you adjust the volume.
16. When the video is playing, you can press Menu to
select the Equalizer functions.
19
Chapter 6 Operation Instructions
Audio Playback
1. On the NEUROS442 main menu, press the
Navigation button until you see the Audio Player
function
2. On the Audio Player option, Press
button to
enter Audio Player mode.
3. Press
or
button to page up or page down
on the screen.
4. You can press
or
button to select the files
from list.
5. File details will be shown on the screen.
(Title / Artist / Album / Year / Genre)
6. You can press MENU to delete or add files to play
list.
7. Press MENU and select REPEAT Folder, files will
be shown by folders.
8. Press MENU and select REPEAT ALL, all files will
be shown without folders.
9. Press MENU and select REPEAT Fav, files in play
list will be shown.
10. Select Update Play list after you edit your files.
20
Chapter 6 Operation Instructions
11. Press
button to play the song.
12. Press the Right Key on Navigation button to
fast-forward the Audio playback.
(Press once to fast-forward by 2x, press twice to
00:01:52
fast-forward 4x, etc up to 16x).
13. Press the Left Key on Navigation button to rewind
the Audio playback.
(Press once to return-forward by -2x, press twice to
return-forward -4x, etc up to 16x).
14. Press
button to make Audio playback normal.
15. Press Volume control on top of the NEUROS442 to
increase or decrease the volume. The volume
status bar will appear while you adjust the volume.
16. When the song is playing, you can press Menu to
select EQ Preset.
21
Chapter 6 Operation Instructions
Photo Viewer
1. On the NEUROS442 main menu, press the
Navigation button until you see the Photo Player
function
2. On the Photo Player option, Press
button to
enter the Photo Player mode
3. Press
or
button to page up or page down
on the screen.
4. You can press
or
button to select the files
from list.
5. You can press
button to watch the selected
photo in full screen.
6. While viewing photo in full screen, you can press
or
button to view previous or next photo.
7. Press MENU button to delete files, select Slide
Show On/Off, and Play Audio On/Off. You can play
music from your playlist and view photos at same
time.
8. Press
the
Volume
control
on
top
of
the
NEUROS442 to increase or decrease the volume.
Volume status bar will appear while you adjust the
volume.
9. The NEUROS442 can play JPG (6M pixel), BMP (max.
1600x1200 pixels) and GIF (max. 1023x1600 pixels).
22
Chapter 6 Operation Instructions
Personal Video Recording
1. Connect the NEUROS442 AV-in jack to an AV
output device, such as TV or video player. Match
video line-in cable to AV signal connecters on the
same row by color or text.
2. On the NEUROS442 main menu, press the
Navigation
button until you see the Video
Recorder function
3. On Video Recorder option, Press
button to
enter the Video Recorder mode
4. Press
button to start recording.
5. Press Exit button to stop recording.
You can
enter menu to setting the recording time.
6. When finished recording, you can press Menu into
the Quick viewer, or go to the PVR folder in the
Video Player Mode to play the file.
7. Press Menu to choose Resolution mode: VGA
(640x480) / HVGA (640x240) / QVGA (320x240).
8. Press Menu to choose Video Quality mode: High /
Mid / Low.
Quality:
Low (bitrate)
Mid (bitrate)
Hi (bitrate)
HVGA
1320 Kbps
1760 Kbps
2640 Kbps
QVGA
1200 Kbps
1600 Kbps
2400 Kbps
23
Chapter 6 Operation Instructions
9. Press Menu to choose the Audio Quality: Hi
(128
Kbps MP3) / Mid (96 Kbps MP3) / Low (64 Kbps
MP3)
10. Press Menu to choose the Rec Time: 0.5hr / 1hr /
1.5hrs / 2hrs / 2.5hrs / 3hrs / 3.5hrs / 4hr
24
Chapter 6 Operation Instructions
Audio Recording
1. Connect the NEUROS442 AV-in jack to an AV
output device, such as TV or CD player. Match
line-in cable to AV signal connecters on the same
row by color or text.
2. On the NEUROS442 main menu, press the
Navigation button until you see the Voice function.
3. On Voice option, Press
button to enter the
Audio Recorder mode.
4. Press
button to start Audio recording.
5. Press Exit button to stop recording.
6. When you finished recording, you can press Menu
to use the Quick viewer, or go to the VOICE folder
in the Audio Player mode to play the file.
7. Press Menu to choose Quality mode: High/Mid/Low.
8. Press Menu to choose Audio type: Audio type:
High
MP3 / G726 (not all media players on your PC
support G726).
9. Press Menu to choose the maximum Record Time:
0.5hr/1hr/1.5hrs/2hrs/2.5hrs/3hrs/3.5hrs/4hrs
25
Chapter 6 Operation Instructions
SETUP
NEUROS442 Set Up menu includes Display, System, and information Tab.
1. On the NEUROS442 main menu, press the
Navigation button until you see the Setup function
2. On the Setup option, Press
button to enter the
Setup menu.
3. You can press
or
button to select the item.
4. Press Right Key on Navigation button to select one
of the following settings:
(1). Power Auto Off Time: Set the time for the
NEUROS442 to automatically power off when
not in use. There are five modes available: OFF
/ 5 min / 10 min / 15 min / 20 min
(2). LCD Backlight Time: Set the time for the
backlight to switch off when not in use. There
are six modes available: OFF / 1 min / 2 min /
3 min / 4 min / 5 min
(3). LCD Brightness: Set the brightness of the
screen. The options vary from 1 (dark) up to 5
(light).
(4). TV Out: Select your TV system: NTSC or PAL
26
Chapter 6 Operation Instructions
(5). Date and Time: You can set the date and time
by pressing the
or
button for each item.
(6). Reset to Default: This option restores all the
parameters to a factory default.
(7). Update Firmware: Select to start the firmware
update procedure.
(8). DivX VOD: DivX Video On Demand. Surf to
www.divx.com/vod for instructions how to
download content.
(9). Language: Enables you to select different
languages: English (default), Dutch, German,
Italian, Spanish, French, Portuguese,
27
Chapter 6 Operation Instructions
Files Editor
1. On the NEUROS442 main menu, press the
Navigation button until you see the Files function
2. To choose the Files icon and press it.
3. There are two disks (a: HD ; b: SD / MMC)
b: /
available on the screen.
4. You can press
or
button to select the file.
5. You may choose the file of “a” disk on the left side
and press Enter to mark it.
6. Refer to the folder of “b” disk on the right side and
press MENU button to select the function to edit
your files, such as:
(1). Exit: exit the menu
(2). Copy: copy the selected file from the left
working window to the selected folder on the
right working window.
(3). Delete Files: delete the files selected.
(5). Add to Favorite: add your favorite files to your play list
(6). Make Directory: create a folder
(7). Format disk: delete all the files and folders.
Caution: this will erase all the data on the hard disk!!!
28
Chapter 6 Operation Instructions
7. How to copy the file:
(1). Press Back button to choose a or b disk on the
left working window.
(2). Press
or
button to select the file.
(3). Press
to highlight the file that you want to
copy.
(4). Press
button to right working window.
(5). Press
or
and then the
button to
select the folder you want the file to be copied
to.
(6). Press Menu button and select Copy, the file
will be copied from the right working window to
the left working window.
29
Chapter 6 Operation Instructions
Note
1. The NEUROS442 internal battery should be charged ONLY with the provided
power adapter.
2. Please plug the AC adapter when you use the recording function to prevent
the battery running empty.
3. We recommend setting resolution and AV quality in the setting menu to “Best”
before recording from TV.
4. If a file selected to play or to view is not supported by the NEUROS442, you
will see Unsupported.
5. Although the XviD video codec is not supported, it is possible that some files
can be played by the NEUROS442.
6. When selecting a Video or Audio file, press MENU to select REPEAT
FOLDER. The display will now show all of the folders.
When playing a Video or Audio file, press MENU to select REPEAT ALL. The
display will show all of files.
30
Chapter 7 Trouble Shooting
Warning!
Do not open or repair the NEUROS442. This will void your warranty. When there is
a problem or failure, please check the checklist below for solutions.
Table 1
Symptom
Recommended Solution
NEUROS442 does not power
1. Check if the NEUROS442 battery is
on
charged.
2. Check if the AC / DC adapter is
connected properly.
The NEUROS442 hangs and
doesn’t response to any key
pressed
1. Check if the AC / DC adapter is
connected properly
2. Check if the battery needs to be
recharged.
3. Press Reset key for over 3 seconds to
force the NEUROS442 to shut down.
Then press Power to turn on the
NEUROS442 again.
NEUROS442 cannot be
recognized by the computer’s
operating system
1. Check if the NEUROS442 is connected
correctly to the computer using the USB.
2. Check if your USB ports are functioning
correctly under your operating system.
3. Check if the battery needs to be
recharged or use the AC/DC adapter.
31
Chapter 7 Trouble Shooting
Table 1 (Continued)
Symptom
Recommended Solution
“Hard Disk Read Error” or “No
1. Check if the battery needs to be
Hard Disk Found” shown on the
display of the NEUROS442
recharged.
2. Use the AC/DC adapter.
3. Restart the NEUROS442 by pressing
the Power key for over 3 seconds to
force the NEUROS442 to shut down,
the turn on the NEUROS442 again to
see if the problem still exist.
No sound or the sound quality is
poor
1. Check if the earphones are connected
properly.
2. Check if the earphone plug is clean.
3. Check the volume level, adjust it to a
higher
level.
4. Check if the player is located close to
strong magnetic fields.
Sound skips during play mode
1. Check if the battery needs to be
recharged.
2. Check if the music file is not badly
encoded.
3. Connect the NEUROS442 to your PC
and run a hard disk scan to check if
there are any bad sections on the disk.
32
Chapter 7 Trouble Shooting
Table 1 (Continued)
Symptom
Recommended Solution
No display on the LCD / Bad
1. Press the TV / Lock button once.
Contrast on LCD
2. Check if the battery needs to be
recharged.
3. Use the AC/DC adapter.
4. Change the Contrast in Setup Menu.
5. Check if the hard disk is running. If
without display, please contact your
sales point.
Noise within recorded voice
Turn off the backlight and try again; This
can interfere with microphone recording.
Recorded music / voice files
1. The file names of recorded music / voice
could not be seen from display
files are automatically generated by the
(after renaming them)
NEUROS442 and are managed
separately from downloaded music.
When renaming them you have to
move them to the Music Files folder.
2. You are recommended to create a new
folder (album); move the recorded files
into the new folder.
33
Chapter 8 Limitation
The limitation for WMA/WMV format supported
It just supports:
WMV: SP@ML with CIF at 30fps. Use the Video Toolbox supplied on the Software
CD to convert video files into these specifications.
WMA: 2-channels WMA9 L2 up to 48KHz sampling from 16 up to 320Kbps in
playback.
The limitation of PDDRM
The NEUROS442 can only play WMA with DRM encoded with a constant bitrate
(CBR). Variable bitrate (VBR) is not supported. The relevant formats, which are
supported by the NEUROS442 are listed on the next page in Table 2.
34
Chapter 8 Limitation
Support Bitrates / Sample Rates and Channels for WMA with PD-DRM support.
Table 2
Bit Rate (bps) Sample
Rate (Hz)
192000
48000
160000
48000
128000
48000
192000
44100
160000
44100
128000
44100
96000
44100
80000
44100
80000
44100
64000
44100
64000
44100
64000
44100
48000
44100
48000
44100
128000
44100
64000
44100
48000
44100
32000
44100
64000
32000
64000
32000
48000
32000
48000
32000
48000
32000
44000
32000
40000
32000
40000
32000
36000
32000
32000
32000
32000
32000
32000
32000
32000
32000
32000
32000
32000
22050
32000
22050
22000
22050
20000
22050
20000
22050
16000
22050
35
Channels
2
2
2
2
2
2
2
2
2
2
2
2
2
2
1
1
1
1
2
2
2
2
2
2
2
2
2
2
2
1
1
1
2
2
2
2
1
1
Chapter 9 Maintenance
How to keep your NEUROS442 working properly.
1. This product has a hard disk inside, do not drop the device.
2. If there is any spot on the outer case, please use soft cloth and neutral cleaner
to wipe the NEUROS442 clean.
3. The unit may not function properly if used at extremely high or freezing
temperatures.
4. Do not stick or write anything on either side of NEUROS442.
5. Always avoid leaving the NEUROS442 at the places exposed to direct
sunlight.
6. Always avoid leaving the NEUROS442 at the places exposed to water or
extremely humidity.
7. Always avoid leaving the NEUROS442 at the places with strong magnetic
fields such as TV’s or loud speakers.
8. Always avoid leaving the NEUROS442 at the places exposed to heavy dust.
36
Chapter 10 Glossary
Hardware
CPU
TI DM270
SDRAM
64M
FLASH
8M (Program code: 1.5 / Bmp: 2.5, other for Font BMP)
Audio Code
AIC23
TV Decode
TVP5150
USB 2.0
Slave interface (GL811E)
Panel
3.6” LCD (TFT)
Battery
3.6V 2200mAh
Decode
Resolution
VGA640x480 / HVGA 640x240 / QVGA 320x240
Quality
Bit Rate
Type
Low
Mid
Hi
HVGA
1320
1760
2640
QVGA
1200
1600
2400
Audio Type
None / G726 / MP3
Record Time
0,5 Hrs ~ 4 Hrs, Step 0,5 Hrs
Photo Viewer
JPEG: File size 6MB, Max pixel- 6M pixel
Supports
GIF: File size 6MB, Max pixel: 1023*1600 pixels
BMP: File size 6MB, Max pixel: 1600*1200 pixels
Quick View
Auto Play back last recode file directly.
37