1
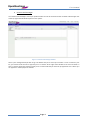
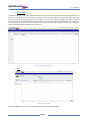
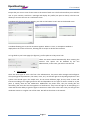
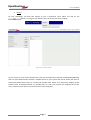
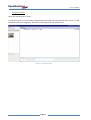
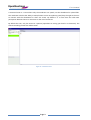
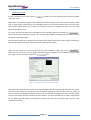
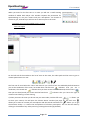
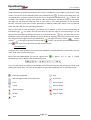
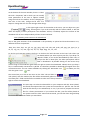
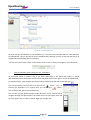
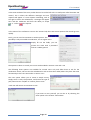
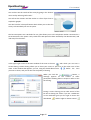
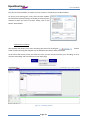
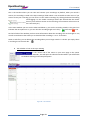
User's manual
OpenMeetings2.0
User's manual
June 2012
User's manual
Table of contents
1. Logging in – Creating a new account ....................................................................................................... 1
2. Editing your profile .................................................................................................................................. 2
3. Contacts and messages ............................................................................................................................ 4
4. Search for users........................................................................................................................................ 5
5. Chat .......................................................................................................................................................... 5
6. Types of users .......................................................................................................................................... 6
7. Rooms....................................................................................................................................................... 7
7.1 Types of rooms ................................................................................................................................... 8
7.2 Entering a room ................................................................................................................................ 11
7.3 Possible actions and available tools in a room ................................................................................ 12
7.3.1 Users rights ................................................................................................................................ 12
7.3.2 Whiteboard ............................................................................................................................... 13
7.3.3 Uploading a document to the whiteboard ................................................................................ 14
7.3.4 Downloading a document from the whiteboard...................................................................... 15
7.3.5 Screen sharing ........................................................................................................................... 17
7.3.6 Session recording ...................................................................................................................... 18
8. The calendar or how to set up a meeting ............................................................................................. 19
User's manual
1. Logging in – Creating a new account
Figure 1 – Login window
When you connect to the server, this is the first window that appears. This is where you enter your username and
password if you already have an account in the system. Otherwise, provided that the administrator has enabled
this button, you can register (see Figure 2) and create a new account. You can also log into the system using your
Facebook ID, this also provided that the system administrator has enabled this feature.
Figure 2 - Registration window
After entering your details, click the
button to create your account. Depending on the
parameters set by the administrator, you will receive an email containing a link you that you must click to confirm
your registration.
Openmeetings allows the creation of user groups; it is possible for a user to be part of more than one group. In
that case, when logging in, the user will see this window, asking him to choose the group in which he wants to log
into for this session.
Figure 3 – Choice of usergroup
Page 1
User's manual
Figure 4 – Welcome window
This is the home window of OpenMeetings; it consists of several elements that we are going to review…
2. Editing your profile
The first thing to do after connecting for the first time to the system is to edit your profile to complete it. You can
do this by clicking on the 'Edit your profile' link top left of the screen.
Figure 5 – My profile window
The profile window shows your profile as it is for the moment. It also has three other tabs 'Contacts and messages',
'Edit settings' and 'Search Users'. This page can also be accessed via the link 'Profile' at the top right of the window
anywhere in the system.
Page 2
User's manual
Let's first see the 'Edit settings' tab.
Figure 6 – Edit profile settings window
This is where you can complete your details and indicate whether you wish this information to be visible or
invisible to other users of the system. You can also change your password in this screen.
By clicking on 'Upload New Image', a new window allows you to import an image from your computer. (Click on
'Select File', select the desired file on your computer and click 'Start upload')
That image will be displayed in your profile, in the chat room and in the conference room if you do
not use a camera.
As its name says, the button 'more display options' opens a window that allows you to
enable or disable certain options that do not require further explanation here.
When you enter a conference room, a self-test window is displayed. Here you can disable this window so it does
not appear in the future anymore.
When you're finished completing your information, click the disk icon
your changes.
Page 3
in the top left of the window to save
User's manual
3. Contacts and messages
The 'Contacts and messages' tab of your profile window can also be accessed via the 'Contacts and messages' link
at the top right of the window anywhere in the system.
Figure 7 - Contacts and messages window
Here is your message board (we will not go into details here) and a list of your contacts. To see a contact in your
list, you must first ask the user to approve you as a contact. At the right of this window is the list of contacts on
hold, i.e. the list of persons wishing to have you as a contact and that you have not yet approved. This is where you
can approve or refuse people as contacts.
Page 4
User's manual
4. Search users
The third tab of your profile page is the 'Search users' tab. This is where you can search for registered users in the
system by entering free text or on the basis of interests that users have indicated in their profile page. When you
find a user, you can, by clicking on the icons in the 'Actions' column, see his profile, send him a message or add him
to your contact list. As explained above, adding a user to your contact list does not actually add him, a message is
sent telling him you want to add him to your contact list, and he is then free to accept or refuse. Only if he agrees
will his name effectively be added to your contact list.
Figure 8 – Search users window
5. Chat
Figure 9 – Chat window
Your homepage also has a 'Chat' tab which requires no further explanation.
Page 5
User's manual
Except that you can see a set of icons next to the name of each user. The first three allow you to add the
user to your contacts, send him a message and display his profile (see point 4 above). The last icon
allows you to invite the user in a conference room.
A window with the list of rooms appears, just click on the button 'Invite' next to the desired room.
A window allowing you to send an invitation appears. When it is sent, an acceptance window is
displayed on the screen of the user, allowing him to accept or decline the invitation.
Let's go back to your home page (see figure 4), you'll maybe see a 'My rooms' tab.
These are rooms created automatically when creating the
account. This option can be disabled by the site
administrator; in that case, you will not see this tab.
6. Types of users
There are three types of users. The first is the administrator, the person who manages and configures
the system (general parameters, the rooms, users, etc.). He has the right to do anything anywhere in the
system. The second type is the simple user, he can access different page, he may enter a room and
interact according to the rights granted to him and dependent on the type of room in which he is (see
point 7). Finally, there are the moderators. Moderators are power users, they are usually (but not
necessarily) the ones who are the organizers of conferences. They have the right to do everything in a
room and have the ability to give the rights to interact to other users in the room. They can also give the
moderator status to a regular user of the room. We will see that later in the manual.
Page 6
User's manual
7. Rooms
On your homepage, you have two options to join a conference room. Either you click on the
button, or you go to the 'Rooms' menu at the top left of the window.
Figure 10 – Rooms window
As you can see, a list of rooms already exists, they are automatically created by installing OpenMeetings
and only if the administrator decides it. Maybe the list on your system will not be exactly the same as
the picture shown above. There is a second tab 'Private room' which, as its name says, displays all the
private rooms. As explained above, it is possible that, as a user, you are part of a usergroup and in this
case, you will only see the list of private rooms of your usergroup.
Page 7
User's manual
7.1 Types of rooms
There are several types of rooms:
A conference room is a room where everyone shares his camera and microphone and has access to the
whiteboard and can manage files. The session recording records the whole screen.
Figure 11 – Conference room
Page 8
User's manual
A restricted room is a room where only the moderator can speak, use the whiteboard or upload files.
The moderator also has the ability to mute/unmute a user microphone, grant/deny the right to the user
to interact with the whiteboard or share his screen. By default it is a room that can hold more
participants because there is a restriction on the use of resources.
By default the user, only has access to a pointer (equivalent to raising your hand in a classroom). The
session recording records the whole screen.
Figure 12 – Restricted room
Page 9
User's manual
An interview room is a room where only two users can share video and audio (there may be more than
two users in the room and the moderator will then enable or disable the cameras and microphones as
he wants) and in which there is no whiteboard, 'Actions' menu or screen sharing possibility. The session
recording only records video and audio.
Figure 13 – Interview room
The video and whiteboard room and video only room are rooms in which the video is enabled by default
when you enter.
Page 10
User's manual
7.2 Entering a room
To join a conference in a room, click the
or private rooms.
button next to the desired room in the list of public
When done, a window will appear. This is where you decide whether you will use audio and video, audio
only or video only by choosing the corresponding option in the first drop down menu. The two dropdown menus below allow you to choose your camera and your microphone and you can test them
before entering the room.
To do this, choose your camera and microphone in the two drop down lists and click the
button which will record a few seconds. You can then check whether recording went well and so if your
hardware is working properly.
The last menu allows you to choose the resolution of the camera. The choice of the camera resolution is
particularly important because it will influence the transmission quality
When you are ready or if you do not want to test your hardware, simply click on the
button to enter the room. If you no longer want this window to appear, you can disable it in your profile
(see page 3 of this manual) or check the
box.
Figure 14 – Choose and test your hardware window
The higher the resolution you choose, the more bandwidth will be required and therefore the session
will be resource-intensive. The choice of the resolution depends on several factors like the quality of
your connection, the quality and power of the server, the number of people in the room and the quality
of their connections and the resolution of their cameras. You must therefore try to find a compromise
on the video size and quality of transmission. Some tests will help you quickly get a sense of the
resolution to choose.
Page 11
User's manual
When you enter for the first time in a room you will see a small warning
window of Adobe Flash Player. This window requests the permission for
Openmeetings to use your camera and your microphone. You should of
course say yes, otherwise you will not see or hear anyone in the room.
7.3 Possible actions and available tools in a room
7.3.1 User rights
Figure 15 – Tools for the moderator
On the left side of the window is the list of users in the room, the video pods and the icons to give or
remove permissions to a user.
The first row of icons below the 'Users' tab concerns you. The first four are enabled by default because
you are the moderator of the room, let review them. The first icon
indicates that you are a
moderator, the second one
indicates that you have access to the whiteboard, the third one
that you can share/record your screen and the fourth one
indicates that you have the right to
remote control during a screen sharing.
If, when you enter the room you do not see your own video, click the fifth icon,
it allows you
to share your camera, this will open the 'Choose device' window (see page 11). The sixth icon
allows you to mute or unmute your microphone and the seventh and final icon
allows you to get
the exclusive audio, i.e. it mutes the microphones of all other participants. This can also be done by
clicking in the middle of any video pod or by pressing the F12 key (by default).
Page 12
User's manual
Under these icons is the list of participants in the room, including you. To the right of your name, in each
column, you can see an icon indicating what you are allowed to do,
(in theory everything since you
are a moderator). In the last column you can see an icon shaped like a double arrow,
it allows you
to restart your camera or change your audio or video by opening the window of choice for the device
(see page 11). You find the same icon next to your name in your video pod where it has the same
function, and next to the name of each participant in different video pods, where it will synchronize
audio and video with the corresponding participant.
Next to the name of each participant, you should see, by default, a series of icons representing an
interdiction sign,
this means that the user does not have the right to do certain things. It is you
who give him such rights by clicking on its icon. So if you click the first
icon, you'll give the user the
moderator status (use with care because it means he can do anything, even kick you out of the room).
You can give him the right to access the whiteboard,
the right to share his screen,
remote
control
or the right to give the exclusive audio.
Finally, you can also see an icon shaped like a
cross,
with wich you can eject the user and close his session.
7.3.2 Whiteboard
A big part of the room window is occupied by the whiteboard. The whiteboard is a space where you can
write, draw, point or place documents.
Next to the word 'Whiteboard' you can see a green cross,
whiteboard (or more). Below is the whiteboard tool bar.
It allows you to add a second
You can move this bar by clicking in the shaded area to the left of the bar and moving the mouse while
holding the button down. The icons in the toolbar are quite self-explaining, here is a brief description.
Erase the whiteboard
Draw
Remove objects from current document
Draw a line
Save
Draw a square
Cancel
Draw an ellipse
Select an object
Draw an arrow
Pointer
Insert a clipart
Text
Page 13
User's manual
At the bottom of the main window, there is a 'Chat'
tab and a 'Properties' tab in which you can modify
some parameters of the text or objects created
using the tools on the toolbar, such as changing the
text color or line color, change the fill color of a
shape or change the size of a text amongst other things.
In the upper right corner of the window is the zoom, you can adjust it to your
liking, knowing that if you scroll vertically with the mouse wheel, it will also
affect the display of other participants. The checkbox 'Full-Fit', if enabled, adjusts the content of the
whiteboard for all users independently of their screen resolution.
7.3.3 Uploading a document on the whiteboard
One of the great interests of the whiteboard is the possibility to upload and show documents on it,
different formats accepted are:
.bmp, .doc, .docx, .dpx, .exr, .gif, .ico, .jpg, .jpeg, .odp, .ods, .odt, .pcd, .pcds, .pdf, .png, .ppt, .pptx, .ps, .p
sd, .rtf, .svg, .sxc, .sxi, .sxw, .tga, .tiff, .ttf, .txt, .wpd, .wpg, .xcf, .xls, .xlsx
To do this you have two options, the first is to click on the 'Files' tab next to the 'Users' tab. There you
can decide where you want to place your file, if you drop it in
'My Files' folder, it can not be downloaded by other users. If
you put the file in 'Room files', the other participants will be
able to download it by double clicking on the version they
want as long as the moderator gave them the right to access the whiteboard. Indeed, when you drop a
file, it is automatically converted to a .pdf file. It is therefore possible to download the original file or the
converted version. You can create subfolders by clicking the 'Add Folder' icon
to submit your file,
click the green cross
icon.
The second way is to click in the menu on the 'Files' tab and then on
'File upload', with this method, the file will be automatically placed in
the 'Room files' folder and therefore accessible to other users if they have the
right to access the whiteboard.
The next step is to select the desired file on your computer and click 'Start upload',
the file will be imported into the system and converted to a .pdf file. You can also
load the file directly to the whiteboard, or not, if you wish to prepare the various
files for a future presentation. If you uncheck this box, your file will be placed on
the system under the 'Files' menu and converted, you can then later drag and drop
the files to the whiteboard when you need them.
Page 14
User's manual
Figure 16 – Uploaded document
Here you see the uploaded file on the whiteboard, in case you have unchecked the box 'Load directly to
the whiteboard', you can put the file on the whiteboard by selecting your file on the left and drag it on
the whiteboard by holding the mouse button.
You can see at the bottom center of the window a set of icons to help you navigate in your document.
7.3.4 Downloading a document from the whiteboard
As mentioned earlier in section 7.3.3, if you load a document in the 'Room files' folder, it can be
downloaded by other participants of the room if they have received the right to access the whiteboard.
To download a file, either double click the desired file name on the left side or click the icon
In the new window, you have two icons, the first one
allows
retrieve the document in its original form, the second one
you to retrieve the .pdf converted document.
you to
allows
You can also view the different pages of the document, this is another way to
navigate through your presentation, but unlike the set of icons above, here you
have the opportunity to select a specific page with a single click.
Page 15
User's manual
In the main window of the room, under the user list on the left side is a small space called 'Activities and
actions'; this is where the different messages and user
requests will appear. If a user requests something, such as
the right to access the whiteboard, a message will appear
here and the moderator will have the ability to accept
or refuse
the request.
In the menu of the conference room is the 'Actions' tab; there are several options that we will go over
rapidly.
Firstly, you can send an invitation to another person. This
possibility is only accessible to moderators, not to regular users.
Simply fill out the fields, you can
protect the room with a password
and set a validity period.
The options to share or record your screen are described in sections 7.3.5 and 7.3.6
The following three options are available for normal users only and allow them to ask for the
moderation status, ask to access the whiteboard or ask to share their audio/video. They have the same
functionality as the icons seen earlier in section 7.3.1.
The next option allows you to create a simple survey.
Simply enter a name, the question, and choose the type of
poll, limited to two 'Yes/No' or 'numeric from 1 to 10'.
Each user will receive an invitation to vote.
If you want to vote yourself, you can do so by choosing the
'Vote' option in the 'Actions' menu above.
Page 16
User's manual
You can then see the results of the survey by going in the 'Actions'
menu and by selecting 'Poll results'.
You will see the answers and the results in a form of pie chart or
simple bar graphic.
You also have the 'Close poll' button which allows you to close the
survey so that nobody can vote anymore.
The last two options are a SIP dialer for one, (this allows you to call a telephone number connected in a
SIP environment. This option is only visible if the SIP option has been enabled by the administrator) and
'Edit setup' for the other.
7.3.5 Screen sharing
In the upper right corner of the main window of the room is the icon
with which you can start a
screen sharing. Screen sharing allows you to show your screen or part of it to the other users of the
room. In the window that appears, you can, using the double blue arrows
define the area
you want to share, and you can also set the quality of sharing.
When you click the
button, a
message appears on the screens of other
participants allowing them to accept or refuse to see
the sharing.
During a screen sharing you can take control of the
PC that is sharing the screen if you are a moderator
or the moderator gave you the right to access the
whiteboard
and the right to remote control.
Page 17
User's manual
You also have the possibility to stream your live screen to a third party live video website.
To do this, start sharing your screen, then click the 'Publish'
tab and fill the required settings according to the third party
website to which you want to stream. Finally, click on the
button 'Start Publish'.
7.3.6 Session recording
This window also allows you to start recording the session by clicking the
It will record everything that happens on the whiteboard as well as video and audio.
button.
At the end of the session, when you leave the room, you can view and retrieve your recording, to do so
click the 'Recordings' tab in the menu on your main page.
Figure 17 – Recordings window
Page 18
User's manual
This is the window where you can view and retrieve your recordings. By default, when you record a
session, the recording is saved in the 'My recordings' folder which is not accessible to other users. If you
want to share your recording you can move it in the 'Public recordings' by clicking the desired recording
and dragging it in the 'Public recordings' folder. (Be warned that this means
that any user will have access to the recording, even someone who was not in
the room with you.)
In the main window you can see the video and below it, you see the recording timeline. The green line
indicates the microphone is on, you see also the recording length and a 'Play '
and' Stop'
icon.
On the left side of the window you have some information about the recording such as the length or size,
as well as two buttons that allow you to download the recording in .avi or. flv formats.
Same as with files, you can delete the recording when you no longer need it. To do this you simply select
it and drag it into the trash bin.
8. The calendar or how to set up a meeting
In the 'Home' tab of the menu on your main page is the option
'Calendar', this will open the calendar window where you will be able
to schedule meetings and invite participants.
Figure 18 - The calendar
Page 19
User's manual
Like any calendar, you can change the view by clicking the 'Day', 'Week' or 'Month' buttons. Top right,
two arrows
let you navigate between dates.
To schedule a new meeting, you simply click on the desired date in
the center of the window or select the date in the calendar at the
top left and click on the 'New Event' button. Enter a name for the
event, set the start time and end time, select the reminder mode
(none, iCal or simple email), choose the type of room desired and a
password if it should be password protected. Then you can add
attendees: you can either choose them from the list of known
users (registered in the system)
or add external participants
(you must then provide their names and emails).
Do not forget to add a little comment that will accompany the invitation and explain the purpose of the
meeting. By clicking on the 'Save' button, an e-mail is sent to each participant with a direct link to the
room. That link will be valid only during the defined time. Participants will not be able to enter the room
before the time.
Page 20