1
Allen-Bradley
Application
Generator
Software
(Cat. No. 2708-NAG)
User
Manual
Important User Information
Solid state equipment has operational characteristics differing from those of
electromechanical equipment. “Safety Guidelines for the Application,
Installation and Maintenance of Solid State Controls” (Publication SGI-1.1)
describes some important differences between solid state equipment and
hard–wired electromechanical devices. Because of this difference, and also
because of the wide variety of uses for solid state equipment, all persons
responsible for applying this equipment must satisfy themselves that each
intended application of this equipment is acceptable.
In no event will the Allen-Bradley Company be responsible or liable for
indirect or consequential damages resulting from the use or application of
this equipment or software.
The examples and diagrams in this manual are included solely for illustrative
purposes. Because of the many variables and requirements associated with
any particular installation, the Allen-Bradley Company cannot assume
responsibility or liability for actual use based on the examples and diagrams.
No patent liability is assumed by Allen-Bradley Company with respect to use
of information, circuits, equipment, or software described in this manual.
Reproduction of the contents of this manual, in whole or in part, without
written permission of the Allen-Bradley Company is prohibited.
Throughout this manual we use notes to make you aware of safety
considerations.
!
ATTENTION: Identifies information about practices or
circumstances that can lead to personal injury or death, property
damage, or economic loss.
Attentions help you:
• identify a hazard
• avoid the hazard
• recognize the consequences
Important: Identifies information that is especially important for successful
application and understanding of the product.
Microsoft is a registered trademark of Microsoft
Toshiba is a trademark of Toshiba America, Inc.
PLC is a registered trademark of Allen-Bradley Company, Inc.
PLC-5 is a trademark of Allen-Bradley Company, Inc.
Table of Contents
Application Generator
User Manual
Overview
Chapter 1
What Is It? . . . . . . . . . . . . . . . . . . . . . . . . . . . . . . . . . . . . . . . . . . . . . . . .
What Does It Do? . . . . . . . . . . . . . . . . . . . . . . . . . . . . . . . . . . . . . . . . . . .
Who Can Use It? . . . . . . . . . . . . . . . . . . . . . . . . . . . . . . . . . . . . . . . . . . . .
How Does It Work? . . . . . . . . . . . . . . . . . . . . . . . . . . . . . . . . . . . . . . . . . .
Contents of This Manual . . . . . . . . . . . . . . . . . . . . . . . . . . . . . . . . . . . . . . .
Conventions Used . . . . . . . . . . . . . . . . . . . . . . . . . . . . . . . . . . . . . . . . . . .
Related Publications . . . . . . . . . . . . . . . . . . . . . . . . . . . . . . . . . . . . . . . . .
Installing & Starting
Application Generator
Chapter 2
Using Application
Generator
Chapter 3
Running & Compiling
Applications
Chapter 4
Sample Program Listing
Appendix A
System Requirements . . . . . . . . . . . . . . . . . . . . . . . . . . . . . . . . . . . . . . . .
Installation . . . . . . . . . . . . . . . . . . . . . . . . . . . . . . . . . . . . . . . . . . . . . . . .
Starting Application Generator . . . . . . . . . . . . . . . . . . . . . . . . . . . . . . . . . .
The Default Personality . . . . . . . . . . . . . . . . . . . . . . . . . . . . . . . . . . . . . . .
Keystroke Summary . . . . . . . . . . . . . . . . . . . . . . . . . . . . . . . . . . . . . . . . .
Basic Control Key Functions . . . . . . . . . . . . . . . . . . . . . . . . . . . . . . . . . .
Simulated Device Input Keys . . . . . . . . . . . . . . . . . . . . . . . . . . . . . . . . .
Special Purpose Keys . . . . . . . . . . . . . . . . . . . . . . . . . . . . . . . . . . . . . .
Variables . . . . . . . . . . . . . . . . . . . . . . . . . . . . . . . . . . . . . . . . . . . . . . . . . .
Main Operations Menu . . . . . . . . . . . . . . . . . . . . . . . . . . . . . . . . . . . . . . . .
F1 – General Help . . . . . . . . . . . . . . . . . . . . . . . . . . . . . . . . . . . . . . . . .
F2 – Display To Screen . . . . . . . . . . . . . . . . . . . . . . . . . . . . . . . . . . . . .
F3 – Keyboard Read/Laser . . . . . . . . . . . . . . . . . . . . . . . . . . . . . . . . . . .
F4 – Read From Laser Or Device . . . . . . . . . . . . . . . . . . . . . . . . . . . . . .
F5 – Send To Host Or Device . . . . . . . . . . . . . . . . . . . . . . . . . . . . . . . . .
F6 – Move, Transfer, Add, Etc. . . . . . . . . . . . . . . . . . . . . . . . . . . . . . . . .
F7 – Other Operations . . . . . . . . . . . . . . . . . . . . . . . . . . . . . . . . . . . . . .
Adding A-B VBASIC Functions . . . . . . . . . . . . . . . . . . . . . . . . . . . . . .
F8 – IF (Conditional) . . . . . . . . . . . . . . . . . . . . . . . . . . . . . . . . . . . . . . .
F9 – GoTo Or Loop To Position . . . . . . . . . . . . . . . . . . . . . . . . . . . . . . . .
Fl0 – File (New, Load, Save, Generate) . . . . . . . . . . . . . . . . . . . . . . . . . .
Editing a Program . . . . . . . . . . . . . . . . . . . . . . . . . . . . . . . . . . . . . . . . . . .
1–1
1–1
1–2
1–2
1–2
1–3
1–3
2–1
2–1
2–1
2–2
3–1
3–1
3–1
3–2
3–2
3–3
3–3
3–3
3–5
3–9
3 – 10
3 – 11
3 – 14
3 – 18
3 – 19
3 – 20
3 – 20
3 – 21
Introduction . . . . . . . . . . . . . . . . . . . . . . . . . . . . . . . . . . . . . . . . . . . . . . . . 4 – 1
Running a Program . . . . . . . . . . . . . . . . . . . . . . . . . . . . . . . . . . . . . . . . . . 4 – 1
Compiling and Downloading a Program . . . . . . . . . . . . . . . . . . . . . . . . . . . . 4 – 1
Default Personality . . . . . . . . . . . . . . . . . . . . . . . . . . . . . . . . . . . . . . . . . . . A – 1
i
Table of Contents
Application Generator
User Manual
Tables & Figures
Table 1.A
Summary of Contents . . . . . . . . . . . . . . . . . . . . . . . . . . . . . . . . . . . . . . 1 – 2
Figure 2.1
Application Generator Main Screen at Startup . . . . . . . . . . . . . . . . . . . . . 2 – 2
Figure 3.1
The Application Generator Main Screen and Main Operations Menu. . . . . 3 – 3
Figure 3.2
AG Display to Screen Menu . . . . . . . . . . . . . . . . . . . . . . . . . . . . . . . . . 3 – 4
Figure 3.3
AG More Display to Screen Menu . . . . . . . . . . . . . . . . . . . . . . . . . . . . . 3 – 4
Figure 3.4
AG Read From Keyboard/Laser Menu . . . . . . . . . . . . . . . . . . . . . . . . . . 3 – 5
Figure 3.5
AG Field Attributes Menu . . . . . . . . . . . . . . . . . . . . . . . . . . . . . . . . . . . 3 – 6
Figure 3.6
AG Range Selection Menu . . . . . . . . . . . . . . . . . . . . . . . . . . . . . . . . . . 3 – 7
Figure 3.7
AG Lookup Options Menu . . . . . . . . . . . . . . . . . . . . . . . . . . . . . . . . . . . 3 – 8
Figure 3.8
AG Timeout Selection Menu . . . . . . . . . . . . . . . . . . . . . . . . . . . . . . . . . 3 – 9
Figure 3.9
AG Read Laser/Device Menu . . . . . . . . . . . . . . . . . . . . . . . . . . . . . . . . 3 – 10
Figure 3.10
AG Send to Host/Devices Menu . . . . . . . . . . . . . . . . . . . . . . . . . . . . . . . 3 – 10
Figure 3.11
AG Communications Line/LED Menu . . . . . . . . . . . . . . . . . . . . . . . . . . . 3 – 11
Figure 3.12
AG Move/Transfer/Add Menu . . . . . . . . . . . . . . . . . . . . . . . . . . . . . . . . 3 – 12
Figure 3.13
AG Transfer to Variable Menu . . . . . . . . . . . . . . . . . . . . . . . . . . . . . . . . 3 – 12
Figure 3.14
AG Other Math Operations Menu . . . . . . . . . . . . . . . . . . . . . . . . . . . . . . 3 – 13
Figure 3.15
AG More Complete Operations Menu . . . . . . . . . . . . . . . . . . . . . . . . . . . 3 – 14
Figure 3.16
ii
Table of Contents
Application Generator
User Manual
AG Other Operations Menu . . . . . . . . . . . . . . . . . . . . . . . . . . . . . . . . . . 3 – 15
Figure 3.17
AG Sound Menu . . . . . . . . . . . . . . . . . . . . . . . . . . . . . . . . . . . . . . . . . . 3 – 15
Figure 3.18
AG On Condition Menu . . . . . . . . . . . . . . . . . . . . . . . . . . . . . . . . . . . . . 3 – 17
Figure 3.19
AG On Other Inputs Menu . . . . . . . . . . . . . . . . . . . . . . . . . . . . . . . . . . . 3 – 18
Figure 3.20
AG Conditionals (IF) Menu . . . . . . . . . . . . . . . . . . . . . . . . . . . . . . . . . . 3 – 19
Figure 3.21
AG File Operations Menu . . . . . . . . . . . . . . . . . . . . . . . . . . . . . . . . . . . 3 – 20
iii
Chapter 1
Overview
Chapter
1
Overview
This brief chapter provides an overview of the A-B VBASIC Applications
Generator Software (Cat. No. 2708-NAG). The topics it covers include
descriptions of:
•
•
•
•
•
What Is It?
What it is
What it does
Who can use it
How it works
Contents of this manual
The Application Generator (AG) is an interactive program development tool
for Catalog No. 2708–DH5B2L and -DH5B4L products from Allen-Bradley
Company. It simulates a workstation on a standard personal computer (PC).
An AG developer trains a DH5 workstation by interactively modifying its
current behavior until the desired functions are achieved.
Because the developer is working with the actual operation of the program,
instead of trying to relate the program’s behavior to a listing of program
source code, development with AG is both faster and more intuitive than
using traditional programming techniques. AG allows a wider range of
programmers to develop software. It no longer requires a “software
engineer” to write an application program within a reasonable amount of
time.
What Does It Do?
The simulation is controlled by the AG master program. The AG developer
first loads an initial personality file (with the extension .AIP) into the
simulator program.
The personality file contains a set of operations which are eventually
compiled into an A-B VBASIC program. The operation of the program is
controlled by menu selections within AG.
Unlike an actual program, the personality can be executed stepwise, both
forward and backward. Any operation the simulator program performs can
thus be “undone”. The developer can easily insert missing operations, and
delete extraneous operations.
When the program successfully simulates a desired application, it generates
an A-B VBASIC program. On the workstation, that program will perform
identically to the A-B VBASIC computer simulator.
1–1
Chapter 1
Overview
Who Can Use It?
An AG developer should have a good grasp of the problem to be solved, and
be familiar with use of PC- based products. General programming skills may
be beneficial, although they are not required.
While AG substantially decreases development time, and improves overall
program quality, it cannot duplicate the in-depth problem analysis, and
insight available only from a human developer.
How Does It Work?
The simulation is controlled by the AG master program. The AG developer
loads an initial personality (.AIP) file into the simulator program.
The personality will contain a set of operations that are eventually compiled
into an A-B VBASIC program. The operations are selectable from menus
within AG.
Unlike a program, a personality can be executed stepwise, both forwards and
in reverse. This means that any operation the simulator program performs
can be undone. This provides true ‘hands on’ access to programming instead
of the more common indirect approach.
The AG developer steps forwards and backwards through the operation of
the current personality. Where operations are missing, the developer inserts
them. If the personality performs extraneous operations then the developer
deletes them.
Contents of This Manual
This manual provides the information necessary to use the Application
Generator software. It includes 4 chapters and an appendix.
Table 1.A
Summary of Contents
Chapter
Title
1
Overview
Purpose
2
Installing and Starting
Application Generator
3
Using Application
Generator
4
Running & Compiling
Applications
Describes the steps necessary to compile an
application based upon your successful simulation.
Appendix A
Sample Program Listing
Provides a complete listing of the default application
for reference and further study.
Provides an overview of the manual.
Describes how to install the software on your
system, and how to begin using it.
Describes how to navigate the software’s menu
system and create your own application
simulations.
Index
1–2
Chapter 1
Overview
Conventions Used
The following conventions are used in this manual:
• All menus and screens reproduced in this manual are approximate
renderings of what you will see on your terminal screen. Allen-Bradley
reserves the right to make minor modifications to any menu or screen to
help improve performance.
• A symbol or word appearing in brackets represents a single key on the
computer keyboard. For example: [ESC], [ENTER], or
[BACKSPACE].
On some keyboards, the [ENTER] key is labeled [ ↵ ] or [RETURN].
• The Application Generator software has many configuration parameters
from which you can choose. Throughout the manual these parameter
names are italicized wherever they appear.
• Information which you can select or enter into the menus or screens
appear in the text as bold type.
Related Publications
Publication No.
Other publications to which you may want to refer include:
Title
Purpose of Publication
2708-801
Application Generator User Manual
Describes how to use Application Generator Software to create
custom application programs.
2708-802
Network Manager User Manual
Describes how to use the Network Manager Software to
configure the workstation for a variety of network configurations.
2708-803
Basic Language Kit User Manual
Describes how to use the Basic Language Kit source files to
reduce program development time.
Describes the differences between standard Visual BASICt
and the Allen-Bradley VBASIC modified for use with the
2708-DH5B_L workstation.
2708-2.3
A-B VBASIC vs. Visual BASICt
2708-2.2
Interfacing a 2708 Attended Workstation
Network with a Flexible Interface Module
Describes how to implement the 2708-DH5 into the 1771
architecture
1–3
Chapter 2
Installing and Starting Application Generator
Chapter
2
Installing and Starting Application Generator
This chapter contains information which will help you prepare to use the AG
software to develop new applications. It includes information on:
•
•
•
•
System requirements
Installation instructions
Starting AG
The default personality
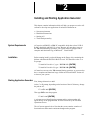
System Requirements
AG requires an IBM PC or IBM PC compatible which has at least 512K of
RAM, a hard disk, and DOS 3.2 or later. Because AG must have access to
the VB command during operation, your system must be equipped with a
complete and functional copy of Microsoftt Visual BASIC.
Installation
Before running install, you should change to the floppy drive containing the
diskette which has the INSTALL.BAT file on it. You should be at the A: or
B: prompt.
To install AG on drive C, type : INSTALL C: [ENTER]
To install AG on drive D, type : INSTALL D: [ENTER]
AG must have access to the VB command during operation, so you must also
have a complete and functional copy of Microsoft Visual BASIC Version 4.5
or later on your system.
Starting Application Generator
First, change directories to AG:.
At the C or D prompt, depending on the location of the AG directory, change
the path to AG.
C:\ > CD \ AG [ENTER]
Then type AG to start the program.
C:\ AG > AG [ENTER]
A welcome screen identifying the program and its version number will
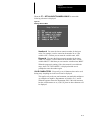
appear briefly as the program loads. It will be followed by the AG Main
Operations Screen.
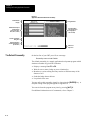
The AG screen appears below. Note that the screen contains a number of
functional areas that remain consistent throughout the program.
2–1
Chapter 2
Installing and Starting Application Generator
Figure 2.1
Application Generator Main Screen at Startup
Simulated DH5
Display
Program Status
Simulated DH5 Input &
Output Devices
(access using Alt L,
Alt H, Alt C, or Alt A)
Operations Menu
(use function key or
the highlighted
letter to select)
Contents of Variables
Being Used
Program Operations
You Have Entered (use
up and down)
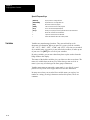
The Default Personality
Status and
Help Lines
On the last line of your CRT you will see a message:
Personality name to load: Default
The default personality is a sample application development program which
simulates a number of typical DL5 functions:
• Displays a message Use F1 to F4
• Waits for user to enter a badge or press a function key.
• Branches to various editing and entry routines to illustrate many of the
features of AG.
• Sends the badge data to the host.
• Loops back to the start.
You may call up this personality simply by depressing the [ENTER] key. A
complete listing of this program appears in Appendix A.
You can exit from the program at any time by pressing [ALT] X.
For additional information on AG commands, refer to Chapter 3.
2–2
Chapter 3
Using Application Generator
Chapter
3
Using Application Generator
This chapter provides a detailed summary of how you can use AG to
generate your own custom applications. It includes:
•
•
•
•
Keystroke Summary
a concise summary of the keystrokes used by the program
an explanation of variables as used in AG
an explanation of each menu choice on the AG screens
instructions for editing a program
The following list provides a summary of the special keystroke functions
recognized by AG.
Basic Control Key Functions
Commonly used keys for controlling the Applications Generator.
[ALT] R
RUN the program starting at line 1 (ESC to stop).
[ALT] G
Go (RUN) starting at this line.
[ALT] U
Undo back to this line.
[ALT] E
Edit the current program in full screen mode.
[ALT] V
List the variables in the program.
[Up Arrow]
Undo the previous line (if stepping) or up one line.
[Down Arrow]
Execute the next line (if stepping) or down one line.
[INS]
Toggles into single step mode.
[ESC]
Stop running or abandon current operation
[DEL]
Delete line or operation. Press twice.
[ENTER]
Edit current operation.
Simulated Device Input Keys
[ALT] L
Simulate input from bar code port (key entry).
[ALT H
Simulate input from host computer (key entry).
[ALT] C
Simulate input from COM1 RS-232 line (key entry).
[ALT] A
Simulate input from COM2 RS-232 line (key entry).
[ALT] F
[ALT] N
Select a DOS file to use for simulated inputs. Specify the input device by
entering the first letter of Laser, Host, Com, or Aux.
Simulate the next line of input from the response file (file entry).
3–1
Chapter 3
Using Application Generator
Special Purpose Keys
Variables
[PAGE UP]
Skip up 6 lines or change field size.
[PAGE DOWN]
Skip down 6 lines or change field size.
[END]
Move to the end of the program.
[HOME]
Undo or move to the start of the program.
[ALT] I
Set or clear the interrupt (breakpoint).
[ALT] D
Allows you to specify a device log file that will store I/O transactions.
–
Moves the current line to the edit buffer.
+
Copies the current line to the edit buffer.
*
Inserts the edit buffer above the current position.
Variables are named storage locations. They can each hold up to 80
characters of information. When you start AG, you are given the variables
“IN”, “OUT”, “SRC”, “NET”, “COM”, and “AUX”. Any time you are asked
for a variable name, you can key in one of the built in names, or make up one
of your own. Use [ALT] V to see all of your variables.
By using variables, you can move data from place to place such as from the
badge reader to the display.
The names of the default variables give you a hint as to how to use them. The
name of a variable does not in any way affect what you can use it for. A
name is just a way of referring to the same group of characters.
Variable names must not start with a quote mark (“) or a digit. It is good
practice to use just one word. Upper and lower case does not matter.
In many cases where you are asked for a variable name, you can key in a
number or a string. (A string is characters enclosed in quotes.) These are
constants.
3–2
Chapter 3
Using Application Generator
Main Operations Menu
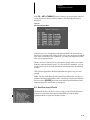
The Main Operations Menu, like all AG menus, is located in the upper right
of the screen. An explanation of the choices it presents appears below.
Figure 3.1
The Application Generator Main Screen and Main Operations Menu.
F1 – General Help
The last two lines of the display contain ‘field specific’ help information at
all times.
Selecting F1 brings up the context sensitive help system.
F2 – Display To Screen
The Display Menu (F2) is used to display text, variables, date or time on the
workstation. It is also used to clear the display.
The size and format of each field is controlled by pressing the plus key (+)
and the minus key (–). The arrow keys are used to position the field on the
screen.
Note that if you select a variable to display, make sure to use the plus key (+)
to make the field as long as the data you want to display. If the field is too
small then characters will be truncated.
3–3
Chapter 3
Using Application Generator
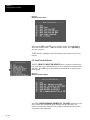
When F2 is pressed the Main Operations Menu is replaced with the options
shown in Figure 3.2.
Figure 3.2
AG Display to Screen Menu
In options F2, F3, and F7–F9, you are prompted to enter the text or the
variable name. When you provide a name it is shown on the workstation
display in the upper right corner of the CRT. You then use the arrow keys to
position it, and the plus and minus keys to choose the size of the field. When
both are to your satisfaction, press [ENTER] to write the statement in the
program.
In options F4 and F5, the time or date is displayed on the screen representing
the workstation display. You use the arrow keys to move the time/date to the
desired position, then press [ENTER] to write the statement.
Option F6 clears the workstation’s display.
Option F10 offers various clear functions.
Figure 3.3
AG More Display to Screen Menu
3–4
Chapter 3
Using Application Generator
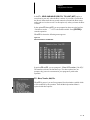
F3 – Keyboard Read/Laser
The Keyboard Read menu is used to read fields and characters from the
keyboard. When you chose one of these attributes a message is displayed on
the next to last line of the CRT. Then the attribute is added to the read
statement in the program. When F3 is pressed the Main Operations Menu is
replaced with these options:
Figure 3.4
AG Read From Keyboard/Laser Menu
Note: Since there are many options that can be selected for reading, you will
have to press [ENTER] until the Main Operations Menu is shown in order to
store a READ operation. Watch the help line at the bottom of your computer
screen.
If you choose F2 – READ A SINGLE KEYSTROKE then the key number
will be placed into the input variable. An example use of this choice would
be in a Time & Attendance program when you need to know if the employee
is checking IN or OUT; the entry could be the single keystroke of the (IN) or
(OUT) key. Some of the more important ·numbers are:
F1 = 225
F6 = 230
[ENTER] = 13
EXIT = 159
F2 = 226
F7 = 231
IN = 43
UP = 24
F3 = 227
F8 = 232
OUT = 45
LEFT = 8
F4 = 228
F9 = 233
CLEAR = 127
DOWN = 25
F5 = 229
F10 = 234
SPACE = 32
RIGHT = 26
The F3 – READ NUMBER will create a numeric field. The input will be
converted into a number.
!
ATTENTION: The limits of this numeric field are +2, 147, 483,
647 maximum to – 2, 147, 483, 647 minimum. If a value is
entered that is outside of this range the number will overflow to
an incorrect value. If very large positive or negative numbers are
expected, then set an input range to the above limits (see F7
option).
3–5
Chapter 3
Using Application Generator
The F4 – READ ALPHA creates a field which will allow entry of all
displayable characters.
The F5 – SPECIAL OPTIONS which can be selected for reading fields
are:
Figure 3.5
AG Field Attributes Menu
AUTOEXIT: When the operator has entered as many characters as are
in the field, then the read is completed. ‘Autoexit’ is added to the
Keyboard read statement.
DON’T CLEAR: Prevents the field from being cleared on the first
character typed (see default). ‘No Clear’ is added to the Keyboard read
statement.
DEFAULT: The previous value of the variable is shown instead of
displaying a blank field. ‘Default’ is added to the Keyboard read
statement.
ZERO FILL: Numeric field is right justified with zeros. ‘Zerofill’ is
added to the Keyboard read statement.
PASSWORD: ***‘s are shown instead of the characters typed.
‘Secure’ is added to the Keyboard read statement.
If the F6 – ACCEPT LASER INPUT ALSO is selected then the laser is
included in the read statement.
Note: Range checks and other edit checks do not apply to this option.
3–6
Chapter 3
Using Application Generator
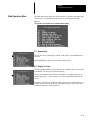
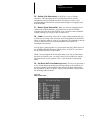
When the F7 – SET AN INPUT RANGE/LOOKUP is entered the
following sub-menu is displayed:
Figure 3.6
AG Range Selection Menu
Smallest #: You enter the lowest numeric number for the input
value. For example, it can be entered as the number 20, or if the
variable AGE = 20 then you can enter the variable name, AGE.
Biggest #: You enter the biggest numeric number for the input
value. For example, it can be entered as the number 9999, or if the
variable MOST = 9999 then you can enter the variable name, MOST.
When the program is running, if the value entered is not within the
range, then * OUT OF RANGE * is displayed and the user is
prompted to enter the number again.
VALID CHARACTERS: You specify a set of characters that can be used
during entry. Anything not in the set will not be displayed.
This applies only to the one read statement you attach this attribute to.
An example use might be: Departments are coded A, B, C, and D.
When the operator enters the Department field, if the read statement
has the valid character set as {A,B,C,D], then no other characters will
be displayed.
3–7
Chapter 3
Using Application Generator
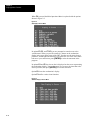
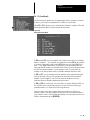
Lookup in workstation file: You enter the name of the Lookup
File and the starting character position to compare.
Figure 3.7
AG Lookup Options Menu
Lookup in Host file: You enter the name of the Lookup File and
the starting character position to compare. These lookups are
performed by your host computer. Allen-Bradley Network Manager
Software (Catalog No. 2708-NNM) V5.0 must be installed and
running on your host computer in order for host lookups to work.
This allows a workstation program to always have up to the minute
information about a file which is being maintained by the host
computer.
The LOOKUP options allow you to restrict input to values which
match those in a workstation file or in a HOST file. It is a method of
verifying data against a file or obtaining records from a file. A text file
must first be created using a text editor or another program.
Lookups can be selected here or in the sub-menu from the
Move/Transfer/Add menu.
Note: When using Read lookups, the data read from the file is always placed
in the OUT variable.
3–8
Chapter 3
Using Application Generator
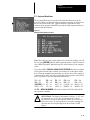
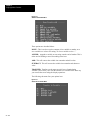
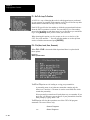
If the F8 – SET A TIMEOUT option is chosen, you are given the choice of
setting the timeout from seconds to minutes. The following sub-menu is
displayed:
Figure 3.8
AG Timeout Selection Menu
Timeouts are a way of stopping a read operation before the operation has
finished. If your program is waiting for the user to enter his password and the
user walks off and leaves the workstation, you want your program to restart
after a given amount of time.
When you select a timeout you are also asked to specify where you want to
branch to when the timeout occurs. To select the GOTO statement, you can
use the arrow keys to select the destination statement or enter the statement
number.
This option is appended to the Read statement and replaces any previous
timeout.
Note: You stay in the Read from Keyboard/Laser Menu after selecting an
attribute. More than one attribute can be selected for a single read statement.
Be sure to press [ENTER] and return to the Main Operations Menu for the
read statement to be entered into your program.
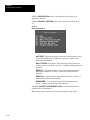
F4 – Read From Laser Or Device
The Read From Laser or Device menu is used to read fields and characters
from devices other than the keyboard. When F4 is pressed the Main
Operations Menu is replaced with these options:
3–9
Chapter 3
Using Application Generator
Figure 3.9
AG Read Laser/Device Menu
In the options F2 through F6, you are prompted on the next to the last line:
‘Read into Variable Name : “. IN is the default variable. Press [ENTER] to
store the operation.
The F7 option is appended to the Read statement and replaces any previous
timeout.
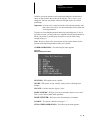
F5 – Send To Host Or Device
The F5 – SEND TO HOST OR DEVICE option is used to send data to the
host, send data out a communications port, or to control the workstation LED
indicators. When F5 is pressed the Main Operations Menu is replaced with
these options:
Figure 3.10
AG Send to Host/Devices Menu
In the F2 – SEND VARIABLE INDIRECTLY TO HOST option, the record
sent is held in the workstation queue memory until the Host polls. The
number of records sent when the Host if offline is dependent of the amount
of memory in the workstation.
3 – 10
Chapter 3
Using Application Generator
In the F3 – SEND VARIABLE DIRECTLY TO HOST (NET) option, a
record can be sent only when the Host is online. If you send a record when
the Host if offline then the next record cannot be sent until the Host comes
online and receives the record. Use this option only when you know the Host
is online.
In the options F2 through F5, you are prompted on the next to the last line:
“Variable to send to ... . ”. OUT is the default variable. Press [ENTER] to
store the operation.
When F6 is chosen the following menu appears:
Figure 3.11
AG Communications Line/LED Menu
In options F2 and F3, you are prompted : “Enter LED number (1 to 10):”.
The numbers reference the function keys. The other options have no
prompts, they just write a statement in your program to perform the
operation.
F6 – Move, Transfer, Add, Etc.
When F6 is pressed, you are first prompted for a destination variable which
will be modified by the operation. Then the Main Operations Menu is
replaced with these options:
3 – 11
Chapter 3
Using Application Generator
Figure 3.12
AG Move/Transfer/Add Menu
These options are described below:
MOVE: This is used to copy the contents of one variable to another, or to
set a variable to a value or text string. To clear a variable set it to “ ”.
APPEND: Appends a variable or text string onto the end of another. This is
often used in building a record for sending to the host.
ADD: This will convert the variable into a number and add a value.
SUBTRACT: This will convert the variable into a number and subtract a
value.
TRANSFER: Transfers are the most powerful way of manipulating
variables. These allow you to edit the contents of a variable in the same way
you can edit the screen using the display operations.
The following sub-menu lists your options here:
Figure 3.13
AG Transfer to Variable Menu
3 – 12
Chapter 3
Using Application Generator
Variables, text, date and time can be positioned within the variable (this is
shown on the second to the last line of the display). The (+) and (–) will
change the field size and format, while left and right arrows are used for
positioning.
Important: It is best to be in single step mode while entering transfers since
that is the easiest way to see the relationship between fields that
are being formatted.
Transfers are fixed length operations that always pad with spaces. If this is
not what you want, you may want to use Append or the advanced operations.
When you position a variable using a transfer, be sure the field is long
enough (using (+)).
Note: Be sure to observe the second to the last line on the monitor for the
position of the data being transferred into your variable.
OTHER OPERATIONS: The following sub-menu appears:
Figure 3.14
AG Other Math Operations Menu
MULTIPLY: Will operate on any variable.
DIVIDE: Will operate on any variable. It may result in a floating point
number.
NEGATE: Is used to alter the sign of a value.
MAKE NUMERIC: Will get rid of any non-numeric parts to a text value.
This is a side effect of other math operations.
MAKE INTEGER: Will remove the fractional part of a number.
LOOKUP: This option is described on page 3 – 7.
STILL OTHER OPERATIONS: The following sub-menu appears:
3 – 13
Chapter 3
Using Application Generator
Figure 3.15
AG More Complete Operations Menu
LENGTH: Returns the number of characters in a variable
LEFT: Isolates the left ‘n’ characters from a variable. Left 4 characters of
IN = 092890, returns 0928.
RIGHT: Isolates the right ‘n’ characters from a variable. Right 2 characters
of IN = ABCDEFG, returns FG.
MIDDLE: Is used to get data from the middle of a variable. Warning! If you
use middle on a variable that is too short and try to get characters that are not
present, AG will abort. The 2 middle characters, starting in position 3 will
return the following:
Variable = ABCDEFG
Variable = ABC
returns
returns
CD
program abort
TRIM: Removes spaces from the front and back of a variable.
UPPER CASE: Converts a variable into upper case.
CHAR and ASCII: converts the exchange character values into ASCII and
back to characters.
MODULUS: Is the positive remainder from a division operation.
Note: Watch the ‘Contents of Variables’ lines to see what each variable is
set equal to as the program runs in the stepping mode.
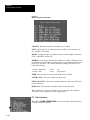
F7 – Other Operations
When F7 – OTHER OPERATIONS is selected the Main Operations Menu
is replaced with these options:
3 – 14
Chapter 3
Using Application Generator
Figure 3.16
AG Other Operations Menu
F2 – Beep: When the F2 – BEEP option is chosen the following sub-menu
appears:
Figure 3.17
AG Sound Menu
Beep: The tone is set to 1000 Hz for 0.25 (1/4) of a second.
Chirp : The tone is set to 2000 Hz for 0.15 of a second.
Boop: The tone is set to 300 Hz for 1 second.
Key in.. .: The workstation can produce sounds in the range of 100 to 3000
Hz. A low sounding tone is around 200 Hz. A high pitched tone is above
2000 Hz.
The loudness of the sound will vary depending on the frequency. Your PC
will only produce an approximation of the actual sound produced by the
workstation.
F3 – Pause: You can pause your program for any number of seconds. Use
this to leave a prompt on the display long enough for the user to read it.
3 – 15
Chapter 3
Using Application Generator
While you are testing your program, even a pause as short as 0.1 seconds will
take a full second to execute on the PC. When you generate your program,
the downloaded version will pause for the selected interval.
F4 – Chain to Personality: If your program becomes too large to run as a
single program then you will need to use chaining. This is a method of
having one program start the execution of another.
In order to use chaining, you will need to put CHAIN operations in the main
program to start up your subprogram. Then in the subprogram, you will need
a CHAIN that restarts the main program when the operation is completed.
The chain operation does not save the contents of user variables so you will
need to make sure that the operations are entirely separate in order for
chaining to be useful.
Chaining Requirements: Note that to download the files, you must use the
FILE DOWNLOAD feature of the Network Manager Software (Catalog No.
2708-NNM) V5.0. This is in the FILE SERVICES menu of the Network
Manager Software and is NOT the same as PROGRAM DOWNLOAD. Both
your main program and your subprograms must be loaded using FILE
DOWNLOAD.
You can start the main program by making a small program containing only
the statement: CHAIN “MAIN” and using PROGRAM DOWNLOAD.
Alternatively you can start the main program using the Start Program feature:
NM 5.0. This feature is not normally accessible. You will need to add it to
one of the NM menus before you can get to it.
Global Variables: Chained programs may make use of GLOBAL variables.
These are variables whose value is accessible by all of the chained programs.
The names of the global variables must be placed in a text file named
“GLOBAL.DEF” in your program directory using a text editor. Put one
variable name on each line.
Important: The GLOBAL.DEF file is not downloaded to the workstation.
Keep it in the subdirectory of the program you will use.
!
ATTENTION: Once you have created GLOBAL.DEF you may
only ADD variable names to the end of the list. If you insert or
delete old names then you will damage your existing AG
Personalities that use globals.
A maximum of 99 global variables may be defined. Using a lot of globals
will significantly slow down chaining your programs.
F5 – Comment line: This allows you to put comments into your program.
For example, the first line of the program might be a Comment line stating
the program name and purpose. The comment line is identified by a single
quote (‘) at the beginning of the line.
3 – 16
Chapter 3
Using Application Generator
F6 – GoSub (Call Subroutine): A GOSUB is a way of calling a
subroutine. The subroutine can do its job and then return to the line
immediately after the GOSUB statement. This makes it easier to write
programs that have the kind of structure found in high level languages such
as A-B VBASIC.
F7 – Return (From Subroutine): When you write the subroutine that is
called by the GOSUB statement, you must be sure to put a RETURN
operation at the last line of the GOSUB. If you execute too many GOSUBs
without returning you will get a stack overflow error.
F8 – Label: Line numbers work well for writing simple programs that you
will not have to change often. For better structured programs you should use
labels. A label is a name for a line in your program. The advantage is that the
GOTO or GOSUB will have a name that makes sense instead of a
meaningless line number.
You can place a label anywhere in your program using the LABEL option in
the OTHER OPERATIONS menu. When you key in a GOTO, you can use
the label name instead of a line number.
When you are prompted for the line/label name, if you key in a label name
that does not currently exist, you will be asked if you would like to put the
label somewhere in your program. This is a nice shortcut for entering the
labels.
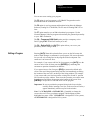
F9 – ON Event GoTo Line/Label Operations: The ON event operation is
a way of branching to more than one place depending on the condition of a
previous operation. If the condition is met then the program will branch to
the line number or label you define. The previous operation is defined from
the following menu selections:
Figure 3.18
AG On Condition Menu
3 – 17
Chapter 3
Using Application Generator
The other menu contains these conditions that you can test for:
Figure 3.19
AG On Other Inputs Menu
Note: The destination variable must be in the IN variable.
Adding A-B VBASIC Functions
A-B VBASIC Functions are added to the Other Operations Menu by
modifying the file AGUSER.BAS. You may add up to 10 named statements
which will appear in a sub-menu named Additional Operations.
3 – 18
Chapter 3
Using Application Generator
F8 – IF (Conditional)
An IF statement is another way of changing the order or program execution.
It allows you to GOTO a statement IF a variable is in some state.
When F8 – IF is chosen you are asked for the Variable to compare. Then the
Main Operations Menu is replaced with this sub-menu:
Figure 3.20
AG Conditionals (IF) Menu
In F2 through F5, you are prompted with “Value (text in quotes) or Variable
name to compare : ”. For example, you might have entered IN as the variable
to compare immediately after pressing F8, then after you chose F4 (If less
than ..) you might enter 9999, if you want to be sure the number that was
input into the IN variable was less than 9999. Then you are prompted to enter
the GOTO statement number if your compare is true. You can enter the
number or use the up/down arrows to find the statement and press enter.
In F6 and F7, you are prompted to enter both the lower limit and the upper
limit of the range. Then you are prompted to enter the GOTO statement
number if your compare is true. You can enter the number or use the
up/down arrows to find the statement and press enter.
In F8 and F9 the ‘starts with’ and ‘ends with’ are used to branch (GOTO) if
the variable starts or ends with some piece of text. You will usually type
quotation marks (“) in front of the text being checked.
After you have entered the compare data, (text as above, a numeric, or
another variable), you are prompted to enter the GOTO statement number if
your compare is true. You can enter the number or use the up/down arrows to
find the statement and press [ENTER].
3 – 19
Chapter 3
Using Application Generator
F9 – GoTo Or Loop To Position
A GOTO is a way of changing the order in which operations are performed
in your program. A program which contains no GOTOs will do one step after
another until it reaches the last step. Then it will stop.
Each GOTO specifies the line number to which the program should advance
when the GOTO operation is reached. You can either key in a line number,
enter a label or use the up and down arrow keys to find where you would like
to go. Press [ENTER] when you have made your selection.
When choosing this option, note the prompt on the next to last line of the
CRT; “Go to line number : ”. You can enter the number or use the up/down
arrows to find the statement and press [ENTER].
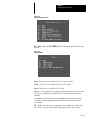
Fl0 – File (New, Load, Save, Generate)
When F10 – FILE is chosen the Main Operations Menu is replaced with
these options:
Figure 3.21
AG File Operations Menu
The F2 or F3 options are for loading or saving your personalities.
A personality name is an 8 character name that contains only the
letters A to Z and 0 to 9. The name is used to create DOS files which
contain the personality.
Select personality names that will make them easy to remember. If you
are in the \ AG directory, you can list all of your personalities from the
DOS prompt by typing : DIR *.AIP
The F4 option will clear the operations area of the CRT of all program
statements. The area will have only:
<Start of Program>
==>
3 – 20
<End of Program>
Chapter 3
Using Application Generator
You can now start creating your program.
The F5 option is used to generate a A-B VBASIC Program that can be
downloaded into the workstation network.
The F6 option is used to generate and download using Network Manager
Software (Catalog No. 2708-NNM). The PC must be running NM V5.0 or
later.
The F7 option transfers you to NM to download you program. Use the
Network Manager Software program to download your generated personality
to your -DH5 workstation.
The F8 – Temporary DOS Shell option provides a temporary exit to
DOS. Typing EXIT in DOS will return you to AG.
The F9 – Exit to DOS (also [ALT] X) option allows you to save your
personality before exiting to DOS.
Editing a Program
Entering [ALT]E from the keyboard allows you to use the full screen edit
mode to make changes or comments in your program. Full screen edit mode
lets you edit only existing lines in the program under development. You
cannot use it to create new lines.
For example, if you want to edit line 20 of a program, press [ALT]E, use the
cursor to move to line 20, then press the [ENTER] key and change the
constants or operation instructions on that line.
If you want to insert a line, first press [ESC] to return to the default split
screen. Then scroll the program listing until the line immediately preceding
the location of the new line is at the top of the listing window. For example,
if you want to add a new line between the existing lines 20 and 21, position
line 20 at the top of the window. Then select the operation you want to insert
from the menu and follow the prompts at the bottom of the screen. Press
[ENTER] to accept the new line and insert it in the program.
Important: Be sure to position the program listing in the lower window
carefully before inserting a new line, as the new line will always
appear immediately after the top line in the window.
Note: Use VCHAD.EXE or XCHAD.EXE (if installed) to change the
screen colors on LCD or gas plasma equipped Toshiba laptops to make
highlighted text more visible. VCHAD.EXE is designed for VGA systems,
and XCHAD.EXE is designed for EGA systems.
3 – 21
Chapter 4
Running & Compiling Applications
Chapter
4
Running & Compiling Applications
Introduction
In this chapter you will find information on:
• Running your program
• Compiling your program
• Downloading your program
Running a Program
Once you have typed in your your program, you can run it in the AG
environment (by selecting [ALT]R). This offline simulation feature allows
you to thoroughly test your program before downloading it.
When the personality behaves as you expect, save it in its final form. You can
use the personality name in which you have been working, or create a new
one. Use standard DOS file naming conventions when assigning a name. No
extension is necessary, as the AG software adds its own extensions to the
files it creates during compilation.
Compiling and Downloading
a Program
Once saved in its final form, you can generate an A-B VBASIC program that
can be downloaded into the DH5 network. This program will behave as did
your development personality in the AG environment. Your Network
Manager software should be installed and set up before you begin
downloading.
To compile a downloadable application program:
1. In the Main Operations Menu select F10 – File (new, load, save,
generate).
2. In the File Operations menu, select either F6 – Generate and
Download using NM or F7 – Transfer to NM to download.
3. Having selected F10 – File you will generate a program that is ready to
download to the Network Manager Software at a later time. Having
selected F10 – File, you will be in the process of downloading that
compiled program for immediate use.
Note: For information on setting up and using Network Manager, please
refer to the Network Manager Software User Manual (Publication 2708-802).
4–1
Aoppendix A
Sample Program Listing
Appendix
A
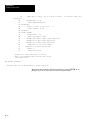
Sample Program Listing
Default Personality
The listing that follows is for the default personality that appears at the
bottom of the Main Menu when you first start AG. You can accept this
personality simply by pressing [ENTER].
––––– Personality DEFAULT generated by A.G. V3.0 at 01:20 pm on 04–Feb–94
1
2
3
4
5
6
7
8
9
10
11
12
13
14
15
16
17
18
19
20
21
22
23
24
25
26
27
28
29
30
31
32
33
34
35
36
37
38
’––––– Simple Example Default AG Program –––––
’Created by John Fogarty : 11–Oct–90
Restart:
DISPLAY w/CLS 7 27 from ”ALLEN–BRADLEY COMPANY, INC.”
UpdateTime:
DISPLAY 41 9 from TIME
DISPLAY 72 9 from DATE
READ KBD LASER to IN 0 0 on Timeout 3000 goto UpdateTime(5)
ON Laser INPUT GOTO SendBadge(42)
ON F1 KEY GOTO F1–Pressed(17)
ON F2 KEY GOTO F2–Pressed(24)
ON F3 KEY GOTO F3–Pressed(28)
ON F4 KEY GOTO F4–Pressed(35)
DISPLAY w/CLR2 48 24 from ”***** Use F1 to F4 *****”
PAUSE 1
GOTO Restart(3)
F1–Pressed:
DISPLAY w/CLS 15 11 from ”Clocking In”
MOVE ”IN” to OP
AskForBadge:
DISPLAY w/CLR2 49 24 from ”Please Enter a Badge Now”
READ LASER to IN
GOTO SendData(45)
F2–Pressed:
DISPLAY w/CLS 14 12 from ”Clocking Out”
MOVE ”OUT” to OP
GOTO AskForBadge(20)
F3–Pressed:
DISPLAY w/CLS 11 18 from ”Manual Field Entry”
DISPLAY 41 10 from ”Operation:”
DISPLAY 58 5 from ”Data:”
READ KBD to OP 51 1 AutoExit on Timeout 3000 goto Restart(3)
READ KBD to IN 63 18 on Timeout 3000 goto Restart(3)
GOTO SendData(45)
F4–Pressed:
DISPLAY w/CLS 12 17 from ”Move Ticket Entry”
MOVE ”M ” to OP
DISPLAY 41 17 from ”Destination Code:”
A–1
Aoppendix A
Sample Program Listing
39
READ KBD to DEST
59 8 n>=100 n<=5000
Restart(3)
40
APPEND DEST to OP
41
GOTO AskForBadge(20)
42 SendBadge:
43 ’––––– Badge is sent to the host –––––
44
MOVE ”Badge” to OP
45 SendData:
46 CLEAR SCREEN
47
SOUND 1000, .25
48
MOVE Sys:DATE to NET
49
APPEND Sys:TIME to NET comma separated
50
APPEND OP to NET comma separated
51
APPEND IN to NET comma separated
52
SEND NET to host data QUEUE
53
DISPLAY 15 9 from ”Thank You”
54
PAUSE .5
55
GOTO Restart(3)
on Timeout 3000 goto
– Generation completed with no errors.
– Basic file DEFAULT.BAS contains 647 lines.
– LXB compilation.
NO ERRORS DETECTED
– DEFAULT.LXE can be downloaded to LINX terminals
You can run the personality default personality by pressing [ALT]R. Press
[ESC] at any time to cancel the execution of the personality.
A–2
Index
Symbols
Download program, 3 – 21
.AIP file extension, 1 – 1
[ALT] X. See Exit to DOS
[ALT]R command, 4 – 1
E
A
A-B VBASIC, 1 – 1
A–B VBASIC, adding functions,
3 – 18
Add, 3 – 12
AGUSER.BAS, 3 – 18
Append, 3 – 12
Application Generator,
description, 1 – 1
ASCII, convert to, 3 – 14
Autoexit, 3 – 6
Edit mode, 3 – 21
Exit program, 3 – 21
Exit to DOS shell, 3 – 21
Extension, .AIP, 1 – 1
F
B
Field Attributes menu, 3 – 6
File
AGUSER.BAS, 3 – 18
personality, 1 – 1
File Download, 3 – 16
File extension, .AIP, 1 – 1
File name, 4 – 1
File Operations menu, 3 – 20
Full screen editor, 3 – 21
Beep, 3 – 15
Boop, 3 – 15
G
C
Catalog Number 2708-NNM,
3 – 16
Chain to personality, 3 – 16
Character, convert to, 3 – 14
Characters, valid, 3 – 7
Chirp, 3 – 15
Comment line, 3 – 16
Compile program, 3 – 21
Compiling a program, 4 – 1
Conditionals (IF) menu, 3 – 19
Contents, summary of (Table),
1–2
Control keys, 3 – 1
Convert to ASCII, 3 – 14
Convert to character, 3 – 14
Convert to upper case, 3 – 14
D
Default personality file, 2 – 2
Default variable names, 3 – 2
Display to screen, 3 – 3
Divide, 3 – 13
DOS, exit to, 3 – 21
DOS shell, 3 – 21
Gas plasma display, 3 – 21
Generate a program, 3 – 21, 4 – 1
Global variable, 3 – 16
maximum number, 3 – 16
GLOBAL.DEF, 3 – 16
GoSub command, 3 – 17
GOTO, with conditionals, 3 – 19
GOTO or Loop to Position, 3 – 20
GOTO statement, 3 – 9
H
Help, 3 – 3
Host, send variable to, 3 – 10
I
IN variable, 3 – 18
Inserting a new line, 3 – 21
Introduction, Related Publications
Application Generator User’s
Manual, 1 – 3
Basic Language Kit User’s
Manual, 1 – 3
Network Manager User’s
Manual, 1 – 3
Index – 1
Index
K
Key in sound frequency, 3 – 15
Key number, 3 – 5
Keystroke summary, 3 – 1
L
Label, 3 – 17
LCD display, 3 – 21
LED number, 3 – 11
Left operation, 3 – 14
Length of variable, 3 – 14
Limits, and conditionals, 3 – 19
Limits in numeric fields, 3 – 5
Lookup, 3 – 13
Lookup Option menu, 3 – 8
Loudness, 3 – 15
M
Main Operations menu, 3 – 3
Main Operations Screen, 2 – 1
Make integer, 3 – 13
Make numeric, 3 – 13
Memory, workstation, 3 – 10
Menu
Communications Line/LED,
3 – 11
Communications Line/LED
menu, 3 – 11
Conditionals (IF), 3 – 19
Field Attributes, 3 – 6
File Operations, 3 – 20
Lookup Options, 3 – 8
Main Operations, 3 – 3
More Compute Operations,
3 – 13
Move, Transfer, Add, Etc.,
3 – 11
Move/Transfer/Add, 3 – 8
On Condition, 3 – 17
On Other Inputs, 3 – 17
Other Operations, 3 – 13, 3 – 14
Range Selection, 3 – 7
Read from Keyboard/Laser,
3–5
Read from Laser or Device,
3–9
Send to Host or Device, 3 – 10
Index – 2
Sound, 3 – 15
Timeout Selection, 3 – 9
Transfer to Variable, 3 – 12
Message, Out of Range, 3 – 7
Microsoft Visual BASIC, 2 – 1
Version required, 2 – 1
Middle operation, 3 – 14
Modulus, 3 – 14
More Compute Operations menu,
3 – 13
Move, 3 – 12
Move, Transfer, Add, Etc. menu,
3 – 11
Move/Transfer/Add menu, 3 – 8
Multiply, 3 – 13
N
Negate, 3 – 13
Network Manager Software,
3 – 16, 3 – 21, 4 – 1
New line, inserting, 3 – 21
Numeric field, limits, 3 – 5
O
On Condition menu, 3 – 17
ON event GoTo Line/Label,
3 – 17
On Other Inputs menu, 3 – 17
Other Operations menu, 3 – 13,
3 – 14
Out of Range message, 3 – 7
P
Password, 3 – 6
Pause, 3 – 15
Personality
chain to, 3 – 16
name of, 3 – 20
Personality file, 1 – 1
default, 2 – 2
vs. program, 1 – 2
Personality name, 4 – 1
Program
generation, 3 – 21
initiate compile, 4 – 1
initiating download, 3 – 21
Index
vs. personality file, 1 – 2
Program Download, 3 – 16
Program listing. See personality
file
Program pause, 3 – 15
chirp, 3 – 15
frequency, 3 – 15
loudness, 3 – 15
Sound frequency, key in, 3 – 15
Sound menu, 3 – 15
Subtract, 3 – 12
Q
Quit program, 3 – 21
R
Range checks, with laser input,
3–6
Range limits, and conditionals,
3 – 19
Range Selection menu, 3 – 7
Read From Keyboard/Laser
menu, 3 – 5
Read from Laser or Device menu,
3–9
Read statement, 3 – 9
Return command, 3 – 17
Return to DOS, 3 – 21
Right operation, 3 – 14
Run command, 4 – 1
S
Screen
Main Operations, 2 – 1
regions of, 2 – 2
welcome, 2 – 1
Send to Host or Device menu,
3 – 10
Send variable, 3 – 10
Simulation, running a program,
4–1
Sound
beep, 3 – 15
boop, 3 – 15
T
Timeout Selection menu, 3 – 9
Toshiba laptop, 3 – 21
Transfer, 3 – 12
Transfer to Variable menu, 3 – 12
Trim operation, 3 – 14
U
Upper case, 3 – 14
V
Valid characters, 3 – 7
Variable
global, 3 – 16
IN, 3 – 18
Variable length, 3 – 14
Variables, 3 – 2
VB command, 2 – 1
VCHAD.EXE, 3 – 21
Visual BASIC, 2 – 1
W
Welcome screen, 2 – 1
Workstation memory, 3 – 10
X
XCHACAD.EXE, 3 – 21
Z
Zero fill, 3 – 6
Index – 3
Rockwell Automation helps its customers receive a superior return on their investment by bringing
together leading brands in industrial automation, creating a broad spectrum of easy-to-integrate
products. These are supported by local technical resources available worldwide, a global network
of system solutions providers, and the advanced technology resources of Rockwell.
Worldwide representation.
Argentina • Australia • Austria • Bahrain • Belgium • Bolivia • Brazil • Bulgaria • Canada • Chile • China, People’s Republic of • Colombia • Costa Rica • Croatia • Cyprus
Czech Republic • Denmark • Dominican Republic • Ecuador • Egypt • El Salvador • Finland • France • Germany • Ghana • Greece • Guatemala • Honduras • Hong Kong
Hungary • Iceland • India • Indonesia • Iran • Ireland • Israel • Italy • Jamaica • Japan • Jordan • Korea • Kuwait • Lebanon • Macau • Malaysia • Malta • Mexico • Morocco
The Netherlands • New Zealand • Nigeria • Norway • Oman • Pakistan • Panama • Peru • Philippines • Poland • Portugal • Puerto Rico • Qatar • Romania • Russia • Saudi
Arabia • Singapore • Slovakia • Slovenia • South Africa, Republic of • Spain • Sweden • Switzerland • Taiwan • Thailand • Trinidad • Tunisia • Turkey • United Arab Emirates
United Kingdom • United States • Uruguay • Venezuela
Rockwell Automation Headquarters, 1201 South Second Street, Milwaukee, WI 53204-2496 USA, Tel: (1) 414 382-2000 Fax: (1) 414 382-4444
Rockwell Automation European Headquarters, Avenue Hermann Debroux, 46, 1160 Brussels, Belgium, Tel: (32) 2 663 06 00, Fax: (32) 2 663 06 40
Rockwell Automation Asia Pacific Headquarters, 27/F Citicorp Centre, 18 Whitfield Road, Causeway Bay, Hong Kong, Tel: (852) 2887 4788, Fax: (852) 2508 1846
World Wide Web: http://www.ab.com
Publication 2708-801 – August 1994
Supersedes Catalog Number 2708-ND002
40062-287-01(A)
Copyright 1994 Allen-Bradley Company, Inc. Printed in USA