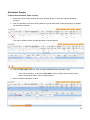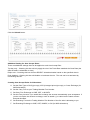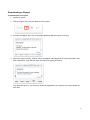
1
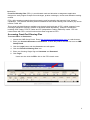
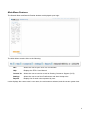
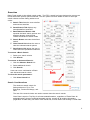
Front End Clearing Plus
User Manual
April 2014
CME Clearing Europe
Global Operations Education
1
Contents
Accessing Front End Clearing Plus .................................................................................................... 3
Main Menu Features .......................................................................................................................... 4
Searches ............................................................................................................................................ 5
Basic Search Fields............................................................................................................................ 6
Advanced Search Fields .................................................................................................................... 7
Saved Searches................................................................................................................................. 8
Search Types ..................................................................................................................................... 9
Search Field Result Descriptions...................................................................................................... 10
Trade Search ................................................................................................................................... 12
Trade Actions ................................................................................................................................... 12
Trade Search ................................................................................................................................... 15
Field Descriptions............................................................................................................................. 16
Trade Actions ................................................................................................................................... 16
Trade Search ................................................................................................................................... 18
Field Descriptions............................................................................................................................. 19
Trade Actions ................................................................................................................................... 19
Cross Exchange Contracts............................................................................................................... 38
Marking Trades ................................................................................................................................ 38
Globex Trades .............................................................................................................................. 38
Pit Trades ..................................................................................................................................... 40
Unmark Trades ............................................................................................................................. 41
Allocation Groups ............................................................................................................................. 42
Allocate Multiple Groups .................................................................................................................. 43
Single Allocation............................................................................................................................... 44
Reverse an Allocation – Allocation Group ........................................................................................ 45
Delete an Allocation ......................................................................................................................... 47
Claim an Allocation .......................................................................................................................... 48
Edit the Carry Account ..................................................................................................................... 49
Mass Update ................................................................................................................................ 49
Give Up a Trade............................................................................................................................... 50
Give Up Trades in FEC .................................................................................................................... 51
Claimed Give Up Allocation .............................................................................................................. 51
Mass Allocations .............................................................................................................................. 52
Downloading a Report ...................................................................................................................... 61
User Notification Services ................................................................................................................ 62
2
Introduction
Front End Clearing Plus (FEC+) is a web-based trade and allocation management application
designed to easily support multiple firm exchanges, product exchanges, venues and alternative trading
models.
FEC+ offers seamless straight-through-processing and functionality that improves firms’ clearing
capabilities. The features include a powerful streamlined and robust clearing user interface (UI) and an
intuitive FIXML API.
This manual will detail features available only through the third phase of FEC+ which supports Cross
Exchange Allocations (formerly referred to as Mutual Offset Allocations), Clearport Transactions
including CDS Trades, OTCFX Trades and ITP (Independent Trading Platforms) trades. FEC will
communicate with FEC+ until all functions have been migrated to FEC+.
Accessing Front End Clearing Plus
To access FEC+ in Production:
1. Access the CME Group Portal. Enter http://connect.cmeclearingeurope.com in a web browser.
2. Enter your Connect Username and Password. Ensure the product selection list is set to CME
Group Portal.
3. Click the Login button and the Connect menu will appear.
4. Click the Front End Clearing Plus icon.
5. Enter your Clearing Single Sign-on Username and Password.
6. Click Login.
Users can also click the FEC+ link on the FEC classic menu.
3
Main Menu Features
The Search Menu and Search Results window are displayed upon login.
The Main Menu contains links to the following:
FEC
Allows the user to open FEC in a new window
Help
Displays the FEC+ User Manual
Contact Us
Allows the user to send an e-mail to Clearing Customer Support (CCS)
Settings
Allows the user to set User Preferences and Auto Accept rules
Reports
Displays list of result sets requested by user
It also displays the current user’s user name, the environment selected, and the current system time.
4
Searches
Basic Trade search is the default search mode. The FEC+ search has been designed to return more
results with fewer specific options selected. The ALL option has been added to some of the major
search criteria to make finding trades much
easier.
A. Search Tab allows the user to define
and execute searches
B. Saved Search Tab displays any
saved/predefined searches
C. Basic/Advanced Search Link
expands the basic search options and
displays advance search fields.
Closes the Advanced search fields
D. Search Button executes the defined
search
E. Clear Search Link allows the user to
clear the selected search options
F. Save Search Link allows the user to
create and save predefined searches
To execute a Basic Search:
1. Select your search criteria
2. Click Search
To execute an Advanced Search:
1. Click the Advance Search link
2. Select additional criteria
3. Click Search
Users can use a combination of Basic
and Advanced search criteria.
To clear the search parameters:
1. Click Clear Search link
Search Considerations
The minimum search criteria for
finding trades are: Firm, Firm
Exchange, Product Exchange, and
Date.
The rest of the search criteria are used to narrow down the search results.
Clear Date is equal to Top Day for all new trades/allocations, regardless of Trade Date. All
trades/allocations that are matched/accepted top-day, as well as all pending allocations
(regardless of trade date), will return in the results list, if Clear Date is set to today’s Trade Date.
5
Basic Search Fields
Firm
Trading Member Firm Number to which the transaction belongs.
Search Type
Search Type allows user to select the transaction type: Trades, Allocations,
Allocation Groups, or Claims.
Venue
Venue on which the trade was executed: Electronic, Pit, or Ex-Pit.
Trade Type
Trade Type to be searched: BLOCK, CLUPD, CXT, EA, EBF, EFP, EFR, EFS,
EOO, FU (Funge), NONE, OPNT, REG, SUB, or TRNSF.
Firm Exch
Firm Exchange: CBT, CME, or NYMEX.
Product Exch
Product Exchange: CBT, CMD, CME, COMEX, DME, or NYMEX.
Date Type
Defines whether the transactions will be retrieved by the date the trade was
executed
(Trade Date) or the date the trade cleared or is scheduled to be
cleared (Clear Date).
From Date
Starting date of a date range search. Pit and Ex-Pit Transactions can be
searched within a date range.
To Date
End date of a date range search. Setting the To Date equal to the From Date
results in a single date search.
Traded As
Indicates whether the transaction(s) were executed as an outright or spread;
Outright, Spread, Leg Spread, or Differential.
Market Side
Side of the trade; Buy or Sell
Product Type
Product type; Future, Option, Call, Put, Combo, Forward, or CDS
Contract Period
Contract month, year, and date (MM/YY/DD). The day value (DD) is only
required for daily-listed contracts.
Product Code
CME Clearing product code. Up to 5 product codes can be searched at a time,
separated by a comma.
Status
Depending on the Search Type selected, the choices in the Status field will vary.
Trade: Accepted, Deleted, Error, Hold, Matched, Pending Accept, Pending
Opposite, Rejected, Reverse Rejected, Reverse Requested, Reversed,
Transferred, Unmatched, or Voided.
Allocations or Claims: Accepted, Error, Pending Accept, Pending Delete,
Pending Opposite, Rejected, Reverse Rejected, Reverse Requested, or
Reversed.
Allocation Groups: Complete or Working.
Account
Account number associated with the trade/allocation. Customer Account Number
or Position Account Number (OTC). “Wild-card” search eligible by using an
asterisk before, in the middle, or after.
Order
Order number or ticket number associated with the trade/allocation. “Wild-card”
search eligible by using an asterisk before, in the middle, or after.
Trade ID
ID of the trade, allocation or allocation group.
Trader
Trader associated with the trade/allocation.
Opposite Firm
Opposite Firm associated with the trade. Does not display for trades that are
anonymous.
6
Allocation Type
Type of allocation associated with the trade: APS, Cross Exchange (MOS),
GUS, or None (not marked for allocation)
Strike Price
The strike price of an option
Coupon Rate
Coupon Rate of a CDS trade.
Trade Sub Type
Sub Type associated with certain trades: All, None, TAM, TAS, AUCTN
(Auction), or CONV (Conversion)
Quantity
Quantity of the trade. An inequality sign such as > can be used to expand the
search. Ex. >100 would only display trades with a quantity over 100.
Input Source
Platform indicator of where the trade originated. For ClearPort trades and all
platforms using the ClearPort API, the Input Source will be CPC. For all other
platforms, the abbreviation will be listed.
Advanced Search Fields
Date/Time
The selections all correspond to the time which the specific action took place.
After defining the Date/Time field, a time range within which the action occurred
can be specified by utilizing the Start Date/Time and End Date/Time fields.
Trades: Entry, Match, Change, or Expired.
Allocations or Claims: Allocation, Accept, Reject, or Expired.
Allocation Groups: Entry or Change.
Price
The price at which the trade was executed. Price is entered in true decimal or
TCC format; All, Reg, TAS Initial, TAS Final, TAM Initial, TAM Final, Fixed Cab,
Var Cab, Percentage, Settlement, and Deal Spread.
Origin
Origin defines the relationship of the originating firm; Customer or House.
Customer Type
Customer Type Indicator (CTI).
1 = Broker/Trader trading for his/her own account
2 = Broker/Trader trading for Clearing Member Firm’s House account
3 = Broker/Trader trading for the account of another trader on the trading
floor
4 = Broker/Trader trading for any other account (Customer)
Operator ID
Globex Operator ID (“Tag 50”)
Opposite Trader
The opposite trader for a trade (not available for all trade types).
Avg Px Group ID
Average Price Group ID. This field is unavailable if Search Type is set to
Trades.
Spread Strategy
Globex spread strategy.
7
Saved Searches
Saving search parameters allows users to quickly execute regularly queried searches. Take the
following steps to save the search parameters:
To save your search parameters:
1. Enter your search criteria.
2. Click the Save Search link.
3. Name the search that is being saved.
4. Click Save. A confirmation message will display.
To Retrieve Saved Searches
1. Click the Saved Search tab.
2. Click the search name. You will be redirected
the Search tab with the saved search
parameters populated.
back to
3. Click the Search button to execute the
search.
Note: Saved Searches cannot be updated.
To Delete a Saved Search.
1. Click on the Saved Search tab
2. Find the Saved Search to be deleted
3. Click the delete icon.
4. A confirmation message will display.
8
Search Types
FEC+ has four Search Types: Trades, Allocation Groups, Allocations, Claims
Trades
The Trades screen displays all trades executed on Independent Trading Platforms (including ClearPort)
or that are marked for Cross-Exchange Allocation (read-only).
This screen allows the following actions to be completed:
View, Expand/Collapse
Accept, Reject, Update
Allocate, Unmark
Transfer (for future use)
Allocation Groups
The Allocation Group screen shows allocations at the group-level and allows the following actions to be
completed at the group-level:
View, Expand/Collapse
Allocate (mass-allocate)
Reverse, Cancel Reverse, Accept Reverse, Reject Reverse
Complete, Uncomplete (Average Price Group)
Delete
This screen allows the group to be expanded for taking the following actions at the allocation-level:
View, Create, Update, Delete
Reverse, Accept Reverse, Cancel Reverse, Reject Reverse
Allocations
The Allocations screen displays all allocations at the individual allocation-level.
This screen allows the following action to be completed at the allocation-level:
View, Update, Delete
Reverse, Accept Reverse, Cancel Reverse, Reject Reverse
Claims
The Claims screen displays all inbound allocations
This screen allows the following actions to be completed:
View
Re-Allocate
Accept, Reject, Update
Reverse, Accept Reverse, Cancel Reverse, Reject Reverse
9
Search Field Result Descriptions
Accepted Quantity
Quantity accepted by claiming firm
Account
Executing/Customer account number
OTC: If Account number matches an existing Position account, it will post
to that position account
Allocation Quantity
Quantity allocated from the Allocation Group
Alloc Type
Allocation Type for Trades.
GG- Give-up
AG - Average-Priced Give-up (APS)
XG- Cross-Exchange allocation to SGX Firm (MOS)
Allocation Type
APS ID
Allocation Type for Allocation Groups.
AG - Average-Priced Give-up Group (APS)
AS - Single-trade Allocation Group at the request of submitter
GG - Give-up Group
SG - Single-trade Allocation Group (NYMEX/COMEX)
XG - Cross-Exchange (MOS) Allocation Group
Average Price Group ID
Average Price
Allocation Group Average Price
B/S
Market side of the trade, trade(s) in the Allocation Group, or individual
allocation. B=Buy, S=Sell
Broker (Brkr)
Floor/Globex Trader ID
Carry Account
Account of the Carry Firm
Carry Exchange
(Allocations) Clearing Exchange of the Carry Firm
Carry Firm
Allocation: Carry firm
Contract Period
Contract period. For OTCFX, this indicates the Fixing Date
Create Date
Date/Time trade was received by FEC+. Time allocation was created in or
received by FEC+
CTI
Customer Type Indicator
Grp ID
Average Price Group ID
Firm
Trading Member Firm number
ID
FEC+ Allocation Group ID or ID of individual Allocation. Systematically
generated
Last Modify Date
Most recent Date/Time trade was updated by your firm
Last Modify User
FEC+ User ID of the last user to modify a trade/allocation from your firm’s
side. If trade was updated via back-office API messaging, the field will
display as API.
Last Update
Most recent Date/Time allocation was updated
Marker
Traded at Marker (TAM) Indicator
Marker Typ
Traded at Marker (TAM) type
Operator ID
Globex Operator ID
Oppo Brkr
Opposite Floor/Globex Trader ID
10
Oppo Exch
Clearing Exchange for the Executing Firm (Claims screen)
Oppo Firm
Trade: Opposite side of the trade, Allocation: Executing firm
Order ID
Order Number
Order Type
Order Type
Origin (Org)
C=Customer, H=House
P/C
Put/Call Indicator. C=Call, P=Put
Price
Trade Price or price of individual allocation
Price Typ
Traded at Settlement (TAS), Traded at Marker (TAM)
Product (Product ID)
CME Product Code
Product Type
FUT (Futures), OOF (Options), OOC (Combo), CDS, FWD
Qty
Allocation or trade quantity
Quantity
Allocation Group Quantity
Re-Allocate
Indicates if the Allocation has been designated for re-allocation.
Residual
The difference between True Average Price and the Rounded
Average Price.
Status
Status of the trade, Allocation Group, Allocation (outbound and inbound)
Status Date
Last Date/Time status of the allocation was updated.
Strike Price/Coupon Rate Indicates Strike Price for Option trades or Coupon Rate for CDS
trades.
Trade Date
CME Trade Date on of originally executed trade(s)
Trade ID
FEC+ Trade ID. Systematically generated, unless supplied by firm.
Trade Subtype
TAM- Traded at Marker, TAS- Traded at Settlement
CONV- Migrated Trade, AUCTN- Price Quality Auction Trade
Trade Type
BLOCK, EBF, EFP, EFR, EFS, EOO, FU (Funge), OPNT, REG (regular
non-OPNT trade), SUB, or TRNSF.
Traded As
Indicates whether the transaction was executed as an O (outright),
S (spread), L (legged spread), or DIFF (differential spread).
User
FEC+ User ID of the last user to modify an allocation from your firm’s
side. If trade was updated via back-office API messaging, the field will
display as API.
Venue
Venue on which the transaction occurred.
GLBX: Globex/electronic
PIT: Pit Trades; executed on the trading floor
XPIT: Privately negotiated trades, includes blocks, EFP’s etc. Any
non-electronic trade not executed in the pit.
11
Trade Management
Trade Search
To search for trades in FEC+, define the criteria
Firm
Search Type (set to Trades)
Firm Exchange
Product Exchange
Date
Trade queries can be set to include the Trade Date or Clear Date.
Trades can be searched across multiple dates. The additional
search criteria are optional and can be used to narrow down results.
The search results window is designed to display as many different
trade types as possible on the same screen. Therefore, all common
trade information is displayed on the main results line, with productspecific information available in the expanded view. If available, the
expanded view, which displays additional product-specific trade
information, can be displayed by clicking the expand (“+”) button located to the left of the result line. To
return to the normal view, click the collapse (“-“) button.
Trade Actions
The following actions can be taken on OPNT trades (non-CDS):
Update
Mark for Allocation (give-up)
Allocate
Claims
Mark for APS
All new OPNT trades post to FEC+ in Matched (MA) status.
To Update an OPNT trade:
1. Click on the trade line to be updated.
2. Enter or select the modification.
3. Click the Update button.
Changes can be made to several trades simultaneously.
Modifications cannot be made after 7:00 pm CST; only Account, CTI, and Origin are eligible for
changes.
12
To Mark an OPNT trade for Allocation (give-up):
1. Click on select box of the desired trade(s) to be updated.
2. Click the Allocate button suite and choose Mark for Give-Up.
3. Click the Update button.
The Trade Allocation Screen will appear in a pop-up window. The top section of the Allocation Screen
indicates the trade or trades that were selected, whose full trade quantity will be sent to an allocation
group.
4. To create an allocation of the full trade amount, enter the Carry Firm and Carry Account in the
corresponding fields.
5. Click the Save button.
NOTE: If a Carry Firm and Carry Account are not specified before clicking save, the trade will be
marked for allocation and an allocation group will be created but no allocations will be created.
The AllocType will now be populated with SG link (give-up group). Clicking this link will send you to the
Allocation Group.
To Un-Mark an OPNT trade from an Allocation Group:
1. Click on select box of the desired trade(s) to be updated.
2. Click the Allocate button suite and choose Un-Mark.
13
3. Click the Update button.
An “Are you sure” window will pop up.
4. Click Ok
This will remove the selected trade from the allocation group and will also remove the SG from the Alloc
Typ column.
NOTE: If the allocation group has NO Accepted Allocations, and the Allocation Group Qty is reduced to
zero, the pending allocations will be deleted and the allocation group will be deleted.
If the allocation group DOES have any Accepted Allocations, any pending allocations will be deleted,
and the Allocation Group Qty will be reduced by the Qty of the trade removed.
14
Credit Default Swaps (CDS) Trade Management
All new platform-executed and migrated CDS trades are managed in FEC+.
Trade Search
To search for CDS trades in FEC+, define the criteria:
Firm
Search Type (set to Trades)
Firm Exchange (set to CME)
Product Exchange (set to CMD)
Date
CDS queries can be set to include the Trade Date or Clear
Date. CDS trades can be searched across multiple dates. The
additional search criteria are optional.
The search results window is designed to display as many
different trade types as possible on the same screen. Therefore, all common trade information is
displayed on the main results line and with product-specific information available in the expanded view.
The expanded view, which displays additional CDS trade information, can be displayed by clicking the
expand (“+”) button located to the left of the result line. To return to the normal view, click the collapse
(“-“) button.
15
Expanded Field Descriptions
Exec ID
Exec ID2
Original Trade ID
Original Trade Date
Deal Spread
Percent of Par
Reset to Par
Initial Premium
Cash Residual
ClearPort Clearing (CPC) Platform ID
Platform ID (optional)
Original Trade Identifier submitted by the platform (optional).
Original Trade Date submitted by the platform (optional).
Deal Spread, as a percentage
Percent of Par
Reset to Par. Marking the trade from Trade Price to Par.
Initial Coupon
The difference between submitted up-front fee and CMEcalculated up-front fee.
Initial Payment
The actual Up-front Fee, if supplied by platform. Otherwise, the
CME-calculated Up-front Fee displays.
Platform Allocating ID
Allocation ID assigned via the platform (optional).
Trade Actions
The following actions can be taken on a CDS trade:
Accept
Reject
Update
All new CDS trades post to FEC+ in Pending Match (PM) status.
To Accept a CDS trade:
1. Check the Select Box for the applicable transaction.
2. Click the Accept button.
Accepting the trade changes the trade status from PM to Pending Opposite (PO). Once the opposite
Clearing Firm accepts their side of the trade, the status will change from PO to MA (matched). Note
that if the opposite firm has accepted their side of the trade first, the trade will change immediately from
PM to MA, upon acceptance.
To Reject a CDS trade:
1. Check the Select Box for the applicable transaction.
2. Click the Reject button.
16
The rejected CDS trade will display in Deleted (DL)
status in FEC+ until the end of the Clearing Day: 7:00pm
CST, when it is removed from the system.
To Update a CDS trade:
1. Click on the trade line to be updated.
2. Enter or select the modification.
3. Click the Update button.
Changes can be made to several trades simultaneously.
Modifications cannot be made after 6:00 pm CST; only
Account, CTI, and Origin are eligible for changes.
17
OTCFX Trade Management
All new platform-executed OTCFX trades are managed in FEC+.
Trade Search
To search for OTCFX trades in FEC+, define the criteria:
Firm
Search Type (set to Trades)
Firm Exchange (set to CME)
Product Exchange (set to CME)
Date
Product Type: (set to Forward)
OTCFX queries can be set to include the Trade Date or Clear Date. OTCFX trades can be searched
across multiple dates. The additional search criteria are optional.
The search results window is designed to display as many different trade types as possible on the
same screen. Therefore, all common trade information is displayed on the main results line and with
product-specific information available in the expanded view. The expanded view, which displays
additional OTCFX trade information, can be displayed by clicking the expand (“+”) button located to the
left of the result line. To return to the normal view, click the collapse (“-“) button.
18
Expanded Field Descriptions
Exec ID
Exec ID2
Original Trade ID
Original Trade Date
Platform Allocating ID
ClearPort Clearing (CPC) Platform ID
Platform ID (optional)
Original Trade Identifier submitted by the platform (optional).
Original Trade Date submitted by the platform (optional).
Allocation ID assigned via the platform (optional).
Trade Actions
The following actions can be taken on an OTCFX trade:
Update
All new OTCFX trades post to FEC+ in Matched (MA) status.
To Update an OTCFX trade:
5. Click on the trade line to be updated.
6. Enter or select the modification.
7. Click the Update button.
Changes can be made to several trades simultaneously.
Modifications cannot be made after 6:00 pm CST; only Account, CTI, and Origin are eligible for
changes.
19
Allocation Management
(Give-ups and Average-Priced Give-ups)
Marking Trades for Allocation
Trades can be marked for Allocation upon execution on any platform (i.e. Globex), via API messaging,
or via the UI. For information on FIXML reference CME Group website
http://www.cmegroup.com/clearing/systems-operations/technical-standards.html.
Globex Trades
To mark an Electronic trade for Give-up or Averaging:
1. Search for the trade by setting the Search Type to Simple and the Venue to Globex.
2. Enter additional criteria if you would like to narrow your search.
3. Click Search.
4. The Trade Search Results will appear, click Enter Edit Mode.
5. Under the Alloc column, select G (Give-up) or A (Averaging) from the Allocation drop down list.
6. Click Update.
Note: The allocation will display as ‘P’ momentary. After the trade is linked to FEC+ the allocation will
display as a ‘G’ (if margked for Give-up) or an ‘A’ (if marked for Averaging). To bring back the latest
information, click Refresh.
To mark an Electronic trade for Give-up (including Carry Info) or Averaging (including APS
Group ID):
Start with steps 1-5 from above
6. While in Edit Mode, click the Enter Carrying Info check box.
20
7. Click Update.
The Confirm Give-Up Update List screen will appear.
A) For Give-Ups
8. Enter the Carrying Firm and Account (optional).
9. Click Confirm Update or click Cancel to abort your changes.
Note: When marking for Give-up, the APS Group ID field is locked from editing.
B) For Averaging
8. Enter the APS Group ID.
9. Click Confirm Update or click Cancel to abort your changes.
Note: When marking for Averaging, the Carrying Firm and Carrying Account fields are locked from
editing.
You will be returned to the Trade Search Results. The Update(s) successful message will display.
Note: The allocation will display as ‘P’ momentary. After the trade is linked to FEC+ the allocation will
display as a ‘G’ (if margked for Give-up) or an ‘A’ (if marked for Averaging). To bring back the latest
information, click Refresh.
21
Clicking the G or A hyperlinks will redirect to the specific Allocation Group in the FEC+ application in
the Allocation Groups search screen.
If no updates were performed in the Confirm Give-Up Update List window, the message below will
display.
22
Allocation Groups
Create a New Allocation within a Group
1. Insert the correct search criteria, and click “Search” button to show the desired allocation
group(s).
2. Click the Allocation Icon (blue arrow) within the group that needs a new allocation(s) to expand
the Allocations window.
The User’s default number of blank Allocation rows will appear
3. Click the “New Alloc” button in order to display additional blank allocation rows.
The number drop-box, to the left of “New Alloc” button, allows users to specify how
many new blank allocation rows to display create.
4. Enter the desired allocation criteria.
23
5. Click the “Save” button to create the new allocation(s).
The allocation will appear in PA status. The Carry Firm will see the allocation immediately after
saving.
Using Mass Update Feature When Creating a New Allocations within a Group
1. Insert the correct search criteria, and click “Search” button to show the desired allocation
group(s).
2. Click the Allocation Icon (blue arrow) within the group that needs a new allocation(s) to expand
the Allocations window.
3. Enter any allocation information that is to be applied to multiple rows in the fields in the Column
Headings.
Information can be entered in multiple fields simultaneously.
4. Click the “select box” of the allocation(s) for which the Mass Update is to apply.
Clicking the “select box” in the Header Row will select all results on the page.
Mass Update will ONLY apply to Allocation rows that have the “select box” checked
5. Enter the rest of the Allocation info
6. Click the “Save” button to create the new allocations.
Information in the Header Row will apply to all selected rows.
24
Update an Allocation within a Group
1. Insert the correct search criteria, and click “Search” button to show the desired allocation
group(s).
2. Click the Allocation Icon (blue arrow) within the desired group to reach the Allocation window.
3. Click anywhere on the allocation row that is to be updated. This opens the updateable fields for
editing.
4. Enter any changes that are needed.
5. Click the “Save” button to save the changes.
Deleting an Allocation within a Group
1. Insert the correct search criteria, and click “Search” button to show the desired allocation
group(s).
2. Click the Allocation Icon (blue arrow) within the desired group to reach the Allocation window.
25
3. Click the “select box” of the desired allocation(s).
Clicking the “select box” in the Header Row will select all results on the page.
4. Click the “Delete” button within the Allocation window.
5. Click the “Ok” button on the Are You Sure pop-up window.
Deleted Allocation(s) will disappear from the screen.
Only Allocation(s) in Pending Accept (PA) or Rejected (RJ) status can be deleted.
Mass Allocate Groups
To allocate the full quantity of one or more groups to the same carry firm and account.
26
1. Insert the correct search criteria, and click “Search” button to show the desired allocation
group(s).
2. Click the “select box” of the desired allocation group(s).
Clicking the “select box” in the Header Row will select all results on the page.
3. Click the “Allocate” button to open the Mass Allocation Window.
4. Enter Carry Firm and Carry Account
5. Click “Submit” button to save the allocations.
The full quantity of all selected Allocation Groups will be allocated to the same
firm/account.
Delete an Allocation Group
1. Insert the correct search criteria, and click “Search” button to show the desired allocation
group(s).
2. Click the “select box” of the desired allocation group(s).
27
Clicking the “select box” in the Header Row will select all results on the page.
3. Click the “Delete” button to delete the selected group(s).
4. Click the “Ok” button on the Are You Sure pop-up window.
Only unallocated groups or groups with only Pending (PA) allocations can be deleted.
Deleting a group will “Un-mark” all trades that at a part of that group.
Reverse an Allocation Group
Reversal actions can be taken at the group level and will apply to all eligible allocations within the
group.
1. Insert the correct search criteria, and click “Search” button to show the desired allocation
group(s).
2. Click the “select box” of the desired allocation group(s).
Clicking the “select box” in the Header Row will select all results on the page.
3. Click the “Reverse” drop box to display the Reversal suite of options.
4. Click the “Reverse” option.
All allocations in Accepted status (AF or AA) will change to PO status.
Cancel Reverse, Accept Reverse, and Reject Reverse actions can also be taken at the
group level
28
Display Trade Information
To see the details of the trades that make up an Allocation Group.
1. Insert the correct search criteria, and click “Search” button to show the desired allocation
group(s).
2. Click the Expand Trade Icon (blue “plus” symbol) in Trd column to expand the Trades window.
Information for all trades that make up the group are displayed.
This view is for information purposed only. Trades cannot be amended from this screen.
3. Click the Collapse Trade Icon (blue “minus” symbol) in Trd column to collapse the Trades
window.
29
Allocations
The Allocations Search Type displays allocations individually, outside of their respective Allocation
Groups, for easier maintenance.
Update an Allocation
1. Insert the correct search criteria, and click “Search” button to show the desired allocation(s).
2. Click anywhere on the allocation row that is to be updated. This opens the updateable fields for
editing.
To mass update multiple allocations, enter any allocation information that is to be applied
to multiple rows in the fields in the Column Headings. Click the “select box” of the
allocations for which the mass update should be applied. Clicking the “select box” in the
Header Row will select all results on the page.
Only Allocations in Pending Accept (PA) or Rejected (RJ) status can be updated.
3. Enter new allocation criteria
4. Click the “Update” button to update the allocation(s).
Update Multiple Allocations Using the Mass Update Feature
1. Insert the correct search criteria, and click “Search” button to show the desired allocation(s).
2. Enter any allocation information that is to be applied to multiple rows in the fields in the Column
Headings.
3. Click the “select box” of the allocations for which the mass update should be applied.
Clicking the “select box” in the Header Row will select all results on the page.
Only Allocations in Pending Accept (PA) or Rejected (RJ) status can be updated.
4. Click the “Update” button to update the selected allocations.
30
Delete an Allocation
1. Insert the correct search criteria, and click “Search” button to show the desired allocation(s).
2. Click the “select box” of the desired allocation(s).
Clicking the “select box” in the Header Row will select all results on the page.
3. Click the “Delete” button to delete the selected allocation(s).
Allocations that have already been accepted cannot be deleted.
4. Click the “Ok” button on the Are You Sure pop-up window.
Deleting an allocation will not delete the Allocation Group.
Reverse an Allocation
1. Insert the correct search criteria, and click “Search” button to show the desired allocation(s).
2. Click the “select box” of the desired allocation group(s).
Clicking the “select box” in the Header Row will select all results on the page.
31
3. Click the “Reverse” drop box to display the Reversal suite of options.
4. Click the “Reverse” option.
All allocations in Accepted status (AF or AA) will change to PO status.
Cancel Reverse, Accept Reverse, and Reject Reverse actions can also be taken from
this screen.
32
Claims
Accept a Claim
1. Insert the correct search criteria, and click “search” in order to show the desired claim(s).
2. Check the box of the desired claim(s).
In order to select all claims at once, click on the top checkbox to mark all claims as
selected.
3. Once the desired claim(s) is selected, click “Accept” to fully accept the claim(s).
Reject a Claim
1. Insert the correct search criteria, and click “search” in order to show the desired claim(s).
2. Check the box of the desired claim(s).
In order to select all claims at once, click on the top checkbox to mark all claims as
selected.
3. Once the desired claim(s) is selected, click “Reject” to reject the claim(s).
Update a Claim
1. Insert the correct search criteria, and click “search” in order to show the desired claim(s).
2. Click on the field that must be changed, and enter then new criterion.
33
If all claims need to be similarly updated, use the top criteria bar in order to make global
changes.
3. Check the box of the desired claim(s).
4. Click on “Update” and all changes will be implemented.
Re-Allocate a Claim
1. Insert the correct search criteria, and click “search” in order to show the desired claim(s).
2. Check the box of the desired claim(s).
In order to select all claims at once, click on the top checkbox to mark all claims as
selected.
3. Click on “Allocate” and an allocation box will appear.
4. Enter the correct criteria, and click “Save.”
Reverse a Claim
1. Insert the correct search criteria, and click “search” in order to show the desired claim(s).
2. Check the box of the desired claim(s).
34
In order to select all claims at once, click on the top checkbox to mark all claims as
selected.
3. Once the desired claim(s) is selected, click “Reverse” in order to show a drop down box.
In the drop down box, click “Reverse” to reverse a claim.
In the drop down box, click “Accept Reverse” to accept a reversal.
In the drop down box, click “Cancel Reversal” to cancel a reversal.
In the drop down box, click “Reject Reversal” to reject a reversal.
35
APS
To select a trade(s) for APS.
1. Insert the correct search criteria, and click “search” in order to show the trades
2. Select trade that will be marked for APS.
3. Select Allocate and Mark for Give-Up
4. In the Choose allocation type Select APS and enter APS Group Name
5. Then click Save.
Complete APS Group
1. Insert the correct search criteria, and click “search” in order to show the desired allocation
group(s).
2. Check the box of the desired group(s).
In order to select all groups at once, click on the top checkbox to mark all groups as
selected.
36
3. Click on “Complete” in order to complete the APS group(s).
Un-complete APS Group
1. Insert the correct search criteria, and click “search” in order to show the desired allocation
group(s).
2. Check the box of the desired group(s).
In order to select all groups at once, click on the top checkbox to mark all groups as
selected.
3. Click on “Uncomplete” in order to un-complete the APS group(s).
37
Cross Exchange Allocations
SGX Cross Exchange allocations were formerly referred to as MOS allocations. These allocations are
facilitated by a partner program between CME Group and Singapore Exchange (SGX). This program
enables traders to trade a futures contract on one exchange and clear it on the other. This program
gives firms a means of managing overnight risk. Trades should be designated for cross exchange
allocation upon execution.
Cross Exchange Contracts
SGX Cross Exchange Contracts
CME Clearing Code
Eurodollars
ED
Euroyen TIBOR
EY
Yen Denominated Nikkei 225 Futures
N1
Dollar Denominated Nikkei 225 Futures
NK
E-micro S&P CNX Nifty (Nifty 50) Futures
II
Marking Trades for Cross-Exchange Allocation
Trades can be marked for SGX Cross Exchange Allocation upon execution on any platform (i.e.
Globex), via API messaging, or via FEC. Only matched trades can be marked for Cross Exchange
Allocation. For information on FIXML reference CME Group website
http://www.cmegroup.com/clearing/systems-operations/technical-standards.html.
Globex Trades
To mark a trade for SGX Cross Exchange Allocation:
10. Begin by searching for the trade.
11. Set the Search Type to Simple and the Venue to Globex.
12. Enter additional criteria if you would like to narrow your search.
13. Click Search.
14. The Trade Search Results will appear, click Enter Edit Mode.
38
15. While you are in Edit Mode, click the Enter Carrying Info check box.
16. Under the Alloc column, select S (SGX) from the Allocation drop down list.
17. Click Update.
The Confirm Give-Up Update List screen will appear.
18. Enter the Carrying Firm. The Carrying Exchange is already set to SX.
19. Click Confirm Update or click Cancel to abort your changes.
Note: APS Group ID and Carrying Account should be left blank.
You will be returned to the Trade Search Results. The Update(s) successful message will display.
39
If no updates were performed the message below will display.
Note: The allocation will display as ‘P’ momentary. After the trade is linked to FEC+ the allocation will
display as an ‘S’ for SGX (see example below). To bring back the latest information, click Refresh.
Clicking the S hyperlink will redirect to the FEC+ application with the selected trade information
populated in the Allocation Group screen.
FEC+ UI View
Pit Trades
To mark a pit trade for SGX Cross Exchange Allocation:
1. Begin by searching for the trade.
2. Set the Search Type to Simple and the Venue to Pit.
3. Enter additional criteria if you would like to narrow your search.
4. Click Search.
40
5. The Trade Search Results Screen will appear, select S from the GU dropdown list.
6. Enter the Carrying Firm in the Give Up Firm field.
7. Click Update to save the changes. The user will remain on the Trade Search Results list and
the GU column will display an ‘S’ hyperlink.
Note: The GU column will display as ‘P’ momentary. After the trade is linked up to FEC+ the allocation
will display with an ‘S’ for SGX.
Unmark Trades
To unmark trades for SGX:
1. In FEC+ complete a search, Search Type ‘Trade’.
2. Click the check box next to the trade to unmark.
3. Click Unmark.
4. Click OK to confirm.
Note: Once a trade has been unmarked, the ‘S’ in FEC UI is removed. FEC+ will display the allocation
under an allocation search with a Delete (DC) status.
41
Allocations
The Allocation screen displays all outgoing allocated trades and provides the following functionality:
Reverse
Accept Reverse
Delete
Update
Actions can be taken on multiple allocations at the same time by selecting multiple check boxes.
Note: Allocations cannot be created from the Allocation screen. They are created from the Allocation
Groups screen.
Allocation Groups
The Allocation Group screen shows allocations at the group level and allows the groups to be
expanded to complete the following actions:
The Allocation screen allows the user to fully allocate multiple groups at the same time by selecting
multiple groups and clicking the Allocate button. The following actions can be completed:
View
Create
Modify
Delete
Reverse, Accept Reverse, Cancel Reverse and Reject Reverse.
Complete and Uncomplete Group
Click to display the
allocation.
Click to display the
trades.
42
Note: Under Settings, User Preference users can pre specify the number of new rows that will display
when clicking the New Allocations link.
Note: Users can fully allocate multiple groups at the same time by selecting multiple groups and
clicking the Allocate button within the Allocation Group screen.
Allocate Multiple Groups
The Allocation Group search type allows the user to allocate multiple groups.
To allocate multiple groups:
1. Click the check box of the line items to allocate.
2. Click the Allocate button.
The Mass Allocation pop-up window will display with the selected groups displayed.
3. Enter the Carry Information: Exchange, Carry Firm, Carry Account CTI and Origin.
43
4. Click Allocate.
The Mass Allocation is complete and in a Pending Accept status.
Single Allocation
To add a single allocation:
1. Click the allocation icon (
) to display the allocation.
Enter the quantity, SX Firm Number, Foreign Carry Exchange, and Account.
44
2. Click Save. The allocation has a ‘PA’ status – – waiting for SGX to accept the allocation. SGX
accepts the allocation the status changes to ‘AF’ (fully accepted) or ‘AA’ (auto accepted)
Note: To add another allocation, click the ‘New Allocation’ link.
If the allocation is rejected, the status is ‘RJ’ allowing the trade to be reallocated.
1. Click the New Allocation link.
2. Enter the allocation information.
3. Click Save.
Note: Any allocation that is rejected remains with the executing firm and a rejected status will be
treated as an out trade. Deleting rejected allocations will prevent them from displaying on out-trade
reports.
Reverse an Allocation – Allocation Group
If an allocation was mistakenly given to the wrong firm, to ‘undo’ the allocation, either side can initiate a
reverse. The opposite side must accept that reverse. The allocation status must be in an ‘AF’ state.
45
To reverse an allocation:
Reverse an Allocation Group
1. Insert the correct search criteria, and click “search” in order to show the desired allocation
group(s).
2. Check the box of the desired group(s).
In order to select all groups at once, click on the top checkbox to mark all groups as
selected.
3. Once the desired group(s) is selected, click “Reverse” in order to show a drop down box.
In the drop down box, click “Reverse” to reverse a group.
The status will change to ‘PO’; waiting on the opposite side to accept the reversal. After the reversal
has been accepted, the allocation is automatically deleted.
46
Delete an Allocation
To delete an allocation in Pending Accept (PA) status:
1. Click the check box in the allocation section.
2. Click Delete. The status will change to DC. The deletion of the allocation has been completed
for the cross exchange allocation. Go to step 3.
Note: SGX has to accept the deletion before the group can be deleted.
To delete a group:
3. Click the check box in the group section.
4. Click Delete. Located at the bottom of the screen.
47
Claim an Allocation
To claim an allocation:
1. To search for Cross Exchange allocations, complete a search with the following parameters:
Firm
Search Type - Claims
Status - PA (Pending Accept)
Allocation Type – Cross Exchange
2. Click Search.
Displays the trades sent from Singapore that has not been claimed.
The user will be able to Accept, Reject and Reverse (Reverse – Accept Reverse) trades.
Note: The Update button is not active.
3. After completing a search, select all of the trades by clicking the check box located on the
header row or to select one trade click the check box next to the trade.
4. Click Accept. The status will update to ‘CC’. The User column will also update to display the
last user ID.
48
Note: MOS Accept requests remain in CC status until SGX Exchange verifies the request, then status
changes to AF or AA.
Edit the Carry Account
To edit a carrying account:
1. Complete a search using Search Type Claims.
2. Click the Carry Account field, enter the updated account number.
3. Click Update.
To update the CTI or Origin fields, click the field and enter the updated information.
Mass Update
The fields that can be mass updated are Carry Account, CTI and Origin.
To complete a mass update:
1. To complete a Mass Update, select the check boxes of the trades to be updated. If all trades
on a screen should be updated select the check box in the header row
2. Enter the new information.
3. Click Update.
The updated information is displayed in the Claims screen.
49
Re-Allocate a Trade
To re-allocate an allocation that has a fully accepted (AF status):
1. Click the select box of the trade to be re-allocated.
2. Enter the carry information in the Allocation pop-up window.
3. Click the Save button.
User may click the Save button without entering carry information. This will create a new allocation
group in FEC Classic. All subsequent allocation management for this new group will occur in FEC
Classic.
50
Give Up Trades in FEC
To give up the trade in FEC:
1. Click the ‘Sel’ check box.
2. Click Allocate.
3. Enter the Firm, Account, Customer Type and Origin.
4. Click Allocate.
Claimed Give Up Allocation
To mark a claimed give-up allocation for cross exchange:
1. Complete a search in FEC:
a. Search Type = Give Ups, Venue = Pit or Globex and Subtype (Claims).
2&4
3
5
2. Click the ‘Sel’ check box.
3. Click ‘Accept’.
4. Click the ‘Sel’ check box.
5. Click ‘Send to MOS’.
51
6. Enter the Carrying Firm and Carry Account.
7. Click Confirm Update.
Mass Allocations
Select multiple claim records and allocate them simultaneously for mutual offset using the “Send to
MOS” button in FEC.
To complete a Mass Allocation:
1. Complete a search in FEC:
a. Search Type = Give Ups, Venue = Pit or Globex and Subtype (Claims).
2. Click the ‘Select All’.
3. Click Accept. The status will change from ‘PA’ to ‘AF’.
4. Click the ‘Select All’ check box.
5. Click ‘Send to MOS’.
a. Enter Carry Firm (SX Firm)
b. Enter Carrying Account
6. Click Confirm Update. The Sub column will display a ‘P’, click refresh to display the ‘S’
52
la.m Search Resulb
53
Settings
The settings link is located at the top of the screen in the Main Menu bar.
Three tabs will appear appear:
User Preferences – Allows user to cuztomize the various user settings
Auto Accept Rules – This tab allows users to search/edit existing Auto Except Rules for their firm
New Auto Accept Rule – This tab allows users to create new Auto Accept Rules for their firm
User Preferences
Settings that can be changed in the User Preferences Menu:
The default Firm Exchange and Product Exchange when logging into FEC+
The date format can be changed in Locale
US-MM/DD/YY or GB-DD/MM/YY
The time zone displayed in the search results of FEC+
Chicago/Central or London/Greewich
The number of search result records a user will see when performing a search
10, 25, 50, or 100
The number of allocation rows that will appear when a user expands an Allocation Group
54
1-20
The columns that will display when a search is performed. This can be customized for the four
different Search Types (Trades, Allocations, Groups, Claims).
To save any changed settings, click the Save button located near the bottom of the screen.
Number of Allocations Example
As noted above, setting the Number of Allocations field in User Settings determines the default number
of rows that populate for the New Allocation function.
55
El
05113109 195111
RADTEST1
XG
12f20H
ED
97.1
Res
Oly
Ir
3
Carry firm
Sl
Ll
n
D
D
D
DC
••sv
PIT
CTl
(Kg
Last Update
.
User
Staws Change
.'
AlocO
195112
009
10G
Sl
carry Acct
REG
0
• New Aloe•- 8
I ' oc
n
Carry Exch
RADT1
c
ROW
sx
c
RADT1
RSV
05118111 14:08
0511W11 14:08
'
Aloe ID
195112
Res
Oty
Carry f irm
100
009
I
I
Carry Exch
sx
ct!E "::J•
CTI
Carry Acct
Org
c
RADT1
-
-
0511811114:08
User-
RSV
Status Chilnge
0511W11 14:08
c
CLE
I
c
CLE
I
c
-
Lasl te
-
56
Auto Accept Rules
The Auto Accept screen allows a firm to specify criteria for automatically accepting or rejecting
allocations coming in from another firm or for trades designated to be cleared by your firm.
Firms may specify Auto Accept rules for:
Allocations:
Allocations from a specific firm number in a specific account. Can also specify to accept into a
different account
A maximum allocation quantity to accept from a firm.
The first time and last time of the day that your firm will auto accept allocations from a firm. Note
this is a 24-hour time format (e.g. 1:00 p.m. = 1300).
When the Auto Accept criteria are met, the status of the allocation will change from ‘PA’ to ‘AA’ (Auto
Accept).
Trades:
Trades for a specific account number.
A maximum trade quantity to accept for that account.
The time frame in which auto-accept rules will apply. Note this is a 24-hour time format (e.g.
1:00 p.m. = 1300).
When the Auto Accept criteria are met, the status of the trade will change from ‘PM’ to ‘AA’ (Auto
Accept).
To Create an Auto Accept Rules:
1. Click on the Settings link in the Main Menu bar, located at the top of the page
2. Click the New auto accept rule tab.
3. Select or enter the required information to define the rule.
All required fields are denoted with an asterisk (*).
57
Click the Submit button.
Additional Setting for Auto Accept Rules:
There are additional settings that can be applied to each Auto Accept Rule:
Top day only – Checking this box will only apply the rule if the Trade Date matched the Clear Date (the
date the trade is scheduled to clear)
Reject rule – Checking this box will Auto REJECT allocations/trades based on the specified criteria
Rule disabled – Chicking this box will disable or inactivate the rule. The rule can be re-activated by
unchecking this box.
Creating Auto Accept Rules for Allocations:
A. Set the Rule Type to GUS (give-ups), APS (Averaged priced give-ups), or Cross Exchange (for
MOS allocations)
B. Set the Carry Firm as your Trading Member Firm Number
C. Set Carry Firm Exchange to CME, CBT, or NYMEX
D. Set the Carry Account if you would like to change the account automatically upon acceptance. If
you do not require the account to change, enter an asterik (*) to claim into the same account
that was allocated
E. Set Executing Firm as the Trading Member Firm Number of the firm who is allocating to you
F. Set Executing Exchange to CME, CBT, NYMEX, or SX (for MOS allocations)
58
G. Set the Executing Account as the account the executing firm will set on the allocation
H. Set Product Exchange to CME, CBT, NYMEX, or COMEX
I.
Set the maximum quantity field. Filling the field with 9’s means No quantity limit.
Creating Auto Accept Rules for CDS Trades:
A. Set the Rule Type to Trades
B. Set the Carry Firm as your Trading Member Firm Number
C. Set Carry Firm Exchange to CME
D. Set the Carry Account as the Customer/Position Account the trade will clear under
E. Set Executing Firm as your Trading Member Firm Number
F. Set Executing Exchange to CME
G. Set the Executing Account as the Customer/Position Account the trade will clear under
H. Set Product Exchange to CMD
I.
Set the maximum quantity field. Filling the field with 9’s means No Quantity Limit.
Search for an Auto Accept Rule:
1. Select a Firm Number. Only firm numbers you are authorized to view will display.
2. Select a Firm Exchange.
3. Select Rule Type:
All
Trade
GUS
59
APS
Cross Exchange
Results can be narrowed down further by including information in the Carry Account, Executing
Account, or Executing Firm search fields.
4. Click Search.
The Reset button will clear the screen.
If there are multiple Auto Accept rules, the following hierarchy is used:
Exchange ID
Executing Firm ID
Executing Firm Account
Venue
Product Exchange
Commodity Code
To Edit an Auto Accept Rule:
1. Click anywhere on the row that needs to updated
2. Enter the new information in the appropriate field(s).
3. Click Save.
To Copy or Delete an Auto Accept Rule:
1. Click the check box next to the rule.
2. Click Copy or Delete.
To Close the Setting Window:
1. Click the Back to search link.
60
Downloading a Report
To download a new report
1. Perform a search
2. Click the Report icon near the bottom of the screen
3. A notice will appear at the top of the page specifying that the report is running.
4. When the report is ready, another notice will appear, indicating that the report generation has
been completed. Click the link within this notice to access the report.
The report will open in .csv format in whichever application your system has set as default for
such files.
61
User Notification Services
The User Notification Services allows Clearing House to send mass communication to anyone logged
into FEC+. The message will appear above the results screen toward the right-hand side of the page.
There are three types of messages: Error, Warning and Information.
Error
e-:._ ';£ Front End Clearing
--
llritJl"¥1,1§s(.jlu!§&f!o ·
TIXIII!Tp:
,_
O.Tp
f a
D*
- - - ----.
...
1-31210
.,.
Tr:DO.
,..
51
9
.
.
Warning
eCME Group
·------
-O.T
TROttla
Front End Clearing
This is a warning message.
Tr:m.T.-
F _.o.;•
Yl3'2009
""".".".'.....
------ --------------
-
Information
eC. M..E._G.. roup
--
Front End Clearing
I
This is aninformation message.
T X tlp:
62
-
63
Appendix I – Results Fields
Column
Header
Type
Trade
s
Accepted Quantity
Account
●
Alc
Alloc Type
Allocatio
n
Groups
Allocation
s
Description
Claim
s
●
Quantity that has been
accepted
●
Account number for which the
trade was executed.
●
Expands the allocation group to
allow user to add/view/edit
allocations created from the
group
●
●
Allocation Quantity
●
Allocation Type
●
Indicates the type of allocation
Allocation quantity
APS Group ID
●
Indicates the type of allocation
●
Average Price Group ID
APS ID
●
Average Price Group ID
Average Price
●
Price of the Average Price
Group
B/S
●
Brkr
●
●
●
●
Broker
●
Broker
Buy or Sell : Indicates whether
the trade side is a buy or a sell.
Buy = B , Sell = S
Broker
●
Carry Exchange
●
Clearing Exchange of the Carry
Firm (Should be SX for MOS
allocations)
Carry Firm
●
Carry firm
Contract Period
●
●
●
●
Account designated on an
allocation
Carry Account
●
Contract month/year
(MM/YY/DD).
64
Column
Header
Create Date
Type
Trade
s
Allocatio
n
Groups
●
Description
Allocation
s
Claim
s
●
●
Date/Time that trade or
allocation was created
CTI
●
●
●
●
Customer Type Indicator: 1 =
Broker trading for his own
account, 2 = Broke trading for
the House account, 3 = Broker
trading for anoter broker on the
floor 4 = Broker trading for any
other account (Customer
Orders)
Firm
●
●
●
●
Trading member firm number
Grp ID
●
●
ID
Last Modify Date
Last Modify User
Average Price Group ID
●
●
CME-issued ID for Allocation
Groups or individual Allocations
●
Last date/time trade was
updated
●
FEC+ User ID of the last users
to modify the trade. If updated
via messaging, API or MQM will
display
●
Last Update
●
Last date/time trade was
updated
Marker
●
TAM marker indicator
Marker Type
●
TAM marker indicator
●
Msg
●
User message. Can be used as
a notepad for both firms
involved in the allocation to
pass notes
Operator ID
●
Operator ID
Oppo Broker
●
Opposite broker/trader
Oppo Exch
●
Opposite Exchange. Will be SX
on MOS allocations
65
Column
Header
Oppo Firm
Type
Trade
s
Allocatio
n
Groups
Allocation
s
●
●
Ord ID
Order ID
●
Order Type
●
Org
●
Claim
s
●
Opposite Firm : Opposite side
of the transaction
●
Order ID: Executing firm’s order
number
Order ID: Executing firm’s order
number
●
Order Type
●
●
Origin: 1 = House, 2 =
Customer
Origin: 1 = House, 2 =
Customer
●
Origin
Description
P/C
●
●
●
●
Put or Call indicator
Price
●
●
●
●
Trade, Allocation Group, or
Alocation Price
Price Type
●
Product
●
Product Type
●
Qty
●
Price Type
●
●
●
●
●
Trade or Allocation Quantity
●
Re-allocate inducates claimed
allocation was re-allocated
●
●
●
The averaging residual attached
to Averaged Priced allocations
●
●
●
Trade, Allocation Group, or
Allocation status
●
●
Timestamp of last time
allocation status was changed
●
●
Strike Price or Coupon Rate
Status Date
Strike Price /Coupon
●
Allocation Group Quantity
Re-Allocate
Residual
Two character code CME
Product Code
Product Type
●
Quantity
Status
●
●
66
Column
Header
Type
Trade
s
Allocatio
n
Groups
Allocation
s
Description
Claim
s
Rate
●
●
●
Trade date of Trade, Trades in
an Allocation Group or
Allocation
Trade Date
●
Trade ID
●
CME-issued ID for Trades
Trade Subtype
●
Trade Subtype
Trade Type
●
●
●
●
Trade Type
Traded As
●
●
●
●
O = Outright, S = Spread, L =
Leged Spread
Allows the user to see all trades
that make up that Allocation
Group
●
Trd
User
●
Venue
●
●
●
FEC+ User ID of the last users
to modify the trade. If updated
via messaging, API or MQM will
display
●
●
Trade Venue: Pit, Elec, XPIT
Appendix II – Status Codes
Code
Description
AA
Auto-Accepted
Note
Allocation Status: Accepted via an AutoAccept rule.
Trade Status: Accepted via an AutoAccept rule.
AF
Accepted Fully
AR
Accepted Reversal
C
Completed Average Price
Group
Allocation Status
Allocation Status: The allocation was
reversed
Allocation Group Status. Applies to
Averaged Priced Give-up Groups,
indicates that the Average Price
calculations are complete and that no
more trades can be added to the group.
67
Code
Description
Note
Allocations can only be created from an
Average Priced Group once it is in
Completed status.
CC
Claim Pending
Confirmation
Allocation Status: Intermediary MOS
Status: Accept requests remain in CC
status until SGX Exchange verifies the
request, then status changes to AF or AA.
DC
Delete Pending
Confirmation
Allocation Status: Intermediary MOS
Status: Delete requests remain in DC
status until SGX Exchange verifies the
request, then the allocation will be
removed from the screen.
DL
Deleted
EE
Error
Allocation Status: Applies to MOS
allocations that have received an error
response from SGX. Error message will
display in the UI.
JC
Reject Pending
Confirmation
Allocation Status: Intermediary MOS
Status: Reject requests remain in JC
status until SGX Exchange verifies the
request, then status changes to RJ.
MA
Matched
MC
Modify Pending
Confirmation
Allocation Status: Intermediary MOS
Status: Change requests remain in MC
status until SGX Exchange verifies the
request, then status changes to PA.
PA
Pending Acceptance
Allocation Status. Allocation is pending
action
PM
Pending Match
Trade Status. Trade is pending action
PO
Pending Opposite
Trade Status: Deleted trades remain
viewable in FEC+.
Trade status
Trade Status: Signifies that your firm has
accepted this trade, and is pending the
Opposite Clearing Member Firm to accept.
Once the opposite firm accepts, trade
moves into MA (or AA) status.
Allocation Status: Signifies a reversal
68
Code
Description
Note
request submitted from your side; awaiting
action from opposite party.
PR
Pending Reversal
Signifies a reversal request that requires
your attention.
RJ
Rejected
RO
Reversal Rejected
Allocation Status- Rejected by opposite
firm
RR
Reversal Rejected
Allocation Status- Rejected by your firm
UC
Uncompleted Averge
Pricing Group
UN
Unmatched
AG
Average Priced Group
Allocation Type
GG
Give-Up Group
Allocation Type
SG
Single Trade Per Group
Allocation Type
XG
Cross Exchange
Allocation Group
Allocation Type
Allocation Status. Allocation has been
rejected by the claiming firm. Allocation
may be claimed by the claiming firm until it
is deleted by the Executing firm.
Allocation Group Status. Trades can be
added to Uncompleted Averabe Pricing
Group. Allocations cannot be created from
a group in uncompleted status.
Trade Status
69
Appendix III – Navigational Tools
The left side of the display screen drives navigation within FEC+.
The window display area can be adjusted to display
all of the returned search columns.
1. Anchor your mouse between the search
menu and the display area until the double
pointed arrow is displayed.
2. Move the arrow left or right to resize the
window.
3. By double clicking you can completely hide
the search window
Navigating Pages
Download Report Button
Next link
Submits a request to
download current results
To go advance a
page.
Previous link
To go back a
page.
Refresh current
result list.
Sort
The trade display area has a sort option allowing a user to sort one column at a time.
To sort a column, click the sort icon the icon will change colors to display the column sorted.
Confirmation Messages
A confirmation message will display at the top of
the screen informing the user if the requested
action was completed successfully or if the requst
could not be completed.
Messages (MSG)
User messages can be entered for the opposite
party
to read. Click the ‘N’ hyperlink to enter a
70
message.
If there is a message the ‘Msg’ will display a
‘Y’, click to read.
Appendix IV – Cross Exchange Allocations FAQ
1. How do trades get into FEC+?
Globex Terminals – Trades designated for
cross-exchange Allocation upon execution.
Front End Clearing (FEC) – Trades marked for cross-exchange Allocation directly in FEC.
API messaging – Message sent to FEC marking trades for cross-exchange Allocation.
2. Are the originating Singapore trades in FEC?
No, trades originating from Singapore do not display in the FEC User Interface.
3. After a trade has been entered into FEC+, can I make a change to the trade?
The only changes that can be made to outbound cross-exchange allocations in FEC+ are Carry
Account.
4. Are all of my trades in FEC+?
No, only trades that are in FEC+ are trades that are marked for SGX and ClearPort and
Platform trades.
5. What if I accept a trade by mistake?
If an allocation has been accepted by mistake, you will have to request a reverse.
6. I only want to accept SX firm 123 trades with account number 99999, can I automatically do
this?
Yes, select Settings and setup an Auto Accept Rule. A rule can also be added to reject trades
by clicking the check box “Is reject rule”.
7. I want to give this allocation to another CME firm, can this be done?
Yes. Complete a search in FEC+ using search type ‘Claim’. The trade must be in an ‘AF’
status.
1. Click the check box of the allocation to be re-allocated.
2. Click the Allocate button.
3. Enter the carry information in the Allocation pop-up window.
4. Click Save.
8. Will I be responsible for any allocations that are rejected?
Any allocation that is rejected remains with the executing firm. Rejected allocations may be
updated/changed, which will be sent back to the SGX firm in ‘PA’ status. Any rejected allocation
that remains in Rejected status will be treated as an out trade. Deleting a rejected allocation will
prevent it from showing up as an out trade.
9. Is there any wildcard functionality?
Yes, to use the wildcard functionality enter an asterisk (*) e.g. *123, abc*90.
70
10. I entered a message on a trade that was marked for SGX, but I didn’t see the message in
FEC+.
Messages are not copied from FEC to FEC+; they will stay in the system where they were
created.
11. Who should I contact for FEC+ support?
Contact CME Clearing Europe Support Team
on: 44 20 3379 3131.
Email address:
[email protected]
12. Do you offer training on FEC+?
Yes, contact CME Clearing Europe Support Team on:
44 20 3379 3131.
Email address:
[email protected]
71
CMC OROUPGU)UAl OffiCES
20South Waclee OrNe
Chicago, ll 60506
cmegroup.com
New York
Washington O.C
Houston
London
Singapo-e
To"kyo
sao Pa.-.11o