1
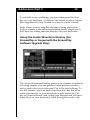
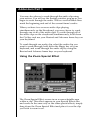
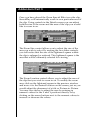
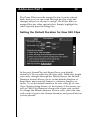
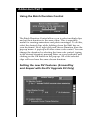
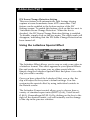
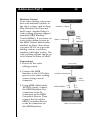
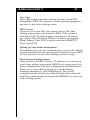
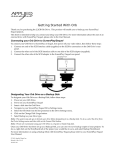
Applied Magic
29
User Manual Addendum, Part 3
Trimming and Editing in Full-Screen
This feature allows you to scrub, trim, and edit your video in
full-screen and is perfect for getting a closer look at all your
edits as well as showing your product to clients.
Press the Full-Screen key on your keyboard to trim and edit
your video in full-screen. If you are already in full-screen
mode then you will not have to press the key again. Next,
press the Pause key, also located on your keyboard. The
current frame will now be displayed in full-screen.
From here you can use the playback, frame advance, fast
forward, and rewind controls to trim and edit your video. Onscreen controls are available, or, if you prefer, you can choose
not to view these on-screen controls.
To turn off the on-screen controls, go into your View Options
Setup screen and, under the section 'General user options',
click on the button next to 'Show on-screen controls during
full-screen pause'. When this button is checked, your onscreen controls will be activated. When this button is not
checked, the on-screen controls will be deactivated. You can
also deactivate the on-screen controls while you are in the
process of full-screen editing by holding down the Ctrl key on
your keyboard and then pressing the down arrow key on
your keyboard. To view them again, simply hold down the
Ctrl key and press the up arrow key on your keyboard.
Addendum Part 3
30
To exit full-screen scrubbing, you can either press the Stop
key on your keyboard, or click on 'the return to editor' button
(the clapperboard icon) located on your on-screen controls.
Note: If you want to stop the clip that is being played but
wish to remain in the full-screen editing mode, simply press
the Pause key rather than the Stop key on your keyboard.
Using the Audio Waveform Display (For
ScreenPlay or Sequel with the ScreenPlay
Software Upgrade Only)
The Audio Waveform Display presents five frames of audio in
a floating display over the quarter-screen preview window,
and is perfect for voice-overs and 'Cut to the beat' editing. To
use this feature, select an audio clip from the clips bin or an
audio clip already on your Storyboard, hold down the Ctrl
key on your keyboard, and, using your Rewind and Advance
frame keys on your keyboard, scrub through the audio clip.
Addendum Part 3
31
You may also choose to scrub through the audio clip using
your mouse. You will see the floating window pop-up as you
begin to scrub through the audio. The two vertical black lines
mark the beginning and end of the current frame's audio.
When you have two or more audio clips playing
simultaneously on the Storyboard, you may choose to scrub
through one or all of the audio clips. To scrub through all of
the audio clips on the storyboard simultaneously, hold down
the Ctrl key and use your Rewind and Advance frame keys on
your keyboard.
To scrub through one audio clip, select the audio clip you
want to scrub through, hold down the Magic key on your
keyboard, and scrub through the audio clip by using the
Rewind and Advance frame keys on your keyboard.
Using the Zoom Special Effect
The Zoom Special Effect zooms in on a user-selectable area
within a clip. This effect appears in your Special Effects Bin
and works in the same way as the other special effects; simply
drag down the Zoom Special Effect and place it over the clip
you wish to zoom in on.
Addendum Part 3
32
Once you have placed the Zoom Special Effect over the clip,
ScreenPlay will automatically zoom in on a particular area of
the clip. Using controls in the Details screen you can adjust
both the size of the zoom and the area of the clip you would
like to zoom in on.
The Zoom Size control allows you to adjust the size of the
area you wish to select. By moving the two slider controls,
you will notice that the size of the lightened square within
the clip is enlarged or reduced. This lightened square is the
area that will be ultimately selected for viewing.
The Zoom Location control allows you to adjust the area of
the clip that you wish to zoom in on. To modify the zoom
area, click on the lightened square in the preview window
and move it to the desired location on the screen, just as you
would adjust the placement of a title or Picture-in- Picture.
You may also choose to adjust the area by entering in
numeric values for the X and Y positions directly or by
clicking on the arrow buttons next to the numeric values to
increase or decrease the values.
Addendum Part 3
33
The Zoom Effect must be merged before it can be played
back, however you can scrub through the clip to see the
changes before you choose to merge. The Zoom Effect is
merged like any other special effect. Simply highlight the
video clip and press the Merge key.
Setting the Default Duration for New Still Clips
In the past, ScreenPlay and Sequel have set a default
duration of five seconds for all video stills. While this length
was easily changed through the Details Screen, the Default
Duration feature allows you to set the default duration of
Snap Shots and extracted frames to whatever length you
desire. To set the default duration for new stills, go to your
View Options Setup Screen. At the bottom of the screen you
will see 'Still Clip Duration' along with a time code control.
To change the default duration for new stills, select the time
code control, type in the desired duration, and press Enter on
your keyboard.
Addendum Part 3
34
Using the Batch Duration Control
The Batch Duration Control allows you to select multiple clips
and set their duration to the same value. This is especially
useful for creating animations and photo-montages. To do this,
select the desired clips while holding down the Shift key on
your keyboard. Next, right click and choose Duration from the
pop-up menu. A pop-up will offer a time code control. You can
change the duration by selecting the time code control, typing
in the desired duration, pressing Enter on your keyboard, and
clicking on the OK button in the pop-up. All of the selected
clips will now have the same chosen duration.
Setting the new DV Features (ScreenPlay
and Sequel with the DV Upgrade Kit Only)
Addendum Part 3
35
Version 2.5 includes an extra screen in the Setup Screens area.
This screen is titled 'DV/DVD Settings' and is divided into
three areas that allow you to enable and disable the DV
Machine Control and DV Scene Change Detection features as
well as allowing you to choose an output display format.
DV Machine Control Setting
Because some DV equipment may not fully support DV
machine control, this option allows you to disable the feature.
By clicking on the box in the DV Machine Control area, you
can enable or disable the DV Machine Control feature. When
the box is checked, the DV Machine Control feature is enabled.
An empty box indicates that the DV Machine Control feature is
disabled. When a change is made in this area, you will need to
restart your system for the changes to take effect.
Activating DV/DVD Records when Mastering
If you have activated DV Machine Control you will see an
option to activate DV/DVD records when mastering. If your
DV deck or DVD burner supports deck control (DV AV/C
commands), this option will automatically start the recorder
when Mastering. To activate this option, simply click on the
box located next to the option. When the box is checked, the
option is activated.
Output Display Format
To choose a mode to output DV footage, simply click on the
box next to the desired ratio (16:9, 4:3, 16:9 Letterbox). This
function sets the format of your DV output stream. It will not
change the aspect ratio of your source material.
Usage: You can now choose to capture footage at the 16:9
mode, bring it into your unit, edit it, and output it back in the
16:9 mode. This will preserve the 16:9 aspect ratio for later
duplication and mastering. 16:9 Letterbox mode is used for
times when your footage is Letterboxed on ScreenPlay and
you would like the footage to appear full-screen on 16:9
displays. The 4:3 mode is for normal television viewing.
Addendum Part 3
36
DV Scene Change Detection Setting
This new feature will automatically split footage during
capture at scene boundaries from a DV camcorder. This
feature can be enabled in the bottom section of the DV
Settings screen. To enable this feature, click on the box next to
'Automatic Scene Change Detection'. When the box is
checked, the DV Scene Change Detection Setting is enabled.
To disable, simply click on the box again. The check mark will
disappear, indicating that the DV Scene Change Detection has
been turned off.
Using the Letterbox Special Effect
The Letterbox Effect allows you to crop or scale your video in
a letterbox format. This effect appears in your Special Effects
Bin and works in the same way as other special effects.
Simply drag the Letterbox Special Effect and place it over the
clip you wish to modify.
Once you have placed the Letterbox Effect over a clip, the
clip will adjust to the system's default settings. You can
customize the special effect by using individual controls in
the Details screen.
The Letterbox Format control allows you to choose from a
variety of standard aspect ratio (HDTV (16:9), VistaVision®
(1.88:1), CinemaScope®(2.35:1)). By clicking on the box to the
right of the desired format, you will instantly see the change
to the clip in the preview window.
Addendum Part 3
37
The Letterbox Options controls allow you to either crop or
scale the video clip to conform to the letterbox format. To
choose either crop or scale, simply click on the box next to the
desired action. Crop is used for standard 4:3 source material.
Scale may be used to correct 16:9 footage intended for 4:3
output.
Pasting Transitions on Multiple Selected Clips
This feature will allow you to paste a transition onto multiple
clips enabling fast creation of slide shows and photomontages. To do this, right click on the transition you would
like to use, then select Copy from the options displayed in the
pop-up. Next, choose the clips you would like to have the
transition applied to by clicking on one clip, holding down the
Shift key on your keyboard, and then selecting the next clip(s).
Once you have selected all the clips you wish to add the
transition to, right click on the Storyboard and select Paste
from the options displayed in the pop-up. This will add the
copied transition to each clip that you have selected.
Note: You may copy a transition from both the Transitions Bin
or a transition already placed on your Storyboard. All
properties, such as duration, envelope, and border color, will
be preserved across all the new transitions.
Using the Range Selection Feature
The Range Selection Feature allows easier selection of
multiple items within the Bins or Storyboard. By clicking on
the first item, pressing and holding down the alt key while
selecting the last clip in a range, all the items in the range will
be selected. To place all of the selected clips on the Storyboard,
hold down the Alt Key located on your keyboard and use
your mouse to drag the selected area down to the Storyboard.
Addendum Part 3
38
Set up and Use of MIDI Control
Overview
MIDI Control allows your Applied Magic video editing
system to synchronize with external MIDI devices, such as
music workstations and sequencers. Applied Magic's MIDI
Control has been tested with the digital studio workstation
Roland VS-1680. The MIDI Control is also compatible with the
Roland VS series, VM-C7200, CM-C7100, A-6 digital recorders,
the VM-3100 digital mixer, and machines that have MMC and
MTC capability. A MIDI interface must be plugged into the
serial port of your video editing system in order to use MIDI
control. The serial to MIDI Interface currently supported is
Portman PC/S from MIDIMAN.
Synchronization
Synchronizing two machines
together means that both
machines share the same time
code. Usually one machine is the
source of the time code (this
machine is called the Master) and
the other one is the receiver of
the time code (this machine is
called the Slave). The video
editing system sends the MIDI
Time Code (MTC) as a source of
time code to any machine that
recognizes it. The receiving
machine will read the MTC sent
from the video editing system
and synchronize its time
accordingly. So, if the video
editing system sends out a time
code of 00:01:58:22, the other
machine will set its master clock
to 00:01:58:22 as well. Your video
editing system can only be set as
master of MTC.
00:01:58:22
Addendum Part 3
Machine Control
Your video editing system can
also send machine controls to
the slave system, such as Stop,
Play, Rewind, Fast Forward,
and Locate. Applied Magic's
video editing systems support
standard MIDI Machine
Control (MMC). If you have set
your video editing system as
the MMC Master and another
machine as Slave, then when
you press PLAY on your vide
editing system, your Slave
machine will begin to play. The
video editing system can be set
to be Master or Slave of MMC.
39
master / slave
slave / master
Connections
1. Power off the video
editing system.
2. Connect the MIDI
Interface to the 10101 data
port on your video editing
system using a serial
connector.
3. Using MIDI cables (male
180 DIN 5 pins), connect
the MIDI Interface Out
connection to the In
connection of the MIDI
Controlled Device. Then
connect the Out of the
MIDI Controlled Device
to the In connection on
the MIDI Interface.
play,
stop,
rewind
ScreenPlay
serial connector
MIDI
interface
midi cables
out
in
in
out
MIDI controlled device
Addendum Part 3
40
MIDI Settings
Once you have installed Version 2.5 software and MIDI
Control (located in the extras area in the installation menu),
you will see an additional screen in your Setup Screens. Click
on the Setup tab, and then select
MIDI Settings.
The following is an overview of the settings that can be made
within the MIDI Settings screen. (See "Basic System
Configurations" for detailed descriptions.)
Device ID Number
When using the MMC, each machine (Master and Slaves)
must have the same Device ID number. If your video editing
system is the MMC Master and its ID is 10, the MMC Slave
machine must also have an ID of 10 in order to accept the
MMC commands from the video editing system.
MMC (MIDI Machine Control)
Your video editing system can be set to be Master or Slave or
both Master and Slave (Dual) of MMC. In the Dual mode, the
video editing system can send or receive commands, allowing
the devices to communicate with each other.
Addendum Part 3
41
Sync Type
Sync Type enables the video editing system to send MTC
through the MIDI OUT interface so that external equipment
can sync to the video editing system.
MTC Format
If you choose to use MTC this option will set the video
editing system time code format to MTC. If the system is
running in PAL the default time code format is 25 frames
per second. The default for NTSC is 30 frames per second
(Drop-Frame). Note: MTC is easily converted to SMPTE
Time Code (LTC).
Setting up Your Audio Workstation
The machine that you are synchronizing to your video editing
system should have both external sync set and the same MTC
Format selected as your video editing system is using.
Basic System Configurations
Once you have installed Version 2.5 software, you can set up
your video editing system and MIDI Device using one of two
basic configurations. The first configuration described below
allows your video editing system to act as the Master,
sending commands to your MIDI Device. The second
configuration described below (Dual Mode) allows for back
and forth communication between the MIDI Device and your
video editing system.
Addendum Part 3
42
Master Mode
In this MMC mode, your system will send all transport
control commands (Stop, Play, Rewind, etc.) to your MIDI
machine. To set up your video editing system in Master
Mode, choose the following settings in your video editing
system's MIDI Settings screen:
Device ID
Choose the same ID used by
your MIDI machine.
MMC
Master
Sync Type
MTC Format
MTC
Default- 30 frames per second
(drop-frame) NTSC. This
setting can be changed to
match the MIDI machine time
format.
Next, make the following changes to your MIDI machine
settings:
Device ID
Choose the same ID used by
your video editing system.
MMC
Slave
Sync Type
MTC (External)
MTC Format
Same format which the video
editing system was set to.
When your video editing system is set up in Master Mode,
you can scrub through any active clip
on the Storyboard and view the corresponding time code on
both your video editing system and
your MIDI machine. Commands like Play, Stop, and Rewind
are sent from your video editing
system to your MIDI machine.
Addendum Part 3
43
Dual Mode
In this MMC mode, your system will send and receive
transport control commands (Stop, Play, Rewind, etc.). To set
up your video editing system and MIDI Device in Dual
Mode, choose the following settings in your video editing
system's MIDI Settings screen:
Device ID
Choose the same ID
used by your MIDI
machine.
MMC
Dual
Sync Type
MTC
MTC Format
Default 30 frames per second
(drop-frame) NTSC. This
setting can be changed to
match the MIDI machine time
format.
Next, make the following changes to your MIDI machine
settings:
Device ID
Choose the same ID used by
your video editing system.
MMC
Master
Sync Type
MTC (External)
MTC Format
Same format which the video
editing system was set to.
When your video editing system is set up in Dual Mode, you
can control your video editing
system by using the controls on your MIDI machine (Stop,
Play, Rewind, etc.).
Addendum Part 3
44
Technical Information
MIDI Interface
In order to send and receive MIDI formatted data the video
editing system requires a MIDI interface. The MIDI interface
must be a serial to MIDI type of interface that is connected in
the RS232 serial port in the back of the video editing unit.
MTC (MIDI Time Code)
MIDI Control allows your video editing system to be the
Master of MTC. The MTC time type can be adjusted to:
24
25
30
30
frames per second
frames per second (PAL)
frames per second (Drop-Frame) (NTSC)
frames per second (Non-Drop)
The video editing system can only be set as the Master of
MTC. Machines intended to receive the MTC from the video
editing system should be set to external sync. This means the
time code is sent via MTC when the video editing system is
in play mode.
MMC (MIDI Machine Control)
Applied Magic's MIDI Control supports MMC (MIDI
Machine Control). Your video editing system can be set to be
Master or Slave of MMC. You must set the Device ID of your
video editing system as well as the machines you set to
receive the MMC from your video editing system. MIDI
Control recognizes and sends MMC commands, including
Stop, Play, Deferred Play, Fast Forward, Rewind, Reset, and
Locate Target.