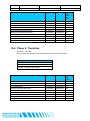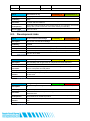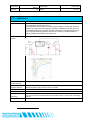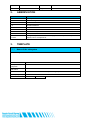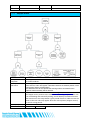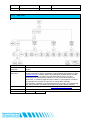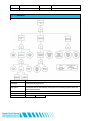
1
Sensur av hovedoppgaver Høgskolen i Buskerud Avdeling for Teknologi Prosjektnummer: 2012-3 For studieåret: 2011/2012 Emnekode: SFHO-3200 Prosjektnavn Kompakt Fly-By-Wire System Compact Fly-By-Wire System Utført i samarbeid med: Equator Aircraft Norway. Ekstern veileder: Knut Brødreskift Sammendrag: Vi fikk en oppgave av Equator Aircraft Norway, den gikk ut på å utvikle et elektronisk styringssystem til deres nye prototype; P2 Excursion. Vi skal kunne styre alle styreflatene kun ved hjelp av en tre akse joystick, slik at ror-pedalene som er vanlige i småfly i dag kan bli eliminert. Systemet vårt kan programmeres til å bli brukt som autopilot og det kan forhindre pilotfeil som stall og misstolkning av høyde. I 2010 ble det gjort en undersøkelse i USA, hvor det ble klart at mer enn 50% av alle amatørflyulykker skjedde grunnet pilotfeil. Stikkord: Brukervennlig Fly-sikkerhet Elektronisk Tilgjengelig: JA Prosjektdeltagere og karakter: Navn Ole Anders Riiser Kjetil Mjøs Runar Løken Axel Gravningsbråten Thomas Andersen Sindre Andersen Karakter Dato: 14. Juni 2012 ________________ Sigmund Gudvangen Intern Veileder _______________ Olaf Hallan Graven Intern Sensor _______________ Knut Brødreskift Ekstern Sensor Compact Fly-By-Wire System Version Category Issue Date Made by 1.0 Released 29.05.2012 Ole Anders Riiser Kjetil Mjøs Axel Gravningsbråten Runar Løken Sindre Andersen Thomas Andersen TABLE OF CONTENTS Introduction …………………….…………………… 1 Idea Report …....................................................... 2 Project Plan ………………………….……………… 3 Risk Analysis ………………….……………………… 4 Accounting ……………………………………….... 5 Time Sheet ………………………………………… 6 User Manual ………………………………………… 7 Technical Manual ………………………………………… 8 Hardware Description ………………………………………… 9 Hardware Research ……………………………………….. 10 Software Description ……………………………………….. 11 Fault Tree Analysis ……………………………………….. 12 Requirements & Test Specification ……..………………………………… 13 Test Results ……………………………………….. 14 Additional Tests ……………………………………….. 15 Improvement recommendations ……………………………………..… 16 Conclusion ……………………………………….. 17 APPENDIX One wire Diagram ……………………………………….... 1 MCC Overview ………………………………………… 2 SC Overview ………………………………………… 3 System Topology ……………………………………….... 4 MCC Wiring Diagram ………………………………………… 5 SC Wiring Diagram ………………………………………… 6 HMI Wiring Diagram ………………………………………… 7 Terminal Block ………………………………………… 8 MCC Schematic ………………………………………… 9 SC Schematic ……………………………………….. 10 Bill of Materials MCC ……………………………………...... 11 Bill of Materials SC ……………………………………...... 12 MCC Software Class Diagram ……………………………….…….… 13 SC Software Class Diagram ……………………………….…….… 14 1. INTRODUCTION: This assignment was given to us by Equator Aircraft Norway, to develop a new FlyBy-Wire system for their new P2 Excursion prototype. Fly-By-Wire is a general name of an electronic control system for aircrafts; it is mostly used in commercial airplanes, fighter jets and other large airplanes. The benefits of using a Fly-By-Wire system; it is very versatile when it comes to pilot assistance options and easy implementation of new functions. By a survey conducted in 2010 in the USA, it was concluded that more than 50% of all small plane accidents in the same year was a result of pilot miss-control or pilot judgment. This means that more than 50% of all small planes accidents could have been avoided by using a computer assisted steering system aka a Fly-By-Wire system. And it stresses the need for such a system today! Our task was therefore to develop a system that is redundant, durable and it must be ready for implementation of safety functions. Idéskriv Oppgaven Oppgaven vi har mottat fra Equator Aircraft Norway er å utvikle et Fly-by-Wire system for et to seters amfibiefly. I dag blir småfly styrt mekanisk av stag og vaiere fra styrestikke og pedaler. Dette gjør det vanskelig å implementere autopilot og overvåkningssystemer som kan hjelpe piloten. Fly by Wire er et elektrisk styresystem som har erstattet det mekaniske systemet i større fly. Det ble først utviklet for jagerfly på slutten 50-tallet som i utgangspunktet blir flydd i en ustabil tilstand. Disse flyene ville vært umulige å styre uten elektronisk hjelp fra en rekke sensorer som holder flyet stabilt. Dette er nå standard i nye kommersielle fly pga. økt sikkerhet og vektbesparelser. Systemet er foreløpig ikke benyttet i små fly, men vil også her kunne gi tilsvarende fordeler. Vi skal skrive oppgaven på engelsk. Av dokumentasjon er oppdragsgiver interressert i en teknisk sluttrapport. Resten av dokumentasjonen blir levert inn som separate filer til høgskolen. Første del av oppgaven går ut på å undersøke og sette oss inn i hvilke systemer som finnes i dag, og hva slags krav som stilles til slike systemer. Deretter skal vi undersøke feilsannsynlighet og utføre en feil tre analyse. Sluttproduktet er et ferdig kretskort samt valg av aktuator. Oppdragsgiver vil at vi skal bevise funskjonaliteten i en FAT. Og det hele vil bli demonstrert i en avsluttende presentasjon. Ekstern veileder ønsker i hovedsak å benytte seg av epost til kommunikasjon og dropbox til utveksling av filer. Oppdragsgiver Equator Aircraft Norway Ekstern veileder: Knut Brødreskift Sivilingeniør Marin teknisk avd NTH 1978 Epost: [email protected] Tlf: 328 51 995 Gruppemedlemmer Ole Anders Riiser 21år Studerer Kybernetikk Epost: [email protected] Tlf: 480 24 862 Axel Gravningsbråten 23år Studerer Kybernetikk Epost: [email protected] Tlf: 905 44 419 Thomas Andersen 22år Studerer Embeddded systems Epost: [email protected] Tlf: 461 31 909 Sindre Andersen 21år Studerer Kybernetikk Epost: [email protected] Tlf: 414 08 967 Runar Løken 21år Studerer Kybernetikk Epost: [email protected] Tlf: 452 39 863 Kjetil Mjøs 23år Studerer Kybernetikk Epost: [email protected] Tlf: 416 88 340 PROJECT PLAN Bachelor Project Compact Fly-by-wire System Version Category Issue Date Made by 2 Released 25.05.2012 A.G, O.R, K.M, R.L, S.A and T.A NOTES REGARDING VALIDITY OF THIS DOCUMENT: Paper copies are uncontrolled. This copy is valid only at the timeof printing. The controlled version of this document is available from the Company Intranet / DropBox. This document contains Equator Aircraft Norway legal entity proprietary and confidential information that is legally privileged and is intended only for the person or entity to which it is addressed and any unauthorised use is strictly prohibited. It is provided for limited purpose and shall not be reproduced, stored electronically, transferred to other documents, disseminated or disclosed to any third parties without the prior written consent of the relevant Equator Aircraft Norway legal entity. Any attachments are subject to the specific restrictions and confidentiality regulations stated therein and shall be treated accordingly. The document is to be returned upon request and in all events upon completion of use for which it was provided. Document: Version Project plan 2 Issue date: Page 25.05.2012 2 of 18 TABLE OF CONTENTS 1. LIST OF TABLES ................................................................................................................... 3 2. LIST OF FIGURES ................................................................................................................. 3 3. ABBREVIATION ..................................................................................................................... 4 4. REFERENCES ........................................................................................................................ 4 5. PURPOSE ............................................................................................................................... 4 6. INTRODUCTION..................................................................................................................... 4 7. PROJECT MODEL ................................................................................................................. 5 7.1. 7.1.1. The four phases: .................................................................................................................... 6 The nine different disciplines:................................................................................................. 7 8. PROJECT PLAN .................................................................................................................... 8 8.1. Conditions .............................................................................................................................. 8 8.2. 8.2.1. 8.2.2. 8.2.3. 8.2.4. 8.2.5. 8.2.6. Project objectives ................................................................................................................... 8 Priority 1 ................................................................................................................................. 8 Priority 2 ................................................................................................................................. 8 Priority 3 ................................................................................................................................. 8 Priority 5 ................................................................................................................................. 8 Priority 6 ................................................................................................................................. 8 Priority 7 ................................................................................................................................. 9 9. BUDGET ................................................................................................................................. 9 Organizing Budget .................................................................................................................................. 9 9.1.1. Presentations ......................................................................................................................... 9 9.1.2. Documentation ....................................................................................................................... 9 9.2. 9.2.1. 9.2.2. 9.2.3. Materials Budget .................................................................................................................... 9 Research ................................................................................................................................ 9 Construction ......................................................................................................................... 10 Testing .................................................................................................................................. 10 10. TIME SCHEDULE ................................................................................................................. 10 10.1. Phase 1: Inception................................................................................................................ 10 10.2. Phase 2: Elaboration ............................................................................................................ 11 10.3. Phase 3: Construction .......................................................................................................... 12 10.4. Phase 4: Transition .............................................................................................................. 13 11. TIMELINE ............................................................................................................................. 14 11.1. Milestones: ........................................................................................................................... 14 12. PROJECT ORGANIZATION ................................................................................................ 14 12.1. The Group ............................................................................................................................ 14 12.2. Supervisors .......................................................................................................................... 14 12.3. Group policy ......................................................................................................................... 15 12.4. About the contractor ............................................................................................................. 15 Document: Project plan Version 2 Issue date: Page 25.05.2012 3 of 18 12.5. Project Documentation ......................................................................................................... 15 13. DESCRIPTION OF RESPONSIBILITIES ............................................................................. 16 13.1. Project manager ................................................................................................................... 16 13.2. Economy and budgeting ...................................................................................................... 16 13.3. Requirements ....................................................................................................................... 16 13.4. Test ...................................................................................................................................... 16 13.5. Web ...................................................................................................................................... 17 13.6. Software ............................................................................................................................... 17 13.7. Risk ...................................................................................................................................... 17 13.8. Redundancy ......................................................................................................................... 17 13.9. Circuit design........................................................................................................................ 17 13.10. Documentation ..................................................................................................................... 17 13.11. Actuator ................................................................................................................................ 17 14. REVISIONS ........................................................................................................................... 18 1. LIST OF TABLES Table 1: Abbreviation list ......................................................................................................................... 4 Table 3: Reference list............................................................................................................................. 4 Table 4: List of important tasks in phase 1. ........................................................................................... 10 Table 5: List of activities phase 1 .......................................................................................................... 11 Table 6: List of important tasks phase 2 ................................................................................................ 11 Table 7: List of activities phase 2 .......................................................................................................... 12 Table 8: List of important tasks phase 3 ................................................................................................ 12 Table 9: List of activities phase 3 .......................................................................................................... 13 Table 10: List of group members ........................................................................................................... 14 Table 11: List of supervisors ................................................................................................................. 14 Table 12: List over project documentation ............................................................................................ 15 Table 13: Description of responsible persons ....................................................................................... 16 Table 14: Actual list of responsibilities .................................................................................................. 16 Table 15: List of document revisions ..................................................................................................... 18 2. LIST OF FIGURES Figure 1: The spiral model ....................................................................................................................... 6 Document: Project plan Version 3. 2 Issue date: Page 25.05.2012 4 of 18 ABBREVIATION Technical Term Standard Definition K.M. Kjetil Mjøs A.G. Axel Gravningsbråten S.A. Sindre Andersen T.A. Thomas Andersen R.L. Runar Løken O.R. Ole Riiser IMC / IMU MTBF Internal Measurement Card; is an electronic device that measures and reports on the aircraft’s velocity, orientation and gravitational forces, using a combination of accelerometers and gyroscopes. Mean Time Between Failures MCC Main Controller Card SC Supervision Card Table 1: Abbreviation list 4. REFERENCES Reference Document Description [1]http://www.equatoraircraft.com/ Contractor, history Table 2: Reference list 5. PURPOSE The purpose of this document is to have a project plan to work after. The document also contains information regarding time deadlines, definitions and responsibilities. The main goal for this project is to give practical experience with working in a group to solve a real world engineering problem. 6. INTRODUCTION Our group got a task from the company Equator Aircraft Norway. This company developing a new type of small airplane, which will bring this type of airplane to a new dimension. We are to develop and construct the fly by wire control circuit for the plane. Today, the fly by wire technology is not much used in small planes. Close to all planes in this category are controlled mechanically by wires and rods. Equator Aircraft thinks small airplanes also could benefit from the fly by wire technology. The goal for this project is to test our circuit with an FAT (Factory Acceptance Test). We will define this as our goal because we have limited time, and the prototype of the airplane that the circuit is going to be implemented in is not yet finished. This makes it impossible to test it with an SAT (Site Acceptance Test). Document: Version 7. Project plan 2 Issue date: Page 25.05.2012 5 of 18 PROJECT MODEL In our project we had to choose a development process. We have chosen to use the Rational Unified Process (PUP) because we think this model will help us to develop a good result in the end. The RUP model is based on the spiral model, which is a model that uses the same loop of research and control for every step we take, these loops are called iterations. One cycle in the process is approximately equal to the waterfall model. The RUP model is an iterative model which focuses on the risk early in the process. It is important to have an overview over the different risks that can affect the project. By focusing on the risks that can occur we are able to make some precautions which can help us prevent these risks, or if they still happen, we have a plan how to solve the problem. Because we do the same process a lot of times, this will help us to learn in the development process and the process will be improved for every cycle. The RUP model is initially a software model, and since we do not have a pure software project we have to modify the model a bit to fit our project. In our project the loops will be a bit different from the loops in a pure software project. We will have several iterations on every activity as they go along, which means that we will have some cycles going parallel in time. This will help us to find mistakes and improve the subsystem before we put all the different subsystems together and start the iterations on the entire system in the test phase. The RUP model is based on a lot of elements that shows how the product should be and what skills that are needed to satisfy the requirements. The three main elements are: roles, tasks and work products. The roles define different skills and competencies. It also defines what responsibility the different roles have. The tasks are awarded to the different roles. A task is a unit of work that should be so good that it can be implemented in the final product. This result is a part of the element called work product, but it is not only this result. It is also all of models that are developed in the task and all documentation that has been written. Every task in iteration can be divided into 9 disciplines. These disciplines are again divided into 6 “engineer disciplines” and 3 “supporting disciplines.” In our project it is the 6 "engineer disciplines” that are most important, and we will focusing most on these disciplines. The “supporting” discipline Project management is also important; this will be the one of the 3 “supporting” disciplines that we will spend most time with. The whole project is, according to the RUP model, divided into 4 different phases. These phases are described according to where in the project process we are. The end of each phase should be marked with a millstone. To go further in the process some defined goals should be checked if they are satisfied according to the requirement specification. The phases are divided into sub-phases, where the end of every sub-phase marks a small milestone. The secondary objectives contain a group of activities; one activity can last for maximum 14 days. One activity consists of several small iterations, where we work our way to a prototype, we check the prototype for faults and starts to improve it until it we are satisfied with the product. One Iteration might last from 1 day up to 10 days. Document: Project plan Version 2 Issue date: Page 25.05.2012 6 of 18 Figure 1: The spiral model 7.1. The four phases: Inception - In this phase we should find the requirements and the limits of the project, it is also required that we discuss risks and costs. Design and usability should also be planed. Elaboration - Here we should plan architecture and system requirements. It is also expected to find risks and approach to the problem before we go further in the process. In this phase it is time for producing a prototype, work further with the design and demonstrates the product for the contractor. Construction - This phase includes developing of the program and the circuit. We should develop this product as fast as possible so the contractors can test the product and give feedback. Transition - Means that we should test the prototype to find faults which we should repair before developing the complete product. Document: Project plan Version 2 Issue date: 25.05.2012 Page 7 of 18 7.1.1. The nine different disciplines: Engineer disciplines: Business modeling - This discipline will help to make a better understanding between product developers and business developers. We should understand the structure and dynamic of the company that will use the product, and find problems and possible improvements. Requirements - This includes finding what the system should be able to do, and which requirements that satisfies it. Analysis and Design - This shows how the system will be realized in the implementation discipline. Implementation - This includes developing parts to the system and putting them together including the software. Test - This discipline include testing that all the needs of the system is implemented correct, and identifying mistakes in the system and correct them before further development. Deployment - Here we present the product to the contractor and discuss the solutions. Supporting disciplines: Configuration and Change Management- In this discipline we are going to work with configuration management and status and goal management. Project Management - Here it is required to work with risk treatment, project planning and control of the process development. Environment - It is required to describe the processes that are necessary for the development process and improve project specific funds. We should also make an equipment list for the project. When we look at the different phases and disciplines we can clearly see that all the disciplines extend over close to all the different phases. This property makes the model resistant to errors, and if it is necessary to change some specifications or requirements, this model is very modular. Document: Project plan Version 8. 2 Issue date: Page 25.05.2012 8 of 18 PROJECT PLAN 8.1. Conditions It is several conditions that have to be met in order to finish the project; the parts we need have to be ordered in time so we have time to implement and test them on the system. Therefore one of the important tasks is to find the right actuators and components, draw a circuit board and order the parts as early as possible. However in case something unexpected is to happen we will need to have an emergency plan ready. Another important factor is that the group have to put in a maximum performance as a whole and also individually. It is important for our group to have a precise timetable to follow. We have to make good plans ahead and try not to make the tasks too big and difficult, so they can be more foreseeable and easier to meet the deadlines. 8.2. Project objectives The goals for this project is do implement a fly-by-wire system in the equator p2 excursion aircraft. The main functions of the system will be to control the flight control surfaces with a joystick without using mechanical transferring. We are replacing the pedals with the yaw axis on the joystick, and finding actuators for the control surfaces and the nose wheel. The final result will be made for easy configuration and implementation of external control inputs, such as autopilot and trim optimizer. In order to be sure we start and finish the most important parts first we divided the tasks into different priorities. We will start with priority 1 and continue to priority 7. 8.2.1. Priority 1 The first priority is to make and finish the circuit board design and send it in for production. This way we can start working with other problems until the circuit board returns from the supplier. 8.2.2. Priority 2 We need to find the best suitable Actuators / stepper motors at an early stage, so we can order them in early and be sure to have them before the last presentation, in case the delivery time is long. 8.2.3. Priority 3 The airplane is not set up with pedals, so the most important thing is to get the yaw axis of the joystick to turn the rudder without using mechanical transferring. 8.2.4. Priority 5 It is desirable with an easily configurable system with possibilities for external control inputs such as autopilot, trim optimizer, angle of attack limiter etc. It should also be possible to read the desirable values and the actual positions of the control surfaces on a display. 8.2.5. Priority 6 The P2 excursion is an amphibious aircraft, hence it can do the first test flights on water, and it is therefore not that important to implement the actuator for the nose wheel, though it is desirable. Document: Project plan Version 2 Issue date: 25.05.2012 Page 9 of 18 8.2.6. Priority 7 Make a user friendly interface and make it compatible with Android 9. BUDGET Organizing Budget Activity Estimated Cost Presentations 400 Documentation 400 9.1.1. Presentations This represents the costs associated with the presentations. This can be things we have to buy to make a better presentation and coffee to the audience. 9.1.2. Documentation This is expenses like Printing of documents, binders, separators and such. 9.2. Materials Budget The materials budget will contain all expected expenses incurred in this period which deals with the construction of the different solutions through the whole period. This is only an estimate and may vary with the solutions we come up with. We divide the materials budget into different groups indicating the period costs incurred. Activity Estimated Cost Research 2000 Construction -Stepper motors 5000 -Production PCB 2500 -Other Components Sum 1500 Testing 1500 Total 12500 11000 9.2.1. Research We have to see which of the solutions we come up with which is the best to solve our problem. To do this, we need to construct and try different circuits and use different types of components to decide. If the school holds any of the components we need, we will borrow them. Document: Project plan Version 2 Issue date: Page 25.05.2012 10 of 18 9.2.2. Construction When we have decided which of the solutions that is the best, we have chosen the components that we need. Therefore, we have to order the decided parts and get them soldered. The costs of this spot also contain printing on a PCB and different cosmetically components. 9.2.3. Testing When we are finished constructing our product, we will test if it actually works like it’s supposed to. If it doesn’t we maybe have to buy other components. This point will apply together with 5.2.2 Construction. 10. TIME SCHEDULE 10.1. Phase 1: Inception September 5th – January 12th. In this phase of the project we have just started up, and at the beginning we don’t even know which project we are doing yet. This had to be done as fast as possible. In the meantime we could figure out a lot of ground rules for the project, and there are a lot of things that has to be done before we can start the problem solving part of the task. In addition to finding a task we have to set up a lot of document templates that will save us a lot of time later on in the project. As soon as we got the project there was a set of documents we needed to deliver: Idea Document, Requirements Specification, Test Specifications and the Project plan. This is to be prepared for the next phase so we can start this as efficient as possible. The first phase ends up as the first presentation where we have to know exactly what we are making and when the different parts can be made. Important Tasks Find a Proper Project Get the idea behind it and deliver the “Idea Document” Make Templates Deliver Project Plan, Requirement- and Test specification Do the first presentation Table 3: List of important tasks in phase 1. Document: Project plan Version 2 Issue date: 25.05.2012 Page 11 of 18 Description Start date End Date Estimated hour Count in this phase Setting up document standards, project planning and initial research. 15.08.2011 25.09.2011 60 Meetings 15.08.2011 01.01.2012 60 Setting up budget 01.12.2011 01.01.2012 2 Making a Webpage 15.08.2011 01.01.2012 30 The First Presentation 01.01.2012 10.01.2012 20 Making the Idea Document 01.09.2011 01.10.2011 40 Writing the Technical Requirements 01.10.2011 05.01.2012 60 Writing the Test Specification 01.10.2011 05.01.2012 30 Writing the Project Plan 01.10.2011 05.01.2012 50 Table 4: List of activities phase 1 10.2. Phase 2: Elaboration January 12th. – April 11th. This is the phase where we design and develop the system. In the end of this phase we have to be sure that priority 1 to 3 is solved and that they are ready to be implemented. It is crucial that everybody in the group has defined tasks at all times. From this phase and through the rest of the project the group have to deliver a “Status Document” each week. This document contains: An overview from the tasks every person worked on last week, a plan over the tasks each person is going to work on next week, a general summary of how the progress is according to the project plan, make a summary of critical activities, append timesheet from last week. This phase ends up in the second presentation that has a technical perspective. By this presentation, most of the technical problems should be solved so we can discuss the solution with the supervisors and still have time to correct critical errors. Important Tasks Set up a basic test rig Define all components needed Order the components Write the basis code for the system Make layouts for the PCB boards Do some functionality testing Develop a Redundant System Order PCBs Table 5: List of important tasks phase 2 Document: Project plan Version 2 Issue date: 25.05.2012 Page 12 of 18 Description Start date End Date Estimated hour Count in this phase Technical Meetings with supervisors and planning 10.01.2012 29.03.2012 15 Starting on the accounting 10.01.2012 29.03.2012 4 Updating the webpage 10.01.2012 29.03.2012 15 Second presentation 20.02.2012 29.03.2012 40 Setting up a risk analysis 10.01.2012 29.03.2012 4 Write the Technical Document 20.01.2012 29.03.2012 60 Writing the weekly Status Report 10.01.2012 29.03.2012 70 Writing Fail probability document 20.01.2012 29.03.2012 35 Writing the Final Document 01.02.2012 29.03.2012 70 Software Development 10.01.2012 29.03.2012 640 Hardware development 10.01.2012 29.03.2012 800 Testing 10.01.2012 29.03.2012 150 Table 6: List of activities phase 2 10.3. Phase 3: Construction th April 11th. – May 29 . This phase starts immediately after the second presentation. This is the last phase and is where we test everything together. After this stage all Important Tasks Do all the testing defined in the test specification Finish all the technical documents Do the main software development Writing technical documents Table 7: List of important tasks phase 3 Document: Project plan Version 2 Issue date: 25.05.2012 Page 13 of 18 Description Start date End Date Estimated hour count in this phase Technical Meetings with supervisors and planning 29.03.2012 01.06.2012 15 Accounting 29.03.2012 01.06.2012 10 Updating the webpage 29.03.2012 01.06.2012 25 Write the Technical Document 29.03.2012 01.06.2012 150 Writing the weekly Status Report 29.03.2012 01.06.2012 70 Writing Fail probability document 29.03.2012 01.06.2012 35 Writing the Final Document 29.03.2012 01.06.2012 200 Software Development 29.03.2012 01.06.2012 700 Testing 29.03.2012 01.06.2012 200 Implementation 01.04.2012 01.06.2012 300 Table 8: List of activities phase 3 10.4. Phase 4: Transition May 29st. – June 8th. Here we finish off the project and hopefully polish everything we have done. Important Tasks Finishing the Final report Making Project Poster Prepare a great final presentation Description Start date End Date Estimated hour Count Accounting 29.03.2012 15.06.2012 10 Updating the webpage 29.03.2012 15.06.2012 25 Final Presentation 01.06.2012 11.06.2012 50 Write the Technical Document 29.03.2012 29.05.2012 150 Writing the weekly Status Report 29.03.2012 29.05.2012 70 Writing the Final Document 29.03.2012 29.05.2012 400 Software Development 29.03.2012 29.05.2012 50 Testing 29.03.2012 29.05.2012 40 Implementation 29.03.2012 29.05.2012 20 Document: Project plan Version 11. 2 Issue date: 25.05.2012 Page 14 of 18 TIMELINE 11.1. Milestones: Our milestones are important dates for our projects. These milestone dates are dates when our project is done with important tasks and phases. 1. 2. 3. 4. 5. 6. 7. 12. st th 1 presentation; 10 of January 2012 th Sending circuit board for printing 16 April th Primary software functions 15 March nd rd 2 presentation April – 23 Mars 2012 nd First System function test 2 May th The system shall be finished 18 May rd nd th 3 presentation 2 June – 12 June 2012 PROJECT ORGANIZATION 12.1. The Group Name Age Course Contact Info Sindre Andersen 21 Cybernetics [email protected] Tlf:414 08 967 Thomas Andersen 23 Embedded Systems [email protected] Tlf:461 31 909 KjetilMjøs 23 Cybernetics [email protected] Tlf:416 88 340 Axel Gravningsbråten 24 Cybernetics [email protected] Tlf:905 44 419 RunarLøken 22 Cybernetics [email protected] Tlf:452 39 863 Ole Anders Riiser 21 Cybernetics [email protected] Tlf:480 24 862 Table 9: List of group members 12.2. Supervisors Name Age Knut Brødreskift [email protected] Sigmund Gudvangen [email protected] Olaf Hallan Graven [email protected] Table 10: List of supervisors Document: Project plan Version 2 Issue date: 25.05.2012 Page 15 of 18 12.3. Group policy There are a set of rules the members of the group should follow in order to operate smoothly together: Everyone will meet up at the appointed time, by omission – notify in good time Factual communication and acceptance All documents is collected in the “Equator_HiBu_2012” dropbox folder Democracy is used to meet agreement The roles as chairman and secretary will be changed at each meeting. Everyone will be given tasks, and they are expected to do the best they can to solve them. 12.4. About the contractor Equator Aircraft Norway SA was established in 2011 [1]. The idea was born when industrial designer Tomas Brødreskift met Guenter Poeschel in 2008. Guenter Poeschel is a mechanical engineer, GA test pilot and aircraft constructor. He started working on his aviation visions over 40 years ago. He founded Equator Aircraft Company GmbH in Ulm, Germany in 1974. Poeschel was way ahead of aircraft designers around the world and his old designs still represent some of the most innovative thoughts in the industry even today. Tomas later teamed up with mechanic, industrial designer and professional pilot Øyvind Berven, and continued developing the P2 (now “P2 Excursion”). With this, Equator Aircraft Norway SA was established early 2011. Today, Equator Aircraft Norway is a consortium of idealists from all over the world. They believe in an “open and idealistic approach where each member can apply a small amount of resources and see their dreams come alive”. They offer different levels of membership and involvement which you can read about on their webpage. The EQP2 Excursion is a Carbon Composite Construction, Hybrid / Electric Powered Amphibian Aircraft. Aiming for the Experimental category first – followed by the ultra light, ELA & LSA markets. 12.5. Project Documentation Document Name Time of delivery Responsible Idea Document Oct 1. 2011 Ole A. Riiser Project Plan Jan 8. 2012 KjetilMjøs Requirements Specification Jan 8. 2012 Axel Gravningsbråten Technical Document Time Sheet Jan 8. 2012 May 29. 2012 RunarLøken Kjetil Mjøs / Sindre Andersen Requirement & test specification May 29. 2012 Axel Gravningsbråten Meeting Minutes May 29. 2012 Sindre Andersen User Manual May 29. 2012 Axel Gravningsbråten Product May 29. 2012 Ole A. Riiser SW Specification May 29. 2012 Thomas Andersen Table 11: List over project documentation Document: Project plan Version 13. 2 Issue date: 25.05.2012 Page 16 of 18 DESCRIPTION OF RESPONSIBILITIES This is the official area of responsibilities: Name Responsibility Ole Anders Riiser Sindre Andersen Thomas Andersen Runar Løken Kjetil Mjøs Axel Gravningsbråten Project manager, Testing Analysis and accounting Software and Web Document and Project Model Hardware Requirements and Design Table 12: Description of responsible persons However, after working with the project for a while the area of responsibility has changes due to practical reasons, here is the actual list of responsibilities: Name Responsibility Ole Anders Riiser Sindre Andersen Thomas Andersen Runar Løken Kjetil Mjøs Axel Gravningsbråten Project manager, Hardware, Circuit design Risk, Design and Accounting Software and Web Project Model & Simulation Redundancy & Testing, Actuator Analysis, Document & Requirements Table 13: Actual list of responsibilities Table 14: shows the responsibility area for each person in the project group. There is only one person who has the main responsible for one area. But we have also set up a second person as a backup if someone get sick or is absent. 13.1. Project manager The project manager has the main responsibility for the project. He has to that the time schedule is followed and deadlines are met. The project manager is also the person responsible for good communication with HIBU and equator aircrafts. 13.2. Economy and budgeting The persons(s) responsible for the economy must have full control of the group budget and have to give consent if something needs to be purchased. He has to have a perfect understanding of the economical agreement between the group and the client. The economy responsible will pay back all the cash outlays as quick as possible. 13.3. Requirements The person responsible for the requirements document. He will also have to follow up the requirements as they are met, and he will make sure that all the demands are taken into consideration. 13.4. Test The test responsible is responsible for all the testing within the project, and all the test specifications and reports. Document: Project plan Version 2 Issue date: Page 25.05.2012 17 of 18 13.5. Web The web responsible is responsible for the project web page, and will continuously make sure the web page is updated with the right information and pictures.He also has to check that sensitive material not get posted online. The address to our webpage is http://www.fbw.eu.pn/ 13.6. Software The software responsible has the overall response for the software code written in the project. He has to make sure the code has a good structure which is easy to read, efficient and modular made. . 13.7. Risk The risk responsible is responsible for the risk analysis; this document will describe the probability and consequence for a given scenario. The responsible person will make sure the risk analysis is updated every time a new risk scenario occurs. He is also responsible for making an error-tree analysis. 13.8. Redundancy The person(s) responsible for the redundancy must have a full overview of the system and its critical links, and is responsible for giving crucial information on redundancy to others in the group that are working on different aspects of the system. The person(s) responsible are also the key designers of the redundancy of the total system. 13.9. Circuit design The circuit design responsible has the main response for the layout and design of the circuit board. 13.10. Documentation The person(s) responsible for the documentation is expected to have full overview of all the documents in the Dropbox folder, as well as arrange the documents in an orderly manner. The document responsible will check that all the documents follow the project group’s document standards and that everyone has signed the documents before they are delivered 48 hours (2 work days) prior to the presentations. Prior to the presentations the document responsible will also burn all the documentation on a CD, and he is responsible for not publishing sensitive information according to the contract with the client. 13.11. Actuator Responsible for finding a suitable motor/actuator for controlling the ailerons, elevator, rudder and nose wheel. Document: Project plan Version 2 Issue date: 25.05.2012 Page 18 of 18 REVISIONS 14. Responsible person for this document, procedure or template rev Description 01 02 03 First Draft; Milestones and Group policy Description of responsibilities Goals for the project and priority 1 -5 Description of responsibilities, Tasks, Conditions, The group and Project documentation. Added Group information and delivery details, added time schedule, updated responsible areas, added activities Small grammatical changes to some of the text Filled in IMU definition. Edited and made new priority 1, updated 5.1, 6.11 and heading 1.1, 1.2 and 1.3 Made new priority 2. Made budget, history of the contractor and phases of the project. Added new milestone, introduction and purpose. Updated table captions and added table list. Updated project objectives. Removed priority 4. Updated phase dates and text. Updated responsible person list and dates of document hand in. Cosmetic changes to tables Revised responsibilities Made table of figures and Project model RUP First Release Updating web information Updating project model Updated phases Updating project model Updating Activity numbers Updated and edited: 8. Project model Updated activities Updated 13 DESCRIPTION OF Responsibilities Made final revision, did some small changes 04 05 06 07 08 09 0.10 1.0 1.1 1.2 1.3 1.4 1.5 1.6 2.0 Table 14: List of document revisions Date Name 01.11.2011 22.11.2011 23.11.2011 A.G A.G A.G 25.11.2011 A.G 16.12.2011 O.R 19.12.2011 A.G 20.12.2011 A.G 21.12.2011 A.G 03.01.2011 K.M, S.A, O.R & A.G 04.01.2012 A.G, R.L 6.1.2012 O.R 11.01.2012 R.L 13.01.2012 16.1.2012 23.02.2012 07.03.2012 11.05.2012 23.05.2012 R.L O.R A.G S.A A.G A.G Risk Analysis Group 3 Compact Fly-by-wire system Version Category Issue Date Made by 1.0 Released 26.05.2012 S.A, R.L Checked by A.G Approved by S.A NOTES REGARDING VALIDITY OF THIS DOCUMENT: Paper copies are uncontrolled. This copy is valid only at the time of printing. The controlled version of this document is available from the Company Intranet / DropBox. This document contains Equator Aircraft Norway legal entity proprietary and confidential information that is legally privileged and is intended only for the person or entity to which it is addressed and any unauthorised use is strictly prohibited. It is provided for limited purpose and shall not be reproduced, stored electronically, transferred to other documents, disseminated or disclosed to any third parties without the prior written consent of the relevant Equator Aircraft Norway legal entity. Any attachments are subject to the specific restrictions and confidentiality regulations stated therein and shall be treated accordingly. The document is to be returned upon request and in all events upon completion of use for which it was provided. Document: Version Risk document 1.0 Issue date: Page 26.05.2012 2 of 8 TABLE OF CONTENTS 1. LIST OF TABLES ................................................................................................................... 3 2. ABBREVIATION ..................................................................................................................... 3 3. INTRODUCTION..................................................................................................................... 3 3.1. The purpose of this document. ............................................................................................... 3 4. SCALE .................................................................................................................................... 4 5. TEMPLATE ............................................................................................................................. 4 6. RISKS ..................................................................................................................................... 4 6.1. Requirement risks .................................................................................................................. 4 6.2. Development risks .................................................................................................................. 5 6.3. Working progress risks ........................................................................................................... 6 7. REVISIONS ............................................................................................................................. 8 Document: Risk document Version 1. 1.0 Issue date: Page 26.05.2012 3 of 8 LIST OF TABLES Table 1: Abbreviation............................................................................................................................... 3 Table 2: Scale .......................................................................................................................................... 4 Table 3: Template .................................................................................................................................... 4 Table 4: Risk 1 ......................................................................................................................................... 4 Table 5: Risk 2 ......................................................................................................................................... 4 Table 6: Risk 3 ......................................................................................................................................... 5 Table 7: Risk 4 ......................................................................................................................................... 5 Table 8: Risk 5 ......................................................................................................................................... 5 Table 9: Risk 6 ......................................................................................................................................... 5 Table 10: Risk 7 ....................................................................................................................................... 6 Table 11: Risk 8 ....................................................................................................................................... 6 Table 12: Risk 9 ....................................................................................................................................... 6 Table 13: Risk 10 ..................................................................................................................................... 6 Table 14: Risk 11 ..................................................................................................................................... 7 Table 15: Risk 12 ..................................................................................................................................... 7 Table 16: Risk 13 ..................................................................................................................................... 7 Table 17: Risk 14 ..................................................................................................................................... 7 Table 18: Risk 15 ..................................................................................................................................... 8 Table 19: Risk 16 ..................................................................................................................................... 8 Table 20: Revisions ................................................................................................................................. 8 2. ABBREVIATION Technical Term Standard Definition K.M. Kjetil Mjøs A.G. Axel Gravningsbråten S.A. Sindre Andersen T.A. Thomas Andersen R.L. Runar Løken O.R. Ole Riiser Table 1: Abbreviation 3. INTRODUCTION 3.1. The purpose of this document. The risk analysis contains risk evaluation of different groups of risk. The risks evaluated in this document will assist the other documents and may be referred to later. By evaluating the risks in advance, will help us to avoid problems before they occur. If the problems occur, we will have the solution and already know how to solve them. The risk analysis will contain a description of the problem, information about the probability for the problem to happen, how to prevent the problem, the consequence and how to solve the problem. Document: Risk document Version 4. 1.0 Issue date: 26.05.2012 Page 4 of 8 SCALE Scale Color 1 – 2 (Very unlikely) 3 – 4 (Unlikely) 5 – 6 (Possible) 7 – 8 (Likely) 9 – 10 (Very likely) Table 2: Scale 5. TEMPLATE Risk # Name Probability: Consequence: Description Probability Prevention Consequence Solution Owner & date Table 3: Template 6. RISKS 6.1. Requirement risks Risk 1 Not satisfied A req. Probability: 2 Consequence: 10 Description The group has not met the “A” requirements Probability Unlikely Prevention We have to work properly with our tasks, comply with deadlines and choose the most effective solutions Consequence Our product will not meet the requirements of our contractor, and we will end up with a product with lack of basic functionality. Owner & date S.A 11.01.2012 Table 4: Risk 1 Risk 2 Not satisfied B req. Description The group has not met the “B” requirements Probability Possible Prevention We have to work properly with our tasks, comply with deadlines and choose the most effective solutions Consequence Our product will not meet all the requirements of our contractor, and we will end up with a product with lack of functionality. Owner & date S.A 11.01.2012 Table 5: Risk 2 Probability: 5 Consequence: 7 Document: Risk document Version 1.0 Issue date: 26.05.2012 Page 5 of 8 Risk 3 Not satisfied C req. Probability: 8 Consequence: 3 Description The group has not met the “C” requirements Probability Likely Prevention We have to work properly with our tasks, comply with deadlines and choose the most effective solutions Consequence Our product will not meet all of the requirements of our contractor, and we will end up with a product with lack of the extra ordinary functionality. Owner & date S.A 11.01.2012 Table 6: Risk 3 6.2. Development risks Risk 4 Lack of technical knowledge Probability: 5 Consequence: 8 Description We will later on in the development of this project meet a point where we have a lack of technical knowledge. Probability Possible Prevention We must acquire technical knowledge through the whole period Consequence We will not be able to deliver a complete product Solution We must acquire technical knowledge through the whole period Owner & date S.A, R.L 12.01.2012 Table 7: Risk 4 Risk 5 Lack of components Probability: 5 Consequence: 5 Description The probability that we get a lack of components and late deliveries Probability Possible Prevention Order the components in good time, and do thorough research in good time prior to each phase and sub-phase Consequence The construction may be delayed. Solution We will change our plan, try to do other tasks that can be solved so we will not lose time Owner & date S.A, R.L 12.01.2012 Table 8: Risk 5 Risk 6 Wrong delivery Description The probability that we get the wrong parts or do not get the ordered parts at all Probability Very unlikely Prevention We cannot do much if we get the wrong parts. We have to trust the producers and distributers Consequence There is a big probability that we will not be able to order new parts in time which leads to an unfinished product Solution Order new parts on express mail, and hope the reorder will be delivered in time Owner & date S.A, R.L 12.01.2012 Table 9: Risk 6 Probability: 2 Consequence: 9 Document: Risk document Version 1.0 Issue date: 26.05.2012 Page 6 of 8 Risk 7 Disagreement about the technical solution Description Some of the members have different opinions about the technical solutions Probability Likely Prevention This is a positive risk Consequence Some of our members may feel run over by the others and we spend more time than if everyone agree with the solutions Solution We have to discuss, analyze and agree with one solution. Owner & date S.A, R.L 12.01.2012 Probability: 7 Consequence: 2 Table 10: Risk 7 Risk 8 Probability for loss of data Probability: 2 Description The probability for loss of data if we get a computer-crash Probability Very unlikely Prevention We have data backup on dropbox and on every computer Consequence Loss of data Solution We have to rewrite the lost documents if we have time Owner & date S.A, R.L 12.01.2012 Consequence: 9 Table 11: Risk 8 Risk 9 Damaged hardware Description The probability that we damage the hardware Probability: 3 Consequence: 9 Probability Unlikely Prevention We have to be careful when we are working with the hardware and use ESD protection when handling the circuit boards Consequence The hardware may be destroyed Solution Order new hardware if time allows. Owner & date S.A, R.L 12.01.2012 Table 12: Risk 9 6.3. Working progress risks Risk 10 Illness Description Some of our members become ill during the project Probability Very likely Prevention Each one has to be careful not to be ill. Consequence We will have one less working person for a couple of days Solution There should be at least two persons working with each task so the progress will not stop because of one person. Owner & date S.A, R.L 12.01.2012 Table 13: Risk 10 Probability: 9 Consequence: 3 Document: Risk document Version 1.0 Issue date: 26.05.2012 Page 7 of 8 Risk 11 Injury Probability: 1 Consequence: 5 Description Some of our members become injured during the project Probability Unlikely Prevention No one knows what tomorrow brings. So we have to be careful Consequence We will have one less working person for a period Solution There should be at least two persons working with each task so the progress will not stop because of one person. Owner & date S.A, R.L 12.01.2012 Table 14: Risk 11 Risk 12 Some quits school Probability: 1 Consequence: 7 Description Someone quits school because of personal or professional reasons Probability Very unlikely Prevention We have to motivate and respect each other and work with teambuilding Consequence We will have one less working person for the rest of the project Solution The other persons in the group have to divide the tasks to the missing person between the remaining members of the group. Owner & date S.A, R.L 12.01.2012 Table 15: Risk 12 Risk 13 Lack of motivation Description Someone in the group get lack of motivation during the project which leads to bad working spirit. Probability: 5 Consequence: 3 Probability Possible Prevention Allow each other to decide working hours, keep building team spirit and get through boring tasks. Consequence The working progress will slow down. Solution Allow each other to decide working hours, keep building team spirit and help others through boring tasks. Owner & date S.A, R.L 12.01.2012 Table 16: Risk 13 Risk 14 Losing our supervisors Description Losing our internal or/and external supervisors Probability Very unlikely Prevention Arranging meeting and make conscientious effort Consequence We will get inadequate follow-up Solution We have to find a new internal or/and external supervisor. Owner & date S.A, R.L 12.01.2012 Table 17: Risk 14 Probability: 2 Consequence: 8 Document: Risk document Version 1.0 Issue date: 26.05.2012 Page 8 of 8 Risk 15 Time shortage Probability: 9 Consequence: 4 Description That we are using more time than expected Probability Very likely Prevention Work evenly hard during the whole project Consequence We get less leisure and we may not finish all of the tasks Solution Work more and make the right priorities Owner & date S.A, R.L 12.01.2012 Table 18: Risk 15 Risk 16 Too much time Description Probability: 1 That we are using less time than expected Probability Very unlikely Prevention Have a list of different tasks and improvements. Consequence We get more leisure and finish all tasks Solution We need to find tasks and improvements Owner & date S.A, R.L 12.01.2012 Consequence: 2 Table 19: Risk 16 7. REVISIONS Responsible person for this document, procedure or template rev 01 02 03 04 1.0 Description Made templates, wrote introduction and made the requirement risks Made risks 1-16 Fixing grammar Did some cosmetic changes to the tables Made the PDF copy and checked the document for errors Table 20: Revisions Date 11.01.2012 12.01.2012 12.01.2012 13.01.2012 13.01.2012 Name R.L & S.A R.L & S.A A.G A.G A.G ACCOUNTING DOCUMENT Compact fly-by-wire system Version Category Issue Date 1.0 Released 29.05.2012 Made by S.A Checked by A.G Approved by O.R NOTES REGARDING VALIDITY OF THIS DOCUMENT: Paper copies are uncontrolled. This copy is valid only at the timeof printing. The controlled version of this document is available from the Company Intranet / DropBox. This document contains Equator Aircraft Norway legal entity proprietary and confidential information that is legally privileged and is intended only for the person or entity to which it is addressed and any unauthorised use is strictly prohibited. It is provided for limited purpose and shall not be reproduced, stored electronically, transferred to other documents, disseminated or disclosed to any third parties without the prior written consent of the relevant Equator Aircraft Norway legal entity. Any attachments are subject to the specific restrictions and confidentiality regulations stated therein and shall be treated accordingly. The document is to be returned upon request and in all events upon completion of use for which it was provided. Document: Version ACCOUNTING DOCUMENT REV1.0 1.0 Issue date: Page 29.05.2012 2 of 5 TABLE OF CONTENTS 1. LIST OF TABLES ................................................................................................................... 3 2. INTRODUCTION..................................................................................................................... 3 3. ABBREVIATION ..................................................................................................................... 3 4. PRODUCT PURCHASE LIST ................................................................................................ 3 5. PARTS PURCHASE LIST ...................................................................................................... 3 6. REVISIONS ............................................................................................................................. 4 Document: ACCOUNTING DOCUMENT REV1.0 Version 1. 1.0 Issue date: 29.05.2012 Page 3 of 5 LIST OF TABLES Table 1: Abbreviation............................................................................................................................... 3 Table 2: Product purchase list ................................................................................................................. 3 Table 3: Revisions ................................................................................................................................... 5 2. INTRODUCTION This document contains a list of purchased items during the project. 3. ABBREVIATION Technical Term Standard Definition K.M. Kjetil Mjøs A.G. Axel Gravningsbråten S.A. Sindre Andersen T.A. Thomas Andersen R.L. Runar Løken O.R. Ole Riiser Table 1: Abbreviation 4. PRODUCT PURCHASE LIST Product Price(NOK) Buyer Status Date Tape 29 S.A Paid 03.01.12 Coffee for the first presentation 135 K.M Paid 10.01.12 Biscuits for the first presentation 29 S.A Paid 10.01.12 Paper plates & plastic knives 37 A.G Paid 12.01.12 Fuel for meeting 3 14 NOK/L 196 A.G Paid 08.02.12 Spraypaint and sanding paper 149 S.A Paid 18.03.12 Coffe and biscuits for the second pres. 175 S.A Paid 18.04.12 Food for teambuilding and meeting with Knut 215 S.A Paid 25.05.12 Table 2: Product purchase list 5. PARTS PURCHASE LIST Buye r Status Date 1186 (order1) S.A Paid 09.02.12 www.sparkfun.com Order1 S.A Paid 09.02.12 One wire www.sparkfun.com 47(order 2) S.A Paid 09.02.12 PSU www.ebay.com 3.3V regulator www.ebay.com Order 2 S.A Paid 09.02.12 Linear voltage regulator www.ebay.com Order 2 S.A Paid 09.02.12 LEDS www.ebay.com Stepper controller www.pololu.com 141 S.A Paid 09.02.12 Microcontrollers www.mikroe.com 592 S.A Paid 24.02.12 Product Supplier Price(NOK) IMU www.sparkfun.com GPS S.A 09.02.12 S.A 09.02.12 Document: ACCOUNTING DOCUMENT REV1.0 Version Issue date: 1.0 29.05.2012 Page 4 of 5 Taxes Order 1 237 S.A Paid 24.02.12 Taxes On microcontrollers 264 S.A Paid 05.03.12 Sample connector Elfa electronics 128 S.A Paid 19.03.12 MCC PCB cards pcbCart.com 1187 S.A Paid 1.4.2012 Stepper controllers Pololu.com 1100 S.A Paid 3.4.2012 Parts from ebay Ebay.com 203 S.A Paid 3.4.2012 Cables, connector and a lot of small parts. S.A Paid 9.4.2012 Ebay.com 1107 Power connectors Digikey.com 200 K.M Paid 18.4.2012 Potmeters and misc www.sparkfun.com 436 S.A Paid 18.4.2012 O.R Paid O.R Paid O.R Paid O.R Paid Usb connector resistors and transistors, two stepper motors and other misc. LPC1768 and debugger Ebay.com 490 Ebay.com 382 Capacitors headers and potentiometer Ebay.com 69 10 Rocker switches, green leds, red leds and standoffs Ebay.com 108 Ordered SC PCB card Pcbcart.com 1116 S.A Paid Ordered ammeters Ebay.com 63 O.R Paid 27.04.2012 74HCT365 Ebay.com 69 O.R Paid 02.05.2012 LM3526-L Elfa 147 O.R Paid 02.05.2012 Metal plate, epoxy and cutting disc S.A Paid 02.05.2012 Biltema 70 Spray paint Maxbo Hokksund 107 S.A Paid 07.05.2012 Metal plates, brackets Biltema 73 S.A Paid 14.05.2012 Shrink tube Biltema 25 A.G Unpaid 15.05.2012 Tape Biltema 35 S.A Paid 15.05.2012 Spraypaint, wood, sanding paper 180 S.A Paid -- 17.04.2012 Maxbo Hokksund Ties Biltema 46 A.G Unpaid 19.05.2012 Table 3: Purchased items 6. RESULT Post Budget Spent Result Research 2000 0 2000 Stepper Motors 5000 260 4740 PCB-Production 2500 2303 197 Other Components 1500 6745 -5245 Testing SUM 1500 500 1000 12500 9808 2692 7. REVISIONS Responsible person for this document, procedure or template ACCOUNTING DOCUMENT REV1.0 Document: Version 1.0 rev 0.1 0.2 1.0 Issue date: Page Description Made table for accounting Updated Purchase lists, Checked for errors and approved, Added the result table for better overview Table 4: Revisions 29.05.2012 5 of 5 Date Owner 12.01.2011 09.02.2012 S.A S.A S.A, O.R 22.05.2012 COMPLETE TIME SHEET Activity name Activity number Setup 1 Project plan 2 Requirements 3 Test spec. 4 Risk analysis 5 Presentation 6 Meeting 7 HW research 8 SW development 9 Technical doc. 10 HW development 11 Testing 13 Sum Activity name Activity number Setup 1 Project plan 2 Requirements 3 Test spec. 4 Risk analysis 5 Presentation 6 Meeting 7 HW research 8 SW development 9 Technical doc. 10 HW development 11 Testing 13 Sum Ole 51 24 6 9,5 0 31,5 36 69,5 35,5 69 196 39 Kjetil 25,5 32,5 12,5 0 0 36,5 31 29 265 46 0 89,5 Axel 12 12,5 45,5 16 0 36 57 36 1 232 33,5 7,5 Sindre 19 36,5 0 0 12 26 56 71,5 0 160,5 100,5 8 Runar 13 65,5 0 13 6 33,5 48 100 159,5 34 8 29 Thomas 3 48 0 12 0 27 30,5 10,5 270 24 0 53 567 567,5 489 490 509,5 478 Sum 123,5 219 64 50,5 18 190,5 258,5 316,5 731 565,5 338 226 3101 Ole Test spec. 2% Project plan 4% Testing 7% Setup 9% Requirements 1% Risk analysis 0% Presentation 6% Meeting 6% HW development 35 % HW research 12 % Technical doc. 12 % SW development 6% Kjetil HW development 0% Testing 16 % Project plan Requirements 6% Test spec. 2% Setup 0% Risk analysis 5% 0% Presentation 6% Technical doc. 8% SW development 47 % Meeting 5% HW research 5% Project plan Testing Setup 3 % 2% 3% Axel HW development 7% Requirements 9% Test spec. 3% Risk analysis 0% Presentation 7% Meeting 12 % Technical doc. 47 % HW research 7% SW development 0% Sindre Testing 2% Requirements Test spec. 0% 0% Setup 4 % Project plan 7% Risk analysis 2% Presentation 5% HW development 21 % Meeting 11 % Technical doc. 33 % HW research 15 % SW development 0% Runar Setup HW development 2% 2% Technical doc. Testing 7% 6% Requirements 0% Project plan 13 % Test spec. 2% Risk analysis 1% Presentation 7% SW development 31 % Meeting 9% HW research 20 % Thomas Setup 1% HW development 0% Technical doc. 5% Testing 11 % Project plan 10 % Test spec. Requirements 3 % 0% Risk analysis 0% Presentation 6% Meeting 6% HW research 2% SW development 56 % User Manual Compact Fly-By-Wire System Equator Aircraft Document: USER MANUAL Version 1. 1.0 Issue date: Page 28.05.2012 2 of 7 WELCOME Congratulations on your new P-2 Excursion! Before you go flying please read this document carefully to ensure a safe and pleasant flight. We want you to spend as much time to enjoy flying and as little time as possible on concerning for you safety. This document will guide you step-bystep through the different control features of the Compact-Fly-By-Wire System. This is a document directed only towards the user interface, and contains no technical documentation or data. For technical support please read the Technical User Manual. 2. SC The SC is a supervisor Card that supervises the system and reports errors and alarms. It also supervises the pilot inputs and can prevent critical pilot errors like stalling and altitude misjudgment during landing. If the SC is turned off (read: Analog HMI) the system will work normally without any safety features. 3. JOYSTICK The joystick is the most important part of the system, as it is what transfers your inputs to the system and further out to the control surfaces. Note: All the joystick axes sends out a linear control signal. 3.1.1.1. Pitch By using the Pitch axis on the joystick (the forward and backward movement) you will control the elevator. Pushing the elevator forward will point the elevator down, and during flight the aircraft nose will point down and you will lose altitude. By pulling the stick towards you the elevator will point upwards, and during flight the aircraft will point upwards and you gain altitude. When SC is activated a stall limiter will prevent the aircraft from stalling, by stopping the elevator movement upwards if the aircraft is close to stalling. WARNING: When the SC is deactivated be aware of the stall speed when attempting to increase altitude, make sure you have sufficient speed before pulling the joystick. Document: Version USER MANUAL 1.0 Issue date: 28.05.2012 Page 3 of 7 3.1.1.2. Roll The roll axis (sideways movement) on the joystick controls the ailerons. Pulling the joystick to the right will cause the aircraft to bank to the right, and vice versa. When banking the aircraft the stall speed increases, when SC is activated it will prevent a stall from happening by limiting the bank angle and increasing the speed. WARNING: When the SC is deactivated be aware that the stall speed increases when banking the aircraft. 3.1.1.3. Yaw The Yaw axis (twisting movement) on the joystick controls the rudder, the nose wheel and the water rudder. By twisting the joystick to the right the aircraft’s horizontal direction will start pointing to the right. When the aircraft is located on water, a small water rudder will ensure maneuverability on the sea, by twisting the joystick to the right during forward movement, the aircraft will turn to the right. When the landing gear is activated and the aircraft is located on a runway, the yaw axis controls the nose wheel. Twisting the yaw axis to the right will turn the nose wheel to the right and the aircraft will turn right. 3.1.2. Autopilot The autopilot can be activated from the joystick, by using the AP button (ON/OFF Switch) This autopilot setting is a simple autopilot without possibility of automatic take-off & landing and waypoints. With the joystick autopilot option you can set desired altitude with the ALT button, and set the compass heading with the HDG button. Document: USER MANUAL Version 1.0 Issue date: 28.05.2012 Page 4 of 7 Figure1: Joystick with autopilot 4. ANDROID TABLET On the next page is an example of the factory set user interface of the Android flight instrument panel. The Tablet is the main instrument panel of the aircraft, and it handles all the information you need, we advise you to use some time to get to know the functions of it. In the above example you can see the factory settings of the instrument panel, containing; - Google map with airspace zones - Compass heading - Distance to destination - Time to destination - Altitude - Airspeed - Ground speed - Autopilot settings - System status Warnings and alarms will automatically pop up on the screen no matter the user settings. The autopilot is available with vast possibilities of functions, with waypoints, automatic takeoff and landing, automatic altitude settings according to the airspace zones. Etc. You can set other information bars, change the sizes and add more, the user interface can be customized to suit your needs and wishes. There is also possible to download new functions from Android Market by registering your name and flight registration number. The Marked will be updated regularly with new functions and updates. Document: Version USER MANUAL 1.0 Issue date: Page Figure 1: Example of an Android application 28.05.2012 5 of 7 Document: USER MANUAL Version 5. 1.0 Issue date: Page 28.05.2012 6 of 7 ANALOG HMI WARNING: When activating the override button, only activate one at a time! Activating of multiple Main controller cards can damage the system, and cause failure! If the SC fails to supervise the system or you do not want the safety features to interfere with your flying, you can override the choice of controller manually by pushing one of the three buttons on the Analog HMI board, you will then choose the respective MCC as operative. You can also see the status of each card on the LEDs. To ensure that the system starts up correctly when powered, check if all the LEDs turn green before take-off! If any LEDs don’t turn green, try to turn off the power for 5 seconds and repower the system. If the problem persists, contact a technician. Figure 2: Analog HMI Document: USER MANUAL Version 6. 1.0 Issue date: 28.05.2012 Page 7 of 7 FURTHER INFORMATION For a more detailed explanation of the functions please read: - SW description HW description For information on how to assemble the system and troubleshooting please read: - System topology MCC wiring diagram SC wiring diagram HMI wiring diagram 6.1.1.1. Contact For further assistance please do not hesitate to contact Equator Aircraft Norway on: Home page: http://www.equatoraircraft.com/ e-mail: [email protected] phone: (+47) 970 39 469 Visit: Brugata 11 0186 Oslo Norway Post address: Maridalsveien 64C 0458 Oslo Norway Technical Manual Compact FBW System Equator Aircraft NOTES REGARDING VALIDITY OF THIS DOCUMENT: Paper copies are uncontrolled. This copy is valid only at the time of printing. The controlled version of this document is available from the Company Intranet / DropBox. This document contains Equator Aircraft Norway legal entity proprietary and confidential information that is legally privileged and is intended only for the person or entity to which it is addressed and any unauthorised use is strictly prohibited. It is provided for limited purpose and shall not be reproduced, stored electronically, transferred to other documents, disseminated or disclosed to any third parties without the prior written consent of the relevant Equator Aircraft Norway legal entity. Any attachments are subject to the specific restrictions and confidentiality regulations stated therein and shall be treated accordingly. The document is to be returned upon request and in all events upon completion of use for which it was provided. Document: Version Technical User Manual 1.0 Issue date: Page 26.05.2012 2 of 15 TABLE OF CONTENTS 2. PURPOSE ............................................................................................................................... 3 3. THE SYSTEM ......................................................................................................................... 3 3.1. Introduction ............................................................................................................................. 3 3.2. 3.2.1. 3.2.2. 3.2.3. The Main Controller Card ....................................................................................................... 4 Introduction ............................................................................................................................. 4 Where to find Information? ..................................................................................................... 7 Software ................................................................................................................................. 5 3.3. 3.3.1. 3.3.2. 3.3.3. The Supervisor ....................................................................................................................... 8 Introduction ............................................................................................................................. 8 Where to find Information? ..................................................................................................... 8 Software ................................................................................................................................. 9 3.4. Simulator ................................................................................................................................ 9 4. FURTHER INFORMATION................................................................................................... 15 4.1.1.1. Contact ................................................................................................................................. 15 Document: Technical User Manual Version 2. 1.0 Issue date: Page 26.05.2012 3 of 15 PURPOSE This document is intended for the technician of the Compact Fly-By-Wire System, and it explains how to assemble and wire the system. How to connect a computer and how to do Software changes on the system, and how the system works in general. 3. THE SYSTEM 3.1. Introduction The system we make is a replacement for the old manual steering system for light airplanes. It is supposed to mimic the movements that the old system has but also prevent critical pilot errors like stall angle etc. The system can also be implemented with autopilot etc. for computer assisted flight. The system (Figure 1) consists of three Main controller cards (MCC) which by itself can control the airplane, but since electronics are more likely to fail then wires we made the system triple redundant. They get joystick readings from a triple redundant joystick which has three axes and has their own stepper controller for actuation of the control surfaces. The stepper motors on the control surfaces has a really high life expectancy so they don’t need redundancy. The three MCCs needs supervision so they don’t overrides each other and this is why we have the supervisor card (SC). The supervisor card receives information from all the MCCs and decides which one that is in command and controls the control surfaces. We have also a USB-host port on the supervisor so it can be interfaced with an android device for easy access to information and you can control various parts of the system with the autopilot. The SC also contains a lot of sensors for measuring the planes orientation, velocity and height which can be used as pilot assistance and reference for autopilot. The sensors we have included are: Internal sensors: Accelerometer Gyroscope Magnetometer Barometer GPS External sensors Ultrasonic range sensor Airspeed sensor Angle of attack sensor Figure 1: System diagram Document: Technical User Manual Version 1.0 Issue date: Page 26.05.2012 4 of 15 3.2. The Main Controller Card 3.2.1. Introduction Figure 2: MCC Part Description 1. 7805 5V regulator for Analog Circuitry(Warning: The output voltage from this regulator needs to be lower than the voltage in 2, we mounted regulators on 1 that was at least 50-100mV. Every 7805 has a slightly different output voltage) 2. 7805 5V regulator as a power supply, this regulator supplies 5v to everything except the analog circuitry. 3. PIC18F8520 breakout board from mikroelectronika 4. RC filter to protect every input, the resistor network is 5 isolated resistors. 5. Voltage read by voltage division 6. DS18B20 temperature sensor, one wire protocol. 7. Stepper Controller for one stepper motor. 8. NA 9. Programming connector for PICKIT2 programmer 10. Power Connector(7v-25V input) 11. PTC fuse, this blocks 5v to connector if current exceeds 0.25A 12. 470uF capacitor to remove transients. Another note that is important is the standardization of the connectors, 5v is always on Pin1 marked on the board and GND is on the second last pin as drawn on the board. This is the default on all connectors! Document: Technical User Manual Version 1.0 Issue date: 26.05.2012 Page 5 of 15 3.2.2. Software The development of software for the main controller cards is done using MicroC Pro for PIC. A link to the download page for the software is found here: http://www.mikroe.com/eng/products/view/7/mikroc-pro-for-pic/ (22.05.2012). The free demo version has a program limit of 2kB. A dongle with a full licence is supplied with the compact fly by wire product. A user manual for the MicroC compiler is found here: http://www.mikroe.com/eng/downloads/get/30/mikroc_pic_pro_manual_v101.pdf (22.05.2012). When a project is compiled a hex file is created. There is two ways of getting this hex file onto the PIC microcontroller. One way is by using the BigPic5 development board. When pressing the compile and program with the BigPic5 connected the code will be uploaded to the controller. The controller chip can then be taken out and inserted into one of the three main controller cards. The other way of getting the hex file onto the main controller cards is by using a PICKit programmer. Figure 3: The PICkit2 programmer We have been using the PICkit2 programmer but the PICkit3 should also work. Software for the PICkit can be downloaded from here: http://www.microchip.com/stellent/idcplg?IdcService=SS_GET_PAGE&nodeId=1406&dDocN ame=en023805 (22.05.2012). The programmer connects to part 9 on Figure 2. The arrow on the card should point towards the arrow on the programmer. Start the PICkit2 programmer by pressing this icon: Document: Version Technical User Manual 1.0 Issue date: Page 26.05.2012 6 of 15 The main screen is then showed: Figure 4: PICkit2 programmer software Open file and choose import hex. Navigate to the hex file created by MicroC. Press OK and you should get a hex file successfully loaded. Document: Version Technical User Manual 1.0 Issue date: Page 26.05.2012 7 of 15 Figure 5: PICkit2 hex file successfully loaded You can now press write and the hex file gets loaded into the PIC controller. It is recommended to restart the PIC after the code has been loaded to get a clean start-up. 3.2.3. Where to find Information? Documents we used a lot while developing the system: Wiring Diagram for MCC: Here you can see where every wire is connected on the MCC and which pin on the PIC that goes to which connector. Card Configuration: This is a great reference for programmers! It is an Excel sheet with explanation on which pins that are used on the microcontrollers and what they interface with. Schematic for MCC: Self-explanatory, a schematic for the PCB. PCB-Layout MCC: This requires the user to have the Proteus PCB Design Package, but is a great way getting to know the PCB card, and troubleshooting the circuit. Document: Technical User Manual Version 1.0 Issue date: Page 26.05.2012 8 of 15 3.3. The Supervisor 3.3.1. Introduction Figure 6: SC Part description 1. LPC1768 Cortex m3 microprocessor. When we received this core board there was some buttons and sensors on it which had to be removed since we use these pins on out PCB. 2. 3.3Volt 800mA regulator. 3. 5V regulator for charging USB device and level conversion. 4. GPS device 5. IMU device(magnetometer, Gyroscope and accelerometer) 6. Level conversion for communication(TX from 3.3 to 5v) 7. RC filter 8. JTAG for programming 9. USB Connector 10. USB charge controller 11. Temperature sensor, One Wire 12. Power Connector 3.3.2. Where to find Information? Documents we used a lot while developing the system: Wiring Diagram for SC: Here you can see where every wire is connected on the SC and which pin on the LPC1768 that goes to which connector. Card Configuration: This is a great reference for programmers! It is an Excel sheet with explanation on which pins that are used on the microcontrollers and what they interface with. Schematic for SC: Self-explanatory, a schematic for the PCB. PCB-Layout SC: This requires the user to have the Proteus PCB Design Package, but is a great way getting to know the PCB card, and troubleshooting the circuit. Document: Technical User Manual Version 1.0 Issue date: Page 26.05.2012 9 of 15 3.3.3. Software The code development for the supervisor is done using Keil compiler. The program can be downloaded from here: http://www.keil.com/download/product/ The demo version has a 32kB limit that is sufficient for our use so a license will not be supplied with the product. A user manual for the keil compiler is found here: http://www.keil.com/support/man/ To get the software loaded into the LPC ARM controller it is necessary to use a programmer/debugger. The ULINK programmer/debugger will be supplied with the compact fly by wire product. The USB cable connects to your computer and the other end connects to JTAG port on the supervisor see part 8 on Figure 6. To compile the code press the button. To upload the code, press the button. The code is then loaded into the LPC controller. The supervisor card needs to be restarted after the code is uploaded. 3.3.4. Where to find Information? Documents we used a lot while developing the system: Wiring Diagram for SC: Here you can see where every wire is connected on the SC and which pin on the LPC1768 that goes to which connector. Card Configuration: This is a great reference for programmers! It is an Excel sheet with explanation on which pins that are used on the microcontrollers and what they interface with. Schematic for SC: Self-explanatory, a schematic for the PCB. PCB-Layout SC: This requires the user to have the Proteus PCB Design Package, but is a great way getting to know the PCB card, and troubleshooting the circuit. 3.4. Simulator To the system it is programmed a software code in Arduino IDE and a XML-file for communicate with an open source flight simulator called FligtGear. This simulator can be downloaded from FlightGears homepage: http://www.flightgear.org/ (16.05.2012) Document: Technical User Manual Version 1.0 Issue date: Page 26.05.2012 10 of 15 The software code and the XML file can be found in the: Software folder The aircraft that the code is made for is not a part of the original aircraft library. This aircraft is called “Long EZ” and can be downloaded from the page: http://www.flightgear.org/download/aircraft-v2-4/ (16.05.1012) To implement this in FlightGear, find the FlightGear folder on your computer and unzip the downloaded folder to FlightGear/Data/Aircraft. The XML code should be placed in the folder Flightgear/data/Protocol After finishing the downloading, connect the Arduino microcontroller to you PC and push the Flightgear Icon shown under, to start the simulator. Figure 1: Icon for flightgear When FlightGear starts, you get the screen sown under. Here select the aircraft “Rutan Long EZ” and push next. Figure 2: Select Aircraft The next step is to choose a location where you want to fly, here you can choose the one you want, and push next. Document: Technical User Manual Version 1.0 Issue date: Page 26.05.2012 11 of 15 Figure 3: Select Location In the next screen picture it is possible to set different condition, and it is here you have to implement the XML code. For doing this, select “Advanced.” Figure 4: Conditions settings Document: Technical User Manual Version 1.0 Issue date: Page 26.05.2012 12 of 15 In the advanced menu choose Input/Output on the left hand side of the screen. The developed code is based on serial communication and the protocol that has been used is Generic. The direction of the serial data should be in and the frequency can be chosen after how often you want to read the incoming data. To know which Port you shall use, you have to check which comport the Arduino microcontroller is connected to. The baud rate used in the developed code is 9600, so it is important to use this baud rate in FlightGear too. One the last option you shall choose the developed XML-code that you past in the folder “protocol.” No push ok then run. Figure 5: Advanced Options FlightGear is no running, and screen in figure 6 is shown. If everything is correctly done, the simulator is ready to be used. If there is an error, the loading screen in figure 6 will “not respond” and the simulator does not start. Then it can be an idea to start FlightGear with nothing added in figure 5, just delete the Input/Output properties. This to be sure that the PC is able to run FlightGear. Document: Technical User Manual Version 1.0 Issue date: Page 26.05.2012 13 of 15 Figure 6: FlightGear running When the FlightGear is running, it is possible to check the parameters we want to control. To check this, go to Debug on the top line, and choose Browse Internal Properties. You will now get the screen shown in figure 7. Figure 7: Browse Internal Properties All the flaps parameters can be found under controls/flight. These parameters shall respond to the motion of the joystick Document: Technical User Manual Version 1.0 Figure 8: Flaps parameters Issue date: Page 26.05.2012 14 of 15 Document: Technical User Manual Version 4. 1.0 Issue date: 26.05.2012 Page 15 of 15 FURTHER INFORMATION For a more detailed explanation of the functions please read: - SW description HW description For information on how to assemble the system and troubleshooting please read: - System topology MCC wiring diagram SC wiring diagram HMI wiring diagram 4.1.1.1. Contact For further assistance please do not hesitate to contact Equator Aircraft Norway on: Home page: http://www.equatoraircraft.com/ e-mail: [email protected] phone: (+47) 970 39 469 Visit: Brugata 11 0186 Oslo Norway Post address: Maridalsveien 64C 0458 Oslo Norway Hardware Description Version Category Issue Date 1.0 Released 26.05.2012 Made by A.G Checked by O.R Approved by A.G NOTES REGARDING VALIDITY OF THIS DOCUMENT: Paper copies are uncontrolled. This copy is valid only at the time of printing. The controlled version of this document is available from the Company Intranet / DropBox. This document contains Equator Aircraft Norway legal entity proprietary and confidential information that is legally privileged and is intended only for the person or entity to which it is addressed and any unauthorised use is strictly prohibited. It is provided for limited purpose and shall not be reproduced, stored electronically, transferred to other documents, disseminated or disclosed to any third parties without the prior written consent of the relevant Equator Aircraft Norway legal entity. Any attachments are subject to the specific restrictions and confidentiality regulations stated therein and shall be treated accordingly. The document is to be returned upon request and in all events upon completion of use for which it was provided. Document: Version System Description Issue date: 1.0 Page 26.05.2012 2 of 14 TABLE OF CONTENTS 1. PURPOSE ............................................................................................................................... 3 2. ABBREVIATION ..................................................................................................................... 3 3. 3.1.1. TEMPLATE ............................................................................................................................. 3 Name: ..................................................................................................................................... 3 4. SYSTEM DIAGRAM ............................................................................................................... 4 5. MAIN CONTROLLER CARD ................................................................................................. 5 5.1. 5.1.1. Power Supply Unit .................................................................................................................. 5 Linear Voltage Regulator 5V (LM 78L05) .............................................................................. 5 5.2. 5.2.1. Stepper Controller .................................................................................................................. 6 A4899 Stepper motor driver ................................................................................................... 6 5.3. 5.3.1. Sensors .................................................................................................................................. 7 Temperature DS18B20 .......................................................................................................... 7 6. 6.1.1. 6.1.2. SUPERVISOR CARD ............................................................................................................. 7 Linear Voltage Regulator 3.3V (LD111733) ........................................................................... 7 Linear Voltage Regulator 5V (LM 78L05) .............................................................................. 8 6.2. 6.2.1. Microcontroller ........................................................................................................................ 8 LPC1768 ................................................................................................................................ 8 6.3. 6.3.1. 6.3.2. Sensors .................................................................................................................................. 9 IMU ......................................................................................................................................... 9 GPS ........................................................................................................................................ 9 7. 7.1.1. ANALOG HMI ....................................................................................................................... 10 Analog HMI switches ............................................................................................................ 10 8. 8.1.1. SIMULATOR ......................................................................................................................... 12 Simulator hardware .............................................................................................................. 12 9. REFERENCES ...................................................................................................................... 13 9.1. 9.1.1.1. 9.1.1.2. 9.1.1.3. 9.1.1.4. 9.1.1.5. MCC ..................................................................................................................................... 13 MCU Cards for BIGPIC5™ development systems .............................................................. 13 PIC18F6520/8520/6620/8620/6720/8720 ............................................................................ 13 LM78LXX Series 3-Terminal Positive Regulators ................................................................ 13 A4988 Data sheet................................................................................................................. 13 DS18B20 temp sensor ......................................................................................................... 13 9.2. SC ........................................................................................................................................ 13 9.2.1.1. IMC ....................................................................................................................................... 13 Accelerometer datasheet: http://www.sparkfun.com/datasheets/Sensors/Accelerometer/ADXL345.pdf 13 Gyro datasheet: http://www.sparkfun.com/datasheets/Sensors/Gyro/PS-ITG-3200-00-01.4.pdf ........ 13 Magnetometer datasheet:..................................................................................................................... 14 http://dlnmh9ip6v2uc.cloudfront.net/datasheets/Sensors/Magneto/HMC5883L-FDS.pdf ................... 14 Author: HoneyWell Copyright 2010 ...................................................................................................... 14 Last Read: 13.02.2012 ......................................................................................................................... 14 9.2.1.2. GPS ...................................................................................................................................... 14 10. REVISIONS ........................................................................................................................... 14 Document: System Description Issue date: Version 1.0 1. 26.05.2012 Page 3 of 14 PURPOSE The purpose of this document is to learn how our system works and go into detail on each component and unit on the MCC and the SC PCB’s, to specify the I/O ports needed on the PIC18F8520. Make a piggyback for the units and to find out the voltage each component and unit needs, and also to identify the MTBF on each components in order for us to calculate the MTBF of the MCC and the SC, and off course the whole system. 2. ABBREVIATION Technical Term Standard Definition K.M. KjetilMjøs A.G. Axel Gravningsbråten S.A. Sindre Andersen T.A. Thomas Andersen R.L. RunarLøken O.R. Ole Riiser MCC Main Controller Card SC Supervision Card MCU Microcontroller Unit MIPS Million Instructions Per Second EEPROM Electrically Erasable Programmable Read-Only Memory USART Universal Synchronous/ Asynchronous Receiver/Transmitter PWM Pulse-Width Modulation CCP Capture/Compare/PWM MTBF Mean Time Between Failure IMU Inertial measurement Card 3. TEMPLATE 3.1.1. Name: Schematic drawing: Description Function I/O specification Vin & Imax MTBF Footprint Price References Author / date Specify the inputs and the outputs needed on the PIC18 Document: System Description Version 4. Issue date: 1.0 Page 26.05.2012 4 of 14 SYSTEM DIAGRAM The system we make is a replacement for the old manual steering system for light airplanes. It is supposed to mimic the movements that the old system has but also prevent critical pilot errors like stall angle etc. The system can also be implemented with autopilot etc. for computer assisted flight. The system (Figure 1) consists of three Main controller cards (MCC) which by itself can control the airplane alone. But because we don’t always trust electronics we make the system triple redundant. They get joystick readings from a triple redundant joystick which has three axes and has their own stepper controller for actuation of the control surfaces. The stepper motors on the control surfaces has a really high life expectancy so they don’t need redundancy. The three MCCs needs supervision so they do not overrides each other and this is why we have the supervisor card (SC). The supervisor card receives information from all the MCCs and decides which MCC to be in control of the control surfaces. The SC also contains a lot of sensors for measuring the planes orientation, velocity and height which can be used as pilot assistance and reference for autopilot. The sensors we have included are: Internal sensors: Accelerometer Gyroscope Magnetometer Barometer GPS External sensors Ultrasonic range sensor Airspeed sensor Angle of attack sensor Figure 1: System diagram Document: System Description Version Issue date: 1.0 5. Page 26.05.2012 5 of 14 MAIN CONTROLLER CARD See: Appendix 5; MCC Wiring Diagram Appendix 2; MCC Overview 5.1. Power Supply Unit Linear Voltage Regulator 5V (LM 78L05) 5.1.1. Schematic drawing: Description We have changed this regulator from a switching regulator since the estimated current consumption of the board is a lot less than expected. We have estimated that the board will draw approximately 150mA, which will produce 1.35watts of heat, we consider using the ground plane as a heat sink. Function Deliver a steady power supply to the logic circuits as well as the LEDs used. (5V ±0.2V). Input Output I/O specification 13.8V ±4V 5V ± 0.2V GND N/A Vin & Imax 7.9Vmin – 35Vmax & load currents up to 1000mA MTBF 1002356520 hours Footprint TO-92 Price 1 USD References 7.1.1.4 LM 78L05 data sheet Author / date O.R Figure 2: Connectors On MCC 20.03.2012 Document: System Description Version Issue date: 1.0 Page 26.05.2012 6 of 14 5.2. Stepper Controller 5.2.1. A4899 Stepper motor driver Schematic drawing: Description Each Stepper controller is controlling one stepper motor; it is five stepper controllers on each MCC controlling the Nose wheel, rudder, right aileron, left aileron and the elevator. Function The stepper controller will amplify and convert a directional pulse from the PIC18F8520 to a current signal to the motor, controlling the speed and direction. The stepper controller will be enabled or disabled by the PIC18. And can be reset if desired. I/O specification Output: PIC18F8520 Input: A4899 Ref: MCC Card configuration STEP Ref: MCC Card configuration RESET Ref: MCC Card configuration DIR Ref: MCC Card configuration ENABLE 13.8V VMOT GND GND 5V VDD GND GND Output: A4988 Stepper motor: 1A Red 1B Yellow 2A Orange 2B Blue Vin & Imax 8 – 35 Vin & maximum 2A per coil (2 coils = 4A) MTBF 31,784.5 hours Price 12.95 USD References 7.1.1.5 data sheet of the A4988 Author / date A.G and R.L 07.03.2012 Document: System Description Version Issue date: 1.0 26.05.2012 Page 7 of 14 5.3. Sensors 5.3.1. Temperature DS18B20 Picture: Description This device will give us the temperature of the Card specified. Function This sensor gives us a calibrated reading without the need for a analog input. The sensor uses a One wire protocol that gives a string of data upon request. I/O specification Connected to a 1-wire bus. Vin & Imax 5v MTBF - Footprint TO-92 Price 2 USD References http://datasheets.maxim-ic.com/en/ds/DS18B20.pdf Author / date O.R 6. 23.05.2012 SUPERVISOR CARD The Supervisor card is the card that decides which of the Main controller cards that is active. The Supervisor card can also be implemented with autopilot and can be connected to an android tablet. The Supervisor receives status information from all the MCCs and compares them to each other. This si also the controller that communicates with the user. 6.1.1. Linear Voltage Regulator 3.3V (LD111733) Picture: Description Function The LPC1768 Is Running at 3.3 Volt and Therefore we use this Voltage Regulator. It can Supply 800mA of current Deliver a steady power supply to the joystick (5V ±0.2V). Document: System Description Version Issue date: 1.0 I/O specification Page Input Output 13.8V ±4V 3.3V ± 0.033V GND N/A Vin & Imax 7.9Vmin – 18Vmax & load currents up to 1000mA MTBF 1002356520 hours Footprint TO-220(NOT standard pinout!!) Price 1 USD References 7.1.1.4 LM 78L05 data sheet Author / date A.G 6.1.2. 26.05.2012 8 of 14 09.02.2012 Linear Voltage Regulator 5V (LM 78L05) Schematic drawing: Description This power supply will provide some 5v circuitry with 5v, like logiv level converter and USB charging Current. Function Deliver a steady power supply to the joystick (5V ±0.2V). I/O specification Input Output 13.8V ±4V 5V ± 0.2V GND N/A Vin & Imax 7.9Vmin – 35Vmax & load currents up to 1000mA MTBF 1002356520 hours Footprint TO-220 Price 1 USD References 7.1.1.4 LM 78L05 data sheet Author / date A.G 09.02.2012 6.2. Microcontroller 6.2.1. LPC1768 Schematic drawing: Description The LPC1768 is a 32-bit microcontroller which is much better for this board than the PIC18F8520. We use a Core-board solution which has J-tag connector breaked out Document: System Description Version Issue date: 1.0 Page 26.05.2012 9 of 14 and we don’t need to solder surface mount components. http://www.wayengineer.com/index.php?main_page=product_info&products_id=200 Function Monitor every MCC and decide which that has control over the system. I/O specification “The LPC1768 microcontroller has 512KB of internal flash and 64KB RAM. Ethernet MAC, USB Device/Host/OTG interface, 8-channel general purpose DMA controller, 4 UARTs, 2 CAN channels, 2 SSP controllers, SPI interface, 3 I2C-bus interfaces, 2-input plus 2-output I2S-bus interface, 8-channel 12-bit ADC, 10-bit DAC, motor control PWM, Quadrature Encoder interface, 4 general purpose timers, 6-output general purpose PWM, ultra-low power Real-Time Clock (RTC)” http://www.sparkfun.com/products/9931 Price 20USD: References ics.nxp.com/products/lpc1000/datasheet/lpc177x.lpc178x.pdf Author / date O.R 16.04.2012 6.3. Sensors 6.3.1. IMU Schematic drawing: http://dlnmh9ip6v2uc.cloudfront.net/datasheets/Sensors/IMU/9DoF-Stick-v13.pdf (Author Sparkfun electronics, Last Read 13.02.2012) Description This is a sensor card that will give us information about the position of the plane and where it’s heading. This module has an accelerometer, gyroscope and a magnetometer (Compass) built in. Module made by Sparkfun Electronics. Function Gives us data about heading direction(Magnetometer), angular velocity in three dimensions(Gyroscope) and acceleration forces in three axis(Accelerometer) I/O specification I2C Bus, has a built-in 3.3v regulator Vin & Imax 16v Footprint 4 connector holes with 0.1” spacing Price 99USD References http://www.sparkfun.com/products/10724 (last read 13.02.2012) Author / date O.R 6.3.2. 13.02.2012 GPS Schematic drawing: http://www.sparkfun.com/datasheets/GPS/Modules/Venus_GPS-v15sma.pdf (Author SparkFun Electronics, Last Read: 13.02.2012) Description This is a GPS module that will give us positioning data, height, ground speed and clock. Function Gives positioning data, height, ground speed, and time. I/O specification This device communicates over a serial line and will be connected t the multiplexer described in this document(Error! Reference source not found.) Vin & Imax 3.3v regulated, 29mA load current Footprint Four connector holes with 0.1” spacing Price 49 USD Document: System Description Version Issue date: 1.0 Page References http://www.sparkfun.com/products/11058 Author / date O.R 7. ANALOG HMI 7.1.1. Analog HMI switches Schematic drawing: 13.02.2012 26.05.2012 10 of 14 Document: System Description Issue date: Version 1.0 Page 26.05.2012 11 of 14 Description The analog HMI switches should only be used if the SC is not responding or is acting strange. Function If MCC 1 switch is pressed down, the 5V signal from the MCC1 will be sent to the “enable” port on the MCC1, and it will go to operational state. At the same time a signal is sent to MCC2 & MCC3 telling them that MCC1 is in control, and they will go to standby mode. The same signal will go to the SC telling it that the analog HMI is activated, and the SC will go to standby. Same function for the MCC2 & the MCC3 switch. I/O specification Power supply Switch Input 5V from MCC1 MCC1 Enable MCC1 5V from MCC1 MCC1 Disable MCC2 5V from MCC1 MCC1 Disable MCC3 5V from MCC1 MCC1 HMI activated 5V from MCC2 MCC2 Enable MCC2 5V from MCC2 MCC2 Disable MCC1 5V from MCC2 MCC2 Disable MCC3 5V from MCC2 MCC2 HMI activated 5V from MCC3 MCC3 Enable MCC3 5V from MCC3 MCC3 Disable MCC1 5V from MCC3 MCC3 Disable MCC2 5V from MCC3 MCC3 HMI activated Vin & Imax Vin = 5V from MCC1, MCC2 or MCC3 MTBF N/A Price N/A References N/A Author / date A.G 22.02.2012 Document: System Description Version Issue date: 1.0 8. SIMULATOR 8.1.1. Simulator hardware Page 26.05.2012 12 of 14 Schematic drawing: I/O specification To the simulator communication we use a Arduino Mega microcontroller. This is connected the way the drawing shows with 4 switches that turns the different parameters on and off. The serial lines are used to send data, and the slide potmeter is used for throttle. Digital Pin 3, =Gear down Digital Pin 4 = Magnetos Digital Pin 6 = Start engine Digital Pin 7 = Brake Analog Pin 3 = Throttle Pin 18 = Possible to send data from Flightgear to our system Pin 19 = Receive data from our system USB port = sending data to Flightgear from Arduino Mega Price 67 USD References Arduino Mega 2560 user manual Description Document: System Description Version Issue date: 1.0 26.05.2012 Page 13 of 14 http://arduino.cc/en/Main/ArduinoBoardMega2560 Last read 15.05.2012 Author / date 9. Runar Løken 15.05.2012 REFERENCES 9.1. MCC 9.1.1.1. MCU Cards for BIGPIC5™ development systems Data sheet for the PIC18F8520 piggyback Author: Micro Electronika Last read: 09.02.2012 by A.G 9.1.1.2. PIC18F6520/8520/6620/8620/6720/8720 Data sheet for the PIC18F8520 Author: Microchip Last read: 09.02.2012 by A.G 9.1.1.3. LM78LXX Series 3-Terminal Positive Regulators Data sheet for the LM78L05 PSU th Author: Texas Instruments Copyright 15 of January 2012 Last read: 09.02.2012 by A.G 9.1.1.4. A4988 Data sheet Data sheet for the A4988 stepper controller Author: Allegro Microsystems, Inc. Last read: 10.02.2012 by A.G 9.1.1.5. DS18B20 temp sensor Datasheet: http://datasheets.maxim-ic.com/en/ds/DS18B20.pdf Author: Maxim, Copyright 2008 Last Read: 13.02.2012 9.2. SC 9.2.1.1. IMC Error! Reference source not found. Picture: HYPERLINK "http://dlnmh9ip6v2uc.cloudfront.net/images/products/10724-01b.jpg" http://dlnmh9ip6v2uc.cloudfront.net/images/products/10724-01b.jpg Accelerometer datasheet: http://www.sparkfun.com/datasheets/Sensors/Accelerometer/ADXL345.pdf Author: Analog Devices Copyright 2009 Last Read: 13.02.2012 Gyro datasheet: http://www.sparkfun.com/datasheets/Sensors/Gyro/PS-ITG-3200-0001.4.pdf Author: InvenSense Copyright 2009 Last Read: 13.02.2012 Document: System Description Version Issue date: 1.0 26.05.2012 Page 14 of 14 Magnetometer datasheet: http://dlnmh9ip6v2uc.cloudfront.net/datasheets/Sensors/Magneto/HMC5883L-FDS.pdf Author: HoneyWell Copyright 2010 Last Read: 13.02.2012 9.2.1.2. GPS Product Link: http://www.sparkfun.com/products/10921 Last Read: 13.02.2012 GPS-Datasheet: http://dlnmh9ip6v2uc.cloudfront.net/datasheets/Sensors/GPS/Venus638FLPx.pdf Author: SkyTrack Technology Copyright 2008. Version 0.7 Last Read 13.02.2012 10. REVISIONS Responsible person for this document, procedure or template Rev 0.1 0.2 0.3 0.4 0.5 0.6 0.7 0.8 1.0 Description Made the template, wrote the purpose, updated references Made: 5.1.1 LM2596, 5.1.2 LM78L05, Made: 4.3.1 Temperature DS18B20, 5.2.1 744052, 5.3.1 IMC, 5.3.2 GPS Made: 6.1.1 analog HMI Updating 4.2 stepper controller Changed document name and filled in overview Changed main PSU 5.1.1 Making chapter for simulator hardware Updated the document Official release Date Name: 09.02.2012 S.A / A.G 10.02.2012 O.R / A.G 22.02.2012 07.03.2012 19.03.2012 20.3.2012 15.05.2012 23.05.2012 23.05.2012 A.G R.L O.R O.R R.L O.R/A.G A.G HARDWARE RESEARCH DOCUMENT Compact Fly By Wire System Version Category Issue Date 1.0 Released 22.05.2012 Made by O.R Checked by A.G Approved by Knut brødreskift NOTES REGARDING VALIDITY OF THIS DOCUMENT: Paper copies are uncontrolled. This copy is valid only at the timeof printing. The controlled version of this document is available from the Company Intranet / DropBox. This document contains Equator Aircraft Norway legal entity proprietary and confidential information that is legally privileged and is intended only for the person or entity to which it is addressed and any unauthorised use is strictly prohibited. It is provided for limited purpose and shall not be reproduced, stored electronically, transferred to other documents, disseminated or disclosed to any third parties without the prior written consent of the relevant Equator Aircraft Norway legal entity. Any attachments are subject to the specific restrictions and confidentiality regulations stated therein and shall be treated accordingly. The document is to be returned upon request and in all events upon completion of use for which it was provided. Document: Version HARDWARE RESEARCH REV1.0 1.0 Issue date: Page 22.05.2012 2 of 34 TABLE OF CONTENTS 1. LIST OF TABLES ................................................................................................................... 4 2. SCOPE .................................................................................................................................... 4 3. PURPOSE ............................................................................................................................... 4 4. ABBREVATION ...................................................................................................................... 4 5. 5.1.1. HARDWARE RESEARCH TEMPLATE ................................................................................. 5 Name of the component ......................................................................................................... 5 6. HARDWARE GROUPS .......................................................................................................... 5 6.1. 6.1.1. 6.1.2. 6.1.3. Production .............................................................................................................................. 5 Printline.dk .............................................................................................................................. 5 Elprint.no ................................................................................................................................ 6 PCBCart.com ......................................................................................................................... 6 6.2. 6.2.1. 6.2.2. Communication ...................................................................................................................... 6 Serial communication USART ................................................................................................ 6 Parallel data ........................................................................................................................... 7 6.3. 6.3.1. 6.3.2. Communication between all MCCs and SC ........................................................................... 8 Multiplexer .............................................................................................................................. 8 New controller (LPC1768) ...................................................................................................... 8 6.4. 6.4.1. Cables .................................................................................................................................... 9 0.25mm2 copper cable ........................................................................................................... 9 6.5. 6.5.1. 6.5.2. 6.5.3. Shielding ................................................................................................................................. 9 No shielded cables for power and signal ............................................................................... 9 Shield power and signal cables separately ............................................................................ 9 Shield power and signal cables together ............................................................................. 10 6.6. 6.6.1. 6.6.2. 6.6.3. Input protection for microcontroller....................................................................................... 10 Current resistor and Metal Oxide Varistor ............................................................................ 10 Littelfuse SP724AHT ............................................................................................................ 11 Input protection with R/C filtering ......................................................................................... 11 6.7. 6.7.1. Decoupling capacitor ............................................................................................................ 12 0.1uF capacitor..................................................................................................................... 12 6.8. 6.8.1. 6.8.2. Component package standard ............................................................................................. 12 Surface mount components ................................................................................................. 12 Through hole type ................................................................................................................ 13 6.9. 6.9.1. 6.9.2. Joystick ................................................................................................................................. 13 Using an inductive sensor in the joystick ............................................................................. 13 Using potentiometer as a sensor in the joystick ................................................................... 14 6.10. Connector ............................................................................................................................. 14 6.10.1. Harwin .................................................................................................................................. 14 6.10.2. BLF 5.08/../90 ....................................................................................................................... 15 6.10.3. 4 bit Ethernet cable .............................................................................................................. 15 6.10.4. BLF 5.08HC/03/90 SN BK BX .............................................................................................. 15 6.10.5. We decided to not spend more time on this issue, and used standard DuPont Connector, this has 0.1” spacing So these can be replaced by others. .................................................................. 16 6.11. 6.11.1. 6.11.2. 6.11.3. Power connector .................................................................................................................. 16 AMPINNERGY ..................................................................................................................... 16 LMZFL 5/2/135 3.5SW ......................................................................................................... 16 ED2237 ................................................................................................................................ 17 Document: Version HARDWARE RESEARCH REV1.0 1.0 Issue date: Page 22.05.2012 3 of 34 6.12. 6.12.1. 6.12.2. 6.12.3. 6.12.4. Temperature sensor ............................................................................................................. 17 LM 335A Analog temperature sensor .................................................................................. 17 Thermistor 10K ..................................................................................................................... 18 TMP 36 Analog temperature sensor ................................................................................... 18 DS18B20 One Wire digital temperature sensor ................................................................... 18 6.13. 6.13.1. 6.13.2. 6.13.3. 6.13.4. Power supply ........................................................................................................................ 19 LM2596 ................................................................................................................................ 19 LM22676QMRE-5.0 ............................................................................................................. 19 LM2678S-5.0 ........................................................................................................................ 21 LM 7805 ............................................................................................................................... 22 6.14. 6.14.1. 6.14.2. Choosing MCC Signal .......................................................................................................... 23 Multiplexing .......................................................................................................................... 23 Enable each MCC card controller ........................................................................................ 23 6.15. 6.15.1. 6.15.2. Redundancy ......................................................................................................................... 24 Triple redundancy to MCC ................................................................................................... 24 Parallel redundancy ............................................................................................................. 25 6.16. 6.16.1. 6.16.2. Microcontroller ...................................................................................................................... 26 PIC18F8520 ......................................................................................................................... 26 LPC1768 .............................................................................................................................. 26 6.17. 6.17.1. 6.17.2. Stepper controller ................................................................................................................. 27 Big Easy driver ..................................................................................................................... 27 A4899 Stepper motor driver ................................................................................................. 27 6.18. 6.18.1. Stepper motor....................................................................................................................... 28 Sanyo Denki 2-phase, type: 103H5208-10U41, NEMA 17 .................................................. 28 6.19. 6.19.1. 6.19.2. 6.19.3. Inertial Measuring ................................................................................................................. 28 9 degrees of freedom(gyro , accelerometer & magnetometer) ............................................ 28 2 Level conversion for i c-bus ................................................................................................. 29 This is not needed after the change of Microcontroller which operates at 3.3V .................. 29 6.20. 6.20.1. 6.20.2. Linear voltage regulator ....................................................................................................... 29 LM 317 ................................................................................................................................. 29 LM 7805 ............................................................................................................................... 30 6.21. 6.21.1. 6.21.2. 6.21.3. Current regulators ................................................................................................................ 30 Current regulator with 5 output on 2A .................................................................................. 30 Current regulator with one output on 10A ............................................................................ 31 This is not needed because of the current regulators on the stepper controllers ................ 31 6.22. 6.22.1. 6.22.2. HMI LEDS ............................................................................................................................ 31 Status LEDs HMI .................................................................................................................. 31 Status LEDs HMI .................................................................................................................. 32 6.23. 6.23.1. 6.23.2. 6.23.3. Ground plane on PCB .......................................................................................................... 32 Separate ground planes w/ one small connection between analog and digital ground plane. 32 Moated ground plane ........................................................................................................... 32 Solid Ground Plane .............................................................................................................. 33 6.24. 6.24.1. 6.24.2. Communication with external screen (android tablet) .......................................................... 34 Vinculum II............................................................................................................................ 34 This is not needed after the change of Microcontroller, which has internal USB. ............... 34 7. REVISIONS ........................................................................................................................... 34 Document: HARDWARE RESEARCH REV1.0 Version 1. 1.0 Issue date: Page 22.05.2012 4 of 34 LIST OF TABLES Table 1: Abbreviation............................................................................................................................... 5 Table 2: Hardware research template ..................................................................................................... 5 Table 3: Option 6.1.1 ............................................................................................................................... 5 Table 4: Option 6.1.2 ............................................................................................................................... 6 Table 5: Hardware research template ................................................................................................... 17 Table 6: Revisions ................................................................................................................................. 34 2. SCOPE This document will contain detailed information about the choices of components we make during the project. 3. PURPOSE We made this document to get a complete overview over the current and faulted components. The overview contains information about why we chose the components, what they do, positive/negative aspects, time spent and which component the new one replaces. The purpose is to show and explain why we chose a specific component over another one that has the same functionality. This document is also useful for looking at key functions of the component and where it is used in the system. 4. ABBREVATION Technical Term Standard Definition K.M. KjetilMjøs A.G. Axel Gravningsbråten S.A. Sindre Andersen T.A. Thomas Andersen R.L. RunarLøken O.R. Ole Riiser MCC Main Controller Card Document: HARDWARE RESEARCH REV1.0 Version 1.0 Issue date: 22.05.2012 Page 5 of 34 SC Supervision Card MCU Microcontroller Unit MIPS Million Instructions Per Second EEPROM Electrically Erasable Programmable Read-Only Memory USART Universal Synchronous/ Asynchronous Receiver/Transmitter PWM Pulse-Width Modulation CCP Capture/Compare/PWM Table 1: Abbreviation 5. HARDWARE RESEARCH TEMPLATE 5.1.1. Name of the component Part of Background Critical component function Positive aspects Negative aspects Time spent(Hours) Replaces Reference Owner and date Table 2: Hardware research template 6. HARDWARE GROUPS 6.1. Production 6.1.1. Printline.dk Part of Production of the card Background We need to decide for which producer who will print our circuit Critical component function Fast delivery and quality production Positive aspects Fast delivery, multi-layer production Negative aspects N/A Time spent(Hours) 1 Replaces 6.1.2 Reference www.printline.dk 13.01.2012 Owner and date S.A 13.01.12 Table 3: Option 6.1.1 Document: HARDWARE RESEARCH REV1.0 Version 1.0 Issue date: Page 22.05.2012 6 of 34 6.1.2. Elprint.no Part of Production of the card Background We need to decide for which producer who will print our circuit Critical component function Fast delivery and quality production Positive aspects Fast delivery, multi-layer production Negative aspects N/A Time spent(Hours) 1 Replaces N/A Reference www.elprint.no 13.01.2012 Owner and date S.A 13.01.12 Table 4: Option 6.1.2 6.1.3. PCBCart.com Part of Production of the card Background We need to decide for which producer who will print our circuit Critical component function Fast delivery and cheap production Positive aspects Fast delivery and cheap production Negative aspects N/A Time spent(Hours) 1 Replaces 6.1.2 Reference www.pcbcart.com 03.05.2012 Owner and date O.R 03.05.2012 6.2. Communication 6.2.1. Serial communication USART Part of Communication between units By using this method we are able to send as much info as we want to the SC. Example about info that can be sent: - MCC number sending - X-Y-Z joystick input - X-Y-Z calculated control signal to stepper controller - Time used for calculating output signal - MCC card temperature - Checksum A typical example of a serial package: $2,522,522,522,34,34,34,45,3* Description Document: HARDWARE RESEARCH REV1.0 Version Critical component function 1.0 Issue date: 22.05.2012 Page 7 of 34 Positive aspects Communication and “lifeline” for MCC to SC Fast speed, 19200bps. Simple, well-known, has been a standard for decades. Start en end message character for added security. Checksum number for confirmation that the correct number of bits is received. A “lifeline” can be implemented by using a counter that counts the time since last received data. If no data is received in a predefined time period it is reasonable to assume that the MCC is down. All the info sent makes it easy to pinpoint an error. The bandwidth of the serial wires is bigger than the parallel wires. “If, however, we bump up the power in a serial connection by using a differential signal with 2 wires (one with a positive voltage, and one with a negative voltage), we can use the same amount of power, have twice the SNR, and reach an even higher bitrate without suffering the effects of noise.” Negative aspects Data may be corrupted. A little out-dated, problems with communication between devices that have separate power supplies, Time spent(Hours) 4 Replaces N/A Reference http://en.wikipedia.org/wiki/RS-232 23.01.2012 http://www.edaboard.com/thread229518.html 23.01.2012 http://en.wikibooks.org/wiki/Communication_Networks/Parallel_vs_Serial 06.02.2012 Owner and date K.M & S.A 06.02.2012 6.2.2. Parallel data Part of MCC and SC Description Example about info that can be sent: - Pulsating signal indicating that the MCC is live and working - Binary status updates Critical component function Positive aspects Communication and “lifeline” for MCC to SC Easy “lifeline” communications with a pulsating input Negative aspects Limited information can be sent. Takes up more pins on both the MCC and SC. Suffers from inter-symbol interference and noise over long distances. The bandwidth of the parallel wires are smaller than the serial wires. “Because of the increased potential for noise and interference, parallel wires need to be far shorter than serial wires” Risk Profile May cause confusion to the system if lines are disconnected. Time spent(Hours) 3 Replaces N/A Reference http://en.wikipedia.org/wiki/Parallel_communication 30.01.2012 http://en.wikibooks.org/wiki/Communication_Networks/Parallel_vs_Serial 06.02.2012 Owner and date K.M & S.A 06.02.2012 Document: HARDWARE RESEARCH REV1.0 Version 1.0 Issue date: 22.05.2012 Page 8 of 34 6.3. Communication between all MCCs and SC 6.3.1. Multiplexer Part of SC Background On the PIC18F8520 there is only two UARTS and we need the SC to communicate with five units with serial interface. This we can accomplish by using a multiplexer. Critical component function The multiplexer need to be easily controllable for both TX and RX. The 744052 has two four channel multiplexers which is optimal for our use. Positive aspects We get all the serial communication we need with a simple interface. Negative aspects Extra component which will decrease the MTBF. Time spent(Hours) 3 Replaces N/A Reference http://www.taydaelectronics.com/datasheets/A-027.pdf visited 09.02.2012 Owner and date O.R 09.02.2012 6.3.2. New controller (LPC1768) Part of SC Background On the old Controller (PIC18F8520) there was only two UARTS. We decided to change this controller of many reasons. Which this was one of them. Critical component function It has four UARTS which all has its own buffer, this makes is easier to operate Positive aspects We get all the serial communication we need with a simple interface. Fewer components than the above solutions. Negative aspects Extra component which will decrease the MTBF. Time spent(Hours) 3 Replaces 6.3.1 Reference Owner and date O.R 16.05.2012 Document: HARDWARE RESEARCH REV1.0 Version 1.0 Issue date: 22.05.2012 Page 9 of 34 6.4. Cables 6.4.1. 0.25mm2 copper cable Part of MCC and joystick Background In order to prevent a significant voltage loss in the cables Critical component function Conduct electricity Negative aspects Only 0.0018174V drop when: 5V power supply, at a 3mA current, and maximum 8m distance at 30˚C. No shielding Time spent(Hours) 2 Replaces N/A Reference https://www1.elfa.se/data1/wwwroot/assets/datasheets/05540000.pdf 25.01.2012 Owner and date A.G 23.01.2012 Positive aspects 6.5. Shielding 6.5.1. No shielded cables for power and signal Part of Communication between the devices Background We need to avoid as much noise as possible Critical component function Avoid noise Positive aspects The currents flowing in the cables will hopefully not be able to pick up any noise. There will be less work shielding the cables. The cables will be smaller. Negative aspects The cables may be able to pick up noise. Not as protected for wear. Time spent(Hours) 1 Replaces N/A Reference Internal discussion with Sigmund Gudvangen 26.01.2012 Owner and date S.A 27.01.2012 6.5.2. Shield power and signal cables separately Part of Communication between the devices Background We need to avoid as much noise as possible Critical component function Avoid noise Positive aspects The signal cables will not be affected by any current in the power cables. Negative aspects We need to separate the cables Time spent(Hours) 1 Replaces N/A Reference http://www.omega.com/literature/transactions/volume2/analogsignal3.html 25.01.2012 Owner and date S.A 25.01.2012 Document: HARDWARE RESEARCH REV1.0 Version 1.0 Issue date: Page 22.05.2012 10 of 34 6.5.3. Shield power and signal cables together Part of Communication between the devices Background We need to avoid as much noise as possible Critical component function Avoid noise Positive aspects Hopefully, the current in the power cables will not be high enough to affect the signal cables noticeably. Less work than shielding the power and signal cables separately Negative aspects The Current that goes through the power cable might interfere with the signals Time spent(Hours) 1 Replaces N/A Reference N/A Owner and date S.A 25.01.2012 6.6. Input protection for microcontroller 6.6.1. Current resistor and Metal Oxide Varistor Part of Every input from both MCC and SC cards. Background We need to protect our circuit against the horrible outside world from voltage surges. We found one simple solution with a current limiting resistor and an 5.5 volt MOV(metal oxide varistor) this circuit will protect against 8KV “zapps” without affecting the operation Critical component function The components need to react fast enough to protect the microcontroller from voltage and current surges. Positive aspects Cheap and good protection, CE approved Negative aspects Time spent(Hours) 2 Replaces N/A Reference http://www.opencircuits.com/Input_protection (page modified 26.October 2011) Owner and date O.R 20.02.2012 Document: HARDWARE RESEARCH REV1.0 Version 1.0 Issue date: 22.05.2012 Page 11 of 34 6.6.2. Littelfuse SP724AHT Part of Every input from both MCC and SC cards. Background We need to protect our circuit against the horrible outside world from voltage surges. Critical component function The component needs to react fast enough to protect the microcontroller from voltage and current surges. Positive aspects Good protection. You can protect four lines at each unit. Cheap. Does not take a lot of space. Negative aspects N/A Time spent(Hours) 2 Replaces 6.6.1 Reference http://www.alldatasheet.com/datasheet-pdf/pdf/122751/LITTELFUSE/SP724AHT.html 20.02.2012 http://www.dz863.com/datasheet-81345363-SP724AHT_Tvs-Diode-Arrays-Scr-DiodeArray-For-Esd-And-Transient-Overvoltage-Protection/ 20.02.2012 Owner and date S.A 20.02.2012 6.6.3. Input protection with R/C filtering Part of Every input from both MCC and SC cards. Background We need to protect our circuit against the horrible outside world from voltage surges. Critical component function Positive aspects The component needs to react fast enough to protect the microcontroller from voltage and current surges. Negative aspects Adding resistors and capacitors will provide some protection. The capacitor resists change in the volt across it, and the resistor will limit the current N/A Time spent(Hours) 1 Replaces N/A Reference http://www.w9xt.com/page_microdesign_pt10_input_protection.html 20.02.2012 Owner and date S.A 20.02.2012 Document: HARDWARE RESEARCH REV1.0 Version 1.0 Issue date: Page 22.05.2012 12 of 34 6.7. Decoupling capacitor 6.7.1. 0.1uF capacitor Part of MCC & SC Background We need to decouple our logic IC’s to minimize high currents in a large loop on the PCB to lower EMI Critical component function The component helps us eliminate EMI by providing enough power for the IC it supports so we don’t get large currents in a big loop on the PCB-board, this gives EMI and voltage drops. Positive aspects Negative aspects Time spent(Hours) 2 Replaces NA Reference http://www.hottconsultants.com/techtips/decoupling.html Last read 20.02.2012 made by Henry Ott Consultants Owner and date O.R 20.02.2012 6.8. Component package standard 6.8.1. Surface mount components Part of MCC & SC Background We are making two different PCB-cards for our project which needs to have components soldered to it, we discuss the pros and cons of Surface Mount Devices. Critical component function Positive aspects Smaller footprints and better EMI specifications Negative aspects SMD do not cope high vibration environments Time spent(Hours) 2 Replaces NA Reference Owner and date O.R 22.02.2012 Document: HARDWARE RESEARCH REV1.0 Version 1.0 Issue date: Page 22.05.2012 13 of 34 6.8.2. Through hole type Part of MCC & SC Background We are making two different PCB-cards for our project which needs to have components soldered to it, we discuss the pros and cons of Through Hole devices Critical component function Positive aspects They are easy to solder, more cost efficient in small and they also cope better with vibration environments and high G-forces which is the main reason we use through hole components Negative aspects Time spent(Hours) Takes up a bigger area of the board, and has a bit disadvantage with EMI since it has longer leads which will give some more capacitance and inductance. 2 Replaces Surface mount components Reference Owner and date O.R 22.02.2012 6.9. Joystick 6.9.1. Using an inductive sensor in the joystick Part of Joystick Background We need to have a sensor who registers movement in the joystick Critical component function Works as a sensor, and sends a simple analog signal to the MCC Negative aspects Very reliable. Not affected by vibrations, harsh environments, lack of lubricant. Has not got a limited lifespan. Very useable in aviation and other vehicals. Can be connected and directly replaced in a circuit constructed for potentiometers. More expensive than a potentiometer. Time spent(Hours) 2 Replaces Using potentiometer as a sensor in the joystick Reference http://en.wikipedia.org/wiki/Inductive_sensor 06.02.2012 http://www.controlengeurope.com/article/38145/Potentiometers-suffering-because-of-thefailure-of-a-few-in-harsh-environments.aspx 06.02.2012 Owner and date S.A 06.02.2012 Positive aspects Document: HARDWARE RESEARCH REV1.0 Version 1.0 Issue date: Page 22.05.2012 14 of 34 6.9.2. Using potentiometer as a sensor in the joystick Part of Joystick Background We need to have a sensor who registers movement in the joystick Critical component function Works as a sensor, and sends a simple analog signal to the MCC Positive aspects Simple, cheap, reliable in right working conditions, well-known Negative aspects Unreliable due to vibrations and harsh environments. Mechanical measurement. Has a limited lifespan (500.000 cycles for a good potentiometer). If exposed to vibration, the vibrations count as a cycle, which will reduce the lifespan dramatically– from several years, to days because of mechanical wear. Also attraction of dust, sand and other foreign elements will decrease the lifespan. Time spent(Hours) 2 Replaces N/A Reference http://www.controlengeurope.com/article/38145/Potentiometers-suffering-because-of-thefailure-of-a-few-in-harsh-environments.aspx 06.02.2012 Owner and date S.A 06.02.2012 6.10. Connector 6.10.1. Harwin Part of MCC and SC Background We need to decide which connectors that shall be used on the PCBs to connect de different parts of the system Critical component function The connectors must be resistant to vibration. It is important because It is a lot of vibration in the plane and we do not the connectors to disconnect. Positive aspects This connectors are resistant to vibration. This component is through hole mounted. Negative aspects Time spent(Hours) 2 Replaces N/A Reference https://www.elfaelektronikk.no/elfa3~no_no/elfa/init.do?item=43-951-26 13.02.2012 https://www.elfaelektronikk.no/elfa3~no_no/elfa/init.do?item=43-959-28&toc=19792 13.02.2012 Owner and date R.L 13.02.2012 Document: HARDWARE RESEARCH REV1.0 Version 1.0 Issue date: 22.05.2012 Page 15 of 34 6.10.2. BLF 5.08/../90 Part of MCC Background We need to find a suitable connector for the joystick on the MCC Critical component function Transmit analogue data from the joystick to the MCC without losing data Positive aspects It is robust and without screws. Negative aspects It is not suitable for shielded cables Time spent(Hours) 3 Replaces N/A Reference http://weidmuller.com/system/files/webfm/downloads/pdfs/literature/1250030000_CAT2_ BLF.pdf 25.01.2012 Owner and date A.G & R.L / 25.01.2012 6.10.3. 4 bit Ethernet cable Part of MCC/SC Background What kind of connectors shall be used for serial communication Critical component function We need a cable that are resistant to vibration Positive aspects It has a lock function which helps it not to disconnect because of vibration Negative aspects The lock function is not very safety Time spent(Hours) 1 Replaces 8.2 Reference N/A Owner and date R.L 17.01.2012 6.10.4. BLF 5.08HC/03/90 SN BK BX Part of MCC/SC Background What kind of connectors shall be used for serial communication Critical component function We need a cable that are resistant to vibration Positive aspects It is spring loaded, which is the most important property Negative aspects N/A Time spent(Hours) 2 Replaces N/A Reference http://weidmuller.com/system/files/webfm/downloads/pdfs/literature/1250030000_CAT2_ BLF.pdf 17.01.2012 Owner and date A.G & R.L 17.01.2012 Document: HARDWARE RESEARCH REV1.0 Version 1.0 Issue date: Page 22.05.2012 16 of 34 6.10.5. We decided to not spend more time on this issue, and used standard DuPont Connector, this has 0.1” spacing So these can be replaced by others. 6.11. Power connector 6.11.1. AMPINNERGY Part of MCC Background The other connectors we use cannot carry enough current for our stepper motors. So we need a connector that can carry enough current >10amp. We found a connector which can carry up to 35 amperes. Ampinnergy556879-2 and Ampinnergy556882-2, Connector&Contact Critical component function The connector needs to carry at least ten amperes and needs to be spring loaded. Positive aspects High current rating and heavy duty construction Negative aspects Big footprint Time spent(Hours) 3 Replaces 6.10.1 Reference Product-link Last read 08.03.2012 Owner and date O.R 08.03.2012 6.11.2. LMZFL 5/2/135 3.5SW Part of MCC Background The other connectors we use cannot carry enough current for our stepper motors. So we need a connector that can carry enough current >10amp Critical component function The connector needs to carry at least ten amperes and needs to be spring loaded. Positive aspects This connector can handle currents up to 24A and cable thickness up to 2.5mm The connector is small; W/L/H 13mm/14.5mm/16.7mm Negative aspects The connection point is 45˚ (135˚) with the circuit board Time spent(Hours) Replaces 2 Reference 1. http://search.digikey.com/no/en/products/1811510000/1811510000-ND/2638883 2. http://media.digikey.com/PDF/Data%20Sheets/Weidmuller%20PDFs/1811510000.pdf 3. http://catalog.weidmueller.com/catalog/Start.do?localeId=en&ObjectID=1811510000 AG 08.03.2012 Owner and date 2 6.11.1 Document: HARDWARE RESEARCH REV1.0 Version 1.0 Issue date: 22.05.2012 Page 17 of 34 6.11.3. ED2237 Part of MCC and SC Background The other connectors we use cannot carry enough current for our stepper motors. So we need a connector that can carry enough current >10amp The connector needs to carry at least ten amperes and needs to be spring loaded. Critical component function Positive aspects This connector can handle currents up to 16A and cable thickness up to 2mm Negative aspects The connection point is 45˚ (135˚) with the circuit board Time spent(Hours) Replaces 2 6.11.1 Reference Owner and date 2 4. http://media.digikey.com/pdf/Data%20Sheets/On%20Shore%20PDFs/ED3000.pdf O.R 16.05.2012 6.12. Temperature sensor The temperature sensor is to be used to monitor the temperature around the circuit board to prevent it from getting to warm and also give a notice if the temperature is too low. Table 5: Hardware research template 6.12.1. LM 335A Analog temperature sensor Part of MCC and SC - Description Critical component function Temp limits: -40 to +100C Directly calibrated in Kelvin Output: 10mV/K Linear output Less than 1ohm dynamic impedance Operates from 400microA to 5mA Positive aspects Notifying the user that the temperature does not exceed critical limits. Low cost Negative aspects Needs calibration Time spent(Hours) 1 Replaces N/A Reference http://www.sparkfun.com/products/9438 Owner and date K.M 02.02 Document: HARDWARE RESEARCH REV1.0 Version 1.0 Issue date: 22.05.2012 Page 18 of 34 6.12.2. Thermistor 10K Part of MCC and SC - Description Critical component function Temp limits: -40 to +125C Positive aspects Notifying the user that the temperature does not exceed critical limits. Low cost Negative aspects Inaccurate Time spent(Hours) 1 Replaces N/A Reference http://www.sparkfun.com/products/9438 Owner and date K.M 02.02 6.12.3. TMP 36 Analog temperature sensor Part of MCC and SC Description Notifying the user that the temperature does not exceed critical limits. - Critical component function Power supply range 2.7-5.5V Temp limits: -40 to +125C (+/-2C) Output: 10mV/C Linear output Positive aspects No calibration needed, low cost Negative aspects Inaccurate Time spent(Hours) 1 Replaces N/A Reference http://www.sparkfun.com/products/10988 Owner and date K.M 02.02 6.12.4. DS18B20 One Wire digital temperature sensor Part of MCC and SC - Description Critical component function Each sensor has a unique 64bit address so it can be connected in a 1wire network. Temp limits: -55 to +125C (+/-0.5C) Power supply range 3-5.5V Resolution is user selectable from 9-12 bits Converts temperature to 12-bit digital word in 750ms Positive aspects Notifying the user that the temperature does not exceed critical limits. No calibration needed Negative aspects A bit costy. Around 4USD a piece, more complicated than the analogue ones. Time spent(Hours) 1 Replaces N/A Reference http://www.sparkfun.com/products/245 Owner and date K.M 02.02 Document: HARDWARE RESEARCH REV1.0 Version 1.0 Issue date: Page 22.05.2012 19 of 34 6.13. Power supply 6.13.1. LM2596 Part of Power supply Background We had a discussion with our external supervisor and we agreed that we would be Better off with buying a complete PSU-circuit rather that make our own from scratch. We therefore found one option that is really similar to the other options. Critical component function We need an efficient power supply which also has a stable output voltage. Positive aspects Complete PSU for a very low price and easy implementation! Lower ripple that the other PSUs (5mV) Negative aspects Less control over the PCB-layout will need more EMI research. Time spent(Hours) Replaces 2 6.13.2 Reference http://www.ti.com/general/docs/lit/getliterature.tsp?genericPartNumber=lm2596&fileType=pdf (LM2596-data sheet) http://www.buyincoins.com/details/lm2596-step-down-adjustable-dc-dc-power-supplymodule-new-product-9004.html (whole module) Owner and date O.R 09.02.2012 6.13.2. LM22676QMRE-5.0 Part of Power supply Background We look into other options that option 6.4.1 Critical component function Figure 1: Circuit schematic Document: HARDWARE RESEARCH REV1.0 Version 1.0 Issue date: Page 22.05.2012 20 of 34 Figure 2: Efficiency Positive aspects Even lower Part cost than option 1, and the same part count(6). The Vout p-p is better that option 1(10mV). The max current is 3A which is way more than we expect the system to use. Negative aspects Lower efficiency that option 1, but it is still >80% which is great! But this is still a switching power supply which can be a source for EMI Time spent(Hours) 3 Replaces 6.13.3 Schematics and graphs: Reference http://www.national.com/appinfo/webench/scripts/c.cgi?ID=1234543_NSjd8dZZDb4C2_power _111154 Owner and date O.R 19.1.2012 Document: HARDWARE RESEARCH REV1.0 Version 1.0 Issue date: 22.05.2012 Page 21 of 34 6.13.3. LM2678S-5.0 Part of Background Power supply We need a power supply that can supply our system with 5v from the 12 volts that is the supply we can get power from. We need a PSU that can give us a stable output voltage of 5 volts and at least 2 amperes of current. We are focusing on switching regulators since they are a lot more efficient than linear converter that will make a lot of heat @ 2Amps (2A*(125)V=14W) the switching regulator can achieve a efficiency higher that 90% in optimal conditions that reduces the heat a lot! Critical component function This Converter has an efficiency of 86 percent when Iout is 0.7Amps 1 Figure 3:Circuit Schematic Figure 4:Converter efficiency Low external part count (6) Low part costs(4.26$)Vout p-p: 40mV Positive aspects Negative aspects May be abit overkill for our project, we don’t need 5 Amps of current. Also Switching power supply can be a source for EMI Time spent(Hours) 3 Replaces None Schematics and graph: 1 Reference http://www.national.com/appinfo/webench/scripts/SD2.cgi?ID=111162::power::riiserhob@g mail.com Owner and date O.R 18.1.2012 Document: HARDWARE RESEARCH REV1.0 Version 1.0 Issue date: 22.05.2012 Page 22 of 34 6.13.4. LM 7805 Part of Logic supply Description Will regulate the power from 13.8 V down to 5V needed for the logic circuits. - Critical component function Output current up to 1.5A Internal thermal overload protection Internal short circuit current limiting Min input voltage 7V Max input voltage 25V Output voltage 5V (+/-0.2V) Operating temperature 0-125C Output noise voltage 40microV Positive aspects Cheap, high ripple noise rejection, less components than the switching regulators and they are through hole. Negative aspects Produces more heat, but for the current consumption on our board, it’ won’t be a problem. Time spent(Hours) 1 Replaces 6.13.1 Reference http://www.sparkfun.com/datasheets/Components/LM7805.pdf 02.02.2012 Owner and date O.R 20.03.2012 Document: HARDWARE RESEARCH REV1.0 Version 1.0 Issue date: Page 22.05.2012 23 of 34 6.14. Choosing MCC Signal 6.14.1. Multiplexing Part of MCC Background We have multiple MCC and an SC that has to choose which of the MCCs that will control the stepper motors on the control surfaces. Figure 5: Actuator signal routing Critical component function We need to make sure that only one of the signals can make it to the stepper driver without any interference from the other signals as they still are available for use. Positive aspects This is an easy controllable system which isolates every other signals efficiently Negative aspects This is a critical part of the system that cannot fail, so if the power supply to this circuit fails the system is useless. We also need one multiplexer per signal to the stepper controller which can take a lot of space on the PCB Time spent(Hours) 3 Replaces N/A Reference http://www.electronics-tutorials.ws/combination/comb_2.html Owner and date O.R 26.1.2012 6.14.2. Enable each MCC card controller Part of MCC Background We have multiple MCCs that can control the stepper motors. Critical component function We have to find a way to control that only one MCC can control the stepper motors at any given time. This option is that we can implement five stepper controllers on each MCC and use the enable pins on these controllers to choose which of the MCCs stats in charge of the stepper motors. Positive aspects This removes the single failure aspect of the other option. Negative aspects The MCCs gets more expensive since it needs more HW Time spent(Hours) 4 Replaces 6.14.1 Reference Discussion with external supervisor Owner and date O.R 09.02.2012 Document: HARDWARE RESEARCH REV1.0 Version 1.0 Issue date: Page 22.05.2012 24 of 34 6.15. Redundancy 6.15.1. Triple redundancy to MCC Part of MCC Background We use a dual/triple redundancy setup on the joystick and MCC and we have some different options on how we connect all the redundant axis to the MCC’s One option is to have all the redundant axis into all of the MCC’s which will give every MCC the option to find the best signal source and use this. Critical component function These signals will give the MCC the user a set point and needs to be isolated so we still have single failure tolerance. The setup we try here will need extra circuitry for this to function Positive aspects The MCCs can see which of the joystick reading that is the best, and working properly. This gives extra safety if made properly. Time spent(Hours) The risk with this is that one MCC has the access to all the joystick signals, which in a worst case scenario can interfere with all the signals and corrupt them e.g. if one of the MCCs get destroyed due to mechanical stress. This can also happen in software if the analog read pin is set high or low by mistake. This system is actually not redundant by definition 2 Replaces N/A Reference N/A Owner and date O.R 27.1.2012 Negative aspects Document: HARDWARE RESEARCH REV1.0 Version 1.0 Issue date: 22.05.2012 Page 25 of 34 6.15.2. Parallel redundancy Part of MCC We use a dual/triple redundancy setup on the joystick and MCC and we have some different options on how we connect all the redundant axis to the MCC’s This option makes three parallel systems which is isolated like the figure below Background Critical component function These signals will give the MCC the user set point from the joystick Positive aspects We have three isolated and parallel circuits that eliminate single failure. Negative aspects Time spent(Hours) If one axis on each redundant potentiometer fails e.g.(x-axis on red.1, y-axis on red. On red. 2 & z-axis on red. 3) 5 Replaces Triple redundancy to MCC Reference 6.15.1 Owner and date O.R 27.1.2011 Document: HARDWARE RESEARCH REV1.0 Version 1.0 Issue date: Page 22.05.2012 26 of 34 6.16. Microcontroller The Microcontroller of choice is the PIC18F8520. Our contractor wanted us to use this MCU both for the SC and the MCC; therefore we have not done much research on other types of MCU’s 6.16.1. PIC18F8520 Part of MCC & SC Background Positive aspects We will need to decide on a MCU for the SC and the MCC cards - Pin Count: 80 - Program memory: 32KB - CPU speed: 10MIPS - RAM: 2048 bytes - Data EEPROM: 1024 bytes - Digital Communication Peripherals: 2-A/E/USART, 1-MSSP(SPI/I2C) - Capture/Compare/PWM Peripherals: 5CCP - Timers: 2 x 8-bit, 3 x 16-bit - ADC: 16-channels, 10-bit - Comparators: 2 - Temperature range: -40 to 125 ˚C - Operating Voltage Range: 2V to 5.5V A lot of extra I/O’s, well known manufacturer Negative aspects N/A Time spent(Hours) 1 Replaces N/A Reference [1] Owner and date A.G 18.01.2012 Critical component function 6.16.2. LPC1768 Part of SC Background Positive aspects We needed a more powerful microcontroller for the SC card “The LPC1768 microcontroller has 512KB of internal flash and 64KB RAM. Ethernet MAC, USB Device/Host/OTG interface, 8-channel general purpose DMA controller, 4 UARTs, 2 CAN channels, 2 SSP controllers, SPI interface, 3 I2C-bus interfaces, 2-input plus 2-output I2S-bus interface, 8-channel 12-bit ADC, 10-bit DAC, motor control PWM, Quadrature Encoder interface, 4 general purpose timers, 6-output general purpose PWM, ultra-low power Real-Time Clock (RTC)” http://www.sparkfun.com/products/9931 If this is used we can lower our part count and end up with a lot more power supervisor which has a USB-interface and four UARTS, And we are going to need all of them! It is important to understand that this only applies to the SC and NOT the MCC Negative aspects Time spent(Hours) A lot of configuration on the software side 1 Replaces PIC18F8520 Critical component function Reference Owner and date O.R 03.05.2012 Document: HARDWARE RESEARCH REV1.0 Version 1.0 Issue date: Page 22.05.2012 27 of 34 6.17. Stepper controller Stepper motor controller is used to control the current going to the motor. This controller needs to be used as a piggyback module on our MCC cards. 6.17.1. Big Easy driver Part of MCC Description Control of the stepper motor - Critical component function Max current 2A per coil Max motor voltage 35V On board voltage regulator Five different step resolutions Positive aspects Built in current limiter, open-source Negative aspects Big size, high cost Time spent(Hours) 2 Replaces N/A Reference http://www.sparkfun.com/products/10735 Owner and date K.M & A.G 02.02 6.17.2. A4899 Stepper motor driver Part of MCC Description Control of the stepper motor - Critical component function Power supply logic control 3-5.5V Max current 2A per coil Motor voltage 8-35V Five different step resolutions Positive aspects Built in current limiter, high temperature shut down, under voltage lockout, small size, low cost Negative aspects N/A Time spent(Hours) 2 Replaces Big Easy driver Reference http://www.pololu.com/catalog/product/1182 Owner and date K.M & AG 02.02 Document: HARDWARE RESEARCH REV1.0 Version 1.0 Issue date: Page 22.05.2012 28 of 34 6.18. Stepper motor The reason for using a stepper motor instead of an actuator is simply because it was a wish from Knut Brodreskift. Also the shaft on the stepper motor will be easy to swivel when the stepper motor is off power. This is a positive aspect when it comes to safety issues. An actuator will in most cases stay in the last position it had if it lose power, and this could cause serious problems when the aircraft is airborne. This is the motor which will control the control surfaces. 6.18.1. Sanyo Denki 2-phase, type: 103H5208-10U41, NEMA 17 Part of Airplane body Description Will control the wings of the airplane. This is a unipolar stepper motor. - Critical component function 1.8 step per resolution Hold torque: 4.25 kg/cm 10.6 ohm per phase in bipolar setup Weight 0.29 kg 17.2 mH inductance per phase in bipolar setup Recommended power supply 24VDC, min 1.7A in bipolar setup Recommended controller reference power 1.4V, 0.85A per phase in bipolar setup Positive aspects Cheap, ability to be controlled as a bipolar stepper motor which yields higher torque. Lightweight Negative aspects N/A Time spent(Hours) 3 Replaces N/A Reference http://www.ebay.com/itm/Sanyo-2-Ph-Step-Stepper-Motors-CNC-Router-103H520810U41-Nema-17-Frame-Hobby-NEW/300657930592?pt=BI_Robotics&hash=item46009bf160#ht_6992wt_1270 Owner and date K.M 02.02 6.19. Inertial Measuring 6.19.1. 9 degrees of freedom(gyro , accelerometer & magnetometer) Part of SC Background We need to measure the position of the airplane in order to implement autopilot and to check if the pilot makes any critical errors. We have found a lot of ways to do this but we need atleast two sensors: A gyroscope and a accelerometer. The gyroscope measures the angular velocity and the accelerometer measures the forces the plane is exposed to. These two sensors can be combined in software to get a great result. Critical component function They need to give accurate readings and be easy and accessible and have a 2 fast response time. The Sparkfun 9 degrees of freedom uses an i c interface which has a very fast data rate and conversion time compared to analog outputs. Positive aspects I c bus, very small footprint and it has everything we need to measure the planes angle in every direction. Negative aspects High cost and it communicates on a 3.3 volt bus, when the PIC is 5v, this requires a level converter. Time spent(Hours) 3 2 Document: HARDWARE RESEARCH REV1.0 Version 1.0 Issue date: 22.05.2012 Page Replaces NA Reference http://www.sparkfun.com/products/10183 Last read 5.3.2012 Owner and date O.R. 5.03.2012 29 of 34 6.19.2. Level conversion for i2c-bus 2 Part of Sc (i c-bus) Background The IMC and barometer communicates over a 3.3v bus, and the pic has a 5v interface. This needs to be converted in both directions in order to function properly. Both from 5v->3.3v and from 3.3v5v. we can use a FET transistor to do this in this way: Critical component function Figure 6: Logic translation Positive aspects We only need three basic parts to do the translation bidirectional. And we need two of these setups in order to translate both SDA and SCL lines. Negative aspects it is six parts we would like to not have in the board. Time spent(Hours) 4 Replaces No translation Reference http://www.rocketnumbernine.com/2009/04/10/5v-33v-bidirectional-levelconverter Last Read: 05.03.2012 O.R 05.03.2012 Owner and date 6.19.3. This is not needed after the change of Microcontroller which operates at 3.3V 6.20. Linear voltage regulator 6.20.1. LM 317 Part of Joystick power supply Description Will regulate the power from 13.8 V down to 5V needed for the analogue conversion for the joystick. - Critical component function Positive aspects Cheap Negative aspects Time spent(Hours) 1 Output current greater than 1.5A Internal thermal overload protection Internal short circuit current limiting Output voltage 1.25 to 37V Operating temperature 0-125C Output noise voltage 0.003V Document: HARDWARE RESEARCH REV1.0 Version 1.0 Issue date: Page 22.05.2012 30 of 34 Replaces Reference http://www.sparkfun.com/datasheets/Components/LM317.pdf 02.02.2012 Owner and date K.M. 02.02.2012 6.20.2. LM 7805 Part of Joystick power supply Description Will regulate the power from 13.8 V down to 5V needed for the analog conversion for the joystick. - Critical component function Positive aspects Output current up to 1.5A Internal thermal overload protection Internal short circuit current limiting Min input voltage 7V Max input voltage 25V Output voltage 5V (+/-0.2V) Operating temperature 0-125C Output noise voltage 40microV Cheap, high ripple noise rejection Negative aspects Time spent(Hours) 1 Replaces Reference http://www.sparkfun.com/datasheets/Components/LM7805.pdf 02.02.2012 Owner and date K.M. 02.02.2012 6.21. Current regulators 6.21.1. Current regulator with 5 output on 2A Part of MCC Background We need a regulator to control the current to each stepper motor Critical component function The regulator should be able to give maximum 2 A to each stepper motor Positive aspects This regulator will give maximum 2 A to each stepper motor. And there is no risk that one motor use more current, and that it will affect on the other stepper motors. Risk Profile N/A Time spent(Hours) 1 Replaces 6.21.2 Reference N/A Owner and date R.L 01.02.2012 Document: HARDWARE RESEARCH REV1.0 Version 1.0 Issue date: 22.05.2012 Page 31 of 34 6.21.2. Current regulator with one output on 10A Part of MCC Background We need a regulator to control the current to each stepper motor Critical component function The regulator should be able to give maximum 2 A to each stepper motor Positive aspects It will regulate the total current to the 5 stepper motors to maximum 10 A Risk Profile There is a possibility that one stepper motor will use more than 2 A which will cause in to little current to the other motors. Time spent(Hours) 1 Replaces N/A Reference N/A Owner and date R.L 01.02.2012 6.21.3. This is not needed because of the current regulators on the stepper controllers 6.22. HMI LEDS 6.22.1. Status LEDs HMI Part of HMI Background We need to have a bi-color LED who indicates the statuses on the MCCs. Critical component function Shows status on the MCC We have done some calculations on this. The multicolor LEDS have different volt drops which require different resistors. The red LED only needs 3mA to get a bright light. The green one needs 15 mA to get a bright light. So the calculated resistors are 1k Ω for the red, and 200 Ω on the green. Positive aspects Cheap safety and simple overview Negative aspects N/A Time spent(Hours) 2 Replaces N/A Reference N/A Owner and date S.A & O.R 07.03.2012 Document: HARDWARE RESEARCH REV1.0 Version 1.0 Issue date: Page 22.05.2012 32 of 34 6.22.2. Status LEDs HMI Part of HMI Background We cannot use Bi-color LEDs for our HMI since people with color-blindness can’t tell the difference if the LED is green or red. Critical component function Shows status on the MCC We have done some calculations on this. The LEDS have different volt drops which require different resistors. The red LED only needs 3mA to get a bright light. The green one needs 15 mA to get a bright light. So the calculated resistors are 1k Ω for the red, and 200 Ω on the green. Positive aspects Cheap safety and simple overview Negative aspects N/A Time spent(Hours) 1 Replaces Bicolor LEDs Reference N/A Owner and date O.R 03.05.2012 6.23. Ground plane on PCB 6.23.1. Separate ground planes w/ one small connection between analog and digital ground plane. Part of Ground plane on the PCB’s Background We need to avoid as much noise we can. And try to reduce the EMC on the card. Critical component function If we separate the analog ground plane from the digital ground plane with a small connection, we will be able to maintain the same potential and reference in both domains. The small connection will not transfer noise and other unbalances between the domains. Positive aspects Negative aspects The analog part of the circuit will not record noise from the digital part and the switching regulator. N/A Time spent(Hours) 3 Replaces N/A Reference http://www.ce-mag.com/ce-mag.com/archive/01/03/0103CE_028.html 07.03.2012 http://www.analog.com/library/analogDialogue/archives/39-09/layout.html 07.03.2012 Owner and date S.A 07.03.2012 6.23.2. Moated ground plane Part of Ground plane on the PCB’s Background We need to avoid as much noise we can. And try to reduce the EMC on the card. Critical component function If we create a moated ground plane, we will reduce the coupling between circuits by basic physical separation. We will be able to maintain the same potential and reference in both domains. Noise voltage and power surge will be Document: HARDWARE RESEARCH REV1.0 Version 1.0 Issue date: Page 22.05.2012 33 of 34 prevented since the grounds to the other circuits will be so far away in distance because of the gap between the circuits. Positive aspects The analog part of the circuit will not record noise from the digital part and the switching regulator. Negative aspects N/A Time spent(Hours) 2 Replaces N/A Reference “EMC at component and PCB level” By Martin O’Hara 1998. Newnes. Page 124. Owner and date S.A 08.03.2012 6.23.3. Solid Ground Plane Part of Ground plane on the PCB’s Background We need to avoid as much noise we can. And try to reduce the EMC on the card. Critical component function The simplest and best solution we’ve came up with is just to have a solid plane. Positive aspects Simple and great solution Negative aspects N/A Time spent(Hours) 2 Replaces Moated Ground Plane Reference Owner and date S.A 08.03.2012 Document: HARDWARE RESEARCH REV1.0 Version 1.0 Issue date: 22.05.2012 Page 34 of 34 6.24. Communication with external screen (android tablet) 6.24.1. Vinculum II Part of SC Background We need a UART to USB converter in order to communicate with the advanced user interface( where the pilot can edit parameters and autopilot setpoints) We found the Vinculum Chip from FTDI. Which is can be interfaced with android Critical component function Communicate with Android device Positive aspects Powerful Chip, this may help the PIC with heavy computations when the system is further developed. Negative aspects Adds more complex components to the SC board. Time spent(Hours) 5 Replaces UART communication Reference http://www.ftdichip.com/Support/Documents/DataSheets/ICs/DS_Vinculum-II.pdf (how to access android accessory mode) Last Read 20.03.2012 http://apple.clickandbuild.com/cnb/shop/ftdichip?op=catalogue-productsnull&prodCategoryID=117&title=V2DIP2 (braked out chip with needed interface) Last Read 20.03.2012 O.R 20.03.2012 Owner and date 6.24.2. This is not needed after the change of Microcontroller, which has internal USB. 7. REVISIONS Responsible person for this document, procedure or template Rev Description 0.1 Made templates, wrote introduction Filled inn abbreviation list, and made 6.2 microcontroller + some cosmetic and practical changes to the tables Gathered together all the finished hardware researches we have done till 01.02.2012 Added Linear regulator research Cleaned up the document and added PSU research Gathered together finished hardware researches we have done from 01.02.2012 till 17.02.2012 Made: 6.11.1 6.11.2 6.19.2 Made : 6.13.4 and 6.24.1 Made updates after change of microcontroller Made more updates on outdated tables. Finished documents Made last revision 0.2 0.3 0.4 0.5 0.6 0.7 0.8 0.9 0.10 1 Table 6: Revisions Date Name 13.01.2012 S.A A.G 18.01.2012 02.02.2012 08.02.2012 09.02.2012 17.02.2012 08.03.2012 20.03.2012 03.05.2012 16.05.2012 22.05.2012 S.A K.M O.R S.A AG / O.R O.R O.R O.R O.R SOFTWARE DESCRIPTION Bachelor Project Compact Fly-By-Wire System Version Category Issue Date 1.0 Released 29.05.2012 Made by A.G Checked by K.M Approved by T.A NOTES REGARDING VALIDITY OF THIS DOCUMENT: Paper copies are uncontrolled. This copy is valid only at the time of printing. The controlled version of this document is available from the Company Intranet / DropBox. This document contains Equator Aircraft Norway legal entity proprietary and confidential information that is legally privileged and is intended only for the person or entity to which it is addressed and any unauthorised use is strictly prohibited. It is provided for limited purpose and shall not be reproduced, stored electronically, transferred to other documents, disseminated or disclosed to any third parties without the prior written consent of the relevant Equator Aircraft Norway legal entity. Any attachments are subject to the specific restrictions and confidentiality regulations stated therein and shall be treated accordingly. The document is to be returned upon request and in all events upon completion of use for which it was provided. Document: Version Software description 1.0 Issue date: Page 29.05.2012 2 of 12 TABLE OF CONTENTS 1. PURPOSE ............................................................................................................................... 3 2. ABBREVIATION ..................................................................................................................... 3 3. DEFINITIONS ......................................................................................................................... 3 3. RESEARCH ............................................................................................................................ 4 3.1. Code language ....................................................................................................................... 4 3.2. State failure research ............................................................................................................. 4 3.3. Single failure on SC ............................................................................................................... 4 3.4. MCC2 Backup ........................................................................................................................ 5 3.5. 3.5.1. 3.5.2. Simulator ................................................................................................................................ 6 Generic Protocol..................................................................................................................... 6 Telnet Protocol ....................................................................................................................... 7 4. CODE STANDARD ................................................................................................................. 7 4.1. Naming ................................................................................................................................... 7 4.2. Comments .............................................................................................................................. 8 4.3. Formatting .............................................................................................................................. 8 5. MAIN CONTROLLER CARD ................................................................................................. 9 6. SUPERVISOR CARD ........................................................................................................... 10 7. COMMUNICATION PROTOCOL ......................................................................................... 11 8. SIMULATOR ......................................................................................................................... 11 9. REVISIONS ........................................................................................................................... 12 TABLE OF FIGURES Figure 1: FTA complete system .............................................................................................................. 5 Figure 2: FTA Complete System with MCC2 backup .............................................................................. 6 Figure 3: Python code ............................................................................................................................. 7 Figure 4: Use case diagram for Main controller card .............................................................................. 9 Figure 5: Class diagram MCC ................................................................. Error! Bookmark not defined. Figure 6: Use case diagram for Supervisor controller card ................................................................... 10 Figure 7: Class diagram SC .................................................................... Error! Bookmark not defined. , TABLE OF TABLES Table 1: Single failure on SC ................................................................................................................... 4 Table 2: MCC2 Backup ........................................................................................................................... 5 Table 3: Table of actors from MCC use case diagram ............................................................................ 9 Table 4: Table of actors from SC use case diagram ............................................................................. 10 Table 5: Communication example from SC to MCC ............................................................................. 11 Table 6: Communication example from MCC to SC ............................................................................. 11 Document: Software description Version 1. 1.0 Issue date: 29.05.2012 Page 3 of 12 PURPOSE The purpose of this document is to give a general overview of the software part of the project. This is done with class- and activity diagrams for both the SC and MCC. The source code and a more detailed description of the software will be on the CD. 2. ABBREVIATION Technical Term Standard Definition K.M. Kjetil Mjøs A.G. Axel Gravningsbråten S.A. Sindre Andersen T.A. Thomas Andersen R.L. Runar Løken O.R. Ole Riiser 3. DEFINITIONS Name Description MCC Main Controller Card SC Supervision Card MCU Microcontroller Unit MIPS Million Instructions Per Second EEPROM Electrically Erasable Programmable Read-Only Memory USART Universal Synchronous/ Asynchronous Receiver/Transmitter PWM Pulse-Width Modulation CCP Capture/Compare/PWM SPOF Single Point Of Failure Document: Software description Version 3. 1.0 Issue date: 29.05.2012 Page 4 of 12 RESEARCH 3.1. Code language When writing code for the Main Controller Cards we had the option to write code in C or Basic. We have chosen C. The main reason is because it is more used and support is easier to get. 3.2. State failure research We have to consider how the system will respond to a failure to the critical system functions (MCC and the SC) Therefore we have done some state failure research; Explanations to the Tables: - Green V means that the card is working properly. - Red X means that the card is not working properly or has broken down. - The RESULT describes what the system does in each of the different cases. - MCC1: MCC1 will be assigned. - MCC2: MCC2 will be assigned. - MCC3: MCC3 will be assigned. - HMI: The pilot has to intervene and assign an MCC. - SYSTEM FAIL: The system has failed, and the pilot may use the trim tabs to control the control surfaces or pull the reserve parachute. 3.3. Single failure on SC Table 1: describes the result if the MCC’s and the SC fails. In this example the SC is a Single Point Of Failure, which means that if the SC fails to work, the SC will not send commands to the MCC’s. When none of the MCC’s receive an enable signal from the SC, the MCC’s do not know what to, and the pilot have to intervene and use the Analog HMI to assign a operating MCC. If this were to happen during critical operations such as takeoff, landing, flying in a lot of air traffic etc. The consequences can be fatal because of the small margins the pilot have for errors. The time it takes for the pilot to understand what is happening and to do something about the situation (assign an MCC) might be time the pilot does not have. EVENT: SC MCC1 MCC2 MCC3 1 V V V V 2 X V V V RESULT MCC1 HMI 3 V X V V 4 X X V V MCC2 HMI 5 V V X V 6 X V X V MCC1 HMI 7 V X X V Single failure on SC 8 9 10 X V X V X V V X X V V V V X X X MCC3 HMI MCC1 HMI 11 12 X X V X MCC2 HMI 13 V V X X 14 X V X X MCC1 HMI Table 1: Single failure on SC To further explain we made a FTA diagram of the problem in Figure 1: 15 16 V X X X X X X X SYSTEM FAIL SYSTEM FAIL Document: Software description Version 1.0 Issue date: 29.05.2012 Page 5 of 12 Figure 1: FTA complete system If the SC fails with this system setup, the system function depends on the pilot’s reaction. Because of these safety reasons we want to avoid the full dependency of the HMI-panel as much as possible. 3.4. MCC2 Backup Description of Table 2: When SC is working it will send a message to MCC2, telling it that MCC1 or MCC3 is operational. Then if the SC were to break down, the MCC2 will lose the message from the SC and it will assign itself as operational. When MCC1 or MCC3 lose contact with SC they will go in standby mode. This way the system will automatically assign MCC2 as the operational MCC if the SC breaks down. And we will avoid four of the seven events resulting with HMI. EVENT: SC MCC1 MCC2 MCC3 1 V V V V 2 X V V V 3 V X V V 4 X X V V MCC2 is chosen if contact with SC is lost, or SC has failed 5 6 7 8 9 10 11 12 13 V X V X V X V X V X V V X X V V X X V V X X X X V V V V X X V V V V X X X X X X RESULT MCC1 MCC2 MCC2 MCC2 MCC1 HMI Table 2: MCC2 Backup MCC3 HMI MCC1 MCC2 MCC2 MCC2 MCC1 HMI 14 15 16 V X X X X X X X SYSTEM FAIL SYSTEM FAIL Document: Software description Version 1.0 Issue date: Page 29.05.2012 6 of 12 To further explain the advantages of this function you can see from Figure 2. That the MTBF will be higher and the full dependency of the HMI-panel and pilot reaction is less likely to happen, because both MCC2 and SC will have to fail at the same time. Figure 2: FTA Complete System with MCC2 backup 3.5. Simulator To our system we have used a freeware simulator called Flightgear to illustrate the system. We have tried a lot of different ways to communicate with the simulator and these options are described here. All ways are using serial communication and a Arduino Mega microcontroller, but with different protocols. 3.5.1. Generic Protocol With this protocol it is possible to send input to Flightgear and receive data from Flightgear, but it is not possible to do both at the same time. This is the reason that we tried the telnet protocol, to see if it is possible to get feedback at the same time as we send inputs. For more technical specifications about this protocol and our solution, see the software description Document: Software description Version 1.0 Issue date: Page 29.05.2012 7 of 12 document. The arduino will receive serial data from the system, scale it in the format the flightgear needs, and send it out as a new serial line to flightgear. It is required to make a XML file to make flightgear understanding which serial input that shall be send to which parameter in flightgear. For more info about the code and other technical information for this protocol, see the Software description document. 3.5.2. Telnet Protocol This protocol is a bit more flexible than Generic. With this protocol we send unscaled data to the PC from the Arduino. The Arduino is simply just used to send data. The unscaled data are we modulating in a Python script at the PC. In the Python script we include the telnet protocol, so this script can talk directly to Flightgear without a XML file. In this protocol we got only feedback from the parameters that we send in to the simulator, which it useless in this case. A part of the code developed for Python script are sown under. We do not make a complete code for this solution because it was replaced by the generic protocol. Figure 3: Python code 4. CODE STANDARD Since we have been only two people working on software and this assignment is a proof of concept our focus, when coding, has been on functionality. However, to ensure better readability of the code we have used this very simple code standard: 4.1. Naming Variables - The variables uses logical names that makes the function easy see. - Always starts with lowercase character. If the name is made up by several words the next word start with an uppercase. Example: int joystickStepElevator. Document: Software description Version 1.0 Issue date: 29.05.2012 Page 8 of 12 Function names - Always starts with lowercase character. If the name is made up by several words the next word start with an uppercase. Example: void joystickElevatorOneStep(). Defines - Always uppercase letters. - Words separated by “_”. Constants - Always uppercase letters. - Words separated by “_”. Function- and variable prefixes - “is” to ask a question about something. Whenever someone sees Is they will know - it's a question. “get” get a value. “set” set a value. - Pointer variables Place the * close to the variable name not pointer type Example: char *rudderStep; 4.2. Comments Variable comments - Single line commenting with “//” Function comments - Block comments on multiple lines /** * */ 4.3. Formatting One statement per line We will only be using one statement per line. Example: char **a = 0; char *b = 0; Document: Version 5. Software description 1.0 Issue date: Page 29.05.2012 9 of 12 MAIN CONTROLLER CARD Figure 4: Use case diagram for Main controller card Figure 4: Use case diagram for Main controller cardFigure 4 shows a use-case diagram of the MCC. This illustrates the actors, external sensors and influences that the MCC has to relate to. Actors Pilot UART Elevator Left aileron Right aileron Rudder Nosewheel Description Controls the aircraft with joystick and the HMI input panel. Sends and receives data to the supervisor. Elevator stepper motor Left aileron stepper motor Right aileron stepper motor Rudder stepper motor Nosewheel stepper motor Table 3: Table of actors from MCC use case diagram For a Class diagram of the MCC code, See Appendix: 13 MCC Software Class Diagram For detailed explanation of the code and calculations performed please see the index.html file in the software documentation folder on the DVD. Document: Software description Version 6. 1.0 Issue date: Page 29.05.2012 10 of 12 SUPERVISOR CARD Figure 5: Use case diagram for Supervisor controller card Figure 5 shows a use-case diagram of the SC. This illustrates the actors, external sensors and influences that the SC has to relate to. Actors Pilot UART Stall sensor Windspeed sensor Ultrasound Barometer GPS IMU Description Controls the aircraft by autopilot setpoints. Sends and receives data to the Main controller cards. Measures the angle of attack. Measures the wind speed. Measures the distance to the ground. (05m) Measure the atmospheric pressure Calculates the aircraft position Measures the rotational attributes Table 4: Table of actors from SC use case diagram For a Class diagram of the SC code, See Appendix: 14 SC Software Class Diagram For detailed explanation of the code and calculations performed please see the index.html file in the software documentation folder on the DVD or dropbox. Document: Software description Version 7. 1.0 Issue date: 29.05.2012 Page 11 of 12 COMMUNICATION PROTOCOL To make the communication between the main controller cards and supervisor card as robust as possible we have made a protocol with the following principles: All messages are sent in ASCI. The SC will initiate all communication with either a GET – (request value) or SET- (set value) message. All messages sent from the SC to the MCC will be of length 7 characters. Header:3, body:3, delimiter:1. All messages sent from the MCC’s to the SC will be of length 6 characters. Header:2, body:3, delimiter:1. Messages from the SC will be formatted with a header containing two fields: One containing the get/set character and the other the value in question. Messages sent from MCC’s will be formatted with a header containing only one field, the value in question. All messages with end with a “|” character. Table 5 and Table 6, shows some examples on messages that can be sent between SC and MCC. From SC to MCC Header field 1 Header field 2 < ES Parameters 000 Delimiter | < EF 000 | > Ac XXX (000-001) | Description GET elevator step GET elevator feedback SET active Table 5: Communication example from SC to MCC From MCC to SC Header Parameters GE XXX (000-999) Delimiter | Description Answers the request Table 6: Communication example from MCC to SC A list of all the commands possible to send is found in the communication.c file in the source code. It is also easy to add more GET and SET functions if needed. 8. SIMULATOR Name Flowchart: Part of Simulator Description For the simulator we made a software code for the Arduino. This code read serial data from our system, processing it, and sends the modulated data out to flightgear. Al the float variables in flightgear have to be scaled from -1 to 1, excapt throttle that shall be unit scaled(we do not want negative throttle), this variables are: - Elevator - Aileron - Rudder - Throttle The 3 first variables do we got from our system. The throttle is read from an analog Document: Software description Version 1.0 Issue date: 29.05.2012 Page 12 of 12 input at the arduino, and the variables for magnetos, starter, brakes and gear down, is integers which get the values from switches connected to digital inputs at the arduino. Al these variables are 0 or 1, except magnetos which is modulated in the code to be 3 because flightgear required it to start the plane. To get communication with flightgear we need to write a XML-code. This code read the data that comes over the serial line one after one. To separate the data that comes over the serial line, we have to define a variable separator in the XML. An example of how to send the serial data from the Arduino, and how the XML is build are shown under: Arduino code: Serial.print(start); Serial.print(","); XML code: <line_separator>newline</line_separator> <var_separator>,</var_separator> <chunk> <name>Magnetos</name> <node>/controls/engines/engine/magnetos</node> <type>float</type> </chunk> Owner and date 9. Runar Løken 16.05.2012 REVISIONS Rev Description Date Name 0.1 0.2 0.3 0.4 Made template rev 0.1 Made software description for MCC Updated class info. Making software description for simulator 24.02.2012 24.02.2012 19.04.2012 15.05.2012 Added research chapter, communication protocol, MCC and SC flowcharts and UML diagrams A.G R.L K.M R.L K.M 0.5 28.05.2012 T.A Fault-Tree Analysis Compact Fly-By-Wire System Version Category Issue Date Made by 1.0 Released 29.05.2012 A.G / S.A Checked by A.G Approved by Knut Brødreskift NOTES REGARDING VALIDITY OF THIS DOCUMENT: Paper copies are uncontrolled. This copy is valid only at the time of printing. The controlled version of this document is available from the Company Intranet / Dropbox. This document contains Equator Aircraft Norway legal entity proprietary and confidential information that is legally privileged and is intended only for the person or entity to which it is addressed and any unauthorized use is strictly prohibited. It is provided for limited purpose and shall not be reproduced, stored electronically, transferred to other documents, disseminated or disclosed to any third parties without the prior written consent of the relevant Equator Aircraft Norway legal entity. Any attachments are subject to the specific restrictions and confidentiality regulations stated therein and shall be treated accordingly. The document is to be returned upon request and in all events upon completion of use for which it was provided. Document: Version Fault-tree analysis 1.0 Issue date: Page 29.05.2012 2 of 34 TABLE OF CONTENTS 1. PURPOSE ............................................................................................................................... 3 1.1. Explanation to the MTBF numbers......................................................................................... 3 1.2. List of MTBF numbers ............................................................................................................ 3 1.3. Explanations to the diagrams ................................................................................................. 5 2. ABBREVIATION ..................................................................................................................... 6 3. 3.1.1. TEMPLATE ............................................................................................................................. 6 Name of the subsystem ......................................................................................................... 6 4. 4.1.1. 4.1.2. 4.1.3. 4.1.4. 4.1.5. COMMON UNITS FOR SC AND MCC ................................................................................... 7 Voltage read 13.8V ................................................................................................................ 7 Voltage read 5V...................................................................................................................... 8 Power LED ............................................................................................................................. 9 Temp sensor ........................................................................................................................ 10 Power Supply 13.8V ............................................................................................................. 11 5. MAIN CONTROLLER CARD ............................................................................................... 12 5.1. 5.1.1. 5.1.2. 5.1.3. 5.1.4. 5.1.5. 5.1.6. 5.1.7. Description to the chapter .................................................................................................... 12 MCC FTA ............................................................................................................................. 12 PIC18F8520 ......................................................................................................................... 13 Stepper Controller ................................................................................................................ 14 Stepper motor....................................................................................................................... 15 7805 Linear Voltage Regulator 5V ....................................................................................... 16 Stepper position sensor ....................................................................................................... 17 Joystick ................................................................................................................................. 18 6. 6.1.1. 6.1.2. 6.1.3. 6.1.4. 6.1.5. 6.1.6. 6.1.7. 6.1.8. 6.1.9. 6.1.10. 6.1.11. SUPERVISION CARD .......................................................................................................... 19 SC FTA ................................................................................................................................. 19 5V regulator .......................................................................................................................... 20 3.3V regulator ....................................................................................................................... 21 LPC1768 .............................................................................................................................. 22 IMC ....................................................................................................................................... 23 GPS ...................................................................................................................................... 24 Distance sensor.................................................................................................................... 25 Stall sensor ........................................................................................................................... 26 Airspeed sensor ................................................................................................................... 27 Barometer............................................................................................................................. 28 Autopilot ............................................................................................................................... 29 7. 7.1.1. 7.1.2. 7.1.3. HMI-PANEL .......................................................................................................................... 30 HMI FTA ............................................................................................................................... 30 HMI LED’s ............................................................................................................................ 31 HMI-Switches ....................................................................................................................... 32 8. 8.1.1. COMPACT FLY-BY-WIRE SYSTEM ................................................................................... 33 FTA Complete system with MCC2 backup .......................................................................... 33 9. REFERENCES ...................................................................................................................... 34 10. REVISIONS ........................................................................................................................... 34 Document: Fault-tree analysis Version 1. 1.0 Issue date: Page 29.05.2012 3 of 34 PURPOSE Since no system is perfect, and our system needs to be as reliable as possible, it is a necessity to inspect the fault probability of the system. The easiest way to do this is to deduce a failure analysis in which an undesired state of the system is analyzed using Boolean logic to combine a series of lowerlevel events. By dividing our system in to smaller subsystems we can assure less error work probability, and less system analysis. Afterwards the subsystems are integrated to form the whole well analyzed complete system. To illustrate the fault tree diagram we will use logic gates symbols. 1.1. Explanation to the MTBF numbers A lot of the MTBF numbers are not mapped, such as “sharp objects fracture copper path” and the like. So we have calculated a number for these events. Other events are documented. When the probability for an event is so small it in practice can be neglected we have put it to 2,000,000 hours (230 years). To see the calculations we have on the MTBF numbers see: Excel-diagram 1.2. List of MTBF numbers Event name Broken copper path MTBF (Hours) 2,000,000 Scientific Number -7 5.E Sharp objects fracture copper path 2,000,000 5.E Mechanical wear creates fracture on copper path 2,000,000 1.E Broken wires Conductive debris creates shortcut on copper path Moisture creates shortcut on copper path broken wire shortcuts copper path Vibrations cause unit to loosen Corrosion cause bad connectivity Joystick Locks 200,000 2,000,000 700,000 -7 -6 -6 5.E -7 5.E -6 1.34E -6 1,000,000 1.E 500,000 2.E -6 -6 500,000 2.E 2,000,000 5.E -7 Description The copper path can I practice not be broken without excessive external force. In that case the aircraft should be inspected also. The PCB’s will be located in an assigned box with an IP degree of protection. This event is therefore close to neglect able. PCB’s are known to have a long expected life span. The PCB’s are protected inside a box. Bad connection points are often the reason for an electrical failure. That is however why there will be used robust terminals and connectors. Additionally to the box where the PCB’s are located and protected, the top and bottom layer of the PCB’s are also coated with a protective insolating film. Even though the PCB’s are protected inside an IP coded box. Moisture may get in during service and such. The chances for a shortcut as a result of this however are very small. If there is bad connections, or cables that are broken, they may shortcut on the PCB where the components are placed, or on terminals. The probability of this event is reduced as much as possibly by using through-hole components. If moisture gets into the box, there is a possibility of corrosion. Regular service and checks on the system is therefore required to prevent this. The likelihood that something physically blocks the joystick during flight is very small. Document: Fault-tree analysis Version Joystick breaks Joystick sensor fails 1.0 2,000,000 2,000,000 Issue date: Page 29.05.2012 4 of 34 -7 5.E -7 5.E In order to break the joystick, excessive force must be applied. This would probably happen when entering, exiting or loading the plane when on ground. We advice Equator Aircraft to use Hall sensors for the joystick. There is no mechanical contact inside these sensors, and they are known to be way more reliable than normal resistive potentiometers. This number is taken from: Generator breakdown 10,000 -4 1.E http://src.alionscience.com/pdf/TypicalEquipmentMTB FValues.pdf The equator crew will however produce its own biodiesel generator, so this number might have to be adjusted when the generator is tested. However biodiesel engines are known to be long lived. So our MTBF number is probably too low. This is done on purpose. The equator crew has not yet decided on a battery package. So we picked a low MTBF number on purpose, to be sure it would be close to or less than the actual MTBF. Ref: http://alternativeBattery breakdown -4 energy.6pie.com/batteries/lifespan-of-batteries.php (one year = 8760 hours) -6 The chances of a fuse blowing without being overloaded are rather small. -6 The chances of a fuse blowing without being overloaded are rather small. 3,000 3.33.E MCC fuse blows 1,000,000 1.E SC fuse blows 1,000,000 1.E External heat Dislocation of heat-sink 1,000,000 500,000 -6 1.E -6 2.E -6 Dislocation of sensor 500,000 2.E Mechanical error on sensor 500,000 2.E Fraction on cable 500,000 2.E Electrical error on sensor 500,000 2.E Wire loosen from sensor 200,000 5.E Mechanical disturbance on sensor HMI switch breaks 300,000 1,000,000 All the PCB’s are placed at different locations sealed off from other equipment. And they are sufficiently cooled. The heat sink for the motor controllers will be glued on by a special thermally conductive paste, it is very strong, and due to the small weight of the heat sink, it will be resistive to vibrations. By accident or poor mounting the sensor may be dislocated, and give wrong feedback to the system. -6 The Sensor might not be working because of mechanical reasons -6 The cables from the sensors to the MCC’s might be fractured -6 The sensor might be leading the output signals to ground. Or it might simply not work. -6 Connectors and terminals are often the weakest link -6 3.33.E -6 1.E Something might come between the sensor and the control plane and interfere on the sensor output signals We have not yet decided on what switches to use on our Analog HMI Panel, as this is not a high priority. We have therefore set a sensible MTBF number Document: Version Fault-tree analysis 1.0 Issue date: 29.05.2012 Page 5 of 34 1.3. Explanations to the diagrams Here is a description of all the logic symbols used in the diagrams. We Made the FTA diagrams in order to see which events affect which event, how it is affected and the consequence of it. The diagram is also used to produce the Excel tables, where we calculated the MTBF numbers. Logic symbol Standard Definition The AND gate multiplies two or more events together. This means that in order for the consequence to occur, both events need to happen at the same time. This reduces the chances dramatically for something to happen. The OR gate adds two or more events together. This means that in order for a consequence to occur only one event need to happen. This increases the chances for something to happen. This symbol represents a basic event. The event represents things that happen, for example: “sharp objects fracture copper path”. This symbol represents the product of two or more events. And is calculated by the AND or the OR gate. In our diagram the external event represents the battery breakdown or the generator breakdown, this is events that have a direct impact on our system, but is external events that we cannot influence. This logic gates combination with the OR gate directly after the AND gate is generally not a common way to do it. But we have decided to do it like this just to save space and time on the drawing. There would normally be a consequence between the AND and the OR gate. However since this combination with the battery and the generator is used so often we wanted it to use as small space as possible. The result is still the same. Document: Fault-tree analysis Version 2. 1.0 Issue date: Page 29.05.2012 6 of 34 ABBREVIATION Technical Term Standard Definition K.M. Kjetil Mjøs A.G. Axel Gravningsbråten S.A. Sindre Andersen T.A. Thomas Andersen R.L. RunarLøken O.R. Ole Riiser FTA Fault Tree Analysis MTBF Mean Time Between Failure IP Code IP degree of protection. A number telling you how waterproof & dustproof a capsule, box or component is. 3. TEMPLATE 3.1.1. Name of the subsystem Fault tree diagram: Part of System? Description of the subsystem Function? Consequence of total failure: MTBF: X hours between each failure. Ref (excel diagram) Time spent (Hours) 3 hours Owner and date A.G 02.03.2012 Document: Fault-tree analysis Version 4. 1.0 Issue date: Page 29.05.2012 7 of 34 COMMON UNITS FOR SC AND MCC To keep the document as short as possible we have made this chapter for components that are used on both the MCC and the SC. 4.1.1. Voltage read 13.8V Fault tree diagram: Part of MCC Description of the subsystem The voltage reader measures the voltage right after the connector on the MCC. Consequence of total failure: The pilot will not get any information about the voltages on the card. If only the Voltage reader fails, it will not affect the flights maneuverability. If the pilot wants to get the voltage information, he will have to change MCC. MTBF: Time spent (Hours) 83,589.0 Hours Between failures. Ref: Excel-diagram\Common Rev0.2.xlsx Owner and date S.A 1 hour 12.03.2012 Document: Fault-tree analysis Version 1.0 Issue date: Page 29.05.2012 8 of 34 4.1.2. Voltage read 5V Fault tree diagram: Part of MCC Description of the subsystem The voltage reader measures the voltage right after the 5V voltage regulator on the MCC. Consequence of total failure: The pilot will not get any information about the voltages on the card. If only the Voltage reader fails, it will not affect the flights maneuverability. If the pilot wants to get the voltage information, he will have to change MCC. MTBF: 36,412.2 Hours Between failures. Ref: Excel-diagram\Common Rev0.2.xlsx Time spent (Hours) 1 hour Owner and date S.A 12.03.2012 Document: Fault-tree analysis Version 1.0 Issue date: Page 29.05.2012 9 of 34 4.1.3. Power LED Fault tree diagram: Part of MCC Description of the subsystem The Power LED indicates whether the MCC is ON or OFF. Consequence of total failure: The pilot will not get any information if the card is on or off. If only the Power LED fails, it will not affect the aircraft’s maneuverability. If the pilot wants to see the power LED on, he will have to change MCC. MTBF: 36,412.2 Hours Between failures. Ref: Excel-diagram\Common Rev0.2.xlsx Time spent (Hours) 1 hour Owner and date S.A 12.03.2012 Document: Fault-tree analysis Version 1.0 Issue date: Page 29.05.2012 10 of 34 4.1.4. Temp sensor Fault tree diagram: Part of MCC Description of the subsystem The Temp sensor shows the temperature on the MCC. Consequence of total failure: The pilot will not get any information regarding the temperature on the MCC. If only the Temperature sensor fails, it will not affect the flights maneuverability. If the pilot wants to see the temperature, he will have to change MCC. MTBF: 37,087.4 Hours Between failures. Ref: Excel-diagram\Common Rev0.2.xlsx Time spent (Hours) 1 hour Owner and date S.A 12.03.2012 Document: Fault-tree analysis Version 1.0 Issue date: Page 29.05.2012 11 of 34 4.1.5. Power Supply 13.8V Fault tree diagram: Part of MCC Description of the subsystem The 13.8V is the main power supply, and supply all the MCC’s and the SC with power. Consequence of total failure: If the 13.8V fails, it might be the fuse, so another MCC might work. MTBF: 165,746.8 Hours between failures. Ref: Excel-diagram\Common Rev0.2.xlsx Time spent (Hours) 2 hour Owner and date S.A / A.G 19.04.2012 Document: Fault-tree analysis Version 5. 1.0 Issue date: Page 29.05.2012 12 of 34 MAIN CONTROLLER CARD 5.1. Description to the chapter We consider the MCC’s as independent systems in this chapter, and divide them into several smaller subsystems to ensure a less extensive system analysis. 5.1.1. MCC FTA Fault tree diagram: Part of This is the FTA of the MCC. Description of the system This is the entire MCC system. It is the MCC that controls the control surfaces on the airplane. Consequence of total failure: Total failure of the MCC means that the airplane is uncontrollable. That is the reason why we have three of these doing the same job. If all of the three fails simultaneously the pilot then has two choices: 1 try to control the aircraft using the trim tabs on the control planes. 2 pull the emergency parachute. MTBF: 4,891.3 hours between failures. Ref: Excel-diagram\MCC Rev0.2.xlsx Time spent (Hours) 2 hours Owner and date S.A / A.G 18.04.2012 Document: Fault-tree analysis Version 1.0 Issue date: 29.05.2012 Page 13 of 34 5.1.2. PIC18F8520 Fault tree diagram: Part of MCC Description of the subsystem The PIC18F8520 is the “heart” of the MCC, and it does all the calculations and handle all the I/O’s. Consequence of total failure: MTBF: If the PIC18 fails on the MCC, the MCC is useless, it will stop sending data to SC, and the SC will change the command to another MCC. Time spent (Hours) 3 hours Owner and date A.G 55,895.8 hours between failures. Ref: Excel-diagram\MCC Rev0.2.xlsx 18.04.2012 Document: Fault-tree analysis Version 1.0 Issue date: 29.05.2012 Page 14 of 34 5.1.3. Stepper Controller Fault tree diagram: Part of MCC Description of the subsystem The stepper controller receives commands from the PIC18F8520, and controls the stepper motor accordingly. Consequence of total failure: If the Stepper motor controller stops working; the MCC receive feedback from the control plane sensors, and it will register a deviation between the desired position of the control plane and the actual position. The MCC sends a status report to the SC, and it will simultaneously change the color on the HMI LED from green to red. MTBF: 31,784.5 hours between failures. Ref: Excel-diagram\MCC Rev0.2.xlsx Time spent (Hours) 5 hour Owner and date A.G / S.A 18.04.2012 Document: Fault-tree analysis Version 1.0 Issue date: Page 29.05.2012 15 of 34 5.1.4. Stepper motor Fault tree diagram: Part of Common unit Description of the subsystem The stepper motor receives commands from the stepper controller, and controls the control surfaces. Consequence of total failure: If the Stepper motor stops working; the MCC receive feedback from the control plane sensors, and it will register a deviation between the desired position of the control plane and the actual position. The affected motor will not operate the steering surface and therefore the airplanes maneuverability will be affected. MTBF: 202,898.6 Hours between failures. Ref: Excel-diagram\MCC Rev0.3.xlsx The stepper motor produces more heat when not moving. To prevent the coils from overheating and eventually melting, we will develop å software function that switch one or two steps within a given period of time in order to move the strain on the coils. This only applies when the control planes (stepper motors) are still for a long period. Time spent (Hours) 3 hour Owner and date S.A / A.G 19.04.2012 Document: Fault-tree analysis Version 1.0 Issue date: 29.05.2012 Page 16 of 34 5.1.5. 7805 Linear Voltage Regulator 5V Fault tree diagram: Part of MCC Description of the subsystem The 5V regulator will convert the 13.8V voltage into a linear 5V power supply for the Joystick and for the analog devices on the MCC Consequence of total failure: If the 5V voltage regulator fails, this will lead to total failure of the MCC and the pilot has to change MCC. MTBF: 64,675.2 hours between failures. Ref: Excel-diagram\MCC Rev0.1.xlsx Time spent (Hours) 2 hour Owner and date S.A / A.G 17.04.2012 Document: Fault-tree analysis Version 1.0 Issue date: 29.05.2012 Page 17 of 34 5.1.6. Stepper position sensor Fault tree diagram: Part of MCC Description of the subsystem The Digital sensor reports to the MCC every time the control plane is in zero position. The Analog sensor measure the actual position of the control plane, and every time the control plane passes the zero position the MCC checks if the analog sensor is sending the right values according to the position, and it resets the “zero value” of the analog sensor on the MCC. Consequence of total failure: The stepper motors can be controlled open-loop. Therefore, if only the sensor fails, it will not affect the flights maneuverability. But the MCC will not detect any errors if they occur. All the MCC’s will report the failure to the SC, the SC will give an alarm to the pilot and recommend the pilot to land and fix the problem. MTBF: 25,340.9 hours between failures. Ref: Excel-diagram\MCC Rev0.2.xlsx Time spent (Hours) 2 hours Owner and date S.A / A.G 18.04.2012 Document: Fault-tree analysis Version 1.0 Issue date: 29.05.2012 Page 18 of 34 We are considering the joystick as a part of the MCC because every MCC is assigned its own set of axis sensors from the joystick. 5.1.7. Joystick Fault tree diagram: Part of MCC Description of the subsystem The joystick will transfer the pilot’s desired action into electrical signals, which go to the microcontroller on the MCC and further control the control surfaces. Consequence of total failure: If the joystick fails, the airplane will be out of control. We therefore have a tripleredundant joystick, where every set of the axes are connected to their own MCC card. If the mechanical failure occurs, the problem cannot be fixed by changing MCC, and the pilot will have to try to fix it. If not the system has failed. MTBF: 121,212.1 hours between failures. Ref: Excel-diagram\MCC Rev0.2.xlsx Time spent (Hours) 2 hour Owner and date S.A /A.G 18.04.2012 Document: Fault-tree analysis Version 6. 1.0 Issue date: Page 29.05.2012 19 of 34 SUPERVISION CARD We consider the SC as an independent system in this chapter, and divide it into several smaller subsystems to ensure a less extensive system analysis. 6.1.1. SC FTA Fault tree diagram: Part of This is the FTA of the SC. Description of the system This is the entire SC FTA system. The SC automatically chooses the operating MCC. SC can also be used to supervise the control inputs from the pilot and as autopilot. Consequence of total failure: Total failure of the SC means that the airplane does not choose MCC by itself if it fails. Therefore the pilot has to manually choose which MCC who is operating by the HMI panel. The pilot will not have the extra functions to improve the overall flight experience either. MTBF: 9,976.7 Hours between failures. Ref: Excel-diagram\SC Rev0.2.xlsx Time spent (Hours) 2 hours Owner and date S.A 19.04.2012 Document: Fault-tree analysis Version 1.0 Issue date: Page 29.05.2012 20 of 34 6.1.2. 5V regulator Fault tree diagram: Part of SC Description of the subsystem The 5V regulator will convert the 13.8V voltage into a linear 5V power supply for the microcontroller on the SC. Consequence of total failure: If the 5V voltage regulator fails, this will lead to total failure of the SC. This will lead to loss of all the functions the SC provide. The pilot therefore needs to change MCC manually if something happens, and will be warned by a light on the HMI that he needs to land the airplane and get the problem sorted out. MTBF: 66,836.6 Hours between failures. Ref: Excel-diagram\SC Rev0.2.xlsx Time spent (Hours) 1 hour Owner and date S.A / A.G 19.04.2012 Document: Fault-tree analysis Version 1.0 Issue date: Page 29.05.2012 21 of 34 6.1.3. 3.3V regulator Fault tree diagram: Part of SC Description of the subsystem The 3.3V regulator will convert the 5V voltage into a linear 3.3V power supply for the GPS, barometer and the IMC. Consequence of total failure: If the 3.3V voltage regulator fails, this will lead to failure on the GPS, barometer and the IMC. The pilot will get a message through the SC LED which tells him that the SC is not working properly. MTBF: 32,869.1 Hours between failures. Ref: Excel-diagram\SC Rev0.2.xlsx Time spent (Hours) 1 hour Owner and date S.A 19.04.2012 Document: Fault-tree analysis Version 1.0 Issue date: Page 29.05.2012 22 of 34 6.1.4. LPC1768 Fault tree diagram: Part of SC Description of the subsystem The LPC1768 is the “heart” of the SC, and it does all the calculations and handle all I/O’s. Consequence of total failure: If the LPC fails on the SC. All SC functions will stop working, the SC will stop sending a package to MCC2 and MCC2 will automatically be operational. (Ref: Software research, Chapter: State Failure Research) Simultaneously an alarm will be given and the SC light on the HMI panel will turn off or turn Red (depending on the fault reason). When SC is non-functional the pilot is the “Supervisor”. If something happens with the MCC in control (MCC2 or another MCC assigned by the pilot) The pilot has to change MCC manually. If the aircraft is controlled by the autopilot when the LPC fails. The autopilot will stop, MCC2 will take command and the pilot must fly the aircraft manually. MTBF: 20,485.8 Hours between failures. Ref: Excel-diagram\SC Rev0.2.xlsx Time spent (Hours) 3 hours Owner and date A.G 19.04.2012 Document: Fault-tree analysis Version 1.0 Issue date: Page 29.05.2012 23 of 34 6.1.5. IMC Fault tree diagram: Part of SC Description of the subsystem IMC consists of three units; Gyro, Magnetometer and accelerometer. This will provide information about the flight to the SC. Consequence of total failure: If the IMC fails, the SC will not have all the desirable functions, but it will still be able to automatically change MCC if something happens to it. MTBF: 36,464.8 Hours between failures. Ref: Excel-diagram\SC Rev0.2.xlsx Time spent (Hours) 1 hour Owner and date S.A 19.04.2012 Document: Fault-tree analysis Version 1.0 Issue date: 29.05.2012 Page 24 of 34 6.1.6. GPS Fault tree diagram: Part of SC Description of the subsystem The GPS are able to calculate the airplanes position through satellites. Consequence of total failure: If the GPS fails, the autopilot will not be able to operate the airplane, but the SC will still be able to automatically change MCC if something happens to it and have all the other functions. The pilot will also not be able to get the airplanes position. MTBF: 29,449.0 Hours between failures. Ref: Excel-diagram\SC Rev0.2.xlsx Time spent (Hours) 1 hour Owner and date S.A 19.04.2012 Document: Fault-tree analysis Version 1.0 Issue date: Page 29.05.2012 25 of 34 6.1.7. Distance sensor Fault tree diagram: Part of SC Description of the subsystem The Distance sensor is used for takeoff and landing, to measure the exact distance to the runway/water. It has a short range, and is only used when the aircraft is close to the ground. Consequence of total failure: If the Distance sensor fails, the pilot only has the GPS altitude and visual measurement to show the distance to the ground. MTBF: 28,365.8 Hours between failures. Ref: Excel-diagram\SC Rev0.2.xlsx Time spent (Hours) 1 hours Owner and date A.G 19.04.2012 Document: Fault-tree analysis Version 1.0 Issue date: Page 29.05.2012 26 of 34 6.1.8. Stall sensor Fault tree diagram: Part of SC Description of the subsystem The stall sensor measures the angle of attack of the airplane, and by knowing the stall limit of the airplane, the maximum angle of attack can be calculated and the system can prevent the aircraft ending up in stall or deep stall. Consequence of total failure: If the stall sensor fails, the system will not be able to detect or prevent the aircraft from stalling. It is not a critical failure to the system function; however it is advisable to fix the problem as soon as possible of safety reasons. MTBF: 28,365.8 Hours between failures. Ref: Excel-diagram\SC Rev0.2.xlsx Time spent (Hours) 2 hours Owner and date A.G 19.04.2012 Document: Fault-tree analysis Version 1.0 Issue date: Page 29.05.2012 27 of 34 6.1.9. Airspeed sensor Fault tree diagram: Part of SC Description of the subsystem The airspeed sensor measures the airflow around the aircraft, and therefore measures the airspeed of the airplane. Consequence of total failure: If the airspeed sensor fails, it is not possible to measure the actual airspeed of the aircraft; However the GPS measures the ground speed, so the pilot has a certain indication of the speed. He will however not know for certain the amount of lift generated, since this is a result of the airspeed. All in all it is not a critical failure to the system, as long as the pilot is aware of it. MTBF: 28,365.8 Hours between failures. Ref: Excel-diagram\SC Rev0.2.xlsx Time spent (Hours) 2 hours Owner and date A.G 19.04.2012 Document: Fault-tree analysis Version 1.0 Issue date: Page 29.05.2012 28 of 34 6.1.10. Barometer Fault tree diagram: Part of SC Description of the subsystem The Barometer measures the atmospheric pressure around the aircraft, and if it is calculated it then gives a good estimate of the altitude of the aircraft. It must be calculated before every flight as a result of the atmospheric pressure changes that follows/gives the weather. Consequence of total failure: If the barometer fails; you still have the GPS to measure the altitude, and the distance sensor to measure the distance from the ground at low altitudes. It is not a critical failure to the function of the system. MTBF: 28,365.8 Hours between failures. Ref: Excel-diagram\SC Rev0.2.xlsx Time spent (Hours) 2 hours Owner and date A.G 19.04.2012 Document: Fault-tree analysis Version 1.0 Issue date: Page 29.05.2012 29 of 34 6.1.11. Autopilot Fault tree diagram: Part of SC Description of the subsystem The autopilot is able to operate the airplane through calculations and predetermined preferences. Consequence of total failure: If the autopilot fails, the SC will not be able to operate the airplane through it, but it will still be able to automatically change MCC if something happens and have all the other functions. MTBF: 36,464.8 Hours between failures. Ref: Excel-diagram\SC Rev0.2.xlsx Time spent (Hours) 1 hour Owner and date S.A 16.03.2012 Document: Fault-tree analysis Version 7. 1.0 Issue date: Page 29.05.2012 30 of 34 HMI-PANEL 7.1.1. HMI FTA Fault tree diagram: Part of This is the FTA of the HMI. Description of the system This is the entire HMI FTA system. The HMI panel consists of LEDs and switches indicating which MCC/SC who is running. These switches are override switches. Consequence of total failure: Total failure of the HMI means that the airplane cannot be manually overridden by the pilot, and the SC/MCC2 is operative. This will not affect the maneuverability of the airplane. If the HMI, SC and MCC2 fails at the same time, the flight will be out of control. . If all of the three fails the pilot then has two choices: 1 try to control the aircraft using the trim tabs on the control planes. 2 pull the emergency parachute. MTBF: 3,734,944,338 hours between failures. Ref: Excel-diagram\HMI Rev0.1.xlsx The reason for the High MTBF is of the AND gate. All the Switches need to fail at the same time in order for the total analog HMI to fail. Time spent (Hours) 2 hours Owner and date S.A / A.G 18.04.2012 Document: Fault-tree analysis Version 1.0 Issue date: Page 29.05.2012 31 of 34 7.1.2. HMI LED’s Fault tree diagram: Part of HMI-Panel Description of the subsystem The HMI-LED’s indicate the state of the corresponding MCC’s or SC. The LED’s can be tested using a lamp test button. Each LED is Powered by its respective MCC / SC. Consequence of total failure: If the one or more LED’s fail, it will not be a critical failure to the function of the system. However; if the SC is down along with the LED’s the pilot will not know which of the MCC’s to use. And he will think every MCC not having a working LED is down, and he is probably right. Therefore it is important of safety reasons that the LED’s work at any given time. MTBF: 1,346.4 hours between failures. Ref: Excel-diagram\HMI Rev0.1.xlsx Time spent (Hours) 1,346 hours seems like a short time, and it is. However this number does not represent the lifetime of the LED. It rather represent the time between each time the system fails to provide power for one or more LED’s. 3 hours Owner and date A.G 19.04.2012 Document: Fault-tree analysis Version 1.0 Issue date: Page 29.05.2012 32 of 34 7.1.3. HMI-Switches Fault tree diagram: Part of HMI-Panel Description of the subsystem The Switches makes it possible for the pilot to manually switch between the MCC’s. And it is a safety factor if the SC fails. Each Switch is powered by its respective MCC Consequence of total failure: MTBF: If the SC is out of order and the switches fail, it is a critical failure to the system. The pilot will not be able to switch MCC, if the operating MCC fails the consequence can be fatal; and the pilot has to options; try to control the aircraft using the trim tabs on the control surfaces, or pull the emergency parachute. This is however only the case if the SC, the operating MCC and the Switch fails at the same time. 1,551.5 hours between faults. Ref: Excel-diagram\HMI Rev0.1.xlsx Time spent (Hours) 2 hours Owner and date A.G 18.04.2012 Document: Fault-tree analysis Version 8. 1.0 Issue date: Page 29.05.2012 33 of 34 COMPACT FLY-BY-WIRE SYSTEM Here we integrate the results from the SC, MCC and HMI-Panel to form the complete system fault tree analysis. 8.1.1. FTA Complete system with MCC2 backup Fault tree diagram: Part of This is the FTA of the entire system. Description of the system This is the entire Compact fly-by-wire system. The system we are developing and in the end will control the aircraft. For further description of the function of the MCC2 in the Fault tree diagram above; Refer to: Software Research Chapter: State Failure Research. We did not add the Stepper Motor in this FTA calculation because the stepper motor is “outside” of our system, and it should therefore not affect our MTBF number. There is possible to use more than one stepper motor for redundancy. Consequence of total failure: Total failure means that the whole system has failed; The Pilot then has two choices: 1 try to control the aircraft using the trim tabs on the control planes. 2 pull the emergency parachute. MTBF: 2,307,825 hours between failures. Ref Excel-diagram\Compact fly-by-wire system Rev.0.2.xlsx According to requirement: R310.1 the MTBF must exceed 800,000 hours. Our system meets this requirement by a good margin. Time spent (Hours) 4 hours Owner and date A.G 19.04.2012 Document: Fault-tree analysis Version 1.0 Issue date: 29.05.2012 Page 34 of 34 9. REFERENCES Num. Reference source Description Date Referring to the design, of the FTA and how we compute the MTBF 20.03.2012 Fault-tree analysis.pdf Referring to how we compute the MTBF values 20.03.2012 Rel_MTBF.pdf The MTBF numbers for common units and components 19.04.2012 Excel-diagram\Common Rev0.2.xlsx Excel-diagram\Compact fly-by-wire system Rev.0.2.xlsx The MTBF numbers for the whole system 19.04.2012 The MTBF numbers for the HMI panel 19.04.2012 Excel-diagram\HMI Rev0.1.xlsx 7 Excel-diagram\MCC Rev0.3.xlsx The MTBF numbers for the MCC 19.04.2012 8 Excel-diagram\SC Rev0.2.xlsx The MTBF numbers for the SC 19.04.2012 10. REVISIONS 1 2 4 5 6 If any changes to the document are done, a new revision will be issued Rev Description 0.1 0.2 0.3 0.4 0.5 0.6 0.7 0.8 0.9 0.10 0.11 1.0 Date Name Made template 02.03.2012 Made: The MCC FTAs 12.03.2012 A.G S.A / A.G A.G / S.A A.G / S.A A.G / S.A Changed: 5.1.6, Error! Reference source not found., 4.1.2, Made a new roup of FTAs; Common units between SC and MCC. Reorganized all the FTA diagrams. Made: Error! Reference source not ound. Made: Error! Reference source not found., Error! Reference source t found., 5.1.7, 6.1.6, 6.1.5, 6.1.11, 5.1.1, Error! Reference source not found. Made: 6.1.8, 6.1.9, 6.1.10, 7.1.2, 7.1.3 Made: 6.1.1, 7.1.1, 5.1.4, Listed References, made some comments to the chapters Updated: 6.1.4, 6.1.1, 5.1.3, 5.1.4, Error! Reference source not found., REF _Ref322432307 \r \h 6.1.2, Deleted: 5.1.6 MUX Updated: 5.1.1, 5.1.2, 5.1.3, 5.1.6, 5.1.7, 7.1.1, 7.1.2, 7.1.3, Updated: 9 References 8.1.1, 7.1.2, 6.1.11, 6.1.10, 6.1.9, 6.1.8, 6.1.7, 6.1.6, 6.1.5, 6.1.4, 6.1.3, 6.1.2, 6.1.1, 5.1.4, 4.1.5, 4.1.4, 4.1.3, 4.1.2, 4.1.1 & 1.1 Explanation to the MTBF numbers, Made the public release. Made: 1.3, and checked the grammar 14.03.2012 15.03.2012 16.03.2012 17.03.2012 19.03.2012 20.03.2012 17.04.2012 18.04.2012 A.G S.A A.G A.G / S.A A.G A.G 19.04.2012 20.04.2012 A.G Requirement & Test Specification Bachelor Project Compact Fly-by-wire System Version Category Issue Date Made by 2 Released 23.05.2012 A.G, O.R and R.L NOTES REGARDING VALIDITY OF THIS DOCUMENT: Paper copies are uncontrolled. This copy is valid only at the time of printing. The controlled version of this document is available from the Company Intranet / DropBox. This document contains Equator Aircraft Norway legal entity proprietary and confidential information that is legally privileged and is intended only for the person or entity to which it is addressed and any unauthorised use is strictly prohibited. It is provided for limited purpose and shall not be reproduced, stored electronically, transferred to other documents, disseminated or disclosed to any third parties without the prior written consent of the relevant Equator Aircraft Norway legal entity. Any attachments are subject to the specific restrictions and confidentiality regulations stated therein and shall be treated accordingly. The document is to be returned upon request and in all events upon completion of use for which it was provided. Document: Version Requirement & Test Specification 2 Issue date: Page 23.05.2012 2 of 14 TABLE OF CONTENTS 1. PURPOSE ............................................................................................................................... 3 2. ABBREVIATION ..................................................................................................................... 4 3. REFERENCES ........................................................................................................................ 4 4. DEFINITIONS ......................................................................................................................... 4 5. REQUIREMENTS & TEST SPECIFICATION ........................................................................ 5 5.1. COMMENTS .......................................................................................................................... 5 5.2. Environmental conditions ....................................................................................................... 5 5.3. Overall system function .......................................................................................................... 5 5.4. Failure tolerance..................................................................................................................... 8 5.5. Software ................................................................................................................................. 8 5.6. Hardware .............................................................................................................................. 10 5.7. 5.7.1. Joystick ................................................................................................................................. 11 Important notes to the requirements: ................................................................................... 11 5.8. Control surface ..................................................................................................................... 12 6. RESPONSIBILITY ................................................................................................................ 13 7. REVISIONS ........................................................................................................................... 14 TABLE OF FIGURES Figure 2: Joystick ..................................................................................................................................... 3 Figure 1: Control Surfaces....................................................................................................................... 3 Document: Requirement & Test Specification Version 1. 2 Issue date: Page 23.05.2012 3 of 14 PURPOSE The purpose of this document is to define the requirements for the system. And to define tests for all the requirements. We have to be sure that the system works as supposed and that we get the expected output when we execute an input command. We have defined a test for each of the requirements, and the tests are numbered according to their respective requirement number. The System output is the control surfaces shown in Fig.1. Inputs to the system are the pilot’s joystick Fig. 2 and an IMU. Figure 1: Control Surfaces Figure 2: Joystick Document: Requirement & Test Specification Version 2. 2 Issue date: Page 23.05.2012 4 of 14 ABBREVIATION Technical Term Standard Definition K.M. Kjetil Mjøs A.G. Axel Gravningsbråten S.A. Sindre Andersen T.A. Thomas Andersen R.L. Runar Løken O.R. Ole Riiser IMC / IMU Inertial Measurement Card; is an electronic device that measures and reports on the aircraft’s orientation and gravitational forces using a combination of accelerometers and gyroscopes. MTBF Mean Time Between Failures MCC Main Controller Card SC Supervision Card 3. REFERENCES Num. Reference Document Description Date [1] Idea document For definition of the project 03.01.2012 [2] http://www.ipc.org/4.0_Knowledge/4.1 _Standards/IPC-A-610E-redline-April2010.pdf For description of soldering standard IPCA-610E [3] http://www.tronico.fi/OH6NT/docs/NM EA0183.pdf For description of the NMEA 0183 protocol 03.01. 2012 04.01.2012 ASTM F2245 -11 Standard specification for design and performance of a Light Sport Airplane Development Process-Aerospace Fly-By Wire Actuation system 04.01.2012 SAE ARP5007A 04.01.2012 SAE AIR4253A Description of Actuation systems for aircraft With Fly-By-Wire Flight Control Systems [4] [5] [6] 4. 03.01. 2012 DEFINITIONS Name Description Priority A Requirements that are essential for the function of the system Priority B Requirements that will give extra functionality to the system such as; additional external inputs, preparations for indicators and displays etc. Also safety features such as stall inhibitor, landing gear specifications, modular design etc. Generally the requirements are essential for the system to be approved and put to production regarding safety and usability. Priority C Requirements that will give extra ordinary functionality to the system, such as software configured for GPS, Gyro, Autopilot and other functions that will give extensive usability to the system. Document: Requirement & Test Specification Version 5. 2 Issue date: 23.05.2012 Page 5 of 14 REQUIREMENTS & TEST SPECIFICATION 5.1. COMMENTS When the project is due, the airplane is not finished for us to mount our system. Therefore, we will not be able to do a SAT on the system. Some of the requirements and tests in this document is for the final product, and are meant as guidelines for us. We will however not be able to test these fully or test them at all, when this is the case; it is commented in the Test description. 5.2. Environmental conditions Req. Code Priority Description Date Owner R102.4 A Temperature range between -30C +70C 02.01.2012 O.R R105.1 A Humidity Relative Humidity 100% (condensation) 02.01.2012 A.G R106.1 A Maximum G-force 10G 02.01.2012 A.G R107.2 A Vibrations due to turbulence and running generator 12.01.2012 A.G Table 1: Environmental condition requirements 5.3. Overall system function Test Code Req. Code Pri Description Date Owner R205.4 B The weight of the control system must not exceed 1 kg minus the actuators 10.01.2012 A.G This is a B requirement in the sense that safety comes first. It is desirable to save as much weight as possible; however it is not going to be on expense of the safety of the system. The test is simply done by weighing the entire system with mounting equipment before it is mounted in the aircraft. 10.01.2012 A.G When the landing gear is extended, the nose wheel actuator must be activated and controlled parallel to the rudder, but in opposite direction. (Hence the yaw axis on the joystick turns clockwise, the nose wheel will turn clockwise and the rudder will turn counter clockwise) 22.11.2011 A.G The landing gear will not yet be mounted on the aircraft, so this test will simply be to check that the outputs of the system are according to the requirement. 04.01.2012 A.G Dual source Input voltage 13.8VDC ±4V 10.01.2012 O.R This test will have to be done by Equator Aircraft Norway when the hybrid system is mounted. The voltage source will be measured when the batteries are at full load from the electric engine, and when it is recharging with the generator. If the voltage varies less than ±4V from 13.8VDC the test is passed. 10.01.2012 R.L T205.3 R207.2 A T207.3 R216.4 T216.3 A Document: Requirement & Test Specification Version 2 R218.2 B T218.2 R219.2 B T219.2 R220.2 B T220.2 R221.2 B T221.2 R222.2 B T222.2 R223.2 B T223.1 R224.2 B T224.2 R225.2 B T225.2 R226.2 T226.2 B Issue date: 23.05.2012 Page 6 of 14 When the landing gear is retracted, the nose wheel actuator is disabled 03.01.2012 A.G We will simulate an input signal from the “retracted landing gear sensor” and then try to send a command to the nose gear. If no command is given, the test is passed. 04.01.2012 R.L When the “retract landing gear” command is given, the nose wheel will first go to zero position, and then be retracted. 03.01.2012 A.G Since we have to use a FAT, we will test this requirement by observing the actuator when the “retract landing gear” command is given to the system. If the actuator goes to “zero position” before the command to retract the landing gear is given, the test is passed. 04.01.2012 R.L The system must be open for additional external input for positional data and heading references 03.01.2012 A.G In this test, we can simply test if the additional external inputs are able to receive the proper data. 04.01.2012 R.L The system must be open for additional external inputs using NMEA 0183 [3] serial protocol 03.01.2012 A.G To test this, we have to connect the NMEA 0183 serial protocol to our system and see if the communication is according to the protocol. 04.01.2012 R.L The system must be open for additional external inputs from gyro reference platform 03.01.2012 A.G In this test, we can simply test if the additional external inputs are able to receive the proper data. 04.01.2012 R.L The system must be open for additional external input from Compass direction signal 03.01.2012 A.G To check this, we have to add an external compass and see that it corresponds with our system. 03.01.2012 R.L The system must be open for additional external input from angle of attack sensor 03.01.2012 A.G We will here connect an external angle of attack sensor to our system and observe that the system receives the proper data. 04.01.2012 R.L The system must be open for additional manual activation of autopilot (ON/OFF) (1x DI) 03.01.2012 A.G The activation is a simple ON/OFF switch, so here we have to check if the system is able to receive the Digital signal. And further give the command to the joystick “off” or give the command to the autopilot “on”. 04.01.2012 R.L The system must be open for additional manual activation of gyro stabilization (ON/OFF) (1xDI) 03.01.2012 A.G The activation is a simple ON/OFF switch, so here we have to check if the system is able to receive the Digital signal. And further give the command to the joystick “off” or give the command to the gyro stabilization “on”. 04.01.2012 R.L Document: Requirement & Test Specification Version 2 R227.2 B T227.3 R228.2 B T228.2 R229.2 C T229.2 R230.2 A T230.2 R231.2 C T231.2 R232.2 T232.1 B Issue date: 23.05.2012 Page 7 of 14 The system must be open for additional manual input of heading and climb input set point 03.01.2012 A.G Confirm that the heading and climb set point is received into the MCC software. 04.01.2012 R.L The system must be prepared for LCD display 03.01.2012 A.G To check this requirement we have to connect a LCD display to our system, and confirm that it displays the right values. 04.01.2012 R.L The system must be prepared for Tablet PC with Android operating system (USB serial communication) 03.01.2012 A.G To check this, we will try to connect a Tablet PC with android operating system to our system and see if they are communicating correctly. 04.01.2012 R.L The system must be prepared for Digital status indicators 03.01.2012 A.G We connect some LED to our system and see if we can control them (ON/OFF). 04.01.2012 R.L The system must be able to recharge the Tablet PC via the USB 03.01.2012 A.G To check this, we will see if the Tablet PC is recharging when it is connected to our system through the USB 04.01.2012 R.L The weight of the actuating mechanism for each actuating point must not exceed 0.6kg 03.01.2012 A.G We have to weigh the actuating mechanism for each actuating point to check if they are below 0.6 kg 03.01.2012 R.L Document: Requirement & Test Specification Version 2 Issue date: 23.05.2012 Page 8 of 14 5.4. Failure tolerance Test Code Req. Code Pri R301.2 Description Date Owner A Manual override of critical control circuit choice 01.11.2011 K.M 20.12.2011 A.G A When the system is running, we will change the critical control circuit choice by the manual switch. We will have four choices, and for all the changes in circuit choice the system will change control circuit without lagging or losing data. Use dual modular redundancy 19.12.2011 A.G To test the dual modular redundancy, we will shut down the operating part of the system, to check if the second part will take over without losing too much data in the process. 20.12.2011 A.G Ability to control surfaces in open loop 17.11.2011 O.R Confirm that control functions aren’t disabled by removing feedback 05.01.2012 O.R Failure probability must be supplied with each part, to establish the failure probability of the entire system. 03.01.2012 A.G This must be documented in the Fault Three Analysis 15.05.2012 A.G Actuator electrical supply loss - The control plane must automatically go back to neutral position by aerodynamic forces 02.01.2012 A.G This test must be done when the stepper motor is mounted with the gearing. 15.05.2012 A.G System condition status to be detected and displayed to pilot. 02.01.2012 A.G Confirm that the HMI-panel works, and that the respective LED’s illustrate the condition of the respective MCC’s / SC 15.05.2012 A.G Modular design to comply with single/dual failure tolerance. And comply with MTBF requirements 03.01.2012 A.G Confirm that parts are easily replaceable and that it does not affect the MTBF 15.05.2012 A.G The Mean Time Between Failure of the entire system must exceed 800,000 hours 19.04.2012 A.G Confirm this with the Fault Three Analysis 15.05.2012 A.G T301.1 R302.3 T302.2 R304.1 A T304.1 R305.2 C T305.1 R306.1 A T306.1 R308.1 A T308.1 R309.1 B T309.1 R310.1 A T310.1 5.5. Software Test Code Req. Code Pri Description Date Owner 03.01.2012 T.A A Response time must be according to actuation and control surfaces requirements: R707, R710, R713, R718 Measure calculation time (should be less than 5ms) 03.01.2012 T.A R401.2 T401.2 Document: Requirement & Test Specification Version 2 R402.2 9 of 14 T.A Confirm modular development 03.01.2012 T.A B Access to system status on the SC 12.01.2012 O.R 03.01.2012 O.R 10.01.2012 O.R C Update system status frequently to be sure that we have the correct system status Advanced function modules - Stall inhibit - Autopilot from gyro/compass platform - Autopilot from GPS reference Confirm that that we can get data from these sensors and that we can get an output from simulating a change from these. 03.01.2012 O.R Easy selection of control modes in flight 12.01.2012 O.R Software development tools must be of high level language type with debugging and simulation facilities for fast development of code 03.01.2012 A.G Confirm that we have chosen a good development tool 03.01.2012 O.R All program statements not self-explained to be commented 03.01.2012 A.G Confirm proper commenting 03.01.2012 O.R Program versions to be managed by revisions and revisions history 03.01.2012 A.G Check that the programming history and revisions are correct. 10.01.2012 A.G The prime function modules - Control planes actuation – rudder (water rudder) , elevator & ailerons - Nose gear actuation 03.01.2012 A.G Check that the output corresponds with the input 10.01.2012 A.G Monitoring of supervisor control functions 10.01.2012 A.G Confirm that the supervisor control functions are enabled by exceeding the limits set by the supervisor, and confirm that the status is updated 10.01.2012 A.G B Receive and store data from the IMC on the SC 10.01.2012 O.R 12.01.2012 A.G A Confirm that the data is received and stored on the SC The SC is monitoring the selection of MCC 12.01.2012 A.G 12.01.2012 A.G A Confirm that the operating MCC is monitored by the SC Display the selection of MCC to the pilot 12.01.2012 A.G Confirm that the operating MCC is displayed to the pilot 12.01.2012 A.G Display the status of the MCC’s to the pilot; “Not working”, “standby” and “operating” 12.01.2012 A.G Confirm that the status of the MCC’s is displayed to the pilot 12.01.2012 A.G T404.3 R405.3 T405.2 C T407.2 Confirm that we can change from autopilot to manual flight and don’t lose any functionality R408.1 B T408.1 R409.1 A T409.1 R410.1 B T410.1 R411.1 A T411.1 R412.2 A T412.1 R413.1 T413.1 R414.2 T414.1 R415.2 T415.1 R416.1 A T416.1 Page 03.01.2012 T402.2 R407.3 23.05.2012 Software to be designed in modules for easy further development B R404.4 Issue date: Document: Requirement & Test Specification Version 2 Issue date: 23.05.2012 Page 10 of 14 5.6. Hardware Test Code Req. Code Pri Description Date Owner R501.3 C Ability to mount the MCC on different locations to avoid common environmental impact 03.01.2012 O.R Confirm that the circuit boards can communicate over a distance (<4m) Module based HW for further development 12.01.2012 O.R 03.01.2012 O.R Confirm modular development The soldering on the circuit board is according to the IPC-A-610E [2] standard Document soldering 03.01.2012 O.R 03.01.2012 A.G 03.01.2012 O.R The parts must tolerate the vibrations defined in R107 Confirm that the parts can withstand the vibrations 10.01.2012 A.G 03.01.2012 O.R Cables and the general equipment must be mounted with spring loaded connections and cable ties to avoid resonance vibrations. Cannot be tested in FAT. However it will be checked and confirmed during the installation in the aircraft The MCC must contain a complete and independent function as described in the software (8.4), failure tolerance (8.3) and the system function (8.2) requirements. Confirm that the MCC can execute all critical functions independently The MCC may be doubled or tripled if the failure tolerance analyses show an unacceptable failure risk. Confirm that the MTBF goal is achieved by using the needed number of MCC’s The MCC is prepared for interface with the SC 10.01.2012 A.G 12.01.2012 O.R 03.01.2012 A.G 03.01.2012 O.R 03.01.2012 A.G 03.01.2012 O.R 03.01.2012 A.G Confirm communication between the two cards 12.01.2012 O.R All the MCC’s not in use will be in active-stand-by mode Confirm that the MCC’s not in use receive and calculate data by debugging interface The operating MCC can be chosen manually by the pilot Confirm that the chosen MCC becomes active when chosen SC to be designed for the described signal interface, (ref. Software(8.4) and System function(8.2)) with 20% reserved capacity on I/O’s for further development Check that the number of interfaces is according to requirements in Software (8.4), System functions (8.2) and R518. The circuit boards to be of multi layer design with surface mounted components Confirm that the circuit is of multi layer design and has surface mounted components 03.01.2012 A.G 03.01.2012 O.R 03.01.2012 A.G 12.01.2012 O.R 12.01.2012 A.G 05.01.2012 O.R 03.01.2012 A.G 05.01.2012 O.R T501.4 R502.2 B T502.2 R504.2 B R505.3 C T504.2 T505.2 R506.3 C T506.3 R509.1 A T509.1 R510.1 B T510.1 R511.1 A T511.2 R512.1 A T512.1 R513.1 A T513.2 R518.2 C T518.1 R519.1 T519.1 B Document: Requirement & Test Specification Version 2 Issue date: 23.05.2012 Page 11 of 14 5.7. Joystick 5.7.1. Important notes to the requirements: The Joystick is going to be designed by our contractor. Requirement’s R602, R603, R606, R607 and R610 are all set by our contractor to give us an image of how the joystick will work. R611 is a requirement we set for our contractor to make the joystick compatible with our system. Test Code Req. Code Pri Description Date Owner R601.1 A The yaw axis on the joystick (twisting movement) will replace the pedals to control the rudder, when the joystick is twisted clockwise, the rudder will rotate anticlockwise and vice versa. 02.01.2012 A.G Control that output is according to input 03.01.2012 O.R The yaw axis on the joystick control the nose gear when it is extended 02.01.2012 A.G Control that the nose wheel stepper motor is controlled by the yaw axis 03.01.2012 O.R Joystick rotating angle (yaw axis): ±25˚ from zero position (forward direction) 03.01.2012 A.G Control that the joystick can twist ±25˚ in the yaw axis 03.01.2012 O.R Joystick rotating torque (yaw): 100-300g/cm from zero to max position in each direction 03.01.2012 A.G Confirm that the joystick torque is within the given range 03.01.2012 O.R The forward and backward movement on the joystick (pitch) control the elevator 02.01.2012 A.G Control that output is as expected 03.01.2012 T.A Backward movement move the elevator upwards and vice versa 02.01.2012 A.G Control that output is as expected 03.01.2012 O.R Joystick movement angle (pitch axis): ±25˚ from zero position (forward direction) 03.01.2012 A.G Control that the joystick can twist ±25˚ in the pitch axis 03.01.2012 T.A Joystick movement torque (pitch and roll): 100500g/cm from zero to max in each direction for pitch and roll 03.01.2012 A.G Confirm that the joystick torque is within the given range 03.01.2012 O.R The sideways movement on the joystick (roll) control the ailerons 02.01.2012 A.G Control that output is as expected 03.01.2012 T.A Left “roll” movement on the joystick move the left aileron upwards and the right aileron downwards and vice versa 02.01.2012 A.G Control that output is as expected 03.01.2012 O.R T601.1 R612.1 A T612.1 R602.2 C T602.2 R603.2 C T603.2 R604.1 A R605.1 A T604.1 T605.1 R606.2 C T606.2 R607.2 C T607.2 R608.1 A T608.1 R609.1 T609.1 A Document: Requirement & Test Specification Version 2 R610.2 C T610.2 R611.3 B T611.4 Issue date: 23.05.2012 Page 12 of 14 Joystick movement angle (roll axis): ±25˚ from zero position 03.01.2012 A.G Control that the joystick can twist ±25˚ in the roll axis 03.01.2012 T.A Redundancy output signals from joystick 27.01.2012 K.M Confirm the redundancy (two or more outputs from joystick per axis) 27.01.2012 O.R 5.8. Control surface Test Code Req. Code Pri Description Date Owner R702.1 A The rudder must be able to move 25 degrees in both directions from zero position. Zero position is when the rudder is parallel to the vertical stabilizer. Control that output is as expected 02.01.2012 A.G 03.01.2012 O.R R703.1 A The elevator must be able to move 25 degrees in both directions from zero position. Zero position is when the elevator is parallel to the tail plane. Control that output is as expected 02.01.2012 A.G 03.01.2012 O.R The ailerons must be able to move 25 degrees in both directions from zero position. Zero position is when the ailerons are parallel to the wing. 02.01.2012 A.G Control that output is as expected 03.01.2012 O.R Aileron torque is minimum 40kg/cm in both directions Confirm that the ailerons can withstand 40kg/cm 27.01.2012 A.G 27.01.2012 O.R Aileron response time from zero to maximum deflection (25˚) in each direction: 0.5 sec 03.01.2012 A.G Confirm that they have the specified angular velocity 03.01.2012 T.A Minimum resolution of aileron surfaces: 5 steps/degree 02.01.2012 A.G Confirm the resolution 03.01.2012 T.A Rudder torque is minimum 40kg/cm in both directions Confirm that the rudder can withstand 40kg/cm 27.01.2012 A.G 27.01.2012 T.A Rudder response time from zero to maximum deflection (25˚) in each direction: 0.5 sec 03.01.2012 A.G Confirm that they have the specified angular velocity 03.01.2012 T.A Minimum resolution of rudder surface: 5 steps/degree 02.01.2012 A.G Confirm the resolution 03.01.2012 T.A Elevator torque is minimum 40kg/cm in both directions 27.01.2012 A.G Confirm that the elevator can withstand 40kg/cm 27.01.2012 T.A T702.1 T703.1 R704.1 A T704.1 R706.2 C T706.2 R707.2 B T707.2 R708.1 A R709.2 C T708.1 T709.2 R710.2 B T710.2 R711.1 A T711.1 R712.2 T712.2 C Document: Requirement & Test Specification Version 2 R713.2 B T713.2 R714.1 A T714.1 R716.2 C R717.1 A T716.2 T717.1 R718.2 A T718.2 R719.2 C T719.1 6. Issue date: 23.05.2012 Page 13 of 14 Elevator response time from zero to maximum deflection (25˚) in each direction: 0.5 sec 03.01.2012 A.G Confirm that they have the specified angular velocity 03.01.2012 T.A Minimum resolution of elevator surface: 5 steps/degree 02.01.2012 A.G Confirm the resolution 03.01.2012 T.A Nose gear torque is minimum 40kg/cm 27.01.2012 A.G Confirm that the nose gear can withstand 40kg/cm 27.01.2012 A.G Nose gear movement ±90˚ from forward heading 02.01.2012 A.G Confirm that nose gear has ±90˚ movement 05.01.2012 T.A Nose gear response time from zero to max deflection: maximum 8sec 03.01.2012 A.G Confirm that they have the specified angular velocity 03.01.2012 O.R Minimum resolution of nose gear: 1 steps/degree 27.01.2012 A.G Confirm that the resolution of the nose gear is more than 1 step/degree 27.01.2012 A.G RESPONSIBILITY Axel Gravningsbraaten is responsible for updating and controlling the requirements in this document and Ole A. Riiser is responsible for updating and controlling the Tests. Key Person Summary of Responsibilities within this Procedure Axel Gravningsbraaten Responsible for the requirements Ole A. Riiser Responsible for the Tests Document: Requirement & Test Specification Version 7. 2 Issue date: Page Description 0.1 Filled in requirement list. Made test req: T201, T202, T205, T207, T208, T209, T210, T211, T212, T213, T214, T507, T302. Updated req list to rev 0.6. and updated table 2.2, 2.3 and 2.4 Updated T205, T208, T209, T210, T211, T212, T213, T214, T302. Made T301, T204, T501, T503, T504, T505, T506, T507, T508, T503. Made test for Joystick, control surfaces and software Uptaded T207 Made T216, T217, T218, T219, T220, T221, T222, T223, T224, T225, T226, T227, T228, T229, T230, T231, T232 Made some cosmetic changes to all tables, put in References, Updatet: T207, T216, T217, T218, T219, T220, T221, T222, T224, T225, T226, T227, T228, T229, T230, T231 Updating the Responsibility (3) Deleted R303, grammar correction Released Document Abbreviation list. WSC->SC, IMU->IMC. Definitions (6): Priority B & C Updated: R205 & T205, R216 & T216, R405 Added: R410-R413 & T410-T413, Updated: T413-T415, R413-R415, R407, T501, R505, R506 & T506, T507, T508, T511, T513, T514, T516, R518, T611 Made: T416, R416 Deleted: R503 & T503, R515 & T515, R701 & T701, Deleted: R507 & T507, R508 & T508, R514 & T514, R516 & T516, R517 & T517 Updated: R611 & T611, R706 & T706, R709 & T709, R712 & T712, R716 & T716 Filled in: R719 Made: T719 Updated the abbreviation list (IMC) Updated: R205, R305.2 & T305.1, R306.1 & T306.1, R308.1 & T308.1, R309.1 & T309.1, R310.1 & T310.1 Deleted: R217 & T217 Small updates and adjustments on the text. Made the official revision 0.3 0.4 0.5 0.6 0.7 0.8 1.0 1.1 1.2 1.3 1.4 1.5 2 14 of 14 REVISIONS Rev 0.2 23.05.2012 Date 16.12.2011 Name O.R 19.12.2011 A.G 20.12.2011 03.01.2012 A.G T.A, O.R 03.01.2012 R.L 04.01.2012 A.G,K.M 05.01.2012 05.01.2012 6.1.2012 A.G T.A O.R 10.01.2012 A.G 12.01.2012 A.G 27.01.2012 A.G 15.05.2012 A.G 19.05.2012 22.05.2012 A.G A.G Test Results Bachelor Project Compact Fly-by-wire System Version Category Issue Date Made by 1.0 Released 29.05.2012 A.G, O.R Checked by K.M Approved by A.G NOTES REGARDING VALIDITY OF THIS DOCUMENT: Paper copies are uncontrolled. This copy is valid only at the time of printing. The controlled version of this document is available from the Company Intranet / DropBox. This document contains Equator Aircraft Norway legal entity proprietary and confidential information that is legally privileged and is intended only for the person or entity to which it is addressed and any unauthorised use is strictly prohibited. It is provided for limited purpose and shall not be reproduced, stored electronically, transferred to other documents, disseminated or disclosed to any third parties without the prior written consent of the relevant Equator Aircraft Norway legal entity. Any attachments are subject to the specific restrictions and confidentiality regulations stated therein and shall be treated accordingly. The document is to be returned upon request and in all events upon completion of use for which it was provided. Document: Version Test Results 1.0 Issue date: Page 29.05.2012 2 of 10 TABLE OF CONTENTS 1. SCOPE .................................................................................................................................... 3 2. RESULT DESCRIPTION ........................................................................................................ 3 3. ABBREVIATION ..................................................................................................................... 3 4. TESTS TO THE REQUIREMENTS ........................................................................................ 4 4.1. Environmental conditions ....................................................................................................... 4 4.2. Overall system function .......................................................................................................... 4 4.3. Failure tolerance..................................................................................................................... 6 4.4. Software ................................................................................................................................. 6 4.5. Hardware ................................................................................................................................ 7 4.6. Joystick ................................................................................................................................... 8 4.7. Control surface ....................................................................................................................... 9 5. REVISIONS ........................................................................................................................... 10 Document: Test Results Version 1. 1.0 Issue date: Page 29.05.2012 3 of 10 SCOPE The scope of this document is to describe the result of the requirement tests. 2. RESULT DESCRIPTION Technical Term Standard Definition N/T Not Tested, due to the lack of ability to do an SAT. Passed The test was successful and the system passed the test The test was successful, but the system failed the test Failed 3. ABBREVIATION Technical Term Standard Definition K.M. Kjetil Mjøs A.G. Axel Gravningsbråten S.A. Sindre Andersen T.A. Thomas Andersen R.L. Runar Løken O.R. Ole Riiser IMC / IMU MTBF Inertial Measurement Card; is an electronic device that measures and reports on the aircraft’s orientation and gravitational forces using a combination of accelerometers and gyroscopes. Mean Time Between Failures MCC Main Controller Card SC Supervision Card Document: Test Results Version 4. 1.0 Issue date: 29.05.2012 Page 4 of 10 TESTS TO THE REQUIREMENTS 4.1. Environmental conditions The system we came up with is a proof of concept, not a complete system ready for production. And some of the work on the product is therefore not done professionally, (e.g soldering & mounting) this means that we have prioritized the function of the system, not the durability of it. The environmental conditions are therefore not tested. Req. Code Priority Result Description of the result Date Test engineer 15.05.2012 A.G R102.4 A N/T We do not have enough time to test this requirement R105.1 A N/T We do not have enough time to test this requirement 15.05.2012 A.G R106.1 A N/T We do not have enough time to test this requirement 15.05.2012 A.G N/T We do not have enough time to test this requirement 15.05.2012 A.G R107.2 A 4.2. Overall system function Req. Code Priority Result Description of the result Date Test engineer R205.4 B Passed The circuit boards and, sensors and connectors weigh less than 1 kg. Though the weight of the entire system depends on the length of the cables between the cards 23.05.2012 A.G R207.2 A Passed The output is according to the requirement 16.05.2012 A.G R216.4 A N/T Test must be done by Equator Aircraft Norway 15.05.2012 A.G R218.2 B N/T We have not been able to test this requirement due to shortage of time. It has been a low priority to do tests on the nose wheel. 29.05.2012 A.G R219.2 B N/T This has to be tested when the landing gear is mounted on the prototype. The reason for this is that EAN will test if it goes back to zero position by aerodynamic forces 29.05.2012 A.G R220.2 B Passed We have implemented this function on the SC PCB card, it is therefore now internal. The SC also has additional spare connectors for reference signals. 15.05.2012 A.G Document: Test Results Version 1.0 Issue date: 29.05.2012 Page 5 of 10 R221.2 B Passed We have implemented this function on the SC PCB card, it is therefore now internal. The SC also has additional spare connectors for reference signals. 15.05.2012 A.G R222.2 B Passed We have implemented this function on the SC PCB card, it is therefore now internal. The SC also has additional spare connectors for reference signals. 15.05.2012 A.G R223.2 B Passed We have implemented this function on the SC PCB card, it is therefore now internal. The SC also has additional spare connectors for reference signals. 15.05.2012 A.G R224.2 B Passed There is a spare AI terminal on SC for the angle of attack sensor. 19.05.2012 A.G R225.2 B Passed SC is set up with a port handling the manual activation of the autopilot 15.05.2012 A.G R226.2 B Passed SC is set up with a port handling the manual activation of the gyro stabilization 15.05.2012 A.G R227.2 B Passed The SC does have climb rate (2xDI), heading set point (2xDI) and an altitude set point (2xDI) implemented for the autopilot. The SC does all the calculations and sends out a control signal directly to the stepper controller on the operating MCC. 15.05.2012 A.G R228.2 B Passed With regards to the hardware the SC is ready for communication with an Android Tablet, which can be used as a display. The SC also has spare connectors which can be used for the LCD display for the autopilot. 15.05.2012 A.G R229.2 C Passed With regards to the hardware, the SC is ready for an Android tablet. 15.05.2012 A.G R230.2 A Passed Both the MCC’s and the SC has spare DO connectors. In addition a green and a red LED are connected on the HMI panel for both SC and all the MCC’s, to indicate the status of the cards. 15.05.2012 A.G R231.2 C Passed The USB is standardized, and can charge at 5V 15.05.2012 A.G R232.2 B Passed The weight of one stepper motor is less than 300grams. The weight of the rest of the mechanism depends on Equator Aircraft Norway. 15.05.2012 A.G Document: Test Results Version 1.0 Issue date: 29.05.2012 Page 6 of 10 4.3. Failure tolerance Req. Code Priority Result Description of the result Date Test engineer R301.2 A Passed This is tested and it works, we however only use three choices, one for each MCC 23.05.2012 A.G R302.3 A Passed We use triple modular redundancy instead of double. 23.05.2012 A.G R304.1 A Passed We tested the stepper motors without any feedback. During the test no steps were skipped. 15.05.2012 A.G R305.2 C Passed Ref. Fault Three Analysis 15.05.2012 A.G R306.1 A Passed The stepper motors loose all retaining power when no power is connected, The control plane will therefore run freely if the power supply is lost. This must however be tested when the system is mounted by Equator Aircraft Norway. 15.05.2012 A.G R308.1 A Passed Each MCC can control it’s two HMI LEDs to show the correct status to the pilot 21.05.2012 O.R R309.1 B Passed The failure tolerance and MTBF numbers are described in the Fault Three Analysis 15.05.2012 A.G R310.1 A Passed Ref. Fault Three Analysis 15.05.2012 A.G 4.4. Software Req. Code Priority Result Description of the result Date Test engineer R401.2 A N/T We are not able to test this requirement with our test bench. The test must be done by Equator Aircraft Norway 23.05.2012 A.G R402.2 B Passed Software is divided up in classes with a logical grouping. This ensures a easy readable code and possibilities for further developing 22.05.2012 K.M R404.4 B Passed MCC can send information to SC and SC can read and process it. 22.05.2012 K.M R405.3 C N/T We have not written any software for testing these functions. 22.05.2012 K.M R407.3 C Passed Control modes can be set through SC and is done automatically. The system is also setup for development of autopilot. 22.05.2012 K.M R408.1 B Passed The software we use for developing provides plenty of opportunities to further develop our system. 22.05.2012 K.M R409.1 A Passed Commenting explains the coding and makes it easy readable. 22.05.2012 K.M Document: Test Results Version 1.0 Issue date: 29.05.2012 Page 7 of 10 R410.1 B Passed We have made backup when there has been significant changes in the code. This works as our version history. 22.05.2012 K.M R411.1 A Passed Moving the joystick moves the correct control surface. 22.05.2012 K.M R412.2 A N/T This has to to with stall angle, and this sensor is not mounted on our system, the system is however ready for it. 23.05.2012 A.G R413.1 B Passed This function has not been written due to a lack of time. 22.05.2012 K.M R414.2 A Passed SC can receive data continuously or by asking for data. This makes it possible for SC to monitor the MCC’s. 22.05.2012 K.M R415.2 A Passed The working MCCs are displayed to the pilot through the HMI LEDs. This information can also be displayed through the tablet when the software for it get’s developed. 22.05.2012 K.M R416.1 A Passed The status of the MCC is displayed through the HMI LEDs. 22.05.2012 K.M 4.5. Hardware Req. Code Priority Result Description of the result Date Test engineer R501.3 C Passed There is Three MCC’s, they can be mounted anywhere in the airplane where it is desirable and with our current baud rate of 9600 distances of up to 4 meters is no issue. 15.05.2012 A.G R502.2 B Passed The Microcontrollers (PIC18f8520 & LPC1768) are mounted with piggyback, and are therefore easily replaceable. The stepper controllers are modules soldered on the MCC’s. The GPS and the IMC are also modules that are soldered on the SC. This makes them easily replaceable. 15.05.2012 A.G R504.2 B Failed Due to the limited time, we had to do the soldering ourselves. 15.05.2012 A.G R505.3 C N/T Due to limited time, we do not have time to test this requirement 15.05.2012 A.G R506.3 C N/T Equator Aircraft Norway have to make sure the mounting is correct 15.05.2012 A.G R509.1 A Passed The MCC’s function independent as described. 15.05.2012 A.G R510.1 B Passed Three MCC’s is sufficient according to the Fault Three Analysis. 15.05.2012 A.G R511.1 A Passed The MCC and the SC are prepared for interface. 15.05.2012 A.G Document: Test Results Version 1.0 Issue date: 29.05.2012 Page 8 of 10 R512.1 A Passed By disabling the stepper controllers on the MCC in standby mode, they are able to do all calculations and operate as normal without sending commands to the motors. 15.05.2012 A.G R513.1 A Passed The HMI panel is working, and the MCCs can be chosen manually. 29.05.2012 A.G R518.2 C Passed The SC does have all required interface, with more than 30% reserve capacity on I/O’s. 15.05.2012 A.G R519.1 B Passed All PCB’s are two layered. But with as few surface mounted components as possible, for better vibration resistance. 15.05.2012 A.G 4.6. Joystick Req. Code Priority Result Description of the result Date Test engineer R601.1 A Passed The output is according to the requirement 16.05.2012 A.G R612.1 A Passed The output is according to the requirement 16.05.2012 A.G R602.2 C Passed/ N/T The joystick we use for testing can twist ±90˚ , Equator Aircraft Norway must make sure the joystick to be used is according to the requirements 16.05.2012 A.G R603.2 C N/T We do not have access to the actual joystick, it is not yet produced. Equator Aircraft Norway must make sure the joystick is according to requirement 16.05.2012 A.G R604.1 A Passed The pitch axis controls the elevator stepper motor. 16.05.2012 A.G R605.1 A Passed The output is according to the requirement 16.05.2012 A.G R606.2 C N/T We do not have access to the actual joystick, it is not yet produced. Equator Aircraft Norway must make sure the joystick is according to requirement 16.05.2012 A.G R607.2 C N/T We do not have access to the actual joystick, it is not yet produced. Equator Aircraft Norway must make sure the joystick is according to requirement 16.05.2012 A.G R608.1 A Passed The roll movement controls the ailerons 16.05.2012 A.G R609.1 A Passed The output is according to the requirement 16.05.2012 A.G R610.2 C N/T We do not have access to the actual joystick, it is not yet produced. Equator Aircraft Norway must make sure the joystick is according to requirement 16.05.2012 A.G R611.3 B N/T Our system is prepared for a triple redundant joystick. Equator Aircraft Norway must make sure the joystick is according to the requirement 16.05.2012 A.G Document: Test Results Version 1.0 Issue date: 29.05.2012 Page 9 of 10 4.7. Control surface Req. Code Priority Result Description of the result Date Test engineer R702.1 A N/T The rotating angle on the stepper motor depends on the SW parameters. Equator Aircraft Norway must make sure the control surfaces can move according to the standards 16.05.2012 A.G R703.1 A N/T The rotating angle on the stepper motor depends on the SW parameters. Equator Aircraft Norway must make sure the control surfaces can move according to the standards 16.05.2012 A.G R704.1 A N/T The rotating angle on the stepper motor depends on the SW parameters. Equator Aircraft Norway must make sure the control surfaces can move according to the standards 16.05.2012 A.G R706.2 C N/T This test cannot be tested with our test bench. 21.05.2012 O.R R707.2 B N/T This test cannot be done without proper loading and gear ratio. But on our testbench with 1:1 gear ratio we are way within that requirement 21.05.2012 O.R R708.1 A Passed/ N/T The resolution of the stepper motor is 200steps/360˚, with the gearing (10x). 2000 steps /360˚ = 5.5 steps / degree. 16.05.2012 A.G R709.2 C N/T This has to be tested by Equator Aircraft Norway, when the system is mounted on the aircraft. 23.05.2012 A.G R710.2 B N/T This has to be tested by Equator Aircraft Norway, when the system is mounted on the aircraft. 23.05.2012 A.G R711.1 A Passed/ N/T The resolution of the stepper motor is 200steps/360˚, with the gearing (10x). 2000 steps /360˚ = 5.5 steps / degree. 16.05.2012 A.G R712.2 C N/T This has to be tested by Equator Aircraft Norway, when the system is mounted on the aircraft. 23.05.2012 A.G R713.2 B N/T This has to be tested by Equator Aircraft Norway, when the system is mounted on the aircraft. 23.05.2012 A.G R714.1 A Passed/ N/T The resolution of the stepper motor is 200steps/360˚, with the gearing (10x). 2000 steps /360˚ = 5.5 steps / degree. 16.05.2012 A.G R716.2 C N/T This has to be tested by Equator Aircraft Norway, when the system is mounted on the aircraft. 23.05.2012 A.G Document: Test Results Version 1.0 Issue date: 29.05.2012 Page 10 of 10 R717.1 A Passed/ N/T The Nose gear movement is dependent on the gearing. However the movement of the stepper motor is totally dependent on the SW. The actual resolution of the stepper motor must be calculated when the gearing of the motor is known. 16.05.2012 A.G R718.2 A N/T This has to be tested by Equator Aircraft Norway, when the system is mounted on the aircraft. 23.05.2012 A.G R719.2 C N/T Equator Aircraft Norway have to make sure the resolution is according to the requirement when the nose wheel is mounted. 16.05.2012 A.G 5. REVISIONS Responsible person for this document, procedure or template Rev Description 0.1 Made Templates. 12.01.2012 0.2 0.3 0.4 0.5 0.6 Made 2.2.1 Made Schematic test results, layout test with results See: Additional Tests See: Additional Tests See: Additional Tests Made: R102, R105, R106, R107 in 4.1 Made: R216.4, R220.2, R221.2, R222.2, R223.2, R225.2, R226.2, R227.2, R228.2, R229.2, R230.2, R231.2, R232.2 in 4.2 Made: R304.1, R305.2, R306.1, R309.1, R310.1 in 4.3 Made: R501.3, R502.2, R504.2, R505.3, R506.3, R509.1, R510.1, R511.1, R512.1, R518.2, R519.1 in 4.5 Made: 4, 2. Made: R207.2 in4.2 Made: R601.1, R612.1, R602.2, R603.2, R604.1, R605.1, R606.2, R607.2, R608.1, R609.1, R610.2, R611.3 in 4.6 Made: R702.1, R703.1, R704.1, R708.1, R711.1, R714.1, R717.1, R719.2 in4.7 Made: R224.2 Made: R401.2, R402.2, R404.4, R405.3, R407.3, R408.1, R409.1, R410.1, R411.1, R412.2, R413.1, R414.2, R415.2, R416.1 Made: 205.4, 401.2, R412.2, R709.2, R710.2, R712.2, R713.2, R716.2, R718.2 Made: R513.1, R218.2, R219.2 Made official copy, divided the document 25.01.2012 20.03.2012 24.04.2012 27.04.2012 04.05.2012 A.G & O.R A.G O.R A.G A.G O.R 15.05.2012 A.G 16.05.2012 A.G 19.05.2012 A.G 22.05.2012 K.M 23.05.2012 A.G 28.05.2012 A.G 0.7 0.8 0.9 0.1 0.11 1.0 Date Name Additional Tests Bachelor Project Compact Fly-By-Wire System Version Category Issue Date Made by 1.0 Released 29.05.2012 A.G/O.R Checked by A.G Approved by A.G NOTES REGARDING VALIDITY OF THIS DOCUMENT: Paper copies are uncontrolled. This copy is valid only at the time of printing. The controlled version of this document is available from the Company Intranet / DropBox. This document contains Equator Aircraft Norway legal entity proprietary and confidential information that is legally privileged and is intended only for the person or entity to which it is addressed and any unauthorised use is strictly prohibited. It is provided for limited purpose and shall not be reproduced, stored electronically, transferred to other documents, disseminated or disclosed to any third parties without the prior written consent of the relevant Equator Aircraft Norway legal entity. Any attachments are subject to the specific restrictions and confidentiality regulations stated therein and shall be treated accordingly. The document is to be returned upon request and in all events upon completion of use for which it was provided. Document: Version Additional Tests 1.0 Issue date: Page 29.05.2012 2 of 8 TABLE OF CONTENTS 1. TEST EQUIPMENT LIST ........................................................................................................ 3 1.1. 1.1.1. 1.1.1.1. 1.1.1.2. 1.1.2. 1.1.3. 1.1.4. 1.1.5. 1.1.6. Sensor Panel .......................................................................................................................... 3 Motor position sensor ............................................................................................................. 3 Photo Interrupter GP1A57HRJ00F ........................................................................................ 3 5K OHM Linear Taper Rotary Potentiometer 5KB B5K Pot ................................................... 3 Airspeed sensor simulator ...................................................................................................... 3 Angle of attack sensor simulator ............................................................................................ 3 Distance sensor simulator ...................................................................................................... 3 Autopilot set point buttons simulator ...................................................................................... 3 Nose wheel Down/up sensor simulator .................................................................................. 4 1.2. Sensor table: .......................................................................................................................... 4 1.3. 1.3.1. 1.3.2. Template ................................................................................................................................ 4 Test Plan ................................................................................................................................ 4 Test Result ............................................................................................................................. 4 1.4. 1.4.1. 1.4.2. Cables .................................................................................................................................... 5 Test Plan ................................................................................................................................ 5 Test Result ............................................................................. Error! Bookmark not defined. 2. HARDWARE ........................................................................................................................... 5 2.1. 2.1.1. 2.1.1.1. 2.1.2. 2.1.2.1. 2.1.3. 2.1.3.1. MCC ....................................................................................................................................... 5 Schematic test ........................................................................................................................ 5 Schematic test ........................................................................................................................ 5 Layout test .............................................................................................................................. 6 Layout test .............................................................................................................................. 6 Parallel stepper controllers ..................................................................................................... 7 Stepper controller redundancy test ........................................................................................ 7 3. REVISIONS ............................................................................................................................. 8 Document: Additional Tests Version 1. 1.0 Issue date: 29.05.2012 Page 3 of 8 TEST EQUIPMENT LIST 1.1. Sensor Panel Here you will find the Sensors we will use to simulate different functions and states on the MCC and the SC card. 1.1.1. Motor position sensor We need a sensor to simulate the position sensors of the control planes, in order to test the closed loop in software. We also need optical sensors that tell us every time the motors are in zero position. 1.1.1.1. Photo Interrupter GP1A57HRJ00F This is the Digital sensor we will use to simulate the zero position of the motor. It is an infrared emitter and an infrared detector, when the infrared signal is interrupted the sensor sends out a digital signal. Ref: http://www.sparkfun.com/products/9299 last checked: 24.04.2012 by A.G 1.1.1.2. 5K OHM Linear Taper Rotary Potentiometer 5KB B5K Pot This potentiometer works well for measuring the position of a stepper motor. It has a 300 degree ± 10˚ rotary angle, and 10k ohm. Ref: http://www.ebay.com/itm/5K-OHM-Linear-Taper-Rotary-Potentiometer-5KB-B5K-Pot/260780963335?pt=LH_DefaultDomain_0&hash=item3cb7c1b607#ht_1507wt_1037 last checked: 24.04.2012 by A.G 1.1.2. Airspeed sensor simulator The airspeed sensor in the aircraft will measure the increase in air pressure caused by the moving aircraft. This sensor will send out an analog signal. To simulate the airspeed of the aircraft we will use the same potentiometer as in 1.1.1.2. 1.1.3. Angle of attack sensor simulator The angle of attack sensor simply measures the difference in angle of the aircraft compared to the direction of the aircraft through the air. It is an analog sensor measuring an angle. To illustrate this sensor we will use the same potentiometer as in 1.1.1.2 1.1.4. Distance sensor simulator We use the same sensor that is going to be mounted in the aircraft as the test sensor. 1.1.5. Autopilot set point buttons simulator We will use some momentary switches to simulate the autopilot set point buttons on the joystick since it is not yet ready for production. The buttons will be used for: - (+) altitude - (-) altitude Document: Additional Tests Version 1.0 Issue date: 29.05.2012 Page 4 of 8 - (+) compass heading - (-) compass heading - (+) climb rate - (-) climb rate All the button functions are set points only. And it is therefore the values the system will work to reach. 1.1.6. Nose wheel Down/up sensor simulator There will be a sensor that detects when the Nose Wheel is activated. The Nose Wheel Controller on the operating MCC will then be activated. We will simulate this function with a toggle switch. 1.2. Sensor table: Test sensor: Pcs Used for: Date Name Photo Interrupter GP1A57HRJ00F 5K OHM Linear Taper Rotary Potentiometer 5KB B5K Pot 5 1.1.1 Motor position sensor 24.04.2012 A.G 7 24.04.2012 A.G Momentary buttons 6 24.04.2012 A.G Toggle Switch 1 1.1.1 Motor position sensor, 1.1.2 Airspeed sensor simulator & 1.1.3 Angle of attack sensor simulator. 1.1.5 Autopilot set point buttons simulator 1.1.6 Nose wheel Down/up sensor simulator 25.04.2012 A.G 1.3. Template 1.3.1. Test Plan Test # Name # Priority: Budgeted hours: Success rate: Accumulated hours: Description: Why: How: Owner: Date: 1.3.2. Test Result Test Result #.x Name # Result description: Necessary changes: Owner: Date: Document: Additional Tests Version 1.0 Issue date: 29.05.2012 Page 5 of 8 1.4. Cables 1.4.1. Test Plan Test 2.2.1 Signal interference Description: The analog cable from the joystick to the MCC may be vulnerable to magnetic interference from the generator and from surrounding noise sources. Why: We need to make sure that the analog signals are disturbed as little as possible from the joystick to the MCC How: We will send some analogue signals trough a normal signal cable in the EMC-room at HiBu. We will then measure the signal loss. We will repeat the test for a shielded cable and compare the results. We also have to test the signal interference the power (5V) is inducing on the signals from the potentiometers. And then decide if we need to separate the signal cables and the power cables to the joystick due to the interference. Owner: A.G Date: 25.01.2012 2. Priority: Budgeted hours: 7h HARDWARE These test are not part of the requirements but are needed. 2.1. MCC 2.1.1. Schematic test Priority: Budgeted hours: 8 Description: This test is the first to ensure that the circuit board is correct. We are going to use isis to simulate the schematic and run a basic code on the microcontroller. Why: We need to confirm that our circuit is connected the way it is supposed to be. This can save us a lot of time if we get the circuit right on the first try! How: We need to make a dummy code for our microcontroller that sets one pin high and then scans through all the pins on our controller. In that way we can assure us that all of our connections is wired properly by “measure” voltage in our simulator. This has to me done for both SC and MCC schematics. Owner: O.R Date: 7.03.2012 2.1.1.1. Schematic test Success rate: Accumulated hours: 5 Result description: We made a simple code which toggles one pin on the microcontroller this went well and everything was connected properly I Necessary changes: N/A Owner: Date: 12.03.2012 Document: Additional Tests Version 1.0 2.1.2. Layout test Issue date: 29.05.2012 Page Priority: 6 of 8 Budgeted hours: 4 Description: When we make the PCB-layout we need to cross check that we make the right connections as we go, it is very important that the person who makes the layout in Ares has control over the system and can recognize if the signal and power lines when it is routed. Why: We need to do this test so we don’t make a pcb-card that doesn’t function properly. How: When the card is routed, we need to check the card configuration document so we know that the routes are correct. Owner: O.R Date: 19.03.2012 2.1.2.1. Layout test Success rate: Accumulated hours: 0.5 Result description: The layout and schematic was cross checked with card configuration and we needed to update the card configuration. We need to cross check that all the microcontroller pins are compatible with the signal that it is connected to. Necessary changes: We needed to change the card configuration so it is compatible. Owner: O.R Date: 19.03.2012 Document: Additional Tests Version 1.0 2.1.3. Parallel stepper controllers Issue date: 29.05.2012 Page 7 of 8 Priority:9 Budgeted hours: 3 Description: We are testing to see how the stepper controllers is reacting if they are paralleled Why: We need to determine if our redundant system is causing more trouble to the stepper controllers than it helps. Controller test Test Controller 1 disabled and controller 2 is running Controller 1 unpowered and controller 2 is running Controller 1 enabled but not stepped and controller 2 is running Both controllers is activated and stepping Controllers are alternating the enable pins Result Date How: This is the form we’re going to use to see if the controllers can operate simultaneously. We’re connecting Owner: O.R Date: 04.05.2012 2.1.3.1. Stepper controller redundancy test Controller test Test Controller 1 disabled and controller 2 is running Controller 1 unpowered and controller 2 is running Controller 1 enabled but not stepped and controller 2 is running Result description: Both controllers is activated and stepping Controllers are alternating the enable pin. Success rate: 9 Accumulated hours: 3 Result Works Date 04.05.2012 Works 04.05.2013 Works 04.05.2014 Works One enters protection mode, one needs to be reset 04.05.2015 Works 04.05.2017 04.05.2016 Necessary changes: None, but we learned that we might need to use the reset pin if something fails. And we need to make our software aware of this problem. Owner: O.R Date: 04.05.2012 Document: Additional Tests Version 3. 1.0 Issue date: 29.05.2012 Page 8 of 8 REVISIONS Rev Description 0.1 Made Templates. 12.01.2012 0.2 0.3 Made 2.2.1 Made Schematic test results, layout test with results Made:1.1, 1.1.1, 1.1.1.1, 1.1.1.2, 1.1.2, 1.1.3, 1.1.4, 1.1.5 Made: 1.1.6 Made test: See Test Results Rearranged and divided the document 25.01.2012 20.03.2012 0.4 0.5 0.6 0.7 Date 24.04.2012 27.04.2012 04.05.2012 28.05.2012 Name A.G & O.R A.G O.R A.G A.G O.R A.G Improvement Recommendations Group 3 Compact Fly-by-wire system Version Category Issue Date 1.0 Released 28.05.2012 Made by S.A Checked by K.M Approved by K.M NOTES REGARDING VALIDITY OF THIS DOCUMENT: Paper copies are uncontrolled. This copy is valid only at the time of printing. The controlled version of this document is available from the Company Intranet / DropBox. This document contains Equator Aircraft Norway legal entity proprietary and confidential information that is legally privileged and is intended only for the person or entity to which it is addressed and any unauthorised use is strictly prohibited. It is provided for limited purpose and shall not be reproduced, stored electronically, transferred to other documents, disseminated or disclosed to any third parties without the prior written consent of the relevant Equator Aircraft Norway legal entity. Any attachments are subject to the specific restrictions and confidentiality regulations stated therein and shall be treated accordingly. The document is to be returned upon request and in all events upon completion of use for which it was provided. Document: Version Improvement recommendations 1.0 Issue date: Page 28.05.2012 2 of 6 TABLE OF CONTENTS 1. ABBREVIATION ..................................................................................................................... 3 2. PURPOSE ............................................................................................................................... 3 3. IMPROVEMENTS ................................................................................................................... 4 3.1. 3.1.1. 3.1.2. 3.1.3. 3.1.4. 3.1.5. Hardware ................................................................................................................................ 4 General ................................................................................................................................... 4 MCC ....................................................................................................................................... 4 SC .......................................................................................................................................... 4 HMI ......................................................................................................................................... 4 Joystick ................................................................................................................................... 4 3.2. 3.2.1. 3.2.2. 3.2.3. 3.2.4. 3.2.5. 3.2.6. 3.2.7. Software ................................................................................................................................. 5 General ................................................................................................................................... 5 Watchdog timer ...................................................................................................................... 5 Sensor reading ....................................................................................................................... 5 Autopilot ................................................................................................................................. 5 Android tablet ......................................................................................................................... 5 Code optimalization ................................................................................................................ 5 Stepper motor acceleration .................................................................................................... 5 4. REVISIONS ............................................................................................................................. 6 Document: Improvement recommendations Version 1. 1.0 Issue date: Page 28.05.2012 3 of 6 ABBREVIATION Technical Term Standard Definition K.M. Kjetil Mjøs A.G. Axel Gravningsbråten S.A. Sindre Andersen T.A. Thomas Andersen R.L. Runar Løken O.R. Ole Riiser Table 1: Abbreviation 2. PURPOSE Our assignment was to make a proof of concept that demonstrates that a FBW system can make flying safer and simpler. Therefore we made a fully functional proof of concept, however in order to making a prototype it needs improvements described below. (DISCLAIMER: The improvements below are what we see as necessary changes, there are surely more improvements that can be done.) Document: Improvement recommendations Version 3. 1.0 Issue date: Page 28.05.2012 4 of 6 IMPROVEMENTS 3.1. Hardware 3.1.1. General It should be used connectors and connection points designed for tough environments. Specially to keep dust, water and other external influences from making corrosion and/or bad connection. The system should be mounted in a closed metal box or baked in a form together with for example epoxy to prevent the cards to be exposed from the outer world, such as an ECU for cars. The card should be created using 4-layers to improve the inductance, ground plane issues and to have different layers dedicated to one thing. For example top layer as power plane, the two layers between as routing layers and the bottom layer as ground plane. This setup will create a Faraday cage and will exclude magnetic interference. It should be used surface-mounted components instead of through-hole to decrease the mass of the component and the inductance in the component legs, this will also make them more resistant to vibrations. It should also be done a job regarding ground plane problems. If the card will be created as 4-layers it will remove some of these issues. The cards should be mounted inside a metal box and ground should be connected to the box to create a good ground connection. This electric field will lead to better shielding. The screw holes internally on the cards should be connected with the ground plane to have more ground connections. 3.1.2. MCC It should be made some more spare connectors on the cards to have all the pins on the microprocessor available. 3.1.3. SC It should be chosen an IMC designed for tough environments. Since our product is a proof of concept and we have a small budget compared to the final system, we did not feel it necessary to choose an expensive module special designed for this application. 3.1.4. HMI It should be used buttons which are connected to each other mechanically to prevent two MCC cards to be activated at the same time. This means that if you activate one button, all of the other will be deactivated. 3.1.5. Joystick It should be used a redundant joystick using non-contact sensors to minimize the wear of the mechanics of the joystick and potentiometers. Document: Improvement recommendations Version 1.0 Issue date: Page 28.05.2012 5 of 6 3.2. Software 3.2.1. General To ensure that every code on the three MCC’s is different it should be written by different persons. This is to not have one software error that can happen on all the MCC’s at the same time. 3.2.2. Watchdog timer A watchdog timer is a microcontroller function that resets the code if it has been hanging in the same loop for a specific amount of time. To get this function to work properly you would need to calculate how much time every function use and reset the watchdog timer on appropriate places. 3.2.3. Sensor reading Sensors on SC need to be read. The best way of doing this would be to make a class for every sensor and find a suitable update time for them. 3.2.4. Autopilot When all sensors are correctly read into the system an autopilot can be implemented. The data can then be sent to the MCC’s to control the stepper motors and get the airplane to follow the coordinates. 3.2.5. Android tablet The digital HMI interface to the pilot is going to be an Android tablet. The tablet is connected to SC via a USB cable. An USB library needs to be made for the supervisor in order to be able to send data to the tablet. An android app with an intuitive GUI also needs to be made. 3.2.6. Code optimalization The MCC’s are using an 8bit controller. The code can be optimized for this processor in order to make it more efficient. 3.2.7. Stepper motor acceleration To get the optimal performance of a stepper motor it needs to have a controlled acceleration. The first steps needs to be slow before it can speed up to ensure the motors does not skip a step. Document: Improvement recommendations Version 4. 1.0 Issue date: 28.05.2012 Page 6 of 6 REVISIONS Responsible person for this document, procedure or template rev 01 1.0 Description Created this document and made all of the improvements on MCC, general, SC, HMI, Joystick and software improvements Checked the document for errors, did small changes and changed the name of the document from Improvement Document to Improvement recommendations. Table 2: Revisions Date 25.05.2012 Name S.A, K.M A.G 28.05.2012 Conclusion: The system we made is an important step within the small plane aviation industry. We have proven that it is possible to make a cheap and available Fly-By-Wire system that can easily be implemented in most small airplanes. The system makes the airplane lighter, safer and gives the pilot a simpler environment with a lot of extra features that can prevent fatal pilot errors. During our project we have come up with a lot of solutions, some are good and some need more work. The biggest challenges we encountered was not to choose the simplest solution, but one that could be further developed. One example was by changing the controller on the supervisor card from an 8bit to a 32bit controller which we did in April. Another challenge was to make the system redundant, they need to work together but they also need to be fully independent if one controller crashes. Altogether we are proud of what we have done in six months and we hope our product can be used as a platform for further development of the Compact Fly-By-Wire System. And later we hope it will be used in the Equator P2 Excursion. NW CONTROLLER MCLR U1 2 49 9 10k C1 100n SPARE_AI11 Roll-1 Spare_AI12 5V LINEAR Digital Sensor R Yaw-1 Reset Controller E Status LED Red Status LED Green Mcc 1 enable PGC PGD Digital Sensor NW Mcc 3 enable Mcc 2 enable TX RX Enable Controller Direction R Step R 5V BUCK PIC18F8520 30 29 28 27 34 33 50 58 57 56 55 54 53 52 47 36 35 43 44 45 46 37 38 72 69 68 67 66 65 64 63 25 26 OSC1/CLKI MCLR/VPP RA0/AN0 RA1/AN1 RA2/AN2/VREFRA3/AN3/VREF+ RA4/T0CKI RA5/AN4/LVDIN RA6/OSC2/CLKO RB0/INT0 RB1/INT1 RB2/INT2 RB3/INT3/CCP2B RB4/KBI0 RB5/KBI1/PGM RB6/KBI2/PGC RB7/KBI3/PGD RC0/T1OSO/T13CKI RC1/T1OSI/CCP2A RC2/CCP1 RC3/SCK/SCL RC4/SDI/SDA RC5/SDO RC6/TX1/CK1 RC7/RX1/DT1 RD0/PSP0/AD0 RD1/PSP1/AD1 RD2/PSP2/AD2 RD3/PSP3/AD3 RD4/PSP4/AD4 RD5/PSP5/AD5 RD6/PSP6/AD6 RD7/PSP7/AD7 AVDD AVSS RE0/RD/AD8 RE1/WR/AD9 RE2/CS/AD10 RE3/AD11 RE4/AD12 RE5/AD13 RE6/AD14 RE7/CCP2C/AD15 RF0/AN5 RF1/AN6 RF2/AN7 RF3/AN8/C2IN+ RF4/AN9/C2INRF5/AN10/C1IN+/CVREF RF6/AN11/C1INRF7/SS RG0/CCP3 RG1/TX2/CK2 RG2/RX2/DT2 RG3/CCP4 RG4/CCP5 RH0/A16 RH1/A17 RH2/A18 RH3/A19 RH4/AN12 RH5/AN13 RH6/AN14 RH7/AN15 RJ0/ALE RJ1/OE RJ2/WRL RJ3/WRH RJ4/BA0 RJ5/CE RJ6/LB RJ7/UB 4 3 78 77 76 75 74 73 24 23 18 17 16 15 14 13 5 6 7 8 10 79 80 1 2 22 21 20 19 62 61 60 59 39 40 41 42 Reset Controller NW Step RA Step LA Direction RA Reset Controller LA SPARE_AI13 Pitch-1 ANALOG POSITION LA Analog Position RA Spare_AI21 Analog Position E Spare_AI22 Digital Sensor E 5V BUCK ENABLE CONTROLLER NW 1 R1 Enable Controller NW Reset Controller NW Step NW 13.8V 2B NW 1A NW 5V BUCK 1 3 5 7 9 11 13 15 E-NW PULLUP R CONTROLLER Enable Controller Reset Controller R Step R 13.8V 2B R 1A R 5V BUCK 1 3 5 7 9 11 13 15 C26 Direction LA Reset Controller RA Step NW Direction NW Analog Position R Analog Position NW INTERNAL VOLTAGE READ EXTERNAL VOLTAGE READ 470u Enable Controller Reset Controller LA Step LA 13.8V 2B LA 1A LA 5V BUCK 1 3 5 7 9 11 13 15 2 4 6 8 10 12 14 16 26641601RP2 RA CONTROLLER Enable Controller E-PULLUP 10k PIC18F8520 Reset Controller RA Step RA 13.8V 2B RA 1A RA 5V BUCK 1 3 5 7 9 11 13 15 2 4 6 8 10 12 14 16 Direction RA GND 2A RA 1B RA GND 26641601RP2 E CONTROLLER Enable Controller C27 Compact-Fly-by-Wire Main Controller Card Component schematic 470u Reset Controller E Step E 13.8V 2B E 1A E 5V BUCK 1 3 5 7 9 11 13 15 2 4 6 8 10 12 14 16 26641601RP2 Date: 21.05.2012 Direction LA GND 2A LA 1B LA GND 5V BUCK 13.8V Author: Sindre Andersen Direction R GND 2A R 1B R GND LA CONTROLLER Digital Sensor LA Digital Sensor RA 1-WIRE 2 4 6 8 10 12 14 16 26641601RP2 13.8V Step E Direction E Direction NW GND 2A NW 1B NW GND 26641601RP2 Enable Controller NW Reset Controller R 2 4 6 8 10 12 14 16 10k ENABLE CONTROLLER 5V BUCK Version: 1 Stepper Controllers Direction E GND 2A E 1B E GND 13.8V C-ST-RA POWER 1 3 1 3 5 1B RA 2 4 2 4 6 5V BUCK 1A RA 2A RA 2B RA 26640601RP2 Power PACKAGE=POWER CONNECTOR 5V LINEAR 0.1 1 3 5 1B E 2 4 6 Pitch-1 prefiltered Roll-1 prefiltered Yaw-1 prefiltered 2 4 6 SPARE2 1 3 GND 5V LINEAR PTC4 0.1 HMI PTC2 1 3 5 7 0.1 2 enable prefiltered LED Red regulated 2 4 6 8 PTC3 0.1 GND 1 3 TX PREFILTERED RX PREFILTERED 5V LINEAR 26640401RP2 S-R 1 3 C-ST-NW 1 3 5 2 4 6 0.1 1A NW 2A NW 2B NW 0.1 C-ST-R 0.1 C-ST-LA 1A LA 2A LA 2B LA DIGITAL SENSOR RA PREFILTERED ANALOG POSITION RA PREFILTERED S-E 1 3 2 4 Compact-Fly-by-Wire Main Controller Card DIGITAL SENSOR E PREFILTERED ANALOG POSITION E PREFILTERED Component schematic 26640401RP2 GND 26640601RP2 GND 2 4 5V LINEAR PTC7 2 4 6 S-RA 1 3 GND GND 1 3 5 DIGITAL SENSOR LA PREFILTERED ANALOG POSITION LA PREFILTERED 26640401RP2 1A R 2A R 2B R 26640601RP2 1B LA 2 4 26640401RP2 PTC6 2 4 6 S-LA 1 3 GND GND 1 3 5 DIGITAL SENSOR R PREFILTERED ANALOG POSITION R PREFILTERED 5V LINEAR 26640601RP2 1B R 2 4 GND PTC5 1B NW DIGITAL SENSOR NW PREFILTERED ANALOG POSITION NW PREFILTERED 26640401RP2 2 4 Sc COMMON 2 4 26640401RP2 SC 1 3 SPARE_AI21-PREFILTER SPARE_AI22-PREFILTER S-NW Mcc 3 enable prefiltered Mcc 1 enable prefiltered GND Status LED Green regulated 5V LINEAR 26640801RP2 2 4 26640401RP2 GND 5V BUCK SPARE_AI11-PREFILTER SPARE_AI12-PREFILTER SPARE_AI13-PREFILTER 1A E 2A E 2B E 26640601RP2 26640601RP2 2 4 6 26640601RP2 C-ST-E JS 1 3 5 0.1 SPARE1 1 3 5 GND GND PTC1 PTC8 Author: Sindre Andersen Date: 21.05.2012 Connectors Version: 1 RESISTOR NETWORK 4 Pitch-1 Yaw-1 Roll-1 Mcc 1 enable C4 C5 C6 C7 10uF 10uF 10uF 100n Mcc 2 enable Mcc 3 enable Analog Position RA prefiltered Analog Position RA Digital Sensor RA prefiltered Digital Sensor RA Analog Position E prefiltered Analog Position E Digital Sensor E prefiltered Digital Sensor E 1 2 3 4 5 6 7 8 9 10 RESISTOR NETWORK 1 1 2 3 4 5 6 7 8 9 10 YAW-1 PREFILTERED YAW-1 ROLL-1 PREFILTERED ROLL-1 PITCH-1 PREFILTERED PITCH-1 Analog Position NW prefiltered Analog Position NW Digital Sensor NW prefiltered Digital Sensor NW CONN-H10 Analog Position NW CONN-H10 Digital Sensor NW J2 C8 C9 C10 C11 100n 100n 10uF 100n Analog Position R Digital Sensor R ANALOG POSITION LA Digital Sensor LA SPARE_AI13-PREFILTER SPARE_AI13 SPARE_AI12-Prefilter SPARE_AI12 SPARE_AI11-PREFILTER SPARE_AI11 SPARE_AI22-Prefilter SPARE_AI22 SPARE_AI21-Prefilter SPARE_AI21 1 2 3 4 5 6 7 8 9 10 CONN-H10 RESISTOR NETWORK 2 1 2 3 4 5 6 7 8 9 10 Mcc 1 enable prefiltered Mcc 1 enable Mcc 2 enable prefiltered Mcc 2 enable Mcc 3 enable prefiltered Mcc 3 enable RX prefiltered RX TX TX prefiltered CONN-H10 C12 C13 C14 C15 10uF 100n 10uF 100n Analog Position RA Digital Sensor RA Analog Position E Digital Sensor E C16 C17 C18 C19 10uF 100n 10uF 100n SPARE_AI13 SPARE_AI12 SPARE_AI11 SPARE_AI21 RESISTOR NETWORK 3 Analog Position R prefiltered Analog Position R Digital Sensor R prefiltered Digital Sensor R Analog Position LA prefiltered Analog Position LA Digital Sensor LA prefiltered Digital Sensor LA 1 2 3 4 5 6 7 8 9 10 CONN-H10 Resistors For RC and R filters SPARE_AI22 Compact-Fly-by-Wire Main Controller Card C25 C24 C23 C22 C20 100n 100n 100n 100n 100n Component schematic Author: Sindre Andersen Rc-Filter Caps Date: 21.05.2012 Version: 1 5V BUCK 5V BUCK 13.8V J4 1 2 3 4 5 6 MCLR PGD PGC STATUS LED GREEN R2 18k INTERNAL VOLTAGE READ CONN-H6 R8 R4 10k STATUS LED GREEN REGULATED EXTERNAL VOLTAGE READ R3 R5 10k 3.9k 200 STATUS LED RED PICKIT Connector R9 STATUS LED RED REGULATED 400 Voltage Read Current Limiters For HMI LEDs 5V BUCK R6 5V BUCK R7 1k 6.5k 3 2 1 1-WIRE VCC DQ GND 1 U4 21.0 POWER LED LED-BLUE 2 DS18B20 PWR LED 5V BUCK 7805 7805 VI VO 3 C21 2 GND 1 1 7805-A VI VO 3 5V LINEAR GND 13.8V 13.8V 7805-D C2 2 Temp Sens C3 C31 Compact-Fly-by-Wire Main Controller Card 100n 10uF Component schematic 100n 10uF GND Author: Sindre Andersen GND Date: 21.05.2012 5V Reg Reg for Analog devices Version: 1 Regulators U1 LPC1768 SPARE8 75 74 73 70 69 68 67 66 65 64 53 52 51 50 SPARE6 SPARE5 SPARE4 SPARE3 SPARE2 SPARE1 MCC3 TX LV MCC3 RX RTS_ISP SPARE13 SPARE12 97 83 72 55 41 31 VSS VSS VSS VSS VSS VSS 27 26 82 85 VDDA VSS-A USB_PWRD 3 2 USB_OVRCR SPARE10 MCC2 TX LV MCC2 RX SPARE16 3 4 OUT A FLAG A IN FLAG B GND ENB OUT B USB_Current 8 1 100n 7 6 5 LM3526 U4 SPARE15 13.8V 7805 SPARE14 RD1 1 TD1 INTERNAL VOLTAGE READ External Voltage Read AIRSPEED STALL SENSOR SDA SCL USB_D+ USB_D- 1 2 3 4 5 100 14 17 22 23 16 18 C19 100n 5V SPARE11 C1 ENA 2 VO GND U3 1 USB_PPWR VI VI 3 VO 5V GND SPARE9 3.3Volt MCC1 TX LV MCC1 RX GREEN STATUS LED RED STATUS LED C21 C31 2 1-WIRE USB_OVRCR LD111733 GPS TX GPS RX 100n 100n GND Logic level translation DTR_RST 12 15 10 11 U2 MCC1 TX LV MCC2 TX LV MCC3 TX LV VBAT SPARE7 3.3V 13.8V 46 47 98 99 81 80 79 78 77 76 48 49 62 63 61 60 59 58 57 56 9 8 7 6 25 24 29 30 19 Usb_link_Good USB_PPWR RANGE ENABLE RANGE(PWM) USB_PWRD VDD(3V3) VDD(3V3) VDD(3V3) VDD(3V3) VDD(REG)(3V3) VDD(REG)(3V3) VDD(3V3) AUTOPILOT ENABLE DISABLE SUPERVISOR MCC1 DISABLE SUPERVISOR MCC2 DISABLE SUPERVISOR MCC3 P1[0]/ENET_TXD0 P0[0]/RD1/TXD3/SDA1 P1[1]/ENET_TXD1 P0[1]/TD1/RXD1/SCL1 LPC1768 P1[4]/ENET_TX_EN P0[2]/TXDO/AD0[7] P1[8]/ENET_CRS P0[3]/RXDO/AD0[6] P1[9]/ENET_RXD0 P0[4]/I2SRX_CLK/RD2/CAP2[0] P1[10]/ENET_RXD1 P0[5]/I2SRX_WS/TD2/CAP2[1] P1[14]/ENET_RX_ER P0[6]/I2SRX_SDA/SSEL1/MAT2[0] P1[15]/ENET_REF_CLK P0[7]/I2STX_CLK/SCK1/MAT2[1] P1[16]/ENET_MDC P0[8]/I2STX_WS/MISO1/MAT2[2] P1[17]/ENET_MDIO P0[9]/I2STX_SDA/MOSI1/MAT2[3] P1[18]/USB_UP_LED/PWM1[1]/CAP1[0] P0[10]/TXD2/SDA2/MAT3[0] P1[19]/MCOA0/USB_PPWR/CAP1[1] P0[11]/RXD2/SCL2/MAT3[1] P1[20]/MCI0/PWM1[2]SCK0 P0[15]/TXD1/SCK0/SCK P1[21]/MCABORT/PWM1[3]/SSEL0 P0[16]/RXD1/SSEL0/SSEL P1[22]/MCOB0/USB_PWRD/MAT1[0] P0[17]/CTS1/MISO0/MISO P1[23]/MCI1/PWM1[4]/MISO0 P0[18]/DCD1/MOSI0/MOSI P1[24]/MCI2/PWM1[5]/MOSI0 P0[19]/DSR1/SDA P1[25]/MCOA1/MAT1[1] P0[20]/DTR1/SCL1 P1[26]/MCOB1/PWM1[6]/CAP0[0] P0[21]/RI1/RD1 P1[27]/CLKOUT/USB_OVRCR/CAP0[1] P0[22]/RTS1/TD1 P1[28]/MCOA2/PCAP1[0]/MAT0[0] P0[23]/AD0[0]/I2SRX_CLK/CAP3[0] P1[29]/MCOB2/PCAP1[1]/MAT0[1] P0[24]/AD0[1]/I2SRX_WS/CAP3[1] P1[30]/VBUS/AD0[4] P0[25]/AD0[2]/I2SRX_SDA/TXD3 P1[31]/SCK1/AD0[5] P0[26]/AD0[3]/AOUT/RXD3 P0[27]/SDA0/USB_SDA P2[0]/PWM1[1]/TXD1 P0[28]/SCL0/USB_SCL P2[1]/PWM1[2]/RXD1 P0[29]/USB_D+ P2[2]/PWM1[3]/CTS1/TRACEDATA[3] P0[30]/USB_DP2[3]/PWM1[4]/DCD1/TRACEDATA[2] P2[4]/PWM1[5]/DSR1/TRACEDATA[1] TDO/SWO P2[5]/PWM1[6]/DTR1/TRACEDATA[0] TDI P2[6]/PCAP1[0]/RI1/TRACECLK TMS/SWDIO P2[7]/RD2/RTS1 TRST P2[8]/TD2/TXD2 TCK/SWDCLK P2[9]/USB_CONNECT/RXD2 RTCK P2[10]/EINT0/NMI RSTOUT P2[11]/EINT1/I2STX_CLK RESET P2[12]/EINT2/I2STX_WS XTAL1 P2[13]/EINT3/I2STX_SDA XTAL2 RTCX1 P3[25]/MAT0[0]/PWM1[2] RTCX2 P3[26]/STCLK/MAT0[1]/PWM1[13] P4[28]/RX_CLK/MAT2[0]/TXD3 VREFP P4[29]/TX_MCLK/MAT2[1]/RXD3 VREFN 28 54 71 96 42 84 13 95 94 93 92 91 90 89 88 87 86 32 33 34 35 36 37 38 39 40 43 44 45 21 20 HEADING DECREASE HEADING INCREASE CLIMB DECREASE CLIMB INCREASE ALTITUDE DECREASE ALTITUDE INCREASE 2 4 6 10 12 14 1 15 A1 A2 A3 A4 A5 A6 Y1 Y2 Y3 Y4 Y5 Y6 Vcc GND OE1 OE2 3 5 7 9 11 13 MCC1 TX 5V MCC2 TX MCC3 TX 16 8 74HCT365 3.3V LPC1768 GPS SCL SDA SDA SCL IMU BAROMETER R4 R16 R11 1.5K 1.5K 3.3V 1 3.9k DS18B20 LED-GREEN 2 LED-GREEN 1-WIRE USB_LINK_GOOD RED LED 500 R19 500 Q1 Q2 BSS138 BSS138 10k USB LINK POW LED R18 R23 1 R5 2 EXTERNAL VOLTAGE READ 18k 1 2 3 4 GREEN STATUS LED 3.3V 3.3V LED Driver 3.3V IMU1 1 2 3 4 5 6 9 8 7 6 3.3VOLT GPS TX GPS RX 13.8V BAROMETER GPS1 RED STATUS LED Internal Sensors And status GREEN LED 3.3VOLT 3 2 1 VCC DQ GND 21.0 R20 6.5k R21 6.5k Compact-Fly-by-Wire Supervision Card Sensors and IC DS18B20 Author: Ole Riiser Date: 21.05.2012 Version:1 3.3V 3.3V 13.8v J2 1 3 PTC7 PTC1 2 4 0.1 0.1 AUTOPILOT POWER CONNECTOR 1 3 5 7 9 HEADING DECREASE prefilter 3.3V CLIMB DECREASE prefilter ALTITUDE INCREASE prefilter MCC1-ISP 1 3 5 2 4 6 2 4 6 8 10 SPARE1 1 3 5 7 HEADING INCREASE prefilter CLIMB INCREASE prefilter ALTITUDE DECREASE prefilter AUTOPILOT ENABLE prefilter SPARE2 SPARE4 2 4 6 8 SPARE1 SPARE3 SPARE5 SPARE6 26640801RP2 MCC1 RX PREFITLER MCC1 TX PREFITLER 26641001RP2 5V DTR_RST PREFILTER 26640601RP2 RTS_ISP PREFILTER MCC 2 1 3 2 4 ANALOG HMI MCC2 TX PREFITLER 1 3 5 7 DISABLE SUPERVISOR MCC2 PREFILTER RED LED 1 3 2 4 MCC3 RX PREFITLER 1 3 5 7 9 SPARE7 0.1 26640401RP2 MCC 3 SPARE2 PTC4 MCC2 RX PREFITLER 2 4 6 8 DISABLE SUPERVISOR MCC1 PREFILTER DISABLE SUPERVISOR MCC3 PREFILTER GREEN LED SPARE9 SPARE11 SPARE13 SPARE15 26641001RP2 3.3VOLT J1 26640801RP2 MCC3 TX PREFITLER 1 3 5 7 9 26640401RP2 3.3V PTC8 PTC5 0.1 0.1 STALL 1 3 PTC3 STALL SENSOR prefilter 0.1 1 3 2 4 26641001RP2 TD1 3.3VOLT RD1 2 4 0.1 J4 R15 AIRSPEED prefilter USB_PWRD USB_D33 26640401RP2 R1 USB_D+ 3.3V PTC2 0.1 33 DISTANCE 1 3 2 4 PTC6 26640401RP2 AIRSPEED 1 3 2 4 6 8 10 CAN 2 4 26640401RP2 3.3V 2 4 6 8 10 RANGE(PWM)-PREFILTER RANGE ENABLE-PREFILTER R12 R13 15k 15k Vcc DD+ GND USB 26640401RP2 Compact-Fly-by-Wire Supervision Card External Connector schematic Author: Ole Riiser External Connectors Date: 21.05.2012 Version:1 SPARE8 SPARE10 SPARE12 SPARE14 SPARE16 Input filtering (R/RC) resistors RC filter Caps ALTITUDE INCREASE CLIMB INCREASE HEADING INCREASE AUTOPILOT ENABLE ALTITUDE DECREASE C7 C8 100n 100n C9 100n C10 C11 100n RESISTOR NETWORK 5 100n RTS_ISP PREFILTER RTS_ISP MCC1 RX PREFITLER MCC1 RX MCC1 TX PREFITLER MCC1 TX CLIMB DECREASE HEADING DECREASE STALL SENSOR AIRSPEED C12 C13 100n 100n C14 10uF 1 2 3 4 5 6 7 8 9 10 DISABLE SUPERVISOR MCC3 prefilter DISABLE SUPERVISOR MCC3 DISABLE SUPERVISOR MCC2 prefilter DISABLE SUPERVISOR MCC2 DISABLE SUPERVISOR MCC1 prefilter DISABLE SUPERVISOR MCC1 AUTOPILOT ENABLE PREFILTER AUTOPILOT ENABLE ALTITUDE INCREASE PREFILTER ALTITUDE INCREASE RESISTOR NETWORK 4 STALL SENSOR PREFILTER STALL SENSOR AIRSPEED PREFILTER AIRSPEED DISABLE SUPERVISOR MCC2 DISABLE SUPERVISOR MCC3 C16 RANGE(PWM)-PREFILTER RANGE(PWM) RANGE ENABLE-PREFILTER RANGE ENABLE C17 100n RESISTOR NETWORK 2 CONN-H10 DISABLE SUPERVISOR MCC1 C18 100n 1 2 3 4 5 6 7 8 9 10 3.3VOLT 5V 1 2 3 4 5 6 7 8 9 10 CONN-H10 RESISTOR NETWORK 3 CONN-H10 Decoupling Caps 1 2 3 4 5 6 7 8 9 10 CONN-H10 C15 10uF 100n RESISTOR NETWORK 1 ALTITUDE DECREASE PREFILTER ALTITUDE DECREASE CLIMB DECREASE PREFILTER CLIMB DECREASE CLIMB INCREASE PREFILTER CLIMB INCREASE HEADING DECREASE PREFILTER HEADING DECREASE HEADING INCREASE PREFILTER HEADING INCREASE DTR_RST PREFILTER DTR_RST MCC2 RX PREFITLER MCC2 RX MCC2 TX PREFITLER MCC2 TX MCC3 RX PREFITLER MCC3 RX MCC3 TX PREFITLER MCC3 TX 1 2 3 4 5 6 7 8 9 10 CONN-H10 13.8V C4 C5 C6 C3 100n 100n 100n 100n 5V 3.3VOLT 3.3V C26 Compact-Fly-by-Wire Supervision Card 470u C23 C24 C20 100n 100n 1uF RC filtering and decoupling caps Author: Ole Riiser Date: 21.05.2012 Version:1