1
DataFRAME
Remote Data
Protection Pack
User Manual
Copyright/
Limited
Warranty
This manual is the confidential and proprietary
product of LeftHand Networks, Inc. Any
unauthorized use, reproduction, or transfer of this
manual without the express, written consent of
LeftHand Networks, Inc. is strictly prohibited.
This manual is designed to provide accurate and
authoritative information in regard to the use of the
Network Storage Module, the SAN/iQ™ Centralized
Management Console, and the SAN/iQ™ software,
proprietary products of LeftHand Networks, Inc.
Information in this document is subject to change
without notice and does not represent a
commitment on the part of LeftHand Networks, Inc.
The software described in the document is
furnished under a license agreement. The software
may be used or copied only in accordance with the
terms of the agreement. It is against the law to
copy the software on any medium except as
specifically allowed in the license or nondisclosure
agreement.
The software distributed to you by LeftHand
Networks, Inc. includes certain software packages
indicated to be subject to one of the following open
source software licenses: GNU General Public
License ("GPL"), the GNU Lesser General Public
License ("LGPL"), or the BSD License (each, an "OSS
Package"). Please refer to the license_readme file
included with the software for additional
information regarding the application of these
licenses to the OSS Packages and your rights and
responsibilities under these licenses.
Copyright/Limited Warranty
The software described in the document includes
software developed by the Apache Software Foundation, The Legion of the Bouncy Castle, and Free
Software Foundation, Inc.
© Copyright 2001-2005 LeftHand Networks, Inc. All
rights reserved. LeftHand Networks, the LeftHand
Networks logo, SAN/iQ and AEBS are iii registered
trademarks of LeftHand Networks. Distributed Storage Matrix and Remote IP Copy are trademarks of
LeftHand Networks.
© Copyright 1999 The Apache Software Foundation.
All rights reserved.
© Copyright 2000 The Legion of the Bouncy Castle.
All rights reserved.
© Copyright 1991, 1999 Free Software Foundation,
Inc. All rights reserved.
Used under license by MPC Computers, LLC.
EMA001078-00 KDA 11-01-2005
iii
Copyright/Limited Warranty
iv
Table Of Contents
Copyright/Limited Warranty ......................... ii
Chapter 1
Understanding Remote Data
Protection Pack
Remote Data Protection Pack Overview ........... 1
Planning for Remote Data Protection Pack ........ 7
Using Schedules for Remote Data Protection Pack 8
Chapter 2
Using Remote Data Protection Pack
Chapter 3
Sample Remote Data Protection Pack
Configurations
Index 75
Remote Data Protection Pack Overview .......... 15
Registering Remote Data Protection Pack ........ 15
Working with Remote Snapshots ................... 15
Monitoring Remote Snapshots....................... 27
Scheduling Remote Snapshots ...................... 31
Configuring Failover .................................. 43
Resuming Production After Failover ............... 43
Rolling Back Primary and Remote Volumes ....... 47
Using Remote Snapshots for Data Migration and Data
Mining .............................................. 50
Disassociate Remote Management Groups ........ 51
Overview ...............................................
Using Remote Data Protection Pack for Business
Continuance ......................................
Using Remote Data Protection Pack for
Off-site Backup and Recovery..................
Using Remote Data Protection Pack for Data
Migration ..........................................
53
53
65
72
v
vi
Understanding Remote Data
Protection Pack
Remote Data
Protection
Pack
Overview
1
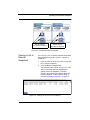
Remote Data Protection Pack provides a powerful
and flexible method for replicating data and
keeping that replicated data available for business
continuance, backup and recovery, data
migration, and data mining.
Remote Data Protection Pack uses the existing
volume and snapshot features along with
replication across geographic distances to create
remote snapshots. The geographic distance can be
local (in the same data center or on the same
campus), metro (in the same city), or long
distance.
For example, the accounting department in the
corporate headquarters in Chicago runs the
corporate accounting application and stores the
resulting data. The designated backup site is in
Des Moines. Nightly at 11:00 p.m., accounting
updates are replicated to the Des Moines backup
facility using Remote Data Protection Pack.
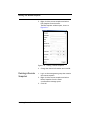
Purchase Remote
Data Protection
Pack
Remote Data Protection Pack is an add-on module.
You must purchase a license to use Remote Data
Protection Pack beyond the 30-day evaluation
period. You must purchase a license for each
DataFRAME in a cluster that will contain a primary
volume or a remote volume.
Glossary for
Remote Data
Protection Pack
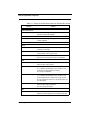
The following terminology is used in describing the
components and processes involved in Remote
Data Protection Pack.
Understanding Remote Data Protection Pack 1
Remote Data Protection Pack Overview
Table 1.1. Remote Data Protection Pack Glossary
Term
Definition
Primary Volume
The volume which is being accessed by the application
server. The primary volume is the volume that is backed up
with Remote Data Protection Pack.
Primary Snapshot
A snapshot of the primary volume which is created in the
process of creating a remote snapshot. The primary
snapshot is located on the same cluster as the primary
volume.
Remote Volume
The volume that resides in the Remote Data Protection
Pack location where the remote snapshots are created.
The remote volume contains no data. It acts as a pointer to
tell the system where to make the copy of the primary
snapshot. It can be stored on the same cluster or a
different cluster than the primary volume.
Remote Snapshot
An identical copy of a primary snapshot. The remote
snapshot is located on the same cluster as the remote
volume.
Remote Copy Pair
The primary volume and its associated remote volume.
Failover
The process by which the user transfers operation of the
application server over to the remote volume. This can be
a manual operation or it can be scripted.
Acting Primary Volume The remote volume, when it assumes the role of the
primary volume in a failover scenario.
Failback
After failover, the process by which the user restores the
primary volume and turns the acting primary back into a
remote volume.
Failover Recovery
After failover, the process by which the user chooses to fail
back to the primary volume or to make the acting primary
into a permanent primary volume.
Synchronize
The process of copying the most recent snapshot from the
primary volume to a new remote snapshot. On failback,
synchronization is the process of copying the most recent
remote snapshot back to the primary volume. The Console
displays the progress of this synchronization.
Split Mirror
A split mirror is a remote snapshot whose relationship to
the primary volume has been severed. Split mirrors are
usually created for one-time use and then discarded.
2 Understanding Remote Data Protection Pack
Remote Data Protection Pack Overview
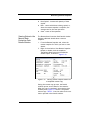
How Remote Data
Protection Pack
Works
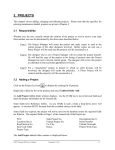
Replicating data using Remote Data Protection
Pack follows a three-step process.
1. At the production location, you create a
snapshot of the primary volume — this is
called the primary snapshot.
2. You create a remote volume at the remote
location and then create a remote snapshot.
The remote snapshot is a snapshot of the
empty remote volume, and it is linked to the
primary snapshot.
3. The system copies data from the primary
snapshot to the remote snapshot.
Figure 1.1. Basic flow of Remote Data Protection
Pack
Note: Both primary and completed remote snapshots are
the same as regular snapshots. See the chapter “Working
with Snapshots” in the DataFRAME SAN Software
Manual.
Note: Remote Data Protection Pack can be used on the
same site, even in the same management group and
cluster.
Understanding Remote Data Protection Pack 3
Remote Data Protection Pack Overview
Graphical
Representations
of Remote Data
Protection Pack
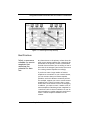
The Centralized Management Console displays
special graphical representations of Remote Data
Protection Pack.
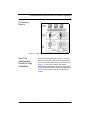
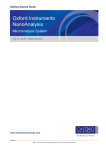
Copying the Primary Snapshot to the Remote
Snapshot
When the primary snapshot is copying to the
remote snapshot, the Console depicts the process
with a moving graphic of pages from the primary
to the remote snapshot, as illustrated in
Figure 1.2. The pages move in the direction of the
data flow from primary to remote snapshot.
Remote snapshot.
Copying from the
primary snapshot to
the remote snapshot.
Primary snapshot.
Figure 1.2. Icons depicting the primary snapshot copying to the remote snapshot
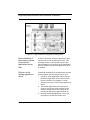
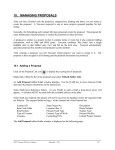
Graphical Legend for Remote Data Protection
Pack Icons
The graphical legend available from the Help
menu depicts the icons associated with Remote
Data Protection Pack. Figure 1.3 displays the
Remote Data Protection Pack states icons from the
graphical legend.
4 Understanding Remote Data Protection Pack
Remote Data Protection Pack Overview
Remote Data Protection Pack graphics
from the Graphical
Legend in the
Figure 1.3. Icons for Remote Data Protection Pack as displayed in the Graphical
Legends window
Remote Data
Protection Pack
and Volume
Replication
Remote Data Protection Pack is asynchronous
replication of data. Volume replication is
synchronous replication. Volume replication is
described in detail in the DataFRAME SAN Software
Manual in the chapter, “Working with Volumes.”
Using synchronous volume replication on multiple
DataFRAMEs within a cluster in combination with
asynchronous Remote Data Protection Pack on a
different cluster of DataFRAMEs creates a robust
high-availability configuration.
Understanding Remote Data Protection Pack 5
Remote Data Protection Pack Overview
Uses for Remote
Data Protection
Pack
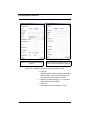
Table 1.2. Uses for Remote Data Protection Pack
Use Remote Data Protection
Pack for
How It Works
Business continuance/
disaster recovery
Using Remote Data Protection Pack, store remote
snapshots off-site. The remote snapshots remain continuously available in the event of a site or system
failure.
Off-site backup and recovery
Remote Data Protection Pack eliminates the backup
window on an application server by creating remote
snapshots on a backup server, either local or remote,
and backing up from that server.
Split mirror, data migration,
content distribution
Using Remote Data Protection Pack, make a complete
copy of one or more volumes without interrupting
access to the original volumes. Move the copy of the
volume to the location where it is needed.
Benefits of
Remote Data
Protection Pack
Remote Data Protection Pack maintains the
primary volume’s availability to application
servers. Snapshots on the primary volume are
taken instantaneously, and are then copied to
remote snapshots in the off-site location.
Remote Data Protection Pack operates at the
block level, moving large amounts of data
much more quickly than file system copying.
Snapshots are incremental—that is, snapshots
save only those changes in the volume since
the last snapshot was created. Hence failover
recovery may need to resynchronize only the
latest changes rather than the entire volume.
Remote Data Protection Pack is robust. If the
network link goes down during the process,
copying resumes where it left off when the
link is restored.
6 Understanding Remote Data Protection Pack
Planning for Remote Data Protection Pack
Planning for
Remote Data
Protection
Pack
Remote Data Protection Pack works at the
management group, cluster, volume, snapshot,
and DataFRAME level.
Table 1.3. Remote Data Protection Pack, SAN/iQ, and DataFRAMEs
Storage System Level
Management Groups
Remote Data Protection Pack Configuration
Remote snapshots can be created in the same management group or in a different management group
than the primary volume.
If using different management groups, the remote
bandwidth setting of the management group containing
the remote volume determines the maximum rate of
data transfer to the remote snapshot.
Clusters
Remote snapshots can be created in the same cluster
or in a different cluster than the primary volume.
Volumes
Primary volumes contain the data to be copied to the
remote snapshot.
Data is copied to the remote snapshot via the remote
volume.
The remote volume is a pointer to the remote snapshot.
The remote volume has a size of 0.
Snapshots
Once data is copied from the primary snapshot to the
remote snapshot, the remote snapshot behaves as a
regular snapshot.
DataFRAME
Active monitoring of each DataFRAME notifies you
when copies complete or fail. Active monitoring also
notifies you if a remote volume or snapshot is made
primary or if the status of the connection between management groups containing primary and remote
volumes changes.
Planning the
Remote Snapshot
In order to create a remote snapshot:
you must be logged in to both the management group that contains the primary volume
and the management group containing the
Understanding Remote Data Protection Pack 7
Using Schedules for Remote Data Protection Pack
target cluster where the remote snapshot will
be created.
you must designate or create a remote volume
in that remote management group.
you must have enough space on the target
cluster for the remote snapshot.
Logging in to the
Management Group
Log in to both management groups before you
begin. If you are creating the remote volume and
remote snapshot in the same management group
as the primary volume, then you only need to log
in to that management group.
Designating or
Creating the Remote
Volume
You can create a remote volume by any of the
following methods:
Make an existing volume into a remote
volume.
Create a new remote volume during creation
of a remote snapshot.
Create a new volume from the cluster Details
panel and then select the Remote option on
the New Volume window.
For more information about the three methods of
creating remote volumes, see “Creating a Remote
Volume” on page 18.
Using
Schedules for
Remote Data
Protection
Pack
Scheduled remote snapshots provide high
availability for business continuance/disaster
recovery and provide a consistent, predictable
update of data for remote backup and recovery.
8 Understanding Remote Data Protection Pack
Using Schedules for Remote Data Protection Pack
Planning the
Remote Copy
Schedule
When creating a remote snapshot schedule, a
number of considerations are important to plan.
All of these issues impact the amount of storage
available in the system.
Recurrence
How often do you want the snapshots created? The
recurrence frequency must account for the
amount of time it takes to complete a remote
snapshot. For example, if your recurrence
schedule is set for a new snapshot every 4 hours
you should ensure that the time to copy that
snapshot to the remote location is less than 4
hours.
1.
2.
3.
4.
Test the Time Required for Copying a Snapshot
One way to check the time required to copy a
snapshot is to run a test of the actual process.
In the test you take two remote snapshots of
the primary volume. Since the first remote
snapshot copies the entire volume, it will take
longer to copy. The second remote snapshot
copies only changes made to the volume since
the first remote snapshot. Since you create
the second remote snapshot after the time
interval you intend to schedule, the copy time
for the second remote snapshot is more representative of the actual time required for
copying subsequent remote snapshots.
Create a remote snapshot of the primary
volume.
Wait for the copy to finish.
Create another remote snapshot of the
primary volume.
Track the time required to complete the
second remote snapshot. This is the minimum
amount of time that you should allow between
scheduled copies.
Understanding Remote Data Protection Pack 9
Using Schedules for Remote Data Protection Pack
Be sure to check the remote bandwidth
setting for the management group containing
the remote volume, since that setting affects
the time required to copy a remote snapshot.
Thresholds
Does the cluster that contains the remote
snapshots have sufficient space to accommodate
scheduled snapshots? See the chapter on
snapshots in the DataFRAME SAN Software Manual
for information about managing capacity using
volume and snapshot thresholds.
If the cluster does not have sufficient space
available, the remote snapshot will appear in the
Console and it will flash red. On the Details tab of
the remote snapshot, the status says “Read only,
not enough space in cluster to start copy.”
Retention Policies
How long do you want to retain the primary
snapshots? The remote snapshots? You can set
different retention policies for the primary and
remote snapshots. For example, you can choose to
retain 2 primary snapshots and 5 remote
snapshots. The number of snapshots retained
refers to completed snapshots.
Parameters for
Remote Snapshot
Schedule Retention
Policies
The system will never delete the last fully synchronized remote snapshot.
Under some circumstances, such as unpredictable
network speeds or varying snapshot size, a remote
snapshot schedule may create primary snapshots
more frequently than the remote copy process can
keep up with. The retention policies for scheduled
remote copies ensure that such factors do not
cause primary and remote snapshots to become
unsynchronized. Regardless of the retention policy
defined for scheduled remote copies, up to 2
10 Understanding Remote Data Protection Pack
Using Schedules for Remote Data Protection Pack
additional snapshots may be retained by the
system at any given time. These two additional
snapshots include the snapshot that is in the
process of being copied, and the last fully
synchronized snapshot. A fully synchronized
snapshot is one that has completed copying so
that the remote snapshot is a complete mirror of
its corresponding primary snapshot.
Up to two additional snapshots may be retained
by the system at any given time.
Because the system will never delete the last fully
synchronized primary snapshot, a remote copy
schedule may retain N+2 copies for a retention
policy of N (the currently copying remote snapshot
plus the last fully synchronized snapshot). Using
the example above, if you have a retention policy
for your remote copy schedule of 2 primary and 5
remote snapshots, the system may retain up to 4
primary and 7 remote snapshots for a period of
time.
Table 1.4. Snapshot retention policy and maximum number of
snapshots retained in system
Remote Schedule
Retention Policy
Maximum Number of
Snapshots Retained
n of primary snapshots
x of remote snapshots
n + 2 primary snapshots
x + 2 remote snapshots
n of hours for primary snapshots
x of hours for remote snapshots
n + 2 primary snapshots older than n
x + 2 remote snapshots older than xx
n of days for primary snapshots
x of days for remote snapshots
n + 2 primary snapshots older than n
x + 2 remote snapshots older than xx
n of weeks for primary snapshots
x of weeks for remote snapshots
n + 2 primary snapshots older than n
x + 2 remote snapshots older than xx
Understanding Remote Data Protection Pack 11
Using Schedules for Remote Data Protection Pack
Remote snapshots will only be deleted after
their corresponding primary snapshot is
deleted.
Additionally, a remote snapshot will only be
deleted after its counterpart primary snapshot.
Therefore, you can not retain fewer scheduled
remote snapshots than primary snapshots when
setting your retention policies.
Note: If you retain more remote snapshots than primary
snapshots, the remote snapshots become regular
snapshots when their corresponding primary snapshots
are deleted. You can identify them as remote snapshots
by their names, since the naming convention is established as part of creating the remote snapshot schedule.
Best Practices
Retain at least two primary snapshots to
ensure that only incremental copying is
required for primary snapshots.
Review your remote copy schedule to ensure
that the frequency of the remote copies correlates to the amount of time required to
complete a copy.
Use the checklist in Table 1.5 to help plan
scheduled remote snapshots.
12 Understanding Remote Data Protection Pack
Using Schedules for Remote Data Protection Pack
Scheduled Remote
Data Protection Pack
Planning Checklist
Table 1.5. Scheduled Remote Data Protection Pack Planning Checklist
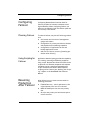
Configuration Category
Parameters
Snapshot Schedule
Start Time
Recurrence
Start date (mm/dd/yyyy) and
Start time (mm:hh:ss)
for the schedule to begin
Recurrence (3). Recurrence is a yes/no choice.
You can schedule a remote snapshot to occur
one time in the future and not have it recur.
Frequency (minutes, hours, days or weeks)
Primary Setup
Hard Threshold
Soft Threshold
Retention
Set the hard threshold and soft threshold for the
primary snapshot.
Retain either
Maximum number of snapshots (#)
Set period of time (minutes, hours, days or
weeks)
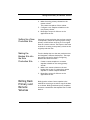
Remote Setup
Management Group
The management group to contain the remote
snapshot
Volume
The remote volume for the remote snapshots
Retention
Retain either
Maximum number of snapshots (#). This number
equals completed snapshots only. In-progress
snapshots take additional space on the cluster
while they are being copied. Also, the system will
not delete the last fully synchronized snapshot.
For space calculations, figure N+2 with
N=maximum number of snapshots.
Set period of time (minutes, hours, days or
weeks)
Understanding Remote Data Protection Pack 13
Using Schedules for Remote Data Protection Pack
14 Understanding Remote Data Protection Pack
Using Remote Data
Protection Pack
Remote Data
Protection
Pack
Overview
Registering
Remote Data
Protection
Pack
Working with
Remote
Snapshots
Creating a
Remote Snapshot
2
This chapter provides instructions for registering,
configuring, and using Remote Data Protection
Pack for business continuance, backup and
recovery, and failover.
For information about how Remote Data Protection Pack works and how to plan capacity for
Remote Data Protection Pack, see Chapter 1,
“Understanding Remote Data Protection Pack” .
Remote Data Protection Pack is an add-on module.
You must purchase a Remote IP Copy license to use
Remote Data Protection Pack beyond the 30-day
evaluation period. For information about registering Remote Data Protection Pack licenses, see
Chapter 16, “Feature Registration”in the
DataFRAME SAN Software Manual.
Remote snapshots are the core of Remote Data
Protection Pack. You use the existing volume and
snapshot capabilities along with replication across
geographic distances to create remote snapshots.
Creating a remote snapshot is the main task in
Remote Data Protection Pack. You can create a
one-time remote snapshot or set up a schedule for
recurring remote snapshots. Many of the parameters for either case are the same. Creating a
remote snapshot involves four main steps:
Using Remote Data Protection Pack 15
Working with Remote Snapshots
Getting There
First, log in to the management groups that
will contain primary and remote volumes.
Second, create a primary snapshot on the
primary volume.
Third, create a remote volume or select an
existing remote volume.
Fourth, specify the settings for the remote
snapshot.
1. Log in to the management group that contains
the primary volume for which you are creating
the remote snapshot.
2. Log in to the management group that will
contain the remote volume and remote
snapshot.
You can create remote volumes and snapshots
within the same management group. In that
case, you only log in to the one management
group.
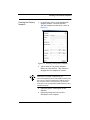
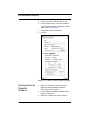
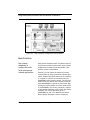
3. Right-click the primary volume and select
Remote Copy > New Remote Snapshot.
The New Remote Snapshot window opens,
shown in Figure 2.1.
Figure 2.1. Creating a new remote snapshot
16 Using Remote Data Protection Pack
Working with Remote Snapshots
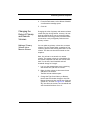
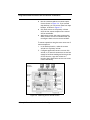
Creating the Primary
Snapshot
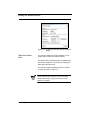
1. In the Primary section of the New Remote
Snapshot window, click New Snapshot.
The New Snapshot window opens, shown in
Figure 2.2.
Figure 2.2. Creating a new primary snapshot
2. Type a name for the primary snapshot.
Names are case sensitive. They cannot be
changed after the snapshot is created.
Tip: Make the beginning of volume and snapshot names
meaningful, for example, “Snap1Exchg_03.”
The Console displays volume and snapshot names under
the icons. If a name is longer than the width of the icon,
the end of the name is cut off (however, the full name
does show on the corresponding Details tab and on other
relevant tab views).
3. [Optional] Type in a description of the
snapshot.
4. [Optional] Change the hard and soft
thresholds for the snapshot.
Using Remote Data Protection Pack 17
Working with Remote Snapshots
5. Click OK to return to the New Remote
Snapshot window.
The information for the primary snapshot is
filled in, as shown in Figure 2.3. At this point
the primary snapshot has been created.
Figure 2.3. New primary snapshot created
Creating a Remote
Volume
If you have already created the remote volume,
select the management group and existing remote
volume in the Remote section of the New Remote
Snapshot window. Then go to “Completing the
Remote Snapshot” on page 21.
You can create a remote volume by any of the
following methods:
Make an existing volume into a remote
volume.
Create a new remote volume during creation
of a remote snapshot.
Create a new volume from the cluster Details
panel and then select the Remote option on
the New Volume window.
18 Using Remote Data Protection Pack
Working with Remote Snapshots
Making an existing volume into a remote
volume.
Selecting an existing volume to become a remote
volume will cause
1. a snapshot of all existing data to be created
for that volume and then
2. all the data in that volume will be deleted so
that the remote volume will have zero length
and zero hard and soft thresholds.
Creating a new remote volume.
When you create the remote snapshot, use the
Remote Snapshot window, shown in Figure 2.1, to
create the volume. Alternately, you can create a
new volume from the cluster details panel and
select the Remote option in the New Volume
Window.
Tip: The fastest way to create a remote volume is to
create it as part of creating the remote snapshot, using the
Remote Snapshot window.
To create the remote volume from the New
Remote Snapshot window:
1. In the Remote section, select the Management
Group to contain the remote snapshot.
You must be logged into the management
group to continue.
2. To create a new remote volume, click New
Volume.
The Cluster List window opens, shown in
Figure 2.4.
Using Remote Data Protection Pack 19
Working with Remote Snapshots
Figure 2.4. Selecting a cluster for the remote volume
3. Select a cluster for the remote volume and
click OK.
The New Volume window opens, shown in
Figure 2.5. See the chapter on volumes in the
DataFRAME SAN Software Manual for detailed
information about creating volumes.
Figure 2.5. Creating a new remote volume
20 Using Remote Data Protection Pack
Working with Remote Snapshots
4. Type a name for the volume.
A volume name must be from 1 to 127 characters and is case sensitive.
5. [Optional] Type a description of the volume.
6. Select the replication level.
You can set different replication levels for the
remote volume and the primary volume.
Note: You cannot set the size or thresholds for the remote
volume. Those values are 0, since the remote volume is a
placeholder for data.
7. Select a replication priority.
If you select a replication level of None, you
cannot set a replication priority. See the
chapter on volumes in the DataFRAME SAN
Software Manual for detailed information
about creating volumes.
8. Select the Target Type for the volume.
9. [Optional] If the volume is an iSCSI target and
you want to use 1-way or 2-way CHAP, type a
target secret.
10. Click OK to return to the New Remote
Snapshot window.
The new remote volume has been created at
this point.
Completing the
Remote Snapshot
1. Type a name for the remote snapshot.
2. [Optional] Type a description for the
snapshot.
The completed window is shown in Figure 2.6.
3. Click OK.
Using Remote Data Protection Pack 21
Working with Remote Snapshots
Figure 2.6. Completing the New Remote Snapshot
dialog
What the System
Does
The system creates the remote snapshot in the
cluster that contains the remote volume.
The system then copies the primary snapshot onto
the remote snapshot. The process of copying the
data may take some time.
The remote snapshot appears below the remote
volume, as shown in Figure 2.7.
Note: If you create a remote snapshot of a volume with a
remote snapshot still in progress, the second remote
snapshot will not begin copying until the first remote
snapshot is complete.
22 Using Remote Data Protection Pack
Working with Remote Snapshots
Primary Volume
and Primary Snapshot
Remote Volume
and Remote Snapshot
Figure 2.7. Viewing the remote snapshot
Viewing a List of
Remote
Snapshots
You can view a list of remote snapshots associated
with management groups, clusters, volumes or
snapshots.
1. Click the item for which you want to view the
list of remote snapshots.
2. Click the Remote Snapshot tab.
The tab view opens, shown in Figure 2.8. The
report on the tab lists both management
groups and all the snapshots. The other
columns report status information about the
remote snapshots, as described in detail in
“Monitoring Remote Snapshots” on page 27.
Figure 2.8. Viewing the list of remote snapshots
Using Remote Data Protection Pack 23
Working with Remote Snapshots
Setting the
Remote
Bandwidth
The remote bandwidth sets the maximum rate for
data transfer between management groups. The
remote bandwidth setting is the upper limit of the
range of data transfer—that is, the copy rate will
be equal to, or less than, the rate set.
The remote bandwidth specifies the speed at
which data is received from another management
group. This means that to control the maximum
rate of data transfer to a remote snapshot, set the
remote bandwidth on the management group that
contains the remote snapshot.
1. Right-click the remote management group and
select Edit Management Group.
The Edit Management Group window opens,
shown in Figure 2.9.
Figure 2.9. Editing a remote management group
2. In the Remote Management Groups section,
click Edit Bandwidth.
The Edit Remote Bandwidth window opens.
24 Using Remote Data Protection Pack
Working with Remote Snapshots
Figure 2.10. Editing the remote bandwidth
3. Change the bandwidth setting as desired.
For example, change the value to 93 KB to use
no more than about one-half the capacity of a
T1 line.
Note: Both bandwidth settings are configured in kilobytes.
Be careful when configuring this parameter as you may be
used to using bits for networking settings.
Canceling a
Remote Snapshot
When you cancel a remote snapshot that is in
progress, the remote snapshot is deleted and the
primary snapshot remains.
To cancel a remote snapshot that is in progress
1. Click the primary or remote snapshot.
The snapshot tab view opens.
2. Click the Remote Snapshot tab.
3. Select from the list the remote snapshot you
want to cancel.
4. Click Cancel Remote Snapshot.
A confirmation message opens.
5. Click OK.
Editing a Remote
Snapshot
You can edit the description of a remote snapshot.
You can also change the hard and soft thresholds,
but it is not recommended.
1. Log in to the management group that contains
the remote snapshot.
Using Remote Data Protection Pack 25
Working with Remote Snapshots
2. Right-click the remote snapshot and select
Edit Snapshot from the menu.
The Edit Snapshot window opens, shown in
Figure 2.11.
Figure 2.11. Editing a remote snapshot
3. Change the desired information and click OK.
Deleting a Remote
Snapshot
1. Log in to the management group that contains
the remote snapshot.
2. Right-click the remote snapshot and select
Delete Snapshot from the menu.
A confirmation message opens.
3. Click OK.
26 Using Remote Data Protection Pack
Monitoring Remote Snapshots
Monitoring
Remote
Snapshots
Configuring Active
Monitoring Alerts
for Remote Data
Protection Pack
Information for monitoring remote snapshots is
available from multiple sources. Active monitoring
features provide you the capability to configure
alerts that you view in the Console as well as
receiving alerts as emails and through SNMP traps.
The Console tab view also provides monitoring
information for remote snapshots.
There are four variables for remote snapshots for
which you can configure alerts. Notification for
these variables automatically come as alert
messages in the Console. You can also configure
Active Monitoring to receive email notification or
for SNMP traps. The Remote Data Protection Pack
variables that are monitored include
Remote Data Protection Pack status - an alert
is generated if the copy fails
Remote Data Protection Pack complete - an
alert is generated when the remote copy is
complete
Remote Data Protection Pack failovers - an
alert is generated when a remote volume is
made primary
Remote management group status - an alert is
generated if the connection to a remote management group changes (disconnects and/or
reconnects)
For detailed information about configuring Active
Monitoring, see the Reporting chapter of theDataFRAME SAN Software Manual.
Monitoring
Remote Snapshot
Details from the
Console Tab View
View information about each remote snapshot in
both the Remote Snapshot tab and in the Remote
Data Protection Pack Details panel.
Using Remote Data Protection Pack 27
Monitoring Remote Snapshots
Viewing Information
in the Remote
Snapshot Tab
The Remote Snapshot tab displays a list of remote
snapshots connected with a selected item in the
Network view. For example, if you select a management group, the Remote Snapshot tab displays
the list of remote snapshots associated with that
management group. You can view lists of remote
snapshots by management group, cluster, volume
and snapshot levels.
1. Select the appropriate item in the Network
view.
2. Click the Remote Snapshot tab to bring it to
the front, shown in Figure 2.13.
Figure 2.12. Viewing remote snapshot details in the Remote Snapshot tab
The remote snapshot details displayed include
Primary Management Group - containing the
primary volume from which remote snapshots
are created.
Primary Snapshot - from which the remote
snapshot is copied.
Remote Management Group - containing the
remote volume to which the remote snapshot
is attached.
Remote Snapshot - target for the copied
primary snapshot.
% Complete - the incremental progress of the
remote copy operation.
Elapsed Time - incremental time of the copy
operation.
28 Using Remote Data Protection Pack
Monitoring Remote Snapshots
Viewing Status in the
Remote Data
Protection Pack
Details Window
Data Copied - incremental quantity of data
copied.
Rate - rate at which data is being copied, or,
when the remote snapshot is complete, the
average rate for the total operation.
State - status of the operation.
The Remote Data Protection Pack Details window
displays additional details about a remote
snapshot.
1. From the Remote Snapshot tab, select the
remote snapshot for which you want to view
details.
2. Right-click and select View Remote Snapshot
Details (or double-click the snapshot).
The Remote Data Protection Pack Details
window opens, as shown in Figure 2.13.
Figure 2.13. Viewing remote snapshot details for
a completed remote copy
During the remote copy process, the Details
window reports current data for the statistics.
When the copy is completed, the statistics show
summary data. Figure 2.13 shows a completed
remote copy. Table 2.1 lists the values for the statistics reported in the Details window.
Using Remote Data Protection Pack 29
Monitoring Remote Snapshots
Table 2.1. Values for Remote Data Protection Pack Details window
Statistic
Values
Source Info Section
Primary Mgmt Group
Name of the management group containing the
primary volume and snapshot
Primary Snapshot
Name of the primary snapshot
Remote Mgmt Group
Name of the management group containing the
remote snapshot
Remote Snapshot
Name of the remote snapshot
Status
Manual|Scheduled
Whether the snapshot was created using a snapshot
schedule or manually
State
Started, Copying, Stalled, Complete
Current state of the copy process.
% Complete
0-100%
Percent of the copy process that is completed.
Time
Start Time
MM/DD/YY HH:MM [AM/PM]
Date and time copy started
Elapsed Time
Xd Xh Xm Xs
X = a number and the days, hours, minutes, and
seconds the copy has been processing.
N/A if not yet available.
Est. Time Remaining
Xd Xh Xm Xs
X = a number and the days, hours, minutes, and
seconds estimated to remain in the copy process.
N/A for completed copies or in-progress copies not
yet calculated.
Completion Time
MM/DD/YY HH:MM [AM/PM]
Date and time copy completed.
N/A for in-progress copies.
Data
Data Copied
MB, GB, or TB
Amount of data copied so far in smallest unit size.
30 Using Remote Data Protection Pack
Scheduling Remote Snapshots
Table 2.1. Values for Remote Data Protection Pack Details window
Statistic
Values
Data Remaining
MB, GB, or TB
Amount of data remaining to be copied in smallest
unit size
Current Rate
Kb/sec.
Current rate of data being copied in Kb/second. This
rate is recalculated regularly throughout the remote
copy process.
N/A If not yet available or completed.
Avg. Rate
Kb/sec.
Average rate of copy progress.
You can leave the Details window open and
monitor the progress of the remote copy. An
example of a Details window with a remote copy
in progress is shown in Figure 2.14.
Figure 2.14. Viewing remote snapshot details for a
remote copy in progress
Scheduling
Remote
Snapshots
Scheduled remote snapshots provide high availability for business continuance/disaster recovery
and provide a consistent, predictable update of
data for remote backup and recovery.
Using Remote Data Protection Pack 31
Scheduling Remote Snapshots
The first step in scheduling remote snapshots is
planning for creating and deleting primary and
remote snapshots. Issues that require planning
include
Recurrence (frequency)
Snapshot thresholds
Retention policies
For detailed information about these issues, see
“Planning for Remote Data Protection Pack” on
page 7.
Once you have defined your plan, you are ready to
create the remote snapshot schedule.
Creating the
Schedule
First create the schedule
Second, configure the primary volume and
snapshot, and
Third, create the remote volume and
configure remote snapshots.
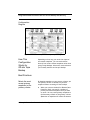
1. Right-click the volume for which you want to
create the remote snapshot schedule and then
select Remote Data Protection Pack > New
Remote Snapshot Schedule.
The New Remote Snapshot Schedule window
opens, shown in Figure 2.15.
2. Type a name for the schedule.
3. [Optional] Type a description for the
schedule.
32 Using Remote Data Protection Pack
Scheduling Remote Snapshots
Remote
snapshot
schedule
Primary
setup
Remote
setup
Figure 2.15. Creating a new remote snapshot schedule
Remote Snapshot
Schedule
The time zone displayed in the Remote Snapshot
Schedule area is the time zone set on the
DataFRAME through which you are logged in to the
management group.
Best Practice
Set all DataFRAMEs in the management group to
the same time zone. Reset the management group
time before creating a remote snapshot schedule.
For detailed information, see “Resetting the Management Group Time” in the chapter “Working
with Management Groups” in the DataFRAME SAN
Software Manual.
1. Select a start date and time for the schedule.
2. [Optional] Select a recurrence interval for the
schedule.
Using Remote Data Protection Pack 33
Scheduling Remote Snapshots
Configuring the
Primary Volume and
Snapshots
1. On the Primary Setup tab, specify the hard
threshold and the soft threshold for the
primary snapshots.
2. Specify the retention policy for the primary
snapshots.
Configuring the
Remote Volume and
Snapshots
1. Click the Remote Setup tab to bring it to the
front.
Figure 2.16. The Remote Setup tab
2. Select the management group to contain the
remote volume and remote snapshots.
3. Select an existing volume, or click New
Volume to create the remote volume.
See “Making a Primary Volume Into a Remote
Volume” on page 37.
4. Specify a retention policy for the remote
snapshots.
5. Click OK.
34 Using Remote Data Protection Pack
Scheduling Remote Snapshots
What the System
Does
If you created a new volume for the remote
volume, the system creates a new primary
snapshot of the primary volume and a remote
snapshot of the remote volume.
If you selected an existing volume to become
the remote volume, the system alerts you that all
the data on the existing volume will be deleted,
but that a snapshot of all the existing data will be
created first. The snapshot that is then created
retains all the volume’s data.
1. Type a name for that snapshot in the alert.
2. Click Yes to continue.
The new snapshot is created and the volume
becomes a remote volume.
The system creates a new primary snapshot of the
primary volume and a remote snapshot of the
remote volume. It then copies the data from the
primary snapshot to the remote snapshot. This
process will recur according to the schedule.
Editing a Remote
Snapshot
Schedule
When editing a remote snapshot schedule, you can
change the following items.
Schedule—description, start date and time,
recurrence policy
Primary Setup—primary snapshot thresholds,
retention policy
Remote Setup—retention policy
Note: Be certain to plan threshold changes carefully. See
the chapter on snapshots in the DataFRAME SAN
Software Manual for detailed information about threshold
requirements.
1. Select the primary volume that has the
schedule you want to edit.
2. Click the Remote Snapshot Schedules tab.
Using Remote Data Protection Pack 35
Scheduling Remote Snapshots
3. Select from the list the schedule to edit.
4. From the Tasks menu, select Edit Schedule.
The Edit Remote Snapshot Schedule window
opens, shown in Figure 2.17.
5. Change the desired information.
6. Click OK.
Figure 2.17. Editing a remote snapshot schedule
Deleting a Remote
Snapshot
Schedule
1. Select the volume for which you want to
delete the remote snapshot schedule.
The volume tab view opens.
2. Click the Remote Snapshot Schedule tab to
bring it to the front.
3. Select the schedule you want to delete.
36 Using Remote Data Protection Pack
Scheduling Remote Snapshots
4. From the Tasks menu, select Delete Schedule.
A confirmation message opens.
5. Click OK.
Changing the
Roles of Primary
and Remote
Volumes
Changing the roles of primary and remote volumes
comes into play during failover recovery. You use
these procedures when you are resynchronizing
data between the acting primary volume and the
recovered or newly configured production site
primary volume.
Making a Primary
Volume Into a
Remote Volume
You can make any primary volume into a remote
volume. First the system takes a snapshot of the
volume to preserve the existing data that is on the
volume. The data can then be accessed on that
snapshot.
Next, the volume is converted to a remote
volume. The remote volume is a placeholder for
the remote snapshots and does not contain data
itself. So the size, hard threshold and soft
threshold change to 0 length.
1. Log in to the management group containing
the volume that you want to convert.
2. Right-click the volume in the network view
and select Edit Volume.
The Edit Volume window opens.
3. Change the Type from Primary to Remote.
Notice that the window changes to the Edit
Remote Volume window, and all the fields are
greyed out, as shown in Figure 2.18. Additionally, the values in the size, hard threshold and
soft threshold fields are set to 0.
Using Remote Data Protection Pack 37
Scheduling Remote Snapshots
Primary volume with size, hard and
soft thresholds defined.
Selecting Remote changes the volume to
a remote volume with the size, hard and
soft thresholds set to 0.
Figure 2.18. Changes to a volume when changed from Primary to Remote
4. Click OK.
The Make Volume Remote window opens,
shown in Figure 2.19.
38 Using Remote Data Protection Pack
Scheduling Remote Snapshots
Figure 2.19. Creating a snapshot before making a
primary volume into a remote volume
5. Type a name for the snapshot that will be
created.
This snapshot preserves any existing data on
the volume.
6. [Optional] Type a description for the
snapshot.
7. Click OK.
The snapshot is created and the volume
becomes a remote volume. The Edit Remote
Volume window opens again with the editable
fields enabled, as shown in Figure 2.20.
Using Remote Data Protection Pack 39
Scheduling Remote Snapshots
Figure 2.20. Finalizing the new remote volume
8. [Optional] Make any necessary changes to the
new remote volume.
Making a Remote
Volume Into a
Primary Volume
You can make a remote volume into a primary
volume. Changing the remote volume into a
primary volume allows the backup application
server to read and write to the volume. This is
useful in failover recovery if you want to use the
failover site as the acting primary site.
Note: You cannot make a remote volume into a primary
volume while a remote snapshot is in progress. Wait until
the remote snapshot copy is complete before making the
remote volume into a primary volume.
40 Using Remote Data Protection Pack
Scheduling Remote Snapshots
Designating Size and
Threshold Values for
the Converted
Volume
If the remote volume was originally created as
a remote volume
you will need to designate a volume size, and
hard and soft thresholds.
If the remote volume was originally created as
a primary volume that was then changed to
remote
returning that volume to its primary state will
automatically return the original size and
threshold values. You can change these values
before completing the conversion.
1. Log in to the management group containing
the remote volume that you want to convert.
2. Right-click the volume in the network view
and select Edit Volume.
The Edit Remote Volume window opens.
3. Change the Type from Remote to Primary.
Notice that the window changes to the Edit
Volume window and all the fields are greyed
out, as shown in Figure 2.21.
Using Remote Data Protection Pack 41
Scheduling Remote Snapshots
Remote volume with editable fields
enabled.
Selecting Primary changes the volume to a
primary volume with all fields greyed out.
Figure 2.21. Making a remote volume into a primary volume
4. Click OK.
The Edit Volume window displays the editable
fields enabled. You can edit everything but
the name and created date and time.
5. Make any required changes, i.e., to the size
and hard and soft thresholds.
6. Click OK.
The volume becomes a primary volume.
42 Using Remote Data Protection Pack
Configuring Failover
Configuring
Failover
Planning Failover
Configuring Remote Data Protection Pack for
failover provides for business continuance and
high availability. When configuring failover you
take into consideration both the failover path and
the recovery from failover.
To achieve failover you plan the following parameters:
Using Scripting for
Failover
Resuming
Production
After Failover
the location and structure of management
groups and clusters
configuration of primary and remote volumes
and snapshots and scheduling snapshots
configuration of application servers and
backup application servers
task flow for failover recovery [resuming production after failover]
Application-based scripting provides the capability
for creating, mounting and deleting snapshots
using scripts. Remote Data Protection Pack can be
scripted as well. Remote snapshots and snapshot
schedules can be created and managed using
scripts. Detailed information about snapshot
scripting can be found in the “Working with Scripting” chapter in the DataFRAME SAN Software
Manual.
After failover occurs, three scenarios exist for
resuming production.
Failback Recovery - return operations to the
original primary site once it is restored.
Make the backup site into the new primary
site.
Set up a new primary site and resume operations at that site.
Using Remote Data Protection Pack 43
Resuming Production After Failover
The task flow for restoring or recovering data and
resuming the original Remote Data Protection Pack
configuration are different for each scenario.
Synchronizing
Data After
Failover
After a failover, there will usually be two
snapshots or volumes that have conflicting data.
Recovering and synchronizing such data depends
on multiple factors, including the application
involved.
Example Scenario
The following example illustrates only one process
for synchronizing data. Remember that such synchronization is optional.
Timetable of failover
Table 2.2. Timetable of failover
Time
Event
What Happens
1:00 p.m.
Regular hourly scheduled remote
snapshot
RemoteSS_0 created in
Remote Management Group
1:10 p.m.
Remote copy finishes
Copying is complete
1:30 p.m.
Primary volume goes offline
OrigPrimaryVol_0 offline
1:33 p.m.
Scripted failover causes remote
volume to become the acting
primary volume.
ActPrimaryVol_0 active in
Remote Management Group
2:00 p.m.
Original primary volume comes
back online
OrigPrimaryVol_0 online
Data that now needs
to be synchronized
Original volume which contains data from 1:00
to 1:30 p.m.
Acting primary volume which contains data
from 1:33 to 2:00 p.m.
44 Using Remote Data Protection Pack
Resuming Production After Failover
Returning
Operations to
Original Primary
Site
Once the original primary site is operational again,
restore operations to that site. The steps to
restore operations depend upon the state of the
original primary volume.
Synchronizing the
Data Between the
Acting Primary
Volume and the
Original Primary
Volume
If the primary volume is working
Synchronize the data between the acting
primary volume and the restored primary
volume before returning the acting primary
volume to its remote volume state.
If the primary volume is not available
Create a new primary volume, synchronize the
data with the acting primary volume, and
then return the acting primary volume to a
remote volume.
1. Create Snapshots of Data
First you create snapshots that contain the data
that you need to synchronize. The steps to create
those snapshots are described in Table 2.3.
Volumes and
Snapshots on
Primary Management Group
Action/Activity
Volumes and
Snapshots on
Remote Management Group
What This Step
Accomplishes
1. Stop applications
that are accessing
the volumes.
Table 2.3. Creating snapshots of data to synchronize
Using Remote Data Protection Pack 45
Resuming Production After Failover
Volumes and
Snapshots on
Primary Management Group
Action/Activity
Volumes and
Snapshots on
Remote Management Group
Creates a snapshot
of the original
primary volume
that includes the
data from 1:00 1:30 p.m.
OrigPrimaryVol_0
OrigPrimarySS_0
2. Make a snapshot
of the original
volume.
RemoteVol_0
ActPrimarySS_0
3. Make the acting
primary volume
into the remote
volume. This automatically creates a
snapshot of the
acting primary
volume.
What This Step
Accomplishes
Returns the remote
management group
to its original configuration.
Table 2.3. Creating snapshots of data to synchronize
2. Synchronize the Data
Synchronize the snapshots OrigPrimarySS_0 and
ActPrimarySS_0 created in Steps 2 and 3 of
Table 2.3 as appropriate for the application.
Creating a New
Primary Volume at
the Original
Production Site
If the original primary volume is not available,
designate a new primary volume, synchronize the
data from the acting primary volume, and
configure the remote snapshot schedule on the
new primary volume.
1. Stop the application that is accessing the
acting primary volume.
2. Create a remote snapshot of the acting
primary volume and make a new primary
volume on the original production site as part
of creating that remote snapshot.
3. Convert the remote volume into a primary
volume.
46 Using Remote Data Protection Pack
Rolling Back Primary and Remote Volumes
4. Make the acting primary volume into the
remote volume.
This creates a snapshot of that volume.
5. Configure a new snapshot schedule on the
new primary volume.
6. Reconfigure scripts for failover on the
application servers.
Setting Up a New
Production Site
Setting up a new production site involves creating
a new primary volume and syncing up the acting
primary volume before returning it to its original
state as a remote volume. The steps are the same
as those for creating a new primary volume at the
original production site.
Making the
Backup Site into
the New
Production Site
Turn the backup site into the new production site
and designate a different backup site. The steps
are similar to those for initially configuring
Remote Data Protection Pack.
Rolling Back
Primary and
Remote
Volumes
1. Create a remote snapshot or a remote
snapshot schedule on the acting primary
volume.
2. Make a new remote volume on the new
backup site as part of creating that remote
snapshot or remote snapshot schedule.
3. Reconfigure scripts for failover on the
application servers.
Rolling back a volume from a snapshot is the
method for reverting to an earlier copy of the data
on a volume. Rolling back destroys any snapshots
that were created after the snapshot that is rolled
back to.
Using Remote Data Protection Pack 47
Rolling Back Primary and Remote Volumes
Rolling Back a
Primary Volume
Rolling back a primary volume to a primary
snapshot replaces the original primary volume
with a read/write copy of the selected primary
snapshot. The new volume has a different name
than the original, and the original volume is
deleted.
Prerequisites
Stop applications from accessing the volume.
Delete all snapshots that are newer than the
snapshot you are rolling back from.
Warning: After rolling back a volume to a snapshot, you
lose all data that was stored since the rolled back
snapshot was created.
Warning: Any uncompleted remote copy snapshot that
is newer than the snapshot that you are rolling back to will
be cancelled.
1. Log in to the management group that contains
the primary volume that you want to roll
back.
2. Select the snapshot that you want to roll back
to.
3. Review the snapshot Details tab to ensure you
have selected the correct snapshot.
4. From the Tasks menu, select Roll Back
Volume.
The Roll Back Volume window opens, shown in
Figure 2.22.
48 Using Remote Data Protection Pack
Rolling Back Primary and Remote Volumes
Figure 2.22. Rolling back a primary volume
5. Type a new name for the rolled back primary
volume.
You can also change the hard threshold and
soft threshold if necessary.
Table 2.4. Requirements for rolling back a primary volume
Item
Requirements for Changing
New Primary Volume Name
Must be from 1 to 127 characters. Names are case sensitive.
Hard Threshold
Hard threshold size must be equal to or less than the
size of the volume.
Soft Threshold
Soft threshold size must be equal to or less than the
hard threshold size.
6. Click OK.
The Roll Back Volume confirmation message
opens.
Using Remote Data Protection Pack 49
Using Remote Snapshots for Data Migration and Data Mining
Figure 2.23. Verifying the primary volume roll
back
7. Click OK.
The primary snapshot version of the primary
volume is restored as a read/write volume.
8. Reconfigure application servers to access the
new volume.
Rolling Back a
Remote Volume
Using Remote
Snapshots for
Data
Migration and
Data Mining
Creating a Split
Mirror
A remote volume cannot be rolled back. In order
to roll back a remote volume, you must make the
remote volume into a primary volume.
Use remote snapshots to create split mirrors for
data mining and data migration. A split mirror is a
one-time remote snapshot created from the
volume containing the data you want to use or
move. Split mirrors are usually created for onetime use and then discarded.
To create a split mirror
create a remote snapshot
create a volume list for that snapshot
create an authentication group for client
access
configure client to access the remote snapshot
50 Using Remote Data Protection Pack
Disassociate Remote Management Groups
Disassociate
Remote
Management
Groups
Management groups become associated when
linked by remote snapshots or remote snapshot
schedules. When you have management groups
that no longer share remote snapshots or remote
snapshot schedules, you can disassociate those
management groups. Disassociating management
groups destroys all the shared knowledge between
those groups.
1. Log in to both management groups that you
want to disassociate.
2. Right-click the remote management group and
select Edit Management Group.
The Edit Management Groups window opens,
shown in Figure 2.24.
Figure 2.24. Editing a management group
3. Select the management group or groups you
want to disassociate.
4. Click Disassociate.
A confirmation message opens, describing the
results of disassociating the management
groups.
Using Remote Data Protection Pack 51
Disassociate Remote Management Groups
Warning: Disassociating the management groups
- cancels any in-progress remote snapshots and
- deletes all snapshot schedules that are shared between
the selected management groups.
5. Click OK.
The Edit Management Group window opens
and the remote management group you disassociated from is gone from the list.
6. Click OK to return to the Network view.
52 Using Remote Data Protection Pack
Sample Remote Data
Protection Pack
3
Configurations
Overview
Because of the flexibility provided by Remote Data
Protection Pack, you can use the functionality in a
variety of configurations that are most suitable for
your requirements. The sample configurations
described in this chapter are only a few possible
ways to use Remote Data Protection Pack for
business continuance, backup and recovery, data
migration and data mining.
Using Remote
Data
Protection
Pack for
Business
Continuance
Achieving High
Availability
Business continuance comprises both disaster
recovery and high availability of data. Using
Remote Data Protection Pack for business continuance, data is stored off-site and is continuously
available in the event of a site or system failure.
Creating remote snapshots in remote locations
with application-based scripting can ensure that
database applications such as SQL Server, Oracle,
and Exchange have continual access to data
volumes if production application servers or data
volumes fail.
Sample Remote Data Protection Pack Configurations 53
Using Remote Data Protection Pack for Business Continuance
Using off-site remote snapshots of your production
volumes, you can configure a backup application
server to access those remote snapshots. Off-site
remote snapshots, particularly when supplemented with synchronous volume replication
within a cluster, ensures high availability of
critical data volumes.
Configuration for
High Availability
To use remote snapshots for high availability,
configure a backup application server to access
remote snapshots in the event of a primary system
failure. Figure 3.1 illustrates this simple high
availability configuration.
Configure clustered application servers in both
the primary and backup locations.
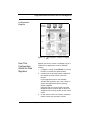
During normal operation, the production
application server read/writes to the primary
volume.
Set up a schedule for copying remote
snapshots to the backup location. If your
application server uses multiple volumes that
must be in sync, use a script to quiesce the
application before creating remote snapshots.
54 Sample Remote Data Protection Pack Configurations
Using Remote Data Protection Pack for Business Continuance
Configuration
Diagram
Figure 3.1. High availability example configuration
How This
Configuration
Works for High
Availability
If the production application server or volumes
become unavailable, application processing fails
over to the backup application server. As shown in
Figure 3.2, the remote volume and remote
snapshots become primary and the backup application server becomes the production application
server, accessing data from the acting primary
volume.
Sample Remote Data Protection Pack Configurations 55
Using Remote Data Protection Pack for Business Continuance
Figure 3.2. High availability configuration during failover
Data availability if
the primary volume
or production
application server
fails
If either the primary volume or production application server in your production site fails, only
that data written to the volume since the last
remote snapshot was created will be unavailable
until the volume or production application server
is restored.
Failover to the
backup application
server
To maintain availability of the application and the
remaining data, the following process occurs:
1. A script or other application monitoring the
production application server discovers that
primary volume is not available. A script
executes to fail over to the backup application
server.
2. The backup application server executes a
script to convert the remote volume into a
primary volume so that the volume can be
accessed by the backup application server.
3. Because the backup application server was
configured to access the remote (now
56 Sample Remote Data Protection Pack Configurations
Using Remote Data Protection Pack for Business Continuance
primary) volume, operation of backup
application server begins.
The application continues to operate after the
failover to the backup application servers.
Failback to the
production
configuration
When the production server and volumes become
available again, you have two failback options:
Merging data for
failback
Resume operations using the original production server, and return the backup volumes to
their original remote status, as illustrated in
Figure 3.3. This will require migration back
onto the production volumes of data that was
written to the backup volumes since the
failure.
Continue operating on the backup application
server. When the production server and
volumes become available, configure the production server to be the backup server (role
reversal).
In the failover scenarios described above there are
probably two snapshots with different data. As
part of failback, users must make a decision
whether to merge the data from the two
snapshots and the most effective method for doing
so. See “Synchronizing the Data Between the
Acting Primary Volume and the Original Primary
Volume” on page 45.
Sample Remote Data Protection Pack Configurations 57
Using Remote Data Protection Pack for Business Continuance
Figure 3.3. High availability configuration during failback
Best Practices
Use remote
snapshots in
conjunction with
local synchronous
volume replication
Using remote snapshots alone, any data written to
the primary volume since the most recent remote
snapshot was created will be unavailable if the
primary volume is unavailable.
However, you can lessen the impact of primary
volume failure by using synchronous volume replication. Volume replication allows you to create up
to 3 copies of a volume on the same cluster of
DataFRAMEs as the primary volume. The only limitation is that the cluster must contain at least as
many DataFRAMEs as replicas of the volume. Replicating the volume within the cluster ensures that
if a DataFRAME in the cluster goes down, replicas
of the volume elsewhere in the cluster will still be
available. (For 3-way replication up to 2
DataFRAMEs can fail.) For detailed information
about volume replication, see the chapter on
58 Sample Remote Data Protection Pack Configurations
Using Remote Data Protection Pack for Business Continuance
volumes in the DataFRAME SAN Software Manual
for details.
Example
configuration
This example, illustrated in Figure 3.4, uses 3
DataFRAMEs per cluster. However, this scenario
can use any number of DataFRAMEs. Information
about creating clusters and volumes can be found
in the DataFRAME SAN Software Manual.
In the production location, create a management group and a cluster of 3 DataFRAMEs.
Create volumes on the cluster, and set the
replication level to 2.
Configure the production application server to
access the primary volume.
See the DataFRAME EBSD Driver for Linux User
Manual for instructions about configuring
DataFRAME EBSD Driver for Linux clients.
Create a second management group and
cluster of 3 DataFRAMEs in the backup
location.
Create a schedule for making remote
snapshots of the primary volume. See “Scheduling Remote Snapshots” on page 31.
Note: Volume replication levels are set independently for
primary and remote volumes.
How It Works. If one of the DataFRAMEs in the
primary location fails, the primary volume will
still be available. If all of the DataFRAMEs fail, or
if the application server fails, then failover to the
backup application server occurs, and the remote
snapshot becomes available.
Sample Remote Data Protection Pack Configurations 59
Using Remote Data Protection Pack for Business Continuance
Figure 3.4. High Availability During Failover - Example Configuration
Achieving
Affordable
Disaster Recovery
Even if you do not have clustered application
servers or network bandwidth required for configuring hot backup sites, you can still use Remote
Data Protection Pack to protect your data during
an emergency.
Using remote snapshots, you can maintain copies
of your volumes in remote sites. Set up a schedule
for creating remote copies, and if your primary
storage site becomes unavailable, you can easily
access the most recent remote copy of your data
volumes. You can also use remote snapshots to
transfer data to a backup location where tape
backups are then created. This eliminates the
backup window on your primary volumes, and
ensures that you have copies of your data in the
remote site on DataFRAMEs as well as on tape.
60 Sample Remote Data Protection Pack Configurations
Using Remote Data Protection Pack for Business Continuance
Configuration for
Affordable
Disaster Recovery
To configure affordable disaster recovery, create
remote snapshots of your volumes in an off-site
location. In addition, you can create tape backups
from the remote snapshots in the off-site location:
Designate one or more off-site locations to be
the destination for remote snapshots.
Set up a schedule for creating remote
snapshots in the designated off-site locations.
If your application server uses multiple
volumes that must be in sync, use a script to
quiesce the application before creating
remote snapshots.
Create routine tape backups of the remote
snapshots in the off-site locations.
Configuration
Diagram
Figure 3.5. Affordable disaster recovery example configuration
How this Works
for Affordable
Disaster Recovery
If the DataFRAMEs in your primary location fail or
volumes become unavailable, the off-site location
contains the most recent remote snapshots.
Sample Remote Data Protection Pack Configurations 61
Using Remote Data Protection Pack for Business Continuance
Use the remote snapshots to resume operations as shown in Figure 3.6. If you created
tape backups, you can recover data from tape
backups, as shown in Figure 3.7.
Only data written to the primary volumes
since the last remote snapshot was created
will be unavailable.
Application servers that were accessing the
down volumes will not be available until you
reconfigure them to access recovered data.
To resume operations using the most recent set of
remote snapshots:
1. In the backup location, make the remote
volume into a primary volume.
2. Configure application servers to access this
volume, or if network connections are not fast
enough to facilitate reading and writing to the
off-site location, copy this volume to a
location where application servers can access
it more efficiently.
Figure 3.6. Restoring from a remote volume
62 Sample Remote Data Protection Pack Configurations
Using Remote Data Protection Pack for Business Continuance
Figure 3.7. Restoring from tape backup
Best Practices
Select a recurrence
schedule for remote
snapshots that
minimizes the
potential for data
loss.
Any data written to the primary volume since the
most recent remote snapshot was created will be
unavailable if the primary volume is unavailable.
Consider how much data you are willing to lose in
the event of an emergency and set the recurrence
for creating remote snapshots accordingly.
If you do not want a large number of remote
snapshots to accumulate on your remote volume,
you can use more than one remote snapshot
schedule, each with different retention policies.
For example, suppose you want to create remote
snapshots every 4 hours to ensure that no more
than 4 hours worth of data is lost in an emergency.
In addition, you want to retain 1 week's worth of
remote snapshots. Retaining 4-hour snapshots for
1 week can result in the accumulation of over 40
remote snapshots. Another approach would be to
create 2 remote snapshot schedules for the
volume:
Sample Remote Data Protection Pack Configurations 63
Using Remote Data Protection Pack for Business Continuance
Use remote
snapshots in
conjunction with
local synchronous
volume replication
One schedule to create remote snapshots
every 4 hours, but only retain the most recent
3 remote snapshots. This will ensure that you
do not lose more than 4 hours worth of data in
an emergency.
A second schedule to create remote snapshots
every 24 hours and retain 7 remote snapshots.
To prevent data loss, reinforce Remote Data Protection Pack with synchronous replication of the
volume within the cluster of DataFRAMEs at the
primary geographic site. With synchronous replication, a single DataFRAME can be off-line, and your
primary volume will remain intact.
At the backup location, you can also use synchronous replication to protect your remote volume
against DataFRAME failure.
Example
configuration
In the production location, create a cluster of
3 DataFRAMEs, all with managers.
Create volumes on the cluster, and set the
replication level to 2.
Create a schedule for making remote
snapshots of the primary volume. Set the
recurrence to every 4 hours, and retention of
remote snapshots to 2 days.
Note: You can use the same volume replication
configuration on the remote volume as well. However, this
replication is configured independently of the volume
replication configured on the primary volume.
If one of the DataFRAMEs in the primary location
fails, the primary volume will still be available. If
all of the DataFRAMEs fail, or if the application
server fails, then you can recover data from the
remote snapshots or tape backups in the off-site
location.
64 Sample Remote Data Protection Pack Configurations
Using Remote Data Protection Pack for Off-site Backup and Recovery
Using Remote
Data
Protection
Pack for
Off-site
Backup and
Recovery
For backup and recovery systems, Remote Data
Protection Pack can eliminate the backup window
on an application server. Using scripting, configure
the DataFRAME EBSD Driver for Linux driver to
mount remote snapshots on a backup server
(either local or remote), and then back up the
remote snapshot from the backup server. The
remote snapshot is available if the primary volume
fails.
Achieving
Off-site Tape
Backup
Rather than creating tape backups and then transporting them to a secure off-site location, you can
use Remote Data Protection Pack to create remote
snapshots in an off-site location and then create
tape backups at the off-site location.
Configuration for
Off-site Backup
and Recovery
To use remote snapshots for off-site tape backup,
create remote snapshots for access by your tape
backup application:
Create remote volumes in your backup
location.
Configure your backup application to access
the remote snapshots.
Configure schedules to create remote
snapshots in the designated off-site locations.
If your application server uses multiple
volumes that must be in sync, use a script to
quiesce the application before creating
remote snapshots.
Create routine tape backups of the remote
snapshots.
See the example configuration illustrated in
Figure 3.8.
Sample Remote Data Protection Pack Configurations 65
Using Remote Data Protection Pack for Off-site Backup and Recovery
Configuration
Diagram
Figure 3.8. Off-site backup and recovery example configuration
How This
Configuration
Works for
Off-site Tape
Backup
Depending on how long you retain the copies of
the remote snapshots, you can retrieve data
directly from recent remote snapshots rather than
going to tape backups. Otherwise, retrieve data as
you normally would from the tape backup.
Best Practices
Retain the most
recent primary
snapshots in the
primary cluster
By keeping snapshots on your primary volume, you
can quickly roll back a volume to a previous
snapshot without accessing off-site backups.
When you create a schedule for Remote Data
Protection Pack, you specify a number of
primary and remote snapshots that you want
to retain. You can retain primary snapshots to
facilitate easy rollback of the primary volume.
(Retention of snapshots will affect the amount
66 Sample Remote Data Protection Pack Configurations
Using Remote Data Protection Pack for Off-site Backup and Recovery
Example
configuration
Achieving NonDestructive
Rollback
of space that is used in the cluster of
DataFRAMEs, so balance the number of
snapshots to retain with the amount of space
you are willing to use. To roll back to a
snapshot that you did not retain, you can still
access remote snapshots or tape backups.)
Retain remote snapshots in the backup
location to facilitate fast recovery of backed
up data. If you retain a number of remote
snapshots after a tape backup is created, you
can access this data without going to the
backup tape.
Retain 3 primary snapshots. This enables you
to roll the primary volume back, yet it
requires a relatively small amount of space on
the primary cluster.
Retain up to a week's worth of remote
snapshots on the backup cluster.
For snapshots older than 1 week, go to the
backup tape.
As discussed in “Rolling Back a Primary Volume” on
page 48, rolling a snapshot back to a volume
deletes any snapshots that were created since the
snapshot that you roll back to. For example,
suppose you created snapshots of a volume on
Monday, Tuesday, and Wednesday. On Thursday, if
you roll the volume back to Monday's snapshot,
then the snapshots from Tuesday and Wednesday
will be deleted.
You can use Remote Data Protection Pack to roll a
volume back to an old snapshot without losing the
interim snapshots. Because Remote Data Protection Pack creates two sets of snapshots—primary
snapshots and remote copies—you can roll a
volume back to a snapshot and still retain the
other set of snapshots.
Sample Remote Data Protection Pack Configurations 67
Using Remote Data Protection Pack for Off-site Backup and Recovery
Configuration for
Non-Destructive
Rollback
To use remote snapshots for non-destructive
rollback:
Create a remote snapshot schedule.
In the schedule, specify the same retention
policy for the primary and remote snapshots.
This ensures that you have copies of the same
number of snapshots in your primary and
remote locations. Any snapshots destroyed
during rollback of one volume will remain
intact on the other volume.
See Figure 3.9 for an illustration of this configuration.
Configuration
Diagram
Figure 3.9. Non-destructive rollback example
68 Sample Remote Data Protection Pack Configurations
Using Remote Data Protection Pack for Off-site Backup and Recovery
How This
Configuration
Works for NonDestructive
Rollback
You can choose to roll back either the primary
snapshot or the remote snapshot. Rolling back one
of the snapshots will cause all the more recent
snapshots of that volume to be deleted. The other
volume retains the full set of snapshots. You can
continue to make snapshots even though one side
was rolled back and the other side was not.
When deciding whether to roll back the primary or
remote volume, consider the following:
When you roll back the primary snapshot to a
primary volume, any applications accessing
the primary volume will no longer have access
to the most current data (as the primary
volume has been rolled back to a previous
state). If the primary volume must be synchronized with other volumes accessed by the
same application, consider rolling back the
remote volume instead. Figure 3.10 shows
rollback of the primary snapshot while leaving
the remote snapshots intact.
Sample Remote Data Protection Pack Configurations 69
Using Remote Data Protection Pack for Off-site Backup and Recovery
Figure 3.10. Non-destructive rollback from the primary snapshot
To roll back the remote snapshot, you must
first make the remote volume into a primary
volume. This will stop scheduled creation of
remote snapshots, which may jeopardize your
high availability, disaster recovery, or routine
backup strategies. Figure 3.11 shows rollback
of the remote snapshot.
70 Sample Remote Data Protection Pack Configurations
Using Remote Data Protection Pack for Off-site Backup and Recovery
Figure 3.11. Non-destructive rollback from the remote snapshot
Best Practices
Roll back the primary
snapshot and keep
the remote snapshots
as a backup
To ensure that Remote Data Protection Pack
continues to operate, roll back the primary
volume as follows:
1. Preserve the current state of the primary
volume that you want to roll back by creating
a one-time (manual) remote snapshot of it.
2. Roll back the volume.
Remote snapshots remain intact.
3. After the primary volume is rolled back,
scheduled creation of remote IP copies will
continue.
Sample Remote Data Protection Pack Configurations 71
Using Remote Data Protection Pack for Data Migration
Using Remote
Data
Protection
Pack for Data
Migration
Achieving Data
Migration
Remote Data Protection Pack allows a one-time
migration of data from one application server to
another without interrupting the production application server. This capability supports a number of
uses such as data mining or content distribution.
You can use Remote Data Protection Pack to make
a complete copy of one or more volumes without
interrupting access to the original volumes. This
type of data migration allows you to copy an
entire data set for use by a new application or
workgroup.
To copy data from one location to another, simply
create a one-time remote snapshot of the volume.
To make the remote snapshot a read/write
volume, make it into a primary volume.
Configuration for
Data Migration
To make a copy of a volume in a remote location,
configure a cluster of DataFRAMEs in the remote
location with enough space to accommodate the
volume. See the example illustrated in
Figure 3.12.
72 Sample Remote Data Protection Pack Configurations
Using Remote Data Protection Pack for Data Migration
Configuration
Diagram
Figure 3.12. Data migration example configuration
How This
Configuration
Works for Data
Migration
Suppose you want to create a complete copy of a
volume for an application to use in different
location.
1. Configure a cluster of DataFRAMEs in the new
location to contain the copied volume.
2. Create either a one-time remote snapshot of
the volume onto the cluster in the new
location.
If your application server uses multiple
volumes that must be in sync, use a script to
quiesce the application before creating
remote snapshots.
[Optional] You can create regular one-time
snapshots and use remote copy to move the
snapshots to the remote cluster at your convenience.
3. On the cluster in the new location, make the
remote volume into a primary volume.
Sample Remote Data Protection Pack Configurations 73
Using Remote Data Protection Pack for Data Migration
4. Configure the application server in the new
location to access the new primary volume.
Figure 3.13 shows migration of data by making
a remote volume into a primary volume.
Figure 3.13. Configuration after data migration
74 Sample Remote Data Protection Pack Configurations
Index
A
Adding
a remote snapshot schedule
31–
35
a remote volume 18
remote snapshots 15–22
Affordable Disaster Recovery
best practices 63
configuration 61
configuration diagram 61
B
Backup and Recovery
using Remote Data Protection Pack
65–71
Benefits
of Remote Data Protection Pack 6
Best Practices
for affordable disaster recovery 63
for high availability 58
for non-destructive rollback 71
for off-site backup and recovery
66
remote snapshot schedules 33
remote snapshots schedules 12
Business Continuance Using Remote
Data Protection Pack 53–64
C
Canceling a Remote Snapshot 25
Changing
backup site into new production
site 47
remote volume into primary
volume 40
roles of primary and remote
volumes 37
volume into remote volume 37
Configuration
for affordable disaster recovery 61
for data migration 72
for high availability 54
for non-destructive rollback 68
for off-site backup and recovery
65
Configuring
failover 43
primary volume and snapshots 34
Remote Data Protection Pack 7
remote volume and snapshots 34
Copy Bandwidth
setting 8
Copying
using Remote Data Protection Pack
15
Creating
split mirrors 50
Customer Support
registering Remote Data Protection Pack 15
D
Data
availability during failover 56
merging for failback 57
synchronizing 44
transfer rate (bandwidth setting)
24
Data Migration
and Remote Data Protection Pack
72–74
configuration diagram
73
75
configuration for 72
using Remote Data Protection
Pack for 72
Deleting
remote snapshot schedules 36
remote snapshots 26
Designating or Creating the Remote
Volume 8
Disaster Recovery
affordable, using Remote Data
Protection Pack 60–64
E
Editing
remote snapshot schedules 35–36
remote snapshots 25
F
Failback
merging data for 57
to production configuration 57
Failover
data availability during 56
to backup application server 56
with Remote Data Protection Pack
55–59
Feature Registration
15
G
Glossary for Remote Data Protection
Pack 1
Graphical Representations of Remote
Data Protection Pack 4
H
High Availability
and failover 55–59
and Remote Data Protection Pack
53–59
best practices 58
configuration diagram
configuration for 54
76
55
configuration of Remote Data Protection Pack 54–59
I
Icons for Remote Data Protection Pack
4
L
License Keys
15
M
Management Groups
disassociating 51–52
Merging data for failback 57
Monitoring Remote Snapshots
N
Non-Destructive Rollback
best practices 71
configuration diagram
configuration for 68
27–31
68
O
Off-Site Backup and Recovery
best practices 66
configuration diagram 66
configuration for 65
using Remote Data Protection
Pack for 65
P
Planning
failover 43
remote snapshot schedules 9–13
remote snapshots 7
Primary Volumes
making remote 37
prerequisites for rolling back 48
rolling back 48–50
name requirements for 49
threshold requirements 49
R
Remote Data Protection Pack
and data migration 72–74
and volume replication 5
business continuance 53–64
creating 4
disassociating management
groups 51–52
glossary 1
high availability 53–59
high availability and failover
Split mirrors, creating 50
Sync Bandwidth
setting 8
Synchronizing Data
after failover 44
between acting primary volumes
and original primary volumes
45
55–
59
high availability configuration 54–
T
Thresholds
requirements
rolled back primary volumes
59
icons for 4
overview 1
registering 15
routine backup and recovery
49
Timetable of failover
65–
??
Remote IP Copy
routine backup and recovery
44
U
Uses for Remote Data Protection Pack
6
??–
71
Remote Snapshots
canceling 25
creating 15–22
creating schedule 31–35
editing schedules 35–36
monitoring 27–31
planning 7
planning for scheduled 9–13
Rolling Back a Volume
Remote Data Protection Pack and
primary volumes 48–50
Remote Data Protection Pack and
remote volumes 50
Using
schedules for Remote Data Protection Pack 24
scripting for failover 43
Using Data Protection Pack
for Data Migration 72
Using Remote Data Protection Pack
for Business Continuance 53
for Off-Site Backup and Recovery
65
V
Viewing a List of Remote Snapshots 23
Volumes
making remote 37
Volumes See also Primary Volumes,
Remote Volumes
S
Scheduling
remote snapshots 31–35
Setting Bandwidth 8
Snapshots See also Primary Snapshots,
Remote Snapshots
77
78