1
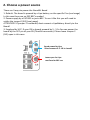
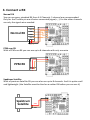
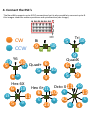
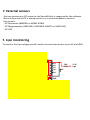
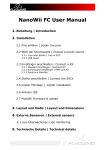
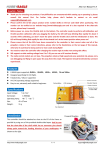
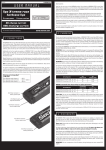
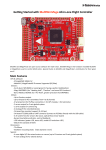
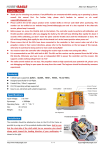
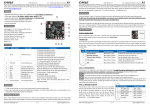
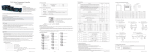
NanoWii User Manual_v01
1. Introduction
The NanoWii was designed to controll small to medium large multicopter.
It contains a microcontroller unit, a 3-axis gyroscope and a 3-axis ACC.
Without additional sensors it is possible to fly in acro and stable mode.
Acro = like normal RC helicopters
Stable = like coaxial helicopters (it always returns to a horizontal position)
The used microcontroller unit (Atmega32u4) has 6 high resolution PWM (ESC signal)
Outputs, a USB Port (no need fo a FTDI adaptor) and is able to read the signals of
various RX types. Gyro and ACC are combined in the MPU-6050.
GND
VCC
THR
AUX1
YAW
PITCH
ROLL
A3
A2
A1
A0
D4
Mini USB
Reset
GND
GND
SCL
SDA
3.3V
D9 D10 D5 D6 D11 D13
GND
RAW
2~3S
Lipo
SJ2(ESC<->RAW)
TX
Spek.sat
GND RAW if SJ2 is closed
2. Choose a power source
There are 3 ways to power the NanoWii Board
1. Default. The board is powerd by a Lipo battery on the specific Pins (see Image)
In this case there are no ESC BEC's needed
2. Power supply by a ESC BEC or just a BEC. To use it like this you will need to
solder the jumper2 (SJ2) (see Image)
ATTENTION ! If jumper 2 is soldered, dont connect a LipoBattery directly to the
Board!
3. Supplyed by VCC. If your RX is already powerd by 5 - 5,5v You can power the
board by the VCC pin of your RX (Throttle connector). Please leave Jumper 2
(SJ2) open in this case.
Board powed by Lipo
!!Dont connect it if SJ2 is closed!!
Leave open for Lipo
use.Close for BEC use
3. Connect a RX
Normal RX
You can use every standard RX from 4-5 Channels. 5 channel are recommended.
Only for the Throttle pin are all wires connected (signal,+,-). For the other channels
are only the signal wires needed.
AUX2
AUX1
Normal RX
RUDD
PITCH
ROLL
THR
- + s
PPM sum RX
With a PPM sum RX you can use up to 8 channels with only one wire
PPM RX
PPM
- + s
Spektrum Satellite
With a Spectrum Satellite RX you can also use up to 8 channels. And it is quite small
and lightweight. (the Satellite must be bind on a nother RX before you can use it)
Spektrum
Satellite
RX
3.3V
GND
4. Connect the ESC's
The NanoWii supports up to 6 ESC connections but its also possible to connect up to 8.
this images show the motors positions and spindirection (see Image)
CW
Bi
CCW
13
5
Y6
6
5
6
10
5
10
6
9
10
11 Quad+
9
QuadX
6 10
6
5
10
11
13
9
Hex 6+ 11
9
5
9
Hex 6X
6 10
5
9
Tri
Octo X 11 10
6
10
9
13
5
9
A2
5
13
6
4
5. Copter installation
When installing the NanoWii it will be good to place it at the center of your copter
with foam double sided tape
6. MultiWii Firmware & upload
The NanoWii is specially designed for the use with MultiWii
Download the Latest version of it (The nanoWii is full supportet at the V2.1)
Open it with Arduino and select the NanoWii and the needed settings in the file config.h.
If all settings are right, press the upload button.
7. External sensors
You may connect any I2C sensor to the NanoWii that is supported by the software.
But as a Gyro and a ACC is already present, it is recommendable to connect
this sensors:
- I2C Barometer (BMP085 or MS561101BA)
- I2C Magnetometer (HMC5843, HMC5883, AK8975 or MAG3110)
- I2C GPS
7. Lipo monitoring
To monitor the Lipo voltage you will need to connect two resitors to pin A3 and GND.
GND
VCC
THR
AUX1
YAW
PITCH
ROLL
A3
A2
A1
A0
D4
Mini USB
Reset
GND
GND
SCL
SDA
3.3V
D9 D10 D5 D6 D11 D13
56K
33K
GND
RAW
SJ2(ESC<->RAW)
TX
Spek.sat
GND RAW if SJ2 is closed
2~3S
Lipo