1
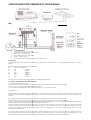
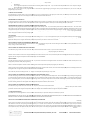
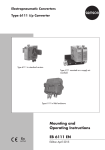
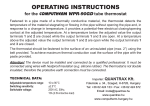
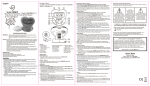
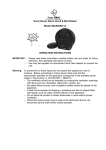
COMPUTTHERM Q7 RF THERMOSTAT USER MANUAL
4A Kealew Business Park, Mountrath Road, Portlaoise, Laois, Ireland.
Ireland www.helvetic.ie
COMPUTHERM Q7RF THERMOSTAT USER MANUAL
Wiring Instructions
Display Icons
ADJUSTING THE CURRENT DAY AND TIME
1.
Press the SET key to go in to the main screen.
2.
Press the DAY key. The day of the week will start to flash
3.
With the Keys - + keys adjust the day.
4.
Press the TIME key and the hour starts to flash.
5.
With the - + adjust the minutes
6.
Press the SET key to finish the programmingg and go back to the main screen.
PROGRAMMING
In the Wireless thermostat you can set a daily programme (every
(
day of the week has the same daily program) or a weekly program (different
(
programs for each day of
the week)
By default the wireless thermostat has the following daily program:
Slot
Start time Set Temperature
P1
7.00
20 Degrees
P2
9.00
17 Degrees
P3
12.30
20 Degrees
P4
15.00
19 Degrees
P5
17.30
22 Degrees
P6
23.00
17 Degrees
The start time of each slot and the consignment temperature can be
b modified in the following way.
THE SAME DAILY PROGRAMMING FROM MONDAY TO SUNDAY
1. Press the SET key to go to the main screen.
2. Press and hold the SET key then press PROG to go to the program. In the upper part of the screen, the days of the week start Flashing.
3. With the - + keys, select the group of days: MON TUE WED THR FIR SAT SUN.
4. Press the PRO key to confirm the program block. Then the hour of the key - + keys set in steps of 10 minutes
Press the PROG key.
The desired temperature of the slot starts flashing. With the help of - + keys set the desired temperature. The Temperature can be set in steps of 0.5 Degree. Press the
PROG key to confirm the programming and going to the next slot. Repeat the steps 1 and 2 until you have programmed the 6 slot.
slot Finish the programming by pressing
the set Key.
If you want to modify the programming for any day, do the following weekly programming. Press the SET key to go to the main screen.
Press and hold the SET key then press the PRO to go to the programming. The upper part of the screen, the days of the week start flashing.
With the - + Keys, select the day you want to modify: MON TUE WED
WE THR FRI SAT SUN is illustrated by 1 2 3 4 5 6 7 . The programming will automatically become daily
dai
and the modified day is adopted within the programming. Press the PROG to confirm the day.
Then the hour of the first slot P1 starts flashing. With the help of the - + keys set start hour of the first slot. The time can be set in steps of 10 minutes. Press the PROG
key. The program temperature for the first slot starts flashing. With the help of the - + keys set the desired temperature. The Temperature can be set in steps of 0.5
degree. Press the PROG key to confirm the programming and going to the next slot. Repeat the step 1 and 2 until you have programmed the 6 slots. Finish the
programming by pressing the set key
If you want to modify the programming for any day, do the following: Weekly programming Press the SET key to go to the main screen. Press and hold the Set key then
press the programming. In the upper part of the screen, the days of the week starts flashing. With the - + keys, select the day you want to modify: SUN.....Sat. The
programming will automatically become weekly and the
he modified day is adopted within
in the programming. Press the PROG to confirm the day.
1.
Then the hour of the first slot P1 starts flashing. With the help of the - + keys set start hour of the first slot. The time can be set in steps of 10 minutes. Press
the PROG key.
onsignment temperature of the first slot starts flashing. With the help of the - + keys set the desired temperature can be set in steps of 0.5 degree.
2.
The Consignment
Press the PROG key to confirm the program.
Repeat the step 1 and 2 until you have programmed the 6 slots.
slots. Finish the programming by pressing the set key. Repeat the process if you want to modify the
programming of any other day.
TO DISPLAY THE SET PROGRAM
Press the SET key to go to the main screen. Press the PRO key. If you use a daily program: In the upper part of the screen, the seven days of the week SUN... MON is
displayed and the lower part the screen displays the start time and temperature of the first slot P1.
By pressing the PROG key several times, the screen will display the start time and desired temperature
temperature of every one of the following slots: P2, P3, P4, P5 and P6.
PROGRAMMING THE CURRENT DAY
In the upper part of the screen it displays the current day indicator and in the lower part it displays the start time and temperature
temperature of the first slot P1 of that day. By
pressing the PROG several times, the screen will display
isplay the start and consignment temperature of every one of the following slots P2, P3, P4 and P6.
PROGRAMMING ANY OTHER DAY OF THE WEEK DIFFERENT FROM THE CURRENT DAY
D
The program of daily program will download to the weekly program. With the help of the - + Keys select the day of the week you want to check SUN......SAT. In the lower
part of the start time and consignment temperature for the first slot P1 are displayed by pressing the PROG key several times, the screen will display the start time and
consignment temperature of everyone of the following slots: P2, P3, P4, P5 and P6.
P6. If you want to check the programming of any day, repeat the steps above. To go back
b
to the main screen, press the SET key. If you want to reset the weekly program, you can just press, SET and PROG key together then press
pre + or – key to go back to daily
mode. The program will be reset to factory settings again.
COPY FUNCTION
In AUTO mode
ode press COPY key for 5 seconds display COPY week flashing. Press + or – key to select the date that you want to copy. Press COPY key week stops flashing.
Press + or – key to select which date that you want to copy. Press COPY key to download. Press + or – Key again to copy another date. Press COPY key once again, it’s ok.
Repeat the above process to copy the date that all you required press SET key to confirm or exits auto in 15 seconds.
HOW TO MANUALLY CHANGE THE CONSIGNNMENT TEMPERATURE
The manual variation
ation of the consignment temperature may be done in four different ways. Nit the next slot during the certain number of hours (Selectable from 1 to 9
hours). During a certain number of days (Selectable
Selectable from 1 to 99 days) permanently
HOW TO CHANGE THE TEMPERATURE
ERATURE UNTIL THE NEXT SLOT
Press the SET key to go to the main screen. Press the + key to increase the desired value. Press the – key to increase the desired value.
NOTE: to cancel the temperature manual variation and then go back to the temperature adjust
adju by the program press the SET key.
When the manual variation is done in the consignment temperature until the next slot, in the screen, alternatively the time remaining
remaining until the next slot is displayed, and
together with the consignment temperature indication,
cation, if displays the word MANUAL.
HOW TO CHANGE THE CONSIGNMENT TEMPERATURE DURING A CERTAIN NUMBER OF HOURS
Press the SET key to go to the main screen. Press the + or – key to increase or decrease the consignment value. Press the DAY to enter the number of hours (from 1 to 9)
during which you want to modify the programming
NOTE: to cancel the temperature manual variation and then go back to the temperature adjust by the program press the SET key.
When you make a manual variation of the consignment
signment temperature during a certain number of hours, the screen alternatively displays the time remaining until the next
slot together with a consignment temperature indicator and the word COMFORT
Once in the slot you want to modify press the + or – keys
key you can modify the temperature again as you want.
HOW TO CHANGE THE CONSIGNMENT TEMPERATURE DURING A CERTAIN NUMBER OF DAYS
Press the SET key to go to the main screen. Press the HOLD key. With the + - keys adjust the desired temperature. Press the HOLD key during and keep pressing it during
3 seconds to enter the number of days in the programming. The screen displays the letter d and the number of days is flashing.
flashing. With + - keys select the number of days
(from 1 to 99) during which you want to modify the programming. NOTE: To cancel the temperature manual variation and then go back to the temperature adjusted by
the program, press the SET key. When you make a manual variation
variation of the consignment temperature during a certain number of days, the screen alternatively displays
the time remaining until the next slot together with a consignment temperature indicator, and the word F.
HOW TO CHANGE THE CONSIGNMENT TEMPEATURE PERMANTENTLY
PERM
Press the SET key to go to the main screen. Press the + or – keys to increase or decrease the desired value.
NOTE: If you want to cancel the temperature manual variation and go back to the temperature adjusted in the program, press the
th SET key. When you make a manual
permanent variation of the consignment temperature, the screen displays the word HOLD beside the consignment temperature indicator.
indicator
TO TURN ON THE BACK LIGHT
Press LIGHT once. The back light will turn on for 10 seconds. Unless other keys
k
are pressed it will keep on until last key is pressed.
BEFORE SENDING OUT, WE WILL SET UP THE COMMUNICATION BETWEEN THE TRANMITTER AND RECIEVER UNITS, BUT IF YOU FIND THERE IS ANT INTERFERENCE OR
REASON YOU WANT TO CHANGE THE COMMUNICATION ADRESS, PLEASE
PLE
FOLLOW THE THESE STEPS:
HOW TO SET UP THE COMMUNICATION BETWEEN THE TRANMITTER AND RECIEVER
Install the receiver unit and turn on the power. Install power supply to the receiver.
receiver. Press the M/A key for 10 seconds, green LED will flash and will enter in to learning
mode. First press transmitters SET key and press DAY key. After 10 second’s later transmitter green LED stops flashing and learning id successful. The receiver unit green
LED should be turned off. Now pressing and holding TEST key for 2 seconds
second on the transmitter. The transmitter unit will transmit RF signal every five seconds
alternatively. This can be helping you to find a suitable range to operate the unit. The receiver unit can be operated manually by pressing MANUAL key once to adjust to
manual
anual (Green Led on) or auto (Green Led off) mode. You can turn the system on and off by pressing M/A button alternatively the
the red LED on indicates heating system is
on. If you want to go into mode again just press the MANUAL button once (Green LED off) then
then the system will turn on and off according to the signal received.
4A Kealew Business Park, Mountrath Road, Portlaoise, Co. Laois
www.helvetic.ie
Phone: 057 8 66 1234