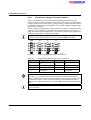
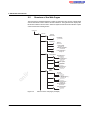
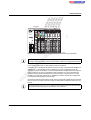
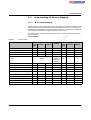
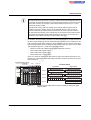
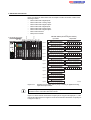
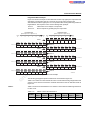
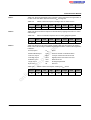
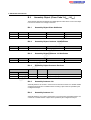
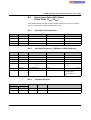
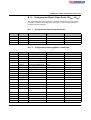
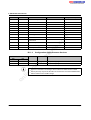
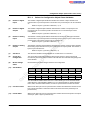
1
on
l
in
ec
om
po
ne
nt
s.
co
m
AUTOMATION
User Manual
UM EN IL EIP BK DI8 DO4 2TXPAC
Order No.: –
Inline Bus Coupler for Ethernet/IP With Eight
Digital Inputs and Four Digital Outputs
s.
nt
ne
po
om
in
ec
on
l
co
m
AUTOMATION
User Manual
02/2008
UM EN IL EIP BK DI8 DO4 2TX-PAC
Revision:
01
Order No.:
–
Designation
in
ec
This user manual is valid for:
om
po
ne
Designation:
nt
s.
co
m
Inline Bus Coupler for Ethernet/IP With Eight Digital Inputs and Four
Digital Outputs
2897758
on
l
IL EIP BK DI8 DO4 2TX-PAC
Order No.
7538_en_01
PHOENIX CONTACT
IL EIP BK DI8 DO4 2TX-PAC
Please Observe the Following Notes
In order to ensure the safe use of the product described, you have to read and understand
this manual. The following notes provide information on how to use this manual.
User Group of This Manual
The use of products described in this manual is oriented exclusively to qualified electricians
or persons instructed by them, who are familiar with applicable standards and other
regulations regarding electrical engineering and, in particular, the relevant safety concepts.
co
m
Phoenix Contact accepts no liability for erroneous handling or damage to products from
Phoenix Contact or third-party products resulting from disregard of information contained in
this manual.
Explanation of Symbols Used and Signal Words
nt
s.
This is the safety alert symbol. It is used to alert you to potential personal injury
hazards. Obey all safety messages that follow this symbol to avoid possible
injury or death.
po
ne
DANGER
This indicates a hazardous situation which, if not avoided, will result in death or serious
injury.
om
WARNING
This indicates a hazardous situation which, if not avoided, could result in death or serious
injury.
in
ec
CAUTION
This indicates a hazardous situation which, if not avoided, could result in minor or
moderate injury.
on
l
The following types of messages provide information about possible property damage and
general information concerning proper operation and ease-of-use.
NOTE
This symbol and the accompanying text alerts the reader to a situation which may cause
damage or malfunction to the device, either hardware or software, or surrounding
property.
This symbol and the accompanying text provides additional information to the reader. It is
also used as a reference to other sources of information (manuals, data sheets, literature)
on the subject matter, product, etc.
PHOENIX CONTACT
7538_en_01
IL EIP BK DI8 DO4 2TX-PAC
General Terms and Conditions of Use for Technical Documentation
Phoenix Contact reserves the right to alter, correct, and/or improve the technical
documentation and the products described in the technical documentation at its own
discretion and without giving prior notice, insofar as this is reasonable for the user. The
same applies to any technical changes that serve the purpose of technical progress.
nt
s.
co
m
The receipt of technical documentation (in particular data sheets, installation instructions,
manuals, etc.) does not constitute any further duty on the part of Phoenix Contact to furnish
information on alterations to products and/or technical documentation. Any other
agreement shall only apply if expressly confirmed in writing by Phoenix Contact. Please
note that the supplied documentation is product-specific documentation only and that you
are responsible for checking the suitability and intended use of the products in your specific
application, in particular with regard to observing the applicable standards and regulations.
Although Phoenix Contact makes every effort to ensure that the information content is
accurate, up-to-date, and state-of-the-art, technical inaccuracies and/or printing errors in
the information cannot be ruled out. Phoenix Contact does not offer any guarantees as to
the reliability, accuracy or completeness of the information. All information made available
in the technical data is supplied without any accompanying guarantee, whether expressly
mentioned, implied or tacitly assumed. This information does not include any guarantees
regarding quality, does not describe any fair marketable quality, and does not make any
claims as to quality guarantees or guarantees regarding the suitability for a special purpose.
ne
Phoenix Contact accepts no liability or responsibility for errors or omissions in the content
of the technical documentation (in particular data sheets, installation instructions, manuals,
etc.).
on
l
in
ec
om
po
The aforementioned limitations of liability and exemptions from liability do not apply, in so
far as liability must be assumed, e.g., according to product liability law, in cases of
premeditation, gross negligence, on account of loss of life, physical injury or damage to
health or on account of the violation of important contractual obligations. Claims for
damages for the violation of important contractual obligations are, however, limited to
contract-typical, predictable damages, provided there is no premeditation or gross
negligence, or that liability is assumed on account of loss of life, physical injury or damage
to health. This ruling does not imply a change in the burden of proof to the detriment of the
user.
7538_en_01
PHOENIX CONTACT
IL EIP BK DI8 DO4 2TX-PAC
Statement of Legal Authority
This manual, including all illustrations contained herein, is copyright protected. Use of this
manual by any third party is forbidden. Reproduction, translation, and public disclosure, as
well as electronic and photographic archiving or alteration requires the express written
consent of Phoenix Contact. Violators are liable for damages.
Phoenix Contact reserves all rights in the case of patent award or listing of a registered
design. Third-party products are always named without reference to patent rights. The
existence of such rights shall not be excluded.
How to Contact Us
Up-to-date information on Phoenix Contact products and our Terms and Conditions can be
found on the Internet at:
m
Internet
co
www.phoenixcontact.com.
nt
www.download.phoenixcontact.com.
s.
Make sure you always use the latest documentation.
It can be downloaded at:
A conversion table is available on the Internet at:
ne
www.download.phoenixcontact.com/general/7000_en_00.pdf.
If there are any problems that cannot be solved using the documentation, please contact
your Phoenix Contact subsidiary.
Subsidiary contact information is available at www.phoenixcontact.com.
Published by
po
Subsidiaries
.
in
ec
om
PHOENIX CONTACT GmbH & Co. KG
Flachsmarkstraße 8
32825 Blomberg
Germany
Phone +49 - (0) 52 35 - 3-00
Fax
+49 - (0) 52 35 - 3-4 12 00
PHOENIX CONTACT
586 Fulling Mill Road
P.O. Box 4100
Harrisburg, PA 17111-0100
USA
Phone +1-717-944-1300
on
l
Should you have any suggestions or recommendations for improvement of the contents and
layout of our manuals, please send your comments to
PHOENIX CONTACT
[email protected].
7538_en_01
Table of Contents
1
The Inline Ethernet/IP Bus Coupler ..........................................................................................1-1
2
Installation ...............................................................................................................................2-1
Inline Station....................................................................................................... 2-1
2.2
Bus Coupler Wiring............................................................................................. 2-3
2.2.1
Connecting the Ethernet/IP System .................................................... 2-3
2.2.2
Connection of Supply, Actuators, Sensors .......................................... 2-4
Startup/Operation ....................................................................................................................3-1
Default Upon Delivery/Default Settings............................................................... 3-1
3.2
Starting the Firmware ......................................................................................... 3-1
3.3
Sending BootP Requests ................................................................................... 3-2
3.4
Web-Based Management (WBM) ...................................................................... 3-2
3.5
Structure of the Web Pages................................................................................ 3-4
3.5.1
Diagnostics ......................................................................................... 3-5
3.5.2
Services .............................................................................................. 3-6
3.5.3
Bus Configuration ............................................................................... 3-7
3.5.4
Process Data Monitoring ..................................................................... 3-8
3.5.5
Password Protection ........................................................................... 3-9
3.5.6
Ethernet Speed and Configuration ...................................................... 3-9
3.5.7
Firmware Update via WBM and TFTP ................................................ 3-9
3.5.8
Process Data Access via XML ..........................................................3-10
3.5.9
XML File Structure ............................................................................3-11
co
m
3.1
3.6
3.7
Traps ................................................................................................................ 3-15
Autoconfiguration .............................................................................................3-15
Configuration ....................................................................................................3-15
on
l
in
ec
3.8
om
po
ne
nt
s.
3
2.1
7538_en_01
3.9
The CIP I/O Module Capacity ...........................................................................3-16
3.10
Configuring the Inline Station............................................................................3-17
3.10.1 Bus Coupler ......................................................................................3-17
3.10.2 Analog Input (AI) Modules .................................................................3-21
3.10.3 Thermocouple and RTD Modules .....................................................3-22
3.10.4 Special Function Modules .................................................................3-24
3.11
Understanding I/O Memory Mapping................................................................3-25
3.11.1 Bus Coupler Mapping .......................................................................3-25
3.11.2 Reserving I/O Memory for Future System Expansion .......................3-29
3.12
I/O Data Transfer ..............................................................................................3-30
3.12.1 I/O Scan Methods .............................................................................3-30
3.12.2 I/O Communications Objects ............................................................3-31
3.13
System Operational Guidelines ........................................................................ 3-33
3.13.1 Repeat Packet Interval (RPI) Settings ...............................................3-33
3.13.2 Maximum Connection Consideration ................................................3-33
PHOENIX CONTACT
i
IL EIP DI8 DO4 2TX-PAC
Diagnostics ..............................................................................................................................4-1
4.1
Diagnostic and Status Indicators ........................................................................ 4-1
4.2
Available Network Diagnostics ........................................................................... 4-4
4.2.1
Inline Status Word ............................................................................... 4-4
4.2.2
Major/Minor Faults .............................................................................. 4-4
4.2.3
Bit Meanings for Inline Status Word (Byte 0) ....................................... 4-5
4.2.4
Bit Meanings for Inline Status Word (Byte 1) ....................................... 4-5
4.2.5
Latched Diagnostics ........................................................................... 4-6
4.2.6
Inline Control Byte ............................................................................... 4-6
4.2.7
I/O Point/Channel Status ..................................................................... 4-7
4.2.8
Fault/Idle State and Value ................................................................... 4-7
4.2.9
Inline Analog Input, Thermocouple and RTD Fault Codes .................. 4-8
4.2.10 Error History ........................................................................................ 4-8
s.
Technical Data ................................................................................................... 5-1
5.2
Ordering Data ..................................................................................................... 5-5
ne
nt
5.1
Serial and Other PCP Inline Modules...................................................................................... A-1
A1
General.............................................................................................................. A-1
A2
Communications Methods................................................................................. A-7
A3
Serial and Generic PCP Modules Produced and Consumed Sizes ................. A-40
A4
I/O Memory Mapping, Serial and Special Function PCP Modules ................... A-42
Configuration Brief for the RS-232 and
RS-485/RS-422 Modules
A-43
on
l
in
ec
A5
po
A
Technical Data and Ordering Data...........................................................................................5-1
om
5
co
m
4
ii
PHOENIX CONTACT
7538_en_01
Table of Contents
Ethernet/IP Object Classes, Message Types, and Services ................................................... B-1
General.............................................................................................................. B-1
B2
CIP Class Services ............................................................................................ B-1
B3
CIP Object Classes ........................................................................................... B-2
B4
Identity Object (Class Code: 01dec, 01hex)......................................................... B-3
B5
Router Object (Class Code: 02dec, 02hex) ......................................................... B-5
B6
Assembly Object (Class Code: 04dec, 04hex)..................................................... B-6
B7
Digital Input Point (DIP) Object (Class Code: 08dec, 08hex) ............................... B-7
B8
Digital Output Point (DOP) Object (Class Code: 09dec, 09hex)........................... B-9
B9
Analog Input Point (AIP) Object (Class Code: 10dec, 0Ahex)............................ B-11
B 10
Analog Output Point (AOP) Object (Class Code: 11dec, 0Bhex) ....................... B-13
B 11
Configuration Object (Class Code: 100dec, 64hex)........................................... B-15
B 12
Inline Interface Object (Class Code: 101dec, 65hex)......................................... B-20
B 13
Inline Module Object (Class Code: 102dec, 66hex)........................................... B-23
B 14
Inline Special Function Object (Class Code: 103dec, 67hex) ............................ B-25
B 15
COS Mask Object (Class Code: 104dec, 68hex)............................................... B-27
B 16
PCP Object (Class Code: 105dec, 69hex)......................................................... B-30
B 17
Serial Communications Object (Class Code: 106dec, 6Ahex) ........................... B-34
B 18
Port Object Class Definition (Class Code: 244dec, F4hex)................................ B-39
B 19
TCP/IP Interface Object (Class Code: 245dec, F5hex)...................................... B-40
co
s.
nt
ne
po
Ethernet Link Object (Class Code: 246dec, F6hex) ........................................... B-42
on
l
in
ec
B 20
m
B1
om
B
7538_en_01
PHOENIX CONTACT
iii
on
l
in
ec
om
po
ne
nt
s.
co
m
IL EIP DI8 DO4 2TX-PAC
iv
PHOENIX CONTACT
7538_en_01
The Inline Ethernet/IP Bus Coupler
1
The Inline Ethernet/IP Bus Coupler
Ethernet/IP Bus Coupler
The Ethernet/IP bus coupler, shown in Figure 1-1, provides an interface between
Ethernet/IP and the Phoenix Contact range of Inline I/O modules. It also provides the
required bus signal conditioning and the power supply for the connected station
components.
The bus coupler provides the initial connection for the main supply, UM, and the segment
(I/O) supply, US, to the station. You can also provide the main supply UM and the segment
supply US using a power terminal and/or a segment terminal respectively.
m
11
I2
AC
X-P
I1
nt
2T
O4
I8 D
K D 758
IP B 97
IL E -No.: 28xx .xx
er /x xx
Ord W: xx xx.xx.
/F
HW Addr.: IP
C
t
e
MA
O1
PWR
confo
rm
ance
SE
d
T
RY
MS
NS
S1
D
E
2
1
4
3
2
1
4
3
7
5
8
6
7
2.
1. 1
1
po
RE
teste
BO
UL
US
UM
ne
erN
Eth
1
T
AC
LN
2
9
s.
co
10
1
K1
4x
X1
AC
T2
in
ec
3
om
K2
LN
Figure 1-1
X2
4
6
5
8
75380001
Features of the Inline Ethernet/IP bus coupler
on
l
Key:
1
2
3
4
5
6
Electronics base
Reset button
Ethernet/IP connections (twisted pair
cables in RJ45 format)
Power connector
Connector for digital outputs
Connector for digital inputs
7
8
9
10
Diagnostic and status indicators
Labeling field
End plate
MAC address in clear text and as a
barcode
11 Two FE contacts for grounding the bus
coupler using a DIN rail
(on the back of the module)
The Electronic Data Sheet (EDS) can be found on the Internet at:
www.download.phoenixcontact.com.
7538_en_01
PHOENIX CONTACT
1-1
IL EIP BK DI8 DO4 2TX-PAC
Features
The key features of the IL EIP BK DI8 DO4 2TX-PAC are listed below:
– Module Features
–
–
m
co
–
–
–
Up to 61 other Inline terminals can be connected (process data channel)
Up to eight other PCP modules can be connected
Can be installed in the field, software for automatic configuration of the station is not
required
Automatic baud rate detection on the local bus (500 kbaud or 2 Mbaud)
s.
– Inline Features
nt
–
–
–
–
ne
–
–
–
–
–
–
2 x Ethernet twisted pair according to 802.3 with auto negotiation and auto crossover
connected via an integrated 3-port switch (2 external ports, 1 internal port)
Ethernet connection via 8-pos. RJ45 female connector
Ethernet TCP/IP, with 10/100 Base-T (X)
Industrial Ethernet/IP, Version 1.2
Process data access via XML
Web-based management (WBM)
IP parameter configuration:
BootP, WBM, Static IP (DHCP to be added on later revision)
Integrated web server
Eight digital inputs
Four digital outputs
Diagnostic and status indicators
Electrical isolation of Ethernet interface and logic
Type of device profile: 0Chex communication adapter
Supported CIP connections in total:
128 (eight, typical)
Explicit signaling:
Max. number of connections 128 (eight, typical)
I/O signaling:
Max. number of connections 128 (eight, typical)
Device configuration possibilities:
EDS, individual software
MAC parameter configuration:
Rate: 10 Mbps, 100 Mbps, automatic
Duplex: half, full, automatic
om
–
–
–
in
ec
– Ethernet and CIP
Features
po
For additional information about the supported Inline modules, please refer to the "I/O
Modules at Bus Couplers" application note. It can be downloaded at:
www.download.phoenixcontact.com.
–
on
l
–
Applications
1-2
PHOENIX CONTACT
–
–
–
Connection of sensors/actuators via Ethernet/IP
7538_en_01
Installation
2
Installation
2.1
Inline Station
m
The Inline product range is a modular automation system. Inline modules are joined
together to create functional units that meet the requirements of the application.
See Figure 2-1, shown with the Ethernet/IP bus coupler. Both communication and power
routing is accomplished automatically by the physical interconnections between the I/O
modules. Additional networking options permit the Inline station to branch out to various
machine mounted I/O modules such as Fieldline Modular, or AS-i devices.
co
For general information on the setup of an Inline station, please refer to the
IL SYS INST UM E user manual.
2
X5
X6
D
PWR
EtherNet IP
O1
I1
BO RY
D E
UL MS
US NS
UM S1
1
3
X7
X8
X9
1
1
1
1
2
2
1
3
2
4
5 7
6 8
2
1
ACT1
LNK2
ACT2
2
1
2
1
2
1
X13
X14
X15
D
1
X17
D
D
1
2
2
X16
D
1
US
1
1
2
4 5
X18
D
E
3
4
2
1
2
1
2
1
X19
UL
2
2
2
1
2
1
2
1
2
FLM
1
2
1
2
1
2
1
2
po
LNK1
1
X12
2
2
4
2
X11
1
2
3
4
conformance tested
RESET
D
1
2
2
3
2
4
X10
D
D
1
I2
ne
IL EIP BK DI8 DO4 2TX-PAC
Order-No.: 2897758
HW/FW: xx/xxx
MAC Addr.: xx.xx.xx.xx
3
2
nt
1
s.
Inline I/O station (example)
X1
om
X2
6
in
ec
Network
connector
on
l
24 V DC
Power
supply
DIO 8/4
Fieldline Modular I/O modules
75380002
Figure 2-1
Example of a basic Inline station
Key:
1 Bus coupler (here: IL EIP BK DI8 DO4 2TX-PAC)
2 I/O modules
3 Power terminal
4 Segment terminal (here: IB IL 24 SEG/F-D)
5 Branch terminal for integrating a Fieldline Modular local bus in an Inline station
(here: IB IL 24 FLM-PAC)
6 Fieldline Modular local bus
7538_en_01
PHOENIX CONTACT
2-1
IL EIP BK DI8 DO4 2TX-PAC
Bus Coupler Module
The first step in setting up a modular I/O station is to connect the bus coupler module to the
Ethernet/IP cable. I/O modules may be installed branching off from these bus coupler
modules, to create a local bus. The bus coupler module also supplies communications
power to the connected I/O modules.
A breakdown of the supply voltage on the bus coupler module stops the communications to
the modules connected to the bus coupler and causes an error message for the node.
–
–
–
–
Coupling of Ethernet/IP and the Inline I/O modules
Supplying the I/O modules with communications power
Electrical isolation of the local I/O
Providing diagnostic information from the connected I/O to Ethernet/IP
Maximum Number of
Devices
The maximum number of devices that you can connect to a bus coupler is determined by
the following parameters:
– Up to 61 devices can be connected to a bus coupler. This number includes all the
devices after the bus coupler with input or output data, i.e., the Inline modules and the
modules for Fieldline Modular local bus.
– The bus coupler can supply a maximum of 0.8 A for communications power and 0.5 A
for analog supply power.
– The current carrying capacity of the voltage jumpers is limited. For the limit values of the
individual voltage jumpers, refer to the IL SYS INST UM E user manual.
ne
nt
s.
co
m
Tasks of the Bus Coupler
Module
on
l
in
ec
om
po
Observe the current consumption of each device for a given power supply.
Current consumption specifications can be found in the product-specific data sheets.
2-2
PHOENIX CONTACT
7538_en_01
Installation
2.2
Bus Coupler Wiring
2.2.1
Connecting the Ethernet/IP System
I2
AC
X-P
I1
O1
PWR
erN
Eth
ance
RE
teste
d
E
2
1
4
3
X1
ne
T2
AC
K2
Connecting the RJ45 connector
Pin assignment of the RJ45 connector
Assignment
in
ec
on
l
75380003
om
Table 2-1
Pin
po
X2
Figure 2-2
7
5
8
6
T
SE
T1
AC
K1
LN
LN
2
1
4
3
s.
rm
D
RY
MS
NS
S1
nt
confo
BO
UL
US
UM
co
2T
O4
I8 D
K D 758
IP B 97
IL E -No.: 28xx .xx
er /x xx
Ord W: xx xx.xx.
/F
HW Addr.: IP
C
t
e
MA
m
Connect the Ethernet/IP system to the bus coupler (see Figure 2-2) via an RJ45 connector.
For the pin assignment, please refer to Table 2-1.
1
TxD + (transmit data +)
2
TxD - (transmit data -)
RJ45
Pin 1
TD+
Pin 2
TD-
Pin 3
RD+
3
RxD + (receive data +)
4
Reserved
Pin 4
res.
5
Reserved
Pin 5
res.
6
RxD - (receive data -)
Pin 6
RD-
7
Reserved
Pin 7
res.
8
Reserved
Pin 8
res.
Both Ethernet interfaces have an auto crossover function.
7538_en_01
PHOENIX CONTACT
2-3
IL EIP BK DI8 DO4 2TX-PAC
2.2.2
Connection of Supply, Actuators, Sensors
Figure 2-3 and Table 2-2 to Table 2-5 list terminal assignments for the bus coupler
connectors. Figure 2-4 shows a wiring schematic for the power connector. Note that the bus
coupler provides I/O power to the main (UM) and segment (US) circuits for the Inline station.
Communications/logic power and analog power (UANA) are also supplied by the bus coupler
through the UL connection.
The bus coupler has 3 external power supply connections UL (logic), US (segment) and UM
(main). The 7.5 volt internal UL (communications) supply and the +24 V UANA (analog)
supply are derived from the external +24 V UL. The +24 V (UL) external power supply can be
connected to Ethernet/IP or another external supply.
1.4
3.1 4.1
1
1
1.2 2.2
2
2
1.3 2.3
3
3
1.4 2.4
4
4
2.1 1.1
2.2 1.2
2.3 1.3
2.4 1.4
1
1
1.2 2.2
2
2
1.3 2.3
3
3
1.4 2.4
4
4
2.1 1.1
2.2 1.2
2.3 1.3
2.4 1.4
1
1
1.2 2.2
2
2
1.3 2.3
3
3
1.4 2.4
4
2.1 3.1
2.2 3.2
1
co
I2
1.1 2.1
4
1
3.2 4.2
4.1
4.2
s.
1.3
I1
1.1 2.1
2.3 3.3
2
2.4 3.4
2
3.3 4.3
3
nt
1.2
O1
1.1 2.1
3
3.4 4.4
4
4
4.3
4.4
ne
1.1
PWR
m
For information on special features of an Inline station, such as voltage supply, voltage
distribution, and grounding, please refer to the IL SYS INST UM E user manual.
3
2
4
75370008
Terminal point assignment of the Inline connector
Table 2-2
Terminal point assignment of the power connector (1)
po
1
Figure 2-3
1.1
1.2
in
ec
1.3
om
Terminal Point Assignment
1.4
Terminal Point Assignment
US
2.1
UM
UL
2.2
UM
GND UL
2.3
GND UM, US
Functional earth
ground (FE)
2.4
Functional earth
ground (FE)
on
l
NOTE: Module is damaged in the event of overload
The GND UM, US potential jumper carries the total current of the main and segment
circuits. The total current must not exceed the maximum current carrying capacity of the
potential jumpers (8 A). If, in the course of configuring, it is found that the 8 A limit is
reached at one of the potential jumpers US, UM and GND, a new power terminal must be
used.
The functional earth ground must be connected to the 24 V DC supply/functional earth
ground connection.
2-4
PHOENIX CONTACT
7538_en_01
Installation
Table 2-3
Terminal point assignment of the output connector (2, O1)
Terminal Point Assignment
Terminal Point Assignment
1.1
OUT1
2.1
OUT2
1.2
GND
2.2
GND
1.3
FE
2.3
FE
1.4
OUT3
2.4
OUT4
Table 2-4
Terminal point assignment of the input connector (3, I1)
Terminal Point Assignment
1.1
IN1
2.1
m
Terminal Point Assignment
IN2
US
2.2
GND
2.3
GND
1.4
IN3
2.4
IN4
Terminal point assignment of the input connector (4, I2)
IN5
3.2
US
3.3
GND
3.4
po
3.1
Terminal Point Assignment
ne
Terminal Point Assignment
nt
Table 2-5
IN7
4.1
IN6
4.2
US
4.3
GND
4.4
IN8
PWR DO4 DI4 DI4
2
1
3
4
IN6
in
ec
om
J
+
-
+24 V
+
+24 V
US
UL -
UM
OUT2
-
OUT3
on
l
IN8
+
Ethernet/IP
Figure 2-4
US
s.
co
1.2
1.3
75370005
Connection example
J = internal jumper (in the module)
7538_en_01
PHOENIX CONTACT
2-5
on
l
in
ec
om
po
ne
nt
s.
co
m
IL EIP BK DI8 DO4 2TX-PAC
2-6
PHOENIX CONTACT
7538_en_01
Startup/Operation
3
Startup/Operation
3.1
Default Upon Delivery/Default Settings
Upon delivery, the following functions and features are available:
m
Disable
0.0.0.0
c2897758.fw
IL EIP BK DI8 DO4 2TX-PAC
Ethernet/IP Bus Terminal
Unknown
Unknown
0 ms (Disabled)
Reset Fault Mode (Default)
Enable inputs & outputs
Starting the Firmware
in
ec
3.2
po
–
om
–
ne
nt
–
0.0.0.0
0.0.0.0
0.0.0.0
Enable
co
–
IP Configuration
IP Address:
Subnet Mask:
Default Gateway:
BootP Requests:
Software Update
Software Update on Next Reboot:
TFTP-Server IP Address:
Downloadable File Name:
System Identification
Name of Device:
Description:
Physical Location:
Contact:
Process Data Monitoring
Process Data Watchdog Timeout:
Fault Response Mode:
Plug and Play Mode
s.
–
on
l
Upon delivery, the IL EIP BK DI8 DO4 2TX-PAC bus coupler has no valid IP parameters.
7538_en_01
Once you have connected the power to the bus coupler, the firmware is started. The
following sequence appears on the LEDs:
Table 3-1
LEDs during the starting sequence
Display
Meaning
BO flashing
Starting Boot loader
Transmitting BootP requests
BO on
Extracting firmware
BO off
Starting firmware
RY flashing
Firmware ready to operate
PHOENIX CONTACT
3-1
IL EIP BK DI8 DO4 2TX-PAC
3.3
Sending BootP Requests
BootP Enabled
During start-up the device sends BootP requests without interruption until it receives a valid
IP address. The requests are transmitted at varying intervals (2 s, 4 s, 8 s, 2 s, 4 s, etc.) so
the network is not loaded unnecessarily. If valid IP parameters are received the device will
use these parameters until the device is reset or power is cycled.
BootP Disabled
With a valid IP configuration saved to the device and BootP disabled the device will start
with the stored IP configuration and will not send BootP requests.
s.
Web-Based Management (WBM)
nt
3.4
co
m
NOTE: Before disabling automatic BootP setting, be sure to record the current IP address.
You will need the current IP address if you want to re-enable BootP setting of the IP
address. If you forget the IP address, the only way is to delete the whole configuration with
the reset button during power up.
ne
The IL EIP BK DI8 DO4 2TX-PAC has a web server, which generates the required pages for
web-based management and, depending on the requirements of the user, sends them to
the "Factory Manager" or a standard web browser.
po
Web-based management can be used to access static information (e.g., technical data,
MAC address) or dynamic information (e.g., IP address, status information) or to change
the configuration (password-protected).
om
Calling Web-Based Management
in
ec
The IL EIP BK DI8 DO4 2TX-PAC web server can be addressed using the IP address if
configured correspondingly. The bus coupler homepage is accessed by entering the URL
"http://<IP address>".
Example: http://172.16.113.38
on
l
If you cannot access the WBM pages, check the connection settings in your browser and
deactivate the proxy, if set.
3-2
PHOENIX CONTACT
7538_en_01
WBM homepage
on
l
in
ec
om
po
Figure 3-1
ne
nt
s.
co
m
Startup/Operation
7538_en_01
PHOENIX CONTACT
3-3
IL EIP BK DI8 DO4 2TX-PAC
3.5
Structure of the Web Pages
The web pages for the Ethernet/IP bus coupler are divided into two sections. The left-hand
side has the selection menu with the relevant submenus. The right-hand side displays the
information related to the menu item. Static and dynamic information about the bus coupler
can be found in the following menus.
< ip - a d d r e s s >
in d e x .h tm
m
G e n e ra l
In s tr u c io n s
D e v ic e
In fo r m a tio n
-
co
In fo r m a tio n
g e n in s t.h tm
G e n e ra l d e v in fo .h tm
ne
nt
s.
T e c h n ic a l D a ta te c h d a ta .h tm
H a r d w a r e In s ta lla tio n
h w in s ta l.h tm
L o c a l D ia g n o s tic s
lo c d ia g .h tm
-
-
po
D e v ic e
C o n fig u r a tio n
-
ip c o n in f.h tm
S y s te m
Id e n tific a tio n
s y s c o n f.h tm
-
s y s in fo .h tm
S o ftw a re U p d a te
s w u p d a te .h tm
om
in
ec
on
l
IP C o n fig u r a tio n
ip c o n fig .h tm
-
s w u p in fo .h tm
ftp in fo .h tm
C h a n g e P a s s w o rd
p a s s w o rd .h tm
-
p a s s in fo .h tm
In lin e
S ta tio n
S e r v ic e s s e r v ic e s .h tm
s v p p in fo .h tm
s v p fin fo .h tm
P r o c e s s D a ta M o n ito r in g
p d m o n it.h tm
-
p d m o n in f.h tm
p d n fin fo .h tm
R e m o te D ia g n o s tic s
r e m d ia g .h tm
B u s C o n fig u r a tio n
b u s c o n f.h tm
P C P C o n fig u r a tio n
p c p c o n f.h tm
-
p c p in fo .h tm
Figure 3-2
3-4
PHOENIX CONTACT
Structure of the web pages (example)
7538_en_01
Startup/Operation
3.5.1
Diagnostics
Remote diagnostics in WBM
on
l
in
ec
om
Figure 3-3
po
ne
nt
s.
co
m
On this website example, you can have a look at the local bus diagnostics. The diagnostic
status and diagnostic parameter register are shown here.
7538_en_01
PHOENIX CONTACT
3-5
IL EIP BK DI8 DO4 2TX-PAC
3.5.2
Services
om
po
ne
nt
s.
co
m
In this example website the user can set or reset the Plug & Play Modes. The user can
acquire and store the currently connected I/O configuration. Also the user can confirm any
I/O station peripheral faults.
Website of the services
on
l
in
ec
Figure 3-4
3-6
PHOENIX CONTACT
7538_en_01
Startup/Operation
3.5.3
Bus Configuration
in
ec
om
po
ne
nt
s.
co
m
This example website shows the current configuration of the Inline station including the I/O
produced and consumed sizes and local bus baud rate. If an error occurs, the error location
is indicated. The number of the affected element is highlighted in red.
Bus configuration of the station
on
l
Figure 3-5
7538_en_01
PHOENIX CONTACT
3-7
IL EIP BK DI8 DO4 2TX-PAC
3.5.4
Process Data Monitoring
Monitoring the Ethernet/IP connections is executed by the Ethernet/IP protocol stack with
the help of connection timers. If a connection is aborted, due to a broken cable or a control
system without connection reset, the outputs are set back to the pre-defined state. The state
is set either in the DOP (digital output point) or in the AOP (analog output point) objects. In
order to regain control over the outputs, the error must be removed.
An additional process data watchdog is integrated into the bus coupler to avoid uncontrolled
setting/resetting of the Inline station outputs in the event of an error.
m
If outputs of the stations are set, ensure access of the controlling process to the station. In
the event of an error, e.g., network line interrupted or function error in the controlling
process, the bus coupler can react appropriately via the process data watchdog. By default
upon delivery, the watchdog is deactivated with a 0 ms timeout.
s.
co
If the watchdog timeout is set to a value other than 0 (e.g. 500 ms). The first write process
activates the process data watchdog. The next write process is expected during timeout
(500 ms). During error-free operation, the write process is performed during timeout and the
watchdog is restarted (triggered). If there is no triggering during timeout, an error occurred.
ne
nt
Two reactions follow:
– The selected fault response mode is executed
– The NetFail signal is set
po
For safety reasons, the user cannot stop the watchdog once it has been activated. In case
the user terminates the controlling application, there is no watchdog triggering; when
timeout has expired, the NetFail signal is set and the selected fault response mode is
executed.
on
l
in
ec
om
The NetFail signal is acknowledged using the web-based management and the fault
response mode is reset. Read calls do not trigger the process data watchdog. By
acknowledging the error, the watchdog is restarted. This means that it must be triggered
during timeout, otherwise an error is detected again.
Figure 3-6
3-8
PHOENIX CONTACT
Process data monitoring
7538_en_01
Startup/Operation
3.5.5
Password Protection
All status changes to the bus coupler require the entry of a password. The password can be
changed at any time. Your unique password must be between four and twelve characters
long (please note that it is case-sensitive). By default upon delivery, the password is
"private".
If you forget the password, the only way to access the bus coupler again is to reset the
entire configuration using the reset button.
Ethernet Speed and Configuration
m
3.5.6
Firmware Update via WBM and TFTP
po
3.5.7
ne
nt
s.
co
The IL EIP BK DI8 DO4 2TX-PAC firmware will include a website setting that allows for the
selection of Fixed Manual override or auto-negotiate of transmission speeds. Auto
Negotiation plus Manual Override provides support for the widest possible range of network
infrastructure devices, such as switches. This will allow the BK to adapt to virtually all
possible system applications, including older systems that do not support the higher/auto
data rates. By providing the manual over-ride, the system is freed of any auto-negotiate
traffic that could possibly impact an older system. However, by default, the module will be
in the "auto- negotiate detect" mode of data transmission to allow for easiest connection to
current systems.
on
l
in
ec
om
The following steps must be carried out when executing a firmware update using WBM:
– In WBM, click on "Device Configuration" and then "Software Update". Enter the IP
address of the TFTP server in the "TFTP Server IP Address" field. Then enter the file
name of the firmware and the path name, if necessary, in "Downloadable File Name".
In the "Software Update on Next Reboot" field, click "Enable".
– Enter your password. To wait until later to apply the update with a restart, click "Apply".
To start the update immediately, click "Apply and Reboot".
– Check the execution of the update by checking the firmware version under "Device
Information/General". In the event of an error during the download, a restart repeats the
download. To abort the update, set "Disable" in the "Software Update on Next Reboot"
field.
7538_en_01
PHOENIX CONTACT
3-9
"Software Update" menu
ne
Figure 3-7
nt
s.
co
m
IL EIP BK DI8 DO4 2TX-PAC
po
If BootP is set to "Enable" and a reply with values for "TFTP Server IP Address" and
"Downloadable File Name" is received on a restart, these values overwrite the entries
made in WBM. The received values are displayed in WBM after the restart.
in
ec
om
In the event of an error during Flash programming (e.g., voltage interrupt), the bus coupler
can only be restarted by repeating the update. The bus coupler starts the update
automatically after a restart. Access to WBM is no longer possible.
3.5.8
Process Data Access via XML
on
l
The integrated web server of the IL EIP BK DI8 DO4 2TX-PAC offers the option of
accessing the process data of the connected Inline terminals via a web page in XML format.
You can access the web pages via a standard web browser. To access the XML pages with
the process data in the address line of the browser, enter the address in the following
format:
http://<IP address>/procdata.xml
3-10
PHOENIX CONTACT
7538_en_01
Startup/Operation
3.5.9
XML File Structure
The XML file contains different data areas:
IL_STATION
Frames for the entire XML file. The mandatory elements of this frame are
IL_BUS_TERMINAL and IL_BUS.
IL_BUS_TERMINAL
m
This data area contains information on the entire Inline station (bus coupler and all
connected terminals). This data area includes:
co
TERMINAL_TYPE
This area contains the name of the bus coupler, which is always
IL EIP BK DI8 DO4 2TX-PAC.
nt
s.
NAME
Contains the user-specific station name. The station name can be modified via WBM.
ne
IP_ADDRESS
Contains the IP address of the station.
om
po
MODULE_NUMBER
Contains the number of connected Inline terminals, including local I/Os. In the event
of a bus error, the number of the last known operable configuration is indicated.
in
ec
DIAGNOSTIC_STATUS_REGISTER
Contains the status of the Inline station, represented by all bits of the diagnostic status
register. A detailed description can be found in the diagnostic parameter register.
Whenever an error bit is set, the diagnostic parameter register is rewritten.
IL_BUS
on
l
Frame for the connected Inline terminals.
IL_MODULE
Frame for the data of an individual Inline terminal. The terminals are numbered
consecutively from one to a maximum of 63.
MODULE_TYPE
Contains the terminal type. Possible types are DI, DO, DIO, AI, AO, AIO, and PCP.
PD_CHANNELS
Number of process data channels in an Inline terminal. For digital terminals the
number of channels is equal to the number of supported bits. For other terminals, the
number of process data words is indicated.
Example: An IB IL AO 2 has two process data channels and an IB IL 24 DO 8 has
eight bits and therefore eight process data channels.
7538_en_01
PHOENIX CONTACT
3-11
IL EIP BK DI8 DO4 2TX-PAC
PD_WORDS
Number of process data words in an Inline terminal. Please note that analog terminals
always have the same number of output and input words. An IB IL AO 2 therefore also
has two input words and an IB IL AI 2 also has two output words.
PD_IN
This area is used by all terminals that occupy input data. The number of process data
words depends on the terminal type.
Examples:
a) Inline terminal with two active inputs
ne
nt
s.
<IL_MODULE number="1">
<MODULE_TYPE>DI</MODULE_TYPE>
<PD_CHANNELS>2</PD_CHANNELS>
<PD_WORDS>1</PD_WORDS>
<PD_IN word="1">3</PD_IN>
</IL_MODULE>
co
m
PD_OUT
This area is used by all terminals that occupy output data (see also "PD_OUT" on
page 3-13).
po
b) Inline terminal with two digital inputs and only the second input is active.
in
ec
om
<IL_MODULE number="3">
<MODULE_TYPE>DI</MODULE_TYPE>
<PD_CHANNELS>2</PD_CHANNELS>
<PD_WORDS>1</PD_WORDS>
<PD_IN word="1">2</PD_IN>
</IL_MODULE>
on
l
c) Inline terminal with 16 digital inputs and the 13th and the 14th input are active.
<IL_MODULE number="7">
<MODULE_TYPE>DI</MODULE_TYPE>
<PD_CHANNELS>16</PD_CHANNELS>
<PD_WORDS>1</PD_WORDS>
<PD_IN word="1">12288</PD_IN>
</IL_MODULE>
The input word returns the value 12288 (212 + 213).
d) Inline terminal with two analog inputs, only the first channel being active (14970).
<IL_MODULE number="10">
<MODULE_TYPE>AI</MODULE_TYPE>
<PD_CHANNELS>2</PD_CHANNELS>
<PD_WORDS>2</PD_WORDS>
3-12
PHOENIX CONTACT
7538_en_01
Startup/Operation
<PD_IN word="1">14970</PD_IN>
<PD_IN word="2">8</PD_IN>
<PD_OUT word="1">0</PD_OUT>
<PD_OUT word="2">0</PD_OUT>
</IL_MODULE>
PD_OUT
This area is used by all terminals with output data. The use of bits is identical to the use of
"PD_IN".
m
In the event of an error in the Inline station, this is indicated in the diagnostic registers. The
D LED flashes on the bus coupler. The process data is invalid because only internal values
are indicated, not the values on local bus.
co
In order to make sure that only valid data is displayed, the diagnostic register must also
always be requested. The same is valid in the event of a faulty configuration. In this case,
local bus does not run and only internal values can be read in the XML file.
on
l
in
ec
om
po
ne
nt
s.
In the event of a peripheral fault, all data is valid, except for the data of the faulty terminal.
7538_en_01
PHOENIX CONTACT
3-13
on
l
in
ec
om
po
ne
nt
s.
co
m
IL EIP BK DI8 DO4 2TX-PAC
Figure 3-8
3-14
PHOENIX CONTACT
Screen for XML data
7538_en_01
Startup/Operation
3.6
Traps
Trap Generation
When important events occur, e.g., a configuration change, the bus coupler sends a trap to
a trap manager defined by the user. This enables the network administrator to react quickly
to these events and to ensure network availability. Traps are usually only transmitted once.
Supported Traps
ColdStart is sent twice each time the device is restarted.
PasswordChange is sent after the password is changed successfully.
FWHealth is sent after any changes to the firmware operating status.
Configuration is sent after any changes to the hardware configuration.
m
–
–
–
–
Autoconfiguration
nt
3.7
s.
co
SNMP is not supported in the first development step. The integration of SNMP is planned
for the second step.
Configuration
om
3.8
po
ne
That means you can now change your local bus configuration and make it active via the
website. To use this function you have to stop your I/O connection. That means you cannot
use the ADD ALL function when you have a running I/O connection.
on
l
in
ec
Configuration services can be accomplished by using the defined CIP Objects. Some
configuration features are also made available to the user through the web server.
7538_en_01
PHOENIX CONTACT
3-15
IL EIP BK DI8 DO4 2TX-PAC
3.9
The CIP I/O Module Capacity
The bus coupler is capable of processing the maximum number of instances (points) for
objects listed below.
Digital Input Points (DIP)
510 instances
Digital Output Points (DOP)
510 instances
Analog Inputs Points (AIP)
128 instances
Analog Output Points (AOP)
128 instances
Special Function Object
61 instances
8 instances*
Serial Communication Object
8 instances*
m
PCP Special Function Object
co
*Total instances shared between the PCP Special Function and Serial Communication
Objects cannot exceed 8.
nt
s.
There are certain considerations that must be observed when determining the number of I/O
devices that can be connected to the bus coupler. These considerations are described in
the following paragraphs.
1. The bus coupler cannot provide more than 0.8 A of communications/logic power (UL).
po
a.
Only the IB IL 24 FLM-PAC uses the logic supply (UL).
b.
FLM I/O devices will use current from the segment power (US); see
documentation for the IB IL 24 FLM-PAC.
on
l
in
ec
4.
The maximum number of devices connected to the bus coupler cannot exceed 61.
Analog modules cannot draw more than 0.5 A from the analog supply (UANA). Note that
analog modules also require current from the 0.8 A communications/logic supply (UL).
FLM devices
om
2.
3.
ne
If UL power requires more than 0.8 A a IB IL 24 PWR IN/R terminal can be inserted to
reinject UL power.
3-16
PHOENIX CONTACT
c.
The IB IL 24 FLM does not count towards the 61 device maximum.
d.
Each FLM I/O device does count towards the 61 device maximum.
There are 0.8 A of the current available on the Inline communications supply (UL) and
0.5 A of current available on the analog supply (UANA). Refer to the specific I/O module's
data sheet or the Phoenix Contact Automation Catalog to determine the amount of current
draw required for each I/O module or device to be connected to the bus coupler. The total
current consumption of all modules/devices cannot exceed the 0.8 A and 0.5 A
ratings stated above.
7538_en_01
Startup/Operation
3.10
Configuring the Inline Station
If using a serial or another type of PCP module, read this section then refer to Section
"Serial and Other PCP Inline Modules" on page A-1.
3.10.1
Bus Coupler
nt
ne
om
–
Digital input
Digital output
Analog input
Analog output
Special function
(incremental encoder, absolute encoder, high speed counter, other)
PCP and serial (AS-i master, RS232, RS485, and others)
po
–
–
–
–
–
s.
co
m
Configuration of the bus coupler allows it to read and communicate specific information
about the I/O modules connected on its local bus (backplane). Specific local bus information
includes:
– How many I/O modules are on the local bus
– Position of the I/O modules on the local bus
– How many points or channels (instances) each module contains
– Bytes of produced and consumed data
– Types of I/O modules:
Any module that is not recognized will be placed into the special function category.
in
ec
When configuring the Inline Ethernet/IP bus coupler, it is recommended that you remove
the connection to the Ethernet/IP scanner or make sure the scan list for the Ethernet/IP
scanner is empty.
on
l
3.10.1.1
Configuration Methods
When creating, adding to, or changing an Inline Ethernet/IP station, the I/O configuration
stored in the bus coupler must be updated to match the new configuration of the station.
Configure the bus coupler using one of the following 3 methods
1. Electronic Data Sheet (EDS) file
2. Auto-configuration (no software required)
3. Sending an explicit message
Electronic Data Sheet (EDS) File Method
The EDS file is the software interface between the bus coupler and a configuration software
package. The EDS file contains information about the number of produced and consumed
bytes and user-settable parameters.
The following procedure describes how to configure a bus coupler using the Electronic Data
Sheet. Repeat this procedure for each bus coupler on the network.
7538_en_01
PHOENIX CONTACT
3-17
IL EIP BK DI8 DO4 2TX-PAC
1.
2.
3.
m
4.
Obtain a list of I/O modules that will be used in the Ethernet/IP station.
Determine which types of I/O modules will be included in the scan. By default, all
modules will be included. If the default needs to be altered, a new value must be
downloaded to the bus coupler through EDS Parameter (Add All Mode).
Determine whether the "Inline Status" (diagnostic) word needs to be included in the
produced size. By default, these 2 bytes will be added to the produced size. By using
the produced data channel, the Inline Status word gives the user the ability to locate and
define any faults that could occur on the Inline local bus. If the user decides to disable
this feature, then the user must download a 0 to the bus coupler using Parameter 1 (Use
Inline Status) in the EDS file.
Determine whether analog or special function modules are used. If used, the user has
the option to set the Pad I/O parameter to a 0 or 1 (default). If not used, proceed to step
5.
If future system expansions are anticipated, determine if there is a need to reserve
digital points (bits) or analog words in the scan. If so, determine the number of points
(bits) or words to be reserved, then add to this the number of points or words currently
being used. For more information, refer to Section "Reserving I/O Memory for Future
System Expansion" on page 3-29. This total number of points or words must be
downloaded to the bus coupler. Reserving points or words in local I/O memory is
accomplished by using parameter Reserve Digital Inputs, parameter Reserve Digital
Outputs, parameter Reserve Analog Inputs and parameter Reserve Analog Outputs.
Enter the new station configuration parameters into the flash memory of the bus coupler
by changing the default value of parameter Add All I/O from a 0 (False) to a 1 (True).
Depending on the size of the local bus, the user may have to wait until the downloading
of the new configuration is completed. Completion of the download can be determined
by observing the state of the "MS" LED on the bus coupler and the "D" LEDs on the I/O
modules. While downloading, the LEDs will blink. Once the download is completed, the
blinking stops and the new configuration is now stored in the flash memory of the bus
coupler.
on
l
in
ec
6.
om
po
ne
5.
nt
s.
co
Depending on the I/O configuration, the analog or special function data may start on an
odd byte. If this is the case, it is possible that this word could span two words in the master
scanner. By setting the parameter Pad I/O to 1 (default) one byte will be added to the
produced/consumed size, thereby, forcing the first word based module to start on an even
byte. If this word already starts on an even byte and the user sets parameter 2 Pad I/O to
1 (default), no additional bytes will be added to the produced/consumed size.
3-18
PHOENIX CONTACT
7538_en_01
Startup/Operation
Plug and Play Mode
When in Plug and Play Mode, during power-up, the bus coupler will automatically attempt
to start the local I/O. When disabled, the bus coupler will compare the stored I/O
configuration with the connected I/O and start if equal.
Reboot not required to implement changes.
in
ec
om
po
ne
nt
s.
co
m
Setting the Store Config button will read in the current connected local bus and store it as
the I/O configuration.
Plug and Play mode
on
l
Figure 3-9
7538_en_01
PHOENIX CONTACT
3-19
IL EIP BK DI8 DO4 2TX-PAC
Sending an Explicit Message Method
When configuring the bus coupler of an Inline station by sending an explicit message,
observe the decisions stated under Section "Electronic Data Sheet (EDS) File Method" on
page 3-17. The parameters listed there can also be configured by sending multiple
explicit messages to the Configuration Object (Class Code 100dec, 64hex).
Service Code
16dec, 10hex
Class Code
100dec, 64hex
1
Attribute
X (X = Attribute to be changed)
Attribute Data
1
co
Instance
m
When using the explicit message method to change defaults, the following command
structure must be used to configure the Ethernet/IP bus coupler.
16dec, 10hex
Class Code
100dec, 64hex
Instance
1
Attribute
7 (Add All I/O)
Attribute Data
1
po
ne
nt
Service Code
s.
If no default settings need to be changed, you still must send one explicit message using the
following command structure to configure the Ethernet/IP bus coupler.
om
Setting Attribute 7 (Add All I/O) to a 1 instructs the bus coupler to scan its local bus and store
its current configuration into the bus coupler's flash memory. This configuration will remain
in flash memory until the next "Add All I/O" is sent or until a different configuration method is
used.
on
l
in
ec
The service that allows Attribute 7 to be set is Service Code 16dec, 10hex
(Set_Attribute_Single). Object classes, and services are described in Appendix B
"Ethernet/IP Object Classes, Message Types, and Services". The construction software
(RSNetworx for EIP or Pyramid EIP scan software) can be used to send explicit
messages.
3-20
PHOENIX CONTACT
7538_en_01
Startup/Operation
3.10.2
Analog Input (AI) Modules
General Configuration
Non-multiplexed (standard) analog input (AI) modules default to a unipolar range of 0 V DC
to +10 V DC. To change this range, the range attribute can be set in the Analog Input Point
(AIP) Object (Class Code 10dec, 0Ahex). Set the range by sending an explicit message using
"Class Instance Editor" in the construction software. Additionally, attributes 100 and 101
could be used to write a custom configuration value to the analog input module. Refer to the
Thermocouple and RTD module paragraph below to determine how to use attributes 100
and 101. Enabling attribute 101 will override any range settings.
m
Once the range is set for the new value, the bus coupler will retain that setting in flash
memory. If the bus coupler is replaced the configuration will need to be redone.
co
Appendix B "Ethernet/IP Object Classes, Message Types, and Services" provides details
of the AIP Object (Class Code 10dec, 0Ahex) range settings.
on
l
in
ec
om
po
ne
nt
s.
Multiplexed analog input (AI) modules such as the AI8 will appear to have only as many
channels as the module has data words. The BK has no way of determining how many
channels are contained within those words. By default, the control words for an analog input
module are not placed in the poll. However, with multiplexed modules, it is often desirable
to change the control word frequently. The user can instruct the BK to place these control
words into the poll. This is done by enabling attribute 102 "AIP configuration word in poll" of
the AIP object. Enabling attribute 102 will override both attribute 101 and any range settings.
7538_en_01
PHOENIX CONTACT
3-21
IL EIP BK DI8 DO4 2TX-PAC
3.10.3
Thermocouple and RTD Modules
General Configuration
This section describes how to change default settings for the Inline 2-channel thermocouple
module. However, changing the default settings for the 2-channel RTD modules is
accomplished in the same manner.
There is no "Thermocouple" or "RTD Object". To change default settings, the Analog
Input Points (AIPs) Object (Class Code 10dec, 0Ahex) must be used. Refer to Appendix B
"Ethernet/IP Object Classes, Message Types, and Services".
m
Default settings for the thermocouple modules are:
K
Resolution:
0.1°C (1 microvolt)
Output format:
15 bits and 1 sign bit with extended diagnostics
Cold junction:
Internal
s.
co
Sensor type:
nt
In order to change any setting. Refer to the thermocouple data sheet to determine the
appropriate attribute settings for the AIP Object (Class Code 10dec, 0Ahex).
ne
Keep in mind that thermocouple or RTD instances will appear as analog input instances.
There are 2 instances for every thermocouple or RTD module. Channel 0 will be the first
instance and Channel 1 will be the second.
on
l
in
ec
om
po
The user must keep track of which instances are analog inputs and which instances are
thermocouple inputs. Figure 3-10 shows a station where instances 1 and 2 of the AIP are
used by the 2-channel thermocouple. Instances 3, 4, 5 and 6 of the AIP are used by the next
two, 2-channel analog input modules. Instances 7 and 8 of the AIP are used by the next 2channel thermocouple module. The last two, 2-channel analog input modules occupy
instances 9,10,11 and 12.
3-22
PHOENIX CONTACT
7538_en_01
Ch
a
Ch nnel
ann 0 =
el 1 Ins
Ch
= In tanc
a
e
s
Ch nnel
ann 0 = tance 1
2
el 1 Ins
Ch
= In tanc
ann
e
s
Ch
ann el 0 = tance 3
4
el 1 Ins
Ch
= In tanc
a
e
s
Ch nnel
ann 0 = tance 5
6
el 1 Ins
Ch
= In tanc
a
sta e 7
Ch nnel
n
ann 0 =
ce
8
el 1 Ins
Ch
= In tanc
a
sta e 9
Ch nnel
nce
ann 0 =
10
el 1 Ins
= In tanc
sta e 11
nce
12
Startup/Operation
IL EIP BK DI8 DO4 2TX-PAC
Order-No.: 2897758
HW/FW: xx/xxx
MAC Addr.: xx.xx.xx.xx
EtherNet IP
2UTH AI2
2
PWR
O1
I1
BO RY
D E
UL MS
US NS
UM S1
1
3
2
4
I2
1
3
D
4
D
1
2
1
3
2
4
5 7
6 8
AI2 2UTH AI2
3
3
5
D
6
D
7
D
D
2
3
4
DO8
1
2
3
4
DO8
1
2
3
4
DO8
1
2
3
4
DO8
1
2
AI2
4
DO8
4
DO8
conformance tested
1
LNK1
2
1
2
1
2
1
2
ACT1
X2
PE
PE
ne
PE
nt
ACT2
1
2
PE
PE
PE
75380004
I/O station with analog input terminals and thermocouple terminals
po
Figure 3-10
2
s.
X1
LNK2
1
co
RESET
m
Bus Coupler
om
Default settings are modified by sending an explicit message to a specific instance. This
message can be sent using a "Class, Instance Editor" window in a configuration software.
Using attribute 100 along with the correct instance in the AIP object is one way to determine
how a thermocouple, RTD, or analog input module is configured.
on
l
in
ec
If Attribute 100 = 0 (default) in the AIP, the user has access to all standard AIP attributes. If
Attribute 100 = 1 the user has access to Attribute 101 (Input Configuration word). By
assigning a value to the Attribute 101, the user will be able to configure the thermocouple or
RTD module(s). The correct configuration value for attribute 101 can be determined by
using the module specific data sheets for the thermocouple, or RTD modules. It is also
possible to use the same method as for multiplexed modules, whereby the configuration
word is placed permanently into the poll data.
Once the new thermocouple setting is made, the new configuration will be stored in the flash
memory of the bus coupler. If the bus coupler is replaced the configuration will need to be
redone.
AIP Object (Class Code 10dec, 0Ahex) settings are described in Appendix B "Ethernet/IP
Object Classes, Message Types, and Services" of this manual.
7538_en_01
PHOENIX CONTACT
3-23
IL EIP BK DI8 DO4 2TX-PAC
3.10.4
Special Function Modules
General Configuration
Special function modules such as the incremental encoder, absolute encoder and the highspeed counter are configurable through the produced/consumed data channel by default.
Output word(s) that are assigned to the special function module are used to program the
terminal. The user must refer to the specific special function module's data sheet or manual
to determine what codes need to be written to the associated output word(s).
If the special function module is not included in the poll, it can be programmed through the
use of explicit message Special Function Object (Class Code 103dec, 67hex).
on
l
in
ec
om
po
ne
nt
s.
co
m
The programming of a special function module cannot be stored in the bus coupler flash
memory. The user's application will have to implement a programming subroutine.
3-24
PHOENIX CONTACT
7538_en_01
Startup/Operation
3.11
Understanding I/O Memory Mapping
3.11.1
Bus Coupler Mapping
The I/O image in the bus coupler flash memory contains all produced data (input data) and
consumed data (output data) derived from the I/O modules connected to it. I/O image data
is added to the poll through the use of parameter 9 (Add All I/O). Configuration through EDS
and configuration software was explained in the previous section.
An I/O image could contain the following produced and consumed elements in the priority
order listed below.
Class
(hex)
Instance
Attribute
Default
Setting
-
-
-
Inline Control Byte
65
1
Actual DOPs
09
X
Reserved DOPs
09
X
Class
(hex)
Instance
Attribute
Enabled
64
1
43
20
Disabled
64
1
32
3
Enabled
64
1
4
3
Disabled
64
1
23
Enabled if
number of
DOP bytes
uneven
64
1
14
po
Run/Idle
NULL
om
Padding
Actual AOPs
Control Object
nt
Location
ne
Data
co
Consumed data
s.
Table 3-2
m
Consumed Data
0B
X
3
Enabled
64
1
6
0B
X
3
Disabled
64
1
36
0A
X
101
Disabled
0A
X
102
67
X
4
Enabled
67
X
7
–
–
–
Disabled
64
1
38
PCP Module X Process Data
69
X
20
Disabled
69
X
21
PCP Module X Request Fragment
69
X
15
Disabled
69
X
17
AIP Control Data
PCP Data
SCO Data
on
l
Special Function Data
in
ec
Reserved AOPs
–
–
–
Disabled
64
1
39
SCO Module X Control Word
6A
X
6
Disabled
6A
X
31
SCO Module X Transmit Fragment
6A
X
10
Disabled
6A
X
32
7538_en_01
PHOENIX CONTACT
3-25
IL EIP BK DI8 DO4 2TX-PAC
Produced Data
Table 3-3
Produced data
Data
Location
Instance
Attribute
–
–
–
Default
Setting
Control Object
Class
(hex)
Instance
Attribute
Disabled
64
1
42
1
4
Enabled
64
1
11
65
1
5
Enabled
64
1
11
DIP Faults
08
X
4
Disabled
64
1
15
DOP Faults
09
X
4
Disabled
64
1
16
AIP Faults
0A
X
4
Disabled
64
1
17
AOP Faults
0B
X
4
Disabled
64
1
18
Special Function Faults
67
X
6
Disabled
64
1
19
Actual DIPs
08
X
3
Enabled
64
1
3
Reserved DIPs
08
X
3
Disabled
64
1
22
NULL
64
1
14
X
3
Enabled
64
1
5
X
3
Disabled
64
1
35
X
100
Disabled
0B
X
102
67
X
4
Enabled
67
X
7
–
–
–
Disabled
64
1
38
69
X
19
Disabled
69
X
21
X
16
Disabled
69
X
17
0A
Reserved AIPs
0A
AOP Response Data
0B
om
Actual AIPs
Special Function Data
PCP Data
in
ec
PCP Module X Process Data
PCP Module X Response Fragment
69
co
s.
Enabled if
number of
DIP bytes
uneven
–
–
–
Disabled
64
1
39
SCO Module X Status Word
6A
X
5
Disabled
6A
X
31
SCO Module X Receive Fragment
6A
X
9
Disabled
6A
X
32
on
l
SCO Data
po
Padding
m
65
Inline First Faulted Module
ne
Inline Status Byte
nt
Run/Idle
Class
(hex)
3-26
PHOENIX CONTACT
All produced elements of the same priority will be mapped together regardless of their
location. However, their relative location to the bus coupler will be used to determine their
instance values (sequential ordering). This same approach applies to consumed elements.
Analog channels will start at the first completely unused byte after the last digital module. If
the total number of digital points of the same image is not modulus 8, there will be unused
bits between the digital data area and the analog data area.
7538_en_01
Startup/Operation
Depending on what I/O modules are connected to the bus coupler determines whether or
not analog data starts on an even or odd byte. In those cases when analog data starts on
an odd byte, analog data will span two words in the master scanner. If you prefer to have
analog data to start on an even byte, set the EDS parameter 2 (Pad I/O) to a 1. Then
download to the bus coupler.
This will prevent analog data from starting on an odd byte without regard to the I/O
modules connected to the bus coupler. Once parameter Pad I/O is set, one byte of
unused I/O data may be added to the produced/consumed size. This byte of unused
m
I/O data will force the analog word to always start on an even byte in the master scanner.
If the physical configuration dictates that the analog word starts on an even byte and
parameter Pad I/O will not add a byte of data to the I/O data size.
s.
co
The physical order of data in the I/O table is determined by the position of the modules on
the local bus. The first module connected to the Inline Ethernet/IP bus coupler will reside in
the first I/O byte (keeping in mind the "which data type comes first" rule). Furthermore, the
LSB of the first module will be assigned to the first instance. The next module of the same
type and image will line up next to the first module without leaving any "gaps" in the I/O table.
ne
nt
The example in Figure 3-11 consist of the following modules:
– Inline bus coupler with 4 digital outputs and 8 digital inputs onboard
– Inline terminal with 8 digital outputs
– Inline terminal with 2 digital output
– Inline terminal with 1 analog output.
po
Figure 3-11 shows an example I/O table (memory map) for the station shown below. The
total amount of input bytes (Inline Status Word) would be 3 and the total amount of output
bytes would be 4.
om
IL EIP BK DI8 DO4 2TX-PAC
Onboard
DO4* DI8*
BO RY
UL MS
US NS
UM S1
EtherNet IP
conformance tested
O1
I1
I2
1
D E
1
3
2
4
5
2
4
5 7
6 8
D
1
1
1
2
2
3
3
D
22
1
DO8
2
1
2
1
D
1
Byte 0
1
DO8
2
1
2
Byte 3
X2
PE
PE
PE
PE
0
Bit 15
ACT2
PE
Output Data
8
0
Bit 7
0
Not Not DO2 DO2 DO8 DO8 DO8 DO8
Used Used Bit1 Bit0 Bit7 Bit6 Bit 5 Bit 4
Status word high byte
Bit 7
Bit 7
DO8 DO8 DO8 DO8 DO4* DO4* DO4* DO4*
Bit 3 Bit 2 Bit 1 Bit 0 Bit 3 Bit 2 Bit 1 Bit 0
Status word low byte
Byte 1
Byte 2
X1
LNK2
Bit 7
D
4
DO8
2
Input Data
2
4
DO8
I/O Data Tables
7
3
3
DO8
2
2
4
4
DO8
6
on
l
ACT1
4
22
1
3
1
RESET
LNK1
3
PWR
in
ec
IL EIP BK DI8 DO4 2TX-PAC
Order-No.: 2897758
HW/FW: xx/xxx
MAC Addr.: xx.xx.xx.xx
DO2 AO1
DO8
0
DI8* DI8* DI8* DI8* DI8* DI8* DI8* DI8*
Bit 7 Bit 6 Bit 5 Bit 4 Bit 3 Bit 2 Bit 1 Bit 0
Bit 7
0
Analog output low byte
Bit 15
8
Analog output high byte
PE
75380005
Figure 3-11
7538_en_01
Example of an I/O table (memory map) consisting of analog and digital
output modules
PHOENIX CONTACT
3-27
IL EIP BK DI8 DO4 2TX-PAC
EtherNet IP
2
PWR
O1
I1
BO RY
D E
UL MS
US NS
UM S1
1
3
2
4
I2
2
4
1
5 7
6 8
D
3
1
4
D
4
UM
1
DO8
DO8
5
D
3
1
D
D
1
UM
1
DO8
DO8
D
2
3
DO8
S
3
3
4
4
DO8
8
2
2
3
4
4
DO8
D
G
4
4
1
OUT
3
0
Status word, low byte
Byte 0
9
Bit 15
E
4
8
2
1
2
1
2 1
2
1
2
1
2
1
2
1
2
1
2
1
Bit 7
2
Byte 2
ACT1
Bit 7
X1
LNK2
Byte 3
ACT2
PE
PE
PE
PE
PE
PE
PE
po
PE
Byte 4
PE
PE
Bit 15
om
in
ec
on
l
Bit 7
0
Bit 7
0
Analog output, low byte
Bit 15
8
Analog output, high byte
Bit 7
0
Bit 15
8
Counter word 0, high byte
Bit 7
0
Counter word 1, low byte
8
Bit 15
8
Counter word 1, high byte
0
Counter word 0, low byte
Bit 15
8
Counter word 0, high byte
Bit 7
0
Counter word 1, low byte
Bit 15
Figure 3-12
8
Analog input 2, high byte 2
Bit 7
Byte 11
Bit 7
Counter word 0, low byte
0
Bit 15
Byte 10
0
Analog input 2, low byte 2
Byte 7
Byte 9
0
Analog input 1, high byte 1
Byte 6
Byte 8
0
Analog input 1, low byte 1
Byte 5
0
DO4 DO4 DO2 DO2 DO4* DO4* DO4* DO4*
Bit 1 Bit 0 Bit 1 Bit 0 Bit 3 Bit 2 Bit 1 Bit 0
Not Not DI4 DI4 DI4 DI4 DI2 DI2
Used Used Bit 3 Bit 2 Bit 1 Bit 0 Bit 1 Bit 0
Bit 7
X2
Bit 7
DI8* DI8* DI8* DI8* DI8* DI8* DI8* DI8*
Bit 7 Bit 6 Bit 5 Bit 4 Bit 3 Bit 2 Bit 1 Bit 0
ne
LNK1
nt
1
Output Data
Not Not Not Not Not Not DO4 DO4
Used Used Used Used Used Used Bit 3 Bit 2
Status word, high byte
Byte 1
conformance tested
RESET
m
7
6
2
2
3
4
DO8
4
Input Data
CNT
Bit 7
3
2
1
3
DO4
co
IL EIP BK DI8 DO4 2TX-PAC
Order-No.: 2897758
HW/FW: xx/xxx
MAC Addr.: xx.xx.xx.xx
DO2 DI4 AI2
s.
Onboard DI2 AO1
DO4* DI8*
I/O Data Tables (As seen by the master)
PWR IN
IL EIP BK DI8 DO4 2TX-PAC
PWR IN
Figure 3-12 shows an Inline station and an example I/O table. The station consists of the
following modules:
– Inline terminal with 2 digital inputs
– Inline terminal with 1 analog output
– Inline terminal with 2 digital outputs
– Inline terminal with 4 digital inputs
– Inline terminal with 2 analog inputs
– Inline terminal with 4 digital outputs
– Inline counter terminal
– Inline power terminals
Counter word 1, high byte
8
75380006
Example of an I/O table (memory map) consisting of digital and analog,
input and output modules
The I/O configuration is for data mapping example only. Please follow the installation
guidelines in the IL SYS INST UM E user manual.
Figure 3-12 shows that the total number of input bytes is 12 (byte 0 through byte 11). This
includes the Inline Status word. Figure 3-12 also shows that the total number of output bytes
is 8 (byte 0 to byte 7).
3-28
PHOENIX CONTACT
7538_en_01
Startup/Operation
3.11.2
Reserving I/O Memory for Future System Expansion
Memory reservation is only available for digital and analog modules. It is not required for
special function modules.
Rules for Reserving I/O Memory
po
ne
nt
s.
4.
m
3.
Reserved I/O points will take up physical space in the produced and/or consumed data.
After reserving digital and/or analog I/O, any new modules added must be connected
after (anywhere to the right of) the last digital/analog module of the same type and
image (input or output) on the local bus.
If special function modules are added, they must be added after the right most special
function module on the station. After adding the special function module, the station
must be reconfigured to add the special function data to the scan. This additional data
will not effect existing mapping of the master scanner.
If you want to reserve space for analog input configuration words, you must add the
number of analog input configuration words to be reserved to the number of analog
output words to be reserved. This will be the total number of analog output words to be
reserved.
When adding modules to this shared reserve space, analog output words will be added
to the lower end of this space and analog input configuration words will be added to the
upper end of this space until the entire space is used. For information about analog
input configuration words, refer to the Section "Analog Input (AI) Modules" on
page 3-21.
co
1.
2.
Ways to Reserve I/O Memory
on
l
in
ec
om
The bus coupler can reserve digital or analog I/O in either the input or output image. This will
allow for future system expansion(s) without having to change the master scanner's I/O
tables. The actual reservation can be done in the following two ways:
1. By using EDS file Parameter 3 (Reserve Digital Inputs), Parameter 4 (Reserve Digital
Outputs), Parameter 5 (Reserve Analog Inputs), Parameter 6 (Reserve Analog
Outputs). The entry downloaded to the bus coupler will be equal to the current physical
number of I/O points on the local bus, plus the number of I/O points to be reserved.
2. By sending an explicit message to the Configuration Object (Class Code 100dec,
64hex). The user can reserve a digital bit by writing to parameters 22 (Reserve Digital
Inputs), 23 (Reserve Digital Outputs), 35 (Reserve Analog Inputs) and 36 (Reserve
Analog Outputs). The entry downloaded to the bus coupler will be equal to the current
physical number of I/O points on the local bus, plus the number of I/O points to be
reserved.
7538_en_01
PHOENIX CONTACT
3-29
IL EIP BK DI8 DO4 2TX-PAC
3.12
I/O Data Transfer
A detailed explanation of the following objects and their attributes can be found in
Appendix B "Ethernet/IP Object Classes, Message Types, and Services".
I/O data transfer can be accomplished by establishing an I/O connection (implicit) or by
establishing a message connection (explicit). For operational considerations, see Section
"Maximum Connection Consideration" on page 3-33.
Implicit
m
An implicit connection provides a dedicated path from a producing application to one or
more consuming applications and is typically used for real-time data transfer.
co
Explicit
I/O Scan Methods
nt
3.12.1
s.
An explicit connection is a generic connection between two devices where a request is sent
and an acknowledge is expected. It is used for configuration and data transfer.
on
l
in
ec
om
po
ne
The Ethernet/IP master will scan the bus coupler through the use of several implicit/explicit
I/O scan types. The following scan methods are available to the user:
– Cyclic
– Change of State (COS)
– Application triggered
3-30
PHOENIX CONTACT
7538_en_01
Startup/Operation
3.12.2
I/O Communications Objects
Bus coupler I/O communication objects can be accessed through the use of the explicit
messages. Listed below are the objects used to transfer I/O data for the bus coupler. If data
needs to be transferred to a device that is not in a scan list, a "Get" or "Set" explicit message
service can be sent to the proper class, instance and attribute in question.
3.12.2.1
Digital Input Point (DIP) Object (Class Code 08dec, 08hex)
The DIP object models digital inputs in the bus coupler. There is a separate instance for
each digital input point available on the device. Attributes include Value and Status.
m
Setting DIP Inputs to Latch
Latched or current data selection
om
Figure 3-13
po
ne
nt
s.
co
Each DIP point can be independently configured to latch on a desired state. This is
accomplished by using attributes 100 and 101. Figure 3-13 shows how "actual input" or
"latched" data is selected.
Attribute 100 is used it to enable the latching feature for any specific DIP. When set to a logic
0 (default), the latching feature is OFF. When set to logic 1, the latching feature is ON
(enabled).
in
ec
Attribute 101 determines the latch level of a specific DIP. Setting Attribute 101 to a logic 0
enables the DIP to select a low-level latch. Setting Attribute 101 to a logic 1 enables the DIP
to select a high-level latch.
on
l
Enabling the latch and setting the desired latch state must be done by sending an explicit
message.
Resetting the latched condition must be done by setting bit 1 in the Inline Control byte. This
clear will effect all latched inputs. After the latches are reset, bit 1 in the Inline Control byte
must be set back to 0 to allow for the next latched condition to occur when the control byte
is in the consumed data.
By default the Inline Control byte is not included in the consumed data command. The user
can add this to the consumed data by issuing an explicit message to the Configuration
Object (Class Code 100dec, 64hex, Attribute 32).
If the user does not want to clear the latches through the produced data I/O then an explicit
message to the Inline Interface Object (Class Code 101dec, 65hex, Attribute 20) can be sent.
Setting attribute 20 to a 2 will reset all latches enabling the next input latch. It will also
automatically reset the attribute 20 value to 0.
7538_en_01
PHOENIX CONTACT
3-31
IL EIP BK DI8 DO4 2TX-PAC
Latch values are retained during operation and will not be cleared until the latches are
reset. Once a reset is received the latches will re-initialize to the value that allows the input
level to be captured. This initialization depends on the value determined by attribute 101,
Latch Level.
Digital Output Point (DOP) Object (Class 09hex)
Analog Input Point (AIP) Object (Class 0Ahex)
m
The DOP object models digital outputs in the Ethernet/IP bus coupler. There is a separate
instance for each digital output point available on the device. However, the value of the
status is the same for all the given points on a particular I/O module. Other attributes include:
Value, Status, Fault State, Fault Value, Idle State and Idle Value.
s.
co
The AIP object models analog inputs in the Ethernet/IP bus coupler. There is a separate
instance for each analog input point available on the device. Attributes include: Value,
Status and Range.
Analog Output Point (AOP) Object (Class 0Bhex)
ne
nt
The AOP object models analog outputs in the Ethernet/IP bus coupler. There is a separate
instance for each analog output point available on the device. Attributes include: Value,
Output Range, Value Data Type, Fault State, Idle State, Fault Value and Idle Value.
Accessing Analog and Digital Instances 1 Through 128
om
Digital Inputs
po
The bus coupler automatically supports the following number of instances for the specific
object types when accessed using produced/consumed data that is mapped to a scanner.
510 instances
510 instances
Analog Inputs
128 instances
Analog Outputs
128 instances
in
ec
Digital Outputs
on
l
Inline Special Function Object (Class 43hex)
The Inline special function object gives the user the ability to control and monitor the below
listed modules and any other module that does not map to a standard Ethernet/IP object.
– Incremental encoder
– Absolute encoder
– High Speed counter
PCP Special Function Object
By default, the PCP Special Function Object contains one instance for each PCP module. If
the bus coupler detects that the modules is designed for serial communications, it will also
create an instance in the Serial Communications Object. An example of a PCP module is:
– AS-i master
3-32
PHOENIX CONTACT
7538_en_01
Startup/Operation
Serial Communications Object
The Serial Communications Object contains one instance for each PCP module that is
designed for serial communications. It is possible to access an instance of the Serial
Communication Object into an instance in the PCP Special Function Object. Examples of
Serial Communications PCP modules are:
– RS-232
– RS-485
System Operational Guidelines
Repeat Packet Interval (RPI) Settings
co
3.13.1
m
3.13
po
ne
nt
s.
When setting up an Ethernet/IP system, care must be exhibited when setting the RPI value
in the control system scanner. Depending on the vendor's implementation, this value may
range from 5 ms to 100's of ms in 5 ms increments. The RPI value establishes the rate at
which the scanner will send Ethernet/IP messages (packets). It also establishes the
maximum rate that the Inline station (in this case) will send messages. Though the value is
set in the PC/PLC scanner is also transferred by the scanner to the BK so that the system is
working on the same time base. In addition to setting the speed of the network updates, the
RPI value is used to set the rate at which the scanner expects to receive back in time, the
scanner will assume there is a problem, stop I/O communications and the I/O station will go
into its fault response mode.
on
l
in
ec
om
As is true with most Ethernet/IP devices (Inline included) the CPU in the BK, splits its time
servicing the Ethernet/IP network, performing internal functions such as updating internal
websites, and of course scanning I/O. In larger I/O systems setting the RPI too low may
overload the BK with a level of network traffic it can not accomplish. In these cases the
module will stop communicating and go into a fault state. In addition to physically larger I/O
stations use of PCP communications (RS-232) modules, etc. requires extra processing
therefore potentially higher (larger ms) RPI settings. While actual settings will vary based on
the station configuration and application requirements, as a general rule of thumb the
following considerations should be followed:
– Configurations requiring RPI rates below 10ms should be tested in advance to confirm
operation.
– Configurations requiring PCP modules should use RPI settings at a minimum of 20 ms.
Settings below 20 ms should be tested in advance.
3.13.2
Maximum Connection Consideration
The module firmware supports up to 128 connections total (any mix implicit or explicit).
Application considerations such as CPU loading, frequency of data updates (RPI
parameter), and I/O quantity scanned will impact the actual maximum connections. Fewer
connections allow faster data update rates (RPI value). For maximum I/O performance the
quantity of connections should be limited to 8 or less.
7538_en_01
PHOENIX CONTACT
3-33
on
l
in
ec
om
po
ne
nt
s.
co
m
IL EIP BK DI8 DO4 2TX-PAC
3-34
PHOENIX CONTACT
7538_en_01
Diagnostics
4
Diagnostics
4.1
Diagnostic and Status Indicators
All modules are provided with diagnostic and status indicators for rapid local error detection.
Diagnostic Indicators
The diagnostic indicators (red or green) show the state of the Inline modules. When a
module is operating normally, all its diagnostic LEDs are green.
m
After an error is detected, the indicators immediately display the current status.
The status indicators (yellow) display the status of the relevant inputs/outputs or of the
connected device.
co
Status Indicators
Each different type of module has different diagnostic and status indicators.
Figure 4-1 and Table 4-1 provide the different LED states that can be read from the bus
coupler.
ne
LEDs on the Ethernet/IP
Bus Coupler
nt
s.
Refer to the IL SYS INST UM E user manual and to the module-specific data sheet to see
which diagnostic and status LED indicators apply to that module.
I2
om
po
PWR
I2
in
ec
ETH
LNK1
BF
PWR
BF BO
DIA UL
US
UM
RY
MS
NS
S1 -PAC
X
4 2T
DO
DI8
BK 97758
TH
IL E -No.: 28xx .xx
er /x xx
Ord W: xx xx.xx.
/F r.:
W
H Add
IP
C
et
MA
erN
Eth
ACT1
confo
rm
ance
teste
d
5 6
7 8
I2
I1
O1
PWR
BO
UL
US
UM
D
RY
MS
NS
S1
E
2
1
4
3
2
1
4
3
I1
7
5
8
6
I1
DIA
on
l
LNK2
RE
1 2
3 4
T
SE
AC
LN
T1
K1
X1
AC
LN
O1
D E
T2
K2
X2
1 2
3 4
O1
6
75370002
Figure 4-1
7538_en_01
ACT2
Diagnostic and status indicators on the bus coupler
PHOENIX CONTACT
4-1
IL EIP BK DI8 DO4 2TX-PAC
Table 4-1
LED
Local status and diagnostic indicators on the bus coupler
Color
Meaning
State
Description of the LED States
LNK1
Green
Link at
port 1
ON
Link connection at port 1 present
LNK2
Green
Link at
port 2
ETH
Activity on
port 1
ACT2
Yellow
Activity on
port 2
Link connection at port 2 present
OFF
Link connection at port 2 not present
ON
Data transmission on port 1 active
OFF
Data transmission on port 1 not active
ON
Data transmission on port 2 active
OFF
Data transmission on port 2 not active
m
Yellow
Link connection at port 1 not present
ON
co
ACT1
OFF
PWR
US
Green
Green
ULogic
Waiting for BootP/DHCP reply
OFF
Firmware started successfully
ON
24 V communications supply / 7.5 communications power present
OFF
24 V communications supply / 7.5 communications power not
present
ON
USegment
Green
UMain
ON
om
OFF
UM
Boot loader active, firmware started
s.
ON
Flashing
nt
Boot
ne
UL
Green
po
BO
OFF
Green
Ready
in
ec
RY
ON
Red/
green
Module
status
on
l
MS
24 V segment circuit supply present
24 V segment circuit supply not present
24 V I/O supply present
24 V I/O supply not present
Ready
Connection to a process data client established
Flashing
Firmware ready to operate
OFF
Firmware not active
Green ON
Device status
Normal operation
Red ON
Unrecoverable error
Flashing green
–
–
4-2
PHOENIX CONTACT
Device not configured, or device configuration not complete or
faulty
Device in standby mode
Flashing red
Recoverable error
Flashing redgreen
Selftest
OFF
No supply voltage
7538_en_01
Diagnostics
Table 4-1
Local status and diagnostic indicators on the bus coupler
LED
Color
Meaning
NS
Green/
red
Network
status
State
Description of the LED States
Network status
Green ON
Module is online and has established a connection
Red ON
Error preventing communication with the network
(e.g., bus offline or double MAC ID).
Flashing green
Device online, connections not established
Device has finished the "double MAC ID" test but has not
established connections to other nodes.
One or more connections in timeout state
Flashing redgreen
Selftest
OFF
Device not online
co
m
Flashing red
s.
Device has not yet finished the "double MAC ID" test.
Device has no IP address or is not supplied with voltage.
Boot
source
status
ON
IP parameters received from BootP/DHCP server
Flashing
BootP request/responses in process
OFF
Stored IP parameters are used
ON
Data transmission within the station active
nt
Green
ne
S1
1-4
Red
Yellow
I1, I2
Yellow
Error
Output 1 to
Output 4
Flashing
ON
Input 1 to
Input 8
Data transmission within the station not active
Short circuit/overload of outputs
OFF
No short circuit/overload of outputs
ON
Output active
OFF
Output not active
ON
Input active
OFF
Input not active
on
l
1-8
Diagnostics
om
E
Green
in
ec
D
po
O1
7538_en_01
PHOENIX CONTACT
4-3
IL EIP BK DI8 DO4 2TX-PAC
4.2
Available Network Diagnostics
A detailed explanation of object classes can be found in Appendix B "Ethernet/IP Object
Classes, Message Types, and Services".
Inline Status Word
co
4.2.1
m
Diagnostic information is made available through several mechanisms. The EDS file allows
the user to read the Inline Status word and condition of the standard DIPs, DOPs, AIPs,
AOPs and special function modules. This Inline Status word and I/O point/channel status
can also be mapped directly to the produced data. The final method of retrieval is to
explicitly query the attributes from the Configuration Object (Class Code 64hex) and Inline
Object (Class Code 65hex).
nt
s.
By default, Inline Status word data is made available to the user as two bytes of diagnostic
data in the produced data. These two bytes contain the Inline fault code (byte 0) and the
number of the first module in the local bus that is faulted (byte 1). The status word adds 2
bytes to the produced data size by default. The status word updates status automatically so
when an error is cleared the status will be set back to a 0.
po
ne
If the user needs to remove this data from the produced data, the status word can be
disabled by setting Configuration Object (Class 100dec, 64hex) Attribute 11 "Use Inline
Status" to 0, then setting Configuration Object (Class 100dec, 64hex) Attribute 7 "Add All I/O"
to 1.
Major/Minor Faults
om
4.2.2
on
l
in
ec
By default all Inline Status word fault bits (byte 0, bits 0, 2-6) except for bit 1 are considered
major recoverable faults, as defined in the Identity Object state and status attributes, and
will flash the red MS LED on the bus coupler when that specific type of failure occurs. Bit 1,
peripheral fault, is assigned as a minor recoverable (default value) fault and will not flash the
MS LED when in a faulted condition. These default values can be changed by using the
EDS file or by sending an explicit message to the Configuration Object (Class Code 64hex).
Possible fault action settings are:
4-4
PHOENIX CONTACT
0
None
1
Minor Recoverable Fault
2
Major Recoverable Fault
7538_en_01
Diagnostics
4.2.3
Bit Meanings for Inline Status Word (Byte 0)
The CRC error bit will be set when a data transmission error occurs due to unwanted
interference on the Inline local bus. The EDS parameter number 23, "Max Retry", will allow
the module to retransmit the data cycle up to the number of times that the "Max Retry"
parameter is set to. If the transmission does not pass the CRC (Cyclic Redundancy Check)
after the "Max Retry" has expired then the CRC error bit is set.
Bit 1 Peripheral Fault
The Peripheral Fault bit will be set when any output is shorted or a loss of power to an
intelligent segment module.
Bit 2 Power Fault
The Power Fault bit will be set when any of the power supplies (UL, US, UM, Ethernet/IP) is
in an under voltage condition (less than 11 V DC).
Bit 3 Module Change
The Module Change bit will be set when the configuration present on the Inline local bus
does not match the configuration that was stored in flash during the last configuration cycle.
Bit 4 Configuring Error
The Configuring Error bit will be set when the bus coupler is not able to talk to the first I/O
module connected to it. Possible failures include the bus coupler itself or the first I/O module
connected to it. Power down and reconnect the I/O to the bus coupler.
Bit 5 Module Connection
Error
The Module Connection Error bit will be set when the bus coupler is no longer able to talk to
the modules connected to it and can determine the failure position. This failure occurs due
to a broken data path. The exact path "between what two modules" can be read from the
Inline Interface Object (Class Code 65hex).
Bit 6 Outputs Set to
Preprogram Ethernet/IP
Fault State
This bit can only be set in the Fault Response mode 2. It is made available to let the
application know that the local outputs have gone to their preprogrammed Ethernet/IP fault
state and will no longer respond to the controller.
Bit 7
Reserved for future use.
in
ec
om
po
ne
nt
s.
co
m
Bit 0 CRC Error
on
l
4.2.4
Bit Meanings for Inline Status Word (Byte 1)
Contains the first failed device number. The device number determines the position on the
Inline station where a failure or warning has occurred. These positions are numbered
starting at the bus coupler being assigned with a 1. The numbering will continue to the right
up to 64, which is the maximum number of devices that can be connected to an Inline station
[63 I/O devices (including two devices on the bus coupler) + 1 bus coupler].
Inline local errors will not be sent over the network unless the Inline Status Word is in the
poll or an explicit message to the Inline Object is sent periodically.
These errors by default are considered a major (except for a peripheral fault) error and the
MS LED on the bus coupler will blink red. A determination must be made regarding the
Inline Status Word and its desired effect on the network and/or failing node through the
users application.
7538_en_01
PHOENIX CONTACT
4-5
IL EIP BK DI8 DO4 2TX-PAC
4.2.5
Latched Diagnostics
The bus coupler will latch the last occurring Inline Status word fault, module number and
connection point 1 and 2 failures. This benefits the user by capturing any fault that may be
occurring intermittently and that is occurring too quickly to be updated by the Ethernet/IP
implicit or explicit message. These latched values can not be cleared until the station is
reconfigured. The following latched diagnostics are available through the EDS file or by
sending an explicit message to the Inline Interface Object (Class Code 65hex).
This parameter will contain the last reported Inline station failure. The bit weights signify the
same failures as described in the Inline Status word (byte 0).
Latched Faulted Module
This parameter will contain the first failed module location that was reported during the last
Inline station fault. The bit weights signify the same failures as described in the Inline Status
word (byte 1).
Latched Connection
Failure Endpoint 1
This parameter will contain the number of the module that was reported on the first end of a
connection failure.
Latched Connection
Failure Endpoint 2
This parameter will contain the number of the module that was reported on the other end of
a connection failure.
4.2.6
ne
nt
s.
co
m
Latched Inline Status
Word
Inline Control Byte
po
The Inline Control Byte is used to acknowledge latched peripheral faults (bit 0) or to clear
latched inputs states (bit 1).
om
For an explanation of latching input states, refer to Section "I/O Data Transfer" on
page 3-30.
on
l
in
ec
By default, the Inline Control Byte is not added to the poll. It can be added by setting
Instance 1, Attribute 32 of the Configuration Object (Class Code 64hex) to a 1. If the user
would rather access this byte through an explicit message, a Get or Set can be sent to the
Inline Interface Object (Class Code 65hex), Instance 1, Attribute 20.
– Bit 0: When set to a 1, will attempt to clear all latched peripheral faults.
– Bit 1: When set to a 1, will clear all latched input states.
4-6
PHOENIX CONTACT
The latched peripheral fault can only be generated by certain Inline modules. Examples of
this type of module are the IB IL SEG-ELF and the IB IL 24 EDI 2-DESINA.
7538_en_01
Diagnostics
4.2.7
I/O Point/Channel Status
The fault status of a digital, analog, or special function point is either 0 (functioning) or 1
(failed). The fault status can be added to the poll through the EDS file or solicited by issuing
an explicit message to the Configuration Object (Class Code 64hex), see Appendix B
"Ethernet/IP Object Classes, Message Types, and Services". When adding this status to
the poll, a bit for each point or channel will be assigned to the input image. This will occur
before the mapping of the actual point or channel. The mapping assignments of these status
bits will occur in order of their instances on the local bus.
m
I/O status bits can be added to the poll through the use of the EDS file. Parameters 16
through 20 (described in the following paragraphs) allow for respective status bits to be
added to the poll.
Selects the number of DIP faults added to the poll response on a point basis.
Parameter 17
Selects the number of DOP faults added to the poll response on a point basis.
Parameter 18
Selects the number of AIP faults added to the poll response on a channel basis.
Parameter 19
Selects the number of AOP faults added to the poll response on a channel basis.
Parameter 20
Selects the number of special function faults added to the poll response on a channel basis.
Fault/Idle State and Value
po
4.2.8
ne
nt
s.
co
Parameter 16
in
ec
om
The bus coupler supports the standard Ethernet/IP DOP (Digital Output Points), AOP
(Analog Output Points), fault or idle states, and values. These values can be set and read
by the use of an explicit message. Fault states will only occur during a network error. They
will not occur after an Inline local error. The default value for the AOPs and DOPs is zero.
Idle states and values will occur when a PLC is taken out of the run state. The default value
for the idle state is also zero.
on
l
Digital Output Support
Analog Output Support
–
–
–
Holds last state
Turn off during a faulted condition (default)
Turn on during a faulted condition
–
–
–
–
Hold last value
Set to low limit
Set to high limit
Set to value determined by the fault value attribute
Appendix B "Ethernet/IP Object Classes, Message Types, and Services" will detail the
DOP (Class Code 09hex) and AOP (Class Code 0Bhex) fault/idle values and states.
7538_en_01
PHOENIX CONTACT
4-7
IL EIP BK DI8 DO4 2TX-PAC
4.2.9
Inline Analog Input, Thermocouple and RTD Fault Codes
Inline analog inputs, thermocouples and RTDs can report diagnostic codes. These codes
must be read from the produced response or the AIP detailed in Appendix B "Ethernet/IP
Object Classes, Message Types, and Services". A list of these codes, in Inline format "IL",
is shown in Table 4-2.
Table 4-2
m
Error codes are dependent on the type of module and how that module's format is
configured. By default error codes are received in the Inline "IL" format and can be viewed
as shown inTable 4-2. If the format has been changed, the user must refer to the module
specific data sheet to determine what error code has been received.
Error messages of analog input modules
Error Message
8001
Under-range
8002
Open circuit
s.
co
Code (hex)
8004
Measured value invalid
Cold junction defective
nt
8008
I/O supply voltage faulty
ne
8020
8010
8080
Module defective
Over-range
Error History
om
4.2.10
po
8040
Configuration invalid
on
l
in
ec
Error history provides access to the last ten errors that have been stored in the bus coupler.
These errors can be accessed using either the EDS file (Parameter 56 (most recent)
through Parameter 65 (oldest) or by using the Inline Interface Object Class 101, Instance 1,
Attribute 21 (most recent) to attribute 30 (oldest). As error values are added, existing values
will be shifted to older parameters. The new value is then placed in the "most recent"
parameter and the value in the "Last Saved" parameter is discarded.
4-8
PHOENIX CONTACT
The error history entry will contain the faulted module number in the high byte and the Inline
status code in the low byte.
A "0" for an error history entry represents a point where an error was removed.
An error history value may be recorded at a point where an error is detected but is not yet
localized. When the error is localized, a new error history value will be added.
7538_en_01
Technical Data and Ordering Data
5
Technical Data and Ordering Data
Technical Data
5.1
General Data
Housing dimensions (width x height x depth)
80 mm x 121 mm x 70 mm
Weight
270 g with connectors
Ambient temperature (operation)
-25°C to +60°C
Ambient temperature (storage/transport)
-25°C to +85°C
10% to 95%, according to EN 61131-2
Permissible air pressure (operation/storage/transport)
70 kPa to 106 kPa (up to 3000 m above sea level)
m
Permissible humidity (storage/transport)
IP20 according to IEC 60529
Class of protection
Class 3, according to EN 61131-2, IEC 61131-2
co
Degree of protection
Perpendicular to a standard DIN rail
Connection to functional earth ground
The functional earth ground must be connected to the supply connection. The
contacts are directly connected to the potential jumper and FE springs on the
bottom of the housing. The terminal is grounded when it is snapped onto a
grounded DIN rail. Functional earth ground is only used to discharge
interference.
Ambient compatibility
Free of substances which would hinder coating with paint or varnish
Resistance to solvents
Resistant to standard solvents
ne
nt
s.
Preferred mounting position
Connection data for Inline connectors
Connection type
Spring-cage terminals
0.2 mm2 to 1.5 mm2 (solid or stranded), 24 -16 AWG
po
Conductor cross-section
System Limits of the Bus Coupler
63, maximum (including two devices on the bus coupler)
Number of I/O data
Transmission rate on the local bus
Power supply at UL (7.5 V)
Power supply at US
Power supply at UM
Interfaces
Type
Number
on
l
Ethernet
in
ec
Power supply at UANA
om
Number of devices per station
512 bytes, maximum
500 kbps or 2 Mbps (automatic detection)
0.8 A, maximum
0.5 A, maximum
8 A, maximum
8 A, maximum
Ethernet
10Base-T and 100Base-TX with auto negotiation and auto crossover
Two
Connection format
8-pos. RJ45 female connector
Connection medium
CAT 5 twisted pair cable
with a conductor cross section of 0.14 mm2 to 0.22 mm2
Cable impedance
100 Ω
Transmission speed
10 Mbps (10Base-T), 100 Mbps (100Base-TX)
half duplex, full duplex (auto detection)
Maximum network segment extension
Local bus
100 m
Through data routing
Supply Voltage for UL, US, UM
Recommended cable lengths
30 m, maximum; routing cables through outdoor areas is not admissible
Continuation
Through potential routing
Special demands on the voltage supply
The supplies UM/US and the bus coupler supply UBK do not have the same
ground potential because they are supplied by two separate power supply
units.
7538_en_01
PHOENIX CONTACT
5-1
IL EIP BK DI8 DO4 2TX-PAC
Supply Voltage for UL, US, UM (Continued)
Behavior in the event of voltage fluctuations
Voltages (main and segment supply) that are transferred from the bus coupler
to the potential jumpers follow the supply voltages without delay.
Nominal value
24 V DC
Permissible range (according to EN 61131-2)
19.2 V to 30 V (ripple included)
NOTE: Module is damaged in the event of overload
This 24 V area must be externally protected. The power supply unit must be able to supply 4 times the nominal current of the external fuse,
to ensure that it trips in the event of an error.
m
Observe the logic current consumption of each device when configuring an Inline station. This information is given in every module-specific
data sheet. The current consumption can differ depending on the individual module. The permissible number of devices that can be
connected therefore depends on the specific station structure.
co
Communications Power UL (7.5 V) and Analog Supply UANA
- Communications Power (Potential Jumper)
s.
The bus coupler supply UL (24 V) generates the communications power UL (7.5 V) and the analog supply UANA (24 V) for the Inline station.
7.5 V DC
Maximum output current
2 A DC (observe derating)
Safety equipment
Electronic short-circuit protection
ne
nt
Nominal value
- Analog Supply (Potential Jumper)
Nominal value
24 V DC
0.5 A DC (observe derating)
Safety equipment
po
Maximum output current
Electronic short-circuit protection
Current consumption from UL (24 V)
Current consumption of module electronics
om
Current Consumption/Power Consumption
0.08 A, maximum
0.4 A, maximum
Current consumption from UANA (24 V)
0.5 A, maximum
in
ec
Current consumption of local bus (800 mA load at 7.5 V)
Total current consumption from UL
0.98 A, maximum
Current consumption from US (24 V)
3 mA +4 mA for each output set + load, typical; 8 A, maximum
Current consumption from UM (24 V)
3 mA +3 mA for each output set + load, typical; 8 A, maximum
Power dissipation of entire device
3 W, typical
Interface
on
l
Bus Interface of the Lower-Level System Bus
Electrical isolation
Inline local bus
No
Number of Inline terminals that can be connected
Limitation by software
Limitation by power supply unit
63, maximum (including two devices on the bus coupler)
Maximum logic current consumption of the connected local bus modules:
Imax ≤ 2 A DC
Observe the logic current consumption of each device when configuring an Inline station. This information is given in every module-specific
data sheet. The current consumption can differ depending on the individual module. The permissible number of devices that can be
connected therefore depends on the specific station structure.
Digital Outputs
Number
4
Connection method for actuators
2 and 3-wire technology
Nominal output voltage UOUT
24 V DC
Differential voltage at Inom
<1V
Nominal current Inom per channel
0.5 A
5-2
PHOENIX CONTACT
7538_en_01
Technical Data and Ordering Data
Digital Outputs (Continued)
Total current
2A
Protection
Short circuit; overload
Nominal load
Ohmic
12 W
Lamp
12 W
Inductive
12 VA (1.2 H)
Switching frequency with nominal inductive load
0.5 Hz (1.2 H), maximum
Overload response
Auto restart
Response with inductive overload
Output may be damaged
Reverse voltage protection against short pulses
Protected against reverse voltages
Protected against reverse voltages, permissible current 2 A, maximum
The output follows the supply voltage without delay.
Limitation of the voltage induced on circuit interruption
-30.0 V, approximately
m
Resistance to permanently applied reverse voltages
Response upon power down
Integrated free running circuit in the output chip
Overcurrent shutdown
0.7 A, minimum
Maximum output current when switched off
10 µA
s.
nt
When not loaded, a voltage can be measured even at an output that is not set.
co
Safety equipment
ne
Digital Inputs
Number
8
Connection method for sensors
2 and 3-wire technology
According to EN 61131-2 Type 1
po
Input design
Definition of switching thresholds
Maximum low-level voltage
ULmax < 5 V
Minimum high-level voltage
UHmin > 15 V
om
Common potentials
Nominal input voltage UIN
Permissible range
Current flow
Delay time
in
ec
Nominal input current for UIN
Sensor supply UM, ground
24 V DC
-30 V < UIN < +30 V DC
3 mA, typical
Limited to a 3 mA, maximum
< 500 ms
Permissible cable length to the sensor
100 m
Use of AC sensors
AC sensors in the voltage range < UIN are limited in application
Safety equipment
on
l
Error message to the higher-level control system
Surge voltage, polarity reversal
Sensor supply not present
Mechanical Requirements
Vibration test sinusoidal vibrations according to IEC 60068-2-6;
EN 60068-2-6
5g load, 2 hours in each space direction
Shock test according to IEC 60068-2-27; EN 60068-2-27
25g load for 11 ms, half sinusoidal wave,
three shocks in each space direction and orientation
Conformance With EMC Directives
Developed according to IEC 61000-6.2
IEC 61000-4-2 (ESD)
Criterion B
6 kV contact discharge
6 kV air discharge (without labeling field)
8 kV air discharge (with labeling field)
IEC 61000-4-3 (radiated noise immunity)
Criterion A
IEC 61000-4-4 (burst)
Criterion B
IEC 61000-4-5 (surge)
Criterion B
7538_en_01
PHOENIX CONTACT
5-3
IL EIP BK DI8 DO4 2TX-PAC
Conformance With EMC Directives
IEC 61000-4-6 (conducted noise immunity)
Criterion A
IEC 61000-4-8 (noise immunity against magnetic fields)
Criterion A
EN 55011 (noise emission)
Class A
Approvals
on
l
in
ec
om
po
ne
nt
s.
co
m
Information on current approvals can be found on the Internet at www.download.phoenixcontact.com or www.eshop.phoenixcontact.com.
5-4
PHOENIX CONTACT
7538_en_01
Technical Data and Ordering Data
5.2
Ordering Data
Bus Coupler
Description
Type
Inline bus coupler for Ethernet/IP with eight digital inputs and four digital
IL EIP BK DI8 DO4 2TX-PAC
outputs; including accessories (end plate, Inline connector and labeling fields)
Order No.
Pcs./Pkt.
2897758
1
Accessories
Description
Type
Order No.
Pcs./Pkt.
Connector set for Inline bus coupler with connected I/Os
IL BKDIO-PLSET
2878599
1
FL PLUG RJ45 GR/2
2744856
2
FL PLUG RJ45 GN/2
2744571
2
CP-MSTB
ZB 6 ... see CLIPLINE catalog
1734634
100
1051003
10
co
Keying profile
Zack marker strip to label the terminals
m
Gray RJ45 connector set for linear cable
Green RJ45 connector set for crossed cable
Zack marker strip to label the terminals
ZB 12 ... see CLIPLINE catalog
0812120
10
Labeling field covering one connector
IB IL FIELD 2
2727501
10
IB IL FIELD 8
ESL 62X10
Insert strips for IB IL FIELD 8, perforated, can be labeled using a laser printer,
marker pen or CMS system (15 sheets)
ESL 62X46
DIN EN 50022 DIN rail, 2 meters
NS 35/7,5 PERFORATED
NS 35/7,5 UNPERFORATED
Flexible Ethernet cable
Tools
Description
2727515
10
0809492
1
0809502
5
0801733
0801681
1
1
CLIPFIX 35-5
3022276
50
E/UK
1201442
50
po
in
ec
Voltage supplies
om
Additional System Components
Description
Media converter 660 nm
nt
ne
End clamp can be snapped on without tools
End clamp can be fixed using screws
Double sheathed Ethernet cable
s.
Labeling field covering four connectors
Insert strips for IB IL FIELD 2, perforated, can be labeled using a laser printer,
marker pen or CMS system (72 sheets)
Type
Order No.
Pcs./Pkt.
FL CAT5 HEAVY
2744814
1 meter
FL CAT5 FLEX
2744830
1 meter
FL MC 10BASE-T/FO POF
2744513
1
QUINT-PS ... see INTERFACE catalog
Order No.
Pcs./Pkt.
FL CRIMPTOOL
2744869
1
Screwdriver according to DIN 5264, blade width 3.5 mm
SZF 1-0,6X3,5
1204517
10
Type
Order No.
Pcs./Pkt.
IPAssign.exe
This software can be downloaded at
www.download.phoenixcontact.com.
Software
Description
on
l
Type
Assembly tool for RJ45 connector
BootP IP Addressing Tool
Documentation
Description
Type
Order No.
Pcs./Pkt.
"I/O Modules at Bus Couplers" application note
AH IL BK IO LIST
9015358
1
"Automation Terminals of the Inline Product Range" user manual
IL SYS INST UM E
2698737
1
7538_en_01
PHOENIX CONTACT
5-5
on
l
in
ec
om
po
ne
nt
s.
co
m
IL EIP BK DI8 DO4 2TX-PAC
5-6
PHOENIX CONTACT
7538_en_01
Serial and Other PCP Inline Modules
A Serial and Other PCP Inline Modules
A1
General
A 1.1
Exchanging Device Parameters
Communication Relationships
Communication Relationship List (CRL)
co
m
Before data can be exchanged between two PCP devices, a logical connection must exist
between the two devices. Such logical connections are called communication relationships.
Communication relationships are established between application processes.
nt
s.
The host controller board creates a list for every PCP device. Within this list, all permitted
communication relationships are specified, independent of their time of use. The
connection type and the context requirements (the connection parameters) by which the
communication relationship can be established, are stored in this communication
relationship list (CRL). The CRL can be manually changed as required.
po
ne
The logical connections configured in the communications relationship list guarantee a
smooth data exchange between two communication devices. The connection parameters
(context conditions) of both communication partners are checked for agreement before the
information is exchanged - during the connection establishment.
Communication Reference (CR)
on
l
in
ec
om
The communication relationship list is set up line by line. Every permissible communication
relationship contains a number, the communication reference (CR). The communication
relationship is thereby unambiguously coded. An unambiguous code is necessary in order
to distinguish between the individual devices. The Inline bus coupler numbers the devices
automatically during local bus initialization. It allocates the numbers beginning with 2 in the
order of the physical bus configuration.
7538_en_01
PHOENIX CONTACT
A-1
IL EIP BK DI8 DO4 2TX-PAC
A 1.2
Communication Services
The client and the server use communication services for the service order and execution.
If, in our example, the parameter value for the speed acceleration is to be transmitted to the
frequency inverter, then this is done by means of a write command, which implies using the
write service.
A service is divided into individual basic service operations (primitives). First, a service
request is transmitted, in our example a Write Request: the parameter value is transmitted.
The frequency inverter receives the parameter value as a service input, in our example a
Write Indication. After execution of the command, when the parameter value has been
entered, the frequency inverter transmits a service confirmation, a Write Response.
m
This is sent back as a service confirmation, in our example as a Write Confirmation. The bus
transmits the content of the information in the form of a PDU message (Protocol Data Unit).
co
A service consists of the following four basic operations:
The client transmits its service request with this basic operation.
Service Indication
The service input is reported to the server with this basic operation.
Service Response
The server transmits the service confirmation with this basic operation.
Service Confirmation
This basic operation confirms execution of the service, it is the service acknowledgement.
ne
nt
s.
Service Request
Figure A-1 gives an overview of the interaction of the basic operations..
Request message
CONFIRMATION
Server
Service
execution
RESPONSE
5067A204
PCP basic service operations (confirmed services)
on
l
in
ec
Figure A-1
INDICATION
Response message
om
Client
po
REQUEST
A-2
PHOENIX CONTACT
7538_en_01
General
A 1.3
Communication Phases
The Inline bus coupler supports connection-oriented (one to one) communication
relationships. The communication-oriented communication is divided into three phases:
– Connection establishment
– Data transfer
– Connection abort
In the connection establishment phase, a PCP device acting as a client tries to establish a
communication link to another PCP device acting as a server. In the process, the context
conditions (the connection parameters) that are determined in the communication
relationship list of both devices, are checked. If the context requirements agree then the
data transfer phase is initiated. Otherwise, the connection establishment is cancelled with
an error message.
Data Transfer Phase
In the data transfer phase, the PCP devices exchange data under the context conditions.
The connection remains until it is intentionally aborted or a communication error occurs.
Connection Abort Phase
After the data exchange has been completed the connection can be cancelled by a
connection abort. If a communication error occurs then the connection is automatically
aborted. Data exchange can then only be carried out after a renewed connection
establishment.
Description of the Communication Services
po
A 1.4
ne
nt
s.
co
m
Connection Establishment
Phase
om
Each PCP service is described in this section together with all of its basic operations. The
parameters that apply in all basic operations are shown from the beginning and are not
always repeated for the individual services
Parameter Counter
Communication
Reference (CR)
7538_en_01
Indicates the number of the subsequent data words, each of 2 bytes. If there is only a 1 byte
parameter in a line then this is also counted.
Invoke ID does not apply to this PCP version 00. The value is therefore always 00.
on
l
Invoke ID
Preset number that is set for each command and each message. Command Code and
Message Code are each given in the description of the basic operations.
in
ec
Command Code /
Message Code
CR indicates the communication reference that is set for the communication relationship
between host controller board and the remote device. The standard setting for the first PCP
module is CR=2, for the second PCP module CR=3, etc.
PHOENIX CONTACT
A-3
IL EIP BK DI8 DO4 2TX-PAC
Basic Service Request
Service
Modules
Index (LSB)
Index (MSB)
Subindex
Data [0]
Data [x]
m
Service Request w/Invoke ID
co
Service
Invoke ID
s.
Modules
ne
Subindex
nt
Index (LSB)
Index (MSB)
Length
Data [0]
po
Data [x]
om
Basic Service Response Success
Service
on
l
in
ec
Status
Length
Data [0]
Data [x]
Basic Service Response Success w/Invoke ID
Service
Invoke ID
Modules
Index (LSB)
Index (MSB)
Subindex
Length
Data [0]
Data [x]
A-4
PHOENIX CONTACT
7538_en_01
General
Basic Service Error Response
Service
Status
Error Class
Error Code
Additional Error (LSB)
Additional Error (MSB)
m
Service w/Invoke ID Error Response
Service
co
Invoke ID
Status
s.
Error Class
ne
Additional Error (MSB)
nt
Error Code
Additional Error (LSB)
po
Basic Service Abort Response
Service
Status
om
Abort ID
Abort Code
in
ec
Abort Reason [0]
Abort Reason [1]
on
l
Service w/Invoke ID Abort Response
Service
Invoke ID
Status
Abort ID
Abort Code
Abort Reason [0]
Abort Reason [1]
7538_en_01
PHOENIX CONTACT
A-5
IL EIP BK DI8 DO4 2TX-PAC
Basic Service Reject Response
Service
Status
PDU Type
Reject Code
Additional Error (LSB)
Additional Error (MSB)
m
Service w/Invoke ID Reject Response
Service
co
Invoke ID
Status
s.
PDU Type
po
Supported Services
ne
Additional Error (MSB)
Code (hex)
Service
NOP
01
PCP Read
02
PCP Write
03
Read PDU Size
09
PCP Read w/Invoke ID
10
PCP Write w/Invoke ID
om
00
on
l
in
ec
nt
Reject Code
Additional Error (LSB)
A-6
PHOENIX CONTACT
7538_en_01
Communications Methods
A2
Communications Methods
Communications to an Inline serial module and to a generic PCP Inline module can be
accomplished in two main ways each. The type of module being used, either serial or
generic PCP, determines what types of communication methods are available to the user.
The first method available to the user is the sending or receiving of data using process/cyclic
data channel (fragmentation) and the second is by sending explicit messages. Choosing
between the two methods is a matter of the capabilities of the Ethernet/IPTM scanner and/
or personal preference.
m
When using the Inline RS-232 or RS-485/422 modules, simplified methods 1 or 2 can be
used. If using any (including serial) that supports PCP, methods 3 or 4 must be used.
s.
Method 1: Transfer of Serial Data Using Serial Fragmentation
Method 2: Transfer of Serial Data Using Explicit Messages
Method 3: Transfer of Generic PCP Data Using PCP Fragmentation
Method 4: Transfer of Generic PCP Data Using Explicit Messages
nt
–
–
–
–
co
Serial modules are not supported under mapping revision 0.
ne
Supported serial modules are:
– IB IL RS 485/422 (Inline RS-485/422 module)
– IB IL RS 232 (Inline RS-232 module)
in
ec
2.
PCP is not required when using the ASI MA IB IL, if the AS-i branch has less than
32 slaves.
If the PCP module looses power, a reset service, with a data value of "1", can be
issued to the Inline Interface object (101dec, 65hex) or the BK can be power cycled.
You can access a serial module as a PCP Special Function module. To do this, first
disable the module's instance in the Serial Communication Object. Then, remove the
module's serial process and fragment data from the poll using the Serial
Communication Object. Finally, add the PCP special function process and fragment
data into the poll using the PCP Special Function Object.
om
1.
po
An example of a "Generic" PCP Inline module is the:
– ASI MA IB IL Inline AS-I Gateway
on
l
3.
If the autoconfiguration switch is ON, at next power-up the BK will erase any custom
settings described in the note 3 above.
The bus coupler can hold up to 64 bytes of incoming and 64 bytes of outgoing data before
data will overflow internal buffers.
7538_en_01
PHOENIX CONTACT
A-7
IL EIP BK DI8 DO4 2TX-PAC
A 2.1
Method 1: Transfer of Data Using Serial Fragmentation
This method defines how serial data is exchanged using process/cyclic data. The
messages that are required to read and write data are encoded into the high-speed data
stream. The protocol is handled using a series of message fragments that are initiated by a
client request and then followed up with a server response.
Each fragment contains 8 bytes. Every fragment includes a control byte for a request (output
data) and a status byte for a response (input data).
These fragments were specifically designed for the serial Inline modules and will not work
for other PCP based Inline modules.
A 2.1.1
co
m
Depending on the amount of data to be sent, the number of fragments required to read/write
data can vary. Fragments are eight bytes in length. Each fragment contains a request format
and a response format. These formats are detailed in the following paragraphs.
Format of Fragmented Serial Output Data
s.
Consumed Request
Control Byte (See Table A-1)
Bytes 1 to 7
Data block, if necessary
Control Byte
6
Res.
Res.
in
ec
Bit 5
Receive
Ack.
4
3
Transmit
Request
Reset
Request
2
1
0
Number of Data Bytes to
Transmit (Per Fragment)
om
Bit 6
5
po
7
Bit 7
ne
Table A-1
nt
Byte 0
on
l
Bit 4
Reserved
Reserved
Receive Ack (RxAck)
This bit must be set to the value of the Receive Request bit (RxReq) in order
for the module to receive more data. This tells the module that the "master"
has received the data and has processed it.
Transmit Request
This bit must be toggled to signal the module that there is new data to
transmit. On devices that cannot ensure data consistency, the user should
first set the number of bytes and place the proper data into the TxData
mapping before toggling this bit.
Bit 3
Reset Request
When this bit is set, all errors are cleared, the buffers are flushed, and the
RxReq and TxAck bits are cleared. This allows re-sync of the protocol.
Bit 2 to 0
Number of Bytes to Transmit
This tells the module how many bytes of the data are valid and should be
transmitted.
A-8
PHOENIX CONTACT
7538_en_01
Communications Methods
A 2.1.2
Format of Fragmented Serial Input Data
Produced Response:
Byte 0
Status Byte (See Table A-2)
Byte 1 to 7
Data block, if necessary
Table A-2
Status Byte
7
6
5
4
3
Error
Res.
Receive
Request
Transmit
Ack.
Reset
Ack.
Error
1
0
Number of Data Bytes
Received (Per Fragment)
m
Bit 7
2
Reserved
Bit 5
Receive Request
s.
Bit 6
co
When this value is set, an error has occurred such as parity or overrun. The
user should query the status parameter for more information.
ne
nt
This value is toggled to indicate new data has been received. The user
must acknowledge the reception of data by echoing back this value in the
Receive Ack bit.
Bit 4
Transmit Ack.
po
When this value is equal to the Transmit Request, it indicates that the
output data has been queued into the output buffer. Once they are equal
the user can then send more data.
Reset Ack.
om
Bit 3
If a Reset has been requested, this value will be set to 1 to indicate that the
serial port has been reset and the buffers have been flushed. This causes
the TxAck and RxReq to be reset to 0 allowing re-sync of protocol.
in
ec
Bits 2 to 0
on
l
A 2.1.3
7538_en_01
Number of Bytes Received
Indicates the number of valid data bytes that are in the data section of the
input data.
Serial Fragmentation Examples
The following examples will show how to read, write and handle errors using serial process
data fragmentation.
– Fragmented Read
– Fragmented Write
– Error Handling, Communications Backplane Break
– Error Handling, Host Communications Loss
PHOENIX CONTACT
A-9
IL EIP BK DI8 DO4 2TX-PAC
Fragmented Read Example
Figure A-2 shows an example I/O data table that contains only eight bytes of input data and
eight bytes of output data. This I/O is shown in an event by event sequence that
demonstrates how these eight bytes of I/O are updated when reading data using Serial PCP
fragmentation. The sequence works on this following basic principle:
Event x.
Client issues server 8 bytes of output data
Event x+1.
Server responds by updating 8 bytes of input data
2
3
4
5
6
Byte
7
Byte
0
1
Control
Event 1
I:1.1-I:1.4
Status
00hex
00hex
XX
XX
XX
XX
XX
XX
27hex
Rx
Rx
Rx
Rx
Rx
Rx
Rx
Data 1 Data 2 Data 3 Data 4 Data 5 Data 6 Data 7
65hex
6Chex
6Chex
6Fhex
20hex
57hex
48hex
“e”
“I”
“I”
“o”
“”
“W”
“H”
po
Control
05hex
20hex
Rx
Rx
Rx
Rx
Rx
Rx
Rx
Data 1 Data 2 Data 3 Data 4 Data 5 Data 6 Data 7
72hex
6Chex
64hex
21hex
6Fhex
XX
XX
“r”
“l”
“d”
“!”
“o”
om
Status
Control
Status
00hex
in
ec
Event 7
I:1.1-I:1.4
00hex
Rx
Rx
Rx
Rx
Rx
Rx
Rx
Data 1 Data 2 Data 3 Data 4 Data 5 Data 6 Data 7
XX
XX
XX
XX
on
l
Figure A-2
Event 1
XX
XX
Tx
Tx
Tx
Tx
Tx
Tx
Tx
Data 1 Data 2 Data 3 Data 4 Data 5 Data 6 Data 7
XX
XX
XX
XX
XX
XX
O:1.1-O:1.4
XX
XX
O:1.1-O:1.4
PHOENIX CONTACT
XX
XX
XX
Tx
Tx
Tx
Tx
Tx
Tx
Tx
Data 1 Data 2 Data 3 -Data 4 Data 5 Data 6 Data 7
XX
XX
XX
XX
XX
XX
XX
O:1.1-O:1.4
Event 6
Tx
Tx
Tx
Tx
Tx
Tx
Tx
Data 1 Data 2 Data 3 Data 4 Data 5 Data 6 Data 7
XX
XX
XX
XX
XX
XX
O:1.1-O:1.4
XX
Event 8
7524A128
Serial fragmented read example
The following paragraphs explain those events listed in Figure A-2.
Table A-3 to Table A-9 demonstrate the order of events when issuing a fragmented read
service to a PCP device. Each "Event" should be referenced to the I/O data table shown in
Figure A-2.
Table A-3 shows the transmission from a master to slave when the serial fragmentation is
in "Idle" mode.
Table A-3
A-10
XX
Event 4
Event 5
I:1.1-I:1.4
Byte
7
6
ne
Status
00hex
XX
nt
Control
Event 3
I:1.1-I:1.4
XX
Event 2
XX
5
4
Tx
Tx
Tx
Tx
Tx
Tx
Tx
Data 1 Data 2 Data 3 Data 4 Data 5 Data 6 Data 7
XX
Rx
Rx
Rx
Rx
Rx
Rx
Rx
Data 1 Data 2 Data 3 Data 4 Data 5 Data 6 Data 7
3
2
co
1
s.
Byte
0
Output Data Table
(Event Sequence for Bytes 0 to 7)
m
Input Data Table
(Event Sequence for Bytes 0 to 7)
Master to slave idle transmission
Control
Tx
Data 1
Tx
Data 2
Tx
Data 3
Tx
Data 4
Tx
Data 5
Tx
Data 6
Tx
Data 7
00hex
XX
XX
XX
XX
XX
XX
XX
7538_en_01
Communications Methods
Event 2
Table A-4 shows the slaves response to the idle state by replying with a 00hex.
Table A-4
Slave to master idle response
Status
Rx
Data 1
Rx
Data 2
Rx
Data 3
Rx
Data 4
Rx
Data 5
Rx
Data 6
Rx
Data 7
00hex
XX
XX
XX
XX
XX
XX
XX
Event 3
Master still sending the idle message.
Event 4
Table A-5 shows that the slave has received 7 bytes of new data. This indication is
explained as follows:
Rx
Data 1
Rx
Data 2
Rx
Data 3
27hex
48hex
„H“
65hex
„e“
6Chex
„I“
27hex
ne
Bit 5 = 1
Rx
Data 7
6Chex
„I“
6Fhex
„0“
20hex
„“
57hex
„W“
Receive request being toggled indicates that
new data is present.
Shows the number of bytes received.
Table A-6 shows the master to slave acknowledgment of a Receive Request indication.
Master to slave, receive data acknowledgement
om
Table A-6
Tx
Data 1
Tx
Data 2
Tx
Data 3
Tx
Data 4
Tx
Data 5
Tx
Data 6
Tx
Data 7
20hex
XX
XX
XX
XX
XX
XX
XX
in
ec
Control
on
l
Control, byte 0
7538_en_01
Rx
Data 6
po
Bits 2 to 0 = 7
Event 5
Rx
Data 5
nt
Status, byte 0
Rx
Data 4
s.
Status
m
Slave to master indication that new data has been received
co
Table A-5
20hex
Bit 5 = 1
After the 7 bytes have been received and
processed the Receive Ack. Bit is set to the same
value as the Receive Request bit to signal the
module that the master is ready to receive more
data.
PHOENIX CONTACT
A-11
IL EIP BK DI8 DO4 2TX-PAC
Table A-7 shows that the slave has received 5 additional bytes of data:
Table A-7
Slave to master indication that more data is present
Status
Rx
Data 1
Rx
Data 2
Rx
Data 3
Rx
Data 4
Rx
Data 5
Rx
Data 6
Rx
Data 7
05hex
6Fhex
„0“
72hex
„r“
6Chex
„I“
64hex
„d“
21hex
„!“
XX
XX
Bit 5 = 0
Receive request being toggled
(In event 6 bit 5 = 0) Indicates that new data is
present.
Bits 2 to 0 = 5
Shows the number of bytes received.
Table A-8 shows the master to slave acknowledgment of a Receive Request indication.
Control
Tx
Data 1
Tx
Data 2
00hex
XX
XX
Control, byte 0
Tx
Data 4
Tx
Data 5
Tx
Data 6
Tx
Data 7
XX
XX
XX
XX
XX
po
om
After the 5 bytes have been received and
processed the Receive Ack. bit is set to the same
value as the Receive request bit to signal the
module that the master is ready to receive more
data.
in
ec
Table A-9 shows the slave to master indication that no more data is present.
on
l
Table A-9
A-12
Tx
Data 3
00hex
Bit 5 = 0
Event 8
s.
Master to slave, receive data acknowledgement
nt
Table A-8
ne
Event 7
05hex
co
Status, byte 0
m
Event 6
PHOENIX CONTACT
Slave to master, no more data indication
Status
Rx
Data 1
Rx
Data 2
Rx
Data 3
Rx
Data 4
Rx
Data 5
Rx
Data 6
Rx
Data 7
00hex
XX
XX
XX
XX
XX
XX
XX
7538_en_01
Communications Methods
Fragmented Write Example
Figure A-3 shows an example I/O data table that contains only eight bytes of input data and
eight bytes of output data. This I/O is shown in an event by event sequence that
demonstrates how these eight bytes of I/O are updated when reading data using serial PCP
fragmentation. The sequence works on this following basic principle:
Event x.
Client issues server 8 bytes of output data
Event x+1.
Server responds by updating 8 bytes of input data
2
3
4
5
6
Byte
7
Byte
0
Control
Event 1
I:1.1-I:1.4
Status
00hex
00hex
Rx
Rx
Rx
Rx
Rx
Rx
Rx
Data 1 Data 2 Data 3 Data 4 Data 5 Data 6 Data 7
XX
XX
XX
XX
XX
XX
Control
10hex
XX
XX
XX
XX
XX
po
Control
00hex
XX
XX
XX
XX
XX
XX
00hex
in
ec
Status
Control
XX
XX
XX
on
l
Figure A-3
Event 1
XX
XX
XX
XX
XX
XX
XX
XX
XX
Tx
Tx
Tx
Tx
Tx
Tx
Tx
Data 1 Data 2 Data 3 Data 4 Data 5 Data 6 Data 7
48hex
65hex
6Chex
6Chex
6Fhex
20hex
57hex
“H”
“e”
“l”
“l”
“o”
“”
“W”
O:1.1-O:1.4
O:1.1-O:1.4
Tx
Tx
Tx
Tx
Tx
Tx
Tx
Data 1 Data 2 Data 3 -Data 4 Data 5 Data 6 Data 7
6Fhex
72hex
6Chex
64hex
21hex
XX
XX
“o”
“r”
“l”
“d”
“!”
O:1.1-O:1.4
XX
Tx
Tx
Tx
Tx
Tx
Tx
Tx
Data 1 Data 2 Data 3 Data 4 Data 5 Data 6 Data 7
XX
XX
XX
XX
XX
XX
O:1.1-O:1.4
XX
Event 8
7426A134
Serial fragmentation write example
The following paragraphs explain in detail those events listed in Figure A-3.
Table A-10 to Table A-15 demonstrate the order of events when issuing a fragmented write
service to a PCP device. Each "Event" should be referenced to the I/O data table shown in
Figure A-3.
Table A-10 shows the transmission from a master to slave when the serial fragmentation is
in "Idle" mode.
Table A-10
7538_en_01
00hex
Rx
Rx
Rx
Rx
Rx
Rx
Rx
Data 1 Data 2 Data 3 Data 4 Data 5 Data 6 Data 7
XX
Tx
Tx
Tx
Tx
Tx
Tx
Tx
Data 1 Data 2 Data 3 Data 4 Data 5 Data 6 Data 7
Event 6
XX
Event 7
I:1.1-I:1.4
05hex
Rx
Rx
Rx
Rx
Rx
Rx
Rx
Data 1 Data 2 Data 3 Data 4 Data 5 Data 6 Data 7
om
Status
Byte
7
Event 4
XX
Event 5
I:1.1-I:1.4
6
nt
17hex
Rx
Rx
Rx
Rx
Rx
Rx
Rx
Data 1 Data 2 Data 3 Data 4 Data 5 Data 6 Data 7
XX
5
4
ne
Status
3
2
Event 2
XX
Event 3
I:1.1-I:1.4
1
co
1
s.
Byte
0
Output Data Table
(Event Sequence for Bytes 0 to 7)
m
Input Data Table
(Event Sequence for Bytes 0 to 7)
Master to slave idle transmission
Control
Tx
Data 1
Tx
Data 2
Tx
Data 3
Tx
Data 4
Tx
Data 5
Tx
Data 6
Tx
Data 7
00hex
XX
XX
XX
XX
XX
XX
XX
PHOENIX CONTACT
A-13
IL EIP BK DI8 DO4 2TX-PAC
Event 2
Table A-11 shows the slave's response to the idle state by replying with a 00hex.
Table A-11
Status
Rx
Data 1
Rx
Data 2
Rx
Data 3
Rx
Data 4
Rx
Data 5
Rx
Data 6
Rx
Data 7
00hex
XX
XX
XX
XX
XX
XX
XX
Tx
Data 5
Tx
Data 6
Tx
Data 7
6Fhex
„0“
20hex
„“
57hex
„W“
Table A-12 shows the master to slave transmission of 7 bytes of data.
Master to slave data transmission
Tx
Data 1
Tx
Data 2
Tx
Data 3
Tx
Data 4
17hex
48hex
„H“
65hex
„e“
6Chex
„I“
6Chex
„I“
Control, byte 0
17hex
co
Control
m
Table A-12
s.
Event 3
Slave to master idle response
Transmit request is toggled indicating that new
data is being transmitted.
nt
Bit 4 = 1
Event 4
Table A-13 shows that the BK has received the data.
Slave to master acknowledgement of data transmission
po
Table A-13
Rx
Data 1
Rx
Data 2
Rx
Data 3
Rx
Data 4
Rx
Data 5
Rx
Data 6
Rx
Data 7
10hex
XX
XX
XX
XX
XX
XX
XX
om
Status
on
l
in
ec
Status, byte 0
Event 5
PHOENIX CONTACT
10hex
Bit 4 = 1
Transmit acknowledge is being set to the same
value as Transmit request to indicate that the
module is ready to receive more data.
Bits 2 to 0 = 0
0 bytes are being received at this time
Table A-14 shows the master to slave acknowledgment of Transmit Request indication.
Table A-14
Master to slave indication for data transmission
Control
Tx
Data 1
Tx
Data 2
Tx
Data 3
Tx
Data 4
Tx
Data 5
Tx
Data 6
Tx
Data 7
05hex
6Fhex
„0“
72hex
„r“
6Chex
„I“
64hex
„d“
21hex
„!“
XX
XX
Control, byte 0
A-14
Shows the number of bytes to transmit.
ne
Bits 2 to 0 = 7
05hex
Bit 4 = 0
Transmit Request has been toggled indicating
that there is more data to be transmitted.
Bits 2 to 0 = 5
Shows 5 bytes to transmit.
7538_en_01
Communications Methods
Table A-15 shows that the slave has received 5 additional bytes of data: This indication is
explained as follows:
Table A-15
Slave to master output data is "Queued" response
Status
Rx
Data 1
Rx
Data 2
Rx
Data 3
Rx
Data 4
Rx
Data 5
Rx
Data 6
Rx
Data 7
00hex
XX
XX
XX
XX
XX
XX
XX
00hex
Bit 4 = 0
Transmit Acknowledge is being set to the same
value as Transmit Request to indicate that the
module is ready to received more data.
Bits 2 to 0 = 5
No data is being received at this time
co
Status, byte 0
m
Event 6
Master to slave and slave to master idle mode. (No more data to send.)
on
l
in
ec
om
po
ne
nt
s.
Event 7 and Event 8
7538_en_01
PHOENIX CONTACT
A-15
IL EIP BK DI8 DO4 2TX-PAC
Fragmented Error Handling, Loss of Inline Backplane Communications Example
This serial fragmentation error handling example, shown in Figure A-4, will show how the
fragmentation will react during a break in the communications path on the Inline station’s
backplane. The error-handling sequence is also applicable for a write sequence.
Refer to the fragmented read example for an explanation of events 1 to 4.
Input Data Table
(Event Sequence for Bytes 0 to 7)
2
3
4
5
6
Byte
7
Byte
0
1
Control
Event 1
I:1.1-I:1.4
Status
00hex
00hex
XX
XX
XX
XX
XX
XX
Control
Event 3
27hex
Rx
Rx
Rx
Rx
Rx
Rx
Rx
Data 1 Data 2 Data 3 Data 4 Data 5 Data 6 Data 7
65hex
6Chex
6Chex
6Fhex
20hex
57hex
48hex
“e”
“I”
“I”
“o”
“”
“W”
“H”
Event 5
po
Rx
Rx
Rx
Rx
Rx
Rx
Rx
Data 1 Data 2 Data 3 Data 4 Data 5 Data 6 Data 7
6Fhex
72hex
6Chex
64hex
21hex
XX
XX
“o”
“r”
“l”
“d”
“!”
00hex
in
ec
Status
XX
XX
XX
on
l
Figure A-4
Event 5
00hex
Rx
Rx
Rx
Rx
Rx
Rx
Rx
Data 1 Data 2 Data 3 Data 4 Data 5 Data 6 Data 7
XX
Events 6 to 9
XX
XX
XX
XX
XX
XX
XX
XX
XX
O:1.1-O:1.4
XX
O:1.1-O:1.4
XX
XX
Tx
Tx
Tx
Tx
Tx
Tx
Tx
Data 1 Data 2 Data 3 Data 4 Data 5 Data 6 Data 7
XX
XX
XX
XX
XX
XX
O:1.1-O:1.4
XX
Event 7
Control
Event 8
I:1.1-I:1.4
XX
Event 4
20hex
om
05hex
XX
Tx
Tx
Tx
Tx
Tx
Tx
Tx
Data 1 Data 2 Data 3 Data 4 Data 5 Data 6 Data 7
XX
Control
Status
Byte
7
A data path is broken on the Inline Station’s communications
backplane during a read.
Event 6
I:1.1-I:1.4
6
nt
Status
00hex
5
ne
I:1.1-I:1.4
XX
Event 2
XX
4
Tx
Tx
Tx
Tx
Tx
Tx
Tx
Data 1 Data 2 Data 3 Data 4 Data 5 Data 6 Data 7
XX
Rx
Rx
Rx
Rx
Rx
Rx
Rx
Data 1 Data 2 Data 3 Data 4 Data 5 Data 6 Data 7
3
2
m
1
s.
Byte
0
Output Data Table
(Event Sequence for Bytes 0 to 7)
co
Events 1 to 4
Tx
Tx
Tx
Tx
Tx
Tx
Tx
Data 1 Data 2 Data 3 Data 4 Data 5 Data 6 Data 7
XX
XX
XX
XX
XX
XX
XX
O:1.1-O:1.4
Event 9
7426A138
Serial fragmentation error example 1
An error has occurred. The communications path between the bus coupler and its I/O has
been broken. If incoming serial data overflows the buffer on the serial module, overflow data
will be lost.
Error is repaired and the connection is reestablished thus data continues to be received.
Fragmented Error Handling, Loss of Communications from the Host to the Bus
Coupler
If communications is lost between the host controller an the Inline bus coupler during a read
or write service the bus coupler will wait for the error to be corrected (network cable is
repaired) and then continue to finish the serial fragmentation transaction.
A-16
PHOENIX CONTACT
7538_en_01
Communications Methods
A 2.2
Method 2: Transfer of Serial Data Using Explicit Messages
The ability to send explicit messages is a function of the Ethernet/IP I/O scanner. Not all
scanners have an explicit messaging channel available to the user. This manual will not
document the mechanics of the actual sending of an explicit message. Information of this
type must be provided in the documentation for the I/O scanner.
Configuration software can be an option to understand the structure of an explicit
message before the message is actually integrated into the control program.
m
Explicit messages can be sent as an alternative to using fragmentation and the high-speed
data channel. For this method the Serial Communications Object, Class Code 106dec
(6Ahex) will need to be directly accessed using an explicit message.
Receiving Serial Data
nt
A 2.2.1
s.
co
The Serial Communications Object contains attributes used for the sending and receiving
of data to or from a serial module. When using Method 2, the 8 bytes of fragmentation
produced and consumed data, as well as the Status and Control words can be removed
from the scan. For easy access, it may be advantageous to allow the Status and Control
words to remain in the scan.
om
po
ne
Attribute 7 of the Serial Communications Object (SCO) is the Receive Data parameter.
Using this attribute along with the status word, bit 0 "Receive Buffer is not Empty", is
required to receive data from a serial module. The status word (and a control word) from the
serial module(s) is automatically added to the Ethernet/IP scan by default. (See the
respective serial modules data sheet for more information on specific control functions and
status capabilities.) The user will need to monitor bit 0. When bit 0 is set, there is data
present from the serial module. At this point the user will send an explicit message with the
following parameters:
Node address
14dec (Get_Attribute_Single)
Class =
106dec (Serial Communications Object)
on
l
in
ec
Service Code
Instance =
1 (In this case the 1st occurrence of a serial module)
Attribute =
7 (Receive data)
Instance is determined by the physical location on the Inline station. The 1st instance will
be assigned to the serial module (RS-232 or RS-485/RS-422) located closest to the bus
coupler and the last instance (maximum of 8) will be assigned to the right most module.
When this message is sent, the bus coupler will send its response back to the sender.
Typically an I/O scanner control bit is set when an explicit response is present. At that point
the response can be read. The response will include a positive or negative confirmation.
The first data byte returned by bus coupler will be the number of bytes to follow. These
"following" bytes are the actual data that was received by the serial module. Keep in mind
that the user will need to understand the explicit message response format dictated by the
I/O scanner. It is probable that several bytes of data pertaining to the response "header"
will be returned before the actual data returned from the serial module is present. This
header may include such information as: transaction ID, command, nodes address and
confirmation (positive or negative).
7538_en_01
PHOENIX CONTACT
A-17
IL EIP BK DI8 DO4 2TX-PAC
A 2.2.2
Transmitting Serial Data
Attribute 8 of the Serial Communications Object (SCO) is the Transmit Data parameter. This
attribute is required to transfer data to a serial module. To transmit data to the serial module
the user will send an explicit message with the following parameters:
Node address
16dec (Set_Attribute_Single)
Class =
106dec (Serial Communications Object)
Instance =
1 (In this case the 1st occurrence of a serial module)
Attribute =
8 (Transmit data)
m
Service Code =
co
Instance is determined by the physical location on the Inline station. The 1st instance will
be assigned to the serial module (RS-232 or RS-485/RS-422) located closest to the bus
coupler and the last instance (maximum of 8) will be assigned to the right most module.
nt
s.
When this message is sent, the bus coupler will send its response back to the sender.
Typically an I/O scanner control bit is set when an explicit response is present. At that point
the response can be read. When sending a transmit command the user can expect a
positive or negative confirmation in return.
on
l
in
ec
om
po
ne
The first byte transmitted to the bus coupler will be the number of bytes to follow. These
"following" bytes are the actual data that is being sent to the serial module.
A-18
PHOENIX CONTACT
7538_en_01
Communications Methods
A 2.3
Method 3: Transfer of Data Using PCP Fragmentation
This method defines how PCP data is exchanged, using process/cyclic data, with an Inline
module that supports the Peripherals Communications Protocol (PCP) and is not a serial
module. An example of this type of module would be the Inline AS-i-Gateway (ASI MA IB IL).
Typically the ASI MA IB IL will not require the use of PCP data exchange. However PCP
data exchange will be required if there are more than 31 slaves on the AS-i "subnetwork".
m
The messages that are required to read and write data are encoded into the high-speed
data stream. The protocol is handled using a series of message fragments that are initiated
by a client start request and then followed up with a server response. These fragments were
specifically designed to be used with any Inline PCP modules.
s.
co
These process data messages are used to read or write to a specific slave device’s memory
location that is access by an Index and subindex designation. Beside the exchange of
normal I/O data PCP process data communications can be used to parameterize an Inline
module or retrieve informative data.
nt
Information pertaining to the supported indexes, subindexes and Invoke ID can be found
in the specific module’s data sheet and/or manual.
po
ne
For each PCP Inline module, by default, 8 bytes (1 fragment) are added to the Ethernet/IP
produced size and eight bytes are added to the consumed size. These eight bytes can only
be used to send PCP data messages and are in addition to any other I/O data that might
also be added into the scan. This type of information can be found in the specific module's
data sheet.
in
ec
om
An example of this type of information would be a status and control word. These two bytes
would also be added to the produced size and to the consumed size in addition to the eight
bytes allocated for the "I/O messaging" connection. For this example there would be a total
of 10 produced bytes and 10 consumed bytes allocated for this one Inline PCP module.
When using PCP fragmentation a request will be sent and a response will be returned the
format of a request and a response is as follows:
on
l
Request (Output Data) –
NO Invoke ID
7538_en_01
Byte 0
Service
Byte 1
Module number
Byte 2
Index low
Byte 3
Index high
Byte 4
Subindex
Byte 5
Length
Byte 6 to N
Data block, if necessary
PHOENIX CONTACT
A-19
IL EIP BK DI8 DO4 2TX-PAC
Invoke ID
Byte 2
Module number
Byte 3
Index low
Byte 4
Index high
Byte 5
Subindex
Byte 6
Length
Byte 7 to N
Data block, if necessary
Byte 0
Service
co
m
Service
Byte 1
Byte 1
Status
Byte 2
Length
Byte 3 to N
Data block, if necessary
s.
Successful Response:
(Input Data) – NO Invoke
ID
Byte 0
nt
Request (Output Data) –
With Invoke ID
Service
Byte 1
Status
Byte 2
Error class
Byte 3
Error code
po
Byte 0
om
Errored Produced
Response: (Input Data) –
NO Invoke ID
ne
If the response was not successful the response will be returned in the following format:
Additional error code 1 LSB, if necessary
Byte 5
Additional error code 1 MSB, if necessary
Byte 6
Additional error code 2 LSB, if necessary
Byte 7
Additional error code 2 MSB, if necessary
Byte 0
Service
Byte 1
Invoke ID
Byte 2
Status
Byte 3
Length
Byte 4 to N
Data block, if necessary
in
ec
Byte 4
on
l
Successful Response:
(Input Data) – With Invoke
ID
If the response was not successful the response will be returned in the following format:
A-20
PHOENIX CONTACT
7538_en_01
Communications Methods
Byte 0
Service
Byte 1
Invoke ID
Byte 2
Status
Byte 3
Error class
Byte 4
Error code
Byte 5
Additional error code 1 LSB, if necessary
Byte 6
Additional error code 1 MSB, if necessary
Byte 7
Additional error code 2 LSB, if necessary
Byte 8
Additional error code 2 MSB, if necessary
m
Errored Produced
Response: (Input Data) –
With Invoke ID
co
The Response Service byte is a reflection of the request service byte, with the exception of
the request/response bit (see the definition of the Start Fragment for more information on
this bit).
Fragment Types
po
A 2.3.1
ne
nt
s.
It is important to keep track of the "client-service" relationship between the master and the
slave. For example, a read request involves a single non-fragmented service. The slave
responds with a completely new service to transfer the response data. This new service
begins with a start fragment and ends (if enough data was requested) with a last fragment.
The write request on the other hand, starts with a start fragment and ends (if enough data
was sent) with a last fragment. The slave responds with a non-fragmented start fragment.
on
l
Start Fragment
in
ec
om
Four transfer-fragment types are distinguished by the service-byte (byte 0 of each
fragment). The types are as follows:
– Start fragment
– Middle fragment
– Last fragment
– Abort/error fragment
7538_en_01
To begin any message a start fragment must be sent. The start fragment’s eight bytes have
the following format:
Byte 0
Service
Byte 1
Module number
Byte 2
Index low
Byte 3
Index high
Byte 4
Subindex
Byte 5
Length
Byte 6
Data block, if necessary
Byte 7
Data block, if necessary
PHOENIX CONTACT
A-21
IL EIP BK DI8 DO4 2TX-PAC
Byte 0, Service Definition of the Start Fragment (Shown in Table A-16)
Table A-16
Service byte definition of the start fragment
7
6
5
4
Request/
Response
0
0
No
Fragment
/
Fragment
2
1
0
PCP Service
Request/Response
The request response bit is set when the actual Inline PCP module
responds to the PCP service that the user requested. The amount of time
that it takes to process this service depends on the PCP channel size, the
number of Inline modules, and the actual service requested. The user can
use this bit to know when the service is actually processed by the Inline
PCP module. For a read request, this bit will be set by the bus coupler as
soon as the read request is called. For a write request, this bit is set as soon
as all data reaches the PCP module.
Request (Service in process)
1
Response (Service is processed)
nt
0
Fragment Type
For a start fragment these bits will always be a zero.
Fragmented
Bit 4 informs the slave as to whether the message contains more than eight
bytes (7 data bytes) or not.
om
Bit 4
on
l
in
ec
Bit 3 to 0
A-22
PHOENIX CONTACT
Start - fragment
po
00
ne
Bit 6 to 5
s.
co
m
Bit 7
3
0
Does not fragment
1
Fragments
PCP Service
Bits 3 to 0 informs the slave of the type of message (service) being sent.
The means are described as follows:
00hex
No action (Clears input bytes in response)
01hex
Read
02hex
Write
03hex
Read PDU length
04hexto 0Fhex
Reserved
7538_en_01
Communications Methods
Middle Fragment
Any write request or read response requires more than the available number of data bytes
in both a start fragment and a last fragment, then a middle fragment must be used. Middle
fragments have the following format.
Byte 0
Service
Byte 1
Data block, if necessary
Bytes 2 to 7
Data blocks, if necessary
Byte 0, Service Definition of a Middle Fragment (Shown in Table A-17)
Service byte definition of the middle fragment
6
5
Request/
Response
0
1
4
3
2
1
0
Fragment Number (01hex to 1Fhex)
co
7
m
Table A-17
Request/Response
See start fragment for definition.
Bit 6 to 5
Fragment Type
For a middle fragment these bits will always be a 01.
Count
Bits 4 to 0 keep track of how many middle fragments have been sent. 31 is
the maximum number of middle fragments that can be counted (01hex to
1Fhex). If more fragments are needed, the fragment number will roll over to
0 and fragments can continue to be sent.
om
po
Bit 4 to 0
Middle fragment
ne
01
nt
s.
Bit 7
Last Fragment
To recognize the end of a fragmented message, a last fragment must be issued. A last
fragment has the following format:
in
ec
Byte 0
Byte 1 to 7
Service
Data block, if necessary
Byte 0, Service Definition of the Last Fragment (see Table A-18)
on
l
Table A-18
Service byte definition of the last fragment
7
6
5
Request/
Response
1
0
3
2
Request/Response
See start fragment for definition.
Bit 6 to 5
Fragment Type
For a last fragment these bits will always be a 10.
10
1
0
Reserved
Bit 7
Bit 4 to 0
7538_en_01
4
Last fragment
Reserved
PHOENIX CONTACT
A-23
IL EIP BK DI8 DO4 2TX-PAC
Abort/Error fragment:
If a transmission error is detected an abort/error fragment will be generated.
Byte 0, Service Definition of a PCP Abort/Error Fragment (see Table A-19)
Table A-19
Service byte definition of the PCP abort/error fragment
7
6
5
Request/
Response
1
1
3
2
1
0
Reserved
Request
1
Response
Fragment Type
For an abort/error fragment, these bits will always be an 11.
11
Abort/error fragment
Reserved
nt
Bit 4 to 0
co
Bit 6 to 5
0
m
Request/Response
See start fragment for definition.
s.
Bit 7
4
Table A-20
Service byte definition of the PCP abort/error fragment
6
5
4
po
7
ne
Byte 1, Status Definition of a Abort/Error Fragment (See Table A-20)
1
0
Fragmen
tation
Error
PCP
Channel
Busy
PCP
Error
Module
Comm
Error
Bit 7 to 4
Reserved
Bit 3
Fragmentation Error:
An error has occurred with either the type or sequence of the fragments (i.e.
middle received after last, middle fragment 2 received before 1, etc.)
in
ec
on
l
2
om
Reserved
3
Bit 2
PCP Channel Busy
A PCP transaction is already in progress, such as from an explicit request.
Bit 1
PCP Error
A PCP Service-Specific error has occurred. See the Error Class and Error
Code bytes.
Bit 0
Module Comm Error
When set, communication with the module is no longer possible.
Byte 2-7, Error Class and Error Code
Bytes 2 and 3 will display the error class and error code. If there is any additional error
information it will be displayed in bytes 4 to 7. To interpret the error information, a PCP
reference manual must be consulted.
A-24
PHOENIX CONTACT
7538_en_01
Communications Methods
A 2.3.2
PCP Fragmentation Examples
on
l
in
ec
om
po
ne
nt
s.
co
m
The following examples will show how to read, write and handle errors using PCP process
data fragmentation. The examples to follow are:
– Fragmented Read
– Fragmented Write
– Error Handling, Communications Backplane Break
– Error Handling, Host Communications Loss
7538_en_01
PHOENIX CONTACT
A-25
IL EIP BK DI8 DO4 2TX-PAC
Fragmented Read Example
Figure A-5 shows an example I/O data table that contains only eight bytes of input data and
eight bytes of output data. This I/O is shown in an event by event sequence that
demonstrates how these eight bytes of I/O are updated when reading data using PCP
fragmentation. The sequence works on this following basic principle:
Event x
Client issues server 8 bytes of output data
Event x+1
Server responds by updating 8 bytes of input data
2
3
5
4
6
Byte
7
Event 1
I:1.1-I:1.4
Service
Not
Used
Not
Used
Not
Used
Not
Used
Not
Used
Not
Used
Not
Used
00hex
XX
XX
XX
XX
XX
XX
XX
Byte
0
D2
D3
D4
00hex
01hex
02hex
03hex
04hex
05hex
91hex
10hex
Event 5
Service
D5
D6
D7
D8
A1hex
06hex
07hex
08hex
09hex
D10
D9
om
I:1.1-I:1.4
0Ahex
0Bhex
C0hex
0Dhex
in
ec
D12
I:1.1-I:1.4
D14
D15
Not
Used
Not
Used
Not
Used
0Ehex
0Fhex
10hex
XX
XX
XX
Event 9
Event 10
Status
Not
Used
Not
Used
Not
Used
Not
Used
Not
Used
Not
Used
Not
Used
00hex
XX
XX
XX
XX
XX
XX
XX
Figure A-5
Not
Used
Not
Used
XX
XX
XX
XX
XX
00hex
XX
XX
Event 2
Module Index
Number Low
Index
High
Sub- Length Not
Index
Used
01hex
Not
Used
E0hex
5Fhex
00hex
00hex
XX
XX
O:1.1-O:1.4
O:1.1-O:1.4
Event 4
Service
Not
Used
Not
Used
Not
Used
Not
Used
Not
Used
Not
Used
Not
Used
91hex
XX
XX
XX
XX
XX
XX
XX
0Chex
D13
on
l
Service
Not
Used
O:1.1-O:1.4
D11
Event 7
I:1.1-I:1.4
Not
Used
Not
Used
nt
D1
Not
Used
Not
Used
ne
D0
Byte
7
Service
01hex
Service Status Length
6
3
po
I:1.1-I:1.4
5
2
Service
Event 3
4
1
co
1
s.
Byte
0
Output Data Table
(Event Sequence for Bytes 0 to 7)
m
Input Data Table
(Event Sequence for Bytes 0 to 7)
Event 6
Service
Not
Used
Not
Used
Not
Used
Not
Used
Not
Used
Not
Used
Not
Used
A1hex
XX
XX
XX
XX
XX
XX
XX
O:1.1-O:1.4
Event 8
Service
Not
Used
Not
Used
Not
Used
Not
Used
Not
Used
Not
Used
Not
Used
C0hex
XX
XX
XX
XX
XX
XX
XX
Service
Not
Used
Not
Used
Not
Used
Not
Used
Not
Used
Not
Used
Not
Used
00hex
XX
XX
XX
XX
XX
XX
XX
O:1.1-O:1.4
O:1.1-O:1.4
Event 11
7426A144
I/O events for a read sequence using PCP fragmentation
In the following paragraphs the events in Figure A-5 will be explained in detail.
Table A-21 to Table A-31 demonstrate the order of events when issuing a fragmented read
service to a PCP device. Each "Event" should be referenced to the I/O data table shown in
Figure A-5.
A-26
PHOENIX CONTACT
7538_en_01
Communications Methods
Event 1
Table A-21 shows the transmission from a master to slave when the PCP fragmentation is
in "Idle" mode. Note that in byte 0 the service 00hex is being sent.
Master to slave idle request, sending a 00hex no action service
Table A-21
Service
Not
Used
Not
Used
Not
Used
Not
Used
Not
Used
Not
Used
Not
Used
00hex
XX
XX
XX
XX
XX
XX
XX
Table A-22 shows the slaves response to the idle state by replying with a 00hex no action
acknowledge.
Service
Not
Used
Not
Used
Not
Used
00hex
XX
XX
XX
Not
Used
Not
Used
XX
XX
Not
Used
Not
Used
XX
XX
Table A-23 shows how the start fragment request is sent from the master to the slave to
initiate a read. This message is built with the format shown below. Note that the target index
is 5FE0hex.
nt
s.
Event 3
Slave to master idle response, 00hex no action acknowledgement
m
Table A-22
co
Event 2
01hex
Read
ne
Service, Byte 0
First PCP module on the Inline station
Index high, byte 3
5Fhex
High byte of the PCP index to be read
Subindex, byte 4
00hex
Subindex is zero
Length, byte 5
00hex
No length requirement
XX
Not used
Module Number byte 1
om
Bytes 6 and 7
in
ec
Table A-23
E0hex
Low byte of the PCP index to be read
po
Index Low, byte 2
01hex
Master to slave read request, sending a 01hex service
Module
Number
Index
Low
Index
High
SubIndex
Length
Not
Used
Not
Used
01hex
01hex
E0hex
5Fhex
00hex
00hex
XX
XX
on
l
Service
7538_en_01
PHOENIX CONTACT
A-27
IL EIP BK DI8 DO4 2TX-PAC
Table A-24 shows the response from the slave that includes the first 5 bytes of actual data
that was requested from index 5FE0hex. This reply is explained as follows:
Table A-24
Slave to master, response to the read request
Service
Status
Length
D0
D1
D2
D3
D4
91hex
00hex
10hex
01hex
02hex
03hex
04hex
05hex
Service, Byte 0
91hex
This signifies that the fragment is a response
Bit 6 = 0
This signifies a start fragment
Bit 5 = 0
This signifies a start fragment
Bit 4 = 1
This denotes that the response will be sent in
fragments
Bits 3 to 0 = 1
This signifies a read service
Status
00hex
No errors
Length
10hex
Informs the master that there will be 16 data
bytes in the message
co
m
Bit 7 = 1
nt
s.
Event 4
First 5 bytes of the message (bytes D5-D15 to be
sent in the following fragments)
ne
D0 - D4
po
It is important to realize that event 4 is really the start fragment of the slave's message
containing the requested data.
Table A-25 shows the master to slave acknowledgment of the response being received. In
this acknowledge the service byte reflection is the indication that the 1st response was
received.
om
Event 5
in
ec
Table A-25
Master to slave acknowledgement
Not
Used
Not
Used
Not
Used
Not
Used
Not
Used
Not
Used
Not
Used
91hex
XX
XX
XX
XX
XX
XX
XX
on
l
Service
A-28
PHOENIX CONTACT
7538_en_01
Communications Methods
Since the reception of the first 5 bytes of data has been acknowledged the slave is ready to
send the next fragment. This second fragment is a middle fragment with a slightly different
format. Table A-26 shows the response from the slave that includes the service byte and 7
more bytes of data that was requested from index 5FE0hex. This reply is explained as
follows:
Table A-26
Slave to master, reply with first middle fragment
Service
D5
D6
D7
D8
D9
D10
D11
A1hex
06hex
07hex
08hex
09hex
0Ahex
0Bhex
0Chex
A1hex
This signifies that the fragment is a response
Bit 6 = 0
Designates a middle fragment
when bit 6 = 0 and bit 5 = 1
Bit 5 = 1
Designates a middle fragment
when bit 6 = 0 and bit 5 = 1
Bit 4 to 0 = 1
These bit count the fragments.
1 = the 1st middle fragment
Table A-27 shows the master to slave acknowledgment of the response being received. In
this acknowledge the service byte reflection is the indication that the 1st middle fragment
response was received.
Master to slave acknowledge of the first middle fragment
om
Table A-27
po
Event 7
Not
Used
Not
Used
Not
Used
Not
Used
Not
Used
Not
Used
Not
Used
A1hex
XX
XX
XX
XX
XX
XX
XX
in
ec
Service
on
l
Table A-28 shows the slave to master reception of the last fragment that was requested
from index 5FE0hex. This fragment returns the last 4 data bytes as expected by the length
byte shown in Figure A-5. This response is explained as follows:
Table A-28
Slave to master acknowledge last fragment response
Service
D12
D13
D14
D15
Not
Used
Not
Used
Not
Used
C0hex
0Dhex
0Ehex
0Fhex
10hex
XX
XX
XX
Service, byte 0
7538_en_01
co
Specifies 7 additional bytes of data (5 received in
the first response)
ne
Bytes 1 to 7 = 7
Event 8
m
Bit 7 = 1
nt
Service, byte 0
s.
Event 6
C0hex
Bit 7 = 1
This signifies that the fragment is a response
Bit 6 = 1
Designates a last fragment
when bit 6 = 1 and bit 5 = 0
Bit 5 = 0
Designates a last fragment
when bit 6 = 1 and bit 5 = 0
Bits 4 to 0
Reserved
PHOENIX CONTACT
A-29
IL EIP BK DI8 DO4 2TX-PAC
Event 9
Table A-29 shows the master to slave acknowledgment of the last fragment being received.
In this acknowledge the service byte reflection is the indication that the last fragment
response was received.
Table A-29
Service
Not
Used
Not
Used
Not
Used
Not
Used
Not
Used
Not
Used
Not
Used
C0hex
XX
XX
XX
XX
XX
XX
XX
Master to slave idle service
Service
Not
Used
Not
Used
Not
Used
00hex
XX
XX
XX
Not
Used
Not
Used
Not
Used
XX
XX
XX
Not
Used
Not
Used
Not
Used
Not
Used
XX
XX
XX
XX
s.
XX
Slave to master idle service response
Not
Used
00hex
XX
Not
Used
Not
Used
XX
XX
on
l
in
ec
om
po
Service
nt
Table A-31
Not
Used
co
Table A-30
m
Knowing that the last fragment was received the master issues an idle service to the slave
as shown in Table A-30 and the slave respond with its reply as shown in Table A-31.
ne
Events 10 and 11
Master to slave last fragment acknowledgement
A-30
PHOENIX CONTACT
7538_en_01
Communications Methods
Fragmented Write Example
Figure A-6 shows an example I/O data table that contains only eight bytes of input data and
eight bytes of output data. This I/O is shown in an event by event sequence that
demonstrates how these eight bytes of I/O are updated when reading data using PCP
fragmentation. The sequence works on this following basic principle:
Event x
Client issues server 8 bytes of output data
Event x+1
Server responds by updating 8 bytes of input data
2
3
5
4
6
Byte
7
Event 1
I:1.1-I:1.4
Service
Not
Used
Not
Used
Not
Used
Not
Used
Not
Used
Not
Used
Not
Used
00hex
XX
XX
XX
XX
XX
XX
XX
Byte
0
Not
Used
Not
Used
Not
Used
Not
Used
Not
Used
12hex
XX
XX
XX
XX
XX
XX
XX
Not
Used
Not
Used
Not
Used
Not
Used
Not
Used
21hex
XX
XX
XX
XX
XX
00hex
I:1.1-I:1.4
XX
XX
XX
XX
D0
D1
XX
XX
Event 2
Module Index
Number Low
Index
High
Sub- Length
Index
I
01hex
E0hex
5Fhex
00hex
10hex
01hex
02hex
D5
D6
D7
D8
21hex
03hex
04hex
05hex
06hex
07hex
08hex
09hex
Not
Used
XX
XX
Not
Used
Not
Used
Not
Used
Not
Used
Not
Used
XX
XX
XX
XX
XX
XX
Event 9
Event 10
Status
Not
Used
Not
Used
Not
Used
Not
Used
Not
Used
Not
Used
Not
Used
XX
XX
XX
XX
XX
XX
XX
XX
Figure A-6
XX
00hex
D4
Not
Used
on
l
82hex
in
ec
Service Status
Not
Used
D3
Event 7
I:1.1-I:1.4
Not
Used
D2
Not
Used
om
Service
Not
Used
Service
Event 5
I:1.1-I:1.4
Not
Used
Not
Used
nt
Not
Used
Not
Used
Not
Used
ne
Not
Used
Byte
7
Service
12hex
Service
6
3
O:1.1-O:1.4
O:1.1-O:1.4
Event 4
po
I:1.1-I:1.4
5
2
Service
Event 3
4
1
co
1
s.
Byte
0
Output Data Table
(Event Sequence for Bytes 0 to 7)
m
Input Data Table
(Event Sequence for Bytes 0 to 7)
O:1.1-O:1.4
Event 6
Service
D9
D10
D11
D12
D13
D14
D15
40hex
09hex
0Ahex
0Bhex
0Chex
0Dhex
0Ehex
0Fhex
O:1.1-O:1.4
Event 8
Service
Not
Used
Not
Used
Not
Used
Not
Used
Not
Used
Not
Used
Not
Used
82hex
XX
XX
XX
XX
XX
XX
XX
Service
Not
Used
Not
Used
Not
Used
Not
Used
Not
Used
Not
Used
Not
Used
00hex
XX
XX
XX
XX
XX
XX
XX
O:1.1-O:1.4
O:1.1-O:1.4
Event 11
7426A155
I/O events for a write sequence using PCP fragmentation
In the following paragraphs the events in Figure A-6 will be explained in detail.
Table A-32 to Table A-42 demonstrate the order of events when issuing a fragmented write
service to a PCP device. Each "Event" should be referenced to the I/O data table shown in
Figure A-6.
7538_en_01
PHOENIX CONTACT
A-31
IL EIP BK DI8 DO4 2TX-PAC
Event 1
Table A-32 shows the transmission from a master to slave when the PCP fragmentation is
in "Idle" mode. Note that in byte 0 the service 00hex is being sent.
Master to slave idle request, sending a 00hex no action service
Table A-32
Service
Not
Used
Not
Used
Not
Used
Not
Used
Not
Used
Not
Used
Not
Used
00hex
XX
XX
XX
XX
XX
XX
XX
Table A-33 shows the slaves response to the idle state by replying with a 00hex no action
acknowledge.
Service
Not
Used
Not
Used
Not
Used
00hex
XX
XX
XX
Not
Used
Not
Used
XX
XX
XX
XX
nt
Module
Number
Index
High
Subinde
x
Length
D0
D1
12hex
01hex
5Fhex
00hex
10hex
01hex
02hex
om
Index
Low
po
Service
12hex
Fragmented write
Bit 4
Indicates that the write is fragmented
Bits 0 to 3
Write service (02hex)
First PCP module on the Inline station
Index Low, byte 2
E0hex
Low byte of the PCP index to be read
Index High, byte 3
5Fhex
High byte of the PCP index to be read
Subindex, byte 4
00hex
Subindex is zero
Length, byte 5
10hex
16 bytes
Bytes 6 and 7
XXhex
First 2 data bytes
in
ec
on
l
E0hex
Module Number, byte 1 01hex
Table A-35 shows the acknowledge from the slave that indicates the write request fragment
was processed. In this acknowledge the service byte reflection is the indication that the 1st
response was received.
Table A-35
PHOENIX CONTACT
ne
Master to slave write request, sending a 02hex service
Service, byte 0
A-32
Not
Used
Table A-34 shows how the start fragment request is sent from the master to the slave to
initiate a write. This message is built with the format shown below. Note that the target index
is 5FE0hex.
Table A-34
Event 4
Not
Used
s.
Event 3
Slave to master idle response, 00hex no action acknowledgement
m
Table A-33
co
Event 2
Slave to master, acknowledgement of the write service
Service
Not
Used
Not
Used
Not
Used
Not
Used
Not
Used
Not
Used
Not
Used
12hex
XX
XX
XX
XX
XX
XX
XX
7538_en_01
Communications Methods
Since the reception of the first 2 bytes of data has been processed and acknowledged the
master is ready to send the next fragment. This second fragment is a middle fragment with
a slightly different format. Table A-36 shows the service byte and the next 7 bytes of data to
be written to index 5FE0hex. This request is explained as follows:
Table A-36
Master to slave, sending the 1st middle fragment
Service
D2
D3
D4
D5
D6
D7
D8
21hex
03hex
04hex
05hex
06hex
07hex
08hex
09hex
21hex
This signifies that the fragment is a request
Bit 6 = 0
Designates a middle fragment
when bit 6 = 0 and bit 5 = 1
Bit 5 = 1
Designates a middle fragment
when bit 6 = 0 and bit 5 = 1
Bits 4 to 0 = 1
These bit count the fragments.
1 = the 1st middle fragment
Table A-37
21hex
Not
Used
XX
Not
Used
Not
Used
Not
Used
Not
Used
Not
Used
Not
Used
XX
XX
XX
XX
XX
XX
Since the reception of the first middle fragment of data has been acknowledged the master
is ready to send the next fragment. This next fragment is the last fragment. Table A-38
shows the last fragment that includes the service byte and 7 more bytes of data that is being
sent to index 5FE0hex (16 bytes total). This last fragment request is explained as follows:
in
ec
Event 7
on
l
Table A-38
Master to slave last fragment
Service
D2
D3
D4
D5
D6
D7
D8
40hex
09hex
0Ahex
0Bhex
0Chex
0Dhex
0Ehex
0Fhex
Service, byte 0
Bytes 1 to 7
7538_en_01
Slave to master, acknowledgement of 1st middle fragment
om
Service
ne
Table A-37 shows the slave to master acknowledgment. The service byte reflection
indicates that the 1st middle fragment data was received and processed.
po
Event 6
More bytes of data (2 sent with first request)
nt
Bytes 1 to 7 = 7
m
Bit 7 = 0
co
Service, byte 0
s.
Event 5
40hex
Bit 7 = 0
This signifies that the fragment is a request
Bit 6 = 1
Designates a last fragment
when bit 6 = 1 and bit 5 = 0
Bit 5 = 0
Designates a last fragment
when bit 6 = 1 and bit 5 = 0
Bits 4 to 0 = 0
Reserved
Last 7 bytes of data
PHOENIX CONTACT
A-33
IL EIP BK DI8 DO4 2TX-PAC
Event 8
Table A-39 shows the slave to master acknowledgment of the last fragment being received
and processed. In this acknowledge the service byte reflection is the indication that the last
fragment data was received. It is important to realize that event 8 is really a start fragment
from the slave signaling the response and status information for the write request.
Table A-39
Service
Not
Used
Not
Used
Not
Used
Not
Used
Not
Used
Not
Used
Not
Used
82hex
XX
XX
XX
XX
XX
XX
XX
Master to slave acknowledgement
Service
Not
Used
Not
Used
Not
Used
82hex
XX
XX
XX
co
Table A-40
m
Table A-40 shows the master to slave acknowledgment of the last fragment being received.
In this acknowledge the service byte reflection is the indication that the last fragment
response was received.
Not
Used
s.
Event 9
Slave to master last fragment acknowledgement
Not
Used
Not
Used
XX
XX
XX
nt
XX
Not
Used
Table A-41
ne
Knowing that the last fragment was received the master can issue an idle service to the
slave as shown in Table A-41 and the slave respond with its reply as shown inTable A-42.
Master to slave idle
Service
Not
Used
Not
Used
Not
Used
Not
Used
Not
Used
Not
Used
Not
Used
00hex
XX
XX
XX
XX
XX
XX
XX
om
po
Events 10 and 11
Table A-42
in
ec
Service
Not
Used
Not
Used
Not
Used
Not
Used
Not
Used
Not
Used
Not
Used
XX
XX
XX
XX
XX
XX
XX
on
l
00hex
Slave to master response to idle
A-34
PHOENIX CONTACT
7538_en_01
Communications Methods
Fragmented Error Handling, Loss of Inline Backplane Communications
This PCP fragmentation error handling example, shown in Figure A-7, will show how the
fragmentation will react during a break in the communications path on the Inline station’s
backplane.
Input Data Table
(Event Sequence for Bytes 0 to 7)
3
2
5
4
6
Byte
7
Event 1
I:1.1-I:1.4
Service
Not
Used
Not
Used
Not
Used
Not
Used
Not
Used
Not
Used
Not
Used
00hex
XX
XX
XX
XX
XX
XX
XX
Byte
0
1
2
3
4
5
6
Byte
7
Service
Not
Used
Not
Used
Not
Used
Not
Used
Not
Used
Not
Used
Not
Used
00hex
XX
XX
XX
XX
XX
XX
XX
Event 2
Service
Service Status Length
D0
D1
D2
D3
D4
00hex
01hex
02hex
03hex
04hex
05hex
91hex
10hex
Service
D5
D6
D7
D8
D9
D10
D11
A1hex
06hex
07hex
08hex
09hex
0Ahex
0Bhex
0Chex
om
Event 7
01hex
Service
Not
Used
XX
XX
Not
Used
Not
Used
Not
Used
Not
Used
Not
Used
XX
XX
XX
XX
XX
XX
Not
Used
Not
Used
Not
Used
Not
Used
Not
Used
Not
Used
XX
XX
XX
XX
XX
XX
in
ec
E0hex
Not
Used
on
l
I:1.1-I:1.4
Service Status
Service
D12
D13
D14
D15
Not
Used
Not
Used
Not
Used
C0hex
0Dhex
0Ehex
0Fhex
10hex
XX
XX
XX
Service
Not
Used
Not
Used
Not
Used
Not
Used
Not
Used
Not
Used
Not
Used
00hex
XX
XX
XX
XX
XX
XX
XX
Event 15
Figure A-7
7538_en_01
5Fhex
00hex
00hex
XX
XX
O:1.1-O:1.4
Not
Used
Not
Used
Not
Used
Not
Used
Not
Used
Not
Used
Not
Used
XX
XX
XX
XX
XX
XX
XX
O:1.1-O:1.4
Ereignis 6
Service
Not
Used
Not
Used
Not
Used
Not
Used
Not
Used
Not
Used
Not
Used
A1hex
XX
XX
XX
XX
XX
XX
XX
O:1.1-O:1.4
Event 9
Event 10
Error—Repaired
Event 11
Event 13
I:1.1-I:1.4
D1
Error—Inline Station encounters a communications path break
between local I/O modules.
Event 8
I:1.1-I:1.4
D0
ne
91hex
po
I:1.1-I:1.4
Sub- Length
Index
Event 4
Service
Event 5
E0hex
01hex
Index
High
O:1.1-O:1.4
s.
I:1.1-I:1.4
01hex
Module Index
Number Low
nt
Event 3
m
1
co
Byte
0
Output Data Table
(Event Sequence for Bytes 0 to 7)
Event 12
Service
Not
Used
Not
Used
Not
Used
Not
Used
Not
Used
Not
Used
Not
Used
C0hex
XX
XX
XX
XX
XX
XX
XX
O:1.1-O:1.4
Event 14
Service
Not
Used
Not
Used
Not
Used
Not
Used
Not
Used
Not
Used
Not
Used
XX
XX
XX
XX
XX
XX
XX
XX
O:1.1-O:1.4
7426A164
Local communications error sequence using PCP fragmentation
PHOENIX CONTACT
A-35
IL EIP BK DI8 DO4 2TX-PAC
Events 1 to 7
For an explanation of events 1 to 7, look at the examples in this section for a read sequence.
Event 8
An error has occurred. The communications path between the bus coupler and its I/O has
been broken.
Event 9
A PCP abort/error fragment has been issued from the slave to the master as shown in
Table A-43.
Table A-43
Abort/error fragment
Status
Not
Used
Not
Used
Not
Used
Not
Used
Not
Used
Not
Used
E0hex
01hex
XX
XX
XX
XX
XX
XX
co
E0hex
This signifies that the fragment is a response
Bit 6 = 1
Designates an abort/error fragment
when bit 6 = 1and bit 5 = 1
Bit 5 = 1
Designates an abort/error fragment
when bit 6 = 1 and bit 5 = 1
s.
Bit 7 = 1
nt
Service, byte 0
m
Service
Reserved
Byte 1 = 1
Identifies a module communication error
XX
Not used
po
Bytes 2 to 7
ne
Bits 4 to 0 = 0
Event 10
Data is no longer being received in the input table.
om
Once the connection is reestablished the data will continue to be sent.
In this example the communications error is corrected at this point.
Events 12-15
in
ec
Event 11
Read service is completed as described previously in the section.
on
l
Fragmented Error Handling, Loss of Communications from the Host to the Bus
Coupler
A-36
PHOENIX CONTACT
If communications is lost between the host controller an the Inline bus coupler during a read
or write service the bus coupler will wait for the service to be completed (network cable is
repaired) and acknowledge the completion of the service once the transaction has ended.
7538_en_01
Communications Methods
A 2.4
Method 4: Transfer PCP Data Using Explicit Messages
Explicit messages can be sent as an alternative to using the high-speed data channel and
PCP fragmentation to send PCP messages. For method 4 the PCP Special Function Object,
Class Code 105dec (69hex) will need to be directly accessed using an explicit message. By
default this method does not apply to serial modules. Refer to "Communications Methods"
on page A-7.
The ability to send explicit messages is a function of the Ethernet/IP I/O scanner. Not all
scanners have an explicit messaging channel available to the user. This manual will not
document the mechanics of the actual sending of an explicit message. Information of this
type must be provided in the documentation for the I/O scanner.
m
Configuration software can be an option to understand the structure of an explicit
message before the message is actually integrated into the control program.
co
The PCP Special Function Object, Class Code 105dec (69hex) is detailed further in
Appendix B "Ethernet/IP Object Classes, Message Types, and Services".
on
l
in
ec
om
po
ne
nt
s.
When sending PCP messages using explicit messages I/O scan size can be reduced by
removing the eight bytes of fragmentation data that is added to the produced and consumed
sizes by default. This can be accomplished by using the PCP Special Function Object.
7538_en_01
PHOENIX CONTACT
A-37
IL EIP BK DI8 DO4 2TX-PAC
A 2.4.1
Reading PCP Data
When reading PCP data from a PCP module that is not a serial based module, the PCP
Special Function Object, Class Code 105dec (69hex) must be used. Within this object, there
are two sub-methods that can be used to read data explicitly. Sub-method A involves
directly requesting/reading the complete PCP services using attributes 6 and 7. Submethod B provides greater efficiency. It fixes the module number, index, and subindex so
that only the data is received for each request (attributes 8, 12, 13, and 14). The following
procedure uses sub-method B.
m
Three explicit messages will be required to read a specific PCP memory area. They are as
follows:
1. Select index
2. Select subindex
3. Read data
105dec (69hex), PCP Special Function Object
Instance
Select the occurrence of the PCP device within the object
Attribute
12dec, PCP Read Index (Example: Index number 5FE0hex)
om
Instance
Attribute
105dec (69hex), PCP Special Function Object
Select the occurrence of the PCP device within the object
13dec, PCP Read Subindex (Example: Subindex number 0)
Build Read Data Message: Message is sent using the Get_Attribute_Single service
(14dec)
in
ec
on
l
ne
Build Select Subindex Message: Message is sent using the Set Attribute Single service
(16dec)
Class Code
3.
nt
Class Code
po
2.
s.
co
These messages will have the format shown below and will need to be sent with the
required service.
1. Build Select Index Message: Message is sent using the Set Attribute Single service
(16dec)
Class Code
105dec (69hex),PCP Special Function Object
Instance
Select the occurrence of the PCP device within the object
Attribute
14dec, PCP Read Data
Instance is determined by the physical location on the Inline station. The 1st instance will
be assigned to the PCP module located closest to the bus coupler and the last instance
(maximum of 8) will be assigned to the right most PCP module. Serial modules will occupy
an instance in this object.
The PCP module attribute (attribute 8) defaults to the instance value.
When message 3 is sent, the bus coupler will send the data back to the sender.
The first data byte returned by bus coupler will be the number of bytes to follow. These
"following" bytes are the actual data that was sent by the PCP module.
A-38
PHOENIX CONTACT
7538_en_01
Communications Methods
A 2.4.2
Sending PCP Data
When sending PCP data from a PCP module that is not a serial based module, the PCP
Special Function Object, Class Code 105dec (69hex) must be used. Within this object, there
are two sub-methods that can be used to write data explicitly. Sub-method A involves
directly requesting/writing the complete PCP services using attributes 6 and 7. Sub-method
B provides greater efficiency. It fixes the module number, index, and subindex so that only
the data is sent for each request (attributes 8, 9, 10, and 11). The following procedure uses
sub-method B.
m
Three explicit messages will be required to write a specific PCP memory area. They are:
1. Select index
2. Select subindex
3. Write data
105dec (69hex), PCP Special Function Object
Instance
Select the occurrence of the PCP device within the object
Attribute
9, PCP Write Index (Example: Index number 5FE0 hex)
ne
Build Select Subindex Message: Message is sent using the Set_Attribute_Single
service (16dec)
Class Code
Instance
om
Attribute
on
l
105dec (69hex), PCP Special Function Object
Select the occurrence of the PCP device within the object
10dec, PCP Write Subindex (Example: Subindex number 0)
Build Read Data Message: Message is sent using the Set_Attribute_Single service
(16dec)
in
ec
3.
nt
Class Code
po
2.
s.
co
These messages will have the format shown below and will need to be sent with the
required service.
1. Build Select Index Message: Message is sent using the Set_Attribute_Single service
(16dec)
Class Code
105dec (69hex), PCP Special Function Object
Instance
Select the occurrence of the PCP device within the object
Attribute
11dec, PCP Write Data
Data
First byte contains the number of bytes to be sent, then the
actual data
Instance is determined by the physical location on the Inline station. The 1st instance will
be assigned to the PCP module located closest to the bus coupler and the last instance
(maximum of 8) will be assigned to the right most PCP module. Serial modules will occupy
an instance in this object.
The PCP module attribute (attribute 8) defaults to the instance value.
When message 3 is sent, the bus coupler will receive the data from the sender.
The first data byte returned by bus coupler will be the number of bytes to follow. These
"following" bytes are the actual data that was sent by the PCP module.
7538_en_01
PHOENIX CONTACT
A-39
IL EIP BK DI8 DO4 2TX-PAC
A3
Serial and Generic PCP Modules Produced and
Consumed Sizes
Section 3, "Startup/Operation" provides additional information in regard to how data is
mapped into the scanner and other considerations.
A 3.1
Determining Produced and Consumed Size
co
m
The bus coupler can auto-configure itself to the Inline I/O connected to it (Refer to
Section 3, "Startup/Operation"). Once this is done the total number of produced and
consumed data, for the entire Inline station (will include fragmentation data), can be read
from the EDS file.
nt
s.
By default any module that uses the PCP protocol (includes the serial modules) will have 8
bytes of produced data and 8 bytes of consumed data added to the network scan. These
bytes are used to transfer data back and forth between an Ethernet/IP scanner and, for
example, an Inline serial module. This data transfer using 8 bytes is required when using
process/cyclic data to Tx/Rx serial data (fragmentation).
om
po
ne
In addition to the bytes used for transferring serial or other PCP data there may be additional
data produced or consumed by the I/O module. This additional data must be added to the
8 bytes described in the previous paragraph. The number of additional process data bytes
can be found in the specific Inline module's data sheet or manual. These process data bytes
will be added to the scan ahead of the 8 bytes of fragmentation data in the scanner’s I/O
memory. Table A-44 gives and example of calculating the total number of bytes produced
and consumed by an individual Inline RS-232 module.
Calculation of a serial module's produced and consumed bytes
in
ec
Table A-44
Produced
on
l
Bytes required by the RS-232 module for status
and control (found in data sheet)
A-40
PHOENIX CONTACT
Consumed
2
+
2
+
Bytes required to Tx/Rx serial data
(fragmentation)
8
8
Total used by each RS-232 module
10 bytes
10 bytes
7538_en_01
Serial and Generic PCP Modules Produced and Consumed Sizes
A 3.2
Removing or Adding Fragmentation Data
Fragmentation data must not be removed if using methods 1 or 3 described in Appendix
A 2 "Communications Methods".
If serial or other PCP data is going to be transmitted using explicit messages, then the 8
bytes used for the process/cyclic data messaging (fragmentation) that is added to the scan
by default, will not be needed. The unused 8 bytes of produced and 8 bytes of consumed
should be removed to ensure the best possible network performance.
m
If the user has a serial module and wants to remove or add the fragmentation data (8 bytes)
they must send the following explicit messages. This must be sent to the Serial
Communications Object, Class Code 106dec (6Ahex), using the proper instance and
attribute 32, "Fragment Data in Ethernet/IP I/O".
co
To add or remove the Serial Data (8 bytes of fragment data) from the Ethernet/IP I/O, set the
following:
s.
Class 106
nt
Instance X
Attribute 32 (Serial Communications Object Fragment Data)
Removes data
1
Adds data
ne
0
om
po
If the user has any other PCP module and wants to add/remove the fragmentation data (8
bytes) they must send an explicit message. This must be sent to the PCP Special Function
Object Class Code 105dec (69hex), using the proper instance and attribute 17, "PCP
Fragment Data in Ethernet/IP I/O".
To add or remove the Other PCP Data from the Ethernet/IP I/O, set the following:
Class 105
in
ec
Instance X
Attribute 17 (PCP Fragment Data)
Removes data
1
Adds data
on
l
0
7538_en_01
PHOENIX CONTACT
A-41
IL EIP BK DI8 DO4 2TX-PAC
A4
I/O Memory Mapping, Serial and Special Function
PCP Modules
Section 3, "Startup/Operation" provides additional information in regard to how data is
mapped into the scanner and other considerations.
I/O Mapping Rules
Section 3, "Startup/Operation" describes configuration methods (mapping) in greater
detail.
co
m
The I/O image in the bus coupler flash memory contains all produced-data (input data) and
consumed-data (output data) derived from the I/O modules connected to it. I/O image data
is added to the poll through the use of parameter 9 (Add All I/O), or by using auto
configuration.
nt
s.
An I/O image could contain the Inline Status word (included by default in the produced data),
command byte (not included in the consumed data by default), module fault data, reserved
I/O space, digital, analog, special function (no PCP), special function PCP modules or serial
modules (process data first then fragmentation data).
on
l
in
ec
om
po
ne
Mapping priority is determined by the type of module without regard to its location to the BK
or other modules of different types. However, it does take into account the order of modules
of the same type that exist on the station.
A-42
PHOENIX CONTACT
7538_en_01
Configuration Brief for the RS-232 and RS-485/RS-422 Modules
A5
Configuration Brief for the RS-232 and
RS-485/RS-422 Modules
General Configuration
Appendix B "Ethernet/IP Object Classes, Message Types, and Services" provides details
of the Serial Communications Object (Class Code 106dec, 6Ahex) for configuration
attributes.
m
This section describes how to change default settings for the Inline RS-232 and RS-485/
RS-422 modules. Information provided in this section must be used in conjunction with the
specific module’s data sheet.
co
In order to change any setting, refer to the module's specific data sheet to determine the
appropriate attribute settings for the Serial Communications Object (Class Code 106dec,
6Ahex).
ne
nt
s.
The default settings can only be changed by sending an explicit message. An explicit
message can either be sent from a control program or an Ethernet/IP configuration software
package. Once the desired parameters have been updated, the settings are stored in flash
memory of the bus coupler. If the bus coupler is replaced, the serial configuration will need
to be sent again, unless the configuration explicit messages are embedded into the control
program.
Service
Class Code
om
Instance
po
The explicit message format required to configure the RS-232 or RS-485/RS-422 modules
is as follows:
106dec (6Ahex) Serial Communications Object
1 (1st serial module)
Attribute
12
This attribute is used to modify the baud rate
Data
08
(Refer to the RS-232 module’s data sheet)
Code "08" represents a baud rate of 19.2K
in
ec
on
l
Set_Attribute_Single, 16dec (10hex)
Instance is the occurrence of the module within the Serial Communications Object.
Instances are assigned by the physical order of the serial Inline modules on the station
starting with the module closest to the bus coupler being assigned to instance 1. The next
module to follow will be assigned to instance 2 and so on up to a maximum of 8 instances.
(There is a maximum of 8 PCP modules of any kind allowed to reside on the Inline station.)
Both the RS-232 and RS-485/RS-422 modules occupy instances in the Serial
Communications Object. If one of each reside on the station the closest to the bus coupler
will be assigned to instance 1and the other will be assigned to instance 2.
7538_en_01
PHOENIX CONTACT
A-43
on
l
in
ec
om
po
ne
nt
s.
co
m
IL EIP BK DI8 DO4 2TX-PAC
A-44
PHOENIX CONTACT
7538_en_01
Ethernet/IP Object Classes, Message Types, and Services
B Ethernet/IP Object Classes, Message Types,
and Services
B1
General
The IL EIP BK DI8 DO4 2TX-PAC is an Ethernet/IP capable adapter that functions as a
generic device type. The BK maps the I/O connected via the backplane to standard or user
defined CIP objects.
CIP Class Services
nt
B2
s.
co
m
The bus coupler supports CIP using ODVA standard Digital Input Points (DIP), Digital
Output Points (DOP), Analog Input Points (AIP) and Analog Output Points (AOP). Additional
objects include user defined configuration, Inline Interface, Inline Module, Inline Special
Function, PCP Special Function and Serial Communication Objects.
Service Code
hex
po
01
Service Name
01
Get_Attribute_All
02
Set_Attribute_All
om
dec
ne
The IL EIP BK DI8 DO4 2TX-PAC supports the following class services and instance
services.
05
Reset
09
09
Delete
14
0E
Get_Attribute_Single
16
10
Set_Attribute_Single
02
on
l
in
ec
05
7538_en_01
PHOENIX CONTACT
B-1
IL EIP BK DI8 DO4 2TX-PAC
B3
CIP Object Classes
The IL EIP BK DI8 DO4 2TX-PAC supports the following CIP object classes:
Class Code
Object Type
On
Page
B-3
hex
01
01
Identity Object
02
02
Router Object
B-5
04
04
Assembly Object
B-6
08
08
Digital Input Point (DIP) Object
B-7
09
09
Digital Output Point (DOP) Object
B-9
10
0A
Analog Input Point (AIP) Object
11
0B
Analog Output Point (AOP) Object
B-13
100
64
Configuration Object
B-15
101
65
Inline Interface Object
B-20
B-11
66
Inline Module Object
B-23
103
67
Inline Special Function Object
B-25
104
68
COS Mask Object
B-27
105
69
PCP Object
B-30
106
6A
om
245
ne
B-34
Port Object Class Definition
B-39
F5
TCP/IP Interface Object
B-40
F6
Ethernet Link Object
B-42
on
l
in
ec
246
Serial Communications Object
F4
po
244
nt
102
s.
co
m
dec
B-2
PHOENIX CONTACT
7538_en_01
Identity Object (Class Code: 01dec, 01hex)
B4
Identity Object (Class Code: 01dec, 01hex)
The Identity Object is required on all devices and provides identification of and general
information about the device.
B 4.1
Name
1
Get
Revision
UINT
1
2
Get
Max Object Instance
UINT
1
6
Get
Max Class Identifier
UINT
7
Get/Set
Max Instance Attribute
UINT
Value
7
s.
co
6
Attribute
Access
Name
1
Get
Vendor
2
Get
Product Type
3
Get
Product Code
4
Get
Revision
nt
Identity Object Instance Attributes
Type
ne
B 4.2
Type
m
Access
po
Attribute
Identity Object Class Attributes
om
Major Revision
Minor Revision
Value (see B 4.4)
UINT
562
UINT
0 = Generic Device
UINT
8167
(3)
STRUCT OF
(4)
BYTE
1
BYTE
1
Get
Device Status
UINT
(5)
6
Get
Serial Number
UINT
(6)
7
Get
Device Name
STRUCT OF
in
ec
5
(7)
USINT
26
Name
STRING [6]
IL EIP BK DI8 DO4 2TX-PAC
on
l
Length
7538_en_01
PHOENIX CONTACT
B-3
IL EIP BK DI8 DO4 2TX-PAC
B 4.3
Class
Instance
01
Yes
Yes
Get_Attribute_All
05
05
No
Yes
Reset
14
0E
Yes
Yes
Get_Attribute_Single
16
10
No
Yes
Set_Attribute_Single
dec
hex
01
Values for Identity Object Class Attributes
co
B 4.4
Service Name
m
Service Code
Identity Object Common Services
Product Code
The product code is fixed at 8167 for the IL EIP BK DI8 DO4 2TX-PAC. The product code is
used within the Electronic Data Sheet format to uniquely identify the product type.
(4):
Revision
The major revision number will increment as functional enhancements are implemented.
The minor firmware revision control number is incremented if minor changes are
incorporated.
(5):
Device Status
ne
nt
s.
(3):
Bit Number
Name
Meaning
0
Owned
1
Reserved
2
Configured
3
Reserved
4 ... 7
User defined
8
Minor Recoverable Fault
= 0, no fault
= 1, minor recoverable faults (DOP short circuit)
9
Minor Unrecoverable Fault
= 0, no fault
= 1, minor unrecoverable faults
10
Major Recoverable Fault
= 0, no fault
= 1, major recoverable faults (Loss of +24 V DC)
Major Unrecoverable Fault
= 0, no fault
= 1, major unrecoverable faults (Checksum, A/D)
on
l
in
ec
om
po
= 0, not owned
= 1, allocated
11
12 ... 15
= 0, not configured – this bit is not supported
Reserved
(6):
Serial Number
The Serial Number is encoded in the product during the manufacturing cycle and is
guaranteed to be unique across all product lines produced by Phoenix Contact.
(7):
Device Name
The Device Name provides a character array containing the short string
IL EIP BK DI8 DO4 2TX-PAC.
B-4
PHOENIX CONTACT
7538_en_01
Router Object (Class Code: 02dec, 02hex)
B5
Router Object (Class Code: 02dec, 02hex)
The Router Object provides a messaging connection point through which a client may
address a service to any object class or instance residing in the physical device.
B 5.1
Router Object Class Attributes
Access
1
Get
Revision
UINT
1
6
Get
Max Class Identifier
UINT
0
7
Get
Max Instance Attribute
UINT
Name
Type
1
Get
Router Class List
ARRAY
2
Get
Max Connections
14
0E
in
ec
hex
ne
07 00 01 00 02 00 04 00 06
00 F4 00 F5 00 F6 00
128
Router Object Common Services
Instance
Yes
Service Name
Get_Attribute_Single
on
l
Yes
Value
po
UINT
om
Class
dec
nt
Access
Service Code
0
Router Object, Instance 1 Attributes
Attribute
B 5.3
Value
s.
B 5.2
Type
co
Name
m
Attribute
7538_en_01
PHOENIX CONTACT
B-5
IL EIP BK DI8 DO4 2TX-PAC
B6
Assembly Object (Class Code: 04dec, 04hex)
The Assembly Object binds attributes of multiple objects to allow data to or from each object
to be sent or received over a single connection.
B 6.1
Assembly Object Class Attributes
Access
1
Get
Revision
UINT
2
2
Get
Max Class ID
UINT
101
Value
Assembly Object, Instance 100 Attributes
s.
B 6.2
Type
co
Name
m
Attribute
Access
Name
Type
3
Get
Consumed (output) Data
Array of USINT
ne
Assembly Object, Instance 101 Attributes
po
B 6.3
Value
nt
Attribute
Access
Name
3
Get
Produced (input) Data
Type
Value
Array of USINT
om
Attribute
Service Code
in
ec
B 6.4
hex
14
0E
16
on
l
dec
10
Assembly Object Common Services
Class
Instance
Yes
Yes
Get_Attribute_Single
No
Yes
Set_Attribute_Single
B 6.5
Service Name
Assembly Instance 100
Assembly instance 100 is used to consume the I/O data and consists of a variable number
of digital output states and a variable number of analog output values as specified by the
Configuration Object.
B 6.6
Assembly Instance 101
Assembly instance 101 is used to generate the I/O produced data. Assembly Instance 101
consists of a variable number of bytes that is specified by the Configuration Object.
B-6
PHOENIX CONTACT
7538_en_01
Digital Input Point (DIP) Object (Class Code: 08dec, 08hex)
B7
Digital Input Point (DIP) Object
(Class Code: 08dec, 08hex)
The Digital Input Point (DIP) Object models digital inputs in a product. You can use this
object in applications as simple as a toggle switch or as complex as a digital I/O control
module. There is a separate instance for each digital input available on the device.
DIP Object Class Attributes
Type
UINT
2
Get
Max Object Instance
UINT
6
Get
Max Class Identifier
UINT
7
Get
Max Instance Attribute
UINT
Name
Input State
4
Get
Input Status
100
Get/Set
101
Get/Set
Value (see B 7.4)
0 == OFF,
1 == ON
(3)
BOOL
0 == Okay,
1 == Fault
(4)
Latch Enable
BOOL
0 = Off,
1 = Latch
(100)
Latch State
BOOL
0 = Latch Low,
1 = Latch high
(101)
in
ec
7538_en_01
on
l
101
BOOL
B 7.3
14
7
Type
po
Access
Get
om
Attribute
Service Code
(Number of DIPs)
DIP Object, Instance 1.. (Number of DIPs) Attributes
3
dec
2
ne
B 7.2
Value
m
Name
Revision
co
Access
Get
nt
Attribute
1
s.
B 7.1
DIP Object Common Services
Class
Instance
Yes
Yes
Service Name
hex
0E
Get_Attribute_Single
PHOENIX CONTACT
B-7
IL EIP BK DI8 DO4 2TX-PAC
B 7.4
Values for DIP Object Class Attributes
(3):
Input State
This attribute provides the state of the specific digital input. A value of 0 indicates an OFF
state and a value of 1 indicates an ON state. The digital inputs provide feedback of the
digital output states. If the corresponding output state is set to 0 these points may be used
as inputs.
(4):
Input Status
The Input Status bit indicates if an error has occurred associated with a physical input. If the
+24 V DC power is not present the circuitry cannot accurately determine the state of the
inputs and will set the Input Status bits of inputs 1 ... 24. The status bits are cleared when
the +24 V DC power is restored.
When set to 1, the corresponding input instance is latched at the state defined in
Attribute 101.
(101): Latch State
This attribute defines the state of the inputs that will be latched. 0 = latch low input 1 = latch
high input.
on
l
in
ec
om
po
ne
nt
s.
co
m
(100): Latch Enable
B-8
PHOENIX CONTACT
7538_en_01
Digital Output Point (DOP) Object (Class Code: 09dec, 09hex)
B8
Digital Output Point (DOP) Object
(Class Code: 09dec, 09hex)
The Digital Output Point (DOP) Object models digital outputs in a product. You can use this
object in applications as simple as an actuator or as complex as a digital I/O control module.
There is a separate instance for each digital output available on the device.
DOP Object Class Attributes
Type
UINT
2
Get
Max Object Instance
UINT
6
Get
Max Class Identifier
UINT
7
Get/Set
Max Instance Attribute
UINT
Name
Output State
4
Get
Output Status
5
Get/Set
Fault State
6
Get/Set
7
Get/Set
8
Get/Set
Value (see B 8.4)
State of Output
(3)
BOOL
Status of Output
(4)
BOOL
0 = Fault value,
1 = No change
(5)
Fault Value
BOOL
0 = OFF, 1 = ON
(6)
Idle State
BOOL
0 = Idle value,
1 = No change
(7)
BOOL
0 = OFF, 1 = ON
(8)
in
ec
on
l
8
BOOL
Idle Value
B 8.3
DOP Object Common Services
Class
Instance
Service Name
hex
14
0E
Yes
Yes
Get_Attribute_Single
16
10
No
Yes
Set_Attribute_Single
7538_en_01
7
Type
po
Access
Get/Set
om
Attribute
Service Code
(Number of DOPs)
DOP Object, Instance 1.. (Number of DOPs) Attributes
3
dec
1
ne
B 8.2
Value
m
Name
Revision
co
Access
Get
nt
Attribute
1
s.
B 8.1
PHOENIX CONTACT
B-9
IL EIP BK DI8 DO4 2TX-PAC
B 8.4
Values for DOP Object Class Attributes
(3):
Output State
This attribute contains the desired state of the output.
(4):
Output Status
The output status bit indicates a fault condition.
(5):
Fault State
The Fault State determines what action is taken if a software fault condition is detected due
to a connection timeout.
Action Taken
0 (default)
Set the output to the stated determined by the Fault Value
1
Leave the output in the current state
m
Fault State
Fault Value
The Fault Value determines the state of the DOP output if the Fault State bit is clear and a
fault condition occurs. (Default = 0)
(7):
Idle State
The Idle State determines what action is taken if an idle condition is detected. Idle conditions
occur if an I/O request is received with less than the calculated number of bytes or the Run/
Idle header is set to idle and the Run/Idle header is used. Refer to the Configuration Object
to determine the size of the I/O consumed data. An I/O request of 0 bytes is typically used
to force an idle condition.
B-10
PHOENIX CONTACT
Action Taken
0 (default)
Set the output to the stated determined by the Idle Value
1
Leave the output in the current state
po
Idle Value
Idle State
The Fault Value is used to set the output if the Idle State bit is clear and an idle condition
occurs. (Default = 0)
on
l
in
ec
om
(8):
ne
nt
s.
co
(6):
7538_en_01
Analog Input Point (AIP) Object (Class Code: 10dec, 0Ahex)
B9
Analog Input Point (AIP) Object
(Class Code: 10dec, 0Ahex)
The IL EIP BK DI8 DO4 2TX-PAC supports variable analog inputs. There is a separate
instance for each analog channel available on the device.
B 9.1
Name
Type
Value
1
Get
Revision
UINT
2
2
Get
Max Object Instance
UINT
6
Get
Max Class Identifier
UINT
7
Get
Max Instance Attribute
UINT
Attribute
Access
Name
3
Get
Value
4
Get
Status
7
Get/Set
Range
8
Get
Type
100
Get/Set
101
102
102
nt
AIP Object, Instance 1.. (Number of AIPs) Attributes
Type
Value (see B 9.4)
UINT
0 ... FFFFhex
(3)
BOOLEAN
0 = ok
(4)
USINT
2
(7)
USINT
6
(8)
Override Range
BOOL
0 = No
(100)
Get/Set
AIP Control Data
UINT
Get/Set*
AIP Control Data in I/O
BOOL
om
1 = Yes
in
ec
on
l
Service Code
B 9.3
(101)
0 = Not in
consumed data
1 = In consumed
data
(102)
Common Services
Class
Instance
Service Name
dec
hex
14
0E
Yes
Yes
Get_Attribute_Single
16
10
No
Yes
Set_Attribute_Single
7538_en_01
7
s.
co
(Number of AIPs)
ne
B 9.2
m
Access
po
Attribute
AIP Object Class Attributes
PHOENIX CONTACT
B-11
IL EIP BK DI8 DO4 2TX-PAC
B 9.4
Values for AIP Object Class Attributes
(3):
Value
This attribute contains the desired value to be sent to the AOP.
(4):
Status
If the analog input status bit is set it indicates that a hardware fault has occurred during the
previous analog read. The value is left at the last valid value read. A fault during the analog
input function results in a Major Unrecoverable Fault condition (see Section "Identity Object
(Class Code: 01dec, 01hex)" on page B-3).
(7):
Range
The AIP range value is used to configure the measuring range of the Inline analog input
module. The AIP Range values are stored in non-volatile memory.
0
-10 to +10 V
2
0 to +10 V
3
+4 to +20 mA
6
0 to +20 mA
7
-20 mA to +20 mA (non standard CIP value)
nt
s.
co
m
Description
Type
The Type attribute determines the data type to be used by the attribute Value. The type is
fixed as UINT (6).
ne
(8):
Range Value
When set, the control data is sent to the AIP as the control word instead of the value
corresponding to the range.
(101): AIP Control Data
If the Override Range attribute is set, the value in this attribute is sent to AIP as the control
word instead of the value corresponding to the range. Note: this is a NV attribute and
constant changing will use NV life cycles. Use Control Data in I/O for dynamic changing of
the control word.
(102): Control Data in I/O
When set the Control Data is added to the I/O connection, allowing dynamic changing of the
AIP control word.
on
l
in
ec
om
po
(100): Override Range
B-12
PHOENIX CONTACT
7538_en_01
Analog Output Point (AOP) Object (Class Code: 11dec, 0Bhex)
B 10
Analog Output Point (AOP) Object
(Class Code: 11dec, 0Bhex)
The IL EIP BK DI8 DO4 2TX-PAC supports Analog Output Points (AOP). There is a
separate instance for each analog channel available on the device.
B 10.1
AOP Object Class Attributes
Access
Name
Type
Value
1
Get
Revision
UINT
2
2
Get
Max Object Instance
UINT
6
Get
Max Class Identifier
UINT
7
Get
Max Instance Attribute
UINT
7
100
s.
co
(Number of AOPs)
nt
AOP Object, Instance 1.. (Number of AOPs) Attributes
ne
B 10.2
m
Attribute
Access
Name
3
Get/Set
Value
7
Get/Set
Output Range
8
Get
Output Data Type
USINT
6 = UINT
(8)
9
Get/Set
Fault State
BYTE
0 ... 3
(9)
om
po
Attribute
Type
Value (see B 10.4)
UINT
0 ... FFFFhex
BYTE
(3)
(7)
Get/Set
Idle State
BYTE
0 ... 3
(10)
11
Get/Set
Fault Value
INT
0 ... FFFFhex
(11)
12
Get/Set
Idle Value
INT
0 ... FFFFhex
(12)
100
Get
AOP Response Data
UINT
in
ec
10
on
l
B 10.3
Service Code
dec
AOP Object Common Services
Class
Instance
Service Name
hex
14
0E
Yes
Yes
Get_Attribute_Single
16
10
No
Yes
Set_Attribute_Single
7538_en_01
(100)
PHOENIX CONTACT
B-13
IL EIP BK DI8 DO4 2TX-PAC
B 10.4
Values for AOP Object Class Attributes
(3):
Value
The analog output value is given in offset binary format. The value provided must be in the
range 0 ... 65535 (0 ... FFFFhex). Reference Inline analog output module specific data sheet
for actual values.
(7):
Output Range
The analog output range defaults to a fixed value of 1 (0 V DC to +10 V DC).
If the AO module reports that it the range is different, it will change to 3 (-10 V DC to
+10 V DC).
Output Data Type
The analog output data type is fixed as 6 (UINT).
(9):
Fault State
The Fault State determines what action is taken if a fault condition is detected. Fault
conditions include software conditions (connection timeout).
co
m
(8):
Action Taken
0
Hold the last value
1
Set to low limit (0 V DC)
2
Set to high limit (+10 V DC)
3
Set to value determined by Fault Value.
ne
nt
s.
Fault State
The Idle State determines what action is taken if an idle condition is detected. Idle conditions
occur if an I/O request packet is received with less than the calculated number of bytes or
the run/idle header is set to idle and the run/idle header is enabled. Refer to the
Configuration Object to determine the size of the I/O request data. An I/O request of 0 bytes
is typically used to force an idle condition if the run/idle header is not enabled.
Idle State
Action Taken
0
Hold the last value
on
l
in
ec
1
(11): Fault Value
om
po
(10): Idle State
Set to low limit (0 V DC)
2
Set to high limit (+10 V DC)
3
Set to value determined by Fault Value.
The Fault Value determines the output if the Fault State bit is set to 3 and a fault condition
occurs. The value must be in the range 0 ... 65535 (0 ... FFFFhex).
(12): Idle Value
The Fault Value is used to set the output if the Idle State bit is set to 3 and an idle condition
occurs. The value must be in the range 0 ... 65535 (0 ... FFFFhex).
(100): AOP Response
Data
This attribute allows the user to see the response coming back from the AOP module.
B-14
PHOENIX CONTACT
7538_en_01
Configuration Object (Class Code: 100dec, 64hex)
B 11
Configuration Object (Class Code: 100dec, 64hex)
The Configuration Object allows the user to configure what data they want in each I/O
connection. In addition, the configuration object gives access to several operational
parameters such as status info.
B 11.1
Configuration Object Class Attributes
Access
Name
Type
Value
Get
Revision
UINT
2
2
Get
Max Object Instance
UINT
6
Get
Max Class Identifier
UINT
7
Get
Max Instance Attribute
UINT
7
255
s.
co
1
Configuration Object, Instance 1 Attributes
nt
B 11.2
m
Attribute
1
Name
Number of Digital Inputs
Type
Value (see B 11.4)
USINT
(3)
4
Get/Set
Number of Digital Outputs
USINT
(4)
5
Get/Set
Number of Analog Inputs
USINT
(5)
6
Get/Set
Number of Analog Outputs
USINT
(6)
7
Get/Set
Add All I/O
BOOL
(7)
8
Get/Set
Accept New Configuration
BOOL
(8)
9
Get
Module Change Status
BYTE
(9)
10
Get/Set
Add All Mode
BYTE
(10)
11
Get/Set
Use Inline Status
BOOL
(11)
12
Get/Set
Include DSUP
BOOL
(12)
13
Get/Set
Special Function Modules
BOOL
(13)
om
in
ec
on
l
14
ne
Access
Get/Set
po
Attribute
3
Get/Set
Pad I/O
BOOL
(14)
Get/Set
Number of DIP Faults
UINT
(15)
Get/Set
Number of DOP Faults
UINT
(16)
17
Get/Set
Number of AIP Faults
UINT
(17)
18
Get/Set
Number of AOP Faults
UINT
(18)
19
Get/Set
Number of Special Function
Faults
UINT
(19)
20
Get
Produced Size
UINT
(20)
21
Get
Consumed Size
UINT
(21)
22
Get/Set
Bytes Reserved for DIPs
UINT
(22)
23
Get/Set
Bytes Reserved for DOPs
UINT
(23)
24
Get
Fault Mode
USINT
(24)
15
16
7538_en_01
PHOENIX CONTACT
B-15
IL EIP BK DI8 DO4 2TX-PAC
Attribute
Access
Name
Type
Value (see B 11.4)
32
Get/Set
Inline Control Byte in Poll
BOOL
(32)
38
Get/Set
Number of PCP Modules
UINT
(38)
39
Get/Set
Number of SCO Modules
UINT
(39)
40
Get/Set
Number of PCP Faults
UINT
(40)
41
Get/Set
Number of SCO Faults
UINT
(41)
42
Get/Set
Run/Idle in Produced I/O
BOOL
(42)
Get/Set
Run/Idle in Consumed I/O
BOOL
(43)
44
Get/Set
Watchdog Timeout Action
USINT
(44)
45
Get/Set
P&P Mode
UINT
(45)
46
Set
Delete All Timed Out
Connections
USINT
47
Set
Confirm Peripheral Faults
USINT
48
Get/Set
I/O Size Word Align
USINT
49
Get/Set
BootP Operation
USINT
Class
hex
14
0E
16
10
Yes
No
co
s.
nt
(49)
Instance
Service Name
Yes
Get_Attribute_Single
Yes
Set_Attribute_Single
Changing the configuration object will cause the CONSUMED and PRODUCED size
of the I/O connection to be changed. These values are retained in non-volatile
memory and may only be set when the I/O connection is not in the RUNNING state.
Values retained in non-volatile storage.
in
ec
–
(48)
Configuration Object Common Services
om
dec
(47)
ne
Service Code
(46)
po
B 11.3
m
43
on
l
–
B-16
PHOENIX CONTACT
7538_en_01
Configuration Object (Class Code: 100dec, 64hex)
B 11.4
Values for Configuration Object Class Attributes
Number of Digital
Inputs
The Number of Digital Inputs attribute determines the number of input channels to be
returned in the I/O produced packet. The number of I/O produced bytes can be calculated
as:
Number of bytes = ((number of channels) + 7) / 8
(4):
Number of Digital
Outputs
The Number of Digital Outputs attribute determines the number of output bytes to be
processed in the I/O consumed packet. The number of I/O consumed bytes can be
calculated as:
Number of bytes = ((number of channels) + 7) / 8
(5):
Number of Analog
Inputs
The Number of Analog Inputs attribute determines the number of analog input channels
returned in the I/O produced packet. Each analog input produces 2 bytes of data in the I/O
produced data. The number of bytes may be calculated as:
Number of bytes = ((number of channels) * 2)
(6):
Number of Analog
Outputs
The Number of Analog Outputs attribute determines the number of analog output channels.
Each analog output consumes two bytes of data in the I/O request packet. The number of
bytes may be calculated as:
Number of bytes = ((number of channels) * 2)
(7):
Add All I/O
The Add All I/O attribute will add all Inline I/O modules to the I/O connection.
(8):
Accept New
Configuration
The Accept New Configuration attribute will keep the current I/O setup even though
modules may have been added or deleted. This will clear the I/O Module change flag in the
status attribute.
(9):
Module Change
Status
Inline Modules have been changed since the last configuration.
om
po
ne
nt
s.
co
m
(3):
in
ec
(10): Add All Mode
on
l
Bit15
Bit14
Bit13
Bit12
Bit11
Bit10
Bit9
Bit8
SCO
PCP
SF
AOPs
AIPs
DOPs
DIPs
Bit7
Bit6
Bit5
Bit4
Bit3
Bit2
Bit1
Bit0
Control
SCO
PCP
SF
AOPs
AIPs
DOPs
DIPs
The Add All Mode attribute allows the user to select which type of I/Os and faults will be
added when the add all attribute (Attribute 7) is set. Default is 000Fhex meaning all DIPs,
DOPs, AIPs, and AOPs will be added, no faults or special function modules are added.
(11): Use Inline Status
When set the first byte of the I/O produced data contains the Inline Status and the second
byte contains the number of the first module in the stack with a fault. (Adds 2 bytes to
produced size)
(12): Include DSUP
When set the first byte of the I/O produced data contains the Device Supervisor exception
status byte. (Adds 1 byte to produced size)
7538_en_01
PHOENIX CONTACT
B-17
IL EIP BK DI8 DO4 2TX-PAC
(13): Special Function
Modules
When set the Inline EIP BK will put the process data for the Special function modules with
the Data In Attribute set in the I/O consumed and I/O produced.
(14): Pad I/O
When set this attribute will add an extra byte if necessary to align the analog inputs and
outputs to word boundaries. (Will add 0 or 1 byte to consumed and/or produced size)
(15): Number of DIP
Faults
Selects the number of DIP Faults added to the I/O produced data.
(16): Number of DOP
Faults
Selects the number of DOP Faults added to the I/O produced data.
(Number of bytes = ((number of channels) + 7) / 8)
(17): Number of AIP
Faults
Selects the number of AIP Faults added to the I/O produced data.
(Number of bytes = ((number of channels) + 7) / 8)
(18): Number of AOP
Faults
Selects the number of AOP Faults added to the I/O produced data.
(Number of bytes = ((number of channels) + 7) / 8)
(19): Number of Special
Function Faults
Selects the number of Special Function Faults added to the I/O produced data.
(Number of bytes = ((number of channels) + 7) / 8)
(20): Produced Size
This attribute allows the user to determine the produced size of the device.
(21): Consumed Size
This attribute allows the user to determine the consumed size of the device.
(22): Bytes Reserved for
DIPs
This attribute allows the user to reserve bytes in the I/O data for future expansion of actual
Digital Input Points. The I/O data contains the number of bytes defined by the greater of
either the actual number of DIPs or the number of bytes reserved by this attribute.
(23): Bytes Reserved for
DOPs
This attribute allows the user to reserve bytes in the I/O data for future expansion of actual
Digital Output Points. The I/O data contains the number of bytes defined by the greater of
either the actual number of DOPs or the number of bytes reserved by this attribute.
m
co
s.
nt
ne
po
om
in
ec
(24): Fault Mode
(Number of bytes = ((number of channels) + 7) / 8)
on
l
(32): Inline Control Byte
in Poll
This attribute allows the user to select which action is taken during a major failure.
When set to a 1 the first byte of the Poll Command is the Inline Control Byte. (See Inline
Object.) Default = 0
(38): Number of PCP
Modules
Indicates how many PCP capable modules are present on the Inline configuration.
(39): Number of SCO
Modules
Indicates how many PCP capable modules, capable of serial communications, are present
on the Inline configuration.
(40): Number of PCP
Faults
Selects number of PCP fault data bits to add to the I/O PCP Fault Data area. If the number
entered is less than the number of PCP modules, the first modules, in order of instance, will
receive bits until the bits are filled.
(41): Number of SCO
Faults
Selects number of SCO fault data bits to add to the I/O PCP Fault Data area. If the number
entered is less than the number of SCO modules, the first modules, in order of instance, will
receive bits until the bits are filled.
B-18
PHOENIX CONTACT
7538_en_01
Configuration Object (Class Code: 100dec, 64hex)
(42): Run/Idle in
Produced I/O
This attribute allows the user to select if the 32 bit Run/Idle header is in the produced data
00 = No (default), 01 = Yes.
(43): Run/Idle In
Consumed I/O
This attribute allows the user to select if the 32 bit Run/Idle header is in the consumed data
00 = No, 01 = Yes (default).
Connection
State Interpretation
0
Timeout
1
Auto Delete (default)
2
Auto Reset
3
Deferred Delete
m
(44): Watchdog Timeout
Action
This attribute allows the user to select the Plug and Play mode.
2 = P&P MODE ENABLED with inputs ONLY
1 = P&P MODE ENABLED with inputs and outputs active
0 = P&P MODE DISABLED, the configuration must match last saved configuration
(46): Delete All Timed
Out Connections
This attribute allows the user to delete all timed out connections.
(47): Confirm Peripheral
Faults
This attribute allows the user to confirm all peripheral faults.
(48): I/O Size Word Align
This attribute will enable byte padding (if required) to keep the produced and consumed
sizes to 16-bit boundaries.
1 = Pad byte (default)
0 = No pad byte
(49): BootP Operation
This attribute allows the user to select the BootP operation
0 = If BootP is enabled, the module issues BootP requests without interrupt until a
valid IP configuration is received (default).
1 = If BootP is enabled, the module issues 3 BootP requests. If a valid IP
configuration is not received it will then use the last stored IP configuration.
on
l
in
ec
om
po
ne
nt
s.
co
(45): P&P Mode
7538_en_01
PHOENIX CONTACT
B-19
IL EIP BK DI8 DO4 2TX-PAC
B 12
Inline Interface Object (Class Code: 101dec, 65hex)
The Inline Interface Object allows the user to control and monitor the Inline interface on the
IL EIP BK DI8 DO4 2TX-PAC.
B 12.1
Name
1
Get
Revision
UINT
2
2
Get
Max Object Instance
UINT
1
6
Get
Max Class Identifier
UINT
7
Get
Max Instance Attribute
UINT
Attribute
Access
Value
63
s.
co
7
Inline Interface Object, Instance 1 Attributes
nt
B 12.2
Type
m
Access
Name
Type
ne
Attribute
Inline Interface Object Class Attributes
Value (see B 12.4)
Get
Inline Status
5
Get
First Faulted Module
6
Get/Set
Max Retry
7
Get
Number of Modules
8
Get
Number of Bits
UINT
(8)
9
Get
Number of Bytes
UINT
(9)
11
Get
Scans Per Second
UINT
(11)
12
Get
Loop Diagnostic Count
UINT
(12)
13
Get
Connection Failure
Endpoint #1
USINT
(13)
14
Get
Connection Failure
Endpoint #2
USINT
(14)
om
in
ec
on
l
15
po
4
BYTE
(4)
USINT
(5)
USINT
(6)
UINT
(7)
Get/Set
Latched Inline Status
BYTE
(15)
Get
Latched Faulted Module
USINT
(16)
Get
Latched Connection Failure
Endpoint #1
USINT
(17)
18
Get
Latched Connection Failure
Endpoint #2
USINT
(18)
19
Get
Power Supply Fault
BYTE
(19)
20
Get/Set
Inline Control Byte
BYTE
(20)
21
Get
Error History (most recent)
UINT
(21)
…
…
…
…
30
Get
Error History (last saved)
UINT
16
17
B-20
PHOENIX CONTACT
(30)
7538_en_01
Inline Interface Object (Class Code: 101dec, 65hex)
B 12.3
Service Code
Class
Instance
05
No
Yes
Reset
14
0E
Yes
Yes
Get_Attribute_Single
16
10
No
Yes
Set_Attribute_Single
dec
hex
5
Service Name
Values for Inline Interface Object Class Attributes
m
B 12.4
Bit6
Bit5
Bit4
Bit3
EIP
Connection
Timeout
Fault Cycles
Inline
Connection
Error
Configuring
Module
Change
Bit2
Bit1
Bit0
Power Fault
Peripheral
Fault
CRC
nt
Bit7
co
Inline Status
s.
(4):
Inline Interface Object Common Services
First Faulted
Module
Contains the number of the first module that is faulted 1 = Inline BK
(6):
Max Retry
Sets the number of bad responses the IL EIP BK DI8 DO4 2TX-PAC will accept before
flagging an error.
Default = 32
(7):
Number of Modules
Displays the number of Inline modules that the IL EIP BK DI8 DO4 2TX-PAC detected.
(8):
Number of Bits
Displays the process data size of the Inline modules in bits.
(9):
Number of Bytes
Displays the process data size of the Inline modules in bytes.
in
ec
om
po
ne
(5):
Displays the number of local I/O scans per second.
(12): Loop Diagnostic
Count
Displays the loop diagnostic count during a connection failure.
on
l
(11): Scans Per Second
(13): Connection Failure
Endpoint #1
Displays the number of the module at the first end of a connection failure.
(14): Connection Failure
Endpoint #2
Displays the number of the module at the second end of a connection failure.
(15): Latched Inline Status
Displays the latched value of the Inline Status during the last failure. (See "(4): Inline Status"
on page B-21)
(16): Latched Faulted
Module
Contains the number of the first module that was faulted during the last fault.
1 = Bus coupler
(17): Latched Connection Failure Endpoint #1
Displays the number of the module at the first end of a connection failure latched during the
last connection failure.
7538_en_01
PHOENIX CONTACT
B-21
IL EIP BK DI8 DO4 2TX-PAC
(18): Latched Connection Failure Endpoint #2
Displays the number of the module at the second end of a connection failure latched during
the last connection failure.
(19): Power Supply Fault
Displays the status of the power supplies connected to the IL EIP BK DI8 DO4 2TX-PAC. A
value of 1 indicates a power supply out of range. A value of 0 indicates power supply is ok.
Bit 7
Bit 6
Bit 5
Bit 4
Bit 3
Bit 2
Bit 1
Bit 0
US
UM
UL
RES
Bit 3
Bit 2
(20): Inline Control Byte
Bit 6
Bit 5
Bit 4
Bit 1
Bit 0
Clear DIP
Latches
Acknowledge PF
co
m
Bit 7
Contains the most recent logged error information.
(30): Error History
(last saved)
Contains the last logged error information. Attributes 22 ... 29 contain the intermediate error
log history.
on
l
in
ec
om
po
ne
nt
s.
(21): Error History
(most recent)
B-22
PHOENIX CONTACT
7538_en_01
Inline Module Object (Class Code: 102dec, 66hex)
B 13
Inline Module Object (Class Code: 102dec, 66hex)
The Inline Module Object allows the user to monitor the Inline modules attached to the
IL EIP BK DI8 DO4 2TX-PAC.
B 13.1
Inline Module Object Class Attributes
Access
Name
Type
Value
1
Get
Revision
UINT
2
2
Get
Max Object Instance
UINT
(Number of Inline Modules)
6
Get
Max Class Identifier
UINT
7
Get
Max Instance Attribute
UINT
3
Get
4
5
co
s.
Type
Value (see B 13.4)
Inline Module ID (Config)
UINT
(3)
Get
Inline Module ID (Current)
UINT
(4)
Get
CIP Class
USINT
(5)
6
Get
First CIP Instance
UINT
(6)
7
Get
Last CIP Instance
UINT
(7)
Service Code
16
7538_en_01
Inline Module Object Common Services
Class
Instance
Service Name
0E
Yes
Yes
Get_Attribute_Single
10
No
Yes
Set_Attribute_Single
hex
on
l
14
in
ec
B 13.3
dec
ne
Name
po
Access
7
Inline Module Object, Instance 1.. (Number of Inline
Modules) Attributes
om
Attribute
7
nt
B 13.2
m
Attribute
PHOENIX CONTACT
B-23
IL EIP BK DI8 DO4 2TX-PAC
B 13.4
Values for Inline Module Object Class Attributes
Inline Module ID
(Config)
Displays the Inline ID for the module as the unit was configured.
(4):
Inline Module ID
(Current)
Displays the current Inline ID for the module.
(5):
CIP Class
Reflects the number of the CIP class that the module is mapped to (i.e. 8 = DIP, 9 = DOP,
etc.).
(6):
First CIP Instance
Reflects the first instance of the CIP object that this module is mapped to.
(7):
Last CIP Instance
Reflects the last instance of the CIP object that this module is mapped to.
B-24
PHOENIX CONTACT
on
l
in
ec
om
po
ne
nt
s.
co
m
(3):
7538_en_01
Inline Special Function Object (Class Code: 103dec, 67hex)
B 14
Inline Special Function Object
(Class Code: 103dec, 67hex)
The Inline Special Function (SF) Object allows the user to control and monitor the Inline
modules attached to the IL EIP BK DI8 DO4 2TX-PAC that do not map to any standard CIP
Object.
Inline Special Function Object Class Attributes
Type
UINT
2
Get
Max Object Instance
UINT
6
Get
Max Class Identifier
UINT
7
Get
Max Instance Attribute
UINT
Access
Name
3
Get
IN Data
4
Get/Set
OUT Data
5
Get
6
7
7
7
Type
Value (see B 14.4)
(3)
(4)
Data Size
USINT
(5)
Get
Status
BOOL
(6)
Get/Set
Data IN I/O
BOOL
(7)
in
ec
om
ARRAY
on
l
Service Code
Inline Special Function Object Common Services
Class
Instance
Service Name
hex
14
0E
Yes
Yes
Get_Attribute_Single
16
10
No
Yes
Set_Attribute_Single
7538_en_01
(Number of Inline SFs)
ARRAY
B 14.3
dec
ne
Attribute
2
Inline Special Function Object, Instance 1.. (Number of
Inline Special Function Modules) Attributes
po
B 14.2
Value
m
Name
Revision
co
Access
Get
nt
Attribute
1
s.
B 14.1
PHOENIX CONTACT
B-25
IL EIP BK DI8 DO4 2TX-PAC
B 14.4
Values for Inline Special Function Object Class Attributes
IN Data
Data returned from the Inline module to the IL EIP BK DI8 DO4 2TX-PAC. Data size is
determined by the module.
(4):
OUT Data
Data sent from the IL EIP BK DI8 DO4 2TX-PAC to the Inline module. Data size is
determined by the module.
(5):
Data Size
Number of bytes of process data used by the module.
(6):
Status
Reflects the status of the Special Function Module.
0 = ok
1 = Faulted.
(7):
Data IN I/O
When set, the IN Data is in the I/O produced and the OUT data is in the I/O consumed. This
attribute affects the produced and consumed sizes of the IL EIP BK DI8 DO4 2TX-PAC and
is therefore only settable when the I/O connections are not in the established state.
B-26
PHOENIX CONTACT
on
l
in
ec
om
po
ne
nt
s.
co
m
(3):
7538_en_01
COS Mask Object (Class Code: 104dec, 68hex)
B 15
COS Mask Object (Class Code: 104dec, 68hex)
The COS Mask Object allows the user control which bits in the produced (input) data cause
a COS message to be generated.
B 15.1
Name
1
Get
Revision
UINT
2
2
Get
Max Object Instance
UINT
1
6
Get
Max Class Identifier
UINT
7
Get
Max Instance Attribute
UINT
Value
co
7
18
s.
B 15.2
Type
m
Access
COS Mask Object, Instance 1 Attributes
nt
Attribute
COS Mask Object Class Attributes
Access
Name
3
Get/Set
Mask Value
4
Get/Set
Index
5
Get/Set
Byte Value
6
Get/Set
Add All Mode
7
Get/Set
Add All
BOOL
(7)
8
Get/Set
Enable Device Supervisor
Exception
BOOL
(8)
9
Get/Set
Enable Inline Status
BOOL
(9)
10
Get/Set
Enable DIP Faults
BOOL
(10)
11
Get/Set
Enable DOP Faults
BOOL
(11)
12
Get/Set
Enable AIP Faults
BOOL
(12)
13
Get/Set
Enable AOP Faults
BOOL
(13)
Get/Set
Enable Special Function
Faults
BOOL
(14)
Get/Set
Enable DIPs
BOOL
(15)
16
Get/Set
Enable AIPs
BOOL
(16)
17
Get/Set
Enable Special Function IN
Data
BOOL
(17)
18
Get/Set
AIP Mask
UINT
(18)
15
7538_en_01
po
om
in
ec
on
l
14
Type
ne
Attribute
Value (see B 15.4)
USINT
(3)
USINT
(4)
BYTE
(5)
WORD
(6)
PHOENIX CONTACT
B-27
IL EIP BK DI8 DO4 2TX-PAC
B 15.3
Service Code
COS Mask Object Common Services
Class
Instance
0E
Yes
Yes
Get_Attribute_Single
10
No
Yes
Set_Attribute_Single
dec
hex
14
16
B 15.4
Service Name
Values for COS Mask Object Class Attributes
Mask Value
Contains the actual array of bytes that is ANDed with the produced to determine whether to
generate a COS message or not.
(4):
Index
Points to specific byte in the COS Mask Value Attribute allowing the Byte Value Attribute to
be get or set.
(5):
Byte Value
Gets or sets the byte in the COS Mask Array that is indexed by the Index Attribute.
(6):
Add All Mode
Automatically generates a COS Mask based on the following bits, when the add all attribute
is set to a 1.
Bit 13
Bit 12
Bit 11
Bit 10
Bit 9
Bit 8
Inline
Status
PCP
SF
AOPs
AIPs
DOPs
DIPs
Bit 6
Bit 5
Bit 4
Bit 3
Bit 2
Bit 1
Bit 0
SCO
PCP
SF
AOPs
AIPs
DOPs
DIPs
om
I/Os
Bit 7
Bit 14
po
Faults
Bit 15
ne
nt
s.
co
m
(3):
in
ec
Control
Add All
(8):
Enable Device
Supervisor
Exception
(9):
Enable Inline Status
on
l
(7):
When set to a 1, generates a COS Mask based on the Add All Mode attribute.
When set to a 1, generates a bit pattern in the COS Mask Array that cause a COS message
to be generated when any bits in the Device Supervisor Exception Status byte changes
state.
When set to a 1, generates a bit pattern in the COS Mask Array that cause a COS message
to be generated when any bits in the Inline Status Word changes state.
(10): Enable DIP Faults
When set to a 1, generates a bit pattern in the COS Mask Array that cause a COS message
to be generated when any DIP Fault changes state.
(11): Enable DOP Faults
When set to a 1, generates a bit pattern in the COS Mask Array that cause a COS message
to be generated when any DOP Fault changes state.
(12): Enable AIP Faults
When set to a 1, generates a bit pattern in the COS Mask Array that cause a COS message
to be generated when any AIP Fault changes state.
(13): Enable AOP Faults
When set to a 1, generates a bit pattern in the COS Mask Array that cause a COS message
to be generated when any AOP Fault changes state.
B-28
PHOENIX CONTACT
7538_en_01
COS Mask Object (Class Code: 104dec, 68hex)
When set to a 1, generates a bit pattern in the COS Mask Array that cause a COS message
to be generated when any Special Function Module Fault changes state.
(15): Enable DIPs
When set to a 1, generates a bit pattern in the COS Mask Array that cause a COS message
to be generated when any DIP value changes state.
(16): Enable AIPs
When set to a 1, generates a bit pattern in the COS Mask Array that cause a COS message
to be generated when any AIP value changes state.
(17): Enable Special
Function IN Data
When set to a 1, generates a bit pattern in the COS Mask Array that cause a COS message
to be generated when any bit in the Special Function IN Data changes state.
(18): AIP Mask
This value is used to generate a bit pattern used to mask each AIP value when the Add All
Attribute is set. Example: AIP Mask = FF00hex any time an AIP’s upper 9 bits changes, a
COS message will be generated.
on
l
in
ec
om
po
ne
nt
s.
co
m
(14): Enable SF Fault
7538_en_01
PHOENIX CONTACT
B-29
IL EIP BK DI8 DO4 2TX-PAC
B 16
PCP Object (Class Code: 105dec, 69hex)
The PCP Object allows the user to access I/O modules that support the PCP protocol.
B 16.1
Name
1
Get
Revision
UINT
1
2
Get
Max Object Instance
UINT
0 ... 8 (Number of attached
PCP modules)
6
Get
Max Class Identifier
UINT
7
Get
Max Instance Attribute
UINT
Value
co
7
23
s.
PCP Object, Instance 1.. (Number of PCP Modules)
Attributes
nt
B 16.2
Type
m
Access
Access
Name
Get
PDU Size
4
Get
PCP Channel Size
5
Get
PCP Module Status
Get/Set
PCP Request
7
Get
PCP Response
8
Get/Set
9
Get/Set
Value (see B 16.4)
USINT
(3)
USINT
(4)
BOOL
(5)
ARRAY of BYTE
(6)
ARRAY of BYTE
(7)
PCP Module
USINT
(8)
PCP Write Index
UINT
(9)
om
6
Type
po
Attribute
3
ne
Attribute
PCP Object Class Attributes
Get/Set
PCP Write SubIndex
USINT
(10)
11
Get/Set
PCP Write Data
SHORT_STRING
(11)
12
Get/Set
PCP Read Index
UINT
(12)
13
Get/Set
PCP Read SubIndex
USINT
(13)
(14)
15
16
on
l
14
in
ec
10
Get
PCP Read Data
SHORT_STRING
Get/Set
PCP Request Fragment
STRUCT of
Get
Service
BYTE
Data
ARRAY of BYTE[7]
PCP Response Fragment
BYTE
Data
ARRAY of BYTE[7]
Get/Set
PCP Fragment in CIP I/O
18
Get
19
Get
20
Get/Set
B-30
PHOENIX CONTACT
STRUCT of
Service
17
(15)
(16)
BOOL
(17)
Process Data Size
USINT
(18)
Process Data IN
ARRAY
(19)
Process Data OUT
ARRAY
(20)
7538_en_01
PCP Object (Class Code: 105dec, 69hex)
Attribute
Access
Name
Type
Value (see B 16.4)
21
Get/Set
Process Data in CIP I/O
BOOL
(21)
22
Get/Set
PCP Write Invoke ID
USINT
(22)
23
Get/Set
PCP Read Invoke ID
USINT
(23)
Instance
0E
Yes
Yes
Get_Attribute_Single
10
No
Yes
Set_Attribute_Single
hex
14
16
B 16.4
Service Name
co
Class
dec
Values for PCP Object Class Attributes
s.
Service Code
PCP Object Common Services
m
B 16.3
PDU Size
Attribute contains the value of the PDU size used for the PCP channel of the module.
Typically 64 bytes. This is the maximum number of bytes the PCP channel can transfer per
request/response.
(4):
PCP Channel Size
Attribute contains the value of the PCP channel size. This indicates the number of bytes that
are transferred during each Inline scan.
(5):
PCP Module Status
Attribute is set to a 1 to indicate an error with the module, a zero indicates the module is ok.
(6):
PCP Request
This attribute allows the user to send a request to the PCP module. The response can be
read in attribute 4. The format is as follows:
om
po
ne
nt
(3):
on
l
in
ec
Byte 1
Service
1 = Read PCP
2 = Write PCP
3 = Read PDU size
Byte 2
Module number
Byte 3
Index LSB
Byte 4
Index MSB
Byte 5
Subindex
Byte 6
Length
Byte 7 to N
Data block, if necessary
The data length is determined by the PCP Index and PCP Subindex of the object to be read/
written, the max data length is variable and can be up to the PDU size for the module,
typically 64 bytes (See "(3): PDU Size" above).
7538_en_01
PHOENIX CONTACT
B-31
IL EIP BK DI8 DO4 2TX-PAC
(7):
PCP Response
This attribute allows the user to get responses from PCP modules. The format is as follows:
Successful response:
Byte 1
Service
Byte 2
Status
Byte 3
Length
Byte 4 to N
Data block, if necessary
Byte 1
Service
Byte 2:
Status
m
Error response:
Error class
Byte 4
Error code
Byte 5
Additional error code 1 LSB, if necessary
Byte 6
Additional error code 1 MSB, if necessary
Byte 7
Additional error code 2 LSB, if necessary
Byte 8
Additional error code 2 MSB, if necessary
ne
nt
s.
co
Byte 3
po
The data length is determined by the PCP Index and PCP Subindex of the object to be read/
written, the max data length is variable and can be up to the PDU size for the module,
typically 64 bytes (See "(3): PDU Size" on page B-31).
PCP Module
This attribute allows the user to set the PCP module number that the reads and writes
(Attributes 11 and 14) will access.
(9):
PCP Write Index
This attribute sets the Index of the PCP Object Dictionary that will be written when the user
writes to the PCP Write Data Attribute (Attribute 11).
on
l
(11): PCP Write Data
in
ec
(10): PCP Write
SubIndex
om
(8):
This attribute sets the SubIndex of the PCP Object Dictionary that will be written when the
user writes to the PCP Write Data Attribute (Attribute 11).
This attribute allows the user to write data to the PCP Object Dictionary that is referenced
by the PCP Module Attribute, PCP Write Index, and PCP Write SubIndex.
(12): PCP Read Index
This attribute sets the Index of the PCP Object Dictionary that will be read when the user
reads from the PCP Read Data Attribute (Attribute 14)
(13): PCP Read
SubIndex
This attribute sets the SubIndex of the PCP Object Dictionary that will be read when the user
reads from the PCP Read Data Attribute (Attribute 14)
(14): PCP Read Data
This attribute allows the user to read data from the PCP Object Dictionary that is referenced
by the PCP Module Attribute, PCP Read Index, and PCP Read SubIndex.
(15): PCP Request
Fragment
This attribute allows the user to send requests to the PCP module. This attribute performs
the same function as the PCP Request Attribute, except that the request is broken up into
packets of 8 bytes each. This allows the user to include the attribute in the I/O data without
consuming an excess amount of bandwidth or to use CIP tools that do not support variable
length explicit services.
B-32
PHOENIX CONTACT
7538_en_01
PCP Object (Class Code: 105dec, 69hex)
This attribute allows the user to get responses from PCP modules. This attribute performs
the same function as the PCP Response Attribute, except that the response is broken up
into packets of 8 bytes each. This allows the user to include the attribute in the I/O data
without consuming an excess amount of bandwidth or to use CIP tools that do not support
variable length explicit services.
(17): PCP Fragment in
CIP I/O
If set the PCP Response Fragment is added to the produced data of all the I/O connections
and the PCP Request Fragment is added to the consumed data. This attribute affects the
produced and the consumed sizes of the I/O connections, and is therefore only settable
when there are no I/O connections in the established state.
(18): Process Data Size
Number of bytes of process data used by the module.
(19): Process Data IN
Data returned from the Inline module to the IL EIP BK DI8 DO4 2TX-PAC. Data size is
determined by the I/O module.
(20): Process Data OUT
Data sent from the IL EIP BK DI8 DO4 2TX-PAC to the Inline module. Data size is
determined by the I/O module.
(21): Process Data IN CIP
I/O
If set the PCP Process Data IN is added to the produced data of all the I/O connections and
the PCP Process Data OUT is added to the consumed data. This attribute affects the
produced and the consumed sizes of the I/O connections, and is therefore only settable
when there are no I/O connections in the established state.
(22): PCP Write Invoke ID
This attribute defines what invoke ID is used for PCP writes. Default is 0.
(23): PCP Read Invoke ID
This attribute defines what invoke ID is used for PCP reads. Default is 0.
on
l
in
ec
om
po
ne
nt
s.
co
m
(16): PCP Response
Fragment
7538_en_01
PHOENIX CONTACT
B-33
IL EIP BK DI8 DO4 2TX-PAC
B 17
Serial Communications Object
(Class Code: 106dec, 6Ahex)
The Serial Communications Object allows the user to control and transfer serial data on
RS232 and RS485 485/422 modules.
B 17.1
Serial Communications Object Class Attributes
Access
Name
Type
Value
Get
Revision
UINT
1
2
Get
Max Object Instance
UINT
6
Get
Max Class Identifier
UINT
7
Get
Max Instance Attribute
UINT
m
Attribute
1
7
33
nt
s.
co
0 ... 8 (Number of attached
serial modules)
Serial Communications Object, Instance 1.. (Number of
Serial Modules) Attributes
Access
NV
Name
3
Get
V
4
Get
V
5
Get
V
6
Get/Set
V
7
Get
V
8
Get/Set
9
Get
Value
(see B 17.4)
Module Type
USINT
(3)
Module Status
BOOL
(4)
Serial Status Word
WORD
(5)
Serial Control Word
WORD
(6)
Receive Data
SHORT_STRING
(7)
V
Transmit Data
SHORT_STRING
(8)
V
Receive Data Fragment
STRUCT of
(9)
om
in
ec
on
l
10
Type
po
Attribute
Get/Set
ne
B 17.2
V
Service
BYTE
Data
ARRAY of USINT[7]
Transmit Data Fragment
STRUCT of
(10)
BYTE
ARRAY of USINT[7]
11
Get/Set
NV
Protocol
USINT
(11)
12
Get/Set
NV
Baud Rate
USINT
(12)
13
Get/Set
NV
Data Width
USINT
(13)
16
Get/Set
NV
Error Pattern
USINT
(16)
17
Get/Set
NV
First Delimiter
USINT
(17)
18
Get/Set
NV
Second Delimiter
USINT
(18)
19
Get/Set
NV
3964R Priority
USINT
(19)
20
Get/Set
NV
Output Type
USINT
(20)
B-34
PHOENIX CONTACT
7538_en_01
Serial Communications Object (Class Code: 106dec, 6Ahex)
Attribute
Access
NV
Name
Type
Value
(see B 17.4)
21
Get/Set
NV
DTR Control
USINT
(21)
Get/Set
NV
Rotation Switch
USINT
(22)
23
Get/Set
NV
XON Pattern
USINT
(23)
24
Get/Set
NV
XOFF Pattern
USINT
(24)
31
Get/Set
NV
Status/Control IN CIP I/O
BOOL
(31)
32
Get/Set
NV
Fragment Data IN CIP I/O
BOOL
(32)
33
Get/Set
NV
Serial Object Enable
BOOL
(33)
Class
Instance
co
Service Code
Serial Communications Object Common Services
Service Name
s.
B 17.3
m
22
hex
14
0E
Yes
Yes
Get_Attribute_Single
16
10
No
Yes
Set_Attribute_Single
ne
Values for Serial Communications Object Class Attributes
po
B 17.4
nt
dec
Module Type
This value indicates the module type of the serial module.
0 = RS-232
1 = RS-485/RS-422
(4):
Module Status
This value indicates the module status.
0 = Ok
1 = Faulted
(5):
Serial Status Word
Bit 7
Reserved
7538_en_01
on
l
in
ec
om
(3):
MSB
Bit 15
Bit 14
Bit 13
Bit 12
Bit 11
Bit 10
Bit 9
Bit 8
Number of Received Characters (Mode Dependent)
LSB
Bit 6
Bit 5
Bit 4
Bit 3
Bit 2
Bit 1
Bit 0
Transmit
Buffer Not
Empty
Transmit
Buffer Full
Receive
Buffer Full
Re-Init
Executed
Send Error
Receive
Error
Received
Buffer Not
Empty
PHOENIX CONTACT
B-35
IL EIP BK DI8 DO4 2TX-PAC
(6):
Serial Control Word
MSB
Bit 15
Bit 14
Bit 13
Bit 12
Bit 11
Bit 10
Bit 9
Bit 8
Reserved
LSB
Bit 7
Bit 6
Bit 5
Bit 4
Bit 3
Bit 2
Bit 1
Bit 0
DTR
Reserved
Reserved
Reserved
Execute
Re-Init
Reset Send
Error
Reset
Receive
Error
Reserved
Receive Data
This attribute allows the user to read the serial data in one Get_Attribute_Single. The format
is a SHORT_STRING.
(8):
Transmit Data
This attribute allows the user to transmit serial data in one Set_Attribute_Single. The format
is a SHORT_STRING.
(9):
Receive Data
Fragment
This attribute allows the user to read the serial data in pieces. This can be useful for tools
that do not support variable length or non-standard length data sizes. It is also used to map
the data into the process data.
nt
s.
co
m
(7):
This attribute allows the user to write the serial data to transmit in pieces. This can be useful
for tools that do not support variable length or non-standard length data sizes. It is also used
to map the data into the process data.
(11): Protocol
Code (hex)
01
02
on
l
(12): Baud Rate
in
ec
03
B-36
PHOENIX CONTACT
Meaning
Transparent
om
00
po
ne
(10): Transmit Data
Fragment
End-to-end
Dual buffer
3964R
04
XON/XOFF
Code (hex)
Value
00
110
01
300
02
600
03
1200
04
1800
05
2400
06
4800
07
9600
08
19200
7538_en_01
Serial Communications Object (Class Code: 106dec, 6Ahex)
(13): Data Width
Code (hex)
Meaning
Data
Bit
Parity
Stop Bits
00
7
Even
1
01
7
Odd
1
02
8
Even
1
03
8
Odd
1
04
8
Without 1
1
7
Without 1
1
06
7
Even
2
07
7
Odd
08
8
Even
09
8
Odd
2
0A
8
Without 2
2
0B
7
Code (hex)
Meaning
24
$
xx
Any character
0D
in
ec
xx
s.
co
2
ne
nt
2
po
om
Code (hex)
2
Without 2
(16): Error Pattern
(17): First Delimiter
m
05
Meaning
Carriage Return (CR)
Any character
on
l
(18): Second Delimiter
Code (hex)
Meaning
0A
Line Feed (LF)
xx
Any character
Code (hex)
Meaning
(19): 3964R Priority
00
Low priority
01
High priority
Code (hex)
Meaning
00
RS-232 (*Default for RS-232 Module Type)
01
RS-485 (*Default for RS-485 Module Type)
02
RS-422
(20): Output Type
7538_en_01
PHOENIX CONTACT
B-37
IL EIP BK DI8 DO4 2TX-PAC
(21): DTR Control (Only
Valid for RS-232
Type)
Code (hex)
Meaning
00
Automatic
01
Via process data
(22): Rotation Switch
Code (hex)
Meaning
00
No rotation
01
Rotation
Code (hex)
Meaning
11
Default
xx
Any character (not the same as XOFF pattern)
Code (hex)
Meaning
13
Default
xx
Any character (not the same as XON pattern)
co
m
(23): XON Pattern
ne
nt
s.
(24): XOFF Pattern
If set, the serial status word is added to the produced data of all the I/O connections and the
serial control word is ADDed to the I/O consumed data. This attribute affects the produced
and the consumed sizes of the I/O connections, and is therefore only settable when there
are no I/O connections in the established state.
(32): Fragment Data IN
CIP I/O
If set the Receive Data Fragment is ADDed to the produced data of all the CIP I/O
connections and the Transmit Data Fragment is added to the I/O consumed data. This
attribute affects the produced and the consumed sizes of the I/O connections, and is
therefore only settable when there are no I/O connections in the established state.
in
ec
If set, the Serial Object will handle the buffering of the serial data. Set this attribute to 0 to
enable direct access of the serial modules using the PCP class instead of the SCO class.
on
l
(33): Serial Object
Enable
om
po
(31): Status/Control IN
CIP I/O
B-38
PHOENIX CONTACT
7538_en_01
Port Object Class Definition (Class Code: 244dec, F4hex)
B 18
Port Object Class Definition
(Class Code: 244dec, F4hex)
B 18.1
Port Object Class Attributes
Attribute
Access
Name
Type
Value
1
Get
Revision
UINT
1
2
Get
Max Object Instance
UINT
3
Get
Number of Object Instances UINT
8
Get
Entry Port
UINT
9
Get
All Ports
ARRAY OF STRUCT
1 (one CIP Port on BK)
m
1
co
1 (only one port supported)
Port Object Instance Attributes
nt
s.
B 18.2
00 00 00 00 04 00 02 00
NV
Name
1
Get
V
Port Type
2
Get
V
Port Number
3
Get
V
Port Object
4
Get
V
Port Name
Type
Value
UINT
04
UINT
02
UINT
02 00 20 f5 24 01
SHORT_STRING
IL EIP BK 10/100
EIP Port
ne
Access
om
po
Attribute
Service Code
in
ec
B 18.3
Class
Instance
01
Yes
Yes
Get_Attribute_All
02
No
No
Set_Attribute_All
0E
Yes
Yes
Get_Attribute_Single
hex
1
2
7538_en_01
on
l
dec
14
Port Object Common Services
Service Name
PHOENIX CONTACT
B-39
IL EIP BK DI8 DO4 2TX-PAC
B 19
TCP/IP Interface Object
(Class Code: 245dec, F5hex)
B 19.1
TCP/IP Interface Object Class Attributes
Access
Name
Type
Value
1
Get
Revision
UINT
1
2
Get
Max Object Instance
UINT
1
3
Get
Number of Object Instances UINT
1
co
m
Attribute
s.
TCP/IP Interface Object Instance Attributes
Attribute
Access
NV
Name
1
Get
V
Status
2
Get
V
nt
B 19.2
Configuration Compatibility
(2)
3
Get/Set
NV
Configuration Control
DWORD
(3)
4
Get
V
Physical Link Object
Struct of:
00
NV
on
l
6
Get
B-40
po
ne
DWORD
Path Size
UINT
Path
Padded
NV
Struct of:
IP Address
UDINT
Network Mask
UDINT
Gateway Address
UDINT
Name Server
UDINT
Name Server 2
UDINT
Domain Name
STRING
Host Name
STRING
(1)
Configurationspecific
Configurationspecific
TCP/IP Interface Object Common Services
Class
Instance
Service Name
dec
hex
1
01
Yes
Yes
Get_Attribute_All
14
0E
Yes
Yes
Get_Attribute_Single
16
10
No
Yes
Set_Attribute_Single
PHOENIX CONTACT
Value
(see B 19.4)
EPATH
Interface Configuration
B 19.3
Service Code
DWORD
om
Get
in
ec
5
Type
7538_en_01
TCP/IP Interface Object (Class Code: 245dec, F5hex)
B 19.4
(1):
Status
Values for TCP/IP Interface Object Class Attributes
Indicates the status of the configuration attribute.
Bit
Called
Definition
0 ... 3
Interface Configuration Status
0 = Not Configured
1 = Valid Configuration
2 ...15 = Reserved
4 ... 31
Reserved
Reserved (set to 0)
Configuration
Capability
The Configuration Capability indicates the devices support for optional network capabilities.
m
(2):
Called
Definition
BootP Client
1 (TRUE) indicates the device can receive its
configuration via BootP.
1
DNS Client
1 (TRUE) shall indicate the device is capable of
resolving host names by querying a DNS server.
2
DHCP Client
1 (TRUE) shall indicate the device is capable of
obtaining its network configuration via DHCP.
3
DHCP-DNS Update
1 (TRUE) shall indicate the device is capable of sending
its host name in the DHCP request.
4
Configuration Settable
5 ... 31
Reserved
5 ... 31
7538_en_01
in
ec
ne
nt
s.
Called
Startup Configuration
on
l
4
1 (TRUE) shall indicate the Interface Configuration
attribute is settable.
Reserved for future use and shall be set to zero.
The configuration control attribute tells the device how to determine its network
configuration:
Bit
0 ... 3
po
Configuration
Control
om
(3):
co
Bit
0
Definition
0 = Use configuration stored in NV
1 = Use BootP
2 = Use DHCP
3 ... 15 = Reserved*
DNS Enable
If 1 the device will resolve host names by using DHCP.
Reserved
Reserved for future use (set to 0)
*Currently, 0 and 1 are the only valid values for Attribute 3. Future revisions will include the
value of 2.
PHOENIX CONTACT
B-41
IL EIP BK DI8 DO4 2TX-PAC
B 20
Ethernet Link Object (Class Code: 246dec, F6hex)
B 20.1
Ethernet Link Object Class Attributes
Access
Name
Type
Value
1
Get
Revision
UINT
3
2
Get
Max Object Instance
UINT
2
3
Get
Number Object Instances
UINT
2
6
Get
Max. Class Identifier
UINT
7
7
Get
Max. Instance Attribute
UINT
co
10
Link Object Instance Attributes
s.
B 20.2
m
Attribute
Access
Name
Type
1
Get
Interface Speed
UDINT
(1)
2
Get
Interface Flags
DWORD
(2)
3
Get
Physical Address
ARRAY OF 6 USINTS
(3)
7
Get
Interface Type
USINT
(7)
10
Get
Interface Label
SHORT_STRING
(10)
ne
po
om
B 20.3
Instance
01
Yes
No
Get_Attribute_All
0E
Yes
Yes
Get_Attribute_Single
hex
1
14
Service Name
on
l
dec
Value
Ethernet Link Object Common Services
Class
in
ec
Service Code
nt
Attribute
B-42
PHOENIX CONTACT
7538_en_01
Ethernet Link Object (Class Code: 246dec, F6hex)
B 20.4
(1):
Interface Speed
(2):
Interface Flags
Values for Ethernet Link Interface Object Class Attributes
The Interface Speed attribute shall indicate whether the interface is running at 10 Mbps,
100 Mbps, 1 Gbps, etc. The scale of the attribute is in Mbps, so if the interface is running at
100 Mbps then the value of the Interface Speed attribute shall be 100. The Interface Speed
is intended to represent the media bandwidth; the attribute shall not be doubled if the
interface is running in full-duplex mode.
Called
Definition
Link Status
Indicates whether or not the Ethernet 802.3
communications interface is connected to an active
network. 0 indicates an inactive link; 1 indicates an
active link.
1
Half/Full Duplex
0 indicates the interface is running half duplex; 1
indicates full duplex. Note that if the Link Status flag is 0,
then the value of the Half/Full Duplex flag is
indeterminate.
2 ... 31
Reserved
Shall be set to zero
nt
s.
co
m
Bit
0
Physical Address
The Physical Address attribute contains the interface’s MAC layer address. The Physical
Address is an array of octets. The recommended display format is "XX-XX-XX-XX-XX-XX",
starting with the first octet. Note that the Physical Address is not a settable attribute. The
Ethernet address shall be assigned by the manufacturer, and shall be unique per IEEE
802.3 requirements.
(7):
Interface Type
The Interface Type attribute shall indicate the type of physical interface. Fixed at a value of
2 (Twisted Pair 10/100 base-T).
om
po
ne
(3):
Text String describing the interface.
Instance 1 = "IL EIP 10/100 Port-X1" Instance 2 = "IL EIP 10/100 Port-X2"
on
l
in
ec
(10): Interface Label
7538_en_01
PHOENIX CONTACT
B-43
on
l
in
ec
om
po
ne
nt
s.
co
m
IL EIP BK DI8 DO4 2TX-PAC
B-44
PHOENIX CONTACT
7538_en_01