1
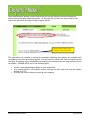
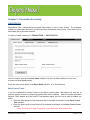
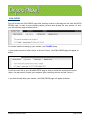
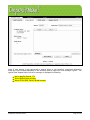
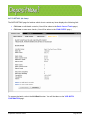
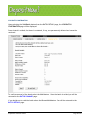
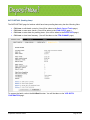
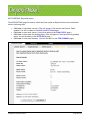
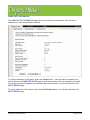
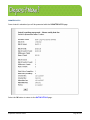
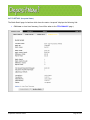
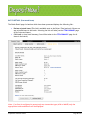
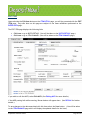
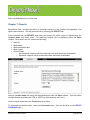
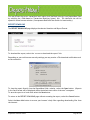
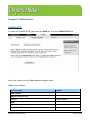
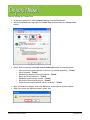
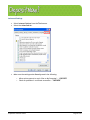
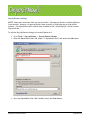
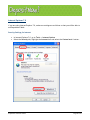
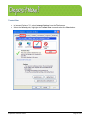
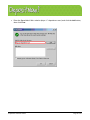
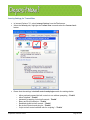
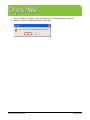
DepositNow! Web User Guide Version 1.1.5.0 April 2008 Table of Contents Chapter 1: Introduction ................................................................................ 5 About This Guide ............................................................................................... 5 Chapter 2: About DepositNow! Web ................................................................. 6 How The Program Works ...................................................................................... 6 System Requirements ......................................................................................... 6 Chapter 3: DepositNow! Web Login.................................................................. 7 SIGN IN ........................................................................................................... 7 SIGN OUT ........................................................................................................ 7 Chapter 4: DepositNow! Web Software Updates .................................................. 8 Software Updates .............................................................................................. 8 Chapter 5: Transaction Processing.................................................................. 11 CREATE BATCH ............................................................................................... 11 Batch Control Totals ................................................................................... 11 SCAN CHECKS ................................................................................................. 12 Scanner Settings ........................................................................................ Image Viewing........................................................................................... Scanner Statuses, Scanner Operations, Error Messages and Status Messages ................. ENTER DATA................................................................................................... 16 17 18 20 Rescan (Depend on MICR parsing result) ............................................................ 22 Editing MICR (Configurable)........................................................................... 22 Chapter 6: Batch Management....................................................................... 25 BATCH SUMMARY ............................................................................................. 25 BATCH DETAILS ............................................................................................... 27 BATCH DETAILS (No Items) ............................................................................ BATCH DETAILS (Pending Items)...................................................................... BATCH DETAILS (Rejected Items) .................................................................... BATCH DETAILS (Completed Items) .................................................................. BATCH DETAILS (Accepted Items) .................................................................... BATCH DETAILS (Processed Items) ................................................................... ITEM SUMMARY ............................................................................................... 29 31 32 34 37 38 40 ITEM DETAIL................................................................................................... 43 EDIT ITEM...................................................................................................... 44 Chapter 7: Reports ..................................................................................... 45 REPORT DOWNLOAD ......................................................................................... 46 Chapter 8: Administration ............................................................................ 47 DepositNow! Web User Guide Page 2 of 76 SCANNER SETUP .............................................................................................. 47 SCANNER SETUP COMPLETE ........................................................................... 48 SB1000 CALIBRATION ................................................................................... 50 PASSWORD..................................................................................................... 51 PASSWORD CHANGED................................................................................... 52 OPT-OUT....................................................................................................... 53 Adding to the OPT-OUT list ........................................................................... 54 Removing an account from the OPT-OUT list ...................................................... 54 STOP FILTER .................................................................................................. 55 Appendix A: Report Format Specifications ....................................................... 56 DepositNow! Web - Report Formats ...................................................................... 56 Posting File Report Format ................................................................................. 57 Yardi Output Report Format ............................................................................... 59 Sample Yardi Output ................................................................................... 59 ACH Item Return Codes and Descriptions ................................................................ 60 Image Item Return Codes and Descriptions .............................................................. 62 Rejected Item Descriptions................................................................................. 63 Appendix B: Internet Explorer Settings ........................................................... 64 Internet Explorer 6.0 ........................................................................................ 64 Trusted Sites ............................................................................................ Advanced Settings ...................................................................................... Pop-Up Blocker Settings ............................................................................... Internet Explorer 7.0 ........................................................................................ 64 67 68 69 Security Settings for Internet ......................................................................... Trusted Sites ............................................................................................ Security Settings for Trusted Sites ................................................................... Advanced Settings ...................................................................................... Pop-Up Blocker Settings ............................................................................... 69 71 73 75 76 DepositNow! Web User Guide Page 3 of 76 List of Tables Table 1: Scanner Statuses........................................................................................ Table 2: Scanner Operations .................................................................................... Table 3: Error Messages .......................................................................................... Table 4: Status Messages ......................................................................................... Table 5: Batch Statuses .......................................................................................... Table 6: Batch Details Particulars .............................................................................. Table 7: Item Statuses............................................................................................ Table 8: List of Scanners ......................................................................................... Table 10: Yardi Output Report Format ........................................................................ Table 11: ACH Item Return Codes and Descriptions ......................................................... Table 12: Image Item Return Codes and Descriptions ....................................................... Table 13: Rejected Item Descriptions.......................................................................... DepositNow! Web User Guide 18 18 18 19 26 27 41 47 59 60 62 63 Page 4 of 76 Chapter 1: Introduction DepositNow! Web is designed to provide electronic check processing services via the Internet. DepositNow! Web allows end users to capture and transmit check MICR data and check images to the DepositNow! Web Server for inclusion in ACH (Automated Clearing House) or ICL (Image Cash Letter) files and for storage. About This Guide This guide provides business information to support the online management of the DepositNow! Web payment application. This guide contains the following chapters: Chapter 1: “Introduction” describes how this guide is organized, and provides additional information about DepositNow! Web. Chapter 2: “About DepositNow! Web ” provides a description of the application including the processes, benefits and system requirements. Chapter 3: “DepositNow! Web Login” provides instructions for launching the DepositNow! Web application and logging in. Chapter 4: “DepositNow! Web Software Updates” provides instructions for applying automatic software updates. Chapter 5: “Transaction Processing” describes how to capture and upload transaction data and check images. Chapter 6: “Batch Management” describes how to review, submit transaction batches, and how to void both individual transactions and entire batches. Chapter 7: “Reports” describes how to download transaction reports. Chapter 8: “Administration” describes the management of user passwords, scanner configurations, and customers who ‘opt out’ of electronic check conversion. Appendix A: “Report Format Specifications” provides a complete listing and description of the downloadable report format specifications. Appendix B: “Internet Explorer Settings” contains instructions on how to configure your Internet Explorer browser in order to run the DepositNow! Web application. Appendix C: “Scanner Installation” provides instructions for installing your DepositNow! Web scanning devices. DepositNow! Web User Guide Page 5 of 76 Chapter 2: About DepositNow! Web How The Program Works DepositNow! Web clients utilize a check scanning device to capture an image of a check and its MICR details. The information captured is then transferred via a secure website to the Bankserv server. This process automatically transfers the specified amount from their customer’s account to the client’s bank account. The image is stored on the Bankserv server for on-line retrieval. Once a transaction is processed, DepositNow! Web provides various downloadable report formats. The basic functional capabilities of DepositNow! Web are: • • • Check data and image capture Review and verification Batch management In the check data and image capture module the workflow components below have been separated to allow for independent processing of each component, either consecutively by one user, or simultaneously by multiple users. These components are: • • • Scan Checks Enter Data Submit Batch System Requirements DepositNow! Web has the following requirements for Hardware and Software: • • • • • • • Processor: 600 MHz Intel Pentium Processor RAM: 512 MB Hard Disk Space: 200 MB Operating System: Windows 2000 (with Service Pack 4) Windows XP (with Service Pack 2) Internet Browser: Internet Explorer 6 (Service Pack 1) or above Internet Access: DSL or better preferred USB 2.0 DepositNow! Web User Guide Page 6 of 76 Chapter 3: DepositNow! Web Login SIGN IN Upon completion of end user configuration within the DepositNow! Web system, you will be given the appropriate URL to connect to the DepositNow! Web application. It must be entered exactly as given, including capitalization and punctuation. Note: Users who make three failed attempts to login will have their account locked for administrative review. Enter the Customer ID (optional), User Name and Password, then click Sign In. When you log in for the first time you will be prompted to select a new password. (See PASSWORD) SIGN OUT Once you are logged into DepositNow! Web you may sign out from any page by selecting the SIGN OUT link. DepositNow! Web User Guide Page 7 of 76 Chapter 4: DepositNow! Web Software Updates Software Updates The DepositNow! Web application is designed to detect when software updates are available on the server and automatically download them prior to launching the SCAN CHECKS page. If updates are available the end user will be presented with one of the following screens. Note: If this is your first time using the DepositNow! Web product and you have never configured a scanner , click on the Admin > Scanner Setup link and refer to the SCANNER SETUP Section in CHAPTER 8 for step by step instructions for setting up your scanner. The following message is displayed when the application detects a new customer setup or that DepositNow! Web ActiveX is not present on the workstation. The following message is displayed when the application detects that software updates are available DepositNow! Web User Guide Page 8 of 76 If you are a veteran DepositNow Web user click on the Admin > Scanner Setup link to be directed to the Scanner Setup page and follow the instructions below: 1. Confirm that the scanner selected in the Select Scanner list box is the scanner attached to their workstation. 2. Click the SET SCANNER button. NOTE: If you are an existing user you do not need to perform Step 1 to launch the Universal Scanner Installer. This Step 1 is necessary for first time DepositNow! Web users only. FIRST Confirm that the selected scanner is correct. SECOND Click the SET SCANNER button. After clicking on the SET SCANNER button the end user will be presented with the following “loading” message as the updated ActiveX Control is downloaded and initiated. DepositNow! Web User Guide Page 9 of 76 Upon completing the update process the end user will see the following screen indicatng the ActiveX Control has been setup successfully. At this point the end user can select either of the links at the bottom of this page to begin scanning checks. Select one of these links to begin scanning checks The application will continue to present the messages indicating that updates are available until the updates have been successfully applied. You may need to contact your technical support group to ensure the updates can be downloaded successfully you continue to see the page directing you to the ADMIN > SCANNER SETUP and of the following apply: . You don’t have Administrative Rights to your workstation Your Internet Explorer (IE) Internet Security Settings are more restrictive than the default settings for IE 7.0 You have Anti Virsus software protecting your computer DepositNow! Web User Guide Page 10 of 76 Chapter 5: Transaction Processing CREATE BATCH DepositNow! Web transactions are grouped into batches of one or more checks. The maximum number of transactions allowed in a batch has been determined during setup. Each batch will be associated with a particular location. In order to create a batch go to TRANSACTIONS >> CREATE BATCH. Select a location from the Location Name dropdown list box. Locations defined for your user account are listed alphabetically. Enter the name of the batch in the Batch Name edit box. (3 to 20 characters) Batch Control Totals If you are configured for Control Totals for the batch, specify them, this feature will help you to improve deposit accuracy by detecting possible data entry problems. Until the system calculated Depsosit Total Amount and the Control Total Amounts agree you will not be able to submit the batch. • Enter the total amount of the items that will be included in the batch in the Batch Control Total edit box. • Enter the total count of items that will be included in the batch in the Batch Control Count edit box. Note: Total count of items is optional, so you may enter total amount only. DepositNow! Web User Guide Page 11 of 76 SCAN CHECKS You will receive the SCAN CHECKS page after creating a batch or following the link from the BATCH DETAILS page. In order to start scanning checks you must have already set your scanner. Or else, you will receive a page as shown below: For further details on setting up your scanner, see SCANNER Setup. If your system consists of older version of ActiveX Control, the SCAN CHECKS page will appear as below: Click in the text link to go to SCANNER SETUP page in order to install the new ActiveX Control. (Note: You may need to restart your computer after installing the new ActiveX Control.) If you have already setup your scanner, the SCAN CHECKS page will appear as below: DepositNow! Web User Guide Page 12 of 76 Note: If your scanner is not connected or scanner driver is not installed, connection attempt is made for a few seconds depending on the selected scanner before an error message is given. The typical time elapsed before the error message is displayed is following: • 60s for MagTek Excella, STX • 30s for Digital Check scanner • About 15s for RDM, Panini, SB1000 scanner DepositNow! Web User Guide Page 13 of 76 DepositNow! Web is designed to allow you to scan all checks within a particular batch before being required to enter any customer data associated with each check. It also provides the ability to capture both the front and back of each check, which is required for clients configured to process both ACH (Automated Clearing House) and Image (Image Cash Letter) items. Checks may be scanned one at a time, enabling image review before manually triggering the scanner to accept the next check. Alternately, you may configure DepositNow! Web to accept each check in the batch without requiring any keyed entry between checks (Auto Scan). In order to start scanning checks: • Make sure your scanner is connected (The Scanner Status should show ONLINE) (Note: If endorsement feature is ON for the selected location and ink cartridge is absent in the scanner, a message regarding this condition will popup in the case of Digital Teller Scan and MagTek Excella. However, in case of Panini, this message is not generated and scanning is allowed even though the ink cartridge is absent in the scanner.) • Insert check(s) in your scanner. • If you wish to scan checks continuously without having to click the Scan Check button more than once, make sure the Enable AutoScan checkbox is checked. • Select the Scan Check button. DepositNow! Web User Guide Page 14 of 76 After the successful scanning of a check, you will be displayed the following on the page: • • • Total Items Count Increment Check Images Message: “Uploading Check Images” will temporary be displayed in the Operation box. If you want to cancel the scanned item, select the Void button. When you have scanned all of the checks within a batch, select the Done button to proceed to the ENTER DATA page. DepositNow! Web User Guide Page 15 of 76 Scanner Settings DepositNow! Web provides the ability to change Scanner Settings depending on the scanner selected. Click in the Settings button in SCAN CHECKS page. The Scanner Settings box will be opened. The displayed settings are dependent on the scanner you have set. There are following five kinds of scanner settings. Device Selection: This feature is available only for MagTek Excella and MagTek STX scanners. You can choose the device you are using to scan from the Selected Device combo box. Auto Scan: This feature is available for all the scanners. Check on this if you want to scan checks continuously without having to click the Scan Check button more than once. Auto Feed: This feature is available only for MagTek Excella scanner. Check on this checkbox if you want to scan checks from Auto Feed compartment of MagTek Excella scanner. Alternatively, if you want to manually feed checks one at a time from the Manual Feed compartment of the scanner, uncheck this checkbox and start scanning. Double Feed Detection: This feature is available only for Panini and Digital Check TellerScan scanners. If you check on this checkbox, double feeds during scanning will be detected and a popup message will be provided. If this check box is de-selected, double feeds during scanning will not be detected. DepositNow! Web User Guide Page 16 of 76 Set Contrast: This feature is available only for BankServ SB1000 and Digital Check TellerScan scanners. If you want to scan dark checks, you can shift the slider to “Lighter” side and if you want to scan light checks, you can shift slider to “Darker” side. Image Viewing DepositNow! Web provides the ability to zoom in on the check image to verify the readability of any required details. Select-hold-drag the mouse across the portion of the image you wish to magnify. The enlarged image will be displayed within the check image window, with scroll bars to allow adjustment of the viewing area. To return to the image of the entire check, select the Fit Image button. Select the BACK tab to view the back image and the FRONT tab to view the front image. DepositNow! Web User Guide Page 17 of 76 Scanner Statuses, Scanner Operations, Error Messages and Status Messages The following tables contain the scanner statuses and operations, and Messages that you will see displayed on the SCAN CHECKS page during various processes: Table 1: Scanner Statuses Scanner On-line Displayed when scanner control has been captured, but the scanner has not been prompted to accept a check. Scanner On-line (H80) Displayed when scanner has been prompted to accept the next check. Scanner Off-line Displayed if scanner control is lost, or scanner loses power. Table 2: Scanner Operations Insert Item Now (Front) Indicates that the scanner has been prompted to capture the front image of a check. Insert Item Now (Back) Indicates that the scanner has been prompted to capture the back image of a check. Processing Indicates that your computer is temporarily storing the captured image and MICR data. Uploading Image Indicates that the image and MICR data is being transmitted to the server. Check Power/Comm Indicates a problem with communication to/from the scanner. Table 3: Error Messages No item to void Indicates there is no item to void, or the item is invalid. Make sure you've placed the check in the scanner. Indicates scanner failed to capture image. Unable to display check image. Please rescan the check. Indicates scanner failed to display image. The scanner could not read the check details. Please rescan the check. Indicates parsing of the check image failed. An error occurred while uploading the check. Please rescan the check. Indicates that there was an error while uploading the check. Scanner not found. Make sure you've connected the scanner. Indicates Scanner could not be detected. DepositNow! Web User Guide Page 18 of 76 Table 4: Status Messages Please ensure your scanner is connected. Indicates scanner is not connected. Error while scanning: Please rescan the last check. Indicates scanner failed to capture image. There was error while displaying the check image. Indicates scanner failed to display image. Please rescan the last check. Indicates parsing of the check image failed. Uploading check images. Indicates check image is processed successfully and uploading is in progress. Current check image has not been uploaded. Indicates an error occurred while parsing the check. After scanning, the Item status changes to MICR Edit or Rejected according to the location’s MICR Edit configuration as follows: • On scanning, if theMICR Edit feature is enabled and the application is unable to “parse” the MICR the Item will have MICR Edit status. • On scanning, if MICR Edit feature is disabled and theapplication is unable to “parse” the MICR the Item will have a Rejected status. DepositNow! Web User Guide Page 19 of 76 ENTER DATA The ENTER DATA page supports the entry of information associated with each check in a batch. As an independent process, one or more users may enter data in a batch for which another user is currently scanning checks. Once a user accesses the ENTER DATA page, the next available pending item will be presented. This item will then be locked against access by another user until the item is complete or the user session has expired (30 minute limit). Transactions created within DepositNow! Web fall into one of two categories. This categorization is based on data captured when the check is scanned, and cannot be altered by the user. Items to be processed via the ACH system will be designated with the transaction type of ACH. Items to be processed in a Image Cash Letter (ICL) File will be given the transaction type of IMAGE. DepositNow! Web User Guide Page 20 of 76 The ENTER DATA page displays the check image and a list of its associated data elements. The standard data elements displayed for each check include: • • • • • • • • • First Name Last Name Check Amount Routing No. Account No. Check No. Scanner MICR If you have setup CUSTOM FIELDS for your Location, those fields will also be displayed. If you have configured for optional sub-amount fields, a cumulative Running Total of those fields will also be displayed. (You may have opted to include up to 12 additional CUSTOM FIELDS specific to your accounts receivable requirements. Rules can be defined with regard to the format of data accepted into those fields. In addition, one of the fields can de designated as the Receiver cross-reference for use within the NetCheck reporting tool.) If you have elected to have the AUTO-FILL feature enabled, the following fields get pre-populated: • • • • First Name Last Name Check Amount Custom Fields The pre-populated data is captured from the most recent data entered for the payer, the identity of whom is determined by the unique combination of transit routing and account numbers. If the MICR parsing fails while scanning, Rescan button will appear here. (See RESCAN for further details.) If you wish to edit the Scanned MICR select the Edit MICR button. (See EDITING MICR for further details.) If you want to remove the scanned check and its details, select the Void button. (You will be taken to the ITEM DETAIL (VOID ITEM CONFIRMATION) page.) After verifying and filling in all details related to the displayed check, select the Next button. • • If you have any items pending data entry in the batch, the next pending item will be displayed. If you have completed data entry for all items in the batch, you will be taken to the EDITING MICR (CONFIGURABLE) page. DepositNow! Web User Guide Page 21 of 76 Rescan (Depend on MICR parsing result) If MICR parsing fails the Rescan button appears in ENTER DATA page. The other buttons display according to the Location’s MICR Edit privileges and the status of the Item Rescan and Void buttons will be displayed in following cases: • If the MICR Edit feature is disabled for the location and the Item is in Rejected status • If the MICR Edit feature is enabled for the location and the Item is in MICR Edit status Rescan, Edit MICR, Next (Inactive) and Void buttons will be displayed in following case: • If the MICR MICR Edit feature is enabled for the location and the Item is in MICR Edit status If you wish to rescan the check, select Rescan. The Item will be deleted and you will be taken to the SCAN CHECKS page so that you can scan checks again. (See SCAN CHECKS for further details.) If you wish to edit the Scanned MICR select the Edit MICR button. (See EDITING MICR for further details.) Editing MICR (Configurable) DepositNow! Web User Guide Page 22 of 76 You should validate the scanned MICR line details against the check image for accuracy, if you find any discrepancies in the Scanned MICR, select Edit MICR so that you may correct it. The Edit MICR box displays the Scanned MICR in MICR font as follows: If you wish to enter MICR symbols right-click in the Edit MICR box. You will be displayed a menu of the MICR symbols as follows. Select the symbol you wish to enter. Alternately, you may type keyboard characters as mentioned in the following table: Key Symbol T O A Once you have edited the MICR, select Update to record the changes. Select Cancel to revoke any changes. DepositNow! Web User Guide Page 23 of 76 ITEM DETAIL (VOID ITEM CONFIRMATION) The ITEM DETAIL (VOID ITEM CONFIRMATION) page displays the following links: • • Click here to go back to ITEM SUMMARY. (You will be taken to the ITEM SUMMARY page.) Click here to go BATCH DETAILS. (You will be taken to the BATCH DETAILS page.) Click the Void Item button to remove the item from the batch. (You will be taken to the VOIDED ITEMS page.) Click the Do not Void Item button to cancel voiding of the item. (You will be taken to the ITEM SUMMARY page.) DepositNow! Web User Guide Page 24 of 76 Chapter 6: Batch Management BATCH SUMMARY Upon selecting the MANAGE BATCH tab, the BATCH SUMMARY page will be presented. The Batch Summary displays the following information for all of the open batches associated with the selected location: • • • • • • • • • Batch ID Batch Name Control Count Total Items # Control Total Amount Data Entry (Completed/Pending) Created on Status DepositNow! Web User Guide Page 25 of 76 The Location Name dropdown menu will default to the last location accessed either for transaction processing or batch management, and is sorted alphabetically. The << First, <Previous, 1, 2, 3, …, Next>, Last>> links, displayed according to the number of deposits in the location and depending on the current page you are in, allow you to page through the list of batches conveniently. Click the row for a particular batch to go to its BATCH DETAILS page. Table 5: Batch Statuses Status Description Created Batches with this status have not been submitted to the server. Accepted Batches with this status have been submitted to the server, and are in process. Processed Batches with this status have been processed by the server. Processed(E) Batches with this status have been accepted by server, but one or more of the items were rejected. Batches with this status are displayed in red text for easy recognition. DepositNow! Web User Guide Page 26 of 76 BATCH DETAILS The BATCH DETAILS page is presented after selecting a batch from the BATCH SUMMARY page. The BATCH DETAILS page varies according to the kind of batch: • • • • • BATCH DETAILS (No Items) BAHTC DETAILS (Pending Items) BATCH DETAILS )Completed Items) BATCH DETAILS (Accepted Items) BATCH DETAILS (Processed Items) Depending on the status of the batch and the items it contains, the following details may or may not be present: Table 6: Batch Details Particulars Label Description Location Name <as selected during the creation of the batch> Batch ID <auto-generated number> Batch Name: <as input during the creation of the batch> Batch Total: <total amount of items in the batch> Batch Control Total <Batch Control Total amount as specified during the creation of the batch> Difference Total: = <Batch Control Total> - <Batch Total> Reject Total: <total amount of rejected items> Batch Count: <total number of items in the batch> Batch Control Count: <Batch Control Count as specified during the creation of the batch> Difference Count: = <Batch Control Count> - <Batch Count> Reject Count <number of rejected items> Net Deposit Amount (ACH+Image) <total amount of deposited items (ACH + Image)> Net Items Deposited (ACH+Image) <total count of deposited items (ACH + Image)> [+/-] ACH Details <Details of ACH Items> [+/-] Image Details <Details of Image Items> Data Entry Complete: <number of items for which data entry is complete> DepositNow! Web User Guide Page 27 of 76 Data Entry Pending: <number of items for which data entry is pending> Created On: <the date of creation of the batch> Created by: <the name of the account that created the batch> Submitted on: <the date of submission of the batch> Submitted by: <the name of the account that submitted the batch> Status: <status of the batch> DepositNow! Web User Guide Page 28 of 76 BATCH DETAILS (No Items) The BATCH DETAILS page for batches which do not contain any items displays the following link: • • Click here to edit batch controls. (You will be taken to the Batch Control Totals page.) Click here to scan more checks. (You will be taken to the SCAN CHECKS page.) To remove the batch, select the Void Batch button. You will be taken to the VOID BATCH CONFIRMATION page. DepositNow! Web User Guide Page 29 of 76 VOID BATCH CONFIRMATION Upon selecting the Void Batch button from the BATCH DETAILS page, the VOID BATCH CONFIRMATION page will be displayed. Once a batch is voided, the items it contained, if any, are permanently deleted and cannot be retrieved. To confirm removal of the batch select the Void button. Once the batch is voided you will be returned to the BATCH SUMMARY page. If you decide not to void the batch select the Do not Void button. You will be returned to the BATCH DETAILS page. DepositNow! Web User Guide Page 30 of 76 BATCH DETAILS (Pending Items) The BATCH DETAILS page for batches which have items pending data entry has the following links: • • • • Click here to edit batch controls. (You will be taken to the Batch Control Totals page.) Click here to scan more checks. (You will be taken to the SCAN CHECKS page.) Click here to enter data for pending items. (You will be taken to the ENTER DATA page.) Click here to view Item Summary. (You will be taken to the ITEM SUMMARY page.) To remove the batch, select the Void Batch button. You will be taken to the VOID BATCH CONFIRMATION page. DepositNow! Web User Guide Page 31 of 76 BATCH DETAILS (Rejected Items) The BATCH DETAILS page for batches which have Item status as Rejected that are not submitted has the following links: • • • • Click here to edit batch controls. (This will appear if the location has Control Totals enabled. You will be taken to the Batch Control Totals page.) Click here to scan more checks. (You will be taken to the SCAN CHECKS page.) Click here to enter data for pending items. (This will appear if the batch has any pending items. You will be taken to the ENTER DATA page.) Click here to view Item Summary. (You will be taken to the ITEM SUMMARY page.) DepositNow! Web User Guide Page 32 of 76 To review the rejected items, select Review rejected items button. You will be taken to the ITEM SUMMARY page with only the Rejected Items listed. These items need to be voided or rescanned if rejected due to MICR failure. To remove the batch, select the Void Batch button. You will be taken to the VOID BATCH CONFIRMATION page. DepositNow! Web User Guide Page 33 of 76 BATCH DETAILS (Completed Items) The BATCH DETAILS page for batches which have data entry complete for all items but which are not yet submitted displays the following links: • • • Click here to edit batch controls. (You will be taken to the Batch Control Totals page.) Click here to scan more checks. (You will be taken to the SCAN CHECKS page.) Click here to view Item Summary. (You will be taken to the ITEM SUMMARY page.) To remove the entire batch, select the Void Batch button. You will be taken to the VOID BATCH CONFIRMATION page. To submit the batch for processing, select the Submit Batch button. You will be taken to the SUBMIT BATCH CONFIRMATION page. DepositNow! Web User Guide Page 34 of 76 SUBMIT BATCH CONFIRMATION The SUBMIT BATCH CONFIRMATION page asks you to confirm your submission. Once a batch is submitted it cannot be modified or deleted. To confirm submission of the batch, select the Submit button. Once the batch is submitted you will be taken to the SUBMITTED BATCH page, and the batch status will have changed to Accepted. The status will again be updated once the batch has been processed. You will be returned to the BATCH DETAILS page. To cancel submission of the batch, select the Do Not Submit button. You will be returned to the BATCH DETAILS page. DepositNow! Web User Guide Page 35 of 76 SUBMITED BATCH Once a batch is submitted you will be presented with the SUBMITED BATCH page. Select the OK button to return to the BATCH DETAILS page. DepositNow! Web User Guide Page 36 of 76 BATCH DETAILS (Accepted Items) The Batch Detail page for batches which have the status ‘Accepted’ displays the following link: • Click here to view Item Summary (You will be taken to the ITEM SUMMARY page.) DepositNow! Web User Guide Page 37 of 76 BATCH DETAILS (Processed Items) The Batch Detail page for batches which have been processed displays the following link: • • Review rejected items (This link is available next to the Reject Total and only if there are any rejected items in the batch. Selecting the link will take you the ITEM SUMMARY page for the rejected items.) Click here to view Item Summary (You will be taken to the ITEM SUMMARY page for all items in the batch.) Note: If a client is configured to accept only one transaction type (ACH or IMAGE) only the appropriate totals and details will be displayed. DepositNow! Web User Guide Page 38 of 76 Select the button for ACH Details or Image Details to display the total Count and Amount of Submitted, Rejected and Deposited Items for the respective transaction type. Select the button again to collapse the table. DepositNow! Web User Guide Page 39 of 76 ITEM SUMMARY The ITEM SUMMARY page may be accessed by selecting the ‘Click here to view Item Summary’ link on the BATCH DETAIL page. The user will be presented with a table of the items that comprise the batch. The Item Summary displays the following information for each item, if available: • • • • • • • • Item ID Routing Account No. Check No. Amount First Name Last Name Status The following link is available: • Click here to go back to BATCH DETAILS. (You will be taken to the BATCH DETAILS page. To scan additional checks for this batch, select the Scan Checks button. (You will be taken to the SCAN CHECKS page.) DepositNow! Web User Guide Page 40 of 76 If there are any items pending data entry, select the Enter Data button. (You will be taken to the ENTER DATA page.) To void items select the corresponding checkbox ( ), then select the Void Selected Items button. (You will be taken to the VOID ITEM CONFIRMATION page.) Note: You may select all the items at once by selecting the checkbox ( row. The selection is used for voiding only. ) in the header You may use the <<First, <Previous, 1, 2, 3, …, Next>, Last>> links, displayed according to the number of items in the batch and depending on the page you are in, to page through the list of items conveniently. Select the row for a particular item to go to its ITEM DETAIL page. Table 7: Item Statuses Status Description Completed The item has all required data. Data Entry The item is pending data entry before it may be submitted. Pending The item is queue behind a data entry item. Processed The item has been submitted and accepted. Rejected The item has been rejected. Rejected Items are displayed in red text for easy recognition. DepositNow! Web User Guide Page 41 of 76 VOID ITEM CONFIRMATION The VOID ITEM CONFIRMATION page lists all the items that have been selected for voiding: Click the Void button to remove the displayed items from the batch. (You will be taken to the VOIDED ITEMS page.) Click the Do not Void button to return to the ITEM SUMMARY page. VOIDED ITEMS The VOIDED ITEMS page lists the items that have been removed from the batch: Click the OK button to return to the ITEM SUMMARY page. The voided items will no longer exist in the list. DepositNow! Web User Guide Page 42 of 76 ITEM DETAIL The ITEM DETAIL page is presented after selecting an item from the ITEM SUMMARY page. This page contains the images of the check, as well as all required and optional data fields for this location. The following links are available on the ITEM DETAIL page: • • Click here to go back to ITEM SUMMARY. (You will be taken to the ITEM SUMMARY page.) Click here to go to BATCH DETAILS. (You will be taken to the BATCH DETAILS page.) To edit the data associated with this item, select the Edit Item button. (This button will be disabled for items that have already been submitted.) You will be taken to the EDIT ITEM page. To void the item, select the Void Item button. (This button will be disabled for items that have already been submitted.) You will be taken to the VOID ITEM CONFIRMATION page. DepositNow! Web User Guide Page 43 of 76 EDIT ITEM Upon selecting the Edit Item button on the ITEM DETAIL page, you will be presented with the EDIT ITEM page. Any edits done on this page are subject to the same validations performed on the ENTER DATA page. The EDIT ITEM page displays the following links: • • Click here to go to BATCH DETAILS. (You will be taken to the BATCH DETAILS page.) Click here to go to ITEM SUMMARY. (You will be taken to the ITEM SUMMARY page.) If you wish to edit the MICR, select Edit MICR. (See Editing MICR for more details.) If the MICR parsing fails while scanning, Rescan button will appear here. (See RESCAN for further details.) To save changes to the data associated with this item select the Save button. (You will be taken to the ITEM SUMMARY page which will display the updated details for the item.) DepositNow! Web User Guide Page 44 of 76 Select the Void button to void the item. Chapter 7: Reports DepositNow! Web provides the ability to download extracts in four formats (See Appendix A for report specifications). You may access these by selecting the REPORTS tab. Once presented with the REPORTS page select the location for which a report is desired from the Location Name drop down menu. All submitted batches will be displayed within the Batch window. Each report row will contain the following: • • • • • Batch ID Batch Name Batch submission date Batch Status Extract Status o Not Extracted : Reports with this status have not been previously downloaded o Extracted : Reports with this status have been previously downloaded Select a Location Name and select the desired batch(es) from the Batch window. (You may select multiple batches by holding the CTRL or SHIFT key while selecting each row.) Select a report format from the Format drop down menu. To download the desired report, select the Download button. (You will be taken to the REPORT DOWNLOAD page.) DepositNow! Web User Guide Page 45 of 76 You may access the server transaction level inquiry tool NetCheck directly from DepositNow! Web by selecting the ‘Click here for Transaction Reporting System’ link. The NetCheck site will be opened in a new browser window. (See separate NetCheck User Guide for functionality.) REPORT DOWNLOAD The REPORT DOWNLOAD page displays the selected Location and Report Format. To download the report, select the ‘Click here to download the report’ link. Depending on your web browser security settings you may receive a File download notification such as the one below: To view the report directly from the DepositNow! Web website, select the Open button. (Reports in the Yardi format will be displayed within the default text editor of the user’s computer. To save the report to a local drive select the Save button. To return to the REPORT DOWNLOAD page without accessing the report, select the Cancel button. Select the More Info button to access your browser’s help files regarding downloading files from the internet. DepositNow! Web User Guide Page 46 of 76 Chapter 8: Administration SCANNER SETUP To access the SCANNER SETUP page select the ADMIN tab, then the SCANNER SETUP tab. Select your scanner from the Select Scanner dropdown menu. Table 8: List of Scanners Scanner Name Remarks RDM Scanner MagTek Excella or STX SB1000 Default Scanner RDM Panini Scanner Digital Check Teller Scan DepositNow! Web User Guide Page 47 of 76 On the Setting up scanner section on the right of the page, select the ‘Click here to view manual’. Depending on the scanner you have selected, follow the procedures below: Step 1: Click here to launch Universal Scanner Installer, when the File Download Dialog prompt is presented select Run. An install wizard will launch in a few moments, please follow the wizard's on screen instructions. Step 2: Click here to launch OCR Plugin. (Required and available only for SB1000) Step 3: Click on the Set Scanner button below. If a dialog box appears prompting you to download the scanner control, click the Install button to continue. After the scanner setup is complete, you will receive the SCANNER SETUP COMPLETE page. SCANNER SETUP COMPLETE Once the scanner is successfully setup, you will be displayed the SCANNER SETUP COMPLETE page. Note that this page is specific to the scanner you have setup. DepositNow! Web User Guide Page 48 of 76 The following links are available on the page: • • • • Click here to download and launch. (You will be presented with the File Download Dialog prompt to download Universal Scanner Installer) Click here to select a different scanner. (You will be taken to the SCANNER SETUP page.) Click here to go to CREATE BATCH. (You will be taken to the CREATE BATCH page. Click here to go to MANAGE BATCH. (You will be taken to the BATCH SUMMARY page.) DepositNow! Web User Guide Page 49 of 76 SB1000 CALIBRATION If you have setup the SB1000 scanner, you need to calibrate your scanner before beginning to scan checks. Follow the procedures below for calibration: • • • • Connect your SB1000 scanner Insert the calibration sheet Select the Calibrate button Once calibration is complete, you will receive the following message. • Click OK. DepositNow! Web User Guide Page 50 of 76 PASSWORD To access the Change Password page, select the ADMIN tab, then the CHANGE PASSWORD tab. Note: This page will be automatically displayed the first time you log into DepositNow! Web , or if the password has been reset. You will also be periodically forced to change your password. To change your password: • • • Enter your old password in the Old Password field. Enter your new password in both the New Password and the Confirm Password fields. (Note: All passwords must be at least 8 characters long.) Select the Save button. To leave the CHANGE PASSWORD page without changing your password select the Cancel button. You will be presented with the CREATE BATCH page. Upon saving your new password you will be presented with the PASSWORD CHANGED page. DepositNow! Web User Guide Page 51 of 76 PASSWORD CHANGED Once a password is successfully changed, the PASSWORD CHANGED page appears: Select the OK button to proceed to the CREATE BATCH page. DepositNow! Web User Guide Page 52 of 76 OPT-OUT ACH processing rules for check conversion require that a consumer be given the option not to have their check converted to an ACH transaction. To ensure compliance with this rule DepositNow! Web provides the ability to maintain a list of clients whose checks should not be converted to an ACH transaction. Note the “Opt-Out” feature applies to ACH conversion only; there are no “OptOut” requirements for Check 21 Check conversion. This means that ACH “Opt Out” items will be processed as Image items if the end user is configured to process both ACH and Image. To access the opt-out list for a particular location select the ADMIN tab, then select a location from the Location Name dropdown menu. The user will be provided with a list of all routing and account number combinations belonging to customers that have chosen not to participate in electronic payments. DepositNow! Web User Guide Page 53 of 76 Adding to the OPT-OUT list To add a customer to the opt-out list, enter the Routing No. and Account No. in the fields provided. Optionally, you may also enter the customer’s first and last name. Then select the Add to List button. Removing an account from the OPT-OUT list To remove one or more customer accounts from the opt-out list, select their corresponding and select the Remove from OPT-OUT List button. checkbox You will be presented with the OPT-OUT CONFIRMATION page. All opt-out items selected for removal will be displayed. To remove the displayed item(s) from the opt-out list select the Remove button. To return to the OPT-OUT page without removing the displayed items select the Do not Remove button. DepositNow! Web User Guide Page 54 of 76 STOP FILTER This function is currently unavailable. DepositNow! Web User Guide Page 55 of 76 Appendix A: Report Format Specifications DepositNow! Web - Report Formats DepositNow! Web provides five report formats available for download: • • • • Posting File – CSV Posting File – Pipe Posting File – Tab Yardi All are text files. All fields, except amount fields, are delimited by commas and enclosed in quotations. DepositNow! Web User Guide Page 56 of 76 Posting File Report Format Table 10: Posting File Report Format Field Name Contents Type Batch ID DepositNow! Web assigned sequence # N Batch Name DepositNow! Web Batch Name associated with Item AN Item Number DepositNow! Web assigned item number N Entry Date Transaction entry date. Format MMDDYY 24:00 AN Processed Date Transaction process date. Format MMDDYY 24:00 AN Depositor ID Server assigned Depositor ID AN Reference Number Server assigned reference number. N Transaction type ACH = ARC C21=Image AN Routing Transit Number Bank Routing Transit number parsed from check micr line AN Payor Account Number Payor Account Number parsed from the check micr line. AN Item Serial Number Serial number parsed from check micr line. AN Amount Format dollars and cents 99.99 N Last name Last name; value as input/entered AN First name First name; value as input/entered AN Created by DepositNow! Web User Name that performed Data Entry AN Submitted by DepositNow! Web User Name that submitted the Batch AN Item Status Item Status: ACHed Imaged Resubmitted Charged back Rejected AN If Item Status = “Charged back” or DepositNow! Web User Guide Page 57 of 76 “Resubmitted” the record will include the Return Code and the Return Description these fields will be blank for other statuses. Customer X-Reference Field Value of the Customer X-Reference field (Third Party X Ref field) AN Return Reason Code The Return Code associated with a Charged back or Resubmitted Item. Note: For Rejected items this field will be blank. AN Return/Reject Description Text description for the Reject or Return Reason Code associated with a Charged back or Resubmitted Item. A Optional field 1 Label (user defined) Optional Fields 1 – Value as input by end user AN Optional field 2 Label (user defined) Optional Fields 2 – Value as input by end user AN Optional field 3 Label (user defined) Optional Fields 3 – Value as input by end user AN Optional field 4 Label (user defined) Optional Fields 4 – Value as input by end user AN Optional field 5 Label (user defined) Optional Fields 5 – Value as input by end user AN Optional field 6 Label (user defined) Optional Fields 6 – Value as input by end user AN Optional field 7 Label (user defined) Optional Fields 7 – Value as input by end user AN Optional field 8 Label (user defined) Optional Fields 8 – Value as input by end user AN Optional field 9 Label (user defined) Optional Fields 9 – Value as input by end user AN Optional field 10 Label (user defined) Optional Fields 10 – Value as input by end user AN Note: Each record will be terminated by new line character (‘\n’). DepositNow! Web User Guide Page 58 of 76 Yardi Output Report Format Table 9: Yardi Output Report Format Field Name Format Tenant ID AN (must begin with a T) Amount AN (up to 10 characters for dollars and, if present, a decimal point and up to 2 characters for cents) Date Processed N (MMDDYYYY) Check Number N(always greater than 100) Blank Field (future use) Note: Requires specific configuration setup. Sample Yardi Output "T5677282", "T7798769", "T6847968", "T8827966", 1000.5,"02172004","2001","" 925,"02172004","2002","" 1100,"02172004","2003","" 1150.75,"02172004","2004","" DepositNow! Web User Guide Page 59 of 76 ACH Item Return Codes and Descriptions Table 10: ACH Item Return Codes and Descriptions Code Description R01 Insufficient Funds R02 Account Closed R03 No Account/Unable to Locate Account R04 Invalid Account Number R05 Unauthorized debit to consumer account using corporate SEC code R06 Returned per ODFI’s Request R07 Authorization Revoked by Customer (adjustment entries) R08 Payment Stopped R09 Uncollected Funds R10 Customer Advises not Authorized (adjustment entries) R11 Check Truncation Entry Return (RDFI to specify in addenda) R12 Branch Sold to Another DFI R13 RDFI not Qualified to Participate R14 Account-holder Deceased R15 Beneficiary Deceased R16 Account Frozen R17 File Record Edit Criteria R18 Improper Effective Entry Date R19 Amount Field Error R20 Non-Transaction Account R21 Invalid Company Identification R22 Invalid Individual ID Number R23 Credit Entry Refused by Receiver R24 Duplicate Entry R25 Addenda Error DepositNow! Web User Guide Page 60 of 76 R26 Mandatory Field Error R27 Trace Number Error R28 Routing Number Check Digit Error R29 Corporate Customer Advises not Authorized R30 RDFI not Participant in Check Truncation Program R31 Permissible Return Entry R32 RDFI Non-settlement R33 Return of XCK Entry R34 Limited Participant DFI R61 Misrouted Return R62 Incorrect Trace Number R63 Incorrect Dollar Amount DepositNow! Web User Guide Page 61 of 76 Image Item Return Codes and Descriptions Table 11: Image Item Return Codes and Descriptions Code Description A Insufficient Funds B UCF - Uncollected Funds Hold C Stop Payment D Closed Account E UTLA - Unable to Locate Account F Frozen/Blocked Account G Stale Dated H Post Dated I Endorsement Missing J Endorsement Irregular K Signature(s) Missing L Signature(s) Irregular M Non-Cash Item (Non Negotiable) N Altered/Fictitious Item O Unable to Process (e.g. Mutilated Item) P Item Exceeded Dollar Limit Q Not Authorized R Branch/Account Sold (Wrong Bank) S Refer to Maker T Stop Payment Suspect U Unusable Image (Image could not be used for required business purpose) V Image fails security check W Cannot Determine Amount DepositNow! Web User Guide Page 62 of 76 Rejected Item Descriptions Table 12: Rejected Item Descriptions SN Description 1 Check Number is too large 2 Generic Error (Cause by no Velocity Settings or missing/invalid location) 3 Invalid ABA 4 Consumer velocity violated. Check Amount exceeds the limit 5 Consumer velocity violated. Number of checks exceeds the limit. 6 Merchant velocity limit is exceeded 8 Duplicate Check 9 Merchant Configuration Error 10 Consumer velocity limit is exceeded DepositNow! Web User Guide Page 63 of 76 Appendix B: Internet Explorer Settings Internet Explorer 6.0 If you are using Internet Explorer 6.0, make sure settings are as follows so that you will be able to use DepositNow! Web: Trusted Sites • • In Internet Explorer 6.0, select Internet Options from the Tools menu. Select the Security tab, highlight the Trusted Sites icon and select the Sites button. DepositNow! Web User Guide Page 64 of 76 • Enter the DepositNow! Web website (https://*.depositnow.com/) and click the Add button, click Close. DepositNow! Web User Guide Page 65 of 76 Security Settings for Trusted Sites • • In Internet Explorer 6.0, select Internet Options from the Tools menu. Select the Security tab, highlight the Trusted Sites icon and select the Custom level… button. • Ensure that the settings in ActiveX controls and plugins match the settings below o o o o o o o • • Allow previously unused ActiveX controls to run without prompting : "Enable" Allow Scriptlets : "Enable" Automatic prompting for ActiveX controls : "Enable" Binary and Script behaviors : "Enable" Download signed ActiveX controls : "Enable" Run ActiveX controls and plug-ins : "Enable" Script ActiveX controls marked safe for scripting* : "Enable" After you make the changes, select the OK button in the Internet Options window. When you receive the Warning window, select Yes. DepositNow! Web User Guide Page 66 of 76 Advanced Settings • • Select Internet Options from the Tools menu. Select the Advanced tab. • Make sure the settings under Security match the following: o o Allow active content to run in files on My Computer* : “CHECKED” Check for publisher’s certificate revocation : “CHECKED” DepositNow! Web User Guide Page 67 of 76 Pop-Up Blocker Settings NOTE: Many users have more than one pop-up blocker. Each pop-up blocker is slightly different from the next. However, all pop-up blockers have a setting to allow pop-ups for a particular website. The DepositNow! Web website must be added to the “Allow Pop-Ups” section of each Pop-up blocker. To edit the Pop-Up Blocker settings in Internet Explorer 6.0: • • Go to Tools >> Pop-up Blocker >> Pop-up Blocker Settings. Enter the DepositNow! Web URL (https://*.depositnow.com/) and select the Add button. • Once the DepositNow! Web URL is added, select the Close button. DepositNow! Web User Guide Page 68 of 76 Internet Explorer 7.0 If you are using Internet Explorer 7.0, make sure settings are as follows so that you will be able to use DepositNow! Web : Security Settings for Internet • • In Internet Explorer 7.0, go to Tools >> Internet Options Select the Security tab, highlight the Internet icon and select the Custom level… button. DepositNow! Web User Guide Page 69 of 76 • Ensure that the settings in ActiveX controls and plugins match the settings below o o o o o o o • • Allow previously unused ActiveX controls to run without prompting : "Enable" Allow Scriptlets : "Enable" Automatic prompting for ActiveX controls : "Enable" Binary and Script behaviors : "Enable" Download signed ActiveX controls : "Enable" Run ActiveX controls and plug-ins : "Enable" Script ActiveX controls marked safe for scripting* : "Enable" After you make the changes, select the OK button in the Internet Options window. When you receive the Warning window, select Yes. DepositNow! Web User Guide Page 70 of 76 Trusted Sites • • In Internet Explorer 7.0, select Internet Options from the Tools menu. Select the Security tab, highlight the Trusted Sites icon and select the Sites button. DepositNow! Web User Guide Page 71 of 76 • Enter the DepositNow! Web website (https://*.depositnow.com/) and click the Add button, then click Close. DepositNow! Web User Guide Page 72 of 76 Security Settings for Trusted Sites • • In Internet Explorer 7.0, select Internet Options from the Tools menu. Select the Security tab, highlight the Trusted Sites icon and select the Custom level… button. • Ensure that the settings in ActiveX controls and plugins match the settings below o o o o o o o Allow previously unused ActiveX controls to run without prompting : "Enable" Allow Scriptlets : "Enable" Automatic prompting for ActiveX controls : "Enable" Binary and Script behaviors : "Enable" Download signed ActiveX controls : "Enable" Run ActiveX controls and plug-ins : "Enable" Script ActiveX controls marked safe for scripting* : "Enable" DepositNow! Web User Guide Page 73 of 76 • • After you make the changes, select the OK button in the Internet Options window. When you receive the Warning window, select Yes. DepositNow! Web User Guide Page 74 of 76 Advanced Settings • • Select Internet Options from the Tools menu. Select the Advanced tab. • Make sure the settings under Security match the following: o o Allow active content to run in files on My Computer* : “CHECKED” Check for publisher’s certificate revocation : “CHECKED” DepositNow! Web User Guide Page 75 of 76 Pop-Up Blocker Settings NOTE: Many users have more than one pop-up blocker. Each pop-up blocker is slightly different from the next. However, all pop-up blockers have a setting to allow pop-ups for a particular website. The DepositNow! Web website must be added to the “Allow Pop-Ups” section of each Pop-up blocker. To edit the Pop-Up Blocker settings in Internet Explorer 7.0: • • Go to Tools >> Pop-up Blocker >> Pop-up Blocker Settings. Enter the DepositNow! Web URL (https://*.depositnow.com/) and select the Add button. • Once the DepositNow! Web URL is added, select the Close button. DepositNow! Web User Guide Page 76 of 76